
:max_bytes(150000):strip_icc():format(webp)/gopro-2619915_1920-2ca3364339c348e5ba44afb3fa79458b.jpg)
Updated How to Add Filter to Video Online for 2024
How to Add Filter to Video Online
When you record a video with your phone camera, digital camera, or even webcam, the color scheme in the video can differ depending on the surrounding light. If it differs a lot from the natural color scheme, it can affect the viewing experience of the audience negatively. That is why color correction is an essential part of video editing, and that is where video filters can be handy. You do not need a dedicated video editor application to add video filters as you can you can put filter on video online.
Video filters can correct color imbalances and make the video have consistent colors. For example, if you had recorded a video when the sun was setting, you can use a high saturation video filter to make the video color more vivid. You can even set the mood of a video with video filters so that the audience can get the exact emotion you want to portray through your video. We will illustrate the different ways on how to add filter to video online instantly.
Way 1. Use Clideo Filter Editor
Clideo Filter Editor is one of the fastest video editors that you can apply filters to your videos instantly. There is a wide range of different presets to apply temporarily and compare. Therefore, you can choose the best video filter and save your modified video. The user interface is super intuitive for everyone.
The platform is completely secure for uploading and editing videos, and you can upload videos in different file formats. You can use Clideo Filter Editor on your web browser from your Mac, Windows PC as well as smartphone. Here are the steps to add video filters online using Clideo Filter Editor.
Step1Open your web browser and visit “clideo.com/filter-video”.
Step2Click on Choose File button to upload your video from your hard drive. You can also upload video from Google Drive and Dropbox.

Step3After successful uploading, you will see the video filters on the right side of your video. Apply them one and one while playing your video so that you can see the changes in video color scheme instantly.

Step4Finalize a video filter to apply to your video and click on Export to save the modified video on your hard drive on any desired file format.

Way 2. Veed.io Video Filters
If you are looking for some stunning video filters to use on your video, Veed.io Video Filters is the best online platform. You can add filter to video online free, and the platform supports several video file formats. You will find color grading filters as well as effects to apply to your video and get the desired outcome. If you are going to upload videos to social media, you should definitely use Veed.io Video Filters to make your videos feel unique. Here are the steps on how to add filter video online using Veed.io Video Filters.
Step1Open your web browser and visit “veed.io/tools/video-filters”. Click on Get Started button.

Step2On the next screen, click on Browser or drag and drop your video file for adding video filters.

Step3After the video file gets uploaded, you will see Filters on the left side of the video. There are two different tabs – Color Grading and Effects available where there are different video filters available to apply to your video.

Step4Click on the filters to see how they look on your video instantly. Once you have selected a filter for the video, click on Export button to save the edited video in desired file format.

Way 3. Clipchamp Video Filter Editor
Clipchamp video filter editor has a wide range of beautiful video filters to enhance your video instantly. You can correct any color imbalance as well as set any required tone to your video. Starting from Outdoor and Portrait to Indoors and Muted, all the popular professional video filters can do the magic to your video. You can also save the edited video in different video resolution and file format as per your requirements. Here are the steps on how to add filter video online using Clipchamp video filter editor.
Step1Open your web browser and visit “clipchamp.com/en/video-filters-editor”. Click on Create with video filters now button.

Step2You have to sign up on the next screen so that you can apply the video filters.
Step3Once the video editor opens, click on Create a Video button.

Step4Drag and drop your video on the video editor and thereafter on Timeline.

Step5Click on Filters option located at the top and you will see a drop-down containing all the filters. Place your mouse pointer on the filters one by one to see how they look on your video instantly.

Step6Finally, click on the selected filter and click on Export button to save the edited video.

Way 4. FlexClip Video Filter Editor
FlexClip has a collection of online tools to edit your video instantly without installing any video editor application. FlexClip Video Filter Editor has over 20 popular video filters to apply to your video on the go. You can change the video outlook, and the platform supports different types of video file formats. You can add filter to video online free, and there is not going to be any watermark on your edited video. Here are the steps on how you can add filter to your video using FlexClip video filter editor.
Step1Open your web browser and visit “flexclip.com/tools/filter-video”.
Step2Drag and drop your video to the free video filter editor online.

Step3After successful uploading, you will see all the video filters on the left side.

Step4Click on the video filters one to one to apply them to the video and see which one suits the best. You can adjust the intensity of the filters as per your preference.

Step5Once you have applied a filter and you can satisfy with it, click on Export button to save the edited video.

Way 5. Kapwing Filter Video Editor
Kapwing is a popular online video editor, and you can add video filters to your recorded video for free. Kapwing Filter Video Editor works on all devices, and you can access it from any popular web browser. You can upload recorded video as well as paste URL of an online video stored in Google cloud platform to apply video filters. The preset filters enhance video quality starting from colors and saturation to brightness and contrast. You can also share them on social media platforms directly from Kapwing video editor. Here are the steps how to put filter on video online using Kapwing filter video editor.
Step1Open your web browser and visit “kapwing.com/tools/filter-video”. Click on Choose a video button to get started.

Step2Once Kapwing video editor opens, drag and drop your video to upload on the platform. You can also paste video URL from Google Drive or Google Photos.

Step3Click on the video and on the right side, go to Edit tab and click on Filters under Video section.

Step4You will see a host of video filters that you can apply to your video. Click on them to check them out. You can also customize the video filter by going to Adjust tab.

Step5Select the best one and click on Apply Filters button. Finally, click on Export Project button to save the edited video.

Conclusion
If you want to apply video filters to your recorded video in order to enhance the video outlook and adjust the color balance, you can use video filter editors online. We have illustrated five different ways on how to add video filters online for free. Each one of them has different sets of video filters. If you are looking for a dedicated video editor desktop application, we recommend Wondershare Filmora .
Free Download For Win 7 or later(64-bit)
Free Download For macOS 10.14 or later
Free Download For macOS 10.14 or later
Step by Step to Cut a Video in QuickTime
Filming a video is fun and editing is more interesting and entertaining. Today, everyone is making videos and there are tons of videos on the internet. Editing videos is required to make the video stand out and retain the audience. Video trimming helps you cut out the unwanted part of the video and leave the desired portion of the viewers.
Cutting a video means your video starts quickly and you don’t lose your audience’s attention.
The first ten seconds of the video are very important when deciding whether to stay or move on to the next video.
How to cut a video in QuickTime
Quicktime is an authentic application developed by Apple in 1991. It allows the users to edit, record, play, and share videos and pictures. If some editing software confuses you, QuickTime is just for you.
You need to download the application and here are all the features you can enjoy. It is compatible with all versions of windows whereas, if you are a Mac user it is already installed in your system.
Cutting a video is one of the basic but useful functions of QuickTime. It requires a few simple steps and some features related to cutting, splitting, and trimming a video.
Let’s start…
1. Cutting/splitting a video
Cutting a video means splitting some parts of the video to edit and rearrange the clips to make a new video. Mostly, it is used where you want to edit all clips of the video differently. It is also needed as it allows you to focus on your message and delete the portion not required and make the video large. You can remove the extra fat from the video to give clarity, direction, and hope. You can convey your message in a clear and concise way.
These steps should be followed to cut/split the video in minutes.
- In the QuickTime player, open the desired video.
- Select show clips from the view on the menu bar.
- Move the red marker from right to left to select the desired portion.
- Hit split clip from the edit

- A yellow rectangular bar appears over the edges of your video.
- You can cut the desired portion and make editing as you like.
- Repeat the sequence until you are done.
- Press the done

Cutting the video by splitting is used when you have a long video and you can easily edit them by splitting them into two parts.
2. Trimming a video
If you are cutting some parts at the beginning and the end of the video, it is called trimming a video. You can say it as removing unnecessary preparation scenes. Normally, professionals start their cameras before the film scene to ensure not to miss any part of the video. Here’s, how to trim video in the QuickTime player.
Let’s dive in…
- Launch QuickTime
- Select your video from the system.
- Select edit from the top menu.
- Select the trim or command T, or you can select the hold option from the drop-down list.

- A yellow trimming bar will appear over the edges of your video.
- Remove the unwanted area by moving from the right or left trim edges also called handles.

Everything inside the yellow bars will remain. You can preview your video anytime during the editing process.
- Hit the trim from the bottom right corner.
- Select save from the file on the top menu bar.
Trimming is critical because it is the time to convince the viewers to stick around and stay with your video.
For more advanced editing without losing the quality of the video, I recommend you to use Wonder Share Filmora 11. It’s an amazing app and very easy to use even for a layman.
An easier way to cut a video with Filmora
Wonder Share Filmora is one of the best video editing tools for beginners. It simplifies the editing process using smart and congenital features that can automate repetitive tasks. It has a lot of exciting features and has collaborated with others to make the work easier.
So here, I recommend Filmora Video Editor , an easy and very powerful, all-in-one video editor software. It enables you to cut, crop, and trim the videos in a few clicks without losing the quality of the video.
For Win 7 or later (64-bit)
For macOS 10.14 or later
Point to be noted:
The cut is removing some unwanted parts of the video.
The Split is dividing the clips into two parts.
The trim is deleting the starting or endpoints of the video.
1. Cut video using Filmora video cutter
Cutting a video is necessary even if you shot a very good video because it contains some irrelevant and unwanted clips. Removing the unnecessary part of the video will make the video short, concise, and to the point. Moreover, it helps in grabbing the attention of your valuable viewers.
If your video has multiple scenes to cut, the scene detection function would be helpful.
- Install Filmora video cutter
- Select the New project.
- Select the video in the media library.
- Right-click and select scene detection to enter the scene detection window.

- Select Detect
This will automatically detach your unwanted videos based on the change in scene.

- Click add to timeline to add the separated video into the timeline.
You can also remove the unwanted videos by clicking the delete icon.
2. Manually cut/split videos
To cut the beginning and the end portion of the video, we can use the trim feature.
Let’s start…
- Import the video and drag it into the timeline.
- Add Marker in the timeline to spot a particular clip.

Pointing the Marker will help to find the unwanted potion without wasting the important portion of the clip.
Here is all about trimming the video from beginning to end but if you want to cut the video into parts to remove the rest of the fat from the clips. You can follow these steps:
- Click the split icon above the timeline.
- Drag the play head to make a rectangle to cover the unwanted portion of the video.
- Press delete from the timeline besides the split tab.

Repeat the process and cut the video into many segments to get the desired video.
Conclusion
Video editing is a critical part of creating eye-catching movies. Along with this, cutting and trimming a video is the core of the whole process as it makes sure that your audience is hooked with your content or not. Once you have downloaded the Wonder Share Filmora app, the art of cutting the video and transforming into a new film is really amazing.
- A yellow rectangular bar appears over the edges of your video.
- You can cut the desired portion and make editing as you like.
- Repeat the sequence until you are done.
- Press the done
Cutting the video by splitting is used when you have a long video and you can easily edit them by splitting them into two parts.
2. Trimming a video
If you are cutting some parts at the beginning and the end of the video, it is called trimming a video. You can say it as removing unnecessary preparation scenes. Normally, professionals start their cameras before the film scene to ensure not to miss any part of the video. Here’s, how to trim video in the QuickTime player.
Let’s dive in…
- Launch QuickTime
- Select your video from the system.
- Select edit from the top menu.
- Select the trim or command T, or you can select the hold option from the drop-down list.
- A yellow trimming bar will appear over the edges of your video.
- Remove the unwanted area by moving from the right or left trim edges also called handles.
Everything inside the yellow bars will remain. You can preview your video anytime during the editing process.
- Hit the trim from the bottom right corner.
- Select save from the file on the top menu bar.
Trimming is critical because it is the time to convince the viewers to stick around and stay with your video.
For more advanced editing without losing the quality of the video, I recommend you to use Wonder Share Filmora 11. It’s an amazing app and very easy to use even for a layman.
An easier way to cut a video with Filmora
Wonder Share Filmora is one of the best video editing tools for beginners. It simplifies the editing process using smart and congenital features that can automate repetitive tasks. It has a lot of exciting features and has collaborated with others to make the work easier.
So here, I recommend Filmora Video Editor , an easy and very powerful, all-in-one video editor software. It enables you to cut, crop, and trim the videos in a few clicks without losing the quality of the video.
For Win 7 or later (64-bit)
For macOS 10.14 or later
Point to be noted:
The cut is removing some unwanted parts of the video.
The Split is dividing the clips into two parts.
The trim is deleting the starting or endpoints of the video.
1. Cut video using Filmora video cutter
Cutting a video is necessary even if you shot a very good video because it contains some irrelevant and unwanted clips. Removing the unnecessary part of the video will make the video short, concise, and to the point. Moreover, it helps in grabbing the attention of your valuable viewers.
If your video has multiple scenes to cut, the scene detection function would be helpful.
- Install Filmora video cutter
- Select the New project.
- Select the video in the media library.
- Right-click and select scene detection to enter the scene detection window.
- Select Detect
This will automatically detach your unwanted videos based on the change in scene.
- Click add to timeline to add the separated video into the timeline.
You can also remove the unwanted videos by clicking the delete icon.
2. Manually cut/split videos
To cut the beginning and the end portion of the video, we can use the trim feature.
Let’s start…
- Import the video and drag it into the timeline.
- Add Marker in the timeline to spot a particular clip.
Pointing the Marker will help to find the unwanted potion without wasting the important portion of the clip.
Here is all about trimming the video from beginning to end but if you want to cut the video into parts to remove the rest of the fat from the clips. You can follow these steps:
- Click the split icon above the timeline.
- Drag the play head to make a rectangle to cover the unwanted portion of the video.
- Press delete from the timeline besides the split tab.
Repeat the process and cut the video into many segments to get the desired video.
Conclusion
Video editing is a critical part of creating eye-catching movies. Along with this, cutting and trimming a video is the core of the whole process as it makes sure that your audience is hooked with your content or not. Once you have downloaded the Wonder Share Filmora app, the art of cutting the video and transforming into a new film is really amazing.
Change Background Color in After Effects
Adobe After Effects is a powerful video editor. After Effects is particularly popular for its special effects that you can add to your videos and blow the mind of your audience. In any video, the background plays a major role in enhancing the overall frame and scene. If you are planning to change background color After Effects or add special effects, you must shoot your video with a solid color background.
During the post-production phase, you can change the background uniformly to any color scheme or special effect as per the requirement of the scene. Since the learning curve for After Effects is slightly steeper, you should know the exact steps to change After Effects background color. We will explain the process in simple steps and provide you with an alternative way to change background color.
Part 1. How to change video BG color in After Effects?
After Effects is widely used for professionals to add animations and special effects to videos during video editing phase. Starting from editing social media videos and YouTube videos to short films and even movies, After Effects finds its application in every field of video editing. Changing background color in After Effects is super simple even though other video editing techniques could be slightly complex for beginners. Here are the steps on how to change background color in After Effects.
Step1 Open After Effects on your computer. Go to File> Import> File. Select the video file from your hard drive and it will appear under Project tab.
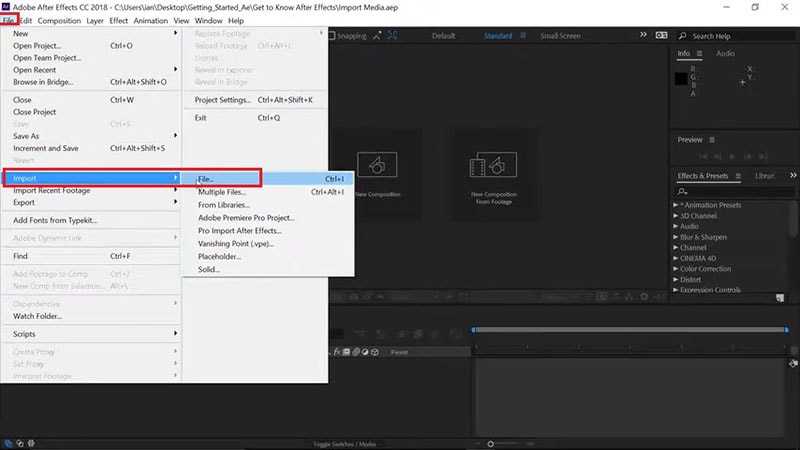
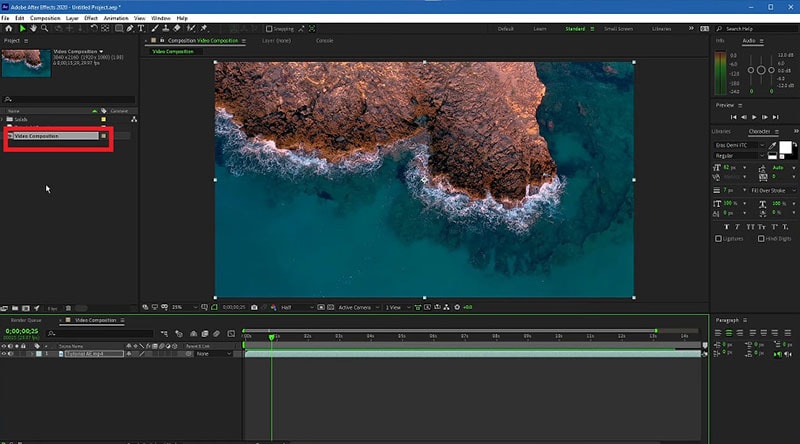
Step2 Drag and drop your video into Timeline. Select the video clip and right-click on Video Composition option located below Project tab.
Step3 From the menu, click on Composition Settings option. You can also use Ctrl + K(Windows) or Command + K(Mac) key combination to open Composition Settings directly.

Step4 On Composition Settings window, go to Background Color and set the color as per your preference. You can also use a color picker as well to select any color from the video directly.
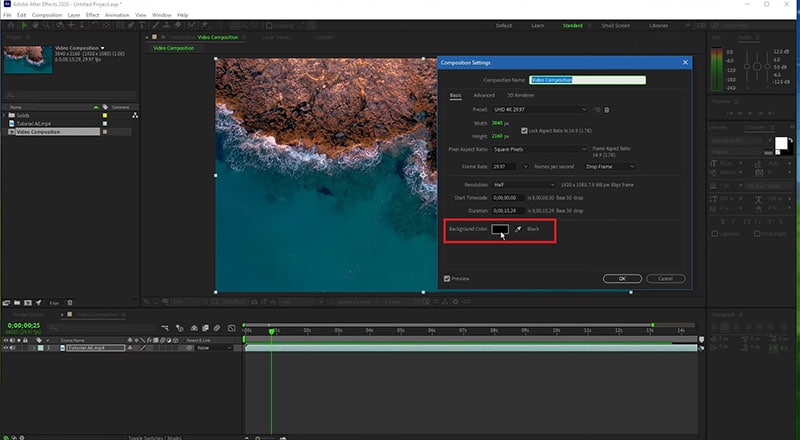
Step5 Click on Ok to set the new background color. Depending on the transparency of your video scene or the transition effect such as fade in and out, the background color will be more prominent.
Part 2. Alternative way to change background color
The best alternative to After Effects is Wondershare Filmora as Filmora has a wide range of special effects and animations. Filmora is a professional video editor where you can perform all basic as well as advanced video editing work. Most importantly, Filmora comes with an intuitive user interface so that even amateurs can use it easily.
There are several ways you can change background color in your video. For example, you can remove background color even when you do not have a solid color. If your video has a solid color, you can change background color to any color or graphical element using Chroma key. Here are the steps to change background color in Filmora .
Free Download For Win 7 or later(64-bit)
Free Download For macOS 10.14 or later
Step1 Download and install Filmora and it is available for Windows and Mac. Launch Filmora and click on New Project.

Step2 Import your video under Project Media folder and drag and drop into Timeline.
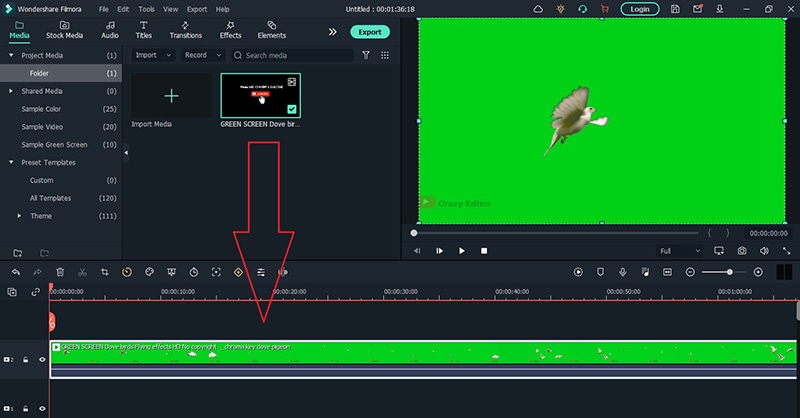
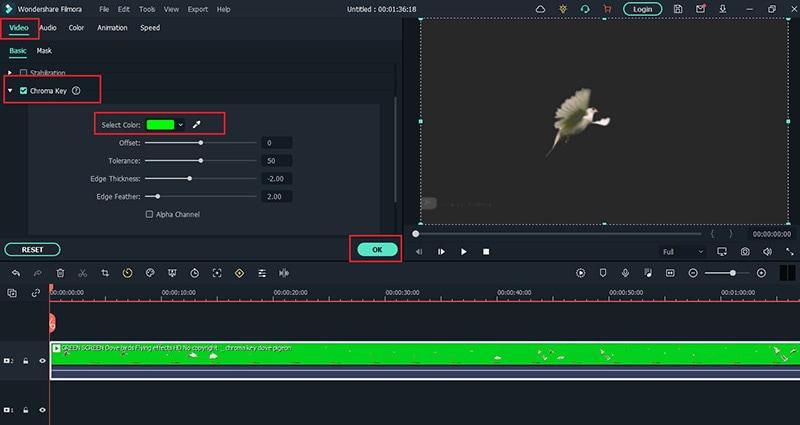
Step3 Double-click on the video clip and go to Video tab and turn on Chroma Key option. Select the solid color present in the background of the video and click on Ok button.
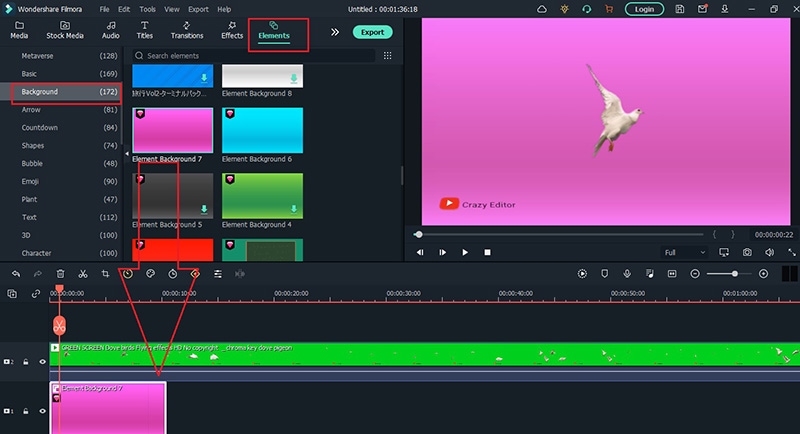
Step4 You will see the background color of the video disappear. Go to Elements> Background and drag and drop any background into Timeline. Make sure it is placed below the video clip and extend the duration of the background color as per your requirements.
Step5 Finally, play the video and click on Export button to save the video.
Part 3. FAQs about Video Background Colors
1. How do I remove background color in After Effects?
Import your video clip with a solid background color and place it on Timeline. Go to Effect menu> Keying> Keylight option. In Effects window and under Keylight, you will see Screen Colour option. Click on the eyedropper icon and select the background color you want to remove.
2. How do I change a solid background in After Effects?
The steps for After Effects how to change background color solid involve removing the background color and adding a layer of solid color to replace the transparency of the video. Go to Layer> New> Solid. Under Solid Settings window, go to Color and select the desired color from Color option and click on OK button. The new color will get reflected in the background of the video.
3. How do you add a white background in After Effects?
Go to Layer> New> Solid and add a white color solid first. However, this white color layer will not be visible unless you turn the background of your video transparent. Go to Effects & Presets and search for Luma Key and drop Luma Key on your video. Set Key type as Brighter and the threshold of the Lema key as per suitability on your video to see the white background appear.
Free Download For macOS 10.14 or later
Step1 Download and install Filmora and it is available for Windows and Mac. Launch Filmora and click on New Project.
Step2 Import your video under Project Media folder and drag and drop into Timeline.
Step3 Double-click on the video clip and go to Video tab and turn on Chroma Key option. Select the solid color present in the background of the video and click on Ok button.
Step4 You will see the background color of the video disappear. Go to Elements> Background and drag and drop any background into Timeline. Make sure it is placed below the video clip and extend the duration of the background color as per your requirements.
Step5 Finally, play the video and click on Export button to save the video.
Part 3. FAQs about Video Background Colors
1. How do I remove background color in After Effects?
Import your video clip with a solid background color and place it on Timeline. Go to Effect menu> Keying> Keylight option. In Effects window and under Keylight, you will see Screen Colour option. Click on the eyedropper icon and select the background color you want to remove.
2. How do I change a solid background in After Effects?
The steps for After Effects how to change background color solid involve removing the background color and adding a layer of solid color to replace the transparency of the video. Go to Layer> New> Solid. Under Solid Settings window, go to Color and select the desired color from Color option and click on OK button. The new color will get reflected in the background of the video.
3. How do you add a white background in After Effects?
Go to Layer> New> Solid and add a white color solid first. However, this white color layer will not be visible unless you turn the background of your video transparent. Go to Effects & Presets and search for Luma Key and drop Luma Key on your video. Set Key type as Brighter and the threshold of the Lema key as per suitability on your video to see the white background appear.
A Comprehensive Guide on Converting Slo-Mo Videos to Normal Speed Videos On iPhone
Thanks to the eccentric and offbeat elements, slow-motion videos have become the super-fun, state-of-the-art trend. Whether you’re in the bar trying to click the aesthetic, cinematic video or capture cool, unique, and enticing birthday moments, you can always rely on the slow-mo feature.

But do you ever feel like converting the slow-motion video in your iOS device to a normal video? Perhaps you thought the slow-mo video would be more attractive, but it’s not, or maybe you want to determine how to remove slow-motion from a video iPhone.
No matter the reason, there are numerous ways to remove slow motion from iPhone video. In this article, you’ll learn the various methods to convert slow-motion video into a regular video on your iPhone or iPad. Also, learn the steps involved in achieving it.
So, let’s start.
How To Convert Slow Motion Video to Normal on iPhone and iPad
Due to the slow-motion and Time-lapse modes that are built into the iPhone, people may quickly record slo-mo and time-lapse clips using their iOS smartphone cameras.
Access the iPhone camera, select Slo-mo, press the Record icon once to begin filming, and then press it once more to stop. This will create a slo-mo video.
Do you ever wish to get your video’s slow motion removed? How to convert slow-motion video to normal on an iPhone? Well, here’s your answer.
Method 1. Using the Photos App
The Photos app is an in-built app for iPhone and iPad that features editing capabilities like rotation, resizing, and auto-enhancement, in addition to helping you manage videos and images.

You may quickly and effortlessly turn a slow-mo video into a regular-speed one with the Photos app’s tucked-away slow-motion converter feature. Additionally, there won’t be any quality loss in your video.
And here are the steps on how to remove slow-mo from iPhone video using the Photos app on an iPad or iPhone to turn it to normal speed.
Step1: Take your iPad or iPhone, navigate to the Photos app, open it, and then go to the bottom to hit the Albums tab.
Step2: Choose the Slo-mo option, and subsequently select the video you wish to turn into a regular speed video. Go to the top right corner of the screen and hit the Edit button.

Step3: If you look under the timeline, you’ll find vertical lines. Here, the area with apart spaces signifies slow motion.

Step4: To learn how to remove slow mo from iPhone video is to learn how to turn it into regular speed. To do so, select the slow-motion bar and drag it towards the other one to position the lines at a close distance.
Step5: When finished, hit the Done button and save this video. However, if you think this change was unnecessary or incorrect, you can discard it by clicking on Edit → Revert → Revert To Original.

Editing Tip
- The Photos app on iPhone doesn’t allow you to convert any video shot at 24fps or 30fps to slow motion.
- You cannot reduce or decrease the overall size of the video after conversion.
Pros & Cons
Pros
- It is a built-in app on every iOS device.
- Saves the hassle of downloading any third-party app.
- No charges are applicable for using this app.
- Excellent slow-mo video convertor.
Cons
- Limited speed adjustment for the conversion of slow-mo videos into regular videos.
Method 2: Using Other Converter Apps
You may think that converting slow-mo video to a regular speed video on your iPad or iPhone is convenient, but there’s a drawback too. The method mentioned above can only help you with minimalistic speed changes, which may not give you the desired result.
However, other converter apps also help you change slow-mo video to regular iPhone video. These apps work seamlessly on your PC or Mac to turn your slow-mo videos on the iPhone or Mac to normal-speed video using customized and high-resolution settings.
Overview of The Apps
| Particulars | iMovie | Slow-Fast Motion Video Editor |
|---|---|---|
| Type (versatile or specialized) | Versatile | Specialized |
| Supported OS | iOS, Mac | iOS, Mac |
| Average Rating | 3.9/5 | 4.7/5 |
| Price | Free | Free |
| Best for | Video editing with cinematic effects | Slo-mo video conversion |
1) iMovie

iMovie is an excellent option if you’re looking for an application to modify a video with additional tools and convert the slow-mo to a regular pace. Among the top video converters for the iPhone is iMovie.
It offers a wide range of tools and capabilities that allow you to change the video transition, audio, and speed, add music, animated text, video overlay effects, normal video effects, and more. Additionally, it aids users in producing stunning films and commercials in a Cinematic manner.
iMovie could convert slow-mo footage to normal speed, in case you didn’t know. Did you ever attempt to change slow mot to regular speed in iMovie? With the use of iMovie, how can slow-motion video be made normally on an iPhone?
Here are the instructions.
Step1: Open the iMovie app, click on the ‘Create Project’ option, → tap on ‘Movie → Media → Video.

Step2: Tap on the slow-mo option, select the slow-motion video you want to convert and hit the ‘Create Movie’ option.

Step3: Get to know the editing options by clicking on the timeline. Then, click on the clock (speed) icon. At the beginning of the lines, you’ll find a turtle. It demonstrates slow motion. Plus, the number right behind the rabbit at the end signifies the speed.

Step4: To turn this slow-motion video into a regular speed video, drag and slide the speed control slider until the number turns 1x.
Step5: To save the changes, tap on the Done option. Subsequently, edit the video as per your preference.
2) Slow-Fast Motion Video Editor

This slow-mo video converter app helps you slow down or speed up any slow-motion video without any watermark and charges. This free app supports both landscape or portrait operation, unlimited video length, and corrected audio pitch.
The application is convenient to use and seamless to speed up or slow down any parts or clips of your videos. Without charging a penny, this app meets the users’ expectations. If you’re wondering how to use this converter app, here’s a step-by-step guide:
Method 3. Using Third-Party Online Tools
The smartphone sector’s most cutting-edge functionalities can be found on iPhones. Users may capture slow-motion videos, for instance. However, you may consider accelerating the slo-mo movie to regular video speed once it has been recorded.
Using your smartphone, how would you go about doing that? Well, we have seen that using the built-in Photos app and converter apps like iMovie can help, but can they really provide the level of customization and outcomes you need?
When things get professional and the expectations are too high, it’s best to use third-party online tools. So, here are a few practical choices:
Overview of the Online Tools
| Particulars | KAPWING | Clideo | EZGIF |
|---|---|---|---|
| Supported File Format | .AVI, .FLV, 3GP, and other edge file types. | MP4, MOV, WMV, AVI, WEBM, FLV, MKV, MPG, MPEG, MTS. | MNG files |
| Watermark | Not Available | Only in Free version | Not Available |
| Available Speed Option | As fast as 4x for an accelerated video | 0.25 times to 2 times | 0.25 times to 2 times |
| Time Consuming | No | Moderate | No |
1) KAPWING

Kapwing is a tool for group film editing that enables people to collaborate to produce original videos. For individuals to create the ideal video, Kapwing offers a collection of pre-built themes, stock footage, and materials.
Kapwing acts as a digital office solution that enables individuals to organize all of their resources in one location and work together on projects utilizing sharing features. Amid its vast range of features, its slow-mo converter is the most famous and widely used one.
- Rating: 4.1/5
- Price: Plan starts at $20 per month
Step-By-Step Guide To Convert Slow-Mo on Iphone Using Kapwing App
Step1: First, download and install the Kapwing app from the App Store.
Step2: Upload the slow-mo video that you want to speed up.
![]()
Note: Kapwing also lets you speed up any slow-mo video present on TikTok, Twitter, or YouTube.

Step3: Perform the video clip speed adjustment by utilizing the Kapwing sidebar. You can accelerate the video clip speed up to four times the original speed. If not, you can play in every level in between.

Step4: Finally, click on the Export option, and the final video clip with all speed adjustments will be generated within a few seconds.

2) Clideo

Among the finest free tools for rapid photo or video editing is Clideo. You can start upgrading your material by uploading files in a wide range of formats to their site.
Limitless customization is possible with the paid version for just $9 a month. The capabilities, though, aren’t as varied as those offered by rivals, and there aren’t any mobile apps for people who want to generate material while on the go.
- Ratings: 4.3/5
- Price: Starts at $9 per month
Step-By-Step Guide To Convert Slow-Mo on Iphone Using Clideo App:
Step1: From your computer (Mac) or mobile device (iPhone), upload a video. You can also add from a Dropbox or Google Drive account.

Step2: Select to speed up the video after it has been recorded. Then, if required, muffle its sound and alter the file type.


Step3: The video can be seen directly in your browser. Click “Download” after you are finished and delighted with your creation.

3) EZGIF

EZGIF is a free online editing tool that enables individuals to change the playback speed of any video. Not only does it effectively convert your slow-mo video on an iOS device to a normal speed video, but it also comes with many other features (later on that). The website has a simple, outdated interface, but except for that, it’s a fine app for beginners.
Step-By-Step Guide To Convert Slow-Mo on Iphone Using Clideo App:
Step1: Upload the video clip and choose a speed multiplier to start using this program.

Step2: A number less than one will slow down playback; a number greater than one will quicken it.
Step3: Thus, input 0.5 to run the program at 1/2 its normal speed, and so forth.

Step4: You can preserve the audio track’s original tempo, vary the speed along with the video, or silence the audio entirely.
Convert Your Slo-Mo Videos Into Regular Ones In a Few Simple Steps With Filmora
Filmora is a leading online video editing software that has become the preferred choice of all professionals and amateurs. From everyday needs to something formal, it helps you edit videos for every occasion.
You can change pace swiftly or consistently in Filmora and vary the pace of the audio or video recordings. Use the Speed Ramping tool in Filmora. If you want to remove slow-mo or add it, you can use Filmora’s speed ramping feature anytime.
Free Download For Win 7 or later(64-bit)
Free Download For macOS 10.14 or later
We will share some details on how to use this feature here, but for a comprehensive, detailed guide, read to the end.
Step-By-Step Guide to Speed Changing
Step1Launch the Video
Activate Wondershare Filmora on your computer. To increase the speed and runtime of the movie, explore the desired video and enter it into the software. You can drag and drop the movie onto the interface as well.
Step2Speed Adjustment

Press the left mouse button as soon as the video shows on the screen. And click the speed tab in the toolbar. There is then a contextual menu displayed. To double the rate, select 2x from the “Fast” menu. The participant may use any fundamental that has more than one.
Step3Save & Export
When finished, select “Save Project” from the list of available options in the “File” panel. Press “Save” after renaming the project.
Using Filmora’s “Export” feature, selecting “Export,” and then modifying the file name is the alternative way to export the video. A device, a system, or even YouTube can receive the exported video. Next, click “Export.”
Bonus Tips. 2 More Methods to Normalize Your Video Speed
Filmora offers you 2 more advanced methods to increase or decrease the speed of the video, one is uniform speed and the other, is speed ramping . Want to learn more about changing speed in Filmora, watch this video tutorial to get a quick start on using them.
Conclusion
That’s basically it! So that’s how you turn any slow-motion video into a regular one.
This article covers all major techniques to convert videos to slow motion on iOS and Mac. You can pick one of them to convert video to slow motion or to slow down slow motion.
So, are you now prepared to convert slow-motion videos on your iPad or iPhone device to ordinary speed? Try the Filmora video editor if you’re looking for something really professional.
It makes it much easier to convert slow-motion videos from your smartphone or tablet to regular speed. It has powerful video editing features and is more comfortable to use. So, get started today!
Method 2: Using Other Converter Apps
You may think that converting slow-mo video to a regular speed video on your iPad or iPhone is convenient, but there’s a drawback too. The method mentioned above can only help you with minimalistic speed changes, which may not give you the desired result.
However, other converter apps also help you change slow-mo video to regular iPhone video. These apps work seamlessly on your PC or Mac to turn your slow-mo videos on the iPhone or Mac to normal-speed video using customized and high-resolution settings.
Overview of The Apps
| Particulars | iMovie | Slow-Fast Motion Video Editor |
|---|---|---|
| Type (versatile or specialized) | Versatile | Specialized |
| Supported OS | iOS, Mac | iOS, Mac |
| Average Rating | 3.9/5 | 4.7/5 |
| Price | Free | Free |
| Best for | Video editing with cinematic effects | Slo-mo video conversion |
1) iMovie
iMovie is an excellent option if you’re looking for an application to modify a video with additional tools and convert the slow-mo to a regular pace. Among the top video converters for the iPhone is iMovie.
It offers a wide range of tools and capabilities that allow you to change the video transition, audio, and speed, add music, animated text, video overlay effects, normal video effects, and more. Additionally, it aids users in producing stunning films and commercials in a Cinematic manner.
iMovie could convert slow-mo footage to normal speed, in case you didn’t know. Did you ever attempt to change slow mot to regular speed in iMovie? With the use of iMovie, how can slow-motion video be made normally on an iPhone?
Here are the instructions.
Step1: Open the iMovie app, click on the ‘Create Project’ option, → tap on ‘Movie → Media → Video.
Step2: Tap on the slow-mo option, select the slow-motion video you want to convert and hit the ‘Create Movie’ option.
Step3: Get to know the editing options by clicking on the timeline. Then, click on the clock (speed) icon. At the beginning of the lines, you’ll find a turtle. It demonstrates slow motion. Plus, the number right behind the rabbit at the end signifies the speed.
Step4: To turn this slow-motion video into a regular speed video, drag and slide the speed control slider until the number turns 1x.
Step5: To save the changes, tap on the Done option. Subsequently, edit the video as per your preference.
2) Slow-Fast Motion Video Editor
This slow-mo video converter app helps you slow down or speed up any slow-motion video without any watermark and charges. This free app supports both landscape or portrait operation, unlimited video length, and corrected audio pitch.
The application is convenient to use and seamless to speed up or slow down any parts or clips of your videos. Without charging a penny, this app meets the users’ expectations. If you’re wondering how to use this converter app, here’s a step-by-step guide:
Method 3. Using Third-Party Online Tools
The smartphone sector’s most cutting-edge functionalities can be found on iPhones. Users may capture slow-motion videos, for instance. However, you may consider accelerating the slo-mo movie to regular video speed once it has been recorded.
Using your smartphone, how would you go about doing that? Well, we have seen that using the built-in Photos app and converter apps like iMovie can help, but can they really provide the level of customization and outcomes you need?
When things get professional and the expectations are too high, it’s best to use third-party online tools. So, here are a few practical choices:
Overview of the Online Tools
| Particulars | KAPWING | Clideo | EZGIF |
|---|---|---|---|
| Supported File Format | .AVI, .FLV, 3GP, and other edge file types. | MP4, MOV, WMV, AVI, WEBM, FLV, MKV, MPG, MPEG, MTS. | MNG files |
| Watermark | Not Available | Only in Free version | Not Available |
| Available Speed Option | As fast as 4x for an accelerated video | 0.25 times to 2 times | 0.25 times to 2 times |
| Time Consuming | No | Moderate | No |
1) KAPWING
Kapwing is a tool for group film editing that enables people to collaborate to produce original videos. For individuals to create the ideal video, Kapwing offers a collection of pre-built themes, stock footage, and materials.
Kapwing acts as a digital office solution that enables individuals to organize all of their resources in one location and work together on projects utilizing sharing features. Amid its vast range of features, its slow-mo converter is the most famous and widely used one.
- Rating: 4.1/5
- Price: Plan starts at $20 per month
Step-By-Step Guide To Convert Slow-Mo on Iphone Using Kapwing App
Step1: First, download and install the Kapwing app from the App Store.
Step2: Upload the slow-mo video that you want to speed up.
![]()
Note: Kapwing also lets you speed up any slow-mo video present on TikTok, Twitter, or YouTube.
Step3: Perform the video clip speed adjustment by utilizing the Kapwing sidebar. You can accelerate the video clip speed up to four times the original speed. If not, you can play in every level in between.
Step4: Finally, click on the Export option, and the final video clip with all speed adjustments will be generated within a few seconds.
2) Clideo
Among the finest free tools for rapid photo or video editing is Clideo. You can start upgrading your material by uploading files in a wide range of formats to their site.
Limitless customization is possible with the paid version for just $9 a month. The capabilities, though, aren’t as varied as those offered by rivals, and there aren’t any mobile apps for people who want to generate material while on the go.
- Ratings: 4.3/5
- Price: Starts at $9 per month
Step-By-Step Guide To Convert Slow-Mo on Iphone Using Clideo App:
Step1: From your computer (Mac) or mobile device (iPhone), upload a video. You can also add from a Dropbox or Google Drive account.
Step2: Select to speed up the video after it has been recorded. Then, if required, muffle its sound and alter the file type.
Step3: The video can be seen directly in your browser. Click “Download” after you are finished and delighted with your creation.
3) EZGIF
EZGIF is a free online editing tool that enables individuals to change the playback speed of any video. Not only does it effectively convert your slow-mo video on an iOS device to a normal speed video, but it also comes with many other features (later on that). The website has a simple, outdated interface, but except for that, it’s a fine app for beginners.
Step-By-Step Guide To Convert Slow-Mo on Iphone Using Clideo App:
Step1: Upload the video clip and choose a speed multiplier to start using this program.
Step2: A number less than one will slow down playback; a number greater than one will quicken it.
Step3: Thus, input 0.5 to run the program at 1/2 its normal speed, and so forth.
Step4: You can preserve the audio track’s original tempo, vary the speed along with the video, or silence the audio entirely.
Convert Your Slo-Mo Videos Into Regular Ones In a Few Simple Steps With Filmora
Filmora is a leading online video editing software that has become the preferred choice of all professionals and amateurs. From everyday needs to something formal, it helps you edit videos for every occasion.
You can change pace swiftly or consistently in Filmora and vary the pace of the audio or video recordings. Use the Speed Ramping tool in Filmora. If you want to remove slow-mo or add it, you can use Filmora’s speed ramping feature anytime.
Free Download For Win 7 or later(64-bit)
Free Download For macOS 10.14 or later
We will share some details on how to use this feature here, but for a comprehensive, detailed guide, read to the end.
Step-By-Step Guide to Speed Changing
Step1Launch the Video
Activate Wondershare Filmora on your computer. To increase the speed and runtime of the movie, explore the desired video and enter it into the software. You can drag and drop the movie onto the interface as well.
Step2Speed Adjustment
Press the left mouse button as soon as the video shows on the screen. And click the speed tab in the toolbar. There is then a contextual menu displayed. To double the rate, select 2x from the “Fast” menu. The participant may use any fundamental that has more than one.
Step3Save & Export
When finished, select “Save Project” from the list of available options in the “File” panel. Press “Save” after renaming the project.
Using Filmora’s “Export” feature, selecting “Export,” and then modifying the file name is the alternative way to export the video. A device, a system, or even YouTube can receive the exported video. Next, click “Export.”
Bonus Tips. 2 More Methods to Normalize Your Video Speed
Filmora offers you 2 more advanced methods to increase or decrease the speed of the video, one is uniform speed and the other, is speed ramping . Want to learn more about changing speed in Filmora, watch this video tutorial to get a quick start on using them.
Conclusion
That’s basically it! So that’s how you turn any slow-motion video into a regular one.
This article covers all major techniques to convert videos to slow motion on iOS and Mac. You can pick one of them to convert video to slow motion or to slow down slow motion.
So, are you now prepared to convert slow-motion videos on your iPad or iPhone device to ordinary speed? Try the Filmora video editor if you’re looking for something really professional.
It makes it much easier to convert slow-motion videos from your smartphone or tablet to regular speed. It has powerful video editing features and is more comfortable to use. So, get started today!
Also read:
- New 2024 Approved Turn Your Text Into a Podcast Made Possible (+ EASY Editing Tips)
- In 2024, In This Article We Will Be Covering the Most Important Topics You Have to Remember when Becoming a Successful YouTube-Star
- 2024 Approved How To Make a Photo Collage in Microsoft Word
- New In 2024, A Guide to Effective Video Marketing
- Updated Are You Excited to Learn About a File Format that Helps in Easy Transfer? We Are Talking About the 3GP Format. Stay with Us and Get to Know More About It
- Updated 2024 Approved Detailed Steps to Rotate Videos in Blender
- New 2024 Approved Top List Best VHS Sound Effect That You Can Use in Video Making
- Updated 2024 Approved AVI Video Format How to Open, Play, Edit AVI File?
- In 2024, So, without Further Dilly-Dallying, Lets Learn How to Create a Retro 1950-Style Video with This Simple Filmora Tutorial
- 2024 Approved Discover How to Change Sky Background with The Best Applications? A Review
- New In 2024, Complete Guide to Make a Super Easy Rotating Video Effect
- Updated 2024 Approved 5 Excellent Tools To Convert Video to 60 FPS
- Best Audio Waveform Generator
- Updated Have You a Desire to Imbibe Your PowerPoint Presentations with Custom Effects and Tools? Be There to Learn All About Creating Custom Slideshows in PowerPoint with Utmost Ease
- New This Article Will Help You Understand How to Create Video Contents that Convert Sales
- New How to Add Miniature Effect in Video with Filmora
- New In 2024, How To Quick Guide for Making Google Slideshows
- Updated How to Zoom In and Out on Mac
- Are You Excited to Learn About a File Format that Helps in Easy Transfer? We Are Talking About the 3GP Format. Stay with Us and Get to Know More About It for 2024
- Updated 2024 Approved 8 Apps to Custom Your GIF Stickers
- New How to Change Quicktime Player Speed on Mac for 2024
- 2024 Approved How to Delete White Background in Photoshop. How to Create a Transparent Background in Photoshop? Steps to Get Rid of White Background in Photoshop
- New Make A Tattoo Disappear Like A Magic for 2024
- New Best Photo Video Maker Apps with Song PC, Mobile, Online for 2024
- Updated In 2024, Top List Best VHS Sound Effect That You Can Use in Video Making
- Updated In 2024, What Is TS Format and How To Play TS Files?
- New In 2024, How to Make a Slow Motion Video in Wondershare Filmora
- New Ideas That Will Help You Out in Making Transparent Image
- In 2024, How to Split Videos - 33 Best Video Splitter Recommend
- Trailer Guide for Creators and Developers for 2024
- Updated In 2024, 3D LUT Mobile App Review - A Composite Application for Editing Media
- Updated How to Convert a GIF to a Video for Instagram
- In 2024, Magic Effects Video Making How To
- 2024 Approved Looking Into The Top Free Slow Motion Apps (Android & iOS)
- In 2024, Clone Yourself in Videos with Filmora
- How to Use Pokémon Emerald Master Ball Cheat On Vivo S18e | Dr.fone
- The Most Effective Ways to Bypass iPhone 12 Pro Max Activation Lock
- Step-by-Step Tutorial How To Bypass Samsung Galaxy S23 FE FRP
- The Best iSpoofer Alternative to Try On Xiaomi Redmi Note 12 Pro 4G | Dr.fone
- Ways to trade pokemon go from far away On Apple iPhone 14 Plus? | Dr.fone
- How to Factory Reset Realme Narzo N53 without Losing Data | Dr.fone
- Unlock Motorola Moto G04 Phone Password Without Factory Reset Full Guide Here
- How to Reset your Vivo Y27s Lock Screen Password
- Unlocking the Power of Smart Lock A Beginners Guide for Vivo S17e Users
- 3 Ways to Change Location on Facebook Marketplace for Tecno Camon 20 | Dr.fone
- How to Remove Forgotten PIN Of Your Realme C55
- In 2024, 10 Free Location Spoofers to Fake GPS Location on your Google Pixel Fold | Dr.fone
- In 2024, How to Get and Use Pokemon Go Promo Codes On Honor 80 Pro Straight Screen Edition | Dr.fone
- In 2024, How Can We Unlock Our Xiaomi 14 Ultra Phone Screen?
- In 2024, How Do You Get Sun Stone Evolutions in Pokémon For Motorola Razr 40? | Dr.fone
- In 2024, 4 Most-Known Ways to Find Someone on Tinder For Lava Yuva 2 by Name | Dr.fone
- In 2024, Process of Screen Sharing Itel A60 to PC- Detailed Steps | Dr.fone
- How to Fake Snapchat Location on Oppo A38 | Dr.fone
- How to Fix Android App Not Installed Error on Itel A05s Quickly? | Dr.fone
- How To Unbrick a Dead Poco X5 | Dr.fone
- In 2024, Full Guide to Fix iToolab AnyGO Not Working On Apple iPhone 12 Pro Max | Dr.fone
- Tecno ADB Format Tool for PC vs. Other Unlocking Tools Which One is the Best?
- Your Complete Guide To Reset Vivo S17e | Dr.fone
- In 2024, Additional Tips About Sinnoh Stone For Realme V30 | Dr.fone
- In 2024, How to Change your Realme 12 Pro 5G Location on Twitter | Dr.fone
- In 2024, Top 5 Car Locator Apps for Apple iPhone XR | Dr.fone
- 4 Methods to Turn off Life 360 On Poco X6 without Anyone Knowing | Dr.fone
- In 2024, How Do You Remove Restricted Mode on iPhone X | Dr.fone
- What is Fake GPS Location Pro and Is It Good On Motorola Moto G24? | Dr.fone
- Preparation to Beat Giovani in Pokemon Go For Xiaomi Civi 3 Disney 100th Anniversary Edition | Dr.fone
- How to retrieve erased videos from Moto G Stylus (2023)
- New 2024 Approved How To Stream Your Favorite Games Online
- Oppo A2 support - Forgotten screen lock.
- In 2024, How To Unlock SIM Cards Of Samsung Galaxy A25 5G Without PUK Codes
- Edit and Send Fake Location on Telegram For your Nubia Red Magic 8S Pro+ in 3 Ways | Dr.fone
- Title: Updated How to Add Filter to Video Online for 2024
- Author: Chloe
- Created at : 2024-04-24 07:08:29
- Updated at : 2024-04-25 07:08:29
- Link: https://ai-editing-video.techidaily.com/updated-how-to-add-filter-to-video-online-for-2024/
- License: This work is licensed under CC BY-NC-SA 4.0.
