
:max_bytes(150000):strip_icc():format(webp)/samsung-smart-tv-lifestyle-alt-5c89160046e0fb00013365c2.jpg)
Updated How to Add Text Animation Online
How to Add Text Animation Online
Before you can publish your recorded video to your viewers, you need to polish the video so that you can get everyone’s appreciation. This is where the magic of video editing comes into the scene. Editing your video is not just about trimming unnecessary parts and adding transitions and effects. The titles and texts you display on your video play a major role in your video content. In fact, you can create a video based on texts and titles only.
Instead of showing static texts, you should create animated texts and place them in the video wherever appropriate. You do not need to download a video editor on your computer or smartphone to add animated text to your video. You can make text animation online using an online text animation maker. We will illustrate the steps to create animated text with three different online editors.
Part 1. Use Biteable Animated Text
Biteable is a popular online platform where you can create amazing animated text video using Biteable text video maker. You can add animated text to your videos as well as photos. The user interface of Biteable is extremely easy for all users. You have to first create an account for free to get started. There are various templates available to create your animated text video from scratch. Here are the steps to use Biteable online text animation maker to create a video based on animated texts.
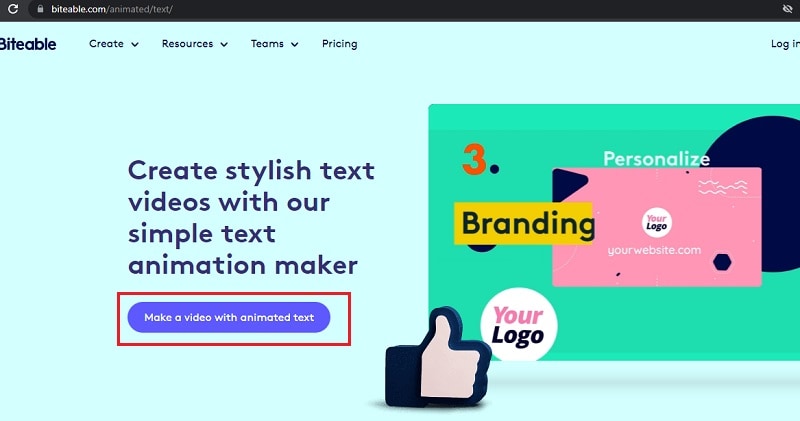
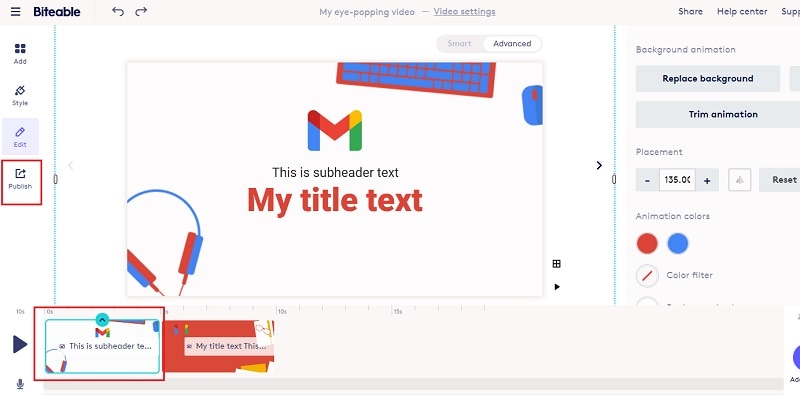
Step1Open your web browser and visit “biteable.com/animated/text”. Click on “Make a video with animated text” button.
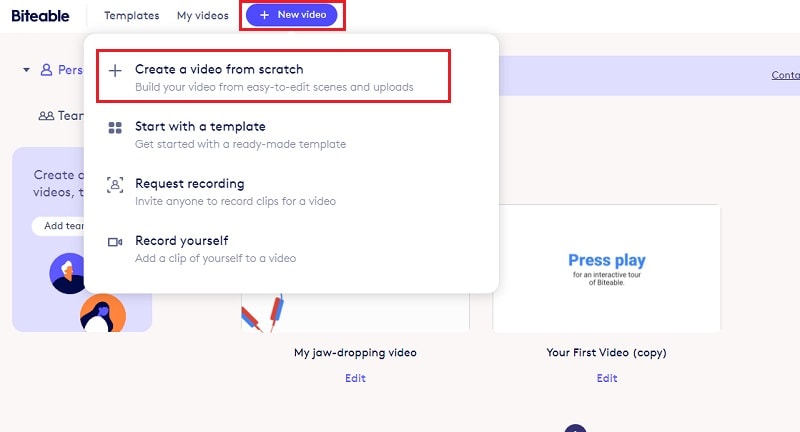
Step2Create an account by following the on-screen instructions. Click on New Video button and select “Create a video from scratch”.
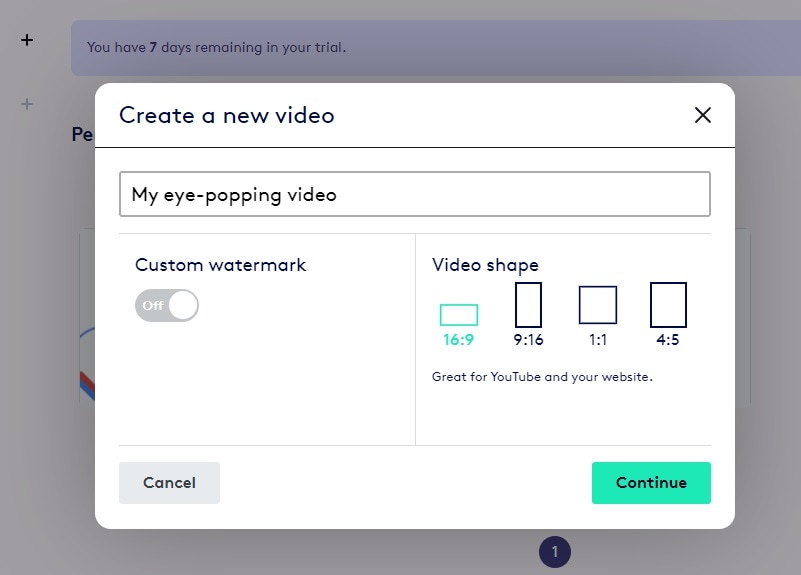
Step3Enter a name for the video and select a video shape as per your preference. Click on Continue button.
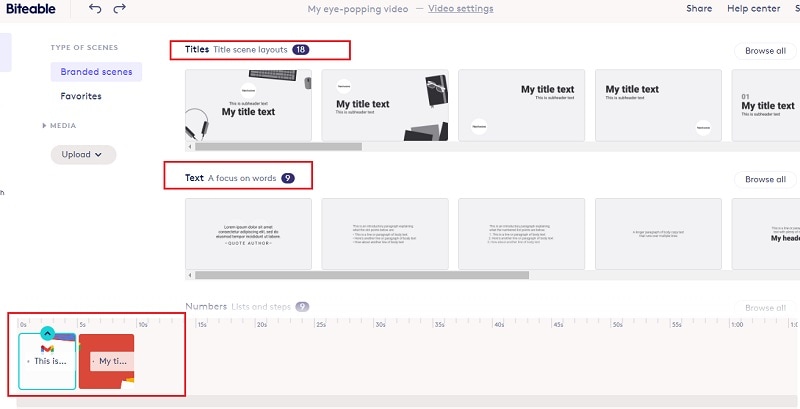
Step4Under Titles, select any template and it will be added to the Timeline. Similarly, you can add multiple titles templates, text templates, number templates and likewise. You will see them in the Timeline placed side by side. You can stretch their durations as per your requirements.
Step5Double-click on each template to edit the text in them and select the text animations as per your preference. Play the video and if you are satisfied, click on Publish button to save the video.
Part 2. Use Motionden Video Maker
Motionden is yet another powerful text animation maker where you can create free text animations instantly. There are over 1500 templates available to choose from in order to create text videos from scratch. You can choose video templates from any category as per the video theme you want. Besides, you can upload your video or photo and add texts and music as per your preference. Here are the steps to create animated text online using Motionden Video Maker.
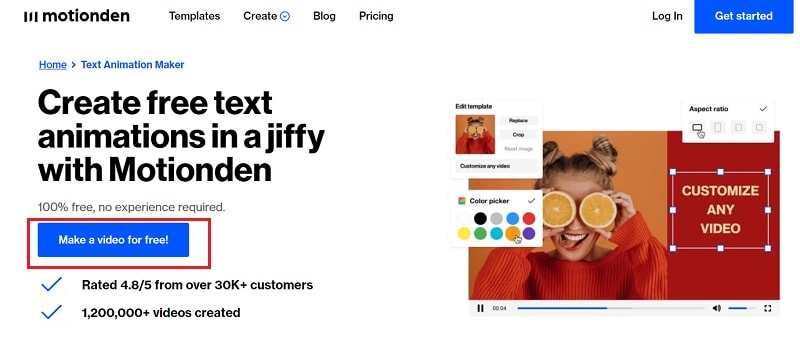
Step1Open your web browser and visit “motionden.com/video-maker/text-animation”. Click on “Make a video for free” button.
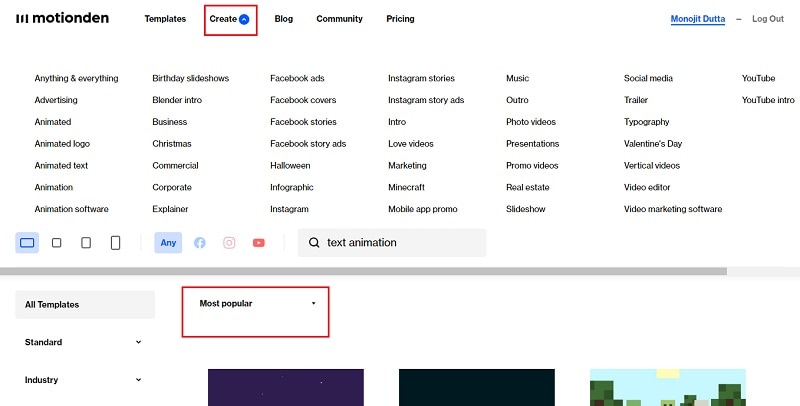
Step2Go to Create menu option and select any category of video templates. You can also check out the popular video templates and select anyone as per your preference.
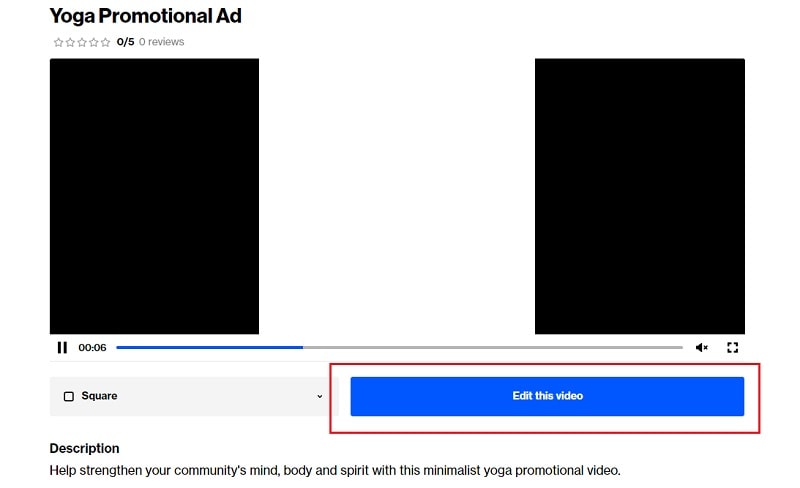
Step3For the selected category, you need to select the desired video template. Click on Edit Video and you can make changes to the template on the video editor as per your requirements. You need to sign up for free in order to continue and edit the template.
Step4Click on individual scenes and click on texts to customize them. Once the editing is done for each scene, click on Make Video button to build and save the text video.

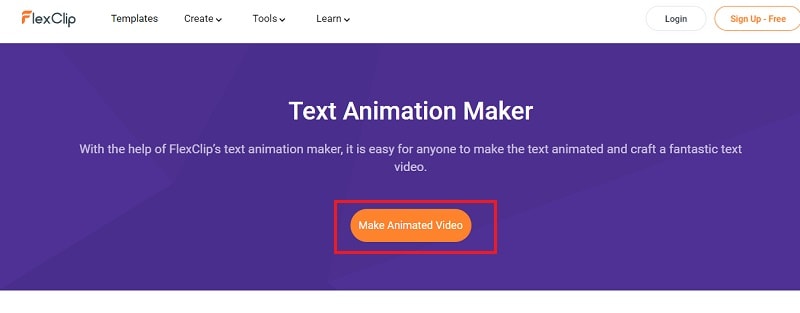
Part 3. Use Flexclip Text Animation Tool
You can use Flexclip Text Animation Tool to create text video from scratch as well as add text to your recorded video. You should use Biteable and Motionden to create video with text effects only directly using video template while you should use Flexclip to edit your video and add text. You can add text effects to photos and videos and here are the steps to follow.
Step1Open web browser and visit “flexclip.com/features/text-animation.html”. Click on Make Animated Video button.
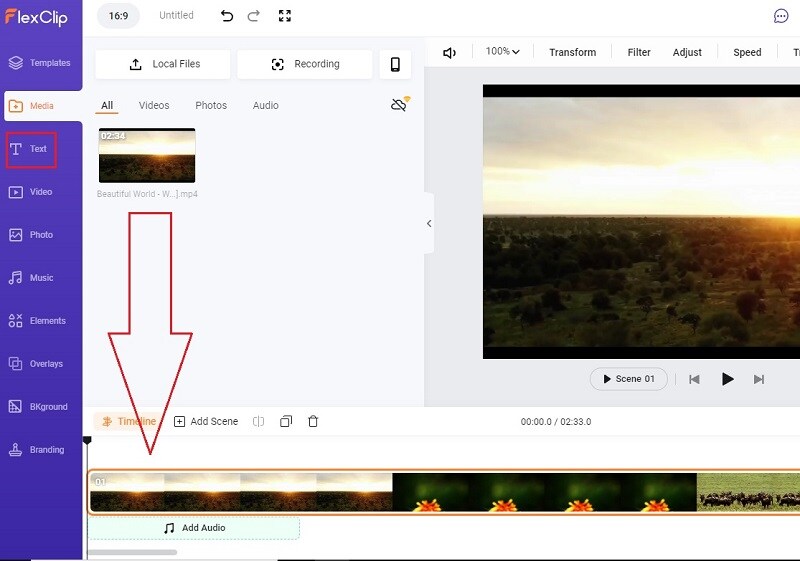
Step2You can choose from the available templates to create video with text from scratch. If you want to add text to your recorded video, go to Media tab. Click on Local Files button and upload your recorded video.

Step3Drag and drop the uploaded video into the Timeline. Thereafter, go to Text tab.
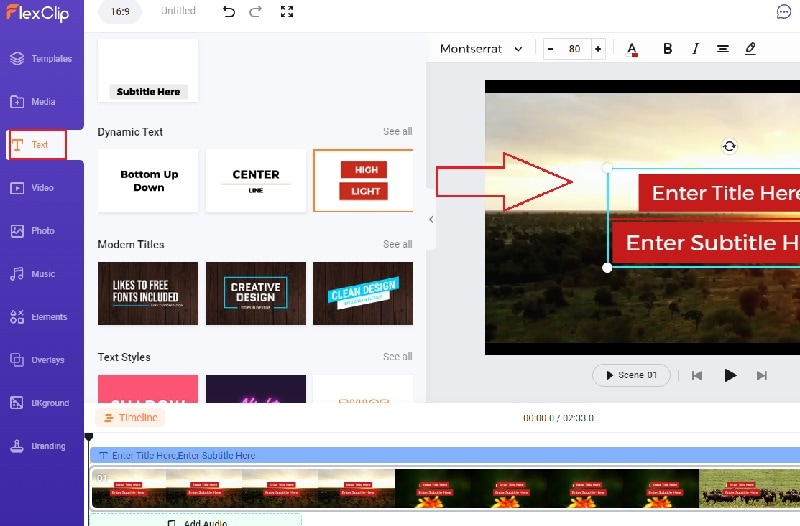
Step4You will see all the different text effects and animations. Place your mouse pointer to preview the animation. Drag and drop the select text template to the video on the Viewer. You can check the Timeline and stretch or compress the text layer as per your requirements.
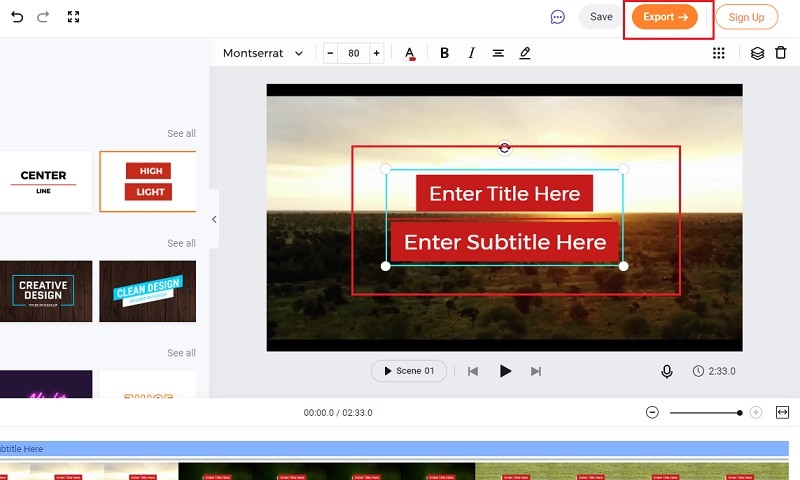
Step5Double-click on the text on Viewer window and customize the text as per your preference. Finally, click on Export button to save the edited video.
Conclusion
You can make video with animated text to make your presentation video eye-catching and attention-grabbing. We have mentioned three different online text animation makers that you can use to create animated text video from scratch by choosing different video templates. You can also edit your recorded video and add animated text wherever you want using Flexclip Text Animation Tool.
Free Download For Win 7 or later(64-bit)
Free Download For macOS 10.14 or later
Motion Tracking Using The Best Video Editors
One of the powerful editing features offered by several premium-grade video editors is motion tracking. It not only boosts the overall video quality but also helps ensuring the object is engaged throughout the video. Many users fail to apply the motion tracking effect to the videos because they don’t use a reliable tool. The primary motive of this discussion is to provide you with the best-in-class motion tracker.
Not only will we tell you the name of the software, but we will also guide you through the procedure of doing this. Moreover, many of you don’t know what motion tracking is. So, this article will also provide significant information about this.
Part 1: What Is Motion Tracking in Video Editing?
Motion tracking helps you analyze the movements of different objects in your video content. This process involves various tasks that can be very helpful in video editing. For example, tracking and identifying the position of elements over time. The main purpose of motion tracking is to add graphics. Moreover, you can also add digital effects to the tracked objects.
You will need special software or video editing tools to perform this process. Here’s how you can understand the motion tracking process with ease:
Selection of Object
The editor can select the object that he wants to track in an effective manner. This object can be a person or any moving element that needs tracking. Moreover, it can also be a moving vehicle or a logo as well. Tracking these moving elements in the frame can allow the editor to improve the areas which have high contrast or distinct features.
Tracking Points
Selecting the object allows the software to identify specific points in the frame. These points can have distinct features or a high contrast that may affect the video quality. With the help of video motion tracking, the editor can note down these areas and improve them to enhance the viewer experience.
Data Mapping
Once the software tracks the movements, it can be very useful for the editor. This is because it calculates the changes in position and rotation of each point. Moreover, it also maps the tracked data into a visual representation for the coordinating system. Using this system, the movements of the objects can be recreated in a 3D space.
Using Effects and Refinement
After obtaining the motion tracking data, the video editor can apply different effects on the object. These effects can include adding graphics and text to the scene. Moreover, it can also help in animation or compositing visual elements. To ensure the accurate alignment of the effects, the editor may need to use extra tracking techniques or manual adjustments.
Start Motion Tracking For Win 7 or later(64-bit)
Start Motion Tracking For macOS 10.14 or later


Part 2: How to Perform Motion Tracking in Adobe After Effects?
As you have gained knowledge about motion tracking, there are many platforms that offer this feature. Adobe After Effects is a video editing platform that can help you perform video motion tracking. If you are a user of this tool, you can learn the steps to motion track your video below:
Step 1: Open Adobe After Effects on your computer and import your video files to the timeline of the platform. Add the object you wish to motion track on Adobe After Effects.
![]()
Step 2: Lead to the “Layer” tab from the top and select the “New” option from the drop-down menu. Continue to select “Null Object” to add a layer to the timeline.
![]()
Step 3: Select the video clip and continue to the “Animation” tab from the top. Select “Track Motion” from the drop-down menu that appears. This will generate a box for selecting the object for motion tracking. You can extend the box and drag it anywhere in the video clip. To check the motion tracking object, click the “Analyze Forward” button on the bottom-right corner of the screen.
![]()
Step 4: As the object is analyzed, click the “Edit Target” button to open a new screen. Continue to change the layer to “Null Object” and click “OK.” Continue to select “Apply” and click “OK” against the pop-up menu that opens. This is how Adobe After Effects applies the motion tracker.
![]()
Part 3: Wondershare Filmora: A Comprehensive Solution to Video Editing
Do you know that there is a video editing platform that makes all video motion tracking process easy? Wondershare Filmora presents a coherent video editing system for its users with high-quality outputs. The platform integrates some of the greatest features and makes it useful for all users. Even if you are a rookie in video editing, this video editing platform can help you make the best of videos.
Start Motion Tracking For Win 7 or later(64-bit)
Start Motion Tracking For macOS 10.14 or later
Motion Tracking is possible with Wondershare Filmora, which is entirely automated. All you have to do is click a button, and the process will execute. Wondershare Filmora helps users apply different effects and track them within the videos. Instead of objects, you can increase your video motion tracking into effects and other elements.
![]()
Features of Wondershare Filmora Video Editor
To know more about this video editing platform, look into the prominent features offered by Filmora. There is much that this software provides apart from motion tracking videos. This will help you generate a better understanding of this best motion-tracking software.
Auto Beat Sync
You can synchronize your audio and videos across this automated video editor. Filmora provides an auto beat sync function that helps users create videos that can be synchronized. Smoothen your videos and make them look professional with a single click. This does not leave behind any noise or echo within the videos .
Text-to-Speech Function
Wondershare Filmora features a dedicated AI text-to-speech functionality. This helps in the automatic conversion of text into speech across the video editor. Users have to add text which will be converted to speech. In this way, creating voiceovers is not only easy but also quick.
Speed Ramping
While you can motion-track your videos, the platform also provides a speed ramping system. Adjusting the speed uniformly or through ramping is effective with Filmora, as it makes it simple to cover. You can adjust the speeds using sliders and graphs.
Part 4: Guide: Perform Paper Motion Tracking With High Quality Using Wondershare Filmora
Filmora is a popular video editing platform among video editors for motion track videos. It offers exquisite features along with a smooth and sleek interface. You can also ensure the best quality integration of motion tracking in videos with Filmora. Do you wish to learn the steps to perform motion tracking with this best motion tracking software? Worry no more because the below-given steps will help you in this matter:
Start Motion Tracking For Win 7 or later(64-bit)
Start Motion Tracking For macOS 10.14 or later
Step 1: Import Video in Filmora
To get started, launch Filmora on your device, select “New Project,” and choose the “Click here to import media” option. To proceed, add the video you want to apply motion tracking. Once the video is visible in the “Import Media” section, drag it to “Timeline.”
![]()
Step 2: Add Motion Tracking in the Video
Select the video in “Timeline” and click the “Motion Tracking” button from the “Toolbar” present above the “Timeline.” Conversely, double-click the video and choose the “Video” tab from the editing settings.
![]()
Step 3: Customize Motion Tracking and Initiate It
To enable the box customization, double-click the “Motion Tracking Box.” Drag the “Motion Tracking Box” on the moving object and cover the whole object in the box. You can also adjust the duration of motion tracking by trimming the video in the timeline. Once done, click the “Click to start Motion Track” button and wait a few moments.
![]()
Step 4: Add Elements or Effects to the Video
Next, select “OK” from the prompt window and go to the “Element” section. Choose an “Element” and drag it into “Timeline” above your video section. To adjust the element, you must double-click on it. There is no restriction on using an element, as you can add “Effects” or other things.
You need to revert to the “Motion Tracking” section and select the drop-down appearing against the option. Choose the name of your “Effect” or “Element” that you’ve applied to before. The particular motion track will be enhanced through an effect or element.
![]()
Step 5: Export Motion Tracked Video in Device
For exporting video, click the “Export” button and personalize the “Export Settings.” Finally, tap “Export” and save the video on your device.
![]()
Conclusion
This article has pointed out the prominence of motion tracking in video editing. An idea for performing video motion tracking in Adobe After Effects has been provided. The article has offered Wondershare Filmora as the ideal solution to this requirement.
You can embed the motion tracking function and perform all the processes within a few seconds. If you have an object that you want to focus on in a video, trying motion tracking is the best option for this.
Start Motion Tracking For Win 7 or later(64-bit)
Start Motion Tracking For macOS 10.14 or later
Part 2: How to Perform Motion Tracking in Adobe After Effects?
As you have gained knowledge about motion tracking, there are many platforms that offer this feature. Adobe After Effects is a video editing platform that can help you perform video motion tracking. If you are a user of this tool, you can learn the steps to motion track your video below:
Step 1: Open Adobe After Effects on your computer and import your video files to the timeline of the platform. Add the object you wish to motion track on Adobe After Effects.
![]()
Step 2: Lead to the “Layer” tab from the top and select the “New” option from the drop-down menu. Continue to select “Null Object” to add a layer to the timeline.
![]()
Step 3: Select the video clip and continue to the “Animation” tab from the top. Select “Track Motion” from the drop-down menu that appears. This will generate a box for selecting the object for motion tracking. You can extend the box and drag it anywhere in the video clip. To check the motion tracking object, click the “Analyze Forward” button on the bottom-right corner of the screen.
![]()
Step 4: As the object is analyzed, click the “Edit Target” button to open a new screen. Continue to change the layer to “Null Object” and click “OK.” Continue to select “Apply” and click “OK” against the pop-up menu that opens. This is how Adobe After Effects applies the motion tracker.
![]()
Part 3: Wondershare Filmora: A Comprehensive Solution to Video Editing
Do you know that there is a video editing platform that makes all video motion tracking process easy? Wondershare Filmora presents a coherent video editing system for its users with high-quality outputs. The platform integrates some of the greatest features and makes it useful for all users. Even if you are a rookie in video editing, this video editing platform can help you make the best of videos.
Start Motion Tracking For Win 7 or later(64-bit)
Start Motion Tracking For macOS 10.14 or later
Motion Tracking is possible with Wondershare Filmora, which is entirely automated. All you have to do is click a button, and the process will execute. Wondershare Filmora helps users apply different effects and track them within the videos. Instead of objects, you can increase your video motion tracking into effects and other elements.
![]()
Features of Wondershare Filmora Video Editor
To know more about this video editing platform, look into the prominent features offered by Filmora. There is much that this software provides apart from motion tracking videos. This will help you generate a better understanding of this best motion-tracking software.
Auto Beat Sync
You can synchronize your audio and videos across this automated video editor. Filmora provides an auto beat sync function that helps users create videos that can be synchronized. Smoothen your videos and make them look professional with a single click. This does not leave behind any noise or echo within the videos .
Text-to-Speech Function
Wondershare Filmora features a dedicated AI text-to-speech functionality. This helps in the automatic conversion of text into speech across the video editor. Users have to add text which will be converted to speech. In this way, creating voiceovers is not only easy but also quick.
Speed Ramping
While you can motion-track your videos, the platform also provides a speed ramping system. Adjusting the speed uniformly or through ramping is effective with Filmora, as it makes it simple to cover. You can adjust the speeds using sliders and graphs.
Part 4: Guide: Perform Paper Motion Tracking With High Quality Using Wondershare Filmora
Filmora is a popular video editing platform among video editors for motion track videos. It offers exquisite features along with a smooth and sleek interface. You can also ensure the best quality integration of motion tracking in videos with Filmora. Do you wish to learn the steps to perform motion tracking with this best motion tracking software? Worry no more because the below-given steps will help you in this matter:
Start Motion Tracking For Win 7 or later(64-bit)
Start Motion Tracking For macOS 10.14 or later
Step 1: Import Video in Filmora
To get started, launch Filmora on your device, select “New Project,” and choose the “Click here to import media” option. To proceed, add the video you want to apply motion tracking. Once the video is visible in the “Import Media” section, drag it to “Timeline.”
![]()
Step 2: Add Motion Tracking in the Video
Select the video in “Timeline” and click the “Motion Tracking” button from the “Toolbar” present above the “Timeline.” Conversely, double-click the video and choose the “Video” tab from the editing settings.
![]()
Step 3: Customize Motion Tracking and Initiate It
To enable the box customization, double-click the “Motion Tracking Box.” Drag the “Motion Tracking Box” on the moving object and cover the whole object in the box. You can also adjust the duration of motion tracking by trimming the video in the timeline. Once done, click the “Click to start Motion Track” button and wait a few moments.
![]()
Step 4: Add Elements or Effects to the Video
Next, select “OK” from the prompt window and go to the “Element” section. Choose an “Element” and drag it into “Timeline” above your video section. To adjust the element, you must double-click on it. There is no restriction on using an element, as you can add “Effects” or other things.
You need to revert to the “Motion Tracking” section and select the drop-down appearing against the option. Choose the name of your “Effect” or “Element” that you’ve applied to before. The particular motion track will be enhanced through an effect or element.
![]()
Step 5: Export Motion Tracked Video in Device
For exporting video, click the “Export” button and personalize the “Export Settings.” Finally, tap “Export” and save the video on your device.
![]()
Conclusion
This article has pointed out the prominence of motion tracking in video editing. An idea for performing video motion tracking in Adobe After Effects has been provided. The article has offered Wondershare Filmora as the ideal solution to this requirement.
You can embed the motion tracking function and perform all the processes within a few seconds. If you have an object that you want to focus on in a video, trying motion tracking is the best option for this.
How to Speed Up Video with Canva Online Tool?
Canva video speed-ups are getting popular daily, and so is the art of making viral content.

One of the crucial features that every editing software should have is the ability to adjust the video speed. This is great for those who are creating YouTube shorts or simply looking to play with the slow-motion effects in their content. Now while talking about such edits, Canva is one such name that comes to mind.
It is a popular video editor and graphic designer you probably have heard of. Canva has tons of built-in functions, accompanied by an intuitive layout that users can’t get enough of. However, in terms of things like video speed-ups, it can get a bit complicated.
That’s why today we will go through the Canva video editor in detail and figure out whether it is possible to speed up the video in Canva or not. In the end, you will also discover other alternatives that provide the same functionality without any strings attached. So, let’s get straight into the topic!
Part I. Basic Understanding of Canva
Before jumping to Canva video speed-ups, it’s best to know a little about this tool. So Canva is an online media designing tool that enables you to create amazing content without much technical knowledge. It was launched back in 2013 and, until then, has managed to empower millions of people globally.
Whether it’s image editing, CV creation, or graphic modification, Canva is the forefront of modern tools. They even have a built-in video optimization feature that lets you boost your content without compromising quality. Everything in Canva is clutter-free, and the layout of their main website is beginners friendly.
There are also tons of free templates that you can use in Canva and format according to your preferred size and needs. Besides that, Canva’s native application is now available for all major operating systems. This means you can enjoy this tool as long as you have iOS 10 or higher (<Android 4.1).
Features of Creating and Editing with Canva
Some amazing perks that you get with Filmora include:
- ✅Dozens of customizable templates
- ✅Available with its drag-and-drop layout
- ✅Ability to add custom elements and transitions
- ✅Precise graphic movement
- ✅Supports single-key shortcuts
- ✅Cut and trim access
- ✅On-site recording
- ✅Up-loadable third-party content
- ✅ Mobile phone compatibility
- ✅Wide range of download formats
Part II. How to Speed Up a Video in Canva?
Managing video duration on your preferred domain is so crucial these days, mainly because of our smaller attention spans. This is why you should be looking to change video speed in Canva as soon as you get your hands on the project. Unfortunately, at the time of writing, there are no known features in which you can speed up the video in Canva. However, there are some alternative methods for archiving sped-up videos.
An Ultimate Guide to Speed Up a Canva Video

Step1Create a New Video Project with Canva
- Head over to Canva’s official webpage and open a new video project through the “Create“ button in the top right corner.

Step2Upload Your Speed Up Canva Video on the Console
- Now, you can either upload your video project into the console through the “Upload“ tab or use the provided video templates from the “Videos“ section.

- Once that’s done, drag and drop your clip on the timeline and adjust it according to your requirements.

Hit preview once you are comfortable with video positioning
Step3Download the Non-speed Up Video in Canva
After previewing the clip, you will soon realize that your video is going too slow and needs to be adjusted. Unfortunately, no feature as of right now could directly fix the issue. It needs to be revamped in a third-party program requiring video download.
- To download the original video in Canva, move your cursor to the top and select the “share“ button.

- Before you download the file, make sure that you have the MP4 format selected.

Step4Use Third-Party Software (Eizgif) to Change Video Speed In Canva
- Once you’ve downloaded your video file onto the system, open a new browser tab and search for Eizgif (or related speed-up video in the Canva tool). Now upload the same video on the given window.

- After the clip has been uploaded, a new tab will open up. Here you will find an option named “multiplier.” Changing its value from greater than one will make your video move fast.

- Adjustust the desired multiplier value and select “change video speed.”

Eizgif also gives you the freedom to adjust sound, if your video has any
Step5Re-upload the Speed-Up Video In Canva Editor
- When you feel like your video has a perfect speed, save it in your system directory.

- Now re-upload your changed video speed in Canva and drag it onto the timeline through the “Videos“ tab.

- Review the clip and notice the enhanced video speed from the Canva editor when it’s done.

So technically, you can change video speed in Canva, but the process can be time-consuming, especially for starters.
Part III. Wondershare Filmora - The Best All-in-one Video Speed-Up Alternative to Canva
Canva is no doubt a great video and graphic editor, but there are a handful of features that it needs to provide. For once, it can’t store files without internet access. Similarly, you need third-party applications even to use the most basic features, such as video speed-ups.
To work on these downsides, dozens of alternatives are available on the market; one of the better ones is Wondershare Filmora . It’s a full-proof video and audio editing app with tons of customizations under its belt. Individuals can use this powerful tool to create unique media content.
Everything is seamless in Filmora, and it’s supported on all major operating systems. There is no technical jargon in its application, and even beginners will be able to enjoy its interface.
Highlights of Filmora Compared to Canva Video Speed-Ups
- ✅Work on your speed-up projects without an internet connection
- ✅Not limited to download formats
- ✅Lack of template limitation on the free version
- ✅Beginner to advanced level UI
Free Download For Win 7 or later(64-bit)
Free Download For macOS 10.14 or later
How to Speed Up a Video Using Filmora?
Step1Create a New Project With Filmora Video Editor
First, if you don’t have it already, download the latest version of this tool from the web .
Once it’s installed, open the app and upload your new project straight into its console.

Step2Change the Speed Or Duration of Your Clip
- Now that your video is in the timeline, right-click it and select the custom “Speed & duration“ button.

- In the new window, change the speed value greater than 1, just like you did in the case of Eizgif. You can also adjust the speed slider for better coverage.

- After finishing, click “Ok“ and preview your clip to see the fast video effect in-placed.
BONUS STEPEnable the Speed Ramping Effects
Speed ramp is a unique feature in Filmora which allows you to apply acceleration or deceleration at any point in your clip, creating unique effects. To use these settings, you need to:
- Select your timeline video and choose the “Speed“ button on the bottom bar. After that, click on “Speed Ramping.”

- You can now apply multiple speed ramping effects based on your preference. Select it (for example, flash-out effect), and it will be used for your whole video.

Step3Export the Final Speed-Up Video
- After changing the video speed in Filmora, save it on your desktop. For that, move to the top left corner and select “File<Save Project.”

- You can also use the “Export“ option to move it to a local folder.
Conclusion
This was our two cents on how you can speed up a video on Canva. In the end, speeding up a video is a great way to keep your audience engaged in video production. It lets you make your content short and precise or introduce dramatic effects. If you want to use such features in your videos, then Filmora is a great way to start. Not only do you get fast video effects, but you can also save them without any internet access. So, give it a try and see the difference yourself!
Free Download For macOS 10.14 or later
How to Speed Up a Video Using Filmora?
Step1Create a New Project With Filmora Video Editor
First, if you don’t have it already, download the latest version of this tool from the web .
Once it’s installed, open the app and upload your new project straight into its console.
Step2Change the Speed Or Duration of Your Clip
- Now that your video is in the timeline, right-click it and select the custom “Speed & duration“ button.
- In the new window, change the speed value greater than 1, just like you did in the case of Eizgif. You can also adjust the speed slider for better coverage.
- After finishing, click “Ok“ and preview your clip to see the fast video effect in-placed.
BONUS STEPEnable the Speed Ramping Effects
Speed ramp is a unique feature in Filmora which allows you to apply acceleration or deceleration at any point in your clip, creating unique effects. To use these settings, you need to:
- Select your timeline video and choose the “Speed“ button on the bottom bar. After that, click on “Speed Ramping.”
- You can now apply multiple speed ramping effects based on your preference. Select it (for example, flash-out effect), and it will be used for your whole video.
Step3Export the Final Speed-Up Video
- After changing the video speed in Filmora, save it on your desktop. For that, move to the top left corner and select “File<Save Project.”
- You can also use the “Export“ option to move it to a local folder.
Conclusion
This was our two cents on how you can speed up a video on Canva. In the end, speeding up a video is a great way to keep your audience engaged in video production. It lets you make your content short and precise or introduce dramatic effects. If you want to use such features in your videos, then Filmora is a great way to start. Not only do you get fast video effects, but you can also save them without any internet access. So, give it a try and see the difference yourself!
Best Tools To Create Blend Image Collage
Best Tools To Create Blend Image Collage
An easy yet powerful editor
Numerous effects to choose from
Detailed tutorials provided by the official channel
While creating a photo collage, the blending of images needs to be perfect so that the final outcome is impressive. Though creating a collage may sound as simple as placing one image next to the other, it requires thoughtful placing and positioning of the images along with additional editing to create a visually impressive frame. To help you with this task, a good collage maker can be used.
Though there are several tools making tall claims, not all deliver what they promise. So, to make your tool selection task a little easier, we have shortlisted the best ones in the following parts.
In this article
01 [Top blended collage maker tool](#Part 1)
02 [Best tool for stock media and video editing- Wondershare Filmora](#Part 2)
Part 1 Top blended collage maker tool
A roundup of the top 5 tools to create blended photo collage is given below.
01PicMonkey
This is a free collage-making tool by Shutterstock that can let you blend images to create wonderful freestyle as well as grid-based collages. If needed, you can even add videos to the collage.
Key features
● Create freestyle grid-based blend collage using images and videos.
● Wide range of layouts to choose from.
● Offer flexible resizing of the cells for proper blending of the images.
● Support drag-and-drop.
● This photo blend collage maker allows adding graphics, text, effects, and other elements.
● Comes with a free stock of photos and videos.

02Photo Collage Maker
This is an integrated mask tool that supports blending your images to create an impressive collage.
Key features
● Simple and intuitive interface.
● Allows creating blend collage in a few simple steps.
● More than 100 templates in different themes and designs are available.
● Enhance the collage by adding masks, clip-arts, captions, and other effects.
● Created collage can be saved in all key image formats like JPEG, PNG, GIF, and TIFF.

03Blend Collage Free
Developed by KDN Soft this is a free Android-based blend collage apk for blending images perfectly and creating an interesting collage.
Key features
● Allows to blend images and create a collage in HD quality.
● Collage can be shared over Instagram, Facebook, and other sites.
● Simple interface that makes the process easy and quick.
● Add images from your device, capture them using the camera or even use the stock collection at the app.
● Decent editing options supported.

04Photo Blend
With a 3.6 rating, this is a decent blend collage app for iOS devices to blend images and create a collage.
Key features
● Blend and add images to create an impressive collage.
● Create a double-exposure effect by blending images.
● A wide range of filters is available to enhance the collage.
● Created collage can be shared with dear ones.

05Blend Collage Photo Editor
To create an impressive collage with a blending effect, this is a good tool to consider.
Key features
● Free to use tool for creating blend collage.
● Comes with more than 50 customized shapes to crop the images.
● Support multiple filters to be used on images.
● Allows cropping the images free-hand as well.
● Save the created collage on the system or share it over Twitter, Facebook, and other sites.

Part 2 Best tool for stock media and video editing- Wondershare Filmora
A lot of blend-collage makers also allow adding videos, and in such situations, the need for a good video editing tool may also arise to edit the video before adding. One such excellent tool that we recommend here is Wondershare Filmora. This is a Windows and Mac-based software that supports all basic as well as advanced video editing features. Files in almost all formats can be quickly processed using the tool.
Additionally, if you are not able to find your choice of image or video, Wondershare Filmora is a great place to checkout as it has a huge collection of media files in an array of categories and themes. You are surely going to get something of your choice and requirement.
There are several other useful features of the software like split-screen-video making, advanced editing, audio editing, and more. Check out more in detail about the software at this this link

● Key Takeaways from This Episode →
● Blend collage allows you to blend your images for creating a smooth and interesting-looking collage.
● Several online tools, desktop programs, and apps are available to create a photo blend collage.
● To get a collection of media files and edit your video professionally, Wondershare Filmora works as the best software.
While creating a photo collage, the blending of images needs to be perfect so that the final outcome is impressive. Though creating a collage may sound as simple as placing one image next to the other, it requires thoughtful placing and positioning of the images along with additional editing to create a visually impressive frame. To help you with this task, a good collage maker can be used.
Though there are several tools making tall claims, not all deliver what they promise. So, to make your tool selection task a little easier, we have shortlisted the best ones in the following parts.
In this article
01 [Top blended collage maker tool](#Part 1)
02 [Best tool for stock media and video editing- Wondershare Filmora](#Part 2)
Part 1 Top blended collage maker tool
A roundup of the top 5 tools to create blended photo collage is given below.
01PicMonkey
This is a free collage-making tool by Shutterstock that can let you blend images to create wonderful freestyle as well as grid-based collages. If needed, you can even add videos to the collage.
Key features
● Create freestyle grid-based blend collage using images and videos.
● Wide range of layouts to choose from.
● Offer flexible resizing of the cells for proper blending of the images.
● Support drag-and-drop.
● This photo blend collage maker allows adding graphics, text, effects, and other elements.
● Comes with a free stock of photos and videos.
02Photo Collage Maker
This is an integrated mask tool that supports blending your images to create an impressive collage.
Key features
● Simple and intuitive interface.
● Allows creating blend collage in a few simple steps.
● More than 100 templates in different themes and designs are available.
● Enhance the collage by adding masks, clip-arts, captions, and other effects.
● Created collage can be saved in all key image formats like JPEG, PNG, GIF, and TIFF.
03Blend Collage Free
Developed by KDN Soft this is a free Android-based blend collage apk for blending images perfectly and creating an interesting collage.
Key features
● Allows to blend images and create a collage in HD quality.
● Collage can be shared over Instagram, Facebook, and other sites.
● Simple interface that makes the process easy and quick.
● Add images from your device, capture them using the camera or even use the stock collection at the app.
● Decent editing options supported.
04Photo Blend
With a 3.6 rating, this is a decent blend collage app for iOS devices to blend images and create a collage.
Key features
● Blend and add images to create an impressive collage.
● Create a double-exposure effect by blending images.
● A wide range of filters is available to enhance the collage.
● Created collage can be shared with dear ones.
05Blend Collage Photo Editor
To create an impressive collage with a blending effect, this is a good tool to consider.
Key features
● Free to use tool for creating blend collage.
● Comes with more than 50 customized shapes to crop the images.
● Support multiple filters to be used on images.
● Allows cropping the images free-hand as well.
● Save the created collage on the system or share it over Twitter, Facebook, and other sites.
Part 2 Best tool for stock media and video editing- Wondershare Filmora
A lot of blend-collage makers also allow adding videos, and in such situations, the need for a good video editing tool may also arise to edit the video before adding. One such excellent tool that we recommend here is Wondershare Filmora. This is a Windows and Mac-based software that supports all basic as well as advanced video editing features. Files in almost all formats can be quickly processed using the tool.
Additionally, if you are not able to find your choice of image or video, Wondershare Filmora is a great place to checkout as it has a huge collection of media files in an array of categories and themes. You are surely going to get something of your choice and requirement.
There are several other useful features of the software like split-screen-video making, advanced editing, audio editing, and more. Check out more in detail about the software at this this link
● Key Takeaways from This Episode →
● Blend collage allows you to blend your images for creating a smooth and interesting-looking collage.
● Several online tools, desktop programs, and apps are available to create a photo blend collage.
● To get a collection of media files and edit your video professionally, Wondershare Filmora works as the best software.
Also read:
- In 2024, Tutorial Guides for Video Maker with Song
- 2024 Approved Get 15 Absolutely-Free LUTs From This Article as Well as Get an Insight on How Cinematic LUTs Affect Your Film
- New Best 15 Subtitle Apps 2023 Windows, Mac, iPhone, Android & Online for 2024
- Ideas That Will Help You Out in Making Transparent Image
- Updated Best iPhone LUTs App to Use for 2024
- In 2024, How to Become a Youtuber?
- How to Make Canva Collages for 2024
- 2024 Approved Do You Want to Know About the DaVinci Resolve Adjustment Layer? Read This Article to Learn How to Use an Adjustment Layer (Clip) in DaVinci Resolve to Edit Videos
- Updated 2024 Approved How To Create Transparent Background On Picsart
- New Minecraft Pixel Art A Complete Guide for Die-Hard Fans
- New In 2024, Top 12 AI Video Generators to Pick
- New Create a Transparent Image in Minimal Steps with Right Tools. Try Out Best Transparent Maker and Know How to Use Them. In No Time, the Desired Image Will Be Right There with You
- Best 15 Subtitle Apps 2023 Windows, Mac, iPhone, Android & Online for 2024
- Updated 2024 Approved Speed Up/Down Videos in VLC
- Updated Applying the Effect of Camera Shake in Video Creation
- Updated In 2024, How to Create Vintage Film Effect 1920S
- Updated Slow Down the GIF to Emphasize Details Better. To Do so, Read This Guide and Learn to Use the Best Platforms for Slow-Motion GIFs
- Updated Best 8 Augmented Reality Video Games
- 2024 Approved Powerpoint Supported Video Format and User Tips
- Updated 2024 Approved Ideas That Will Help You Out in Making Transparent Image
- New 2024 Approved Boost the Pace of Your Instagram Reels Videos with These Simple Tricks
- New How to Livestream Zoom on Facebook?
- New 2024 Approved How to Add Expression in After Effects
- New In 2024, Applying the Effect of Camera Shake in Video Creation
- New 6 Tips for Your First Facebook Ads
- Updated 2024 Approved Cropping a Video in Final Cut Pro Step by Step
- Updated Top 5 Best Video Denoisers
- Updated How to Create An Eye-Catching Intro Videos with InVideo for 2024
- Updated 11 Ways To Speed Up A Video On iPhone for 2024
- Updated A Guide to Use Distortion Effect in Premeiere Pro for 2024
- The Necessity of the Creation of Video Content for Social Media Has Urged Many Editing Software to Come Out on the Market. We Have Reviewed some, Free of Them in This Article for You
- New 2024 Approved Deep Learning of AI Video Recognition
- New Best 31 Video Trimmers for Computer, Phone and Online
- How to Make Double Exposure Effect in Filmora
- Updated How To Polish Your Music Video Edits Using Filmora
- 2024 Approved How Can You Import and Adjust the Video Clips on Wondershare Filmora?
- What Do You Prefer More, MKV File Format or MOV? Increase Your Knowledge and Learn More About MKV Format by Ready the Detailed Article Below
- New In 2024, Easily Combine Videos and Audios with 5 Simple Online Tools
- New Looking for a Video Editor Where You Can Edit Your Tutorial and Training Videos? Camtasia Is a Great Choice. But Is It the Best Video Editor Available? Find Out From Our Camtasia Review
- 2024 Approved The Top 10 Effective SRT Editors Online
- Know How You Can Get some Cool Discord Animated Icons Through some Simple Steps. Presenting the Latest Tool to Get Animated PFP and Logos Instantly for Discord
- The Craziest 10 AI Editors Youve Seen
- VN Editor A Prominent Option for Adding Luts for Video Editing
- Updated Boost Your Spirit Creating Motivational Status Videos for 2024
- How to Retrieve deleted photos on Google Pixel Fold
- Possible solutions to restore deleted messages from Nokia 105 Classic
- In 2024, 6 Methods to Mirror Apple iPhone 11 Pro to your Windows PC | Dr.fone
- Complete Review & Guide to Techeligible FRP Bypass and More For Infinix GT 10 Pro
- Does Xiaomi Mix Fold 3 support MKV video files?
- How to recover old videos from your OnePlus Nord 3 5G
- How to Transfer Data After Switching From Samsung Galaxy A34 5G to Latest Samsung | Dr.fone
- How To Teleport Your GPS Location On Infinix Note 30? | Dr.fone
- How To Stream Anything From Tecno Camon 20 Pro 5G to Apple TV | Dr.fone
- How to Fix My Tecno Spark 20C Location Is Wrong | Dr.fone
- In 2024, Best Pokemons for PVP Matches in Pokemon Go For Apple iPhone 6s Plus | Dr.fone
- In 2024, Hassle-Free Ways to Remove FRP Lock on Infinix Hot 40 Pro Phones with/without a PC
- In 2024, Does Airplane Mode Turn off GPS Location On Poco C55? | Dr.fone
- In 2024, Lock Your Poco F5 5G Phone in Style The Top 5 Gesture Lock Screen Apps
- Simple ways to get lost videos back from Itel S23+
- How to Send and Fake Live Location on Facebook Messenger Of your Tecno Camon 30 Pro 5G | Dr.fone
- In 2024, Forgot Locked iPhone 11 Pro Password? Learn the Best Methods To Unlock | Dr.fone
- How To Transfer Data From Apple iPhone XR To Other iPhone 13 Pro Max devices? | Dr.fone
- Ultimate guide to get the meltan box pokemon go For Motorola Moto G84 5G | Dr.fone
- 5 Quick Methods to Bypass Honor Play 40C FRP
- New Beginners Tutorial Stream to Facebook With OBS Studio for 2024
- In 2024, 4 Ways to Sync Contacts from Apple iPhone 6s to iPad Easily | Dr.fone
- Simple Solutions to Fix Android SystemUI Has Stopped Error For Realme C67 4G | Dr.fone
- How to Recover Apple iPhone 12 Pro Max Data From iOS iTunes Backup? | Dr.fone
- Tips and Tricks for Setting Up your Realme GT Neo 5 Phone Pattern Lock
- In 2024, Unova Stone Pokémon Go Evolution List and How Catch Them For Vivo X100 | Dr.fone
- In 2024, How To Unlock Cricket Apple iPhone 13 Pro for Free
- In 2024, Change Location on Yik Yak For your Poco C51 to Enjoy More Fun | Dr.fone
- Troubleshooting Error Connecting to the Apple ID Server On iPhone XR
- Best 3 Infinix Note 30 VIP Emulator for Mac to Run Your Wanted Android Apps | Dr.fone
- In 2024, How to Intercept Text Messages on Apple iPhone 8 | Dr.fone
- In 2024, 5 Ways To Teach You To Transfer Files from Samsung Galaxy F04 to Other Android Devices Easily | Dr.fone
- How to Cast Infinix Zero 30 5G to Computer for iPhone and Android? | Dr.fone
- In 2024, 3 Effective Methods to Fake GPS location on Android For your Samsung Galaxy F14 5G | Dr.fone
- In 2024, How to Unlock SIM Card on Nokia C210 online without jailbreak
- 3 Ways to Change Location on Facebook Marketplace for Honor Magic Vs 2 | Dr.fone
- What Pokémon Evolve with A Dawn Stone For Realme C53? | Dr.fone
- In 2024, A Comprehensive Guide to iCloud Unlock From Apple iPhone 14 Pro Online
- In 2024, Top 9 Samsung Galaxy S24 Monitoring Apps for Parental Controls | Dr.fone
- Bypassing Google Account With vnROM Bypass For Infinix Note 30i
- How to Bypass Google FRP Lock on Samsung Galaxy A34 5G Devices
- In 2024, Does Life360 Notify When You Log Out On Tecno Camon 20 Premier 5G? | Dr.fone
- In 2024, Top 7 Skype Hacker to Hack Any Skype Account On your Realme GT 3 | Dr.fone
- Title: Updated How to Add Text Animation Online
- Author: Chloe
- Created at : 2024-05-20 03:37:49
- Updated at : 2024-05-21 03:37:49
- Link: https://ai-editing-video.techidaily.com/updated-how-to-add-text-animation-online/
- License: This work is licensed under CC BY-NC-SA 4.0.
