:max_bytes(150000):strip_icc():format(webp)/MorningShow-aed160f9cfd448cc8034b23bb3073314.jpg)
Updated How to Add Text Effects in Adobe Premiere Pro, In 2024

How to Add Text Effects in Adobe Premiere Pro?
If you want to edit your raw video footage and turn ordinary clips into eye-catching videos, you will need a professional video editor. Adobe Premiere Pro is the most commonly used premium video editor that most professionals prefer. When it comes to editing videos, text effects play a major role along with video effects and animations.
If you are new to Adobe Premiere Pro, you will experience a steep learning curve. This is because the user interface is specially designed for professional video editors. Therefore, you might not get Premiere Pro text effects readily available. In this article, we will illustrate how you can add Adobe Premiere Pro text effects to your video project. We will also state the best alternative to Premiere Pro to add stunning text effects easily.
Part 1. Steps to Add Text Effects to Adobe Premiere
Text effects are an essential part of videos to enhance the video content immensely. You can add opening titles and end credits with text effects and animations. You can display the dialogues on the screen as subtitles. Showing location information and shooting date through text effects is quite regular these days. Besides, the use of lower thirds for social media promotion in videos is common. Without further ado, let us look at the steps to add Premiere text effects.
Step1 Add Your Text
First of all, you need to import your video and add text to it and apply different text effects. Here we are starting from scratch for better illustration. Go to Window> Essential Graphics> Text Tool(T). Type your text as per your requirements. You will notice a new text layer appearing under Edit tab.
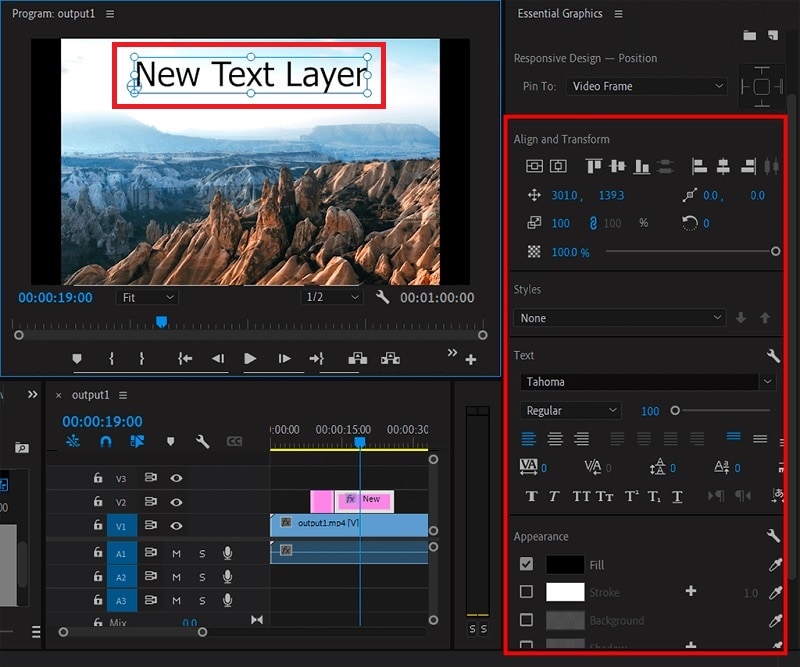
Select the text layer and you will see all the properties that you can tweak. For example, go to Align and Transform section to reposition and resize your text properly. Go to Text section to change the style of the text. Similarly, there is an Appearance section to adjust color, shadow, and much more.
Step2 Apply Pre-Animated Template
Go to Graphics> Essential Graphics and browser through the title templates available to match your requirements. Once you have selected one title template, drag and drop it into your timeline above your video clip.
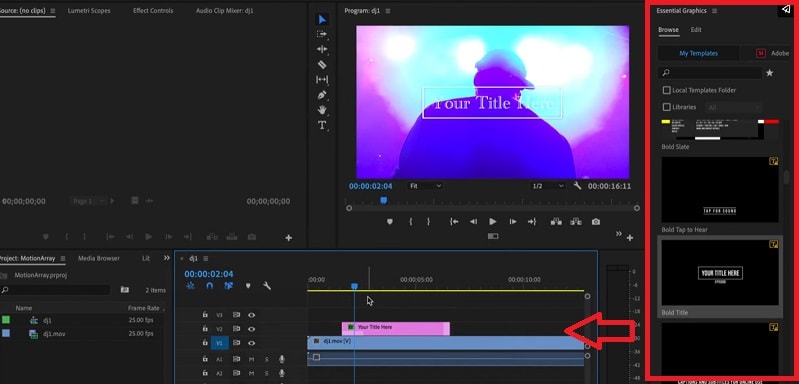
Double-click on the text to edit the content and type your title. Go to Essential Graphics panel and customize the text effect as per your preference. You can also choose the available elements included in the template to enhance the text effects as you think fit.
Step3 Edit the Text Effect and Animation
Select the text layer on your timeline to check out the keyframes applied in the template. Go to Effects Control panel and open Keyframe box by dragging it to the right. Adjust the keyframe to speed up or slow down the animation.

Bring the keyframes closer or spread them apart respectively. You can also adjust Velocity Controls present under different text properties as per the speed requirements.
Part 2. Alternative Way to Make Text Effects
If you are new to Adobe Premiere Pro, you will find title effects Premiere Pro difficult to add and edit as per your requirements. It is very common for amateur video editors to look for an easy alternative to Premiere Pro. We recommend Wondershare Filmora as the best alternative to Adobe Premiere text effects.
Filmora has a super intuitive user interface that is suitable for everyone including those who do not have prior video editing experience. There are more text effects and animations available that you can customize to get the desired effect. Here are the steps to add text effects to your video on Filmora.
Free Download For Win 7 or later(64-bit)
Free Download For macOS 10.14 or later
Step1 Download and install Wondershare Filmora and it is available for both Windows and macOS. Launch the application and click on New Project on the welcome screen.

Step2 Drag and drop your video clips under Project Media folder and then onto the timeline. Go to Titles and you will see different categories of text effects and templates.

Step3 Select a template whichever you think is perfect for your project and drop it on the timeline. Adjust its position on the timeline as per where you want it to appear. Double-click on it to edit the title and type in your text. Similarly, you can reposition the text from Viewer as per your need.
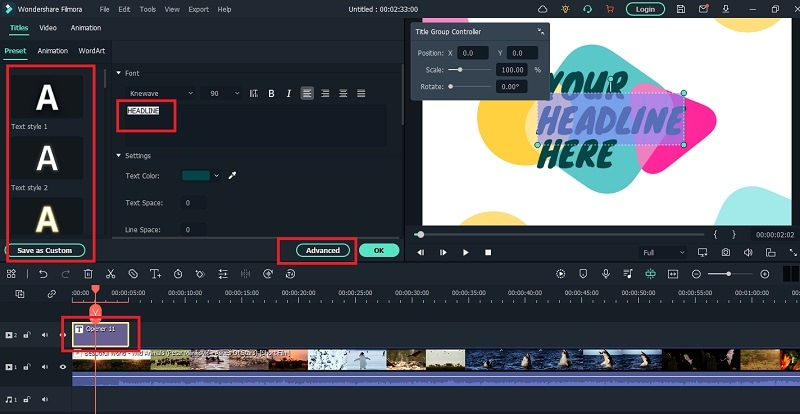
Select the text style as well as adjust fonts and settings to get different styles for your texts. There is also an Advanced section available for detailed editing and getting the desired text effect.
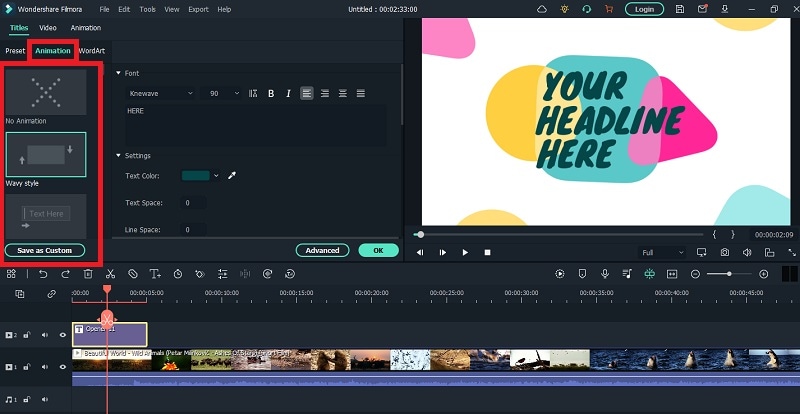
Step4 You can animate the texts in your video from Animation section. Choose from the animation presets to animate individual text in the video. Besides, you can also add keyframes and animate the text as per your preference.
Part 3. Related FAQs on Adobe Premiere Pro
1. How do you make text look good in Premiere Pro?
There are several steps you need to take to make text look good in Premiere Pro. First of all, the color of the text should be in contrast to the background. You can add a rectangle highlighter in the background. Experiment with font and text of the text. Apply a text effect from the different templates available. Customize the effect to get the desired result.
2. How do you add typing effects in Premiere?
Add your text to your video so that a text layer appears on the timeline. Animate the text Effects> Video Effects> Liner Wipe and double-click to get the typing effect. Tweak the parameters like transition completion, wipe angle, and others to smoothen out the animation. Draw a cursor icon using rectangle tool and animation it to move with the text using keyframes.
3. How do I open text effects controls in Premiere Pro?
Select the text layer from the timeline of the project. From the main menu, go to Windows> Effects Control option to open effect controls for text. Otherwise, you can directly go to Effects Control tab located below the menu bar after selecting your text layer.
The Bottom Line
Adding text effects in Premiere Pro can be slightly overwhelming for an amateur video editor who does not have enough experience with Premiere Pro. We have stated the simple steps to apply Premiere Pro text effects to your video project. However, we recommend Wondershare Filmora as the best and the easiest alternative to Premiere Pro where you get more text effects and add them instantly and effortlessly.
Free Download For macOS 10.14 or later
Step1 Download and install Wondershare Filmora and it is available for both Windows and macOS. Launch the application and click on New Project on the welcome screen.

Step2 Drag and drop your video clips under Project Media folder and then onto the timeline. Go to Titles and you will see different categories of text effects and templates.

Step3 Select a template whichever you think is perfect for your project and drop it on the timeline. Adjust its position on the timeline as per where you want it to appear. Double-click on it to edit the title and type in your text. Similarly, you can reposition the text from Viewer as per your need.

Select the text style as well as adjust fonts and settings to get different styles for your texts. There is also an Advanced section available for detailed editing and getting the desired text effect.
Step4 You can animate the texts in your video from Animation section. Choose from the animation presets to animate individual text in the video. Besides, you can also add keyframes and animate the text as per your preference.

Part 3. Related FAQs on Adobe Premiere Pro
1. How do you make text look good in Premiere Pro?
There are several steps you need to take to make text look good in Premiere Pro. First of all, the color of the text should be in contrast to the background. You can add a rectangle highlighter in the background. Experiment with font and text of the text. Apply a text effect from the different templates available. Customize the effect to get the desired result.
2. How do you add typing effects in Premiere?
Add your text to your video so that a text layer appears on the timeline. Animate the text Effects> Video Effects> Liner Wipe and double-click to get the typing effect. Tweak the parameters like transition completion, wipe angle, and others to smoothen out the animation. Draw a cursor icon using rectangle tool and animation it to move with the text using keyframes.
3. How do I open text effects controls in Premiere Pro?
Select the text layer from the timeline of the project. From the main menu, go to Windows> Effects Control option to open effect controls for text. Otherwise, you can directly go to Effects Control tab located below the menu bar after selecting your text layer.
The Bottom Line
Adding text effects in Premiere Pro can be slightly overwhelming for an amateur video editor who does not have enough experience with Premiere Pro. We have stated the simple steps to apply Premiere Pro text effects to your video project. However, we recommend Wondershare Filmora as the best and the easiest alternative to Premiere Pro where you get more text effects and add them instantly and effortlessly.
Color Correction Basics (S-LOG Footage)
S-Log is a gamma curve optimized for digital cameras to maximize the image sensor’s performance. Although these videos may look flat and washed out, they contain lots of color information. Even better, video creators can use color correction to edit the S-Log videos and make them look as natural as possible. That’s what this article is all about.
How to Color-Correct an S-Log Footage
This tutorial assumes that you already have an S-Log footage. If not, you can record S-Log footage using most Canon, Sony, and Panasonic cameras.

Let’s get to the steps!
Step1 Adjust the color settings
Start by adding your video to the timeline on Wondershare Filmora and then double-click the video track. Then, click on the Color tab before tapping Advanced.
Free Download For Win 7 or later(64-bit)
Free Download For macOS 10.14 or later

Step2 Read and study the histogram
Now you’ll see the Advanced Color Correction pop-up window. Here, you’ll see a histogram with the brightest point on the right and the darkest point on the left. From our example, you can see that the video has more dark pixels than bright ones. Horizontally, the histogram shows you how many pixels are in a certain range of brightness.

Step3 Adjust the image colors
Once you’ve understood the histogram, look for pure black and white parts on the video clip. For example, in this video, you can see that the roofs are pure black and the boat at the bottom-right corner is pure white.

After finding the white and black parts in the video, go to the Light section, then adjust the Highlights to see if you can get a pure white on the boat. If the boat or any other image of your choice doesn’t look pure white, increase the Whites slide to make it whiter.

Now adjust the Shadows settings to reduce the effect and make the roofs look closer to pure black. If you want the roofs to look darker, drag the Blacks slider to the left.
Pro tip: Ensure that the darkest and brightest points don’t cross the broken lines on the edge, or the video will start losing details.
Step4 Adjust the color saturation
Does your video still look a little flat? Probably yes! In that case, click the Color section and adjust the Saturation slider to the right to make the video less flat. Saturation simply means how colorful a video clip is to the viewer. Apart from the color saturation, you can also adjust the Vibrance to make your video objects look more colorful.

Step5 Preview and compare the video
Now it’s time to check and compare the results. To make it easier, click the Eye icon at the top-right corner to switch between the original S-Log video and the color-corrected clip. You can also tap the AB icon and choose Split View-Left/Right to view the clips in the side-by-side mode.

Summary
I guess that was easy, right? Up to this juncture, you should be able to perform basic color correction on your video using Wondershare Filmora. Remember, this video editor packs many other editing tools to bring out your creativity. Give it a try!
Free Download For macOS 10.14 or later

Step2 Read and study the histogram
Now you’ll see the Advanced Color Correction pop-up window. Here, you’ll see a histogram with the brightest point on the right and the darkest point on the left. From our example, you can see that the video has more dark pixels than bright ones. Horizontally, the histogram shows you how many pixels are in a certain range of brightness.

Step3 Adjust the image colors
Once you’ve understood the histogram, look for pure black and white parts on the video clip. For example, in this video, you can see that the roofs are pure black and the boat at the bottom-right corner is pure white.

After finding the white and black parts in the video, go to the Light section, then adjust the Highlights to see if you can get a pure white on the boat. If the boat or any other image of your choice doesn’t look pure white, increase the Whites slide to make it whiter.

Now adjust the Shadows settings to reduce the effect and make the roofs look closer to pure black. If you want the roofs to look darker, drag the Blacks slider to the left.
Pro tip: Ensure that the darkest and brightest points don’t cross the broken lines on the edge, or the video will start losing details.
Step4 Adjust the color saturation
Does your video still look a little flat? Probably yes! In that case, click the Color section and adjust the Saturation slider to the right to make the video less flat. Saturation simply means how colorful a video clip is to the viewer. Apart from the color saturation, you can also adjust the Vibrance to make your video objects look more colorful.

Step5 Preview and compare the video
Now it’s time to check and compare the results. To make it easier, click the Eye icon at the top-right corner to switch between the original S-Log video and the color-corrected clip. You can also tap the AB icon and choose Split View-Left/Right to view the clips in the side-by-side mode.

Summary
I guess that was easy, right? Up to this juncture, you should be able to perform basic color correction on your video using Wondershare Filmora. Remember, this video editor packs many other editing tools to bring out your creativity. Give it a try!
Free Download For macOS 10.14 or later

Step2 Read and study the histogram
Now you’ll see the Advanced Color Correction pop-up window. Here, you’ll see a histogram with the brightest point on the right and the darkest point on the left. From our example, you can see that the video has more dark pixels than bright ones. Horizontally, the histogram shows you how many pixels are in a certain range of brightness.

Step3 Adjust the image colors
Once you’ve understood the histogram, look for pure black and white parts on the video clip. For example, in this video, you can see that the roofs are pure black and the boat at the bottom-right corner is pure white.

After finding the white and black parts in the video, go to the Light section, then adjust the Highlights to see if you can get a pure white on the boat. If the boat or any other image of your choice doesn’t look pure white, increase the Whites slide to make it whiter.

Now adjust the Shadows settings to reduce the effect and make the roofs look closer to pure black. If you want the roofs to look darker, drag the Blacks slider to the left.
Pro tip: Ensure that the darkest and brightest points don’t cross the broken lines on the edge, or the video will start losing details.
Step4 Adjust the color saturation
Does your video still look a little flat? Probably yes! In that case, click the Color section and adjust the Saturation slider to the right to make the video less flat. Saturation simply means how colorful a video clip is to the viewer. Apart from the color saturation, you can also adjust the Vibrance to make your video objects look more colorful.

Step5 Preview and compare the video
Now it’s time to check and compare the results. To make it easier, click the Eye icon at the top-right corner to switch between the original S-Log video and the color-corrected clip. You can also tap the AB icon and choose Split View-Left/Right to view the clips in the side-by-side mode.

Summary
I guess that was easy, right? Up to this juncture, you should be able to perform basic color correction on your video using Wondershare Filmora. Remember, this video editor packs many other editing tools to bring out your creativity. Give it a try!
Free Download For macOS 10.14 or later

Step2 Read and study the histogram
Now you’ll see the Advanced Color Correction pop-up window. Here, you’ll see a histogram with the brightest point on the right and the darkest point on the left. From our example, you can see that the video has more dark pixels than bright ones. Horizontally, the histogram shows you how many pixels are in a certain range of brightness.

Step3 Adjust the image colors
Once you’ve understood the histogram, look for pure black and white parts on the video clip. For example, in this video, you can see that the roofs are pure black and the boat at the bottom-right corner is pure white.

After finding the white and black parts in the video, go to the Light section, then adjust the Highlights to see if you can get a pure white on the boat. If the boat or any other image of your choice doesn’t look pure white, increase the Whites slide to make it whiter.

Now adjust the Shadows settings to reduce the effect and make the roofs look closer to pure black. If you want the roofs to look darker, drag the Blacks slider to the left.
Pro tip: Ensure that the darkest and brightest points don’t cross the broken lines on the edge, or the video will start losing details.
Step4 Adjust the color saturation
Does your video still look a little flat? Probably yes! In that case, click the Color section and adjust the Saturation slider to the right to make the video less flat. Saturation simply means how colorful a video clip is to the viewer. Apart from the color saturation, you can also adjust the Vibrance to make your video objects look more colorful.

Step5 Preview and compare the video
Now it’s time to check and compare the results. To make it easier, click the Eye icon at the top-right corner to switch between the original S-Log video and the color-corrected clip. You can also tap the AB icon and choose Split View-Left/Right to view the clips in the side-by-side mode.

Summary
I guess that was easy, right? Up to this juncture, you should be able to perform basic color correction on your video using Wondershare Filmora. Remember, this video editor packs many other editing tools to bring out your creativity. Give it a try!
Splitting Video Into Frames with the FFmpeg [Step by Step]
FFmpeg is the particular framework that is leading in the multimedia industry. It is a complete solution that runs on multiple platforms for converting, recording and streaming videos and audios. FFmpeg allows you to encode, decode, filter, mux, demux, and transcode much better than humans. FFmpeg runs, complies, and tests using the FATE infrastructure on different operating systems.
It includes Mac OS X, Linux, Windows, Solaris and BSDs. This framework works in a number of built-in environment configurations and architectures of the types of machinery from a technical point of view. It is the appropriate solution for the developers for their applications, and the end-users are similar. You can share the codes at the maximum level in the parts of the FFmpeg. Online support is available for your assistance.
In this article, you will learn about splitting the Video into the frames in FFmpeg and mentioning the easy option for doing the same task in a few seconds by Wondershare Filmora.
How can you split the video clips into frames by using FFmpeg?
There is 7 number of ways, or you can say 7 functions are available splitting the video clips in FFmpeg that are as follows:
- Splitting Video into frames
- Splitting Video by their sizes
- Dividing the videos into the parts with the same duration
- Split the videos by width and in the horizontal direction
To split the Video in FFmpeg, you need to use the correct command to fulfil all your tasks. It helps in extracting the particular frames from your Video. These are the files of the images that are making the whole Video. The working of this command is the following:
Step 1:
The first step is opening the terminal in Mac operating system. Enter the command below for navigating the folder of pictures and videos. Must change the directory whenever you are in the terminal. First, change the location wherever the video file is in your system. Remember that you run these commands in the same folder where the source of the videos is.
Cd ~/Videos and press enter.

Step 2:
This specific command is for splitting the videos into frames. It saves every image separately as the thumbnail file. FFmpeg -I video.mp4 thumb%04d.jpg -hide_banner
splitting is done into the frames. Go to your same folder and choose your image according to your requirement.
An easier way to split the video into the frames
As you see above, it is just 2 significant steps for splitting the Video into frames by FFmpeg. But what if you don’t remember the command or are not familiar with the technical background. Then you need to look for better options and even most straightforward than FFmpeg. There is just one answer to all these questions that is Filmora Video Editor . It is not only a powerful tool but also all the tools are right in front of the screen—no need to enter any command or change of the directory.
For Win 7 or later (64-bit)
For macOS 10.14 or later
Features
- Trimming, rotating, resizing of the clips
- Easy to remove the noise in the background
- Simple to export and share the videos
- Splitting of the screens
- Correcting and matching of the colours
- Availability of controls for audio and Video
The best part is that the Video’s quality remains the same in this software. It is just a few clicks, and the extraction will be done. All the images are high resolution, so no worries about losing any frame quality and images saved in your media library. Follow the easy steps below to begin the extraction of the frames from the Video in Wondershare Filmora.
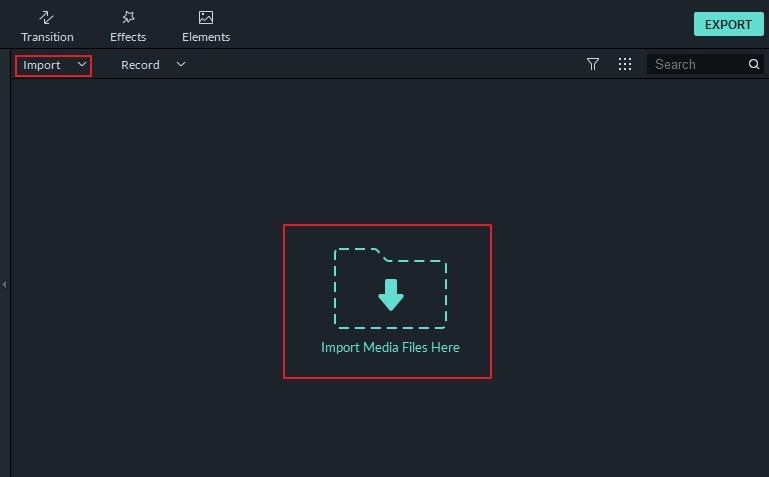
Step 1. First, import the video file or drag and drop it in the window. Videos are visible in the library so that you can select them accordingly. Click on the Video’s thumbnail if you want the same resolution of the frame as the Video.
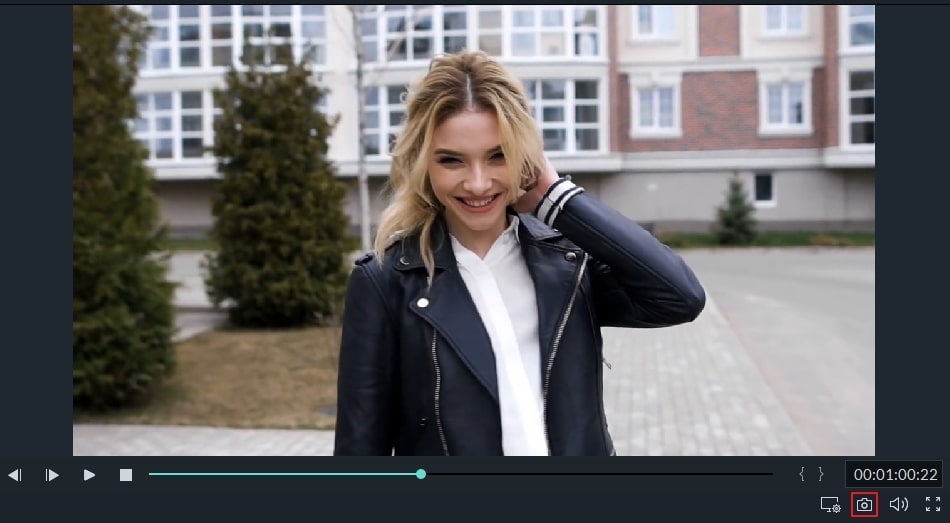
Click the Play button for the preview. After the preview, click on the Camera icon to extract frames. Automatically, all the frames are saved in the library of media files.
Step 2. Sometimes, you require to see the preview of the Video in the form of frames for extraction purposes. Simply drag and drop the file in the timeline. To begin the preview, press the space bar on the keyboard and take the screenshot whenever the Video starts.
Press the icon of snapshot or press the keys CRTL+ALT+S. Use the left or right keys for playing back the video frame to frame and save it in the form of an image. Select the “Reveal in Explorer” option when you click the screenshot in the library of media files.
The frame extractor of Wondershare Filmora is absolutely free so that you won’t find any watermark on the images. You won’t face any difficulty while extracting your frames as a user. Even you can edit these frames and save them in the format of your own choice.
Although there is a huge range of editing software, including FFmpeg, they always have some disadvantages when you keep finding the replacement. Even FFmpeg is an open-source program, and beginners can’t handle it properly.
They need to be familiar with the technicalities. There are many benefits to using Wondershare Filmora for extracting the frames from the videos.
It is supportive to 4K resolution means saving the images in the same resolution. No loss of video quality enables you to explore all the details very clearly. The whole editor appears right before you to edit all the frames.
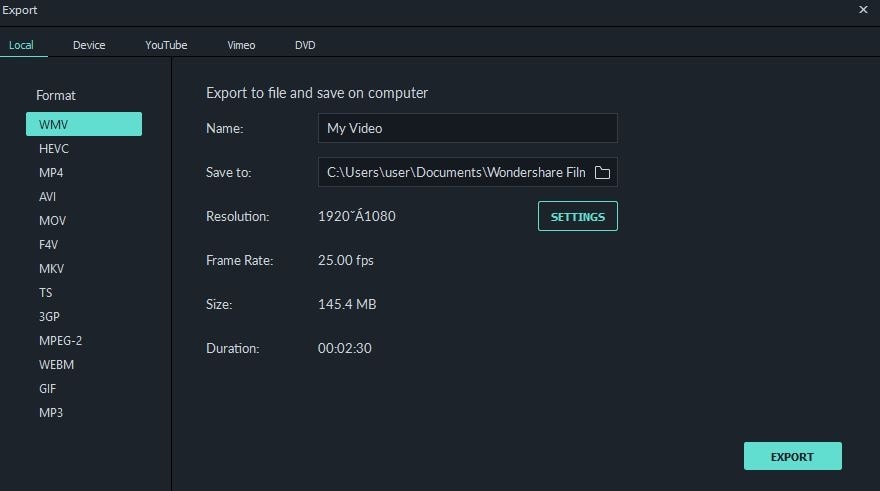
You can also export these images wherever you want or save them for backup purposes. Even you can upload them on your social networking sites. So, what are you waiting for? No more thinking now; let’s start exploring and using Wondershare Filmora
Step 2:
This specific command is for splitting the videos into frames. It saves every image separately as the thumbnail file. FFmpeg -I video.mp4 thumb%04d.jpg -hide_banner
splitting is done into the frames. Go to your same folder and choose your image according to your requirement.
An easier way to split the video into the frames
As you see above, it is just 2 significant steps for splitting the Video into frames by FFmpeg. But what if you don’t remember the command or are not familiar with the technical background. Then you need to look for better options and even most straightforward than FFmpeg. There is just one answer to all these questions that is Filmora Video Editor . It is not only a powerful tool but also all the tools are right in front of the screen—no need to enter any command or change of the directory.
For Win 7 or later (64-bit)
For macOS 10.14 or later
Features
- Trimming, rotating, resizing of the clips
- Easy to remove the noise in the background
- Simple to export and share the videos
- Splitting of the screens
- Correcting and matching of the colours
- Availability of controls for audio and Video
The best part is that the Video’s quality remains the same in this software. It is just a few clicks, and the extraction will be done. All the images are high resolution, so no worries about losing any frame quality and images saved in your media library. Follow the easy steps below to begin the extraction of the frames from the Video in Wondershare Filmora.
Step 1. First, import the video file or drag and drop it in the window. Videos are visible in the library so that you can select them accordingly. Click on the Video’s thumbnail if you want the same resolution of the frame as the Video.
Click the Play button for the preview. After the preview, click on the Camera icon to extract frames. Automatically, all the frames are saved in the library of media files.

Step 2. Sometimes, you require to see the preview of the Video in the form of frames for extraction purposes. Simply drag and drop the file in the timeline. To begin the preview, press the space bar on the keyboard and take the screenshot whenever the Video starts.
Press the icon of snapshot or press the keys CRTL+ALT+S. Use the left or right keys for playing back the video frame to frame and save it in the form of an image. Select the “Reveal in Explorer” option when you click the screenshot in the library of media files.
The frame extractor of Wondershare Filmora is absolutely free so that you won’t find any watermark on the images. You won’t face any difficulty while extracting your frames as a user. Even you can edit these frames and save them in the format of your own choice.


Although there is a huge range of editing software, including FFmpeg, they always have some disadvantages when you keep finding the replacement. Even FFmpeg is an open-source program, and beginners can’t handle it properly.
They need to be familiar with the technicalities. There are many benefits to using Wondershare Filmora for extracting the frames from the videos.
It is supportive to 4K resolution means saving the images in the same resolution. No loss of video quality enables you to explore all the details very clearly. The whole editor appears right before you to edit all the frames.
You can also export these images wherever you want or save them for backup purposes. Even you can upload them on your social networking sites. So, what are you waiting for? No more thinking now; let’s start exploring and using Wondershare Filmora
Step 2:
This specific command is for splitting the videos into frames. It saves every image separately as the thumbnail file. FFmpeg -I video.mp4 thumb%04d.jpg -hide_banner
splitting is done into the frames. Go to your same folder and choose your image according to your requirement.
An easier way to split the video into the frames
As you see above, it is just 2 significant steps for splitting the Video into frames by FFmpeg. But what if you don’t remember the command or are not familiar with the technical background. Then you need to look for better options and even most straightforward than FFmpeg. There is just one answer to all these questions that is Filmora Video Editor . It is not only a powerful tool but also all the tools are right in front of the screen—no need to enter any command or change of the directory.
For Win 7 or later (64-bit)
For macOS 10.14 or later
Features
- Trimming, rotating, resizing of the clips
- Easy to remove the noise in the background
- Simple to export and share the videos
- Splitting of the screens
- Correcting and matching of the colours
- Availability of controls for audio and Video
The best part is that the Video’s quality remains the same in this software. It is just a few clicks, and the extraction will be done. All the images are high resolution, so no worries about losing any frame quality and images saved in your media library. Follow the easy steps below to begin the extraction of the frames from the Video in Wondershare Filmora.
Step 1. First, import the video file or drag and drop it in the window. Videos are visible in the library so that you can select them accordingly. Click on the Video’s thumbnail if you want the same resolution of the frame as the Video.
Click the Play button for the preview. After the preview, click on the Camera icon to extract frames. Automatically, all the frames are saved in the library of media files.

Step 2. Sometimes, you require to see the preview of the Video in the form of frames for extraction purposes. Simply drag and drop the file in the timeline. To begin the preview, press the space bar on the keyboard and take the screenshot whenever the Video starts.
Press the icon of snapshot or press the keys CRTL+ALT+S. Use the left or right keys for playing back the video frame to frame and save it in the form of an image. Select the “Reveal in Explorer” option when you click the screenshot in the library of media files.
The frame extractor of Wondershare Filmora is absolutely free so that you won’t find any watermark on the images. You won’t face any difficulty while extracting your frames as a user. Even you can edit these frames and save them in the format of your own choice.


Although there is a huge range of editing software, including FFmpeg, they always have some disadvantages when you keep finding the replacement. Even FFmpeg is an open-source program, and beginners can’t handle it properly.
They need to be familiar with the technicalities. There are many benefits to using Wondershare Filmora for extracting the frames from the videos.
It is supportive to 4K resolution means saving the images in the same resolution. No loss of video quality enables you to explore all the details very clearly. The whole editor appears right before you to edit all the frames.
You can also export these images wherever you want or save them for backup purposes. Even you can upload them on your social networking sites. So, what are you waiting for? No more thinking now; let’s start exploring and using Wondershare Filmora
Step 2:
This specific command is for splitting the videos into frames. It saves every image separately as the thumbnail file. FFmpeg -I video.mp4 thumb%04d.jpg -hide_banner
splitting is done into the frames. Go to your same folder and choose your image according to your requirement.
An easier way to split the video into the frames
As you see above, it is just 2 significant steps for splitting the Video into frames by FFmpeg. But what if you don’t remember the command or are not familiar with the technical background. Then you need to look for better options and even most straightforward than FFmpeg. There is just one answer to all these questions that is Filmora Video Editor . It is not only a powerful tool but also all the tools are right in front of the screen—no need to enter any command or change of the directory.
For Win 7 or later (64-bit)
For macOS 10.14 or later
Features
- Trimming, rotating, resizing of the clips
- Easy to remove the noise in the background
- Simple to export and share the videos
- Splitting of the screens
- Correcting and matching of the colours
- Availability of controls for audio and Video
The best part is that the Video’s quality remains the same in this software. It is just a few clicks, and the extraction will be done. All the images are high resolution, so no worries about losing any frame quality and images saved in your media library. Follow the easy steps below to begin the extraction of the frames from the Video in Wondershare Filmora.
Step 1. First, import the video file or drag and drop it in the window. Videos are visible in the library so that you can select them accordingly. Click on the Video’s thumbnail if you want the same resolution of the frame as the Video.
Click the Play button for the preview. After the preview, click on the Camera icon to extract frames. Automatically, all the frames are saved in the library of media files.

Step 2. Sometimes, you require to see the preview of the Video in the form of frames for extraction purposes. Simply drag and drop the file in the timeline. To begin the preview, press the space bar on the keyboard and take the screenshot whenever the Video starts.
Press the icon of snapshot or press the keys CRTL+ALT+S. Use the left or right keys for playing back the video frame to frame and save it in the form of an image. Select the “Reveal in Explorer” option when you click the screenshot in the library of media files.
The frame extractor of Wondershare Filmora is absolutely free so that you won’t find any watermark on the images. You won’t face any difficulty while extracting your frames as a user. Even you can edit these frames and save them in the format of your own choice.


Although there is a huge range of editing software, including FFmpeg, they always have some disadvantages when you keep finding the replacement. Even FFmpeg is an open-source program, and beginners can’t handle it properly.
They need to be familiar with the technicalities. There are many benefits to using Wondershare Filmora for extracting the frames from the videos.
It is supportive to 4K resolution means saving the images in the same resolution. No loss of video quality enables you to explore all the details very clearly. The whole editor appears right before you to edit all the frames.
You can also export these images wherever you want or save them for backup purposes. Even you can upload them on your social networking sites. So, what are you waiting for? No more thinking now; let’s start exploring and using Wondershare Filmora
2 Effective Ways to Add Text Behind Objects
Adding text behind objects in your videos can be a great way to start your videos. For example, you can do so to create an attractive intro or startup a video. So, if you hope to make a video like a pro, let’s learn how to add text behind objects in your videos by Filmora.

Part 1. What Are The Benefits of Adding Text Behind Objects in Videos?
Your videos must maintain quality to create content worthy of a huge audience. You may have a YouTube channel or be starting down the road. Then you must give this a try because
Give a cool look
Adding text behind an object in a video looks cool! Now, your object could be a silhouette of a person or a huge skyscraper. You can add a text tile behind the object, creating the illusion. Due to this, the text will be flying in real-time.
Show creativity
Blasting your channel with innovative and creative content is the key to building a big audience. But, of course, you can always opt for many ways to create a video showing your creativity. One of those ways is to add text behind your object.
You can create an attractive intro by adding text behind objects that captivate the viewer. It ensures that your subscribers stay tuned to your channel and your content.
Build up a solid audience
Every day can be a real struggle if you are a daily content creator on YouTube. The audience demands good content. But your daily videos can get boring if you do not use new methods to edit your videos.
You can add text behind videos to spice up your intros and hook your daily audience even more. That will show the audience that you are genuinely putting in the effort.
Part 2. What Will You Need To Add Text Behind Videos?
Now there are a few things that you will need to add text behind videos. First, take a look at the basic priorities to perform this feature.
1. A Static Object Video
Adding text behind an object can be tricky if the object isn’t static. For example, the effect will be ruined if an object moves around a lot in a video.
Our goal is to create a smooth text behind the video effect. And this can only be achieved if the target object remains static in the video and does not move about its position.
2. A Video Editing Software - Wondershare Filmora
Once you select a video source, you aim to add it to a video editor. For this purpose, Wondershare Filmora would be your best choice. Wondershare Filmora allows you to create innovative and attractive videos.
Free Download For Win 7 or later(64-bit)
Free Download For macOS 10.14 or later
It has a very engaging system UI, allowing even beginner users to get their hands on it instantly. You will learn how to add text behind your videos with a few simple steps.

Now that you know the requirements for the video, let’s move on to the step-by-step guide to add text to your video.
Part 3. Step-by-Step Guide To Add Text Behind Videos
We look at two examples of how to add text behind videos in Wondershare Filmora.
- A static video with an object that can be easily masked out.
- A video with high contrast and a clean background.
Add Text behind a Static Video
First, we will go with adding text behind a static object. For this, scroll more to get the step-by-step process.
Step1 Download Wondershare Filmora
If you are a beginner just starting in the video editing business, Wondershare Filmora is the best choice. Follow the steps below to download the free version of Wondershare Filmora:
- First, download the Wondershare Filmora on your PC or Mac.
- Open the setup and install the Wondershare Filmora.
After downloading the Wondershare Filmora software, let’s edit the video. Scroll below to learn how to start the editing process!
Step2 Add the Video to the Timeline
We will first look at the static video example. For this, follow the below instructions:
- You have to start by importing your video in the import library.
- From the import library, you can click on the video and drag it down below to the timeline.

![]()
Note: Adding video to the timelines will allow you to create a workspace to edit your video.
Now let’s move on to how we will add the text tile to our video.
Step3 Add the Text Tile
It is time to add the text tile you will animate behind the object. To do that, follow the steps mentioned as such.:
- Go to the Titles icon on the bar above the import library.
- A drop-down option will be available on the left side.
- Scroll down to the Plain text.
- Here, you can see many text tiles to add to your video.
- You can choose anyone you like.
- The most commonly used tile is the Basic 6.
- When you add the text tile to the timeline, you must ensure that the text is of equal length to the video.
- To do that, drag the right corner of the text tile and drag it to the right to match the length of the video.

Step4 Edit the Text Tile
After you have added the text tile you desire, you need to type in the text. For this article, we will keep it simple. We will be typing a simple statement such as “Hello, World.“
- Double-click the Text tile to open the settings menu.
- After the settings menu is opened, type in the text box on the import window.
You will notice changes on the main window that your text has changed.

- After the text appears, you can make the font look as desired.
- Look above the text window, and you will see the type of text font selected.
- Click on the drop-down option and choose whatever you like.
Let’s move on to animate the text tile.
Step5 Animate the text tile
After adding text, it is time to animate it. This animation will decide how your text will appear behind the target object.
- First, you must open the text settings by double-clicking on the text tile in the timeline.
- In the settings opened in the import window, you will have to click on the animation tab in the upper left corner, aside from the Preset
- Now scroll down to where you will see the Right Roll
- Click on Right Roll and then click on the OK in the bottom right corner of the import window.

![]()
Note: You may notice now that the text appears in front of our object. Don’t worry now! We are getting there. With a few simple steps, we will see the results.
Now let us move on to the more significant part of the editing, masking the object. Again, look ahead to see how you can mask the object!
Step6 Mask the Object
To mask our object, we will need to be technical. We will begin by adding the same footage of the static object on our timeline. Follow the steps mentioned below:
- Drag and drop the static object footage above the timeline text. Make sure the text stays in the middle of the sandwich.

- We will hide the video in the first track to simplify things. In addition, this will make our editing easier.
- We will have to look in the effects library to insert the masking effect.
- You can see the Effects icon on the bar at the top.
- Click on the Effects.
- You will see the search bar at the top of the import window.
- In the search bar, type in Image mask.
- Drag the Image mask effect on the video above the text tile.
Now the masking effect has been added. But we would have to adjust so that it stays upon our object.
- Double-click on the video and the settings option will open up.
- Go into the Effects
![]()
Note: You must select your target object’s mask shape exactly as its shape.
- We have to mask out a building, so that we will need a vertical rectangle.

- After you have selected the shape of your object, we will need to convert it to the object’s size so that it only masks the building.
- To do that, scroll down below the import window to the settings.
- Here you can see the X, Y, and width settings.
- First, move the width bar so that it matches the width of the building.

- Now drag the X bar until the mask is confined to the building. You would have created the mask only limited to the building.

- Once you complete this step, click OK in the bottom right corner.
- Now un-hide the original video that you imported in the beginning.
Finally, play the video in the main play window from the beginning.

You have successfully created a text behind the object effect. Now that you know how to add text behind static objects let us move to learn how to add text to a video that has high contrast and a clean background.
Add text behind a high contrast and clean background
Besides the text can be added behind a static object, it can also be added to a clean background with high contrast. But how is it? Let’s dive into it.
Step1 Import the video into the timeline
- Import the video from the location in your PC media.
- When imported, drag and drop it onto the timeline.

Step2 Add the text tile
To add the text to your video, follow the steps mentioned below.
- Click on the titles icon on the bar above the import window.
- On the left drop-down option, scroll down to the titles.
- Select the Plain text option.
- You will notice that multiple options will pop up in the import window.
- Select the text title that suits you best.
- After you have selected the text style, drag and drop it down above your video in the timeline.

- Our next step would be to add the text.
- Double-click on the text tile. Doing so will open the settings menu in the import window.
- Type in the text that you want. For reference, we will keep it simple such as, “Hello world.”
- You can also adjust the font of your text.
- Above the type box, a drop-down option will show you the range of fonts available.
- Select the font you desire.

Now that you have added the text, it is time to animate it.
Step3 Take a snapshot
After typing in the text, you will notice in the main play window that your text still appears in front of your object. Therefore, we want to take it behind the object. To do so, first, you will need to take a snapshot.
Follow the steps mentioned to take a snapshot:
- Hide the main video. You can see the Eye icon aside from your main video in the edit column on the left side of the timeline.
- Click on the Eye icon to hide the main video.
- In the main play window, you will notice that the screen turns black, which leaves only the text on the screen.

- In the main play screen, you can notice a small camera icon.
- This camera icon is used to take snapshots of your screen.
- Click on the camera icon to take a snapshot of your screen.
- Your snapshot will now be saved in the main import window.

Now that we have taken a snapshot, we will need to import it into the timeline. Scroll below for more.
Step4 Add the snapshot
After taking it, your goal is to import it into the timeline. To perform this action, perform the following steps:
- Before adding the snapshot to the timeline, we must delete the main text tile.
- Then drag and drop the snapshot from the import library into the timeline above the video.
- Make sure that the snapshot is aligned well with the length of the video.
- If it is longer than the video, drag it from the right to match the length of the video.
- If its length is smaller than the video, drag it to the right to increase its length.

After adding the snapshot, we will have to change its blending mode.
Step5 Change the blending of the snapshot
To create the effect of your text behind the video, you must alter the main text’s blending mode. In this case, it will be the snapshot we took.
![]()
Note: Changing the blending mode of the snapshot will allow it to blend with the transparent background and will create the effect of the text behind the object in the video.
Follow the steps mentioned below to change the blending of the snapshot:
- Double-click the snapshot.
- If you select the compositing tab, the blending options will pop up.
- From default, it would be set to Normal. Click on the Normal
- It will show a drop-down option.
- Scroll down below until you can see an option labeled Then click on Overlay.

- And press OK in the bottom right corner to confirm your changes.
The text can be blended with the background.
- Click on the Eye icon to un-hide the video from the timeline.
- Now play the video from the start from the main play screen to see the final changes.

Congratulations! The above steps allow you to add text behind objects in your videos.
Conclusion
Modern media is full of creative content. And if you are a content creator that wants to make it through the world of YouTube and video creating, you need to be the best. You can only be the best at what you do if you keep pushing the boundaries of your creativity.
Adding text behind objects could be the first step in making your intros shine with creativity and innovation. It allows you to maintain and build your viewing audience. The more the audience, the more your content gets watched!
Free Download For macOS 10.14 or later
It has a very engaging system UI, allowing even beginner users to get their hands on it instantly. You will learn how to add text behind your videos with a few simple steps.

Now that you know the requirements for the video, let’s move on to the step-by-step guide to add text to your video.
Part 3. Step-by-Step Guide To Add Text Behind Videos
We look at two examples of how to add text behind videos in Wondershare Filmora.
- A static video with an object that can be easily masked out.
- A video with high contrast and a clean background.
Add Text behind a Static Video
First, we will go with adding text behind a static object. For this, scroll more to get the step-by-step process.
Step1 Download Wondershare Filmora
If you are a beginner just starting in the video editing business, Wondershare Filmora is the best choice. Follow the steps below to download the free version of Wondershare Filmora:
- First, download the Wondershare Filmora on your PC or Mac.
- Open the setup and install the Wondershare Filmora.
After downloading the Wondershare Filmora software, let’s edit the video. Scroll below to learn how to start the editing process!
Step2 Add the Video to the Timeline
We will first look at the static video example. For this, follow the below instructions:
- You have to start by importing your video in the import library.
- From the import library, you can click on the video and drag it down below to the timeline.

![]()
Note: Adding video to the timelines will allow you to create a workspace to edit your video.
Now let’s move on to how we will add the text tile to our video.
Step3 Add the Text Tile
It is time to add the text tile you will animate behind the object. To do that, follow the steps mentioned as such.:
- Go to the Titles icon on the bar above the import library.
- A drop-down option will be available on the left side.
- Scroll down to the Plain text.
- Here, you can see many text tiles to add to your video.
- You can choose anyone you like.
- The most commonly used tile is the Basic 6.
- When you add the text tile to the timeline, you must ensure that the text is of equal length to the video.
- To do that, drag the right corner of the text tile and drag it to the right to match the length of the video.

Step4 Edit the Text Tile
After you have added the text tile you desire, you need to type in the text. For this article, we will keep it simple. We will be typing a simple statement such as “Hello, World.“
- Double-click the Text tile to open the settings menu.
- After the settings menu is opened, type in the text box on the import window.
You will notice changes on the main window that your text has changed.

- After the text appears, you can make the font look as desired.
- Look above the text window, and you will see the type of text font selected.
- Click on the drop-down option and choose whatever you like.
Let’s move on to animate the text tile.
Step5 Animate the text tile
After adding text, it is time to animate it. This animation will decide how your text will appear behind the target object.
- First, you must open the text settings by double-clicking on the text tile in the timeline.
- In the settings opened in the import window, you will have to click on the animation tab in the upper left corner, aside from the Preset
- Now scroll down to where you will see the Right Roll
- Click on Right Roll and then click on the OK in the bottom right corner of the import window.

![]()
Note: You may notice now that the text appears in front of our object. Don’t worry now! We are getting there. With a few simple steps, we will see the results.
Now let us move on to the more significant part of the editing, masking the object. Again, look ahead to see how you can mask the object!
Step6 Mask the Object
To mask our object, we will need to be technical. We will begin by adding the same footage of the static object on our timeline. Follow the steps mentioned below:
- Drag and drop the static object footage above the timeline text. Make sure the text stays in the middle of the sandwich.

- We will hide the video in the first track to simplify things. In addition, this will make our editing easier.
- We will have to look in the effects library to insert the masking effect.
- You can see the Effects icon on the bar at the top.
- Click on the Effects.
- You will see the search bar at the top of the import window.
- In the search bar, type in Image mask.
- Drag the Image mask effect on the video above the text tile.
Now the masking effect has been added. But we would have to adjust so that it stays upon our object.
- Double-click on the video and the settings option will open up.
- Go into the Effects
![]()
Note: You must select your target object’s mask shape exactly as its shape.
- We have to mask out a building, so that we will need a vertical rectangle.

- After you have selected the shape of your object, we will need to convert it to the object’s size so that it only masks the building.
- To do that, scroll down below the import window to the settings.
- Here you can see the X, Y, and width settings.
- First, move the width bar so that it matches the width of the building.

- Now drag the X bar until the mask is confined to the building. You would have created the mask only limited to the building.

- Once you complete this step, click OK in the bottom right corner.
- Now un-hide the original video that you imported in the beginning.
Finally, play the video in the main play window from the beginning.

You have successfully created a text behind the object effect. Now that you know how to add text behind static objects let us move to learn how to add text to a video that has high contrast and a clean background.
Add text behind a high contrast and clean background
Besides the text can be added behind a static object, it can also be added to a clean background with high contrast. But how is it? Let’s dive into it.
Step1 Import the video into the timeline
- Import the video from the location in your PC media.
- When imported, drag and drop it onto the timeline.

Step2 Add the text tile
To add the text to your video, follow the steps mentioned below.
- Click on the titles icon on the bar above the import window.
- On the left drop-down option, scroll down to the titles.
- Select the Plain text option.
- You will notice that multiple options will pop up in the import window.
- Select the text title that suits you best.
- After you have selected the text style, drag and drop it down above your video in the timeline.

- Our next step would be to add the text.
- Double-click on the text tile. Doing so will open the settings menu in the import window.
- Type in the text that you want. For reference, we will keep it simple such as, “Hello world.”
- You can also adjust the font of your text.
- Above the type box, a drop-down option will show you the range of fonts available.
- Select the font you desire.

Now that you have added the text, it is time to animate it.
Step3 Take a snapshot
After typing in the text, you will notice in the main play window that your text still appears in front of your object. Therefore, we want to take it behind the object. To do so, first, you will need to take a snapshot.
Follow the steps mentioned to take a snapshot:
- Hide the main video. You can see the Eye icon aside from your main video in the edit column on the left side of the timeline.
- Click on the Eye icon to hide the main video.
- In the main play window, you will notice that the screen turns black, which leaves only the text on the screen.

- In the main play screen, you can notice a small camera icon.
- This camera icon is used to take snapshots of your screen.
- Click on the camera icon to take a snapshot of your screen.
- Your snapshot will now be saved in the main import window.

Now that we have taken a snapshot, we will need to import it into the timeline. Scroll below for more.
Step4 Add the snapshot
After taking it, your goal is to import it into the timeline. To perform this action, perform the following steps:
- Before adding the snapshot to the timeline, we must delete the main text tile.
- Then drag and drop the snapshot from the import library into the timeline above the video.
- Make sure that the snapshot is aligned well with the length of the video.
- If it is longer than the video, drag it from the right to match the length of the video.
- If its length is smaller than the video, drag it to the right to increase its length.

After adding the snapshot, we will have to change its blending mode.
Step5 Change the blending of the snapshot
To create the effect of your text behind the video, you must alter the main text’s blending mode. In this case, it will be the snapshot we took.
![]()
Note: Changing the blending mode of the snapshot will allow it to blend with the transparent background and will create the effect of the text behind the object in the video.
Follow the steps mentioned below to change the blending of the snapshot:
- Double-click the snapshot.
- If you select the compositing tab, the blending options will pop up.
- From default, it would be set to Normal. Click on the Normal
- It will show a drop-down option.
- Scroll down below until you can see an option labeled Then click on Overlay.

- And press OK in the bottom right corner to confirm your changes.
The text can be blended with the background.
- Click on the Eye icon to un-hide the video from the timeline.
- Now play the video from the start from the main play screen to see the final changes.

Congratulations! The above steps allow you to add text behind objects in your videos.
Conclusion
Modern media is full of creative content. And if you are a content creator that wants to make it through the world of YouTube and video creating, you need to be the best. You can only be the best at what you do if you keep pushing the boundaries of your creativity.
Adding text behind objects could be the first step in making your intros shine with creativity and innovation. It allows you to maintain and build your viewing audience. The more the audience, the more your content gets watched!
Also read:
- In 2024, The Glitch Filter Is Similar to an Error or a Distorted Effect in the Video. The Article Enables the Users to Get the VHS Filter in One of Their Travel Videos and Instagram Accounts
- A Guide to Color Grade Your Picture in LightRoom
- In 2024, Troubleshoot Snapchat Camera Zoomed in Issue 4 Tips
- Working Through the Details of iMovie Slow Motion Video Making 100 Effective for 2024
- Updated Fixing The Slow Playback Issues in DaVinci Resolve
- New A Countdown Effect Is Widely Used in Gaming and Report Videos. So How to Create Your Own Countdown Video? This Article Will Tell You some Ideas About Contdown Video Editing for 2024
- How To Quickly Create A Screen Print Effect In Photoshop Detailed Guide for 2024
- 2024 Approved Wondering How to Rotate a Video in Windows at Any Desired Angle and Save It Permanently? Find Out All the Different Ways to Rotate Videos Temporarily as Well as Permanently
- In 2024, Intro Videos Have the Potential to Make a First Impression on Viewers, and You Know How They Say that the First Impression Is the Last Impression
- Introduction to LUTs Their Overview and Benefits for 2024
- Updated In 2024, How to Make an Adobe Slideshow the Easy Way
- How to Windows Online Movie Maker Complete Guide
- Slow Down the GIF to Emphasize Details Better. To Do so, Read This Guide and Learn to Use the Best Platforms for Slow-Motion GIFs
- New In 2024, Achieving GoPro Slow Motion with Quality An In-Depth Overview
- Ll About GIF Keyboard That You Want to Know
- New 2024 Approved 2 Methods to Crop Video in VLC
- Best GIF to MOV Converters for 2024
- New How to Create Datamoshing Effect to Your Footage in After Effects, In 2024
- Updated How to Make Split Screen Videos in Filmora
- How to Exit Android Factory Mode On HTC U23 Pro? | Dr.fone
- Looking For A Location Changer On Infinix Smart 7? Look No Further | Dr.fone
- AddROM Bypass An Android Tool to Unlock FRP Lock Screen For your Vivo V29
- In 2024, A Working Guide For Pachirisu Pokemon Go Map On Vivo V27 Pro | Dr.fone
- How To Bypass Vivo S17 FRP In 3 Different Ways
- In 2024, How to Unlock iCloud lock on your iPhone 11 Pro and iPad?
- How to Bypass FRP from Motorola Edge 40 Pro?
- About Google FRP Bypass
- How to Reset a Locked Realme V30T Phone
- In 2024, 5 Ways To Teach You To Transfer Files from Vivo G2 to Other Android Devices Easily | Dr.fone
- How to Track Apple iPhone XS Max Location without Installing Software? | Dr.fone
- In 2024, Why does the pokemon go battle league not available On Nokia XR21 | Dr.fone
- Title: Updated How to Add Text Effects in Adobe Premiere Pro, In 2024
- Author: Chloe
- Created at : 2024-04-24 07:08:43
- Updated at : 2024-04-25 07:08:43
- Link: https://ai-editing-video.techidaily.com/updated-how-to-add-text-effects-in-adobe-premiere-pro-in-2024/
- License: This work is licensed under CC BY-NC-SA 4.0.

