
:max_bytes(150000):strip_icc():format(webp)/GettyImages-970157966-65f3dd434f3e4dc98e28a635b8cacc87.jpg)
Updated How To Add Text In After Effects
How To Add Text In After Effects
In almost every video you come across, you will see text added to the video in different parts. There are various reasons why adding text to videos becomes a necessity. First of all, you can highlight the underlying message or key points in your video. Along with audio and video, the viewers will have another cue point in the form of text that they can retain in their memory for longer. You add animated texts to video to make the video interesting to watch and break the monotony of visual cues only.
Besides, you may have to want credits and add intro as well as outro to your video where adding text is almost a necessity. Text can help your viewer get the context of your video and make sense of the content. After Effects is a popular video editor thanks to its visual effects, text animation animations, and instant video enhancement tools. We will illustrate the different ways of adding text in After Effects in simple steps.
Part 1. Add Text in After Effects with Horizontal Type Tool
Once you have imported your video clip into the Timeline, there are several ways you can add text to your video. First of all, you can right-click on the Timeline and select New> Text to create an empty text layer and add any text you want. Similarly, you can go to Layer> New> Text option to do the same. But the easiest way of adding text in After Effects is by using Horizontal Type Tool. Here are the steps on how you can add text in AE with the type tool.
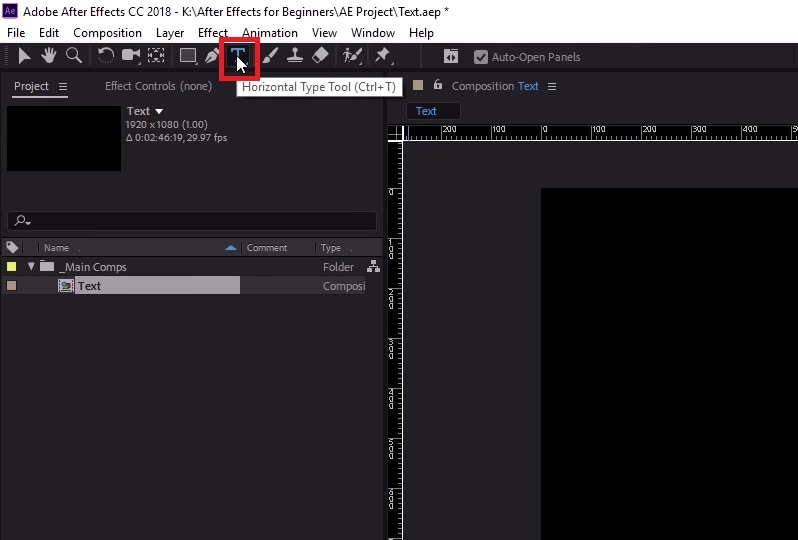
Step1Once you have imported your video into the Timeline, click on Horizontal Type Tool located in the top bar to add any text. You can press Ctrl+T(Windows) or Command+H(Mac) to get it instantly.
Step2Click on the video where you want to place the text and type your desired text there. After you are done adding your text, press Enter key in Num pad to exit out of the text field in the video.
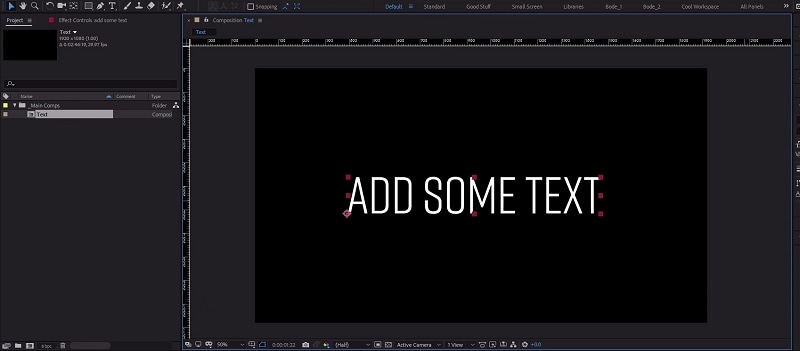
Step3This will automatically create a text layer on Timeline. You can now move the text and place it anywhere you want. You can also modify the text style and add animation which we will illustrate in the next section.
Part 2. Use the Character Panel to Edit Text in AE
When you select Type tool and add your desired text, you get a default style for the text. It is most likely that you have to modify the text style such as changing color, font, and size to fit in your video seamlessly. That is when you have to visit the Character Panel. Character Panel is where you get to edit the font of the text you have typed, increase or decrease the font size, change the font color, and much more. Apart from that, you can increase the spacing between lines when your text is a paragraph instead of a few words. Here are the steps to use Character Panel to edit text in AE.
Step1Once you have typed your text using Horizontal Type tool on the video, click on the text.
Step2Go to Character panel located in the right side of the screen. If it is minimized, click on the panel to expand it.
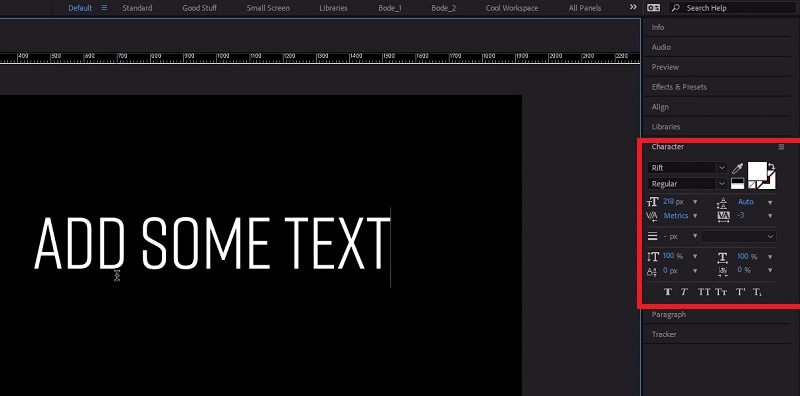
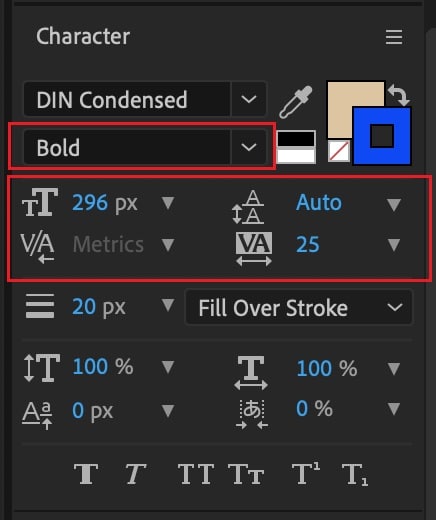
Step3The first option in the panel is the font of the text. By the side of the font is the text color. You can use the color picker tool to choose any color as per your preference.
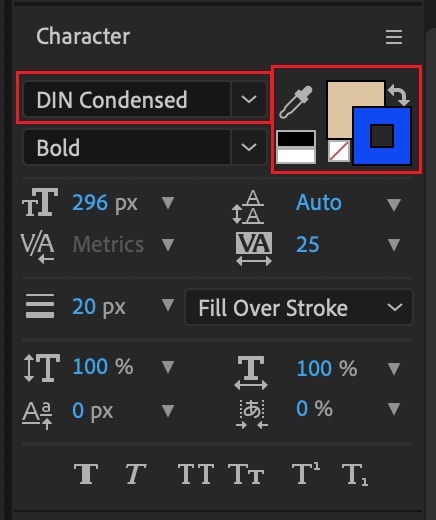
Step4Below the font, you can select the font style such as regular, bold, italics, and likewise. The subsequent part is to change the font size and adjust vertical spacing between lines and horizontal spacing between characters.
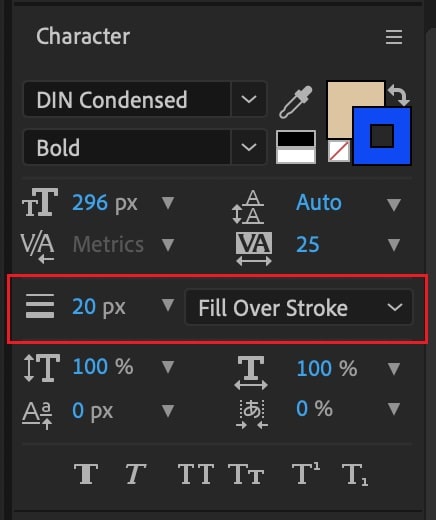
Step5The next section deals with Stroke option as well as fill the text option. You can fill the background of the text with any desired color.
Part 3. Add Animated Text to Video with Animation Presets
Now that you have added a static text and set the text format as per your preference, it is time to animate the text. A static text in a video does not look appealing, and animated texts make the video eye-catching instantly. You can use text animation presets in After Effects to add animated text to video. Here are the steps to add animated text to video with animation presets and effects.
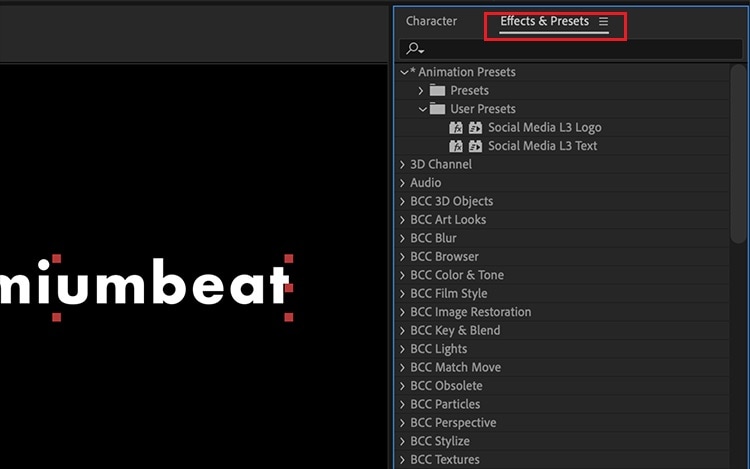
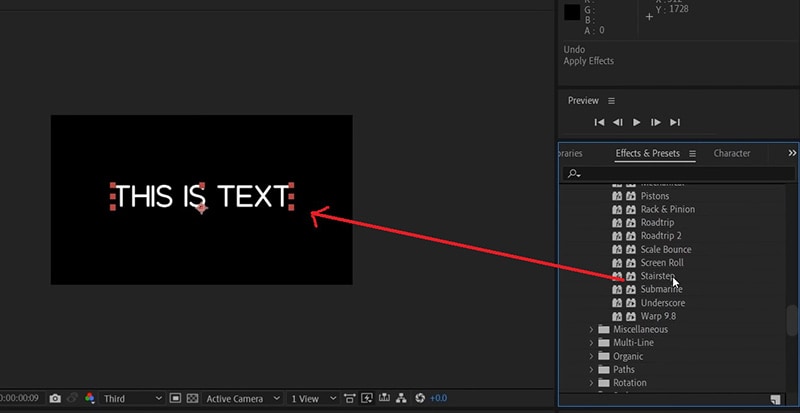
Step1Click on the text on your video that you want to animate. Go to Effects and Presets panel located on the right side.
Step2Under Effects and Presets panel, Click on Text option. This will open all the different categories of animation presets available that you can apply to the text on your video.
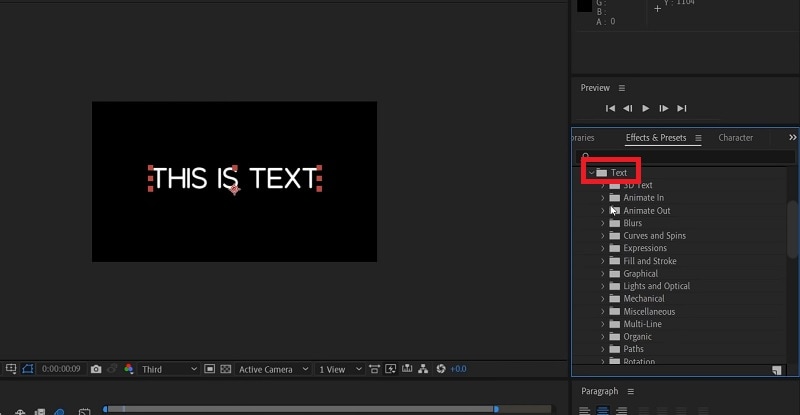
Step3Select any desired animation that you want to apply to the text and drag and drop the animation on the text in the composition window. Play the video and watch the applied animation on the text.
Part 4. Alternative Way to Add Text to Videos
If you are not comfortable with After Effects as a video editor, we recommend Wondershare as the best AE alternative. This is because the user interface of Filmora is super simple and there are loads of text effects and animations available to enhance your video content. Filmora is a professional video editor that is extremely popular among amateur and professional video editors. The application is available for both Windows and Mac users. Here are the steps for adding animated text to video using Filmora.
Step1Install Wondershare Filmora on your computer and launch the application. Click on New Project option on the welcome screen. Otherwise, you can go to File> New Project option.

Step2Go to File> Import Media> Import Media Files to import your video file. You can also drop the video file directly into Project Media folder.

Step3Drag and drop the video file from Project Media folder into the Timeline. If you have multiple video clips, you need to arrange them sequentially on the Timeline.
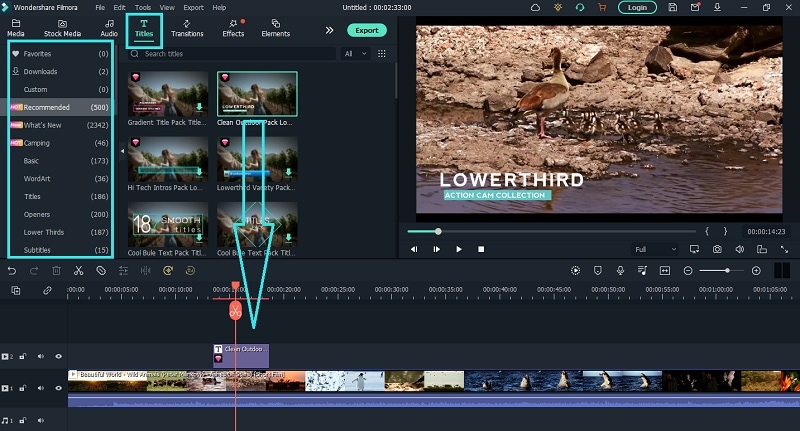
Step4To add text to your video, go to Titles located at the top bar. Check the left panel where you can see different categories of text effects. Select any desired text effect and drop into the Timeline. Make sure that the text layer is above the video layer on Timeline. You can shift the text layer on Timeline to place it where you want it to appear. You can also stretch the duration of the text effect as per your requirements.
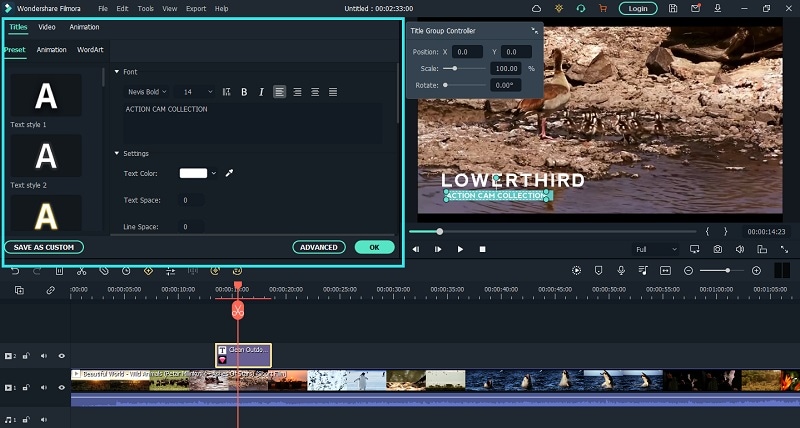
Step5You can edit the text effect by double clicking on the text layer on Timeline. Under Preset tab, you can change the text, font type and size, text color and much more. For further customization, you can click on Advanced button. At last, click on OK button to save the edits done.
The Bottom Line
If you want to add animated text to photo and video, After Effects is a great editor you can use. We have illustrated how you can add text and customize the text and finally, animate it as per your preference. However, if you are looking for AE alternative, we recommend Wondershare Filmora where you can add text to video instantly and choose from a wide range of text effects and animations.
Free Download For Win 7 or later(64-bit)
Free Download For macOS 10.14 or later
Ideas That Help You Out in Converting AVI to GIF
Ideas That Will Help You Out in Converting AVI to GIF
An easy yet powerful editor
Numerous effects to choose from
Detailed tutorials provided by the official channel
GIFs have grown in popularity over the years. They are a great way of expressing emotions in a fun way. You can create a GIF out of any video using a conversion tool.
Converting a video AVI to a gif has several benefits. It can be useful for creating cute gifs or memes. Most savvy agencies or freelancers are using this method to improve the effectiveness of their marketing campaigns.
Doing it manually will lead to splitting the video into several pictures at your own time. But with these ideas, you can avoid this extra task and directly convert AVI to GIF in just a few simple steps.
In this article
01 [How to Make an AVI to GIF on Windows/Mac/Online?](#Part 1)
02 [What’s Best 5 GIF to Avi Converters?](#Part 2)
Part 1 How to Make an AVI to GIF on Windows/Mac/Online?
There are many ways to create AVI to GIF based on your device operating system. Go through the various steps below to create it.
01Convert AVI to GIF with Uniconverter
Step 1: Launch Wondershare Uniconverter

Download Wondershare Uniconvereter software from the official link to your PC/Mac (With Mojave). As the home interface appears, click on the “Toolbox” tab and choose the “GIF Maker” option.
Step 2: Upload the AVI File

In the GIF Maker window, click on the “Import” icon to upload AVI files from your PC. On the right pane, select the start and stop times of the videos for GIF-making.
The next thing to do is select the output size and frame rate of the desired GIF output. On the bottom, click on the “File Location” to choose the directory for the output file.
Step 3: Convert

The end step is to convert AVI to gif by clicking on the “Create GIF” button to begin the process.
02Convert AVI to GIF with VLC Media Player
VLC is a cross-platform media player so you can use it on your Mac and Windows to convert AVI to Gif. It’s free and comes with numerous functions and support other than playing media. It can be used as a GIF maker too because of the snapshot feature.
Step 1: Launch VLC Media Player

Run VLC Media Player and then click on “Media” > “Open File” to upload the AVI file from your PC or Mac.
Step 2: Select the Video Frame

As you can see, the video will start running on your VLC media player screen. Now, select the video frame for getting the desired animation. Next, go to the “Video” menu and choose “Take Snapshop”. This step will save the video frame in the PNG format to the My Pictures folder.
Step 3: Open MSPaint

You will have to open MSPaint on your PC. When it opens, click on the “File” menu and then open the snapshot that you had taken in the previous step. Again, click on “File” > “Save As” > “GIF” to download your GIF.
03Convert AVI to GIF Using Photoshop
Converting AVI to GIF with photoshop can be a bit complex but you will get the highest quality GIFs in a short time. Read the steps here to start converting your AVI file.
Step 1: Launch and Import
Run Adobe Photoshop on your PC or Mac. As the home interface will open, click on “File” > “Import” > “Video Frames to Layers”. Now, import your AVI video.

Step 2: Cut the Part
Separate that part of the video for which you want to create a GIF. From the “Range to Import option, select the default “Beginning to End” or “Selected Range”. You also have to check the box in the “Make Frame Animation” option.
Step 3: Check and Save
Come back to the window and check the animation. Trim or add frames if it seems necessary or else simply go to the left side of the animation and click on check forever.
At last, open “File” > “Save for Web”. Now from the “Preset” menu, choose from the GIF option or select from the drop-down list manually. Finish by clicking on “Save”.
Part 2 What’s Best 5 GIF to Avi Converters?
01Cloud Convert
Cloud Convert is a sophisticated, browser-based one-stop shop for all your video conversion needs. It can easily convert AVI to GIF online. It has been packed with plenty of features for yielding desired output to the users. You can adjust fps, preset, resolution, aspect ratio, codec, and more before getting the final result. Not only does it fit your video and image conversion needs but also provides you with audio, ebook, spreadsheet, and many other file conversion facilities. Over 200 file formats are compatible with this platform.
02Any Conv
Any Conv is a powerful solution to convert gifs to AVI files online without any downloads or installations. It supports over 400 file formats and you can use it with any of your devices. Convert any file from one format to another, or from a batch of files at once. This app doesn’t even ask for registration to use and is completely free! There are various options to modify your GIF before the final conversion to AVI such as changing screen size, resize handling, video bitrate, and more.
03Veed.io
Veed.io helps you to convert Gif to AVI and other popular video formats. You can directly upload a file from your computer or add it from your Dropbox. Moreover, you can paste a YouTube URL link for conversion of a video to GIF. It offers you a whole set of video editing, video conversion, and a lot of other features. If you are looking for some additional help in video creation and editing, it’s the best platform for you. Check it out today and start bringing your ideas to reality. The majority of its features can be accessed free of charge.
04MiConv
MiConv is another easy to use cloud-based gif to AVI converter online platform. This multi-platform online converter tool can turn any GIF to AVI online within a few seconds. In an hour, it allows you to convert around 120 GIFs stably. Don’t worry about the performance because you will get the highest quality output here. You just have to upload or drag and drop your files. After conversion, your files will be removed in the next two hours so no other person can access them.
05Convertio
Convertio lets you convert a video file into various formats. It works as an ebook, image, video, document, presentation, font, audio, and archive converter.
You can add files from the computer, dropbox, and google drive. The maximum input file size allowed here to convert is 100MB. If you wish, get the output AVI file from a GIF with increased size and quality.
Part 3 Bonus Want to Edit AVI Videos? Use Filmora
If you want to do something extra apart from GIF-making, like video editing, we have a surprise for you. Wondershare has rolled out the latest update of Wondershare Filmora Video Editor in the V11 beta version. It is a wonderful video editor for professionals as well as amateurs.

Wondershare Filmora - Best Video Editor for Mac/Windows
5,481,435 people have downloaded it.
Build unique custom animations without breaking a sweat.
Focus on creating epic stories and leave the details to Filmora’s auto features.
Start a creative adventure with drag & drop effects and endless possibilities.
Filmora simplifies advanced features to save you time and effort.
Filmora cuts out repetition so you can move on to your next creative breakthrough.
You can enhance your videos with a range of professional editing tools, including video effects, transitions, sound effects, and more. It can also help you create GIFs from UHD 4K videos without any quality compromise. This software also supports many other video formats, so you can personalize any of them as per your choice. It can turn your video idea into reality with perfection.
With the most comprehensive set of video editing tools available, Filmora is the most convenient way to create videos. It can also convert AVI to GIF and vice versafor your business, brands, and social media channels. More than just an editor, this is your all-in-one video production suite.
● Key Takeaways from This Episode →
● Thank you for taking some time out to read this article! We know the amount of time and effort you put into creating an animated GIF. We don’t want your time to go in vain by not having it be perfect.
● I hope these few tips will help you out in the future. Now, you will be able to create the most perfect GIFs to share with family, friends, and business associates.
● For all-in-one video editing tools, you can always use Wondershare Filmora. If you have any other ideas or questions, please leave a comment below.
GIFs have grown in popularity over the years. They are a great way of expressing emotions in a fun way. You can create a GIF out of any video using a conversion tool.
Converting a video AVI to a gif has several benefits. It can be useful for creating cute gifs or memes. Most savvy agencies or freelancers are using this method to improve the effectiveness of their marketing campaigns.
Doing it manually will lead to splitting the video into several pictures at your own time. But with these ideas, you can avoid this extra task and directly convert AVI to GIF in just a few simple steps.
In this article
01 [How to Make an AVI to GIF on Windows/Mac/Online?](#Part 1)
02 [What’s Best 5 GIF to Avi Converters?](#Part 2)
Part 1 How to Make an AVI to GIF on Windows/Mac/Online?
There are many ways to create AVI to GIF based on your device operating system. Go through the various steps below to create it.
01Convert AVI to GIF with Uniconverter
Step 1: Launch Wondershare Uniconverter
Download Wondershare Uniconvereter software from the official link to your PC/Mac (With Mojave). As the home interface appears, click on the “Toolbox” tab and choose the “GIF Maker” option.
Step 2: Upload the AVI File
In the GIF Maker window, click on the “Import” icon to upload AVI files from your PC. On the right pane, select the start and stop times of the videos for GIF-making.
The next thing to do is select the output size and frame rate of the desired GIF output. On the bottom, click on the “File Location” to choose the directory for the output file.
Step 3: Convert
The end step is to convert AVI to gif by clicking on the “Create GIF” button to begin the process.
02Convert AVI to GIF with VLC Media Player
VLC is a cross-platform media player so you can use it on your Mac and Windows to convert AVI to Gif. It’s free and comes with numerous functions and support other than playing media. It can be used as a GIF maker too because of the snapshot feature.
Step 1: Launch VLC Media Player
Run VLC Media Player and then click on “Media” > “Open File” to upload the AVI file from your PC or Mac.
Step 2: Select the Video Frame
As you can see, the video will start running on your VLC media player screen. Now, select the video frame for getting the desired animation. Next, go to the “Video” menu and choose “Take Snapshop”. This step will save the video frame in the PNG format to the My Pictures folder.
Step 3: Open MSPaint
You will have to open MSPaint on your PC. When it opens, click on the “File” menu and then open the snapshot that you had taken in the previous step. Again, click on “File” > “Save As” > “GIF” to download your GIF.
03Convert AVI to GIF Using Photoshop
Converting AVI to GIF with photoshop can be a bit complex but you will get the highest quality GIFs in a short time. Read the steps here to start converting your AVI file.
Step 1: Launch and Import
Run Adobe Photoshop on your PC or Mac. As the home interface will open, click on “File” > “Import” > “Video Frames to Layers”. Now, import your AVI video.
Step 2: Cut the Part
Separate that part of the video for which you want to create a GIF. From the “Range to Import option, select the default “Beginning to End” or “Selected Range”. You also have to check the box in the “Make Frame Animation” option.
Step 3: Check and Save
Come back to the window and check the animation. Trim or add frames if it seems necessary or else simply go to the left side of the animation and click on check forever.
At last, open “File” > “Save for Web”. Now from the “Preset” menu, choose from the GIF option or select from the drop-down list manually. Finish by clicking on “Save”.
Part 2 What’s Best 5 GIF to Avi Converters?
01Cloud Convert
Cloud Convert is a sophisticated, browser-based one-stop shop for all your video conversion needs. It can easily convert AVI to GIF online. It has been packed with plenty of features for yielding desired output to the users. You can adjust fps, preset, resolution, aspect ratio, codec, and more before getting the final result. Not only does it fit your video and image conversion needs but also provides you with audio, ebook, spreadsheet, and many other file conversion facilities. Over 200 file formats are compatible with this platform.
02Any Conv
Any Conv is a powerful solution to convert gifs to AVI files online without any downloads or installations. It supports over 400 file formats and you can use it with any of your devices. Convert any file from one format to another, or from a batch of files at once. This app doesn’t even ask for registration to use and is completely free! There are various options to modify your GIF before the final conversion to AVI such as changing screen size, resize handling, video bitrate, and more.
03Veed.io
Veed.io helps you to convert Gif to AVI and other popular video formats. You can directly upload a file from your computer or add it from your Dropbox. Moreover, you can paste a YouTube URL link for conversion of a video to GIF. It offers you a whole set of video editing, video conversion, and a lot of other features. If you are looking for some additional help in video creation and editing, it’s the best platform for you. Check it out today and start bringing your ideas to reality. The majority of its features can be accessed free of charge.
04MiConv
MiConv is another easy to use cloud-based gif to AVI converter online platform. This multi-platform online converter tool can turn any GIF to AVI online within a few seconds. In an hour, it allows you to convert around 120 GIFs stably. Don’t worry about the performance because you will get the highest quality output here. You just have to upload or drag and drop your files. After conversion, your files will be removed in the next two hours so no other person can access them.
05Convertio
Convertio lets you convert a video file into various formats. It works as an ebook, image, video, document, presentation, font, audio, and archive converter.
You can add files from the computer, dropbox, and google drive. The maximum input file size allowed here to convert is 100MB. If you wish, get the output AVI file from a GIF with increased size and quality.
Part 3 Bonus Want to Edit AVI Videos? Use Filmora
If you want to do something extra apart from GIF-making, like video editing, we have a surprise for you. Wondershare has rolled out the latest update of Wondershare Filmora Video Editor in the V11 beta version. It is a wonderful video editor for professionals as well as amateurs.
Wondershare Filmora - Best Video Editor for Mac/Windows
5,481,435 people have downloaded it.
Build unique custom animations without breaking a sweat.
Focus on creating epic stories and leave the details to Filmora’s auto features.
Start a creative adventure with drag & drop effects and endless possibilities.
Filmora simplifies advanced features to save you time and effort.
Filmora cuts out repetition so you can move on to your next creative breakthrough.
You can enhance your videos with a range of professional editing tools, including video effects, transitions, sound effects, and more. It can also help you create GIFs from UHD 4K videos without any quality compromise. This software also supports many other video formats, so you can personalize any of them as per your choice. It can turn your video idea into reality with perfection.
With the most comprehensive set of video editing tools available, Filmora is the most convenient way to create videos. It can also convert AVI to GIF and vice versafor your business, brands, and social media channels. More than just an editor, this is your all-in-one video production suite.
● Key Takeaways from This Episode →
● Thank you for taking some time out to read this article! We know the amount of time and effort you put into creating an animated GIF. We don’t want your time to go in vain by not having it be perfect.
● I hope these few tips will help you out in the future. Now, you will be able to create the most perfect GIFs to share with family, friends, and business associates.
● For all-in-one video editing tools, you can always use Wondershare Filmora. If you have any other ideas or questions, please leave a comment below.
How to Create a Slideshow with Icecream Slideshow Maker
How to Make a Slideshow with Icecream Slideshow Maker
An easy yet powerful editor
Numerous effects to choose from
Detailed tutorials provided by the official channel
The Icecream slideshow creator software is a known name in the domain of graphic design applications. Keep reading ahead to learn the knowhow of creating Icecream presentations!
In this article
01 [What is Icecream Slideshow Maker?](#Part 1)
02 [How to Use an Ice Cream Slideshow Maker?](#Part 2)
03 [How Do You Add Music to an Icecream Slideshow?](#Part 3)
Part 1 What is Icecream Slideshow Maker?
Slideshows are interesting content presentation tools that have the potential to deliver even the most customary information in a manner that is engaging enough to hold your audience captive. Browsing across the web or the IT market, you can easily encounter a cluster of slideshow builder software and tools that are ready to cater to your requirement of making top quality slideshow presentations that suit a diversity of personal and professional needs.
Moving ahead with the discussion, let us have a talk about the Icecream slide show maker program, which can definitely be a great choice to design graphic artworks of professional excellence, thanks to the latter’s upgraded features and graphic editing utilities. You can pick the tool to create fun-filled slideshows of cherished personal events, or craft elusive and explanatory business presentations to deliver the most precise company and product information to your clients.
Let us now dive deeper into the program specifications and proceed to take a look at the distinguishing features of the Icecream slideshow maker program in the following section:
● The software grants you the liberty to adjust the screen time and the transition play duration of each of the slide contents.
● You can uplift the feel of your presentations with an upbeat background audio, while choosing the same from the editor’s preset media library in a preferred file format.
● You are allowed to customize the presentation slides with matching text annotations and adjust its font, size, orientation, color and animation.
● Working with the program lets you ensure a seamless presentation flow with a diverse range of inbuilt transition effects.
● Before you set into the final creation process, the software facilitates you with a preview of your work, with all the applied effects, element inclusions and parameter variations introduced. You can thus, observe and modify the presentation if required.
● You can save the slideshows midway of the creation process and resume whenever you like, and prefer to sort the presentation slides in a definite or random sequence.
● The software allows you to create and export high resolution 4K slideshows by burning them to CDs and DVDs.
● The created slideshows can be uploaded to online storage accounts and shared across a variety of social media platforms, in almost any common output file format.
● The software is a Windows exclusive program and works effectively well with the Windows XP, Vista, 7, 8, 8.1 and 10 operating system versions.
Part 2 How to Use an Ice Cream Slideshow Maker?
By now, you must have become quite familiar with the credibility of designing slideshow presentations with the Icecream slideshow creator software. However, the real essence lies in taking a practical experience of working with the program to comprehensively understand the slideshow design process in detail.
Adhering to the aforesaid concern, let us try hands at having an in depth understanding of different aspects of working on a slideshow presentation within the program interface through the following stepwise tutorial guide:
User’s Guide to Work With the Icecream Slideshow Maker Program
Step 1: Download and Install Icecream Slideshow Creator
To begin with, visit the official website of the program to download the same in your Windows device. Once the download is successful, you will need to save and run the program’s installation files sin your system. Having done that, you will be directed to the software’s ‘Installation Wizard’ to initiate a quick an easy installation process.

Step 2: Import Media Files
Post a successful installation, proceed to launch the program and wait for the latter’s welcome screen to appear. In the launch screen, navigate to and tap any one of the ‘Add Photo’ or ‘Add Folder’ buttons at the top left corner to import either a single media file, or an entire media folder to the program’s editing workspace.
Instead of using the ‘Add Folder’ option at the top left, you can also select multiple files by pressing and holding the ‘Ctrl’ key son your system’s keyboard and import them to the editor timeline, all at once. You can alternatively, click on the ‘Add Files to Start Your Photostory’ tab in the center of the software’s welcome screen to import the required media files.

Clicking on any of the aforesaid buttons or tabs will direct you to a ‘File Explorer’ window, where you can make the desired media selections. Your choices are however; filtered according to their respective file formats and only those in line with the formats supported by the Icecream Slideshow creator program are imported to the timeline.
Step 3: Configure the Presentation Settings
As soon as you finish the media import process, the editing workspace bifurcates to present the ‘Queue’ window at the left and ‘Preview and Settings’ window at the right side of the screen. This is the space where you can proceed to configure your presentation settings.
● File Sorting
To sort the arrangement of a media file, navigate to the ‘File Queue Panel’ at the left and click on the desired file, while using the ‘Arrow Keys’ at the right to change the latter’s position in the queue, or choose to delete it from the queue by tapping the ‘Recycle Bin’ icon beside the file.
● Duration and Transition Adjustments
Proceeding further, you can try hands at customizing the duration and transition effects for each of the added media files within the queue. All you need to do is, navigate to and click on the respective tabs within the window. Hit the ‘Time’ button to adjust the screen time of the slides or click on the ‘Transitions’ tab to include suitable animation effects between successive slides for a smooth presentation flow.
You can even stick with a random transition effect to add to the slides, or choose to add no transition effect at all. The inbuilt slideshow player the right side of the editor workspace automatically plays the preview of the applied transition effects. The ‘Transition’ and ‘Time’ settings are the sole customizations that you can apply individually to the slides, the rest of the effects being universally applicable to all the presentation slides together.
If you are interested to apply a particular transition and play duration to all the slides, navigate to and click within the gray bar at the bottom of the file queue to apply the same transition and time characteristics to all the slides of the presentation. You can even opt to delete all the added media files at the same time by tapping the ‘Clear List’ button.

● Media Resolution
Working with the Icecream slideshow creator program, you are allowed to adjust the output resolution of your slideshow in the preview window at the right side of the editor timeline. The resolution range lies between 640 x 480 to 1600 x 1200 pixels. Moving further, you can set common play duration for all the transition effects within different slides of the presentation that you have included within the queue.
● Aspect Ratio
You can choose to either keep the actual aspect ratio of the media files or customize the same to fit into the screen size. To go with the former choice, click within the ‘Scale to Fit’ checkbox. In case you wish to stick to the latter option, click inside the ‘Original Ratio’ checkbox. To learn more about working with any of the aforesaid settings, navigate to and click on the ‘Question Mark’ icon alongside each setting.
● Audio Settings
To add upbeat background music to your presentation, navigate to and tap the ‘Add Audio’ button at the bottom left corner of the ‘Preview’ window. You can choose a desired audio track from your system and use the same as the background sound of the slideshow.
You are additionally, permitted to configure the added music track in line with your specific preferences using the ‘Fade’ and ‘Offset’ settings at the right side of the selected music file. To play the audio track immediately with a time shift, choose to set a negative offset value. Likewise, enter a positive offset value to start playing the track after the lapse of a specified time period.

When you are done with adjusting all the settings and adding the desired effects, proceed to watch a preview of the same in the right side ‘Preview Pane’ of the editor workspace and move ahead with creating the slideshow presentation.
Step 4: Create Your Slideshow
If the slideshow preview ensures that everything is at the right place, navigate to the bottom right corner of the editing timeline and click on the ‘Create’ button start building your presentation. You can tap on the ‘Pause/Resume’ and ‘Cancel’ buttons at the bottom of the screen at any time throughout the project creation process. A pop up window will notify you the completion of the design process, while asking you to click on the ‘Open Folder’ button to view your creation in the latter’s destination folder.

Part 3 How Do You Add Music to an Icecream Slideshow?
Supplementing your slideshow presentations with appealing background music adds that extra spark to your creation, while making them stand out of the crowd. A cohesive audio works to create a perfect sync between the contents and mood of your presentation. Having said that, let us look through the process to add suitable background music to your Icecream slideshow in the following section:
User’s Guide for Adding Music to an Icecream Slideshow
Step 1: Download and Install the Program
Navigate to the home website of the Icecream Slideshow maker program to initiate a free download of the software into your system and proceed to install the same to start the slideshow creation process.
Icecream Slideshow Maker Official Download Link:
https://icecreamapps.com/Download-Slideshow-Maker/

Step 2: Import Media Files
Begin with importing the selected media files to the editor workspace of the program in either of the following ways:
● Add the images directly from your system to the editor timeline through the conventional ‘Drag and Drop’ method.
● Navigate to and hit the ‘Add Photo’ button at the top left corner of the program’s main workspace to browse for the media files in the ‘Windows Explorer’.
● Click on the ‘Add Folder’ button to import all the media files within a selected folder.

Step 3: Sort the Imported Files
Once you are done with importing all the media files, you can see them appear within the ‘File Queue’ at the left window of the slideshow creator program. Use the ‘Up/Down’ arrow keys to sort the media files in your preferred order, for example, arranging them according to their specific file names. The file sorting options are available at the right side of the ‘File Queue’.
Step 4: Include Text Customizations
Navigate to the ‘Text Column’ of the ‘File Queue’ and tap the ‘Add Text’ button to include text annotations within each slide of your presentation. A ‘Text Panel’ will pop up, where you can choose to add color, position and font customizations to the included text, followed by previewing the effect on every slide within the ‘Text Panel’ itself.
Step 5: Add a Desired Background Music
The Icecream Slideshow maker pro allows you to include a background music track within your presentation. For working towards the inclusion process, you will have to import the desired audio files to the program’s editor timeline. The software works well with the WAV, WMA, FLAC, M4A, MP3 and OGG audio file formats. Navigate to and hit the ‘Add Audio’ button in the editor workspace to ‘Drag and Drop’ the desired music files within the software’s timeline.
There is an option to create a playlist of the selected audio tracks, along with dragging the files to set them in a preferred sequence within the playlist. You are also granted the liberty to try hands at looping the audio playback and uplift the tracks with fade and offset effects within the playlist pane.

Step 6: Tweak Some Extra Settings
If you are keen towards making your presentation more impressive, try experimenting with including transition effects within the slides. Though the Icecream slideshow maker full version supports the application of default random transitions, you are allowed to add and customize the same as per your will, both, separately for each slide, as well as to the entre presentation as a whole.
You can even choose to add no transition effect at all, or set the same transition value for all the media files within the queue, by navigating to and clicking on the ‘Common Image Settings in the ’File Queue’ window.

Step 7: Output Resolution
Set a preferable output resolution to generate a premium quality slideshow presentation. To do this, navigate to the bottom left corner of the ‘Preview’ window at the right side of the editor workspace and choose a desired resolution for the slideshow from a range of values, such as, 1280 x 1024, 2560 x 1440, 1920 x 1080, etc., in the ‘Resolution’ tab.

Step 8: Format Selection
The next thing you need to do is, select a convenient output file format for your presentation. You can pick anyone from the available AVI, WebM, MP4, MOV file formats. To make your choice, navigate to the bottom of the ‘File Queue’ window at the left and click on the ‘File Format’ dropdown arrow at the right. A list of the output formats supported by the program appears next, and you are free to pick the one you like.

Step 9: Create Your Icecream Slideshow
When you have finalized all the arrangements and settings, navigate to and hit the ‘Preview’ button at the bottom right corner of the ‘Preview’ window to initiate a mock run of your slideshow in the software’s inbuilt slideshow player. If everything seems fine, proceed to start the slideshow creation process by clicking on the ‘Create’ button.

The process may require you to wait for a few moments before the final presentation output is generated. Nonetheless, you can always keep a track of the creation process through the elapsed and remaining duration in the ‘Progress Bar’ at the bottom of the program’s editing workspace. A completion prompt will pop up as soon as the slideshow is ready.
Creating Music Slideshows in Filmora
When searching for an Icecream slideshow maker alternative to craft your slideshow presentations, you can move ahead with picking the Wondershare Filmora Video Editor slideshow creator program for high end and professional quality results. While the aforementioned software is an all in one package for almost any of your most diverse editing needs, music slideshows are a specialty of the same on account of the following reasons:
For Win 7 or later (64-bit)
For macOS 10.12 or later
● Within by the Filmora slideshow creator program.
● Working on your music presentation in the software, you are allowed to cut and trim the music files automatically as well as manually to ward off undesired portions from the included audio.
● You can pick the most suitable soundtrack from the hundreds of choices available within Filmora’s preset audio library and uplift them with a variety of audio effects.
● Using the software, you can proceed with recording your voiceover, followed by applying fade in and fade out effects to the same.
● The software allows you to design professional slideshows for personal media sharing across various platforms, along with catering to product marketing needs and company business concerns.
● Ending Thoughts →
● Icecream slideshow maker review claims that the latter is an effective slideshow creator and graphic editor program.
● Working with the program, you can easily create high quality photo, video and music slideshow presentations in a quick time span.
● Mentioning about the alternatives to the aforesaid program, you can comfortably choose the Wondershare Filmora slideshow maker software to address the concern.
The Icecream slideshow creator software is a known name in the domain of graphic design applications. Keep reading ahead to learn the knowhow of creating Icecream presentations!
In this article
01 [What is Icecream Slideshow Maker?](#Part 1)
02 [How to Use an Ice Cream Slideshow Maker?](#Part 2)
03 [How Do You Add Music to an Icecream Slideshow?](#Part 3)
Part 1 What is Icecream Slideshow Maker?
Slideshows are interesting content presentation tools that have the potential to deliver even the most customary information in a manner that is engaging enough to hold your audience captive. Browsing across the web or the IT market, you can easily encounter a cluster of slideshow builder software and tools that are ready to cater to your requirement of making top quality slideshow presentations that suit a diversity of personal and professional needs.
Moving ahead with the discussion, let us have a talk about the Icecream slide show maker program, which can definitely be a great choice to design graphic artworks of professional excellence, thanks to the latter’s upgraded features and graphic editing utilities. You can pick the tool to create fun-filled slideshows of cherished personal events, or craft elusive and explanatory business presentations to deliver the most precise company and product information to your clients.
Let us now dive deeper into the program specifications and proceed to take a look at the distinguishing features of the Icecream slideshow maker program in the following section:
● The software grants you the liberty to adjust the screen time and the transition play duration of each of the slide contents.
● You can uplift the feel of your presentations with an upbeat background audio, while choosing the same from the editor’s preset media library in a preferred file format.
● You are allowed to customize the presentation slides with matching text annotations and adjust its font, size, orientation, color and animation.
● Working with the program lets you ensure a seamless presentation flow with a diverse range of inbuilt transition effects.
● Before you set into the final creation process, the software facilitates you with a preview of your work, with all the applied effects, element inclusions and parameter variations introduced. You can thus, observe and modify the presentation if required.
● You can save the slideshows midway of the creation process and resume whenever you like, and prefer to sort the presentation slides in a definite or random sequence.
● The software allows you to create and export high resolution 4K slideshows by burning them to CDs and DVDs.
● The created slideshows can be uploaded to online storage accounts and shared across a variety of social media platforms, in almost any common output file format.
● The software is a Windows exclusive program and works effectively well with the Windows XP, Vista, 7, 8, 8.1 and 10 operating system versions.
Part 2 How to Use an Ice Cream Slideshow Maker?
By now, you must have become quite familiar with the credibility of designing slideshow presentations with the Icecream slideshow creator software. However, the real essence lies in taking a practical experience of working with the program to comprehensively understand the slideshow design process in detail.
Adhering to the aforesaid concern, let us try hands at having an in depth understanding of different aspects of working on a slideshow presentation within the program interface through the following stepwise tutorial guide:
User’s Guide to Work With the Icecream Slideshow Maker Program
Step 1: Download and Install Icecream Slideshow Creator
To begin with, visit the official website of the program to download the same in your Windows device. Once the download is successful, you will need to save and run the program’s installation files sin your system. Having done that, you will be directed to the software’s ‘Installation Wizard’ to initiate a quick an easy installation process.
Step 2: Import Media Files
Post a successful installation, proceed to launch the program and wait for the latter’s welcome screen to appear. In the launch screen, navigate to and tap any one of the ‘Add Photo’ or ‘Add Folder’ buttons at the top left corner to import either a single media file, or an entire media folder to the program’s editing workspace.
Instead of using the ‘Add Folder’ option at the top left, you can also select multiple files by pressing and holding the ‘Ctrl’ key son your system’s keyboard and import them to the editor timeline, all at once. You can alternatively, click on the ‘Add Files to Start Your Photostory’ tab in the center of the software’s welcome screen to import the required media files.
Clicking on any of the aforesaid buttons or tabs will direct you to a ‘File Explorer’ window, where you can make the desired media selections. Your choices are however; filtered according to their respective file formats and only those in line with the formats supported by the Icecream Slideshow creator program are imported to the timeline.
Step 3: Configure the Presentation Settings
As soon as you finish the media import process, the editing workspace bifurcates to present the ‘Queue’ window at the left and ‘Preview and Settings’ window at the right side of the screen. This is the space where you can proceed to configure your presentation settings.
● File Sorting
To sort the arrangement of a media file, navigate to the ‘File Queue Panel’ at the left and click on the desired file, while using the ‘Arrow Keys’ at the right to change the latter’s position in the queue, or choose to delete it from the queue by tapping the ‘Recycle Bin’ icon beside the file.
● Duration and Transition Adjustments
Proceeding further, you can try hands at customizing the duration and transition effects for each of the added media files within the queue. All you need to do is, navigate to and click on the respective tabs within the window. Hit the ‘Time’ button to adjust the screen time of the slides or click on the ‘Transitions’ tab to include suitable animation effects between successive slides for a smooth presentation flow.
You can even stick with a random transition effect to add to the slides, or choose to add no transition effect at all. The inbuilt slideshow player the right side of the editor workspace automatically plays the preview of the applied transition effects. The ‘Transition’ and ‘Time’ settings are the sole customizations that you can apply individually to the slides, the rest of the effects being universally applicable to all the presentation slides together.
If you are interested to apply a particular transition and play duration to all the slides, navigate to and click within the gray bar at the bottom of the file queue to apply the same transition and time characteristics to all the slides of the presentation. You can even opt to delete all the added media files at the same time by tapping the ‘Clear List’ button.
● Media Resolution
Working with the Icecream slideshow creator program, you are allowed to adjust the output resolution of your slideshow in the preview window at the right side of the editor timeline. The resolution range lies between 640 x 480 to 1600 x 1200 pixels. Moving further, you can set common play duration for all the transition effects within different slides of the presentation that you have included within the queue.
● Aspect Ratio
You can choose to either keep the actual aspect ratio of the media files or customize the same to fit into the screen size. To go with the former choice, click within the ‘Scale to Fit’ checkbox. In case you wish to stick to the latter option, click inside the ‘Original Ratio’ checkbox. To learn more about working with any of the aforesaid settings, navigate to and click on the ‘Question Mark’ icon alongside each setting.
● Audio Settings
To add upbeat background music to your presentation, navigate to and tap the ‘Add Audio’ button at the bottom left corner of the ‘Preview’ window. You can choose a desired audio track from your system and use the same as the background sound of the slideshow.
You are additionally, permitted to configure the added music track in line with your specific preferences using the ‘Fade’ and ‘Offset’ settings at the right side of the selected music file. To play the audio track immediately with a time shift, choose to set a negative offset value. Likewise, enter a positive offset value to start playing the track after the lapse of a specified time period.
When you are done with adjusting all the settings and adding the desired effects, proceed to watch a preview of the same in the right side ‘Preview Pane’ of the editor workspace and move ahead with creating the slideshow presentation.
Step 4: Create Your Slideshow
If the slideshow preview ensures that everything is at the right place, navigate to the bottom right corner of the editing timeline and click on the ‘Create’ button start building your presentation. You can tap on the ‘Pause/Resume’ and ‘Cancel’ buttons at the bottom of the screen at any time throughout the project creation process. A pop up window will notify you the completion of the design process, while asking you to click on the ‘Open Folder’ button to view your creation in the latter’s destination folder.
Part 3 How Do You Add Music to an Icecream Slideshow?
Supplementing your slideshow presentations with appealing background music adds that extra spark to your creation, while making them stand out of the crowd. A cohesive audio works to create a perfect sync between the contents and mood of your presentation. Having said that, let us look through the process to add suitable background music to your Icecream slideshow in the following section:
User’s Guide for Adding Music to an Icecream Slideshow
Step 1: Download and Install the Program
Navigate to the home website of the Icecream Slideshow maker program to initiate a free download of the software into your system and proceed to install the same to start the slideshow creation process.
Icecream Slideshow Maker Official Download Link:
https://icecreamapps.com/Download-Slideshow-Maker/
Step 2: Import Media Files
Begin with importing the selected media files to the editor workspace of the program in either of the following ways:
● Add the images directly from your system to the editor timeline through the conventional ‘Drag and Drop’ method.
● Navigate to and hit the ‘Add Photo’ button at the top left corner of the program’s main workspace to browse for the media files in the ‘Windows Explorer’.
● Click on the ‘Add Folder’ button to import all the media files within a selected folder.
Step 3: Sort the Imported Files
Once you are done with importing all the media files, you can see them appear within the ‘File Queue’ at the left window of the slideshow creator program. Use the ‘Up/Down’ arrow keys to sort the media files in your preferred order, for example, arranging them according to their specific file names. The file sorting options are available at the right side of the ‘File Queue’.
Step 4: Include Text Customizations
Navigate to the ‘Text Column’ of the ‘File Queue’ and tap the ‘Add Text’ button to include text annotations within each slide of your presentation. A ‘Text Panel’ will pop up, where you can choose to add color, position and font customizations to the included text, followed by previewing the effect on every slide within the ‘Text Panel’ itself.
Step 5: Add a Desired Background Music
The Icecream Slideshow maker pro allows you to include a background music track within your presentation. For working towards the inclusion process, you will have to import the desired audio files to the program’s editor timeline. The software works well with the WAV, WMA, FLAC, M4A, MP3 and OGG audio file formats. Navigate to and hit the ‘Add Audio’ button in the editor workspace to ‘Drag and Drop’ the desired music files within the software’s timeline.
There is an option to create a playlist of the selected audio tracks, along with dragging the files to set them in a preferred sequence within the playlist. You are also granted the liberty to try hands at looping the audio playback and uplift the tracks with fade and offset effects within the playlist pane.
Step 6: Tweak Some Extra Settings
If you are keen towards making your presentation more impressive, try experimenting with including transition effects within the slides. Though the Icecream slideshow maker full version supports the application of default random transitions, you are allowed to add and customize the same as per your will, both, separately for each slide, as well as to the entre presentation as a whole.
You can even choose to add no transition effect at all, or set the same transition value for all the media files within the queue, by navigating to and clicking on the ‘Common Image Settings in the ’File Queue’ window.
Step 7: Output Resolution
Set a preferable output resolution to generate a premium quality slideshow presentation. To do this, navigate to the bottom left corner of the ‘Preview’ window at the right side of the editor workspace and choose a desired resolution for the slideshow from a range of values, such as, 1280 x 1024, 2560 x 1440, 1920 x 1080, etc., in the ‘Resolution’ tab.
Step 8: Format Selection
The next thing you need to do is, select a convenient output file format for your presentation. You can pick anyone from the available AVI, WebM, MP4, MOV file formats. To make your choice, navigate to the bottom of the ‘File Queue’ window at the left and click on the ‘File Format’ dropdown arrow at the right. A list of the output formats supported by the program appears next, and you are free to pick the one you like.
Step 9: Create Your Icecream Slideshow
When you have finalized all the arrangements and settings, navigate to and hit the ‘Preview’ button at the bottom right corner of the ‘Preview’ window to initiate a mock run of your slideshow in the software’s inbuilt slideshow player. If everything seems fine, proceed to start the slideshow creation process by clicking on the ‘Create’ button.
The process may require you to wait for a few moments before the final presentation output is generated. Nonetheless, you can always keep a track of the creation process through the elapsed and remaining duration in the ‘Progress Bar’ at the bottom of the program’s editing workspace. A completion prompt will pop up as soon as the slideshow is ready.
Creating Music Slideshows in Filmora
When searching for an Icecream slideshow maker alternative to craft your slideshow presentations, you can move ahead with picking the Wondershare Filmora Video Editor slideshow creator program for high end and professional quality results. While the aforementioned software is an all in one package for almost any of your most diverse editing needs, music slideshows are a specialty of the same on account of the following reasons:
For Win 7 or later (64-bit)
For macOS 10.12 or later
● Within by the Filmora slideshow creator program.
● Working on your music presentation in the software, you are allowed to cut and trim the music files automatically as well as manually to ward off undesired portions from the included audio.
● You can pick the most suitable soundtrack from the hundreds of choices available within Filmora’s preset audio library and uplift them with a variety of audio effects.
● Using the software, you can proceed with recording your voiceover, followed by applying fade in and fade out effects to the same.
● The software allows you to design professional slideshows for personal media sharing across various platforms, along with catering to product marketing needs and company business concerns.
● Ending Thoughts →
● Icecream slideshow maker review claims that the latter is an effective slideshow creator and graphic editor program.
● Working with the program, you can easily create high quality photo, video and music slideshow presentations in a quick time span.
● Mentioning about the alternatives to the aforesaid program, you can comfortably choose the Wondershare Filmora slideshow maker software to address the concern.
Best Things People Know About Wedding Slideshow
Top Things People Know About Wedding Slideshow
An easy yet powerful editor
Numerous effects to choose from
Detailed tutorials provided by the official channel
A wedding slideshow is a great way not only to save memories of your special day but also to connect with your guests and let them know your love story in an interesting and creative manner. A well-made wedding slideshow will certainly spice up the entire event and will make it a memorable day for you as well as your dear ones.

To create an eye-grabbing and engaging wedding slideshow there are several factors to be considered as the right selection of the images, effects, music, and much more. The content below will you to know about these factors and tools that will help you create a memorable slideshow.
In this article
01 [Key Steps for Creating a Wedding Slideshow](#Part 1)
02 [Tips to Further Spice Up and Make the Wedding Slideshow Even More Interesting](#Part 2)
03 [Hassle-free Tool for Finding Templates and Creating a Slideshow- Wondershare Filmora](#Part 3)
Part 1 Key Steps For Creating A Wedding Slideshow
There are key steps that go into the making of a wedding slideshow. Check them as below.

01Choose The Appropriate Software
For creating an impressive and engaging wedding slideshow it is very important to choose the right software that comes packed in with all your required features. There is an array of these online and desktop-based programs available. Check out the features, pros, and cons of each of these wedding slideshow maker, and then make a choice. Some of the popular ones include Wondershare Filmora, Animotica, Animoto, Adobe Spark, and others.
02Select A Theme And A Story
Another important thing to be considered before you start making the actual slideshow is deciding the story or the theme. Depending on the theme, the images, videos, and other elements of the wedding photo slideshow will be added. Choose a theme that matches the personality of the couple. The selection of the theme can make a huge difference to the overall creation of the slideshow.
03Duration Of The Slideshow
Next, you need to decide on the total duration for which you need to create the slideshow. A too-short video will not be able to convey your story while a long one can be boring for the viewers. So ideally, a slideshow between 7-10 minutes is good enough.
04Pick Up The Best Images And Videos
Next, comes the crucial and the major part of the slideshow- videos and images. First of all, make sure to choose high-quality clear images that if seen from a distance and on a bigger screen looks clear. Choose the pictures and the videos that go along with your selected story and the theme and portray the couple’s romance and relationship. In addition to the couple, the images of friends, relatives, colleagues, and other dear ones can be included.
Add effects, filters, templates, and other elements
To further spice up your slideshow and make it more interesting, add some filters, transitions, text, effects, and other elements. A lot of professional slideshow-making tools come with built-in effects that can be added. Wedding slide template also work as a great tool for making a slideshow in a hassle-free manner. Choose a design and keep adding the elements.
05Add An Appropriate Music
No matter how well created your wedding slideshow is, it looks incomplete until a music file is added. Depending on your slideshow theme you can either choose simple soft music, a peppy latest song, or any other audio file. The favorite song of the couple can also be included. Using an audio editing tool, you can add multiple audio clips to create a single file to be used for the slideshow.
Part 2 Tips To Further Spice Up And Make The Wedding Slideshow Even More Interesting
Above we have listed the key steps for creating a wedding slideshow. So, if you want to spice up and make your slideshow even more engaging and make it different from all regular others, the below-listed tips will be useful.
● Including some short video clips and images of relatives, best friends, and other dear ones.
● Add short video-based interviews of parents, siblings, and other dear ones about the couple, their relationship, and more.
● Marriage advise from married colleagues and friends.
● Wishes from the relatives and friends who cannot make it to the wedding for some reason.
● Including short clips of the wedding preparations.
● A voiceover of a friend or a relative can be added to the slideshow in a manner as if some script is being narrated.

Part 3 Hassle-Free Tool For Finding Templates And Creating A Slideshow- Wondershare Filmora
Wondershare Filmora Video Editor is a one-stop solution for all your wedding slideshow creation needs. This excellent Windows and Mac-based software is a professional video editing tool supporting advanced features. All your slideshow clips and videos can be processed and customized like a pro using the built-in features of the software like effects, filters, transitions, and more.
For Win 7 or later (64-bit)
For macOS 10.12 or later
A wide range of templates in different categories for creating a slideshow is also available and above all the software allows for creating an impressive slideshow in just a few simple steps. If needed, you can even use the stock footage as well as music files available at the site for your slideshow.
Steps to create a wedding slideshow using Wondershare Filmora
Step 1. Launch the installed software on your system and on the main interface choose the New Project button.
Step 2. The videos and the images that have to be added to the slideshow now have to be imported to the software Media Library.
The added media files can be customized using the editing tool in the software.
Now drag and move the images and videos to the timeline.
Step 3. Next comes the step of adding transitions. Multiple styles of transitions are available in the tool to choose from. You can also adjust the transition duration as needed.
Step 4. Next, add the music to your slideshow. Use a locally saved music file or choose the one from the software media library. The option for adding a voice-over is also there.
Step 5. Finally, save and then export the slideshow. You can save it locally or to a DVD. Sharing option on social media sites is also present.

● Ending Thoughts →
● A wedding slideshow helps the guests at the wedding to know about the love story of the couple and is also a presentation to relive the wedding moments forever.
● There are several key factors and tips that should be followed for creating an engaging, and interesting slideshow.
● Wondershare Filmora is the best slideshow maker for wedding as it comes with variety of templates, editing tools and other functions.
A wedding slideshow is a great way not only to save memories of your special day but also to connect with your guests and let them know your love story in an interesting and creative manner. A well-made wedding slideshow will certainly spice up the entire event and will make it a memorable day for you as well as your dear ones.
To create an eye-grabbing and engaging wedding slideshow there are several factors to be considered as the right selection of the images, effects, music, and much more. The content below will you to know about these factors and tools that will help you create a memorable slideshow.
In this article
01 [Key Steps for Creating a Wedding Slideshow](#Part 1)
02 [Tips to Further Spice Up and Make the Wedding Slideshow Even More Interesting](#Part 2)
03 [Hassle-free Tool for Finding Templates and Creating a Slideshow- Wondershare Filmora](#Part 3)
Part 1 Key Steps For Creating A Wedding Slideshow
There are key steps that go into the making of a wedding slideshow. Check them as below.
01Choose The Appropriate Software
For creating an impressive and engaging wedding slideshow it is very important to choose the right software that comes packed in with all your required features. There is an array of these online and desktop-based programs available. Check out the features, pros, and cons of each of these wedding slideshow maker, and then make a choice. Some of the popular ones include Wondershare Filmora, Animotica, Animoto, Adobe Spark, and others.
02Select A Theme And A Story
Another important thing to be considered before you start making the actual slideshow is deciding the story or the theme. Depending on the theme, the images, videos, and other elements of the wedding photo slideshow will be added. Choose a theme that matches the personality of the couple. The selection of the theme can make a huge difference to the overall creation of the slideshow.
03Duration Of The Slideshow
Next, you need to decide on the total duration for which you need to create the slideshow. A too-short video will not be able to convey your story while a long one can be boring for the viewers. So ideally, a slideshow between 7-10 minutes is good enough.
04Pick Up The Best Images And Videos
Next, comes the crucial and the major part of the slideshow- videos and images. First of all, make sure to choose high-quality clear images that if seen from a distance and on a bigger screen looks clear. Choose the pictures and the videos that go along with your selected story and the theme and portray the couple’s romance and relationship. In addition to the couple, the images of friends, relatives, colleagues, and other dear ones can be included.
Add effects, filters, templates, and other elements
To further spice up your slideshow and make it more interesting, add some filters, transitions, text, effects, and other elements. A lot of professional slideshow-making tools come with built-in effects that can be added. Wedding slide template also work as a great tool for making a slideshow in a hassle-free manner. Choose a design and keep adding the elements.
05Add An Appropriate Music
No matter how well created your wedding slideshow is, it looks incomplete until a music file is added. Depending on your slideshow theme you can either choose simple soft music, a peppy latest song, or any other audio file. The favorite song of the couple can also be included. Using an audio editing tool, you can add multiple audio clips to create a single file to be used for the slideshow.
Part 2 Tips To Further Spice Up And Make The Wedding Slideshow Even More Interesting
Above we have listed the key steps for creating a wedding slideshow. So, if you want to spice up and make your slideshow even more engaging and make it different from all regular others, the below-listed tips will be useful.
● Including some short video clips and images of relatives, best friends, and other dear ones.
● Add short video-based interviews of parents, siblings, and other dear ones about the couple, their relationship, and more.
● Marriage advise from married colleagues and friends.
● Wishes from the relatives and friends who cannot make it to the wedding for some reason.
● Including short clips of the wedding preparations.
● A voiceover of a friend or a relative can be added to the slideshow in a manner as if some script is being narrated.
Part 3 Hassle-Free Tool For Finding Templates And Creating A Slideshow- Wondershare Filmora
Wondershare Filmora Video Editor is a one-stop solution for all your wedding slideshow creation needs. This excellent Windows and Mac-based software is a professional video editing tool supporting advanced features. All your slideshow clips and videos can be processed and customized like a pro using the built-in features of the software like effects, filters, transitions, and more.
For Win 7 or later (64-bit)
For macOS 10.12 or later
A wide range of templates in different categories for creating a slideshow is also available and above all the software allows for creating an impressive slideshow in just a few simple steps. If needed, you can even use the stock footage as well as music files available at the site for your slideshow.
Steps to create a wedding slideshow using Wondershare Filmora
Step 1. Launch the installed software on your system and on the main interface choose the New Project button.
Step 2. The videos and the images that have to be added to the slideshow now have to be imported to the software Media Library.
The added media files can be customized using the editing tool in the software.
Now drag and move the images and videos to the timeline.
Step 3. Next comes the step of adding transitions. Multiple styles of transitions are available in the tool to choose from. You can also adjust the transition duration as needed.
Step 4. Next, add the music to your slideshow. Use a locally saved music file or choose the one from the software media library. The option for adding a voice-over is also there.
Step 5. Finally, save and then export the slideshow. You can save it locally or to a DVD. Sharing option on social media sites is also present.
● Ending Thoughts →
● A wedding slideshow helps the guests at the wedding to know about the love story of the couple and is also a presentation to relive the wedding moments forever.
● There are several key factors and tips that should be followed for creating an engaging, and interesting slideshow.
● Wondershare Filmora is the best slideshow maker for wedding as it comes with variety of templates, editing tools and other functions.
Also read:
- Updated Leading Applications to Create Fast Motion in iPhone for 2024
- New In 2024, Finding LUTs Made by Danny Gevirtz
- Updated Separate Audio From Video in DaVinci Resolve Step by Step
- 2024 Approved Wondering How to Create a Stunning Intro Video with KineMaster? Here Are the Simple Steps to Use KineMaster to Design Your Intro Video in Simple Steps
- Splice Video Editor Online - Get Your Videos Splice for 2024
- New How to Add a Custom Transition to OBS for 2024
- In 2024, Step by Step to Rotate Video Using KMPlayer
- Updated 2024 Approved Adobe After Effects Review
- New Are You Looking for the Best Premiere Pro Slideshow Template Online for Free? If Yes, You Can Find a Few Exciting Slideshow Templates Here. They Are Worth Using
- Updated 2024 Approved Color Correction Basics (S-LOG Footage)
- 2024 Approved Perfecting the Art of Slowing Down Video on Instagram
- New How to Create Vintage Film Effect 1920S
- Are You Looking to Finish Your YouTube Video in Style? The Following Are the Best End Screen Makers to Choose From
- New In 2024, How to Create OBS Slideshow
- Updated Step by Step to Split a Clip in VLC
- New How to Color Grade Your Picture in LightRoom for 2024
- Let Us Talk About the Famous Photoshop and Most Commonly Used Glitch Effect. The Article Understudy Will Discuss in Detail About Photo Glitch Effect
- Being a Content Creator Means Creating a Slow-Mo at some Point. Study This Piece to Learn How to Play a Video in Slow Motion on iPhone for 2024
- Are You a Newbie Across YouTube? Want to Know Who the Best Vloggers Are? This Article Provides You with the Best Vloggers on YouTube for 2024
- Updated 2024 Approved 12 Best Picks of Video Enhancer Software
- Convert MP4 to 60 FPS GIF A Step-by-Step Guide
- Updated Top 22 Free Video Editing Software for 2024
- How to Make Stunning Glitch Effect in Photoshop for 2024
- 2024 Approved Learn How to Blur a Still or Moving Part of Video
- Updated Best 8 Animated Video Makers for 2024
- In 2024, Easily Cut Large Video Faster on Mac
- New The Most Efficient Ways to Manage Your Timeline for 2024
- In 2024, A Roster of 8 Top Color Match Generators
- New Practical Way to Resize Video in Handbrake
- In 2024, 10 Catchy Pixel Art Wallpapers and How to Custom Your Own with Ease
- New What Are The Stages Of Film Production
- Want to Sync Separate Audio with Video? Check Out This Guide to Do It in the Simplest Way Using the Video Editor - Wondershare Filmora for 2024
- New A Full Review of Leeming LUT Pro
- 2024 Approved How to Make a Slow Motion Video in Wondershare Filmora
- In 2024, Using the Best Templates to Create Slow Motion Videos on CapCut
- 2024 Approved How to Create Realistic Fire Effects
- Updated You Are at the Right Post if You Are Surfing for a GIF to MP4 Conversion Tool. This Article Will Provide You with the Top Best Converters that Can Help You Convert GIF to MP4 Videos Quickly and Easily
- Updated Guide To Selecting and Using the Best Braw Luts for 2024
- How to Make A Slideshow Video (+Filmora Techniques)
- How to Use OBS Chroma Key With/Without Green Screen for 2024
- How To Make a Video Podcast
- New In 2024, Complete Guide to Make a Super Easy Rotating Video Effect
- Updated 2024 Approved How To Cut Videos For Instagram On Mac
- Updated Easy Way to Add Effects to Art Video
- How to Add Photos to Tik Tok Video for 2024
- New 100 Workable How to Mask Track with Adobe Premiere Pro for 2024
- Updated This Is the Method Employed During Every Evening Weather Broadcast The Newscaster Is Standing in Front of a Blank Screen, but the Viewers at Home See a Weather Map
- Updated 2024 Approved 15 Best CapCut Templates for Slow Motion Editing
- New One of the Latest Tools for Editing Video and Images Is AI Composite Video App Which Is Popular Among Users. Learn All About This Tool and Its Functioning
- Possible solutions to restore deleted videos from Realme Narzo N55
- How Many Attempts To Unlock iPhone 11 Pro
- How To Simulate GPS Movement With Location Spoofer On OnePlus Nord N30 SE? | Dr.fone
- 2024 Approved How to Make Animated Explainer Videos
- In 2024, Top 6 Apps/Services to Trace Any Motorola Moto G14 Location By Mobile Number | Dr.fone
- In 2024, Fix Apple iPhone 12 mini Stuck on Data Transfer Verified Solution! | Dr.fone
- In 2024, 5 Ways to Track Oppo Find X7 Ultra without App | Dr.fone
- In 2024, Top 4 SIM Location Trackers To Easily Find Your Lost Realme C67 4G Device
- In 2024, How to Track a Lost Xiaomi 14 Pro for Free? | Dr.fone
- In 2024, How I Transferred Messages from Tecno Spark 20C to iPhone 12/XS (Max) in Seconds | Dr.fone
- In 2024, What Legendaries Are In Pokemon Platinum On HTC U23 Pro? | Dr.fone
- How to insert sign in .xltm files
- How to add a digital signature block to Word 2000
- In 2024, How to Bypass Android Lock Screen Using Emergency Call On Xiaomi Redmi 12?
- Remove the lock of Vivo Y78t
- In 2024, 5 Ways to Transfer Music from Vivo V30 Pro to Other Android Devices Easily | Dr.fone
- How to Change your Motorola Moto G73 5G Location on Twitter | Dr.fone
- What is Geo-Blocking and How to Bypass it On OnePlus Nord CE 3 5G? | Dr.fone
- How to Unlock T-Mobile Apple iPhone 6s Plus online without SIM Card?
- In 2024, CatchEmAll Celebrate National Pokémon Day with Virtual Location On Vivo Y100i | Dr.fone
- In 2024, The Magnificent Art of Pokemon Go Streaming On Asus ROG Phone 8? | Dr.fone
- How To Restore Missing Call Logs from Redmi Note 12 Pro 4G
- In 2024, How to Bypass Google FRP Lock from Tecno Spark 20 Pro+ Devices
- Top IMEI Unlokers for Apple iPhone 15 Plus and Android Phones
- In 2024, Best 3 Software to Transfer Files to/from Your Realme 11 Pro via a USB Cable | Dr.fone
- Updated Best Voice Generators & Changers with The Most Anime Voices Supported for 2024
- In 2024, iPogo will be the new iSpoofer On Samsung Galaxy S23 Ultra? | Dr.fone
- How to Update Apple iPhone 15 Plus without iTunes? | Dr.fone
- Undeleted lost videos from Oppo A38
- How to Perform Hard Reset on Itel P55 5G? | Dr.fone
- In 2024, Xiaomi Redmi Note 12T Pro ADB Format Tool for PC vs. Other Unlocking Tools Which One is the Best?
- How to Send and Fake Live Location on Facebook Messenger Of your Oppo Find X7 | Dr.fone
- Title: Updated How To Add Text In After Effects
- Author: Chloe
- Created at : 2024-05-20 03:37:50
- Updated at : 2024-05-21 03:37:50
- Link: https://ai-editing-video.techidaily.com/updated-how-to-add-text-in-after-effects/
- License: This work is licensed under CC BY-NC-SA 4.0.
