
:max_bytes(150000):strip_icc():format(webp)/GettyImages-678913139-58a4ece73df78c345bcd781b.jpg)
Updated How To Change Speed of Video in Final Cut Pro for 2024
How To Change Speed of Video in Final Cut Pro?
When there are certain boring but necessary parts in your video, you need to speed them up. Similarly, you may need to reduce the duration of the entire video. Speeding up the video is your only option when you do not want to cut any part. You must have also observed that certain videos look funny when you speed them up. To speed up videos, you will need a video editor that does not degrade the video quality.
Final Cut Pro is a popular choice to speed up video without distorting the pitch. Many think that the video quality can degrade when they change the speed of the video clip. This concern can be taken care of when you alter the video speed with Final Cut Pro. Instead of changing the speed of the entire video, you can change the speed of specific parts. We will illustrate how to speed up the video using Final Cut Pro and suggest a better choice than FCP.

Part I. Speed Up Video using Final Cut Pro
Final Cut Pro by Apple is one of Mac users’ most popular video editors. Many video creators purchase MacBooks for editing their videos in Final Cut Pro. The video editor is suitable for beginners as well as professionals. FCP, as a video editor, is super fast in rendering and processing video while exporting. Here are the steps for the Final Cut Pro speed-up clip.
Step1 Open FCP. Navigate to File>New> and tap Project to start a new project.

Step2 Go to File>Import> Media and fetch your video clip. After that, drag/drop the video clip into the timeline.

Step3 Choose the video clip from the timeline. Click on the Speedometer(Retime) icon at the top of the timeline.

Step4 Tap the Speedometer icon, to get the drop-drop menu. For the Final Cut Pro speed-up video, go to Fast and select the speed. You get to choose from 2X to 20X.

If you want to customize the speed-up rate, you can click on the Custom option. Enter any desired percentage speed.
Step5 Now, play the video.

Part II. Tips for Speeding Up Video in Final Cut Pro
You have to keep a few points in mind when you speed up videos in Final Cut Pro. This ensures that the video does not get distorted while speeding up a section. Here are some tips to follow to speed up the video in FCP.
Adjust The Pitch of Sped-Up Clips -
By default, Final Cut Pro preserves the pitch of the audio even when you change the speed of the video. However, you may want to change the pitch per the video’s speed. This is because you might want to make the audio sound funny. You need to turn off the Preserve Pitch option from Retime menu. Once you do that, the pitch of the sped-up clip adjusts itself as per the change in speed.
Speeding Up Video by Adjusting Frame Rate -
You can shoot at a low frame rate for the scene you want to speed up. The frame rate should be lower than the overall video project’s frame rate.
You can add the scene to your video project on the timeline. Then you need to choose Automatic Speed from Retime menu. This will increase the frame rate from the scene to the video project frame rate. Once the frame rate increases, the video will speed up automatically.

Smoothen Out the Sped-Up Video -
Sometimes, the overall video may look old when you speed up a particular portion. That is why there are two options available on Final Cut Pro. The first option is frame blending which is more suitable for the slow-motion clip.
The second option is the optical flow that smoothens out the sped-up clip. It adds in-between frames by analyzing the directional movement of pixels. You can find the option from Video Quality present in the Retime menu.
Part III. The Right Final Cut Pro Alternative for Changing Speed - Filmora
Final Cut Pro has a steep learning curve. Unless you have some experience in video editing, you will find the user interface slightly complicated. Besides, Final Cut Pro is only available for Mac users since it is an Apple product.
Many people look for a Final Cut Pro alternative to change the speed of the video. Wondershare Filmora is the best choice over Final Cut Pro to change the speed of video Final Cut Pro.
Wondershare Filmora is a professional video editor that is available for Windows and Mac users. The video editor is suitable for beginners as well as experienced video creators. The popularity of Filmora is due to its super intuitive user interface. You get almost all the features of FCP in Filmora.
In comparison, there are more video effects, elements, and stock media files available to enhance your videos. You get the latest effects from time to time so that you can have the trending elements in the video, you can also save the edited video in different video file formats as per your requirements, and even record video through a webcam and capture the screen using Filmora.
Several AI effects, stickers, and elements are available to enhance your videos. Most users find it easier to edit videos on Filmora over Final Cut Pro.
Free Download For Win 7 or later(64-bit)
Free Download For macOS 10.14 or later
How to Change Video Speed in Filmora?
Changing video speed in Filmora is super easy. You can speed up your video as per your requirements in a number of ways. That is why Filmora happens to be a better option than Final Cut Pro. We will illustrate all the different methods to change video speed in Filmora.
You can watch this video to understand how to change video speed in Filmora.
Method 1. The Simplest Way - Click “2x-100x” Speed Options
Just like Final Cut Pro, you can choose from preset speed options to change video speed. This is undoubtedly the easiest way to change video speed instantly. While Final Cut Pro offers 2X to 20X speed options, Filmora has 2X to 100X speed presets. Here are the steps to speed up video by choosing a preset speed option.
Step1 Download, install and simply Launch Filmora. Tap Create New Project option.

Step2 Go to File> Import Media> Import Media Files and choose the video file. The selected video will be imported into the Project Media folder. Alternatively, you can also use the drag/drop function.

Step3 Drag and drop the video file onto the timeline. Select the video clip from the timeline and click on the Speed (timer icon) option at the top of the timeline. If you want to speed up a portion of the video, you need to split the video clip.

Step4 From the menu, go to Fast and select any speed option as per your requirements. Thereafter, play the video to see the changes.

Step5 Press Export to save the video file in your desired file format.
Method 2. Use Uniform Speed to Change Speed
If you want to customize the video speed uniformly, there is a dedicated option called Uniform Speed in Filmora. This means you do not want to choose from the preset speed options. You may want to set the speed of the video to 3X, but it is not available in the preset options.
That is where Uniform Speed comes in handy, and you can set any speed from 0.01X to 100X. Here are the steps to follow.
Step1 Once you have dropped the video file onto the timeline, click on the Speed(timer) icon.
Step2 Click on the Uniform Speed option. This will open the Uniform Speed tab above the timeline.

Step3 Adjust the speed slider to set the desired speed as per your requirements. The duration will change as per the speed you set, and you can set the duration below the speed slider. Just like Final Cut Pro, you can turn on Ripple and Audio Pitch as per your preference.

Step4 Once you are satisfied with the speed, click on the Ok button. Thereafter, tap Export to save the edited video file.
Method 3. Use Speed Ramping to Change Speed
There is a unique way to change your video speed called speed ramping. You can speed up some parts and slow down the other parts, like crests and troughs in a graph.
The speed ramping feature comes with several graphical presets. You can choose from the presets and customize the speed as per your requirements. Check the steps to use speed ramping to change your video speed.
Step1 Drag and drop the video file onto the timeline. Click on the Speed(timer) icon at the top of the timeline.
Step2 Click on Speed Ramping option. This will open Speed Ramping above the timeline.

Step3 Select from the available preset as per your requirements. Otherwise, you can select Customize option and edit the nodes as needed.

Step4 Once satisfied with the result, click on the Ok button. Finally, tap Export
Conclusion
There are some videos where you may have to speed up certain parts. In detail, we have illustrated how to speed up the video in Final Cut Pro. However, if you do not have Final Cut Pro or are unsatisfied with FCP, Wondershare Filmora is a great choice. Most importantly, the steps for all the different methods are very simple for everyone to follow.
Free Download For macOS 10.14 or later
How to Change Video Speed in Filmora?
Changing video speed in Filmora is super easy. You can speed up your video as per your requirements in a number of ways. That is why Filmora happens to be a better option than Final Cut Pro. We will illustrate all the different methods to change video speed in Filmora.
You can watch this video to understand how to change video speed in Filmora.
Method 1. The Simplest Way - Click “2x-100x” Speed Options
Just like Final Cut Pro, you can choose from preset speed options to change video speed. This is undoubtedly the easiest way to change video speed instantly. While Final Cut Pro offers 2X to 20X speed options, Filmora has 2X to 100X speed presets. Here are the steps to speed up video by choosing a preset speed option.
Step1 Download, install and simply Launch Filmora. Tap Create New Project option.
Step2 Go to File> Import Media> Import Media Files and choose the video file. The selected video will be imported into the Project Media folder. Alternatively, you can also use the drag/drop function.
Step3 Drag and drop the video file onto the timeline. Select the video clip from the timeline and click on the Speed (timer icon) option at the top of the timeline. If you want to speed up a portion of the video, you need to split the video clip.
Step4 From the menu, go to Fast and select any speed option as per your requirements. Thereafter, play the video to see the changes.
Step5 Press Export to save the video file in your desired file format.
Method 2. Use Uniform Speed to Change Speed
If you want to customize the video speed uniformly, there is a dedicated option called Uniform Speed in Filmora. This means you do not want to choose from the preset speed options. You may want to set the speed of the video to 3X, but it is not available in the preset options.
That is where Uniform Speed comes in handy, and you can set any speed from 0.01X to 100X. Here are the steps to follow.
Step1 Once you have dropped the video file onto the timeline, click on the Speed(timer) icon.
Step2 Click on the Uniform Speed option. This will open the Uniform Speed tab above the timeline.
Step3 Adjust the speed slider to set the desired speed as per your requirements. The duration will change as per the speed you set, and you can set the duration below the speed slider. Just like Final Cut Pro, you can turn on Ripple and Audio Pitch as per your preference.
Step4 Once you are satisfied with the speed, click on the Ok button. Thereafter, tap Export to save the edited video file.
Method 3. Use Speed Ramping to Change Speed
There is a unique way to change your video speed called speed ramping. You can speed up some parts and slow down the other parts, like crests and troughs in a graph.
The speed ramping feature comes with several graphical presets. You can choose from the presets and customize the speed as per your requirements. Check the steps to use speed ramping to change your video speed.
Step1 Drag and drop the video file onto the timeline. Click on the Speed(timer) icon at the top of the timeline.
Step2 Click on Speed Ramping option. This will open Speed Ramping above the timeline.
Step3 Select from the available preset as per your requirements. Otherwise, you can select Customize option and edit the nodes as needed.
Step4 Once satisfied with the result, click on the Ok button. Finally, tap Export
Conclusion
There are some videos where you may have to speed up certain parts. In detail, we have illustrated how to speed up the video in Final Cut Pro. However, if you do not have Final Cut Pro or are unsatisfied with FCP, Wondershare Filmora is a great choice. Most importantly, the steps for all the different methods are very simple for everyone to follow.
Top 7 Easy Ways to Convert a Video to a GIF Online
Looking for the best video to gif online conversion tools? No worries, as we have done all the research work and have shortlisted the best tools that can assist you with the task. GIF is short and cute animated files that help in interestingly conveying a message. These short-animated visuals help in reaching and creating an impact on the target audience. So, if you have some videos, GIF animations can be created from them using a good converter tool which can be an online program or system software.
Online programs are preferred by the users owing to their simple and hassle-free use, support for basic features, and cost-saving options. So, here in this topic, we will discuss the top and easy ways to convert video to GIF online.

Part 1: Top 7 Easy Ways to Convert a Video to a GIF Online
Several online tools can be used for converting a video file into GIF, but all do not stand up to the tall claims it makes. So, if you are in search of an easy yet effective tool, shortlisted below are the top 7 tools for video into GIF online conversion.
1. Adobe Express
Powered by Adobe Premiere, this is an excellent online tool that allows converting videos in all key formats in GIF format. The free version allows adding videos for up to 1 hour and the processed files can be downloaded to the local system.
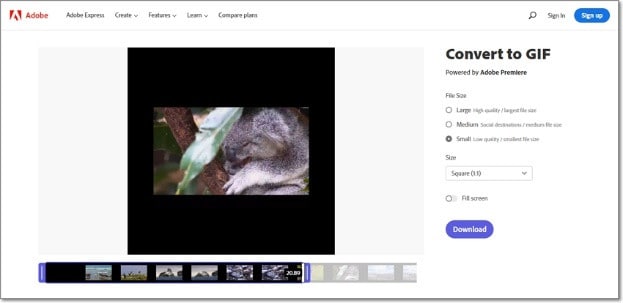
Key features
- Video files in all key formats can be converted to GIF.
- Allows selecting the aspect ratio and the file size of the target file.
- This video to GIF converter online tool support drag and drop feature.
- Allows trimming the video so that the file portion can be selected.
Pros:
- Simple and clean interface.
- Quick file processing.
- Allows selecting aspect ratio and file size.
Cons:
- Only one file at a time can be processed.
- Only desktop files can be added.
- To download the file, you need to free sign-up.
User Review:
A good online multi-platform service that works with interesting features. -TechRadar
This is one of the best programs that comes packed with wide range of features that can assist you in getting the target customized files.
2. Ezgif
Using this browser-based tool, local as well as online videos in key formats can be converted to GIFs. The interface is simple where you just need to add the file and the conversion will be done automatically.
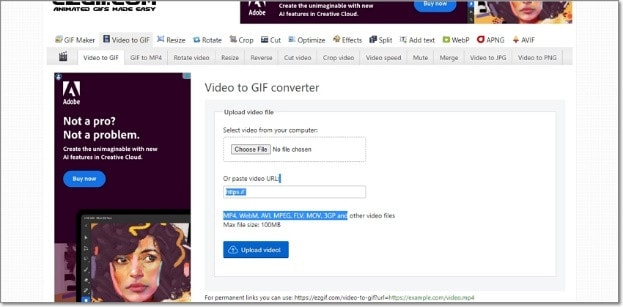
Key features
- GIF can be created from the local and online video files in all key formats.
- Choose the video part for creating the GIF file else by default, the first 5 seconds of the video are used.
Pros:
- All popular video formats like MP4, MPEG, FLV, MOV, and others are supported for conversion to GIF.
- Local, as well as file links in case of online files, can be added.
- Allows selecting the video part for which the GIF has to be created.
- Allows choosing the frame rate, and the size of the video.
This online GIF converter has an option to set static background.
Cons:
- File size limitation of 100 MB.
- Internet dependency.
User Review
“A website with many important and good tools that facilitates making your task easier. You get all features in one place. -Sasa011, Mywot.
This simple online tool is a pocket friendly option for converting your videos into GIF with added option for editing them. Supporting all key formats, the program supports additional tools as well.
3. Img2Go
Your videos on the system, cloud storage, as well as using URLs can be added to this online tool for conversion to GIF format. The look and the quality of GIFs can be adjusted by making changes in the file parameters.

Key features
- Convert all key video files like MP4, MOV, MPEG, and others to GIF.
- Customize the GIF look by editing the file size and applying the color filter.
- This online video to GIF converter allows to choose to enhance, sharpen, equalize, and edit files in other ways.
- Files to be converted can be added from the desktop, Google Drive, Dropbox, as well as URL.
- Processed files can be saved to the cloud storage in addition to the local system.
Pros:
- Multiple sources to add the video file.
- Customize the file parameters and enhance its look.
- Converted file is downloaded automatically to the local system.
Cons:
- Free version allows converting only 3 files at a time.
- Dependency on internet connectivity.
User review:
“This is the best online converter app I have discovered. It is really easy and fast to use. I absolutely recommend it and it really works.”-Maria Ancil, ChromeStats
When you need to convert only a few files at a time in a hassle-free manner consider this simple online tool. After the conversion is done, you would not have any hassles of file downloading as it is automatically saved to the system.
4. CloudConvert
Convert your videos in MP4, FLV, WebM, and other key formats to GIF using this browser-based tool that is simple and free to use. Multiple file parameters can be changed using the tool to get the desired file.

Key Features:
- Allows converting all key video formats.
- Files to be converted can be added from the desktop, URL, Dropbox, Google Drive, and OneDrive.
- Allows adjusting the fit, codec, resolution, aspect ratio, and fps.
- Option to trim the file and also add a watermark.
Pros:
- Files to be converted can be added from multiple sources.
- All key video formats supported.
- Option to control the video size, quality, and aspect ratio.
Cons:
- Free version allows only 25 conversions per day.
- Converted files need to be downloaded.
User Review
“Instant way of converting small-sized files online in many different formats.”
-Sushil, SoftwareAdvice
When conversion of cloud-based files is needed, this works a good online tool that also allows you to edit and change the key file parameters.
5. io
This is a free browser-based tool that allows creating of animated GIF files from videos. There are several video editing options also supported by the tool like split, cut, adding text, and more. You can even add a YouTube video or its link to create a GIF.

Key features:
- Free online tool for creating a GIF file.
- Support all key video formats like MP4, MOV, FLV, and others.
- Local, YouTube as well as videos from Dropbox can be added.
- Option to record the video and create its GIF.
- ‘Allows choosing the size, duration, background color, and several other file parameters.
Pros:
- Videos from multiple sources can be added.
- YouTube videos can also be converted to GIFs.
- Option to record the video and create its GIF.
- Support multiple video editing options.
Cons:
- Slow processing speed.
- Files processed through the free version have a watermark.
- Free version allows processing files under 10 minutes and of 250Mb in size.
User Review:
“It is just a perfect tool and easy to use. It supports a wide variety of media files.” - Koi, Trustpilot.
Option to convert the YouTube videos as well as the recorded videos make this tool different from the others. All popular file formats are supported and you can even customize and change the file parameters as per your requirements.
6. VistaCreate
This is another simple-to-use tool that allows converting all key video formats to a GIF file. The program allows setting various parameters as needed.
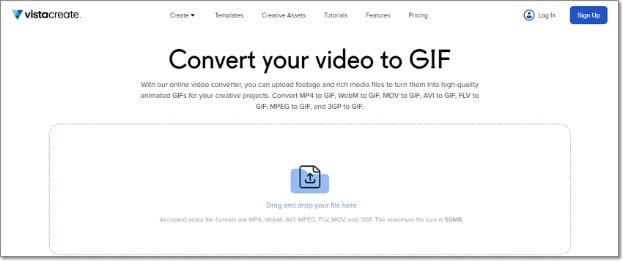
Key Features
- Convert MP4, WebM, AVI, MPEG, FLV, MOV, and 3GP to GIF.
- Support Drag and Drop feature.
- Videos up to 50MB can be processed.
- Allows choosing the video start and the end time for which GIF is to be created. If no time is selected, the first 5 seconds of the video are used.
Pros:
- Simple user interface.
- Allows selecting the video part for which GIF is to be created.
- Choose the frame rate and the speed.
Cons:
- Limited format support.
- Free version has a limitation of 50Mb file size.
- Processing speed is slow.
User Review:
“It is a simple and fast online tool that works. The program allows creating eye-catchy visuals and is free to use.”-Kshitij T, G2. Com
Simple to use, this online tool is apt when you need selected parts of the video for creating a GIF. Though it is compatible with a few selected formats, the process of conversion is simple.
7. XConvert
This online tool support conversion of wide range of file types and formats including videos to GIF. The supported video formats are MP4, WebM, MOV, and MKV. The tool also allows changing the target file parameters.

Key Features
- Free to use online tool with a simple interface.
- Allows converting MO4, MOV, WebM, and MKV videos to GIF.
- Frame Rate and resolution of the target GIF file can be selected.
- Allows adding local as well as files saved to the cloud storage.
Pros:
- Add videos from the desktop, Google Drive, and Dropbox.
- Choose the desired frame rate and resolution.
- Option to save the processed file to the system or Dropbox. Option to get the converted file download link.
Cons:
- Limited file support.
- Converted files need to be downloaded.
- Internet dependency.
User Review:
Portable, nice UI, cross-platform tool and has a lot of actions and run fast. -Roflpancake, Alternativeto
When simple conversion with basic file editing is needed, consider this online tool for your task. In addition to the local system, you can even save the files to your cloud storage.
Part 2: Comparison Table of the Best Video to GIF Converters
The table below compares the above 7 listed tools based on the formats supports, speed of file processing, and the watermark on the processed files.
| Features/Tool | Supported Format | Free Version with watermark or not | Speed of conversion |
|---|---|---|---|
| Adobe Express | All key video formats | No watermark | 2 (Fast) |
| Ezgif | All key formats including MP4, MPEG, FLV, MOV, and others. | No watermark. | 4 (Slow) |
| Img2Go | MP4, FLV, MOV, and all key video formats. | No Watermark | 2 (Fast) |
| CloudConvert | All popular video formats including MP4, MOV, FLV, MPEG, and more. | No Watermark | 2(Fast) |
| Veed.io | All key formats | Yes, free version has a watermark. | 5 (very Slow) |
| VistaCreate | MP4, WebM, AVI, MPEG, FLV, MOV, and 3GP. | No watermark | 5 (Very Slow) |
| XConvert | MP4, WebM, MOV, MKV. | No watermark | 3 (Average) |
Part 3: Best Solution to Convert Video to GIF on Windows/Mac
To convert videos to GIF on your Windows and Mac without worrying about any limitations or internet dependency, desktop software works as the best option. If you too have been looking for one such desktop program, we recommend Filmora Video Editor as the best choice. Though the software is used majorly for advanced video editing options, it is capable of performing a variety of other tasks as well including video to GIF conversion. The software allows file conversion through its export feature.
For Win 7 or later (64-bit)
For macOS 10.14 or later
Key Features
- Almost all video formats like MOV, MP4, MKV, FLV, and others can be converted to GIF.
- High-quality conversion at a fast speed.
- Support batch processing so that multiple files can be processed at a time.
- Allows editing and customizing videos using the built-in features of the software like effects, subtitles, crop, cut, and more.
Pros:
- The interface is simple which makes the software suitable even for beginners.
- Almost all popular video formats are supported.
- High-quality conversion in a hassle-free manner.
- Windows and Mac support.
Cons:
- Being a desktop software, it needs download and installation.
- Need to purchase the software subscription.
Steps to convert videos to GIF using Wondershare Filmora
Step 1. Launch the installed software on your system and the main interface select Create Project > New Project.

Step 2. Click on Import Media Files Here option under the Media tab to browse and add the local video file. Multiple files for batch processing can be added here.

Step 3. After the files are added, now it’s time to move them to the time and for this, you can simply drag and drop them to the bottom. Now at the timeline, using the built-in editing features, customization can be done as required.

Step 4. Finally, tap on the Export button and then choose GIF as the desired target format and also the location to save the converted files.

Conclusion
If one of the above-listed online tools serves your videos for GIF conversion purposes, it’s great. If not, you can use the Wondershare Filmora software. Once downloaded, the software can be used for several editing and other video-related tasks.
For macOS 10.14 or later
Key Features
- Almost all video formats like MOV, MP4, MKV, FLV, and others can be converted to GIF.
- High-quality conversion at a fast speed.
- Support batch processing so that multiple files can be processed at a time.
- Allows editing and customizing videos using the built-in features of the software like effects, subtitles, crop, cut, and more.
Pros:
- The interface is simple which makes the software suitable even for beginners.
- Almost all popular video formats are supported.
- High-quality conversion in a hassle-free manner.
- Windows and Mac support.
Cons:
- Being a desktop software, it needs download and installation.
- Need to purchase the software subscription.
Steps to convert videos to GIF using Wondershare Filmora
Step 1. Launch the installed software on your system and the main interface select Create Project > New Project.
Step 2. Click on Import Media Files Here option under the Media tab to browse and add the local video file. Multiple files for batch processing can be added here.
Step 3. After the files are added, now it’s time to move them to the time and for this, you can simply drag and drop them to the bottom. Now at the timeline, using the built-in editing features, customization can be done as required.
Step 4. Finally, tap on the Export button and then choose GIF as the desired target format and also the location to save the converted files.
Conclusion
If one of the above-listed online tools serves your videos for GIF conversion purposes, it’s great. If not, you can use the Wondershare Filmora software. Once downloaded, the software can be used for several editing and other video-related tasks.
There Are Several Video Players that You Can Use to Watch Videos on Your PC. To Have a Better Experience Viewing Videos and Enhancing Them Across a Similar Platform, You Can Try Out VLC Media Player for PC
Video players have made it quite easy for users to watch movies and their favorite seasons whenever they wish to. While working on improving video quality, several video players have taken dominance across the current market. VLC Media Player stands among the top contenders of video players that have provided users with exceptional services. This article stands on discussing the pointers that would help you use VLC Media Player in a better way.
In this article
01 Key Features of VLC Media Player
02 List of VLC Media Player Supported Format
03 How to Play or Download Streaming Videos with VLC
04 How to Record Screen and Take Screenshots by Using VLC?
05 How to Convert Video File to Different Formats with VLC?
06 Extra Tips: Top Recommended Video Editor in 2022 – Filmora Video Editor
Part 1: Key Features of VLC Media Player
VLC Media Player is an open-source, free video player accessible for all users across major platforms. Being one of the best, it is essential to realize the features that make VLC Media Player special.

Convert Video Files
One of the most anticipated features of VLC is its conversion ability. While converting videos, users can also proceed towards audios. However, as our focus is across the video file formats, VLC offers an extensive set of formats to convert the video without compromising the quality.
Loop Parts of Video
Where most video players provide the option of looping complete files, VLC has changed the narrative of looping specific parts of a video by setting up markers across it. This helps users loop specific parts across their videos.
Stream Podcasts
VLC Media Player exempts the need to download dedicated platforms that stream podcasts for you. The video player allows you to stream podcasts across its platform without the need for any additional settings easily.
Enhance Your Videos
With VLC player, you can always consider revamping your video by adding different filters and effects across it. The user can change the brightness, contrast, colors, geometry, overlays, and several other video features across the platform.
Adding Subtitles
While watching movies and videos, you can download and add external subtitle files across the VLC player to improve your video experience.
Part 2: List of VLC Media Player Supported Format
The following VLC formats are supported across the platform. Users can consider using any of the following as per their convenience:
- AVI
- WMA
- MP4
- MOV
- 3GP
- OGG
- FLAC
- MKV
- MPEG-1/2
- DivX® (1/2/3/4/5/6)
- MPEG-4 ASP
- XviD
- 3ivX D4
- 261
- 263 / H.263i
- 264 / MPEG-4 AVC
- Cinepak
- Theora
- Dirac / VC-2
- MJPEG (A/B)
- WMV 1/2
- WMV 3 / WMV-9
- VC-1
- Sorenson 1/3
- DV
- On2 VP3/VP5/VP6
- Indeo Video v3 (IV32)
- Real Video (1/2/3/4)
Part 3: How to Play or Download Streaming Videos with VLC
As you use a video player, it is always preferable to have one that provides extensive and impressive functions. VLC Media Player for PC allows you to download and play videos across the platform. To understand the procedure, go through the steps provided below:
Step 1: Install VLC Media Player across your device. Run the video player once installed and proceed to select “Media.” Select “Open Network Stream” from the drop-down menu.

Step 2: You need to open the video’s web page that is to be downloaded through VLC. Copy and paste the video URL across the “Please enter a network URL:” box across the window that opens on the screen. Select the “ Stream “ option across the drop-down menu that appears across the “Play” option.

Step 3: On the next window, select “Add” and browse the output destination of the file along with its name.

Step 4: Following this, select the output format of the video file that you need to save your download video in. Ensure that the option of “Activate Transcoding” is enabled. Tap on “Next” to proceed.

Step 5: With all settings specified, click “Stream” to download the video across the specified destination.

Step 6: Once the video is downloaded, select “Media” and tap on “Open Files.” You can access the specific file folder and play the video from there across VLC Media Player with ease.

Part 4: How to Record Screen and Take Screenshots by Using VLC?
Being a content creator, you particularly wish to work on a low budget at the start. Recording videos and streaming them has been made easy with VLC Media Player. Follow the steps of recording screen and taking screenshots of your device with the help of VLC.
Recording Screen with VLC
Step 1: Open VLC Media Player on your device. You also need to open the platform to be recorded with VLC.

Step 2: Tap on “Media” followed by “Open Network Stream” across the drop-down menu to open a new window.

Step 3: Across the “Capture Mode” option, select “Desktop” to record the desktop screen across the player. Set up the desired frame rate for your screen recording. Tap on “Play” once you have configured all essential settings.

Taking Screenshots on VLC
Step 1: Access the “Media” section and select “Open File” to import a video across the player.

Step 2: After opening a video across VLC, you can capture your screen by proceeding to the “Video” tab and selecting the option of “Take Snapshot” to take a screenshot across VLC.

Step 3: You can also set up and use the hotkeys of “CTRL + ALT + S” and “Shift + S” for capturing the screen across the VLC player.
Part 5: How to Convert Video File to Different Formats with VLC?
If you are looking to convert your video file into different VLC formats, you can consider adopting the services of a VLC player. To cover this, look into the steps featured below:
Step 1: Open VLC Media Player on your device and navigate the “Media” tab. Select the “Convert/Save” option across the drop-down menu.

Step 2: With a new screen on the front, select “Add” to import the video file to be converted. Tap on “Convert/Save” once added.

Step 3: Once you add the video, a new screen opens containing the conversion options. Select the file format you wish to change to across the “Profile” option. Set up the output folder of the converted video across the “Destination file” option. As you have set the options, tap on “Start” to conclude the process and convert the video successfully.

Extra Tips: Top Recommended Video Editor in 2022 – Filmora Video Editor
Video editors are as important as video players within this current digital world. Content creators who have their setup across developing videos require platforms that can help them enhance their videos to perfection before playing them across video players such as VLC Media Player. Wondershare Filmora is a clear example of such video editors that provide proficient services in the video editing platform to their users.

For Win 7 or later (64-bit)
For macOS 10.12 or later
As far as the platform goes, it provides a simple and effective user interface to its users. It has tried to embed all necessary features across a simple structure to make things easier for beginners. This is how video editing is quite easy across Filmora Video Editor. With various editing options to work on, users can trim their videos, adjust their audios, add effects and transitions, and utilize visual effects to perfection.
Designing videos with Filmora is a treat for the creators. While recommending the platform for users, they can discover explicit tools for motion tracking, color matching, keyframing, and multiple other options. This is what makes Filmora an exceptional option in video editing platforms. At a price that numerous users can afford, the platform offers unique and diverse options compared to other video editors in the market.
Conclusion
This article has provided an in-depth understanding of the VLC Media Player and the feature it provides. It has also focused on discussing the details about the multiple procedures that can be tried across the player, including conversion, recording, and taking screenshots across VLC. Users new to this platform should look into these details before using it for their specific purpose.
Wondershare Filmora
Get started easily with Filmora’s powerful performance, intuitive interface, and countless effects!
Try It Free Try It Free Try It Free Learn More >

02 List of VLC Media Player Supported Format
03 How to Play or Download Streaming Videos with VLC
04 How to Record Screen and Take Screenshots by Using VLC?
05 How to Convert Video File to Different Formats with VLC?
06 Extra Tips: Top Recommended Video Editor in 2022 – Filmora Video Editor
Part 1: Key Features of VLC Media Player
VLC Media Player is an open-source, free video player accessible for all users across major platforms. Being one of the best, it is essential to realize the features that make VLC Media Player special.
Convert Video Files
One of the most anticipated features of VLC is its conversion ability. While converting videos, users can also proceed towards audios. However, as our focus is across the video file formats, VLC offers an extensive set of formats to convert the video without compromising the quality.
Loop Parts of Video
Where most video players provide the option of looping complete files, VLC has changed the narrative of looping specific parts of a video by setting up markers across it. This helps users loop specific parts across their videos.
Stream Podcasts
VLC Media Player exempts the need to download dedicated platforms that stream podcasts for you. The video player allows you to stream podcasts across its platform without the need for any additional settings easily.
Enhance Your Videos
With VLC player, you can always consider revamping your video by adding different filters and effects across it. The user can change the brightness, contrast, colors, geometry, overlays, and several other video features across the platform.
Adding Subtitles
While watching movies and videos, you can download and add external subtitle files across the VLC player to improve your video experience.
Part 2: List of VLC Media Player Supported Format
The following VLC formats are supported across the platform. Users can consider using any of the following as per their convenience:
- AVI
- WMA
- MP4
- MOV
- 3GP
- OGG
- FLAC
- MKV
- MPEG-1/2
- DivX® (1/2/3/4/5/6)
- MPEG-4 ASP
- XviD
- 3ivX D4
- 261
- 263 / H.263i
- 264 / MPEG-4 AVC
- Cinepak
- Theora
- Dirac / VC-2
- MJPEG (A/B)
- WMV 1/2
- WMV 3 / WMV-9
- VC-1
- Sorenson 1/3
- DV
- On2 VP3/VP5/VP6
- Indeo Video v3 (IV32)
- Real Video (1/2/3/4)
Part 3: How to Play or Download Streaming Videos with VLC
As you use a video player, it is always preferable to have one that provides extensive and impressive functions. VLC Media Player for PC allows you to download and play videos across the platform. To understand the procedure, go through the steps provided below:
Step 1: Install VLC Media Player across your device. Run the video player once installed and proceed to select “Media.” Select “Open Network Stream” from the drop-down menu.
Step 2: You need to open the video’s web page that is to be downloaded through VLC. Copy and paste the video URL across the “Please enter a network URL:” box across the window that opens on the screen. Select the “ Stream “ option across the drop-down menu that appears across the “Play” option.
Step 3: On the next window, select “Add” and browse the output destination of the file along with its name.
Step 4: Following this, select the output format of the video file that you need to save your download video in. Ensure that the option of “Activate Transcoding” is enabled. Tap on “Next” to proceed.
Step 5: With all settings specified, click “Stream” to download the video across the specified destination.
Step 6: Once the video is downloaded, select “Media” and tap on “Open Files.” You can access the specific file folder and play the video from there across VLC Media Player with ease.
Part 4: How to Record Screen and Take Screenshots by Using VLC?
Being a content creator, you particularly wish to work on a low budget at the start. Recording videos and streaming them has been made easy with VLC Media Player. Follow the steps of recording screen and taking screenshots of your device with the help of VLC.
Recording Screen with VLC
Step 1: Open VLC Media Player on your device. You also need to open the platform to be recorded with VLC.
Step 2: Tap on “Media” followed by “Open Network Stream” across the drop-down menu to open a new window.
Step 3: Across the “Capture Mode” option, select “Desktop” to record the desktop screen across the player. Set up the desired frame rate for your screen recording. Tap on “Play” once you have configured all essential settings.
Taking Screenshots on VLC
Step 1: Access the “Media” section and select “Open File” to import a video across the player.
Step 2: After opening a video across VLC, you can capture your screen by proceeding to the “Video” tab and selecting the option of “Take Snapshot” to take a screenshot across VLC.
Step 3: You can also set up and use the hotkeys of “CTRL + ALT + S” and “Shift + S” for capturing the screen across the VLC player.
Part 5: How to Convert Video File to Different Formats with VLC?
If you are looking to convert your video file into different VLC formats, you can consider adopting the services of a VLC player. To cover this, look into the steps featured below:
Step 1: Open VLC Media Player on your device and navigate the “Media” tab. Select the “Convert/Save” option across the drop-down menu.
Step 2: With a new screen on the front, select “Add” to import the video file to be converted. Tap on “Convert/Save” once added.
Step 3: Once you add the video, a new screen opens containing the conversion options. Select the file format you wish to change to across the “Profile” option. Set up the output folder of the converted video across the “Destination file” option. As you have set the options, tap on “Start” to conclude the process and convert the video successfully.
Extra Tips: Top Recommended Video Editor in 2022 – Filmora Video Editor
Video editors are as important as video players within this current digital world. Content creators who have their setup across developing videos require platforms that can help them enhance their videos to perfection before playing them across video players such as VLC Media Player. Wondershare Filmora is a clear example of such video editors that provide proficient services in the video editing platform to their users.
For Win 7 or later (64-bit)
For macOS 10.12 or later
As far as the platform goes, it provides a simple and effective user interface to its users. It has tried to embed all necessary features across a simple structure to make things easier for beginners. This is how video editing is quite easy across Filmora Video Editor. With various editing options to work on, users can trim their videos, adjust their audios, add effects and transitions, and utilize visual effects to perfection.
Designing videos with Filmora is a treat for the creators. While recommending the platform for users, they can discover explicit tools for motion tracking, color matching, keyframing, and multiple other options. This is what makes Filmora an exceptional option in video editing platforms. At a price that numerous users can afford, the platform offers unique and diverse options compared to other video editors in the market.
Conclusion
This article has provided an in-depth understanding of the VLC Media Player and the feature it provides. It has also focused on discussing the details about the multiple procedures that can be tried across the player, including conversion, recording, and taking screenshots across VLC. Users new to this platform should look into these details before using it for their specific purpose.
Wondershare Filmora
Get started easily with Filmora’s powerful performance, intuitive interface, and countless effects!
Try It Free Try It Free Try It Free Learn More >
Perfect Guide for Beginners to Make a TikTok with Multiple Clips
A “day-in-life” short vlog is insanely increasing on TikTok. People love to create small clips throughout the day and then merge it together as a short vlog. With the right tools and methods, you can also create a perfect TikTok with many clips. Moreover, if you don’t know how to film a TikTok with multiple clips, this article is for you.
Here, we will discuss recording multiple clips on TikTok and editing it. If you do not like the editing with TikTok, consider using a third-party video editor. A tool named Wondershare Filmora can help you a lot with this process.

Part 1: How to Make a TikTok Video with Multiple Clips
With more than 1 billion downloads on Play Store and No.1 in the entertainment charts on App Store, TikTok is loved by many users. The community present worldwide has accepted the addition of TikTok to social media. Generally, TikTok is discovered as a source of small videos.
It is widely used for creating and posting entertaining and interactive videos. Making TikTok videos with multiple clips is not as complicated as it sounds. You don’t have to master any videography skills to complete this task.
Moreover, you don’t have to be concerned about private videos as it allows you to make your TikTok account private or public. Managing followers and the following list is also very easy with TikTok. By using the simplified and easy-to-implement methods, you can record multiple TikTok clips with ease:
Method 1: How to Record Multiple Clips on One TikTok Video
The built-in camera recorder of TikTok holds very astonishing metrics. With it, you can switch the flash on and off and swipe the camera from front and back. Moreover, you can also add filters to make videos more complimentary. Enabling beautify feature will help you in looking more beautiful in the videos. By following the steps listed below, you can record multiple TikTok clips:
Step 1: To start the process, locate TikTok on your device and launch it. From the app’s interface, tap the “+” icon from the bottom center of the screen.

Step 2: From the recording interface, select the time limit from the options of “15s”, “60s,” “3m,” and “10m.” Then, hold onto the “Record” button and capture the scenes you want. You can resume and pause the recording to shoot multiple clips. In case you’ve recorded anything unwanted, select “Back Arrow.” Afterward, select the “Tick” icon from the left side of the record button.

Step 3: Following this, you can customize your videos with the options of editing, text, stickers, effects, filters, and more. Once done with editing the video, tap “Next” and add captions and hashtags of your liking. Then hit “Post,” and you upload a TikTok with multiple clips.

Method 2: Uploading Multiple Videos on Create Page
TikTok is a widely used feature-rich application that gives users a full hand to edit videos. You can not only record multiple clips with TikTok but can also add clips in it from the camera roll. Furthermore, TikTok allows you to edit videos by personalizing their speed and length. Adding and deleting clips is also a very smooth process with this app.
You can also use TikTok’s built-in stickers, effects, and filters to give a video a more creative look. They are the perfect elements to enhance the quality of a video. The steps below help you in editing TikTok with more than one clip:
Step 1: To upload several videos on create page, launch TikTok on your device and tap the “Plus” button. Following this, select “Upload” from the bottom right and hit “Select Multiple.” Keep in mind that you cannot select more than 35 clips. After selecting the clips, choose the “Next” button.

Step 2: Once the clips are uploaded as one video, you can enhance them by accessing the TikTok editor. For sound synchronization, select the “Sound Sync” icon from the bottom screen. Edit, text, overlays, and effects can also be customized here.
Once the video is edited, tap on “Save” and select “Next.” Following this add captions of your choice on the next screen and tap “Post.”

Method 3: How to Add Multiple Clips to a TikTok Video Using a Video Editor App
Although TikTok has diversified editing parameters, some users cannot be satisfied with it. That is why they need to take assistance from a third-party video editor. If you are a person who wants to edit TikTok with multiple clips with a third-party tool, the recommendation lies in Wondershare Filmora . Both Android and iPhone users can use this video editor to make prolific TikTok videos.
Filmora has a smooth and sleek interface, making it the best video editing app. It generally provides a variety of editing features to manage videos. Other than this, the processing speed of this tool is ultra-fast, so you can edit TikTok videos in the least time.
download filmora app for ios ](https://app.adjust.com/b0k9hf2%5F4bsu85t ) download filmora app for android ](https://app.adjust.com/b0k9hf2%5F4bsu85t )
Outstanding Key Features of Wondershare Filmora
- Powerful Video Editing Tools: In this app, you can find all the powerful and innovative video editing tools. It can help you with splitting screens, speed ramping, title editing, and more.
- Magnificent Effects: All the video effects in Wondershare Filmora are beyond expectations. It supports all the latest and exclusive video effects. The use of video effects can make your videos eye-catching. AI Portrait and HumanClone are also some special effects in it.
- Edit Videos with Green Screen: Everyone has their own preferences for video editing. If you are working with a green screen and want to change the video’s background, Filmora can help you. It also helps in trimming and adding subtitles and logos in a video.
- Customize Colors: If your video has no illustrative colors, viewers will not like it. That is why Filmora allows you to add a colorful background without complications. You can also blur your background or add an image as your video background.
Steps to Make TikTok Video with Multiple Clips by Using Filmora
To create and enhance the TikTok video with multiple clips in an appealing way, follow the instructions guided below:
Step 1: Launch Filmora and Import Clips
Access Wondershare Filmora on your mobile and launch it. From the main interface, tap “New Project” and select the clips of your choice. Tap the “Import” button and wait a few seconds.

Step 2: Edit the Video with Multiple Clips
Once the clips are imported to Filmora, you will see that they are in the form of one video. From here, you can edit the video by using several editing tools like trim, music, text stickers, and more. You can also tap “Adjust” to customize metrics like exposure and contrast.

Step 3: Export TikTok Video with Multiple Clips
After editing the video to its full extent, tap the “Resolution” dropdown menu from the above panel. From the given options, select the resolution and frames per second for your video. Select the “Export” button to save the edited TikTok video with various clips.

Conclusion
TikTok is an innovative platform for creating and uploading videos. This article has taught you how to film a TikTok with multiple clips with ease. It also offers numerous editing options to its users for creating effective videos. If you don’t like them, you can use a third-party video editor.
A video editor by which you can create and edit TikTok videos with two or more clips is Wondershare Filmora. It never fails to amaze its users with its intuitive and modern tools.
Outstanding Key Features of Wondershare Filmora
- Powerful Video Editing Tools: In this app, you can find all the powerful and innovative video editing tools. It can help you with splitting screens, speed ramping, title editing, and more.
- Magnificent Effects: All the video effects in Wondershare Filmora are beyond expectations. It supports all the latest and exclusive video effects. The use of video effects can make your videos eye-catching. AI Portrait and HumanClone are also some special effects in it.
- Edit Videos with Green Screen: Everyone has their own preferences for video editing. If you are working with a green screen and want to change the video’s background, Filmora can help you. It also helps in trimming and adding subtitles and logos in a video.
- Customize Colors: If your video has no illustrative colors, viewers will not like it. That is why Filmora allows you to add a colorful background without complications. You can also blur your background or add an image as your video background.
Steps to Make TikTok Video with Multiple Clips by Using Filmora
To create and enhance the TikTok video with multiple clips in an appealing way, follow the instructions guided below:
Step 1: Launch Filmora and Import Clips
Access Wondershare Filmora on your mobile and launch it. From the main interface, tap “New Project” and select the clips of your choice. Tap the “Import” button and wait a few seconds.
Step 2: Edit the Video with Multiple Clips
Once the clips are imported to Filmora, you will see that they are in the form of one video. From here, you can edit the video by using several editing tools like trim, music, text stickers, and more. You can also tap “Adjust” to customize metrics like exposure and contrast.
Step 3: Export TikTok Video with Multiple Clips
After editing the video to its full extent, tap the “Resolution” dropdown menu from the above panel. From the given options, select the resolution and frames per second for your video. Select the “Export” button to save the edited TikTok video with various clips.
Conclusion
TikTok is an innovative platform for creating and uploading videos. This article has taught you how to film a TikTok with multiple clips with ease. It also offers numerous editing options to its users for creating effective videos. If you don’t like them, you can use a third-party video editor.
A video editor by which you can create and edit TikTok videos with two or more clips is Wondershare Filmora. It never fails to amaze its users with its intuitive and modern tools.
Also read:
- New 15 Best CapCut Templates for Slow Motion Editing for 2024
- New In 2024, 8 Frame Rate Video Converters for a Professional Finish
- New 2024 Approved 2 Methods to Cut Video in VLC on Windows
- Updated 2024 Approved Step by Step to Rotate Video in Google Photos
- Updated In 2024, The Best Way to Remove Audio From Your Videos
- Updated 20 Must-Have Graduation Songs
- In 2024, The Glitch Filter Is Similar to an Error or a Distorted Effect in the Video. The Article Enables the Users to Get the VHS Filter in One of Their Travel Videos and Instagram Accounts
- New Slow-Motion Edits Are Pretty Mesmerizing, and Weve All Imagined Ourselves in One of Those Visually Appealing, Slowed-Down Movies. Well Teach You How to Make a Smooth Slo-Mo Video Using Twixtor in This Article. Stay Tuned Until the End
- New Best Audio Plug-Ins For Video Editors for 2024
- New How to Use Renderforest Intro Video Maker
- In 2024, Best Online MPEG to GIF Converters
- 2024 Approved With Many Available Video Editing Solutions in the Market Today, It Is a Bit Hard to Choose the Best Video Editing Software for Your Unique Needs
- Updated In 2024, Hitfilm Express Video Editor Review
- Cropping a Video in Final Cut Pro Step by Step
- New 2024 Approved Guide of 8 Photo Collage Apps for PC
- New 2024 Approved Doable Ways to Create Transparent Background in Procreate
- How to Create a Clideo Slideshow for 2024
- New 2024 Approved How to Create Intro Video with KineMaster
- New Best Guide for Setting TikTok Countdown Timer for 2024
- New 7 Best MP4 Editors for Mac Edit MP4 in Mac
- Updated How to Put a Filter on a Video in iMovie
- How To Transfer Data From iPhone 14 Pro To Other iPhone devices? | Dr.fone
- Full Guide to Hard Reset Your Xiaomi Redmi Note 12T Pro | Dr.fone
- Top 9 Samsung Galaxy XCover 6 Pro Tactical Edition Monitoring Apps for Parental Controls | Dr.fone
- Free electronic signature - For .ott file
- 8 Ultimate Fixes for Google Play Your Motorola Edge 2023 Isnt Compatible | Dr.fone
- In 2024, How To Unlock Cricket Apple iPhone 15 Plus for Free
- How To Remove or Bypass Knox Enrollment Service On Samsung Galaxy S23
- Fix the Error of Unfortunately the Process.com.android.phone Has Stopped on Xiaomi Redmi A2 | Dr.fone
- In 2024, Edit and Send Fake Location on Telegram For your Realme 11 Pro in 3 Ways | Dr.fone
- How to Unlock iPhone 15 Plus Passcode without iTunes without Knowing Passcode?
- Latest Guide How To Bypass Oppo A1 5G FRP Without Computer
- 5 Hassle-Free Solutions to Fake Location on Find My Friends Of Samsung Galaxy A14 4G | Dr.fone
- In 2024, Android to Apple How To Transfer Photos From Tecno Pova 5 Pro to iPad Easily | Dr.fone
- In 2024, A Complete Guide To OEM Unlocking on Vivo V29 Pro
- A Step-by-Step Guide on Using ADB and Fastboot to Remove FRP Lock from your Nokia C02
- 10 Fake GPS Location Apps on Android Of your Vivo Y78+ (T1) Edition | Dr.fone
- Wondering the Best Alternative to Hola On Lenovo ThinkPhone? Here Is the Answer | Dr.fone
- Title: Updated How To Change Speed of Video in Final Cut Pro for 2024
- Author: Chloe
- Created at : 2024-04-24 07:08:43
- Updated at : 2024-04-25 07:08:43
- Link: https://ai-editing-video.techidaily.com/updated-how-to-change-speed-of-video-in-final-cut-pro-for-2024/
- License: This work is licensed under CC BY-NC-SA 4.0.
