

Updated How to Color Correct in OBS
How to Color Correct in OBS
Create High-Quality Video - Wondershare Filmora
An easy and powerful YouTube video editor
Numerous video and audio effects to choose from
Detailed tutorials are provided by the official channel
Color Correction is an outstanding functionality that allows editing photos and videos by altering their consistency to match a particular standard. Besides, color correction is available in the premium tool and free applications. And one of the established free software tools with color correction is the OBS.
Even though the Open Broadcaster Software is mainly known for live streaming and offline video recording, it also offers color correction functionality from its open canvas. Read this article to completion and get to the bottom line of how to do color correction in OBS.
More about OBS
In this article
01 What is OBS?
What is OBS?
Open Broadcaster Software (OBS) is free and open-source software that allows users to record videos and live stream events right at their comfort. The software functions effectively on Mac, Windows, and Linux computers.
Open Broadcaster Software (OBS) is free and open-source software that allows users to record videos and live stream events right at their comfort. The software functions effectively on Mac, Windows, and Linux computers.
Since its initial launch in 2012, OBS has made tremendous moves – This is not only from the constant release of its new versions but also the relentless increase in the functionality features. Besides, OBS is equipped with a robust API that enables plugins and scripts which provide extensive customization to precisely suit one’s needs.
However, OBS being a free application can function to date due to enough support from sponsors and backers.
How to Apply Color Correction in OBS
When you carry out basic edits to your videos or images with OBS and realize that your project has poor shade, color, or tone, you don’t have to export it to another software to correct it. Instead, you can use filters for color correction in OBS.
Apart from using OBS filters to color correct video clips and images, you can correct games, browser sources, and video capture devices.
There are various aspects of color correction in OBS. It includes:
1. Gamma
Gamma is a fundamental aspect in OBS that functions by balancing the brightness of an image through contrast. To be precise, Gamma works almost similarly to change in brightness while simultaneously increasing or decreasing the contrast.
In editing, Gamma is applicable mainly for removing shiny foreheads and webcam footage in gaming and browsing.
High Gamma is represented by “L,” whereas low Gamm is represented by “R.”
2. Contrast
Contrast is the difference in the degree of colors and tones in an image. Usually, the low contrast image has a narrow color range, whereas the high contrast images have dark shadows and bright highlights.
“L” represents high contrast in OBS contrast, whereas “R” represents low contrast.
3. Brightness
Brightness is the degree to how light or dark a picture is. To be able to understand an image clearly, it is best to correct its brightness. A change in brightness of a picture has a simultaneous change in pixels of that image.
High brightness in OBS is denounced by the letter “L,” whereas Low brightness is denounced by “R.”
4. Saturation
Saturation is the intensity of colors in a video or an image. High saturated images are bright, strong, and are rich, whereas the low saturated photos appear washed out. Black and white (grayscale) photos have no color saturation. In OBS, high saturation and low saturation are represented as “L” and “R.”
5. Hue Shift
Hue shift is the change in an image’s saturation, lightness, and hue colors. Hue shifting occurs when highlighting or shading images. In OBS, you can use the hue shift functionality to reimage your image with a completely different color palette.
With the hue shift functionality in OBS, you can place the image on top of another and have an 80% opacity. It means that you will still see the first image when you place the second one on top of it.
The “L” sign in the OBS hue shift represents 50% opacity, while the “R” represents 100% Opacity.
Color Grade in OBS
Color grading is the process of enhancing the appearance of an image through attributes such as contrast, saturation, and color, making them enchanting for presentations. Color grading is not only done for still images but also for motion pictures and images.
Color grading functionality in OBS is encompassed with several tools – This includes:
1. Lift tool
As the name suggests, lift tools are used in lifting or removing specific colors from an image. It does so without necessarily affecting other colors in an image.
With this tool, you can selectively remove unwanted colors from your image or video, replace them with your desired ones, and create astonishing results.
2. Offset
Offset is another outstanding tool in OBS color grading that controls the blacks/Shadows of an image. It functions by altering the brightness levels and leaving the highlights and the mid-tones unaffected.
3. Gain
A gain is a tool in OBS color correction that functions by only adjusting the white levels in an image. With the gain tool, brighter colors become brighter or darker.
Many people, especially beginner editors, experience difficulty differentiating between the Gamma and Offset tools. Yes, there is a closer similarity between the two, and for you to be on the safe side, you need to know that Gamma goes with the mid-tones (middle gray levels) whereas the Gain goes with highlights/whites.
How to Apply LUTs in OBS
Look up tables (LUTs) is a functionality feature that allows editors, colorists, and filmmakers to save certain colors as their templates. Therefore, when working on a particular project, they don’t have to create new working color grades; instead, you pick it from your LUT.
Using LUTs OBS is not rocket science. With LUTs, you can create unique projects with a vibrant feel. Here are the simple steps of using LUTs in OBS.
Step 1. Prepare your LUT
First, check and establish whether you have your LUT ready. If you don’t have it, you can download one from the internet. Make sure you download it as a folder. Even though OBS has LUT, It has limited color grades; therefore, it is best to download one. You can extract it to an OBS folder if you downloaded it in a zip file.
Step 2. Add your project to the OBS timeline
Open your OBS software and add your project file. Drag and drop your file to the OBS timeline.

Step 3. Add LUTs to your project
Right-click on the area in your project that you wish to apply LUTs, then click on “Filters.” Select “Apply LUT” from the drop-down menu,” which is usually at the top of the list.

Step 4. Apply your LUT as a filter
On the LUTs section, click on the browser, then open your downloaded LUT folder. Usually, the LUT is in the form of a .cube file. You can adjust your LUT by simply clicking on the “Adjust” option.
Bonus! How to Apply Color Correction for Webcam and Camera
People who primarily use their computers for recording sessions often find it difficult to capture quality videos. It is because most computer cameras are not straightforward. To do away with purchasing a new camera due to poor quality video capture, they can freely use OBS LUTs. For their camera and webcam. LUTs for webcam play a vital role in correcting the quality of photos and videos by using filters.
Here are the simple steps on how to use LUTs for color correction in webcam and camera
Step 1. Check whether your camera has additional software
Most webcams and cameras are controlled by external software, so you first need to check whether yours is also controlled. A thing with these cameras are controlled by their software is that the software determines the color settings and the specific image.
Double click on camera source and select “Configure video.” Computers with external software cameras will have a pop-up window that displays various customizable settings. Here, you can adjust the different settings based on your preference.

Step 2. Download your LUTs
Download online the LUTs you want to use. Download them as folders and extract the files you downloaded as zip files. Save them in the OBS folder.
Step 3. Apply your LUTs
Still, in your OBS software, open your camera and then right-click on it. From the displayed menu, click on “Filters.”
On the bottom left corner of your interface, hit the “+” sign, then select “Apply LUTs” > “Browse.”
Open your already downloaded OBS files. Usually, there is an “Adjust” that allows you to regulate the intensity of the LUT by sliding it.

Step 4. Start recording with LUTs on
After turning on your LUT, you can start recording videos and taking photos. There is an eye icon on the left-hand side of your screen. You can use it to turn on or off LUT.
Conclusion
● And that is how to do color correction in OBS. Besides, you do not have to go to the extremes of getting a new camera because of your webcam faultiness. With OBS, you can correct your camera and webcam and get outstanding results.
● Download LUTs from the internet and use them as a template in OBS. Besides, you don’t have to pay for the LUTs, but you can use the free ones.
Color Correction is an outstanding functionality that allows editing photos and videos by altering their consistency to match a particular standard. Besides, color correction is available in the premium tool and free applications. And one of the established free software tools with color correction is the OBS.
Even though the Open Broadcaster Software is mainly known for live streaming and offline video recording, it also offers color correction functionality from its open canvas. Read this article to completion and get to the bottom line of how to do color correction in OBS.
More about OBS
In this article
01 What is OBS?
What is OBS?
Open Broadcaster Software (OBS) is free and open-source software that allows users to record videos and live stream events right at their comfort. The software functions effectively on Mac, Windows, and Linux computers.
Open Broadcaster Software (OBS) is free and open-source software that allows users to record videos and live stream events right at their comfort. The software functions effectively on Mac, Windows, and Linux computers.
Since its initial launch in 2012, OBS has made tremendous moves – This is not only from the constant release of its new versions but also the relentless increase in the functionality features. Besides, OBS is equipped with a robust API that enables plugins and scripts which provide extensive customization to precisely suit one’s needs.
However, OBS being a free application can function to date due to enough support from sponsors and backers.
How to Apply Color Correction in OBS
When you carry out basic edits to your videos or images with OBS and realize that your project has poor shade, color, or tone, you don’t have to export it to another software to correct it. Instead, you can use filters for color correction in OBS.
Apart from using OBS filters to color correct video clips and images, you can correct games, browser sources, and video capture devices.
There are various aspects of color correction in OBS. It includes:
1. Gamma
Gamma is a fundamental aspect in OBS that functions by balancing the brightness of an image through contrast. To be precise, Gamma works almost similarly to change in brightness while simultaneously increasing or decreasing the contrast.
In editing, Gamma is applicable mainly for removing shiny foreheads and webcam footage in gaming and browsing.
High Gamma is represented by “L,” whereas low Gamm is represented by “R.”
2. Contrast
Contrast is the difference in the degree of colors and tones in an image. Usually, the low contrast image has a narrow color range, whereas the high contrast images have dark shadows and bright highlights.
“L” represents high contrast in OBS contrast, whereas “R” represents low contrast.
3. Brightness
Brightness is the degree to how light or dark a picture is. To be able to understand an image clearly, it is best to correct its brightness. A change in brightness of a picture has a simultaneous change in pixels of that image.
High brightness in OBS is denounced by the letter “L,” whereas Low brightness is denounced by “R.”
4. Saturation
Saturation is the intensity of colors in a video or an image. High saturated images are bright, strong, and are rich, whereas the low saturated photos appear washed out. Black and white (grayscale) photos have no color saturation. In OBS, high saturation and low saturation are represented as “L” and “R.”
5. Hue Shift
Hue shift is the change in an image’s saturation, lightness, and hue colors. Hue shifting occurs when highlighting or shading images. In OBS, you can use the hue shift functionality to reimage your image with a completely different color palette.
With the hue shift functionality in OBS, you can place the image on top of another and have an 80% opacity. It means that you will still see the first image when you place the second one on top of it.
The “L” sign in the OBS hue shift represents 50% opacity, while the “R” represents 100% Opacity.
Color Grade in OBS
Color grading is the process of enhancing the appearance of an image through attributes such as contrast, saturation, and color, making them enchanting for presentations. Color grading is not only done for still images but also for motion pictures and images.
Color grading functionality in OBS is encompassed with several tools – This includes:
1. Lift tool
As the name suggests, lift tools are used in lifting or removing specific colors from an image. It does so without necessarily affecting other colors in an image.
With this tool, you can selectively remove unwanted colors from your image or video, replace them with your desired ones, and create astonishing results.
2. Offset
Offset is another outstanding tool in OBS color grading that controls the blacks/Shadows of an image. It functions by altering the brightness levels and leaving the highlights and the mid-tones unaffected.
3. Gain
A gain is a tool in OBS color correction that functions by only adjusting the white levels in an image. With the gain tool, brighter colors become brighter or darker.
Many people, especially beginner editors, experience difficulty differentiating between the Gamma and Offset tools. Yes, there is a closer similarity between the two, and for you to be on the safe side, you need to know that Gamma goes with the mid-tones (middle gray levels) whereas the Gain goes with highlights/whites.
How to Apply LUTs in OBS
Look up tables (LUTs) is a functionality feature that allows editors, colorists, and filmmakers to save certain colors as their templates. Therefore, when working on a particular project, they don’t have to create new working color grades; instead, you pick it from your LUT.
Using LUTs OBS is not rocket science. With LUTs, you can create unique projects with a vibrant feel. Here are the simple steps of using LUTs in OBS.
Step 1. Prepare your LUT
First, check and establish whether you have your LUT ready. If you don’t have it, you can download one from the internet. Make sure you download it as a folder. Even though OBS has LUT, It has limited color grades; therefore, it is best to download one. You can extract it to an OBS folder if you downloaded it in a zip file.
Step 2. Add your project to the OBS timeline
Open your OBS software and add your project file. Drag and drop your file to the OBS timeline.
Step 3. Add LUTs to your project
Right-click on the area in your project that you wish to apply LUTs, then click on “Filters.” Select “Apply LUT” from the drop-down menu,” which is usually at the top of the list.
Step 4. Apply your LUT as a filter
On the LUTs section, click on the browser, then open your downloaded LUT folder. Usually, the LUT is in the form of a .cube file. You can adjust your LUT by simply clicking on the “Adjust” option.
Bonus! How to Apply Color Correction for Webcam and Camera
People who primarily use their computers for recording sessions often find it difficult to capture quality videos. It is because most computer cameras are not straightforward. To do away with purchasing a new camera due to poor quality video capture, they can freely use OBS LUTs. For their camera and webcam. LUTs for webcam play a vital role in correcting the quality of photos and videos by using filters.
Here are the simple steps on how to use LUTs for color correction in webcam and camera
Step 1. Check whether your camera has additional software
Most webcams and cameras are controlled by external software, so you first need to check whether yours is also controlled. A thing with these cameras are controlled by their software is that the software determines the color settings and the specific image.
Double click on camera source and select “Configure video.” Computers with external software cameras will have a pop-up window that displays various customizable settings. Here, you can adjust the different settings based on your preference.
Step 2. Download your LUTs
Download online the LUTs you want to use. Download them as folders and extract the files you downloaded as zip files. Save them in the OBS folder.
Step 3. Apply your LUTs
Still, in your OBS software, open your camera and then right-click on it. From the displayed menu, click on “Filters.”
On the bottom left corner of your interface, hit the “+” sign, then select “Apply LUTs” > “Browse.”
Open your already downloaded OBS files. Usually, there is an “Adjust” that allows you to regulate the intensity of the LUT by sliding it.
Step 4. Start recording with LUTs on
After turning on your LUT, you can start recording videos and taking photos. There is an eye icon on the left-hand side of your screen. You can use it to turn on or off LUT.
Conclusion
● And that is how to do color correction in OBS. Besides, you do not have to go to the extremes of getting a new camera because of your webcam faultiness. With OBS, you can correct your camera and webcam and get outstanding results.
● Download LUTs from the internet and use them as a template in OBS. Besides, you don’t have to pay for the LUTs, but you can use the free ones.
How to Make a TikTok Loop Video
Nowadays, many people like to make a lot of videos with their phone and share it on social media. But if you are not familiar with this social media, then you should check out TikTok. You probably know that TikTok videos can be looped. If users were unable to replay videos, they would lose interest quickly. Therefore, more than 1 billion people now use the app daily.
TikTok is an app that allows you to create short videos and share them on social media. The app is available on many platforms, including Android, iOS, and Windows Phone. The videos can be up to 15 seconds long. It’s also possible to loop videos in TikTok. Are you dreaming to make loop TikTok videos? But makes you feel it is not as simple as it looks.
That’s where looping comes in. Looping allows you to sell your videos on TikTok directly from within the app. This means that instead of running ads for other companies all over your Instagram feed or website, you can run them from within TikTok itself and keep all of your followers happy!
Part 1: How to Make a TikTok Loop
One of the best features of TikTok is the loop feature. It allows you to add your favorite song and turn it into a video. But, that’s not all. It also allows you to make a video and loop it. If you are looking for an app that allows you to loop videos, then TikTok is a good app to use.
There are many ways to monetize your content. If you’re already making videos, you know how much time and energy it takes to produce them. And if you’re not already making videos, it’s going to take a lot of time and energy before you get started. But what if there was a way to make money while you were still learning?
Step1 Download the TikTok app and create an account on it
Go to your play-store and type TikTok on its search bar. Install the app on your phone and create an account on it. You can sign up through your phone number, Gmail, or Facebook. After that, they will send you a code to verify your account.

Step2 Make or select a video template
Click on the “+” symbol after that you can record your video or you can also select media from your gallery.

Step3 Select a template and add a transition
After selecting the video you can add a template to your video or can add transitions to your video. Your video must have an authentic starting and ending. You can add a transition in the middle of your video. Keep your looping video clips shorter because it looks more real.

Step4 Create a loop video and save it or publish it
If you want to merge the starting video with the ending video in one take. Now you can have to focus on the beginning video and split the starting and ending clips.

Benefits of loop TikTok videos
TikTok loop includes the use of videos with a similar rhythm to create a special atmosphere that attracts people to participate and share them. The videos are made by those people who know how to make the video attractive to the public. The most used technique of communication is through a video that is shared on social networks like Facebook and Instagram.
One reason why loop TikTok videos are so popular is that they’re really easy to use. You don’t need to be an expert in video editing to create them. All you need is a smartphone. Also, loop TikTok videos are a great way to share a moment with your friends and followers. Plus, they can be posted on the go and shared instantly.
Looping TikTok videos can have several positive impacts on your brand. Looping allows you to build a more consistent look for your content if you want to keep building brand equity. Second, it helps you maintain consistency in your storytelling across platforms. Third, it helps you avoid having to spend time creating new content because it gives viewers what they expect from you.
TikTok is one of the fastest-growing mobile apps in the world. It allows you to make short videos, which can be edited and shared with friends. As a plus, you can add cool music to your videos and customize them the way you want. You can also create short videos of yourself lip-syncing to the music. This article will guide you about the loop TikTok video.
Part 2: How to Edit Time-lapse Video on a Computer
Time-lapse video is a type of video that allows you to see a huge amount of change in a very short time. You can see it on all social media websites such as YouTube, Facebook, and Instagram. It can be used to make all kinds of videos, from simple scenes of nature to complex events. The first time-lapse video was made in France in 1872 by Léon Bouly.
There are a lot of steps to make a time-lapse video on a computer.
Step1 You need to download the free software that comes with the camera. You can find it on the manufacturer’s website or through a search engine.
Step2 You’ll want to plug in your phone’s charging cable and plug it in so that it can stay charged while filming.
Step3 You’ll need to find somewhere quiet where you can set up your camera and tripod. If possible, try to do this outside so that there’s no worry about getting dust or dirt on your lens.
Step4 Set up your phone so that it will record once every hour for an hour straight. This will give you enough time for each frame of video before switching over to the next one after an hour has passed.
Step5 Start recording!
Why we should make a time-lapse video on a computer?
Time lapses are also useful for showing how something changes over time. For example, if you want to show how an environment changes from day to night, or how a plant grows from seedlings into mature plants after being watered and nourished by sunlight, these videos would be perfect for demonstrating this change in real-time.
You can also create time-lapse videos that show the growth of plants or flowers over time. You could use this method to demonstrate how plants grow from seedlings into fully grown trees or bushes. You could even try creating a time-lapse video showing the growth of a weed from the seedling stage into full bloom with its seeds spread out across the ground below it!
You can make your videos more fun and engaging. By recording multiple angles at the same time, you can capture all the exciting moments, like when something unexpected happens. Or when something amazing turns out to be a total disaster in real life. You can easily share with friends and family members who might not be able to come to see you in person.
Why Filmora is the best option to make a time-lapse video?
Filmora is the best option to make time-lapse videos. The reason is simple: it has a lot of features that other editing programs don’t have, and it’s been designed by professional editors who know what they’re doing. In addition to offering full HD resolution, Filmora also allows you to easily customize the length of your time-lapse video.
In Filmora you can use your music while editing your video. This means you won’t need to worry about downloading any additional software or paying for expensive music licenses like you would with other editing programs out there. Filmora has an easy-to-use interface that makes it easy for beginners like yourself to get started right away without having any trouble understanding how everything works together.
Free Download For Win 7 or later(64-bit)
Free Download For macOS 10.14 or later
How to edit video in Filmora
A time-lapse video is a great way to show the passage of time in a short video. By speeding up the video, you can show a long event, such as a day of travel, in a short amount of time. You can use it for other purposes as well. But how do you edit time-lapse videos? That’s easy with Filmora just follow the below steps:
Step1 Select a video clip you want to add
Install Filmora from Google Chrome or any browser you want. After that click on create a new project and select media from your gallery. Select the video you want to make a time-lapse.

Step2 Put the video on the timeline
Place your video on a timeline or just simply drag and drop your video clip on the timeline. Place the video header on the front of your video.

Step3 Add effects and transitions
After putting the video on the timeline add some effects to your video. If you are combining two or more videos then must add a dissolve transition between the videos to show your video more seamlessly.

Step4 Edit the duration of the video then export it
After making all the editing videos, you can also select the duration according to your requirements. You can also edit the duration of your per video.

The Bottom Line
As a result, if you do make a TikTok Loop video, it’s important to get the “looping” right. If your end goal is more likes and followers, keep in mind that a short clip will get you there faster than trying to stretch out a single event over an entire song. It’s an easy, cost-free program to use, and it can provide tons of pleasure.
Covering everything from what a TikTok loop is to how to make one, we’ve compiled a guide for anyone looking for an informative and inspiring resource to take advantage of the app’s many features. If you want to edit your loop video, you must require the Filmora editing tool. Filmora is the best tool to customize your video. This software will give your video a professional look.
Free Download For macOS 10.14 or later
How to edit video in Filmora
A time-lapse video is a great way to show the passage of time in a short video. By speeding up the video, you can show a long event, such as a day of travel, in a short amount of time. You can use it for other purposes as well. But how do you edit time-lapse videos? That’s easy with Filmora just follow the below steps:
Step1 Select a video clip you want to add
Install Filmora from Google Chrome or any browser you want. After that click on create a new project and select media from your gallery. Select the video you want to make a time-lapse.
Step2 Put the video on the timeline
Place your video on a timeline or just simply drag and drop your video clip on the timeline. Place the video header on the front of your video.
Step3 Add effects and transitions
After putting the video on the timeline add some effects to your video. If you are combining two or more videos then must add a dissolve transition between the videos to show your video more seamlessly.
Step4 Edit the duration of the video then export it
After making all the editing videos, you can also select the duration according to your requirements. You can also edit the duration of your per video.
The Bottom Line
As a result, if you do make a TikTok Loop video, it’s important to get the “looping” right. If your end goal is more likes and followers, keep in mind that a short clip will get you there faster than trying to stretch out a single event over an entire song. It’s an easy, cost-free program to use, and it can provide tons of pleasure.
Covering everything from what a TikTok loop is to how to make one, we’ve compiled a guide for anyone looking for an informative and inspiring resource to take advantage of the app’s many features. If you want to edit your loop video, you must require the Filmora editing tool. Filmora is the best tool to customize your video. This software will give your video a professional look.
How to Zoom Webcam on PC
Making certain our digital presence is the best it can be pays dividends as more and more of what we do online; similar is the case with how to zoom out webcam windows 10. The majority of experts advise against using the built-in camera that comes with your laptop or computer and instead advocate getting a webcam or an HD camera. These, however, may be hard to come by and pricy if you locate a nice one. If the built-in camera on your laptop doesn’t perform effectively during Zoom meetings, you may want to consider about investing in a separate, better webcam. Webcams offer automatic settings that are intended to function with the largest variety of lighting situations possible. This suggests that they average out a great number of responses to the content of the frame. Because of this, we have incorporated basic PC webcam zooming settings. These answers may be found in the portions that follow.
It’s vital to know how to zoom in on a webcam before visiting there. The camera wasn’t always as vital as it is today, and only very large corporations could afford to employ it as a convenience. But today, nearly everyone, from huge organizations to little firms, acknowledges its value. Everybody needs a webcam that works properly. The camera control software you are using determines the zoom function. The resolution of your picture window and the capabilities of the application dictate how far you can zoom in on the webcam’s video image. You can zoom in and out on camera photos using tools like YouCam and Windows Live Messenger. The most critical camera capabilities for the ideal video conferencing experience are zoom in and zoom out, which at first look may appear trivial. Here, we’ll walk you through each step, in detail. Continue reading, and we’ll check your understanding of webcam zoom in and zoom out skills!
Way 1: Zoom with Windows Live Messenger
When utilizing a camera for video conferencing, you may zoom in on a user’s face to get rid of the background. Webcam settings are not accessible by default in Microsoft Windows. However, camera zoom settings may be changed in instant chat systems. Through an instant messaging tool, such as Windows Live Messenger, you may simply access these options. This application provides private offline chat, video messaging, image and video sharing, and video chatting.
Step1Start Windows Live Messenger on your PC or laptop first. Enter your login name and password by clicking the “Sign In” button.

Step2On the top menu bar, pick “Tools.” And then select the “Audio and Video Setup”. Drag the slider next to “Speaker” to modify the speaker volume. Drag the slider next to “Microphone” to modify the microphone sensitivity. Press “Next.”

Step3From the drop-down list, pick the webcam. The “Camera Control” option is situated on the top; pick “Webcam Settings” after that.
Step4Now, to alter the zoom settings, drag the “Zoom” slider. To zoom in or out, drag the slider to the left or right. Press “OK.”
Way 2: Use Windows 10 Camera App
Wondering how to zoom your camera in the Windows 10 Camera app? The Camera app enables you to zoom in or out on your webcam in both image and video modes. To accomplish so, click or push the Magnification button, and then use the slider to modify the webcam’s zoom level. To operate the zoom feature manually, pick “Manual Zoom.” In the preview window, a square appears when you pick this option. To zoom in on a specific region of the capture window, drag the square there. To expand the image that was acquired by the webcam, slide the slider bar. In simply, The Camera app enables you zoom in or out of photographs and movies shot with your webcam. To do this, click on the “Zoom” button and drag the slider to the left or right as appropriate on your Windows 10 camera. the following steps:
Step1To open the “Start Menu,” make a right-click on “Start.” Now, to access the Camera app, type “Camera App” into the start menu’s search box.

Step2Tap the Camera Control icon when you start or join a meeting. To zoom and pan the camera to the appropriate spot, utilize the icons on the Camera Control panel.
![]()
Step3To exit the Camera Control window and return to the Meeting Controls, touch outside of it.
Way 3: Zoom with YouCam
Unfortunately, the default cameras or webcams bundled with the majority of Windows laptops and desktops don’t have an automatic zoom option. In fact, the only method to adjust their crop is to switch from “Standard” to “Widescreen,” which does slightly zoom in on you but not in the manner we’d want. This makes it inescapable that the only method to manually alter a webcam’s magnification is to acquire one separately and apply its software settings. , like YouCam. YouCam provides video calling, streaming, and broadcasting. includes an integrated app. To employ Zoom with YouCam, refer to the methods given below:
Step1Launch the YouCam camera program and activate the webcam.

Step2In the camera preview window, pick Settings. Then, select “Enable Video Zoom” from the menu.
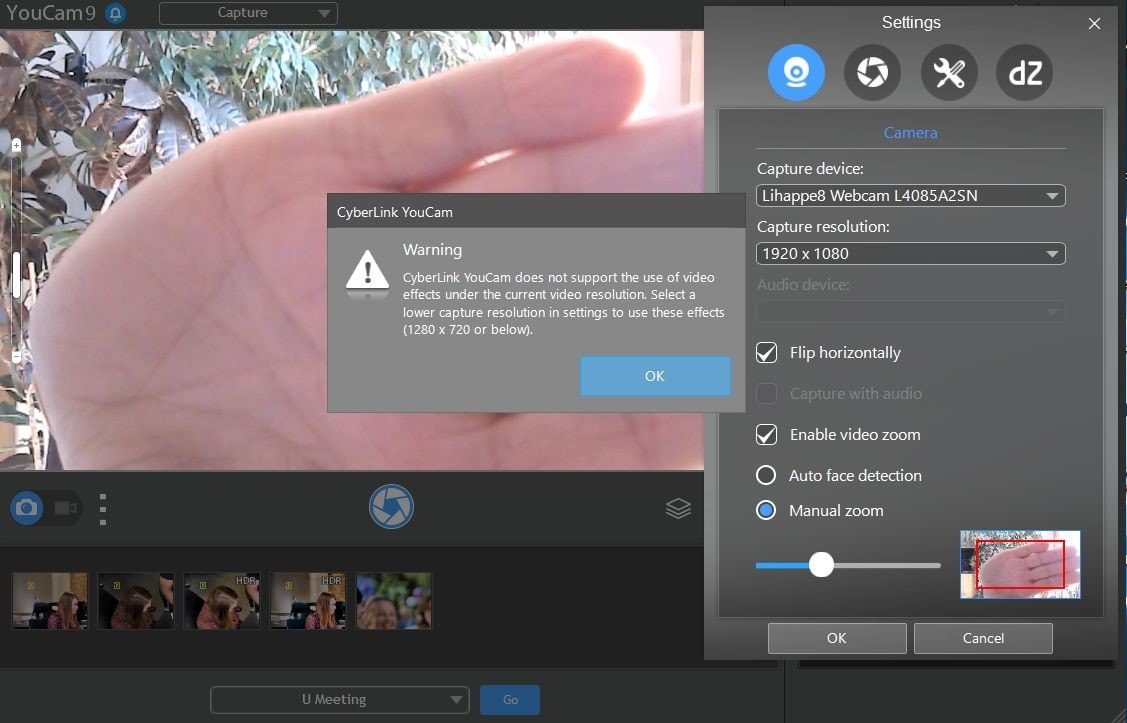
Step3Select “Automatic Face Detection” from the menu. As you wander about in the capture window, the camera watches your face and automatically zooms in on your photo as shown above.
Step4To handle the zoom feature manually, pick “Manual Zoom.” In the preview window, a square appears when you pick this option. To zoom in on a specific region of the capture window, drag the square there. To expand the image that was acquired by the webcam, slide the slider bar.

Way 4: Use iGlasses on Mac
For the perfect webcam look on a MAC, install the Chrome plugin iGlasses for video effects and style tweaks. Your videos will appear better on Zoom as a consequence. You may instantly enhance the appearance of your video interactions by utilizing the digital zoom on your iGlasses. Digital pan, tilt, and zoom are all possible with easy controls. For Macs that support it, an Apple Remote may be used to operate. iGlasses will become an option in Zoom’s video settings when it has been installed. You may improve your camera by altering the settings in iGlasses. You may experiment with a range of amusing effects, like 3-D distortions, using the virtual camera. Let’s learn how to utilize iGlasses on a Mac:
Step1Installing Ecamm’s iGlasses on a MacBook in the first step.
Step2To activate the camera, go to your video settings and pick iGlasses.
Step3Choose the Zoom window and execute the appropriate operations using the Zoom and Flip options. You may now zoom in and out using the camera on your MacBook as you like.

Conclusion
In conclusion, so many people currently take part in online conferences and virtual meetings. You want to create a lasting impression, don’t you? Not or whether you are the host of an online meeting or event, you must now maintain a professional image to prevent turning off attendees. You have discovered how to utilize the tools at your disposal to boost the zoom in and out quality of your camera in this post. However, as will be explained in the sections ahead, you may do it without the third-party plugins. With just one quick plugin, you can significantly transform how you look on a camera. Hence, try out the easy method from the above enlisted ones to get hold on your PC webcam to zoom in or out purposes.
Making certain our digital presence is the best it can be pays dividends as more and more of what we do online; similar is the case with how to zoom out webcam windows 10. The majority of experts advise against using the built-in camera that comes with your laptop or computer and instead advocate getting a webcam or an HD camera. These, however, may be hard to come by and pricy if you locate a nice one. If the built-in camera on your laptop doesn’t perform effectively during Zoom meetings, you may want to consider about investing in a separate, better webcam. Webcams offer automatic settings that are intended to function with the largest variety of lighting situations possible. This suggests that they average out a great number of responses to the content of the frame. Because of this, we have incorporated basic PC webcam zooming settings. These answers may be found in the portions that follow.
It’s vital to know how to zoom in on a webcam before visiting there. The camera wasn’t always as vital as it is today, and only very large corporations could afford to employ it as a convenience. But today, nearly everyone, from huge organizations to little firms, acknowledges its value. Everybody needs a webcam that works properly. The camera control software you are using determines the zoom function. The resolution of your picture window and the capabilities of the application dictate how far you can zoom in on the webcam’s video image. You can zoom in and out on camera photos using tools like YouCam and Windows Live Messenger. The most critical camera capabilities for the ideal video conferencing experience are zoom in and zoom out, which at first look may appear trivial. Here, we’ll walk you through each step, in detail. Continue reading, and we’ll check your understanding of webcam zoom in and zoom out skills!
Way 1: Zoom with Windows Live Messenger
When utilizing a camera for video conferencing, you may zoom in on a user’s face to get rid of the background. Webcam settings are not accessible by default in Microsoft Windows. However, camera zoom settings may be changed in instant chat systems. Through an instant messaging tool, such as Windows Live Messenger, you may simply access these options. This application provides private offline chat, video messaging, image and video sharing, and video chatting.
Step1Start Windows Live Messenger on your PC or laptop first. Enter your login name and password by clicking the “Sign In” button.
Step2On the top menu bar, pick “Tools.” And then select the “Audio and Video Setup”. Drag the slider next to “Speaker” to modify the speaker volume. Drag the slider next to “Microphone” to modify the microphone sensitivity. Press “Next.”
Step3From the drop-down list, pick the webcam. The “Camera Control” option is situated on the top; pick “Webcam Settings” after that.
Step4Now, to alter the zoom settings, drag the “Zoom” slider. To zoom in or out, drag the slider to the left or right. Press “OK.”
Way 2: Use Windows 10 Camera App
Wondering how to zoom your camera in the Windows 10 Camera app? The Camera app enables you to zoom in or out on your webcam in both image and video modes. To accomplish so, click or push the Magnification button, and then use the slider to modify the webcam’s zoom level. To operate the zoom feature manually, pick “Manual Zoom.” In the preview window, a square appears when you pick this option. To zoom in on a specific region of the capture window, drag the square there. To expand the image that was acquired by the webcam, slide the slider bar. In simply, The Camera app enables you zoom in or out of photographs and movies shot with your webcam. To do this, click on the “Zoom” button and drag the slider to the left or right as appropriate on your Windows 10 camera. the following steps:
Step1To open the “Start Menu,” make a right-click on “Start.” Now, to access the Camera app, type “Camera App” into the start menu’s search box.
Step2Tap the Camera Control icon when you start or join a meeting. To zoom and pan the camera to the appropriate spot, utilize the icons on the Camera Control panel.
![]()
Step3To exit the Camera Control window and return to the Meeting Controls, touch outside of it.
Way 3: Zoom with YouCam
Unfortunately, the default cameras or webcams bundled with the majority of Windows laptops and desktops don’t have an automatic zoom option. In fact, the only method to adjust their crop is to switch from “Standard” to “Widescreen,” which does slightly zoom in on you but not in the manner we’d want. This makes it inescapable that the only method to manually alter a webcam’s magnification is to acquire one separately and apply its software settings. , like YouCam. YouCam provides video calling, streaming, and broadcasting. includes an integrated app. To employ Zoom with YouCam, refer to the methods given below:
Step1Launch the YouCam camera program and activate the webcam.
Step2In the camera preview window, pick Settings. Then, select “Enable Video Zoom” from the menu.
Step3Select “Automatic Face Detection” from the menu. As you wander about in the capture window, the camera watches your face and automatically zooms in on your photo as shown above.
Step4To handle the zoom feature manually, pick “Manual Zoom.” In the preview window, a square appears when you pick this option. To zoom in on a specific region of the capture window, drag the square there. To expand the image that was acquired by the webcam, slide the slider bar.
Way 4: Use iGlasses on Mac
For the perfect webcam look on a MAC, install the Chrome plugin iGlasses for video effects and style tweaks. Your videos will appear better on Zoom as a consequence. You may instantly enhance the appearance of your video interactions by utilizing the digital zoom on your iGlasses. Digital pan, tilt, and zoom are all possible with easy controls. For Macs that support it, an Apple Remote may be used to operate. iGlasses will become an option in Zoom’s video settings when it has been installed. You may improve your camera by altering the settings in iGlasses. You may experiment with a range of amusing effects, like 3-D distortions, using the virtual camera. Let’s learn how to utilize iGlasses on a Mac:
Step1Installing Ecamm’s iGlasses on a MacBook in the first step.
Step2To activate the camera, go to your video settings and pick iGlasses.
Step3Choose the Zoom window and execute the appropriate operations using the Zoom and Flip options. You may now zoom in and out using the camera on your MacBook as you like.
Conclusion
In conclusion, so many people currently take part in online conferences and virtual meetings. You want to create a lasting impression, don’t you? Not or whether you are the host of an online meeting or event, you must now maintain a professional image to prevent turning off attendees. You have discovered how to utilize the tools at your disposal to boost the zoom in and out quality of your camera in this post. However, as will be explained in the sections ahead, you may do it without the third-party plugins. With just one quick plugin, you can significantly transform how you look on a camera. Hence, try out the easy method from the above enlisted ones to get hold on your PC webcam to zoom in or out purposes.
4 Solutions to Add White Border to Video on Mobile and Desktop
Would you like to add white borders to your videos?
Are you looking to put white backgrounds to your videos without cutting them?
You have seen many videos with attractive borders on different social media platforms (Instagram, YouTube, Facebook, LinkedIn, etc.) Adding borders allows you to create an evocative effect and also adjust the cropping issues. It plays a good role in redesigning a video. It should be noted that a border can change the entire style of the video.
There are hundreds of video editing software that allow adding borders to the videos for mobile and desktop. In this article, we shall discuss different ways to add white borders in movies used on different social media platforms.

4 Ways to Add White Borders to Video
The following 4 ways can be used to add white borders to the videos.
- Add a white border to the video on the computer (using Filmora)
- Add a white border to the video online
- Add a white border to the video on Android
- Add a white border to the video on iOS
Add a white border to the video on the computer (using Filmora)
Filmora Video Editor is one of the best video editing software. It allows editing the videos in a professional way. It has built-in editing features like splitting/cutting, trimming, cropping, adding watermark, changing speed, recording voice, and many more Along with this, you can rely on this application to add borders with different colors including white borders, black borders, colored border, and customized border. Add white borders on a computer, all this can be done in a few simple steps.
For Win 7 or later (64-bit)
For macOS 10.14 or later
Let’s download the free Wonder Share Filmora 11 software to proceed.
- Go to media, and import the video from your storage.
- Drag the video into the timeline.

- Select the video by clicking on the video.
- Hit the effects You can select the colorful effects from the panel.
- Now, write borders in the search engine. You will find various borders styles in the panel.
- Select the white border at the top of the panel.
- Simply drag and drop the border to the video/image.

- You will see the white border on the selected video.

- You can change the color of the border.
- Select the video by double-clicking on it.
- Hit the Effect tab from the Image and then click on Borders.
- Here you can change the color of your borders.
- Hit the OK

Add A White Border To The Video Online
You can change white borders without launching software by editing online. Kapwing is an online video editing tool that is used to edit videos, images, and GIFs. It is very easy to use and the good thing about Kapwing is, it’s free and you don’t need to sign up or add watermarks to your edited videos/images.
However, it allows you to edit a video up to 250MB or you can only upload a video of almost 7 minutes in length. What you would need is to have a good internet connection and a Web.
Let’s start editing to add white borders step by step:
- Visit Kapwing collage maker and hit start collage maker
- You will see the below window.

- Click on Add media and select the desired video or image.
- Drag and drop the video into the timeline.

- Click on the video and drag the 4 corners to resize your video.
- It will eventually provide you with a white background and you can use it as a white border.

- Hit the Lock ratio tab once you got satisfied with your image borders.
- Double click the border to set the background color.

- You can change the background colors of your choice.

Add a white border to the video on Android
You can add white borders to your videos using android. BeeCut is a very simple and useful application for video editing. It presents a lot of stylish and beautiful frames and effects to make your video amazing. Along with this, it allows you to add text, filters, transitions, and many features to make your video stand out. It is very easy to use as takes a few steps to add frames to your video in android. To start the process follow these steps;
- Launch BeeCut on your mobile/android.
- Open the app and click on Media.
- Hit on Import file.

- Drag the video into the timeline or hit the +
- Hit the overlays
- Select your desired border.

- Drag the desired overlay border over the timeline. Here you can edit your design (change color, effect, etc.)
- Now, hit the export tab and choose the quality and format of your video.
- Save the file on your android.
Add a white border to the video on iOS
The PicsArt app is commonly used to edit videos on iPhone as well as on android. It is a very simple app, even a layman can use PicsArt and make professional white borders. This app is familiar among Instagram users. It changes the rectangular video or image into a square format. The aspect ratio of 1:1 is used for Instagram videos. It not only adds borders to the videos but also provides editing features like cut, resize, rotate, trims, text, etc. Let’s start with step-by-step instructions to add white borders to the video.
- Go to the app store and download the PicsArt app.
- Open the app and select the desired video.
- Hit the Fit tab from the bottom center.

- Select the color tool from the bottom.
- Choose the white color for white borders and you can also choose the desired color.
- Hit the ütab and the video will be saved to your phone gallery or you can directly share the video on Instagram.

Conclusion:
In the above content, we have introduced four methods to add white borders in your videos using windows, android, iPhone, and online. All the methods are free to use.
Wonder Share Filmora 11 is highly recommended to get the best and most professional results. It not only allows you to add borders but also provides you with an advanced editing panel. You can easily edit your videos and share with your social circle.
4 Ways to Add White Borders to Video
The following 4 ways can be used to add white borders to the videos.
- Add a white border to the video on the computer (using Filmora)
- Add a white border to the video online
- Add a white border to the video on Android
- Add a white border to the video on iOS
Add a white border to the video on the computer (using Filmora)
Filmora Video Editor is one of the best video editing software. It allows editing the videos in a professional way. It has built-in editing features like splitting/cutting, trimming, cropping, adding watermark, changing speed, recording voice, and many more Along with this, you can rely on this application to add borders with different colors including white borders, black borders, colored border, and customized border. Add white borders on a computer, all this can be done in a few simple steps.
For Win 7 or later (64-bit)
For macOS 10.14 or later
Let’s download the free Wonder Share Filmora 11 software to proceed.
- Go to media, and import the video from your storage.
- Drag the video into the timeline.
- Select the video by clicking on the video.
- Hit the effects You can select the colorful effects from the panel.
- Now, write borders in the search engine. You will find various borders styles in the panel.
- Select the white border at the top of the panel.
- Simply drag and drop the border to the video/image.
- You will see the white border on the selected video.
- You can change the color of the border.
- Select the video by double-clicking on it.
- Hit the Effect tab from the Image and then click on Borders.
- Here you can change the color of your borders.
- Hit the OK
Add A White Border To The Video Online
You can change white borders without launching software by editing online. Kapwing is an online video editing tool that is used to edit videos, images, and GIFs. It is very easy to use and the good thing about Kapwing is, it’s free and you don’t need to sign up or add watermarks to your edited videos/images.
However, it allows you to edit a video up to 250MB or you can only upload a video of almost 7 minutes in length. What you would need is to have a good internet connection and a Web.
Let’s start editing to add white borders step by step:
- Visit Kapwing collage maker and hit start collage maker
- You will see the below window.
- Click on Add media and select the desired video or image.
- Drag and drop the video into the timeline.
- Click on the video and drag the 4 corners to resize your video.
- It will eventually provide you with a white background and you can use it as a white border.
- Hit the Lock ratio tab once you got satisfied with your image borders.
- Double click the border to set the background color.
- You can change the background colors of your choice.
Add a white border to the video on Android
You can add white borders to your videos using android. BeeCut is a very simple and useful application for video editing. It presents a lot of stylish and beautiful frames and effects to make your video amazing. Along with this, it allows you to add text, filters, transitions, and many features to make your video stand out. It is very easy to use as takes a few steps to add frames to your video in android. To start the process follow these steps;
- Launch BeeCut on your mobile/android.
- Open the app and click on Media.
- Hit on Import file.
- Drag the video into the timeline or hit the +
- Hit the overlays
- Select your desired border.
- Drag the desired overlay border over the timeline. Here you can edit your design (change color, effect, etc.)
- Now, hit the export tab and choose the quality and format of your video.
- Save the file on your android.
Add a white border to the video on iOS
The PicsArt app is commonly used to edit videos on iPhone as well as on android. It is a very simple app, even a layman can use PicsArt and make professional white borders. This app is familiar among Instagram users. It changes the rectangular video or image into a square format. The aspect ratio of 1:1 is used for Instagram videos. It not only adds borders to the videos but also provides editing features like cut, resize, rotate, trims, text, etc. Let’s start with step-by-step instructions to add white borders to the video.
- Go to the app store and download the PicsArt app.
- Open the app and select the desired video.
- Hit the Fit tab from the bottom center.
- Select the color tool from the bottom.
- Choose the white color for white borders and you can also choose the desired color.
- Hit the ütab and the video will be saved to your phone gallery or you can directly share the video on Instagram.
Conclusion:
In the above content, we have introduced four methods to add white borders in your videos using windows, android, iPhone, and online. All the methods are free to use.
Wonder Share Filmora 11 is highly recommended to get the best and most professional results. It not only allows you to add borders but also provides you with an advanced editing panel. You can easily edit your videos and share with your social circle.
Also read:
- New How to Change Video Resolution in Filmora
- Updated Best 5 Tips to Freeze-Frame in After Effects for 2024
- In 2024, Want to Make Your Canva Slideshow More Attractive? Follow the Given Discussion to Know Everything About Making the Best Slideshows with Canva
- New In 2024, 15 Camera Shake Preset for Premiere Pro
- Updated Top 10 Best Slideshow Makers with Music
- New 2024 Approved Best 5 AI Music Video Examples and Makers to Make Them
- New In 2024, Text Animation Intro Tutorial in Filmora
- In 2024, Best 5 Tools to Help You Know More Freeze-Frame Video Editing Skills
- 2024 Approved Several Tips Can Facilitate How You Edit Videos Faster and Easier. All You Need to Do Is to Read This Article to Find Out What They Are
- New 2024 Approved 15 Best Travel Vloggers That You Should Follow
- Learn to Splice Videos Together on iPhone for 2024
- This Article Introduce You the Best Video Trimmers to Use on Different Devices, Check Them Out and Choose Your Favoriate One for 2024
- New Best Video Grabbers for Chrome for 2024
- Updated 8 Best Video Editor with Useful Masking
- Updated Complete Guide to Converting GIF to SVG With Ease
- New How Can You Deny These Best 10 Free Speech to Text Software
- New Rules of Three or Thirds Is a Classic Trick in Photography, and the Result of Video and Photo Is Really Great. This Article Will Show You How to Use Rule of Thirds to Make a Better Video
- Best GIF to MOV Converters for 2024
- 2024 Approved Ultimate Guidelines to Help You Better Use VLC Media Player
- In 2024, 8 Excellent Video and Photo Mergers on Desktop/Mobile/Online
- How to Color Grade Your Picture in LightRoom
- New 2024 Approved Top 10 3D Slideshow Software Review
- Updated Ideas for Time-Lapse Video
- 2024 Approved 12 Impressive AI Video Ideas for Making Engaging Video Content
- New In 2024, Detailed Tutorial to Crop a Video Using Openshot?
- Updated Are You Also Facing a Problem with the Snapchat Camera Zoomed In? Find Out the Easiest Methods to Fix This Error without Installing a Third-Party Tool
- Updated Easy Guide to Zoom Video in VLC
- Updated 2024 Approved Top 20 Best Text To Speech Software Windows, Mac, Android, iPhone & Online
- Top 7 Best GoPro Video Editors for Mac
- In 2024, How to Create a Slideshow with Movavi Slideshow Maker
- Updated In 2024, Video Editing Tips to Know Before Editing First Draft
- Shotcut Review – Is It The Best Free Video Editor for 2024
- Sign .dot file Online with DigiSigner
- Forgotten The Voicemail Password Of Honor X9b? Try These Fixes
- In 2024, How to Bypass Google FRP Lock on Motorola Edge 40 Devices
- How To Fix Part of the Touch Screen Not Working on Motorola Moto G34 5G | Dr.fone
- In 2024, 3 Easy Ways to Factory Reset a Locked Apple iPhone SE (2022) Without iTunes
- How to recover lost data from Edge 40 Pro?
- Universal Unlock Pattern for Vivo S18 Pro
- Getting the Pokemon Go GPS Signal Not Found 11 Error in Nokia C110 | Dr.fone
- MKV stutters on Razr 40 and stops randomly
- 3 Ways to Erase Apple iPhone X When Its Locked Within Seconds | Dr.fone
- In 2024, iCloud Unlocker Download Unlock iCloud Lock for your Apple iPhone XR
- How to Unlock Samsung Galaxy S24+ Phone Pattern Lock without Factory Reset
- How to Transfer Data from Tecno Phantom V Fold to Any iOS Devices | Dr.fone
- 10 Fake GPS Location Apps on Android Of your Itel A70 | Dr.fone
- The way to get back lost data from Itel A05s
- Title: Updated How to Color Correct in OBS
- Author: Chloe
- Created at : 2024-06-26 06:24:25
- Updated at : 2024-06-27 06:24:25
- Link: https://ai-editing-video.techidaily.com/updated-how-to-color-correct-in-obs/
- License: This work is licensed under CC BY-NC-SA 4.0.
