
:max_bytes(150000):strip_icc():format(webp)/1LW4062264-InCar6-1500-5b803f8ec9e77c0025d3f4de.jpg)
Updated How to Convert Videos to Slow Motion? Complete Guide for 2024
How to Convert Videos to Slow Motion? [Complete Guide]
Slow Motion films are unique, don’t you think? Occasionally, individuals use their phones to shoot slow-motion films if they have an in-built function, and if their phone does not have an in-built feature, they may use slow-motion video creator applications to assist them.
But what happens if you have previously filmed a video at regular speed and now want the movie to be converted to slow motion?
Maybe a video of you from the pool when you’re flipping your hair, but no one remembers to take it in slow motion? Don’t be concerned! Today, we will show you how to turn any video into a slow-motion video on different operating systems.
In this article
01 How to Turn Videos Into Slow Motion on Windows for Free?
02 How to Convert Normal Video to Slow Motion for Free on Mac?
03 How to turn Normal Video to Slow Motion With VLC On Linux Computer?
04 How to Use Wondershare Filmora Video Editor to Turn Normal Videos to Slow Motion?
05 Best Slow Motion Converters to Convert Video to Slow Motion Online Free?
06 How to Convert Normal Video to Smooth Slow Motion In iPhone And Android Phones
Part 1: How to Turn Videos Into Slow Motion on Windows for Free?
If you need to conduct some simple editing and effects on your films, there is no need to invest hundreds of dollars in a video editing software application. For example, you may use the Photos App pre-installed on Windows 10 machines to apply the slow-motion effect to your photographs.
Step 1: Right click the video and choose Open with Photos. If it has been recorded by an iPhone or Android device and stored up to OneDrive, it should appear in the Microsoft Photos app without any further effort. Just click it to preview the video.
Step 2: Go to the Edit & Create option on the right corner on the top, and then select Add slo-mo option.

Step 3: Using the slider, you can determine how slowly you want it to go. Microsoft has built-in support for “Slow“ and “Super-Slow“ performance levels. Drag the slide to the right end will trigger the super slow mode.

Step 4: Specifiy the part that you want to apply slow motion in the playback bar at the bottom, and then save the video that you have just created with slow motion effects on Windows 10 .
The possibility exists that you are using an older version of Windows 10 on your computer if you do not see the option anywhere in the Photos app. You can also follow the steps above to create a slow motion video on Windows 11.
Browse Windows Update from the system menu and click on the appropriate button. When all of the updates have been installed, you will have the most recent version of the Photos app, which includes this functionality.
Part 2: How to Convert Normal Video to Slow Motion for Free on Mac?
Slow-motion videos are among the most enjoyable parts of utilizing your iPhone for videography. Video may be recorded with a frame rate of 120 or 240 fps and then played back at a considerably slower rate than usual.
However, if you don’t record video on your iPhone, making slow motion out of videos shot on other cameras or devices is more challenging. The good news is that iMovie for Mac can do this for you. We’ll show you how in this guide.
Slow-motion films are easy to make using iMovie on your Mac . Just follow the steps listed below.
Step 1: Click on the Import Media option in iMovie once launched on your Mac.
Step 2: Click on the blue Import Selected button once you’ve selected the video file in the file browser to slow it down.
Step 3: You may now open the movie in iMovie. Creating a Project is required at this stage. To do so, click on the Projects option.
Step 4: Once you’ve entered a name for your project, click the blue OK button.
Step 5: By dragging the movie onto your timeline, you may modify the video. Select the video by clicking on it and clicking on the Speed option to change its speed.
Step 6: The speed-editing interface will be shown here. Change Normal to Slow in the Speed drop-down menu.
Step 7: The duration of your movie will be increased by halves the pace at which it was initially recorded. The video may be slowed down even further by moving the speed slider.
Step 8: Go to the Menu Bar and choose File > Share. Select the file you want to share.
Step 9: Click the blue Next button once you’ve selected the properties you want for the file.
Step 10: Select a name for the file, store it, and then click the blue Save button to save it to your computer.
Part 3: How to turn Normal Video to Slow Motion With VLC On Linux Computer?
The video speed may be controlled in two ways using VLC. Using shortcut keys or hotkeys is one method, while menus and buttons are another. Both methods are OK, but the shortcut option is the quickest and most efficient.
Speed up and speed down buttons appear on the upper right of the movie when you press them. Depending on how much you tweak it, the speed is represented as 1.50x or 0.80x. This option is available for those who like to use other shortcut keys.
Step 1: From the VLC menu bar, head over to the Playback for Speed and choose a speed option: slower, slower (fine), normal, faster (fine), and faster.
Step 2: Right-clicking is also possible to access these parameters from the Playback > Speed menu.
Step 3: The video’s speed may be altered by selecting one of those options and then clicking the appropriate button.
If you are running VLC on Windows and Mac, you can check this article to find out the detailed information about how to playback video in slow motion in VLC .
Related: Best Free Video Editor for Linux .
Part 4: How to Use Wondershare Filmora Video Editor to Turn Normal Videos to Slow Motion?
For Win 7 or later (64-bit)
For macOS 10.12 or later
Wondershare Filmora is a video editor we’d like to show to you. Whether using a Windows or a Mac computer, you can rapidly speed up and slow down films with this easy video editor . With a user-friendly interface, Filmora video editor has many professional-grade editing features to help refine videos with ease. From motion tracking to keyframe animations, Filmora video editor offers a plethora of options.
Step 1: Launch Filmora video editor on your Windows or Mac computer (I’m running Windows 10 here). Click the New Project in the Startup window to create a new project in 16:9 aspect ratio by default.

Step 2: Import the video you want to add slow motion effect to the media library, and then drag and drop it to the timeline.

Step 3: To add slow motion effect to part of the video, you need to split the video first and then right click it to choose Speed and Duration. There will be a pop-up window. The motion effects will be sped up or slowed down based on the speed values.

Step 4: When you increase or decrease the video playing speed, the video audio speed changes. If you wish to retain the video audio’s actual playing speed, you may first Detach Audio from the video and then edit the video to achieve a perfect pitch.

Step 5: Select Export after you’ve completed setting the video speed. By selecting Format, you may save the video in any significant format.
Part 5: Best Slow Motion Converters to Convert Video to Slow Motion Online Free?
1. Online Converter
This Online Converter is one of the best on the internet. It is simple to use and supports various video formats such as MP4, AVI, FLV, MOV, 3GP, MKV, WMV, M4V, and others. This tool can also change the video speed by increasing (speeding up) or decreasing (slowing down). The audio in the video file will also become faster or slower due to using this tool.
Step 1: click on the Choose File option from the website to upload the video (max. 200MB).
Step 2: Now select the Speed of the video from the given options. Since we are going to make a video with slow motion effect, choose 0.5x or 0.8x will work perfectly.

Step 3: click on Confirm to convert the video to your preferred slo-mo video.
Part 6: How to Convert Normal Video to Smooth Slow Motion In iPhone And Android Phones
In addition to the essential editing tools of the famous social media platform, TikTok, CapCut is mobile video editing software for both Android and iOS smartphones that were mainly built to complement them. Here is how you can use CapCut to transform a regular video into a slow-mo one:
Step 1: Create A New Project on the CapCut app’s home screen. Browse and add the video you want to search for in slow-motion to the project.
Step 2: When you’re ready to turn off the sound, go ahead and hit the Mute clip audio button first, so there will be no creep sound after applying the slow-motion effect.

Step 3: In case you just want to add a slo-mo effect to part of the video, you need to split the video accordingly. Split the portion of the video that will be slowed down by clicking on the Split button in the menu. And use the Split tool again to end the slow-motion effect to get a segment of the video.
Step 4: Tap the cut section of the video and then you will see the Speed option. Open the Speed menu by selecting it from the drop-down menu.

Step 5: In CapCut, there are two methods to slow down a video, Normal and Curve, respectively. You may just choose the “Normal“ option to make things easy. It is possible to reduce the video’s frame rate by moving the speed slider to the left. You may, for example, make the pace 0.3 times slower. Apply a slow-motion effect by tapping the Check box.

Make a slow motion video at this stage to spice things up. CapCut allows you to add text, create transition effects, and more.
For more information, you can check: How to slo-mo in Capcut .
Conclusion
In this complete guide on “How to Convert Videos to Slow Motion?”, we hope you have learned all the basics. We have covered different apps that can help you do so. As the steps are straigthforward, make sure you abide by all the basics and transform your videos into catchy ones!
02 How to Convert Normal Video to Slow Motion for Free on Mac?
03 How to turn Normal Video to Slow Motion With VLC On Linux Computer?
04 How to Use Wondershare Filmora Video Editor to Turn Normal Videos to Slow Motion?
05 Best Slow Motion Converters to Convert Video to Slow Motion Online Free?
06 How to Convert Normal Video to Smooth Slow Motion In iPhone And Android Phones
Part 1: How to Turn Videos Into Slow Motion on Windows for Free?
If you need to conduct some simple editing and effects on your films, there is no need to invest hundreds of dollars in a video editing software application. For example, you may use the Photos App pre-installed on Windows 10 machines to apply the slow-motion effect to your photographs.
Step 1: Right click the video and choose Open with Photos. If it has been recorded by an iPhone or Android device and stored up to OneDrive, it should appear in the Microsoft Photos app without any further effort. Just click it to preview the video.
Step 2: Go to the Edit & Create option on the right corner on the top, and then select Add slo-mo option.
Step 3: Using the slider, you can determine how slowly you want it to go. Microsoft has built-in support for “Slow“ and “Super-Slow“ performance levels. Drag the slide to the right end will trigger the super slow mode.
Step 4: Specifiy the part that you want to apply slow motion in the playback bar at the bottom, and then save the video that you have just created with slow motion effects on Windows 10 .
The possibility exists that you are using an older version of Windows 10 on your computer if you do not see the option anywhere in the Photos app. You can also follow the steps above to create a slow motion video on Windows 11.
Browse Windows Update from the system menu and click on the appropriate button. When all of the updates have been installed, you will have the most recent version of the Photos app, which includes this functionality.
Part 2: How to Convert Normal Video to Slow Motion for Free on Mac?
Slow-motion videos are among the most enjoyable parts of utilizing your iPhone for videography. Video may be recorded with a frame rate of 120 or 240 fps and then played back at a considerably slower rate than usual.
However, if you don’t record video on your iPhone, making slow motion out of videos shot on other cameras or devices is more challenging. The good news is that iMovie for Mac can do this for you. We’ll show you how in this guide.
Slow-motion films are easy to make using iMovie on your Mac . Just follow the steps listed below.
Step 1: Click on the Import Media option in iMovie once launched on your Mac.
Step 2: Click on the blue Import Selected button once you’ve selected the video file in the file browser to slow it down.
Step 3: You may now open the movie in iMovie. Creating a Project is required at this stage. To do so, click on the Projects option.
Step 4: Once you’ve entered a name for your project, click the blue OK button.
Step 5: By dragging the movie onto your timeline, you may modify the video. Select the video by clicking on it and clicking on the Speed option to change its speed.
Step 6: The speed-editing interface will be shown here. Change Normal to Slow in the Speed drop-down menu.
Step 7: The duration of your movie will be increased by halves the pace at which it was initially recorded. The video may be slowed down even further by moving the speed slider.
Step 8: Go to the Menu Bar and choose File > Share. Select the file you want to share.
Step 9: Click the blue Next button once you’ve selected the properties you want for the file.
Step 10: Select a name for the file, store it, and then click the blue Save button to save it to your computer.
Part 3: How to turn Normal Video to Slow Motion With VLC On Linux Computer?
The video speed may be controlled in two ways using VLC. Using shortcut keys or hotkeys is one method, while menus and buttons are another. Both methods are OK, but the shortcut option is the quickest and most efficient.
Speed up and speed down buttons appear on the upper right of the movie when you press them. Depending on how much you tweak it, the speed is represented as 1.50x or 0.80x. This option is available for those who like to use other shortcut keys.
Step 1: From the VLC menu bar, head over to the Playback for Speed and choose a speed option: slower, slower (fine), normal, faster (fine), and faster.
Step 2: Right-clicking is also possible to access these parameters from the Playback > Speed menu.
Step 3: The video’s speed may be altered by selecting one of those options and then clicking the appropriate button.
If you are running VLC on Windows and Mac, you can check this article to find out the detailed information about how to playback video in slow motion in VLC .
Related: Best Free Video Editor for Linux .
Part 4: How to Use Wondershare Filmora Video Editor to Turn Normal Videos to Slow Motion?
For Win 7 or later (64-bit)
For macOS 10.12 or later
Wondershare Filmora is a video editor we’d like to show to you. Whether using a Windows or a Mac computer, you can rapidly speed up and slow down films with this easy video editor . With a user-friendly interface, Filmora video editor has many professional-grade editing features to help refine videos with ease. From motion tracking to keyframe animations, Filmora video editor offers a plethora of options.
Step 1: Launch Filmora video editor on your Windows or Mac computer (I’m running Windows 10 here). Click the New Project in the Startup window to create a new project in 16:9 aspect ratio by default.
Step 2: Import the video you want to add slow motion effect to the media library, and then drag and drop it to the timeline.
Step 3: To add slow motion effect to part of the video, you need to split the video first and then right click it to choose Speed and Duration. There will be a pop-up window. The motion effects will be sped up or slowed down based on the speed values.
Step 4: When you increase or decrease the video playing speed, the video audio speed changes. If you wish to retain the video audio’s actual playing speed, you may first Detach Audio from the video and then edit the video to achieve a perfect pitch.
Step 5: Select Export after you’ve completed setting the video speed. By selecting Format, you may save the video in any significant format.
Part 5: Best Slow Motion Converters to Convert Video to Slow Motion Online Free?
1. Online Converter
This Online Converter is one of the best on the internet. It is simple to use and supports various video formats such as MP4, AVI, FLV, MOV, 3GP, MKV, WMV, M4V, and others. This tool can also change the video speed by increasing (speeding up) or decreasing (slowing down). The audio in the video file will also become faster or slower due to using this tool.
Step 1: click on the Choose File option from the website to upload the video (max. 200MB).
Step 2: Now select the Speed of the video from the given options. Since we are going to make a video with slow motion effect, choose 0.5x or 0.8x will work perfectly.
Step 3: click on Confirm to convert the video to your preferred slo-mo video.
Part 6: How to Convert Normal Video to Smooth Slow Motion In iPhone And Android Phones
In addition to the essential editing tools of the famous social media platform, TikTok, CapCut is mobile video editing software for both Android and iOS smartphones that were mainly built to complement them. Here is how you can use CapCut to transform a regular video into a slow-mo one:
Step 1: Create A New Project on the CapCut app’s home screen. Browse and add the video you want to search for in slow-motion to the project.
Step 2: When you’re ready to turn off the sound, go ahead and hit the Mute clip audio button first, so there will be no creep sound after applying the slow-motion effect.
Step 3: In case you just want to add a slo-mo effect to part of the video, you need to split the video accordingly. Split the portion of the video that will be slowed down by clicking on the Split button in the menu. And use the Split tool again to end the slow-motion effect to get a segment of the video.
Step 4: Tap the cut section of the video and then you will see the Speed option. Open the Speed menu by selecting it from the drop-down menu.
Step 5: In CapCut, there are two methods to slow down a video, Normal and Curve, respectively. You may just choose the “Normal“ option to make things easy. It is possible to reduce the video’s frame rate by moving the speed slider to the left. You may, for example, make the pace 0.3 times slower. Apply a slow-motion effect by tapping the Check box.
Make a slow motion video at this stage to spice things up. CapCut allows you to add text, create transition effects, and more.
For more information, you can check: How to slo-mo in Capcut .
Conclusion
In this complete guide on “How to Convert Videos to Slow Motion?”, we hope you have learned all the basics. We have covered different apps that can help you do so. As the steps are straigthforward, make sure you abide by all the basics and transform your videos into catchy ones!
Easy Guide to Zoom Video in VLC
Even though VLC Media Player is not the default video player in any operating system, most users install VLC Player separately on their computers. This is because VLC Media Player offers several useful and advanced features that the default media player like Windows Media Player lacks. There are situations when users need to zoom into certain parts of a video, and that is where VLC zoom in video feature comes in handy.
You may need to zoom into videos to pay attention to details and focus on parts around the subject that others are missing out. For example, you have recorded a video, and you have played it on VLC to zoom in and ensure that there is nothing distracting before you publish the video. Now, we will illustrate all the different ways on how to zoom in VLC Media Player. We will also suggest a better alternative to zoom into videos easily.
Part 1: Zoom VLC Video Using Interactive Zoom
VLC Media Player comes with Interactive Zoom feature that lets you zoom into a section of a video irrespective of its resolution. You can use Interactive Zoom feature to zoom nearly eight times the original size of the video. While you zoom your video with Interactive Zoom option, VLC Media Player zooms the video digitally, and if the video resolution is not high, you can see some deterioration in video quality as you zoom in. Here are the steps on how to VLC zoom with Interactive Zoom.
Step1First, you have to enable Interactive Zoom feature. Launch VLC Player and go to Tools menu option.
Step2Select Effects and Filters and you will see Adjustments and Effects window open.
Step3Go to Video Effects tab and then go to Geometry tab.
Step4Turn on Interactive Zoom option. Click on Save and Close buttons.

Step5Play a video and you will see a Picture in Picture window in the top-left corner where you can see live preview of the video. You will notice a rectangular box that you can drag around the PiP window to zoom that section of the video.

Step6Wherever you place the rectangular box in PiP window, that part will be zoomed and shown outside the PiP window. You can increase or decrease the level of magnification from the vertical slider present below PiP window.
Part 2: Zoom Video Using VLC Video Menu
Apart from Interactive Zoom, there is also an inbuilt Zoom option available under Video Menu. While Interactive Zoom is for detailed zooming, Zoom through Video menu on VLC is for instant zooming. Moreover, Zoom through Video menu is effective only when you view the video on VLC Player. If you are watching the video on full screen, the zooming effect will not be easily noticeable. Here are the steps on how to zoom in VLC player using VLC Video menu.
Step1Open VLC Media player in windowed mode and play the desired video.
Step2Go to Video menu and select Zoom option.
Step3You will come across several options such as 1:4 quarter, 1:2 half, 1:1 original, and 2:1 double. You can select from one of them as per your requirements.

Otherwise, you can press Shift + Z keys together to try out different zoom options.
Part 3: Zoom VLC Video Using Magnifier
If you are using VLC Media Player on your Windows desktop computer, you can use the inbuilt Magnifier tool to zoom into a video that you are playing on VLC. You can zoom into videos to read any text in the background but this leads to low resolution and distortion. You can zoom in by 16 times which is the highest among all the three methods. Here are the steps on how to VLC zoom video using Magnifier tool.
Step1Open VLC Player and play the desired video.
Step2Go to Start menu on Windows and search for “Magnifier”.

Step3Click on Magnifier App. Once it opens, place the mouse pointer on the video and you will see its magnified version.
Step4Press Windows and “+” keys to zoom in while press Windows and “-“ keys to zoom out.

Part 4: VLC Alternative to Zoom in Videos
If you are not satisfied with VLC Player zoom feature, you can use a video editor to zoom into your video conveniently so that you can check any focused section on your video. You can also read any text on the video comfortably. We recommend Wondershare Filmora as an alternative to VLC Media Player for zooming into videos. Filmora is a professional video editor and here is the list of the steps on how to zoom into videos with Filmora.
Step 1: Download and install Wondershare Filmora and it is available for Windows and Mac users.
Free Download For Win 7 or later(64-bit)
Free Download For macOS 10.14 or later
Step 2: Launch Wondershare and click on New Project option.
Step 3: Import your video on Filmora into Project Media folder by drag and drop option.

Step 4: Drag and drop the video file into Timeline. Click on Crop icon on the top bar of Timeline.
Step 5: Go to Pan & Zoom tab and move the rectangular box and play the video to watch its magnified video. You can also export the video after cropping in your desired file format.

Conclusion
There are several scenarios when you need to zoom into a video to focus on the details. VLC Media Player comes with instant zoom as well as detailed zoom options to satisfy your requirements. You can even use Magnifier App on Windows to zoom into videos. But for the best result, we recommend Wondershare Filmora as the best VLC Player alternative for zooming videos.
Free Download For macOS 10.14 or later
Step 2: Launch Wondershare and click on New Project option.
Step 3: Import your video on Filmora into Project Media folder by drag and drop option.
Step 4: Drag and drop the video file into Timeline. Click on Crop icon on the top bar of Timeline.
Step 5: Go to Pan & Zoom tab and move the rectangular box and play the video to watch its magnified video. You can also export the video after cropping in your desired file format.
Conclusion
There are several scenarios when you need to zoom into a video to focus on the details. VLC Media Player comes with instant zoom as well as detailed zoom options to satisfy your requirements. You can even use Magnifier App on Windows to zoom into videos. But for the best result, we recommend Wondershare Filmora as the best VLC Player alternative for zooming videos.
Windows Movie Maker Review
Are you considering creating impressive movies from your video clips? Then you need to install this famous Windows movie maker tool to fulfill your job. This is expert video editing Microsoft software that you may use for free. This video editing tool by Windows has received massive recognition due to its simplicity. Also, it makes every task easy and quick, like combining video clips to form digital movies, including various effects, background music, transitions, and titles.
So, Windows Movie Maker is undoubtedly the ideal software for this job. Moreover, video editors using this app experience several attributes in their organization to finally emerge with the perfect videos, like audio options, animations, transitions overlays, and timeline narration. It has user-friendly features, which you’ll enjoy experimenting with. This software also has XML code allowing its end users to modify live effects and transitions or even prepare very new ones.
This brilliant tool can even do primary track editing, including fade-out and fade-in effects in your final audio tracks. Windows movie maker even allows you to post your final project effortlessly on various video sites and social media platforms. Here’s a complete guide:
1. Download and Install Windows Movie Maker
Windows movie maker was previously recognized in Windows 7 as Windows Live Movie Maker. So to experience the features of this software, first, you need to download and install this app which is available free of charge. The steps are as follows.
- Firstly, download the setup file of Windows Live Essentials.
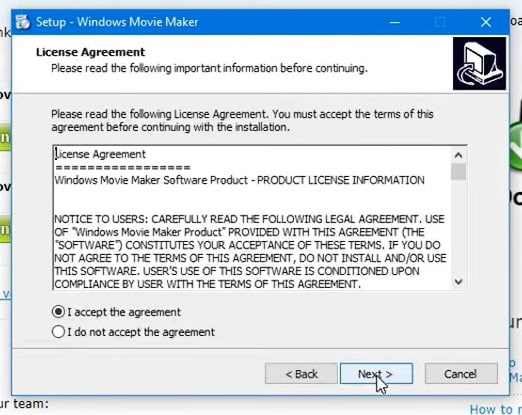
- You’ve to double-click on this setup file called windows-movie-maker.exe. Then tap on ‘Yes’ to permit the setup package to function.
- You’ll now be redirected to the installation window of Windows Essential. Next, you’ll see two options towards the web page’s top, and you’ll have to select the option ‘Install all of Windows Essentials (recommended)’ to continue with the installation process.
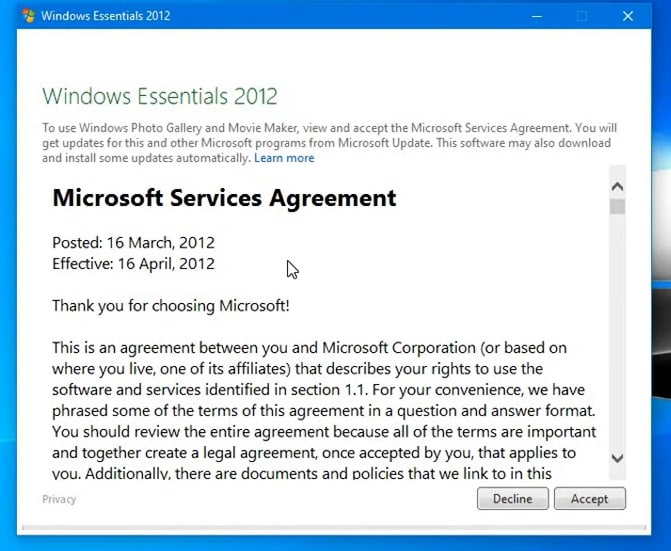
Windows Essentials comprise Microsoft OneDrive, Outlook Connector Pack, Movie Maker, Writer, Mail, Photo Gallery, and Messenger.
- Locate ‘View Details’ towards the left end of the page and tap on it. A progress and percentage bar will pop out along with the details regarding the program you’re installing.
- You need to wait a while to install Windows Movie Maker Software. Pause until the program completes its installation. After you find that the program title changes to another program such as Mail, you may proceed again.
- Now click on the Windows icon and then the ‘Start’ menu on the bottom left of your computer screen.
- Type and Search for ‘Windows Movie Maker, and you’ll find the newly downloaded app on the screen.
- Click on the icon with film reel, which is the Movie Maker app, and you’ll locate it above the Start menu. Next, you’ll be redirected to the terms of use of Windows Essentials for this Window to begin.
- Find the ‘Accept ‘ button towards the screen’s right-end corner and tap on it. Windows Movie Maker will now open.
- Next, tap on ‘Close’ when prompted with an error message from the installation windows.
You may now Enjoy Windows Movie Maker Live and begin making movies and videos using this software.
2. Interface
The user interface of Winona Movie Maker has three essential areas: the timeline and the storyboard, the panes and the toolbar, and the menu bar. This area covers…
- Timeline and storyboard: It offers a timeline and storyboard usage details for working with the current project clips.
- Panes: It offers details regarding Collections pane usage for viewing all your collections. Furthermore, it offers information regarding the Movie Task pane for all general tasks during movie making or project editing.
- Toolbar and Menubar: Here, you’ll get details regarding toolbar and menu commands usage for different tasks in this software.
3. Basic Editing
Adding clips to your timeline is the most straightforward method for creating digital movies using Movie Maker. Thereby, picking any one AutoMovie Themes out of those seven choices from default, sepia, black and white, pan and zoom, fade, cinematic, and contemporary.
You can enjoy the following choices for editing all your video clips:
- Creating clips: You may create new clips from different video clips after you’re done with capturing and importing in the Windows Movie Maker. You may create clips in the software anytime, according to your convenience.
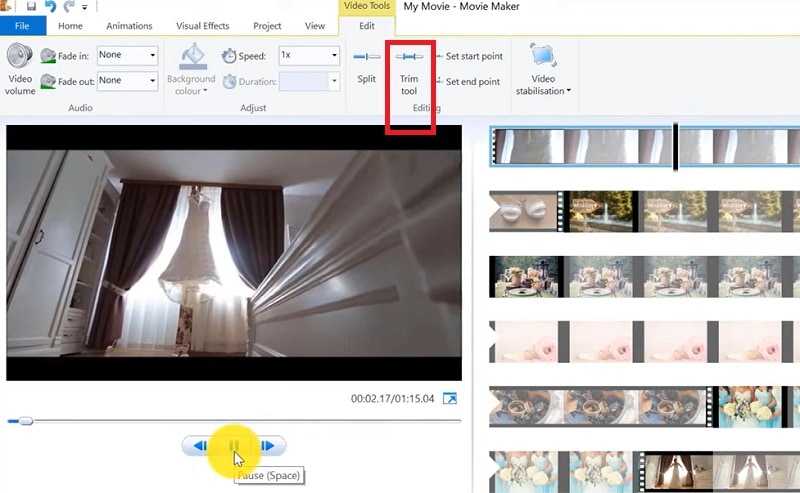
- Trimming any clip: You may hide any clip part you don’t wish to keep in the project. For instance, you may trim the clip’s end or beginning. Also, trimming doesn’t erase the details provided in their source material.
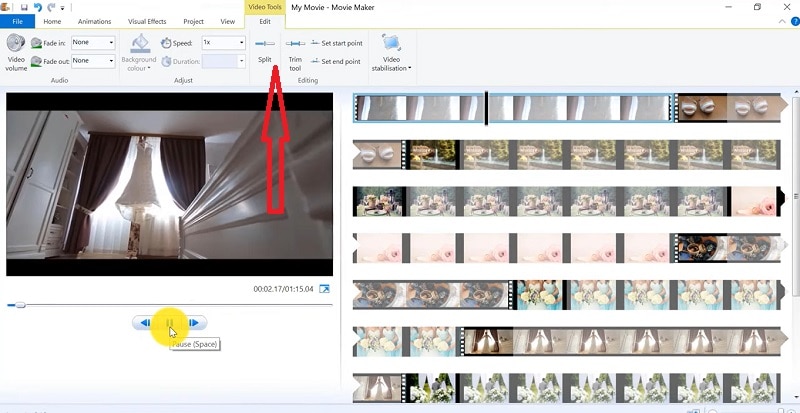
- Splitting Clips: Movie Maker allows you to split any video into two parts which can be helpful when you wish to add a video transition picture between the clips.
- Combining clips: Movie Maker allows you to merge two or multiple contiguous clips. Contiguous indicates that you need to record these clips together so that the beginning and end times are the same as the following video clip.
4. Add Video Effects
Video effects’ ascertain how any title, picture, or video clip displays in the final movie or project. Video effects permit you to include various effects in the movie and are added for the total time that the title, picture, or video clip displays.
Furthermore, you may add various other effects, which you’ll find in the folder of video effects in their Collections pane. You may maintain video effects when moving, copying, cutting, or splitting a picture or video clip.
5. Audio Editing
Windows Movie Maker permits you to operate various audios in several ways. A few specific audio-related jobs you may execute in Windows Movie Live Maker comprise the following:
- Audio levels adjustment: You can adjust your audio level so that you can easily control the audio playback and balance after you have the audio that comes up on Music/ Audio and Audio tracks in your timeline.
- Timeline narration: You may include a voice narration for the picture or video clips, which will appear on the timeline’s video track. There’ll be an automated synchronization of the audio narration with your video, where the narration shall elaborate on the movie event or action when you play it.
- Audio Clips Volume adjustment: You may adjust the audio volume for the video clip’s audio portion or the clips containing only audio. This permits you to control the audio clip’s volume such that you can hear it based on the sound level you’ve set for your audio clip.
- Adding audio effects: You may add various audio effects like mute, fade out and fade in.
6. Share Files
Are you done with video project editing, and now you wish to share it? Windows Movie Maker offers you various choices for sharing straight away from their app, comprising:
- YouTube
- Vimeo
So with this power, you may guarantee to share the video’s correct aspect ratio and size version to any planned platform. Nevertheless, you don’t require signing in to your Microsoft account for sharing to the preferred platform, which may act as a hurdle for all its users who do not have Microsoft Office accounts.
7. Pros and Cons
The software’s advantages are its automated preview, simple controls, and user-friendliness. Additionally, the following are some clear advantages and disadvantages of using Windows Movie Maker:
Pros
- This app is perfect for all novices and is an ideal introduction as it utilizes several pro editing systems’ general workflow components like assembling timelines and importing. Its interface has easy navigation and is exceptionally intuitive for most new beginners as well.
- Windows Live MovieMaker is a video editing Microsoft application that arrives standard with all Windows computers. It is amongst the most favorite editing apps obtainable and exact, as other programs are user-friendly and fun. This software comes free with Vista, XP, and Windows Me and has effortless usage. Moreover, you may download additional video plugins, plus it won’t give you any chance to complain regarding its free software.
- This app is straightforward to learn, and you won’t require any experience in film editing for using Windows Media Player. You’ll explore more than 130 effects with accessible Fantastic credits, titles, and transitions. Next to this, you may drag and then drop the clip at any place in the timeline.
- Windows Movie Maker is an ideal app for image slide shows and was developed to create photo and home movie slide shows. It presents excellent fun transitions and themes; you may add music easily. This app provides excellent variety, being a free editing application. Furthermore, it offers transitions and striking effects to function with.
- Windows Live Movie Maker is free of cost for all Microsoft Windows users and is basically for clients having zero to minimum experience editing audio and videos. Moreover, it has many special effects you may use while creating videos. Also, you may frag and then place any picture or video anywhere you wish to see it.
- You can choose from several themes, enhancing your film with tools like contemporary themes, fade effects, and sepia toning choices. You have to click once, and then the users can choose and apply from the multiple effects collection.
Cons
- Windows Movie Maker contains unlimited audio and video tracks, yet it provides just one accessible one at a time. Hence, if you wish to include some other audio or music track, you may prepare the video, thereby sending it to the ultimate file.
- It isn’t uninstallable using any remove or add control panel. Also, it is impossible to do video overlaying.
- This app requires much patience because it is prone to crashes. Moreover, you’ll require enough time and effort to do video reversing. It often becomes frustrating for all advanced editors to cut clips into small parts and then add them back. Hence, Windows Movie maker isn’t good for professional video editors.
- Windows Live MovieMaker can crash and freeze and is known to suffer frequent crashes. Hence, ensure saving often and avoid creating complex videos. Also, you cannot perform complex editing and can now prepare single audio and video track.
8. Windows Movie Maker Alternative Software
Wondershare Filmora Video Editor is the best alternative for Windows Movie Live Maker and is a highly favored and most effective software program. You can download it for free, and it is adaptable with Windows 7 OS or above. This app is user-friendly but powerful and allows you to split, merge, crop, and trip various video clips with essential built-in video editing attributes.
Free Download For Win 7 or later(64-bit)
Free Download For macOS 10.14 or later
Additionally, you may get a few advanced properties like video stabilization, color correction, and green screen in Filmora effortlessly. You may even explore several fashionable and modern video effects such as music, text, and intros for topics like games, Education, Travel, Vlogger, Beauty, etc. Here is the comparison between the two software:
Filmora and Windows Movie Maker comparison
| Basis | Windows Movie Maker | Wondershare Filmora |
|---|---|---|
| Pricing | Free/ inexpensive | Quote basedAnnual SubscriptionOne-time paymentMonthly Payment |
| Interface | Pleasing interface | Auto movie options |
| Effects | Several overlays and effects | Special effects choices and transition overlays |
| Integration | YouTubeFacebookVimeoEmail | TwitterInstagramFacebookVimeoYouTube |
Conclusion
You may use Windows Movie Maker Live for capturing videos and audio to the computer using various video sources, including Web Cameras and Video Cameras, thereby using the recorded data in your new movies. You may import still pictures, video, and audio into this application to use in the movies you’re making. Moreover, after you’ve finished with video and audio content editing in this app, which may involve adding effects, video transitions, and titles, you may finally save the ultimate movie and then share and watch it with your family and friends.
Want to Add the Amazing Video Text Effects that You Generally See on Video Streaming Platforms? Use Filmora to Add Popular Video Text Effects Instantly
If your video needs to have texts and titles, instead of static text effects, you should opt for video text effects. Basically, you will be showing eye-catching animated texts instead of unappealing still texts. You can get the attention of the audience towards your texts instantly and get the messages across swiftly. There are literally unlimited types of video editing text effects available but a handful of them are widely used by video creators.
If you want to add those popular text effects to your video, you will need a professional video editor. Wondershare Filmora is the best video editor to add all the popular and amazing video text effects. Filmora is equally popular among professionals and amateurs due to its wide range of text effects and intuitive user interface. We will list down the popular text effects in Filmora and illustrate how to add them to your video using Filmora.
Part 1. Popular text effects in Filmora
There are unlimited text effects available in Filmora but some of them are extremely popular that video creators regularly use in their videos. Here is the list of the popular Filmora video editor text effects that you should be aware of.
1. Text Swipe Effect
Text swipe effects are the most commonly used in today’s videos on social media and video streaming platforms. In this effect, the text slides into the video frame from a particular direction. The entire text can swipe in if it is a one-liner and it can even swipe in word by word or sentence by sentence.
If you want to show short texts and you do not want to experiment with text animations, the text swipe effect is the safest option. For example, if you want to display your social media handles, your location, a coupon code, or a correction phrase that you have uttered wrongly, text swipe effects should be on your video.
2. Type Text Effect
The type text effect in Filmora is referred to as the typewriter text effect in Premiere Pro and After Effects. The effect displays the text as if it is being typed in real-time as it is done in a typewriter. The characters will appear on the screen with a cursor on the screen and therefore, it takes more duration than most other text effects.
The type text effect is particularly useful when you are displaying a large size of text on the screen. It is also widely used when showing a paragraph of text instead of a simple line. This helps in drawing the attention of the audience to the paragraph and retaining the attention for a longer duration of time.
3. WordArt Effect
WordArt is synonymous with MS Word where large words have 3D effects and highlighted background. Apart from 3D effect, text can have a thick stroke or outline as well as a gradient color style when WordArt effect is applied. In Filmora, you will find a plethora of WordArt effects and some are them are modern while others have a retro feel to them.
The WordArt effect is particularly popular while displaying titles and funny texts on the entire screen or covering a large part of the video. These are mostly used in the opening or ending scenes of the video. Besides, some video creators use them while making transitions from one scene to another.
4. Keyframe
If you want to create text animations as per your requirements, you have to use keyframes in any video editor. You can always apply the ready-made video editing text effects but if you want to customize and personalize, you can add keyframes in between two timestamps. Thereafter, you need to change text styles and parameters for each frame so that it looks like an animation.
If you want to add uniqueness to text animations so that you can make the audience wonder and appreciate, keyframes are the way. Adding keyframes in the text layer on Filmora is super easy and you can get effects like texts slowly scaling up, dancing randomly, changing fonts, and much more.
5. Color Text Effect
The color text effect is becoming extremely popular and it is widely used for opening and ending credits. Flashing different colors through your texts and titles against a darker background can act as a feast for the human eyes. There are different types of color text effects available that can make your text stand out.
When you are using color text effect, you need to maintain a large font size for your text so that it is widely visible. Even if your background is not dark, you can use a darker box in the background of the text or a darker frame around the text to amplify the effect.
6. Bounce to Zoom Effect
The bounce to zoom effect is widely used during a transition from one scene to another. It is regarded as a funny text effect where the text can swipe in and bounce and enlarge in size. Alternatively, the characters can bounce individually and zoom in and out with the motion as if they are dancing.
Apart from transitions, you can use the bounce to zoom effect to showcase a few important texts at the bottom of the video so that the viewers notice your text. Generally, the effect lasts for a few seconds before the text disappears. When you are using it for a larger text, you can use it for promotions and advertisements as well.
Part 2. How to Add Text Effects with Filmora
When it comes to adding text effects and animations, there is no better alternative to Filmora . Thanks to its super intuitive user interface, adding and customizing text effects in videos is as simple as text effect video online. Apart from the popular text effects we have discussed, there are so many categories of text effect and animation templates available on Filmora. Here are the steps on how to create text effect video in Filmora.
Free Download For Win 7 or later(64-bit)
Free Download For macOS 10.14 or later
Step1 Download and install Wondershare Filmora as per your operating system. Filmora is available for Windows and Mac users. Launch Filmora and click on New Project on the welcome screen.

Step2 Import your video clips under Project Media folder and drop them onto the timeline. Go to Titles menu option and you will see different categories and templates of text effects and templates from the left panel.

Step3 Search for a popular text effect from the search box. Select a text effect template and drop it on the timeline. Adjust its place on the timeline depending on where you want the text to appear. Double-click on the text layer and edit the text as per your requirements.

You can edit the style from fonts and settings section. You can also go to Advanced section available for more minute editing and get the desired text effect.
Conclusion
If texts are an essential part of your video, you should apply amazing video editing text effects to the texts and titles present in your video. You can use the common and the popular video text effects as well as use unique text effects to make your video stand out easily. There is no better video editor to add text effects to your video other than Wondershare Filmora for its unlimited text effect and animation templates.
Part 1. Popular text effects in Filmora
There are unlimited text effects available in Filmora but some of them are extremely popular that video creators regularly use in their videos. Here is the list of the popular Filmora video editor text effects that you should be aware of.
1. Text Swipe Effect
Text swipe effects are the most commonly used in today’s videos on social media and video streaming platforms. In this effect, the text slides into the video frame from a particular direction. The entire text can swipe in if it is a one-liner and it can even swipe in word by word or sentence by sentence.
If you want to show short texts and you do not want to experiment with text animations, the text swipe effect is the safest option. For example, if you want to display your social media handles, your location, a coupon code, or a correction phrase that you have uttered wrongly, text swipe effects should be on your video.
2. Type Text Effect
The type text effect in Filmora is referred to as the typewriter text effect in Premiere Pro and After Effects. The effect displays the text as if it is being typed in real-time as it is done in a typewriter. The characters will appear on the screen with a cursor on the screen and therefore, it takes more duration than most other text effects.
The type text effect is particularly useful when you are displaying a large size of text on the screen. It is also widely used when showing a paragraph of text instead of a simple line. This helps in drawing the attention of the audience to the paragraph and retaining the attention for a longer duration of time.
3. WordArt Effect
WordArt is synonymous with MS Word where large words have 3D effects and highlighted background. Apart from 3D effect, text can have a thick stroke or outline as well as a gradient color style when WordArt effect is applied. In Filmora, you will find a plethora of WordArt effects and some are them are modern while others have a retro feel to them.
The WordArt effect is particularly popular while displaying titles and funny texts on the entire screen or covering a large part of the video. These are mostly used in the opening or ending scenes of the video. Besides, some video creators use them while making transitions from one scene to another.
4. Keyframe
If you want to create text animations as per your requirements, you have to use keyframes in any video editor. You can always apply the ready-made video editing text effects but if you want to customize and personalize, you can add keyframes in between two timestamps. Thereafter, you need to change text styles and parameters for each frame so that it looks like an animation.
If you want to add uniqueness to text animations so that you can make the audience wonder and appreciate, keyframes are the way. Adding keyframes in the text layer on Filmora is super easy and you can get effects like texts slowly scaling up, dancing randomly, changing fonts, and much more.
5. Color Text Effect
The color text effect is becoming extremely popular and it is widely used for opening and ending credits. Flashing different colors through your texts and titles against a darker background can act as a feast for the human eyes. There are different types of color text effects available that can make your text stand out.
When you are using color text effect, you need to maintain a large font size for your text so that it is widely visible. Even if your background is not dark, you can use a darker box in the background of the text or a darker frame around the text to amplify the effect.
6. Bounce to Zoom Effect
The bounce to zoom effect is widely used during a transition from one scene to another. It is regarded as a funny text effect where the text can swipe in and bounce and enlarge in size. Alternatively, the characters can bounce individually and zoom in and out with the motion as if they are dancing.
Apart from transitions, you can use the bounce to zoom effect to showcase a few important texts at the bottom of the video so that the viewers notice your text. Generally, the effect lasts for a few seconds before the text disappears. When you are using it for a larger text, you can use it for promotions and advertisements as well.
Part 2. How to Add Text Effects with Filmora
When it comes to adding text effects and animations, there is no better alternative to Filmora . Thanks to its super intuitive user interface, adding and customizing text effects in videos is as simple as text effect video online. Apart from the popular text effects we have discussed, there are so many categories of text effect and animation templates available on Filmora. Here are the steps on how to create text effect video in Filmora.
Free Download For Win 7 or later(64-bit)
Free Download For macOS 10.14 or later
Step1 Download and install Wondershare Filmora as per your operating system. Filmora is available for Windows and Mac users. Launch Filmora and click on New Project on the welcome screen.
Step2 Import your video clips under Project Media folder and drop them onto the timeline. Go to Titles menu option and you will see different categories and templates of text effects and templates from the left panel.
Step3 Search for a popular text effect from the search box. Select a text effect template and drop it on the timeline. Adjust its place on the timeline depending on where you want the text to appear. Double-click on the text layer and edit the text as per your requirements.
You can edit the style from fonts and settings section. You can also go to Advanced section available for more minute editing and get the desired text effect.
Conclusion
If texts are an essential part of your video, you should apply amazing video editing text effects to the texts and titles present in your video. You can use the common and the popular video text effects as well as use unique text effects to make your video stand out easily. There is no better video editor to add text effects to your video other than Wondershare Filmora for its unlimited text effect and animation templates.
Also read:
- New In 2024, Splitting Video in VSDC Step by Step
- New 2024 Approved How Can You Create Outstanding Educational Teaching Videos?
- In 2024, How to Make a Video with My Phone
- New Top 15 Slow Motion CapCut Templates to Work With
- Best 10 3D Slideshow Software Review
- New How To Edit Youtube Videos In Simple Steps for 2024
- In 2024, The Craziest 10 AI Editors Youve Seen
- Updated Complete Tutorial to Make an Impressive Countdown Timer Video for 2024
- New 2024 Approved Good Ways to Make Sure Your Video Editing Course Is Worthing to Watch
- Updated In 2024, Boost Your Spirit Creating Motivational Status Videos
- In 2024, 10 Best Sony LUT for Different Purposes
- Updated In 2024, How To Edit Youtube Videos In Simple Steps
- New The Ultimate Guide to Slideshow Maker with Music for 2024
- 2024 Approved 3 Best Effects to Appear on Camera
- 2024 Approved Top 15 Best Free MP4 Video Rotators Windows, Mac, Android, iPhone & Online
- New 2024 Approved Create Intro Video with Flixpress
- 2024 Approved What Is HDRI? Everything You Need to Know About HDRI
- 5 Ways to Make a Fake Facetime Call Video
- How to Convert a GIF to a Video for Instagram
- New You May Want to Change the Speed of Certain Portions of Your Video. This Article Enlightens You on How to Splice and Speed up the Video in Simple Ways
- New Best Video Title Generators
- Updated How to Make Your CSGO Montage Impressive for 2024
- Updated How To Mirror a Video Clip in Premiere Pro for 2024
- In 2024, Using VN Editor To Add Luts for Video Editing
- New Final Cut Pro for iPad for 2024
- New In 2024, Best Ideas on Using Filmora Green Screen
- 2024 Approved How to Trim/Crop Video in Microsoft Powerpoint
- 3 Ways to Combine 2 or 3 Videos Into 1 for 2024
- Updated In 2024, TOP 10 Types of Video Framing From Novice to Master
- Updated 2024 Approved Live Stream on YouTube Using Zoom
- Best 5 Tools to Help You Know More Freeze-Frame Video Editing Skills
- Updated 2024 Approved Top 11 Best Video Editing Apps for iPhone
- In 2024, Top 8 AI Video Denoise Software
- Updated Discover the Top 5 Free Online Video Filter Editors to Transform Your Videos with Captivating Color Grading and Correction Presets. Elevate Your Digital Storytelling Effortlessly
- Updated 2024 Approved How to Be a YouTube Vlogger
- New In 2024, How to Add Font Effects to Videos
- Updated Top 10 Free Spanish Text To Speech Converter Websites
- New 10 Creative AR Teaching Examples to Tell You What Is AR in Teaching for 2024
- 2024 Approved Get 15 Absolutely-Free LUTs From This Article as Well as Get an Insight on How Cinematic LUTs Affect Your Film
- How to Create Realistic Fire Effects for 2024
- How to Add Custom Filters in VN App 2024 Quick Guide
- Updated How To Zoom In On TikTok Videos for 2024
- Updated How to Fade in Text in Adobe Premiere Pro
- Get Creative with These 10 Video Editing App With Templates
- Updated 2024 Approved 2 Ways to Add Custom Subtitles to Netflix
- New While Emojis Have High End Credibility Towards Different Media Utilities, People Also Ask About Ways and Methods to Add Emoji to iPhone. Be Here to Get the Easiest Solutions to the Query
- Updated 2024 Approved Focusing On The Best Ways To Convert Slow-Motion Video to Normal
- New The Frames per Second Can Enhance or Hamper Your Ability to Enjoy Watching a Video on YouTube. This Article Will Define Frame Rates and Help You Choose the Best FPS
- In 2024, Add Selective Color Effect to Your Videos Using Filmora
- Best 10 Anime Movies for All Time for 2024
- Top 12 Prominent Oppo Find X7 Ultra Fingerprint Not Working Solutions
- How to Bypass iCloud Lock on Apple iPhone SE
- In 2024, Guide to Mirror Your Nokia 150 (2023) to Other Android devices | Dr.fone
- In 2024, Two Ways to Track My Boyfriends Vivo V30 Lite 5G without Him Knowing | Dr.fone
- In 2024, Full Guide to Bypass Oppo A59 5G FRP
- Top 7 iCloud Activation Bypass Tools For your iPhone 7 Plus
- How Do You Unlock your Apple iPhone 15? Learn All 4 Methods
- 3 Smart and Simple Ways to Change Home Address on Apple iPhone 14 Plus | Dr.fone
- Unlock Your Disabled iPhone XR Without iTunes in 5 Ways
- In 2024, How To Remove or Bypass Knox Enrollment Service On Poco M6 Pro 5G
- How do I reset my Asus ROG Phone 7 Ultimate Phone without technical knowledge? | Dr.fone
- A Quick Guide to OnePlus Open FRP Bypass Instantly
- 3 Solutions to Find Your Xiaomi Redmi Note 12T Pro Current Location of a Mobile Number | Dr.fone
- How to Restore iPhone 12 mini without Backup | Stellar
- How to Transfer Data from Infinix GT 10 Pro to Other Android Devices? | Dr.fone
- iSpoofer is not working On Oppo Find X7 Ultra? Fixed | Dr.fone
- Top 10 Best Spy Watches For your Vivo Y100A | Dr.fone
- In 2024, Reasons why Pokémon GPS does not Work On Vivo Y100i? | Dr.fone
- How To Fix OEM Unlock Missing on Poco F5 5G?
- In 2024, How Do You Get Sun Stone Evolutions in Pokémon For Apple iPhone 12 Pro? | Dr.fone
- Unlock Your Disabled iPhone SE (2022) Without iTunes in 5 Ways | Dr.fone
- In 2024, How to Change GPS Location on Lava Blaze Curve 5G Easily & Safely | Dr.fone
- How to Transfer Photos from Vivo V27 Pro to New Android? | Dr.fone
- In 2024, How to Change Google Play Location On Oppo F23 5G | Dr.fone
- Top 10 Fixes for Phone Keep Disconnecting from Wi-Fi On Honor V Purse | Dr.fone
- How to add a digital signature field to a Word 2010
- Title: Updated How to Convert Videos to Slow Motion? Complete Guide for 2024
- Author: Chloe
- Created at : 2024-04-24 07:08:43
- Updated at : 2024-04-25 07:08:43
- Link: https://ai-editing-video.techidaily.com/updated-how-to-convert-videos-to-slow-motion-complete-guide-for-2024/
- License: This work is licensed under CC BY-NC-SA 4.0.
