:max_bytes(150000):strip_icc():format(webp)/GettyImages-541365354-5c8ad42246e0fb00014a9687.jpg)
Updated How to Create a Text Effect Video with Filmora

How to Create a Text Effect Video with Filmora
If your video needs to have texts and titles, instead of static text effects, you should opt for video text effects. Basically, you will be showing eye-catching animated texts instead of unappealing still texts. You can get the attention of the audience towards your texts instantly and get the messages across swiftly. There are literally unlimited types of video editing text effects available but a handful of them are widely used by video creators.
If you want to add those popular text effects to your video, you will need a professional video editor. Wondershare Filmora is the best video editor to add all the popular and amazing video text effects. Filmora is equally popular among professionals and amateurs due to its wide range of text effects and intuitive user interface. We will list down the popular text effects in Filmora and illustrate how to add them to your video using Filmora.
Part 1. Popular text effects in Filmora
There are unlimited text effects available in Filmora but some of them are extremely popular that video creators regularly use in their videos. Here is the list of the popular Filmora video editor text effects that you should be aware of.
1. Text Swipe Effect
Text swipe effects are the most commonly used in today’s videos on social media and video streaming platforms. In this effect, the text slides into the video frame from a particular direction. The entire text can swipe in if it is a one-liner and it can even swipe in word by word or sentence by sentence.
If you want to show short texts and you do not want to experiment with text animations, the text swipe effect is the safest option. For example, if you want to display your social media handles, your location, a coupon code, or a correction phrase that you have uttered wrongly, text swipe effects should be on your video.
2. Type Text Effect
The type text effect in Filmora is referred to as the typewriter text effect in Premiere Pro and After Effects. The effect displays the text as if it is being typed in real-time as it is done in a typewriter. The characters will appear on the screen with a cursor on the screen and therefore, it takes more duration than most other text effects.
The type text effect is particularly useful when you are displaying a large size of text on the screen. It is also widely used when showing a paragraph of text instead of a simple line. This helps in drawing the attention of the audience to the paragraph and retaining the attention for a longer duration of time.
3. WordArt Effect
WordArt is synonymous with MS Word where large words have 3D effects and highlighted background. Apart from 3D effect, text can have a thick stroke or outline as well as a gradient color style when WordArt effect is applied. In Filmora, you will find a plethora of WordArt effects and some are them are modern while others have a retro feel to them.
The WordArt effect is particularly popular while displaying titles and funny texts on the entire screen or covering a large part of the video. These are mostly used in the opening or ending scenes of the video. Besides, some video creators use them while making transitions from one scene to another.
4. Keyframe
If you want to create text animations as per your requirements, you have to use keyframes in any video editor. You can always apply the ready-made video editing text effects but if you want to customize and personalize, you can add keyframes in between two timestamps. Thereafter, you need to change text styles and parameters for each frame so that it looks like an animation.
If you want to add uniqueness to text animations so that you can make the audience wonder and appreciate, keyframes are the way. Adding keyframes in the text layer on Filmora is super easy and you can get effects like texts slowly scaling up, dancing randomly, changing fonts, and much more.
5. Color Text Effect
The color text effect is becoming extremely popular and it is widely used for opening and ending credits. Flashing different colors through your texts and titles against a darker background can act as a feast for the human eyes. There are different types of color text effects available that can make your text stand out.
When you are using color text effect, you need to maintain a large font size for your text so that it is widely visible. Even if your background is not dark, you can use a darker box in the background of the text or a darker frame around the text to amplify the effect.
6. Bounce to Zoom Effect
The bounce to zoom effect is widely used during a transition from one scene to another. It is regarded as a funny text effect where the text can swipe in and bounce and enlarge in size. Alternatively, the characters can bounce individually and zoom in and out with the motion as if they are dancing.
Apart from transitions, you can use the bounce to zoom effect to showcase a few important texts at the bottom of the video so that the viewers notice your text. Generally, the effect lasts for a few seconds before the text disappears. When you are using it for a larger text, you can use it for promotions and advertisements as well.
Part 2. How to Add Text Effects with Filmora
When it comes to adding text effects and animations, there is no better alternative to Filmora . Thanks to its super intuitive user interface, adding and customizing text effects in videos is as simple as text effect video online. Apart from the popular text effects we have discussed, there are so many categories of text effect and animation templates available on Filmora. Here are the steps on how to create text effect video in Filmora.
Free Download For Win 7 or later(64-bit)
Free Download For macOS 10.14 or later
Step1 Download and install Wondershare Filmora as per your operating system. Filmora is available for Windows and Mac users. Launch Filmora and click on New Project on the welcome screen.

Step2 Import your video clips under Project Media folder and drop them onto the timeline. Go to Titles menu option and you will see different categories and templates of text effects and templates from the left panel.

Step3 Search for a popular text effect from the search box. Select a text effect template and drop it on the timeline. Adjust its place on the timeline depending on where you want the text to appear. Double-click on the text layer and edit the text as per your requirements.

You can edit the style from fonts and settings section. You can also go to Advanced section available for more minute editing and get the desired text effect.
Conclusion
If texts are an essential part of your video, you should apply amazing video editing text effects to the texts and titles present in your video. You can use the common and the popular video text effects as well as use unique text effects to make your video stand out easily. There is no better video editor to add text effects to your video other than Wondershare Filmora for its unlimited text effect and animation templates.
Part 1. Popular text effects in Filmora
There are unlimited text effects available in Filmora but some of them are extremely popular that video creators regularly use in their videos. Here is the list of the popular Filmora video editor text effects that you should be aware of.
1. Text Swipe Effect
Text swipe effects are the most commonly used in today’s videos on social media and video streaming platforms. In this effect, the text slides into the video frame from a particular direction. The entire text can swipe in if it is a one-liner and it can even swipe in word by word or sentence by sentence.
If you want to show short texts and you do not want to experiment with text animations, the text swipe effect is the safest option. For example, if you want to display your social media handles, your location, a coupon code, or a correction phrase that you have uttered wrongly, text swipe effects should be on your video.
2. Type Text Effect
The type text effect in Filmora is referred to as the typewriter text effect in Premiere Pro and After Effects. The effect displays the text as if it is being typed in real-time as it is done in a typewriter. The characters will appear on the screen with a cursor on the screen and therefore, it takes more duration than most other text effects.
The type text effect is particularly useful when you are displaying a large size of text on the screen. It is also widely used when showing a paragraph of text instead of a simple line. This helps in drawing the attention of the audience to the paragraph and retaining the attention for a longer duration of time.
3. WordArt Effect
WordArt is synonymous with MS Word where large words have 3D effects and highlighted background. Apart from 3D effect, text can have a thick stroke or outline as well as a gradient color style when WordArt effect is applied. In Filmora, you will find a plethora of WordArt effects and some are them are modern while others have a retro feel to them.
The WordArt effect is particularly popular while displaying titles and funny texts on the entire screen or covering a large part of the video. These are mostly used in the opening or ending scenes of the video. Besides, some video creators use them while making transitions from one scene to another.
4. Keyframe
If you want to create text animations as per your requirements, you have to use keyframes in any video editor. You can always apply the ready-made video editing text effects but if you want to customize and personalize, you can add keyframes in between two timestamps. Thereafter, you need to change text styles and parameters for each frame so that it looks like an animation.
If you want to add uniqueness to text animations so that you can make the audience wonder and appreciate, keyframes are the way. Adding keyframes in the text layer on Filmora is super easy and you can get effects like texts slowly scaling up, dancing randomly, changing fonts, and much more.
5. Color Text Effect
The color text effect is becoming extremely popular and it is widely used for opening and ending credits. Flashing different colors through your texts and titles against a darker background can act as a feast for the human eyes. There are different types of color text effects available that can make your text stand out.
When you are using color text effect, you need to maintain a large font size for your text so that it is widely visible. Even if your background is not dark, you can use a darker box in the background of the text or a darker frame around the text to amplify the effect.
6. Bounce to Zoom Effect
The bounce to zoom effect is widely used during a transition from one scene to another. It is regarded as a funny text effect where the text can swipe in and bounce and enlarge in size. Alternatively, the characters can bounce individually and zoom in and out with the motion as if they are dancing.
Apart from transitions, you can use the bounce to zoom effect to showcase a few important texts at the bottom of the video so that the viewers notice your text. Generally, the effect lasts for a few seconds before the text disappears. When you are using it for a larger text, you can use it for promotions and advertisements as well.
Part 2. How to Add Text Effects with Filmora
When it comes to adding text effects and animations, there is no better alternative to Filmora . Thanks to its super intuitive user interface, adding and customizing text effects in videos is as simple as text effect video online. Apart from the popular text effects we have discussed, there are so many categories of text effect and animation templates available on Filmora. Here are the steps on how to create text effect video in Filmora.
Free Download For Win 7 or later(64-bit)
Free Download For macOS 10.14 or later
Step1 Download and install Wondershare Filmora as per your operating system. Filmora is available for Windows and Mac users. Launch Filmora and click on New Project on the welcome screen.

Step2 Import your video clips under Project Media folder and drop them onto the timeline. Go to Titles menu option and you will see different categories and templates of text effects and templates from the left panel.

Step3 Search for a popular text effect from the search box. Select a text effect template and drop it on the timeline. Adjust its place on the timeline depending on where you want the text to appear. Double-click on the text layer and edit the text as per your requirements.

You can edit the style from fonts and settings section. You can also go to Advanced section available for more minute editing and get the desired text effect.
Conclusion
If texts are an essential part of your video, you should apply amazing video editing text effects to the texts and titles present in your video. You can use the common and the popular video text effects as well as use unique text effects to make your video stand out easily. There is no better video editor to add text effects to your video other than Wondershare Filmora for its unlimited text effect and animation templates.
Learn 4 Proven Methods for Creating Engaging and Memorable Recap Videos. Elevate Your Event Coverage and Engage Your Audience with These Tips and Tricks
Recap videos are a great way to capture the highlights of an event and share them with a wider audience. Whether you’re a professional videographer or a hobbyist, creating a recap video can be a fun and rewarding experience. But with so many different techniques and approaches, knowing where to start can be challenging.
In this article, we’ll explore four methods for making a recap video to help you capture the essence of your event and keep your audience engaged. From planning and scripting to shooting and editing, we’ll cover all the key steps in creating a high-quality recap video. Whether a seasoned pro or a beginner, you can find something valuable in this guide.
Method 1. How To Make a Recap Video from Scratch Using Filmora for Desktop
One approach to creating a recap video is to start from scratch using video editing software like Wondershare Filmora for Desktop. This powerful software offers a wide range of tools and features that allow you to create professional-looking videos easily.
Free Download For Win 7 or later(64-bit)
Free Download For macOS 10.14 or later
Whether you’re a beginner or an experienced video editor, Filmora for Desktop provides all the tools you need to create a stunning recap video that showcases the best moments from your event. With its intuitive interface and easy-to-use features, Filmora for Desktop makes it simple to bring your vision to life and create a video that truly captures the spirit of your event.
Here’s how to make the recap video from scratch using Wondershare Filmora for Desktop:
Step1 Download New Year Memory Book Pack from FilmStock

Step2 Open Filmora and go to “Effects“ > “FilmStock“ > “New Year Memory Book.”
Step3 Drag and drop media like clips, overlay, and tracks to the timeline

Step4 Import photos and videos.

Step5 Add the imported media and edit the clip.
Step6 Add some effects and overlay to the timeline

Step7 Adjust the Overlay duration of the clip.
Step8 Apply all the transitions and overlay to the clip. Edit the text and save it.

For more detailed instructions, you can watch the video tutorial:
Method 2. How To Make an Event Recap Video Using Filmora Templates on a Desktop
Another approach to creating a recap video is using templates from Filmora for Desktop. Filmora offers various templates specifically designed for event recap videos, making it easy to create a professional-looking video without spending hours editing.
These templates come pre-designed with stunning graphics, animations, and transitions and can be easily customized to match your event. With the help of the templates, you can create an event recap video in a matter of minutes without needing any prior editing experience.
Step1 Begin by creating a new project in Filmora and importing your photos and footage into the software.
Step2 Next, navigate to the “Templates“ tab and search for “Retro“ or “Recap“ to find a template that suits your event. Drag the desired template to the timeline.
Step3 Drag your footage onto the timeline, and when prompted, select “Replace“ to replace the sample footage with your own.
Step4 Customize the texts in the template to match the details of your event.
Step5 Preview the final result in the player window, and if satisfied, click “Export“ and adjust the output settings in the “Output Settings“ window.
Method 3. How to Create an End-of-Year Recap Video With Filmora for Mobile
Creating a recap video doesn’t have to be limited to desktop editing software. With Filmora for mobile, you can create a professional-looking end-of-year recap video from the convenience of your mobile device.
With Filmora for mobile, you have access to a wide range of editing tools and features, including filters, transitions, and text options, so you can create a video that truly captures the essence of your event. So whether you’re on the go or prefer to edit on your mobile device, Filmora for mobile makes it easy to create a high-quality recap video that you can share with your audience.
Step1 Start by launching the Filmora for mobile app and selecting the “Templates“ option.

Step2 Tap the “New Year“ panel for an end-of-year recap video template.

Step3 Select the template and tap on “Make Video“ to start editing.
Step4 Add your photos and footage to the template, then tap “Go.”

Step5 Preview the output. Tap “Pro Export“

Step6 Users can share the video on social platforms or tap “More“ to download the video.

Step7 Save the final video to your device

Method 4. How To Create a Memories Recap Video on Instagram Reel
Another way to create a memories recap video is using the Instagram Reel feature. Instagram Reel is a short-form video feature that allows users to create and share videos up to 60 seconds long. With Instagram Reel, you can easily create a recap video of your event by compiling short clips, adding music and text, and sharing it with your followers.
Instagram Reel provides a platform to reach a wider audience and create engaging content. It’s a great way to engage with your followers and share the highlights of your event in a creative and visually appealing way.
Step1 Start a new Reel on Instagram

Step2 Choose a template

Step3 Compile clips, add music, text, and effects

Step4 Post and share the Reel on Instagram and other platforms.

Tips for Making Event Recap Videos
When creating an event recap video, there are key tips to remember to ensure that your video is engaging and effective.
- Know your audience: Tailor the content of your video to your audience to ensure that it resonates with them.
- Highlight the key moments: Be selective and focus on your event’s most memorable and impactful moments.
- Music and Sound Design: The right music can help set the tone and mood of your video and can greatly enhance the overall impact of your video.
- Quality Footage: Make sure to focus on the quality of your footage and use various shots and angles to keep the video interesting and engaging.
- Editing: Keep the pacing of your video brisk and engaging, and use transitions, special effects, and text overlays to help tie the various elements of your video together.
- Plan the video: Careful planning is crucial for creating a great event recap video.
- Use the right tools: Use the appropriate software and equipment to create a professional-looking video.
- Test the video: Preview the video before publishing and make any necessary adjustments to ensure it meets your standards.
- Post-production: After filming, spend time on post-production, such as color correction, audio mixing, and adding text.
- Share it widely: Share the video on different platforms to reach a wider audience.
By following these tips and working with the right tools and techniques, you can create a video that truly captures the essence of your event and resonates with your audience.
Conclusion
Creating an engaging event recap video is an excellent way to share the highlights of your event with a wider audience. With the right tools and techniques, you can create a professional-looking video that truly captures the essence of your event.
Filmora for desktop, Filmora for mobile, and Instagram Reel are all great options that provide a wide range of editing tools and features to help you create a high-quality video. Whether a seasoned pro or a beginner, these tools make it easy to bring your vision to life and create a video that resonates with your audience.
Free Download For macOS 10.14 or later
Whether you’re a beginner or an experienced video editor, Filmora for Desktop provides all the tools you need to create a stunning recap video that showcases the best moments from your event. With its intuitive interface and easy-to-use features, Filmora for Desktop makes it simple to bring your vision to life and create a video that truly captures the spirit of your event.
Here’s how to make the recap video from scratch using Wondershare Filmora for Desktop:
Step1 Download New Year Memory Book Pack from FilmStock

Step2 Open Filmora and go to “Effects“ > “FilmStock“ > “New Year Memory Book.”
Step3 Drag and drop media like clips, overlay, and tracks to the timeline

Step4 Import photos and videos.

Step5 Add the imported media and edit the clip.
Step6 Add some effects and overlay to the timeline

Step7 Adjust the Overlay duration of the clip.
Step8 Apply all the transitions and overlay to the clip. Edit the text and save it.

For more detailed instructions, you can watch the video tutorial:
Method 2. How To Make an Event Recap Video Using Filmora Templates on a Desktop
Another approach to creating a recap video is using templates from Filmora for Desktop. Filmora offers various templates specifically designed for event recap videos, making it easy to create a professional-looking video without spending hours editing.
These templates come pre-designed with stunning graphics, animations, and transitions and can be easily customized to match your event. With the help of the templates, you can create an event recap video in a matter of minutes without needing any prior editing experience.
Step1 Begin by creating a new project in Filmora and importing your photos and footage into the software.
Step2 Next, navigate to the “Templates“ tab and search for “Retro“ or “Recap“ to find a template that suits your event. Drag the desired template to the timeline.
Step3 Drag your footage onto the timeline, and when prompted, select “Replace“ to replace the sample footage with your own.
Step4 Customize the texts in the template to match the details of your event.
Step5 Preview the final result in the player window, and if satisfied, click “Export“ and adjust the output settings in the “Output Settings“ window.
Method 3. How to Create an End-of-Year Recap Video With Filmora for Mobile
Creating a recap video doesn’t have to be limited to desktop editing software. With Filmora for mobile, you can create a professional-looking end-of-year recap video from the convenience of your mobile device.
With Filmora for mobile, you have access to a wide range of editing tools and features, including filters, transitions, and text options, so you can create a video that truly captures the essence of your event. So whether you’re on the go or prefer to edit on your mobile device, Filmora for mobile makes it easy to create a high-quality recap video that you can share with your audience.
Step1 Start by launching the Filmora for mobile app and selecting the “Templates“ option.

Step2 Tap the “New Year“ panel for an end-of-year recap video template.

Step3 Select the template and tap on “Make Video“ to start editing.
Step4 Add your photos and footage to the template, then tap “Go.”

Step5 Preview the output. Tap “Pro Export“

Step6 Users can share the video on social platforms or tap “More“ to download the video.

Step7 Save the final video to your device

Method 4. How To Create a Memories Recap Video on Instagram Reel
Another way to create a memories recap video is using the Instagram Reel feature. Instagram Reel is a short-form video feature that allows users to create and share videos up to 60 seconds long. With Instagram Reel, you can easily create a recap video of your event by compiling short clips, adding music and text, and sharing it with your followers.
Instagram Reel provides a platform to reach a wider audience and create engaging content. It’s a great way to engage with your followers and share the highlights of your event in a creative and visually appealing way.
Step1 Start a new Reel on Instagram

Step2 Choose a template

Step3 Compile clips, add music, text, and effects

Step4 Post and share the Reel on Instagram and other platforms.

Tips for Making Event Recap Videos
When creating an event recap video, there are key tips to remember to ensure that your video is engaging and effective.
- Know your audience: Tailor the content of your video to your audience to ensure that it resonates with them.
- Highlight the key moments: Be selective and focus on your event’s most memorable and impactful moments.
- Music and Sound Design: The right music can help set the tone and mood of your video and can greatly enhance the overall impact of your video.
- Quality Footage: Make sure to focus on the quality of your footage and use various shots and angles to keep the video interesting and engaging.
- Editing: Keep the pacing of your video brisk and engaging, and use transitions, special effects, and text overlays to help tie the various elements of your video together.
- Plan the video: Careful planning is crucial for creating a great event recap video.
- Use the right tools: Use the appropriate software and equipment to create a professional-looking video.
- Test the video: Preview the video before publishing and make any necessary adjustments to ensure it meets your standards.
- Post-production: After filming, spend time on post-production, such as color correction, audio mixing, and adding text.
- Share it widely: Share the video on different platforms to reach a wider audience.
By following these tips and working with the right tools and techniques, you can create a video that truly captures the essence of your event and resonates with your audience.
Conclusion
Creating an engaging event recap video is an excellent way to share the highlights of your event with a wider audience. With the right tools and techniques, you can create a professional-looking video that truly captures the essence of your event.
Filmora for desktop, Filmora for mobile, and Instagram Reel are all great options that provide a wide range of editing tools and features to help you create a high-quality video. Whether a seasoned pro or a beginner, these tools make it easy to bring your vision to life and create a video that resonates with your audience.
Top 5 Best Video to PPT Converters
Almost three decades after its debut, Microsoft PowerPoint has become a hallmark of professionalism and quality in the presentation software industry. Traditional PPT files produced by PowerPoint have many drawbacks, including the fact that the content of your presentations may be readily edited and reused by others.
The Save to Video option in 2010 and subsequent versions of PowerPoint addresses this problem by allowing users to produce video files that may be readily shared on social media, video sharing sites, or utilized in eLearning courses. The built-in PPT file conversion function in newer versions of PowerPoint has several restrictions that prohibit you from picking the video file type or incorporating embedded media files in the PowerPoint presentation video.
That’s why we’ve compiled a list of the top five video to ppt converter to make the process of turning a PowerPoint presentation into a movie as simple and enjoyable as possible.
Top 5 Best Video to PPT Converters
1.Moyea
Price: $49.95, Free trial available
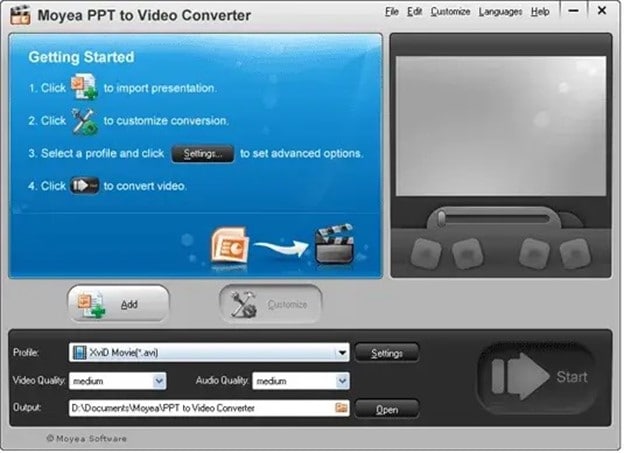
This extremely effective program allows you to convert any documents written with PowerPoint versions up to 2013 and PowerPoint viewer. Convert the presentations to various common file formats, including MP4, WMV, and AVI. All sound files, transitions, and animations from your original presentation are preserved using this Windows-based tool.
In order to tailor the video quality and frame rates to your project’s requirements, Moyea Video to PowerPoint Converter gives you total control over the output video parameters. PPT to Video Converter makes it easy to include logos, watermarks, music and voiceovers in your PowerPoint films.
Pros
Options for converting files with a lot of power
It is possible to convert many files at once.
Cons
There aren’t any HD output choices available.
To be able to convert presentations, you must have PowerPoint installed.
2.Leawo Video to PPT Pro
Price: $44.95
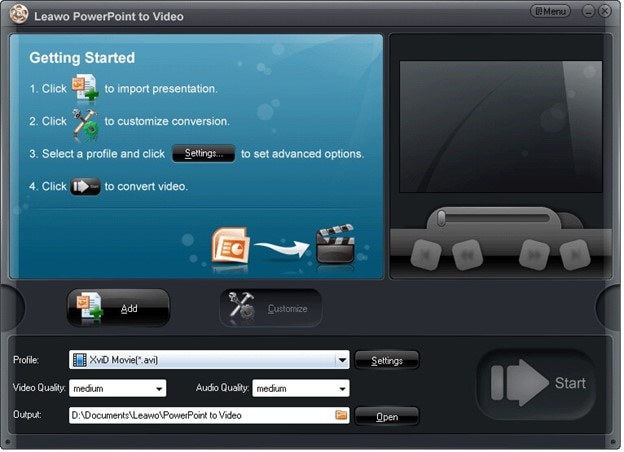
PowerPoint presentations in PPT, PPTX, PPTM, POT, or POTX file formats may be converted to practically any video file type with our video to ppt converter. PowerPoint 2000 through 2016 (both 64-bit and 32-bit) are all supported, as are all versions of the program.
Leawo Video to PPT Pro’s video files is compatible with iPhone and Android smartphones, tablets, gaming consoles, and Apple TV. You can turn your PowerPoint presentations into high-definition films with narration and other audio files using this program. Share your movies with the world through the likes of DailyMotion, Vimeo, YouTube, and Metacafe.
Pros
The ability to do unlimited batch conversions at once.
Allows you to brand converted films with custom logos and watermarks.
Cons
The Mac OS cannot run this program.
Requirements for a complicated system.
3.iSpring River
Price: $97 for a single lifetime license
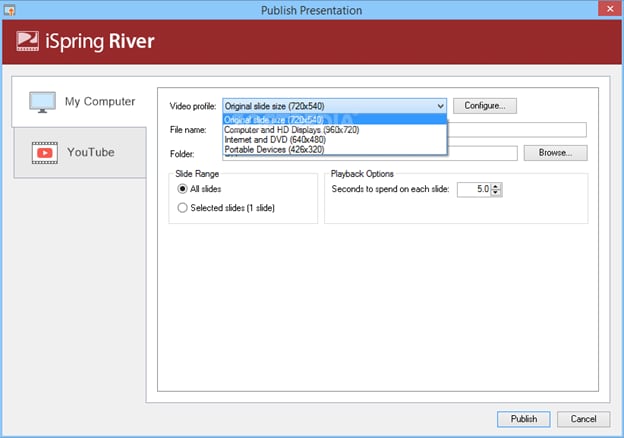
Installing iSpring River on your PC turns it into a PowerPoint add-on that you can use from the ribbon. This isn’t a limitation since iSpring River allows you to convert PPT files to widely suitable video file formats like MP4 or AVI, even though it’s not stand-alone computer software. In addition, you may choose the video size and compression parameters before each file conversion using the add-video on’s settings.
All of the original PowerPoint presentation’s animations and audio files, as well as transitions and font and text formatting, will be included in the final film. Video files exported from iSpring River may be uploaded straight to YouTube, but no other social media services such as Dropbox or Google Drive are supported.
Pros
It’s quick and simple to use.
Upload YouTube videos directly from your computer’s hard disc.
Cons
Cannot be used as a standalone application.
There isn’t any support for high-definition video.
4.RZ PowerPoint Converter
Price: There is a free version available, and prices begin at $29.99.
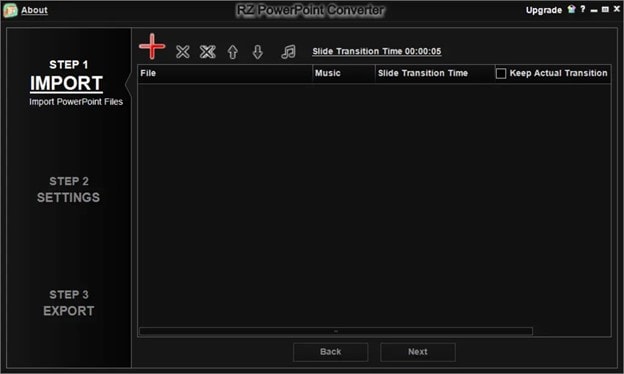
Using this sophisticated converter, any PPT files made with 2013 or previous versions of PowerPoint may be quickly converted to movies. RZ PowerPoint video to ppt converter also allows you to create HD video files that can be readily shared online, as well as files that can be burnt to DVDs.
Any current video playback device can play videos generated with this program, and the quality is so outstanding that you can play them on huge LCD displays. Though this video to ppt converter is accessible for free, its free edition lacks all of the capabilities that make this program an excellent alternative for professionals that prepare PowerPoint presentations on a consistent basis. It’s possible to get the commercial edition of this Windows-based tool and have all of the multimedia you include in the presentations converted to video without losing any quality.
Pros
You may use this to burn DVDs.
All PowerPoint file types are supported.
Cons
However, basic PPT to video file conversion is only available in the free edition of the product.
There is no possibility to convert many files at once.
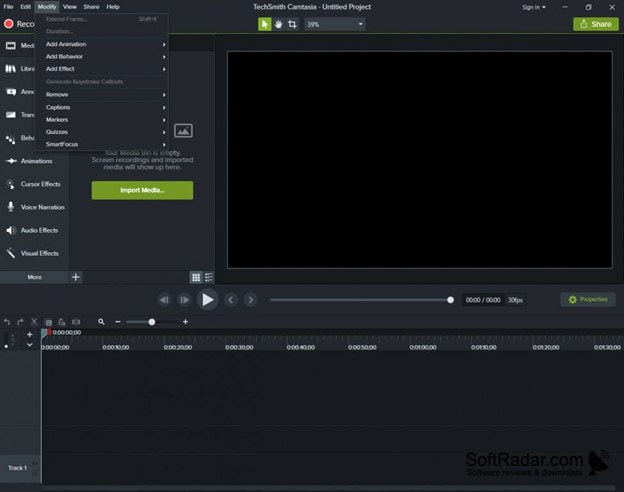
5.Camtasia Studio
Price: A free trial is offered, and a single-user license is $249.
There is much more to Camtasia Studio than simply a video to ppt converter in it. An unencumbered trial edition of this video editing program helps you create professional-looking films from PowerPoint presentations. Camtasia Studio’s single-user license is a good alternative for those who just need to convert a few presentations for free, but if you’re searching for a full-featured video to ppt converter, you should consider purchasing Camtasia.
When using the software’s premium edition, you may add multimedia files, such as PowerPoint presentations and webcam footage to your final video project. With Camtasia Studio, you can easily post your films in nearly any video file type on social media.
Pros
With Camtasia Studio, adding transitions, callouts, or text effects is a cinch.
Advanced video editing tools are available.
Cons
Only 30 days are included in the free trial.
Expensive.
Conclusions
When looking for the best PowerPoint conversion software, there are a lot of factors to consider. The output quality, the ability to use PowerPoint effects, compatibility with new devices, & one publishing are all key considerations. Get a free trial of iSpring Converter Pro, the number one choice on our list, if you need a dependable video to ppt converter that can handle any amount of slides and animations in your presentation.
For Win 7 or later (64-bit)
For macOS 10.12 or later
Price: $49.95, Free trial available
This extremely effective program allows you to convert any documents written with PowerPoint versions up to 2013 and PowerPoint viewer. Convert the presentations to various common file formats, including MP4, WMV, and AVI. All sound files, transitions, and animations from your original presentation are preserved using this Windows-based tool.
In order to tailor the video quality and frame rates to your project’s requirements, Moyea Video to PowerPoint Converter gives you total control over the output video parameters. PPT to Video Converter makes it easy to include logos, watermarks, music and voiceovers in your PowerPoint films.
Pros
Options for converting files with a lot of power
It is possible to convert many files at once.
Cons
There aren’t any HD output choices available.
To be able to convert presentations, you must have PowerPoint installed.
2.Leawo Video to PPT Pro

Price: $44.95
PowerPoint presentations in PPT, PPTX, PPTM, POT, or POTX file formats may be converted to practically any video file type with our video to ppt converter. PowerPoint 2000 through 2016 (both 64-bit and 32-bit) are all supported, as are all versions of the program.
Leawo Video to PPT Pro’s video files is compatible with iPhone and Android smartphones, tablets, gaming consoles, and Apple TV. You can turn your PowerPoint presentations into high-definition films with narration and other audio files using this program. Share your movies with the world through the likes of DailyMotion, Vimeo, YouTube, and Metacafe.
Pros
The ability to do unlimited batch conversions at once.
Allows you to brand converted films with custom logos and watermarks.
Cons
The Mac OS cannot run this program.
Requirements for a complicated system.
3.iSpring River

Price: $97 for a single lifetime license
Installing iSpring River on your PC turns it into a PowerPoint add-on that you can use from the ribbon. This isn’t a limitation since iSpring River allows you to convert PPT files to widely suitable video file formats like MP4 or AVI, even though it’s not stand-alone computer software. In addition, you may choose the video size and compression parameters before each file conversion using the add-video on’s settings.
All of the original PowerPoint presentation’s animations and audio files, as well as transitions and font and text formatting, will be included in the final film. Video files exported from iSpring River may be uploaded straight to YouTube, but no other social media services such as Dropbox or Google Drive are supported.
Pros
It’s quick and simple to use.
Upload YouTube videos directly from your computer’s hard disc.
Cons
Cannot be used as a standalone application.
There isn’t any support for high-definition video.
4.RZ PowerPoint Converter

Price: There is a free version available, and prices begin at $29.99.
Using this sophisticated converter, any PPT files made with 2013 or previous versions of PowerPoint may be quickly converted to movies. RZ PowerPoint video to ppt converter also allows you to create HD video files that can be readily shared online, as well as files that can be burnt to DVDs.
Any current video playback device can play videos generated with this program, and the quality is so outstanding that you can play them on huge LCD displays. Though this video to ppt converter is accessible for free, its free edition lacks all of the capabilities that make this program an excellent alternative for professionals that prepare PowerPoint presentations on a consistent basis. It’s possible to get the commercial edition of this Windows-based tool and have all of the multimedia you include in the presentations converted to video without losing any quality.
Pros
You may use this to burn DVDs.
All PowerPoint file types are supported.
Cons
However, basic PPT to video file conversion is only available in the free edition of the product.
There is no possibility to convert many files at once.
5.Camtasia Studio

Price: A free trial is offered, and a single-user license is $249.
There is much more to Camtasia Studio than simply a video to ppt converter in it. An unencumbered trial edition of this video editing program helps you create professional-looking films from PowerPoint presentations. Camtasia Studio’s single-user license is a good alternative for those who just need to convert a few presentations for free, but if you’re searching for a full-featured video to ppt converter, you should consider purchasing Camtasia.
When using the software’s premium edition, you may add multimedia files, such as PowerPoint presentations and webcam footage to your final video project. With Camtasia Studio, you can easily post your films in nearly any video file type on social media.
Pros
With Camtasia Studio, adding transitions, callouts, or text effects is a cinch.
Advanced video editing tools are available.
Cons
Only 30 days are included in the free trial.
Expensive.
Conclusions
When looking for the best PowerPoint conversion software, there are a lot of factors to consider. The output quality, the ability to use PowerPoint effects, compatibility with new devices, & one publishing are all key considerations. Get a free trial of iSpring Converter Pro, the number one choice on our list, if you need a dependable video to ppt converter that can handle any amount of slides and animations in your presentation.
For Win 7 or later (64-bit)
For macOS 10.12 or later
Price: $49.95, Free trial available
This extremely effective program allows you to convert any documents written with PowerPoint versions up to 2013 and PowerPoint viewer. Convert the presentations to various common file formats, including MP4, WMV, and AVI. All sound files, transitions, and animations from your original presentation are preserved using this Windows-based tool.
In order to tailor the video quality and frame rates to your project’s requirements, Moyea Video to PowerPoint Converter gives you total control over the output video parameters. PPT to Video Converter makes it easy to include logos, watermarks, music and voiceovers in your PowerPoint films.
Pros
Options for converting files with a lot of power
It is possible to convert many files at once.
Cons
There aren’t any HD output choices available.
To be able to convert presentations, you must have PowerPoint installed.
2.Leawo Video to PPT Pro

Price: $44.95
PowerPoint presentations in PPT, PPTX, PPTM, POT, or POTX file formats may be converted to practically any video file type with our video to ppt converter. PowerPoint 2000 through 2016 (both 64-bit and 32-bit) are all supported, as are all versions of the program.
Leawo Video to PPT Pro’s video files is compatible with iPhone and Android smartphones, tablets, gaming consoles, and Apple TV. You can turn your PowerPoint presentations into high-definition films with narration and other audio files using this program. Share your movies with the world through the likes of DailyMotion, Vimeo, YouTube, and Metacafe.
Pros
The ability to do unlimited batch conversions at once.
Allows you to brand converted films with custom logos and watermarks.
Cons
The Mac OS cannot run this program.
Requirements for a complicated system.
3.iSpring River

Price: $97 for a single lifetime license
Installing iSpring River on your PC turns it into a PowerPoint add-on that you can use from the ribbon. This isn’t a limitation since iSpring River allows you to convert PPT files to widely suitable video file formats like MP4 or AVI, even though it’s not stand-alone computer software. In addition, you may choose the video size and compression parameters before each file conversion using the add-video on’s settings.
All of the original PowerPoint presentation’s animations and audio files, as well as transitions and font and text formatting, will be included in the final film. Video files exported from iSpring River may be uploaded straight to YouTube, but no other social media services such as Dropbox or Google Drive are supported.
Pros
It’s quick and simple to use.
Upload YouTube videos directly from your computer’s hard disc.
Cons
Cannot be used as a standalone application.
There isn’t any support for high-definition video.
4.RZ PowerPoint Converter

Price: There is a free version available, and prices begin at $29.99.
Using this sophisticated converter, any PPT files made with 2013 or previous versions of PowerPoint may be quickly converted to movies. RZ PowerPoint video to ppt converter also allows you to create HD video files that can be readily shared online, as well as files that can be burnt to DVDs.
Any current video playback device can play videos generated with this program, and the quality is so outstanding that you can play them on huge LCD displays. Though this video to ppt converter is accessible for free, its free edition lacks all of the capabilities that make this program an excellent alternative for professionals that prepare PowerPoint presentations on a consistent basis. It’s possible to get the commercial edition of this Windows-based tool and have all of the multimedia you include in the presentations converted to video without losing any quality.
Pros
You may use this to burn DVDs.
All PowerPoint file types are supported.
Cons
However, basic PPT to video file conversion is only available in the free edition of the product.
There is no possibility to convert many files at once.
5.Camtasia Studio

Price: A free trial is offered, and a single-user license is $249.
There is much more to Camtasia Studio than simply a video to ppt converter in it. An unencumbered trial edition of this video editing program helps you create professional-looking films from PowerPoint presentations. Camtasia Studio’s single-user license is a good alternative for those who just need to convert a few presentations for free, but if you’re searching for a full-featured video to ppt converter, you should consider purchasing Camtasia.
When using the software’s premium edition, you may add multimedia files, such as PowerPoint presentations and webcam footage to your final video project. With Camtasia Studio, you can easily post your films in nearly any video file type on social media.
Pros
With Camtasia Studio, adding transitions, callouts, or text effects is a cinch.
Advanced video editing tools are available.
Cons
Only 30 days are included in the free trial.
Expensive.
Conclusions
When looking for the best PowerPoint conversion software, there are a lot of factors to consider. The output quality, the ability to use PowerPoint effects, compatibility with new devices, & one publishing are all key considerations. Get a free trial of iSpring Converter Pro, the number one choice on our list, if you need a dependable video to ppt converter that can handle any amount of slides and animations in your presentation.
For Win 7 or later (64-bit)
For macOS 10.12 or later
Price: $49.95, Free trial available
This extremely effective program allows you to convert any documents written with PowerPoint versions up to 2013 and PowerPoint viewer. Convert the presentations to various common file formats, including MP4, WMV, and AVI. All sound files, transitions, and animations from your original presentation are preserved using this Windows-based tool.
In order to tailor the video quality and frame rates to your project’s requirements, Moyea Video to PowerPoint Converter gives you total control over the output video parameters. PPT to Video Converter makes it easy to include logos, watermarks, music and voiceovers in your PowerPoint films.
Pros
Options for converting files with a lot of power
It is possible to convert many files at once.
Cons
There aren’t any HD output choices available.
To be able to convert presentations, you must have PowerPoint installed.
2.Leawo Video to PPT Pro

Price: $44.95
PowerPoint presentations in PPT, PPTX, PPTM, POT, or POTX file formats may be converted to practically any video file type with our video to ppt converter. PowerPoint 2000 through 2016 (both 64-bit and 32-bit) are all supported, as are all versions of the program.
Leawo Video to PPT Pro’s video files is compatible with iPhone and Android smartphones, tablets, gaming consoles, and Apple TV. You can turn your PowerPoint presentations into high-definition films with narration and other audio files using this program. Share your movies with the world through the likes of DailyMotion, Vimeo, YouTube, and Metacafe.
Pros
The ability to do unlimited batch conversions at once.
Allows you to brand converted films with custom logos and watermarks.
Cons
The Mac OS cannot run this program.
Requirements for a complicated system.
3.iSpring River

Price: $97 for a single lifetime license
Installing iSpring River on your PC turns it into a PowerPoint add-on that you can use from the ribbon. This isn’t a limitation since iSpring River allows you to convert PPT files to widely suitable video file formats like MP4 or AVI, even though it’s not stand-alone computer software. In addition, you may choose the video size and compression parameters before each file conversion using the add-video on’s settings.
All of the original PowerPoint presentation’s animations and audio files, as well as transitions and font and text formatting, will be included in the final film. Video files exported from iSpring River may be uploaded straight to YouTube, but no other social media services such as Dropbox or Google Drive are supported.
Pros
It’s quick and simple to use.
Upload YouTube videos directly from your computer’s hard disc.
Cons
Cannot be used as a standalone application.
There isn’t any support for high-definition video.
4.RZ PowerPoint Converter

Price: There is a free version available, and prices begin at $29.99.
Using this sophisticated converter, any PPT files made with 2013 or previous versions of PowerPoint may be quickly converted to movies. RZ PowerPoint video to ppt converter also allows you to create HD video files that can be readily shared online, as well as files that can be burnt to DVDs.
Any current video playback device can play videos generated with this program, and the quality is so outstanding that you can play them on huge LCD displays. Though this video to ppt converter is accessible for free, its free edition lacks all of the capabilities that make this program an excellent alternative for professionals that prepare PowerPoint presentations on a consistent basis. It’s possible to get the commercial edition of this Windows-based tool and have all of the multimedia you include in the presentations converted to video without losing any quality.
Pros
You may use this to burn DVDs.
All PowerPoint file types are supported.
Cons
However, basic PPT to video file conversion is only available in the free edition of the product.
There is no possibility to convert many files at once.
5.Camtasia Studio

Price: A free trial is offered, and a single-user license is $249.
There is much more to Camtasia Studio than simply a video to ppt converter in it. An unencumbered trial edition of this video editing program helps you create professional-looking films from PowerPoint presentations. Camtasia Studio’s single-user license is a good alternative for those who just need to convert a few presentations for free, but if you’re searching for a full-featured video to ppt converter, you should consider purchasing Camtasia.
When using the software’s premium edition, you may add multimedia files, such as PowerPoint presentations and webcam footage to your final video project. With Camtasia Studio, you can easily post your films in nearly any video file type on social media.
Pros
With Camtasia Studio, adding transitions, callouts, or text effects is a cinch.
Advanced video editing tools are available.
Cons
Only 30 days are included in the free trial.
Expensive.
Conclusions
When looking for the best PowerPoint conversion software, there are a lot of factors to consider. The output quality, the ability to use PowerPoint effects, compatibility with new devices, & one publishing are all key considerations. Get a free trial of iSpring Converter Pro, the number one choice on our list, if you need a dependable video to ppt converter that can handle any amount of slides and animations in your presentation.
For Win 7 or later (64-bit)
For macOS 10.12 or later
Best Ways to Add Meme Text to Videos
Need to add meme text to a video clip but don’t know how to?
As we all know, visuals are the best way to engage, entertain, and pass knowledge across. But do you know you can make it better, as in more understandable, by including meme texts? Adding meme text to your video clips makes the storyline easy and quick to comprehend. Also, it makes your content appealing to your audience.
Performing this operation is easy, however, many people find it challenging because they do not have the idea. Is this the same for you? There is a simple guide you could follow to accomplish that here in this post. Here, we will introduce you to the top 2 ways to add meme text to videos.
Part 1. What Is the Most Used Fonts for Memes?
The font type and style you use in designing memes are crucial. With the right font, you can easily express yourself to your audience or viewers via memes. Find below the popular fonts often used for memes:
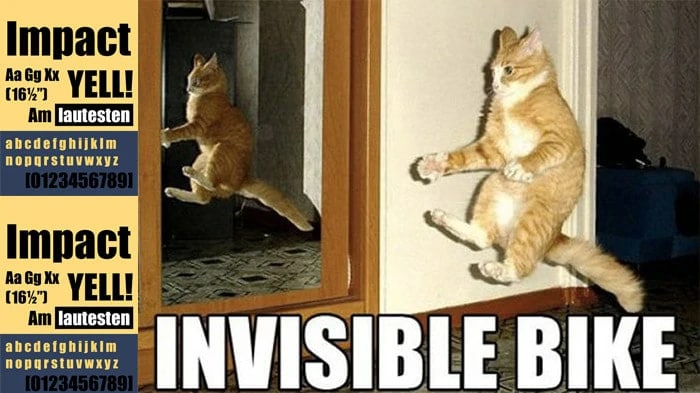
- Impact
The Impact is a famous font widely used in memes. This font stands out in meme pictures because of the boldness, and thickness. Viewers are able to read and understand the message you are passing across.
- Arial
Here is another font type that makes your meme appealing to the receiver. The round edge coupled with the smooth shape makes your meme photos easy to comprehend.

- Montserrat
If you are looking for a font with a modern look, Montserrat should be your choice. The Montserrat font is thin and squaric giving your meme that modern vibes.

Part 2. How to Add Meme Feel Text to Videos?
Here are the best two ways to add meme text to your video clips with complete ease:
Method 1: With Filmora Meme Maker
Wondershare Filmora is a wonderful video editor famous for its impressive editing features. This simple yet effective software lets you add text to videos easily and quickly. With the interactive user interface, you can easily add meme text to videos within the snap of a finger. It’s a powerful video editing tool compatible with Windows and Mac computers.
Beginners and professionals find it simple to operate. The software provides you with several meme editing features. From countless font types & styles to freedom to customize texts and lots more. Wondershare Filmora makes your meme appear stunning. Unlike its competitors in the same industry, this software is lightweight, fast, and secure. It exports edited files directly to your local storage.
Besides creating meme texts, this software permits you to edit your audio file. It supports audio editing tools like the silence detector, audio sync, audio ducking, and more. This software allows you to add/delete backgrounds from videos, create slideshows, record your display screen, etc. Wondershare Filmora holds everything you need in a video editor.
How to Add Meme Text to Videos with Filmora
Download, and install Filmora from the official website. Upon the successful installation, launch the software and follow the detailed stepwise guide below to add meme text to videos with Filmora Video Editor:
Step1 When Filmora opens, you will get an interface as below on your display screen:
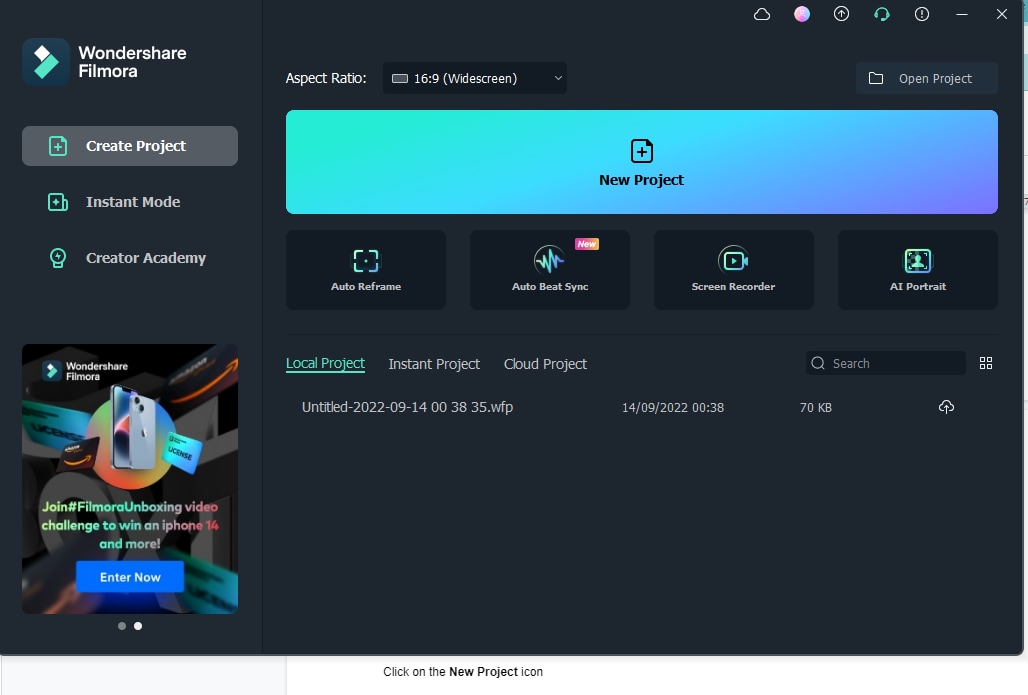
Click on the New Project icon to enter the software main screen. Locate the Files icon at the top left corner of your screen, click on it and a couple of options will pop up underneath:
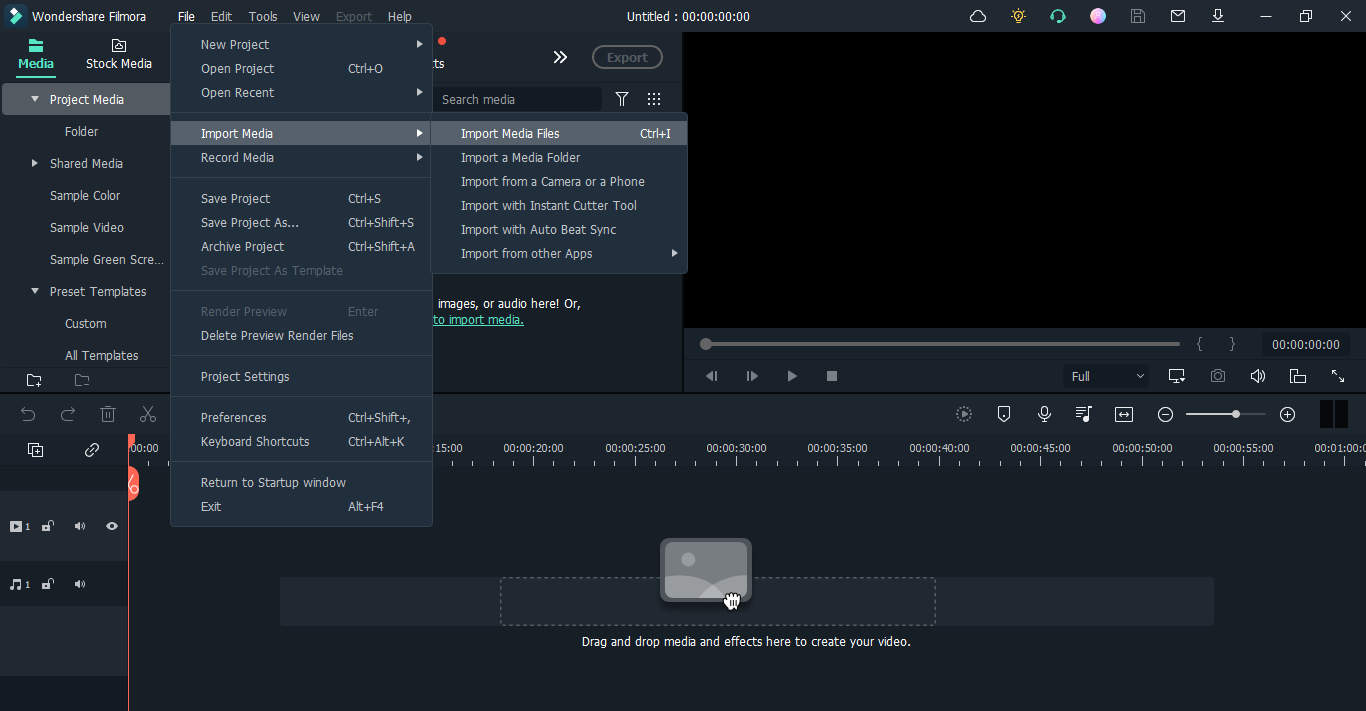
Scroll to the Import Media drop-down menu, click on it and select Import Media Files.
Wondershare Filmora will direct you to your local storage, and the window below will come up:
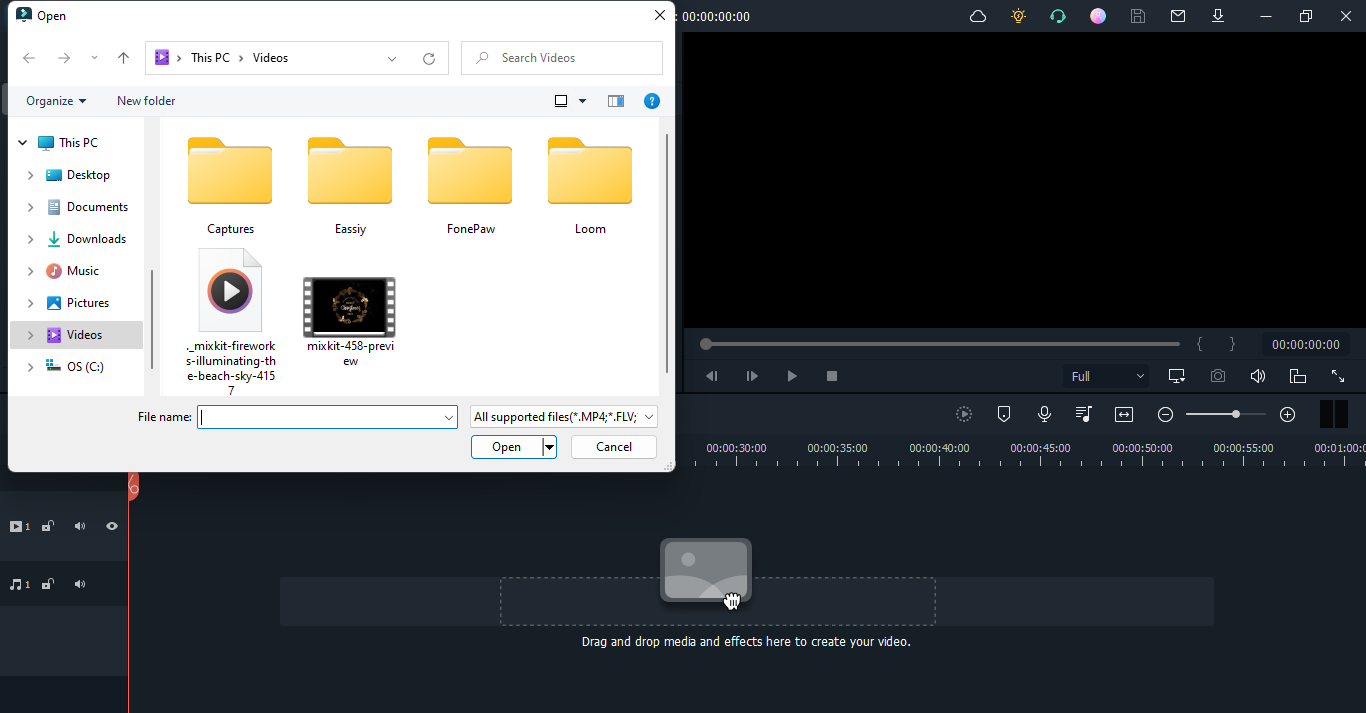
Alternatively, you can use the hotkeys: Ctrl + I to upload a new file.
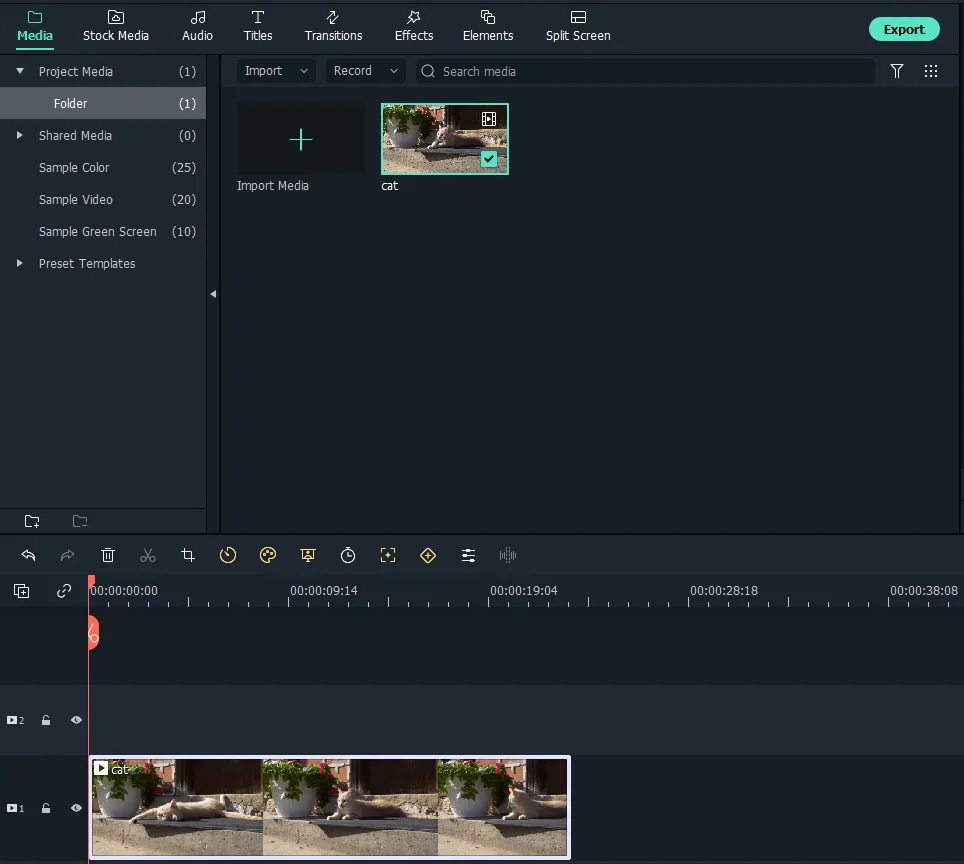
Step2 Next, you have to move the video to the timeline panel so you can edit it. To do that, drag-and-drop the video to the section labeled Drag and drop media and effects here to create your video.
On adding the clip to timeline panel, you will get an interface as below:
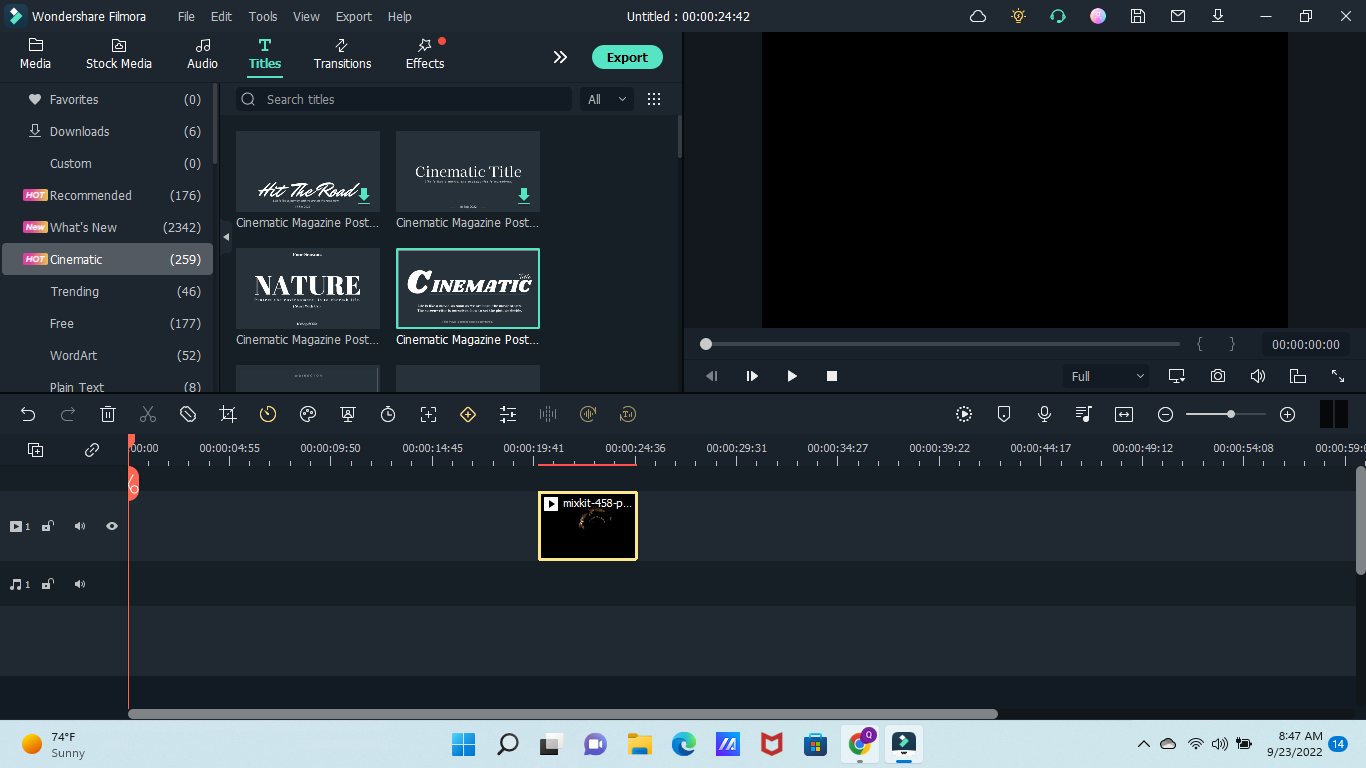
Step3 Now click on the Titles button at the top menu bar. Immediately, the Text & Title preset will pop up on the left sidebar. There are over 200 text effects available on Filmora, select your preferred choice from the list. You can preview the text effect before applying it. To do that, double-click on one of them and check the result in the right hand panel.
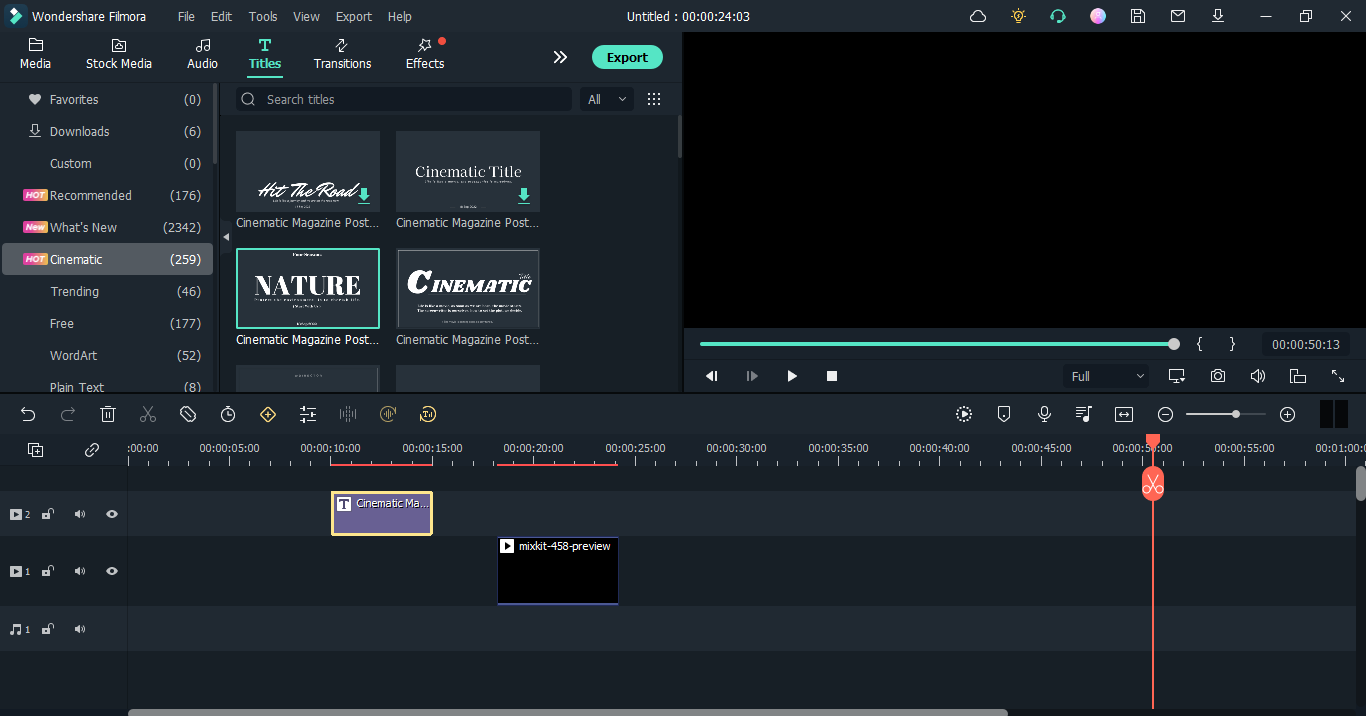
Should the title suit your desire, drag and drop it in the timeline above the video timeline panel. To understand the step better, here is an image to help you out:
Step4 Once the step above is complete, double click on the Title frame in the timeline, and the window below will appear on your display screen:
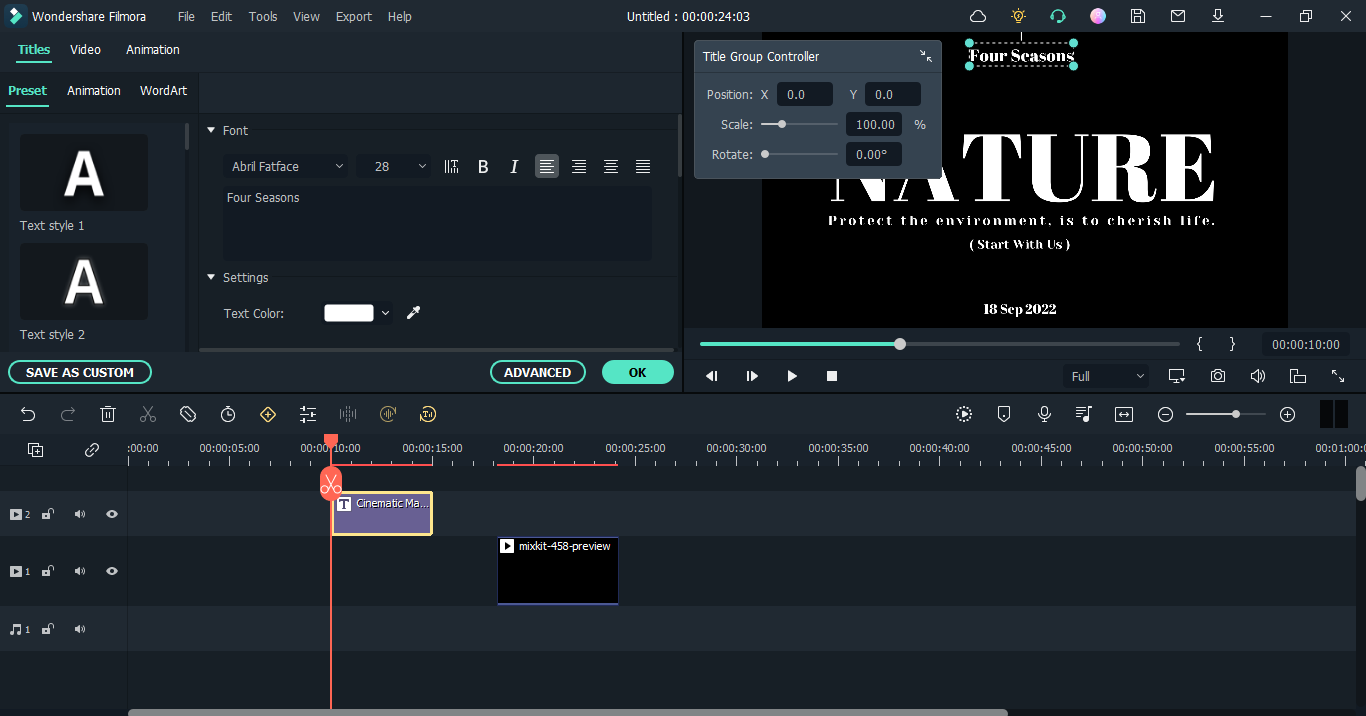
To change font style, click on the Font type drop-down menu just as in the image below:
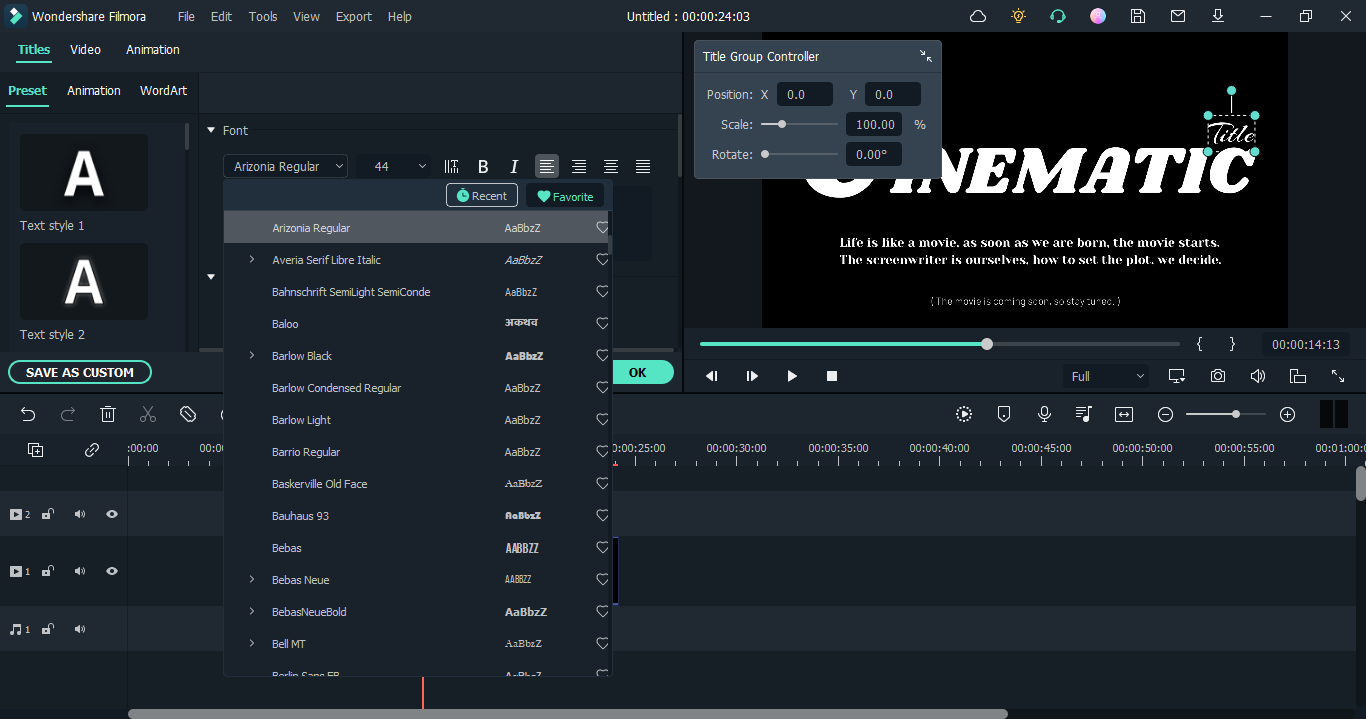
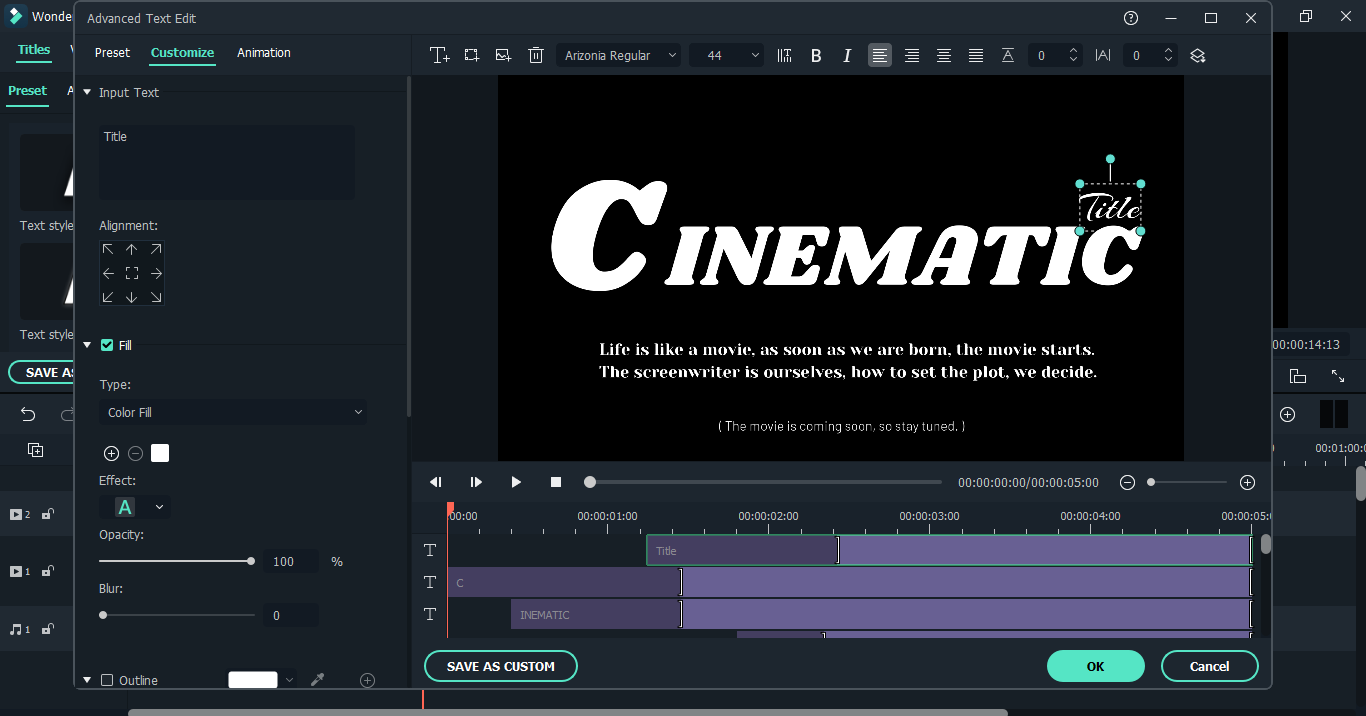
Scroll down and choose a font. Adjust font color clicking on the corresponding key to proceed. For advanced settings, click on ADVANCED to make necessary adjustments.
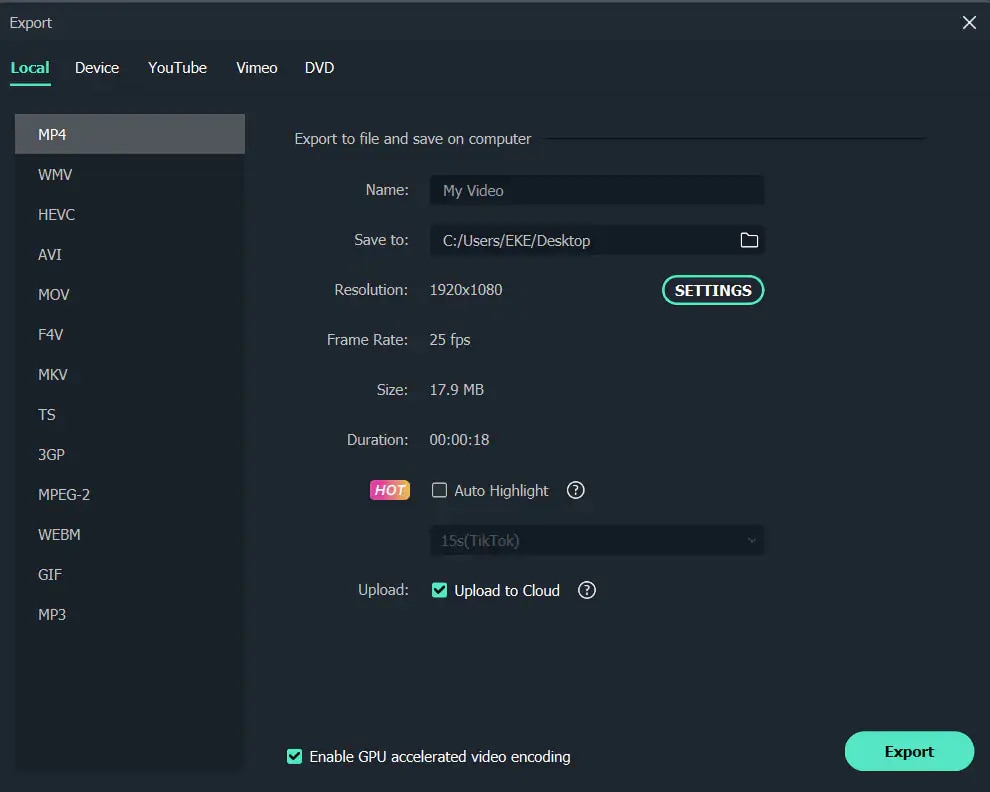
Step5 After completing the aforementioned step, click on the File, and select Save Project from the options that pops up. Choose your preferred destination path to save the file to your local drive.
Method 2: Use Clipchamp Meme Maker To Add the Text You Need
Although Wondershare Filmora is the ultimate video editing solution to add text to videos, Climchamp is another good tool to use. Climchamp is web-based video editor with no operating system limitations. The program allows you to upload video content of any format, add meme text to it and share with friends like Facebook.
This program is well-customized with a straightforward interface that allows amateurs and professionals to navigate easily. Climchamp comes with a library of video templates that you can choose from to customize your videos. It allows you to trim, cut, spli, crop, rotate, add audio & images, and flip videos conveniently.
Climchamp offers free and premium subscription video editing services. Mind you, the free version gives you access to limited features. If you wish to enjoy all of the amazing features the program holds, try subscribing to a premium package. Climchamp is internet depend. Thus, if you need a stable data connection for it to work effectively.
How to Add Meme Text to Videos with Climchamp
Step1 Ensure you are connected to a stable internet connection, open a web browser on your PC, and navigate your way to the official website for Climchamp video meme generator. The page below should pop up:

Click on the Create a video meme icon to proceed.
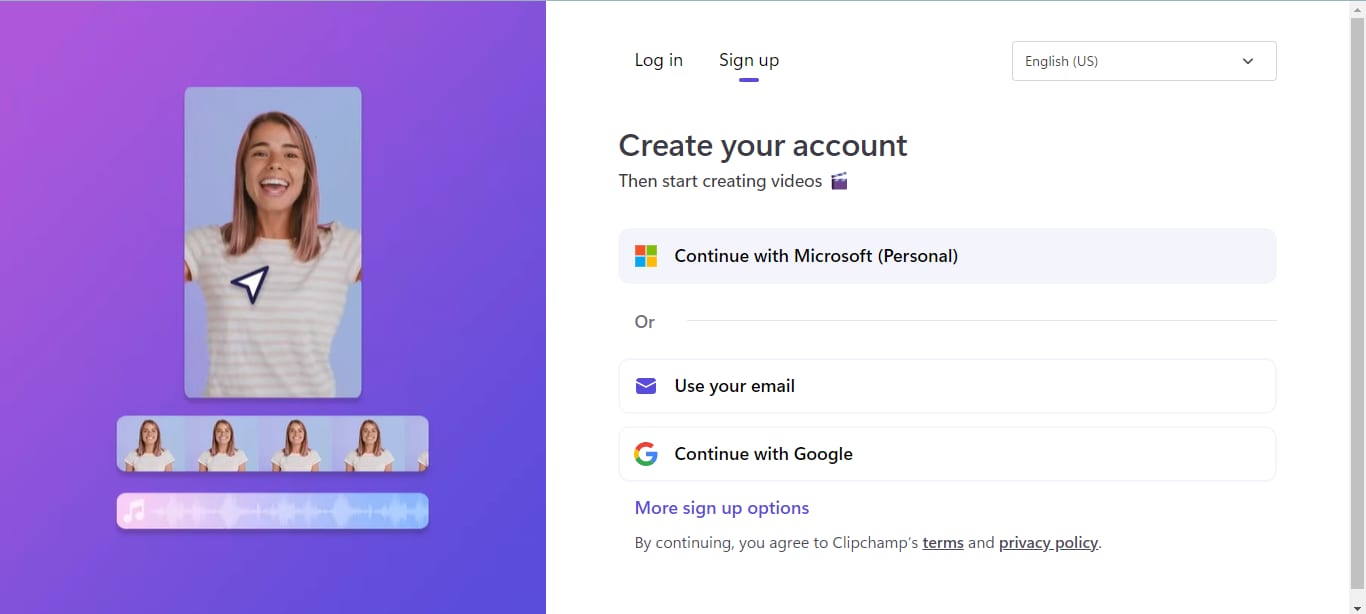
Climchamp video editing program will direct you to a new page where you have to create a profile. Fill out the form, and click on the appropriate button to proceed. Verify your profile, and login.
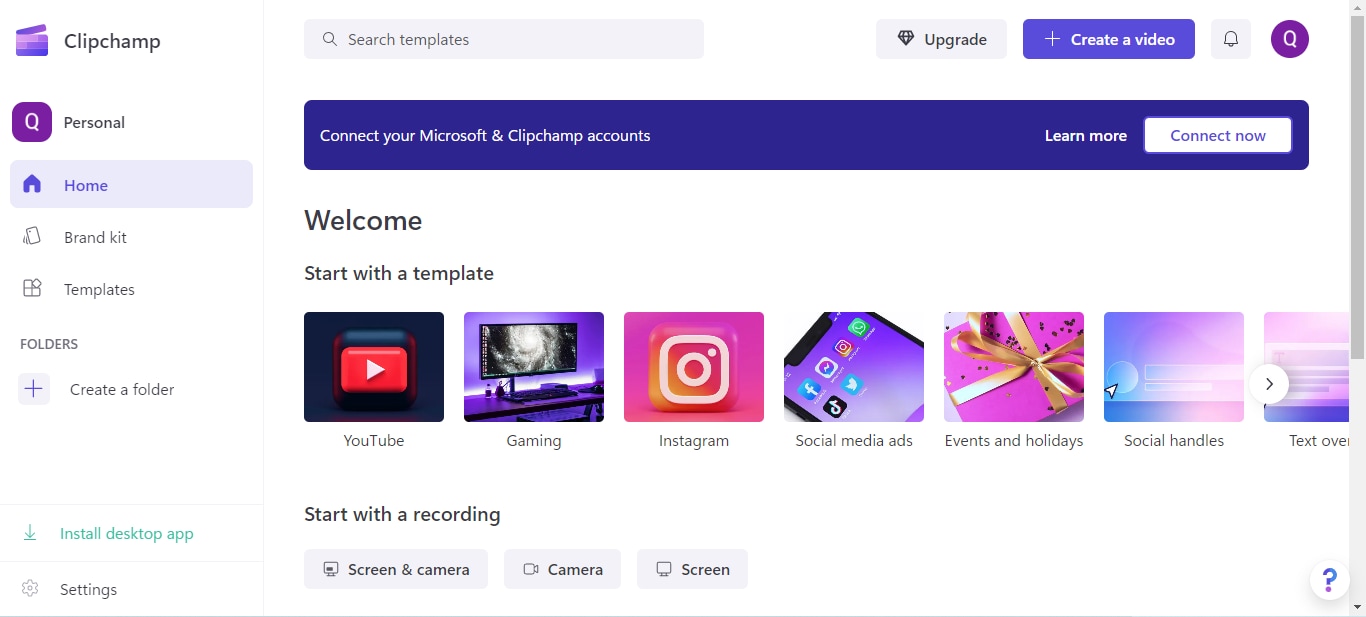
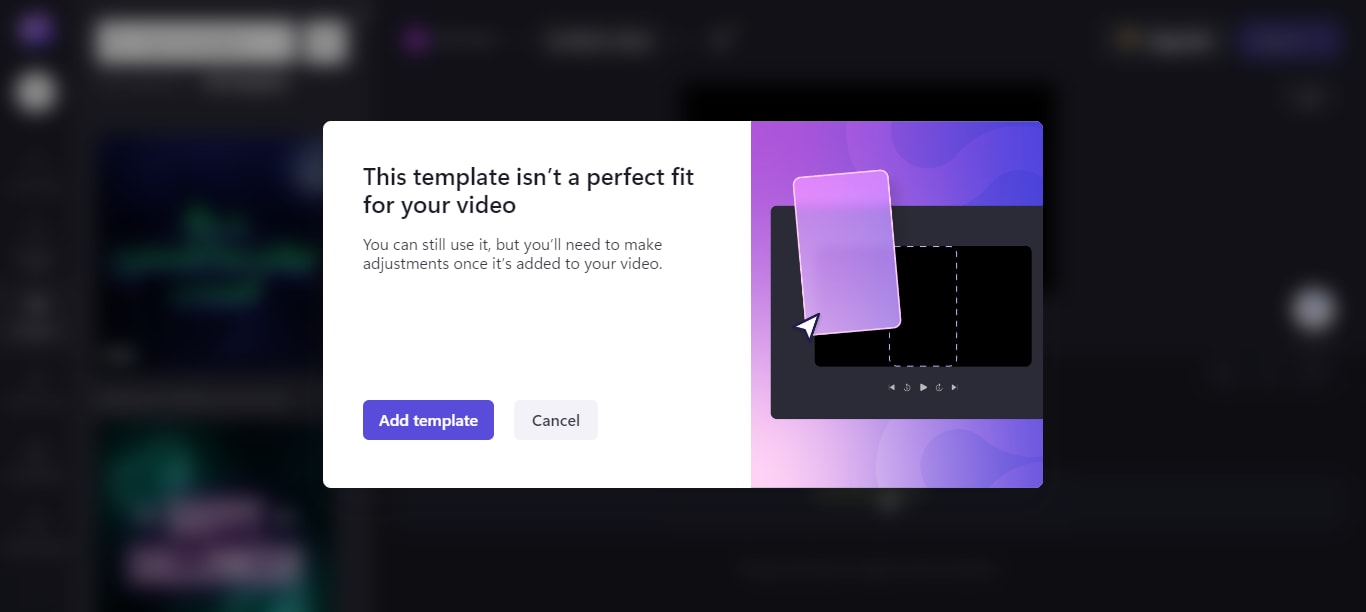
Step2 Locate the Templates icon on the left hand panel. Select a template, and Climchamp will request whether you want to go on with the chosen template.
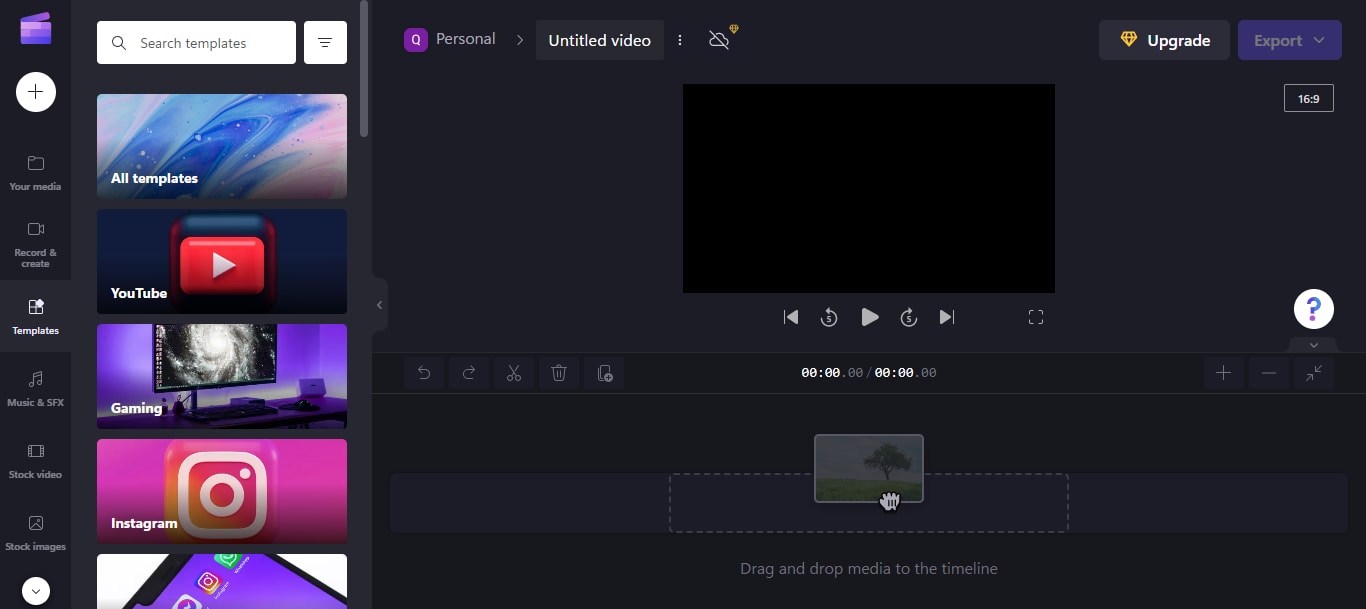
Tap Add template to import it to the video editing program timeline. The interface below will come up:
Step3 Next, proceed to add a video content.
Click the + Create a Video tab at the top right corner of your screen. A new screen will come up just as below:
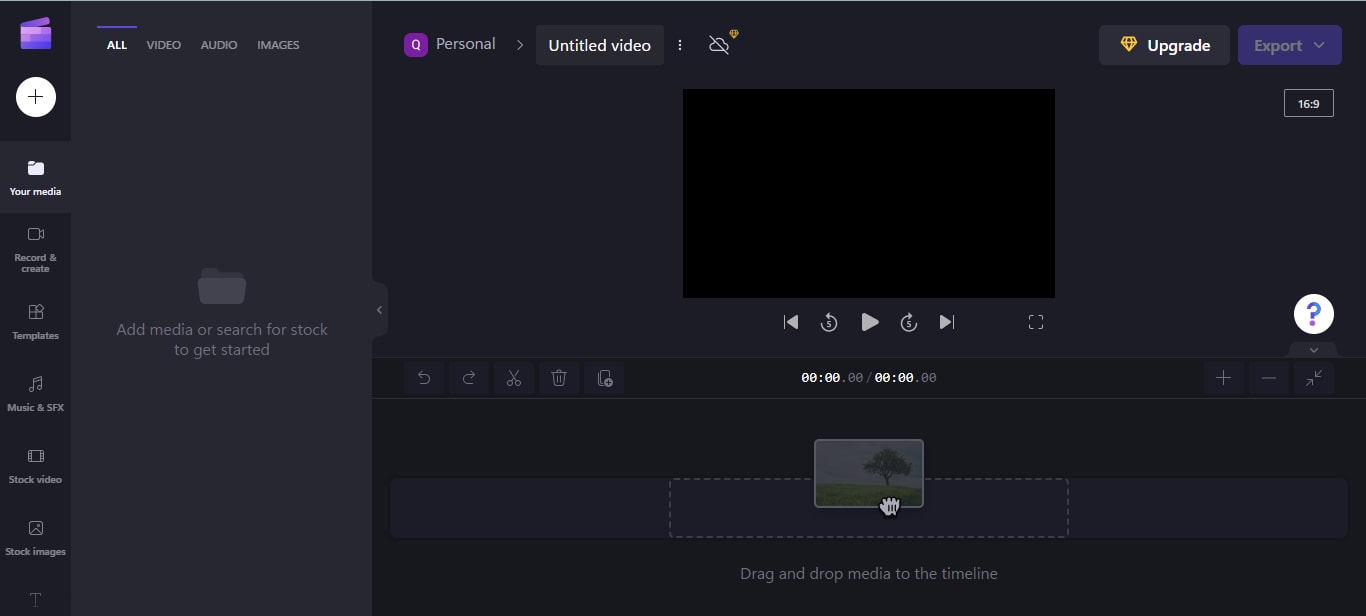
Tap on the + icon on the left sidebar.
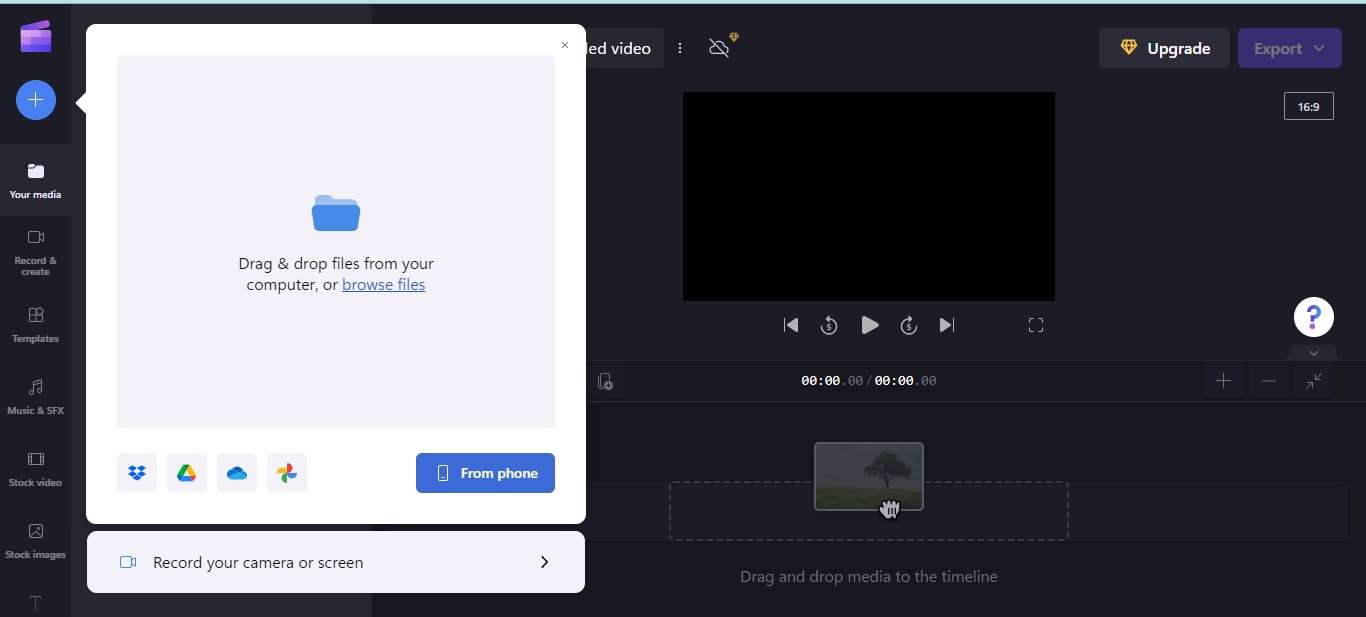
Click on the appropriate key to import your desired video file.
Step4 Now drag-and-drop the content you just uploaded to the timeline panel, and click on the Play icon to view it.
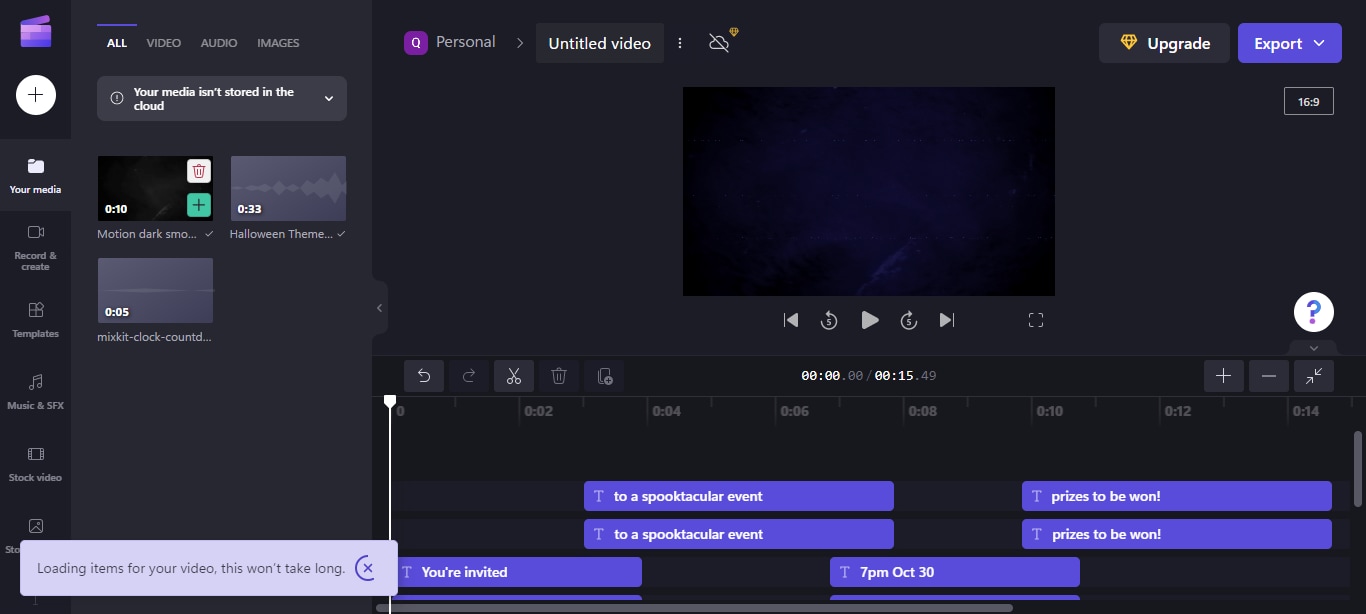
Locate Export at the top right panel on your computer display screen, click it, and choose your preferred destination path.
Part 3. FAQs
Q1. What’s the best app to add texts to videos?
Adding texts to videos shouldn’t be a big deal when you have a professional video editing software. Many apps/software claims to provide quality video editing services, however, Filmora Video Editor is the best option. The software allows you to edit videos without distorting the quality. Additionally, it lets you export your edited files in several formats.
Q2. How do I add text to videos?
With Filmora, you can add text to videos. The detailed stepwise guide you need to follow is shared in the article above. Read through it to add text to your clips now.
Conclusion
With the detailed tutorial guide shared above, adding meme text to your videos shouldn’t be a difficult task to engage in anymore. There are two powerful tools introduced in the guide, Filmora is the best. It’s an offline video editing software that lets you manipulate your videos easily. The software comes with rich editing tools that you need to create stunning clips with professional results.
Free Download For Win 7 or later(64-bit)
Free Download For macOS 10.14 or later
Free Download For macOS 10.14 or later
Also read:
- New 2024 Approved Add Green Screen Video on TikTok
- New How to Create Cooking Video Intro and End Screen for YouTube Channel for 2024
- Learn How to Merge Audio and Video Like a Pro with This Step-by-Step Guide to Using FFmpeg. Create Seamless Videos and Improve Your Video Production Skills
- Finding The Best LUTs for Wondershare Filmora for 2024
- New How to Create Sports Intro and Outro for YouTube Video, In 2024
- New How to Fade to Black Premiere Pro
- New 8 Unexpected Ways to Add Emoji to Photo Online
- Updated General Information That You Need To Know About MKV Format for 2024
- Is Augmented Reality Conferencing the Future of Workplace Collaboratio
- 5 Excellent Tools To Convert Video to 60 FPS
- How to Become a Youtuber?
- Updated Detailed Guide to Rotate Videos in Blender
- The Best 10 AI Video Analytics Companies at a Glance for 2024
- Splitting Clips in Adobe After Effects Step by Step for 2024
- Looking for the Simple Steps to Add Transition Effects in Your Video? We Will Illustrate How to Add Transition in Filmora and Mention Tips and Tricks for Video Transition Effects for 2024
- In 2024, Mask Tracking with Adobe Premiere Pro A Detailed Guide
- New In 2024, 100 Working Methods to Learn How to Rotate TikTok Video
- Before & After Editing Trick - Filmora
- Want to Add the Radial Blur Image Effect to Your Photos to Make Them Stand Out? Read on to Find the 11 Best Tools for Creating Stunning Image Editing Projects for 2024
- Discover How You Can Use Vectorscope to Adjust Luminance, Color Grading, and More in Your Video Editing Projects
- New Best Cloud Storage Service for Videos for 2024
- New 2024 Approved Updated 8 Ways to Merge SRT with MP4
- Updated In 2024, 8 Websites to Find 3D Text PNG
- Updated In 2024, Perfect Moody LUTs for VN Editor An Overview
- Updated General Knowledge About MP4 Format and Best MP4 Video Editor for 2024
- In 2024, Magic Effects Video Making How To
- We All Know Very Well that a 1-Second-Video Has Several Images in a Single Row. Even with iMovie Time-Lapse, You Can Create This! So, without Any Further Ado, Lets Learn How to Make a Timelapse in iMovie for 2024
- New If Youre Not Using Video yet, Now Is the Time to Start. In This Post, Well Discuss the Benefits of Using Video for Social Media Marketing and Provide Tips for Getting Started. Keep Reading to Learn More
- New How to Rotate Video in iMovie with Alternative
- Updated 2024 Approved How Have Game Recording Software Improved Their Stature in the Market? An Overview
- Updated In 2024, How to Crop Videos in Windows Media Player
- New In 2024, Ideas for Time-Lapse Video
- New Add Amazing Filters and Effects for Fun to Watch GIFs Using Adobe After Effects. Read on to Discover an Easy-to-Learn After Effects Alternative for 2024
- New How to Comment on YouTube Live Chat
- Updated IMovie Review – Is It The Best Video Editor for Mac Users, In 2024
- Updated In 2024, How To Make Split Screen Videos in Filmora
- New Some Leading AI Tools to Replace Sky Backgrounds
- Updated Are You Looking to Make Subscribe Channel Graphics? Here Is a Complete Guide on How to Make One on Your Own
- New 2024 Approved How to Create Cinematic Style Videos? Easy Guide for Beginners
- Updated In 2024, Phone Aspect Ratio Vertical Definition, Types and Tips
- How to Make OBS Slideshow
- 2024 Approved Steps to Create Makeup Videos
- 3 Effective Methods to Fake GPS location on Android For your Nubia Red Magic 8S Pro | Dr.fone
- How to Change Spotify Location After Moving to Another Country On Realme 12+ 5G | Dr.fone
- Learn How To Lock Stolen Your Apple iPhone 12 Properly | Dr.fone
- Best 15 2D Animation Software Free That Worth to Try
- Fake the Location to Get Around the MLB Blackouts on Itel P55+ | Dr.fone
- How to Fix Videos Not Playing on Itel A60s?
- In 2024, Top 5 Vivo X100 Pro Bypass FRP Tools for PC That Actually Work
- In 2024, 4 Feasible Ways to Fake Location on Facebook For your Oppo K11 5G | Dr.fone
- Planning to Use a Pokemon Go Joystick on Samsung Galaxy S23 FE? | Dr.fone
- In 2024, Ultimate Guide from Tecno Pova 5 FRP Bypass
- How To Track IMEI Number Of Infinix Zero 5G 2023 Turbo Through Google Earth?
- 3 Ways for Android Pokemon Go Spoofing On Honor 90 Pro | Dr.fone
- In 2024, 3 Facts You Need to Know about Screen Mirroring Nubia Red Magic 8S Pro+ | Dr.fone
- How to Unlock Nokia C12 Pro Phone Pattern Lock without Factory Reset
- How to Detect and Stop mSpy from Spying on Your Samsung Galaxy S23 Tactical Edition | Dr.fone
- In 2024, Mastering Lock Screen Settings How to Enable and Disable on Oppo A18
- All Must-Knows to Use Fake GPS GO Location Spoofer On Vivo Y27 5G | Dr.fone
- Apply These Techniques to Improve How to Detect Fake GPS Location On OnePlus Nord CE 3 Lite 5G | Dr.fone
- In 2024, Overview of the Best Poco C51 Screen Mirroring App | Dr.fone
- Best Video Repair tool to Fix and Repair Corrupt MP4,MOV,AVI video files of Honor 90 Lite
- In 2024, How to Reset Gmail Password on Xiaomi Redmi 12 5G Devices
- In 2024, About Oppo F23 5G FRP Bypass
- How To Restore a Bricked Vivo Y78t Back to Operation | Dr.fone
- How to Transfer Data from ZTE Nubia Flip 5G to Other Android Devices? | Dr.fone
- How Realme C67 4G Mirror Screen to PC? | Dr.fone
- In 2024, How to Reset your Nubia Red Magic 9 Pro Lock Screen Password
- How To Restore Missing Music Files from Samsung
- Everything You Need to Know about Lock Screen Settings on your Nokia 105 Classic
- In 2024, How to Reset a Locked Infinix Zero 30 5G Phone
- In 2024, Overview of the Best Xiaomi 13T Screen Mirroring App | Dr.fone
- In 2024, Android to Apple How To Transfer Photos From Poco X6 to iPad Easily | Dr.fone
- In 2024, 3 Effective Ways to Unlock iCloud Account Without Password From Apple iPhone 14 Pro
- How to Update Apple iPhone 15 Plus to the Latest iOS Version? | Dr.fone
- How to Restore Deleted F5 5G Contacts An Easy Method Explained.
- How to insert signature in Excel 2023 files
- In 2024, Ultimate Guide on iPhone 12 Pro Max iCloud Activation Lock Bypass
- 6 Ways to Change Spotify Location On Your ZTE Axon 40 Lite | Dr.fone
- 3 Easy Solutions to Hard Reset Oppo Reno 8T | Dr.fone
- In 2024, How to Detect and Stop mSpy from Spying on Your Realme V30T | Dr.fone
- Title: Updated How to Create a Text Effect Video with Filmora
- Author: Chloe
- Created at : 2024-05-20 03:38:06
- Updated at : 2024-05-21 03:38:06
- Link: https://ai-editing-video.techidaily.com/updated-how-to-create-a-text-effect-video-with-filmora/
- License: This work is licensed under CC BY-NC-SA 4.0.


