
Updated How to Create Loop Videos with Filmora for 2024

How to Create Loop Videos with Filmora
A loop fashion lookbook will be familiar to you if you are a fashion YouTuber. Here we will show you how to record shots and make a creative lookbook to show off your best outfits in an excellent way with Wondershare Filmora.
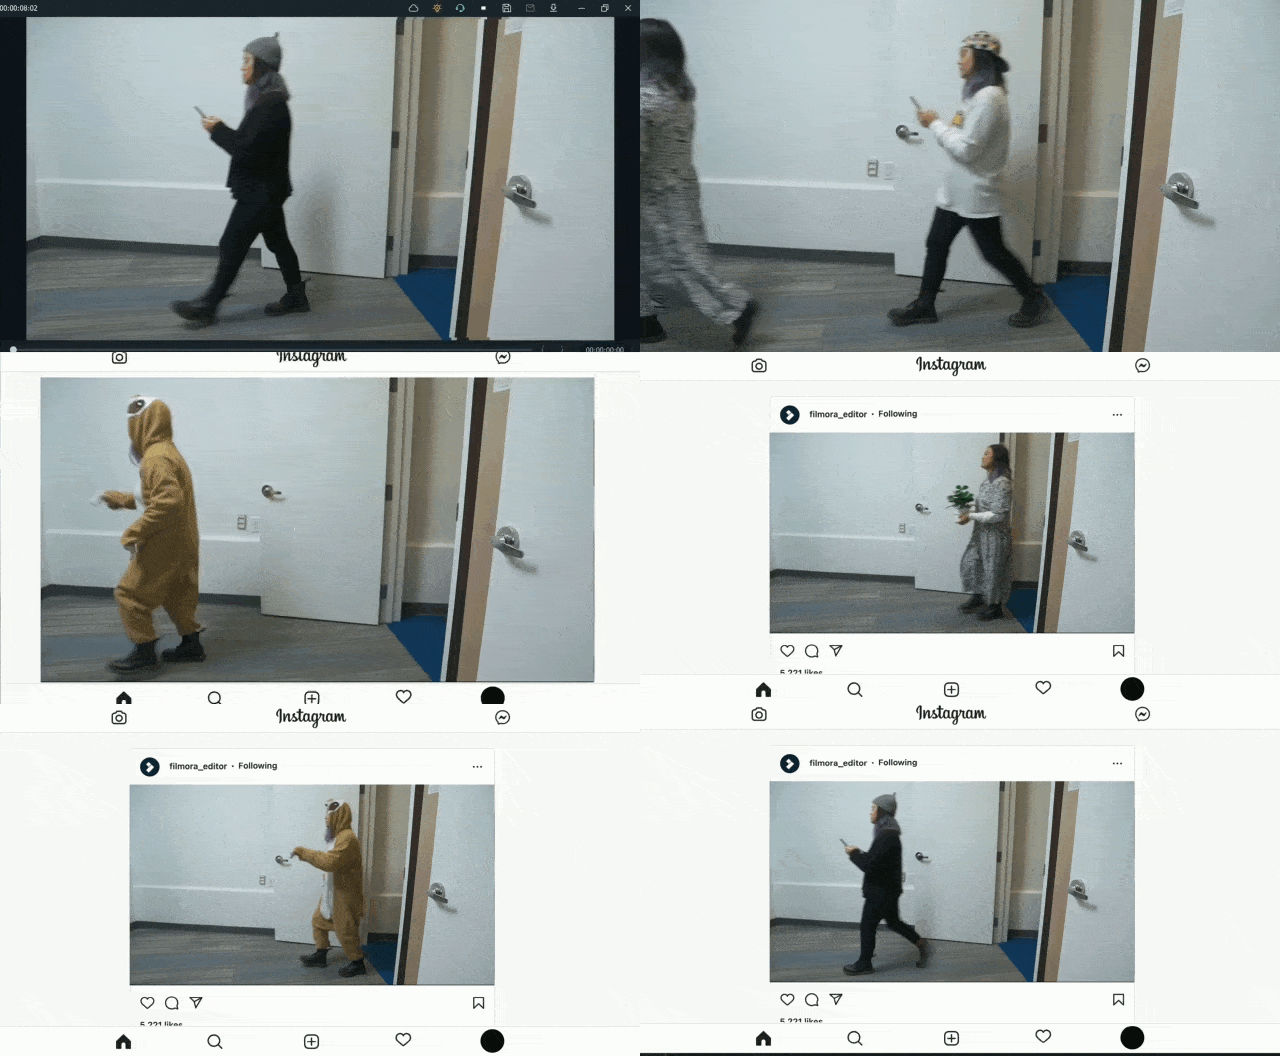
Shots recording for loop masking
The first and most crucial step for creating a good loop video is to record perfect shots. Here are the steps to record video shots for loop videos.
How to create a loop video
Step1 Set your camera or phone on a tripod. Make sure it stands still and does not move.

Step2 Set it so that you have a door on one side and enough room for the subject to walk through the door and move out of the frame.
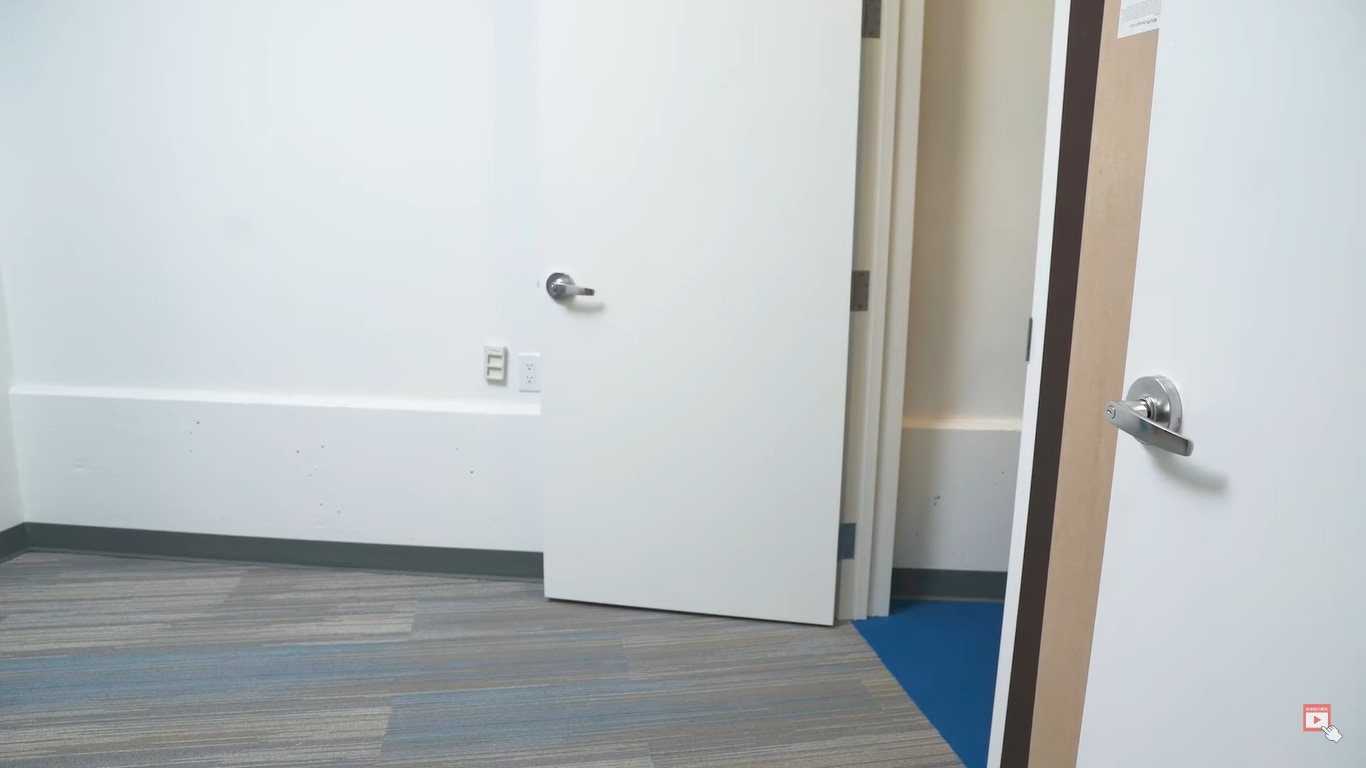
Step3 Make sure all your outfits are ready.

Step4 Start recording on your camera. Walk through the door wearing the first outfit. Change your outfits and repeat the step with all your dresses. It would help if you kept the camera rolling while recording all these clips. Turning the recording on and off with every shot will result in many small movements.
Editing footage with a professional video editor - Wondershare Filmora
After recording the shots, the next step is to edit them. Wondershare Filmora is the best software for this purpose. Creating a loop video using filmora is an easy task.
Free Download For Win 7 or later(64-bit)
Free Download For macOS 10.14 or later
Below is the step-by-step guide on using Wondershare Filmora to create a loop masking or lookbook video.
How to edit a loop lookbook video
Step1 Download and install Wondershare Filmora on your PC or Mac.
Step2 Launch Wondershare Filmora, import the video clip into Filmora and place it on the first track.
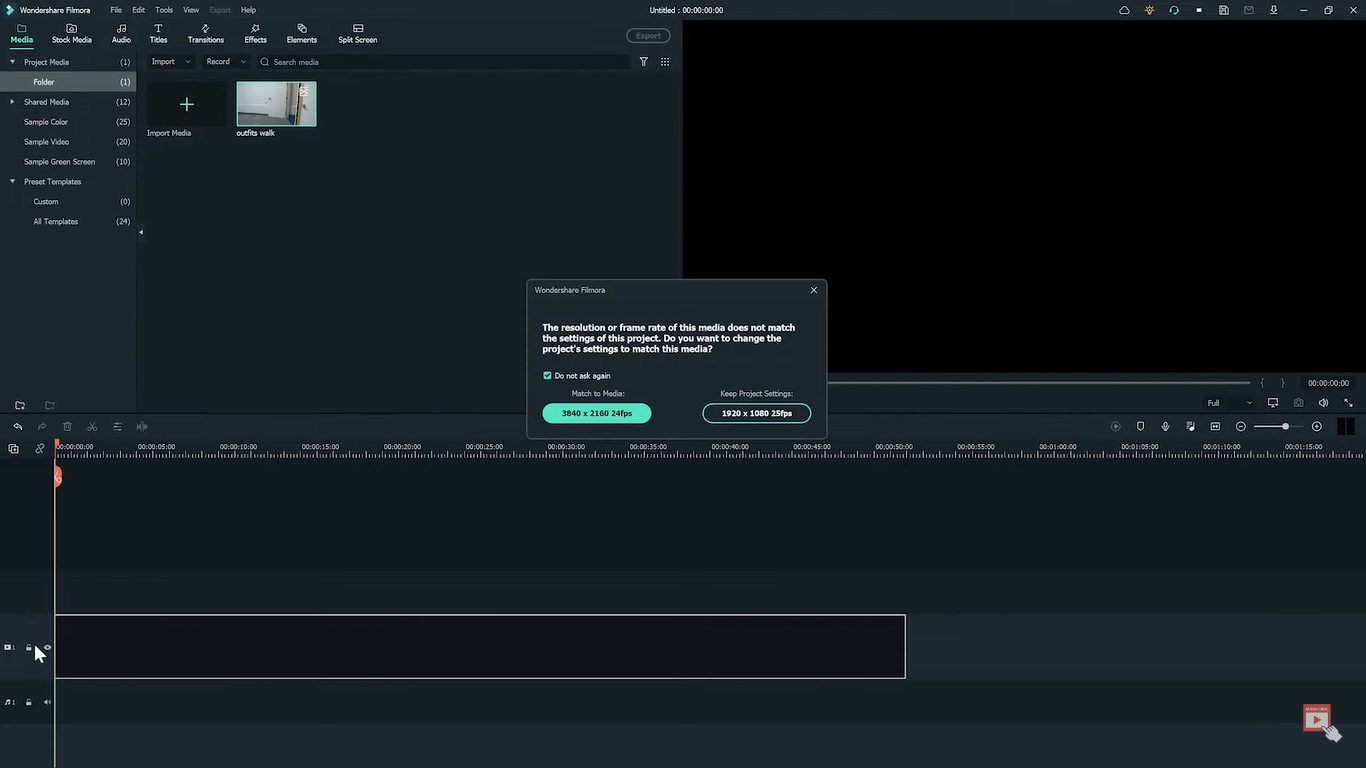
Step3 Find a frame with an empty background, i.e., without the subject, and freeze the frame.
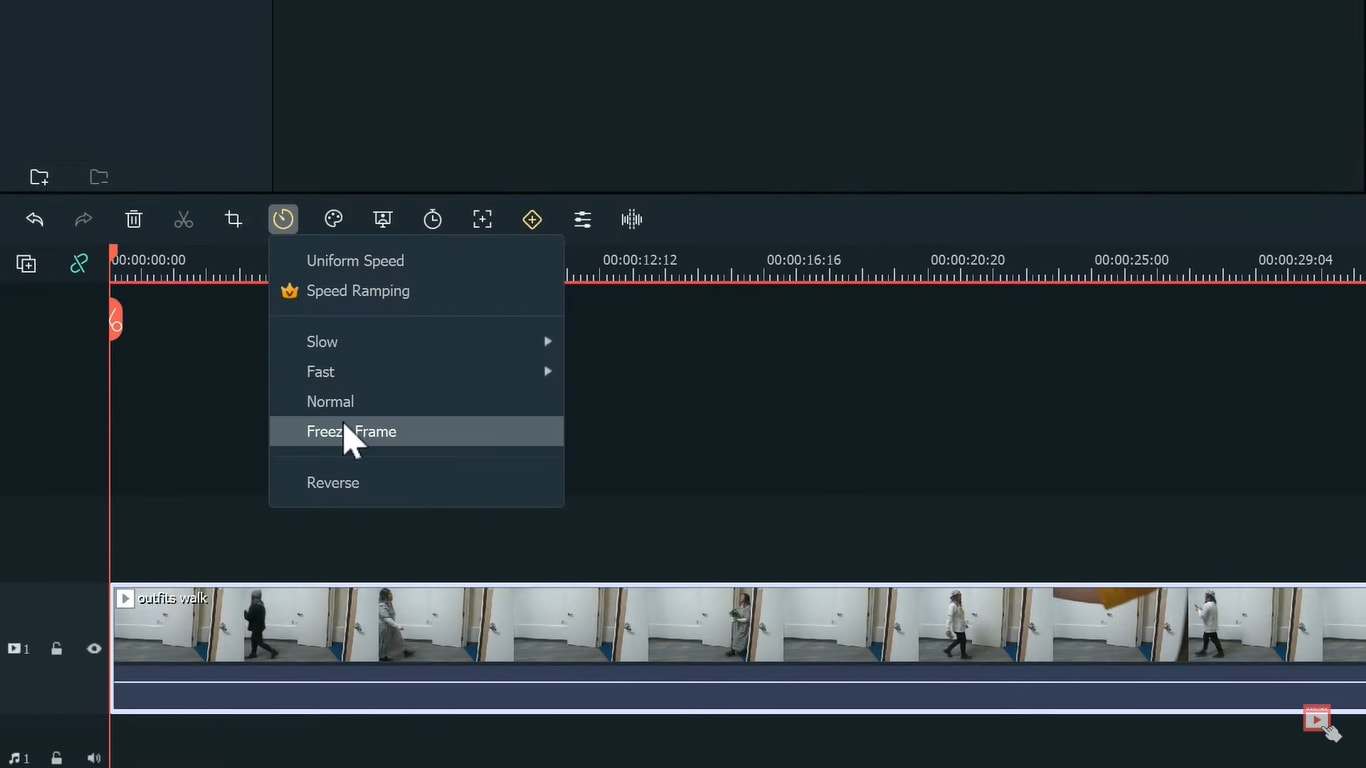
Step4 Extend the frozen frame and cut out the rest of the video.
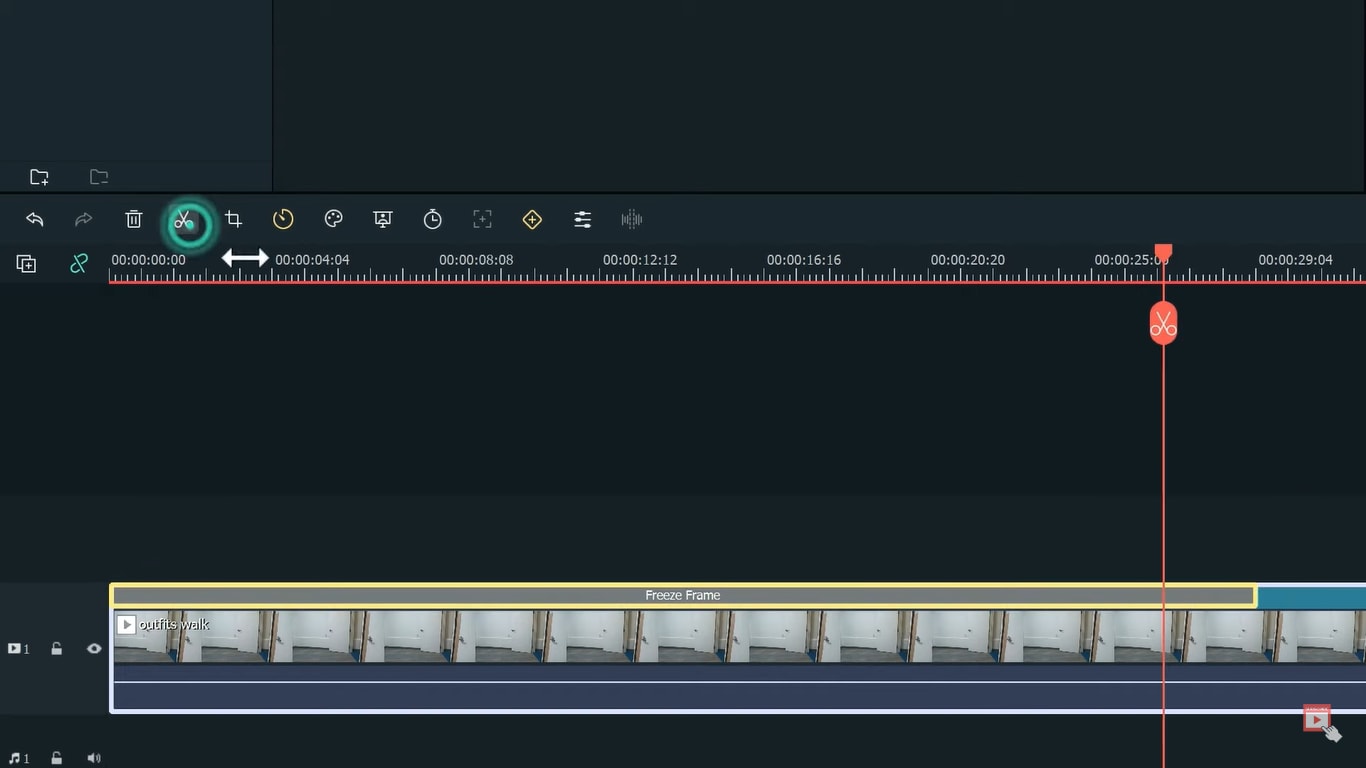
Step5 We are done with the first track so lock it.
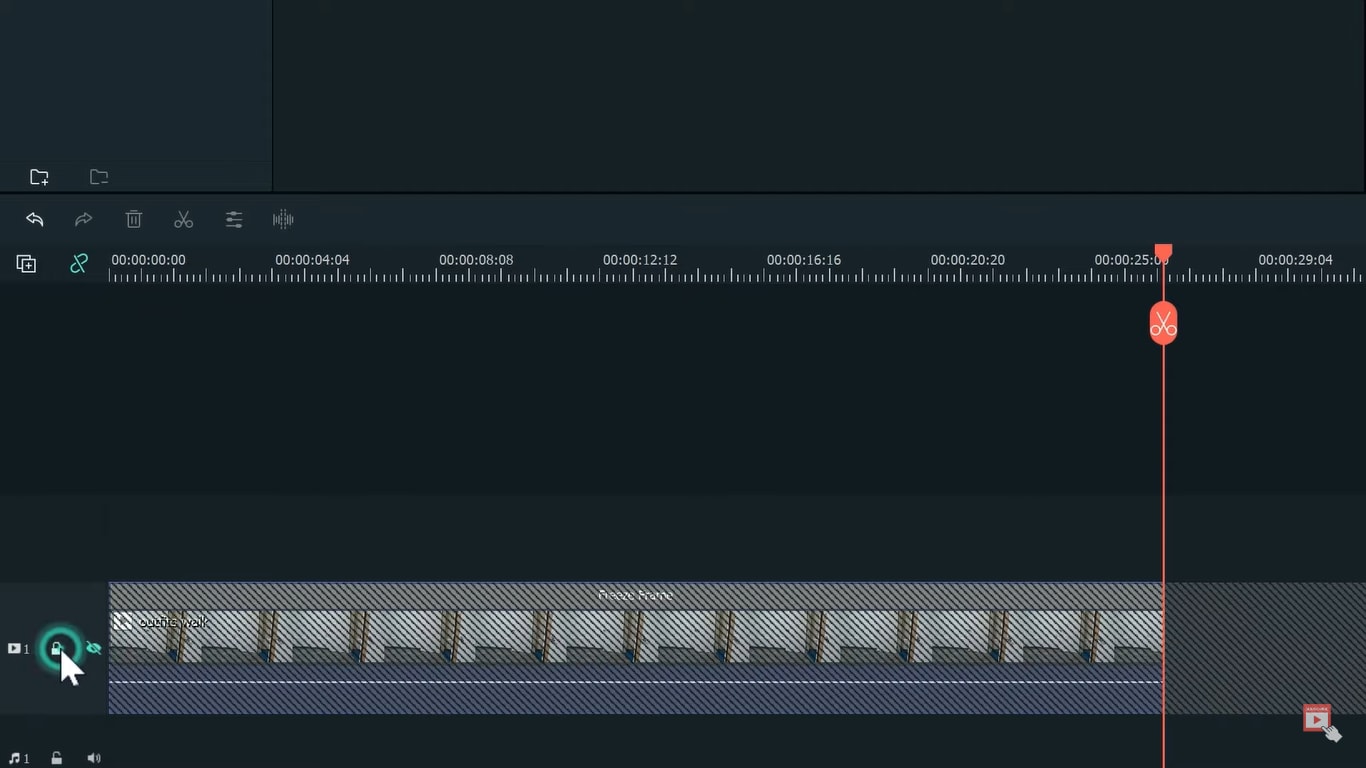
Step6 Import the clip again on the second track. And find the sections of the clips where the subject is walking in the video. Cut the remaining part.
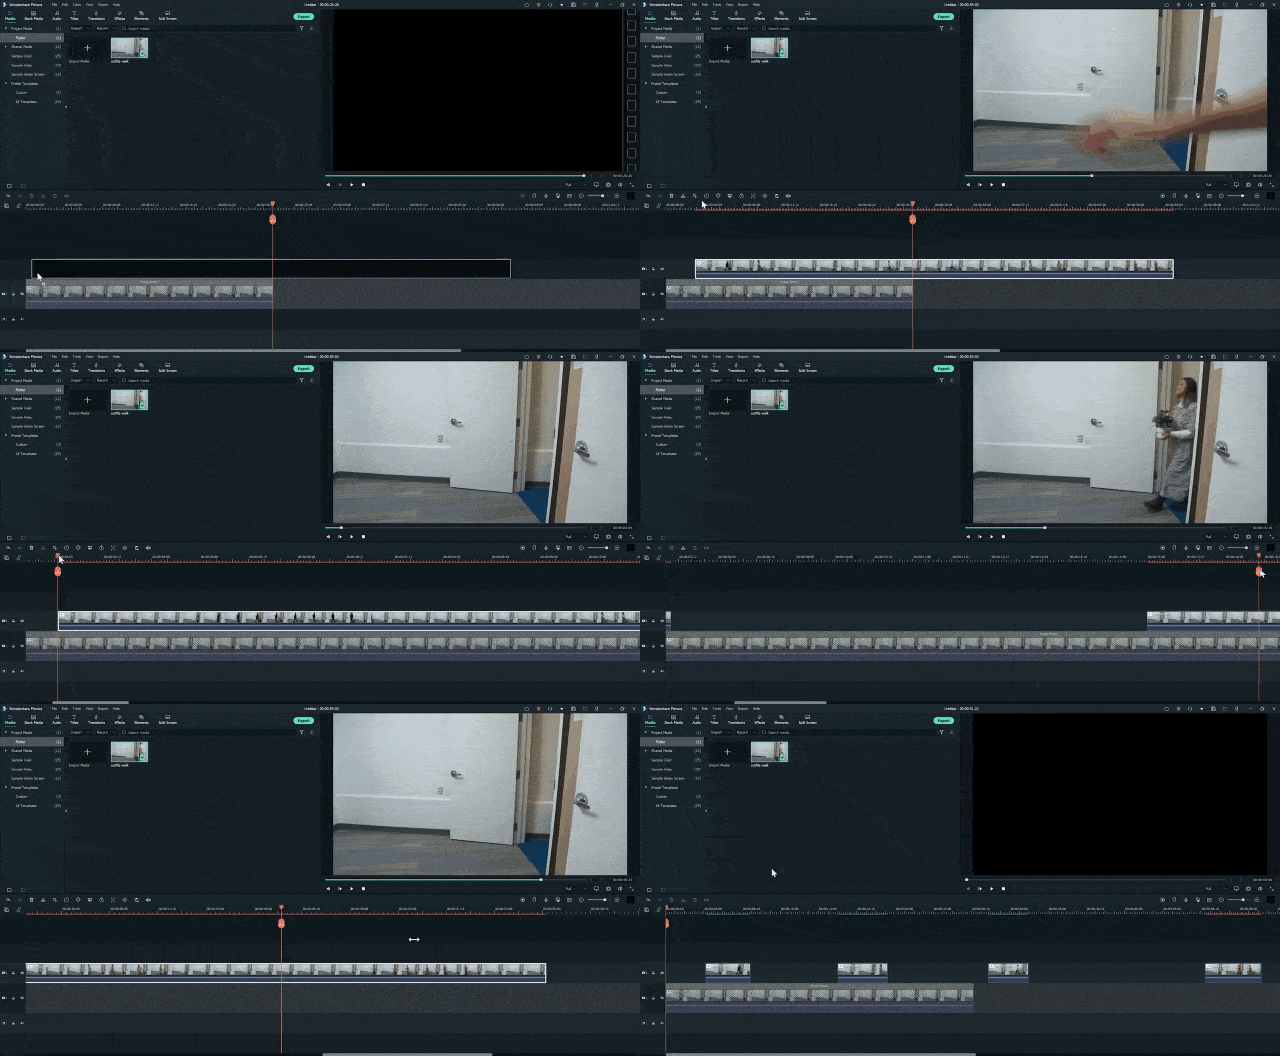
Step7 It will create several small sections on the second track.
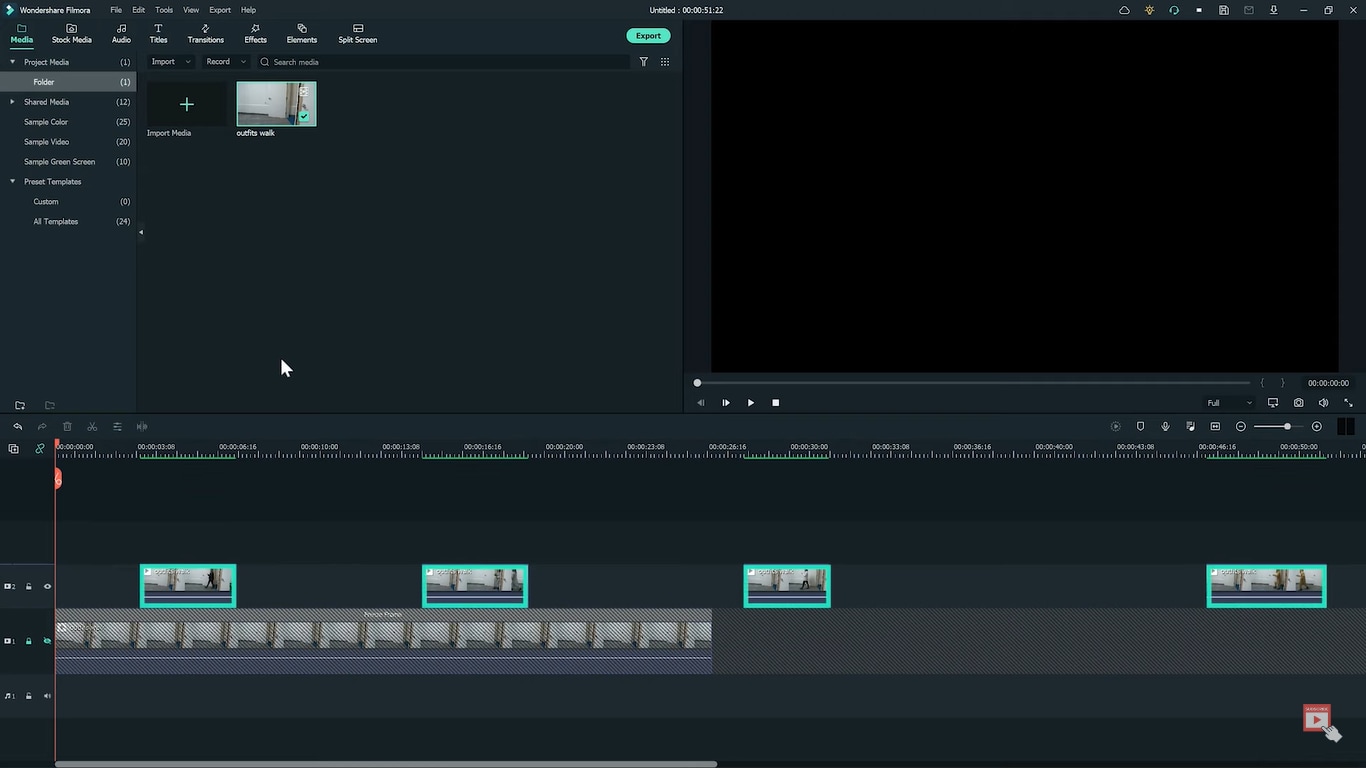
Step8 Put the first clip at the start of the timeline and move the playhead to find the frame containing enough room for the second outfit.
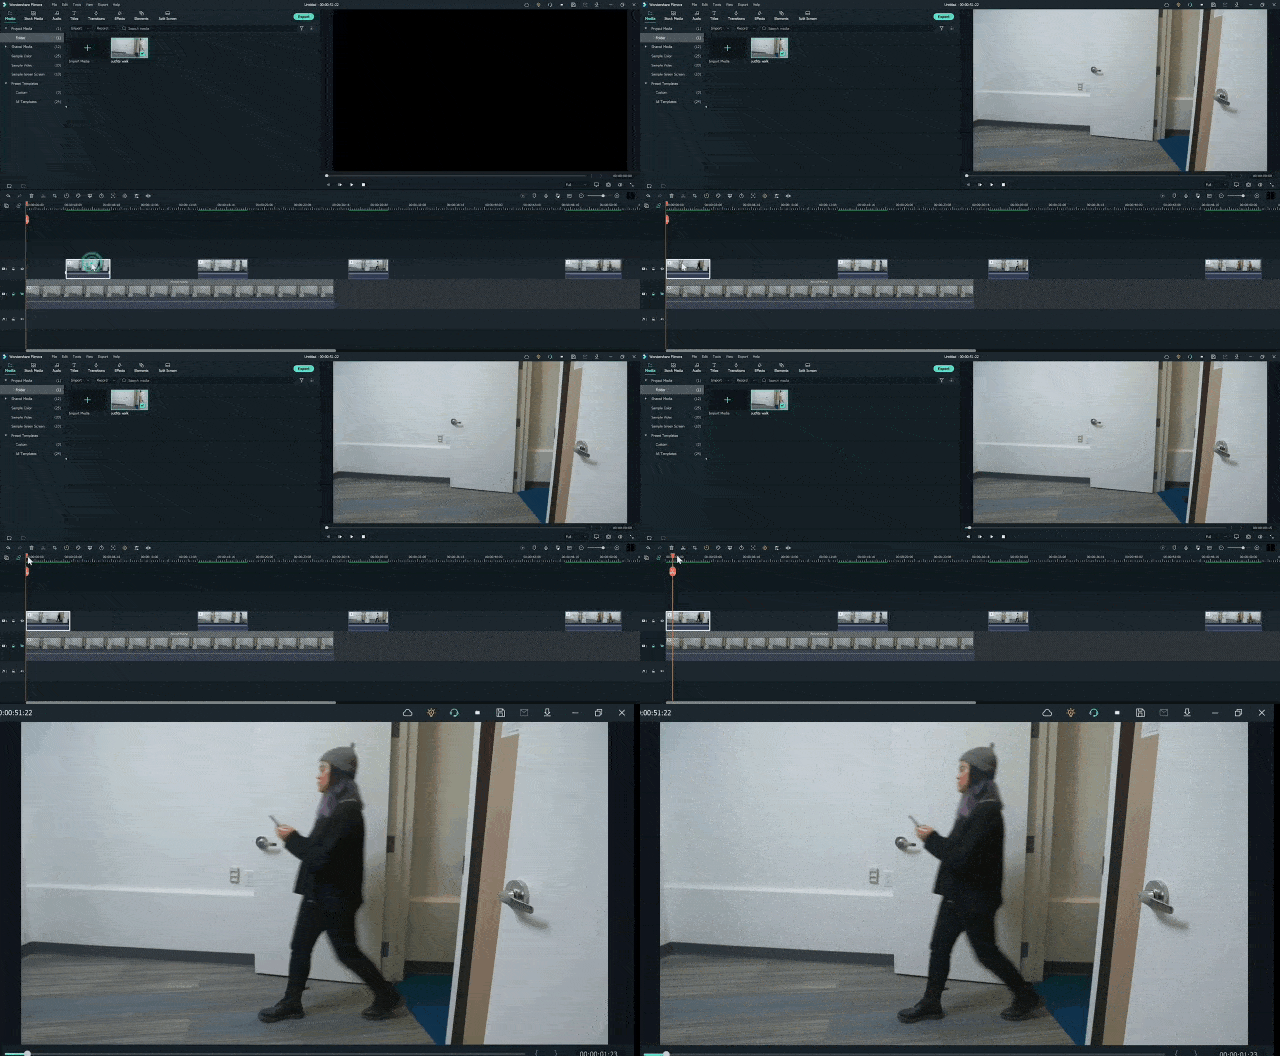
Step9 Move the second outfit to that playhead area.
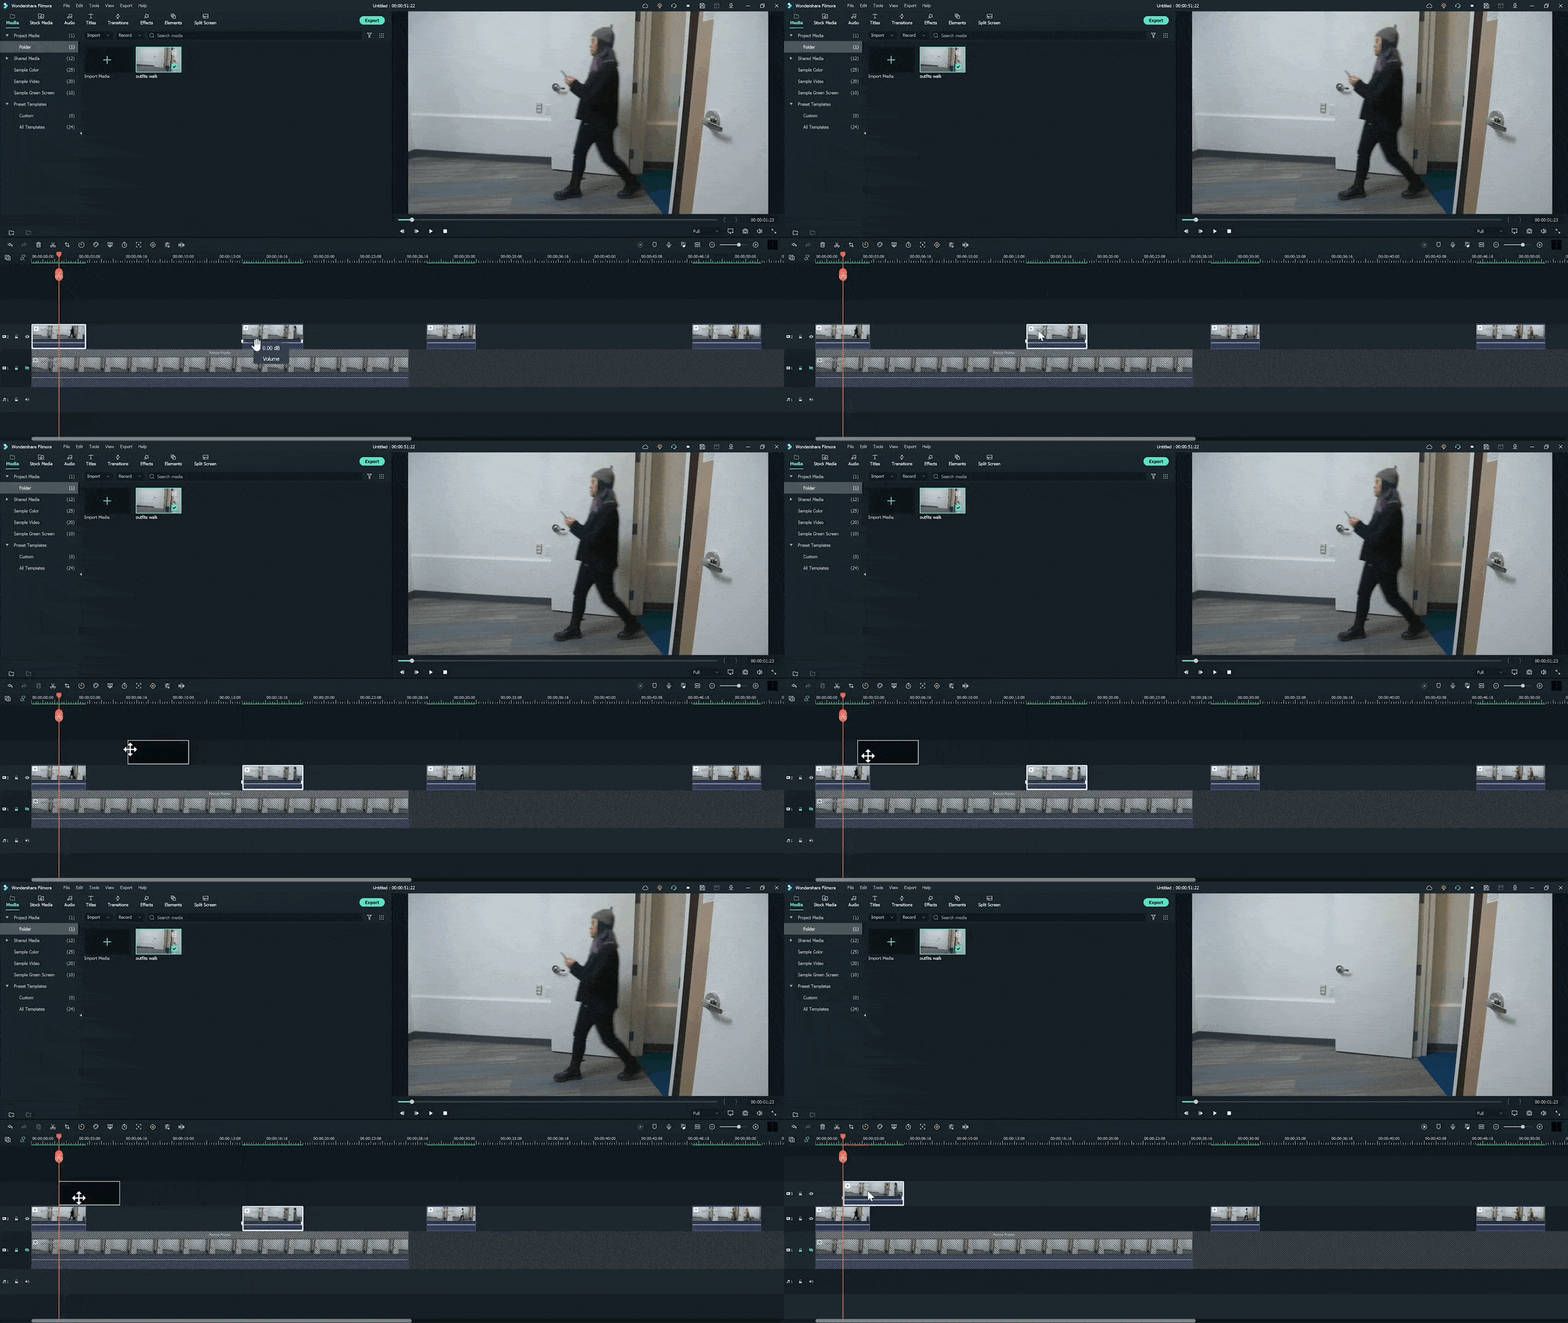
Step10 Double-click on the clip, go to effects, and choose a single-line mask.
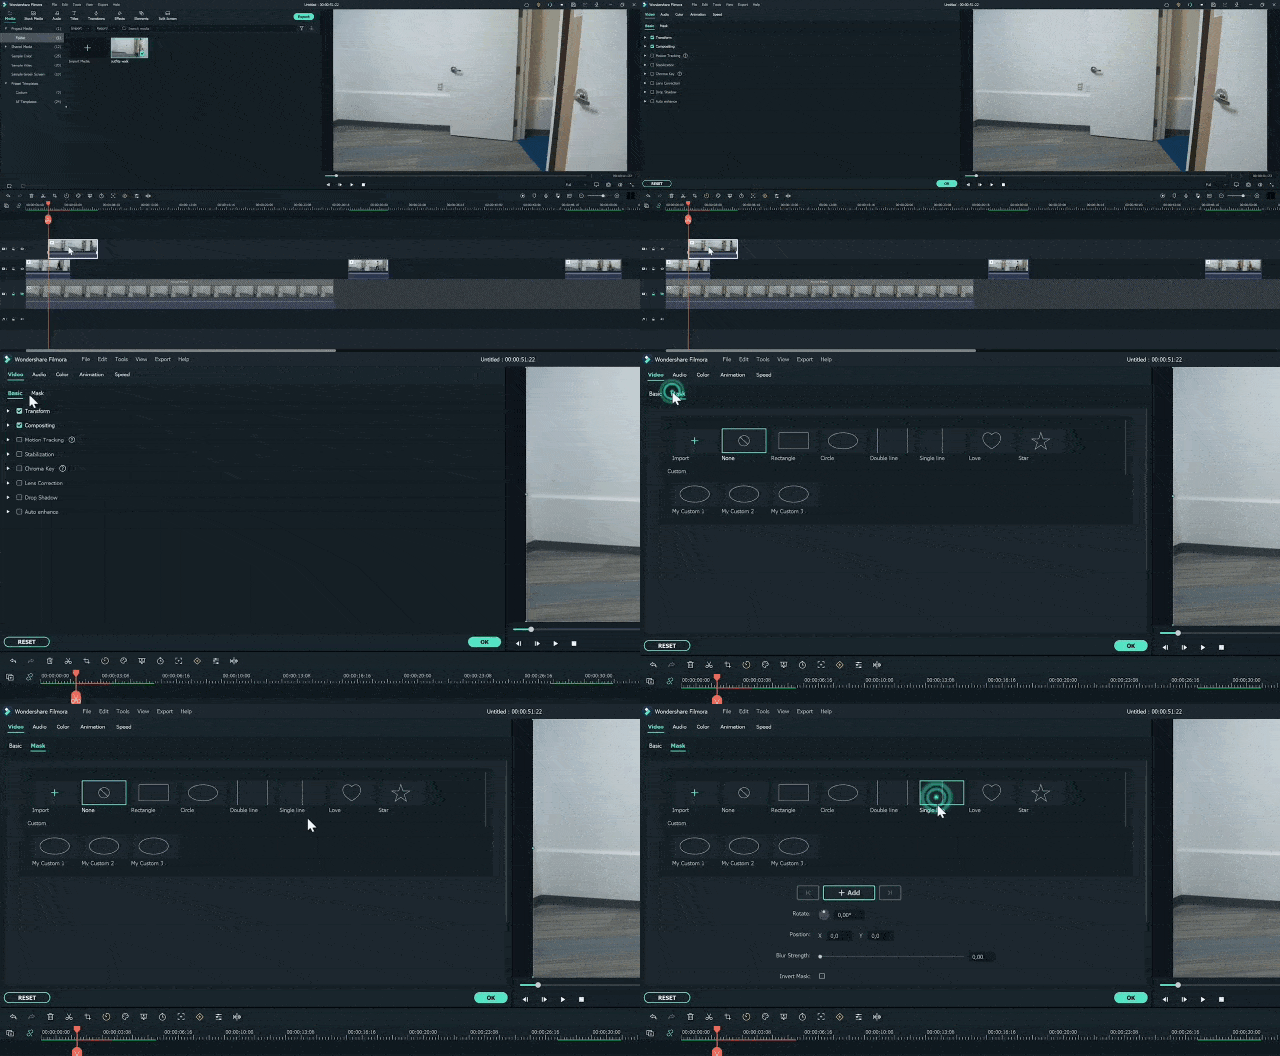
Step11 Drag the mask to the point where it shows the outfit on its right side.
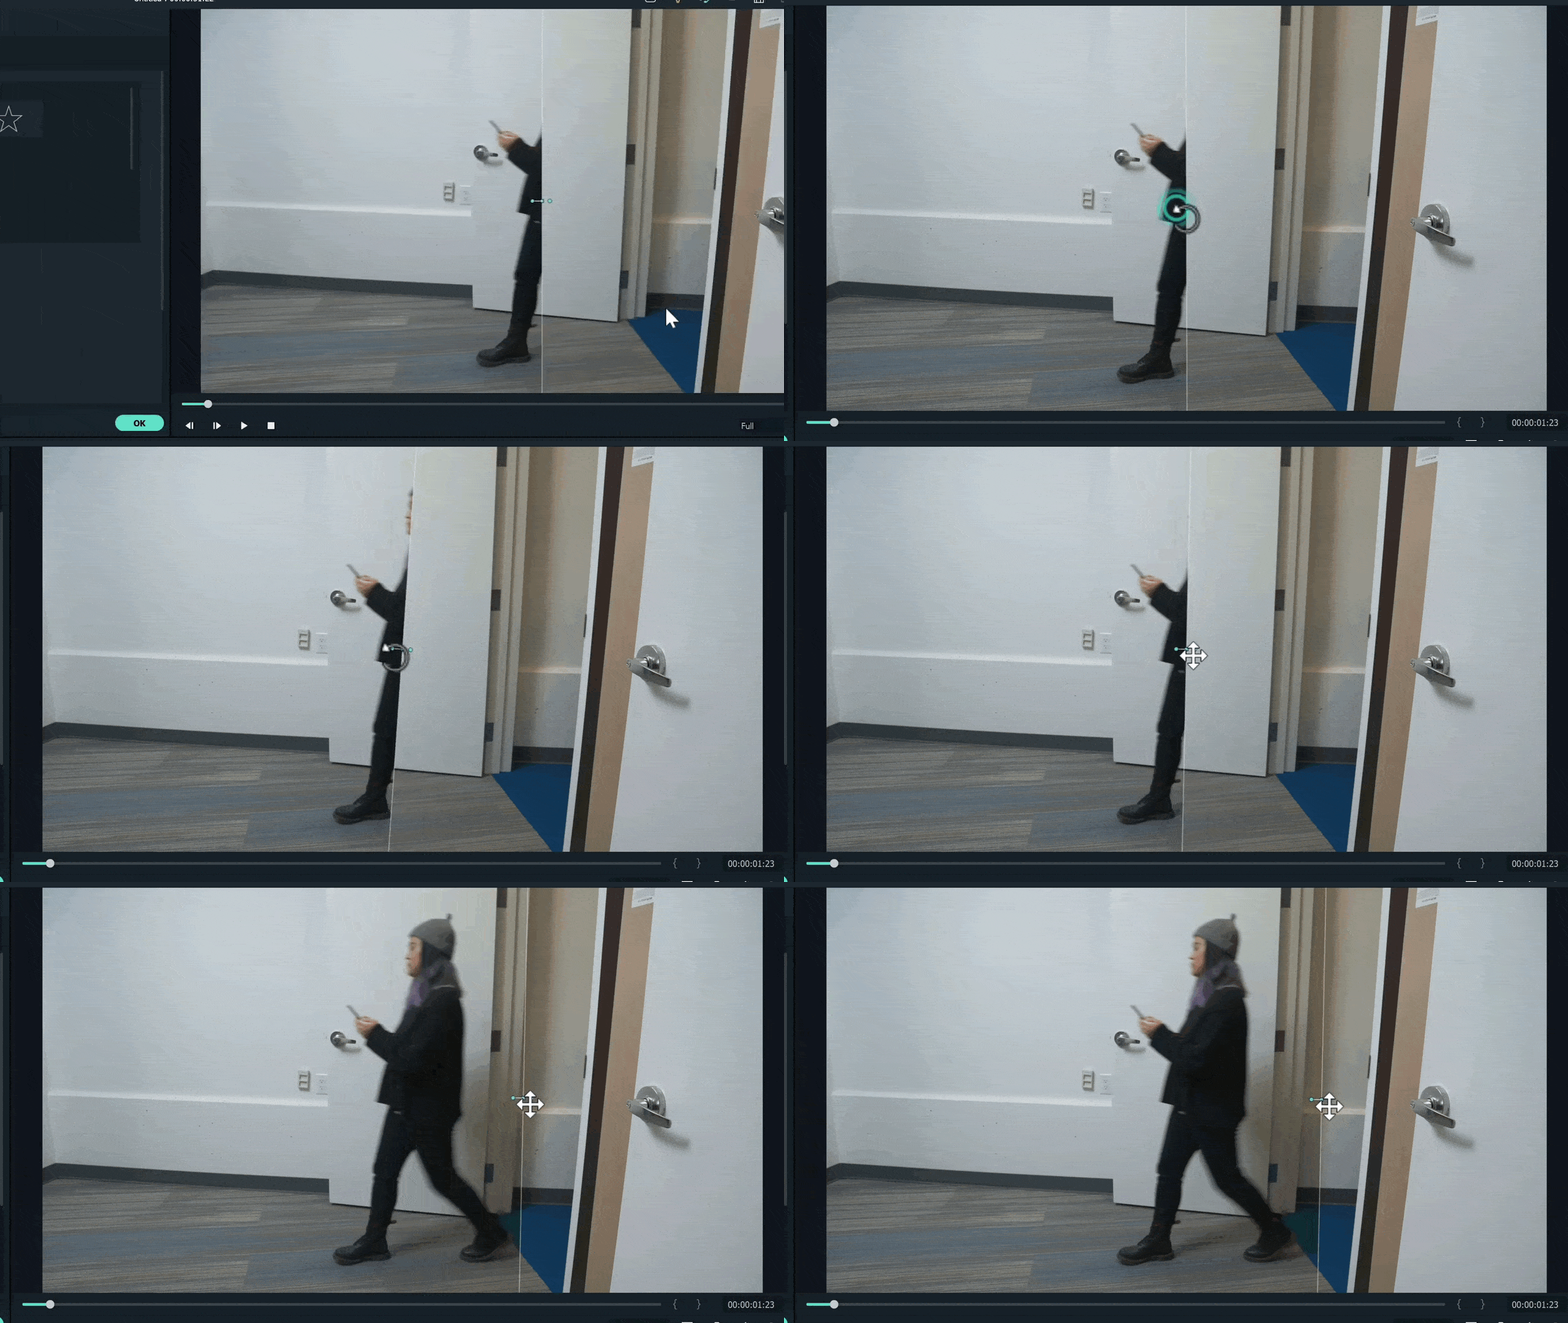
Step12 Blur the mask edges by increasing blur numbers.
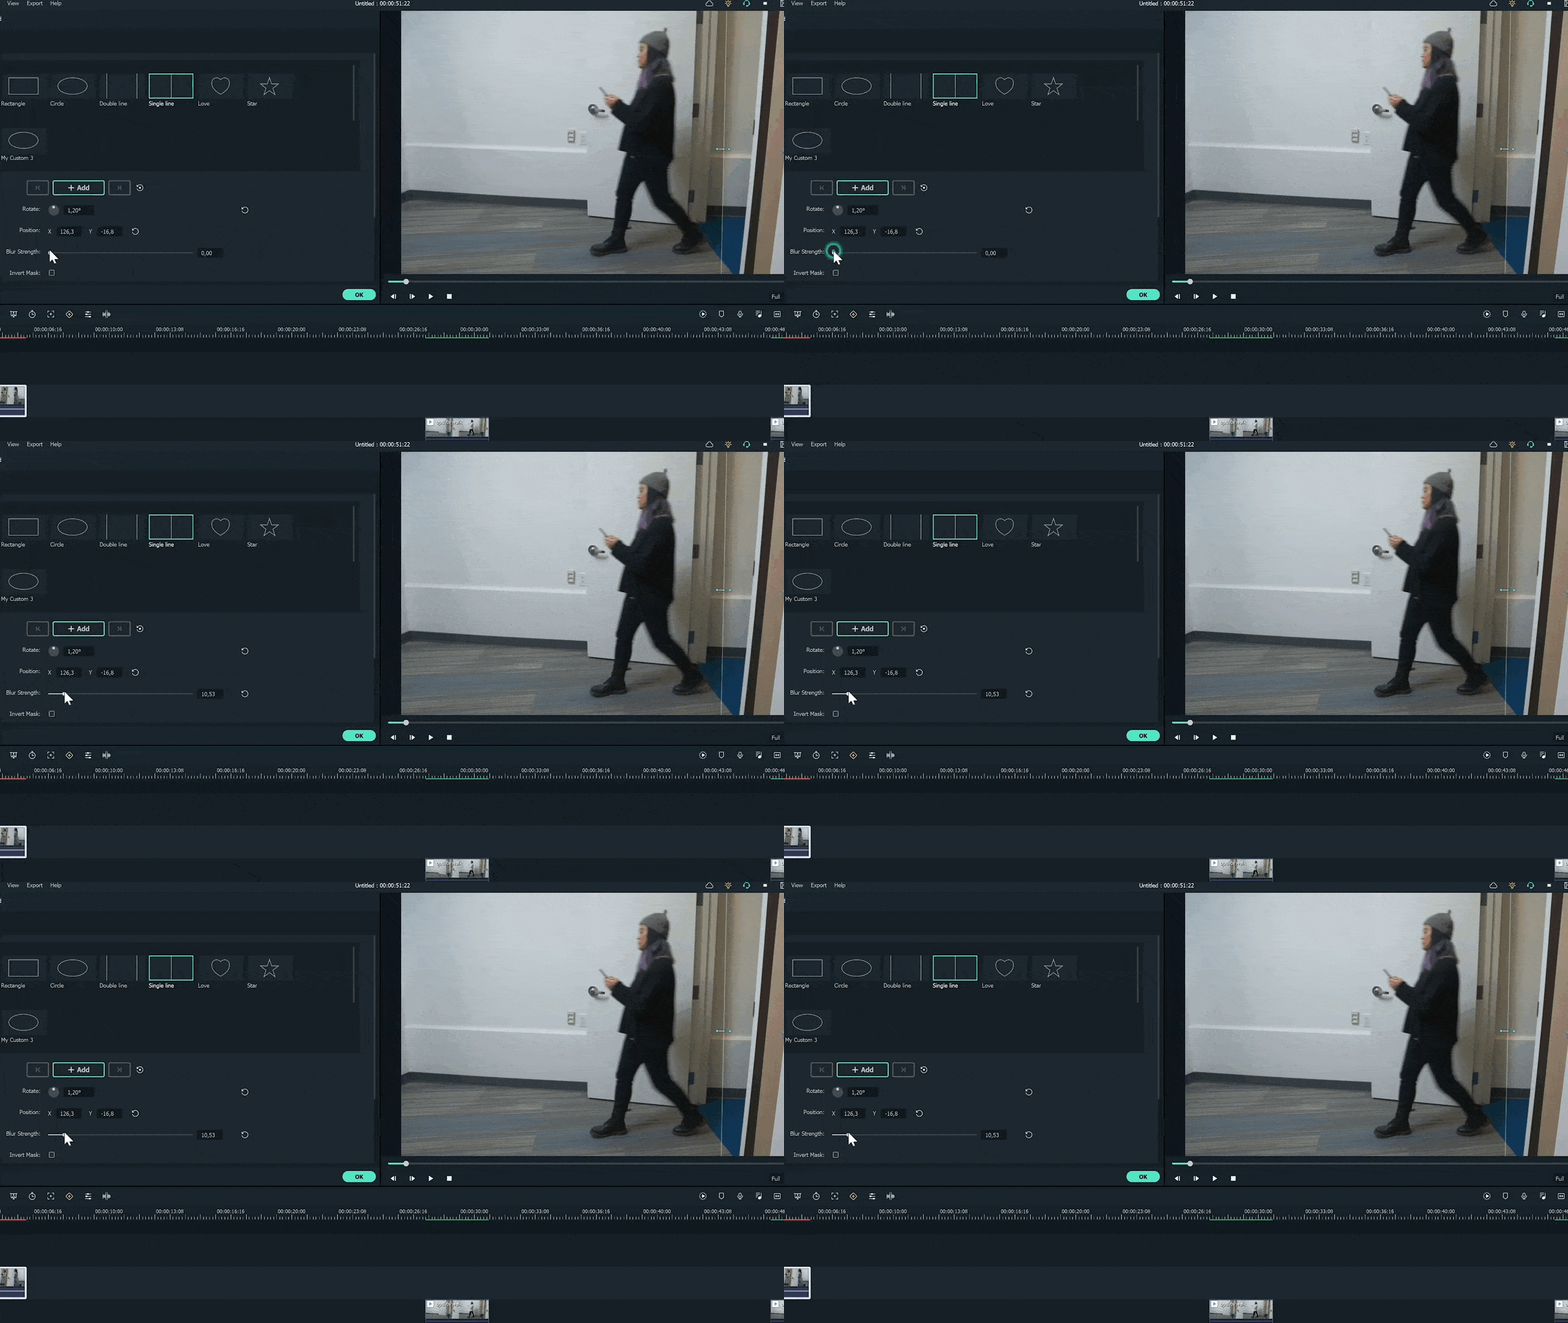
Step13 Click on the add button to add a mask keyframe and move the play head forward until the first outfit leaves the frame.
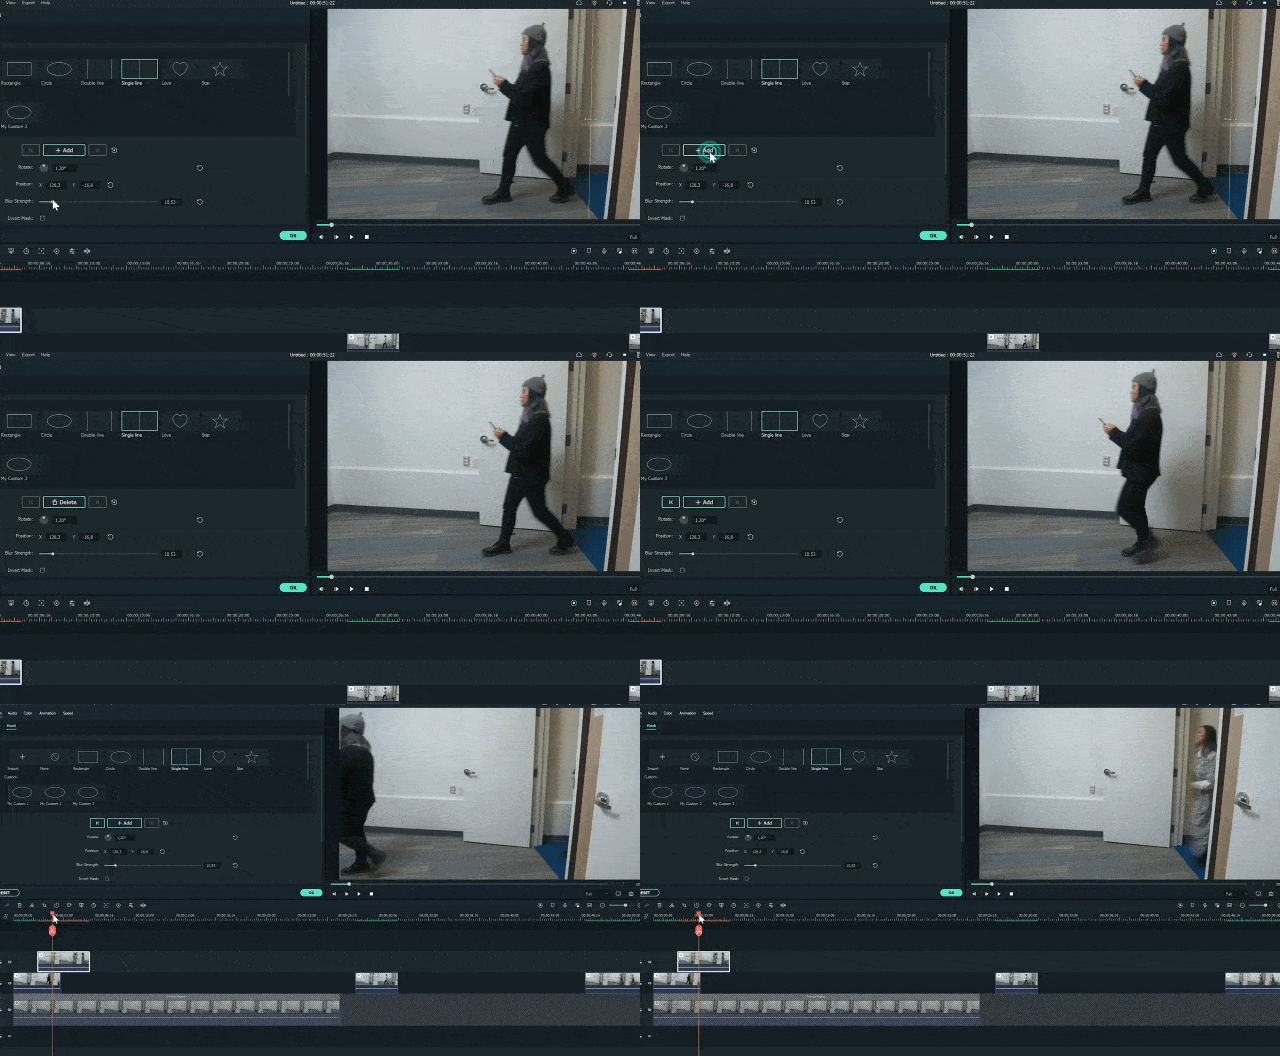
Step14 Move the mask to the left to reveal the entire frame, and repeat the same process with all outfits.
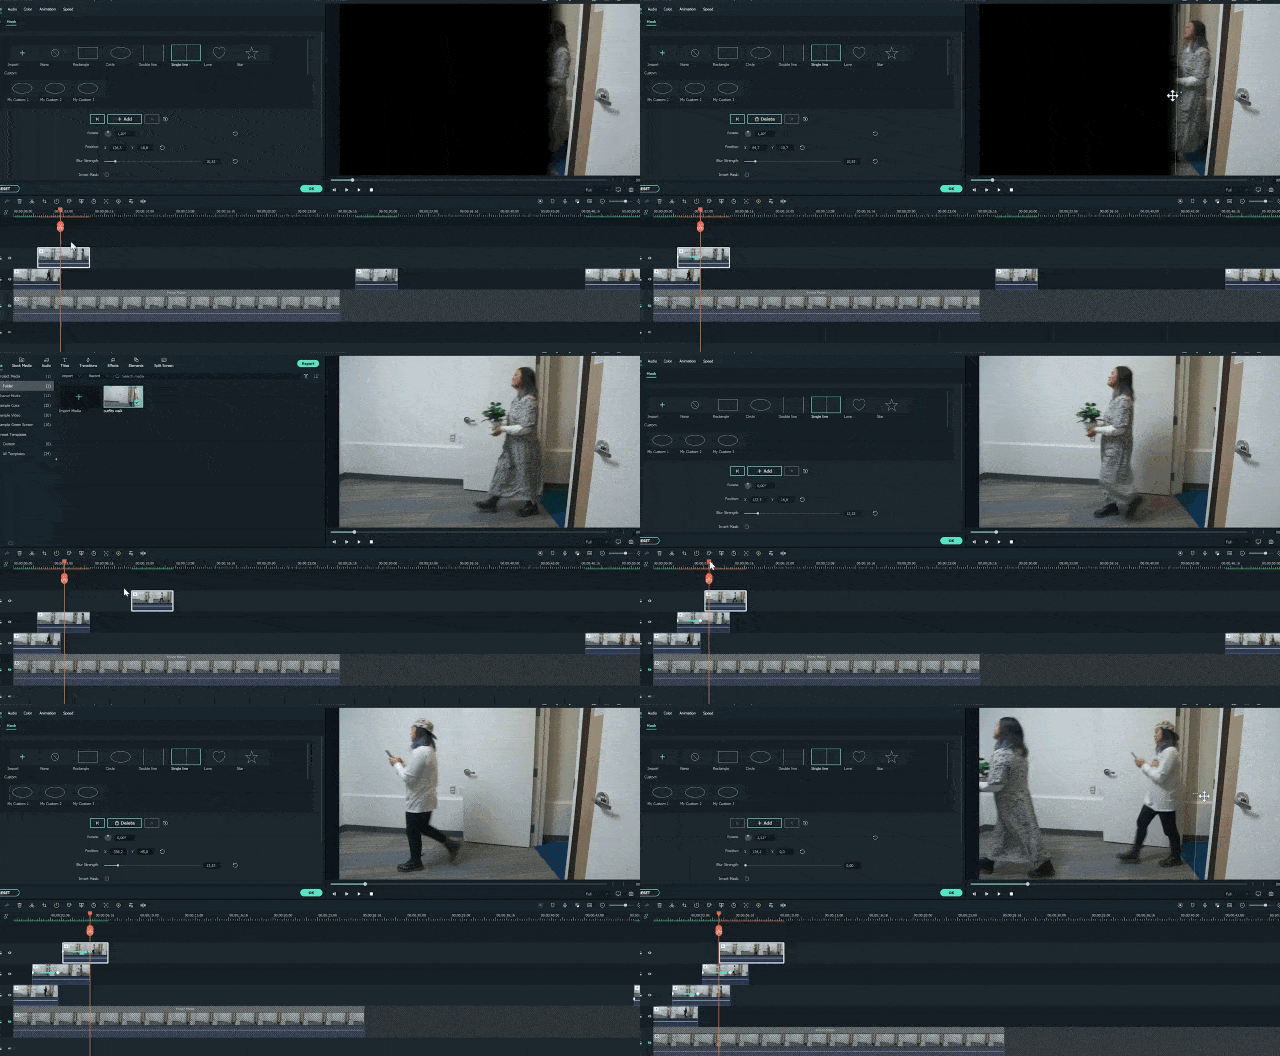
Step15 After finishing all outfits, copy the clip from the first outfit. And paste it on top of all the tracks after the last outfit. And add a mask keyframe to this section too.
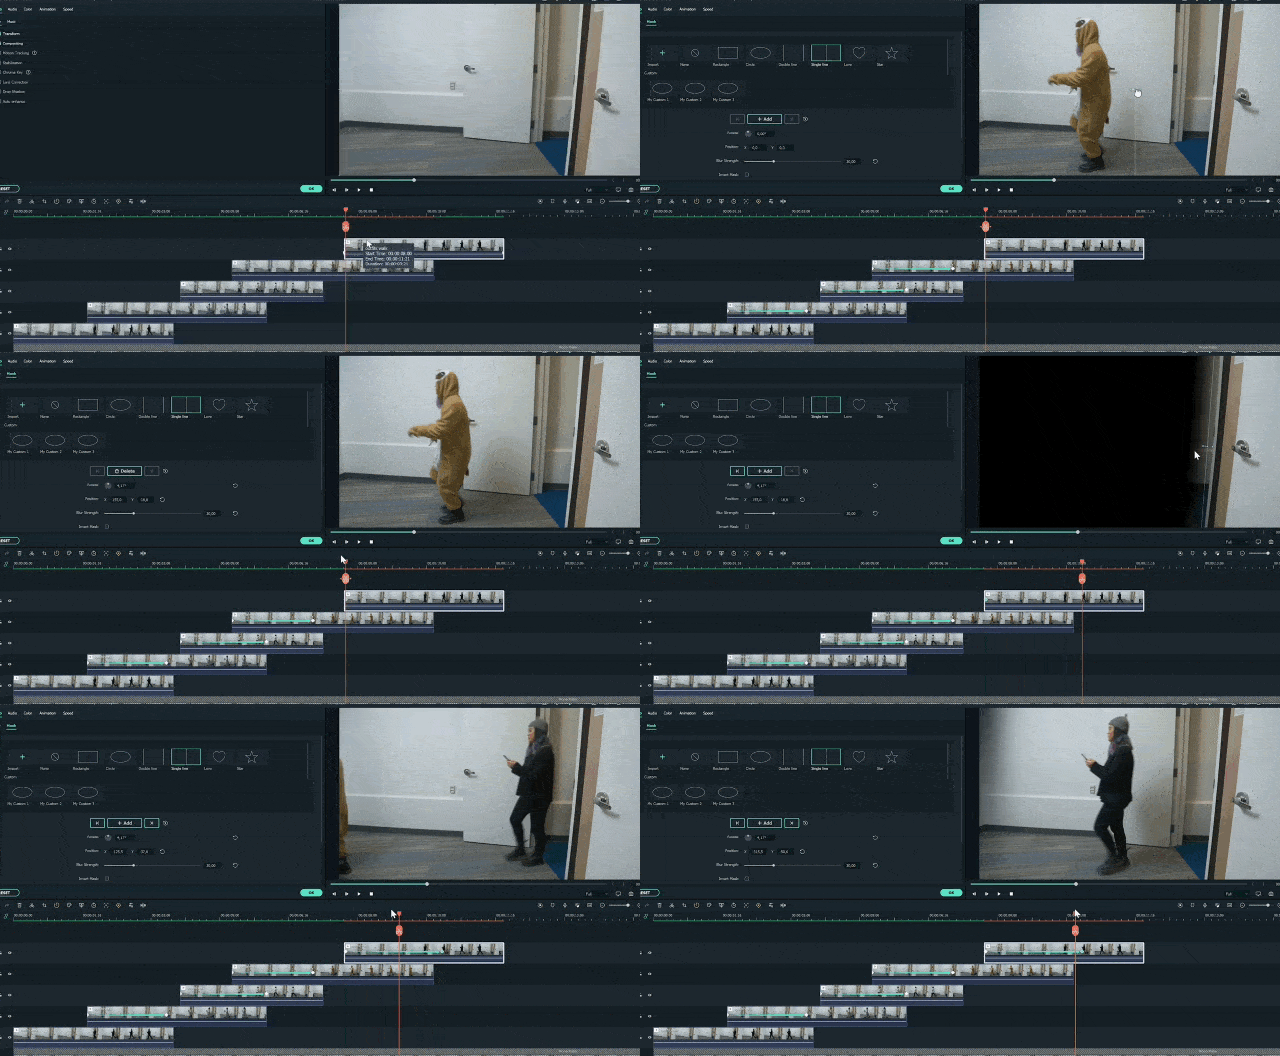
Step16 Unlock the first track and move the playhead to find the point where the subject with 4th outfit moves out of the frame. Then, cut the remaining part of the freeze frame on the right.
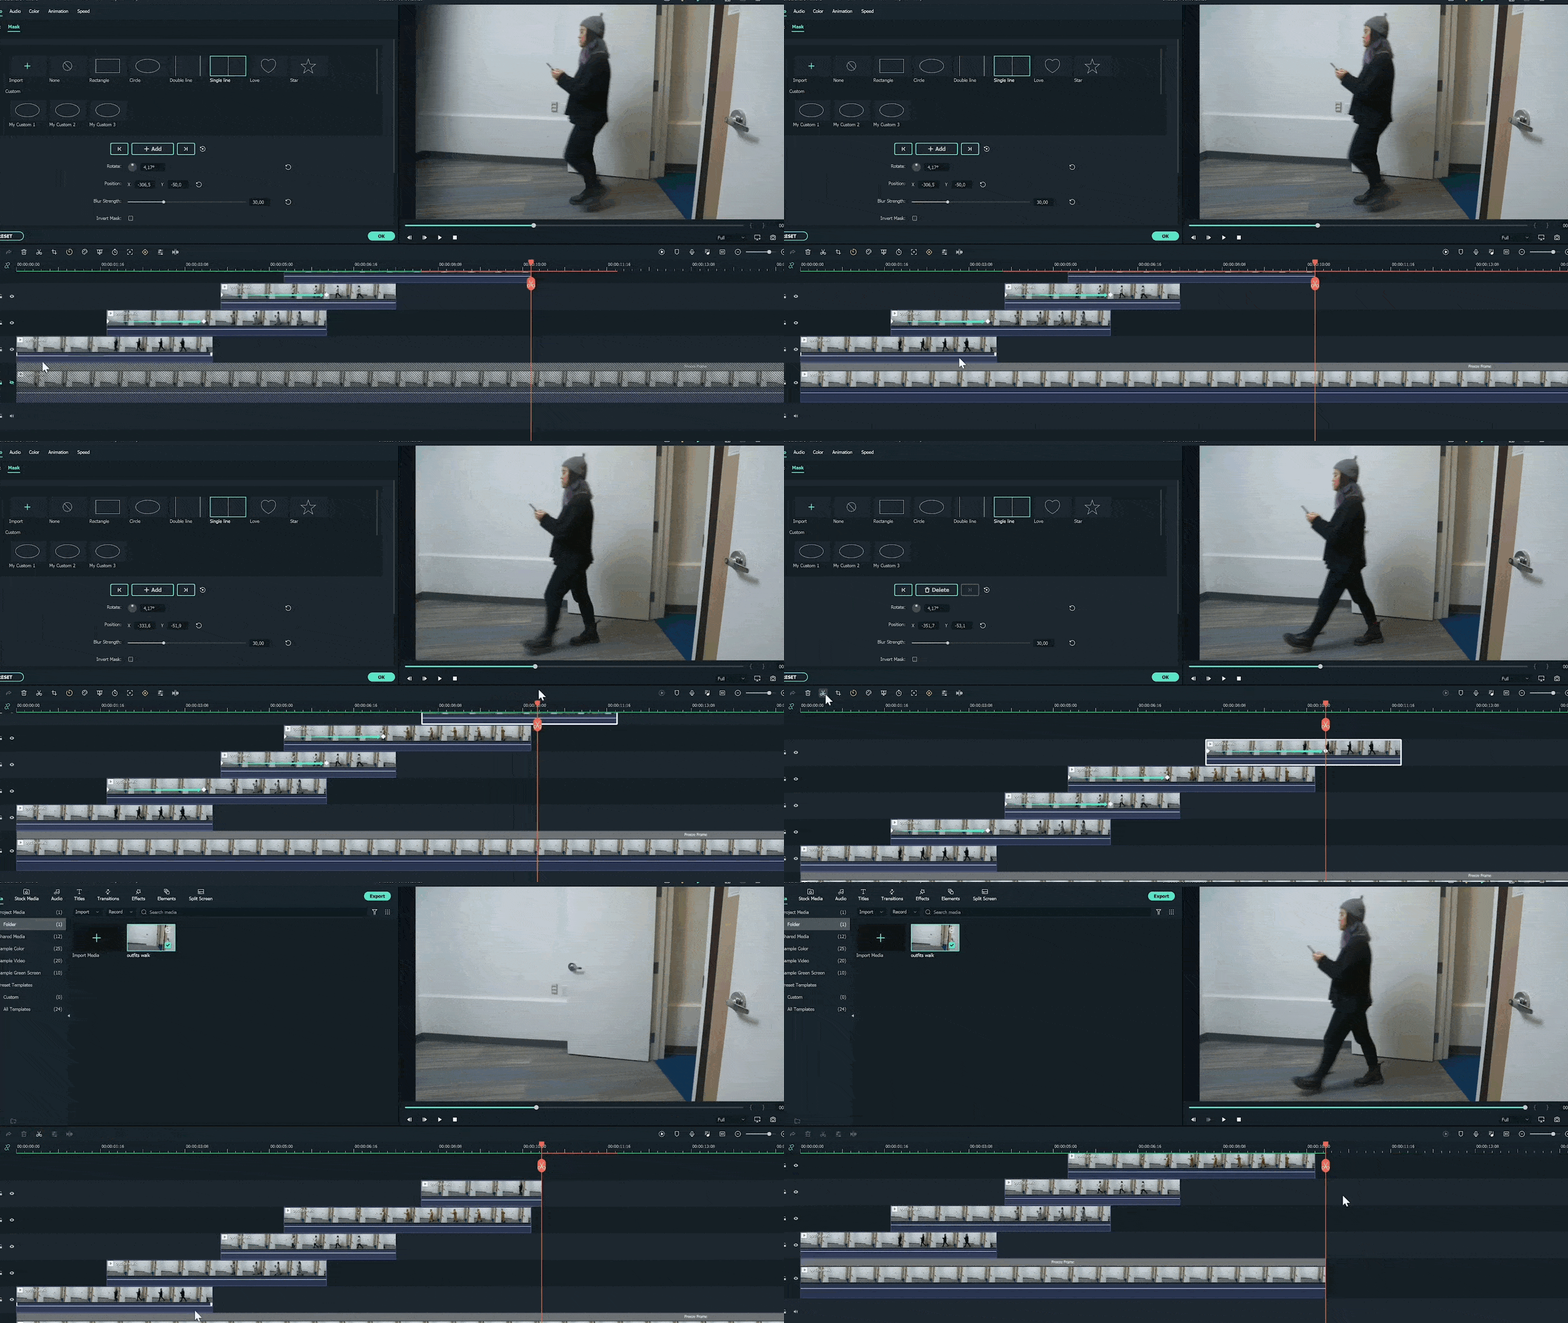
Step17 Now move the playhead to the first frame and find where it coincides with the last part of the final frame. Cut the previous piece.
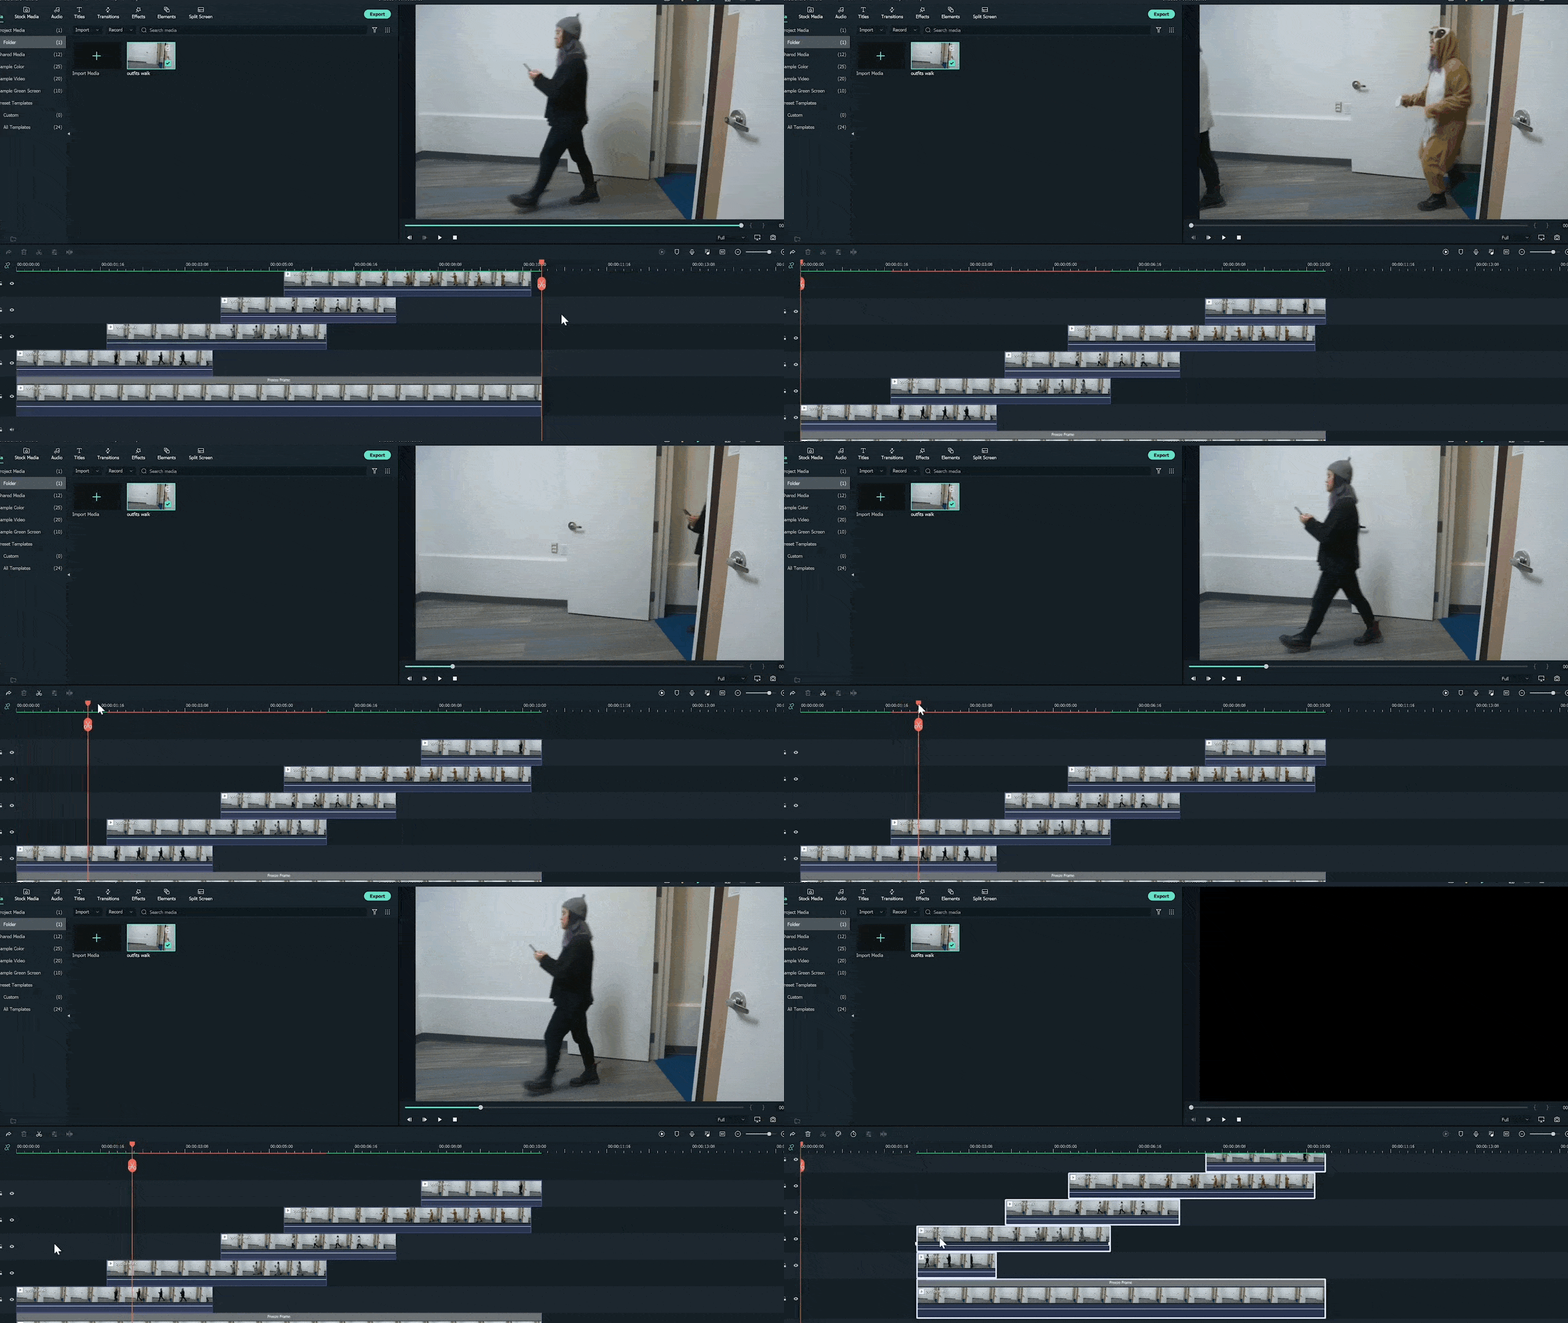
Post it on Instagram, and it will keep playing automatically and act like a loop video. Otherwise, duplicate this edited clip several times to create a longer loop video. Background music plays a vital role in these videos, setting the tone and pace. Follow all the steps in the correct order. Then, create and post loop videos on your social media platforms.
Free Download For macOS 10.14 or later
Below is the step-by-step guide on using Wondershare Filmora to create a loop masking or lookbook video.
How to edit a loop lookbook video
Step1 Download and install Wondershare Filmora on your PC or Mac.
Step2 Launch Wondershare Filmora, import the video clip into Filmora and place it on the first track.

Step3 Find a frame with an empty background, i.e., without the subject, and freeze the frame.

Step4 Extend the frozen frame and cut out the rest of the video.

Step5 We are done with the first track so lock it.

Step6 Import the clip again on the second track. And find the sections of the clips where the subject is walking in the video. Cut the remaining part.

Step7 It will create several small sections on the second track.

Step8 Put the first clip at the start of the timeline and move the playhead to find the frame containing enough room for the second outfit.

Step9 Move the second outfit to that playhead area.

Step10 Double-click on the clip, go to effects, and choose a single-line mask.

Step11 Drag the mask to the point where it shows the outfit on its right side.

Step12 Blur the mask edges by increasing blur numbers.

Step13 Click on the add button to add a mask keyframe and move the play head forward until the first outfit leaves the frame.

Step14 Move the mask to the left to reveal the entire frame, and repeat the same process with all outfits.

Step15 After finishing all outfits, copy the clip from the first outfit. And paste it on top of all the tracks after the last outfit. And add a mask keyframe to this section too.

Step16 Unlock the first track and move the playhead to find the point where the subject with 4th outfit moves out of the frame. Then, cut the remaining part of the freeze frame on the right.

Step17 Now move the playhead to the first frame and find where it coincides with the last part of the final frame. Cut the previous piece.

Post it on Instagram, and it will keep playing automatically and act like a loop video. Otherwise, duplicate this edited clip several times to create a longer loop video. Background music plays a vital role in these videos, setting the tone and pace. Follow all the steps in the correct order. Then, create and post loop videos on your social media platforms.
Step by Step to Cut a Video in QuickTime
Filming a video is fun and editing is more interesting and entertaining. Today, everyone is making videos and there are tons of videos on the internet. Editing videos is required to make the video stand out and retain the audience. Video trimming helps you cut out the unwanted part of the video and leave the desired portion of the viewers.
Cutting a video means your video starts quickly and you don’t lose your audience’s attention.
The first ten seconds of the video are very important when deciding whether to stay or move on to the next video.
How to cut a video in QuickTime
Quicktime is an authentic application developed by Apple in 1991. It allows the users to edit, record, play, and share videos and pictures. If some editing software confuses you, QuickTime is just for you.
You need to download the application and here are all the features you can enjoy. It is compatible with all versions of windows whereas, if you are a Mac user it is already installed in your system.
Cutting a video is one of the basic but useful functions of QuickTime. It requires a few simple steps and some features related to cutting, splitting, and trimming a video.
Let’s start…
1. Cutting/splitting a video
Cutting a video means splitting some parts of the video to edit and rearrange the clips to make a new video. Mostly, it is used where you want to edit all clips of the video differently. It is also needed as it allows you to focus on your message and delete the portion not required and make the video large. You can remove the extra fat from the video to give clarity, direction, and hope. You can convey your message in a clear and concise way.
These steps should be followed to cut/split the video in minutes.
- In the QuickTime player, open the desired video.
- Select show clips from the view on the menu bar.
- Move the red marker from right to left to select the desired portion.
- Hit split clip from the edit

- A yellow rectangular bar appears over the edges of your video.
- You can cut the desired portion and make editing as you like.
- Repeat the sequence until you are done.
- Press the done

Cutting the video by splitting is used when you have a long video and you can easily edit them by splitting them into two parts.
2. Trimming a video
If you are cutting some parts at the beginning and the end of the video, it is called trimming a video. You can say it as removing unnecessary preparation scenes. Normally, professionals start their cameras before the film scene to ensure not to miss any part of the video. Here’s, how to trim video in the QuickTime player.
Let’s dive in…
- Launch QuickTime
- Select your video from the system.
- Select edit from the top menu.
- Select the trim or command T, or you can select the hold option from the drop-down list.

- A yellow trimming bar will appear over the edges of your video.
- Remove the unwanted area by moving from the right or left trim edges also called handles.

Everything inside the yellow bars will remain. You can preview your video anytime during the editing process.
- Hit the trim from the bottom right corner.
- Select save from the file on the top menu bar.
Trimming is critical because it is the time to convince the viewers to stick around and stay with your video.
For more advanced editing without losing the quality of the video, I recommend you to use Wonder Share Filmora 11. It’s an amazing app and very easy to use even for a layman.
An easier way to cut a video with Filmora
Wonder Share Filmora is one of the best video editing tools for beginners. It simplifies the editing process using smart and congenital features that can automate repetitive tasks. It has a lot of exciting features and has collaborated with others to make the work easier.
So here, I recommend Filmora Video Editor , an easy and very powerful, all-in-one video editor software. It enables you to cut, crop, and trim the videos in a few clicks without losing the quality of the video.
For Win 7 or later (64-bit)
For macOS 10.14 or later
Point to be noted:
The cut is removing some unwanted parts of the video.
The Split is dividing the clips into two parts.
The trim is deleting the starting or endpoints of the video.
1. Cut video using Filmora video cutter
Cutting a video is necessary even if you shot a very good video because it contains some irrelevant and unwanted clips. Removing the unnecessary part of the video will make the video short, concise, and to the point. Moreover, it helps in grabbing the attention of your valuable viewers.
If your video has multiple scenes to cut, the scene detection function would be helpful.
- Install Filmora video cutter
- Select the New project.
- Select the video in the media library.
- Right-click and select scene detection to enter the scene detection window.

- Select Detect
This will automatically detach your unwanted videos based on the change in scene.

- Click add to timeline to add the separated video into the timeline.
You can also remove the unwanted videos by clicking the delete icon.
2. Manually cut/split videos
To cut the beginning and the end portion of the video, we can use the trim feature.
Let’s start…
- Import the video and drag it into the timeline.
- Add Marker in the timeline to spot a particular clip.

Pointing the Marker will help to find the unwanted potion without wasting the important portion of the clip.
Here is all about trimming the video from beginning to end but if you want to cut the video into parts to remove the rest of the fat from the clips. You can follow these steps:
- Click the split icon above the timeline.
- Drag the play head to make a rectangle to cover the unwanted portion of the video.
- Press delete from the timeline besides the split tab.

Repeat the process and cut the video into many segments to get the desired video.
Conclusion
Video editing is a critical part of creating eye-catching movies. Along with this, cutting and trimming a video is the core of the whole process as it makes sure that your audience is hooked with your content or not. Once you have downloaded the Wonder Share Filmora app, the art of cutting the video and transforming into a new film is really amazing.

- A yellow rectangular bar appears over the edges of your video.
- You can cut the desired portion and make editing as you like.
- Repeat the sequence until you are done.
- Press the done

Cutting the video by splitting is used when you have a long video and you can easily edit them by splitting them into two parts.
2. Trimming a video
If you are cutting some parts at the beginning and the end of the video, it is called trimming a video. You can say it as removing unnecessary preparation scenes. Normally, professionals start their cameras before the film scene to ensure not to miss any part of the video. Here’s, how to trim video in the QuickTime player.
Let’s dive in…
- Launch QuickTime
- Select your video from the system.
- Select edit from the top menu.
- Select the trim or command T, or you can select the hold option from the drop-down list.

- A yellow trimming bar will appear over the edges of your video.
- Remove the unwanted area by moving from the right or left trim edges also called handles.

Everything inside the yellow bars will remain. You can preview your video anytime during the editing process.
- Hit the trim from the bottom right corner.
- Select save from the file on the top menu bar.
Trimming is critical because it is the time to convince the viewers to stick around and stay with your video.
For more advanced editing without losing the quality of the video, I recommend you to use Wonder Share Filmora 11. It’s an amazing app and very easy to use even for a layman.
An easier way to cut a video with Filmora
Wonder Share Filmora is one of the best video editing tools for beginners. It simplifies the editing process using smart and congenital features that can automate repetitive tasks. It has a lot of exciting features and has collaborated with others to make the work easier.
So here, I recommend Filmora Video Editor , an easy and very powerful, all-in-one video editor software. It enables you to cut, crop, and trim the videos in a few clicks without losing the quality of the video.
For Win 7 or later (64-bit)
For macOS 10.14 or later
Point to be noted:
The cut is removing some unwanted parts of the video.
The Split is dividing the clips into two parts.
The trim is deleting the starting or endpoints of the video.
1. Cut video using Filmora video cutter
Cutting a video is necessary even if you shot a very good video because it contains some irrelevant and unwanted clips. Removing the unnecessary part of the video will make the video short, concise, and to the point. Moreover, it helps in grabbing the attention of your valuable viewers.
If your video has multiple scenes to cut, the scene detection function would be helpful.
- Install Filmora video cutter
- Select the New project.
- Select the video in the media library.
- Right-click and select scene detection to enter the scene detection window.

- Select Detect
This will automatically detach your unwanted videos based on the change in scene.

- Click add to timeline to add the separated video into the timeline.
You can also remove the unwanted videos by clicking the delete icon.
2. Manually cut/split videos
To cut the beginning and the end portion of the video, we can use the trim feature.
Let’s start…
- Import the video and drag it into the timeline.
- Add Marker in the timeline to spot a particular clip.

Pointing the Marker will help to find the unwanted potion without wasting the important portion of the clip.
Here is all about trimming the video from beginning to end but if you want to cut the video into parts to remove the rest of the fat from the clips. You can follow these steps:
- Click the split icon above the timeline.
- Drag the play head to make a rectangle to cover the unwanted portion of the video.
- Press delete from the timeline besides the split tab.

Repeat the process and cut the video into many segments to get the desired video.
Conclusion
Video editing is a critical part of creating eye-catching movies. Along with this, cutting and trimming a video is the core of the whole process as it makes sure that your audience is hooked with your content or not. Once you have downloaded the Wonder Share Filmora app, the art of cutting the video and transforming into a new film is really amazing.

- A yellow rectangular bar appears over the edges of your video.
- You can cut the desired portion and make editing as you like.
- Repeat the sequence until you are done.
- Press the done

Cutting the video by splitting is used when you have a long video and you can easily edit them by splitting them into two parts.
2. Trimming a video
If you are cutting some parts at the beginning and the end of the video, it is called trimming a video. You can say it as removing unnecessary preparation scenes. Normally, professionals start their cameras before the film scene to ensure not to miss any part of the video. Here’s, how to trim video in the QuickTime player.
Let’s dive in…
- Launch QuickTime
- Select your video from the system.
- Select edit from the top menu.
- Select the trim or command T, or you can select the hold option from the drop-down list.

- A yellow trimming bar will appear over the edges of your video.
- Remove the unwanted area by moving from the right or left trim edges also called handles.

Everything inside the yellow bars will remain. You can preview your video anytime during the editing process.
- Hit the trim from the bottom right corner.
- Select save from the file on the top menu bar.
Trimming is critical because it is the time to convince the viewers to stick around and stay with your video.
For more advanced editing without losing the quality of the video, I recommend you to use Wonder Share Filmora 11. It’s an amazing app and very easy to use even for a layman.
An easier way to cut a video with Filmora
Wonder Share Filmora is one of the best video editing tools for beginners. It simplifies the editing process using smart and congenital features that can automate repetitive tasks. It has a lot of exciting features and has collaborated with others to make the work easier.
So here, I recommend Filmora Video Editor , an easy and very powerful, all-in-one video editor software. It enables you to cut, crop, and trim the videos in a few clicks without losing the quality of the video.
For Win 7 or later (64-bit)
For macOS 10.14 or later
Point to be noted:
The cut is removing some unwanted parts of the video.
The Split is dividing the clips into two parts.
The trim is deleting the starting or endpoints of the video.
1. Cut video using Filmora video cutter
Cutting a video is necessary even if you shot a very good video because it contains some irrelevant and unwanted clips. Removing the unnecessary part of the video will make the video short, concise, and to the point. Moreover, it helps in grabbing the attention of your valuable viewers.
If your video has multiple scenes to cut, the scene detection function would be helpful.
- Install Filmora video cutter
- Select the New project.
- Select the video in the media library.
- Right-click and select scene detection to enter the scene detection window.

- Select Detect
This will automatically detach your unwanted videos based on the change in scene.

- Click add to timeline to add the separated video into the timeline.
You can also remove the unwanted videos by clicking the delete icon.
2. Manually cut/split videos
To cut the beginning and the end portion of the video, we can use the trim feature.
Let’s start…
- Import the video and drag it into the timeline.
- Add Marker in the timeline to spot a particular clip.

Pointing the Marker will help to find the unwanted potion without wasting the important portion of the clip.
Here is all about trimming the video from beginning to end but if you want to cut the video into parts to remove the rest of the fat from the clips. You can follow these steps:
- Click the split icon above the timeline.
- Drag the play head to make a rectangle to cover the unwanted portion of the video.
- Press delete from the timeline besides the split tab.

Repeat the process and cut the video into many segments to get the desired video.
Conclusion
Video editing is a critical part of creating eye-catching movies. Along with this, cutting and trimming a video is the core of the whole process as it makes sure that your audience is hooked with your content or not. Once you have downloaded the Wonder Share Filmora app, the art of cutting the video and transforming into a new film is really amazing.

- A yellow rectangular bar appears over the edges of your video.
- You can cut the desired portion and make editing as you like.
- Repeat the sequence until you are done.
- Press the done

Cutting the video by splitting is used when you have a long video and you can easily edit them by splitting them into two parts.
2. Trimming a video
If you are cutting some parts at the beginning and the end of the video, it is called trimming a video. You can say it as removing unnecessary preparation scenes. Normally, professionals start their cameras before the film scene to ensure not to miss any part of the video. Here’s, how to trim video in the QuickTime player.
Let’s dive in…
- Launch QuickTime
- Select your video from the system.
- Select edit from the top menu.
- Select the trim or command T, or you can select the hold option from the drop-down list.

- A yellow trimming bar will appear over the edges of your video.
- Remove the unwanted area by moving from the right or left trim edges also called handles.

Everything inside the yellow bars will remain. You can preview your video anytime during the editing process.
- Hit the trim from the bottom right corner.
- Select save from the file on the top menu bar.
Trimming is critical because it is the time to convince the viewers to stick around and stay with your video.
For more advanced editing without losing the quality of the video, I recommend you to use Wonder Share Filmora 11. It’s an amazing app and very easy to use even for a layman.
An easier way to cut a video with Filmora
Wonder Share Filmora is one of the best video editing tools for beginners. It simplifies the editing process using smart and congenital features that can automate repetitive tasks. It has a lot of exciting features and has collaborated with others to make the work easier.
So here, I recommend Filmora Video Editor , an easy and very powerful, all-in-one video editor software. It enables you to cut, crop, and trim the videos in a few clicks without losing the quality of the video.
For Win 7 or later (64-bit)
For macOS 10.14 or later
Point to be noted:
The cut is removing some unwanted parts of the video.
The Split is dividing the clips into two parts.
The trim is deleting the starting or endpoints of the video.
1. Cut video using Filmora video cutter
Cutting a video is necessary even if you shot a very good video because it contains some irrelevant and unwanted clips. Removing the unnecessary part of the video will make the video short, concise, and to the point. Moreover, it helps in grabbing the attention of your valuable viewers.
If your video has multiple scenes to cut, the scene detection function would be helpful.
- Install Filmora video cutter
- Select the New project.
- Select the video in the media library.
- Right-click and select scene detection to enter the scene detection window.

- Select Detect
This will automatically detach your unwanted videos based on the change in scene.

- Click add to timeline to add the separated video into the timeline.
You can also remove the unwanted videos by clicking the delete icon.
2. Manually cut/split videos
To cut the beginning and the end portion of the video, we can use the trim feature.
Let’s start…
- Import the video and drag it into the timeline.
- Add Marker in the timeline to spot a particular clip.

Pointing the Marker will help to find the unwanted potion without wasting the important portion of the clip.
Here is all about trimming the video from beginning to end but if you want to cut the video into parts to remove the rest of the fat from the clips. You can follow these steps:
- Click the split icon above the timeline.
- Drag the play head to make a rectangle to cover the unwanted portion of the video.
- Press delete from the timeline besides the split tab.

Repeat the process and cut the video into many segments to get the desired video.
Conclusion
Video editing is a critical part of creating eye-catching movies. Along with this, cutting and trimming a video is the core of the whole process as it makes sure that your audience is hooked with your content or not. Once you have downloaded the Wonder Share Filmora app, the art of cutting the video and transforming into a new film is really amazing.
Discover the Top 6 Online Video Speed Controllers Compatible with Chrome, Safari, Firefox for Enhanced Video Playback and Viewing Experience
Social media and video streaming apps like Facebook, Instagram and YouTube let the user control the video speed, but the speed controls are not smart enough. What if you want to watch the YouTube video at more than 2x speed? That’s where the video speed controller comes in.
AI speed control For Win 7 or later(64-bit)
AI speed control For macOS 10.14 or later
These speed controllers let you speed control video at your liking. If you want to take control of video playback speeds, you can go for the video speed controller download options. Let’s discuss some of the best speed controllers apps and extensions.
- Video Speed Controller
- YouTube Playback Speed Control
- Accelerate for Safari
- Playback Speed
- SpeedUp
- PlayerFab All-in-One
TOP 6 Online Video Speed Controller
01 Video Speed Controller
Video speed controller Chrome extension is one of the best speed control video extensions. You can adjust the playback speed, navigate forward or backward, and control HTML5 audio/video using keyboard shortcuts. The best thing about this speed controller extension is its ability to rewind video for a few seconds without changing playback speeds.
Customizable speed control video adjustments.
Easy shortcuts using a keyboard.
Simple user interface to control the video speed.
Sometime forget settings
02 YouTube Playback Speed Control
If you are looking for the video speed controller download, YouTube Playback Speed Control comes with plenty of speed control video options. The simple pressing of ‘+’ key to increase and ‘-’ to decrease playback speed makes it a favorite extension of every browser user. It is one of the best speed controller extension without any annoying popups on your streaming screen.
Control YouTube video playback speed using keyboard shortcuts.
Customize the keyboard buttons used for controlling playback speed.
Functional with HTML5 YouTube players embedded in other websites.
Doesn’t work with other video streaming options.
03 Accelerate for Safari
If you are a Mac, iPhone or iPad user, you can also download the video speed controller Safari. Accelate for Safari also supports Picture-in-Picture and AirPlay, which means you are not bound to stay in Safari browser to stream the video at your preferred pace. You can play the video in the background and continue browsing. The great thing about this video speed controller Safari extension is that it works with all the streaming and video platforms.
Customize video playback speed and controls in Safari.
Supports keyboard shortcuts for various video controls including play/pause and speed adjustment.
Compatible with major video platforms like YouTube, Netflix, Hulu, and more.
First time setup could be a hassle if you are not techie enough. 04 Playback Speed
04 Playback Speed
If you use Firefox like millions of others but feel sad that we haven’t mentioned video speed controller Firefox extension, well, you shouldn’t be. Playback Speed is one of the best speed controller extension on Firefox that lets you customize the playback controls. Another great thing, you won’t see annoying pop ups as its control center is next to the video link search bar. The setup is easier and the settings user interface is pleasing on the eyes with slider controls.
Play HTML5 videos on YouTube at customizable speeds.
Simple and one touch user interface to control settings
Slow playback speed options are limited.
Limited function availability across other streaming platforms.
05 SpeedUp
SpeedUp is a popular video speed controller Firefox extension with hundreds of downloads. There are many extensions that ask for tracking permission across all websites but SpeedUp doesn’t track any activity even on the video platform. Another great thing is that you can enable in-video buttons to control the video as per your preference. If you use a Firefox browser, you use go for the video speed controller download.
Control speed of all the video streaming platforms and websites.
Support for HTML5 videos on any website.
simple user interface provided by Speedify. Disadvantages
The speed playback buttons could be clumsy sometimes.
06 PlayerFab All-in-One
PlayerFab lets you play back local videos, DVD/Blu-ray/UHD discs, and videos from Amazon and Netflix, and other streaming platforms. As a streaming playback platform, it lets you watch and play videos in one place. All you have to do is type the name of the movie/show, and it will play the video while giving you access to video playback controls.
You can watch videos in FHD, and it supports EAC3 5.1 audio quality.
All in one solution for all the streaming platforms.
Lets you adjust the playback speed.
Hi-Res Audio and Video support.
Lifetime license for premium features needs one time purchase.
Conclusion
If you are looking for a video speed controller that lets you speed control video, we have discussed some of the best video speed controller download options. We have chosen some of the best speed controller extensions for Google Chrome, Mozilla Firefox and Safari.
If you are looking for a speed controller extension, you can download any of the extensions mentioned. However, all these free chrome extensions have some compromises. If you don’t want to compromise on features and control access, you can purchase PlayerFab All-in-One.
How to Edit Text in Premiere Pro
Premier Pro is a popular video editing software developed by Adobe Inc. It is one of the best creative platforms if you want to build editing skills. Whether you’re editing a video for social media or a big box office film, Premiere Pro can help you create your story with the tools available there. Import and edit clip, apply effects, and export to any destination. It has everything that you need to make anything you want to. When it comes to its features, there are so many features of using Premiere Pro; one of them is text editing. But how to edit text in premiere pro?
Well, text effects can make your project look more professional and attractive. It includes various activities such as creating a title graphic, adding animation to the text, changing fonts, colors, text, and many more. Before getting into the editing work, you should be familiar with Adobe Premiere Pro software, so it will be really helpful for you to get the most out of it. So, the first and foremost task is the installation of the Adobe Premier Pro app and then learning some basic skills in that.
There are several techniques on how to edit text on premiere pro. But here we will focus on two main approaches.
Part 1. Edit Text in Premiere Using the Type Tool
Firstly, go to the Adobe Premier Pro software in your window or mac. From there, choose the Type Tool option and drag the box to your video to write some text. In some cases, we may need to go to the window followed by Tools and click and hold the Type Tool. Now, coming to edit your text, you need to access Essential Graphics Workspace.
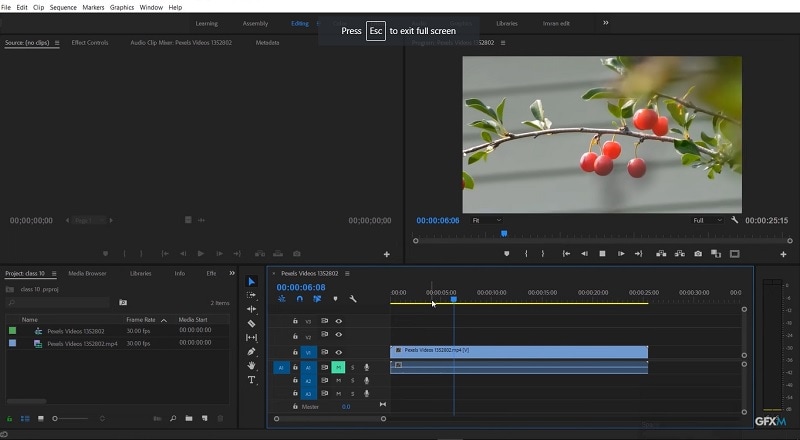
The further steps on how to edit text premiere pro using Type Tool are noted below:
- Go to the Window
- Click on the Workspaces
- Choose Graphics from the menu. Now, you will be able to see the Essential Graphic Panel.
- Then, go to the Edit option and select Text from the dropdown options available there.
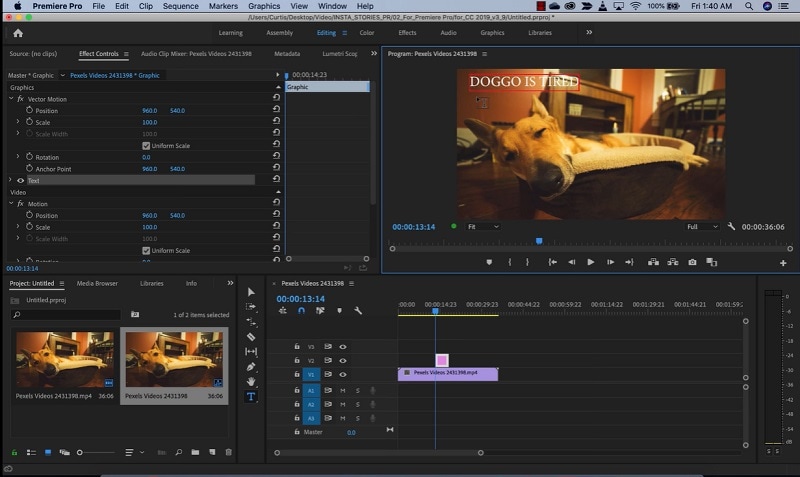
- After finishing all these steps, you now have a text layer overlaid on top of your video. From here, you can precisely personalize your text layer. You can edit the text, change the color, and so on in the new window.
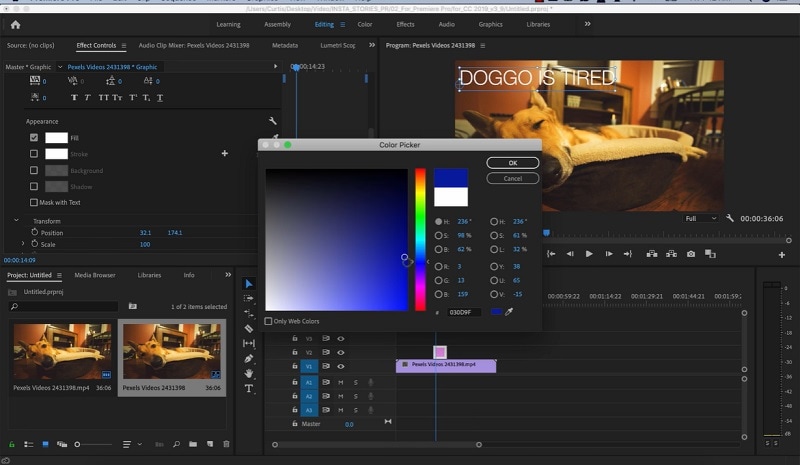
- Text can be bolded, italicized, or underlined here. Text can also be aligned to the left, right, or center of the text frame and the entire window.
- If you want to create a Title Graphic, Go to the Essential Graphic Workspace. First open the Window, followed by Workspaces, followed by Graphics from the main menu. Now, if you wish to add animation to your text, you can use the Effect controls Panel where you can apply motion to the texts.
So, following all these steps on how to edit text in adobe premiere with this tool, we can work in less time and create professional videos.
Part 2. Use Text Templates in Premiere Pro
While learning video editing in Premiere Pro, you will choose a suitable template, right? So, to make your title look more professional, you need to replace the text variant and adjust the color. In the Adobe Premiere pro, you can choose your preferred template as dozens of templates are available there. You can find the one and opt for which you want to select by simply dragging it to the timeline. Here’s a complete process on how to edit text in adobe premiere pro using text templates:
- Open the Adobe Premier pro and select browse on the right-hand “Essential panel”. Then activate it. It will help you with the quick export of your templates that are in the library.
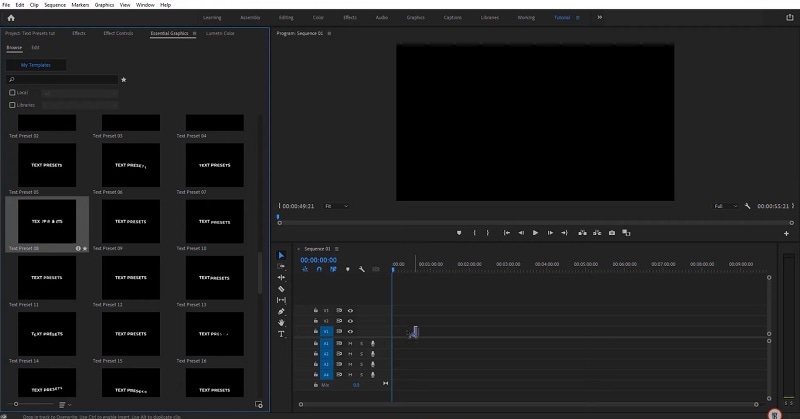
- Now, opt for “edit tab” from where you can opt for the text alignment and addition of the transparency. Further, you may manually tilt or rotate text here.
- Then, you have to choose the font and its size. If you have to opt for resizing a video, do so by the selection of the required font. You can then go for the adjustment of the size of the text that’s there on the “Edit tab”. The icons will be disabled in the case if there is no support for bold and/or italic options. Furthermore, if you wish to underline any object, you can easily add it to a font.
- At this point, opt for the addition of color/effects to the text. You will see options like fill and stroke. (An outline around the shape of a text), shadow, and many more.
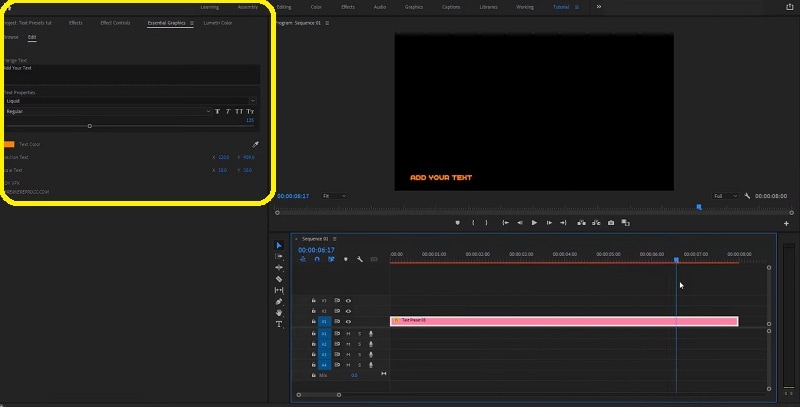
- Select the reqd. color to the text. Then opt for the addition of a stroke and then opt to shadow the same. Just in the case of a window having multiple text frames, opt for double-clicking on it so you can change the same as per the chosen tools.
Part 3. Alternative Way to Edit Text in Videos
Like Premiere Pro, there is another best video editing app called “Filmora” . If you are a beginner then also you will be able to learn editing skills and show your creativity. You don’t need to be a professional or an experienced editor to run the software. You can easily create high-quality and impressive videos using Filmora. The major reason why beginners should go for this video editor is that it requires only a few simple steps to create a video with a lot of features available. That’s why it is the best alternative for Premiere Pro users.
Free Download For Win 7 or later(64-bit)
Free Download For macOS 10.14 or later

Here we have listed below some features so that you will have no reason to get Filmora .
- It is free to download for windows and mac.
- You can edit and personalize your videos with less time and effort with lots of visual effects and transitions.
- You can easily capture your screen recording.
- There are over 800+ effects available and it supports 80+ video formats.
Now you will definitely think of getting Filmora and expanding your creativity to a greater level for sure.
How to edit text in videos in Filmora?
- Before starting a new project, you have to first do the installation of Filmora.
- After this, select a new project. Then allow your media files and start the editing procedure.
- While editing, drag and drop video, audio, photos, and titles into the timeline and create your video. Do trim/crop/cut/rotate/split if necessary.
- Now, go through your entire video and do the final changes.
- Then, export your video and post it on your social media platform to show your creativity.
The Bottom Line
There are millions of platforms available to enhance your innovative ideas. Find the suitable one for you that will consume your time with a great learning outcome. If you prefer Adobe Premiere pro, then be familiar with this software. Because there are certain options available like Layers, Responsive Design, Master styles, Text, Align and Transform, and Appearance in the Essential graphic panel.
Learn the functions of all the various buttons shown there. So, these minute things will help you a lot to make a perfect video. If you are a beginner and confused about where to start, you can go for a free premier pro basic course that provides a set of 7 lessons so that you don’t have to put a lot of effort and time.
Free Download For macOS 10.14 or later

Here we have listed below some features so that you will have no reason to get Filmora .
- It is free to download for windows and mac.
- You can edit and personalize your videos with less time and effort with lots of visual effects and transitions.
- You can easily capture your screen recording.
- There are over 800+ effects available and it supports 80+ video formats.
Now you will definitely think of getting Filmora and expanding your creativity to a greater level for sure.
How to edit text in videos in Filmora?
- Before starting a new project, you have to first do the installation of Filmora.
- After this, select a new project. Then allow your media files and start the editing procedure.
- While editing, drag and drop video, audio, photos, and titles into the timeline and create your video. Do trim/crop/cut/rotate/split if necessary.
- Now, go through your entire video and do the final changes.
- Then, export your video and post it on your social media platform to show your creativity.
The Bottom Line
There are millions of platforms available to enhance your innovative ideas. Find the suitable one for you that will consume your time with a great learning outcome. If you prefer Adobe Premiere pro, then be familiar with this software. Because there are certain options available like Layers, Responsive Design, Master styles, Text, Align and Transform, and Appearance in the Essential graphic panel.
Learn the functions of all the various buttons shown there. So, these minute things will help you a lot to make a perfect video. If you are a beginner and confused about where to start, you can go for a free premier pro basic course that provides a set of 7 lessons so that you don’t have to put a lot of effort and time.
Also read:
- A Guide to Tranquility with GPT
- Come Risolvere Gli Errori Della Modalità Provvisoria Su Windows 7
- Decoding the History of AI: How Old Is This Revolutionary Tech?
- In 2024, Quick Tip Crafting Perfect Insta Collages
- Listen Up! Here Are 13 True Crime Stories to Keep You Hooked
- Live Streaming Mastery with ManyCam: Top Virtual Webcam Software
- Local vs Global: Is a Local Large Language Model Right for Your Needs?
- New 2024 Approved Add Text Animation to A Video Online
- New 2024 Approved How to Add Filter to Video Online
- New In 2024, How to Create the Night-to-Day Effect Video
- Pros & Cons of Switching to iPhone 16: Insights Experts
- Resolved: Troubleshooting Guide - Overcoming 'World of Warcraft Won't Start' On PC
- Reveal Hidden iOS Applications: A Step-by-Step Guide
- Title: Updated How to Create Loop Videos with Filmora for 2024
- Author: Chloe
- Created at : 2025-02-24 22:51:11
- Updated at : 2025-03-04 04:51:50
- Link: https://ai-editing-video.techidaily.com/updated-how-to-create-loop-videos-with-filmora-for-2024/
- License: This work is licensed under CC BY-NC-SA 4.0.