
:max_bytes(150000):strip_icc():format(webp)/GettyImages-1302402871-ea3debd2e3c64ec5a78a99e580b6a8d1.jpg)
Updated How to Create LUTs with LUTs Generator for 2024
How to Create LUTs with LUTs Generator
Lookup Tables can make your videos and pictures look more attractive. LUTs are like filters that give your media files different styles and emotions. There are many presets available on the internet that you can download to use for your media content. Moreover, LUTs help you to quickly change the look and mood of your photos and videos.
You can find LUTs for free or buy them online; some editing software already has LUTs included. Nevertheless, you can create your own LUTs using different online and offline tools. If you can’t find any online LUT generator, search for LUT generator free download. You’ll get many options allowing you to generate LUTs offline.
- Part 2: How to Create LUTs Using LUT Generator Free Download?
- Part 3: How to Create Online LUTs Using Online LUT Creator?
- Bonus Part: Wondershare Filmora – The Perfect Tool to Use Your LUTs
Part 1: An Overview of LUT Generator - The Best Platform for Creating LUTs
LUT Generator is an excellent tool for creating color-grading picture and video presets. This powerful LUT generator-free tool is available on both Windows and Mac. Moreover, you can create LUTs from any photo and video editing application, including Lightroom and Camera Raw. Not only can you create your LUTs, but you can also download presets that are already available.
Furthermore, it offers over 290 cinematic styles LUTs and 50+ LUTs that are optimized for drones and GoPro videos. If you want a surreal look, you can also use 70+ Psychedelia LUTs. This tool allows you to apply third-party effects easily on your photos and videos. Moreover, you can even match the tone of clips from different cameras to give a uniform look.
Part 2: How to Create LUTs Using LUT Generator Free Download?
If you don’t want to apply online LUTs that are available, you can create your own. To do so, you have to download the LUT Generator tool and follow these simple steps to create LUTs.
Step1
To create a LUT of your liking, search for the LUT Generator free download on your browser and download the tool.
Step2
As you launch it, continue to select the “Generate a HALD” option. This option will let you generate a PNG HALD that you can use for color grading using editing software.
Step3
Open the generated PNG HALD into your preferred photo editing application. Apply the desired color correction on the PNG HALD. Save the modified PNG HALD without compression as PNG or at 100% quality in JPG format.
Step4
Click the “Convert to CUBE” button in the LUT Generator and select the modified PNG HALD you saved in the previous step.
Step5
In Preferences, choose the desired size of the 3D LUT as .CUBE format. You can choose between 25x25x25 or 64x64x64. After selecting your desired size, your customized LUT will be created in .CUBE format.

Part 3: How to Create Online LUTs Using Online LUT Creator?
There are two methods to create a LUT online and offline. Previously you’ve learned to generate LUTs using offline tools. However, you can also create LUTs online without installing any tool. This portion will teach you how to create online LUTs in this step-by-step guide.
Step1
Import your photo into Lightroom by dragging and dropping it. You can also import the file by clicking the “File” button and selecting “Import Photos and Video.” For best results, ensure that the photo you will edit is still.

Step2
Edit your photo inside the “Develop” module in Lightroom with your desired preference and style. Only apply changes affecting the colors, not adjustments like noise reduction, vignette, or grain.

Step3
Download the original PNG from <www.onlinelutcreator.com/lutcreator> . Import it into Lightroom as you did in the first step.

Step4
Right-click on your edited photo in the Develop module. Click “Develop Settings,” and select “Copy Settings.” After that, a new window will pop up; make sure you have the same things checked as in the screenshot.

Step5
Right-click the original downloaded PNG file in the Develop module. Go to “Develop Settings,” and choose “Paste Settings.” This will paste the settings from your edited photo onto the original PNG.

Step6
Now export the edited PNG by right-clicking on the PNG and selecting “Export.” In the Export popup menu, ensure you have the same settings as in the screenshot.

Step7
Go back to <www.onlinelutcreator.com/lutcreator> and upload the edited PNG. Generate your LUT and download it. You can now use this LUT to adjust the same color to other videos or photos.

Bonus Part: Wondershare Filmora – The Perfect Tool to Use Your LUTs
Wondershare Filmora is a powerful video editing tool that allows you to use your customized LUTs using this tool. With this tool, you can apply your custom LUTs. Moreover, you can choose from over 200+ pre-made LUTs in its library. Additionally, you can fine-tune your videos with various adjustment and correction options.
Furthermore, you can make changes frame-by-frame to your video footage. This tool also allows you to remove background noises with its AI feature. Moreover, this tool can automatically remove all your long pauses and awkward silence moments from your videos. However, to create a professional video with more options and control, it is a great tool to use.

Key Features To Keep Note of For Wondershare Filmora
- With Filmora, you can select any object or person and change its background. The AI Smart Cutout feature allows you to choose a person to change their background.
- Another fantastic feature is that it gives you access to 10 billion free media files. Moreover, you can select over 200 presets from its in-built for your videos.
- Wondershare Filmora has another unique feature, especially for vloggers and podcasters. With the Auto Ducking feature, music will fade when someone is speaking.
Empower your videos with a new mood using different LUTs. Filmora now offers 100+ top-quality 3D LUTs cover a broad range of scenarios. Transform your videos with Filmora’s powerful 3D LUTs.
Apply LUT on Videos Apply LUT on Videos Learn More


Conclusion
In conclusion, LUTs are essential in modern video and photo editing. They allow editors to apply different color adjustments to color-correct their digital media. There are many pre-made LUTs available online, covering various styles and moods. However, you can create your LUTs with LUT generator-free tools online and offline. You can apply these LUTs using tools like Wondershare Filmora.
- Part 3: How to Create Online LUTs Using Online LUT Creator?
- Bonus Part: Wondershare Filmora – The Perfect Tool to Use Your LUTs
Part 1: An Overview of LUT Generator - The Best Platform for Creating LUTs
LUT Generator is an excellent tool for creating color-grading picture and video presets. This powerful LUT generator-free tool is available on both Windows and Mac. Moreover, you can create LUTs from any photo and video editing application, including Lightroom and Camera Raw. Not only can you create your LUTs, but you can also download presets that are already available.
Furthermore, it offers over 290 cinematic styles LUTs and 50+ LUTs that are optimized for drones and GoPro videos. If you want a surreal look, you can also use 70+ Psychedelia LUTs. This tool allows you to apply third-party effects easily on your photos and videos. Moreover, you can even match the tone of clips from different cameras to give a uniform look.
Part 2: How to Create LUTs Using LUT Generator Free Download?
If you don’t want to apply online LUTs that are available, you can create your own. To do so, you have to download the LUT Generator tool and follow these simple steps to create LUTs.
Step1
To create a LUT of your liking, search for the LUT Generator free download on your browser and download the tool.
Step2
As you launch it, continue to select the “Generate a HALD” option. This option will let you generate a PNG HALD that you can use for color grading using editing software.
Step3
Open the generated PNG HALD into your preferred photo editing application. Apply the desired color correction on the PNG HALD. Save the modified PNG HALD without compression as PNG or at 100% quality in JPG format.
Step4
Click the “Convert to CUBE” button in the LUT Generator and select the modified PNG HALD you saved in the previous step.
Step5
In Preferences, choose the desired size of the 3D LUT as .CUBE format. You can choose between 25x25x25 or 64x64x64. After selecting your desired size, your customized LUT will be created in .CUBE format.
Part 3: How to Create Online LUTs Using Online LUT Creator?
There are two methods to create a LUT online and offline. Previously you’ve learned to generate LUTs using offline tools. However, you can also create LUTs online without installing any tool. This portion will teach you how to create online LUTs in this step-by-step guide.
Step1
Import your photo into Lightroom by dragging and dropping it. You can also import the file by clicking the “File” button and selecting “Import Photos and Video.” For best results, ensure that the photo you will edit is still.
Step2
Edit your photo inside the “Develop” module in Lightroom with your desired preference and style. Only apply changes affecting the colors, not adjustments like noise reduction, vignette, or grain.
Step3
Download the original PNG from <www.onlinelutcreator.com/lutcreator> . Import it into Lightroom as you did in the first step.
Step4
Right-click on your edited photo in the Develop module. Click “Develop Settings,” and select “Copy Settings.” After that, a new window will pop up; make sure you have the same things checked as in the screenshot.
Step5
Right-click the original downloaded PNG file in the Develop module. Go to “Develop Settings,” and choose “Paste Settings.” This will paste the settings from your edited photo onto the original PNG.
Step6
Now export the edited PNG by right-clicking on the PNG and selecting “Export.” In the Export popup menu, ensure you have the same settings as in the screenshot.
Step7
Go back to <www.onlinelutcreator.com/lutcreator> and upload the edited PNG. Generate your LUT and download it. You can now use this LUT to adjust the same color to other videos or photos.
Bonus Part: Wondershare Filmora – The Perfect Tool to Use Your LUTs
Wondershare Filmora is a powerful video editing tool that allows you to use your customized LUTs using this tool. With this tool, you can apply your custom LUTs. Moreover, you can choose from over 200+ pre-made LUTs in its library. Additionally, you can fine-tune your videos with various adjustment and correction options.
Furthermore, you can make changes frame-by-frame to your video footage. This tool also allows you to remove background noises with its AI feature. Moreover, this tool can automatically remove all your long pauses and awkward silence moments from your videos. However, to create a professional video with more options and control, it is a great tool to use.
Key Features To Keep Note of For Wondershare Filmora
- With Filmora, you can select any object or person and change its background. The AI Smart Cutout feature allows you to choose a person to change their background.
- Another fantastic feature is that it gives you access to 10 billion free media files. Moreover, you can select over 200 presets from its in-built for your videos.
- Wondershare Filmora has another unique feature, especially for vloggers and podcasters. With the Auto Ducking feature, music will fade when someone is speaking.
Empower your videos with a new mood using different LUTs. Filmora now offers 100+ top-quality 3D LUTs cover a broad range of scenarios. Transform your videos with Filmora’s powerful 3D LUTs.
Apply LUT on Videos Apply LUT on Videos Learn More
Conclusion
In conclusion, LUTs are essential in modern video and photo editing. They allow editors to apply different color adjustments to color-correct their digital media. There are many pre-made LUTs available online, covering various styles and moods. However, you can create your LUTs with LUT generator-free tools online and offline. You can apply these LUTs using tools like Wondershare Filmora.
Add Text Animation to A Video Online
Do you want to make a creative video? Do you want your presentation or video to be easy to follow and entertaining? You can take the video to another level with the help of text animation. This article will discuss how to add text animation to online videos. You can use a good video editor from where you can select fresh styles and make the best video from there. One of the simplest ways to elevate your movie from good to excellent is with understandable text animation.
Text animation and short captions can broaden the audience for your content as more consumers view videos without sound these days. It matters what fonts you use in the videos, and they establish the mood and facilitate interaction with most viewers who rely on video captions. Add text, alter the font, add transitions, and use text effects to draw the user’s attention as they scroll. Please continue reading to discover how simple it is to make interactive video titles, words, and supers.
1. Use Kapwing animation text editor
(https://www.kapwing.com/animated-text-video-maker )
You can use the potent online editor Kapwing to add animated text to videos online, utilizing music, videos, GIFs, and images. There are no downloads required because everything is already present inside the browser. Kapwing is a capable tool for content production that is simple enough for everyone to use. The majority of video formats, GIF and image, including avi, png, jpg, gif, MOV, mp4, and more, are supported by Kapwing.
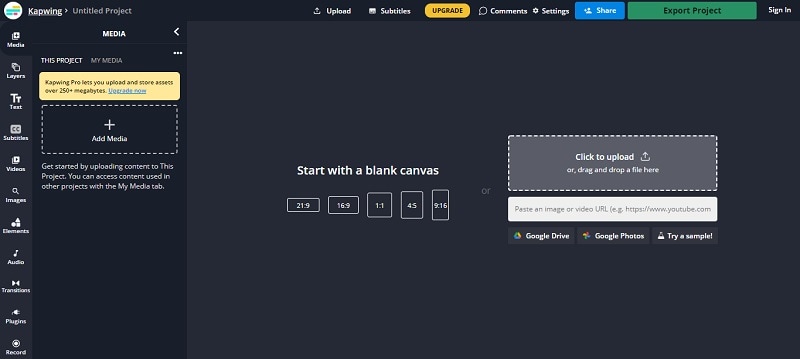
Step1 Upload the Video to Kapwing
You can open Kapwing with the device and tap on “Start Editing” to open up Kapwimg studio. After that, one can use the drag and drop option to upload the video in the studio. You can click on upload or use the link to upload.
If you have a more than 250 MB video, then you will require the Pro version.
Step2 Add the Text
When the video gets uploaded, now you can add your text. You must click the “Text” option on the left and type the text. After that, you can pick your favorite color, background, and color to add style.
You will always want that your text to get animated, but it doesn’t mean that you will have to use explosive fonts or funky or bright, which are very funky. The animation will make your text look attractive, and you can experiment with the colors and fonts to find the best combination.
Step3 Animate the Text
Now the fun part starts; choose the text box present on the right side and click on the “Animate” tab. It will allow the user to select animations like fade, flicker, hue rotates, and many more. Choose the speed according to your requirement, and if you want to change the background and color, you can do it too.
Use “Apply To” for applying this animation in the outro, intro, or both. It will help you to make the text fade out, fade in, or transition out and in with animation. Now the animation library has nine options:
- Drop: It appears on top of the text box
- Flicker: This one is like a candle’s flicker, and text flashes disappear and appear before staying.
- Fade: Opacity can be changed from 0% to 100%.
- Pop:- This grows the text more extensive than the text box and shrinks back to the place.
- Reveal:- Rolls from the left side to the right side
- Wipe:- Rolls from the left side to the right side with a colored background.
- Vibrate: The text box shakes in every direction.
- Hue rotates:- Colour of text cycles through the hue values..
You can use a timeline to adjust the animation’s termination when you set text animation. You can even drag that layer after the start time or use it on end/start time sliders to decrease or increase the time of your video. Text animation can get started when the cursor reaches the start time.
Step4 Export
The video with animated text is now ready to boom. You can click on “Export Video” present at the top and wait for the process. After that, you can download that video and use the links to share it on your social media platform.
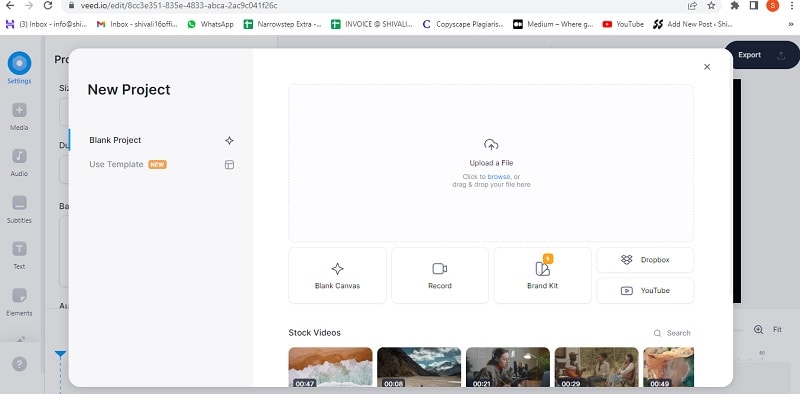
2. Use veed.io text video editor
(https://www.veed.io/create/text-video-maker )
Veed is one of the best video editor text effects online, which allows you to add text to online videos. You can easily add style, color, text, and font in a few clicks. You can upload the video and tap the text to get started. Add title and text or select handwriting font. One can select it from templates. Change transparency, alignment, and font size of the text.
This online software is perfect for creating attractive videos on social media. This is free, which omits the usage of expensive software. It is much easier to avoid many complex video editor apps. With the help of VEED, you can create an excellent video without any experience and do it with a few clicks. Let’s see how to add animated text to photos online.
Step1 Upload the video
Tap on “Choose Video” and choose the file you want to upload on VEED. One can even use the drag and drop option from the folder to the editor.
Step2 Add text
After that, you can add the text by tapping on the “Text” option on the left menu. You can select the text style and start typing.
Step3 Export
Save the video with the text you placed by tapping on “Export.” The video gets saved in an MP4 file.
3. Use Animaker text maker
(https://www.animaker.com/text-animation-maker )
The Animaker is one of the best-animated video makers. This app offers the best collection of charts, BGs, and animated characters. With the help of Animaker, you can make the text disappear or appear off-screen in the best way. After you finish your video, you can download the format in MP4.
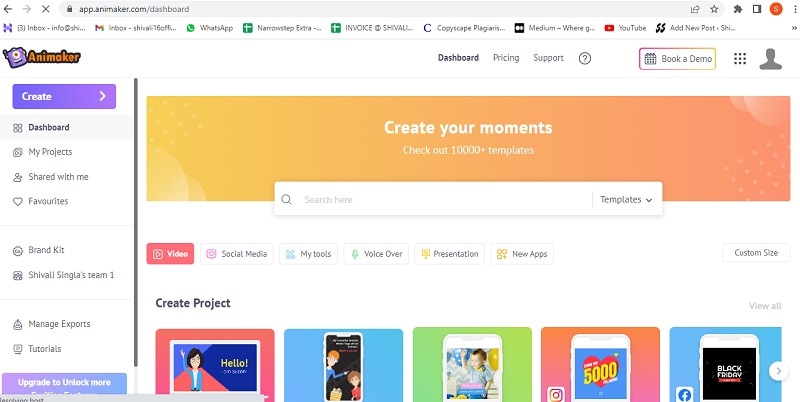
Step1 Upload the video clip
First, you can upload your video clip present on top that you wish to add text animation.
- Tap on the “Upload section” on the bottom left. You can upload your video where you wish to add the animated text.
- The video will get uploaded to “My Files.”
- Click on the uploaded video in the library to load it on the workspace.
Step2 Add text to the video
- You can add text in their text section
- In the next section, one can find two different text types. At the top, you will discover plain text options, and at the bottom, you can find pre-designed boxes seasoned at Animaker.
Let’s see how you can use pre-built text boxes.
- Tap on pre-built designs for your text animation. One can see the text appearing in the center of the workspace, and you can click it and type new text if you want to customize it.
- You can notice widespread options appearing with your text. It is known as the item menu. It will allow the user to modify their text. One can change font size, color, style, etc. Your text will come with pre-defined effects, which will help you to animate text instantly.
- You must have noticed that the purple color bar appears on the timeline, representing the duration of the text visible in the video. For example, if you want that text to get visible between 4rth to 8th seconds, then you will have to drag the edges of that purple bar to the same duration.
To see the scene, you must click on the play button on top of the timeline.
Let’s check the other ways of adding animated text to the video. In the previous one, you have seen how you can add text animation using pre-built boxes. Now you will get to know about doing it by using blank boxes.
- Start tapping the “text section”. Select the bank textbox.
- Click on them and then opt to add new text.
- Opt for clicking the cog icon that is there in the item menu.
- You will notice the settings tab that is on the screen’s right side.
- You can easily opt for the customization of the text in the way you wish. You can start by modifying the style of the font. One can change the size and color of the font as well.
- Use these options and opt for the application of enter and/or exit effects to text. Now, opt to click on the effect option to get more than 50 options. You can select the effect from there.
- Once the animation effect is applied to your timeline, you can notice the pink part in the bar i.e. purple. This completes creating text animation by using Animaker.
Step3 Download the Video
- You can visit the publish option in the right window to download the video.
- Tap on the “download video” option for downloading.
Conclusion
Now, you are aware of how to add text animation to video online and the three best video editors that will help you add animated text to your videos. At this point, you can choose the best one according to your needs and usage. These steps will help you create a unique and good video that will be easy to understand and entertaining.
Free Download For Win 7 or later(64-bit)
Free Download For macOS 10.14 or later
Free Download For macOS 10.14 or later
Top 10 Sony LUT for Different Purposes
If you’ve ever worked in the color grading profession, you’re aware of how time-consuming and labor-intensive it is to achieve a specific look on a scene. To master color grading, you must practice constantly, one of the reasons for the existence of specialists in this field. While everybody can color grade, not everyone can do it well. People in this business have devised remedies to make the editing workflow considerably more accessible and less time-consuming.
Achieving a specific ambiance in a scene demands ongoing effort and naturally takes longer. LUTs, or Lookup Tables, were created as a result. LUTs are ideal for storing a set of colors to use later or in another program. A LUT is the most effective technique to color or alters your image’s colors.
Benefits of using LUTs
There are numerous advantages to using lookup tables to edit your footage. We’ve already discussed that it helps to give your films a more polished and professional appearance, which is one of the primary explanations why individuals use LUTs, but there are many more.
1. A beginning towards professionalism
This is a fantastic approach for beginners to have a good idea of how to build their own trademark looks in their videos. The time it takes to develop your color grading craft is unavoidable. So, as a novice, LUTs will come in useful for you to establish your approach and save your ass, big time.
You’ll eventually come up with a blend of your own LUTs to use, resulting in your own LUT. Not only will LUTs aid in color grading learning, but they will also save funds and resources. You will not only devote time to learning color grading, but you will also spend a significant amount of money on color grading tools and equipment, such as software and color panels. You’ll see why color grading equipment is necessary when you get to this point.
However, for the time being, employing LUTs is the most cost-effective way to obtain a cinematic look.
2. It saves your time
Because LUTs are predefined colors used to establish a specific look on a picture, they save you time. Having a trustworthy LUT to use for video will save the life of freelance editors who are constantly meeting commitments and modifications. Isn’t the purpose of color grading to generate a visual emotion for your movie? So, with LUTs, you can create one without going through the time-consuming process of manual color correction. Only one-color preset will be applied to all scenes in a single LUT.
However, there’s a good probability that it won’t look the same in all of the images. This is where you’ll adjust the colors to make them more evenly match the film. It’s nothing significant most of the time, just some little saturation adjustments, etc.
3. Work on a budget
Time spent in a color-grade suite may be highly costly, and it can lead your films to go over budget in order to achieve a specific aesthetic. LUTs, on the other hand, are available for free online or for a fee for more complex versions. Even if you buy your LUTs, you could save thousands of dollars based on the size of your film. LUTs can also assist you in meeting tight deadlines, and setting targets too optimistically is something I’m sure we’ve all done at some point.
Whether it’s a client or a personal project, things can often get pushed to the last minute, so having something in your arsenal that can save you time is always a good bonus. There are, however, projects where you need to appear competent without investing a lot of time on them due to budget limits; this is where a lookup table comes in handy because you can modify the complete style of your movie in a matter of seconds by pressing a few buttons. Even complicated editing can be completed quickly, giving you more time to work on other tasks that will earn you more money.
4. It provides an artistic approach
LUTs are beneficial because they allow videos shot with cameras that shoot very dark, discolored images to have more vivid tones and contrast. This is excellent for grabbing viewers’ attention and making videos more intriguing and engaging. LUTs add an artistic element to videos and can help you develop a visual artistic identity for your videos if you use the same colors. Another advantage of LUTs is that they enhance the color quality of videos shot on smartphones with particular color schemes. Although this varies significantly from brand to brand, you can use LUTs to make a Smartphone video more vibrant and appealing.
Top 10 Sony LUT for Different Purposes
The highlights in your videos will seem smooth with this set of Free Sony LUTs, while the shadows will add intensity and depth without sacrificing any details. It’s easy to use Sony LUTs in.CUBE and.LOOK versions, and they help you get the cinematic appearance you want.
1. SLog2 & SLog3 to Enhanced Rec709 LUTs
The Sony Natural Enhanced LUT pack was created to address Sony’s color science-related difficulties with skin tones and hue levels. These LUTs correct and fix the colors in your S-Log2 and S-Log3 videos, giving them a colorful natural look.

SLog2 & SLog3 to Enhanced Rec709 LUTs
2. Filmic Tone Creative LUTs
One of our choices is the Filmic Tone LUT set. It enhances your creativity by adding a cinematic tone to your footage. These LUTs were created to convert the green color hues to a dark shade reminiscent of a Bali Instagram-type color while keeping the warmth of the mid-tones and highlights.

Filmic Tone Creative LUTs
3. Sony Nature LUTs
Nature has influenced it. Nature LUTs are designed to complement the natural environs in which we live. Bali, woods, forests, greenery, streams, and beaches are all excellent choices for this design.

Sony Nature LUTs
4. Sony A7S III, FX3 & A7 IV – S-Log 3 Correction LUTs
Three correction LUTs are explicitly created for S-Log 3 footage. They are compatible with Sony a7S III, FX4, and a7 IV footage. They use a simple and clean style that is a wonderful place to start with your film. Following the application of these correction LUTs, we suggest boosting saturation, correcting exposure, and improving contrast. Then you may personalize it. The main goal of these Sony LUTs is to give your videos a new lease on life by enhancing saturation and overall color temperature. When utilized for the environment, lifestyle, and event videos, they also make the picture sharper and more stunning.

Sony A7S III, FX3 & A7 IV – S-Log 3 Correction LUTs
5. Sony Cine-4 Film and Standard LUTs
There are 24 Sony Cine-4 Film LUTs and 24 Rec 709 LUTs in this LUTs set. They can be used in films and television shows, social videos, presentations, and more. They’re also quite simple to operate. To apply stunning color grading to your film, import the preset file or simply drag & drop the LUT over it. It works with any resolution. Make your films, social media posts, documentaries, and images look sleek and modern.

Sony Cine-4 Film and Standard LUTs
6. Sony Urban Dark LUT
The Urban Dark LUT pack aims to provide users with some dark, fascinating tones that work well with urban landscapes. These LUTs have a dark vibe that complements skin tones well.

Sony Urban Dark LUT
7. LUT Sony Vegas “Adventure”
This is one of the best Sony LUTs for adding drama and depth to the video. It also makes the image moodier and more attention-grabbing, which is ideal if your film focuses on people, architecture, or scenic landscapes because it draws attention to the topics.

LUT Sony Vegas “Adventure”
8. Sony LUT “Dessert”
This Sony LUT adds a creamy feel to the video, making it more appealing while also boosting the color palette. It’s suitable for indoor footage and works particularly well with family and love stories.

Sony LUT “Dessert”
9. Sony LUTs for the premiere
If you want to make your video clip look professional without the color grading being too obvious, Sony LUTs for Premiere is one of the best options available. It cools down the image and enhances the contrast slightly to make the topic stand out without being overpowering. This LUT is particularly well suited to business, real estate, and action-oriented videos.

Sony LUTs for the premiere
10. Sony Base LUT pack
The Sony Base LUT Pack replaces Sony’s rec709 LUT and color space. These LUTs have a wonderful warm tone to them and more accurate green colors, and these LUTs are merely a starting point or base for your grading. We recommend grading beyond the simple use of the LUT if you want the best results. Each LUT in this bundle was built with the Sony S-log2 color profile in mind. These LUTs are intended to assist you in achieving proper exposure during filming and grading while maintaining a pleasant image.
Sony Base LUT pack
Wondershare Filmora11 Express Better
Achieve More
Grow Together
Free Download Free Download Learn More

![]()
Closing Thoughts:
LUTs should be present in every videographer’s toolbox since they may save time and money and produce a consistent and professional result. In comparison to color grading suites, LUTs are also less expensive. LUTs are helpful for both beginner and seasoned filmmakers and can aid when you run out of innovative ideas.
Free Download Free Download Learn More
![]()
Closing Thoughts:
LUTs should be present in every videographer’s toolbox since they may save time and money and produce a consistent and professional result. In comparison to color grading suites, LUTs are also less expensive. LUTs are helpful for both beginner and seasoned filmmakers and can aid when you run out of innovative ideas.
[Top iOS Solutions] Finding Premium Slow Motion Apps For Video Creation
iPhone is undoubtedly an awesome device to capture moments. Regardless of the iOS you are using; it has better lens and resolution sensors than Android. The launch of the iPhone 5S enables users to record video in slow motion with their smartphones. Although it is best in capturing and editing slow-mo, people still look for third-party apps .
The reason might be that the iPhone slow motion app offers certain additional features. Maybe they provide more advanced settings and personalization. To find an answer, you should read this article, which lists the best iPhone slow-mo apps.
Slow Motion Video Maker Slow your video’s speed with better control of your keyframes to create unique cinematic effects!
Make A Slow Motion Video Make A Slow Motion Video More Features
Part 1: [Top 10] Slowing Down Videos With Finest iPhone Slow Motion Apps
Are you an enthusiastic user of the iPhone and want to create videos across it to save time? Provided are some quick and effective iPhone slow-motion apps that you can go with. These applications will help you create the best slow-motion content without taking up much effort:
- Slow Motion Video Fx Editor
- SloMo Slow Motion Video Editor
- Slow Motion Video Editor
- Slow Motion’ Video Editor
- Slow Motion Video FX Edit
- Slow Fast Motion Video Editor
- Slow-Fast Motion Video Editor
- TimeFreeze
- Vidma – Video Editor Music
- Vizmato: Video Editor & Maker
1. Slow Motion Video Fx Editor
If you are seeking an iPhone slo-mo app, then this application holds all the relevant features. The application is designed to assist users in achieving slow motion and other speed effects. For precise and accurate slow motion, it offers basic slider and timeline settings. You can slow down a video at any scene by incorporating Advanced or Basic options.

Key Features
- The application offers to manipulate frame rate by 240 fps and 12x slower.
- Users can improve videos by incorporating music using its music library of 170+ tracks.
- The platform provides sharing options along social platforms like Instagram and Facebook.
2. SloMo Slow Motion Video Editor
This iPhone slow-motion app has all the abilities to slow down videos and enhance them. It provides two options to slow down a video via playback speed or video frame rate. The playback speed slows a video instantly while the frame rates smoothen it. You can also choose a specific period for adding the slow-motion effect.

Key Features
- The frame manipulation goes up to 120 fps, and the playback speed goes 12x.
- The application offers 40 color filters to enhance your video’s visual outlook.
- There are multiple ratio options to export a video to upload it to different platforms.
3. Slow Motion Video Editor
Create ultra-slow motion or ultra-high motion videos with this iPhone slo-mo app. It offers distinct speed manipulation options, such as up to 10x to slow down a video. In addition, the application offers built-in speed templates to help you add speed effects to dance videos. Users can also retain the original audio of the videos after speed alteration.

Key Features
- An intuitive user interface that offers a seamless slo-mo editing method.
- Import music from iTunes into this iPhone slo-mo app and add it to your videos.
- Publish your slo-mos directly to other editing apps like GoPro and InShot for additional editing.
4. Slow Motion’ Video Editor
Make professional-grade slow-motion videos using this iPhone slow-motion app. The application can record and edit videos at 60 to 240 fps, ensuring smooth, slow motions. With its modern and accessible user interface, achieving slow motions is easy. Other speed settings include split-second freezing frames and time-lapse videos.

Key Features
- The application passes subscription charges via iTunes for a seamless and trusted process.
- You can trim the unnecessary parts of the video using its Trim tool.
- Offers one-click functionality to share videos across Instagram, YouTube, Facebook, or Email.
5. Slow Motion Video FX Edit
Do you want to be in control of your slow-motion videos while editing? This iPhone slow motion app offers custom speed manipulation options like 12x and 240 fps. You can add freeze frames if you want to highlight a specific part of the video. With its interface, speed manipulation is just as simple as dragging a slider.

Key Features
- Enhance your video’s visuals with up to 40 stunning visual filters to enhance colors.
- The application offers weekly, monthly, and yearly plans to suit your requirements.
- You can add music from your library to videos or specific scenes via this app.
6. Slow Fast Motion Video Editor
Apply slow motion effect to the specific parts of your videos using this iPhone slow motion app. You can access it on the app store; the application is free to download. It features a timeline editing interface and a playback speed of up to 8x for Slomo. It separates the video frames, and you can change their speed, and afterward, it merges them.

Key Features
- The ability to incorporate music from your music library into videos with this app.
- You can manually trim out video segments and merge them back.
- Showcase your creativity to other social platforms directly from the app.
7. Slow-Fast Motion Video Editor
This iPhone slow-motion app download unlocks a professional way of creating slo-mos. The user interface is professional and accessible for all types of editors. It displays a velocity graph to change the playback speed to 8x at specific video frames. This application slows down video to 1/10th of its actual speed. It also maintains the pitch of audio while creating fast or slow-motion videos.

Key Features
- There is no restriction on video length to edit in this iPhone slow-motion app.
- It doesn’t export video with Watermark addition, which is remarkable for branding.
- You can edit and export a video in Portrait or Landscape display.
8. TimeFreeze
If you want to create slow-motion videos effectively, then this iPhone slow-motion app can do it. It works by manipulating the video frame rates from 24 fps to 120 fps. Along with slowing down videos, you can slow down high-motion video to normal as well. The user interface is basic and lacks technicalities to be accessed by skilled people.

Key Features
- The application supports all iOS 12.1, macOS 12.1, and newer versions.
- Uses advanced image processing algorithms for video frame manipulation.
- The application is free to use and only takes up 25.3 MB of your iPhone’s storage.
9. Vidma - Video Editor Music
You have read about many applications that offer to transform normal videos into slow motions. However, this iPhone slo-mo app is much more than just a speed changer. It slows down your videos via a velocity graph and maintains the audio pitch during the process. Using this application, you can slow down videos to 0.1x while also having video reverse options.

Key Features
- With 1000+ music tracks and hundreds of visual effects and filters, your videos can stand out.
- Along with the slow motion, you can also create time-lapse and apply speed ramping presets.
- Export your video in high-quality 4K resolution without any quality loss.
10. Vizmato: Video Editor & Maker
Vizmato stands as a multipurpose video editing app with slow-motion capabilities. Beyond the creation of compelling slow-motion scenes, Vizmato adds dramatic flair by reversing the speed. Furthermore, the software extends the speed manipulation feature via a custom option. In this way, everyone gets a chance to design their videos per their preferences.

Key Features
- It offers 20+ visual themes, 40+ effects, and 140+ music assets to uplift your videos.
- The tool can transform images into slideshows, making a video of your memories.
- You can record and add voiceovers with this iPhone slow-motion app.
Bonus Part: Wondershare Filmora and Slow Motion Video Making: A Simple Connection
Having no fun while editing video with the iPhone slow-motion app? It’s obvious because such applications are limited to slowing down your videos. So, using Wondershare Filmora could change the game in video editing of all types. Users from every field can rely on Filmora to get unique and polished content. This editing platform is available online for Windows, macOS, and mobile phone users.
Wondershare Filmora is integrated with artificial intelligence to boost your productivity in editing. You can use Filmora’s asset library to get media or create your own with AI. Using Filmora will amaze you at every step of editing and creating engaging media.
Free Download For Win 7 or later(64-bit)
Free Download For macOS 10.14 or later
Steps to Slow Down Video with Speed Ramping in Filmora
Speed ramping is a way to slow down or speed up videos smoothly. A slow change in videos gives a more professional outlook to videos. Have you observed this feature in any of the above-discussed iPhone slow-motion apps? The answer is no, so let’s benefit from speed ramping in Filmora by following the given steps.
Step 1Start Working on the New Project
Begin your video editing journey after downloading Filmora on your device. After downloading, open this platform and select “New Project.” This way, you will access its editing screen to begin working. Start with importing your video and bringing it to the timeline.

Step 2Discover the Speed Ramping Option with Templates
Place your cursor on the video and right-click to choose “Speed Ramping” from the list. Now, you can see an editing screen on your right. Pick any of the templates for effortless speed ramping.

Step 3Customize Speed Ramping to Smoothly Slow Down Videos
Otherwise, hit the “Customize” and direct downward. Go to the editing panel and hold the dots to move downward if you want to slow down. You can speed up video portions by holding the dots upward. Meanwhile, you can play the video to see the changes.

Step 4Use Optical Flow for Good Quality and Move to Save Changes
Extend the “AI Frame Interpolation” menu and hit the “Optical Flow.” That’s how you will get a high-quality video with slow speed. Keep editing or save changes through the “Export” button on the upper right.

Find Core Functionalities of Wondershare Filmora
Before using Filmora, it’s important to explore it to avoid confusion. Considering this point, you should discover some of its main features below:
1. AI Copywriting
Except for AI, no one can provide you with an engaging script on short notice. Thus, Filmora integrates an AI copywriting feature for generating the desired script within seconds. It accepts natural language prompts, not limiting experts to giving commands. This feature is considered professional in creating YouTube descriptions to rank the content.
2. AI Copilot Editing
Humans typically need suggestions in editing, whether they are beginners or professionals. What could be better than having an AI as your personal editing assistant? Filmora offers an AI copilot editor that answers your editing-related queries. Besides, it navigates you toward practical solutions by providing links or buttons.
3. AI Audio Denoise
Sometimes, background noises ruin the vocals of the audio. Remove that noise with the help of AI, which can detect the noise type for exact results. This feature can enhance your audio by performing reverb reduction. It can make the voice clear that is present in surroundings, like electrical voices from devices. Audio denoise proves vital in recording podcasts and online course recording scenarios.
4. AI Portrait
It’s a human urge to look beautiful, and video editing apps are not denying it. Filmora also provides more than 70 AI portrait effects to beautify facial features. Moreover, it can assist you in removing the background and keeping humans in video frames. Some AI stickers include Heart eyes, Emojis, and Sunglasses that can evoke humorous emotions.
Conclusion
Until now, you might find your answer about using iPhone slow-motion apps. The overview of such premium apps has guided you to select an app that best aligns with your needs. If you are still confused, use Wondershare Filmora, an incredible video editor. This platform is available for iPhone, Android, Windows, and macOS with its limitless editing tools.
Make A Slow Motion Video Make A Slow Motion Video More Features
Part 1: [Top 10] Slowing Down Videos With Finest iPhone Slow Motion Apps
Are you an enthusiastic user of the iPhone and want to create videos across it to save time? Provided are some quick and effective iPhone slow-motion apps that you can go with. These applications will help you create the best slow-motion content without taking up much effort:
- Slow Motion Video Fx Editor
- SloMo Slow Motion Video Editor
- Slow Motion Video Editor
- Slow Motion’ Video Editor
- Slow Motion Video FX Edit
- Slow Fast Motion Video Editor
- Slow-Fast Motion Video Editor
- TimeFreeze
- Vidma – Video Editor Music
- Vizmato: Video Editor & Maker
1. Slow Motion Video Fx Editor
If you are seeking an iPhone slo-mo app, then this application holds all the relevant features. The application is designed to assist users in achieving slow motion and other speed effects. For precise and accurate slow motion, it offers basic slider and timeline settings. You can slow down a video at any scene by incorporating Advanced or Basic options.
Key Features
- The application offers to manipulate frame rate by 240 fps and 12x slower.
- Users can improve videos by incorporating music using its music library of 170+ tracks.
- The platform provides sharing options along social platforms like Instagram and Facebook.
2. SloMo Slow Motion Video Editor
This iPhone slow-motion app has all the abilities to slow down videos and enhance them. It provides two options to slow down a video via playback speed or video frame rate. The playback speed slows a video instantly while the frame rates smoothen it. You can also choose a specific period for adding the slow-motion effect.
Key Features
- The frame manipulation goes up to 120 fps, and the playback speed goes 12x.
- The application offers 40 color filters to enhance your video’s visual outlook.
- There are multiple ratio options to export a video to upload it to different platforms.
3. Slow Motion Video Editor
Create ultra-slow motion or ultra-high motion videos with this iPhone slo-mo app. It offers distinct speed manipulation options, such as up to 10x to slow down a video. In addition, the application offers built-in speed templates to help you add speed effects to dance videos. Users can also retain the original audio of the videos after speed alteration.
Key Features
- An intuitive user interface that offers a seamless slo-mo editing method.
- Import music from iTunes into this iPhone slo-mo app and add it to your videos.
- Publish your slo-mos directly to other editing apps like GoPro and InShot for additional editing.
4. Slow Motion’ Video Editor
Make professional-grade slow-motion videos using this iPhone slow-motion app. The application can record and edit videos at 60 to 240 fps, ensuring smooth, slow motions. With its modern and accessible user interface, achieving slow motions is easy. Other speed settings include split-second freezing frames and time-lapse videos.
Key Features
- The application passes subscription charges via iTunes for a seamless and trusted process.
- You can trim the unnecessary parts of the video using its Trim tool.
- Offers one-click functionality to share videos across Instagram, YouTube, Facebook, or Email.
5. Slow Motion Video FX Edit
Do you want to be in control of your slow-motion videos while editing? This iPhone slow motion app offers custom speed manipulation options like 12x and 240 fps. You can add freeze frames if you want to highlight a specific part of the video. With its interface, speed manipulation is just as simple as dragging a slider.
Key Features
- Enhance your video’s visuals with up to 40 stunning visual filters to enhance colors.
- The application offers weekly, monthly, and yearly plans to suit your requirements.
- You can add music from your library to videos or specific scenes via this app.
6. Slow Fast Motion Video Editor
Apply slow motion effect to the specific parts of your videos using this iPhone slow motion app. You can access it on the app store; the application is free to download. It features a timeline editing interface and a playback speed of up to 8x for Slomo. It separates the video frames, and you can change their speed, and afterward, it merges them.
Key Features
- The ability to incorporate music from your music library into videos with this app.
- You can manually trim out video segments and merge them back.
- Showcase your creativity to other social platforms directly from the app.
7. Slow-Fast Motion Video Editor
This iPhone slow-motion app download unlocks a professional way of creating slo-mos. The user interface is professional and accessible for all types of editors. It displays a velocity graph to change the playback speed to 8x at specific video frames. This application slows down video to 1/10th of its actual speed. It also maintains the pitch of audio while creating fast or slow-motion videos.
Key Features
- There is no restriction on video length to edit in this iPhone slow-motion app.
- It doesn’t export video with Watermark addition, which is remarkable for branding.
- You can edit and export a video in Portrait or Landscape display.
8. TimeFreeze
If you want to create slow-motion videos effectively, then this iPhone slow-motion app can do it. It works by manipulating the video frame rates from 24 fps to 120 fps. Along with slowing down videos, you can slow down high-motion video to normal as well. The user interface is basic and lacks technicalities to be accessed by skilled people.
Key Features
- The application supports all iOS 12.1, macOS 12.1, and newer versions.
- Uses advanced image processing algorithms for video frame manipulation.
- The application is free to use and only takes up 25.3 MB of your iPhone’s storage.
9. Vidma - Video Editor Music
You have read about many applications that offer to transform normal videos into slow motions. However, this iPhone slo-mo app is much more than just a speed changer. It slows down your videos via a velocity graph and maintains the audio pitch during the process. Using this application, you can slow down videos to 0.1x while also having video reverse options.
Key Features
- With 1000+ music tracks and hundreds of visual effects and filters, your videos can stand out.
- Along with the slow motion, you can also create time-lapse and apply speed ramping presets.
- Export your video in high-quality 4K resolution without any quality loss.
10. Vizmato: Video Editor & Maker
Vizmato stands as a multipurpose video editing app with slow-motion capabilities. Beyond the creation of compelling slow-motion scenes, Vizmato adds dramatic flair by reversing the speed. Furthermore, the software extends the speed manipulation feature via a custom option. In this way, everyone gets a chance to design their videos per their preferences.
Key Features
- It offers 20+ visual themes, 40+ effects, and 140+ music assets to uplift your videos.
- The tool can transform images into slideshows, making a video of your memories.
- You can record and add voiceovers with this iPhone slow-motion app.
Bonus Part: Wondershare Filmora and Slow Motion Video Making: A Simple Connection
Having no fun while editing video with the iPhone slow-motion app? It’s obvious because such applications are limited to slowing down your videos. So, using Wondershare Filmora could change the game in video editing of all types. Users from every field can rely on Filmora to get unique and polished content. This editing platform is available online for Windows, macOS, and mobile phone users.
Wondershare Filmora is integrated with artificial intelligence to boost your productivity in editing. You can use Filmora’s asset library to get media or create your own with AI. Using Filmora will amaze you at every step of editing and creating engaging media.
Free Download For Win 7 or later(64-bit)
Free Download For macOS 10.14 or later
Steps to Slow Down Video with Speed Ramping in Filmora
Speed ramping is a way to slow down or speed up videos smoothly. A slow change in videos gives a more professional outlook to videos. Have you observed this feature in any of the above-discussed iPhone slow-motion apps? The answer is no, so let’s benefit from speed ramping in Filmora by following the given steps.
Step 1Start Working on the New Project
Begin your video editing journey after downloading Filmora on your device. After downloading, open this platform and select “New Project.” This way, you will access its editing screen to begin working. Start with importing your video and bringing it to the timeline.
Step 2Discover the Speed Ramping Option with Templates
Place your cursor on the video and right-click to choose “Speed Ramping” from the list. Now, you can see an editing screen on your right. Pick any of the templates for effortless speed ramping.
Step 3Customize Speed Ramping to Smoothly Slow Down Videos
Otherwise, hit the “Customize” and direct downward. Go to the editing panel and hold the dots to move downward if you want to slow down. You can speed up video portions by holding the dots upward. Meanwhile, you can play the video to see the changes.
Step 4Use Optical Flow for Good Quality and Move to Save Changes
Extend the “AI Frame Interpolation” menu and hit the “Optical Flow.” That’s how you will get a high-quality video with slow speed. Keep editing or save changes through the “Export” button on the upper right.
Find Core Functionalities of Wondershare Filmora
Before using Filmora, it’s important to explore it to avoid confusion. Considering this point, you should discover some of its main features below:
1. AI Copywriting
Except for AI, no one can provide you with an engaging script on short notice. Thus, Filmora integrates an AI copywriting feature for generating the desired script within seconds. It accepts natural language prompts, not limiting experts to giving commands. This feature is considered professional in creating YouTube descriptions to rank the content.
2. AI Copilot Editing
Humans typically need suggestions in editing, whether they are beginners or professionals. What could be better than having an AI as your personal editing assistant? Filmora offers an AI copilot editor that answers your editing-related queries. Besides, it navigates you toward practical solutions by providing links or buttons.
3. AI Audio Denoise
Sometimes, background noises ruin the vocals of the audio. Remove that noise with the help of AI, which can detect the noise type for exact results. This feature can enhance your audio by performing reverb reduction. It can make the voice clear that is present in surroundings, like electrical voices from devices. Audio denoise proves vital in recording podcasts and online course recording scenarios.
4. AI Portrait
It’s a human urge to look beautiful, and video editing apps are not denying it. Filmora also provides more than 70 AI portrait effects to beautify facial features. Moreover, it can assist you in removing the background and keeping humans in video frames. Some AI stickers include Heart eyes, Emojis, and Sunglasses that can evoke humorous emotions.
Conclusion
Until now, you might find your answer about using iPhone slow-motion apps. The overview of such premium apps has guided you to select an app that best aligns with your needs. If you are still confused, use Wondershare Filmora, an incredible video editor. This platform is available for iPhone, Android, Windows, and macOS with its limitless editing tools.
Also read:
- Updated Learn Topaz Video Enhance AI Review
- Premiere Pro Tutorial How To Change Video Frame Rate
- Guide To Selecting and Using the Best Braw Luts
- Updated In 2024, A Review On 3D LUT Creator
- In 2024, How to Stabilize Videos with Google Photos App for Free
- Updated We Can Say that the Horror Movies of the 90S Laid the Foundation for Current Horror Movies. So, without Wasting Time, Lets Create a 1990S Horror Movie Similar to The Blair Witch Project
- New 2024 Approved Top 10 3D Slideshow Software Review
- In 2024, How to Make an Aesthetic Slideshow
- New 5 Best Video Denoisers
- New In 2024, How to Add Adjustment Layer (Clip) in DaVinci Resolve?
- Updated 2024 Approved Best 10 Mind-Blowing Video Collage Maker for PC
- 2024 Approved 10 Best Movie Trailer Voice Generators Windows, Mac, Android, iPhone & Online
- In This Article, We Will Show You How to Rotate Videos Using Obs
- Updated Adobe Premiere Pro Guide to Slow-Down Video
- A Guide to Color Grade Your Picture in LightRoom
- New The Upcoming Generation of AR and VR Is Going to Define Augmented Reality Conferencing as the New Normal for All Business Purposes. With a Global Perspective to Build Better Communication, AR Can Be the Future of Collaborative Workspace
- New Adobe Premiere Pro Download and Use Guide
- Updated 2024 Approved How to Make Your CSGO Montage Impressive
- Updated The Best 10 GIF to JPGPNG Converters
- 30+ Amazing Templates for VN Video Editor for 2024
- 2024 Approved 100 Workable How to Mask Track with Adobe Premiere Pro
- 2024 Approved Doable Ways to Create Transparent Background in Procreate
- Updated How to Use Twixtor Effect to Create Super Slow-Motion Video, In 2024
- 8 Free Title Makers to Use for 2024
- In 2024, To Help You Perform This Action, in This Article, We List the Steps You Will Need for Cropping Into Video Clips with PowerDirector. As an Added Bonus, We Have Also Included the Method to Perform the Same Actions in WonderShare Filmora
- How to Create an URL for Your Video, In 2024
- How to Create a Glitch Text Effect, In 2024
- How to Use Visual Effect for Zoom for 2024
- Dollar-Store DIY Hacks to Use for Filmmaking on a Budget for 2024
- How to Make OBS Slideshow
- New In 2024, 10 Best Meme Text to Speech Tools Windows, Mac, Android, iPhone&Online
- New In 2024, The Ultimate Guide to Using Shotcut To Rotate Videos
- AI Features of Filmora - Silence Detection in Videos
- How to Create Simple Slideshow Word
- 2024 Approved OBS Green Screen Guide
- In 2024, End This Problem! Make Transparent Background Video Today
- The way to get back lost data from Oppo K11x
- In 2024, 5 Quick Methods to Bypass Vivo S17t FRP
- How To Unlock a Realme Easily?
- Unlock Your Disabled iPhone 11 Without iTunes in 5 Ways | Dr.fone
- Complete Guide on Unlocking iPhone 13 Pro Max with a Broken Screen? | Dr.fone
- How to Fix My Vivo T2 5G Location Is Wrong | Dr.fone
- Full Guide to Fix iToolab AnyGO Not Working On Vivo Y100 | Dr.fone
- In 2024, Apple iPhone 11 Screen Mirroring You Must Know | Dr.fone
- In 2024, Process of Screen Sharing Infinix Note 30 Pro to PC- Detailed Steps | Dr.fone
- Is it Possible to Use Miracast with Apple iPhone 13 Pro? | Dr.fone
- In 2024, How to Change Location on TikTok to See More Content On your Samsung Galaxy A15 5G | Dr.fone
- Ultimate Guide on Tecno Phantom V Flip FRP Bypass
- How To Remove Passcode From Apple iPhone 6? Complete Guide
- In 2024, How to Unlock Samsung Galaxy S24 Phone Pattern Lock without Factory Reset
- How to Change GPS Location on Apple iPhone 13 mini Easily & Safely | Dr.fone
- Which Pokémon can Evolve with a Moon Stone For Nokia G42 5G? | Dr.fone
- How Do You Remove Restricted Mode on Apple iPhone 15
- In 2024, Top 6 Apps/Services to Trace Any Xiaomi Redmi Note 13 Pro 5G Location By Mobile Number | Dr.fone
- Title: Updated How to Create LUTs with LUTs Generator for 2024
- Author: Chloe
- Created at : 2024-04-24 07:08:43
- Updated at : 2024-04-25 07:08:43
- Link: https://ai-editing-video.techidaily.com/updated-how-to-create-luts-with-luts-generator-for-2024/
- License: This work is licensed under CC BY-NC-SA 4.0.
