
:max_bytes(150000):strip_icc():format(webp)/001_how-to-transfer-data-from-ps4-to-ps5-3392eb400af3482fabad65cabb2a1a91.jpg)
Updated How To Fade Audio With Movavi Editor
How To Fade Audio With Movavi Editor
Movavi Video Editor Plus is the best option if you want to use its user-friendly Movavi fade audio feature set with plenty of functionality. There are versions of the app on Mac and Windows. For all intents and purposes, Movavi fade out music functionality is an excellent piece of this video editing software. The Movavi Video Editor Plus package comes with standard advanced features and functionality. You may also store your work and share your Movavi fade out audio exports across devices that have the software installed.
Looking for how to fade out music in Movavi? We’ve got you solutions to it. The ability to quickly and simply check that the beginning and conclusion of any audio is one of the best Movavi fade audio features. Prior to the audio, there must be a distinct period of quiet. Finding the program, like Movavi Audio fade out, that best suits your requirements is essential whether you want to fade-in, fad-out, trim, crop, clip, or combine audio files or segments of a music. Find out the details in the upcoming sections.
Part 1. How to Fade Audio with Movavi Editor
When the song’s ending is not featured in the video, fade-out is used to provide an added level of professionalism. Even if you’ve never altered a video before, using Movavi Video Editor Plus is simple. A step-by-step tutorial that walks you through all the tools you’ll need is shown to you when the software initially launches. Additionally, you may always search the Movavi official website for advice.
Steps to use Movavi Fade Audio:
Step1The first step is to import the audio and video files you want to utilize. Drag and drop the files into the software or choose “Add Files” from the Media Bin area to do this. Drag and drop the clip into the timeline after that.
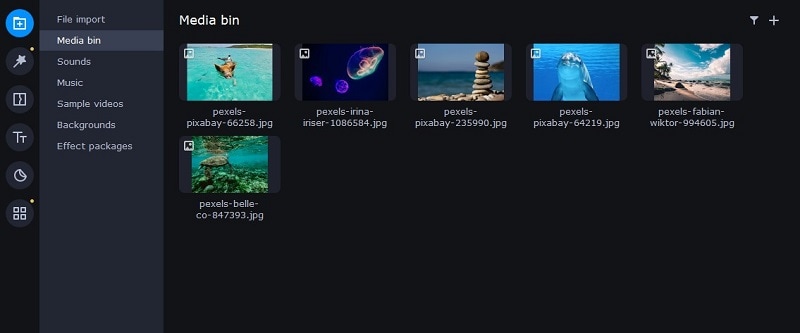
Step2Select the disconnect audio option from the edit menu. Additionally, you can see that the audio and video will no longer be connected by a little connection. Your titles’ location, color, and font may all be changed.
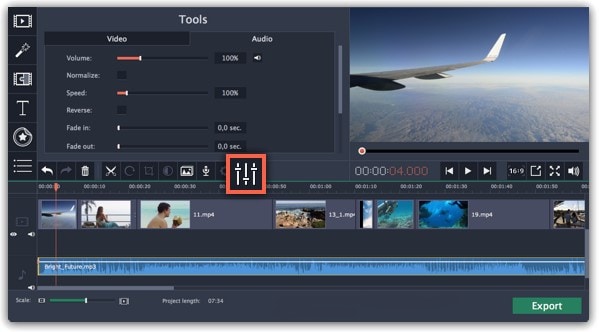
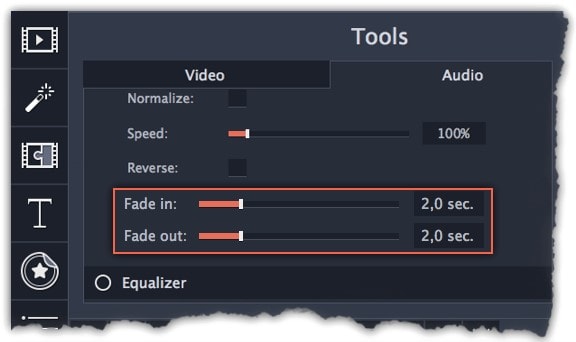
Step3Use the sliders on the Audio tab to set the fade duration by referring to the Audio Properties. Additional options may be used to increase the audio’s loudness, eliminate ambient noise, or even create an echo effect.
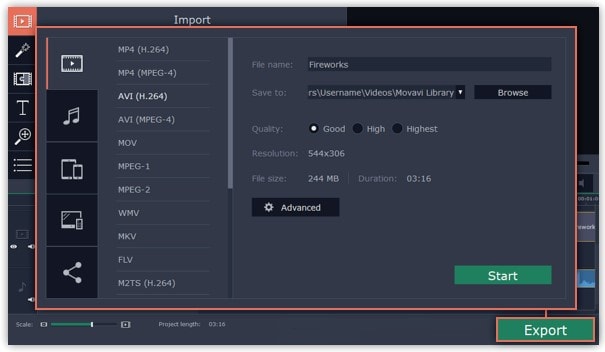
Step4Click on the export option to save this audio as an MP3. Select Audio Export. The MP3 choice is used by default. Select the Save Audio File tab after clicking the Export button. Choose the preferred format and press Start.
Part 2. Movavi Alternative to Fade Audio
Look no further than Filmora by Wondershare if you’re seeking for an effective and user-friendly Movavi audio fade out substitute. This program has all the tools you need to edit, apply special effects, and make titles for videos of a professional caliber. In contrast to Movavi, Filmora gives you the ability to create fade out music without requiring you to install a separate extension. In order to help you understand how to use this function using the Filmora video editing interface, we have enlisted the step-by-step guide for you as well.
Although there are several video editors on the market, Filmora has successfully carved out a position for itself with a variety of intriguing features. The application is appropriate for both new and more experienced users and was designed with novice users in mind. Its user interface (UI), which is rather simple when compared to professional applications. Among all the free video editing programs for beginners, Filmora also offers a far larger selection of effects, customizability, and correction tools, and its screen-splitting capability is much handier than Movavi fade audio feature.
Steps to Fade Out Audio in Filmora:
Step1Install Wondershare Filmora
The straightforward platform to start editing your audio and music files is Filmora, which is available for free. You must first download and install this application on your windows computer in order to utilize it without difficulty. Download the most current edition of this application first. It’s now time to install it on your computer when you’ve completed that. Simply install this program on your computer by following the standard setup instructions if you want to do it fast.
Step2Open Filmora Editor and Import Audio Files
In the step that follows, we’ll show you how to use this platform to fade in and out audio. Filmora may be immediately launched from your desktop or the search bar, then opened as seen below to begin going. By choosing the Video Editor option from the software’s home screen, you may now investigate the basic principles of editing. This will bring up the main interface for Filmora. To import your music and video files, just choose the Import button from the software’s main screen, as seen below:

Step3Load Built-in Audio Editor
You must drag the media files into the program’s timeline after importing them into Filmora. You may modify your media files using every tool in the timeline. To utilize the audio editor in Filmora, just right-click on the specific audio file and choose “Edit Audio” from the list, as seen below.

Step4Use Audio Fade-in/Fade-out
The initial step is to learn how to use Filmora to start fading in and, afterwards, fading out your audio recordings. The best aspect of Filmora is how simple it is to employ these techniques from the timeline. To achieve this, focus on the audio file that you want to change in the timeline; after you’ve picked it, the two icons will show up above the audio file. Drag the first one to the desired duration for the audio fade-in option, as demonstrated:

Step5Edit and Share Video/Sound
In addition to an audio editor, Filmora has a built-in toolset for video editing. You may utilize basic to sophisticated editing techniques inside the program. To choose the basic editor, just click on the video file within the timeline as seen below. There is support for all widely used video and audio formats, including MP3. Click “Export” and choose “File Format” to do this.
By pressing the Format button, choose the required configuration from the list. On a computer, the particular document will be saved to the designated directory.
The Bottom Line
Have you learned how to fade out music in Movavi? If so, then you would also find out that the Movavi fade audio alternative, Filmora , provides a selection of audio editing options in addition to video editing features. The Movavi editor is capable of spicing up your videos and audios, however; Filmora’s workflow is a little more established and well-defined than Movavi’s, which is what propels it to the top of the audio editing field. As a result, Filmora would be the better option if you intend to work as a video editor for a long time.
Free Download For Win 7 or later(64-bit)
Free Download For macOS 10.14 or later
Want to Add Subtitles to Netflix Videos in Your Preferred Language? Read This Article to Learn Two Different Methods for Uploading Custom Subtitles to Netflix
Netflix is the most popular streaming service in the world. It offers loads of movies and series that you can watch on smartphones, tablets, and computers. Over the years, Netflix has become a one-stop destination for watching movies and TV shows in different languages.
While the user base of Netflix is quite diverse, the platform offers subtitles in limited languages for most movies and series. Suppose you want to view a Korean Drama on Netflix with French subtitles. However, you found that French subtitles are unavailable for that Korean Drama. In such a case, you might wonder if adding custom subtitles to Netflix is possible.
Well, you can add subtitles to Netflix, and there are two different methods to do the same. This guide will help you learn both methods available for adding custom subtitles to Netflix. So, let’s get started!
Method 1. Upload Your Custom Subtitle to Netflix
Before proceeding with this method, you must remember that it only works if you are a Netflix Premium user. Now, let’s discuss how to add subtitles to Netflix with this method.
Key Steps to Follow
Below are the steps for adding custom subtitles to Netflix.
Step 1 First of all, you need to install and add Language Learning with Netflix & YouTube™ extension to your web browser (Chrome or Edge).
Step 2 Make sure the extension is activated.
Step 3 Download the .srt file that contains the subtitles in your preferred language for a particular movie or TV show.
Step 4 Open Netflix on a Chrome or Edge browser and sign into your account.
Step 5 Play the movie or TV show for which you have downloaded the subtitles.
Step 6 Within the Netflix player, you will see a settings icon left to the Subtitles icon. Click on it.
Step 7 Among the various setting options, you need to choose the screen and find the one with the label “Lower Subtitles (Mother Language)”. You need to click on its field and select the “Upload Subtitle” option.
Step 8 You will see a pop-up window at the top of the screen where you need to click the “Choose File” button.
Step 9 You then need to navigate to the directory on your computer where you have downloaded the subtitles file, select it, and click the “Open” button.
Step 10 Click the “Okay” button to upload the subtitles to Netflix.
Step 11 Close the settings window and play the video. You can view the uploaded subtitles at the bottom of the player.
Method 2. Add Custom Subtitles to Netflix with Extensions
If you’re not a Netflix Premium user, you can still add subtitles to Netflix with the help of certain browser extensions. We’ll list them down and discuss the steps for using one of them; the basic steps for using all such extensions are pretty much the same.
1. Substital
Supported web browsers: C hrome | Firefox | Edge
Substital is among the most popular extensions that allow you to add subtitles to several online on-demand video streaming platforms, including Netflix. It has more than 100K users on the Chome Web Store.
Key Features
- Offers a built-in subtitles search feature.
- Supports .srt files and .zip files containing subtitles in the .srt format.
- You can manually sync the subtitles with the video.
- It allows you to customize the appearance of subtitles.
Steps to Add Custom Subtitles to Netflix with Substital
Following are the key steps to add custom subtitles to Netflix using the Substital extension:
Step 1 The first thing you need to do is to download and install the Substital extension on your browser.
Step 2 Open Netflix on the same browser and log in to your account.
Step 3 Play the movie or episode from a TV series for which you want to add custom subtitles.
Step 4 Download the subtitles file for the same movie or episode in your preferred language from the web.
Step 5 Now open the extensions menu in your browser and click on the Substital icon.
Step 6 You will see the name of the movie or TV show that you are watching on Netflix. Click on it.
Step 7 In this step, you need to drag and drop the subtitle file from your system (that you downloaded earlier) to the browser window.
Step 8 Finally, you can notice that the subtitles are loaded in the Netflix player.
2. Super Netflix
Web browsers: Chrome
Super Netflix is yet another reliable extension to add subtitles to Netflix. Apart from adding custom subtitles, this extension allows you to change the video playback speed. Like Substital, the Super Netflix extension on Chrome Web Store also has 100K+ users.
Key Features
- It can help you avoid spoilers by blurring images and episode descriptions.
- You can use the extension to skip intros automatically.
- Offers 5 different video modes.
- You get the option to change the Netflix streaming server.
3. Netflix SubStyler: customize subtitles
Web browsers: Chrome
Unlike the other two extensions mentioned above, Netflix SubStyler only allows you to change the styling of subtitles on Netflix. However, the thing that makes this extension worthy of your attention is that it comes loaded with several customization options.
Key Features
- You can choose a custom text color for the subtitles either with the help of an in-built color picker or by entering the RGB value of the color.
- The extension lets you add text outlines and change the size of the text.
- You can even add a text background and change its color and opacity.
Bonus Tip: How to Edit and Add Subtitles to Videos Available Offline
In certain cases, you may want to edit the subtitles of videos probably because either the subtitles are not available for a certain part of the video, or they are not correct. So, if you want to edit subtitles of videos that you have downloaded with ease, you can consider using Wondershare Filmora .
Free Download For Win 7 or later(64-bit)
Free Download For macOS 10.14 or later

Filmora is one of the most popular and powerful video editors out there. Developed by Wondershare, it allows you to import subtitle files in various formats, including .srt, and edit them directly. Some noteworthy features of Filmora for subtitles and video editing include the manual addition of subtitles, speech-to-text conversion, green screen, video stabilization, and color correction.
Wondershare Filmora also offers several advanced text editing tools that make it possible to customize the appearance of subtitles that you add to a video. You can change the color and size of the fonts and add a gradient effect to the text. Additionally, you can animate text to make it stand out.
Add Custom Subtitles with Filmora: A Step-by-Step Guide
If you want to add subtitles to any video using Filmora, you simply need to follow the steps mentioned below. Please note that for this tutorial, we’ll be using Filmora 11.
Step 1 Launch the Filmora app on your computer and create a new project.
Step 2 You can simply click the “Import media” button and load the video onto it.
Step 3 Hover over the video’s thumbnail and click on the (+) button to add it to the timeline.
Step 4 Now, you need to play the video and find the section of the video where you need to add subtitles. Pause the video and add a mark by pressing the M key on your keyboard. You can also do the same by clicking the marker button, which is located beside the microphone icon in the top right of the timeline tab.
Step 5 To add the subtitle, you need to click on the “Titles” button that you can see at the top of the Filmora window. You can see several subtitle templates available there.
Step 6 Download, preview, and choose a subtitle template that seems most appropriate.
Step 7 You can then drag and drop the subtitle to the timeline above the video timeline. You can also trim the subtitle length from any side of the subtitle timeline box.
Step 8 You need to double-click on the subtitle timeline box to add custom text, change font size, color, and alignment, and add animations.
Step 9 Once done, you can click on the “Ok” button to save the changes.
Step 10 Similarly, you can add subtitles for different sections of the video.
Conclusion
If you want to add custom subtitles to Netflix movies and TV shows, you can achieve the same with the two different methods mentioned above. For the first method to work, you must be a Netflix Premium user. On the other hand, the second method will work fine even if you aren’t a Netflix Premium user. Also, you can add custom subtitles to any offline videos using the Wondershare Filmora video editor.
Free Download For macOS 10.14 or later
Filmora is one of the most popular and powerful video editors out there. Developed by Wondershare, it allows you to import subtitle files in various formats, including .srt, and edit them directly. Some noteworthy features of Filmora for subtitles and video editing include the manual addition of subtitles, speech-to-text conversion, green screen, video stabilization, and color correction.
Wondershare Filmora also offers several advanced text editing tools that make it possible to customize the appearance of subtitles that you add to a video. You can change the color and size of the fonts and add a gradient effect to the text. Additionally, you can animate text to make it stand out.
Add Custom Subtitles with Filmora: A Step-by-Step Guide
If you want to add subtitles to any video using Filmora, you simply need to follow the steps mentioned below. Please note that for this tutorial, we’ll be using Filmora 11.
Step 1 Launch the Filmora app on your computer and create a new project.
Step 2 You can simply click the “Import media” button and load the video onto it.
Step 3 Hover over the video’s thumbnail and click on the (+) button to add it to the timeline.
Step 4 Now, you need to play the video and find the section of the video where you need to add subtitles. Pause the video and add a mark by pressing the M key on your keyboard. You can also do the same by clicking the marker button, which is located beside the microphone icon in the top right of the timeline tab.
Step 5 To add the subtitle, you need to click on the “Titles” button that you can see at the top of the Filmora window. You can see several subtitle templates available there.
Step 6 Download, preview, and choose a subtitle template that seems most appropriate.
Step 7 You can then drag and drop the subtitle to the timeline above the video timeline. You can also trim the subtitle length from any side of the subtitle timeline box.
Step 8 You need to double-click on the subtitle timeline box to add custom text, change font size, color, and alignment, and add animations.
Step 9 Once done, you can click on the “Ok” button to save the changes.
Step 10 Similarly, you can add subtitles for different sections of the video.
Conclusion
If you want to add custom subtitles to Netflix movies and TV shows, you can achieve the same with the two different methods mentioned above. For the first method to work, you must be a Netflix Premium user. On the other hand, the second method will work fine even if you aren’t a Netflix Premium user. Also, you can add custom subtitles to any offline videos using the Wondershare Filmora video editor.
The Best 10 GIF to JPGPNG Converters
A GIF to JPG converter software is responsible for altering files in the animated GIF format to static JPG or PNG image format. Since GIFs are not compatible with some sites, platforms, or documentation types, this is a safer alternative.
JPG, PNG, and even APNG formats are easier to download, work on most device/OS types, and are simpler to print. They have a lesser size as well.
If you are looking for a stable converter, we present the top tools for that here, no matter what kind of devices you use! Read to know which ones you can use based on their features, usability, and support.
10 Best Tools to convert GIF into JPG/PNG/APNG
The following are the best converters for turning GIF into JPG, APNG, or PNG formats.
1. OnlineConvert
One of the simplest GIF to JPG converter types is OnlineConvert. It has diverse customization settings. For example, you can choose the image size and quality or use AI-powered optimization support.

How to download: iOS , Android , Online tool , Chrome extension , Firefox extension
Rating: 3.7 stars out of 5 (Google Play Store)
Compatible OS: web-based, iOS, Android
Price: Free
Main Features:
- Advanced features like Equalize, Stabilize, etc.
- Decide the black/white threshold limits.
- Activate AI enable for optimized conversion.
- Set cropping limits.
Pros
- Decide the image quality.
- Choose image width/height.
- Add an example file.
Cons
- The maximum size of the file is 100 MB.
- It cannot convert encrypted files.
2. Ezgif
Ezgif is another simple-to-use online tool with substantial image conversion benefits. You can add your GIF files from the Cloud account or computer and directly get JPG files. PNG does not have a direct conversion here, though.

How to download: Online tool
Rating: 100 out of 100 (Scam Detector)
Compatible OS: web-based browsers
Price: Free
Main Features:
- Support a maximum of 50 MB file size for images.
- Direct converter to JPG.
- Set background color to white.
- Add URL link of online GIF files.
Pros
- Instant conversion.
- No changes to original file quality.
- Add from the device.
Cons
- Upload and convert files one by one.
- No cloud support.
3. CloudConvert
CloudConvert is a high-quality online GIF to PNG converter that people can use to convert high-quality image files with no quality loss. First, choose your files, go for settings, and then the converting will be finished in minutes.

How to download: Online tool
Rating: 4.5 stars of 5 (Capterra)
Compatible OS: web-based
Price: Packages/Subscriptions- Costs start at USD 8 per conversion minute.
Main Features:
- Select a file from various formats, like URL, Device, or cloud accounts.
- Set crop/scape adjustments.
- Note image width and height.
- Select to strip or vice versa.
Pros
- Customize output file type.
- Support watermark security feature. It protects your images and graphic files from being stolen, used, or altered without the owner’s permission.
- High-quality image resolution is available.
Cons
- Slightly complex for beginners to understand or use initially.
- Bigger files take a longer time to load.
4. Convertio
Convertio is another top-grade GIF to JPGF converter which people can utilize to prepare high-definition image files from animated pictures. You can make multiple conversions and get high-priority customer support.

How to download: Online tool
Rating: 4.9 stars of 5 (Capterra)
Compatible OS: web-based
Price: Light- USD 9.99/month, Basic- USD 14.99/month, Unlimited- USD 25.99/month
Main Features:
- Get at least 25 concurrent conversion benefits with paid plans.
- Adfree pages.
- Unlimited conversions are only supported by the highest-paid plan.
- Unlimited allowed conversion minutes for users daily.
Pros
- The drag and drop function is smooth to use.
- Add files with at least 100 MB file size.
- Multiple formats are supported.
Cons
- Signup is necessary for a higher file size allowance.
- More limited service for free.
5. Soda PDF
This GIF to PNG converter is top-notch and used for changing big and small-sized GIF files into static PNG or JPG formats. However, no issues with image quality would be noticeable. You can use it for multiple conversions.

How to download: Online tool
Rating: 3.4 stars of 5 (Capterra)
Compatible OS: Online, Mac, Windows, Linux
Price: Standard- USD 6.73/month, Pro- USD 8.23/month, Business- USD 16.63/month
Main Features:
- Add GIF files from the computer, Dropbox, or Google Drive.
- Files are stored for a full day.
- Direct download button available.
- Redo conversion in case of issues.
Pros
- A desktop version with offline usage is available.
- The drag and drop function makes the converting process more convenient.
- Quick file saving.
Cons
- Cannot access old converted files from servers.
- Ads are available.
6. FreeConvert.com
FreeConvert is operable for multiple types of file conversions. In addition, you can store your files in the cloud and handle various tasks simultaneously, depending on your plan.

How to download: Online tool , Chrome extension
Rating: 58.40 out of 100 (Scam Detector)
Compatible OS: Windows, Mac, Linux
Price: 24-hour Pass- USD 12.99, Pro- USD 25.99/month, Basic- USD 9.99/month, Standard- USD 14.99/month.
Main Features:
- Max 1GB of size allows for free conversion.
- Auto-orientation setting available.
- Choose to compress the file or not.
- Insert from device or cloud.
Pros
- You can add files from the computer, Dropbox, Google Drive, or URL.
- It enables you to strip attached metadata.
- Adjust image size freely.
Cons
- Limited customizations.
- No free plan.
7. Zamzar
You can efficiently utilize this online tool to convert different file formats into another, like GIF into PNG. You can access the files you created for at least 24 hours after the conversion. For more time, upgrade your account.

How to download: Online tool
Rating: 4.5 stars out of 5 (Capterra)
Compatible OS: web-based
Price: Basic- USD 8.60/month, Pro- USD 15.18/month, Business- USD 24.04/month
Main Features:
- It supports multiple file formats for converting.
- Add a file from the device or cloud.
- Insert online URL of files.
- 50 MB is the maximum file size.
Pros
- All saved files for free users can be saved for 24 hours.
- Paid users can decide to remove files from storage.
- Email notification for downloading is possible.
Cons
- Convert/save only two files per day for free.
- You need to register an account when using.
8. Browserling
Browserling is one of the most accessible and high-quality conversion tools for turning GIFs into PNG, JPG, or any other format. The settings are simple to understand and use, and one can convert multiple files.

How to download: Online tool
Rating: 4 stars out of 5 (G2)
Compatible OS: web-based, Windows/Android devices.
Price: Free, Developer- USD 19/month, Team- USD 29+/month
Main Features:
- Insert from the device.
- You can add GIFs of any size.
- Drag and drop functionality is available.
- Automatically saves to the device.
Pros
- Quick conversion.
- Zero complex steps.
- Easy to use for all users at different stages.
Cons
- No batch processing is allowed.
- The free version is only web-based and not compatible with most OS/devices/browsers.
9. iLoveIMG
Another top-notch online GIF to PNG converter is iLoveIMG, with which you can add and alter multiple GIF files simultaneously. Then, after the conversion, share to social media accounts from Facebook or others easily.

How to download: Online tool
Rating: 3.6 stars out of 5 (TrustPilot)
Compatible OS: web-based
Price: Free, Business- custom price, Premium- USD 3.79
Main Features:
- Insert from a folder, Dropbox, or Google Drive.
- Add multiple images.
- Rotate the files.
- Share to social media.
Pros
- Add from the device.
- Cloud support is available.
- Align files alphabetically.
Cons
- Does not work offline.
- Limited batch process for free users.
10. Convertfiles
This online tool can easily include and change GIFs into PNG files. The conversions occur quickly, and you can add your email account to get quick alerts for the completion of the process.

How to download: Online tool
Rating: 4.6 stars out of 5 (mywot.com)
Compatible OS: web-based
Price: Free
Main Features:
- Add specific input format.
- Include the preferred output format.
- Insert email for notifications.
- Support files to be added from the device library.
Pros
- Quicker process of conversion.
- A variety of file formats are compatible.
- Categorized list of formats like documents, images, videos, etc.
Cons
- Can include third-party unauthorized sites that transfer users to other pages.
- No video formats for output.
Pro Tips: How to Convert GIF to Video for Free?
Besides utilizing suitable tools to convert GIFs into PNG or other image files, you can also use the best GIF to video converters. For example, with Wondershare Filmora , you can easily convert GIFs or other image files into video files. In addition, some editing options, like GIFs, allow users to create videos after merging image files.
Free Download For Win 7 or later(64-bit)
Free Download For macOS 10.14 or later
Step1Launch the Filmora software.
Step2Press the “New Project” section and then access “Click to import media files.”

Add the image files, like GIFs, into the editor.

Step3Drag the files to the editing timeline. Use customization settings like Speed, Animation, Audio, Effects, etc., to edit the file.

Step4Click on Export > Local > Mp4. You can choose other video formats too.
Step5Add file information like saving location, name, and formatting specification.

Step6Click on the Export button.
Final Words
You can easily use one of the given tools to convert GIF files into varying image file types. There are fully online options like CloudConvert, and certain choices with a software version, like Online Convert. Try each at least once for the best results to know which fits your needs perfectly.
2. Ezgif
Ezgif is another simple-to-use online tool with substantial image conversion benefits. You can add your GIF files from the Cloud account or computer and directly get JPG files. PNG does not have a direct conversion here, though.
How to download: Online tool
Rating: 100 out of 100 (Scam Detector)
Compatible OS: web-based browsers
Price: Free
Main Features:
- Support a maximum of 50 MB file size for images.
- Direct converter to JPG.
- Set background color to white.
- Add URL link of online GIF files.
Pros
- Instant conversion.
- No changes to original file quality.
- Add from the device.
Cons
- Upload and convert files one by one.
- No cloud support.
3. CloudConvert
CloudConvert is a high-quality online GIF to PNG converter that people can use to convert high-quality image files with no quality loss. First, choose your files, go for settings, and then the converting will be finished in minutes.
How to download: Online tool
Rating: 4.5 stars of 5 (Capterra)
Compatible OS: web-based
Price: Packages/Subscriptions- Costs start at USD 8 per conversion minute.
Main Features:
- Select a file from various formats, like URL, Device, or cloud accounts.
- Set crop/scape adjustments.
- Note image width and height.
- Select to strip or vice versa.
Pros
- Customize output file type.
- Support watermark security feature. It protects your images and graphic files from being stolen, used, or altered without the owner’s permission.
- High-quality image resolution is available.
Cons
- Slightly complex for beginners to understand or use initially.
- Bigger files take a longer time to load.
4. Convertio
Convertio is another top-grade GIF to JPGF converter which people can utilize to prepare high-definition image files from animated pictures. You can make multiple conversions and get high-priority customer support.
How to download: Online tool
Rating: 4.9 stars of 5 (Capterra)
Compatible OS: web-based
Price: Light- USD 9.99/month, Basic- USD 14.99/month, Unlimited- USD 25.99/month
Main Features:
- Get at least 25 concurrent conversion benefits with paid plans.
- Adfree pages.
- Unlimited conversions are only supported by the highest-paid plan.
- Unlimited allowed conversion minutes for users daily.
Pros
- The drag and drop function is smooth to use.
- Add files with at least 100 MB file size.
- Multiple formats are supported.
Cons
- Signup is necessary for a higher file size allowance.
- More limited service for free.
5. Soda PDF
This GIF to PNG converter is top-notch and used for changing big and small-sized GIF files into static PNG or JPG formats. However, no issues with image quality would be noticeable. You can use it for multiple conversions.
How to download: Online tool
Rating: 3.4 stars of 5 (Capterra)
Compatible OS: Online, Mac, Windows, Linux
Price: Standard- USD 6.73/month, Pro- USD 8.23/month, Business- USD 16.63/month
Main Features:
- Add GIF files from the computer, Dropbox, or Google Drive.
- Files are stored for a full day.
- Direct download button available.
- Redo conversion in case of issues.
Pros
- A desktop version with offline usage is available.
- The drag and drop function makes the converting process more convenient.
- Quick file saving.
Cons
- Cannot access old converted files from servers.
- Ads are available.
6. FreeConvert.com
FreeConvert is operable for multiple types of file conversions. In addition, you can store your files in the cloud and handle various tasks simultaneously, depending on your plan.
How to download: Online tool , Chrome extension
Rating: 58.40 out of 100 (Scam Detector)
Compatible OS: Windows, Mac, Linux
Price: 24-hour Pass- USD 12.99, Pro- USD 25.99/month, Basic- USD 9.99/month, Standard- USD 14.99/month.
Main Features:
- Max 1GB of size allows for free conversion.
- Auto-orientation setting available.
- Choose to compress the file or not.
- Insert from device or cloud.
Pros
- You can add files from the computer, Dropbox, Google Drive, or URL.
- It enables you to strip attached metadata.
- Adjust image size freely.
Cons
- Limited customizations.
- No free plan.
7. Zamzar
You can efficiently utilize this online tool to convert different file formats into another, like GIF into PNG. You can access the files you created for at least 24 hours after the conversion. For more time, upgrade your account.
How to download: Online tool
Rating: 4.5 stars out of 5 (Capterra)
Compatible OS: web-based
Price: Basic- USD 8.60/month, Pro- USD 15.18/month, Business- USD 24.04/month
Main Features:
- It supports multiple file formats for converting.
- Add a file from the device or cloud.
- Insert online URL of files.
- 50 MB is the maximum file size.
Pros
- All saved files for free users can be saved for 24 hours.
- Paid users can decide to remove files from storage.
- Email notification for downloading is possible.
Cons
- Convert/save only two files per day for free.
- You need to register an account when using.
8. Browserling
Browserling is one of the most accessible and high-quality conversion tools for turning GIFs into PNG, JPG, or any other format. The settings are simple to understand and use, and one can convert multiple files.
How to download: Online tool
Rating: 4 stars out of 5 (G2)
Compatible OS: web-based, Windows/Android devices.
Price: Free, Developer- USD 19/month, Team- USD 29+/month
Main Features:
- Insert from the device.
- You can add GIFs of any size.
- Drag and drop functionality is available.
- Automatically saves to the device.
Pros
- Quick conversion.
- Zero complex steps.
- Easy to use for all users at different stages.
Cons
- No batch processing is allowed.
- The free version is only web-based and not compatible with most OS/devices/browsers.
9. iLoveIMG
Another top-notch online GIF to PNG converter is iLoveIMG, with which you can add and alter multiple GIF files simultaneously. Then, after the conversion, share to social media accounts from Facebook or others easily.
How to download: Online tool
Rating: 3.6 stars out of 5 (TrustPilot)
Compatible OS: web-based
Price: Free, Business- custom price, Premium- USD 3.79
Main Features:
- Insert from a folder, Dropbox, or Google Drive.
- Add multiple images.
- Rotate the files.
- Share to social media.
Pros
- Add from the device.
- Cloud support is available.
- Align files alphabetically.
Cons
- Does not work offline.
- Limited batch process for free users.
10. Convertfiles
This online tool can easily include and change GIFs into PNG files. The conversions occur quickly, and you can add your email account to get quick alerts for the completion of the process.
How to download: Online tool
Rating: 4.6 stars out of 5 (mywot.com)
Compatible OS: web-based
Price: Free
Main Features:
- Add specific input format.
- Include the preferred output format.
- Insert email for notifications.
- Support files to be added from the device library.
Pros
- Quicker process of conversion.
- A variety of file formats are compatible.
- Categorized list of formats like documents, images, videos, etc.
Cons
- Can include third-party unauthorized sites that transfer users to other pages.
- No video formats for output.
Pro Tips: How to Convert GIF to Video for Free?
Besides utilizing suitable tools to convert GIFs into PNG or other image files, you can also use the best GIF to video converters. For example, with Wondershare Filmora , you can easily convert GIFs or other image files into video files. In addition, some editing options, like GIFs, allow users to create videos after merging image files.
Free Download For Win 7 or later(64-bit)
Free Download For macOS 10.14 or later
Step1Launch the Filmora software.
Step2Press the “New Project” section and then access “Click to import media files.”
Add the image files, like GIFs, into the editor.
Step3Drag the files to the editing timeline. Use customization settings like Speed, Animation, Audio, Effects, etc., to edit the file.
Step4Click on Export > Local > Mp4. You can choose other video formats too.
Step5Add file information like saving location, name, and formatting specification.
Step6Click on the Export button.
Final Words
You can easily use one of the given tools to convert GIF files into varying image file types. There are fully online options like CloudConvert, and certain choices with a software version, like Online Convert. Try each at least once for the best results to know which fits your needs perfectly.
How to Convert SRT to DOCX
SRT to Word: How to Convert an SRT File to Docx file?
The SubRip Text (SRT) format is a popular subtitle format used in many videos. While SRT files are simple text files that can be edited with any text editor, they are not as convenient to work with as MS Word documents.
For one thing, it cannot be easy to format text in a way that is easy to read. In addition, SRT files do not support features such as spell checking and grammar checking.
As a result, converting SRT to Word can be a useful way to improve the quality of subtitles. In addition, it can also make it easier to translate subtitles into other languages.
Other than that, you might need to convert an SRT to a Word document when you need to edit the subtitles for a video you’re working on or you want to create a transcript of a recorded conversation.
You might think that converting a speech to text is difficult or impossible. But it’s not!
Here’s how you can easily convert SRT to DOCX files. Let’s begin.
- Convert SRT to Word file Manually
- How to Edit and merge your Subtitles with Wondershare Filmora
- Hot FAQs on Converting SRT to Word
What is an SRT file?
SRT files are used for subtitles. Subtitles are the audio track of a video or movie. Subtitles are displayed alongside a video or movie on your TV or computer screen. They allow the viewer to understand what is being said in the language they speak.
People have recently begun using online streaming services such as Netflix, Amazon Video, and Hulu to watch movies and television shows. While streaming services offer thousands of movies and shows, there are still many that only exist in a form that can be viewed in their entirety. This requires the user to download the entire file (usually in a format known as a .srt file).
Why do we need to convert SRT files into Word?
Subtitles are a great way to enjoy movies and TV shows in different languages. They provide text on the screen that tells you what the characters are saying, so you can follow along even if you don’t speak the language. However, SRT files can be difficult to work with because they are incompatible with all software programs**.** So, they need to be converted into Word. Some other reasons include:
- It allows your content to be viewed within a web browser or mobile device without downloading .srt file.
- If you need to embed the video into another site, you can do so easily with the.docx file.
- Learning a new language by downloading SRT subtitles from video.
Convert SRT to word file without downloading any software
With the advent of the SRT (SubRip) format, videos can now be enjoyed on both computers and mobile devices. This means that videos can be viewed anywhere and anytime. Converting videos to SRT is relatively easy, but some online converters offer more flexibility than others.
These converters can take an SRT file and convert it into a word document, which can then be edited or saved for future use. Not only do online SRT to word converters save time, but they can also ensure that your captions are accurate and properly formatted. Whether you’re captioning a home video or creating professional subtitles for a film, an online SRT to-word converter can be a valuable tool. Some of them include:
Aspose
Aspose is a simple online tool that can be used to convert SRT files to Docx format. The process is quick and easy, and the results are high quality. To use Aspose to convert your SRT file to a DOCX file, follow these steps:
1. Upload the SRT file inAspose

2. Change the font size as you will

3. In the conversion window that appears, select “DOCX” as the output format and click “Convert”.

4. The conversion will begin immediately, and when it is finished, you will find the “DOWNLOAD” button to download the file. And below, you’ll find a “Send result to:” in which you can email the converted file.

The app is a powerful document conversion tool that supports various formats, making it easy to convert your files for use in different applications. However, its performance is greatly reduced after multiple conversions on the file format.
Happyscribe
With Happyscribe, you can quickly and easily convert SRT files to Docx format. The process is simple with quick results that give high-quality output! Below are the steps to convert an SRT file to a DOCX file using the online tool, Happyscribe.
1. Go to happyscribe

2. First, select your SRT file, second select the format to .docx, and click the convert button.

Using happyscribe converter can also help to reduce your overall costs. By automating the transcription process, you can avoid hiring expensive transcription services. As a result, you can save money while maintaining high quality and accuracy levels. The only drawback of this tool is that it does a poor job at matching times in long videos, resulting in a large amount of reformatting.
Ebby
At first glance, Ebby SRT to DOCX converter may not seem like much. However, this simple tool can be a lifesaver for anyone who needs to convert subtitles from one format to another. Using Ebby is quick and easy; select the file you want to convert, choose your desired output format, and click convert. That’s it! Your file will be converted and ready to download in just a few seconds. Here are the steps:
1. First go to Ebby.co
2. Browse and upload your “SRT file” and change the format to “Word (.docx)”.

3. Then click “CONVERT SRT” after a few seconds, your .docx file will be downloaded to your browser.

Ebby has 100+ languages and dialects, plus its fast transcription and accuracy make it stand out from its competitors. However, the web interface isn’t designed to handle large files. As it has no folder structure and only allows for up to 10 items per page (you can create more by dragging them), you will need another method if your project requires extensive organization or editing before uploading.
Convert .SRT to word file Offline
Converting an SRT file, or SubRip Subtitle file, into a Word document can be helpful if you want to be able to edit the subtitles or captioning for a video.
There are moves online that will do this conversion for you, but you may not want to trust your valuable data to someone else’s server.
Fortunately, some great subtitle editing programs will allow you to make this conversion offline.
These softwares are designed specifically for converting SRT files and usually provide a few different options for how the conversion is done.
They also offer a wide range of features for editing subtitles, and they can export the results as a Word document.
However, some of these programs can be difficult to use, so make sure you read the instructions carefully before trying to convert your file. The most popular softwares are:
Subtitle Edit
Subtitle Edit is a very helpful program for any fan of movies and TV shows who wants to see films and shows in their original language.
This free program can correct various subtitle syncing errors so that you can watch movies and TV shows with perfect subtitles.
Now you know what Subtitle Edit is, let’s discuss its features.
Features:
- It allows you to create or sync subtitle lines.
- You can convert your files in desired format as it supports 300+ formats such as SRT, SBV, advanced Sub station, etc.
- It has an amazing feature of auto translation via google translation.
- You can merge or split the subtitles.
- It enables you to convert your audio into speech with its speech recognition feature.
- You can also adjust your display time.
One of the best part of this software is that it provides a batch converter tool. This tool allows you to convert multiple SRT files to plain Text subtitles files at once. Let’s check out how it works.
Step-by-step guideline to convert SRT to TXT
Step1 Firstly, ensure that Subtitle edit is installed on your device. If not, then download it. After downloading, run this software.
Step2 From its tools menu, open the Batch converter tool.
Step3 Import a folder containing SRT files. You can also drag and drop SRT files to its interface, individually.
Step4 Now, select the output format as Plain Text or any other format and set the encoding option. You can also customize some output configurations including
- Remove formatting
- Add/remove tags
- Redo casing
- Fix some common errors
- Adjust speed, etc.
Step5 Then, provide the output location and hit the convert button to start the conversion process.
Now as we know the method of converting SRT files to Word, let’s discuss its advantages as well as disadvantages.
Pros
- It has friendly and intuitive interface.
- It supports 300+ formats.
- It includes google translate for fast translation.
- It provides open-office spelling correction.
- It has also an audio spectrum.
Cons
- It sometimes seems complex no customization functionality
Best for :
Windows devices
Jubler
Jubler is a powerful text editing tool. It allows you to make or edit existing subtitles and work with almost any video format.
The combination of Jubler and Mplayer allows users to see a preview of subtitles in a movie. In addition, Jubler also includes a tool known as ASpell, which corrects grammar and spelling (works with the English language).
After knowing what Jubler is, let’s move forward to know about its features.
Features:
- It supports multiple formats such as
- SubStation
- SubStation Alpha
- SubRip
- SubViewer
- MicroDVD
- Etc.
- It supports all encodings that are supported by Java platform.
- Jubler also supports translating mode.
- You can mark subtitles with different colors while editing or playing a video.
- It also checks spelling with the support for dictionary selection.
- It offers basic editing skills such as splitting, joining, time shifting, etc.
How to steps with images
Now you know how to convert SRT to Word format, let’s look at its pros and cons.
Pros
- It has a comprehensive interface to sync subtitles.
- You can transcribe your text and run your video at the same time.
- It includes a spell checker.
- It offers good customization possibilities.
- It works in Windows, Linux and Mac.
Cons
- To get a preview of your video, you’ll need to install MP player.
- It’s not really updated anymore.
Best for:
Quick subtitle editing
Subtitle Workshop
Subtitle workshop is a freeware subtitle editing tool that offers a complete, efficient and convenient way to edit subtitles.
It supports all major subtitle formats and provides powerful features such as spell checking, automatic translation, synchronization, timed text preview and more.
Subtitle workshop is constantly being updated with new features and improvements, making it the most complete and convenient subtitle editing tool available.
Features:
- It supports converting, creating, editing and saving over 60 subtitle formats.
- It offers customizable tools and functions for automatic timing and text manipulation.
- It has Multi-Level Undo-Redo system
- It supports the OCR (find-and-replace text) scripts.
- It has comprehensive system for automatically and manually detecting, marking, and fixing subtitle errors.
- It also offers a CPS (Characters per Second) system.
- It supports a variety of audio/video formats.
Now, we’re well aware of this software. Let’s discuss step-by-step guide to convert SRT to Word file with Subtitle Workshop.
Pros
- It’s straightforward to use that makes it ideal for beginners.
- It’s friendly user-interface is customizable and supports multiple language.
- It also supports style and color tags within the subtitle text.
- You can preview your subtitle in full screen mode.
Cons
- It can be difficult while importing transcripts and require a lot of manual lines.
- It shows limited checks on overlaps, reading speeds and duration limits.
Best for:
Small and short SRT files
Convert SRT to Word file Manually
You must first remove the time codes to convert an SRT file to a Word document. Open the SRT file in a text editor (such as Notepad++ or Sublime Text) and delete all the lines that begin with numbers. These lines will typically look something like “00:00:01,000 –> 00:00: 02,000.” Once you have removed the time codes, save the file and open it in Microsoft Word.
The text from the SRT file will now be visible in the Word document. You can then format the text as desired and save the document.
Keep in mind that this manual method will not retain any formatting from the original SRT file, so you may need to do some additional editing to get the final results you want.
How to Edit and merge your Subtitles with Wondershare Filmora
Wondershare Filmora is one of the most popular video editing software programs available today. One of the reasons for its popularity is that it offers a wide range of features, including the ability to convert SRT files to Word format.
This can be a valuable tool for those who need to edit subtitles or create closed captioning for their videos.
In addition, Wondershare Filmora also offers a wide range of other features that make it an essential tool for any video editor, such as the ability to add transitions, effects, and titles.
As a result, Wondershare Filmora is a valuable tool for anyone who needs to edit videos regularly. Here’s how to convert SRT to a Word file using Filmora:
Free Download For Win 7 or later(64-bit)
Free Download For macOS 10.14 or later
1. Download and install Filmora on your computer.
2. Launch Filmora, then click “Import”> “Import files.” To start the project, you need to right-click on the timeline and select Advanced Edit.

3. At advanced edit you can perform the following tasks:
- Edit Time code.
- Change subtitles.
- Add/remove/merge subtitle strips.
- Change subtitle styles (same as Filmora Advanced Edit Text)

4. Finally, select the SRT file on the timeline, right-click and select “Export Subtitle File”.

Hot FAQs on Converting SRT to Word
1. How do I edit an SRT file in Word?
First, open the SRT file in Word. You may see some strange characters or formatting issues, but don’t worry - these can be fixed later. Next, make your changes to the transcript. Be sure to double-check the timing information to make sure it is still accurate. Finally, save the file and close Word. You should now be able to use the updated SRT file in your video player of choice.
2. How do I open SRT files with text on Mac?
If you have downloaded a movie or TV show with an SRT file, you can open the file using the TextEdit application on your Mac. First, open TextEdit and then go to the File menu. Next, select Open and choose the SRT file you want to open. The text from the SRT file will now be displayed in the TextEdit window. You can then save the file if you wish.
Alternatively, you can use the Quick Look feature on your Mac if you want to view the text from the SRT file. To do this, select the SRT file in the Finder and press the spacebar. The text from the SRT file will then be displayed in a Quick Look window.
Final Words
That’s it! You now know how to convert an SRT file into a DOCX. It is easy to convert SRT files to DOCX format with the help of online tools and offline converters.
However, if you want more control over the editing process or an easy-to-use video editing software with all the bells and whistles, try Wondershare Filmora .
This software has all the features you need to edit your subtitles and merge them with your video content.
Plus, it’s affordable and comes with a free trial, so you can try it before you buy. Have fun creating beautiful videos with perfect subtitles!
- Subtitle Edit
- Jubler
- Subtitle Workshop
- Convert SRT to Word file Manually
- How to Edit and merge your Subtitles with Wondershare Filmora
- Hot FAQs on Converting SRT to Word
What is an SRT file?
SRT files are used for subtitles. Subtitles are the audio track of a video or movie. Subtitles are displayed alongside a video or movie on your TV or computer screen. They allow the viewer to understand what is being said in the language they speak.
People have recently begun using online streaming services such as Netflix, Amazon Video, and Hulu to watch movies and television shows. While streaming services offer thousands of movies and shows, there are still many that only exist in a form that can be viewed in their entirety. This requires the user to download the entire file (usually in a format known as a .srt file).
Why do we need to convert SRT files into Word?
Subtitles are a great way to enjoy movies and TV shows in different languages. They provide text on the screen that tells you what the characters are saying, so you can follow along even if you don’t speak the language. However, SRT files can be difficult to work with because they are incompatible with all software programs**.** So, they need to be converted into Word. Some other reasons include:
- It allows your content to be viewed within a web browser or mobile device without downloading .srt file.
- If you need to embed the video into another site, you can do so easily with the.docx file.
- Learning a new language by downloading SRT subtitles from video.
Convert SRT to word file without downloading any software
With the advent of the SRT (SubRip) format, videos can now be enjoyed on both computers and mobile devices. This means that videos can be viewed anywhere and anytime. Converting videos to SRT is relatively easy, but some online converters offer more flexibility than others.
These converters can take an SRT file and convert it into a word document, which can then be edited or saved for future use. Not only do online SRT to word converters save time, but they can also ensure that your captions are accurate and properly formatted. Whether you’re captioning a home video or creating professional subtitles for a film, an online SRT to-word converter can be a valuable tool. Some of them include:
Aspose
Aspose is a simple online tool that can be used to convert SRT files to Docx format. The process is quick and easy, and the results are high quality. To use Aspose to convert your SRT file to a DOCX file, follow these steps:
1. Upload the SRT file inAspose
2. Change the font size as you will
3. In the conversion window that appears, select “DOCX” as the output format and click “Convert”.
4. The conversion will begin immediately, and when it is finished, you will find the “DOWNLOAD” button to download the file. And below, you’ll find a “Send result to:” in which you can email the converted file.
The app is a powerful document conversion tool that supports various formats, making it easy to convert your files for use in different applications. However, its performance is greatly reduced after multiple conversions on the file format.
Happyscribe
With Happyscribe, you can quickly and easily convert SRT files to Docx format. The process is simple with quick results that give high-quality output! Below are the steps to convert an SRT file to a DOCX file using the online tool, Happyscribe.
1. Go to happyscribe
2. First, select your SRT file, second select the format to .docx, and click the convert button.
Using happyscribe converter can also help to reduce your overall costs. By automating the transcription process, you can avoid hiring expensive transcription services. As a result, you can save money while maintaining high quality and accuracy levels. The only drawback of this tool is that it does a poor job at matching times in long videos, resulting in a large amount of reformatting.
Ebby
At first glance, Ebby SRT to DOCX converter may not seem like much. However, this simple tool can be a lifesaver for anyone who needs to convert subtitles from one format to another. Using Ebby is quick and easy; select the file you want to convert, choose your desired output format, and click convert. That’s it! Your file will be converted and ready to download in just a few seconds. Here are the steps:
1. First go to Ebby.co
2. Browse and upload your “SRT file” and change the format to “Word (.docx)”.
3. Then click “CONVERT SRT” after a few seconds, your .docx file will be downloaded to your browser.
Ebby has 100+ languages and dialects, plus its fast transcription and accuracy make it stand out from its competitors. However, the web interface isn’t designed to handle large files. As it has no folder structure and only allows for up to 10 items per page (you can create more by dragging them), you will need another method if your project requires extensive organization or editing before uploading.
Convert .SRT to word file Offline
Converting an SRT file, or SubRip Subtitle file, into a Word document can be helpful if you want to be able to edit the subtitles or captioning for a video.
There are moves online that will do this conversion for you, but you may not want to trust your valuable data to someone else’s server.
Fortunately, some great subtitle editing programs will allow you to make this conversion offline.
These softwares are designed specifically for converting SRT files and usually provide a few different options for how the conversion is done.
They also offer a wide range of features for editing subtitles, and they can export the results as a Word document.
However, some of these programs can be difficult to use, so make sure you read the instructions carefully before trying to convert your file. The most popular softwares are:
Subtitle Edit
Subtitle Edit is a very helpful program for any fan of movies and TV shows who wants to see films and shows in their original language.
This free program can correct various subtitle syncing errors so that you can watch movies and TV shows with perfect subtitles.
Now you know what Subtitle Edit is, let’s discuss its features.
Features:
- It allows you to create or sync subtitle lines.
- You can convert your files in desired format as it supports 300+ formats such as SRT, SBV, advanced Sub station, etc.
- It has an amazing feature of auto translation via google translation.
- You can merge or split the subtitles.
- It enables you to convert your audio into speech with its speech recognition feature.
- You can also adjust your display time.
One of the best part of this software is that it provides a batch converter tool. This tool allows you to convert multiple SRT files to plain Text subtitles files at once. Let’s check out how it works.
Step-by-step guideline to convert SRT to TXT
Step1 Firstly, ensure that Subtitle edit is installed on your device. If not, then download it. After downloading, run this software.
Step2 From its tools menu, open the Batch converter tool.
Step3 Import a folder containing SRT files. You can also drag and drop SRT files to its interface, individually.
Step4 Now, select the output format as Plain Text or any other format and set the encoding option. You can also customize some output configurations including
- Remove formatting
- Add/remove tags
- Redo casing
- Fix some common errors
- Adjust speed, etc.
Step5 Then, provide the output location and hit the convert button to start the conversion process.
Now as we know the method of converting SRT files to Word, let’s discuss its advantages as well as disadvantages.
Pros
- It has friendly and intuitive interface.
- It supports 300+ formats.
- It includes google translate for fast translation.
- It provides open-office spelling correction.
- It has also an audio spectrum.
Cons
- It sometimes seems complex no customization functionality
Best for :
Windows devices
Jubler
Jubler is a powerful text editing tool. It allows you to make or edit existing subtitles and work with almost any video format.
The combination of Jubler and Mplayer allows users to see a preview of subtitles in a movie. In addition, Jubler also includes a tool known as ASpell, which corrects grammar and spelling (works with the English language).
After knowing what Jubler is, let’s move forward to know about its features.
Features:
- It supports multiple formats such as
- SubStation
- SubStation Alpha
- SubRip
- SubViewer
- MicroDVD
- Etc.
- It supports all encodings that are supported by Java platform.
- Jubler also supports translating mode.
- You can mark subtitles with different colors while editing or playing a video.
- It also checks spelling with the support for dictionary selection.
- It offers basic editing skills such as splitting, joining, time shifting, etc.
How to steps with images
Now you know how to convert SRT to Word format, let’s look at its pros and cons.
Pros
- It has a comprehensive interface to sync subtitles.
- You can transcribe your text and run your video at the same time.
- It includes a spell checker.
- It offers good customization possibilities.
- It works in Windows, Linux and Mac.
Cons
- To get a preview of your video, you’ll need to install MP player.
- It’s not really updated anymore.
Best for:
Quick subtitle editing
Subtitle Workshop
Subtitle workshop is a freeware subtitle editing tool that offers a complete, efficient and convenient way to edit subtitles.
It supports all major subtitle formats and provides powerful features such as spell checking, automatic translation, synchronization, timed text preview and more.
Subtitle workshop is constantly being updated with new features and improvements, making it the most complete and convenient subtitle editing tool available.
Features:
- It supports converting, creating, editing and saving over 60 subtitle formats.
- It offers customizable tools and functions for automatic timing and text manipulation.
- It has Multi-Level Undo-Redo system
- It supports the OCR (find-and-replace text) scripts.
- It has comprehensive system for automatically and manually detecting, marking, and fixing subtitle errors.
- It also offers a CPS (Characters per Second) system.
- It supports a variety of audio/video formats.
Now, we’re well aware of this software. Let’s discuss step-by-step guide to convert SRT to Word file with Subtitle Workshop.
Pros
- It’s straightforward to use that makes it ideal for beginners.
- It’s friendly user-interface is customizable and supports multiple language.
- It also supports style and color tags within the subtitle text.
- You can preview your subtitle in full screen mode.
Cons
- It can be difficult while importing transcripts and require a lot of manual lines.
- It shows limited checks on overlaps, reading speeds and duration limits.
Best for:
Small and short SRT files
Convert SRT to Word file Manually
You must first remove the time codes to convert an SRT file to a Word document. Open the SRT file in a text editor (such as Notepad++ or Sublime Text) and delete all the lines that begin with numbers. These lines will typically look something like “00:00:01,000 –> 00:00: 02,000.” Once you have removed the time codes, save the file and open it in Microsoft Word.
The text from the SRT file will now be visible in the Word document. You can then format the text as desired and save the document.
Keep in mind that this manual method will not retain any formatting from the original SRT file, so you may need to do some additional editing to get the final results you want.
How to Edit and merge your Subtitles with Wondershare Filmora
Wondershare Filmora is one of the most popular video editing software programs available today. One of the reasons for its popularity is that it offers a wide range of features, including the ability to convert SRT files to Word format.
This can be a valuable tool for those who need to edit subtitles or create closed captioning for their videos.
In addition, Wondershare Filmora also offers a wide range of other features that make it an essential tool for any video editor, such as the ability to add transitions, effects, and titles.
As a result, Wondershare Filmora is a valuable tool for anyone who needs to edit videos regularly. Here’s how to convert SRT to a Word file using Filmora:
Free Download For Win 7 or later(64-bit)
Free Download For macOS 10.14 or later
1. Download and install Filmora on your computer.
2. Launch Filmora, then click “Import”> “Import files.” To start the project, you need to right-click on the timeline and select Advanced Edit.
3. At advanced edit you can perform the following tasks:
- Edit Time code.
- Change subtitles.
- Add/remove/merge subtitle strips.
- Change subtitle styles (same as Filmora Advanced Edit Text)
4. Finally, select the SRT file on the timeline, right-click and select “Export Subtitle File”.
Hot FAQs on Converting SRT to Word
1. How do I edit an SRT file in Word?
First, open the SRT file in Word. You may see some strange characters or formatting issues, but don’t worry - these can be fixed later. Next, make your changes to the transcript. Be sure to double-check the timing information to make sure it is still accurate. Finally, save the file and close Word. You should now be able to use the updated SRT file in your video player of choice.
2. How do I open SRT files with text on Mac?
If you have downloaded a movie or TV show with an SRT file, you can open the file using the TextEdit application on your Mac. First, open TextEdit and then go to the File menu. Next, select Open and choose the SRT file you want to open. The text from the SRT file will now be displayed in the TextEdit window. You can then save the file if you wish.
Alternatively, you can use the Quick Look feature on your Mac if you want to view the text from the SRT file. To do this, select the SRT file in the Finder and press the spacebar. The text from the SRT file will then be displayed in a Quick Look window.
Final Words
That’s it! You now know how to convert an SRT file into a DOCX. It is easy to convert SRT files to DOCX format with the help of online tools and offline converters.
However, if you want more control over the editing process or an easy-to-use video editing software with all the bells and whistles, try Wondershare Filmora .
This software has all the features you need to edit your subtitles and merge them with your video content.
Plus, it’s affordable and comes with a free trial, so you can try it before you buy. Have fun creating beautiful videos with perfect subtitles!
Also read:
- 2024 Approved A Review of Efectum App Making Slow Motion Video
- New In 2024, How To Add Motion Blur In Davinci Resolve?
- Updated Best 6 Online MP4 Croppers for 2024
- Updated 2024 Approved Convert Your Videos to 60 FPS Using These Excellent Tools
- New How to Create Video in Text Intro, In 2024
- Updated In 2024, Best Tools To Create Blend Image Collage
- Do You Want to Watch Videos in QuickTime with Subtitles in Your Desired Language? Here Are Different Ways to Add Subtitles in QuickTime Player
- Updated In 2024, Demystifying the Vectorscope A Comprehensive Guide for Premiere Pro Color Correction
- Keyframes Interval Everything You Need To Know for 2024
- Updated 3 Best Effects to Appear on Camera Made with Filmora
- Updated 8 Ways To Live Stream Pre-Recorded Video
- In 2024, Create Realistic Fire Effects by Filmora
- Updated In 2024, How to Add Filters on iMovie
- In 2024, What Is the Best MP4 Cutter for YouTuber on Mac?
- Updated What Are The Stages Of Film Production
- In 2024, How to Turn Text Into a Podcast
- Updated In 2024, Adobe Premiere Pro Download and Use Guide
- New In 2024, 8 Frame Rate Video Converters You Must Try
- New Are You Looking to Make Transparent Background in Canva Then You Can Learn About It in This Article
- Updated Top 10 Fun Discord Bots You Need
- You Are at the Right Post if You Are Surfing for a GIF to MP4 Conversion Tool. This Article Will Provide You with the Top Best Converters that Can Help You Convert GIF to MP4 Videos Quickly and Easily for 2024
- New Learning Unique Ways to Slow Down Time Lapse on iPhone
- Updated How to Create Motion Text Effects for Your Video for 2024
- How to Create Discord GIF Avatar in Depth Guide
- Guide to Making Cinematography for Music Video for 2024
- In 2024, 8 Apps to Custom GIF Stickers
- 2024 Approved 8 Frame Rate Video Converters for a Professional Finish
- 2024 Approved How to Create a Light Sweep (Shine) Effect
- In 2024, Dubbing Videos With Voiceovers | Using Wondershare Filmora
- New Complete Guide to Change Video Resolution in Filmora for 2024
- Updated 2024 Approved Beginners Guide About WMV Format and Best WMV Video Editor
- Splitting a Video Into Frames with the FFmpeg Step by Step
- New Discover the Best Video Filter Software . Elevate Your Video Editing with Top Contenders Like Filmora, DaVinci Resolve, HitFilm Express, and More
- 2024 Approved The Top Tips for Becoming a Good Podcast Host Are Presented in This Article. How to Start and End the Podcast Show Is All Set Below. You Can Also Learn About the Ways to Call Guests to Your Show
- In 2024, How to Change Video Thumbnail on Google Drive
- In 2024, Adobe Lightroom Color Grading Tutorial
- In 2024, The Best GIF Editors Weve Tested Heres What We Learned
- New AVI Editor for Windows 11/10/8.1/8/7 Easily Edit AVI Files on PC for 2024
- 2024 Approved Want to Make Professional-Looking Videos? Keep Reading to Give Your Videos a Cinematic Feel with the Audio Mixer of Filmora
- 2024 Approved Want to Make a Fun and Cinematic Video with an Introductory Text Title? Learn the Stages of Editing with Filmora for This Effect Here
- 3 Methods to Combine 2 or 3 Videos Into 1
- Updated Kdenlive Review – Is It The Best Video Editor?
- Top 5 Tools to Help You Know More Freeze-Frame Video Editing Skills
- Updated Confused About Which GoPro Should You Use? This Article Introduces and Provides a Detailed Overview of the Best GoPro for YouTubers You Can Find in the Market for Vlogging
- New Ways to Merge Videos in HandBrake? Expectation Vs. Reality
- 2024 Approved Explore the Advanced Tools to Help You Reshape the Art of Sky Replacement in Digital Imagery. Discover Methods to Enhance Your Visual Narratives Through AI
- New | How to Livestream Zoom on Facebook, In 2024
- New Best Ways to Convert Video Frame Rate to 60FPS Software and Online Choices for 2024
- 3 Facts You Need to Know about Screen Mirroring Tecno Phantom V Fold | Dr.fone
- Three Solutions to Hard Reset Infinix Note 30i? | Dr.fone
- Home Button Not Working on Itel P55T? Here Are Real Fixes | Dr.fone
- Identify missing hardware drivers with Windows Device Manager on Windows 7
- In 2024, Unlocking Apple iPhone XS Max Lock Screen 3 Foolproof Methods that Actually Work | Dr.fone
- Updated 2024 Approved Translate Live Videos With The Best Video Translator
- How do i sign a .xltx files document electronically
- In 2024, A Guide Honor X8b Wireless and Wired Screen Mirroring | Dr.fone
- Easy steps to recover deleted call history from Nubia Z50 Ultra
- How to Track Sony Xperia 5 V by Phone Number | Dr.fone
- In 2024, How to Get and Use Pokemon Go Promo Codes On Vivo Y27 4G | Dr.fone
- In 2024, How Can We Bypass OnePlus 12 FRP?
- Full Guide to Catch 100 IV Pokémon Using a Map On Poco X6 | Dr.fone
- How To Change Your iPhone 8 Apple ID on MacBook
- Unlocking the Power of Smart Lock A Beginners Guide for Infinix Smart 7 Users
- Ultimate Guide to Free PPTP VPN For Beginners On Oppo Find X6 | Dr.fone
- In 2024, CatchEmAll Celebrate National Pokémon Day with Virtual Location On Apple iPhone 15 Pro | Dr.fone
- The Top 5 Android Apps That Use Fingerprint Sensor to Lock Your Apps On Xiaomi Redmi A2+
- Hassle-Free Ways to Remove FRP Lock from Xiaomi Redmi Note 12 5G Phones with/without a PC
- In 2024, Android to Apple How To Transfer Photos From Infinix Hot 30 5G to iPad Easily | Dr.fone
- In 2024, Preparation to Beat Giovani in Pokemon Go For Asus ROG Phone 8 Pro | Dr.fone
- Overview of the Best Infinix Smart 7 Screen Mirroring App | Dr.fone
- In 2024, How and Where to Find a Shiny Stone Pokémon For Lava Storm 5G? | Dr.fone
- Is GSM Flasher ADB Legit? Full Review To Bypass Your Meizu Phone FRP Lock
- Wondering the Best Alternative to Hola On Vivo G2? Here Is the Answer | Dr.fone
- Title: Updated How To Fade Audio With Movavi Editor
- Author: Chloe
- Created at : 2024-05-20 03:38:36
- Updated at : 2024-05-21 03:38:36
- Link: https://ai-editing-video.techidaily.com/updated-how-to-fade-audio-with-movavi-editor/
- License: This work is licensed under CC BY-NC-SA 4.0.
