
:max_bytes(150000):strip_icc():format(webp)/linksys-default-password-list-2619153-5fccecc7c0b04133b2202a1fa9e8d37a.png)
Updated How to Get Zoom on TV Easy Solutions
How to Get Zoom on TV [Easy Solutions]
The modern workforce needs adaptable alternatives to the conventional room-to-room conferencing. The latest integrated online collaboration platform is called Zoom. What’s more, now you can get Zoom on TV. Being one of the most well-known conferencing programs, it offers reliable and efficient hosting of online meetings. In a same vein, you may set up conference rooms, do video seminars, and use instant messaging to receive real-time communications. Moreover, can you get zoom on your tv? Then the answer is Yes! The ideal technique to expand a small conference is to mirror it on TV using Zoom meetings. Additionally, sharing across all platforms and devices is possible. Sharing HD video, audio, and material from your desktop and mobile devices to conference rooms and phone systems is simple, dependable, and safe with Zoom Meetings.
Zoom is one of the top videos calling applications available, however, in terms of functionality, dependability, and stability. Special features include screen sharing for multi-user annotation and local and cloud recording with transcription. With just a single click, you may share any file with supported and encrypted settings for increased security and communicate across all platforms. Zoom has now come to represent meetings for those who do their business remotely. For almost all platforms, including Android, iOS, macOS, Windows, Smart TVs, etc., the Zoom app is officially accessible. For the query how to get zoom on portal tv? you may activate Zoom screen casting whether you’re using a Windows 10 or a Mac laptop with the Chrome browser. This section will be useful to you if you want to benefit from Zoom on a TV. You may thus do so. Continue reading the article to learn more about how to get zoom on tv.
Part 1: Get Zoom on TV with HDMI Cable
Although Zoom provides companies and bigger organizations with a professional solution like Zoom Rooms, if you’re at home, you don’t need to put anything on your TV to use Zoom. You may start using Zoom right away by simply connecting your Zoom device to your TV. Connect your TV to your laptop’s HDMI port if it has one. Simple as that, however if the laptop doesn’t figure it out on its own you may need to explain what is going on with the second display. Although more reliable, connecting via cable means your source device is linked to the TV and you can’t go for a stroll. It also means you don’t have to worry about the wireless connection fading.
Steps to Get Zoom on TV with HDMI
Step1Connect the HDMI End to the TV and the Other End to Your Device
You may use this in its place if you don’t have an HDMI but do have a USB-C port. To connect to the HDMI cable coming into your TV, you’ll need a dongle, but you’ll need to make sure it’s compatible.
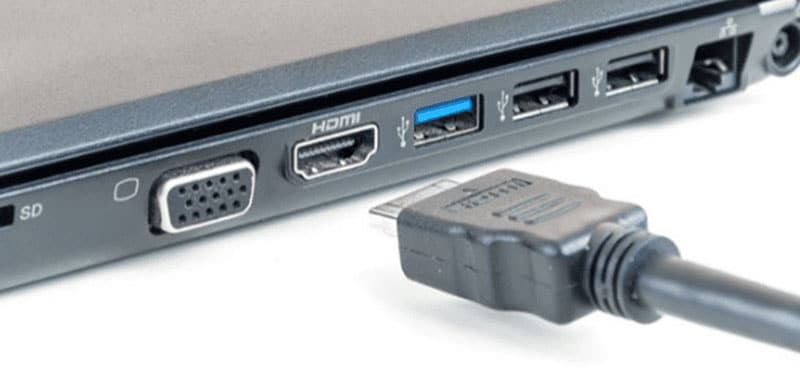
Step2Turn On your TV
Turn on your TV, then switch the video source to the HDMI port you just connected in your device to using the TV remote.
Step3Launch Zoom Meeting
Start or join a meeting by using the Zoom app on your smartphone (available for Android, iOS, Windows, and macOS).
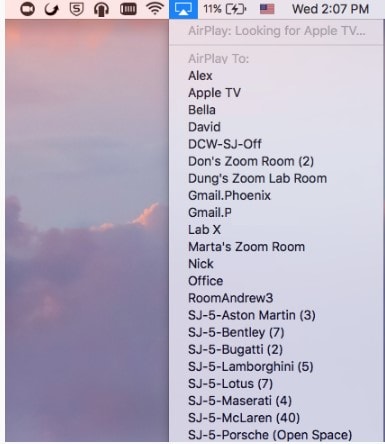
Part 2: Use AirPlay to Connect Zoom to TV
Using AirPlay mirroring, MacOS or iOS devices may share content with Zoom rooms. On MacOS and iOS, Airplay is used to communicate between the Zoom client and the Zoom room. There may be a great potential for your own business requirements if you can figure out how to utilize Airplay to Zoom mirror your screen to your Apple TV. By default, AirPlay sends audio to the Apple TV. Depending on how loud your speakers are set to play and where your input device’s microphone is located, this may cause echoing and ever-louder feedback loops. Without further ado, let’s look at some of the important strategies you may use to maximize live screen streaming on your Apple TV device.
Steps to Use AirPlay to Connect Zoom to TV
Step1Navigate to the Airplay Display in the Apple menu’s top right corner. Choose your Apple TV from the list of AirPlay Display options in the Displays preference pane. The “Show mirroring option in the menu bar when available” checkbox makes it easier to reach the AirPlay menu.

Step2Select Room Management > Zoom Rooms after logging into the Zoom online interface to manage your current Zoom Rooms. Then, modify the account settings and turn on Apple screen mirroring using the location hierarchy system.
Step3Turn on Apple Screen Mirroring by going to the Meetings tab. If this happens, you may need to activate it from the verification dialog box; otherwise, screen mirroring ought to start immediately on your device and let you see Zoom on your Apple TV. A shared password will be required of you.
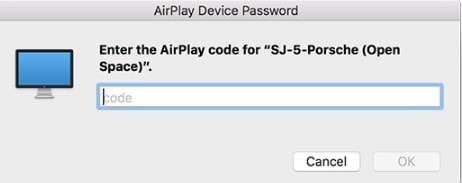
Step4Enter the passcode that is shown on the Zoom room’s screen. You may start using Airplay on your smartphone after enabling Apple screen mirroring.

Step5After that, turn off AirPlay Display by using the option in the preference pane or the system menu bar. To stop sharing, click Disconnect Airplay.
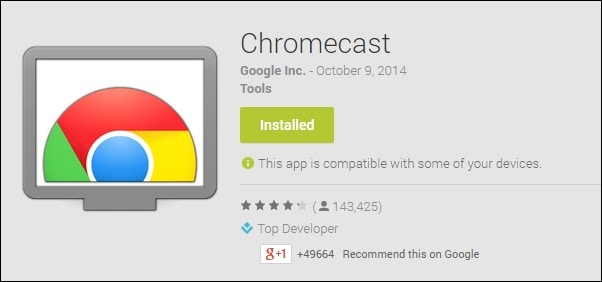
Part 3: Mirror Screen with Chromecast
The Chromecast gadgets from Google are well constructed. They should be able to cast more than just standard streaming services to your TV, logically speaking. Using a Chromecast device is one of the simplest methods to cast a Zoom conference to your TV. They are affordable, and any Google browser and the Google Home app for your Android or iOS smartphone both contain the cast capability. Between a device, such as your phone or computer, and the television, Chromecast offers the perfect connection. Chromecast makes it easy to cast Zoom meetings, particularly conferences with many of participants, since it can virtually reflect everything on your phone, tablet, or computer screen to your TV. For meetings with bigger attendance, it is advantageous to be able to cast Zoom meetings to almost any device, even a smart TV, using Chromecast.
Steps to Mirror Screen with Chromecast
Step1Install the Chromecast
Connect your Google Chromecast to the same internet source as your casting device by plugging it in.
Step2Manage Cast Settings
Locate the casting option on your device and search for recipients. Get the Zoom Cloud Meetings app for iOS or Android. You’ll also need to download the third-party software if you use an iPad or iPhone. After that, sign up for a Zoom account and log in to get started.
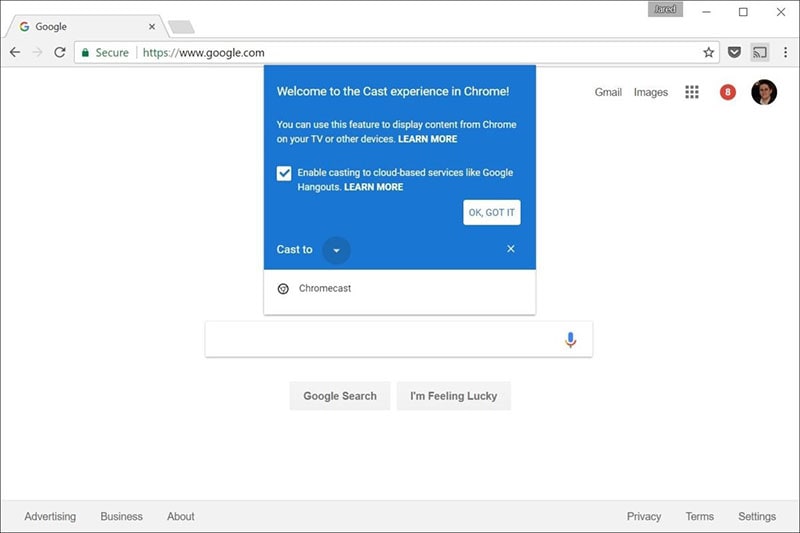
Step3Start Mirroring Zoom
The screen of your phone will show up on your TV when you tap your Chromecast. The best view is obtained by turning your phone into landscape after opening Zoom as usual. Once you place a call from here, the video will cast to your TV. Go to the next screen and click Start Broadcasting. You may now start casting to your Chromecast device by opening the Zoom Cloud Meeting app.
You must download the third-party app if you use an iPhone or iPad. The Chromecast Streamer software will let you cast a Zoom meeting on your Chromecast device as Zoom doesn’t provide a casting option.
Conclusion
Zoom’s popularity has skyrocketed as a result of the Pandemic. Zoom has emerged as the preferred video conferencing solution as the bulk of the global workforce shifts to a “work from home” environment. Now that more individuals than ever before work from home, video conferencing has emerged as a vital tool for marketing and corporate communication. Mirroring Zoom meetings to TV has never been this simple. In light of this, we hope that this guide has helped you come up with some of the greatest ideas and approaches for your personal zoom sharing needs. We really hope that this information has been helpful to you if you’ve been interested in learning more about screen sharing your Zoom to TV. Thanks to these methods, you can now mirror any device platform on TV.
The modern workforce needs adaptable alternatives to the conventional room-to-room conferencing. The latest integrated online collaboration platform is called Zoom. What’s more, now you can get Zoom on TV. Being one of the most well-known conferencing programs, it offers reliable and efficient hosting of online meetings. In a same vein, you may set up conference rooms, do video seminars, and use instant messaging to receive real-time communications. Moreover, can you get zoom on your tv? Then the answer is Yes! The ideal technique to expand a small conference is to mirror it on TV using Zoom meetings. Additionally, sharing across all platforms and devices is possible. Sharing HD video, audio, and material from your desktop and mobile devices to conference rooms and phone systems is simple, dependable, and safe with Zoom Meetings.
Zoom is one of the top videos calling applications available, however, in terms of functionality, dependability, and stability. Special features include screen sharing for multi-user annotation and local and cloud recording with transcription. With just a single click, you may share any file with supported and encrypted settings for increased security and communicate across all platforms. Zoom has now come to represent meetings for those who do their business remotely. For almost all platforms, including Android, iOS, macOS, Windows, Smart TVs, etc., the Zoom app is officially accessible. For the query how to get zoom on portal tv? you may activate Zoom screen casting whether you’re using a Windows 10 or a Mac laptop with the Chrome browser. This section will be useful to you if you want to benefit from Zoom on a TV. You may thus do so. Continue reading the article to learn more about how to get zoom on tv.
Part 1: Get Zoom on TV with HDMI Cable
Although Zoom provides companies and bigger organizations with a professional solution like Zoom Rooms, if you’re at home, you don’t need to put anything on your TV to use Zoom. You may start using Zoom right away by simply connecting your Zoom device to your TV. Connect your TV to your laptop’s HDMI port if it has one. Simple as that, however if the laptop doesn’t figure it out on its own you may need to explain what is going on with the second display. Although more reliable, connecting via cable means your source device is linked to the TV and you can’t go for a stroll. It also means you don’t have to worry about the wireless connection fading.
Steps to Get Zoom on TV with HDMI
Step1Connect the HDMI End to the TV and the Other End to Your Device
You may use this in its place if you don’t have an HDMI but do have a USB-C port. To connect to the HDMI cable coming into your TV, you’ll need a dongle, but you’ll need to make sure it’s compatible.
Step2Turn On your TV
Turn on your TV, then switch the video source to the HDMI port you just connected in your device to using the TV remote.
Step3Launch Zoom Meeting
Start or join a meeting by using the Zoom app on your smartphone (available for Android, iOS, Windows, and macOS).
Part 2: Use AirPlay to Connect Zoom to TV
Using AirPlay mirroring, MacOS or iOS devices may share content with Zoom rooms. On MacOS and iOS, Airplay is used to communicate between the Zoom client and the Zoom room. There may be a great potential for your own business requirements if you can figure out how to utilize Airplay to Zoom mirror your screen to your Apple TV. By default, AirPlay sends audio to the Apple TV. Depending on how loud your speakers are set to play and where your input device’s microphone is located, this may cause echoing and ever-louder feedback loops. Without further ado, let’s look at some of the important strategies you may use to maximize live screen streaming on your Apple TV device.
Steps to Use AirPlay to Connect Zoom to TV
Step1Navigate to the Airplay Display in the Apple menu’s top right corner. Choose your Apple TV from the list of AirPlay Display options in the Displays preference pane. The “Show mirroring option in the menu bar when available” checkbox makes it easier to reach the AirPlay menu.
Step2Select Room Management > Zoom Rooms after logging into the Zoom online interface to manage your current Zoom Rooms. Then, modify the account settings and turn on Apple screen mirroring using the location hierarchy system.
Step3Turn on Apple Screen Mirroring by going to the Meetings tab. If this happens, you may need to activate it from the verification dialog box; otherwise, screen mirroring ought to start immediately on your device and let you see Zoom on your Apple TV. A shared password will be required of you.
Step4Enter the passcode that is shown on the Zoom room’s screen. You may start using Airplay on your smartphone after enabling Apple screen mirroring.
Step5After that, turn off AirPlay Display by using the option in the preference pane or the system menu bar. To stop sharing, click Disconnect Airplay.
Part 3: Mirror Screen with Chromecast
The Chromecast gadgets from Google are well constructed. They should be able to cast more than just standard streaming services to your TV, logically speaking. Using a Chromecast device is one of the simplest methods to cast a Zoom conference to your TV. They are affordable, and any Google browser and the Google Home app for your Android or iOS smartphone both contain the cast capability. Between a device, such as your phone or computer, and the television, Chromecast offers the perfect connection. Chromecast makes it easy to cast Zoom meetings, particularly conferences with many of participants, since it can virtually reflect everything on your phone, tablet, or computer screen to your TV. For meetings with bigger attendance, it is advantageous to be able to cast Zoom meetings to almost any device, even a smart TV, using Chromecast.
Steps to Mirror Screen with Chromecast
Step1Install the Chromecast
Connect your Google Chromecast to the same internet source as your casting device by plugging it in.
Step2Manage Cast Settings
Locate the casting option on your device and search for recipients. Get the Zoom Cloud Meetings app for iOS or Android. You’ll also need to download the third-party software if you use an iPad or iPhone. After that, sign up for a Zoom account and log in to get started.
Step3Start Mirroring Zoom
The screen of your phone will show up on your TV when you tap your Chromecast. The best view is obtained by turning your phone into landscape after opening Zoom as usual. Once you place a call from here, the video will cast to your TV. Go to the next screen and click Start Broadcasting. You may now start casting to your Chromecast device by opening the Zoom Cloud Meeting app.
You must download the third-party app if you use an iPhone or iPad. The Chromecast Streamer software will let you cast a Zoom meeting on your Chromecast device as Zoom doesn’t provide a casting option.
Conclusion
Zoom’s popularity has skyrocketed as a result of the Pandemic. Zoom has emerged as the preferred video conferencing solution as the bulk of the global workforce shifts to a “work from home” environment. Now that more individuals than ever before work from home, video conferencing has emerged as a vital tool for marketing and corporate communication. Mirroring Zoom meetings to TV has never been this simple. In light of this, we hope that this guide has helped you come up with some of the greatest ideas and approaches for your personal zoom sharing needs. We really hope that this information has been helpful to you if you’ve been interested in learning more about screen sharing your Zoom to TV. Thanks to these methods, you can now mirror any device platform on TV.
How to Make Random Letter Reveal Intro?
The introductions in the video can create a major feel for the rest of the video in the viewers’ minds. So, most film and video makers focus on developing different styles of appealing and visually vibrant intro title formats for their projects.
Currently, one of the unique types of title format that is popular today among Youtubers and filmmakers is the style of random letters appearing on screen until the main title forms.

Wondering how to have the same effect for your video? This process will work easily with certain software tools, the most user-friendly and simple being the Wondershare Filmora software. Let’s understand the steps that go into this process here.
1. Launch Filmora on your Device
On Filmora’s official website, you can get the latest software version when you click on the Download button at the top or in the description box. After you do so, the free software will download automatically into your device in an installer format.
Free Download For Win 7 or later(64-bit)
Free Download For macOS 10.14 or later
From the Downloads section of your browser, double-click on it and press the Install button when it appears. Give the necessary permissions that it prompts.

Then, the software will start the installation instantly, likely taking a few seconds to complete.
2. Add the Default Title and Edit its Font
After Filmora launches, click on the “Create New Project” button on the homepage of the editor. Then, click on the Title tab from the top toolbar and choose the default title available here. Drag it and drop it onto the editing timeline below on Track 1.
Double-click on the title on the timeline, which will open the text editing window. Under the Text’s Preset tab, you will find the parameters for changing the main fault. Adjust the font style to the Impact style (or any bold title style you prefer), and click on the text field to add your custom title.
Following that, click on the text size option and change it to 15. Scroll down the menu to the Text Spacing section. Change the value to 20 and tap on the OK button afterward.

3. Split the title
On the editing timeline, tap on the Track 1 clip and click on the Snapshot icon at the far right side of the toolbar just above the timeline. This will automatically save in the media library section.
Then, take hold of the playhead on the timeline at the 3rd frame mark. Then, tap on the Scissor icon on the play head, which will split the clip into two portions. Click on the part following the 3rd frame mark and delete it.

4. Copy the clipped section multiple times
Then, double-click on the amount still available on the timeline to open the title editor section again. Make changes to the title you added here, only keeping the first letter.
Click on this clipped section on the timeline and copy it. Next, keep copying this clip multiple times continuously until the length of the collection on Track 1 to the 5-second mark.
Following that, zoom in on the timeline for a better view of these clipped parts. Choose the last clip that you copied and drag it to expand its time duration to the 6:15 mark.

5. Change the character of each clip
After making the previous edits, use your cursor to move to the first part of the timeline instead of zooming outward. Tap on the first clip that you had edited and double-click on it. In the text editing window, change the character to another random alphabet.

Repeat the same for all the split parts following the first one, changing the character to any random alphabet. At this time, ensure that you do not make two consecutive letters have the same alphabet, as that will put off the effect. However, keep the last elongated clip the same character as you originally put it.
6. Export the first letter clip
Then, please tap on the Export button at the top of the screen and add a name, like the first letter of your title. Click on the Settings button on this page to adjust the resolution and quality of the clip to the highest resolution for the best results.
Press Export again to save it to your device.
7. Edit the second letter clip and so on
After exporting the first file that will ultimately become the first letter of your random letter reveal intro title, you have to make the second letter-related clip.
For this, tap on the last clip on the timeline and double-click on it. Change the text in this clip to the second letter of your title. After doing this, go back to the first clip of your collection and double-click on it after selling it. Tap on the text field and give it another random letter.

Like with the first clip, continue doing this step for all of the next clips, except for the final clip. Then, export it in the same manner as the first clip.
Now that you know how to edit the first and second letters in sequence, repeat this process for all of the letters of your title to create a full clip for all of the intro title letters. When you are done, please select these clips and press the Delete button to remove them from the timeline.

8. Add all clips back to Filmora
Now it’s time to add all of the clips to Filmora and merge them into one cohesive intro title.
For this, click on My Media and go to Project Media. Right-click on the library section and press the Import button. This will take you to your device storage. Find the location where you saved all cut clips, and select them all. Press the Open button, and all of them will import into Filmora.

9. Drag the Snapshot to Timeline
Tap on the Snapshot you saved earlier sitting on the media library and drag it onto the Track 1 of the editing timeline. Double-click on it to open the video editing window.
Click on the Opacity option in the Video editing section and change it to 20%. Press the OK button after that.

10. Drop the Clip into the Timeline
Select the first letter clip from the media library section and drag it onto the timeline. Drop it above the Snapshot in Track 2 part. Then, choose the first Snapshot clip and increase its duration to the 8-second mark.
Next, double-click on the first letter clip on the Track 2 section to open its editing window. Click on the Blending Mode option and choose Screen from the drop-down menu.

Then, right-click on the first letter clip in the timeline and choose the Copy Effects option from the next drop-down menu. Move the playhead to the ending position on the timeline and change the value on the relevant axis of Position until it matches its letter position on the original title.
See the preview playing on the side for a better reference while adjusting the position.
11. Drop the next clips
Following this, click on the second letter clip and drag and drop it onto Track 3 on the timeline. Make sure to move the playhead to mark the starting position of this letter at the 5th frame mark.
Tap on this clip and move your playhead to the end position. Then, right-click on it and choose the Paste Effects option. Double-click on this clip on the timeline and change the position axis value until the letter aligns with its original position per the snapshot. Again, look at the Preview to ensure you align them correctly.

Repeat this with all the other letters, making sure to change the starting position for each consecutive one-two frame forward.
12. Hide and elongate each clip with snapshots
Then, click on the Snapshot clip on Track 1 and delete it. Following that, click the Hide icon on Track 3, Track 4, and onwards till the last one. Then, move the playhead to the end of the Track 2 clip and click on the Snapshot icon.
Choose the saved snapshot in the library window and drag-and-drop it behind Track 2 clip so it continues into it. Double-click on this Snapshot and choose Screen under Blending Mode. Then, right-click on this Snapshot and select “Copy Effects” from the menu.

Then, hide the Track 2 clip, unhide the Track 3 and Track 4 clip, and take a snapshot of that. As you did with Track 1’s screenshot, take this snapshot and place it beside Track 3 clip. Right-click on it and tap on “Paste Effects”. Repeat this one by one for all the clips after unhiding them for their particular step.
13. Finishing touches to Opacity
Finally, unhide all the clips and move the playhead to the 8-second mark. Click on the Scissor icon to Split them all at this position and remove the excess. Then, place the playhead at the beginning of Track 3 and double-click on it. Tap the Animation tab this time and adjust the Opacity to 0. Then, move the playhead ten frames forward and increase the Opacity to 100. Repeat this for all of the steps.

14. Preview and Export
After everything, tap on the Render Preview icon. Make sure to move the second clip on Track 2 as the starting point of the video by moving it to the beginning position. Now, press the Play button under the Preview player.

Conclusion
Finally, you are ready to use the same tactics as explained to optimize the quality and style of your video introduction title. Besides this, you can utilize other preset title options on video projects via Filmora. Try out multiple options and practice this particular approach on different video projects. Then, prepare stunning, visually captivating movies, vlogs, and documentaries quickly.
Free Download For macOS 10.14 or later
From the Downloads section of your browser, double-click on it and press the Install button when it appears. Give the necessary permissions that it prompts.
Then, the software will start the installation instantly, likely taking a few seconds to complete.
2. Add the Default Title and Edit its Font
After Filmora launches, click on the “Create New Project” button on the homepage of the editor. Then, click on the Title tab from the top toolbar and choose the default title available here. Drag it and drop it onto the editing timeline below on Track 1.
Double-click on the title on the timeline, which will open the text editing window. Under the Text’s Preset tab, you will find the parameters for changing the main fault. Adjust the font style to the Impact style (or any bold title style you prefer), and click on the text field to add your custom title.
Following that, click on the text size option and change it to 15. Scroll down the menu to the Text Spacing section. Change the value to 20 and tap on the OK button afterward.
3. Split the title
On the editing timeline, tap on the Track 1 clip and click on the Snapshot icon at the far right side of the toolbar just above the timeline. This will automatically save in the media library section.
Then, take hold of the playhead on the timeline at the 3rd frame mark. Then, tap on the Scissor icon on the play head, which will split the clip into two portions. Click on the part following the 3rd frame mark and delete it.
4. Copy the clipped section multiple times
Then, double-click on the amount still available on the timeline to open the title editor section again. Make changes to the title you added here, only keeping the first letter.
Click on this clipped section on the timeline and copy it. Next, keep copying this clip multiple times continuously until the length of the collection on Track 1 to the 5-second mark.
Following that, zoom in on the timeline for a better view of these clipped parts. Choose the last clip that you copied and drag it to expand its time duration to the 6:15 mark.
5. Change the character of each clip
After making the previous edits, use your cursor to move to the first part of the timeline instead of zooming outward. Tap on the first clip that you had edited and double-click on it. In the text editing window, change the character to another random alphabet.
Repeat the same for all the split parts following the first one, changing the character to any random alphabet. At this time, ensure that you do not make two consecutive letters have the same alphabet, as that will put off the effect. However, keep the last elongated clip the same character as you originally put it.
6. Export the first letter clip
Then, please tap on the Export button at the top of the screen and add a name, like the first letter of your title. Click on the Settings button on this page to adjust the resolution and quality of the clip to the highest resolution for the best results.
Press Export again to save it to your device.
7. Edit the second letter clip and so on
After exporting the first file that will ultimately become the first letter of your random letter reveal intro title, you have to make the second letter-related clip.
For this, tap on the last clip on the timeline and double-click on it. Change the text in this clip to the second letter of your title. After doing this, go back to the first clip of your collection and double-click on it after selling it. Tap on the text field and give it another random letter.
Like with the first clip, continue doing this step for all of the next clips, except for the final clip. Then, export it in the same manner as the first clip.
Now that you know how to edit the first and second letters in sequence, repeat this process for all of the letters of your title to create a full clip for all of the intro title letters. When you are done, please select these clips and press the Delete button to remove them from the timeline.
8. Add all clips back to Filmora
Now it’s time to add all of the clips to Filmora and merge them into one cohesive intro title.
For this, click on My Media and go to Project Media. Right-click on the library section and press the Import button. This will take you to your device storage. Find the location where you saved all cut clips, and select them all. Press the Open button, and all of them will import into Filmora.
9. Drag the Snapshot to Timeline
Tap on the Snapshot you saved earlier sitting on the media library and drag it onto the Track 1 of the editing timeline. Double-click on it to open the video editing window.
Click on the Opacity option in the Video editing section and change it to 20%. Press the OK button after that.
10. Drop the Clip into the Timeline
Select the first letter clip from the media library section and drag it onto the timeline. Drop it above the Snapshot in Track 2 part. Then, choose the first Snapshot clip and increase its duration to the 8-second mark.
Next, double-click on the first letter clip on the Track 2 section to open its editing window. Click on the Blending Mode option and choose Screen from the drop-down menu.
Then, right-click on the first letter clip in the timeline and choose the Copy Effects option from the next drop-down menu. Move the playhead to the ending position on the timeline and change the value on the relevant axis of Position until it matches its letter position on the original title.
See the preview playing on the side for a better reference while adjusting the position.
11. Drop the next clips
Following this, click on the second letter clip and drag and drop it onto Track 3 on the timeline. Make sure to move the playhead to mark the starting position of this letter at the 5th frame mark.
Tap on this clip and move your playhead to the end position. Then, right-click on it and choose the Paste Effects option. Double-click on this clip on the timeline and change the position axis value until the letter aligns with its original position per the snapshot. Again, look at the Preview to ensure you align them correctly.
Repeat this with all the other letters, making sure to change the starting position for each consecutive one-two frame forward.
12. Hide and elongate each clip with snapshots
Then, click on the Snapshot clip on Track 1 and delete it. Following that, click the Hide icon on Track 3, Track 4, and onwards till the last one. Then, move the playhead to the end of the Track 2 clip and click on the Snapshot icon.
Choose the saved snapshot in the library window and drag-and-drop it behind Track 2 clip so it continues into it. Double-click on this Snapshot and choose Screen under Blending Mode. Then, right-click on this Snapshot and select “Copy Effects” from the menu.
Then, hide the Track 2 clip, unhide the Track 3 and Track 4 clip, and take a snapshot of that. As you did with Track 1’s screenshot, take this snapshot and place it beside Track 3 clip. Right-click on it and tap on “Paste Effects”. Repeat this one by one for all the clips after unhiding them for their particular step.
13. Finishing touches to Opacity
Finally, unhide all the clips and move the playhead to the 8-second mark. Click on the Scissor icon to Split them all at this position and remove the excess. Then, place the playhead at the beginning of Track 3 and double-click on it. Tap the Animation tab this time and adjust the Opacity to 0. Then, move the playhead ten frames forward and increase the Opacity to 100. Repeat this for all of the steps.
14. Preview and Export
After everything, tap on the Render Preview icon. Make sure to move the second clip on Track 2 as the starting point of the video by moving it to the beginning position. Now, press the Play button under the Preview player.
Conclusion
Finally, you are ready to use the same tactics as explained to optimize the quality and style of your video introduction title. Besides this, you can utilize other preset title options on video projects via Filmora. Try out multiple options and practice this particular approach on different video projects. Then, prepare stunning, visually captivating movies, vlogs, and documentaries quickly.
Make Videos with Pictures and Music-10 Apps
Versatile Video Editor - Wondershare Filmora
Almost all modern social media platforms allow you to upload videos on your profile, on your story, and even send them as a message. And if you want to create more personalized videos, then you might be looking for apps to put music over video, apps to make videos with pictures and music, and other types of video editor apps. But since everyone wants to edit videos right on their Android and iOS devices, many apps are available. And to help you pick the perfect app for music on video clips and make other edits, we are here with the 10 best apps to make videos with music and pictures. All of these video editor apps also have their important details below. You can easily pick the best app for making videos with pictures and music by going through the following options.
In this article
01 [Best 10 Apps for Making Videos on Android & iOS](#Part 1)
02 [Video Editor Software for Windows & Mac](#Part 2)
Part 1 Best 10 Apps for Making Videos on Android & iOS
#1) Kinemaster
Kinemaster is considered one of the most influential and feature-rich options when you talk about the best app for making videos with music right on your mobile device. While its user interface can be a little imitating initially, it offers almost all the features you will need in a picture video app with music support. You can easily edit 4K videos, apply video effects, work with multiple layers, use its inbuilt media library, and do much more for quickly editing videos with any music of your choice.

#2) Filmr
Filmr can be a great video-creating app with music support for all those who want something easy to use thanks to its user interface. Even though this app may not have all the high-end and versatile video editing features, it certainly offers all the basics making it a great app to make music videos with pictures. Despite being completely free to use, you still get various filters for both video and audio. You can also apply these effects on pictures for making videos with music. And the best part is that you get all of this in a completely free-to-use the app.

#3) Filmora
Filmora is most likely the best app to make a video with music and pictures on your smartphone. This is thanks to the wide range of features and effects that it includes while being one of the easiest to use apps out there. If you want to create videos with pictures and music, you will be glad to know that this is a video editor app with Spotify music support and offline music support so that you can apply any music of your choice. Filmora also allows you to use a wide range of video effects, apply text, add face filters, etc. And if you like Filmora, you can even try the Filmora video editor, which is its desktop version, as you will see below.

#4) Inshot
Inshot is one of the more basic and simpler video editor apps out there. It was primarily made to create square images and videos for posting on social media platforms like Instagram. But now, this app can also be used for trimming, applying effects, changing color filters, adding stickers, adding text, and much more. And most importantly, Inshot can also be used to create slideshows and videos using pictures and music. Unlike some other free video editors, this one does not even have any watermarks.

#5) CapCut
CapCut has been quite a popular option for creating music videos for social media platforms like Instagram Reels, YouTube Shorts, TikTok, and more. Thus, it is the perfect sync video to music beat app that you install on your smartphone. But most importantly, it comes with all the latest video effects, transitions, and much more for creating all the latest video trends on your phone. You can add music to both videos and photos using CapCut as you like.

#6) Vimeo Create
Vimeo is a fairly popular video streaming platform which is almost similar to YouTube. Since a lot of users upload a large number of videos on Vimeo, Vimeo also offers its own editor. While it also has an online editor, you can also download Vimeo Create on your mobile device since it is available for both Android and iOS devices. It is the perfect option for beginners thanks to the large number of templates it offers for creating videos using pictures and music.

#7) Power Director
Power Director is quite a popular video editing app which is available on almost all platforms out there including mobile devices like Android & iOS. And even with the mobile version, you get almost all the functions of the desktop version making it perfect for creating videos using pictures and music. Even with the free version of Power Director, you also get a decent amount of video effects and support for editing 4K videos with ease. However, the free version does have a watermark on all the videos that you create.

#8) Adobe Premiere Rush
If you are familiar with industry standards when you are talking about video editors, then you must know about Adobe Premiere Pro. And if you want a familiar experience on your mobile device, then you can go with the Adobe Premiere Rush. Even on your mobile device, it offers a very similar experience thanks to the wide range of features, effects, controls, and much more it offers. Unlike other video editor apps, it even allows you to record videos if you want more than just creating videos using pictures and music.

#9) GoPro Quik
As you can guess by the name, GoPro Quik is a video editing app primarily made for GoPro cameras. But with newer updates for this app, it can be used with any kind of video or picture files. And the best thing about the GoPro Quik app is that it supports automated music beat sync editing. You can simply add any music track in the app and it will automatically sync photos and videos with it. If you want, you can also use video effects like speed control, crop and trim, color filters, text, stickers, and much more.

#10) Picsart
Even though Picsart was primarily a photo editing app, it also supports video editing in newer versions. And since Picsart is great for editing photos and pictures, creating videos using pictures and music is also quite easy. All of the features and effects supported by Picsart for photos, will also work for editing videos using Picsart. It includes color filters, face filters, makeup options, video effects, cropping, trimming, etc.

Part 2 Video Editor Software for Windows & Mac
With all the various apps given above, you can easily pick the right app to put videos together with music right on your smartphone. And while all of these apps work great for basic usage, any large projects are better to be done on a computer. Thankfully, even if you want an app to put videos and pictures together with music on your computer, you can still find multiple free to use options. Out of all such options,
is considered the best free app to make videos with music for Windows and Mac. Just per the name, Filmora is the desktop version of the previously mentioned Filmora.
Since this is the desktop version of Filmora, it offers even more features making it a great option for those who want the best app to make videos with music on Windows and Mac. Both the Windows and Mac versions of the Filmora video editing app are quite easy to use with easy-to-access options. As for its options, you get a wide range of video effects, color grading, audio settings, keyboard shortcuts, keyframing, motion tracking, and much more. And unlike other options, Filmora is the best perfect picture video app with music support for those who want an easy-to-run video editor since it can run even on entry-level computers with ease.
Wondershare Filmora
Get started quickly with Filmora’s powerful performance, intuitive interface, and countless effects!
Try It Free Try It Free Try It Free Learn More >

Conclusion
While there are music video creator app options available out there, not all of them offer the right features and options. Hence, to help you in picking the best app for music video made on your mobile device, we have already given the 10 best apps to make videos with music and pictures. Since all of these apps are quite different, you can certainly find the right option whether you want music over video app or a video collage with music app for your mobile device. You can also leave your thoughts and questions regarding the best app for making videos with pictures and music in the comments section below.
Almost all modern social media platforms allow you to upload videos on your profile, on your story, and even send them as a message. And if you want to create more personalized videos, then you might be looking for apps to put music over video, apps to make videos with pictures and music, and other types of video editor apps. But since everyone wants to edit videos right on their Android and iOS devices, many apps are available. And to help you pick the perfect app for music on video clips and make other edits, we are here with the 10 best apps to make videos with music and pictures. All of these video editor apps also have their important details below. You can easily pick the best app for making videos with pictures and music by going through the following options.
In this article
01 [Best 10 Apps for Making Videos on Android & iOS](#Part 1)
02 [Video Editor Software for Windows & Mac](#Part 2)
Part 1 Best 10 Apps for Making Videos on Android & iOS
#1) Kinemaster
Kinemaster is considered one of the most influential and feature-rich options when you talk about the best app for making videos with music right on your mobile device. While its user interface can be a little imitating initially, it offers almost all the features you will need in a picture video app with music support. You can easily edit 4K videos, apply video effects, work with multiple layers, use its inbuilt media library, and do much more for quickly editing videos with any music of your choice.
#2) Filmr
Filmr can be a great video-creating app with music support for all those who want something easy to use thanks to its user interface. Even though this app may not have all the high-end and versatile video editing features, it certainly offers all the basics making it a great app to make music videos with pictures. Despite being completely free to use, you still get various filters for both video and audio. You can also apply these effects on pictures for making videos with music. And the best part is that you get all of this in a completely free-to-use the app.
#3) Filmora
Filmora is most likely the best app to make a video with music and pictures on your smartphone. This is thanks to the wide range of features and effects that it includes while being one of the easiest to use apps out there. If you want to create videos with pictures and music, you will be glad to know that this is a video editor app with Spotify music support and offline music support so that you can apply any music of your choice. Filmora also allows you to use a wide range of video effects, apply text, add face filters, etc. And if you like Filmora, you can even try the Filmora video editor, which is its desktop version, as you will see below.
#4) Inshot
Inshot is one of the more basic and simpler video editor apps out there. It was primarily made to create square images and videos for posting on social media platforms like Instagram. But now, this app can also be used for trimming, applying effects, changing color filters, adding stickers, adding text, and much more. And most importantly, Inshot can also be used to create slideshows and videos using pictures and music. Unlike some other free video editors, this one does not even have any watermarks.
#5) CapCut
CapCut has been quite a popular option for creating music videos for social media platforms like Instagram Reels, YouTube Shorts, TikTok, and more. Thus, it is the perfect sync video to music beat app that you install on your smartphone. But most importantly, it comes with all the latest video effects, transitions, and much more for creating all the latest video trends on your phone. You can add music to both videos and photos using CapCut as you like.
#6) Vimeo Create
Vimeo is a fairly popular video streaming platform which is almost similar to YouTube. Since a lot of users upload a large number of videos on Vimeo, Vimeo also offers its own editor. While it also has an online editor, you can also download Vimeo Create on your mobile device since it is available for both Android and iOS devices. It is the perfect option for beginners thanks to the large number of templates it offers for creating videos using pictures and music.
#7) Power Director
Power Director is quite a popular video editing app which is available on almost all platforms out there including mobile devices like Android & iOS. And even with the mobile version, you get almost all the functions of the desktop version making it perfect for creating videos using pictures and music. Even with the free version of Power Director, you also get a decent amount of video effects and support for editing 4K videos with ease. However, the free version does have a watermark on all the videos that you create.
#8) Adobe Premiere Rush
If you are familiar with industry standards when you are talking about video editors, then you must know about Adobe Premiere Pro. And if you want a familiar experience on your mobile device, then you can go with the Adobe Premiere Rush. Even on your mobile device, it offers a very similar experience thanks to the wide range of features, effects, controls, and much more it offers. Unlike other video editor apps, it even allows you to record videos if you want more than just creating videos using pictures and music.
#9) GoPro Quik
As you can guess by the name, GoPro Quik is a video editing app primarily made for GoPro cameras. But with newer updates for this app, it can be used with any kind of video or picture files. And the best thing about the GoPro Quik app is that it supports automated music beat sync editing. You can simply add any music track in the app and it will automatically sync photos and videos with it. If you want, you can also use video effects like speed control, crop and trim, color filters, text, stickers, and much more.
#10) Picsart
Even though Picsart was primarily a photo editing app, it also supports video editing in newer versions. And since Picsart is great for editing photos and pictures, creating videos using pictures and music is also quite easy. All of the features and effects supported by Picsart for photos, will also work for editing videos using Picsart. It includes color filters, face filters, makeup options, video effects, cropping, trimming, etc.
Part 2 Video Editor Software for Windows & Mac
With all the various apps given above, you can easily pick the right app to put videos together with music right on your smartphone. And while all of these apps work great for basic usage, any large projects are better to be done on a computer. Thankfully, even if you want an app to put videos and pictures together with music on your computer, you can still find multiple free to use options. Out of all such options,
is considered the best free app to make videos with music for Windows and Mac. Just per the name, Filmora is the desktop version of the previously mentioned Filmora.
Since this is the desktop version of Filmora, it offers even more features making it a great option for those who want the best app to make videos with music on Windows and Mac. Both the Windows and Mac versions of the Filmora video editing app are quite easy to use with easy-to-access options. As for its options, you get a wide range of video effects, color grading, audio settings, keyboard shortcuts, keyframing, motion tracking, and much more. And unlike other options, Filmora is the best perfect picture video app with music support for those who want an easy-to-run video editor since it can run even on entry-level computers with ease.
Wondershare Filmora
Get started quickly with Filmora’s powerful performance, intuitive interface, and countless effects!
Try It Free Try It Free Try It Free Learn More >
Conclusion
While there are music video creator app options available out there, not all of them offer the right features and options. Hence, to help you in picking the best app for music video made on your mobile device, we have already given the 10 best apps to make videos with music and pictures. Since all of these apps are quite different, you can certainly find the right option whether you want music over video app or a video collage with music app for your mobile device. You can also leave your thoughts and questions regarding the best app for making videos with pictures and music in the comments section below.
Best Love Video Maker with Music
What could be more amazing than sharing a love video on a special day through social media platforms? How about showing your beloved person a special love video containing all of your special moments? Even though every lover wants to make a special video for their loved ones, the idea of creating video with knowledge scares them off. However, it is very easy these days to create a love video with a love video marker.
If you have the photos of your beautiful memories with your loved one readily available on your computer, we have the best love video maker selected for you. You are more likely to have the photos on your phone as most people use phone camera to capture photos. Therefore, we have listed the best love video maker apps with music to create amazing love videos.
Part 1. Best Love Video Maker for PC and Mac
If you are a computer user and you want to make your special love video on your computer from your photos, we recommend Wondershare Filmora. Filmora is a professional video creator and editor that is available for Windows and Mac users. But the user interface is highly intuitive so that all users can use the application without any prior experience.
You can stretch any photo according to the duration you want in the video. There are beautiful love transitions and effects available to make the video eye-catching. Most importantly, you can import any love song and add that as the background music so that the video feels truly special. Here are the steps to make a love video with Filmora.
For Win 7 or later (64-bit)
For macOS 10.12 or later
**Step 1: Install Filmora and Start Your Video Project
Download and install Wondershare Filmora. Launch Filmora and click on New Project from the welcome screen. Drag and drop your love photos into Project Media folder.
**Step 2: Arrange The Photos on Timeline
Drag and drop the imported photos on the timeline. Arrange them in proper order so that they appear perfectly on the video. You can stretch the duration of photos as per your requirements. Make sure there is no gap in between the photos on the timeline to avoid a black screen during the transition from one photo to another.

**Step 3: Add Beautiful Transition Effects
It is time to apply transition effects so that the photos change from one another with beautiful graphical effects. There are dedicated wedding and love transition effects available to select from. Drag and drop the transitions and place them on the photos one by one.

**Step 4: Add Background Music
Now, drag and drop the love song on Project Media folder that you want the video to play in the background. Drag and drop on the audio timeline below the existing timeline.

**Step 5: Export Your Video
Play the video on Filmora and make any adjustment as you think appropriate. Thereafter, click on Export button and export your video to your hard drive in your desired file format.

Part 2. Best Love Video Creator Apps
If you want to make a love video with your photos on your smartphone, here are the best love maker apps you can consider for the best result.
1. Love Video Maker with Music
Love Video Maker with Music is a popular video maker app where you can instantly make love videos from your photos and share anywhere you want. In fact, social media users prefer the app to create short videos from photos and add romantic music and publish them online. There are beautiful frames available where the photos will be featured and thereby, making the video eye-catching and engaging.
Along with frames, there are different types of romantic text styles available to write anything on the photos and frames. Moreover, you can use different love stickers to enhance the video content. The app allows creating HD quality videos and it is best for Android users. Here are the top features of Love Video Maker with Music app.
- Import as many as 60 photos for video creation.
- Includes photo editor that comes with filters and collage feature.
- Different themes, frames, and text designs available.
- Add music file and trim as per length requirements.
- Add different background effects and adjust speed.
- Square format to post on Instagram and Facebook.
2. Love Video Maker with Songs
Love Video Maker with Songs is exclusively available for iOS users. You can create romantic videos, and you will get all the options to enhance your video quality and content exactly the way you want to. You can add different transitions and animations. The app allows adding music from different sources including iTunes. You can even add your voiceover for personalization.
There are standard video editing options available such as trimming, cropping, changing speed, and much more. There is also no dearth of love stickers and frames. You can also add stylish texts and share the video directly from the app to online platforms. Here are the top features of Love Video Maker with Songs.
- Wide range of video filters and graphical effects.
- Standard video editor for trim, crop, speed change.
- Latest love stickers and frames present.
- Add music from iTunes, other videos, and voiceover.
- Set photo animation duration and stylish texts.
- Instant share on social media platforms directly from the app.
3. Love Video Maker from Microsoft
If you are for a love video maker app for your Windows 10 phone, tablet, or even computer, Love Video Maker from Microsoft is a great choice. Creating a love video from your romantic photos is super easy. Select the photos, add a theme, add background music and thereafter, add stunning filters and your video will be ready to instant saving.
The app comes with a standard photo editing tool where you can edit the photos before adding them to the video. You can blur background, add borders and frames, attach cute stickers and custom texts as per your preference. Here are the top features of Love Video Maker.
- Unlimited photos can be selected for video creation.
- Add different themes and overlay effects with filters.
- Add different borders, frames, and stickers to your photos.
- Blur background, add effects, and custom texts to your photos.
- Save and share videos on social media platforms.
Conclusion
Making love and romantic videos for personal collection as well as sharing them on social media platforms is quite a regular thing. You should have a high-quality love video maker where you should have all the different romantic video making tools and options. We have picked the best video maker for computer users as well as top love video making apps for smartphone users. We recommend Wondershare Filmora as there are unlimited effects, elements, and music for publishing best-quality love videos.
For macOS 10.12 or later
**Step 1: Install Filmora and Start Your Video Project
Download and install Wondershare Filmora. Launch Filmora and click on New Project from the welcome screen. Drag and drop your love photos into Project Media folder.
**Step 2: Arrange The Photos on Timeline
Drag and drop the imported photos on the timeline. Arrange them in proper order so that they appear perfectly on the video. You can stretch the duration of photos as per your requirements. Make sure there is no gap in between the photos on the timeline to avoid a black screen during the transition from one photo to another.
**Step 3: Add Beautiful Transition Effects
It is time to apply transition effects so that the photos change from one another with beautiful graphical effects. There are dedicated wedding and love transition effects available to select from. Drag and drop the transitions and place them on the photos one by one.
**Step 4: Add Background Music
Now, drag and drop the love song on Project Media folder that you want the video to play in the background. Drag and drop on the audio timeline below the existing timeline.
**Step 5: Export Your Video
Play the video on Filmora and make any adjustment as you think appropriate. Thereafter, click on Export button and export your video to your hard drive in your desired file format.
Part 2. Best Love Video Creator Apps
If you want to make a love video with your photos on your smartphone, here are the best love maker apps you can consider for the best result.
1. Love Video Maker with Music
Love Video Maker with Music is a popular video maker app where you can instantly make love videos from your photos and share anywhere you want. In fact, social media users prefer the app to create short videos from photos and add romantic music and publish them online. There are beautiful frames available where the photos will be featured and thereby, making the video eye-catching and engaging.
Along with frames, there are different types of romantic text styles available to write anything on the photos and frames. Moreover, you can use different love stickers to enhance the video content. The app allows creating HD quality videos and it is best for Android users. Here are the top features of Love Video Maker with Music app.
- Import as many as 60 photos for video creation.
- Includes photo editor that comes with filters and collage feature.
- Different themes, frames, and text designs available.
- Add music file and trim as per length requirements.
- Add different background effects and adjust speed.
- Square format to post on Instagram and Facebook.
2. Love Video Maker with Songs
Love Video Maker with Songs is exclusively available for iOS users. You can create romantic videos, and you will get all the options to enhance your video quality and content exactly the way you want to. You can add different transitions and animations. The app allows adding music from different sources including iTunes. You can even add your voiceover for personalization.
There are standard video editing options available such as trimming, cropping, changing speed, and much more. There is also no dearth of love stickers and frames. You can also add stylish texts and share the video directly from the app to online platforms. Here are the top features of Love Video Maker with Songs.
- Wide range of video filters and graphical effects.
- Standard video editor for trim, crop, speed change.
- Latest love stickers and frames present.
- Add music from iTunes, other videos, and voiceover.
- Set photo animation duration and stylish texts.
- Instant share on social media platforms directly from the app.
3. Love Video Maker from Microsoft
If you are for a love video maker app for your Windows 10 phone, tablet, or even computer, Love Video Maker from Microsoft is a great choice. Creating a love video from your romantic photos is super easy. Select the photos, add a theme, add background music and thereafter, add stunning filters and your video will be ready to instant saving.
The app comes with a standard photo editing tool where you can edit the photos before adding them to the video. You can blur background, add borders and frames, attach cute stickers and custom texts as per your preference. Here are the top features of Love Video Maker.
- Unlimited photos can be selected for video creation.
- Add different themes and overlay effects with filters.
- Add different borders, frames, and stickers to your photos.
- Blur background, add effects, and custom texts to your photos.
- Save and share videos on social media platforms.
Conclusion
Making love and romantic videos for personal collection as well as sharing them on social media platforms is quite a regular thing. You should have a high-quality love video maker where you should have all the different romantic video making tools and options. We have picked the best video maker for computer users as well as top love video making apps for smartphone users. We recommend Wondershare Filmora as there are unlimited effects, elements, and music for publishing best-quality love videos.
Also read:
- 2024 Approved Steps to Remove Background Noise From Video Sony Vegas
- New In 2024, Learn Topaz Video Enhance AI Review and Achieve Powerful Video Conversion
- New 2024 Approved Deep Learning of AI Video Recognition
- Demystifying the Vectorscope A Comprehensive Guide for Premiere Pro Color Correction for 2024
- Updated Discord Is Becoming More Popular with Time with Millions of Users. Are You Thinking of Getting a GIF for Discord Profile? If Yes, Learn From This Piece Since We Have a Conclusive Summary of Getting a GIF Profile Picture for Discord
- Bored of Extraneous Software Downloads and Program Installations to Edit Your Videos? The Best Video Editing Online Utilities Are Here at Your Rescue for 2024
- New 2024 Approved 6 Best Methods to Make a Video Longer
- 2024 Approved Looking for Final Cut Pro Alternative App for Your Android Smartphone or iPhone? Here Is the List of the Best FCP Alternative Apps for Android and iOS Users
- 2024 Approved Want to Learn How to Make Gaming Montage Videos? You Have Come to the Right Place. This Guide Will Teach You All You Need to Know to Create Montages of Video Games and Share Them with Other Players
- In 2024, How to Create Cinematic Style Videos?
- New 2024 Approved How to Create a Text Effect Video with Filmora
- New In 2024, Best Tools To Create Blend Image Collage
- Useful Guide to Speed Up/Down Videos in VLC
- In 2024, Top 31 Video Trimmers That Will Save You Time in Ediitng
- 2024 Approved This Well-Written Article Will Share a Descriptive Method on How to Stream Zoom to YouTube Quickly. By Doing so, You Can Share Your Zoom Session Live with Your YouTube Audience Effortlessly
- In 2024, Do You Want to Replace the Sky in Your Media? Read the Article to Learn How to Change the Sky App on Your Mobile Phone
- In 2024, How to Control the Speed of Video
- 2024 Approved How to Add the Popular Video Text Effects to Your Video?
- New Learn Top Best Free LUTs For Premiere Pro
- Best Ideas on Using Filmora Green Screen for 2024
- New Shotcut Review – Is It The Best Free Video Editor?
- Updated Want to Come up with Exciting Sony Vegas Slideshow Templates for Your Next Project on YouTube and Other Mediums Then There Is Something for You
- Tutorial How To Add Motion Blur in Blender?
- Guide To Creating The Perfect VHS Effect Look in Premiere Pro for 2024
- In 2024, Best Phantom Slow-Mo Camera For Recording Slow Motion Videos
- Best CapCut Templates for Slow Motion Video Trend for 2024
- In 2024, Your Search for the Best GIF Creator Tools Ends Here
- Frame Rates, Speed, and Wondershare Filmora for 2024
- In 2024, Video Maker with Song
- New Speed Control Is Frequently Used in Video Editing. By Speed up or Slow Down the Video Speed, You Can Achieve Different Visual Results. This Article Will Show You How to Control the Speed of a Video
- Updated In 2024, Step by Step to Split Clips in VLC
- Updated Top Ever Ways Make Tiktok Slideshow Solved
- Updated Guide to Synchronizing Your Audio And Videos Properly, In 2024
- 2024 Approved Focusing On The Best Ways To Convert Slow-Motion Video to Normal
- 2024 Approved Step by Step to Rotate Videos in Windows Media Player
- Step by Step to Rotate Videos in Davinci Resolve for 2024
- 7 Ways to Make GIF From Videos on Mac for 2024
- New How to Create Sports Intro and YouTube Endscreen for 2024
- In 2024, Top 15 LUTS to Buy
- New 2024 Approved How To Quick Guide for Making Google Slideshows
- 2024 Approved Learn How to Rotate Videos with Ease Using Shotcut with Our Comprehensive Guide. Discover Tips and Tricks to Get the Perfect Footage Every Time. Start Using Shotcut Today
- New Add Effects to Video Online for 2024
- Updated In 2024, Step by Step to Rotate Videos Using OBS
- New In 2024, How Can You Deny These Top 10 Free Speech to Text Software
- Updated 2024 Approved Step by Step to Crop Videos Using Lightworks
- How to Spy on Text Messages from Computer & Apple iPhone SE (2022) | Dr.fone
- 5 Ways to Reset Realme C33 2023 Without Volume Buttons | Dr.fone
- 4 Most-Known Ways to Find Someone on Tinder For Itel P40+ by Name | Dr.fone
- In 2024, How to use Snapchat Location Spoofer to Protect Your Privacy On Tecno Camon 20? | Dr.fone
- Easy Fixes How To Recover Forgotten iCloud Password On your Apple iPhone 6 Plus
- In 2024, iPogo will be the new iSpoofer On Realme V30T? | Dr.fone
- 9 Best Free Android Monitoring Apps to Monitor Phone Remotely For your Vivo V27e | Dr.fone
- Life360 Circle Everything You Need to Know On Tecno Phantom V Flip | Dr.fone
- How to Fix Locked Apple ID from iPhone 12 Pro Max
- Easy Guide to OnePlus Ace 2 FRP Bypass With Best Methods
- 4 solution to get rid of pokemon fail to detect location On Honor Play 7T | Dr.fone
- In 2024, How to Bypass Android Lock Screen Using Emergency Call On Vivo V30 Lite 5G?
- Why Your WhatsApp Location is Not Updating and How to Fix On Nokia C32 | Dr.fone
- In 2024, How To Activate and Use Life360 Ghost Mode On Realme 12+ 5G | Dr.fone
- Full Guide to Fix iToolab AnyGO Not Working On Realme 12 Pro 5G | Dr.fone
- How to Rescue Lost Videos from F5 5G
- The Most Effective Ways to Bypass Apple iPhone 8 Plus Activation Lock
- 8 Ultimate Fixes for Google Play Your Oppo Reno 10 Pro+ 5G Isnt Compatible | Dr.fone
- How to Create Your Own Avatar Free
- How to Vivo T2x 5G Get Deleted photos Back with Ease and Safety?
- Lock Your Infinix Note 30 Pro Phone in Style The Top 5 Gesture Lock Screen Apps
- In 2024, Reset iTunes Backup Password Of Apple iPhone 8 Prevention & Solution
- Latest way to get Shiny Meltan Box in Pokémon Go Mystery Box On OnePlus 12R | Dr.fone
- In 2024, Top 10 Fingerprint Lock Apps to Lock Your Vivo Y28 5G Phone
- The Best 8 VPN Hardware Devices Reviewed On Tecno Spark 10C | Dr.fone
- 6 Methods to Share Apple iPhone 14 Plus Screen with PC | Dr.fone
- How to Watch Hulu Outside US On Xiaomi Redmi Note 12 Pro 4G | Dr.fone
- In 2024, Disabled iPhone 6 How to Unlock a Disabled iPhone 6? | Dr.fone
- In 2024, 5 Easy Ways to Copy Contacts from Meizu 21 Pro to iPhone 14 and 15 | Dr.fone
- Why Apple Account Disabled From your iPhone 7 Plus? How to Fix
- Title: Updated How to Get Zoom on TV Easy Solutions
- Author: Chloe
- Created at : 2024-04-24 07:08:11
- Updated at : 2024-04-25 07:08:11
- Link: https://ai-editing-video.techidaily.com/updated-how-to-get-zoom-on-tv-easy-solutions/
- License: This work is licensed under CC BY-NC-SA 4.0.
