:max_bytes(150000):strip_icc():format(webp)/Horserace-56ca33a85f9b5879cc4bcc6e.jpg)
Updated How to Loop Videos with iMovie

How to Loop Videos with iMovie
If you are a video creator, there are times when you have to loop a video. This is to extend the duration of the original video. For instance, you have a stock video of a short duration. You want it to be the background in your video throughout. You have to extend the duration of the stock video by playing it in a loop.
If you are a macOS user, you can use iMovie to loop your video. iMovie comes pre-install on macOS devices. iMovie happens to be one of the most preferred video editors among beginners. In fact, iMovie comes pre-installed on iPhones and iPads. You can easily loop your video on your mobile devices as well. We will illustrate how to loop a video on iMovie on iPhone as well as on Mac.
Part 1. How to loop a video on iMovie iPhone
iMovie by Apple comes pre-installed on iPhone and iPad. Naturally, it is one of the most widely used video editors by iPhone users. iMovie app has options for basic and even advanced levels of video editing. Looping a video on iMovie involves a few simple steps that everyone can perform easily. Here are the steps on how to loop a video in the iMovie app on your iPhone.
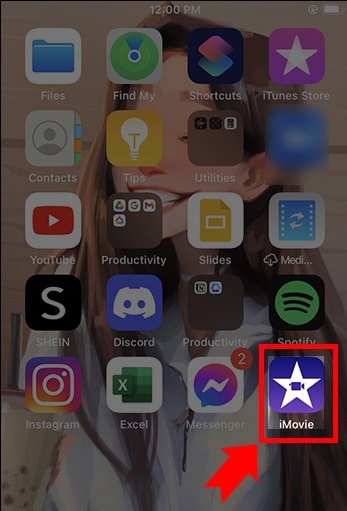
Step1 Launch the iMovie app on your iPhone. If you have uninstalled or disabled the app, you can always go to App Store to install it again.
Step2 If you are opening the app for the first time, you will get a welcome screen. Follow the on-screen instructions to land on the home screen of the app.
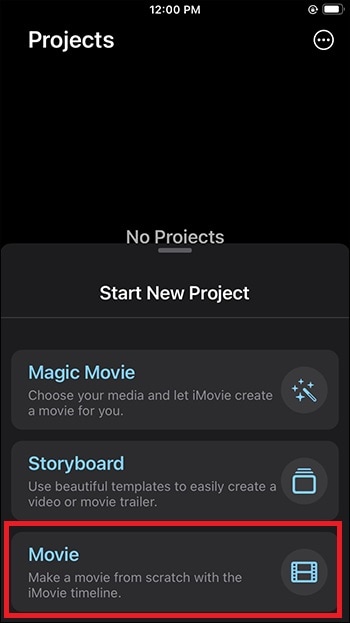
Step3 Tap on New Project “+” icon and select the Movie option to get started. This will take you to the phone media gallery to select a media file to get started.
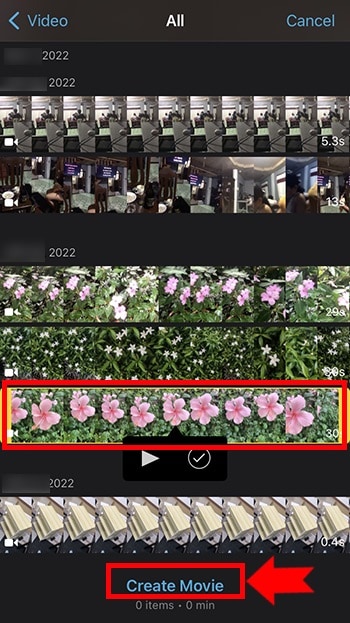
Step4 You should tap on the Video option and select the video that you want to put into a loop. After selecting a video, tap on Create Movie option.
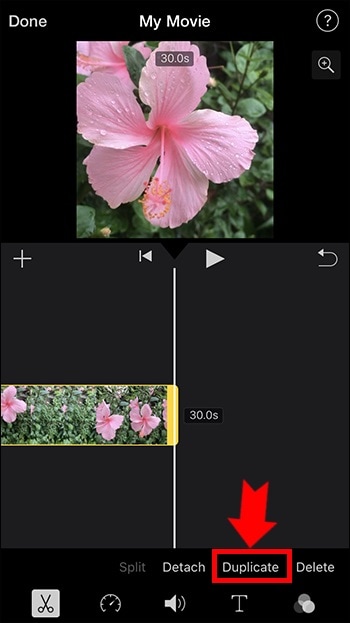
Step5 Tap on the video on the timeline to select the video and tap on the Duplicate option. You will see that the duration of the video has doubled. You can tap on Duplicate as many times as you want to increase the video duration.
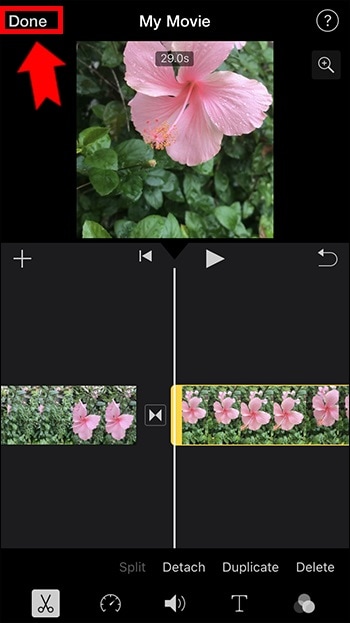
Step6 Once you are done with the iMovie loop, tap on the Done option located in the top-left corner. Thereafter, tap on the Share icon at the bottom.
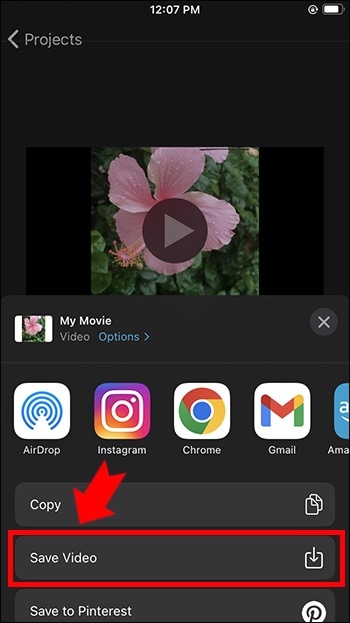
Step7 You will get a pop-up where you have to tap on the Save Video option. The edited video will be saved on your iPhone. You can open the new video from the Photos app.
Part 2. Loop Videos on Mac with iMovie
Editing a video on a Mac is always more comfortable than on an iPhone because of the larger screen. iMovie from Apple comes pre-installed on Mac as well, and hence, you can get started right away. It is completely free to use, and hence, you do not need to install any third-party video editor. Here are the steps on how to loop an iMovie video in simple steps.
Step1 Open the iMovie app from the Applications folder.
Step2 Click on Create New option and then click on the Movie option.

Step3 Bring in the required video under Movie Library by dragging the file from Finder on your Mac. You can also go to File> Import Media option and select the required video. You can also select the required media file from Events or Photos under the Libraries section.

Step4 Drag and drop the video on your timeline. When you want to loop the video, drag and drop the video clip again on the timeline. Make sure there is no gap between the first clip and the second clip on the timeline. You can drag and drop the video clip multiple times on the timeline to increase its duration.

Step5 Once you are done, go to File> Share> File option. Choose the destination to save the edited video.

Part 3. iMovie Alternative to Loop Videos on Mac
If you are looking for an iMovie alternative to perform iMovie loop video action easily, we recommend Wondershare Filmora . Filmora is available for both Mac and Windows. Filmora is a better video editor than iMovie. It is a premium video editor and it has more features and functionalities.
You can loop any video as many times as you want instantly. Besides, you can edit your video clip as per your requirements before looping the edited video. The user interface is highly intuitive for everyone. Hence, it has huge popularity among Mac users. You can also save the looped video in different file formats. Here are the steps to loop a video on Filmora.
Free Download For Win 7 or later(64-bit)
Free Download For macOS 10.14 or later
Step1 Download and install Wondershare Filmora. Launch Filmora and click on New Project on the welcome screen.

Step2 Drag and drop the video file from Finder on Mac to the Project Media folder on Filmora. Thereafter, drop the video file into the timeline.

Step3 Drag and drop the video clip into the timeline again. Make sure that there is no gap between the clips. Besides, make sure that they are on the same channel for looping. You can drag and drop the video into the timeline multiple times.
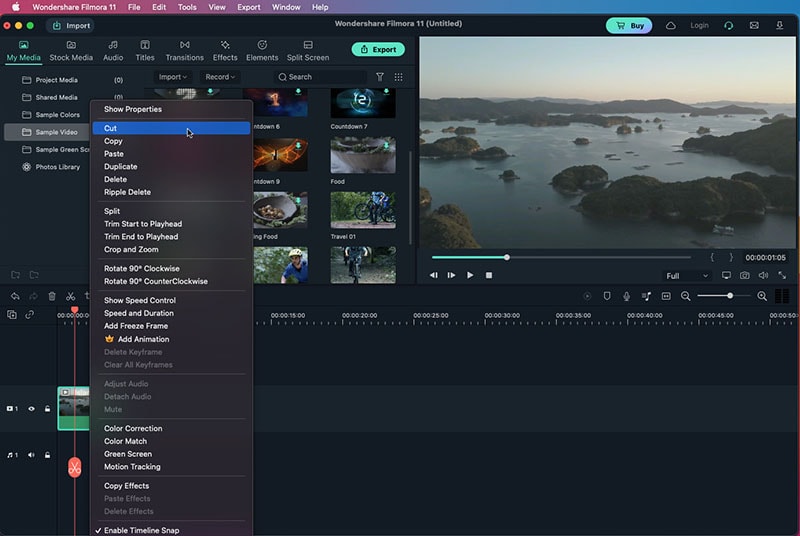
Step4 You can zoom out the timeline for better viewing. Play the video to check its output on Viewer. Finally, click on the Export button and save the video in the desired file format on your Mac.
The Bottom Line
If you want to loop a video on your Mac, iMovie is the most preferred option. The same is applicable to iPhone users as well. iMovie comes pre-installed, and it is completely free to use. That is why you can loop any video instantly. Wondershare Filmora is the best alternative to iMovie to edit and loop your video.
Free Download For macOS 10.14 or later
Step1 Download and install Wondershare Filmora. Launch Filmora and click on New Project on the welcome screen.

Step2 Drag and drop the video file from Finder on Mac to the Project Media folder on Filmora. Thereafter, drop the video file into the timeline.

Step3 Drag and drop the video clip into the timeline again. Make sure that there is no gap between the clips. Besides, make sure that they are on the same channel for looping. You can drag and drop the video into the timeline multiple times.

Step4 You can zoom out the timeline for better viewing. Play the video to check its output on Viewer. Finally, click on the Export button and save the video in the desired file format on your Mac.
The Bottom Line
If you want to loop a video on your Mac, iMovie is the most preferred option. The same is applicable to iPhone users as well. iMovie comes pre-installed, and it is completely free to use. That is why you can loop any video instantly. Wondershare Filmora is the best alternative to iMovie to edit and loop your video.
How to Make Flying Objects in Wondershare Filmora
Let us be honest here, you want to create fly objects in the air but don’t want to get into the witchcraft school. In that case, we have got your back!
In this article, you can learn how to make objects fly in the air! Technically you will not do that in real-time, but with the latest technology and editing tools at your disposal, you will exactly do that.
Use Wondershare Filmora to create the flying object effect. Scroll below to get the guide to the whole process of creation.
Part 1. What will you need to make a flying object?
This is not witchcraft, so we will abstain from using potions and herbs. Instead, to fly objects in our videos, we will use simple techniques that you may also be familiar with.
Video Cameras
The camera, in this scenario, will be the essential accessory as it will capture your video with the proper aspect ratio. This video camera can now be from a mobile phone or a high-quality DSLR. It will all depend upon your preference for quality and frame rate.

Tri-Pod or camera stands
Selecting the Tri-Pod is also crucial to your quality of video taking as it will ensure stability while capturing the video from the camera.

Stability is the key here, as the captured videos will be masked and combined in the later stages of the steps. To do so, consistently capturing the video in the same ratio is necessary. You can stabilize the video with a simple gorilla pod that you can get of good quality or a simple tripod.
The prop
The prop will be the object that we will be flying in the video. It could be a fluffy toy, a ball, a box, or anything you desire to be flying in your video.
![]()
Note: In this article, we are going to use a ball as a prop.

Wondershare Filmora
Now that we have all the physical requirements for the video, our next goal is to ensure that we have the correct video editing software. And what’s best than Wondershare Filmora? Obviously, there’s nothing!
Filmora allows you to edit your videos with ease and comfort. With its interactive UI, even a beginner feels easy to edit a video. With skills on hand, an expert can edit videos ranging from green screen effects to flying objects.
Free Download For Win 7 or later(64-bit)
Free Download For macOS 10.14 or later

Good presentation
Now, if you want your video to shine like the good ones, you will need to know how to present it. In this section, the requirement will be yourself. As you are not flying an object, you must act the part.
A good presentation will allow you to make the video more natural. Because no matter how skilled you are with video editing, a video with props will only be of quality until the subject acts their part with quality.
Part 2. How to capture the footage?
Before we get into how we edit our footage, we need to know how to shoot the video to edit. Follow the steps mentioned below:
- Set up your camera on a tripod or a gorilla pod.
- After setting up the camera, record an empty frame.
![]()
Note: An empty frame video will be the one you will use to mask the original clip.
Reference video
Start recording a five-second clip of the sofa where you will be sitting without yourself or the prop. Here you don’t need to add anything except the reference. Follow the guidelines below when making the reference video:
- The video should be plain.
- It should be simple.
- There should be no moving object or subject.

Main video
After shooting the empty frame video, move on to shooting the video with yourself in it. Follow the below to achieve something unique:
- Your focus should be on the prop.
- Use a thread or a rope to attach the prop to it. (In this case, we are using a ball.)
- Attach the ball to the thread and hand it on the roof.
- Record yourself now with the prop with your desired content or script.

After completing the video, simply stop recording. Now you will end up with two video clips.
Adding these two clips in the Wondershare Filmora , you can easily create the flying object effect. To do so, follow the steps explained in the section ahead.
Part 3. Stepwise guide to making flying objects in Wondershare Filmora
Now that we have looked into our requirements, let us dive into how we will apply our skills to achieve an object to fly in Wondershare Filmora .
Of course, without the software, our editing will not be possible, so download Wondershare Filmora from the steps explained below.
Free Download For Win 7 or later(64-bit)
Free Download For macOS 10.14 or later
Step1Open the Wondershare Filmora software
- Open the Wondershare Filmora software and Click on the New Project icon on the window.
- After you have clicked on the New Project icon, our main workplace will be launched.
- Here you can see various options.
- To get started, we need to import our video clips to edit them.

- Here, you can see two ways to import your clips in Wondershare Filmora.
- Shows you how to import by Right-Clicking on File and selecting the import media option.
- Shows you to drag and drop the file from your main directory simply.
You can choose whatever suits you the best!
Step2Add your clips to your timeline
Now that we have imported our videos into the timeline, our next step will be to add our videos to the timeline.
- Simply click on the imported clips on the import window.
- Then drag it to the timeline below.
- Doing so will create a working timeline you can view and edit as you go along the editing process.

Step3Size the reference video to the original video
Now, remember that we recorded a five-second clip that we will use to create the masking effect. You will need to size it to the original video for that to work. Doing so is simple and will require you to take some easy steps.
- First, click on the clip.
- Then, when it is selected, move on to the tab above to choose the speed option from the bar.
- Here, you will also see options such as cropping, Green screen, and color.
- Choose the option of speed.
- Then, a drop-down tile will pop up. Here you can see different options available to speed up your video.

- You can speed up your video and slow it down.
- For now, we will have to slow it down.
![]()
Note: Slowing it down will increase the time of the video clip and allow you to match it with the original video clip.
Don’t worry about the speed, as the video is already empty, and there will be no distractions to disturb our editing.
Step4Add the masking effect
Now that we have our video aligned with the reference video we are using. Let’s move to the next step.
This step will try to remove the thread attached to the ball; otherwise, it will show in the video, and our effect will be ruined. However, before we do that, we will need to know what masking is.
What is the Masking effect in Wondershare Filmora?
Have you ever seen the behind-the-scenes of those big-budget movies? Then you might have seen the actors and the stunt workers hanging from big ropes performing stunts in front of green screens.
Well, the directors capture the video in real-time. But they can do those big stunts on TV with editing and CGI, and one of the effects is “Masking.”
The masking effect allows you to mask the object on the screen with a reference video. So that’s how the ropes attached to the stuntmen get removed in the original videos.
How to add a masking effect?
Although there are numerous ways to do that, the one we will use in this video is to remove the thread. For this, follow the below steps:
- Simply go to the effect icon that you can see in the bar above.
- In the effects bar, move to the utility tab.
- You will see a window showing you the many effects Wondershare Filmora provides you from default.
- Select the shape mask tile.
- Now drag and drop it on the timeline below.

![]()
Note: You must ensure the effect is applied to the main video, not the reference video.
- When you drag the effect into the main video, you will notice a transparent shape added to the video. This is your Mask.
Step5Edit the masking effect
You must hide the thread attached to the ball with the masking effect. To do this, follow the below guidelines:
- Double-click on the effect added to the main video.
- You will notice another window pop up on the import library.
![]()
Note: In the pop-up window, you will see the multiple options and edits you can apply to the masking effect, such as Transform, Compositing, Motion tracking, and stabilization.

- Scroll down on the window and notice a video effect tab.
In the effect tab, you will have multiple options, such as the shape mask, X, Y, and scale and blur strength options, as shown below.
- Now adjust the mask to hide the string. It may be easy to invert the mask.
![]()
Note: That the borders of the mask are blurred. But you can also change them by inverting the mask, which turns the borders and the space between them.
Remember the invisibility cloak from Harry Potter? It works just like that, only with a solid shape.
- Now use the X and Y options to move the mask anywhere in the video.

Step6Hide the sharp borders
You may notice the shape of borders that do not blend with the background. To blend the borders with the background, follow the steps below:
- Simply Double-click on the effect in the timeline.
- Then, in the editing tab, find out the blur strength option.

- Simply drag the bar to increase the blur strength.
![]()
Note: Please keep looking in the window on the right. Check and increase the blur strength until you are satisfied with the result.
- Lastly, click on OK when you are done.
Step7Creating the popup effect
Now, if you want your object to appear out of thin air, you must create that pop-up effect. You can create the pop-up effect in simple and easy steps, as shown below:
- First, drag the timeline dragger to the point where you want the prop or the ball to pop up.
Your presentation should be accurate and precise!
Imagine you were doing a “swoosh“ action, similar to swinging a wand. Now you want your object to appear at that time.
Split the Video:
- Drag the timeline dragger to that point.
- Now press Ctrl+B to split both videos.
Add Popup Effect:
The masking effect will be applied from the start. Our goal is to hide the masking effect before the ball pop-ups. For this, follow the below steps:
- Go into the setting by Double-Clicking the masking effect on the original video.
- Then move the mask over the ball instead of on the thread. Doing so would make the ball disappear.

Final Results:
- Lastly, click on Ok when done.
Play the clip from the start, and you will notice the ball popping up according to your action.

Congratulations! You did it. You are now able to fly objects with the power of your mind.
Following the abovementioned steps, you can control objects and make them fly in the air. The catch is that you will have to use Wondershare Filmora . But, of course, this is not a witchcraft school now.
Free Download For Win 7 or later(64-bit)
Free Download For macOS 10.14 or later
Conclusion
Well, there comes a time when one needs to make flying objects. Wondershare Filmora is an excellent tool that will allow you to add the masking effect to create the illusion of flying objects in the air.
The video quality at the end will only depend upon how clearly you show during the editing process. Try the above steps and enjoy the results!

Wondershare Filmora
Now that we have all the physical requirements for the video, our next goal is to ensure that we have the correct video editing software. And what’s best than Wondershare Filmora? Obviously, there’s nothing!
Filmora allows you to edit your videos with ease and comfort. With its interactive UI, even a beginner feels easy to edit a video. With skills on hand, an expert can edit videos ranging from green screen effects to flying objects.
Free Download For Win 7 or later(64-bit)
Free Download For macOS 10.14 or later

Good presentation
Now, if you want your video to shine like the good ones, you will need to know how to present it. In this section, the requirement will be yourself. As you are not flying an object, you must act the part.
A good presentation will allow you to make the video more natural. Because no matter how skilled you are with video editing, a video with props will only be of quality until the subject acts their part with quality.
Part 2. How to capture the footage?
Before we get into how we edit our footage, we need to know how to shoot the video to edit. Follow the steps mentioned below:
- Set up your camera on a tripod or a gorilla pod.
- After setting up the camera, record an empty frame.
![]()
Note: An empty frame video will be the one you will use to mask the original clip.
Reference video
Start recording a five-second clip of the sofa where you will be sitting without yourself or the prop. Here you don’t need to add anything except the reference. Follow the guidelines below when making the reference video:
- The video should be plain.
- It should be simple.
- There should be no moving object or subject.

Main video
After shooting the empty frame video, move on to shooting the video with yourself in it. Follow the below to achieve something unique:
- Your focus should be on the prop.
- Use a thread or a rope to attach the prop to it. (In this case, we are using a ball.)
- Attach the ball to the thread and hand it on the roof.
- Record yourself now with the prop with your desired content or script.

After completing the video, simply stop recording. Now you will end up with two video clips.
Adding these two clips in the Wondershare Filmora , you can easily create the flying object effect. To do so, follow the steps explained in the section ahead.
Part 3. Stepwise guide to making flying objects in Wondershare Filmora
Now that we have looked into our requirements, let us dive into how we will apply our skills to achieve an object to fly in Wondershare Filmora .
Of course, without the software, our editing will not be possible, so download Wondershare Filmora from the steps explained below.
Free Download For Win 7 or later(64-bit)
Free Download For macOS 10.14 or later
Step1Open the Wondershare Filmora software
- Open the Wondershare Filmora software and Click on the New Project icon on the window.
- After you have clicked on the New Project icon, our main workplace will be launched.
- Here you can see various options.
- To get started, we need to import our video clips to edit them.

- Here, you can see two ways to import your clips in Wondershare Filmora.
- Shows you how to import by Right-Clicking on File and selecting the import media option.
- Shows you to drag and drop the file from your main directory simply.
You can choose whatever suits you the best!
Step2Add your clips to your timeline
Now that we have imported our videos into the timeline, our next step will be to add our videos to the timeline.
- Simply click on the imported clips on the import window.
- Then drag it to the timeline below.
- Doing so will create a working timeline you can view and edit as you go along the editing process.

Step3Size the reference video to the original video
Now, remember that we recorded a five-second clip that we will use to create the masking effect. You will need to size it to the original video for that to work. Doing so is simple and will require you to take some easy steps.
- First, click on the clip.
- Then, when it is selected, move on to the tab above to choose the speed option from the bar.
- Here, you will also see options such as cropping, Green screen, and color.
- Choose the option of speed.
- Then, a drop-down tile will pop up. Here you can see different options available to speed up your video.

- You can speed up your video and slow it down.
- For now, we will have to slow it down.
![]()
Note: Slowing it down will increase the time of the video clip and allow you to match it with the original video clip.
Don’t worry about the speed, as the video is already empty, and there will be no distractions to disturb our editing.
Step4Add the masking effect
Now that we have our video aligned with the reference video we are using. Let’s move to the next step.
This step will try to remove the thread attached to the ball; otherwise, it will show in the video, and our effect will be ruined. However, before we do that, we will need to know what masking is.
What is the Masking effect in Wondershare Filmora?
Have you ever seen the behind-the-scenes of those big-budget movies? Then you might have seen the actors and the stunt workers hanging from big ropes performing stunts in front of green screens.
Well, the directors capture the video in real-time. But they can do those big stunts on TV with editing and CGI, and one of the effects is “Masking.”
The masking effect allows you to mask the object on the screen with a reference video. So that’s how the ropes attached to the stuntmen get removed in the original videos.
How to add a masking effect?
Although there are numerous ways to do that, the one we will use in this video is to remove the thread. For this, follow the below steps:
- Simply go to the effect icon that you can see in the bar above.
- In the effects bar, move to the utility tab.
- You will see a window showing you the many effects Wondershare Filmora provides you from default.
- Select the shape mask tile.
- Now drag and drop it on the timeline below.

![]()
Note: You must ensure the effect is applied to the main video, not the reference video.
- When you drag the effect into the main video, you will notice a transparent shape added to the video. This is your Mask.
Step5Edit the masking effect
You must hide the thread attached to the ball with the masking effect. To do this, follow the below guidelines:
- Double-click on the effect added to the main video.
- You will notice another window pop up on the import library.
![]()
Note: In the pop-up window, you will see the multiple options and edits you can apply to the masking effect, such as Transform, Compositing, Motion tracking, and stabilization.

- Scroll down on the window and notice a video effect tab.
In the effect tab, you will have multiple options, such as the shape mask, X, Y, and scale and blur strength options, as shown below.
- Now adjust the mask to hide the string. It may be easy to invert the mask.
![]()
Note: That the borders of the mask are blurred. But you can also change them by inverting the mask, which turns the borders and the space between them.
Remember the invisibility cloak from Harry Potter? It works just like that, only with a solid shape.
- Now use the X and Y options to move the mask anywhere in the video.

Step6Hide the sharp borders
You may notice the shape of borders that do not blend with the background. To blend the borders with the background, follow the steps below:
- Simply Double-click on the effect in the timeline.
- Then, in the editing tab, find out the blur strength option.

- Simply drag the bar to increase the blur strength.
![]()
Note: Please keep looking in the window on the right. Check and increase the blur strength until you are satisfied with the result.
- Lastly, click on OK when you are done.
Step7Creating the popup effect
Now, if you want your object to appear out of thin air, you must create that pop-up effect. You can create the pop-up effect in simple and easy steps, as shown below:
- First, drag the timeline dragger to the point where you want the prop or the ball to pop up.
Your presentation should be accurate and precise!
Imagine you were doing a “swoosh“ action, similar to swinging a wand. Now you want your object to appear at that time.
Split the Video:
- Drag the timeline dragger to that point.
- Now press Ctrl+B to split both videos.
Add Popup Effect:
The masking effect will be applied from the start. Our goal is to hide the masking effect before the ball pop-ups. For this, follow the below steps:
- Go into the setting by Double-Clicking the masking effect on the original video.
- Then move the mask over the ball instead of on the thread. Doing so would make the ball disappear.

Final Results:
- Lastly, click on Ok when done.
Play the clip from the start, and you will notice the ball popping up according to your action.

Congratulations! You did it. You are now able to fly objects with the power of your mind.
Following the abovementioned steps, you can control objects and make them fly in the air. The catch is that you will have to use Wondershare Filmora . But, of course, this is not a witchcraft school now.
Free Download For Win 7 or later(64-bit)
Free Download For macOS 10.14 or later
Conclusion
Well, there comes a time when one needs to make flying objects. Wondershare Filmora is an excellent tool that will allow you to add the masking effect to create the illusion of flying objects in the air.
The video quality at the end will only depend upon how clearly you show during the editing process. Try the above steps and enjoy the results!
The Quick and Simple Way to Mirror Video in Premiere Pro
Video editing is a crucial part of filmmaking, and it can make or break the outcome of a project. Adobe Premiere Pro is a widely used video editing software that provides a vast range of tools for professional video editing. One of the features that Premiere Pro offers is the ability to mirror video clips, which can add an interesting visual element to your footage.
In this article, we will look at how to mirror a video clip in Premiere Pro in a few simple steps. Whether you’re a seasoned video editor or just starting, this guide will help you achieve the desired effect in your videos. From basic mirroring to advanced techniques, we will cover everything you need to know to create a symmetrical and visually appealing look in your projects.
What Is To “Mirror” a Video?
Mirroring a video in Adobe Premiere Pro refers to reflecting the footage along either the horizontal or vertical axis. This results in the composition being flipped and reversed, creating a reflection-like effect. Flipping a video is distinct from rotating it, as the orientation of the elements is changed, but their position remains the same.
Flipping can serve both creative and practical purposes. On the one hand, it can add a unique and visually interesting element to a project, creating a form of self-reflection or self-analysis. On the other hand, flipping can also be used to correct videos accidentally captured upside down. For example, flipping a video recorded with a selfie camera along the horizontal axis will correctly display the right side up.
It is important to note the distinction between flipping and rotating a video. A flipped video will look like a mirror image, whereas a video rotated 180 degrees will not. By understanding the differences between these techniques, you can effectively use mirroring to achieve the desired result in your projects.
How To Mirror a Video in Adobe Premiere Pro
Mirroring a video in Adobe Premiere Pro is a quick and simple process that can add a unique and visually appealing touch to your projects. Whether you want to create a symmetrical look or experiment with a new visual style, this guide will mirror a video clip in Premiere Pro. From basic to advanced techniques, you’ll be able to create stunning and reflective videos in no time. So, let’s get started!
Step1 Choose the “Effects“ option from the menu.
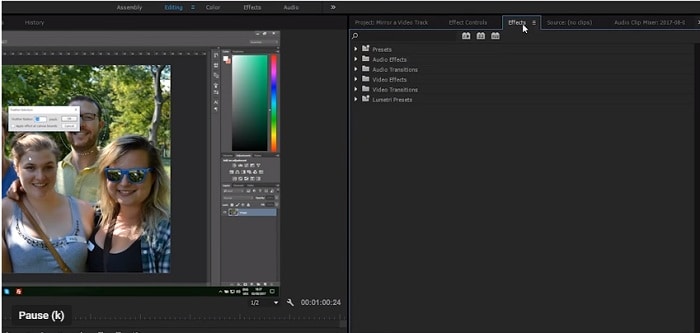
Step2 Look for the “Transform“ tab.
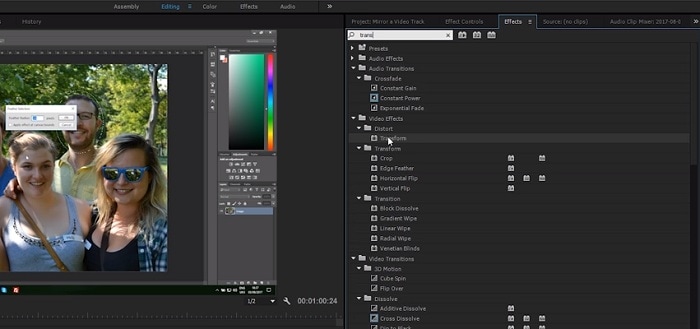
Step3 Pick the “Horizontal Flip“ or “Vertical Flip“ from the drop-down list.
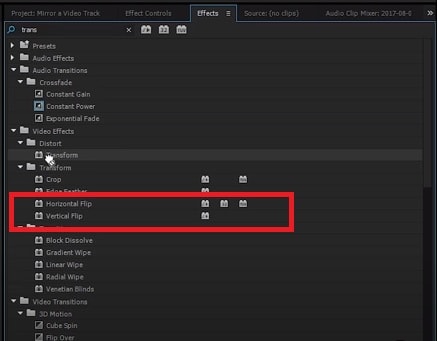
Step4 Drag the desired flip onto the selected clip, which will immediately reverse the image displayed on the Program Monitor.
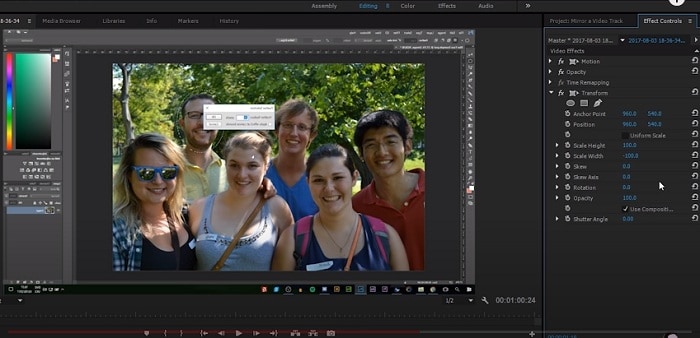
How To Create Mirror Video Effect in Premiere Pro
Creating a mirror video effect in Adobe Premiere Pro opens up a world of artistic possibilities for your projects. With the right techniques, you can create visually appealing and symmetrical videos that stand out from the crowd. This guide will show you how to master the art of mirror video effects in Premiere Pro, from the basics to more advanced techniques. Get ready to explore the creative side of video editing and elevate your projects to the next level.
Step1 Access the “Effects“ menu and select “Video Effects.”
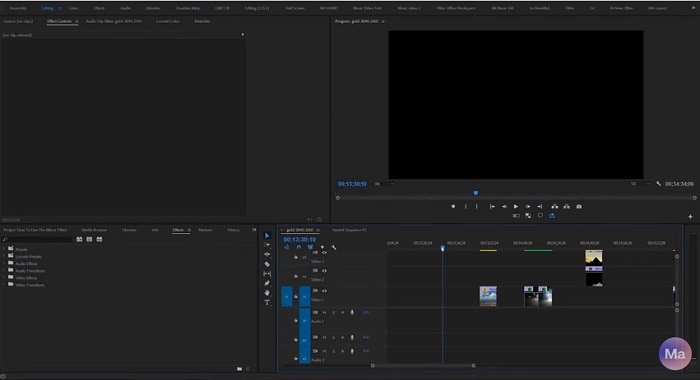
Step2 Pick “Distort“, then the “Mirror“.
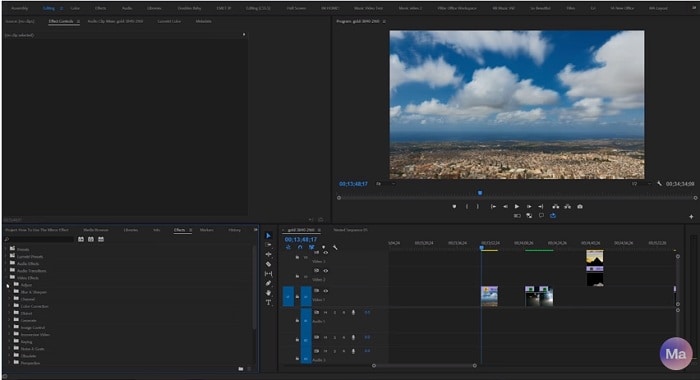
Step3 Apply the Mirror effect to your clip.
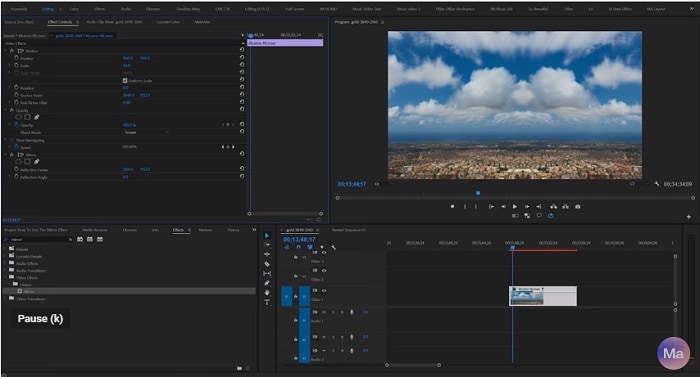
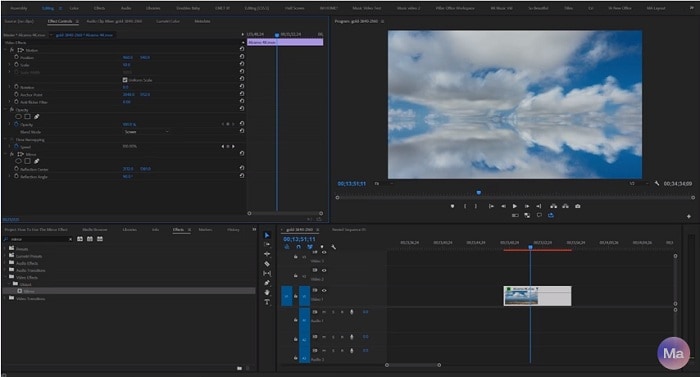
Step4 Adjust “Reflection Center“ for side-by-side effect or “Reflection Angle“ for up-and-down effect in the Effect Controls panel.
[Bonus] Wondershare Filmora – A Great Alternative to Premiere Pro Mirror Tool
Wondershare Filmora is a great alternative to Adobe Premiere Pro for video editing. Not only does it offer an intuitive interface for both beginners and professionals, but it also offers a range of video editing tools and features. One of those features is its ability to easily mirror a video. With Filmora, you can flip your videos vertically or horizontally with just a few clicks.
Free Download For Win 7 or later(64-bit)
Free Download For macOS 10.14 or later

Filmora also offers a variety of creative video effects and templates, making it easy to add a unique touch to your projects. In addition, its built-in audio editing tools allow you to create professional-sounding soundtracks for your videos. Filmora’s easy-to-use keyframe animation feature gives you precise control over the animation of your elements, allowing you to add movement and bring your videos to life.
Furthermore, Filmora’s advanced color correction tools help you achieve the perfect color balance in your videos. Whether you’re a beginner or a professional, Wondershare Filmora is a great option for anyone looking for a powerful and easy-to-use video editor.
How To Mirror a Video Clip With Wondershare Filmora
Mirroring a video clip is a simple process with Wondershare Filmora. This video editing software provides an intuitive and user-friendly interface, making it easy to achieve the desired result.
To mirror your video in Filmora, you can follow a few straightforward steps. Whether you want to flip your video horizontally or vertically, Filmora’s mirroring tool will help you achieve the perfect reflection with just a few clicks. So, if you’re looking for an alternative to Adobe Premiere Pro, Wondershare Filmora is a great option to consider for your video editing needs.
Step1 Within the “Flip“ section, there are four options available. To flip the clip from left to right, select the “Flip Horizontal“ icon, or if you want to turn the clip upside down, choose the “Flip “ option.
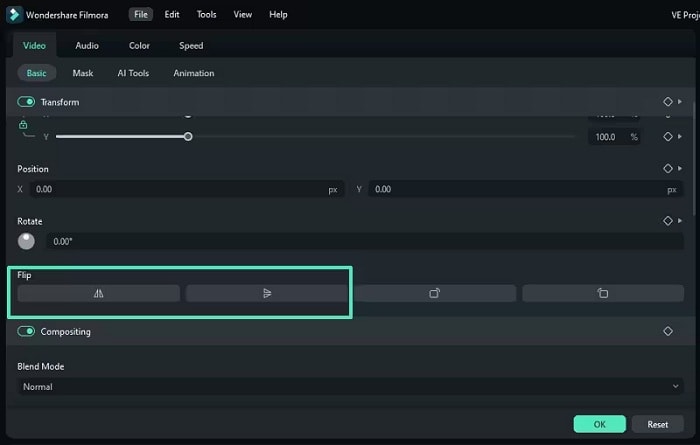
Step2 You can rotate the clip by clicking either the “Clockwise“ or “Counterclockwise“ icons under the Rotate section.

Step3 If you want to specify the rotation angle, you can either enter a value in the box under the Rotate tab or manipulate the dot in the circle to achieve the desired angle.

How To Create Mirror Video Effect in Wondershare Filmora
Wondershare Filmora is an excellent video editing software that offers a simple solution for creating a mirror video effect. Its intuitive interface and powerful features make it possible for amateur and professional video editors to achieve stunning results. Filmora provides users with an array of tools to create a mirror effect on their video clip effortlessly.
Whether you want to create a reversed image, flip the orientation vertically, or rotate the clip in a specific direction, Filmora has got you covered. Let’s see how to create a mirror video effect with Wondershare Filmora.
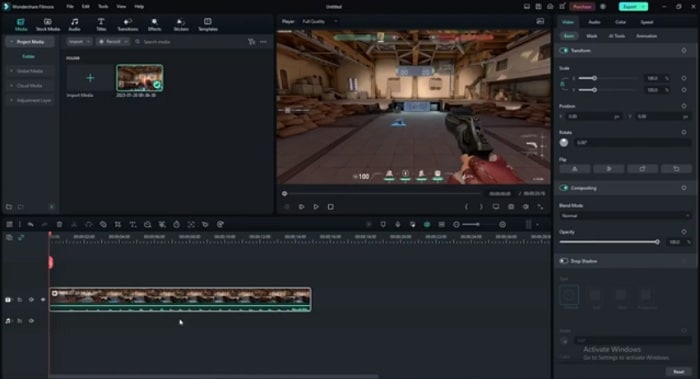
Step1 Add the video clip to a video track on the timeline
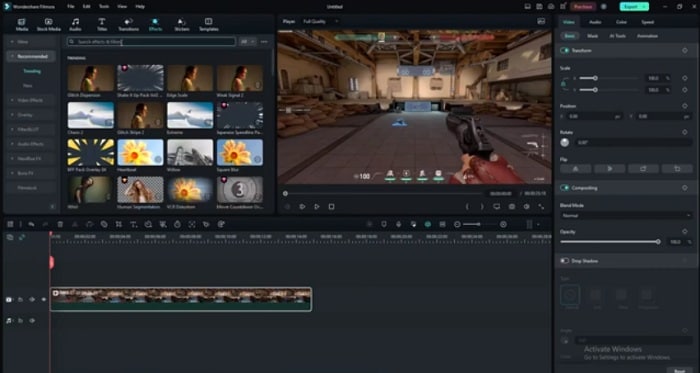
Step2 Click the “Filters“ icon and choose the “Distortion“ category
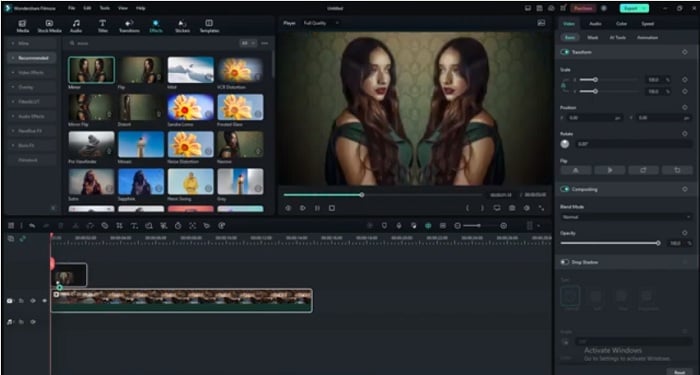
Step3 Locate the “Mirror“ effect, drag and drop it to the filter track, and adjust its duration to match the video clip
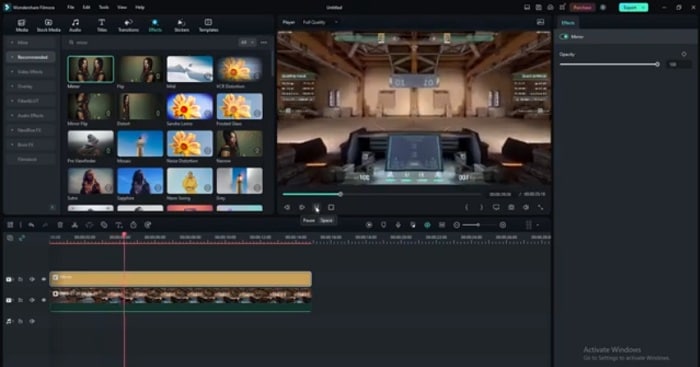
Step4 Preview the results in the Preview Window before exporting the video from Filmora.
Conclusion
Mirroring a video can add an interesting and unique visual effect to your videos. Adobe Premiere Pro and Wondershare Filmora provide easy-to-use tools to achieve this effect. While Premiere Pro offers more advanced features and customization options, Filmora provides a simpler and more user-friendly interface for those who want to achieve the same results without the hassle. Whichever option you choose, you can create stunning mirror videos in no time.
Free Download For macOS 10.14 or later

Filmora also offers a variety of creative video effects and templates, making it easy to add a unique touch to your projects. In addition, its built-in audio editing tools allow you to create professional-sounding soundtracks for your videos. Filmora’s easy-to-use keyframe animation feature gives you precise control over the animation of your elements, allowing you to add movement and bring your videos to life.
Furthermore, Filmora’s advanced color correction tools help you achieve the perfect color balance in your videos. Whether you’re a beginner or a professional, Wondershare Filmora is a great option for anyone looking for a powerful and easy-to-use video editor.
How To Mirror a Video Clip With Wondershare Filmora
Mirroring a video clip is a simple process with Wondershare Filmora. This video editing software provides an intuitive and user-friendly interface, making it easy to achieve the desired result.
To mirror your video in Filmora, you can follow a few straightforward steps. Whether you want to flip your video horizontally or vertically, Filmora’s mirroring tool will help you achieve the perfect reflection with just a few clicks. So, if you’re looking for an alternative to Adobe Premiere Pro, Wondershare Filmora is a great option to consider for your video editing needs.
Step1 Within the “Flip“ section, there are four options available. To flip the clip from left to right, select the “Flip Horizontal“ icon, or if you want to turn the clip upside down, choose the “Flip “ option.

Step2 You can rotate the clip by clicking either the “Clockwise“ or “Counterclockwise“ icons under the Rotate section.

Step3 If you want to specify the rotation angle, you can either enter a value in the box under the Rotate tab or manipulate the dot in the circle to achieve the desired angle.

How To Create Mirror Video Effect in Wondershare Filmora
Wondershare Filmora is an excellent video editing software that offers a simple solution for creating a mirror video effect. Its intuitive interface and powerful features make it possible for amateur and professional video editors to achieve stunning results. Filmora provides users with an array of tools to create a mirror effect on their video clip effortlessly.
Whether you want to create a reversed image, flip the orientation vertically, or rotate the clip in a specific direction, Filmora has got you covered. Let’s see how to create a mirror video effect with Wondershare Filmora.
Step1 Add the video clip to a video track on the timeline

Step2 Click the “Filters“ icon and choose the “Distortion“ category

Step3 Locate the “Mirror“ effect, drag and drop it to the filter track, and adjust its duration to match the video clip

Step4 Preview the results in the Preview Window before exporting the video from Filmora.

Conclusion
Mirroring a video can add an interesting and unique visual effect to your videos. Adobe Premiere Pro and Wondershare Filmora provide easy-to-use tools to achieve this effect. While Premiere Pro offers more advanced features and customization options, Filmora provides a simpler and more user-friendly interface for those who want to achieve the same results without the hassle. Whichever option you choose, you can create stunning mirror videos in no time.
Getting To Know More About the Video Editing Interface of Wondershare Filmora
The importance of good editing software depends on its features and interface. A video editing interface is important when it comes to choosing editing software. The more user-friendly the interface, the easier it is to use the particular tool for editing. Many video editing software is available, but not every tool is popular. One of the reasons is their interface is not friendly enough for the user.
However, getting to know the software’s interface is as crucial as using the tool. Being familiar with the interface will help you understand the tool even better. An interface is like a map; if you’re familiar with the map, you can edit your videos using the tool. This article will explain the user interface design of Wondershare Filmora in detail.
Part 1: How Has Video Editing Improved Over the Years?
Video editing has significantly improved over the years due to advancements in technology. The development of new software and hardware has improved the editing process. You can read some of the most prominent ways video editing has improved.
Edit Video for Free For Win 7 or later(64-bit)
Edit Video for Free For macOS 10.14 or later
1. Digital Editing
The transition from analog to digital editing revolutionized the field. Digital editing eliminated the need for physical film and allowed for non-linear editing. In this way, video clips could be rearranged, trimmed, and modified on a computer. This digital workflow provided greater flexibility, efficiency, and creative possibilities.
2. Improved Software Capabilities
Video editing software has become more powerful with better features. Modern software offers a wide range of tools for editing for the user. These tools have offered color correction, visual effects, and audio mixing. The interfaces have become more friendly, making editing accessible to more people.
3. Real-Time Playback and Rendering
Advancements in hardware and software have enabled real-time video playback. It further eliminates the need for time-consuming rendering during the editing process. Additionally, it allows editors to see their changes, improving efficiency and productivity.
4. High-Resolution Video
With the availability of high-resolution cameras and displays, the quality has improved. Now, video editing has adapted to handle larger and more detailed video files. Such software can edit and export videos in higher resolutions, even up to 4K and 8K.
5. Special Effects and Visual Enhancements
These editing tools can handle complex visual effects and enhancements. Features such as green screens, motion tracking, and 3D effects have become easier to use. Furthermore, these tools allow editors to achieve sophisticated and professional-looking results.
6. Collaboration and Cloud-Based Editing
The rise of cloud computing has introduced new opportunities for collaboration in video editing. Such editing platforms enable multiple editors to work on the same project. Individuals can share files, get inspiration and collaborate remotely. This feature has facilitated more efficient workflows and improved collaboration among people.
Edit Video for Free For Win 7 or later(64-bit)
Edit Video for Free For macOS 10.14 or later
7. Faster Rendering and Exporting
Video editing software now utilizes multi-threading and GPU acceleration to speed up rendering. These new advancements in technology also help in exporting processes. It reduces the time required to generate the final video output. Additionally, it allows editors to meet tight deadlines and work more quickly.
8. Integration with Other Software and Formats
Editing tools have improved their compatibility with other software and formats. They now integrate with visual effects software, audio editing tools, and other tools. Additionally, these tools support a wide range of video file formats. This compatibility means easier import and export of videos from various sources.
9. Mobile Editing
Smartphones and tablets have brought video editing to mobile devices. Mobile apps now offer robust editing capabilities, allowing users to edit videos on the go. This advancement has increased accessibility and convenience for users as well. Now, people prefer to edit videos using their mobile devices.
10. AI-Assisted Editing
Artificial Intelligence (AI) is now integrated into photo and video editing tools. AI can automate certain repetitive tasks and suggest edits or effects based on patterns. This technology also makes change and even suggest edits by learning your preferences. This can save you time and assist editors in making creative decisions.
Part 2: What Should A Good Video Editing Software Constitute?
A good editing tool should possess several key features and functionalities. The purpose of these tools is to provide a comprehensive and efficient editing experience. Here are some important aspects that an excellent video editing tool should have. This help develops a narrative involving its user interface design:
Edit Video for Free For Win 7 or later(64-bit)
Edit Video for Free For macOS 10.14 or later
1. Comprehensive Editing Tools
The software should offer editing tools and features to accommodate different editing needs. This includes basic functions like trimming, cutting, and merging clips. Moreover, it should also offer some advanced capabilities and editing options as well. The software should provide flexibility and control over the editing process.
2. Support for Various Video Formats
Such software should support a wide range of video formats and codecs. This ensures compatibility with different cameras, file types, and video sources. It also allows editors to work with diverse content without the need for additional file conversion.
3. User-Friendly Interface
An editing tool should have a friendly interface and be easy to use. It also should allow users to navigate through the editing process smoothly. Such tools should provide easy access to tools, menus, and features. Additionally, a friendly video editing interface makes the tool simple for everyone.
4. High-Quality Output
These tools should be capable of producing high-quality video output. It should support exporting videos in different resolutions. This includes standard definition, high definition, and even 4K or higher resolutions. The ability to export in different formats and compression options is also valuable.
5. Efficient Performance
Video editing can be resource-intensive, so good software means efficient performance. It should utilize system resources and provide smooth playback for previewing. Additionally, it should minimize rendering times for quicker previews and exports.
6. Audio Editing Capabilities
Audio is one of the most important components of the video editing process. So, the software should offer different audio editing features. This includes the ability to adjust volume levels, apply audio effects, and much more. Furthermore, it should synchronize audio with video and support multiple audio tracks for editing as well.
7. Special Effects and Visual Enhancements
Advanced video editing software often includes special effects and other enhancement options. Filters, overlays, motion graphics, and other key functionalities should be offered. These features allow editors to improve their videos and achieve specific creative objectives.
8. Collaboration and Sharing Options
Powerful editing tools should facilitate collaboration among editors or team members. It should offer features like project sharing and version control. Also, it should provide users the option to work on the same project simultaneously. Additionally, seamless integration with cloud storage or online platforms can be beneficial.
9. Regular Updates and Support
Recommended tools should have a development team that regularly releases updates. The constant updates should address bugs, improve performance, and introduce new features. Timely customer support is also valuable for users to seek assistance.
10. Cost and Licensing Options
Consideration of the software’s pricing model and licensing options is important. Some software may offer a one-time purchase with perpetual usage. However, many others may have subscription-based models. It’s important to assess the pricing structure and determine if it aligns with your budget and editing needs.
Part 3: Wondershare Filmora: Does It Cover All The Points of a Good Video Editing Software?
Wondershare Filmora is a comprehensive video editing software that is available for everyone. One can download this tool from its official website and start editing. This tool provides a platform for professionals and for those who started editing. This tool allows you to edit your videos with many editing options. Additionally, this tool provides features from basic to more advanced ones.
Edit Video for Free For Win 7 or later(64-bit)
Edit Video for Free For macOS 10.14 or later
We have learned previously about what a good editing tool should offer. So, let’s discuss here what Wondershare Filmora has to offer its users.
Key Features of Wondershare Filmora
1. Wondershare Filmora is a complete editing software that you can download. It offers some basic editing options to more professional and advanced ones. You can find it to be the best platform to edit YouTube videos and more.
2. This tool has a friendly and easy-to-use interface. It makes navigation and editing easy, which further makes the process seamless.
3. The software interface supports different formats for images and videos. It includes PAL, MP4, JPEG, Cineform, and more. This makes the import and export of the files easier to share and edit.
4. Filmora is an editing platform that has the capability of handling higher resolutions. Using this tool, you can import and export your video files in up to 4K resolution.
5. Another excellent key feature of this tool is that you can add your audio files for edit . You can import your own audio files or can choose from the in-built library for your videos.
6. If you’re looking for a unique feature, then this feature will amaze you. Wondershare Filmora is equipped with the latest technology and is going through frequent updates. These updates help you to cut down the rendering speed.
7. You have so much to explore with this tool. Filmora has an in-built library that includes presets, effects, filters, and more. Users can use these presets for their editing work.
8. Additionally, if you want to share your videos for different platforms, you can with this tool. This software lets you change the aspect ratio of your video so you can easily share it on different platforms.
9. Besides editing options and features, this tool goes through constant updates and improvements. The latest version of Filmora comes with multiple AI features and support.
10. Lastly, Wondershare Filmora is free software but also offers premium plans for users. You can choose from different subscription plans.
Pricing Plans Offered by Wondershare Filmora
Are you satisfied with working on Wondershare Filmora’s interface? Look into the provided pricing table for some more prominent details:
| Type | Package | Pricing |
|---|---|---|
| Individual | Month Plan | $19.99 |
| Cross-Platform Plan | $69.99/Year | |
| Perpetual Plan | $79.99 | |
| Team & Business | Annual Plan | $155.88/User |
| Education | Monthly Plan | $19.99 |
| Annual Plan | $40.99 | |
| Perpetual Plan | $49.99 |
Part 4: Explaining The Interface - Wondershare Filmora
If you want to learn about the interface of Wondershare Filmora, you’re at the right place. Here you can learn about the video editing interface and the options available in the tool.
Edit Video for Free For Win 7 or later(64-bit)
Edit Video for Free For macOS 10.14 or later
1. The Main Screen
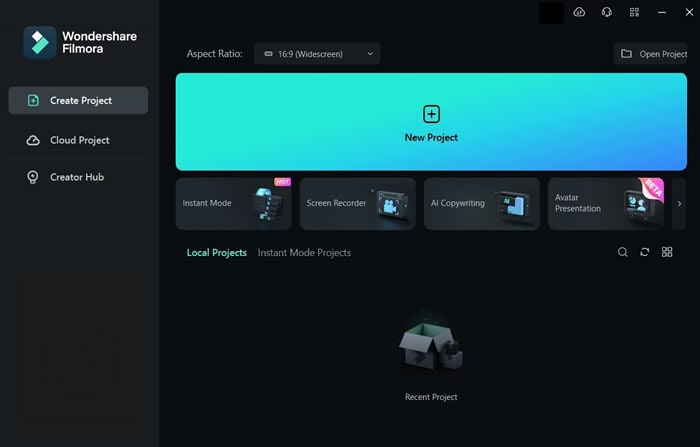
The main interface of the tool has all the essentials available. You will find a “New Project” tab, and beneath that, you will find different options for editing. Moreover, you will find the aspect ratio, from where you can choose preferred video dimensions. On the left side panel, you have the project options and the “Creator Hub” tab. Besides this, you have the search icon to find your previous projects.
2. Importing Videos
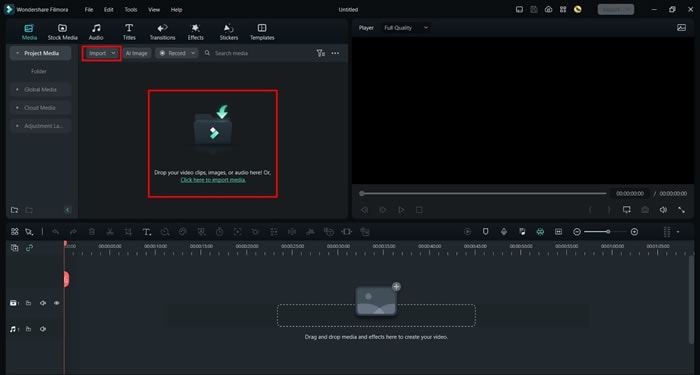
You can import your videos by pressing the designated key. This option allows you to import your media files. Furthermore, you can even import your media by dragging and dropping in the import tab. The import drop-down menu provides multiple import options. This menu also allows you to import your videos from your mobile or external camera.
3. Using the Stock Media
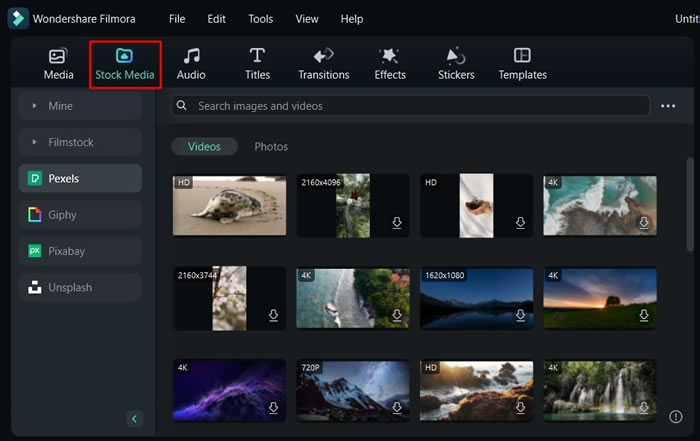
Wondershare Filmora allows you to add free stock media to your videos. The “Stock Media” option has a search option from where you can find your desired media files. Furthermore, this option has multiple free stock media tabs. You can choose the platform from the tabs where you can search and select stock media files.
4. Adding Audios to Videos
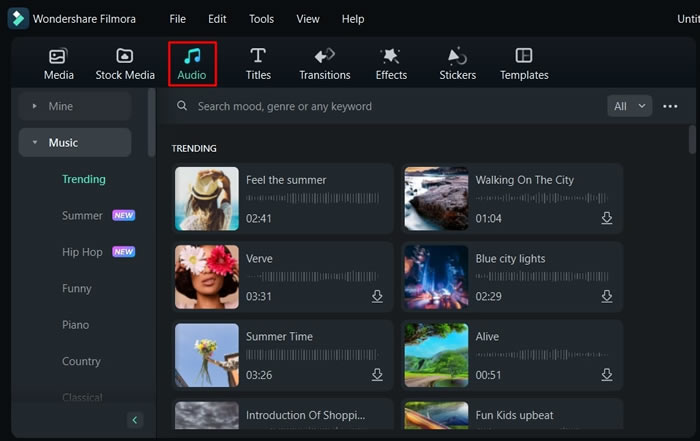
This tool allows you to add music or audio to your editing timeline. The tool has a separate “Audio” button, which allows you to select in-built audio files. You can search different sound effects and music files from this tab. Moreover, you can drag and drop your preferred audio file to the timeline. You can even select the audio file in the timeline to make further changes to the file.
5. Using Titles For Explanation
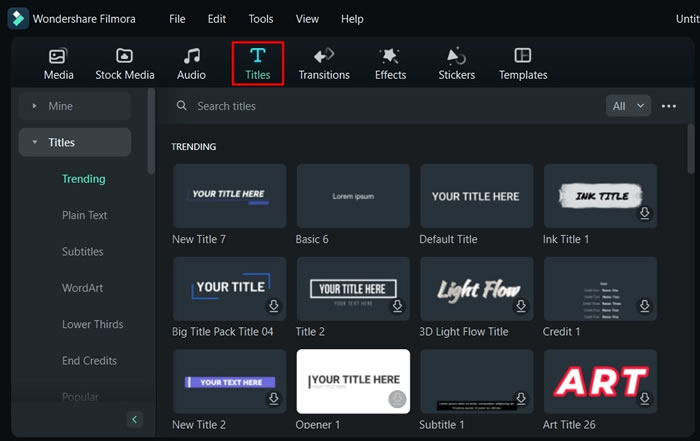
By pressing the “Titles” button, you can select the opening of your title template. This tool has many different title templates available that you can use for your video files. Moreover, you can find categorized titles from the list. This option also allows you to search for different title styles. You can even make changes to your title screen.
Edit Video for Free For Win 7 or later(64-bit)
Edit Video for Free For macOS 10.14 or later
6. Adding Transitions and Effects
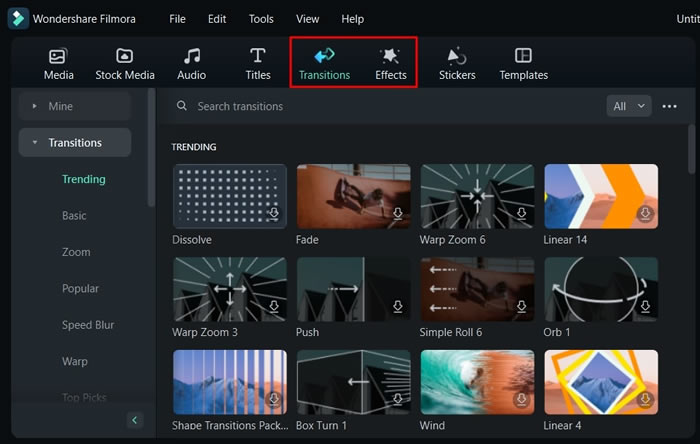
Filmora interface is packed with many filters, overlays, and even transition effects. You can choose from different effects and filters by dragging and dropping to your layer. To apply a transition between two clips, simply place the transition effect between those clips. Additionally, you can change the opacity of the applied filters. Also, you can change the duration of your transition effects.
7. Inducing Elements for Improvement
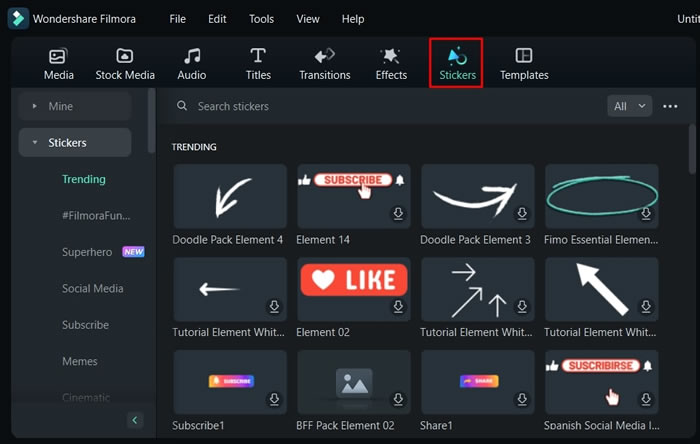
In addition to overlays, filters, and effects, you can also use other elements too. For this, Wondershare Filmora allows you to add stickers to your video edit. By pressing the option, you will find stickers in many categories. You can select stickers from the list; otherwise, you can search for stickers using a keyword. Apply your favorite sticker by selecting and dropping it on a particular layer in the timeline.
8. Getting Aware of the Timeline
The timeline is the section where you add all the layers, effects, and other adjustments to your project. In the timeline section, you will find a particular layer’s hide and unhide option. Moreover, you can mute and unmute the audio of your media file. You can even find an option to manage your tracks in this section. Additionally, there is a Playhead that can also trim your video clip at a specific duration.

9. Things To Know While Exporting
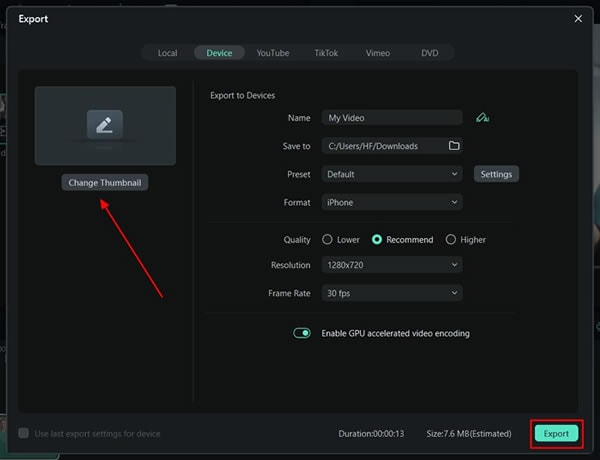
While exporting your project, you will find many options, such as exporting to your device. Furthermore, you can even export your file directly to a specific platform from Filmora. In addition to this, you can even burn your video file to a DVD using this option. Users can also add a thumbnail of their edited video directly from this tool.
Conclusion
Understanding your video editing interface gives you greater creative control over your projects. You can explore and experiment with various editing options and more. Investing time in your tool is important if you’re a professional or an enthusiast. Wondershare Filmora is an amazing editing tool, and its interface is created to make things easy for you.
Edit Video for Free For macOS 10.14 or later
1. Digital Editing
The transition from analog to digital editing revolutionized the field. Digital editing eliminated the need for physical film and allowed for non-linear editing. In this way, video clips could be rearranged, trimmed, and modified on a computer. This digital workflow provided greater flexibility, efficiency, and creative possibilities.
2. Improved Software Capabilities
Video editing software has become more powerful with better features. Modern software offers a wide range of tools for editing for the user. These tools have offered color correction, visual effects, and audio mixing. The interfaces have become more friendly, making editing accessible to more people.
3. Real-Time Playback and Rendering
Advancements in hardware and software have enabled real-time video playback. It further eliminates the need for time-consuming rendering during the editing process. Additionally, it allows editors to see their changes, improving efficiency and productivity.
4. High-Resolution Video
With the availability of high-resolution cameras and displays, the quality has improved. Now, video editing has adapted to handle larger and more detailed video files. Such software can edit and export videos in higher resolutions, even up to 4K and 8K.
5. Special Effects and Visual Enhancements
These editing tools can handle complex visual effects and enhancements. Features such as green screens, motion tracking, and 3D effects have become easier to use. Furthermore, these tools allow editors to achieve sophisticated and professional-looking results.
6. Collaboration and Cloud-Based Editing
The rise of cloud computing has introduced new opportunities for collaboration in video editing. Such editing platforms enable multiple editors to work on the same project. Individuals can share files, get inspiration and collaborate remotely. This feature has facilitated more efficient workflows and improved collaboration among people.
Edit Video for Free For Win 7 or later(64-bit)
Edit Video for Free For macOS 10.14 or later
7. Faster Rendering and Exporting
Video editing software now utilizes multi-threading and GPU acceleration to speed up rendering. These new advancements in technology also help in exporting processes. It reduces the time required to generate the final video output. Additionally, it allows editors to meet tight deadlines and work more quickly.
8. Integration with Other Software and Formats
Editing tools have improved their compatibility with other software and formats. They now integrate with visual effects software, audio editing tools, and other tools. Additionally, these tools support a wide range of video file formats. This compatibility means easier import and export of videos from various sources.
9. Mobile Editing
Smartphones and tablets have brought video editing to mobile devices. Mobile apps now offer robust editing capabilities, allowing users to edit videos on the go. This advancement has increased accessibility and convenience for users as well. Now, people prefer to edit videos using their mobile devices.
10. AI-Assisted Editing
Artificial Intelligence (AI) is now integrated into photo and video editing tools. AI can automate certain repetitive tasks and suggest edits or effects based on patterns. This technology also makes change and even suggest edits by learning your preferences. This can save you time and assist editors in making creative decisions.
Part 2: What Should A Good Video Editing Software Constitute?
A good editing tool should possess several key features and functionalities. The purpose of these tools is to provide a comprehensive and efficient editing experience. Here are some important aspects that an excellent video editing tool should have. This help develops a narrative involving its user interface design:
Edit Video for Free For Win 7 or later(64-bit)
Edit Video for Free For macOS 10.14 or later
1. Comprehensive Editing Tools
The software should offer editing tools and features to accommodate different editing needs. This includes basic functions like trimming, cutting, and merging clips. Moreover, it should also offer some advanced capabilities and editing options as well. The software should provide flexibility and control over the editing process.
2. Support for Various Video Formats
Such software should support a wide range of video formats and codecs. This ensures compatibility with different cameras, file types, and video sources. It also allows editors to work with diverse content without the need for additional file conversion.
3. User-Friendly Interface
An editing tool should have a friendly interface and be easy to use. It also should allow users to navigate through the editing process smoothly. Such tools should provide easy access to tools, menus, and features. Additionally, a friendly video editing interface makes the tool simple for everyone.
4. High-Quality Output
These tools should be capable of producing high-quality video output. It should support exporting videos in different resolutions. This includes standard definition, high definition, and even 4K or higher resolutions. The ability to export in different formats and compression options is also valuable.
5. Efficient Performance
Video editing can be resource-intensive, so good software means efficient performance. It should utilize system resources and provide smooth playback for previewing. Additionally, it should minimize rendering times for quicker previews and exports.
6. Audio Editing Capabilities
Audio is one of the most important components of the video editing process. So, the software should offer different audio editing features. This includes the ability to adjust volume levels, apply audio effects, and much more. Furthermore, it should synchronize audio with video and support multiple audio tracks for editing as well.
7. Special Effects and Visual Enhancements
Advanced video editing software often includes special effects and other enhancement options. Filters, overlays, motion graphics, and other key functionalities should be offered. These features allow editors to improve their videos and achieve specific creative objectives.
8. Collaboration and Sharing Options
Powerful editing tools should facilitate collaboration among editors or team members. It should offer features like project sharing and version control. Also, it should provide users the option to work on the same project simultaneously. Additionally, seamless integration with cloud storage or online platforms can be beneficial.
9. Regular Updates and Support
Recommended tools should have a development team that regularly releases updates. The constant updates should address bugs, improve performance, and introduce new features. Timely customer support is also valuable for users to seek assistance.
10. Cost and Licensing Options
Consideration of the software’s pricing model and licensing options is important. Some software may offer a one-time purchase with perpetual usage. However, many others may have subscription-based models. It’s important to assess the pricing structure and determine if it aligns with your budget and editing needs.
Part 3: Wondershare Filmora: Does It Cover All The Points of a Good Video Editing Software?
Wondershare Filmora is a comprehensive video editing software that is available for everyone. One can download this tool from its official website and start editing. This tool provides a platform for professionals and for those who started editing. This tool allows you to edit your videos with many editing options. Additionally, this tool provides features from basic to more advanced ones.
Edit Video for Free For Win 7 or later(64-bit)
Edit Video for Free For macOS 10.14 or later
We have learned previously about what a good editing tool should offer. So, let’s discuss here what Wondershare Filmora has to offer its users.

Key Features of Wondershare Filmora
1. Wondershare Filmora is a complete editing software that you can download. It offers some basic editing options to more professional and advanced ones. You can find it to be the best platform to edit YouTube videos and more.
2. This tool has a friendly and easy-to-use interface. It makes navigation and editing easy, which further makes the process seamless.
3. The software interface supports different formats for images and videos. It includes PAL, MP4, JPEG, Cineform, and more. This makes the import and export of the files easier to share and edit.
4. Filmora is an editing platform that has the capability of handling higher resolutions. Using this tool, you can import and export your video files in up to 4K resolution.
5. Another excellent key feature of this tool is that you can add your audio files for edit . You can import your own audio files or can choose from the in-built library for your videos.
6. If you’re looking for a unique feature, then this feature will amaze you. Wondershare Filmora is equipped with the latest technology and is going through frequent updates. These updates help you to cut down the rendering speed.
7. You have so much to explore with this tool. Filmora has an in-built library that includes presets, effects, filters, and more. Users can use these presets for their editing work.
8. Additionally, if you want to share your videos for different platforms, you can with this tool. This software lets you change the aspect ratio of your video so you can easily share it on different platforms.
9. Besides editing options and features, this tool goes through constant updates and improvements. The latest version of Filmora comes with multiple AI features and support.
10. Lastly, Wondershare Filmora is free software but also offers premium plans for users. You can choose from different subscription plans.
Pricing Plans Offered by Wondershare Filmora
Are you satisfied with working on Wondershare Filmora’s interface? Look into the provided pricing table for some more prominent details:
| Type | Package | Pricing |
|---|---|---|
| Individual | Month Plan | $19.99 |
| Cross-Platform Plan | $69.99/Year | |
| Perpetual Plan | $79.99 | |
| Team & Business | Annual Plan | $155.88/User |
| Education | Monthly Plan | $19.99 |
| Annual Plan | $40.99 | |
| Perpetual Plan | $49.99 |
Part 4: Explaining The Interface - Wondershare Filmora
If you want to learn about the interface of Wondershare Filmora, you’re at the right place. Here you can learn about the video editing interface and the options available in the tool.
Edit Video for Free For Win 7 or later(64-bit)
Edit Video for Free For macOS 10.14 or later
1. The Main Screen
The main interface of the tool has all the essentials available. You will find a “New Project” tab, and beneath that, you will find different options for editing. Moreover, you will find the aspect ratio, from where you can choose preferred video dimensions. On the left side panel, you have the project options and the “Creator Hub” tab. Besides this, you have the search icon to find your previous projects.

2. Importing Videos
You can import your videos by pressing the designated key. This option allows you to import your media files. Furthermore, you can even import your media by dragging and dropping in the import tab. The import drop-down menu provides multiple import options. This menu also allows you to import your videos from your mobile or external camera.

3. Using the Stock Media
Wondershare Filmora allows you to add free stock media to your videos. The “Stock Media” option has a search option from where you can find your desired media files. Furthermore, this option has multiple free stock media tabs. You can choose the platform from the tabs where you can search and select stock media files.

4. Adding Audios to Videos
This tool allows you to add music or audio to your editing timeline. The tool has a separate “Audio” button, which allows you to select in-built audio files. You can search different sound effects and music files from this tab. Moreover, you can drag and drop your preferred audio file to the timeline. You can even select the audio file in the timeline to make further changes to the file.

5. Using Titles For Explanation
By pressing the “Titles” button, you can select the opening of your title template. This tool has many different title templates available that you can use for your video files. Moreover, you can find categorized titles from the list. This option also allows you to search for different title styles. You can even make changes to your title screen.

Edit Video for Free For Win 7 or later(64-bit)
Edit Video for Free For macOS 10.14 or later
6. Adding Transitions and Effects
Filmora interface is packed with many filters, overlays, and even transition effects. You can choose from different effects and filters by dragging and dropping to your layer. To apply a transition between two clips, simply place the transition effect between those clips. Additionally, you can change the opacity of the applied filters. Also, you can change the duration of your transition effects.

7. Inducing Elements for Improvement
In addition to overlays, filters, and effects, you can also use other elements too. For this, Wondershare Filmora allows you to add stickers to your video edit. By pressing the option, you will find stickers in many categories. You can select stickers from the list; otherwise, you can search for stickers using a keyword. Apply your favorite sticker by selecting and dropping it on a particular layer in the timeline.

8. Getting Aware of the Timeline
The timeline is the section where you add all the layers, effects, and other adjustments to your project. In the timeline section, you will find a particular layer’s hide and unhide option. Moreover, you can mute and unmute the audio of your media file. You can even find an option to manage your tracks in this section. Additionally, there is a Playhead that can also trim your video clip at a specific duration.

9. Things To Know While Exporting
While exporting your project, you will find many options, such as exporting to your device. Furthermore, you can even export your file directly to a specific platform from Filmora. In addition to this, you can even burn your video file to a DVD using this option. Users can also add a thumbnail of their edited video directly from this tool.

Conclusion
Understanding your video editing interface gives you greater creative control over your projects. You can explore and experiment with various editing options and more. Investing time in your tool is important if you’re a professional or an enthusiast. Wondershare Filmora is an amazing editing tool, and its interface is created to make things easy for you.
Also read:
- New Add Motion Blur in After Effects
- Updated 2024 Approved Demystifying the Vectorscope A Comprehensive Guide for Premiere Pro Color Correction
- New YouTube Algorithm Hacks 2024
- Updated Are You Curious About Finding a Good iPhone Slow-Motion App? Discover the Top-Rated Applications in the Market that Will Help You Create the Perfect Video
- Updated How To Quickly Create A Screen Print Effect In Photoshop Detailed Gui
- New Top 10 Sound Extractors to Extract Sound From Video 2023
- New 2024 Approved 10 Best Free Spanish Text To Speech Converter Software Windows, Mac, Android, iPhone, & Online
- New Top 10 Online And PC Cartoon Video Maker 2022 For Beginner
- This Article Discusses the Splitting of the Video Clips in DaVinci Resolve Explicitly. There Is Also a Brief Description of Its Best Alternative, Wondershare Filmora. This Is Also Practically Relevant and Reasonable as Well
- What Slideshow Templates Can Teach You About Aesthetic
- Create the Night-to-Day Effect Videos
- 2024 Approved Several Tips Can Facilitate How You Edit Videos Faster and Easier. All You Need to Do Is to Read This Article to Find Out What They Are
- Updated How to Trim Video in QuickTime Player on Your Mac
- Updated This Article Will Show You How to Clone Yourslef in Videos with Filmora
- Updated How to Convert Time-Lapse to Normal Video
- 2024 Approved Ways to Make Sure Your Video Editing Course Is Worthing to Watch
- In 2024, Guide on How To Change Your Apple ID Email Address On iPhone 11
- In 2024, What to do if your Apple iPhone 14 Plus has bad ESN or blacklisted IMEI?
- In 2024, 4 Ways to Unlock Apple iPhone 12 to Use USB Accessories Without Passcode | Dr.fone
- 2024 Approved Top AI Video Makers to Create Captivating Videos with Pictures
- How to Fix Apple iPhone XS Passcode not Working? | Dr.fone
- In 2024, Edit and Send Fake Location on Telegram For your Oppo Reno 10 Pro 5G in 3 Ways | Dr.fone
- Guide on How To Erase Apple iPhone SE (2022) Devices Entirely | Dr.fone
- In 2024, Easiest Guide How to Clone Xiaomi Redmi A2+ Phone? | Dr.fone
- In 2024, How To Unlink Your Apple iPhone 15 Pro Max From Your Apple ID
- Why is iPogo not working On Oppo Reno 8T 5G? Fixed | Dr.fone
- In 2024, How to Cast Vivo S17 Pro to Computer for iPhone and Android? | Dr.fone
- How to play an MP4 on Motorola Razr 40 Ultra?
- In 2024, How to Mirror Your ZTE Axon 40 Lite Screen to PC with Chromecast | Dr.fone
- Title: Updated How to Loop Videos with iMovie
- Author: Chloe
- Created at : 2024-05-20 03:38:09
- Updated at : 2024-05-21 03:38:09
- Link: https://ai-editing-video.techidaily.com/updated-how-to-loop-videos-with-imovie/
- License: This work is licensed under CC BY-NC-SA 4.0.


