:max_bytes(150000):strip_icc():format(webp)/how-to-change-your-tiktok-username-and-profile-picture-048cd3c3b4854846ab46f920e862332f.jpg)
Updated How To Make a Timelapse in After Effects

How To Make a Timelapse in After Effects
Time-Lapse movies are great for a variety of projects; you can use them as establishing shots in sitcoms, corporate marketing videos, and they can make lovely backgrounds for animated slideshows. A time-lapse video is essentially a series of photographs taken at regular intervals to depict how the environment changes gradually over a shorter period of time. In this article, we’ll demonstrate how you may quickly and easily build an After Effects time-lapse effect.
With that said, let’s start!
Step 1. Create a new composition
Calculating your composition length to accommodate the frame rate and number of images is the first step in generating a time-lapse video.
- Verify the number of images you have for your Sequence.
- New Composition Creation. Selecting a frame rate: A time lapse film produced at 30 frames per second will flow smoothly, but you can select any frame rate you like.
- To determine the duration of your composition, divide the number of photographs you have by the frame rate you’ve chosen. For instance, if you use 600 photos at 30 frames per second, your composition will last 20 seconds.
Step 2. Import your images
You are prepared to make a time-lapse sequence if all of your photographs are saved to the same folder and are in the same order. If you are working directly from your Camera, you will likely have Camera Raw files, although this procedure works with PNG and JPEG sequences.
- Press Command/Control I on your keyboard or select File > Import. Find the folder holding your image sequence.
- To begin, select the first picture in the sequence. If all of your images have accurate names, After Effects will be able to identify a sequence of images.
- Make sure the Force Alphabetical Order and Camera Raw Sequence checkboxes are selected. Your Time-Lapse Sequence will display in the Project Browser Panel after you click Import.
- Once you’ve watched how it plays, you can adjust the Frame Rate by right-clicking the Sequence in the Project Browser and selecting Interpret Footage > Main.
- To update your time-lapse, modify the Frame Rate setting and click OK.

Step 3. Create movements
- After Effects’ Time-Lapse Sequence can be used just like any other standalone clip. This implies that you may give your time-lapse clip movement by adding Keyframes and Effects.
- Place your Playhead at the beginning of the clip after choosing the Image Sequence. Make a keyframe for the scale or position.
- To generate a second Keyframe for the value of your choice, move to the end of the clip. Make any necessary Clip modifications.
- Right-click on the timeline, choose New > Adjustment Layer, then add your effects to the Adjustment Layer to add effects like noise and grain.
Step 4. Create slow motion from a video
You can import your video after you’ve shot it to prepare it for editing. The same steps, including naming your photos in order, must be taken for the Time Lapse sequence. It may be advantageous to entirely rename both your Image Sequence and Performer clip.
- Drag the finished Time Lapse sequence to your Timeline after completing it as previously explained.
- Over the Time Lapse, add the Performer Clip to the Timeline.
- Choose Time>Time Stretch by performing a right-click on the performer clip.
- You can alter the Stretch Factor or Duration in the dialogue box. When you alter one parameter, the other will reflect the new Stretch Factor or Duration for you.
Step 5. Make an overlay
You can alter the Stretch Factor or Duration in the dialogue box. When you alter one parameter, the other will reflect the new Stretch Factor or Duration for you.
- Find Luma Key in the Effect Control Panel and drag it to your clip.
- Change the Key Type setting in the Effect Control Panel to Key Out Brighter.
- The Threshold, Tolerance, and Edge settings should be adjusted until only the silhouette is visible.
- Use the Pen or Mask Tool to create a circle around the parts you want to delete if you discover any corners of your clip that are still visible.
- Add any Effects, such as Light Leaks, to your Adjustment Layer by choosing “Right-click > New > Adjustment layer.”
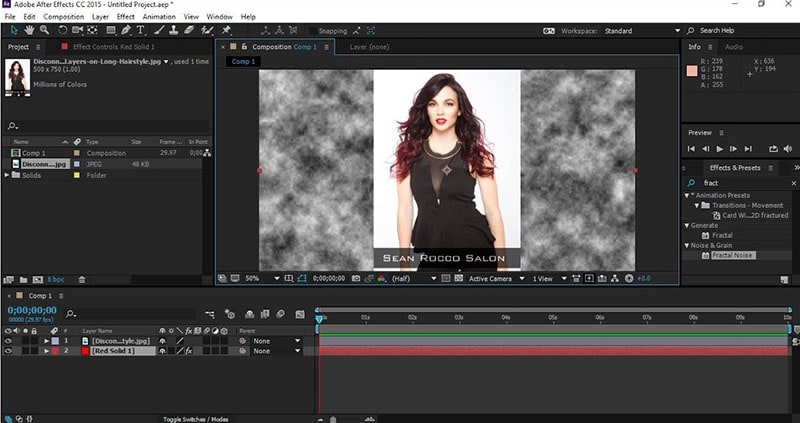
After Effects CC must be opened, a new project must be created, the Import File menu option must be selected, and the appropriate folder containing the altered still images must be located and selected before the time-lapse photos can be turned into a film. You need to make sure that the JPEG Series box is checked, as well as the Force Alphabetical Order box.
Once you have clicked on the first image in the sequence. The time-lapse video that you uploaded appears in the project library. After performing a right-click on the filename, select “New Comp from Selection” from the context menu.
Step 6. Exporting your video
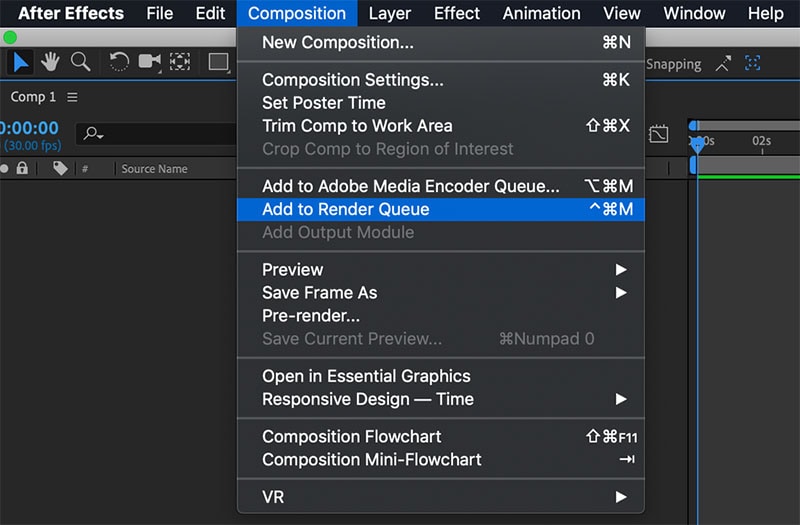
After getting our sequence to perform some kind of slow, understated animation so that it appears as though the camera is moving dramatically, we will need to export a video file. Go to File > Export > Add to Render Queue, then open the Render Queue dialog box by going to Window > Render Queue. From there, you can choose the Output Module and change the settings in the options dialog box. Finally, choose the Output To option and select the location on your computer where you would like to save the video clip that we are currently rendering and exporting.
Conclusion
No matter how you make your time lapse videos, After Effects has a ton of features you can use to modify and enhance the way they look. Now that you are familiar with the fundamentals, you can play with the Frame Rates and Composition options. Check out this helpful manual for more information on Time Stretching and Remapping in After Effects.
Free Download For Win 7 or later(64-bit)
Free Download For macOS 10.14 or later
Free Download For macOS 10.14 or later
Rotate Video in iMovie
Are you wondering how to change the orientation of videos in iMovie? You’re not alone. With iMovie as a professional video editing suite, it is no surprise to see iOS, iPad OS, and Mac OS users wanting to learn how to create cinematic and breathtaking videos using iMovie. iMovie allows its users to import clips, add effects, customize music, employ filters and motion elements, and lots more.
There are many ways of being creative during movie production. iMovie editors are exploring fast forward and slow-motion effects to changing backgrounds and flipping clips over. Depending on what you would like to achieve, you may flip your video clips to make them appear better or give them another outlook. You can decide to change orientation in iMovie. To change video orientation in iMovie requires that you know how to use the software. You can vertically or horizontally flip a clip and rotate it left or right in iMovie.
In this article
01 What is Rotating Video and Why
02 Detailed Steps to Rotate Video in iMovie
03 Rotate Video - iMovie Alternative
Part 1: What is Rotating Video and Why
Rotating a video means changing its orientation. A video clip can turn in a clockwise or counterclockwise direction, in 90° increments. Different video-making and editing software or applications have other steps to carry out this process. However, the result is the same for all, a change in the orientation of the video.
People rotate video clips for a variety of reasons. Here are some reasons as to why you may want to change video orientation in iMovie:
- Video stylization: While a rotated video may look disoriented, editors sometimes use the technique to convey a particular mood or emotion.
- Continuity: Video clip rotation can help you correct production errors or last-minute effect changes.
- Correct disorientation: Sometimes, as a result of errors while shooting, especially when using a mobile device, some video clips may appear in a lateral direction; video rotation can help fix this.
- Create horizontal videos: With a change in video orientation, you can make some footage like backgrounds appear vertically or horizontally.
Now that you know what video rotation is and some of the reasons people choose to change a video’s orientation, let’s now dive right into rotating videos in iMovie. And move ahead to lead from other video editors with this change orientation of video in iMovie technique going to discuss below.
Part 2: Detailed Steps to Rotate Video in iMovie
Appropriate video orientation is the requirement of every video creation project. If video orientation is not as needed, either the one created in iMovie or already existing video. Then, the need arises to look around ways to assist in performing the iMovie change orientation task effectively. This part of the article will specifically explain how to change the orientation of video in iMovie with all the necessary steps.
Before adding a clip or photo to your movie, you can decide to change its orientation. The following steps would show how to change video orientation in iMovie:
Step 1: Launch iMovie
On your Mac, launch iMovie > From the browser or timeline, select the photo or video clip to be rotated.
Step 2: Click on the Crop icon
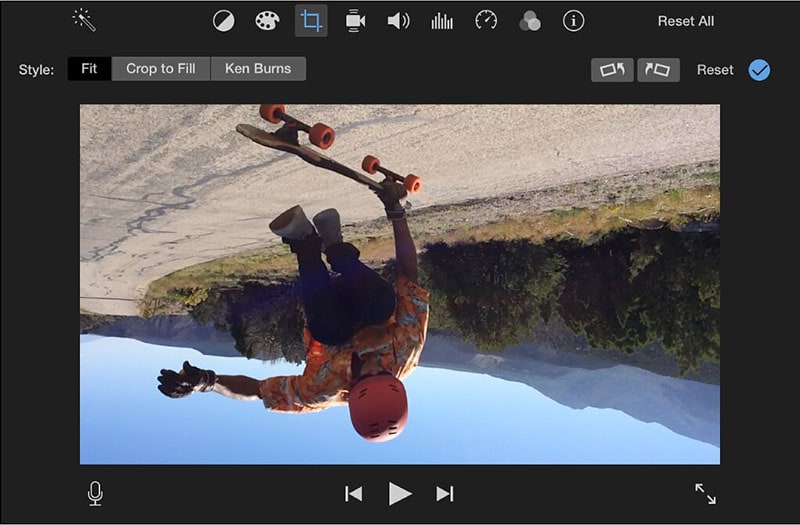
Click the cropping icon to reveal the cropping options/controls.
![]()
Step 3:Rotate Video
On the right portion of the cropping controls, click Rotate Clockwise to rotate the clip or photo in a clockwise direction. Otherwise, click Rotates Counterclockwise to rotate the clip or image counterclockwise.
Step 4:Apply Changes
In the cropping controls, click Apply to effect the changes.
If you wish to remove the rotation, click the reset button at the top right-hand corner of your screen.
Now, as you know the steps to change video orientation in iMovie, simply move ahead of your video creation and editing process with iMovie and enjoy the wonderful experience of creating something new, engaging, and innovative in the world of video making. Not only this step guide will be going to assist you, but there are some more alternative ways also that you can give a try to enhance your overall experience in the area of the video content editing process. For that, you don’t need to go anywhere. Right here, you will have that vast area of information.
Part 3: Rotate Video - iMovie Alternative
Are you looking for some other software to rotate your Video with? Wondershare Filmora is your sure plug! This easy-to-use yet professional video editing software turns videos and add titles, add text, perform color grading, add multiple overlays, do motion tracking, use stickers and animations, and, what is more, purchase the software at an affordable price. With this software, you can comment and play your video clips to not have to worry about doing this now and then.
To rotate MPEG and MPG videos using Wondershare Filmora, follow these simple steps:
Step 1: Import the MP4 files to be rotated
Drag and drop the clip to be rotated on the primary window or click Import to browse your files.

Step 2: Rotate the MP4 clips
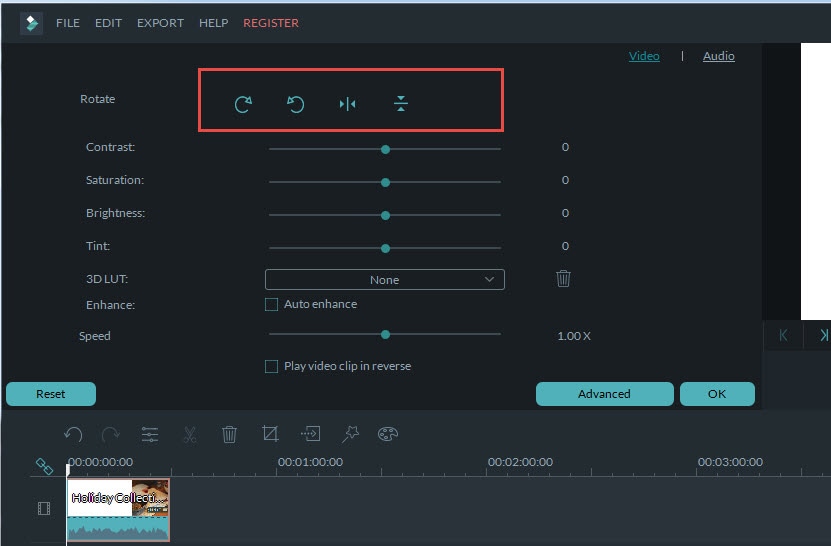
Now, from the User’s Album, drag the MP4 file to be rotated to the video track on the timeline. Double click the MP4 video thumbnail to reveal the Rotate options, allowing you to rotate your video in one click. There are four rotation related options in Wondershare Filmora:
- Rotate the clip 90° in a clockwise direction and continuously. This way, you can rotate the clip 90°, 180°, and 270°.
- Rotate the clip 90° in an anticlockwise direction and constantly.
- Flip the Video horizontally in an upside-down fashion.
- Flip the Video vertically left to right.
Step 3: Export the rotated video clip
To permanently save the changes made, click the Create button to reveal four options: YouTube, DVD, Format, and Device. Select the right format/device and click Create to output your rotated video clip.

You have sufficient equipment to start your voyage to creation and innovation by now. No doubt, Filmora comes here as a rescue and an alternative solution to let you change video orientation and a provider of many editing options. So without any concern, you can explore the tool at any time as per your availability and requirement.
Conclusion
Wondershare Filmora
Get started easily with Filmora’s powerful performance, intuitive interface, and countless effects!
Try It Free Try It Free Try It Free Learn More about Filmora>

Through this article, you learnt how to change orientation in iMovie, and thus nothing is holding your creativity back! With iMovie change orientation, you can now flip video clips in different directions to suit your preference. You now also know that with Wondershare Filmora, you can achieve just about the same result as you would if you were using iMovie for video rotation. So, now you have two robust tools to perform your task. Just keep going and let rock the world with your fantastic creativity and efforts.
02 Detailed Steps to Rotate Video in iMovie
03 Rotate Video - iMovie Alternative
Part 1: What is Rotating Video and Why
Rotating a video means changing its orientation. A video clip can turn in a clockwise or counterclockwise direction, in 90° increments. Different video-making and editing software or applications have other steps to carry out this process. However, the result is the same for all, a change in the orientation of the video.
People rotate video clips for a variety of reasons. Here are some reasons as to why you may want to change video orientation in iMovie:
- Video stylization: While a rotated video may look disoriented, editors sometimes use the technique to convey a particular mood or emotion.
- Continuity: Video clip rotation can help you correct production errors or last-minute effect changes.
- Correct disorientation: Sometimes, as a result of errors while shooting, especially when using a mobile device, some video clips may appear in a lateral direction; video rotation can help fix this.
- Create horizontal videos: With a change in video orientation, you can make some footage like backgrounds appear vertically or horizontally.
Now that you know what video rotation is and some of the reasons people choose to change a video’s orientation, let’s now dive right into rotating videos in iMovie. And move ahead to lead from other video editors with this change orientation of video in iMovie technique going to discuss below.
Part 2: Detailed Steps to Rotate Video in iMovie
Appropriate video orientation is the requirement of every video creation project. If video orientation is not as needed, either the one created in iMovie or already existing video. Then, the need arises to look around ways to assist in performing the iMovie change orientation task effectively. This part of the article will specifically explain how to change the orientation of video in iMovie with all the necessary steps.
Before adding a clip or photo to your movie, you can decide to change its orientation. The following steps would show how to change video orientation in iMovie:
Step 1: Launch iMovie
On your Mac, launch iMovie > From the browser or timeline, select the photo or video clip to be rotated.
Step 2: Click on the Crop icon
Click the cropping icon to reveal the cropping options/controls.
![]()
Step 3:Rotate Video
On the right portion of the cropping controls, click Rotate Clockwise to rotate the clip or photo in a clockwise direction. Otherwise, click Rotates Counterclockwise to rotate the clip or image counterclockwise.

Step 4:Apply Changes
In the cropping controls, click Apply to effect the changes.
If you wish to remove the rotation, click the reset button at the top right-hand corner of your screen.
Now, as you know the steps to change video orientation in iMovie, simply move ahead of your video creation and editing process with iMovie and enjoy the wonderful experience of creating something new, engaging, and innovative in the world of video making. Not only this step guide will be going to assist you, but there are some more alternative ways also that you can give a try to enhance your overall experience in the area of the video content editing process. For that, you don’t need to go anywhere. Right here, you will have that vast area of information.
Part 3: Rotate Video - iMovie Alternative
Are you looking for some other software to rotate your Video with? Wondershare Filmora is your sure plug! This easy-to-use yet professional video editing software turns videos and add titles, add text, perform color grading, add multiple overlays, do motion tracking, use stickers and animations, and, what is more, purchase the software at an affordable price. With this software, you can comment and play your video clips to not have to worry about doing this now and then.
To rotate MPEG and MPG videos using Wondershare Filmora, follow these simple steps:
Step 1: Import the MP4 files to be rotated
Drag and drop the clip to be rotated on the primary window or click Import to browse your files.

Step 2: Rotate the MP4 clips
Now, from the User’s Album, drag the MP4 file to be rotated to the video track on the timeline. Double click the MP4 video thumbnail to reveal the Rotate options, allowing you to rotate your video in one click. There are four rotation related options in Wondershare Filmora:
- Rotate the clip 90° in a clockwise direction and continuously. This way, you can rotate the clip 90°, 180°, and 270°.
- Rotate the clip 90° in an anticlockwise direction and constantly.
- Flip the Video horizontally in an upside-down fashion.
- Flip the Video vertically left to right.

Step 3: Export the rotated video clip
To permanently save the changes made, click the Create button to reveal four options: YouTube, DVD, Format, and Device. Select the right format/device and click Create to output your rotated video clip.

You have sufficient equipment to start your voyage to creation and innovation by now. No doubt, Filmora comes here as a rescue and an alternative solution to let you change video orientation and a provider of many editing options. So without any concern, you can explore the tool at any time as per your availability and requirement.
Conclusion
Wondershare Filmora
Get started easily with Filmora’s powerful performance, intuitive interface, and countless effects!
Try It Free Try It Free Try It Free Learn More about Filmora>

Through this article, you learnt how to change orientation in iMovie, and thus nothing is holding your creativity back! With iMovie change orientation, you can now flip video clips in different directions to suit your preference. You now also know that with Wondershare Filmora, you can achieve just about the same result as you would if you were using iMovie for video rotation. So, now you have two robust tools to perform your task. Just keep going and let rock the world with your fantastic creativity and efforts.
02 Detailed Steps to Rotate Video in iMovie
03 Rotate Video - iMovie Alternative
Part 1: What is Rotating Video and Why
Rotating a video means changing its orientation. A video clip can turn in a clockwise or counterclockwise direction, in 90° increments. Different video-making and editing software or applications have other steps to carry out this process. However, the result is the same for all, a change in the orientation of the video.
People rotate video clips for a variety of reasons. Here are some reasons as to why you may want to change video orientation in iMovie:
- Video stylization: While a rotated video may look disoriented, editors sometimes use the technique to convey a particular mood or emotion.
- Continuity: Video clip rotation can help you correct production errors or last-minute effect changes.
- Correct disorientation: Sometimes, as a result of errors while shooting, especially when using a mobile device, some video clips may appear in a lateral direction; video rotation can help fix this.
- Create horizontal videos: With a change in video orientation, you can make some footage like backgrounds appear vertically or horizontally.
Now that you know what video rotation is and some of the reasons people choose to change a video’s orientation, let’s now dive right into rotating videos in iMovie. And move ahead to lead from other video editors with this change orientation of video in iMovie technique going to discuss below.
Part 2: Detailed Steps to Rotate Video in iMovie
Appropriate video orientation is the requirement of every video creation project. If video orientation is not as needed, either the one created in iMovie or already existing video. Then, the need arises to look around ways to assist in performing the iMovie change orientation task effectively. This part of the article will specifically explain how to change the orientation of video in iMovie with all the necessary steps.
Before adding a clip or photo to your movie, you can decide to change its orientation. The following steps would show how to change video orientation in iMovie:
Step 1: Launch iMovie
On your Mac, launch iMovie > From the browser or timeline, select the photo or video clip to be rotated.
Step 2: Click on the Crop icon
Click the cropping icon to reveal the cropping options/controls.
![]()
Step 3:Rotate Video
On the right portion of the cropping controls, click Rotate Clockwise to rotate the clip or photo in a clockwise direction. Otherwise, click Rotates Counterclockwise to rotate the clip or image counterclockwise.

Step 4:Apply Changes
In the cropping controls, click Apply to effect the changes.
If you wish to remove the rotation, click the reset button at the top right-hand corner of your screen.
Now, as you know the steps to change video orientation in iMovie, simply move ahead of your video creation and editing process with iMovie and enjoy the wonderful experience of creating something new, engaging, and innovative in the world of video making. Not only this step guide will be going to assist you, but there are some more alternative ways also that you can give a try to enhance your overall experience in the area of the video content editing process. For that, you don’t need to go anywhere. Right here, you will have that vast area of information.
Part 3: Rotate Video - iMovie Alternative
Are you looking for some other software to rotate your Video with? Wondershare Filmora is your sure plug! This easy-to-use yet professional video editing software turns videos and add titles, add text, perform color grading, add multiple overlays, do motion tracking, use stickers and animations, and, what is more, purchase the software at an affordable price. With this software, you can comment and play your video clips to not have to worry about doing this now and then.
To rotate MPEG and MPG videos using Wondershare Filmora, follow these simple steps:
Step 1: Import the MP4 files to be rotated
Drag and drop the clip to be rotated on the primary window or click Import to browse your files.

Step 2: Rotate the MP4 clips
Now, from the User’s Album, drag the MP4 file to be rotated to the video track on the timeline. Double click the MP4 video thumbnail to reveal the Rotate options, allowing you to rotate your video in one click. There are four rotation related options in Wondershare Filmora:
- Rotate the clip 90° in a clockwise direction and continuously. This way, you can rotate the clip 90°, 180°, and 270°.
- Rotate the clip 90° in an anticlockwise direction and constantly.
- Flip the Video horizontally in an upside-down fashion.
- Flip the Video vertically left to right.

Step 3: Export the rotated video clip
To permanently save the changes made, click the Create button to reveal four options: YouTube, DVD, Format, and Device. Select the right format/device and click Create to output your rotated video clip.

You have sufficient equipment to start your voyage to creation and innovation by now. No doubt, Filmora comes here as a rescue and an alternative solution to let you change video orientation and a provider of many editing options. So without any concern, you can explore the tool at any time as per your availability and requirement.
Conclusion
Wondershare Filmora
Get started easily with Filmora’s powerful performance, intuitive interface, and countless effects!
Try It Free Try It Free Try It Free Learn More about Filmora>

Through this article, you learnt how to change orientation in iMovie, and thus nothing is holding your creativity back! With iMovie change orientation, you can now flip video clips in different directions to suit your preference. You now also know that with Wondershare Filmora, you can achieve just about the same result as you would if you were using iMovie for video rotation. So, now you have two robust tools to perform your task. Just keep going and let rock the world with your fantastic creativity and efforts.
02 Detailed Steps to Rotate Video in iMovie
03 Rotate Video - iMovie Alternative
Part 1: What is Rotating Video and Why
Rotating a video means changing its orientation. A video clip can turn in a clockwise or counterclockwise direction, in 90° increments. Different video-making and editing software or applications have other steps to carry out this process. However, the result is the same for all, a change in the orientation of the video.
People rotate video clips for a variety of reasons. Here are some reasons as to why you may want to change video orientation in iMovie:
- Video stylization: While a rotated video may look disoriented, editors sometimes use the technique to convey a particular mood or emotion.
- Continuity: Video clip rotation can help you correct production errors or last-minute effect changes.
- Correct disorientation: Sometimes, as a result of errors while shooting, especially when using a mobile device, some video clips may appear in a lateral direction; video rotation can help fix this.
- Create horizontal videos: With a change in video orientation, you can make some footage like backgrounds appear vertically or horizontally.
Now that you know what video rotation is and some of the reasons people choose to change a video’s orientation, let’s now dive right into rotating videos in iMovie. And move ahead to lead from other video editors with this change orientation of video in iMovie technique going to discuss below.
Part 2: Detailed Steps to Rotate Video in iMovie
Appropriate video orientation is the requirement of every video creation project. If video orientation is not as needed, either the one created in iMovie or already existing video. Then, the need arises to look around ways to assist in performing the iMovie change orientation task effectively. This part of the article will specifically explain how to change the orientation of video in iMovie with all the necessary steps.
Before adding a clip or photo to your movie, you can decide to change its orientation. The following steps would show how to change video orientation in iMovie:
Step 1: Launch iMovie
On your Mac, launch iMovie > From the browser or timeline, select the photo or video clip to be rotated.
Step 2: Click on the Crop icon
Click the cropping icon to reveal the cropping options/controls.
![]()
Step 3:Rotate Video
On the right portion of the cropping controls, click Rotate Clockwise to rotate the clip or photo in a clockwise direction. Otherwise, click Rotates Counterclockwise to rotate the clip or image counterclockwise.

Step 4:Apply Changes
In the cropping controls, click Apply to effect the changes.
If you wish to remove the rotation, click the reset button at the top right-hand corner of your screen.
Now, as you know the steps to change video orientation in iMovie, simply move ahead of your video creation and editing process with iMovie and enjoy the wonderful experience of creating something new, engaging, and innovative in the world of video making. Not only this step guide will be going to assist you, but there are some more alternative ways also that you can give a try to enhance your overall experience in the area of the video content editing process. For that, you don’t need to go anywhere. Right here, you will have that vast area of information.
Part 3: Rotate Video - iMovie Alternative
Are you looking for some other software to rotate your Video with? Wondershare Filmora is your sure plug! This easy-to-use yet professional video editing software turns videos and add titles, add text, perform color grading, add multiple overlays, do motion tracking, use stickers and animations, and, what is more, purchase the software at an affordable price. With this software, you can comment and play your video clips to not have to worry about doing this now and then.
To rotate MPEG and MPG videos using Wondershare Filmora, follow these simple steps:
Step 1: Import the MP4 files to be rotated
Drag and drop the clip to be rotated on the primary window or click Import to browse your files.

Step 2: Rotate the MP4 clips
Now, from the User’s Album, drag the MP4 file to be rotated to the video track on the timeline. Double click the MP4 video thumbnail to reveal the Rotate options, allowing you to rotate your video in one click. There are four rotation related options in Wondershare Filmora:
- Rotate the clip 90° in a clockwise direction and continuously. This way, you can rotate the clip 90°, 180°, and 270°.
- Rotate the clip 90° in an anticlockwise direction and constantly.
- Flip the Video horizontally in an upside-down fashion.
- Flip the Video vertically left to right.

Step 3: Export the rotated video clip
To permanently save the changes made, click the Create button to reveal four options: YouTube, DVD, Format, and Device. Select the right format/device and click Create to output your rotated video clip.

You have sufficient equipment to start your voyage to creation and innovation by now. No doubt, Filmora comes here as a rescue and an alternative solution to let you change video orientation and a provider of many editing options. So without any concern, you can explore the tool at any time as per your availability and requirement.
Conclusion
Wondershare Filmora
Get started easily with Filmora’s powerful performance, intuitive interface, and countless effects!
Try It Free Try It Free Try It Free Learn More about Filmora>

Through this article, you learnt how to change orientation in iMovie, and thus nothing is holding your creativity back! With iMovie change orientation, you can now flip video clips in different directions to suit your preference. You now also know that with Wondershare Filmora, you can achieve just about the same result as you would if you were using iMovie for video rotation. So, now you have two robust tools to perform your task. Just keep going and let rock the world with your fantastic creativity and efforts.
Is Augmented Reality Conferencing the Future of Workplace Collaboration?
Is Augmented Reality Conferencing the Future of Workplace Collaboration?
An easy yet powerful editor
Numerous effects to choose from
Detailed tutorials provided by the official channel
AR or Augmented Reality and VR or Virtual Reality are quite a common discussion in the world of technology. Similarly, the technology-driven workspaces demand a seamless workspace collaboration post-pandemic. People are used to working from home and the workspace culture is changing rapidly due to such habits. 59% of the US workers want to continue WFH according to a study by TalentLyft. To cut the cost of daily travel and dedicate more quality time to work, employees are prioritizing online offices. On the other hand, employers are willing to save office space and other expenses with such a professional routine. That’s where the idea of augmented reality video conferencing is hitting to keep the collaboration between workers alive for a synchronized workflow.
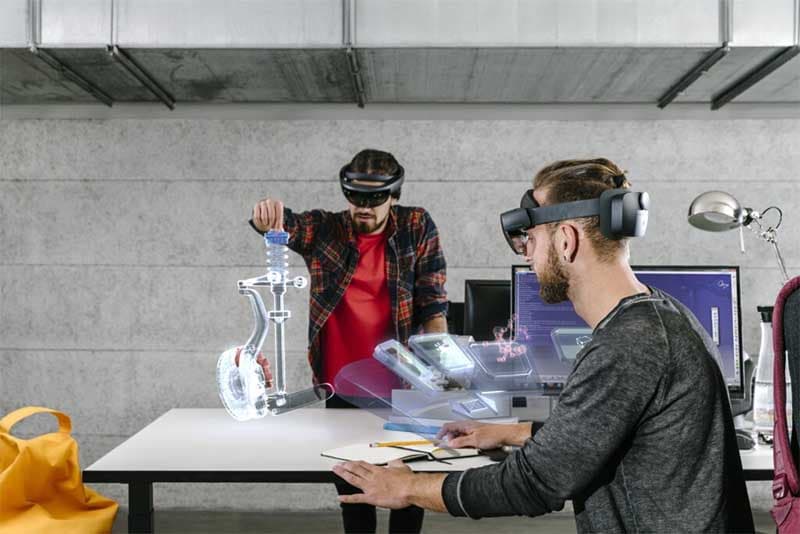
How AR and VR can assist professional collaboration and lift the operations to a better place is the current question. Also, what would be the system through which employees can be habituated to the use? All of the answers are explained in this article.
In this article
01 [What is Augmented Reality Conferencing and What’s VR Video Streaming Workflow](#Part 1)
02 [Pros and Cons of AR and VR Conferencing](#Part 2)
03 [How does Filmora assists AR video conference?](#Part 3)
Part 1 What is Augmented Reality Conferencing and What’s VR Video Streaming Workflow
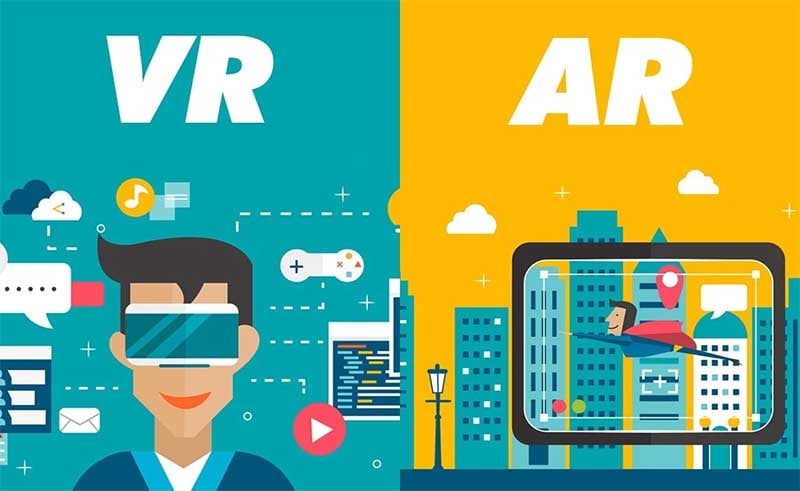
Before jumping to the application of AR and VR, it’s important to clarify the concept of the two different technologies. While AR is an enhanced version of the real world, VR is totally virtual. As a basic concept, note that, augmented reality is an arrangement of the user’s real-world view whereas virtual reality is totally an illusion based on a video. AR can be accessed from a phone to set the camera with a view and a virtual arrangement would be present within it. For example, if there’s a room in the real world, with an AR video conference, people can be adjusted virtually.

Virtual reality, as the name suggests, is totally in control of the system. With goggles or headsets, one can view computer-generated video with 360 degrees of technical effects to be seemed as real. This technology is mainly applicable for a video currently and there’re more scopes to experiment further.

Here comes the question, how these technologies can be merged with a permanent business structure that can be as effective as the older system, and there’s scope for even better results? Well, according to a study by FinancesOnline, 72% of the US customers find AR for better collaboration and 69% think it increases the efficiency in the workspace. Also, 49% of the IT experts believe that AR can access real-time information sooner.
The key idea behind augmented reality conferencing is to omit the parameters like distance, time, and space expenses and motivate positive collaboration in business workflow. There are multiple advantages of this technology for both employees and employers. As people are getting accustomed to the virtual setting in any professional or personal work from home, the plan to shift to a semi-virtual or virtual office structure is not vague now. In fact, this adaptation might take place sooner than expected as a long-term effect of the pandemic.
How augmented reality conferencing and virtual reality video streaming will be working?
AR and VR can be implemented through different technologies and hardware devices. As a result, employees can attend a meeting from home, just with a mobile application that enables the office structure in the room. Or, 2-3 members can be present physically in a meeting room while others are joining from remote places through VR. A 3D video streaming would overshadow the physical absence of the teammates. At the same time, the resources can be shared in no time for reference and transparent communication.
So, how exactly a business can be affected by augmented reality video conferencing on a large scale? Here’s a keen observation from both perspectives.
Part 2 Pros and Cons of AR and VR Conferencing
01Pros of AR and VR Conferencing
● This technology has an initial purpose to save time and energy for the workers including daily travel and balancing personal and professional commitments.
● Employers can hire people from remote places based on their skills and without worrying about the distance and timezone gap.
● Additional resources like bigger office space, electricity, and water can be saved if augmented reality video conferencing is in a complete performance.
● Positive collaboration can be expected while the employees have more energy and a comfortable environment to work in. As a result, productivity might take a boost as well.
● AR video conference serves a better experience than normal video conference in Zoom or Google meeting.
02Cons of AR and VR Conferencing
● The whole process is still under experiment and there’s no confirmed news about its beginning. So, there’s no practical feedback on the process of installation, usage, and maintenance.
● It would be expensive and time-consuming to set up a virtual reality conference system in a big office with n number of people.
● Technical fault from the office or from employees’ home can cost serious penalties in the business workflow.
● Hardware limitations like limited battery life, expensive headsets, and wireless connection are required and these things can cause problems while implementation.
● It can be uncomfortable to wear headsets for a long time during augmented reality conferencing andpeople can experience motion sickness due to this.
Part 3 How does Wondershare Filmora Video Editor assists AR video conference?
To use AR and VR professionally at a larger scale, the videos need to be seamless and follow some standard parameters. With Filmora, it would be easier to manage all the videos during an augmented reality video conferencing. There are multiple effects like “Motion Tracking”, “Keyframing”, “Audio ducking”, “Speed Control”, and “Color matching” that are required while managing a virtual conference with multiple people. It’s important to match the environment thoroughly so there’s no lack of concentration and inferiority in the system.
For Win 7 or later (64-bit)
For macOS 10.12 or later
From a business perspective, a video editor has many roles to play. Similarly, for a modern integration like AR and VR video conferencing, the required tools cannot be compromised. With facilities like “Green screen”, “Audio equalizer”, “Split screen”, “3D Lut”, etc. augmented reality would be presented smartly. To match the whole office environment as effectively as the real (present) one and to boost collaboration in the workspace, new generation video editing tools like Filmora is a must. With minimal effort, virtual meetings can be arranged and presented with the key goal to work at a global level and minimize the distance barrier.
● Ending Thoughts →
● Augmented reality conferencing is at an experiment level now and it is expected to be integrated with the real-life workflow sooner.
● As discussed, there’re both advantages and disadvantages of this technology right now. To enhance the facilities and diminish the cons, a smart video editor can be the gamechanger. In this article, you can find all the current news about AR adaptation for workspace collaboration in detail.
AR or Augmented Reality and VR or Virtual Reality are quite a common discussion in the world of technology. Similarly, the technology-driven workspaces demand a seamless workspace collaboration post-pandemic. People are used to working from home and the workspace culture is changing rapidly due to such habits. 59% of the US workers want to continue WFH according to a study by TalentLyft. To cut the cost of daily travel and dedicate more quality time to work, employees are prioritizing online offices. On the other hand, employers are willing to save office space and other expenses with such a professional routine. That’s where the idea of augmented reality video conferencing is hitting to keep the collaboration between workers alive for a synchronized workflow.

How AR and VR can assist professional collaboration and lift the operations to a better place is the current question. Also, what would be the system through which employees can be habituated to the use? All of the answers are explained in this article.
In this article
01 [What is Augmented Reality Conferencing and What’s VR Video Streaming Workflow](#Part 1)
02 [Pros and Cons of AR and VR Conferencing](#Part 2)
03 [How does Filmora assists AR video conference?](#Part 3)
Part 1 What is Augmented Reality Conferencing and What’s VR Video Streaming Workflow
Before jumping to the application of AR and VR, it’s important to clarify the concept of the two different technologies. While AR is an enhanced version of the real world, VR is totally virtual. As a basic concept, note that, augmented reality is an arrangement of the user’s real-world view whereas virtual reality is totally an illusion based on a video. AR can be accessed from a phone to set the camera with a view and a virtual arrangement would be present within it. For example, if there’s a room in the real world, with an AR video conference, people can be adjusted virtually.

Virtual reality, as the name suggests, is totally in control of the system. With goggles or headsets, one can view computer-generated video with 360 degrees of technical effects to be seemed as real. This technology is mainly applicable for a video currently and there’re more scopes to experiment further.

Here comes the question, how these technologies can be merged with a permanent business structure that can be as effective as the older system, and there’s scope for even better results? Well, according to a study by FinancesOnline, 72% of the US customers find AR for better collaboration and 69% think it increases the efficiency in the workspace. Also, 49% of the IT experts believe that AR can access real-time information sooner.
The key idea behind augmented reality conferencing is to omit the parameters like distance, time, and space expenses and motivate positive collaboration in business workflow. There are multiple advantages of this technology for both employees and employers. As people are getting accustomed to the virtual setting in any professional or personal work from home, the plan to shift to a semi-virtual or virtual office structure is not vague now. In fact, this adaptation might take place sooner than expected as a long-term effect of the pandemic.
How augmented reality conferencing and virtual reality video streaming will be working?
AR and VR can be implemented through different technologies and hardware devices. As a result, employees can attend a meeting from home, just with a mobile application that enables the office structure in the room. Or, 2-3 members can be present physically in a meeting room while others are joining from remote places through VR. A 3D video streaming would overshadow the physical absence of the teammates. At the same time, the resources can be shared in no time for reference and transparent communication.
So, how exactly a business can be affected by augmented reality video conferencing on a large scale? Here’s a keen observation from both perspectives.
Part 2 Pros and Cons of AR and VR Conferencing

01Pros of AR and VR Conferencing
● This technology has an initial purpose to save time and energy for the workers including daily travel and balancing personal and professional commitments.
● Employers can hire people from remote places based on their skills and without worrying about the distance and timezone gap.
● Additional resources like bigger office space, electricity, and water can be saved if augmented reality video conferencing is in a complete performance.
● Positive collaboration can be expected while the employees have more energy and a comfortable environment to work in. As a result, productivity might take a boost as well.
● AR video conference serves a better experience than normal video conference in Zoom or Google meeting.
02Cons of AR and VR Conferencing
● The whole process is still under experiment and there’s no confirmed news about its beginning. So, there’s no practical feedback on the process of installation, usage, and maintenance.
● It would be expensive and time-consuming to set up a virtual reality conference system in a big office with n number of people.
● Technical fault from the office or from employees’ home can cost serious penalties in the business workflow.
● Hardware limitations like limited battery life, expensive headsets, and wireless connection are required and these things can cause problems while implementation.
● It can be uncomfortable to wear headsets for a long time during augmented reality conferencing andpeople can experience motion sickness due to this.
Part 3 How does Wondershare Filmora Video Editor assists AR video conference?
To use AR and VR professionally at a larger scale, the videos need to be seamless and follow some standard parameters. With Filmora, it would be easier to manage all the videos during an augmented reality video conferencing. There are multiple effects like “Motion Tracking”, “Keyframing”, “Audio ducking”, “Speed Control”, and “Color matching” that are required while managing a virtual conference with multiple people. It’s important to match the environment thoroughly so there’s no lack of concentration and inferiority in the system.
For Win 7 or later (64-bit)
For macOS 10.12 or later
From a business perspective, a video editor has many roles to play. Similarly, for a modern integration like AR and VR video conferencing, the required tools cannot be compromised. With facilities like “Green screen”, “Audio equalizer”, “Split screen”, “3D Lut”, etc. augmented reality would be presented smartly. To match the whole office environment as effectively as the real (present) one and to boost collaboration in the workspace, new generation video editing tools like Filmora is a must. With minimal effort, virtual meetings can be arranged and presented with the key goal to work at a global level and minimize the distance barrier.
● Ending Thoughts →
● Augmented reality conferencing is at an experiment level now and it is expected to be integrated with the real-life workflow sooner.
● As discussed, there’re both advantages and disadvantages of this technology right now. To enhance the facilities and diminish the cons, a smart video editor can be the gamechanger. In this article, you can find all the current news about AR adaptation for workspace collaboration in detail.
AR or Augmented Reality and VR or Virtual Reality are quite a common discussion in the world of technology. Similarly, the technology-driven workspaces demand a seamless workspace collaboration post-pandemic. People are used to working from home and the workspace culture is changing rapidly due to such habits. 59% of the US workers want to continue WFH according to a study by TalentLyft. To cut the cost of daily travel and dedicate more quality time to work, employees are prioritizing online offices. On the other hand, employers are willing to save office space and other expenses with such a professional routine. That’s where the idea of augmented reality video conferencing is hitting to keep the collaboration between workers alive for a synchronized workflow.

How AR and VR can assist professional collaboration and lift the operations to a better place is the current question. Also, what would be the system through which employees can be habituated to the use? All of the answers are explained in this article.
In this article
01 [What is Augmented Reality Conferencing and What’s VR Video Streaming Workflow](#Part 1)
02 [Pros and Cons of AR and VR Conferencing](#Part 2)
03 [How does Filmora assists AR video conference?](#Part 3)
Part 1 What is Augmented Reality Conferencing and What’s VR Video Streaming Workflow
Before jumping to the application of AR and VR, it’s important to clarify the concept of the two different technologies. While AR is an enhanced version of the real world, VR is totally virtual. As a basic concept, note that, augmented reality is an arrangement of the user’s real-world view whereas virtual reality is totally an illusion based on a video. AR can be accessed from a phone to set the camera with a view and a virtual arrangement would be present within it. For example, if there’s a room in the real world, with an AR video conference, people can be adjusted virtually.

Virtual reality, as the name suggests, is totally in control of the system. With goggles or headsets, one can view computer-generated video with 360 degrees of technical effects to be seemed as real. This technology is mainly applicable for a video currently and there’re more scopes to experiment further.

Here comes the question, how these technologies can be merged with a permanent business structure that can be as effective as the older system, and there’s scope for even better results? Well, according to a study by FinancesOnline, 72% of the US customers find AR for better collaboration and 69% think it increases the efficiency in the workspace. Also, 49% of the IT experts believe that AR can access real-time information sooner.
The key idea behind augmented reality conferencing is to omit the parameters like distance, time, and space expenses and motivate positive collaboration in business workflow. There are multiple advantages of this technology for both employees and employers. As people are getting accustomed to the virtual setting in any professional or personal work from home, the plan to shift to a semi-virtual or virtual office structure is not vague now. In fact, this adaptation might take place sooner than expected as a long-term effect of the pandemic.
How augmented reality conferencing and virtual reality video streaming will be working?
AR and VR can be implemented through different technologies and hardware devices. As a result, employees can attend a meeting from home, just with a mobile application that enables the office structure in the room. Or, 2-3 members can be present physically in a meeting room while others are joining from remote places through VR. A 3D video streaming would overshadow the physical absence of the teammates. At the same time, the resources can be shared in no time for reference and transparent communication.
So, how exactly a business can be affected by augmented reality video conferencing on a large scale? Here’s a keen observation from both perspectives.
Part 2 Pros and Cons of AR and VR Conferencing

01Pros of AR and VR Conferencing
● This technology has an initial purpose to save time and energy for the workers including daily travel and balancing personal and professional commitments.
● Employers can hire people from remote places based on their skills and without worrying about the distance and timezone gap.
● Additional resources like bigger office space, electricity, and water can be saved if augmented reality video conferencing is in a complete performance.
● Positive collaboration can be expected while the employees have more energy and a comfortable environment to work in. As a result, productivity might take a boost as well.
● AR video conference serves a better experience than normal video conference in Zoom or Google meeting.
02Cons of AR and VR Conferencing
● The whole process is still under experiment and there’s no confirmed news about its beginning. So, there’s no practical feedback on the process of installation, usage, and maintenance.
● It would be expensive and time-consuming to set up a virtual reality conference system in a big office with n number of people.
● Technical fault from the office or from employees’ home can cost serious penalties in the business workflow.
● Hardware limitations like limited battery life, expensive headsets, and wireless connection are required and these things can cause problems while implementation.
● It can be uncomfortable to wear headsets for a long time during augmented reality conferencing andpeople can experience motion sickness due to this.
Part 3 How does Wondershare Filmora Video Editor assists AR video conference?
To use AR and VR professionally at a larger scale, the videos need to be seamless and follow some standard parameters. With Filmora, it would be easier to manage all the videos during an augmented reality video conferencing. There are multiple effects like “Motion Tracking”, “Keyframing”, “Audio ducking”, “Speed Control”, and “Color matching” that are required while managing a virtual conference with multiple people. It’s important to match the environment thoroughly so there’s no lack of concentration and inferiority in the system.
For Win 7 or later (64-bit)
For macOS 10.12 or later
From a business perspective, a video editor has many roles to play. Similarly, for a modern integration like AR and VR video conferencing, the required tools cannot be compromised. With facilities like “Green screen”, “Audio equalizer”, “Split screen”, “3D Lut”, etc. augmented reality would be presented smartly. To match the whole office environment as effectively as the real (present) one and to boost collaboration in the workspace, new generation video editing tools like Filmora is a must. With minimal effort, virtual meetings can be arranged and presented with the key goal to work at a global level and minimize the distance barrier.
● Ending Thoughts →
● Augmented reality conferencing is at an experiment level now and it is expected to be integrated with the real-life workflow sooner.
● As discussed, there’re both advantages and disadvantages of this technology right now. To enhance the facilities and diminish the cons, a smart video editor can be the gamechanger. In this article, you can find all the current news about AR adaptation for workspace collaboration in detail.
AR or Augmented Reality and VR or Virtual Reality are quite a common discussion in the world of technology. Similarly, the technology-driven workspaces demand a seamless workspace collaboration post-pandemic. People are used to working from home and the workspace culture is changing rapidly due to such habits. 59% of the US workers want to continue WFH according to a study by TalentLyft. To cut the cost of daily travel and dedicate more quality time to work, employees are prioritizing online offices. On the other hand, employers are willing to save office space and other expenses with such a professional routine. That’s where the idea of augmented reality video conferencing is hitting to keep the collaboration between workers alive for a synchronized workflow.

How AR and VR can assist professional collaboration and lift the operations to a better place is the current question. Also, what would be the system through which employees can be habituated to the use? All of the answers are explained in this article.
In this article
01 [What is Augmented Reality Conferencing and What’s VR Video Streaming Workflow](#Part 1)
02 [Pros and Cons of AR and VR Conferencing](#Part 2)
03 [How does Filmora assists AR video conference?](#Part 3)
Part 1 What is Augmented Reality Conferencing and What’s VR Video Streaming Workflow
Before jumping to the application of AR and VR, it’s important to clarify the concept of the two different technologies. While AR is an enhanced version of the real world, VR is totally virtual. As a basic concept, note that, augmented reality is an arrangement of the user’s real-world view whereas virtual reality is totally an illusion based on a video. AR can be accessed from a phone to set the camera with a view and a virtual arrangement would be present within it. For example, if there’s a room in the real world, with an AR video conference, people can be adjusted virtually.

Virtual reality, as the name suggests, is totally in control of the system. With goggles or headsets, one can view computer-generated video with 360 degrees of technical effects to be seemed as real. This technology is mainly applicable for a video currently and there’re more scopes to experiment further.

Here comes the question, how these technologies can be merged with a permanent business structure that can be as effective as the older system, and there’s scope for even better results? Well, according to a study by FinancesOnline, 72% of the US customers find AR for better collaboration and 69% think it increases the efficiency in the workspace. Also, 49% of the IT experts believe that AR can access real-time information sooner.
The key idea behind augmented reality conferencing is to omit the parameters like distance, time, and space expenses and motivate positive collaboration in business workflow. There are multiple advantages of this technology for both employees and employers. As people are getting accustomed to the virtual setting in any professional or personal work from home, the plan to shift to a semi-virtual or virtual office structure is not vague now. In fact, this adaptation might take place sooner than expected as a long-term effect of the pandemic.
How augmented reality conferencing and virtual reality video streaming will be working?
AR and VR can be implemented through different technologies and hardware devices. As a result, employees can attend a meeting from home, just with a mobile application that enables the office structure in the room. Or, 2-3 members can be present physically in a meeting room while others are joining from remote places through VR. A 3D video streaming would overshadow the physical absence of the teammates. At the same time, the resources can be shared in no time for reference and transparent communication.
So, how exactly a business can be affected by augmented reality video conferencing on a large scale? Here’s a keen observation from both perspectives.
Part 2 Pros and Cons of AR and VR Conferencing

01Pros of AR and VR Conferencing
● This technology has an initial purpose to save time and energy for the workers including daily travel and balancing personal and professional commitments.
● Employers can hire people from remote places based on their skills and without worrying about the distance and timezone gap.
● Additional resources like bigger office space, electricity, and water can be saved if augmented reality video conferencing is in a complete performance.
● Positive collaboration can be expected while the employees have more energy and a comfortable environment to work in. As a result, productivity might take a boost as well.
● AR video conference serves a better experience than normal video conference in Zoom or Google meeting.
02Cons of AR and VR Conferencing
● The whole process is still under experiment and there’s no confirmed news about its beginning. So, there’s no practical feedback on the process of installation, usage, and maintenance.
● It would be expensive and time-consuming to set up a virtual reality conference system in a big office with n number of people.
● Technical fault from the office or from employees’ home can cost serious penalties in the business workflow.
● Hardware limitations like limited battery life, expensive headsets, and wireless connection are required and these things can cause problems while implementation.
● It can be uncomfortable to wear headsets for a long time during augmented reality conferencing andpeople can experience motion sickness due to this.
Part 3 How does Wondershare Filmora Video Editor assists AR video conference?
To use AR and VR professionally at a larger scale, the videos need to be seamless and follow some standard parameters. With Filmora, it would be easier to manage all the videos during an augmented reality video conferencing. There are multiple effects like “Motion Tracking”, “Keyframing”, “Audio ducking”, “Speed Control”, and “Color matching” that are required while managing a virtual conference with multiple people. It’s important to match the environment thoroughly so there’s no lack of concentration and inferiority in the system.
For Win 7 or later (64-bit)
For macOS 10.12 or later
From a business perspective, a video editor has many roles to play. Similarly, for a modern integration like AR and VR video conferencing, the required tools cannot be compromised. With facilities like “Green screen”, “Audio equalizer”, “Split screen”, “3D Lut”, etc. augmented reality would be presented smartly. To match the whole office environment as effectively as the real (present) one and to boost collaboration in the workspace, new generation video editing tools like Filmora is a must. With minimal effort, virtual meetings can be arranged and presented with the key goal to work at a global level and minimize the distance barrier.
● Ending Thoughts →
● Augmented reality conferencing is at an experiment level now and it is expected to be integrated with the real-life workflow sooner.
● As discussed, there’re both advantages and disadvantages of this technology right now. To enhance the facilities and diminish the cons, a smart video editor can be the gamechanger. In this article, you can find all the current news about AR adaptation for workspace collaboration in detail.
Backup and Organize Your Footage in Minutes
Backing up your data is deemed significantly necessary among video editing communities. Files get corrupted easily. Having a backup drive can save your day and countless hours. You can back up your data any way you deem fit. However, it will do you right if you follow the advice of professionals.
The article is written explicitly after due consideration and suggestions from the professional video editor. You can follow the steps in it to make backup files. Let us start with very straightforward steps to help you understand the professional way of backing up and organizing your footage.
Part 1. Back Up Your Files
Backing up your files gives you peace of mind. If one file is lost, the whole project becomes vulnerable to failure. Therefore, every effort must be made to ensure the protection of files. The best way to protect the files from any misfortune is to back them up.
Remember, there is no specific way to back up your files. Depending on the project’s requirements, you can do that differently. The following steps will light up how you can back up your files.
Step1Back up your files in two different places
It is crucial to do that. If one backup drive corrupts, you have the second option. It gives you an opportunity to back up files.
- You can make two different external backup hard drives.
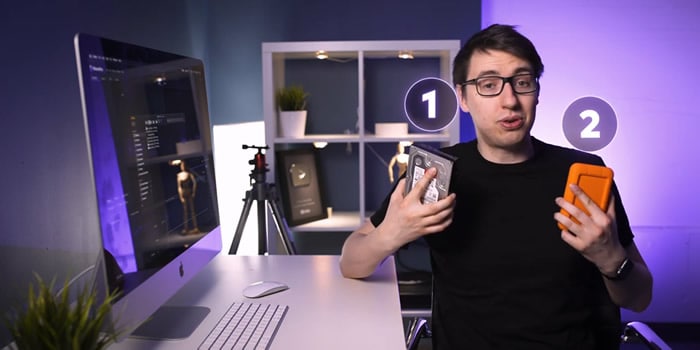
- You can also use your internal and external devices as two backup options.

Step2Make specific folders for each purpose of the video
The next step is how you back up your files properly and safely. Make separate folders for the different formats you are importing in your drive. Always use the primary source to make a copy of your files.
Follow the steps below to understand how to back up your files in two drives.
- Create a folder in your drive.
- Name it. You can name it according to the given format. The choice is yours.

- Your backup folder is created.
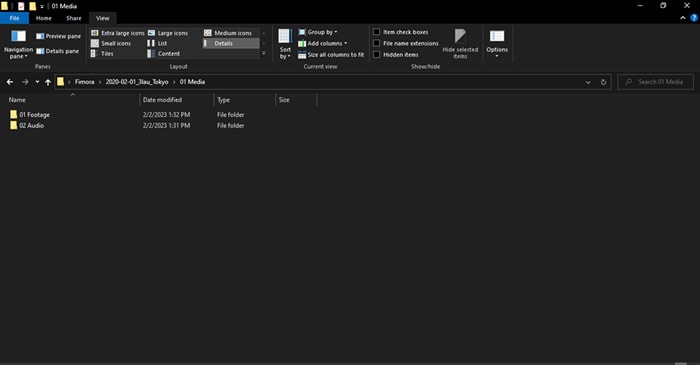
- Make new folders based on the files that are imported into the file. We are making two folders for the project, 01 Footage, and 02 Audio.
- 01 Footage is for the original footage.
- 02 Audio is for audio files provided by the music artist.
Step3Repeat the same process in your second backup drive
- Make the same folders and sub-folders in your secondary backup drive.
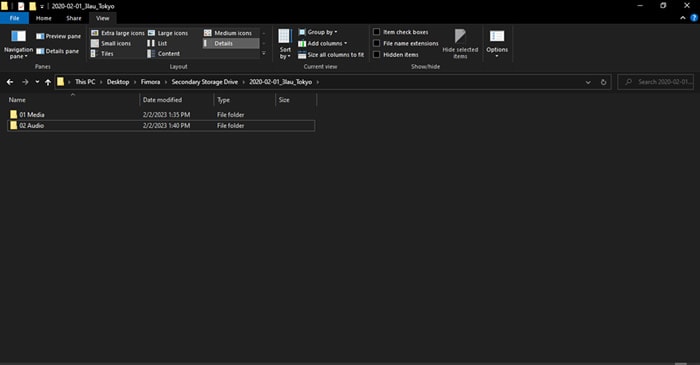
Step4Transfer files to your primary and secondary folders
- Transfer files to folders and sub-folders in your first backup drive.
- Transfer files to folders and sub-folders in your secondary backup drive.
![]()
Note: Most people make the mistake of making a backup drive and then using the same drive to make the second backup. The approach needs to be corrected.
We are done with backing up our files. It is time to organize the files in your drive.
Part 2. Organize Your Files in Filmora
Organizing your files is vital for any operation in video and editing. It makes everything streamlined. The risk of losing your data become negligible. Let us enlighten you on how you can organize your files.
Free Download For Win 7 or later(64-bit)
Free Download For macOS 10.14 or later
Step1Create new folders to lay the foundation for your video editing project
You can imitate the format we have chosen. However, you can choose any way you deem fit.
- Create 02 Project Files and 03 Exports.
- 02 Project contains the files that we will edit in Filmora .
- 03 Exports will have files that will be exported out of Filmora.
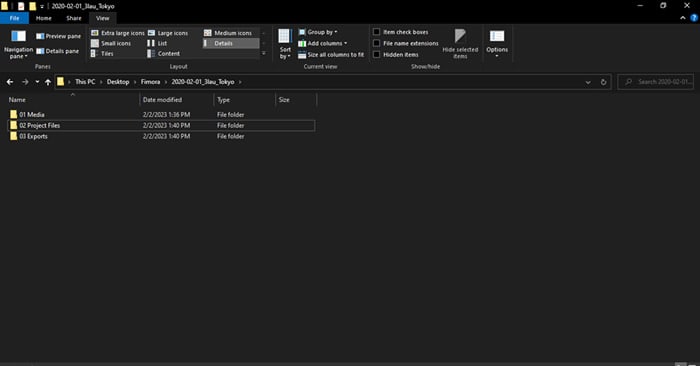
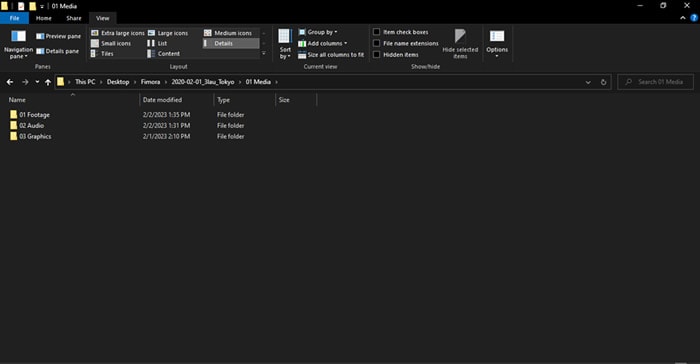
- In the 01 Media folder, create a new folder, 03 Graphics. It will contain graphics the artist will provide, such as a logo. You can also add your graphics to the folder if you want.
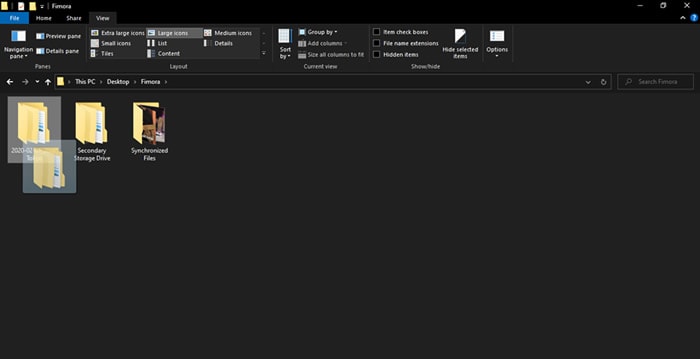
The format will help you if you move files from one device to the next case. In that case, you will only have to move one folder with the artist’s name.
Step2Create a new project
In this step, we will organize our files in Filmora. It will help us to keep discipline and order in file organization. It makes work easy and fun.
- Create a new project when you open Filmora on your PC or Mac.
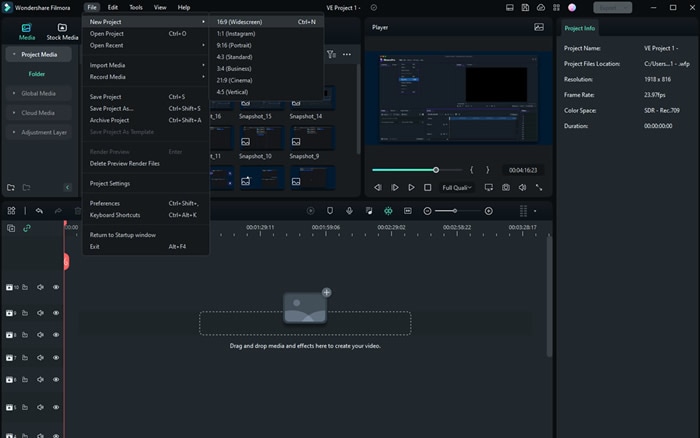
- Save the project in any name you want. We have saved the project in the format explained above.
- Save the file in 02 Project Files.
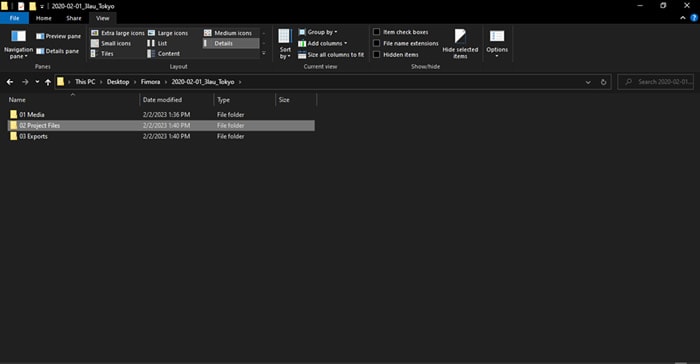
Step3Edit your workspace if you want
Users can edit the workspace in Filmora. You can customize it to your liking. Also, it is entirely optional.
- Go to layout mode. Change the layout if you want.
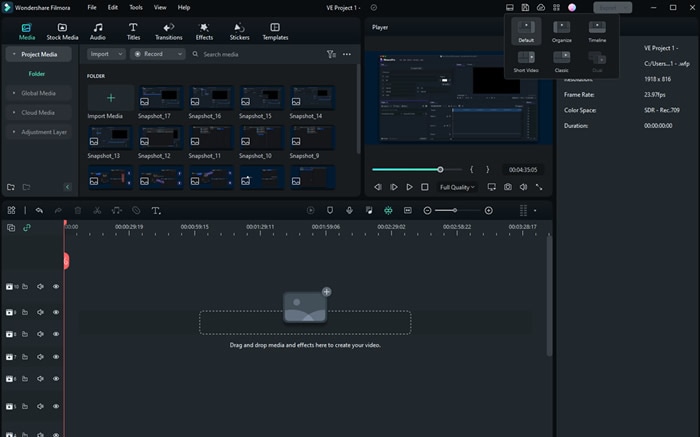
- You can manually change the panels by simply dragging them across the screen.
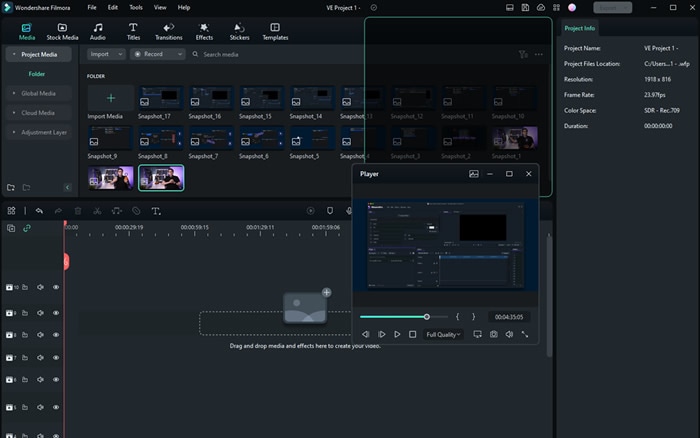
The workspace settings will be saved automatically. The next time you start Filmora, you will not need to readjust the panels.
- Save the file
Step4Recreate the file structure in your 02 project files
Now, you create folders in your project. For that, you can follow our structure, or you can follow your instincts.
- Create the folders in Filmora, as you have created them in your drive. The folders will be created in your 02 Project Files.
These new folders are the exact copies of your media files that you have got from the producer and music artist.
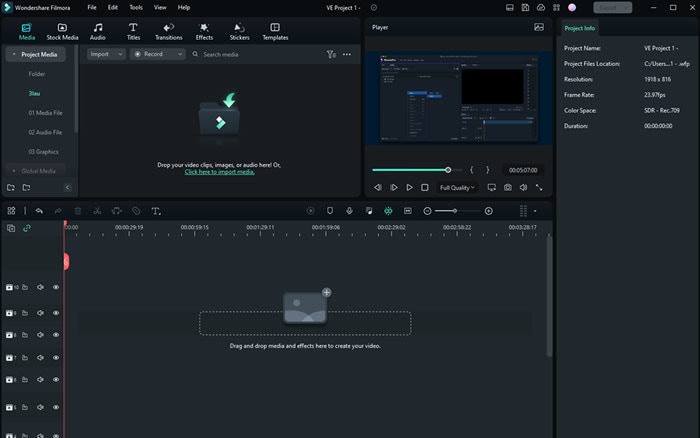
- Import the files into respective folders. Footage should include all the original videos given to your producers.
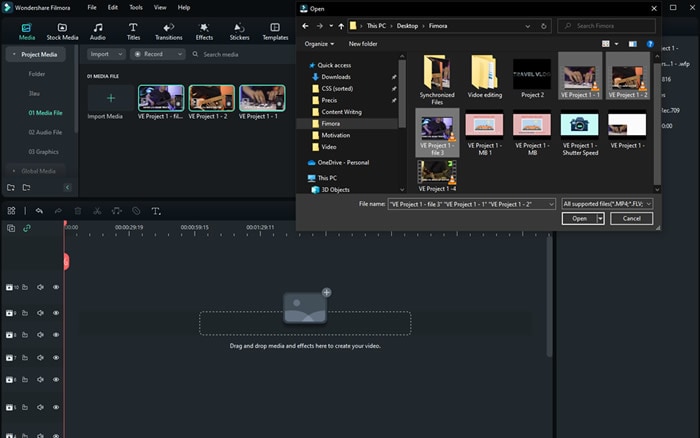
Step5Save the project
You can save the file using the button on Filmora, as shown below.
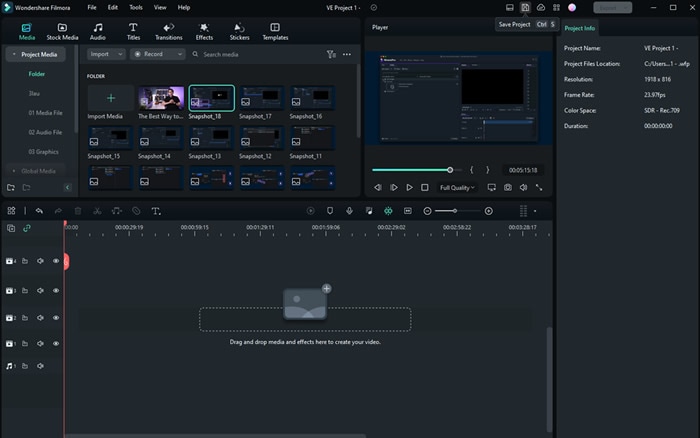
- You can save the files using short keys.

Conclusion
Making a backup file for your project is crucial. For a video editor, it is quite painful to learn that the final product has a missing file. Therefore, one must ensure that all the files are backed up before beginning the editing phase.
Apart from that, one must also keep updating the files in Filmora . You performed some editing. Make sure to save the file then and there. Any minor mistake can cause great worry for the professional editor. Thus, it is better to take proactive actions.
Free Download For Win 7 or later(64-bit)
Free Download For macOS 10.14 or later
We are done with backing up our files. It is time to organize the files in your drive.
Part 2. Organize Your Files in Filmora
Organizing your files is vital for any operation in video and editing. It makes everything streamlined. The risk of losing your data become negligible. Let us enlighten you on how you can organize your files.
Free Download For Win 7 or later(64-bit)
Free Download For macOS 10.14 or later
Step1Create new folders to lay the foundation for your video editing project
You can imitate the format we have chosen. However, you can choose any way you deem fit.
- Create 02 Project Files and 03 Exports.
- 02 Project contains the files that we will edit in Filmora .
- 03 Exports will have files that will be exported out of Filmora.

- In the 01 Media folder, create a new folder, 03 Graphics. It will contain graphics the artist will provide, such as a logo. You can also add your graphics to the folder if you want.

The format will help you if you move files from one device to the next case. In that case, you will only have to move one folder with the artist’s name.

Step2Create a new project
In this step, we will organize our files in Filmora. It will help us to keep discipline and order in file organization. It makes work easy and fun.
- Create a new project when you open Filmora on your PC or Mac.

- Save the project in any name you want. We have saved the project in the format explained above.
- Save the file in 02 Project Files.

Step3Edit your workspace if you want
Users can edit the workspace in Filmora. You can customize it to your liking. Also, it is entirely optional.
- Go to layout mode. Change the layout if you want.

- You can manually change the panels by simply dragging them across the screen.

The workspace settings will be saved automatically. The next time you start Filmora, you will not need to readjust the panels.
- Save the file
Step4Recreate the file structure in your 02 project files
Now, you create folders in your project. For that, you can follow our structure, or you can follow your instincts.
- Create the folders in Filmora, as you have created them in your drive. The folders will be created in your 02 Project Files.
These new folders are the exact copies of your media files that you have got from the producer and music artist.

- Import the files into respective folders. Footage should include all the original videos given to your producers.

Step5Save the project
You can save the file using the button on Filmora, as shown below.

- You can save the files using short keys.

Conclusion
Making a backup file for your project is crucial. For a video editor, it is quite painful to learn that the final product has a missing file. Therefore, one must ensure that all the files are backed up before beginning the editing phase.
Apart from that, one must also keep updating the files in Filmora . You performed some editing. Make sure to save the file then and there. Any minor mistake can cause great worry for the professional editor. Thus, it is better to take proactive actions.
Free Download For Win 7 or later(64-bit)
Free Download For macOS 10.14 or later
Also read:
- Adobe Premiere Pro Rec 709 LUTs Finding The Best Options for 2024
- New In 2024, Video Maker with Song
- Updated In 2024, What Is Motion Tracking and How to Use It
- Updated In 2024, Adjust the TikTok Videos Length to Make Them Captivating
- 2024 Approved Looking For The Best Slow Motion Effect in Premiere Pro
- Updated Interested in Adding a Cinematic Strobe Light Effect to Your Movie or Video Title? Follow the Steps Explained in Detail Here
- In 2024, 7 Best MP4 Editors on Mac Edit MP4 in Mac
- How to Make Stunning Glitch Effect in Photoshop for 2024
- Add Some Shake to Videos with Alight Motion for 2024
- Top Tips on How to Design Travel Slideshow
- Updated Best Movie Title Maker for 2024
- Updated 2024 Approved Add Stylish Text to Videos
- Updated 2024 Approved A Comprehensive Review of LUTs Finding LUTs Made by Danny Gevirtz
- New Funny Content Ideas for YouTube Videos and Funny Music Background for 2024
- Updated 8 Top Premiere Pro Slideshow Templates for 2024
- New 2024 Approved Top 20 Slideshow Makers for Win/Mac/Online Review
- 2024 Approved How to Create Simple Slideshow Word
- New 2024 Approved How to Loop a Video on Android
- New Best Video Format Converter for PC and Online
- Updated In 2024, How to Make Sony Vegas Freeze Frame
- 2024 Approved 10 Best Text to Robot Voice Generators Windows, Mac, Android, iPhone & Online
- 2024 Approved Record Slow Motion Videos With Phantom Slow-Mo Camera
- New Change Video Speed with FFmpeg for 2024
- Updated You Will Also Be Guided on How to Use This Software to Crop Your Videos. Dont Worry and Just Take It One Step at a Time
- In 2024, Read This Review to Learn Everything You Need to Know About Leeming LUT Pro and How to Apply Pro LUTs Using Different Video Editors
- 8 Best Sites to Get Glitch Transition for Premiere Pro
- In 2024, Finding The Finest Way To Add Subtitles to Videos | Filmora
- New 2024 Approved How to Create Vintage Film Effect 1950S
- New Brightening a Video Doesnt Need to Be Complicated. This Article Will Discuss How to Brighten up Your Videos Easily Using Premiere Pro
- Updated In 2024, How to Denoise in After Effects – Audio and Video Noise Removal
- Updated In 2024, The Most Complete Guide to Make Fortnite Montage
- 2024 Approved Are You a Teacher? Are You Looking for Educational Background Music? This Article Has Everything You Will Need to Know for Creating Outstanding Educational Teaching Videos
- Updated Best Free Video Editing Software for Reddit for 2024
- Complete guide for recovering pictures files on Infinix Note 30 Pro.
- How to Unlock Realme Note 50 Phone without Any Data Loss
- How to Turn Off Google Location to Stop Tracking You on Apple iPhone 6 Plus | Dr.fone
- How Do You Remove Restricted Mode on iPhone 13 Pro Max
- How To Restore Missing Contacts Files from Nokia C210.
- Can I use iTools gpx file to catch the rare Pokemon On Apple iPhone 15 Pro | Dr.fone
- Full Guide to Hard Reset Your Xiaomi Redmi Note 13 Pro 5G | Dr.fone
- In 2024, Ways to stop parent tracking your Vivo G2 | Dr.fone
- Oppo Data Retrieval tool – restore lost data from Oppo
- Updated In 2024, The Ultimate Guide to B2B Video Marketing
- In 2024, Top 5 Tracking Apps to Track Vivo Y100 5G without Them Knowing | Dr.fone
- In 2024, How to Bypass FRP from Oppo Reno 10 Pro+ 5G?
- Want to Uninstall Google Play Service from Motorola Moto G23? Here is How | Dr.fone
- Title: Updated How To Make a Timelapse in After Effects
- Author: Chloe
- Created at : 2024-05-20 03:38:10
- Updated at : 2024-05-21 03:38:10
- Link: https://ai-editing-video.techidaily.com/updated-how-to-make-a-timelapse-in-after-effects/
- License: This work is licensed under CC BY-NC-SA 4.0.

