:max_bytes(150000):strip_icc():format(webp)/how-to-see-who-viewed-your-tiktok-5271090-e2cb663541b8484a8a2e80ffbdd98db3.jpg)
Updated How to Make Custom Lower Thirds with Filmora

How to Make Custom Lower Thirds with Filmora
As a video creator, there are times when you need to use Lower Thirds. Although many lower-third presets are available, making unique and personalized ones can ensure your video stands out.
So, to empower your inner video creator, this article will show you how to make your own Lower Thirds in Filmora.
Part 1: What is Lower Third
A Lower Third is a mix of motion graphic design and texts that are placed in the lower area of the screen. It provides additional information, such as a person’s name or other relevant information, without distracting the audience from the main content.
Lower Thirds can be used in various settings, such as news broadcasts or interviews, to help provide viewers with additional context.
Part 2: How to Make Your Own Lower Thirds in Filmora
Free Download For Win 7 or later(64-bit)
Free Download For macOS 10.14 or later
(1) A simple line and texts

Step1 Create a simple line
Go to the Media library > Sample Media folder > choose a color sample. For this tutorial, we will select the white color. Then, drag and drop this sample color onto the upper video track.

Double-click the white sample clip to open the settings and scale it to 30%. Then, reposition the white bar to your desired place.

Step2 Mask the white sample
Since we want to create a thin horizontal shape, you need to make some adjustments to the white sample by using an image mask. So, go to the Effect window > Utility > Image Mask. Then, drag and drop the “Image Mask” onto the white color sample.

After that, double-click the white sample on the timeline and find the Image Mask setting. Choose the shape that works best for your needs. For this tutorial, we are going to use this one. Then, adjust the X and Y-axis scale numbers until it becomes a thin white line. Click OK.

Step3 Add a text for your lower thirds
Go to Titles > Plain Text > Basic 6 and drop it onto the second video track above the white line clip. Don’t worry about the exact position yet. We can adjust it later.

Double-click on the text clip to open the settings, then type some text there and adjust the size and font.

Step4 Add animation to the text
Click Advanced > Animation > Up Down 1 animation. Adjust the animation length by dragging the two brackets on the timeline on the right side. Click Ok.

Step5 Add keyframes to the white line clip when entering
Double-click on the white line clip on the timeline to show the animation keyframe setting window. Then, playback the animation of the text, find a position before the text animation starts and move the play head there. Make sure it is close enough to when the texts show up so the white line enters the keyframe right before the text enters.

Click to add a keyframe, double-check to make sure it is the final position you want, and the opacity should be 100 at this point.
After that, move the play head to the left for a few frames and click add again. To make sure the white line is out of the frame before entering, you need to change the Y-axis number. Change the opacity to 0 as the white line starts in transparent color.

These two keyframes will create an effect of the line entering the frame while turning from transparent to white. Playback the animation and adjust the keyframes marks by dragging them to the left or right until you feel the timing looks good.
Step6 Add keyframes to the white line clip when exiting
Playback again to find where the texts disappear, then move the play head to a position after it. Also, make sure it’s close enough to where the texts disappear so you can ensure the white line exits right after the texts disappear. Then, add the keyframe.

You don’t need to change the setting this time because this keyframe is used to keep the position and opacity unchanged.
Instead, move the play head again to the right for a few frames and add another keyframe. Move the texts out of the frame by changing the y-axis number, then change the opacity to 0. This keyframe is used to create the white line animation exiting the frame and turning back to transparent in the meantime.

Playback the video and see how it looks.
(2) A name card with a solid background

Sometimes you might want to create a name card with a solid background like the sample above. To create it, we can use the same method. Here’s how to do it:
Step1 Make the lower third background
Select the white color sample from the sample color folder and drop it onto the upper video track of the video.

Change the scale to 30%, then reposition the white sample to your desired place. Click OK.

Step2 Create an image mask for the lower third background
Drag and drop the Image Mask onto the white sample clip on the timeline.

Double-click on the white sample clip to activate the video setting window and find the Image Mask settings. Then, choose the mask shape you need. You can also adjust its size by changing the X or Y-axis.

Step3 Add some text
Once the background card is in place, go to Titles > Plain Text > ‘Basic 6’ and drop it onto the third video track.

Now, type in the texts as needed. Reposition and scale the texts to make sure they are on top of the background shape.

Step4 Add animation to the text
Click Advanced > Animation > Push. Then, adjust the animation length accordingly. Click Ok.

Double-click on the background clip to show the animation tab setting. Then, playback the text animation and find a position earlier than the start and add a keyframe.

Similar to the tutorial before, move the play head again a few frames earlier to the left and add another keyframe. If you want to have the name card flying in from the left while expanding, you can change the X-axis and scale of the background card to 0. Change the opacity to 0 to create a color change from transparent to white.

To let the background card exit the frame, add two more keyframes to the background card. Add a keyframe with no changes to settings. Move the play head to the right for a few frames and add another keyframe.

If you want the name card to exit to the bottom, change the Y-axis number until it exits. Change the scale and opacity to 0. Then, playback and adjust the keyframes.
Finally, you can add a Subscribe button from the new default Filmora element pack “Social Media.”

Wrapping up
These are two ways you can create your own Lower Thirds in FIlmora. You can also change the keyframe settings to customize your lower thirds even more. Now, it’s time to try it yourself, and let us know what you think!
Free Download For macOS 10.14 or later
(1) A simple line and texts

Step1 Create a simple line
Go to the Media library > Sample Media folder > choose a color sample. For this tutorial, we will select the white color. Then, drag and drop this sample color onto the upper video track.

Double-click the white sample clip to open the settings and scale it to 30%. Then, reposition the white bar to your desired place.

Step2 Mask the white sample
Since we want to create a thin horizontal shape, you need to make some adjustments to the white sample by using an image mask. So, go to the Effect window > Utility > Image Mask. Then, drag and drop the “Image Mask” onto the white color sample.

After that, double-click the white sample on the timeline and find the Image Mask setting. Choose the shape that works best for your needs. For this tutorial, we are going to use this one. Then, adjust the X and Y-axis scale numbers until it becomes a thin white line. Click OK.

Step3 Add a text for your lower thirds
Go to Titles > Plain Text > Basic 6 and drop it onto the second video track above the white line clip. Don’t worry about the exact position yet. We can adjust it later.

Double-click on the text clip to open the settings, then type some text there and adjust the size and font.

Step4 Add animation to the text
Click Advanced > Animation > Up Down 1 animation. Adjust the animation length by dragging the two brackets on the timeline on the right side. Click Ok.

Step5 Add keyframes to the white line clip when entering
Double-click on the white line clip on the timeline to show the animation keyframe setting window. Then, playback the animation of the text, find a position before the text animation starts and move the play head there. Make sure it is close enough to when the texts show up so the white line enters the keyframe right before the text enters.

Click to add a keyframe, double-check to make sure it is the final position you want, and the opacity should be 100 at this point.
After that, move the play head to the left for a few frames and click add again. To make sure the white line is out of the frame before entering, you need to change the Y-axis number. Change the opacity to 0 as the white line starts in transparent color.

These two keyframes will create an effect of the line entering the frame while turning from transparent to white. Playback the animation and adjust the keyframes marks by dragging them to the left or right until you feel the timing looks good.
Step6 Add keyframes to the white line clip when exiting
Playback again to find where the texts disappear, then move the play head to a position after it. Also, make sure it’s close enough to where the texts disappear so you can ensure the white line exits right after the texts disappear. Then, add the keyframe.

You don’t need to change the setting this time because this keyframe is used to keep the position and opacity unchanged.
Instead, move the play head again to the right for a few frames and add another keyframe. Move the texts out of the frame by changing the y-axis number, then change the opacity to 0. This keyframe is used to create the white line animation exiting the frame and turning back to transparent in the meantime.

Playback the video and see how it looks.
(2) A name card with a solid background

Sometimes you might want to create a name card with a solid background like the sample above. To create it, we can use the same method. Here’s how to do it:
Step1 Make the lower third background
Select the white color sample from the sample color folder and drop it onto the upper video track of the video.

Change the scale to 30%, then reposition the white sample to your desired place. Click OK.

Step2 Create an image mask for the lower third background
Drag and drop the Image Mask onto the white sample clip on the timeline.

Double-click on the white sample clip to activate the video setting window and find the Image Mask settings. Then, choose the mask shape you need. You can also adjust its size by changing the X or Y-axis.

Step3 Add some text
Once the background card is in place, go to Titles > Plain Text > ‘Basic 6’ and drop it onto the third video track.

Now, type in the texts as needed. Reposition and scale the texts to make sure they are on top of the background shape.

Step4 Add animation to the text
Click Advanced > Animation > Push. Then, adjust the animation length accordingly. Click Ok.

Double-click on the background clip to show the animation tab setting. Then, playback the text animation and find a position earlier than the start and add a keyframe.

Similar to the tutorial before, move the play head again a few frames earlier to the left and add another keyframe. If you want to have the name card flying in from the left while expanding, you can change the X-axis and scale of the background card to 0. Change the opacity to 0 to create a color change from transparent to white.

To let the background card exit the frame, add two more keyframes to the background card. Add a keyframe with no changes to settings. Move the play head to the right for a few frames and add another keyframe.

If you want the name card to exit to the bottom, change the Y-axis number until it exits. Change the scale and opacity to 0. Then, playback and adjust the keyframes.
Finally, you can add a Subscribe button from the new default Filmora element pack “Social Media.”

Wrapping up
These are two ways you can create your own Lower Thirds in FIlmora. You can also change the keyframe settings to customize your lower thirds even more. Now, it’s time to try it yourself, and let us know what you think!
Top Free LUTs To Use in Shotcut: An Overview
In this content-driven age, people love to express their emotions through high-quality videos and photos. You can also share your experiences of a trip with other people in the form of videos. Yet to make that video higher quality and engaging, you need vibrant colors. There is no better way to make videos more captivating than to use Shotcut LUTs.
Here on these pages, you will find detailed information about LUTs for Shotcut. Other than we will also guide you about applying LUTs on the videos without any complications.
Part 1: What Do You Know About LUTs in General? What are Their Use Cases
LUTs are the shorter term for Lookup Tables and are used for image processing and video editing. LUTs are mathematical algorithms or tables that can set the color values of the media content to make it more engaging. There are diversified ways through which you can control and customize several metrics of your videos, such as color, brightness, and more.
In addition, LUTs offer a wide array of formats, including 1D, 3D and other LUTs. If you are working on a professional-grade video, you can use the 3D LUTs. However, the 1D LUTs have enough capabilities to make your videos more engaging. You can also use DaVinci Resolve, Shotcut, Adobe Photoshop, or other software to apply LUTs to the videos.
Use Cases of the LUTs
Here are several cases in which you can use the Shotcut LUTs:
- Color Grading and Film Emulation: With LUTs, you can emulate the look of any video in a limited time. Above all, LUTs can also help in color grading, enhancing the video’s overall look. Other than this, you can also control the color metrics, which can lead to a customized look of shots.
- Cinematic Looks and Correction: By using the latest LUTs, you can employ a natural cinematic look in the videos. Above all, they also have the capability to add an aesthetic look to the videos, which can create consistency. Moreover, you can also fix the color problems with LUTs.
- Color Processing and VFX: Along with adding visual effects in videos, you can also streamline your workflow efficiency with it. Moreover, you can also discriminate the color processing and fix all the color issues.
- Calibration and Stimulation: To ensure accurate color representation, you need to adjust the colors and gamma response. Luckily, LUTs can help you to do this without issue. You can also utilize it to enhance important scenes and conditions.
Empower your videos with a new mood using different LUTs. Filmora now offers 100+ top-quality 3D LUTs cover a broad range of scenarios. Transform your videos with Filmora’s powerful 3D LUTs.
Apply LUT on Videos Apply LUT on Videos Learn More

Part 2: Finding the Best LUTs for Using in Shotcut
If you are new in the field of video editing, you must be looking for LUTs that can enhance your Shotcut videos. You can put your concerns to rest as we are going to introduce the LUTs Shotcut in this section. By using the LUTs discussed here, you can upgrade the coloring metrics of your videos in no time:
1. Cinematic LUTs
If you need to make the videos more captivating and attractive, cinematic LUT is the option of recommendation. With these LUTs, you can add stunning effects to the videos. Moreover, it is equipped with modernized colors, so you don’t have to worry about making extra efforts to make your video rank. The dimensions of this LUT are 1920x1080 (HD), so you can make videos of higher quality.

2. Indie Film LUTs
With Indie Film LUTs, you can add the filmy touch to simple videos. It can also be used to convert low-quality videos into the highest-quality films. This adds to you make your videos blockbuster and has optimized file size capability. Furthermore, it can work on video captured with any camera, so there is no restriction on device compatibility.

3. Moody LUTs Pack
Moody LUTs can add the most savage feelings in your simplest videos and photos. It not only changes the colors in the video but also presents the video with a moody feel. Moreover, you can use this LUT for both personal and professional use. It also enhances the details in the videos, which makes the characters more notable.

4. Urban LUTs
If you are an age-town girl in the city and want to present your videos in city style, Urban LUTs can aid you. It can add a realistic look to the videos and work with RAW and LOG. It can also give an aesthetic look to the videos and add consistency. You can also use it for inspiration and references.

5. Portrait LUTs
If you love to create portrait-oriented videos, these LUTs can help you a lot. You can implement your creativity and imagination into the videos and present it to the audience. Above all, it can work with several video editing software, which also makes it a better choice. It also has the capability to add a filmy, lush, grainy, and warm look to the videos.

6. Luxury Grey LUTs
As the name indicates, you can give the most luxurious outlook to the video with it. This LUT can also work on any video without facing any restrictions. Moreover, it is perfect for promoting a product to gain more marketing value. You can add it to marketing ads for several products, such as watches, glasses, and more.

7. Nature LUTs
When working with landscapes or nature videos, sunlight or other lightening issues can impact the video quality. To cater to this, you can take assistance from Nature LUTs. It can add nutty, alive, bamboo, hazel, or many other effects to the videos. The quality of this LUT is also a term to discuss, which plays an essential role in making it unique.

8. Bright Food LUTs for Photo & Video
Food bloggers can never be satisfied with the quality of their food videos. Thus, you can rest easy because this LUT can handle the quality issues of your videos. You can use it to make the food look more delightful and tasty in the videos. It can also be used to add the Bon Appetite effects, which can escalate the engagement ratio of the videos.

Part 3: How to Apply LUTs in Shotcut: A Guide
Is your video extra bright, and now you wish to optimize its color quality? Worry no more because you can take assistance from free LUTs Shotcut to get through this. However, many of you don’t know the procedure to apply LUTs to the videos with Shotcut.
The instructions given below are specifically designed to help you with applying LUTs on video. Follow the steps here to get the work done:
Step 1: First and foremost, find the LUTs that suit the theme of the videos and download it. Following this, go to “Downloads” and right-click “LUTs Files.” Hit the “Extract Here” option to extract the LUTs.

Step 2: Open Shotcut on your computer and import the video. Once the video is opened with Shotcut, click on the “Add a Filter” icon and select “LUT (3D)” while you are in the “Videos” section. Again, select “LUT (3D)” and tap on the “Open” button.

Step 3: To proceed, select the “LUT” from the prompt window and click “Open.” Once the LUT is added, mark the “Checkbox” to enable it. You can also notice the difference in the video before and after adding the LUTs. If you are working on multiple small clips and wish to apply the same LUT on them, select the “Copy” icon.
After this, tap on the clip and select the “Paste” icon. Again, mark the “Checkbox” to apply LUT on the entire video. In case you want to apply the different LUT, choose the clip in “Timeline” and again follow the above procedure to add LUTs.

Conclusion
To sum up everything, you can use the Shotcut LUTs to escalate the quality of your video in no time. Moreover, it can also fix all the color grading issues from the videos and photos. You can also use them for professional purposes, as the LUTs never impact the overlays and content of the video.
There are uncountable LUTs on the web, and you can find some of the commonly used ones above. Moreover, the procedure to apply LUTs to the videos using Shotcut is also discussed above for your ease. You can follow the steps above to maximize your video’s attractiveness in no time.
You can try another video editor - Filmora to add LUTs on videos.
Add LUTs on Video For Win 7 or later(64-bit)
Add LUTs on Video For macOS 10.14 or later
Apply LUT on Videos Apply LUT on Videos Learn More

Part 2: Finding the Best LUTs for Using in Shotcut
If you are new in the field of video editing, you must be looking for LUTs that can enhance your Shotcut videos. You can put your concerns to rest as we are going to introduce the LUTs Shotcut in this section. By using the LUTs discussed here, you can upgrade the coloring metrics of your videos in no time:
1. Cinematic LUTs
If you need to make the videos more captivating and attractive, cinematic LUT is the option of recommendation. With these LUTs, you can add stunning effects to the videos. Moreover, it is equipped with modernized colors, so you don’t have to worry about making extra efforts to make your video rank. The dimensions of this LUT are 1920x1080 (HD), so you can make videos of higher quality.

2. Indie Film LUTs
With Indie Film LUTs, you can add the filmy touch to simple videos. It can also be used to convert low-quality videos into the highest-quality films. This adds to you make your videos blockbuster and has optimized file size capability. Furthermore, it can work on video captured with any camera, so there is no restriction on device compatibility.

3. Moody LUTs Pack
Moody LUTs can add the most savage feelings in your simplest videos and photos. It not only changes the colors in the video but also presents the video with a moody feel. Moreover, you can use this LUT for both personal and professional use. It also enhances the details in the videos, which makes the characters more notable.

4. Urban LUTs
If you are an age-town girl in the city and want to present your videos in city style, Urban LUTs can aid you. It can add a realistic look to the videos and work with RAW and LOG. It can also give an aesthetic look to the videos and add consistency. You can also use it for inspiration and references.

5. Portrait LUTs
If you love to create portrait-oriented videos, these LUTs can help you a lot. You can implement your creativity and imagination into the videos and present it to the audience. Above all, it can work with several video editing software, which also makes it a better choice. It also has the capability to add a filmy, lush, grainy, and warm look to the videos.

6. Luxury Grey LUTs
As the name indicates, you can give the most luxurious outlook to the video with it. This LUT can also work on any video without facing any restrictions. Moreover, it is perfect for promoting a product to gain more marketing value. You can add it to marketing ads for several products, such as watches, glasses, and more.

7. Nature LUTs
When working with landscapes or nature videos, sunlight or other lightening issues can impact the video quality. To cater to this, you can take assistance from Nature LUTs. It can add nutty, alive, bamboo, hazel, or many other effects to the videos. The quality of this LUT is also a term to discuss, which plays an essential role in making it unique.

8. Bright Food LUTs for Photo & Video
Food bloggers can never be satisfied with the quality of their food videos. Thus, you can rest easy because this LUT can handle the quality issues of your videos. You can use it to make the food look more delightful and tasty in the videos. It can also be used to add the Bon Appetite effects, which can escalate the engagement ratio of the videos.

Part 3: How to Apply LUTs in Shotcut: A Guide
Is your video extra bright, and now you wish to optimize its color quality? Worry no more because you can take assistance from free LUTs Shotcut to get through this. However, many of you don’t know the procedure to apply LUTs to the videos with Shotcut.
The instructions given below are specifically designed to help you with applying LUTs on video. Follow the steps here to get the work done:
Step 1: First and foremost, find the LUTs that suit the theme of the videos and download it. Following this, go to “Downloads” and right-click “LUTs Files.” Hit the “Extract Here” option to extract the LUTs.

Step 2: Open Shotcut on your computer and import the video. Once the video is opened with Shotcut, click on the “Add a Filter” icon and select “LUT (3D)” while you are in the “Videos” section. Again, select “LUT (3D)” and tap on the “Open” button.

Step 3: To proceed, select the “LUT” from the prompt window and click “Open.” Once the LUT is added, mark the “Checkbox” to enable it. You can also notice the difference in the video before and after adding the LUTs. If you are working on multiple small clips and wish to apply the same LUT on them, select the “Copy” icon.
After this, tap on the clip and select the “Paste” icon. Again, mark the “Checkbox” to apply LUT on the entire video. In case you want to apply the different LUT, choose the clip in “Timeline” and again follow the above procedure to add LUTs.

Conclusion
To sum up everything, you can use the Shotcut LUTs to escalate the quality of your video in no time. Moreover, it can also fix all the color grading issues from the videos and photos. You can also use them for professional purposes, as the LUTs never impact the overlays and content of the video.
There are uncountable LUTs on the web, and you can find some of the commonly used ones above. Moreover, the procedure to apply LUTs to the videos using Shotcut is also discussed above for your ease. You can follow the steps above to maximize your video’s attractiveness in no time.
You can try another video editor - Filmora to add LUTs on videos.
Add LUTs on Video For Win 7 or later(64-bit)
Add LUTs on Video For macOS 10.14 or later
How to Trim Video in QuickTime Player on Your Mac
Create High-Quality Video - Wondershare Filmora
An easy and powerful YouTube video editor
Numerous video and audio effects to choose from
Detailed tutorials provided by the official channel
You have to trim videos to capture your viewer’s attention because the average attention span of human beings is eight seconds. As such, viewers will click away or keep on scrolling if the first few seconds of your video are in complete silence or a blank screen. Luckily, there is a simple way that Mac users can use to trim videos: QuickTime Player. This guide will give you the low-down on how to trim video in Quicktime to remove unwanted portions.
In this article
02 How to Trim a Video in Quicktime Player
03 Tips & Tricks to Use QuickTime Player
What Is QuickTime Player?
Developed by Apple, QuickTime Player is a software application designed to play, edit, record, and share video and audio files on your Mac. It was created in 1991, and QuickTime X is the latest Mac version available for users of Mac OS X Snow Leopard to macOS Mojave.
QuickTime Player is supported by MovieWorks, PowerPoint, HyperCard, Director, and other standard multimedia authoring apps. One of the exciting features that QuickTime brings to the internet is that it enables video streaming over networks.
In 2016, Apple ended support for the QuickTime Windows version. In 12018, they ceased support for QuickTime 7 version on macOS.
When it comes to OS X Lion, QTKit (the underlying QuickTime media) was deplored in favor of AVFoundation, which was the newer graphics framework and discontinued as of macOS Catalina.
How to Trim a Video in Quicktime Player
Trimming video is a breeze when you are using QuickTime. Follow the steps below to learn how to trim Quicktime video clips.
- Launch QuickTime Player on your Mac. You can find this application by using a Spotlight search. Alternatively, open the Finder app in your Dock and choose the Applications option from the left-hand side menu. You’ll then find QuickTime in the right-hand side menu.
- Once QuickTime has launched, hit the File tab, then click Open File.

- Select the video you would to trim.
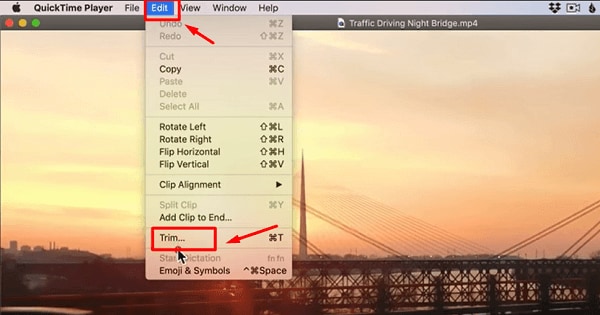
- Navigate to the Edit tab on the top menu with your video open.
- Select Trim in the dropdown menu. Alternatively, use the keyboard shortcut command + T.
- You’ll see a yellow trimming bar around the length of the video at the bottom.
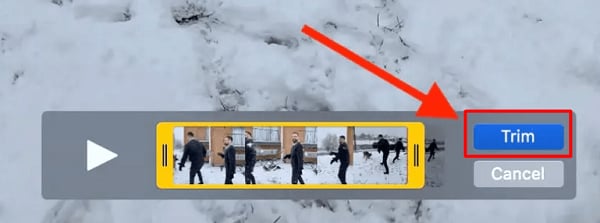
- To QuickTime trim video, drag the handles, and the app will remove everything outside the yellow bars.
- Once you have trimmed your video, click the Trim option on the right side of your screen.
- The play icon allows you to preview your video anytime you want during the editing process.
- Click File then Save to save your trimmed video.
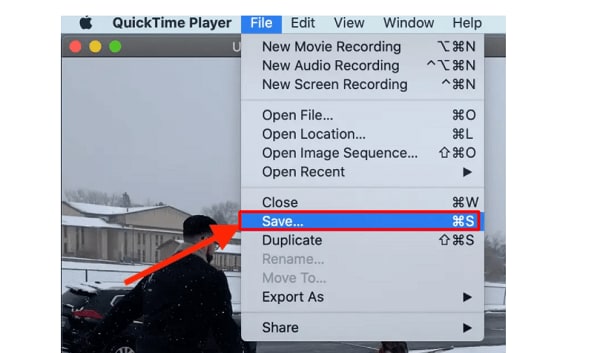
- Name your trimmed video, and then select the location you want to save it. Click Save to complete this action.
Tips & Tricks to Use QuickTime Player
Now that you know how to QuickTime trim video, we have provided some helpful tips and tricks for those using this application.
How to Split and Combine Videos
QuickTime player allows you to split and combine two or more video clips. Follow the steps below to learn how to split and combine your videos.
- Open your file.
- Then, press Command-E or select View > Show Clips.
- Drag the Playhead to the area where you would like the video to split.
- Press Command-Y or select Edit > Split Clip. Both clips will be highlighted yellow.
- You can now insert another video clip or re-arrange the video clips by dragging them to the right or left.
- If you split the video clips thrice, you can select the one in the middle, where a yellow outline will appear around it, and then zap it by hitting Delete on your keyboard.

- To combine your video clips, open one of the clips and select Edit > Add Clip to End.
- Double click the video clip you would like to tack on in the Open dialog box.
- You can also drag the icons of video clips from the Finder and drop them into a video window. The application will add the clips to the end of your existing video. Repeat this process to combine several video clips.
- The second video can appear in the middle of your first one. All you have to do is split the video clip, then click on the clip that will appear before the area where the new video is supposed to go.
- Now, select Edit > Insert Clip After Selection.
- A dialog box will appear; double-click the video file you would like to bring in.
- Alternatively, drag a video from the Finder and take it into the gap between the two clips.

How to Record Audio and Videos
You can record a video using a USB webcam or Mac’s built-in camera. What’s more? You can record audio with the built-in microphone on your Mac, a musical instrument connected via a USB cable, or an external mic. Or maybe you would like to record something that’s happening on your screen, QuickTime Player can also do this. Follow the steps below to record audio and video with QuickTime.
- Select File > New Screen Recording, New Audio Recording, or New Movie Recording.
- The last two options need you to choose quality and an input source. You’ll then have to hit the red Record Button. The first option will summon a pane that features the record button and some audio options.
- Drag to specify an area you want to record or click once to record the whole screen.
- Once you have finished, hit the Record button again. A black screen will appear in your menu bar when you’re recording your screen.
- The file will open in QuickTime Player when you stop recording.
- To save it, choose File > Save.
How to Export and Share Videos
QuickTime allows you to export optimized content so that you can view it on other Apple devices, including Apple TV, iPod Touch, and iPhone. With that in mind, let’s look at how you can export and share your video once you have finished editing it.
- Select File > Export; you’ll get a roundup of resolution options (1080p, 720p, and 480p), settings for Apple TV and iOS devices, and an option for only exporting audio.
- If you go with the iTunes option, you’ll see the same Apple TV and iOS devices optimized settings; however, the video file will be sent to your iTunes library.

- • To export your video and share with other users, select File > Share, and the resulting menu will include AirDrop, Messages, Mail, and the social media sharing platforms YouTube, Flickr, Facebook, and Vimeo.
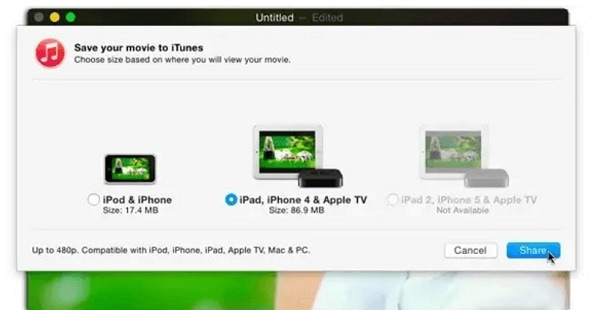
- Choose the option you want, and QuickTime will optimize your video for the service or program you have selected.
- To save the changes you have made to your video file, select File > Close. Name your edited video in the box that will appear, then click Save.
Flip or Rotate a Clip
QuickTime Player also allows you to rotate or flip clips and videos with a single click. Following these step to flip or rotate your video clip.
- Navigate to the Edit tab.
- Select the direction that you want your video to turn. The available options are Flip Vertical, Flip Horizontal, Rotate Right and Rotate Left.
You can apply the changes to your entire video or one of the clips if you had divided the video file.
Present or Record your iPad or iPhone Screen
QuickTime can record or show a live view of what is happening on your iPhone or iPad. If you are using Mac for a presentation, you can show the screen of your iOS devices centered within your Mac’s screen. You only need to follow the steps below:
- Use a USB cable to attach either your iPad or iPhone to your Mac.
- Open QuickTime, then click File > New Movie Recording.
- Now, you need to point the cursor at the QuickTime Player window for the record button to appear.
- Go to the menu next to the record button and pick your iOS device from the list of cameras.
- You’re now ready to enjoy the largest version of your iPhone or iPad with your audience.
- Click Record to record the action.
Conclusion
● Video editing is an essential part of creating video content that attracts viewers. QuickTime trim video allows you to remove unwanted scenes to make it engaging. Your viewers will get hooked on your videos if you trim boring sections, blank screens, and areas with silence. Once you master the art of cutting, your viewer retention and engagement will sky-rocket.
● Don’t forget to use the tips and tricks we have provided to get the most out of this application. You can export videos to various formats, such as FLC animations and image sequences, as well as AVI and DV Streams. You can also split and combine videos, present or record your iOS device screen, record audio and video, and much more.
You have to trim videos to capture your viewer’s attention because the average attention span of human beings is eight seconds. As such, viewers will click away or keep on scrolling if the first few seconds of your video are in complete silence or a blank screen. Luckily, there is a simple way that Mac users can use to trim videos: QuickTime Player. This guide will give you the low-down on how to trim video in Quicktime to remove unwanted portions.
In this article
02 How to Trim a Video in Quicktime Player
03 Tips & Tricks to Use QuickTime Player
What Is QuickTime Player?
Developed by Apple, QuickTime Player is a software application designed to play, edit, record, and share video and audio files on your Mac. It was created in 1991, and QuickTime X is the latest Mac version available for users of Mac OS X Snow Leopard to macOS Mojave.
QuickTime Player is supported by MovieWorks, PowerPoint, HyperCard, Director, and other standard multimedia authoring apps. One of the exciting features that QuickTime brings to the internet is that it enables video streaming over networks.
In 2016, Apple ended support for the QuickTime Windows version. In 12018, they ceased support for QuickTime 7 version on macOS.
When it comes to OS X Lion, QTKit (the underlying QuickTime media) was deplored in favor of AVFoundation, which was the newer graphics framework and discontinued as of macOS Catalina.
How to Trim a Video in Quicktime Player
Trimming video is a breeze when you are using QuickTime. Follow the steps below to learn how to trim Quicktime video clips.
- Launch QuickTime Player on your Mac. You can find this application by using a Spotlight search. Alternatively, open the Finder app in your Dock and choose the Applications option from the left-hand side menu. You’ll then find QuickTime in the right-hand side menu.
- Once QuickTime has launched, hit the File tab, then click Open File.

- Select the video you would to trim.
- Navigate to the Edit tab on the top menu with your video open.
- Select Trim in the dropdown menu. Alternatively, use the keyboard shortcut command + T.

- You’ll see a yellow trimming bar around the length of the video at the bottom.

- To QuickTime trim video, drag the handles, and the app will remove everything outside the yellow bars.
- Once you have trimmed your video, click the Trim option on the right side of your screen.
- The play icon allows you to preview your video anytime you want during the editing process.
- Click File then Save to save your trimmed video.

- Name your trimmed video, and then select the location you want to save it. Click Save to complete this action.
Tips & Tricks to Use QuickTime Player
Now that you know how to QuickTime trim video, we have provided some helpful tips and tricks for those using this application.
How to Split and Combine Videos
QuickTime player allows you to split and combine two or more video clips. Follow the steps below to learn how to split and combine your videos.
- Open your file.
- Then, press Command-E or select View > Show Clips.
- Drag the Playhead to the area where you would like the video to split.
- Press Command-Y or select Edit > Split Clip. Both clips will be highlighted yellow.
- You can now insert another video clip or re-arrange the video clips by dragging them to the right or left.
- If you split the video clips thrice, you can select the one in the middle, where a yellow outline will appear around it, and then zap it by hitting Delete on your keyboard.

- To combine your video clips, open one of the clips and select Edit > Add Clip to End.
- Double click the video clip you would like to tack on in the Open dialog box.
- You can also drag the icons of video clips from the Finder and drop them into a video window. The application will add the clips to the end of your existing video. Repeat this process to combine several video clips.
- The second video can appear in the middle of your first one. All you have to do is split the video clip, then click on the clip that will appear before the area where the new video is supposed to go.
- Now, select Edit > Insert Clip After Selection.
- A dialog box will appear; double-click the video file you would like to bring in.
- Alternatively, drag a video from the Finder and take it into the gap between the two clips.

How to Record Audio and Videos
You can record a video using a USB webcam or Mac’s built-in camera. What’s more? You can record audio with the built-in microphone on your Mac, a musical instrument connected via a USB cable, or an external mic. Or maybe you would like to record something that’s happening on your screen, QuickTime Player can also do this. Follow the steps below to record audio and video with QuickTime.
- Select File > New Screen Recording, New Audio Recording, or New Movie Recording.
- The last two options need you to choose quality and an input source. You’ll then have to hit the red Record Button. The first option will summon a pane that features the record button and some audio options.
- Drag to specify an area you want to record or click once to record the whole screen.
- Once you have finished, hit the Record button again. A black screen will appear in your menu bar when you’re recording your screen.
- The file will open in QuickTime Player when you stop recording.
- To save it, choose File > Save.
How to Export and Share Videos
QuickTime allows you to export optimized content so that you can view it on other Apple devices, including Apple TV, iPod Touch, and iPhone. With that in mind, let’s look at how you can export and share your video once you have finished editing it.
- Select File > Export; you’ll get a roundup of resolution options (1080p, 720p, and 480p), settings for Apple TV and iOS devices, and an option for only exporting audio.
- If you go with the iTunes option, you’ll see the same Apple TV and iOS devices optimized settings; however, the video file will be sent to your iTunes library.

- • To export your video and share with other users, select File > Share, and the resulting menu will include AirDrop, Messages, Mail, and the social media sharing platforms YouTube, Flickr, Facebook, and Vimeo.

- Choose the option you want, and QuickTime will optimize your video for the service or program you have selected.
- To save the changes you have made to your video file, select File > Close. Name your edited video in the box that will appear, then click Save.
Flip or Rotate a Clip
QuickTime Player also allows you to rotate or flip clips and videos with a single click. Following these step to flip or rotate your video clip.
- Navigate to the Edit tab.
- Select the direction that you want your video to turn. The available options are Flip Vertical, Flip Horizontal, Rotate Right and Rotate Left.
You can apply the changes to your entire video or one of the clips if you had divided the video file.
Present or Record your iPad or iPhone Screen
QuickTime can record or show a live view of what is happening on your iPhone or iPad. If you are using Mac for a presentation, you can show the screen of your iOS devices centered within your Mac’s screen. You only need to follow the steps below:
- Use a USB cable to attach either your iPad or iPhone to your Mac.
- Open QuickTime, then click File > New Movie Recording.
- Now, you need to point the cursor at the QuickTime Player window for the record button to appear.
- Go to the menu next to the record button and pick your iOS device from the list of cameras.
- You’re now ready to enjoy the largest version of your iPhone or iPad with your audience.
- Click Record to record the action.
Conclusion
● Video editing is an essential part of creating video content that attracts viewers. QuickTime trim video allows you to remove unwanted scenes to make it engaging. Your viewers will get hooked on your videos if you trim boring sections, blank screens, and areas with silence. Once you master the art of cutting, your viewer retention and engagement will sky-rocket.
● Don’t forget to use the tips and tricks we have provided to get the most out of this application. You can export videos to various formats, such as FLC animations and image sequences, as well as AVI and DV Streams. You can also split and combine videos, present or record your iOS device screen, record audio and video, and much more.
You have to trim videos to capture your viewer’s attention because the average attention span of human beings is eight seconds. As such, viewers will click away or keep on scrolling if the first few seconds of your video are in complete silence or a blank screen. Luckily, there is a simple way that Mac users can use to trim videos: QuickTime Player. This guide will give you the low-down on how to trim video in Quicktime to remove unwanted portions.
In this article
02 How to Trim a Video in Quicktime Player
03 Tips & Tricks to Use QuickTime Player
What Is QuickTime Player?
Developed by Apple, QuickTime Player is a software application designed to play, edit, record, and share video and audio files on your Mac. It was created in 1991, and QuickTime X is the latest Mac version available for users of Mac OS X Snow Leopard to macOS Mojave.
QuickTime Player is supported by MovieWorks, PowerPoint, HyperCard, Director, and other standard multimedia authoring apps. One of the exciting features that QuickTime brings to the internet is that it enables video streaming over networks.
In 2016, Apple ended support for the QuickTime Windows version. In 12018, they ceased support for QuickTime 7 version on macOS.
When it comes to OS X Lion, QTKit (the underlying QuickTime media) was deplored in favor of AVFoundation, which was the newer graphics framework and discontinued as of macOS Catalina.
How to Trim a Video in Quicktime Player
Trimming video is a breeze when you are using QuickTime. Follow the steps below to learn how to trim Quicktime video clips.
- Launch QuickTime Player on your Mac. You can find this application by using a Spotlight search. Alternatively, open the Finder app in your Dock and choose the Applications option from the left-hand side menu. You’ll then find QuickTime in the right-hand side menu.
- Once QuickTime has launched, hit the File tab, then click Open File.

- Select the video you would to trim.
- Navigate to the Edit tab on the top menu with your video open.
- Select Trim in the dropdown menu. Alternatively, use the keyboard shortcut command + T.

- You’ll see a yellow trimming bar around the length of the video at the bottom.

- To QuickTime trim video, drag the handles, and the app will remove everything outside the yellow bars.
- Once you have trimmed your video, click the Trim option on the right side of your screen.
- The play icon allows you to preview your video anytime you want during the editing process.
- Click File then Save to save your trimmed video.

- Name your trimmed video, and then select the location you want to save it. Click Save to complete this action.
Tips & Tricks to Use QuickTime Player
Now that you know how to QuickTime trim video, we have provided some helpful tips and tricks for those using this application.
How to Split and Combine Videos
QuickTime player allows you to split and combine two or more video clips. Follow the steps below to learn how to split and combine your videos.
- Open your file.
- Then, press Command-E or select View > Show Clips.
- Drag the Playhead to the area where you would like the video to split.
- Press Command-Y or select Edit > Split Clip. Both clips will be highlighted yellow.
- You can now insert another video clip or re-arrange the video clips by dragging them to the right or left.
- If you split the video clips thrice, you can select the one in the middle, where a yellow outline will appear around it, and then zap it by hitting Delete on your keyboard.

- To combine your video clips, open one of the clips and select Edit > Add Clip to End.
- Double click the video clip you would like to tack on in the Open dialog box.
- You can also drag the icons of video clips from the Finder and drop them into a video window. The application will add the clips to the end of your existing video. Repeat this process to combine several video clips.
- The second video can appear in the middle of your first one. All you have to do is split the video clip, then click on the clip that will appear before the area where the new video is supposed to go.
- Now, select Edit > Insert Clip After Selection.
- A dialog box will appear; double-click the video file you would like to bring in.
- Alternatively, drag a video from the Finder and take it into the gap between the two clips.

How to Record Audio and Videos
You can record a video using a USB webcam or Mac’s built-in camera. What’s more? You can record audio with the built-in microphone on your Mac, a musical instrument connected via a USB cable, or an external mic. Or maybe you would like to record something that’s happening on your screen, QuickTime Player can also do this. Follow the steps below to record audio and video with QuickTime.
- Select File > New Screen Recording, New Audio Recording, or New Movie Recording.
- The last two options need you to choose quality and an input source. You’ll then have to hit the red Record Button. The first option will summon a pane that features the record button and some audio options.
- Drag to specify an area you want to record or click once to record the whole screen.
- Once you have finished, hit the Record button again. A black screen will appear in your menu bar when you’re recording your screen.
- The file will open in QuickTime Player when you stop recording.
- To save it, choose File > Save.
How to Export and Share Videos
QuickTime allows you to export optimized content so that you can view it on other Apple devices, including Apple TV, iPod Touch, and iPhone. With that in mind, let’s look at how you can export and share your video once you have finished editing it.
- Select File > Export; you’ll get a roundup of resolution options (1080p, 720p, and 480p), settings for Apple TV and iOS devices, and an option for only exporting audio.
- If you go with the iTunes option, you’ll see the same Apple TV and iOS devices optimized settings; however, the video file will be sent to your iTunes library.

- • To export your video and share with other users, select File > Share, and the resulting menu will include AirDrop, Messages, Mail, and the social media sharing platforms YouTube, Flickr, Facebook, and Vimeo.

- Choose the option you want, and QuickTime will optimize your video for the service or program you have selected.
- To save the changes you have made to your video file, select File > Close. Name your edited video in the box that will appear, then click Save.
Flip or Rotate a Clip
QuickTime Player also allows you to rotate or flip clips and videos with a single click. Following these step to flip or rotate your video clip.
- Navigate to the Edit tab.
- Select the direction that you want your video to turn. The available options are Flip Vertical, Flip Horizontal, Rotate Right and Rotate Left.
You can apply the changes to your entire video or one of the clips if you had divided the video file.
Present or Record your iPad or iPhone Screen
QuickTime can record or show a live view of what is happening on your iPhone or iPad. If you are using Mac for a presentation, you can show the screen of your iOS devices centered within your Mac’s screen. You only need to follow the steps below:
- Use a USB cable to attach either your iPad or iPhone to your Mac.
- Open QuickTime, then click File > New Movie Recording.
- Now, you need to point the cursor at the QuickTime Player window for the record button to appear.
- Go to the menu next to the record button and pick your iOS device from the list of cameras.
- You’re now ready to enjoy the largest version of your iPhone or iPad with your audience.
- Click Record to record the action.
Conclusion
● Video editing is an essential part of creating video content that attracts viewers. QuickTime trim video allows you to remove unwanted scenes to make it engaging. Your viewers will get hooked on your videos if you trim boring sections, blank screens, and areas with silence. Once you master the art of cutting, your viewer retention and engagement will sky-rocket.
● Don’t forget to use the tips and tricks we have provided to get the most out of this application. You can export videos to various formats, such as FLC animations and image sequences, as well as AVI and DV Streams. You can also split and combine videos, present or record your iOS device screen, record audio and video, and much more.
You have to trim videos to capture your viewer’s attention because the average attention span of human beings is eight seconds. As such, viewers will click away or keep on scrolling if the first few seconds of your video are in complete silence or a blank screen. Luckily, there is a simple way that Mac users can use to trim videos: QuickTime Player. This guide will give you the low-down on how to trim video in Quicktime to remove unwanted portions.
In this article
02 How to Trim a Video in Quicktime Player
03 Tips & Tricks to Use QuickTime Player
What Is QuickTime Player?
Developed by Apple, QuickTime Player is a software application designed to play, edit, record, and share video and audio files on your Mac. It was created in 1991, and QuickTime X is the latest Mac version available for users of Mac OS X Snow Leopard to macOS Mojave.
QuickTime Player is supported by MovieWorks, PowerPoint, HyperCard, Director, and other standard multimedia authoring apps. One of the exciting features that QuickTime brings to the internet is that it enables video streaming over networks.
In 2016, Apple ended support for the QuickTime Windows version. In 12018, they ceased support for QuickTime 7 version on macOS.
When it comes to OS X Lion, QTKit (the underlying QuickTime media) was deplored in favor of AVFoundation, which was the newer graphics framework and discontinued as of macOS Catalina.
How to Trim a Video in Quicktime Player
Trimming video is a breeze when you are using QuickTime. Follow the steps below to learn how to trim Quicktime video clips.
- Launch QuickTime Player on your Mac. You can find this application by using a Spotlight search. Alternatively, open the Finder app in your Dock and choose the Applications option from the left-hand side menu. You’ll then find QuickTime in the right-hand side menu.
- Once QuickTime has launched, hit the File tab, then click Open File.

- Select the video you would to trim.
- Navigate to the Edit tab on the top menu with your video open.
- Select Trim in the dropdown menu. Alternatively, use the keyboard shortcut command + T.

- You’ll see a yellow trimming bar around the length of the video at the bottom.

- To QuickTime trim video, drag the handles, and the app will remove everything outside the yellow bars.
- Once you have trimmed your video, click the Trim option on the right side of your screen.
- The play icon allows you to preview your video anytime you want during the editing process.
- Click File then Save to save your trimmed video.

- Name your trimmed video, and then select the location you want to save it. Click Save to complete this action.
Tips & Tricks to Use QuickTime Player
Now that you know how to QuickTime trim video, we have provided some helpful tips and tricks for those using this application.
How to Split and Combine Videos
QuickTime player allows you to split and combine two or more video clips. Follow the steps below to learn how to split and combine your videos.
- Open your file.
- Then, press Command-E or select View > Show Clips.
- Drag the Playhead to the area where you would like the video to split.
- Press Command-Y or select Edit > Split Clip. Both clips will be highlighted yellow.
- You can now insert another video clip or re-arrange the video clips by dragging them to the right or left.
- If you split the video clips thrice, you can select the one in the middle, where a yellow outline will appear around it, and then zap it by hitting Delete on your keyboard.

- To combine your video clips, open one of the clips and select Edit > Add Clip to End.
- Double click the video clip you would like to tack on in the Open dialog box.
- You can also drag the icons of video clips from the Finder and drop them into a video window. The application will add the clips to the end of your existing video. Repeat this process to combine several video clips.
- The second video can appear in the middle of your first one. All you have to do is split the video clip, then click on the clip that will appear before the area where the new video is supposed to go.
- Now, select Edit > Insert Clip After Selection.
- A dialog box will appear; double-click the video file you would like to bring in.
- Alternatively, drag a video from the Finder and take it into the gap between the two clips.

How to Record Audio and Videos
You can record a video using a USB webcam or Mac’s built-in camera. What’s more? You can record audio with the built-in microphone on your Mac, a musical instrument connected via a USB cable, or an external mic. Or maybe you would like to record something that’s happening on your screen, QuickTime Player can also do this. Follow the steps below to record audio and video with QuickTime.
- Select File > New Screen Recording, New Audio Recording, or New Movie Recording.
- The last two options need you to choose quality and an input source. You’ll then have to hit the red Record Button. The first option will summon a pane that features the record button and some audio options.
- Drag to specify an area you want to record or click once to record the whole screen.
- Once you have finished, hit the Record button again. A black screen will appear in your menu bar when you’re recording your screen.
- The file will open in QuickTime Player when you stop recording.
- To save it, choose File > Save.
How to Export and Share Videos
QuickTime allows you to export optimized content so that you can view it on other Apple devices, including Apple TV, iPod Touch, and iPhone. With that in mind, let’s look at how you can export and share your video once you have finished editing it.
- Select File > Export; you’ll get a roundup of resolution options (1080p, 720p, and 480p), settings for Apple TV and iOS devices, and an option for only exporting audio.
- If you go with the iTunes option, you’ll see the same Apple TV and iOS devices optimized settings; however, the video file will be sent to your iTunes library.

- • To export your video and share with other users, select File > Share, and the resulting menu will include AirDrop, Messages, Mail, and the social media sharing platforms YouTube, Flickr, Facebook, and Vimeo.

- Choose the option you want, and QuickTime will optimize your video for the service or program you have selected.
- To save the changes you have made to your video file, select File > Close. Name your edited video in the box that will appear, then click Save.
Flip or Rotate a Clip
QuickTime Player also allows you to rotate or flip clips and videos with a single click. Following these step to flip or rotate your video clip.
- Navigate to the Edit tab.
- Select the direction that you want your video to turn. The available options are Flip Vertical, Flip Horizontal, Rotate Right and Rotate Left.
You can apply the changes to your entire video or one of the clips if you had divided the video file.
Present or Record your iPad or iPhone Screen
QuickTime can record or show a live view of what is happening on your iPhone or iPad. If you are using Mac for a presentation, you can show the screen of your iOS devices centered within your Mac’s screen. You only need to follow the steps below:
- Use a USB cable to attach either your iPad or iPhone to your Mac.
- Open QuickTime, then click File > New Movie Recording.
- Now, you need to point the cursor at the QuickTime Player window for the record button to appear.
- Go to the menu next to the record button and pick your iOS device from the list of cameras.
- You’re now ready to enjoy the largest version of your iPhone or iPad with your audience.
- Click Record to record the action.
Conclusion
● Video editing is an essential part of creating video content that attracts viewers. QuickTime trim video allows you to remove unwanted scenes to make it engaging. Your viewers will get hooked on your videos if you trim boring sections, blank screens, and areas with silence. Once you master the art of cutting, your viewer retention and engagement will sky-rocket.
● Don’t forget to use the tips and tricks we have provided to get the most out of this application. You can export videos to various formats, such as FLC animations and image sequences, as well as AVI and DV Streams. You can also split and combine videos, present or record your iOS device screen, record audio and video, and much more.
Steps to Create Green Screen Videos in After Effects
You’ll probably get the finest results in After Effects out of all the editing programs. Working with green screen footage in After Effects can be done in a variety of ways. Utilizing a built-in preset that combines three effects is advised by Adobe. Due to its ability to deliver speedy (and typically excellent) outcomes, this strategy is great for both beginners and specialists. We’ll demonstrate how to do easily for you.
Let’s start off!
1. Importing your footage
After you have imported your material into the After Effects project, you should next create a new composition using the footage. In the following stage, you have the option of either adding each plugin one at a time or doing it all at once. You may find them grouped together as Keylight, Key Cleaner, and Advanced Spill Suppressor in the Animation Presets box, which is located under the “Image Utilities” heading.
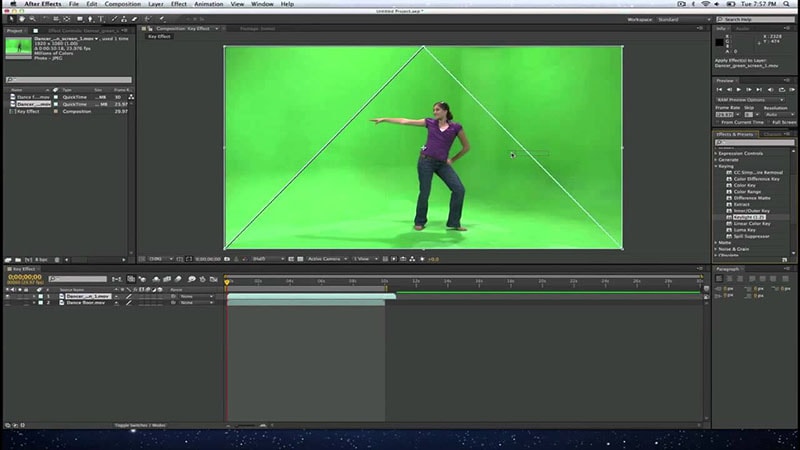
2. Remove the green color
After Effects users can get rid of a green screen by going to the “Animation Presets” window, searching for the “Keylight” preset, dragging, and dropping it over the clip, and then shifting their focus to the “Effects Controls” window. Make sure the Screen Colour is set to the color of your screen’s background (which, in this case, is green). You may do this with the color selector.
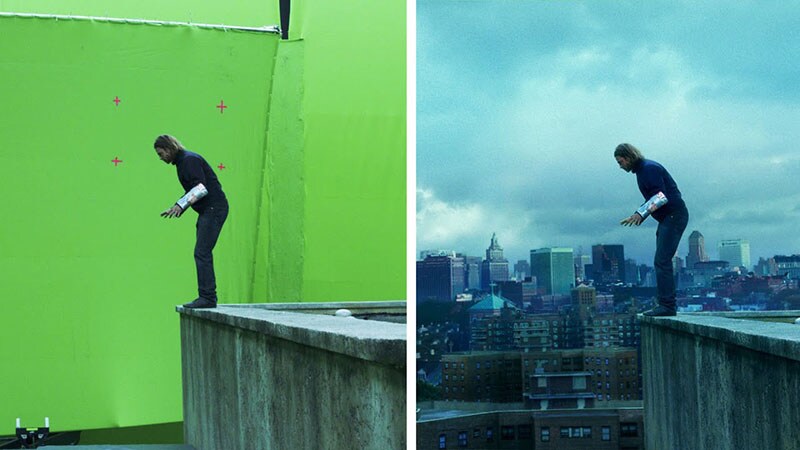
3. Clean up the shot
You have no doubt observed that some of the remaining parts do not have the correct keying installed in them. In order to get rid of them, you need to put the view into the Combined Matte mode and turn the Screen Gain up a notch.
Because everything that is not transparent is turned white by Combined Matte, any remaining debris can be seen very clearly after it has been applied. After you have finished cleaning the frame, you should change the view to Intermediate Result. Your footage may become contaminated with artifacts if the Final Result view is inadvertently switched on.
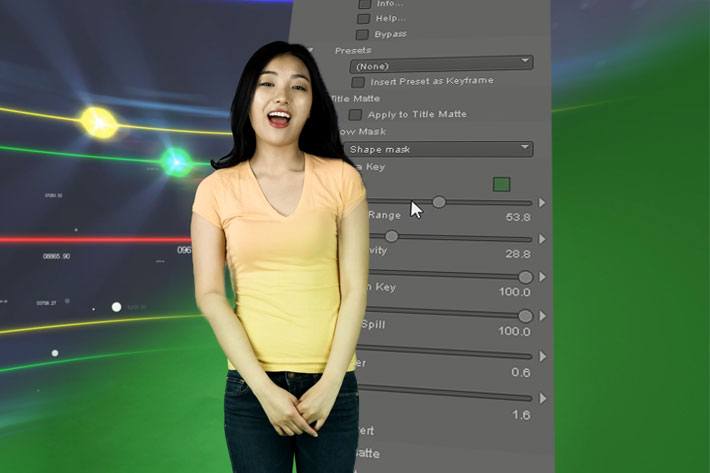
You can go to the “Screen Matte” area if you feel like the frame still needs more tweaking after you’ve applied the previous ones. You can accomplish that with the assistance of Clip Black and Clip White. Feel free to turn the Clip Black dial all the way to the right and turn the Clip White dial to the left. You can also adjust the other settings, if necessary, but based on my observations, everything should be working properly at this point.
The Bottom Line
After completing this lesson, you should have a better understanding of what a chroma key is, how to get rid of a green screen in After Effects, and how to adjust some settings if something goes wrong. Keep in mind that if the footage is not captured properly, you will not be able to successfully key out the green screen in the final video. Extra caution should be taken with the lights, and spills should be avoided at all costs!
Free Download For Win 7 or later(64-bit)
Free Download For macOS 10.14 or later
Free Download For macOS 10.14 or later
Also read:
- Updated In 2024, How to Create Liquid Water Reveal Intro?
- In 2024, How To Track and Blur Faces in Premiere Pro
- In 2024, Understanding The Best Tools for Changing Sky Background
- Updated 11 Best Video Editing Apps for iPhone for 2024
- 2024 Approved Find a Solution for Effortless Sky Replacement Photoshop in This Comprehensive Guide. Also, Use the Easiest Video Editing Tool to Make Your Media Stunning
- Best Online MPEG to GIF Converters
- How to Change Frame Rate in Premiere Pro
- Updated How to Blur a Still or Moving Part of Video for 2024
- Updated What Does It Mean to Color Grade Your Images, and Why Is It so Important? Does It Mean the Same Thing as a Color Correction? Read on to Gather All the Information You Need on Color Grading Photography
- Steps to Add Subtitles in Canva
- Updated 2024 Approved Applying the Effect of Camera Shake in Video Creation
- What Is the Best MP4 Cutters for YouTubers on Mac for 2024
- Learn How to Make Modern TikTok Velocity Dance Videos in Filmora Just Like the Ones You See on TikTok and Instagram Reels for 2024
- New In 2024, How to Make an Aesthetic Slideshow
- Updated 4 Methods How To Make a Recap Video
- New How to Add Font Effects to Videos
- Updated Are You Looking for the Best Video Marketing Agency to Help Your Business Grow Exponentially with Engaging Video Content? Here Is How to Find a High-Quality Video Marketing Company that Takes Your Videos to the Next Level
- Detailed Steps to Rotate Videos in Davinci Resolve for 2024
- You Have to Get It Right when It Comes to Cinematic Grading. We Highlight the Most Common Mistakes to Avoid While Focusing on Various Tips to Apply in the Process for 2024
- Best 10 Mock Location Apps Worth Trying On Infinix Smart 7 HD | Dr.fone
- In 2024, Tips And Tricks To Tell if Your Apple iPhone SE (2020) Is Unlocked
- In 2024, Full Guide on Mirroring Your Motorola Moto G23 to Your PC/Mac | Dr.fone
- In 2024, What Does Jailbreaking iPhone 13 i Do? Get Answers here | Dr.fone
- Does Honor Magic5 Ultimate Have Find My Friends? | Dr.fone
- In 2024, How To Remove Flashlight From iPhone 11 Pro Lock Screen | Dr.fone
- In 2024, Getting the Pokemon Go GPS Signal Not Found 11 Error in Vivo S18 Pro | Dr.fone
- 5 Ways to Reset Tecno Spark 10 5G Without Volume Buttons | Dr.fone
- In 2024, Full Guide to Bypass Sony Xperia 5 V FRP
- How Do You Remove Restricted Mode on iPhone X
- Fix Cant Take Screenshot Due to Security Policy on Realme C51 | Dr.fone
- How To Bypass iCloud By Checkra1n Even From Apple iPhone XS If Youve Tried Everything
- Process of Screen Sharing Realme 12 Pro+ 5G to PC- Detailed Steps | Dr.fone
- Title: Updated How to Make Custom Lower Thirds with Filmora
- Author: Chloe
- Created at : 2024-04-24 07:08:12
- Updated at : 2024-04-25 07:08:12
- Link: https://ai-editing-video.techidaily.com/updated-how-to-make-custom-lower-thirds-with-filmora/
- License: This work is licensed under CC BY-NC-SA 4.0.


