
Updated How To Make Ninja Jump Effect with Filmora

How To Make Ninja Jump Effect with Filmora
Superpower scenes derived from movies are trending these days. Everyone wants to add these superpower effects to their clips. We have covered several of these tutorials, and here we are with a new one; the Super/Ninja Jump effect.
This effect is for the quick movement of a subject from one position to another. Naruto is the prime example where ninjas are made to move around by this effect. Anime creators use this ninja effect a lot.
This article includes tutorials on what to shoot and how to add the Super Jump effect using Wondershare Filmora . The use of tools like masking, time ramping, keyframing, and the new version addition, the Boris FX Pack, makes it super easy to get a perfect super jump effect.
Shots Required For Super Jump Effect
You can use either a mobile phone or a camera for shooting, but you have to keep these things in mind:
Keep the following important tips in mind while shooting clips using your phone or camera.
● Use Wide-Angle
Always use the wide-angle view to ensure everything is in focus with a good depth of field.
● The Camera Should Be Steady
Make sure that the phone or camera is on a steady surface to avoid any turbulence or frame shifting.
● Sufficient Light
Make sure there is sufficient light and ambiance. Once you have set your camera, these are the three shots you have to take:
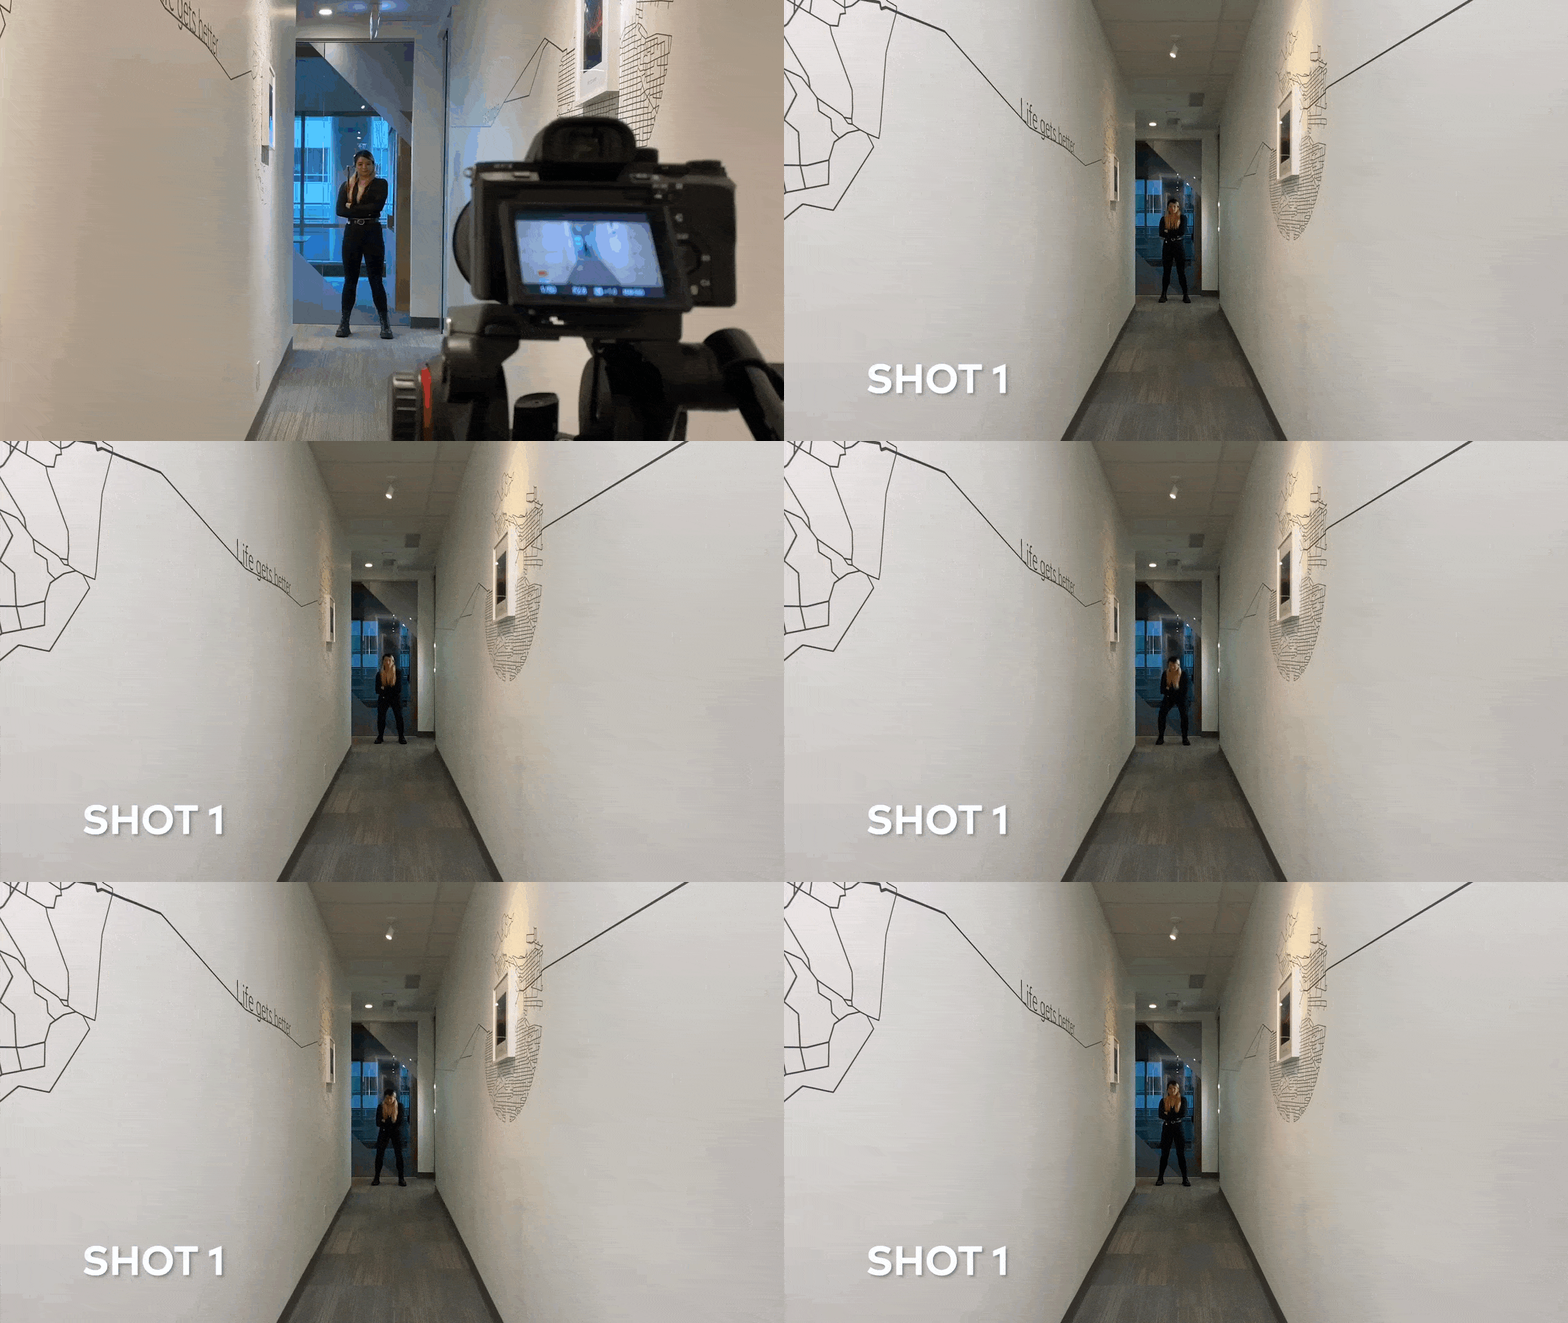
Shot 1: Jump Into the Air at a Distance
The subject will jump into the air at a distance from the camera. He should jump as high as he can, folding his legs so his body is in a ball position while in the air. The distance should be proper—not very far away.
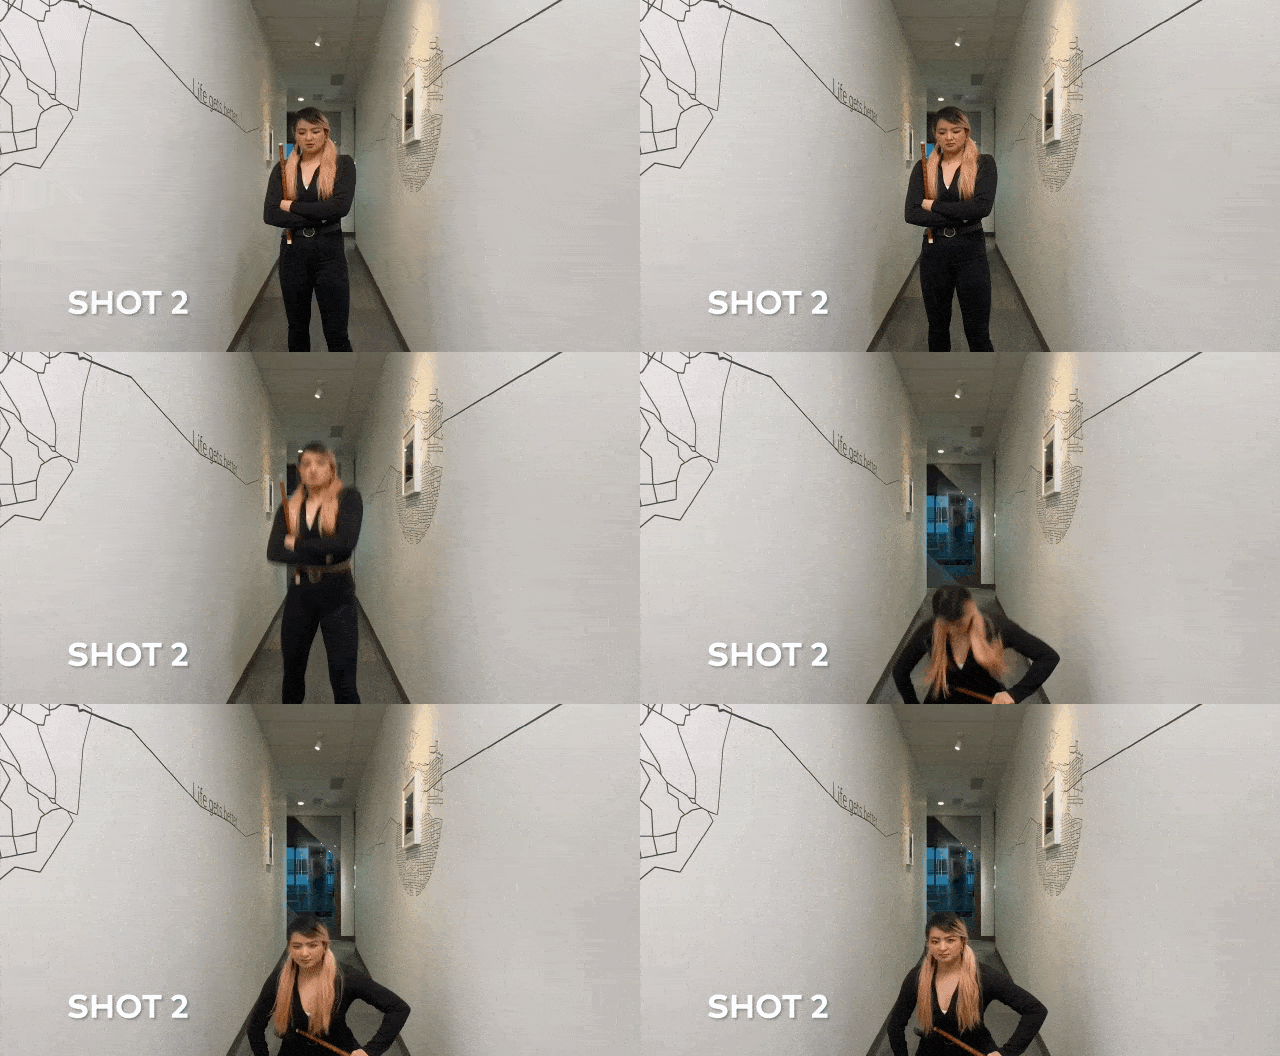
Shot 2: Jump and Act Like You Are Landing
The subject should jump and act like he is landing on the floor. This shot has to be taken directly in front of the camera.
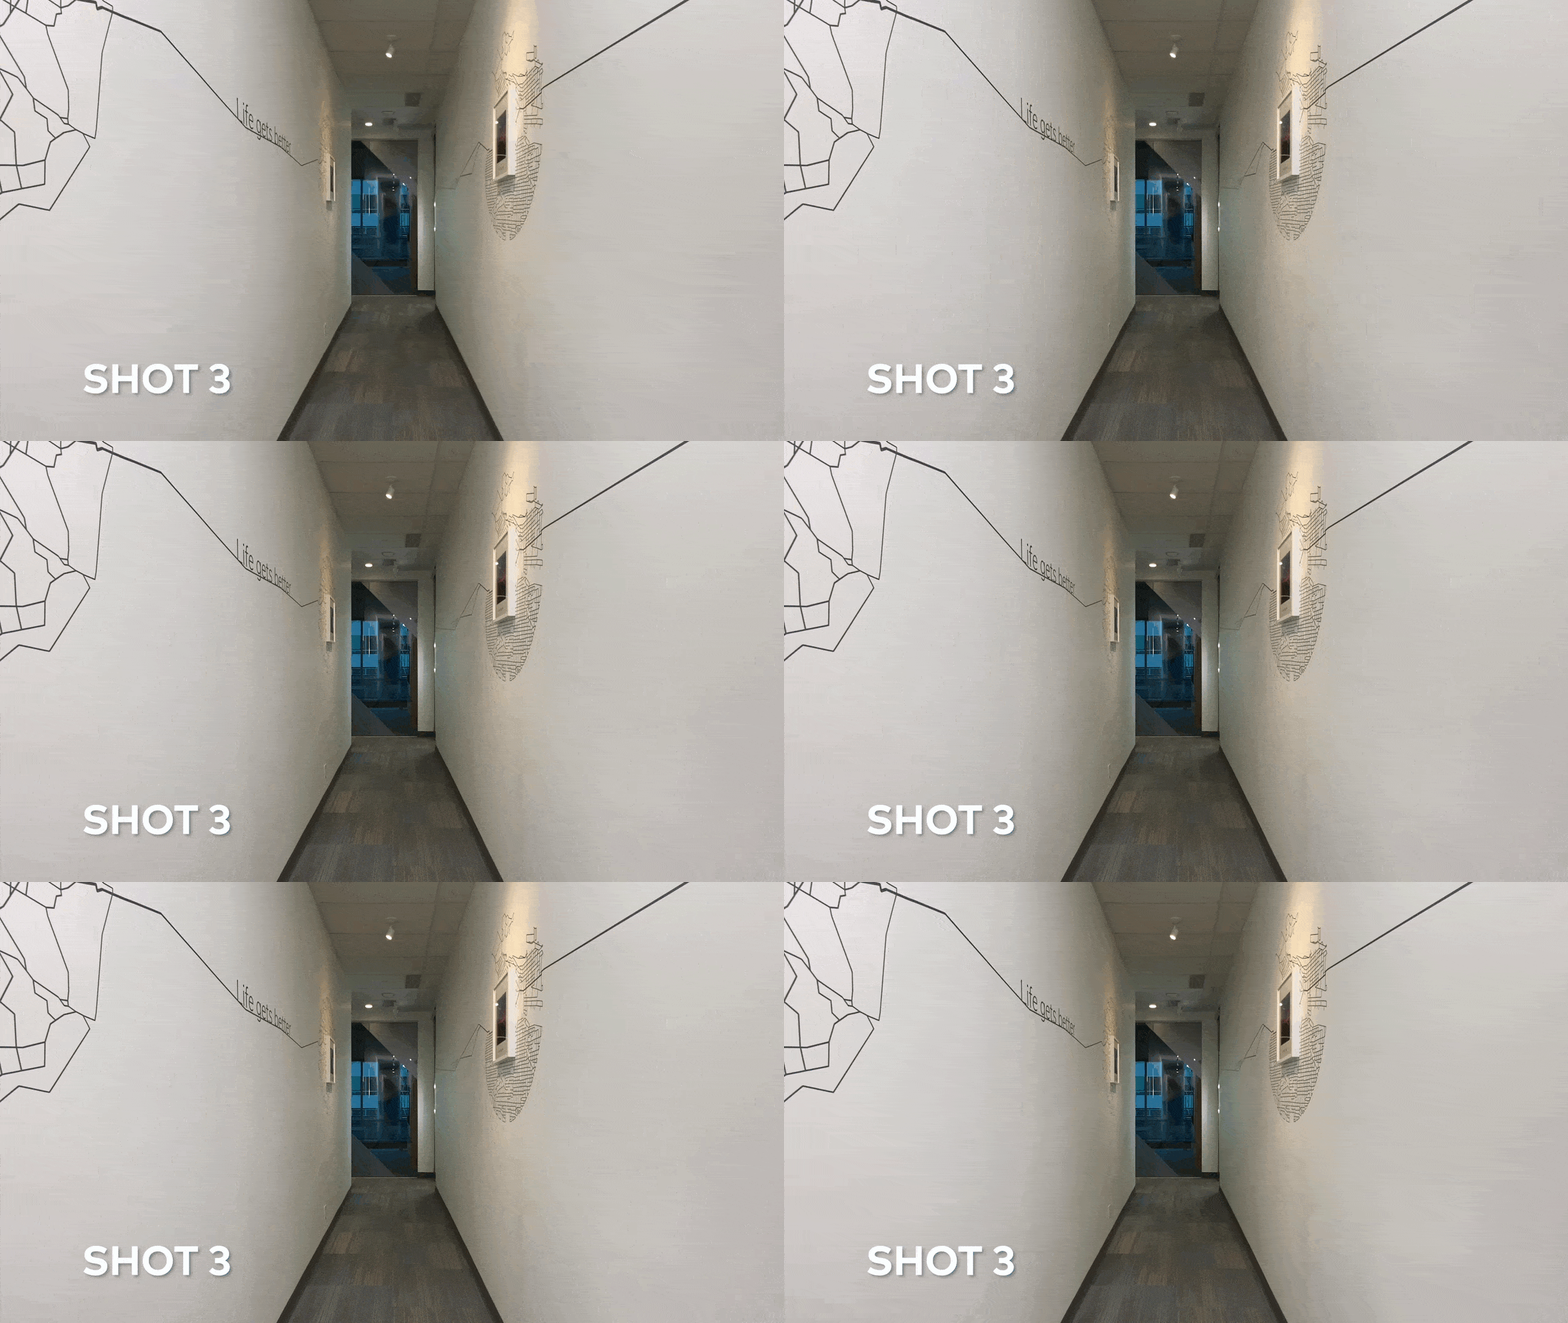
Shot 3: Empty Background Clip
This is an empty background clip. This clip includes only background settings without the subject. We need this clip to make layers while editing.
How To Edit These Clips On Filmora?
Once the shots have been taken, we move towards editing these clips, and for this purpose, we are using Filmora. Here is a step-by-step guide for editing these shots.
Steps To Edit These Clips
The tools we are going to use in this editing are masking, time ramping, speed ramping, keyframing, the Boris FX effect, and many more.
Open Wondershare Filmora and Add Video Tracks
Steps
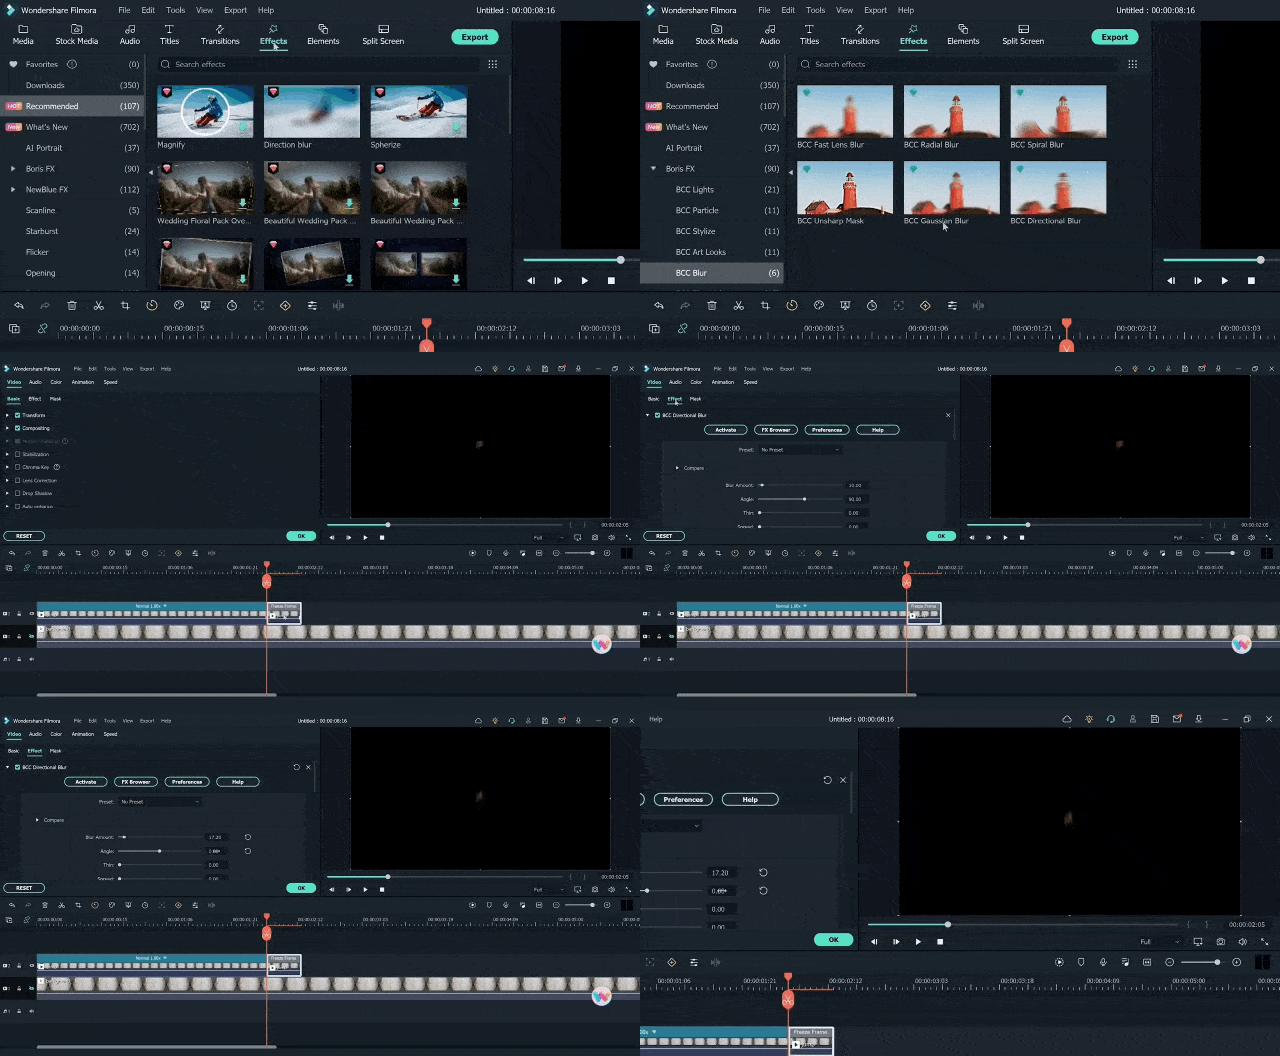
Step1 Select the empty background clip (shot 3) and place it on the first video track timeline.
Step2 Now place the jumping clip (shot 4) on the top.
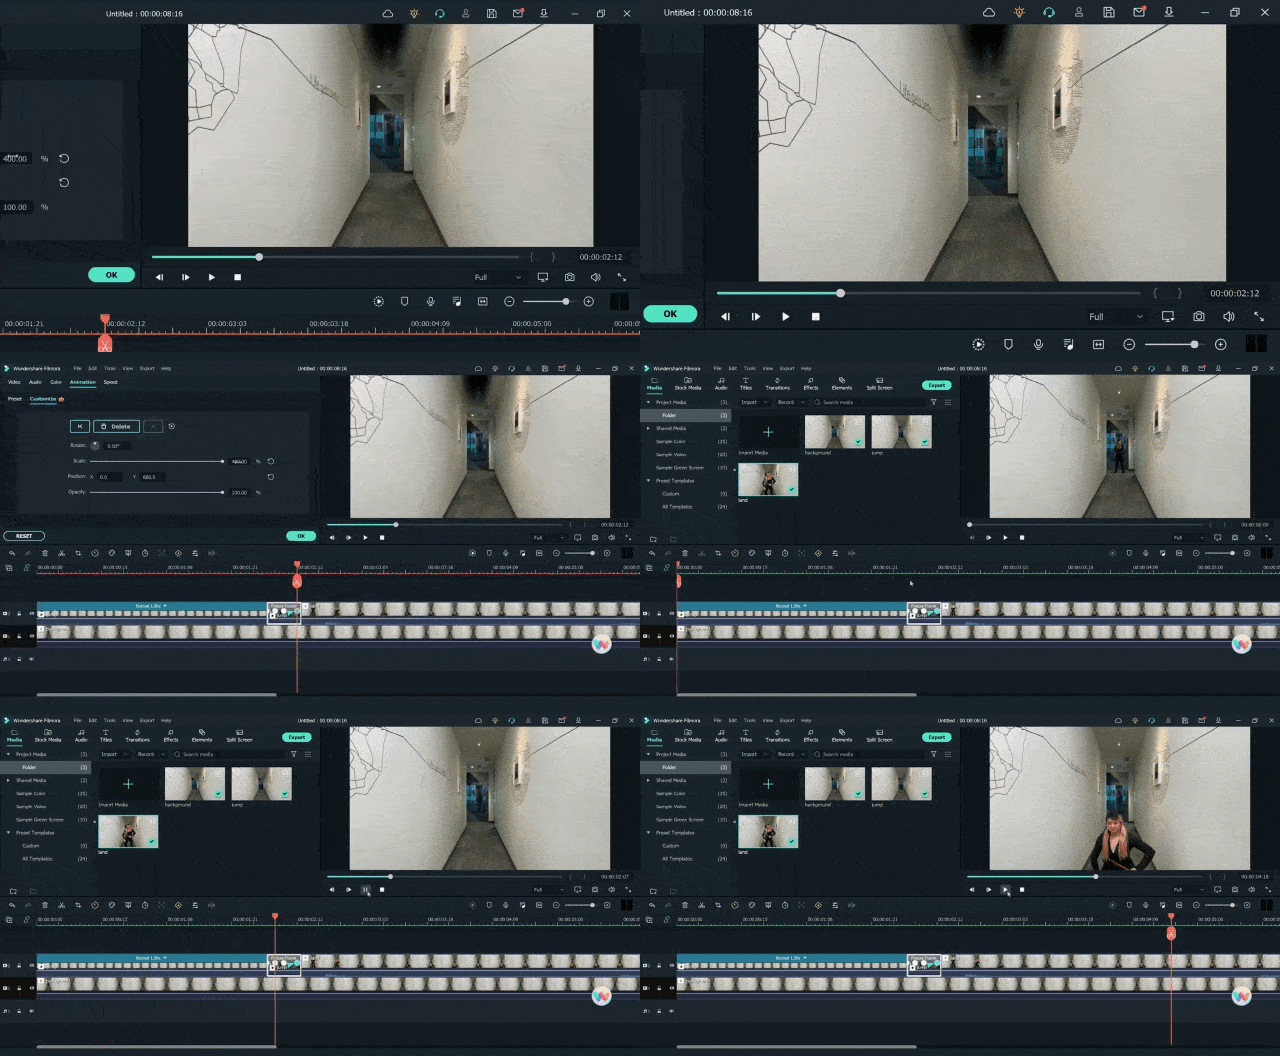
Adding a Freeze Frame
A freeze frame is a type of still image that is created by simply freezing the action. Most of the time, this is used in the last shot of a movie to capture a moment in time. Here are the steps to adding a free frame.
Steps
Step1 Move the playhead up to the point where the subject’s body appears smallest.
Step2 Add a freeze frame at this point by right-clicking on the playhead and selecting the speed option.
Step3 Make a cut at the start of the freeze frame, keep it for 8 frames and delete the rest.
Masking of the Video Clips
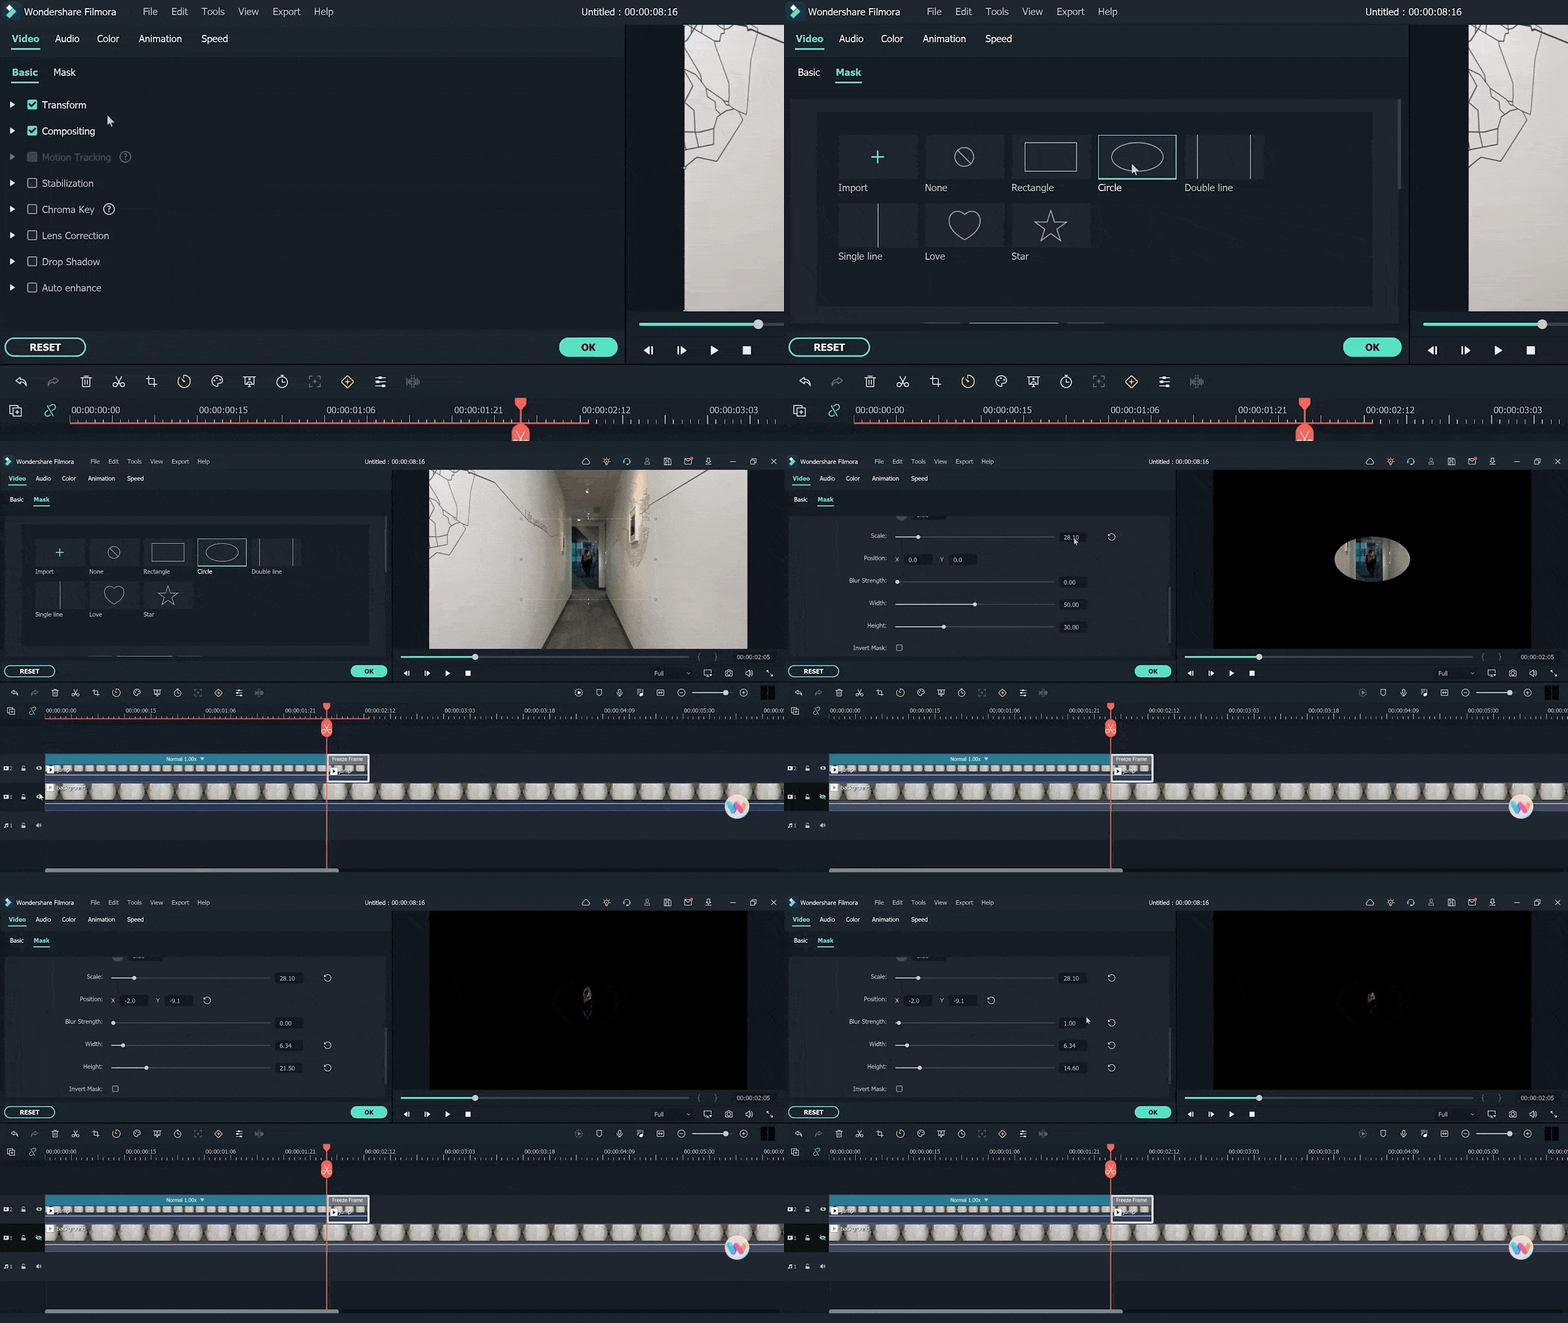
Masking is a tool in editing software that allows you to hide, duplicate, show, or adjust footage by selecting a specific section of the video or using video overlays. The steps for adding the masking effect are given below:
Steps
Step1 Now click on the clip view to open the “settings” window.
Step2 Click on the “mask” section and select the circle mask and create the mask of the jumping subject.
Step3 Hide the first track clip so that mask can be viewed better and edited effectively.
Step4 Adjust the scale, position, and shape of the mask and make the edges smoother to match the object.
Boris Fx Effect
Boris FX is a video editing and visual effects software. Filmora supports six continuum units-professional quality effects plugins from award-winning developer Boris FX.
To add these effects to your videos, follow the steps below:
Steps
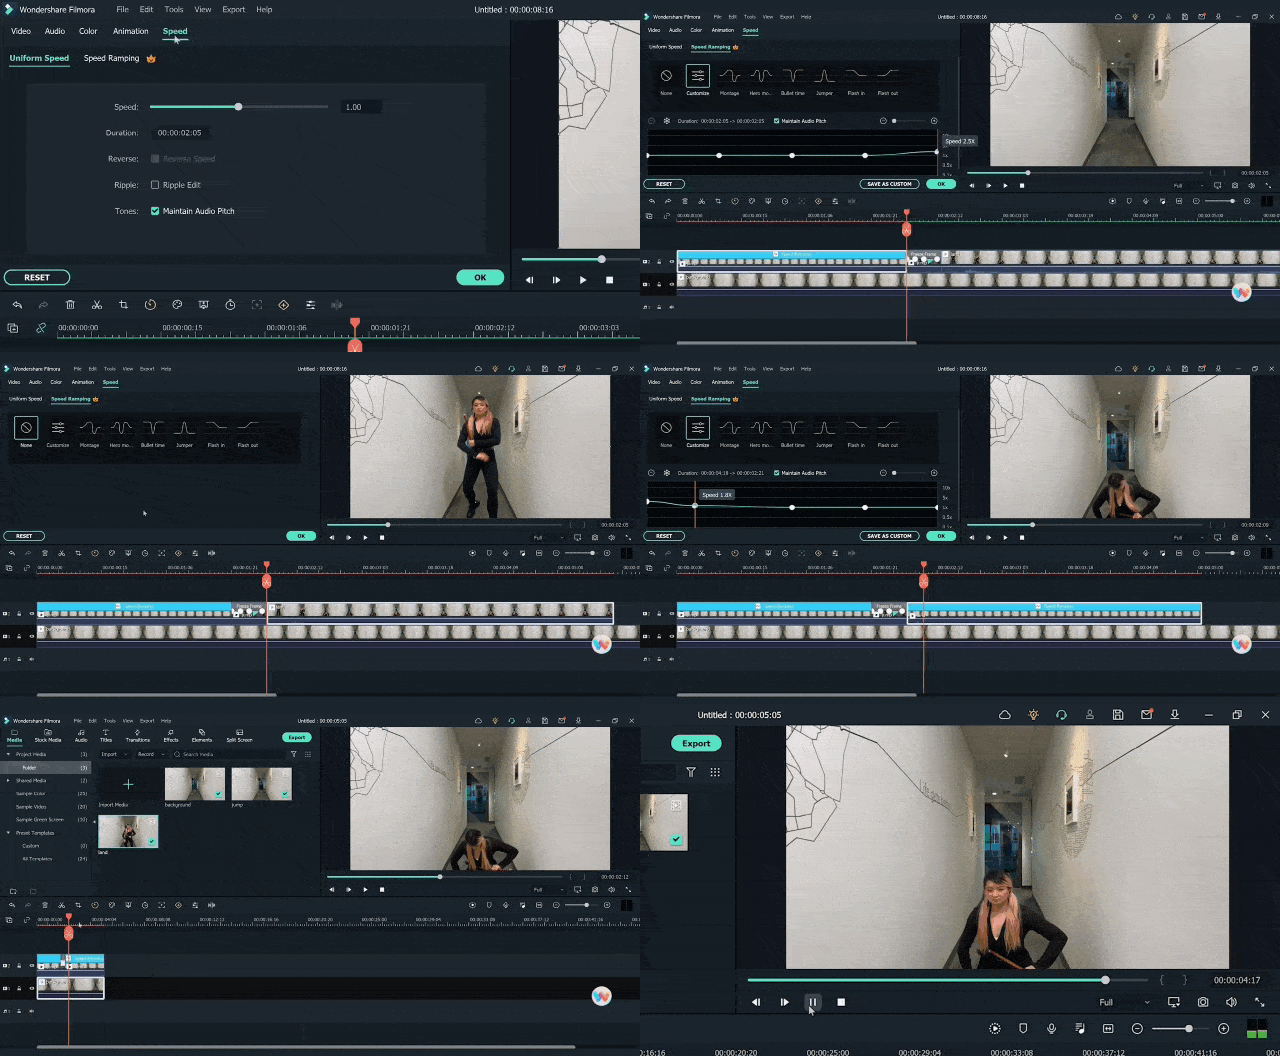
Step1 Go to the “effects” window and open the Boris FX effects.
Step2 Select the directional blur from the bcc blur category.
Step3 Drag the effect to the freeze frame.
Step4 Now clicking on freeze frame, its settings will open.
Step5 Adjust the degree and angle of blur to get a perfect mask object. Turn ON the first video track.
Step6 Add the landing clip (shot 2) on top of the first video track after the freezing frame.
Step7 Find the point where the subject starts to descend toward the floor. Cut the clip here and delete the previous part.
Step8 Move the clip next to the freeze frame clip.
Keyframing
Now we have to add animation in the freezing frame so that the masked shadow can be shown moving from the back towards the front, a speedy moving shadow. This is probably the most crucial step in editing.
Steps
Step1 Click on the freezing frame, and in the settings window, open “animation.”
Step2 Click on the customized option. Add the first keyframe at the start of the clip.
Step3 Now move two frames and add another keyframe with the position of the masked shadow as it is moving out of frame.
Step4 Now move two frames keeping the settings the same.
Step5 Add another keyframe at the end with your masked shadow appearing half from the top of the frame.
This step is a bit tricky to understand, but the most important. Once it is done, your animation will give the impression of an object moving like a flash from the back to the front of view.
Speed Ramping
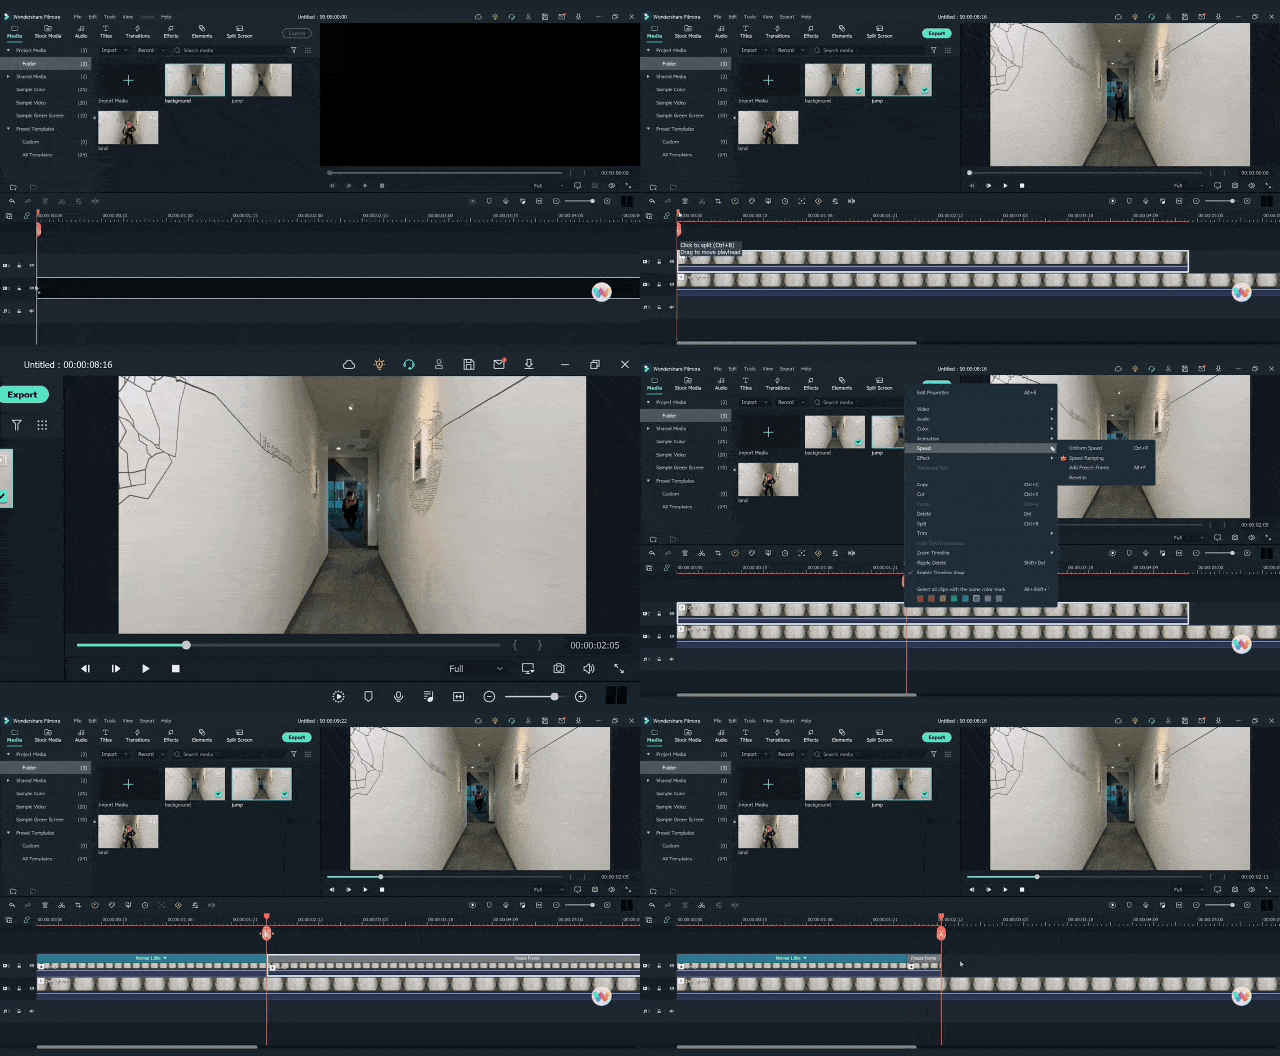
Once the keyframing is done, your super jump effect is roughly ready. All you have to do now is synchronize the speed of jumping, moving shadow, and landing. Here we will use the “speed ramping” tool.
Steps
Step1 Click on the clip, and in the settings window, choose “speed.”
Step2 Click on customize and increase the speed of any frame or clip.
Step3 Move the play head on the frame that you intend to increase the speed of, and move the frame on the speed window to speed up that part.
Once you have done speed ramping on both clips, your editing is done. Now play the video and see how the clip looks and if your super jump effect is remarkable or not.
Final Words
Make sure you follow all these steps in the correct order. You can get Filmora from the Filmora website, but its cracked versions are also available. While editing, try to make the transitions and clips as smooth and synchronized as you can. Also, if you find this article helpful, do not forget to share these tips with your friends.
Free Download For Win 7 or later(64-bit)
Free Download For macOS 10.14 or later
Free Download For macOS 10.14 or later
How to Make Vintage Film Effect 1950S
So, what’s the difference between a vintage film shot in the 1920s and 1950s? It’s simple; in the 1950s, video-making technologies were slightly advanced, although films were more about rock and roll and poodle skirts. So, without further dilly-dallying, let’s learn how to create a retro 1950-style video with this simple Filmora tutorial.
Preparation
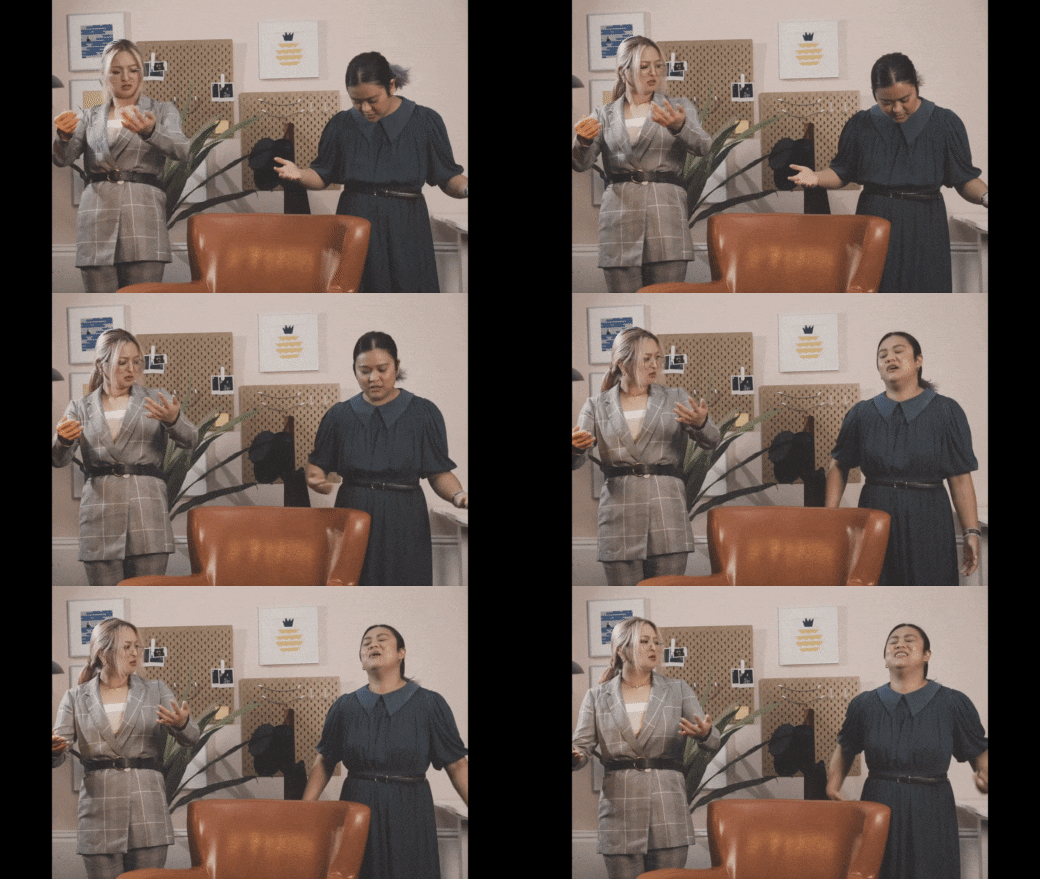
Shooting a video to teleport yourself to the 1950s doesn’t need to be complicated. You simply need to look the part in the video. For example, you can wear velvet-collar jackets, stovepipe trousers, carefully combed back hair, and other trendy styles in the 50s. It’s even better if you can find those vintage chairs in your grandparent’s collection.
How to create a 1950s vintage film:
Step 1 Add your video on Filmora
Free Download For Win 7 or later(64-bit)
Free Download For macOS 10.14 or later
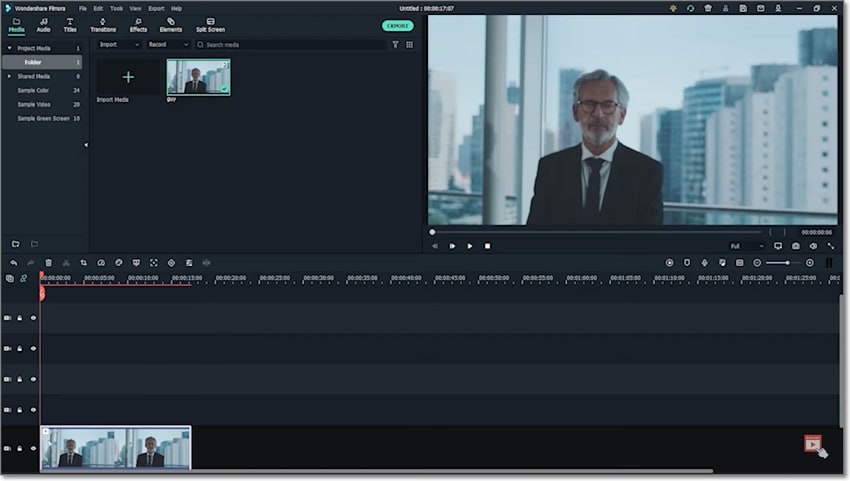
First, fire up Filmora and load the video you want to send back to the 1950s. Then, drag your footage onto the editing timeline.
Step 2 Apply a cropping effect to the video
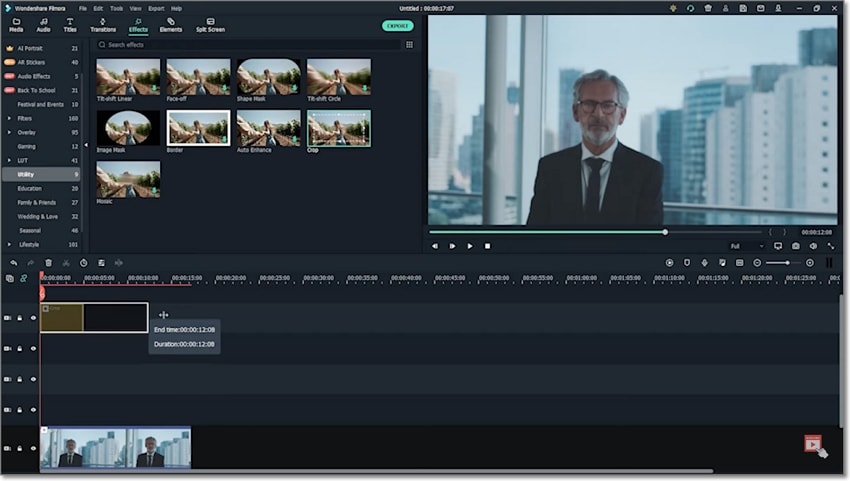
Once the video is successfully added to Filmora, click the Effect tab on the top menu bar and choose the Crop effect under the Utility folder. Make sure you add the Crop effect two or three tracks above the original video track.
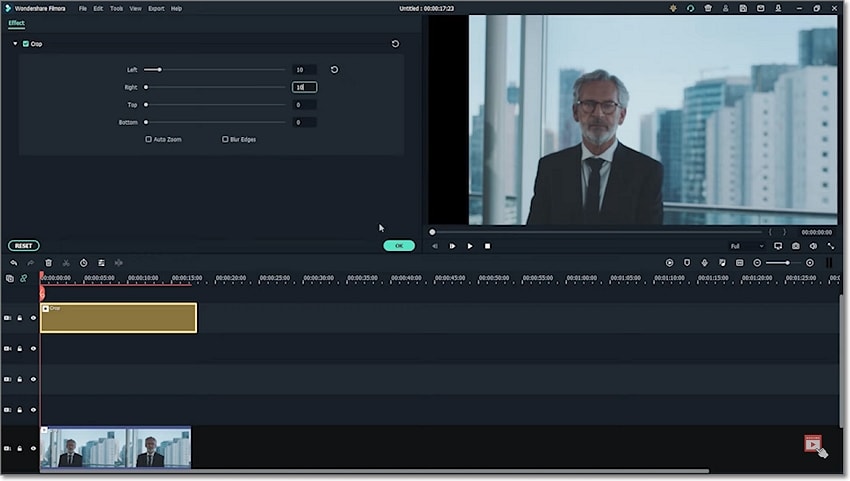
Double-click the Crop effect, then change the Left and Right values to make the video look like it was shot in the 50s. You can set the values as 10.
Step 3 Add a Warm Film color effect
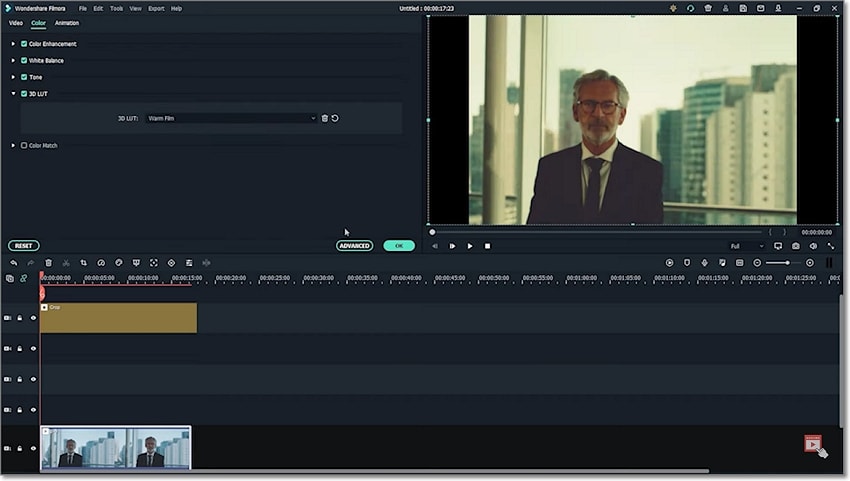
Up to here, you’ll realize that your video doesn’t still look like a 1950s film per se. Double-click your video clip and choose the 3D LUT option under the Color category. Then, open the drop-down menu and choose Warm Film. This will make your video look like it was shot using an old camera.
Step 4 Apply more graininess to the film
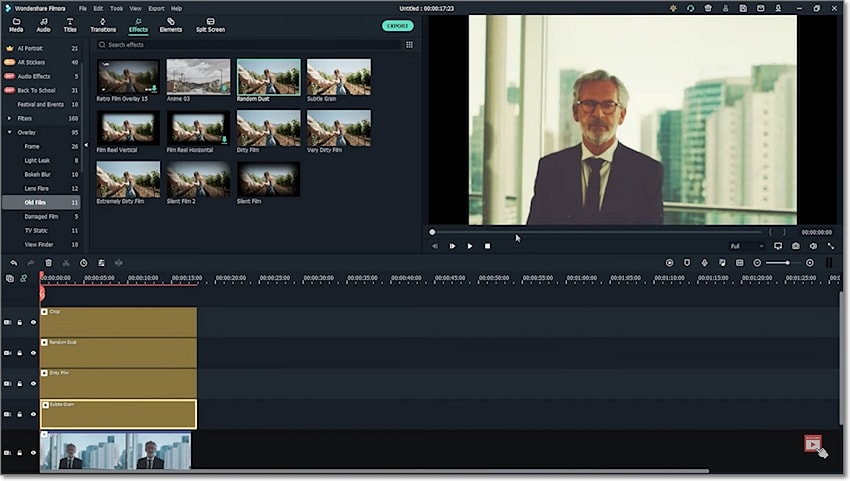
Please don’t stop there; we want to make the footage slightly grainy. In other words, you need to make the footage have a lot of grain and low light. To do that, tap the Overlay menu under the Effects tab, then click Old Film. After that, choose the Random Dust, Dirty Film, and Subtle Grain effects and add them to the tracks above your video clip. Remember to use as much grain as possible to give your footage that vintage look of the 1950s.
Summary
And that’s all there is today! With these steps, you can create an engaging 1950s film without breaking a sweat on Filmora. Remember to visit our other vintage tutorials to learn how to create a film recorded in the 20s, 80s, and 90s. Happy editing, everyone!
Free Download For macOS 10.14 or later

First, fire up Filmora and load the video you want to send back to the 1950s. Then, drag your footage onto the editing timeline.
Step 2 Apply a cropping effect to the video

Once the video is successfully added to Filmora, click the Effect tab on the top menu bar and choose the Crop effect under the Utility folder. Make sure you add the Crop effect two or three tracks above the original video track.

Double-click the Crop effect, then change the Left and Right values to make the video look like it was shot in the 50s. You can set the values as 10.
Step 3 Add a Warm Film color effect

Up to here, you’ll realize that your video doesn’t still look like a 1950s film per se. Double-click your video clip and choose the 3D LUT option under the Color category. Then, open the drop-down menu and choose Warm Film. This will make your video look like it was shot using an old camera.
Step 4 Apply more graininess to the film

Please don’t stop there; we want to make the footage slightly grainy. In other words, you need to make the footage have a lot of grain and low light. To do that, tap the Overlay menu under the Effects tab, then click Old Film. After that, choose the Random Dust, Dirty Film, and Subtle Grain effects and add them to the tracks above your video clip. Remember to use as much grain as possible to give your footage that vintage look of the 1950s.
Summary
And that’s all there is today! With these steps, you can create an engaging 1950s film without breaking a sweat on Filmora. Remember to visit our other vintage tutorials to learn how to create a film recorded in the 20s, 80s, and 90s. Happy editing, everyone!
Free Download For macOS 10.14 or later

First, fire up Filmora and load the video you want to send back to the 1950s. Then, drag your footage onto the editing timeline.
Step 2 Apply a cropping effect to the video

Once the video is successfully added to Filmora, click the Effect tab on the top menu bar and choose the Crop effect under the Utility folder. Make sure you add the Crop effect two or three tracks above the original video track.

Double-click the Crop effect, then change the Left and Right values to make the video look like it was shot in the 50s. You can set the values as 10.
Step 3 Add a Warm Film color effect

Up to here, you’ll realize that your video doesn’t still look like a 1950s film per se. Double-click your video clip and choose the 3D LUT option under the Color category. Then, open the drop-down menu and choose Warm Film. This will make your video look like it was shot using an old camera.
Step 4 Apply more graininess to the film

Please don’t stop there; we want to make the footage slightly grainy. In other words, you need to make the footage have a lot of grain and low light. To do that, tap the Overlay menu under the Effects tab, then click Old Film. After that, choose the Random Dust, Dirty Film, and Subtle Grain effects and add them to the tracks above your video clip. Remember to use as much grain as possible to give your footage that vintage look of the 1950s.
Summary
And that’s all there is today! With these steps, you can create an engaging 1950s film without breaking a sweat on Filmora. Remember to visit our other vintage tutorials to learn how to create a film recorded in the 20s, 80s, and 90s. Happy editing, everyone!
Free Download For macOS 10.14 or later

First, fire up Filmora and load the video you want to send back to the 1950s. Then, drag your footage onto the editing timeline.
Step 2 Apply a cropping effect to the video

Once the video is successfully added to Filmora, click the Effect tab on the top menu bar and choose the Crop effect under the Utility folder. Make sure you add the Crop effect two or three tracks above the original video track.

Double-click the Crop effect, then change the Left and Right values to make the video look like it was shot in the 50s. You can set the values as 10.
Step 3 Add a Warm Film color effect

Up to here, you’ll realize that your video doesn’t still look like a 1950s film per se. Double-click your video clip and choose the 3D LUT option under the Color category. Then, open the drop-down menu and choose Warm Film. This will make your video look like it was shot using an old camera.
Step 4 Apply more graininess to the film

Please don’t stop there; we want to make the footage slightly grainy. In other words, you need to make the footage have a lot of grain and low light. To do that, tap the Overlay menu under the Effects tab, then click Old Film. After that, choose the Random Dust, Dirty Film, and Subtle Grain effects and add them to the tracks above your video clip. Remember to use as much grain as possible to give your footage that vintage look of the 1950s.
Summary
And that’s all there is today! With these steps, you can create an engaging 1950s film without breaking a sweat on Filmora. Remember to visit our other vintage tutorials to learn how to create a film recorded in the 20s, 80s, and 90s. Happy editing, everyone!
How to Create Video in Text Intro?
Have you ever seen videos on social media apps or movies and seen a video in text like the title as the intro? The highly appealing and unique style makes the video introduction stand out. Not to mention, it creates an illusion of almost-transparent titles that showcase the video playing in a subdued manner in the background, thereby showcasing a modern, funky intro.

Now, are you planning to create an effect such as that on your own video project? Worry not; you do not have to hire video editing experts at enormous costs or opt for a video editing course, to name a few. With Wondershare Filmora , you can create the effect at more than half the cost and effort. Let’s learn how that works.
1. Accessing the software
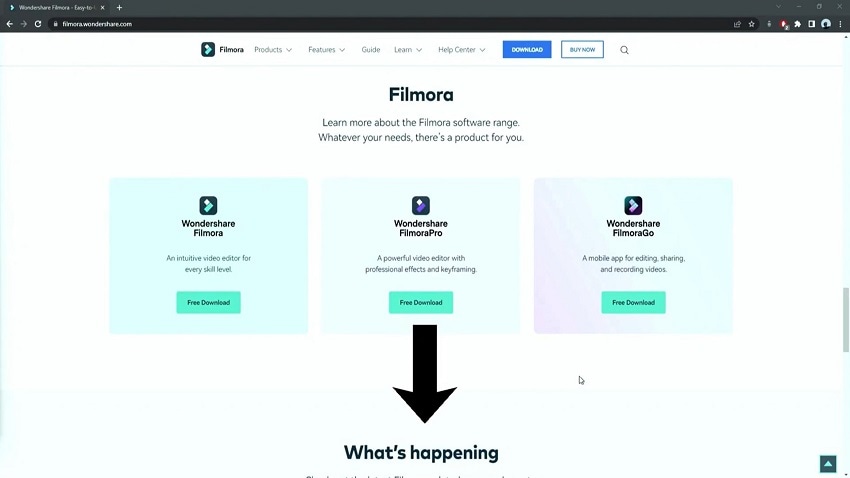
The first step to kickstart the whole process is downloading the software into your system. For this, visit the official website of Filmora and click on the Download button at the top of the page or the description. This will automatically download an installer for the app on your device.
Free Download For Win 7 or later(64-bit)
Free Download For macOS 10.14 or later
From the Downloads section of your Mac or Windows-based device in the browser, double-click on the installer. It will ask you to confirm the terms and conditions and press the Install button on the next pop-up prompt. Then will start the overall downloading process of the software into your device, and it will take some seconds, after which Filmora will automatically open to the homepage.
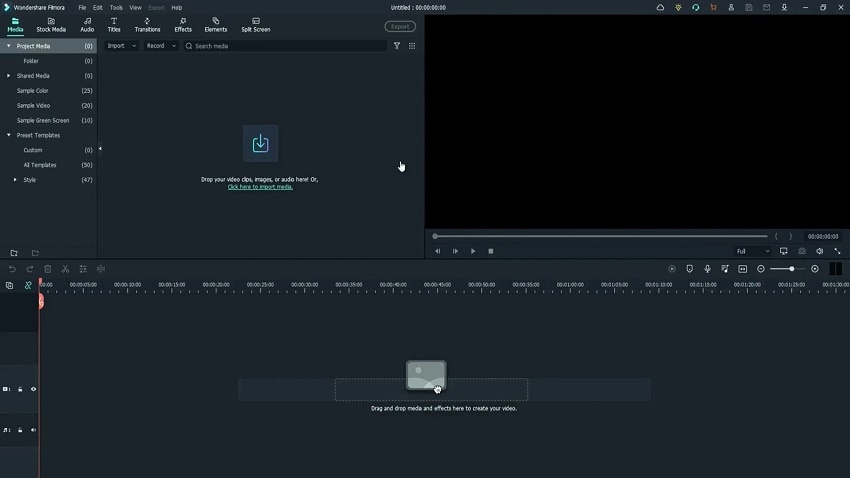
Click on the “Create New Project” button on the homepage, and that will launch the software to the editor window.
2. Add Sample Color
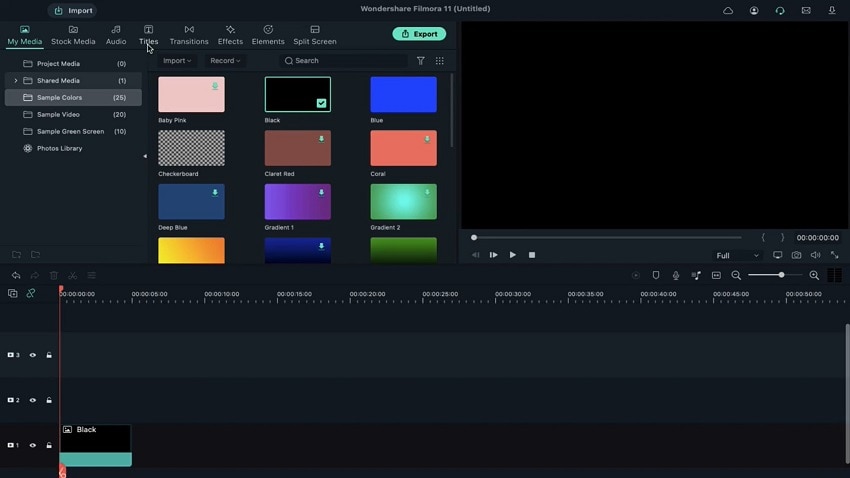
On the main editor window of Filmora, you have to go to the My Media section. From the drop-down list, click on the folder full of Sample Colors. Next, click on the black sample color option and drag it down to the editing timeline. Finally, drop it in the place of the Track 1 section on the timeline.
3. Put the Title tile into the video
After you add the sample color to the timeline, you have to click on the Titles tab from the top main toolbar of Filmora. Out of the options you find here, choose the Default Title. Then, hold it and drag the title template onto the Track 2 section of the editing timeline, and drop it in place.
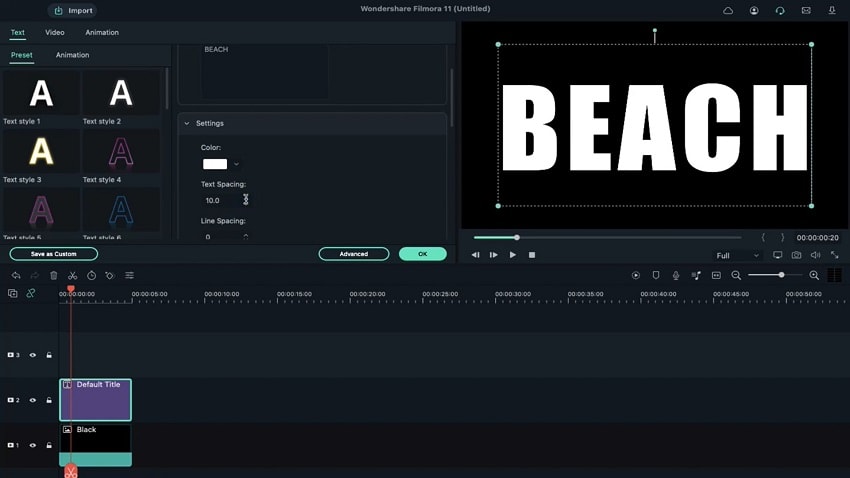
Then, double-click on it to open the editing panel for the text. You will see a text field where you can update the title wording instead of “Your Title Here”. Then, you have to change the size of this title text to 280. Make sure to adjust the font style to whichever option you prefer, but typically a blocky style works. Click on the Bold icon to change the structure of the title text.
Scroll downward among the text editing parameters until you see the Text Spacing option. Whatever the default value here is placed as, you have to turn it to 10. After that, click on the OK button.
4. Take a Snapshot
After adjusting the size and dimension of the title you added, click on the Snapshot icon to take a screenshot of the Track 2 title clip that has been changed. Then, select both of the clips on Tracks 1 and 2 and remove them from the timeline.
5. Insert the background video
Next, go to the My Media tab again and choose the Project Media option. Right-click on the library section and tap on the Import button. This will open you to the device storage of your computer. From there, please search for the video clip you want to insert into your project as the main video background and import it into Filmora.
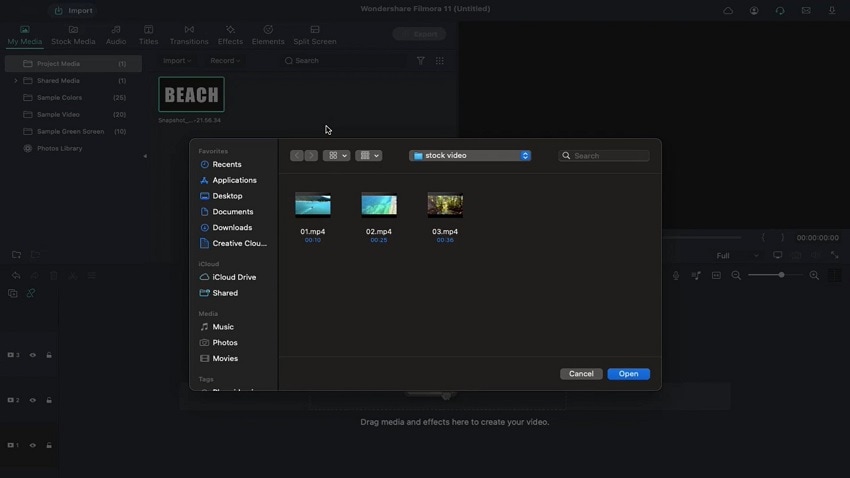
Then, when that is available in your media library section, hold it and drag and drop the clip onto the timeline in the Track 1 section.
6. Add the Black and White Effect
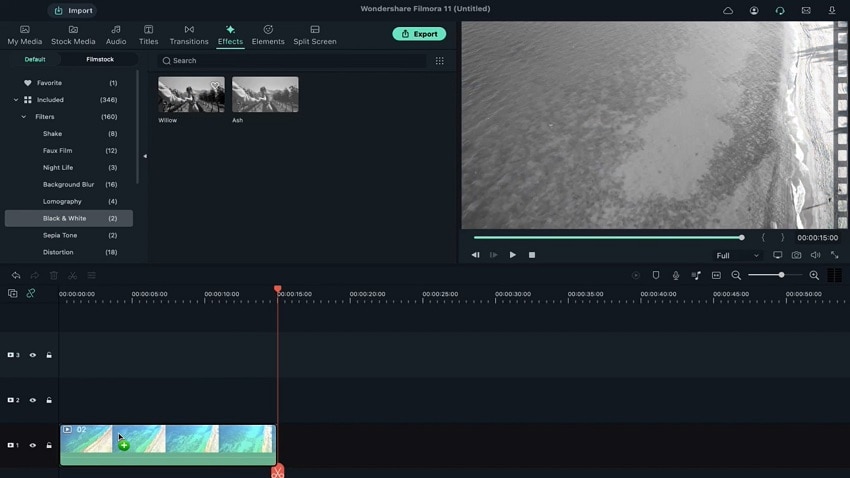
Move the playhead forward to the 15-second mark on the added clip in the timeline. Then, tap on the scissor icon to split this clip. Please tap on the excess amount of the video clip and delete it.
Following that, click on the Effects tab on the top toolbar of Filmora. Out of the list of various effects that you will find, tap on the Black and White category and choose the Willow effect. If you cannot find the Willow effect easily, you can directly search for it in the text search field above and select from there.
Then, drag the willow effect to the video clip in the timeline below, keeping a watch on the preview window. The effect will turn the video into its format of Black and White.
7. Add the Screenshot to the Edit
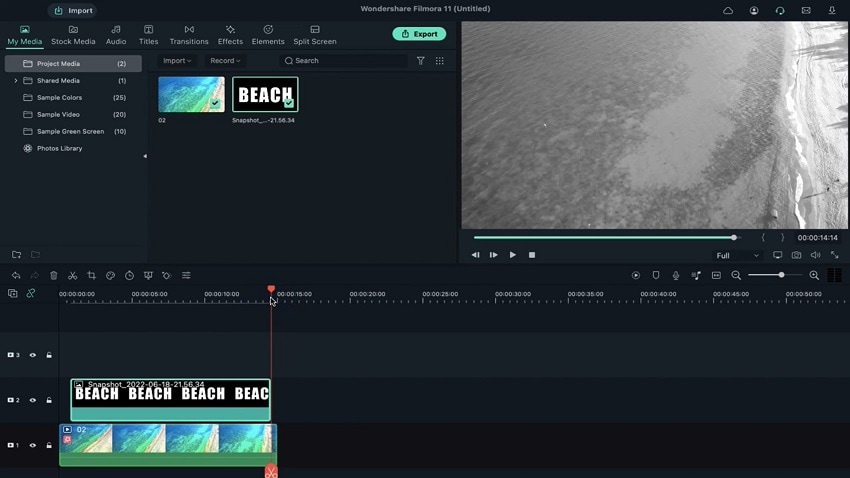
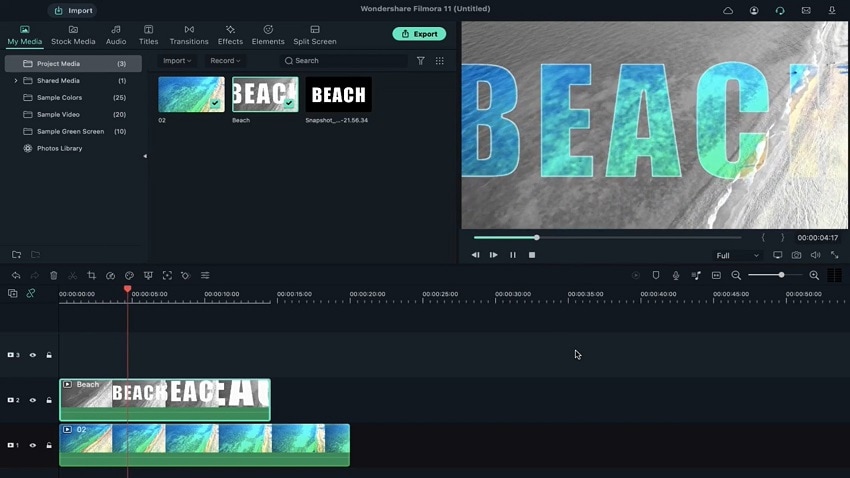
Again, scroll up to the My Media section and tap on the screenshot you created earlier. Then, drag it down onto Track 2 of the editing timeline. Then, use the playback to mark the beginning of the video two frames off of the beginning of the video. Then, move the clip to that position so that it starts from that point onward.
Next, move the playback to the 14-second mark and adjust the Track 3 clip to fit that section perfectly.
8. Use the Chroma Key Effect
Now, double-tap on the Snapshot clip and choose the Video tab. Activate the Chroma Key option and go to the color picker section. Choose the black color from the clip shown on the preview window.
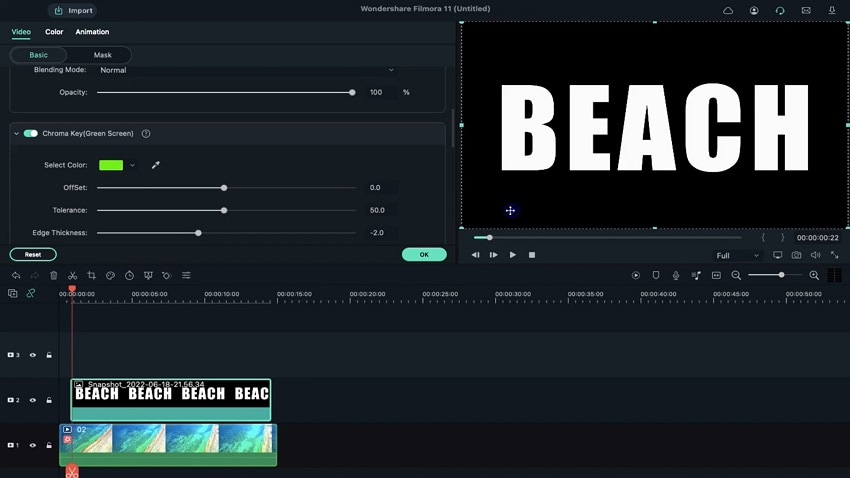
You must now click on the Crop option from the function bar. On the top, you will get the option for Pan and Zoom. Click on it and shorten the visible bright window by dragging it towards the center. Move this cropped rectangle to an all-white position. This will determine the end point of the text to be shown at the starting position of the video.
Move the playhead ahead in the timestamp and again click on the Chroma Key button from the function bar. When it opens, click on the Chroma key option in the editor and change the edge thickness value to a -7 number.
9. Export the Clip
Once done, you need to export this clip. To do so, tap on the Export button at the top of the screen. On the Export page, change the name of the video to the intro title text and go to Settings to see its resolution condition. For the best effect, you should choose the higher bit rate of the file while exporting. After you are done, tap on the Export button.
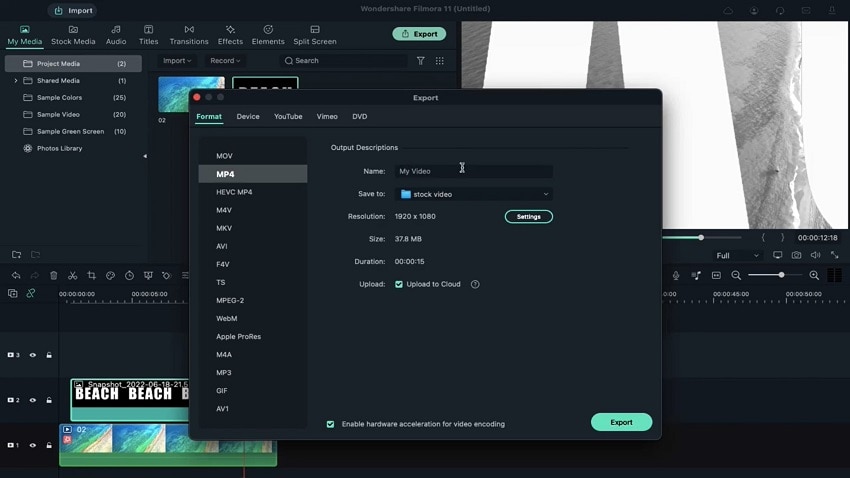
Once the video gets exported, delete the screenshot clip you took from the timeline.
10. Add the Effect on the Video Clip
Double-click on the background video clip on the timeline to open the text editor window. Tap on the Effects tab in this section and remove the Willow effect from your video.
You must extend the video duration to 20 seconds in the lowermost editing window. After that, import the exported video clip from where you stored it after downloading.
11. Drop the Exported Video Version Next
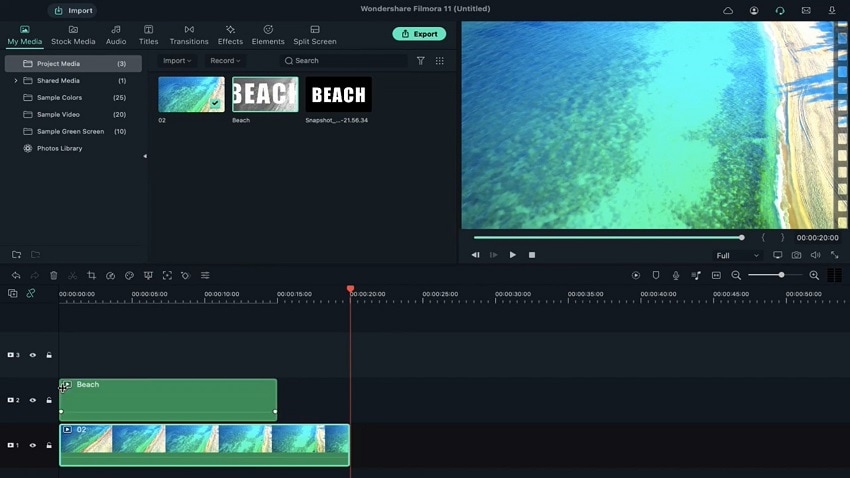
Following this, you must import the video you exported into the timeline. For this, you have to click on the My Media section and go to Project Media. Then, right-click on the library section here and tap on Import. Choose the file and import it from the location where you saved it.
Then, drag and drop the file back into the timeline. Here, the next step for you is to adjust the playhead position for the new video clip. Move the play head to the 14th second and the 14th frame position to synchronize it with the Track 3 video clip.
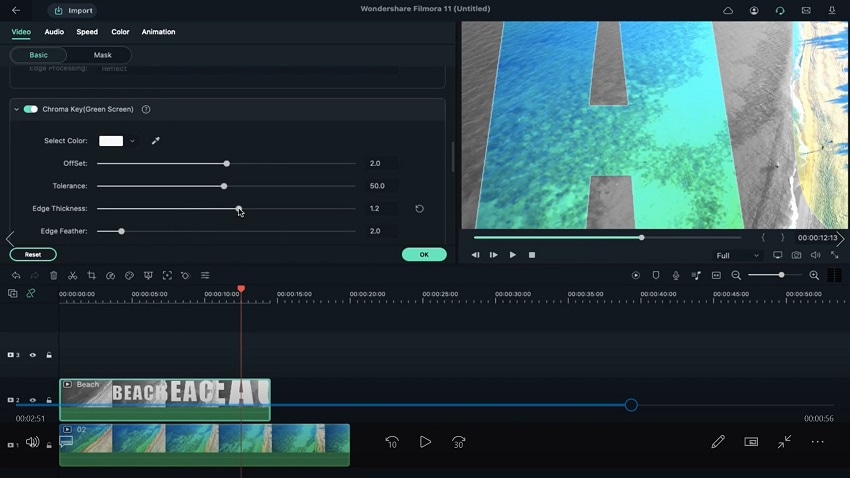
Then, double-click on the video, and under the video tab, choose the Chroma Key option. Then, tap on the color picker and choose to add white color from the preview window. After this, select the Edge Thickness parameter on the editor window and increase it to a value of 1.5.
12. Render Preview and Export Final Intro
Once you are done, click on the Render Preview icon to watch how your edited video stands out. If you are unsatisfied with the outcomes, you can easily roll it back and make the changes. Export the file after you see the preview and are fully satisfied with the effect.
Conclusion
Following the steps outlined, you can create detailed and high-quality introductions on your videos in minutes. Try out the process and features on the software to create more effects and transitions, and play around with other dynamic title design ideas. Filmora has a complete list of title templates that you can also use.
Free Download For macOS 10.14 or later
From the Downloads section of your Mac or Windows-based device in the browser, double-click on the installer. It will ask you to confirm the terms and conditions and press the Install button on the next pop-up prompt. Then will start the overall downloading process of the software into your device, and it will take some seconds, after which Filmora will automatically open to the homepage.
Click on the “Create New Project” button on the homepage, and that will launch the software to the editor window.

2. Add Sample Color
On the main editor window of Filmora, you have to go to the My Media section. From the drop-down list, click on the folder full of Sample Colors. Next, click on the black sample color option and drag it down to the editing timeline. Finally, drop it in the place of the Track 1 section on the timeline.

3. Put the Title tile into the video
After you add the sample color to the timeline, you have to click on the Titles tab from the top main toolbar of Filmora. Out of the options you find here, choose the Default Title. Then, hold it and drag the title template onto the Track 2 section of the editing timeline, and drop it in place.
Then, double-click on it to open the editing panel for the text. You will see a text field where you can update the title wording instead of “Your Title Here”. Then, you have to change the size of this title text to 280. Make sure to adjust the font style to whichever option you prefer, but typically a blocky style works. Click on the Bold icon to change the structure of the title text.
Scroll downward among the text editing parameters until you see the Text Spacing option. Whatever the default value here is placed as, you have to turn it to 10. After that, click on the OK button.

4. Take a Snapshot
After adjusting the size and dimension of the title you added, click on the Snapshot icon to take a screenshot of the Track 2 title clip that has been changed. Then, select both of the clips on Tracks 1 and 2 and remove them from the timeline.
5. Insert the background video
Next, go to the My Media tab again and choose the Project Media option. Right-click on the library section and tap on the Import button. This will open you to the device storage of your computer. From there, please search for the video clip you want to insert into your project as the main video background and import it into Filmora.

Then, when that is available in your media library section, hold it and drag and drop the clip onto the timeline in the Track 1 section.
6. Add the Black and White Effect
Move the playhead forward to the 15-second mark on the added clip in the timeline. Then, tap on the scissor icon to split this clip. Please tap on the excess amount of the video clip and delete it.
Following that, click on the Effects tab on the top toolbar of Filmora. Out of the list of various effects that you will find, tap on the Black and White category and choose the Willow effect. If you cannot find the Willow effect easily, you can directly search for it in the text search field above and select from there.
Then, drag the willow effect to the video clip in the timeline below, keeping a watch on the preview window. The effect will turn the video into its format of Black and White.

7. Add the Screenshot to the Edit
Again, scroll up to the My Media section and tap on the screenshot you created earlier. Then, drag it down onto Track 2 of the editing timeline. Then, use the playback to mark the beginning of the video two frames off of the beginning of the video. Then, move the clip to that position so that it starts from that point onward.
Next, move the playback to the 14-second mark and adjust the Track 3 clip to fit that section perfectly.

8. Use the Chroma Key Effect
Now, double-tap on the Snapshot clip and choose the Video tab. Activate the Chroma Key option and go to the color picker section. Choose the black color from the clip shown on the preview window.

You must now click on the Crop option from the function bar. On the top, you will get the option for Pan and Zoom. Click on it and shorten the visible bright window by dragging it towards the center. Move this cropped rectangle to an all-white position. This will determine the end point of the text to be shown at the starting position of the video.
Move the playhead ahead in the timestamp and again click on the Chroma Key button from the function bar. When it opens, click on the Chroma key option in the editor and change the edge thickness value to a -7 number.
9. Export the Clip
Once done, you need to export this clip. To do so, tap on the Export button at the top of the screen. On the Export page, change the name of the video to the intro title text and go to Settings to see its resolution condition. For the best effect, you should choose the higher bit rate of the file while exporting. After you are done, tap on the Export button.

Once the video gets exported, delete the screenshot clip you took from the timeline.
10. Add the Effect on the Video Clip
Double-click on the background video clip on the timeline to open the text editor window. Tap on the Effects tab in this section and remove the Willow effect from your video.
You must extend the video duration to 20 seconds in the lowermost editing window. After that, import the exported video clip from where you stored it after downloading.

11. Drop the Exported Video Version Next
Following this, you must import the video you exported into the timeline. For this, you have to click on the My Media section and go to Project Media. Then, right-click on the library section here and tap on Import. Choose the file and import it from the location where you saved it.
Then, drag and drop the file back into the timeline. Here, the next step for you is to adjust the playhead position for the new video clip. Move the play head to the 14th second and the 14th frame position to synchronize it with the Track 3 video clip.
Then, double-click on the video, and under the video tab, choose the Chroma Key option. Then, tap on the color picker and choose to add white color from the preview window. After this, select the Edge Thickness parameter on the editor window and increase it to a value of 1.5.

12. Render Preview and Export Final Intro
Once you are done, click on the Render Preview icon to watch how your edited video stands out. If you are unsatisfied with the outcomes, you can easily roll it back and make the changes. Export the file after you see the preview and are fully satisfied with the effect.

Conclusion
Following the steps outlined, you can create detailed and high-quality introductions on your videos in minutes. Try out the process and features on the software to create more effects and transitions, and play around with other dynamic title design ideas. Filmora has a complete list of title templates that you can also use.
Best LUTs for Vlog: A 2024 Overview
Color grading and color correction are essential tools in post-production videos and photos. Many tools can be used for this purpose, such as LUTs. LUTs, or Look Up Tables, are among the most popular color grading and correction tools. It can help to apply a specific color grade or look at your videos and photos.
However, you can choose from different LUT styles if you are a vlogger or a traveler. There are many LUTs vlog options available to choose from, each with a unique look and feel. This article will provide you with different vlog LUTs options that you can try.
- Best LUTs for Vlog to Use in 2024 Editing
- How Has Wondershare Filmora Changed the Dynamics of LUTs in Video Editing?
Part 1: How Can LUTs Help in Vlogging?
If you want to make your vlogs look more professional, try using LUTs. These tables can help you correct the color of your footage easily and quickly while you’re on the go. You can use LUTs for vlogs to fix issues like your clips’ white balance and exposure. Furthermore, many other uses of LUTs for vlogging are discussed below.
Consistency
Consistency is the key when it comes to vlogging. You want your vlog to have a consistent look and feel thorough. With LUTs, you can ensure that the color grading of all your clips is the same. It gives your vlog a cohesive look and makes it stand out from others in the same genre.
Creative Look
Vlog LUTs also allow you to add a unique and creative look to your vlogs. You can set the mood of your vlog by adjusting the colors and tones to match the overall tone of your content. It helps you create a recognizable brand and establish your unique style.
Time-Saving
If you’re short on time, LUTs can help you vlog more efficiently. They save time, allowing you to focus on the storytelling aspect of your vlog. LUTs can also help you to edit your videos and publish them online quickly. It lets you stay on top of trends and maintain an active presence on social media.
Lighting Correction
Sometimes, capturing footage under mixed lighting conditions can be challenging. LUTs can help you to correct this and create a cohesive look for your vlog. You can even use LUTs on mobile editing apps to quickly edit your vlogs to publish them on the go.
Part 2: Best LUTs for Vlog to Use in 2024 Editing
Besides benefits and uses, the real part is to choose the best LUTs for vlogging. With so many LUTs vlog options, choosing a good one takes time and effort. Here are some of the best LUTs that you can use for vlogs.
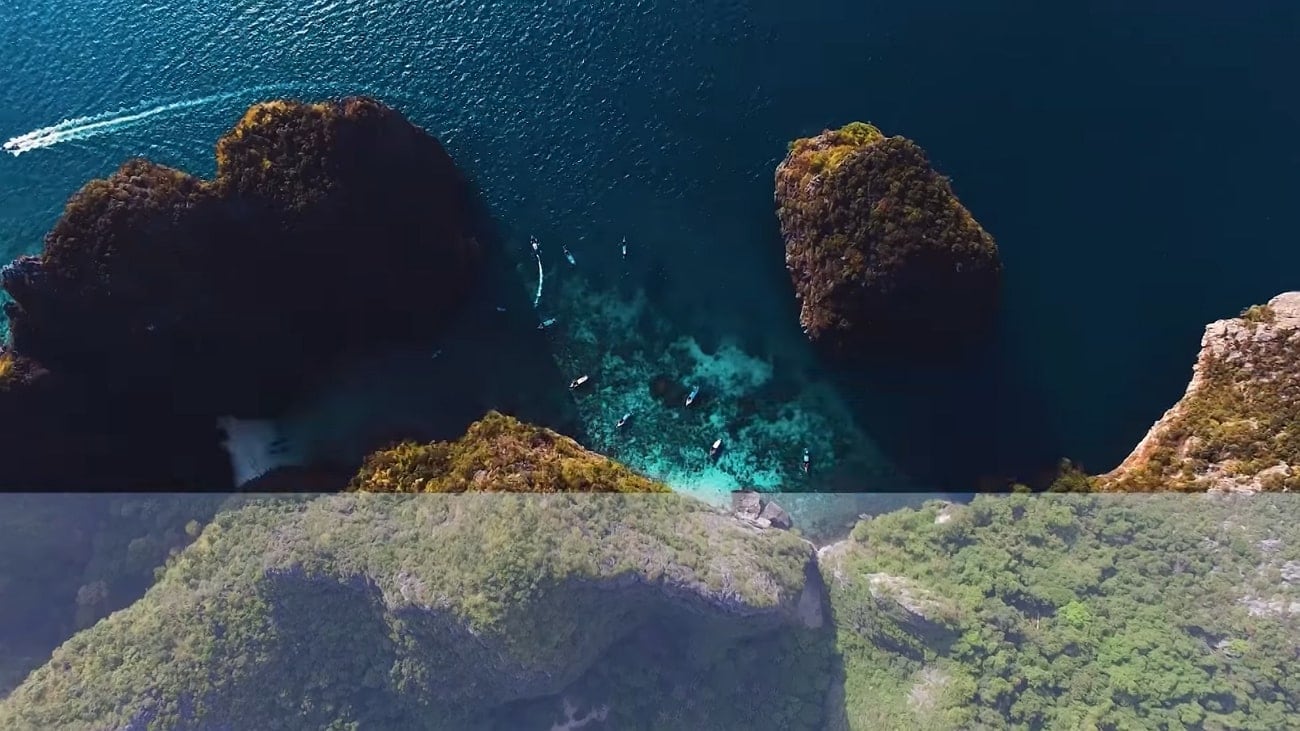
1. Artist Found LUTs Collection
Are you a vlogger looking for a LUT that can help enhance the colors and brightness of your videos? The Artist Found LUTs Collection is a great option. This LUT is perfect for giving your vlogs a professional look that will capture the attention of your viewers. Furthermore, you can make your videos brighter and more vibrant with this LUTs pack.
2. B&W
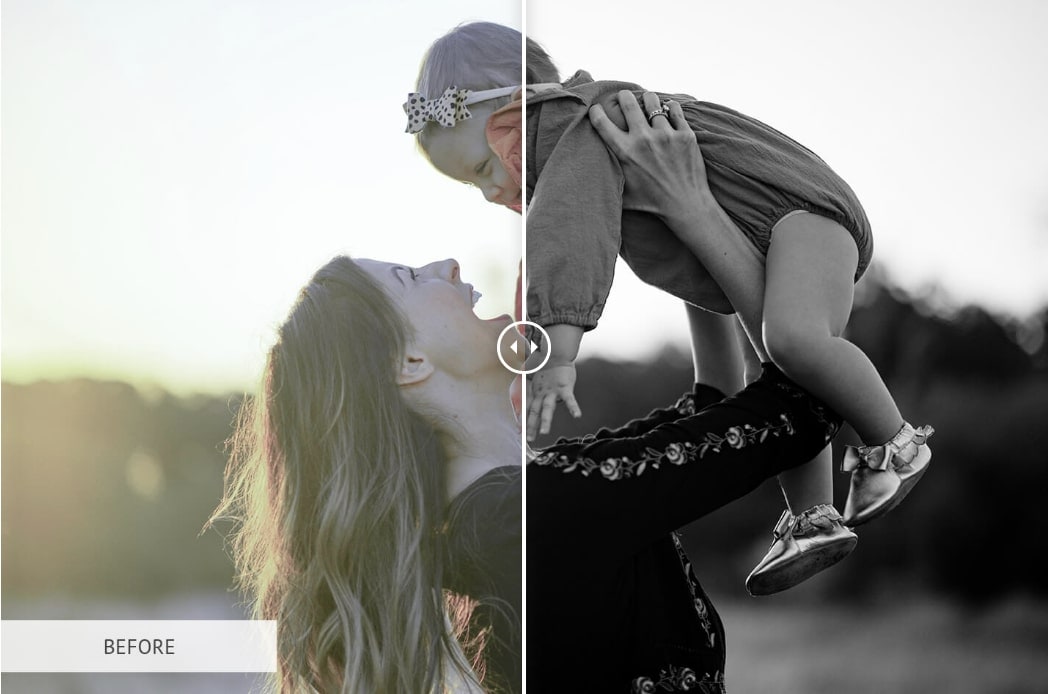
B&W is the best LUT for vlog that can be a great addition to your vlogging toolkit. This LUT allows you to transform your videos into black and white. It gives your vlogs and videos a more serious and dramatic look. You can add a touch of nostalgia and a vintage feel to your videos, giving them an artistic feel. With B&W, you can create a timeless and classic look for your vlogs, making them more memorable and impactful.
3. Travel Video LUTs by Matteo Martignago
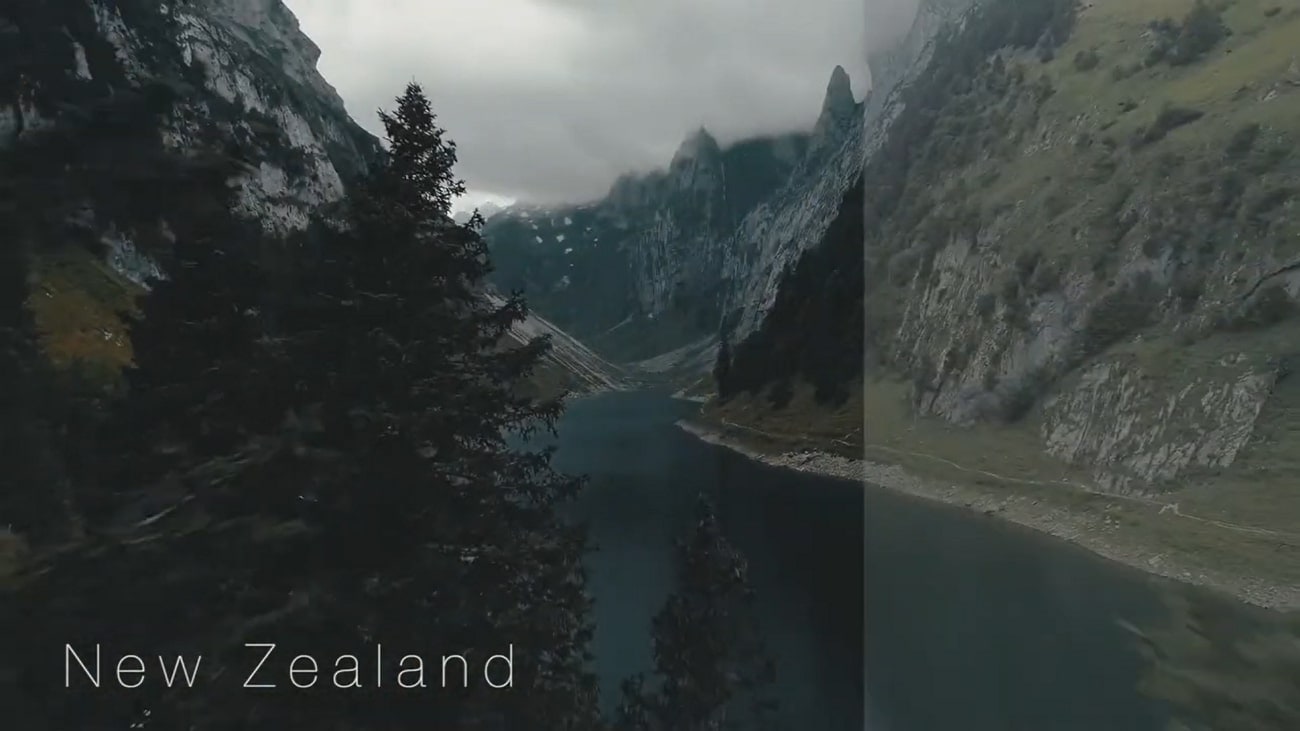
If you’re looking for a LUT to use in your travel vlogs, consider the Travel Video LUTs by Matteo Martignago. In this LUT pack, you’ll find five different LUTs, each with its unique look and feel. Moreover, this pack has warm and cold LUTs, giving you multiple options. The warm LUTs give your videos a cozy feel, while the cold LUTs can create a sense of adventure and excitement.
4. BRIGHT INSTA LUTS
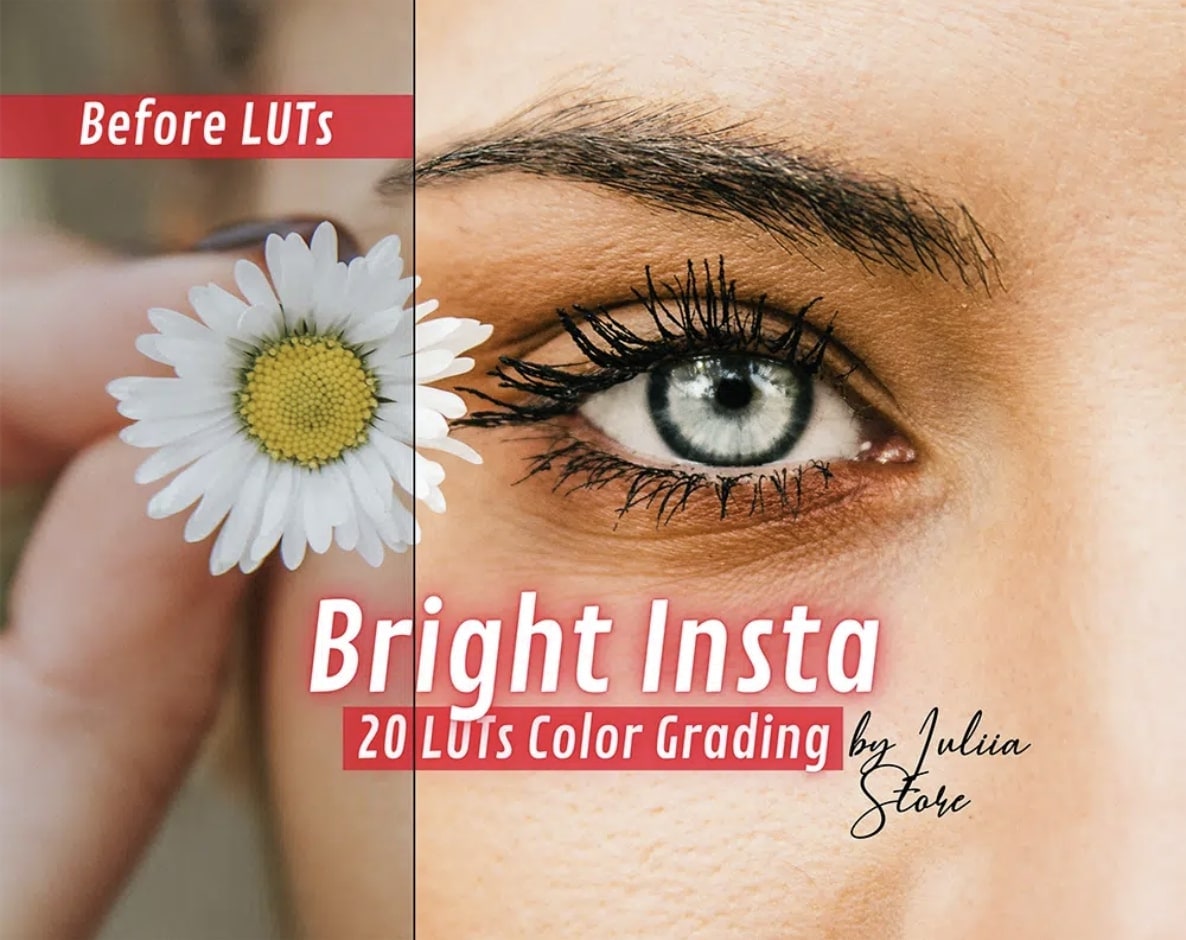
Bright Insta LUTs is the suitable LUT vlog pack for you if you’re a makeup or fashion vlogger. This LUT pack gives your makeup or fashion vlogs a bright and vibrant look. With 20 different LUTs, for instance, you can experiment with various color palettes and find the perfect look for your videos. These LUTs can help you achieve a bright, vibrant, and exposed feel for better fashion and makeup vlogs.
5. Kurt Von Studios Retro Film LUTs
Kurt Von Studios Retro Film LUTs is a great tool for outdoor vloggers who want to add a vintage feel to their videos. It creates a cinematic look with earthy tones and rusty textures that give your content an authentic vintage feel. With this LUT, you can achieve a retro-style feel, adding character to your vlogs and making them more visually appealing.

6. Limit Color
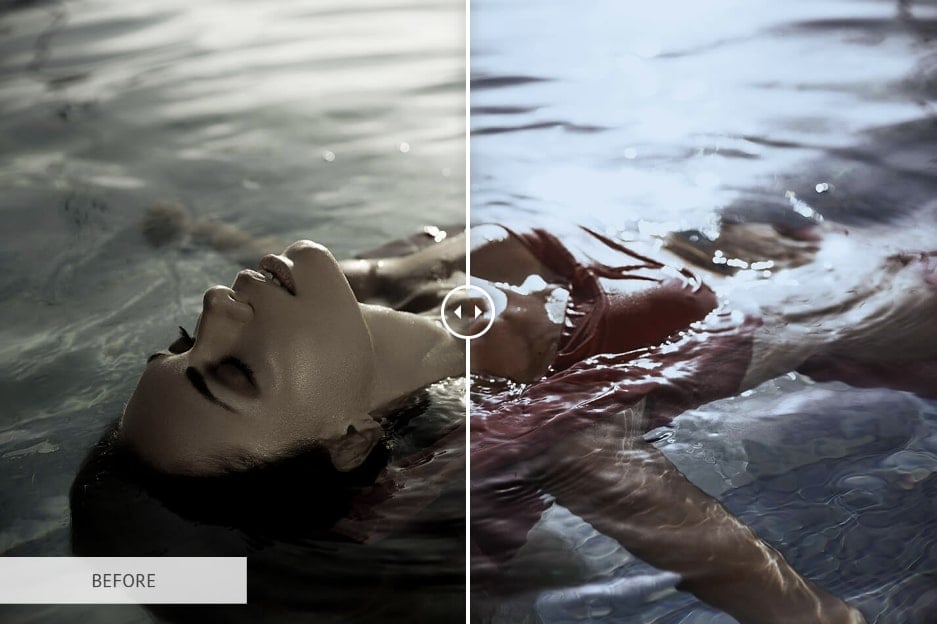
Give your indoor vlogs and podcasts more feel by using Limit Color. This vlog LUT adds an artistic touch to your footage by limiting the color and light in your videos. It creates darker shadows and underexposed colors by focusing on the subject. Similarly, it helps to create a dramatic look that adds emotion to your vlogs and podcasts.
Part 3: How Has Wondershare Filmora Changed the Dynamics of LUTs in Video Editing?
Wondershare Filmora is an excellent video editing software option if you’re a vlogger. The most important element in vlogging is its lighting and color composition. With its latest update, you can use different LUTs to enhance your vlogs. Filmora provides over 200+ LUTs, including many free vlog LUTs, to help you achieve your videos’ desired look and feel.
Apart from LUTs, you can also make color adjustments and corrections to your vlogs. Moreover, you can adjust brightness, contrast, saturation, and hue to create a perfect vlog. If you’re a travel vlogger, you can make certain adjustments to give your vlogs an earthy and warm feel. You can also use different in-built filters and effects to create the perfect ambiance for your travel vlogs.

Key Features
- With this powerful AI video editing tool, you can use its motion tracking feature. This feature tracks the subject in motion so that you can add creative effects to your videos.
- Wondershare Filmora has over 1000 video templates available. You can choose any desired template that suits the style and mood of your vlog.
- This tool provides you with more control with its speed ramping feature. Using this feature, you can increase or decrease the speed of your videos at any point.
Empower your videos with a new mood using different LUTs. Filmora now offers 100+ top-quality 3D LUTs cover a broad range of scenarios. Transform your videos with Filmora’s powerful 3D LUTs.
Apply LUT on Videos Apply LUT on Videos Learn More

Conclusion
To sum up, LUTs are not an option but more of becoming a necessity, especially for vloggers. LUTs not only color-grade your videos but also add depth and perspective to your videos. Your content looks more engaging and interactive with the correct colors and lighting. However, you can use the best LUTs for vlogs even in the Wondershare Filmora tool. This tool lets you create and edit creative vlogs in no time.
Part 1: How Can LUTs Help in Vlogging?
If you want to make your vlogs look more professional, try using LUTs. These tables can help you correct the color of your footage easily and quickly while you’re on the go. You can use LUTs for vlogs to fix issues like your clips’ white balance and exposure. Furthermore, many other uses of LUTs for vlogging are discussed below.
Consistency
Consistency is the key when it comes to vlogging. You want your vlog to have a consistent look and feel thorough. With LUTs, you can ensure that the color grading of all your clips is the same. It gives your vlog a cohesive look and makes it stand out from others in the same genre.
Creative Look
Vlog LUTs also allow you to add a unique and creative look to your vlogs. You can set the mood of your vlog by adjusting the colors and tones to match the overall tone of your content. It helps you create a recognizable brand and establish your unique style.
Time-Saving
If you’re short on time, LUTs can help you vlog more efficiently. They save time, allowing you to focus on the storytelling aspect of your vlog. LUTs can also help you to edit your videos and publish them online quickly. It lets you stay on top of trends and maintain an active presence on social media.
Lighting Correction
Sometimes, capturing footage under mixed lighting conditions can be challenging. LUTs can help you to correct this and create a cohesive look for your vlog. You can even use LUTs on mobile editing apps to quickly edit your vlogs to publish them on the go.
Part 2: Best LUTs for Vlog to Use in 2024 Editing
Besides benefits and uses, the real part is to choose the best LUTs for vlogging. With so many LUTs vlog options, choosing a good one takes time and effort. Here are some of the best LUTs that you can use for vlogs.
1. Artist Found LUTs Collection
Are you a vlogger looking for a LUT that can help enhance the colors and brightness of your videos? The Artist Found LUTs Collection is a great option. This LUT is perfect for giving your vlogs a professional look that will capture the attention of your viewers. Furthermore, you can make your videos brighter and more vibrant with this LUTs pack.

2. B&W
B&W is the best LUT for vlog that can be a great addition to your vlogging toolkit. This LUT allows you to transform your videos into black and white. It gives your vlogs and videos a more serious and dramatic look. You can add a touch of nostalgia and a vintage feel to your videos, giving them an artistic feel. With B&W, you can create a timeless and classic look for your vlogs, making them more memorable and impactful.

3. Travel Video LUTs by Matteo Martignago
If you’re looking for a LUT to use in your travel vlogs, consider the Travel Video LUTs by Matteo Martignago. In this LUT pack, you’ll find five different LUTs, each with its unique look and feel. Moreover, this pack has warm and cold LUTs, giving you multiple options. The warm LUTs give your videos a cozy feel, while the cold LUTs can create a sense of adventure and excitement.

4. BRIGHT INSTA LUTS
Bright Insta LUTs is the suitable LUT vlog pack for you if you’re a makeup or fashion vlogger. This LUT pack gives your makeup or fashion vlogs a bright and vibrant look. With 20 different LUTs, for instance, you can experiment with various color palettes and find the perfect look for your videos. These LUTs can help you achieve a bright, vibrant, and exposed feel for better fashion and makeup vlogs.

5. Kurt Von Studios Retro Film LUTs
Kurt Von Studios Retro Film LUTs is a great tool for outdoor vloggers who want to add a vintage feel to their videos. It creates a cinematic look with earthy tones and rusty textures that give your content an authentic vintage feel. With this LUT, you can achieve a retro-style feel, adding character to your vlogs and making them more visually appealing.

6. Limit Color
Give your indoor vlogs and podcasts more feel by using Limit Color. This vlog LUT adds an artistic touch to your footage by limiting the color and light in your videos. It creates darker shadows and underexposed colors by focusing on the subject. Similarly, it helps to create a dramatic look that adds emotion to your vlogs and podcasts.

Part 3: How Has Wondershare Filmora Changed the Dynamics of LUTs in Video Editing?
Wondershare Filmora is an excellent video editing software option if you’re a vlogger. The most important element in vlogging is its lighting and color composition. With its latest update, you can use different LUTs to enhance your vlogs. Filmora provides over 200+ LUTs, including many free vlog LUTs, to help you achieve your videos’ desired look and feel.
Apart from LUTs, you can also make color adjustments and corrections to your vlogs. Moreover, you can adjust brightness, contrast, saturation, and hue to create a perfect vlog. If you’re a travel vlogger, you can make certain adjustments to give your vlogs an earthy and warm feel. You can also use different in-built filters and effects to create the perfect ambiance for your travel vlogs.

Key Features
- With this powerful AI video editing tool, you can use its motion tracking feature. This feature tracks the subject in motion so that you can add creative effects to your videos.
- Wondershare Filmora has over 1000 video templates available. You can choose any desired template that suits the style and mood of your vlog.
- This tool provides you with more control with its speed ramping feature. Using this feature, you can increase or decrease the speed of your videos at any point.
Empower your videos with a new mood using different LUTs. Filmora now offers 100+ top-quality 3D LUTs cover a broad range of scenarios. Transform your videos with Filmora’s powerful 3D LUTs.
Apply LUT on Videos Apply LUT on Videos Learn More

Conclusion
To sum up, LUTs are not an option but more of becoming a necessity, especially for vloggers. LUTs not only color-grade your videos but also add depth and perspective to your videos. Your content looks more engaging and interactive with the correct colors and lighting. However, you can use the best LUTs for vlogs even in the Wondershare Filmora tool. This tool lets you create and edit creative vlogs in no time.
Also read:
- [New] 2024 Approved SoundSnatcher Free Guide & Assessment
- [Updated] Navigating the Nuances of Nonlinear Audio Editing in Audacity
- BitRaser Pro: Comprehensive Tutorial on Secure Data Destruction via Video
- Effortless Solutions to Your Apex Legends Startup Woes!
- Expert Tips on Repairing Malfunctioning Computer Audio Systems
- How To Fix Auto Lock Greyed Out on iPhone 12 Pro
- In 2024, Apple ID Locked for Security Reasons On iPhone 14 Pro? Find the Best Solution Here
- In 2024, The Ultimate Guide How to Bypass Swipe Screen to Unlock on Nokia C110 Device
- In 2024, Unova Stone Pokémon Go Evolution List and How Catch Them For Honor 100 Pro | Dr.fone
- The New Frontier of Personal Health: The Amazon Halo's Revolutionary Design and Functionality
- Unpacking the Mini-Powerhouse: In-Depth Analysis of the 3Rd Gen Amazon Echo Dot's Alexa Capabilities
- Title: Updated How To Make Ninja Jump Effect with Filmora
- Author: Chloe
- Created at : 2025-01-18 19:37:49
- Updated at : 2025-01-23 17:48:01
- Link: https://ai-editing-video.techidaily.com/updated-how-to-make-ninja-jump-effect-with-filmora/
- License: This work is licensed under CC BY-NC-SA 4.0.

