:max_bytes(150000):strip_icc():format(webp)/GettyImages-1139232374-700d343900854115ad26acf3f1dd80b3.jpg)
Updated How to Make Video Slow Motion? Complete Guide

How to Make Video Slow Motion? [Complete Guide]
Slow-motion videos are in trend now, especially when shooting for Instagram Reels , TikTok videos, or YouTube Shorts . While many users record the entire video in slow motion, there are others who need only a particular section of a clip to play at a reduced speed. Nevertheless, slowing down footage is no longer rocket science, thanks to the advancements in technology, and the availability and ease of access to relevant apps.
That said, here you will learn what is needed to record a video in slow motion, and how to get the job done in a simple way. In addition, you will also learn how to reduce the playback speed of an already existing video if it was recorded at a normal pace.
In this article
01 How to Make Slow Motion Videos via Recording?
02 How to Apply the Smooth Slow-Motion Effect in Post-Production?
Part 1: How to Make Slow Motion Videos via Recording?
The fact is, the playback speed of a video is inversely proportional to the frames per second (FPS) it has been recorded in. Usually, to have a video play at normal speed, it is recorded at 24 FPS or 30 FPS. On the other hand, if you increase the frame rate (FPS) to 120 or 240, the playback speed slows down. You can easily check this if you have access to a DSLR camera or an iPhone. These devices allow you to adjust the FPS so the videos can be recorded in slow motion.
For your convenience and learning, the step-by-step procedure on how to record a video in slow motion using an iPhone is explained below:
Step 1: Get to the SLO-MO Mode
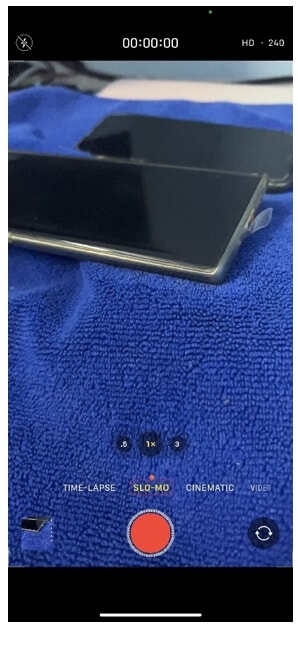
Launch the Camera app on your iPhone (iPhone 13 Pro Max is used here for illustrations), and swipe the screen to the left to get to the SLO-MO mode.
Step 2: Adjust Recording Preferences
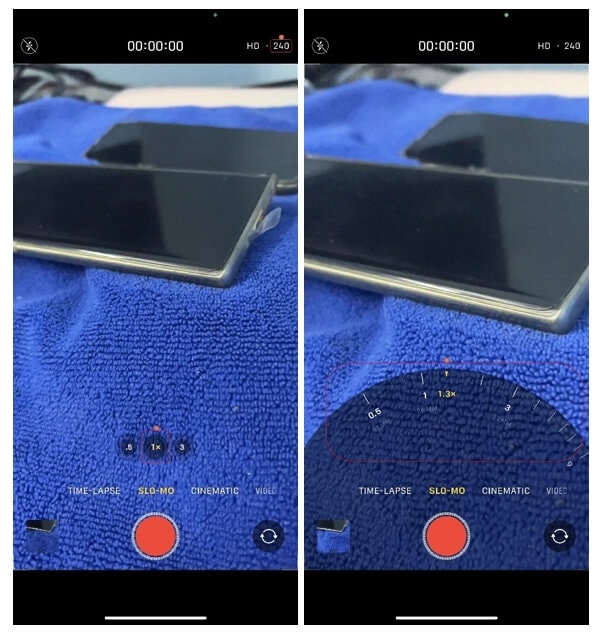
Tap the number at the top-right corner to switch between 120 FPS and 240 FPS as needed. Tap 1x from the lower-middle section of the screen, and use the rotator to adjust your preferred zoom level.
Step 3: Start and Stop Recording
Tap the Record button from the bottom-center of the screen to begin recording the video in slow motion. Tap Stop when you are done. You can access the recorded video from the Videos container of the Photos app in your iPhone.
If you are using Android phone, you can check this article to find out more details about How to Record Super Slow Motion Videos on Your Phone.
You may also like: Best Slo-mo Camera Apps for Android And iPhone
Part 2: How to Apply the Smooth Slow-Motion Effect in Post-Production?
If you don’t have access to a camera that can record videos in slow motion, or in case you want to capture the footage at normal playback speed and then slow it down later, you need a dedicated tool to get the job done. Even though several post-production applications are available in the market, the one that is most versatile, has an intuitive interface, and is quite easy to use is Filmora video editor from Wondershare .
The latest version of the app, i.e., Wondershare Filmora 11 has a new feature called Speed Ramping that enables you to graphically manage the speed of the clips. While using the feature, you can either slow down the entire video or certain parts of it according to your requirements. For your learning, both the methods are explained below:
Method 1: Add Slow Motion Effect to the Whole Clip
For Win 7 or later (64-bit)
For macOS 10.12 or later
Step 1: Import the Source Video and Add to Timeline
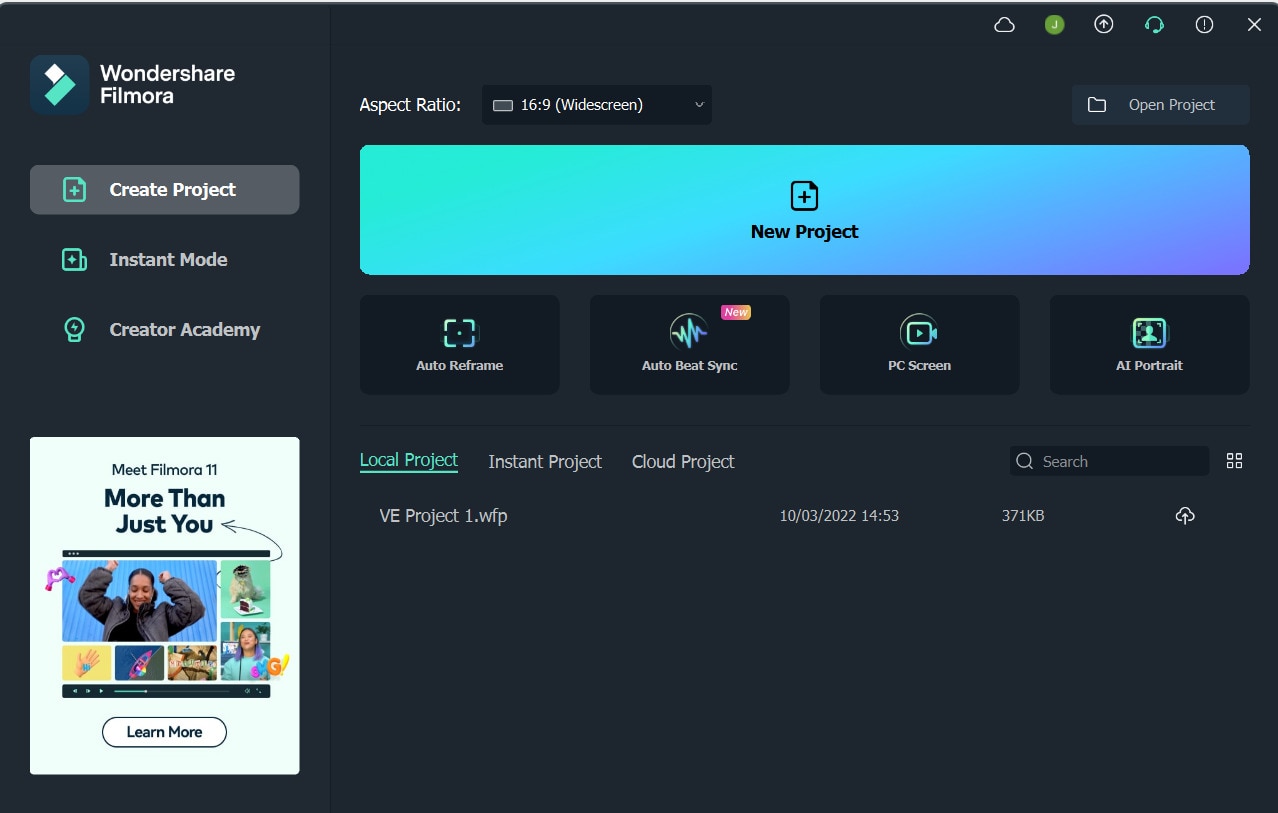
Launch Wondershare Filmora on your Windows or Mac computer (a Windows 11 PC is used here for illustrations), click New Project from the first screen that appears. Make sure that the Media tool is selected from the standard tool bar at the top, click anywhere inside the Media window, and select and import the source clip to the program.
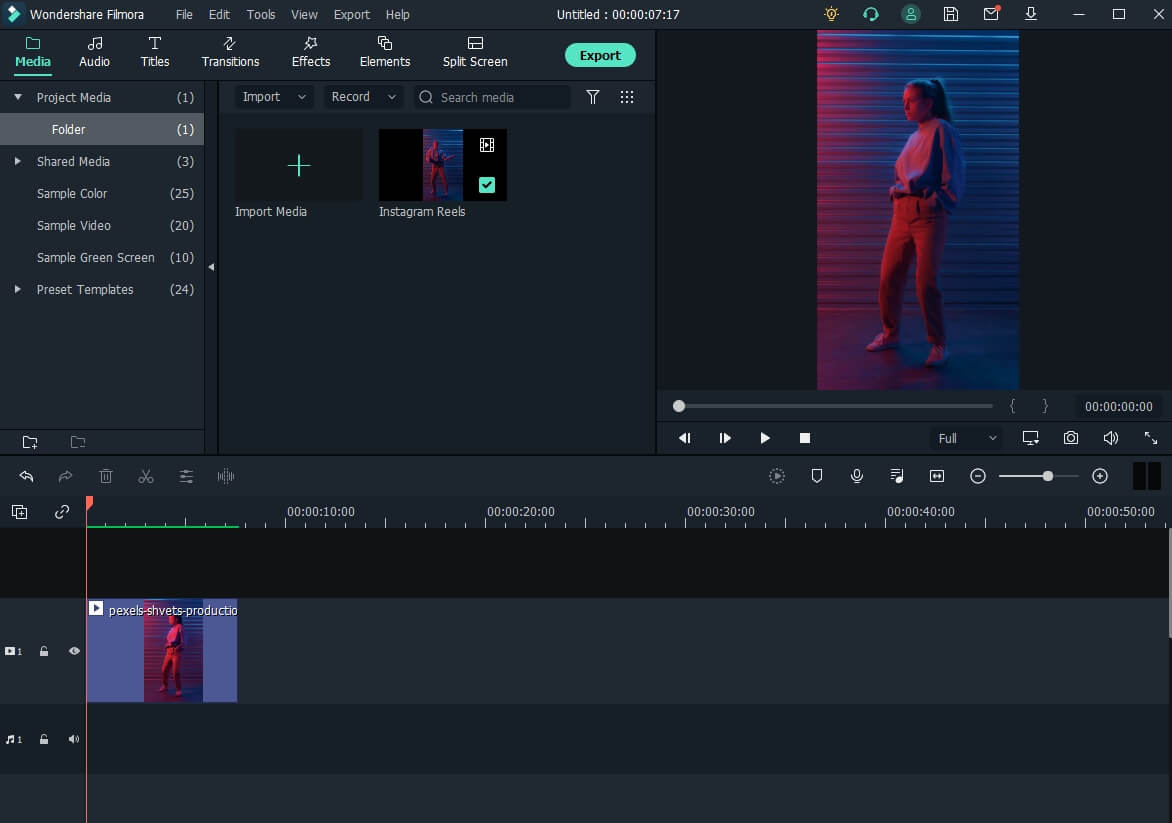
Next, hover the mouse over the thumbnail of the imported video in the Media window, and click the + icon present at its bottom-right corner. When the confirmation box comes up, click the Match to Media or Keep Project Settings button to change the project settings to match the resolution of the video, or change the footage to meet the project settings respectively.
Step 2: Add Slow Motion Effect to the Whole Clip
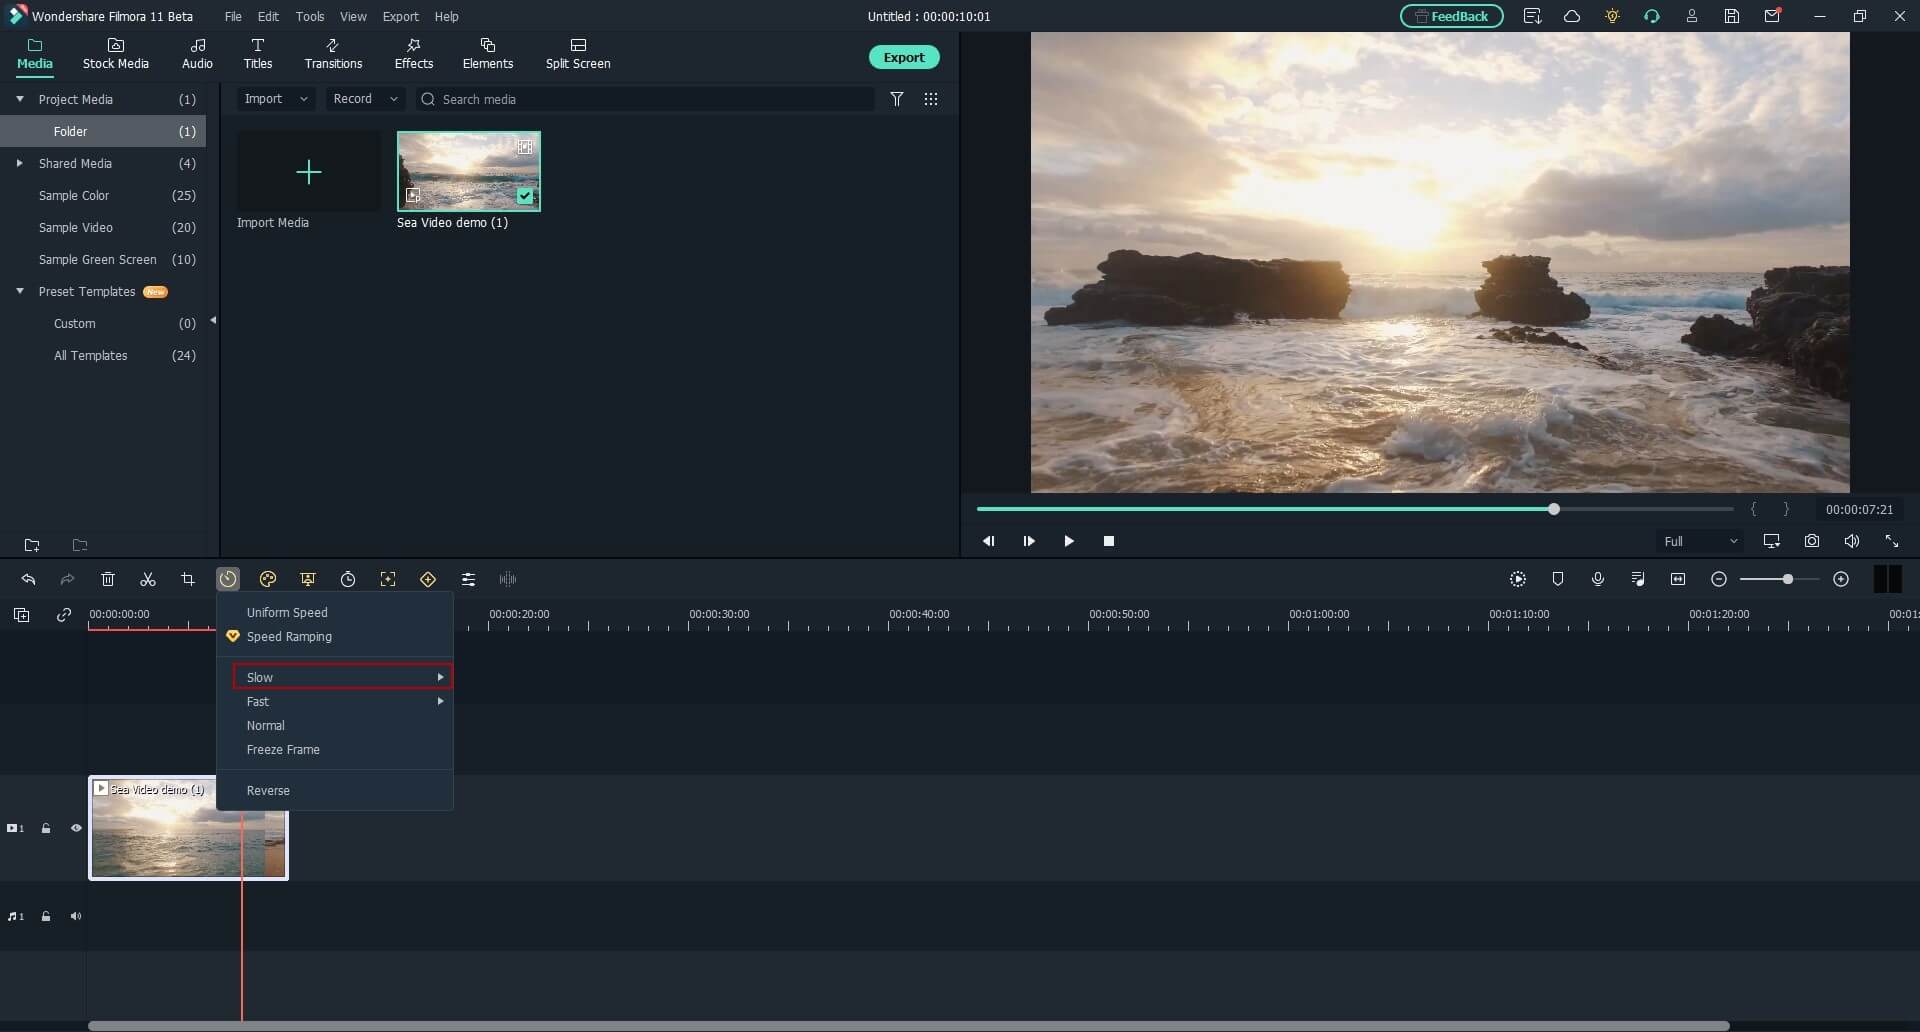
Once the media is added to the timeline, click on it and then click the Speed icon on the toolbar. Scroll down to the Slow menu and then you will see 0.5x, 0.25x, 0.1x, 0.05x and 0.01x presets. Select one to add slo-mo effects to the whole select clip. and click Speed Ramping from the menu that drops down.
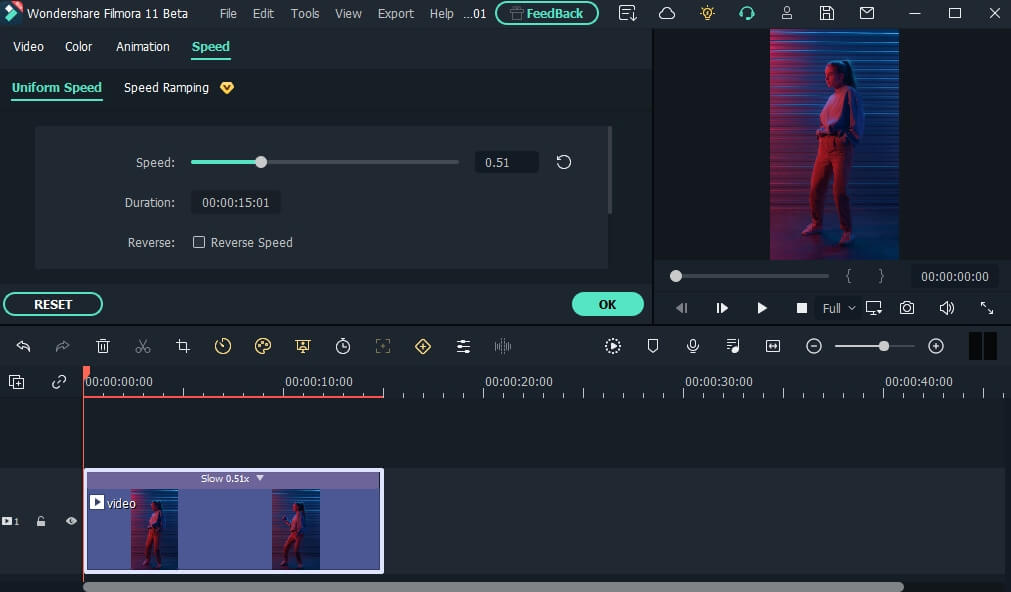
You can also right click the video in the timeline, and hover over to Speed option to select Uniform Speed to adjust the speed of the video to make a slo-mo effect video. Drag the speed slider to the left to slow down the video and you will see how many times it slowed down in the next field.
Method 2: Use Speed Ramping to Add Slow Motion Effect
For Win 7 or later (64-bit)
For macOS 10.12 or later
Speed Ramping enables you to add the slow-motion effect at different parts of a video and even freeze the screen for the duration that you specify. The processes to get these done are given below in detail:
Step 1: Add Source Video to Timeline and Get to the Speed Ramping Window
Use the process given in the previous method to import a source video to Wondershare Filmora 11 and add it to the Timeline. Then use the process given in the second step of the previous method to get to the Speed Ramping window.
Step 2: Add Slow Motion Effect to Different Parts of the Clip
Go to the Speed Ramping tab if it is not already selected, click Custom from the available options, and drag the adjustment points below the center line to reduce the playback speed for that particular section of the clip. Optionally, you can click any of the available presets to automatically add the slow-motion effect to the video.
Note: You can also drag the adjustment points above the line to increase the playback speed.
To add an adjustment point on the frame where it is not already present, place the playhead (skimmer) at the correct position, and click Add Adjust Point from the left of the Speed Ramping window itself. Once added, you can drag it downward to reduce the playback speed of that part of the clip.

Step 3: Freeze the Video
Place the skimmer on the frame where you want to freeze the video for a while, and click Add Freeze Frame from the left of the Speed Ramping window. When the time box appears, in the Freeze Time field, enter the duration in seconds you want to freeze the screen for, and click OK.
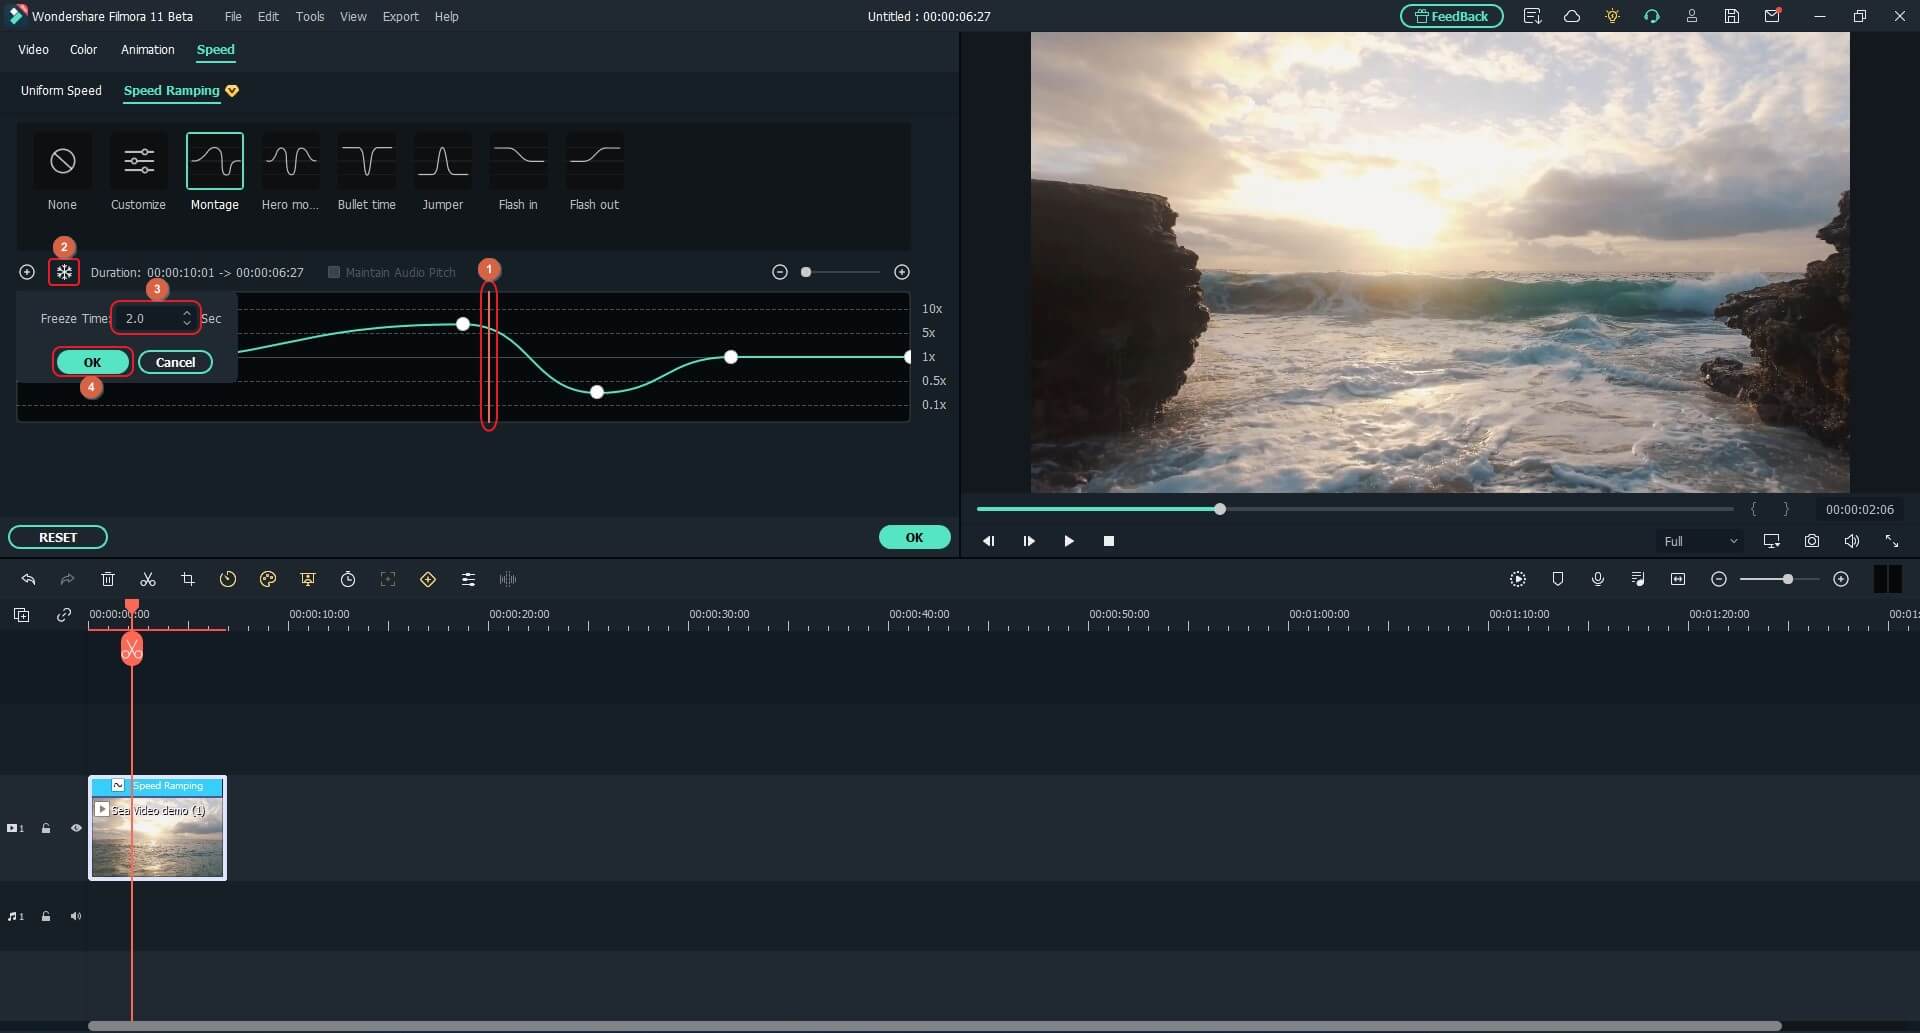
After adding a freeze point, optionally, you can drag and reposition it in the Speed Ramping timeline as needed. Finally, click OK from the bottom-right area to save the changes.
Part 3: When to Use Slow Motion?
There could be many instances when you want to add a slow-motion effect to your videos. Some of the most common ones include:
- Add Focus
If there is a particular scene in a clip that you want the audience to focus on, it would be a good idea to add the slow-motion effect right before that action appears on the screen, and bring the speed back to normal when the section is over.
- Skill or Style Demonstration
When a clip is playing at a normal speed, many times, the audience isn’t able to see the skills that you want to display. This is where you may want to add the slow-motion effect so that every detail can be noticed clearly and in detail.
- Replays
Mostly used for tournaments and matches where the actual action is to replayed so the audience, umpires, and other viewers can see the movements in detail before making the right decision.
- Observation
Some natural phenomena such as a deer running in the woods, a balloon full of water bursting, etc. occur quite quickly. If you want to witness such things clearly and in detail, it would be good to record them, and then reduce the playback speed for better viewing.
- Add Suspense
When you add the slow-motion effect to a scene, the impulse of the audience is automatically increased, and they take that particular section more seriously and with a thrill.
Conclusion
The slow-motion effect is inversely proportional to the framerate, i.e., frames per second or FPS. Almost all DSLR cameras that are available nowadays allow you to switch between different FPS values (typically 120 and 240) before recording. Also, if you have access to an iPhone, its Camera app has a built-in SLO-MO mode that can capture the footage in slow motion.
In addition, if you already have a video that has been recorded at a normal speed, you can use an efficient post-production software like Wondershare Filmora 11, and exploit its Speed Ramping feature to add the slow-motion effect at different scenes of a clip.
02 How to Apply the Smooth Slow-Motion Effect in Post-Production?
Part 1: How to Make Slow Motion Videos via Recording?
The fact is, the playback speed of a video is inversely proportional to the frames per second (FPS) it has been recorded in. Usually, to have a video play at normal speed, it is recorded at 24 FPS or 30 FPS. On the other hand, if you increase the frame rate (FPS) to 120 or 240, the playback speed slows down. You can easily check this if you have access to a DSLR camera or an iPhone. These devices allow you to adjust the FPS so the videos can be recorded in slow motion.
For your convenience and learning, the step-by-step procedure on how to record a video in slow motion using an iPhone is explained below:
Step 1: Get to the SLO-MO Mode
Launch the Camera app on your iPhone (iPhone 13 Pro Max is used here for illustrations), and swipe the screen to the left to get to the SLO-MO mode.

Step 2: Adjust Recording Preferences
Tap the number at the top-right corner to switch between 120 FPS and 240 FPS as needed. Tap 1x from the lower-middle section of the screen, and use the rotator to adjust your preferred zoom level.

Step 3: Start and Stop Recording
Tap the Record button from the bottom-center of the screen to begin recording the video in slow motion. Tap Stop when you are done. You can access the recorded video from the Videos container of the Photos app in your iPhone.
If you are using Android phone, you can check this article to find out more details about How to Record Super Slow Motion Videos on Your Phone.
You may also like: Best Slo-mo Camera Apps for Android And iPhone
Part 2: How to Apply the Smooth Slow-Motion Effect in Post-Production?
If you don’t have access to a camera that can record videos in slow motion, or in case you want to capture the footage at normal playback speed and then slow it down later, you need a dedicated tool to get the job done. Even though several post-production applications are available in the market, the one that is most versatile, has an intuitive interface, and is quite easy to use is Filmora video editor from Wondershare .
The latest version of the app, i.e., Wondershare Filmora 11 has a new feature called Speed Ramping that enables you to graphically manage the speed of the clips. While using the feature, you can either slow down the entire video or certain parts of it according to your requirements. For your learning, both the methods are explained below:
Method 1: Add Slow Motion Effect to the Whole Clip
For Win 7 or later (64-bit)
For macOS 10.12 or later
Step 1: Import the Source Video and Add to Timeline
Launch Wondershare Filmora on your Windows or Mac computer (a Windows 11 PC is used here for illustrations), click New Project from the first screen that appears. Make sure that the Media tool is selected from the standard tool bar at the top, click anywhere inside the Media window, and select and import the source clip to the program.

Next, hover the mouse over the thumbnail of the imported video in the Media window, and click the + icon present at its bottom-right corner. When the confirmation box comes up, click the Match to Media or Keep Project Settings button to change the project settings to match the resolution of the video, or change the footage to meet the project settings respectively.

Step 2: Add Slow Motion Effect to the Whole Clip
Once the media is added to the timeline, click on it and then click the Speed icon on the toolbar. Scroll down to the Slow menu and then you will see 0.5x, 0.25x, 0.1x, 0.05x and 0.01x presets. Select one to add slo-mo effects to the whole select clip. and click Speed Ramping from the menu that drops down.

You can also right click the video in the timeline, and hover over to Speed option to select Uniform Speed to adjust the speed of the video to make a slo-mo effect video. Drag the speed slider to the left to slow down the video and you will see how many times it slowed down in the next field.

Method 2: Use Speed Ramping to Add Slow Motion Effect
For Win 7 or later (64-bit)
For macOS 10.12 or later
Speed Ramping enables you to add the slow-motion effect at different parts of a video and even freeze the screen for the duration that you specify. The processes to get these done are given below in detail:
Step 1: Add Source Video to Timeline and Get to the Speed Ramping Window
Use the process given in the previous method to import a source video to Wondershare Filmora 11 and add it to the Timeline. Then use the process given in the second step of the previous method to get to the Speed Ramping window.
Step 2: Add Slow Motion Effect to Different Parts of the Clip
Go to the Speed Ramping tab if it is not already selected, click Custom from the available options, and drag the adjustment points below the center line to reduce the playback speed for that particular section of the clip. Optionally, you can click any of the available presets to automatically add the slow-motion effect to the video.
Note: You can also drag the adjustment points above the line to increase the playback speed.
To add an adjustment point on the frame where it is not already present, place the playhead (skimmer) at the correct position, and click Add Adjust Point from the left of the Speed Ramping window itself. Once added, you can drag it downward to reduce the playback speed of that part of the clip.

Step 3: Freeze the Video
Place the skimmer on the frame where you want to freeze the video for a while, and click Add Freeze Frame from the left of the Speed Ramping window. When the time box appears, in the Freeze Time field, enter the duration in seconds you want to freeze the screen for, and click OK.

After adding a freeze point, optionally, you can drag and reposition it in the Speed Ramping timeline as needed. Finally, click OK from the bottom-right area to save the changes.
Part 3: When to Use Slow Motion?
There could be many instances when you want to add a slow-motion effect to your videos. Some of the most common ones include:
- Add Focus
If there is a particular scene in a clip that you want the audience to focus on, it would be a good idea to add the slow-motion effect right before that action appears on the screen, and bring the speed back to normal when the section is over.
- Skill or Style Demonstration
When a clip is playing at a normal speed, many times, the audience isn’t able to see the skills that you want to display. This is where you may want to add the slow-motion effect so that every detail can be noticed clearly and in detail.
- Replays
Mostly used for tournaments and matches where the actual action is to replayed so the audience, umpires, and other viewers can see the movements in detail before making the right decision.
- Observation
Some natural phenomena such as a deer running in the woods, a balloon full of water bursting, etc. occur quite quickly. If you want to witness such things clearly and in detail, it would be good to record them, and then reduce the playback speed for better viewing.
- Add Suspense
When you add the slow-motion effect to a scene, the impulse of the audience is automatically increased, and they take that particular section more seriously and with a thrill.
Conclusion
The slow-motion effect is inversely proportional to the framerate, i.e., frames per second or FPS. Almost all DSLR cameras that are available nowadays allow you to switch between different FPS values (typically 120 and 240) before recording. Also, if you have access to an iPhone, its Camera app has a built-in SLO-MO mode that can capture the footage in slow motion.
In addition, if you already have a video that has been recorded at a normal speed, you can use an efficient post-production software like Wondershare Filmora 11, and exploit its Speed Ramping feature to add the slow-motion effect at different scenes of a clip.
02 How to Apply the Smooth Slow-Motion Effect in Post-Production?
Part 1: How to Make Slow Motion Videos via Recording?
The fact is, the playback speed of a video is inversely proportional to the frames per second (FPS) it has been recorded in. Usually, to have a video play at normal speed, it is recorded at 24 FPS or 30 FPS. On the other hand, if you increase the frame rate (FPS) to 120 or 240, the playback speed slows down. You can easily check this if you have access to a DSLR camera or an iPhone. These devices allow you to adjust the FPS so the videos can be recorded in slow motion.
For your convenience and learning, the step-by-step procedure on how to record a video in slow motion using an iPhone is explained below:
Step 1: Get to the SLO-MO Mode
Launch the Camera app on your iPhone (iPhone 13 Pro Max is used here for illustrations), and swipe the screen to the left to get to the SLO-MO mode.

Step 2: Adjust Recording Preferences
Tap the number at the top-right corner to switch between 120 FPS and 240 FPS as needed. Tap 1x from the lower-middle section of the screen, and use the rotator to adjust your preferred zoom level.

Step 3: Start and Stop Recording
Tap the Record button from the bottom-center of the screen to begin recording the video in slow motion. Tap Stop when you are done. You can access the recorded video from the Videos container of the Photos app in your iPhone.
If you are using Android phone, you can check this article to find out more details about How to Record Super Slow Motion Videos on Your Phone.
You may also like: Best Slo-mo Camera Apps for Android And iPhone
Part 2: How to Apply the Smooth Slow-Motion Effect in Post-Production?
If you don’t have access to a camera that can record videos in slow motion, or in case you want to capture the footage at normal playback speed and then slow it down later, you need a dedicated tool to get the job done. Even though several post-production applications are available in the market, the one that is most versatile, has an intuitive interface, and is quite easy to use is Filmora video editor from Wondershare .
The latest version of the app, i.e., Wondershare Filmora 11 has a new feature called Speed Ramping that enables you to graphically manage the speed of the clips. While using the feature, you can either slow down the entire video or certain parts of it according to your requirements. For your learning, both the methods are explained below:
Method 1: Add Slow Motion Effect to the Whole Clip
For Win 7 or later (64-bit)
For macOS 10.12 or later
Step 1: Import the Source Video and Add to Timeline
Launch Wondershare Filmora on your Windows or Mac computer (a Windows 11 PC is used here for illustrations), click New Project from the first screen that appears. Make sure that the Media tool is selected from the standard tool bar at the top, click anywhere inside the Media window, and select and import the source clip to the program.

Next, hover the mouse over the thumbnail of the imported video in the Media window, and click the + icon present at its bottom-right corner. When the confirmation box comes up, click the Match to Media or Keep Project Settings button to change the project settings to match the resolution of the video, or change the footage to meet the project settings respectively.

Step 2: Add Slow Motion Effect to the Whole Clip
Once the media is added to the timeline, click on it and then click the Speed icon on the toolbar. Scroll down to the Slow menu and then you will see 0.5x, 0.25x, 0.1x, 0.05x and 0.01x presets. Select one to add slo-mo effects to the whole select clip. and click Speed Ramping from the menu that drops down.

You can also right click the video in the timeline, and hover over to Speed option to select Uniform Speed to adjust the speed of the video to make a slo-mo effect video. Drag the speed slider to the left to slow down the video and you will see how many times it slowed down in the next field.

Method 2: Use Speed Ramping to Add Slow Motion Effect
For Win 7 or later (64-bit)
For macOS 10.12 or later
Speed Ramping enables you to add the slow-motion effect at different parts of a video and even freeze the screen for the duration that you specify. The processes to get these done are given below in detail:
Step 1: Add Source Video to Timeline and Get to the Speed Ramping Window
Use the process given in the previous method to import a source video to Wondershare Filmora 11 and add it to the Timeline. Then use the process given in the second step of the previous method to get to the Speed Ramping window.
Step 2: Add Slow Motion Effect to Different Parts of the Clip
Go to the Speed Ramping tab if it is not already selected, click Custom from the available options, and drag the adjustment points below the center line to reduce the playback speed for that particular section of the clip. Optionally, you can click any of the available presets to automatically add the slow-motion effect to the video.
Note: You can also drag the adjustment points above the line to increase the playback speed.
To add an adjustment point on the frame where it is not already present, place the playhead (skimmer) at the correct position, and click Add Adjust Point from the left of the Speed Ramping window itself. Once added, you can drag it downward to reduce the playback speed of that part of the clip.

Step 3: Freeze the Video
Place the skimmer on the frame where you want to freeze the video for a while, and click Add Freeze Frame from the left of the Speed Ramping window. When the time box appears, in the Freeze Time field, enter the duration in seconds you want to freeze the screen for, and click OK.

After adding a freeze point, optionally, you can drag and reposition it in the Speed Ramping timeline as needed. Finally, click OK from the bottom-right area to save the changes.
Part 3: When to Use Slow Motion?
There could be many instances when you want to add a slow-motion effect to your videos. Some of the most common ones include:
- Add Focus
If there is a particular scene in a clip that you want the audience to focus on, it would be a good idea to add the slow-motion effect right before that action appears on the screen, and bring the speed back to normal when the section is over.
- Skill or Style Demonstration
When a clip is playing at a normal speed, many times, the audience isn’t able to see the skills that you want to display. This is where you may want to add the slow-motion effect so that every detail can be noticed clearly and in detail.
- Replays
Mostly used for tournaments and matches where the actual action is to replayed so the audience, umpires, and other viewers can see the movements in detail before making the right decision.
- Observation
Some natural phenomena such as a deer running in the woods, a balloon full of water bursting, etc. occur quite quickly. If you want to witness such things clearly and in detail, it would be good to record them, and then reduce the playback speed for better viewing.
- Add Suspense
When you add the slow-motion effect to a scene, the impulse of the audience is automatically increased, and they take that particular section more seriously and with a thrill.
Conclusion
The slow-motion effect is inversely proportional to the framerate, i.e., frames per second or FPS. Almost all DSLR cameras that are available nowadays allow you to switch between different FPS values (typically 120 and 240) before recording. Also, if you have access to an iPhone, its Camera app has a built-in SLO-MO mode that can capture the footage in slow motion.
In addition, if you already have a video that has been recorded at a normal speed, you can use an efficient post-production software like Wondershare Filmora 11, and exploit its Speed Ramping feature to add the slow-motion effect at different scenes of a clip.
02 How to Apply the Smooth Slow-Motion Effect in Post-Production?
Part 1: How to Make Slow Motion Videos via Recording?
The fact is, the playback speed of a video is inversely proportional to the frames per second (FPS) it has been recorded in. Usually, to have a video play at normal speed, it is recorded at 24 FPS or 30 FPS. On the other hand, if you increase the frame rate (FPS) to 120 or 240, the playback speed slows down. You can easily check this if you have access to a DSLR camera or an iPhone. These devices allow you to adjust the FPS so the videos can be recorded in slow motion.
For your convenience and learning, the step-by-step procedure on how to record a video in slow motion using an iPhone is explained below:
Step 1: Get to the SLO-MO Mode
Launch the Camera app on your iPhone (iPhone 13 Pro Max is used here for illustrations), and swipe the screen to the left to get to the SLO-MO mode.

Step 2: Adjust Recording Preferences
Tap the number at the top-right corner to switch between 120 FPS and 240 FPS as needed. Tap 1x from the lower-middle section of the screen, and use the rotator to adjust your preferred zoom level.

Step 3: Start and Stop Recording
Tap the Record button from the bottom-center of the screen to begin recording the video in slow motion. Tap Stop when you are done. You can access the recorded video from the Videos container of the Photos app in your iPhone.
If you are using Android phone, you can check this article to find out more details about How to Record Super Slow Motion Videos on Your Phone.
You may also like: Best Slo-mo Camera Apps for Android And iPhone
Part 2: How to Apply the Smooth Slow-Motion Effect in Post-Production?
If you don’t have access to a camera that can record videos in slow motion, or in case you want to capture the footage at normal playback speed and then slow it down later, you need a dedicated tool to get the job done. Even though several post-production applications are available in the market, the one that is most versatile, has an intuitive interface, and is quite easy to use is Filmora video editor from Wondershare .
The latest version of the app, i.e., Wondershare Filmora 11 has a new feature called Speed Ramping that enables you to graphically manage the speed of the clips. While using the feature, you can either slow down the entire video or certain parts of it according to your requirements. For your learning, both the methods are explained below:
Method 1: Add Slow Motion Effect to the Whole Clip
For Win 7 or later (64-bit)
For macOS 10.12 or later
Step 1: Import the Source Video and Add to Timeline
Launch Wondershare Filmora on your Windows or Mac computer (a Windows 11 PC is used here for illustrations), click New Project from the first screen that appears. Make sure that the Media tool is selected from the standard tool bar at the top, click anywhere inside the Media window, and select and import the source clip to the program.

Next, hover the mouse over the thumbnail of the imported video in the Media window, and click the + icon present at its bottom-right corner. When the confirmation box comes up, click the Match to Media or Keep Project Settings button to change the project settings to match the resolution of the video, or change the footage to meet the project settings respectively.

Step 2: Add Slow Motion Effect to the Whole Clip
Once the media is added to the timeline, click on it and then click the Speed icon on the toolbar. Scroll down to the Slow menu and then you will see 0.5x, 0.25x, 0.1x, 0.05x and 0.01x presets. Select one to add slo-mo effects to the whole select clip. and click Speed Ramping from the menu that drops down.

You can also right click the video in the timeline, and hover over to Speed option to select Uniform Speed to adjust the speed of the video to make a slo-mo effect video. Drag the speed slider to the left to slow down the video and you will see how many times it slowed down in the next field.

Method 2: Use Speed Ramping to Add Slow Motion Effect
For Win 7 or later (64-bit)
For macOS 10.12 or later
Speed Ramping enables you to add the slow-motion effect at different parts of a video and even freeze the screen for the duration that you specify. The processes to get these done are given below in detail:
Step 1: Add Source Video to Timeline and Get to the Speed Ramping Window
Use the process given in the previous method to import a source video to Wondershare Filmora 11 and add it to the Timeline. Then use the process given in the second step of the previous method to get to the Speed Ramping window.
Step 2: Add Slow Motion Effect to Different Parts of the Clip
Go to the Speed Ramping tab if it is not already selected, click Custom from the available options, and drag the adjustment points below the center line to reduce the playback speed for that particular section of the clip. Optionally, you can click any of the available presets to automatically add the slow-motion effect to the video.
Note: You can also drag the adjustment points above the line to increase the playback speed.
To add an adjustment point on the frame where it is not already present, place the playhead (skimmer) at the correct position, and click Add Adjust Point from the left of the Speed Ramping window itself. Once added, you can drag it downward to reduce the playback speed of that part of the clip.

Step 3: Freeze the Video
Place the skimmer on the frame where you want to freeze the video for a while, and click Add Freeze Frame from the left of the Speed Ramping window. When the time box appears, in the Freeze Time field, enter the duration in seconds you want to freeze the screen for, and click OK.

After adding a freeze point, optionally, you can drag and reposition it in the Speed Ramping timeline as needed. Finally, click OK from the bottom-right area to save the changes.
Part 3: When to Use Slow Motion?
There could be many instances when you want to add a slow-motion effect to your videos. Some of the most common ones include:
- Add Focus
If there is a particular scene in a clip that you want the audience to focus on, it would be a good idea to add the slow-motion effect right before that action appears on the screen, and bring the speed back to normal when the section is over.
- Skill or Style Demonstration
When a clip is playing at a normal speed, many times, the audience isn’t able to see the skills that you want to display. This is where you may want to add the slow-motion effect so that every detail can be noticed clearly and in detail.
- Replays
Mostly used for tournaments and matches where the actual action is to replayed so the audience, umpires, and other viewers can see the movements in detail before making the right decision.
- Observation
Some natural phenomena such as a deer running in the woods, a balloon full of water bursting, etc. occur quite quickly. If you want to witness such things clearly and in detail, it would be good to record them, and then reduce the playback speed for better viewing.
- Add Suspense
When you add the slow-motion effect to a scene, the impulse of the audience is automatically increased, and they take that particular section more seriously and with a thrill.
Conclusion
The slow-motion effect is inversely proportional to the framerate, i.e., frames per second or FPS. Almost all DSLR cameras that are available nowadays allow you to switch between different FPS values (typically 120 and 240) before recording. Also, if you have access to an iPhone, its Camera app has a built-in SLO-MO mode that can capture the footage in slow motion.
In addition, if you already have a video that has been recorded at a normal speed, you can use an efficient post-production software like Wondershare Filmora 11, and exploit its Speed Ramping feature to add the slow-motion effect at different scenes of a clip.
Learn How to Rotate Videos with Ease Using Shotcut with Our Comprehensive Guide. Discover Tips and Tricks to Get the Perfect Footage Every Time. Start Using Shotcut Today
Video editing has come a long way in recent years, and with the advancement of technology, it’s now easier than ever to produce high-quality videos. However, one common issue that many video editors encounter is uneven footage. Various reasons can cause this, but the solution is simple - rotating your videos. Shotcut is a powerful video editing software that provides various tools to help you rotate your videos easily.
This guide will explore the ins and outs of using Shotcut to rotate your videos. Whether you’re a seasoned editor or just starting, this guide will provide you with everything you need to know to get the perfect shot every time. This guide has everything from rotating your footage to more advanced tips and tricks. So, if you’re ready to take your video editing skills to the next level, keep reading!
Overview of Shotcut Video Editor
Shotcut is a free, open-source video editing software that offers a range of features for basic video editing. Before downloading Shotcut, it is important to know its features to determine if it suits your video editing needs. Here are the key features of Shotcut that stand out:

- Video Capture. Shotcut allows for screen and webcam capture and audio capture from the system or external microphone. It supports 4K resolution.
- Standard Editing. Shotcut allows for trimming, cutting/copying/pasting of clips and keyframes for video filters and markers. It also uses proxy editing for high-resolution video files.
- Audio Features. Shotcut includes several audio filters for enhancing audio clips and volume control, audio mixing, tone generator, and pitch adjustment options.
- Video Effects. Shotcut offers a range of effects and filters, including blending modes, track compositing, and transitions. It also supports 360-degree filters, reverse video clips, and video scopes.
- Wide Support. Shotcut supports a variety of video and audio formats, as well as photo file formats. The multi-format timeline allows for the mixing of different parameters, and the software supports network streaming and alpha-channel videos.
Shotcut is a versatile video editor that offers a range of features for basic video editing and is a great choice for those looking for a free and open-source video editor.
How To Rotate Videos in Shotcut?
Rotating videos in Shotcut is a simple process. With its user-friendly interface, you can quickly and easily adjust the orientation of your videos to get the perfect shot every time. Whether you need to rotate your footage 90 degrees or make more subtle adjustments, Shotcut has all the tools you need to get the job done.
In this section, we’ll walk you through the steps to rotate your videos in Shotcut and provide you with tips and tricks to ensure that your footage is perfectly aligned every time. So, if you’re ready to rotate your videos, let’s get started!
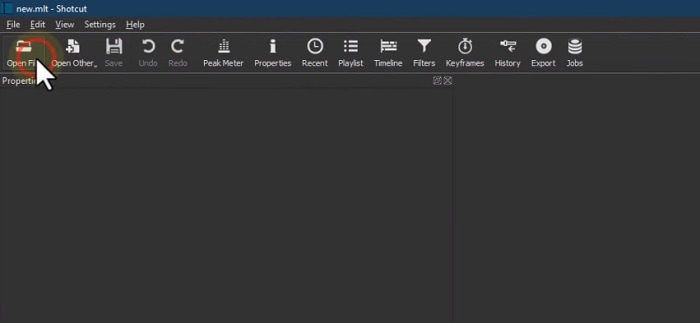
Step1 Start a new Shotcut project and import the video
Step2 Drag the video to the Timeline
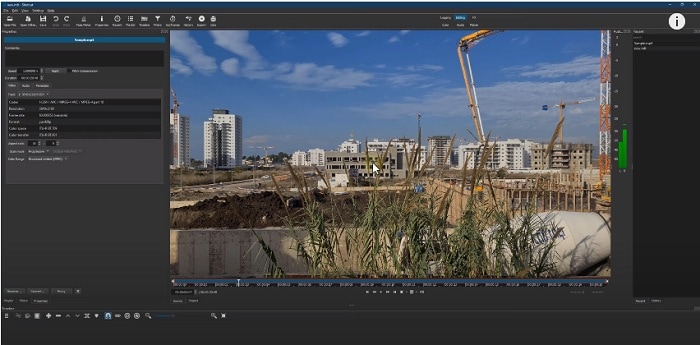
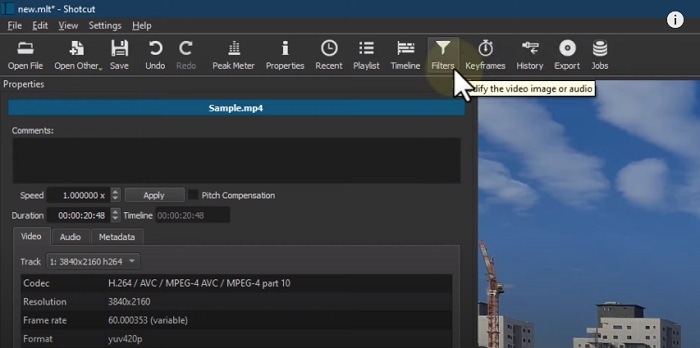
Step3 Go to “Filters“ and press the “+” icon
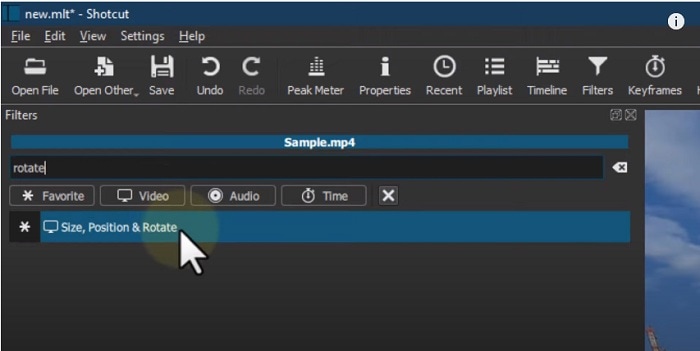
Step4 Search for “Rotate“ and select “Size, Position & Rotate.”
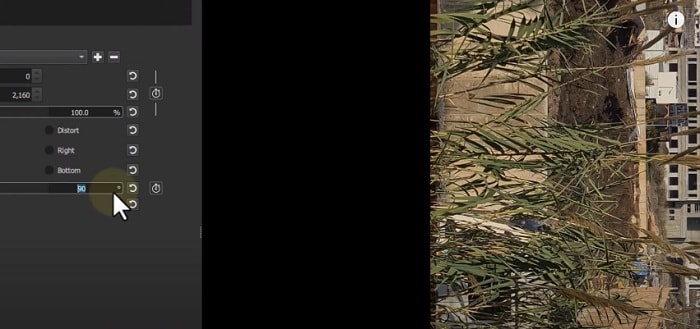
Step5 Use the bar or enter degrees in numbers to rotate the video.
How To Mirror or Flip Videos in Shotcut?
Do you want to flip or mirror your videos in Shotcut? This feature can add a creative twist to your footage and make your videos stand out. Luckily, Shotcut makes it easy to mirror or flip your videos with just a few simple steps.
Whether you want to add a reflection effect or change the direction of your footage, Shotcut has the tools you need to get the job done. So, get ready to take your videos to the next level with Shotcut’s mirroring and flipping capabilities!
For Steps 1-3, follow the steps from the “How To Rotate Videos in Shotcut?“ section.
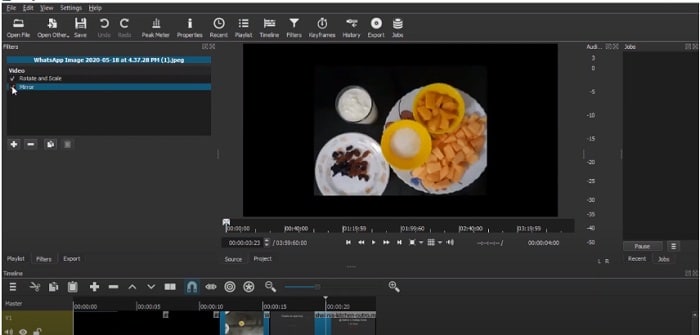
Step4 Search for the “Mirror“ effect.
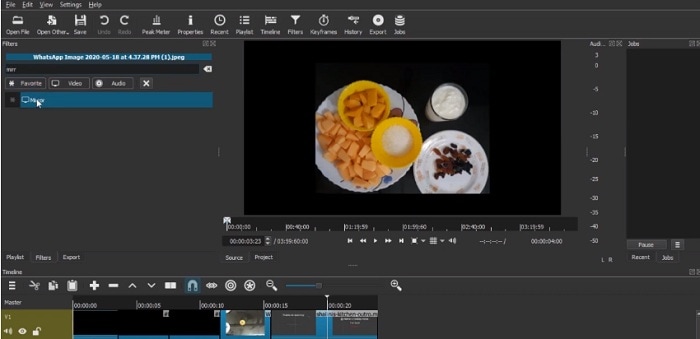
Step5 Select the “Mirror“ effect, and your video will be automatically flipped or mirrored.
How To Make a Vertical Video Horizontal in Shotcut
Are you tired of having a vertical video that doesn’t fit the standard aspect ratio? Don’t worry; Shotcut makes it easy to convert your vertical video into a horizontal format. By converting your vertical video into a horizontal format, you’ll be able to showcase your footage in a more professional and visually appealing manner.
In this section, we’ll walk you through making your vertical video horizontal in Shotcut. With these simple steps, you’ll be able to turn your vertical footage into a horizontal masterpiece in no time!
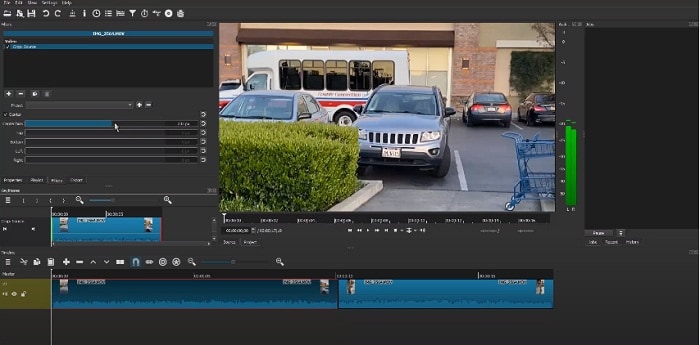
Step1 Drag the video to the timeline
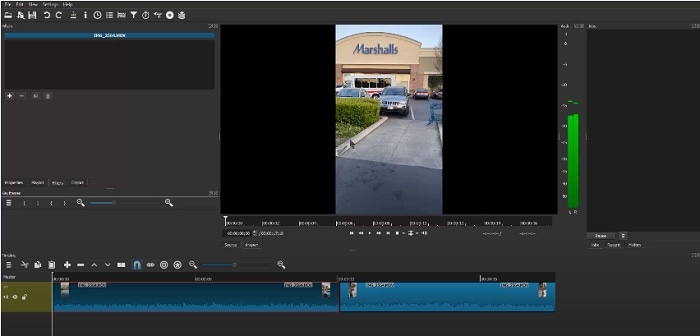
Step2 Go to “Filters“ and press the “+” icon. Search for the “Crop Source“ effect.
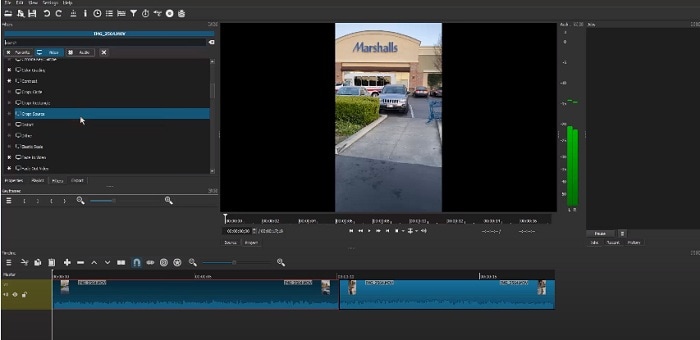
Step3 Toggle “Center“ and notice that it removed the black padding of the horizontal video.
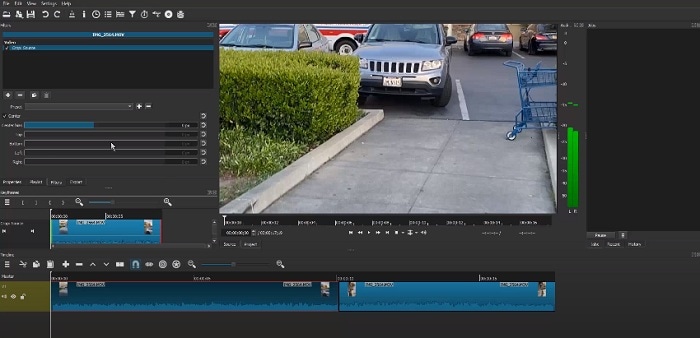
Step4 Adjust the part you want your video to focus on.
Wondershare Filmora – Shotcut’s Alternative To Rotate Videos
If you’re looking for an alternative to Shotcut for rotating your videos, consider Wondershare Filmora . This powerful video editing software is packed with features and is ideal for both beginners and professionals. While Shotcut is a great option for rotating videos, Filmora offers additional capabilities that make it an excellent choice for those who need a more advanced video editing solution.
Free Download For Win 7 or later(64-bit)
Free Download For macOS 10.14 or later

With Wondershare Filmora, you’ll be able to rotate your videos with ease, as well as perform a variety of other editing tasks. From adding music, filters, and text to splitting, trimming, and merging videos, Filmora has you covered.
Additionally, you’ll enjoy the user-friendly interface of Filmora that makes it easy to navigate and find the features you need. Whether you’re just starting with video editing or are a seasoned professional, Wondershare Filmora is the perfect solution for rotating videos and more.
How To Rotate or Flip a Video With Wondershare Filmora?
Wondershare Filmora is a great alternative to Shotcut for those looking to rotate or flip their video clips. It offers an intuitive and user-friendly interface, making rotating or flipping a video simple.
To mirror your video in Filmora, you follow a few easy steps. Whether you want to flip your video horizontally or vertically, Filmora’s rotating tool will help you achieve the perfect reflection with just a few clicks.
In addition to its rotating capabilities, Wondershare Filmora also offers a wide range of features for video editing. From basic video editing tools like trimming and cutting to advanced features like color correction and audio editing, Filmora has everything you need to take your video projects to the next level.
With its user-friendly interface and comprehensive feature set, Wondershare Filmora is a great option for anyone looking for an alternative to Shotcut for their video editing needs.
Step1 Choose between “Flip Horizontal“ or “Flip Vertical“ in the “Flip“ section to mirror the clip left to right or turn it upside down.

Step2 Select either the “Clockwise“ or “Counterclockwise“ icon under the “Rotate“ section to rotate the clip.

Step3 Enter a specific angle value in the “Rotate“ tab or adjust the dot in the circle to reach the desired rotation angle.

How To Make a Vertical Video Horizontal With Filmora?
Are you looking for a solution to convert a vertical video into a horizontal one? Filmora is a great video editing software that can help you do that!
Step1 Launch Filmora and import the video.

Step2 Drag the video to the timeline.

Step3 Right-click on the video and then click on “Crop and Zoom.”
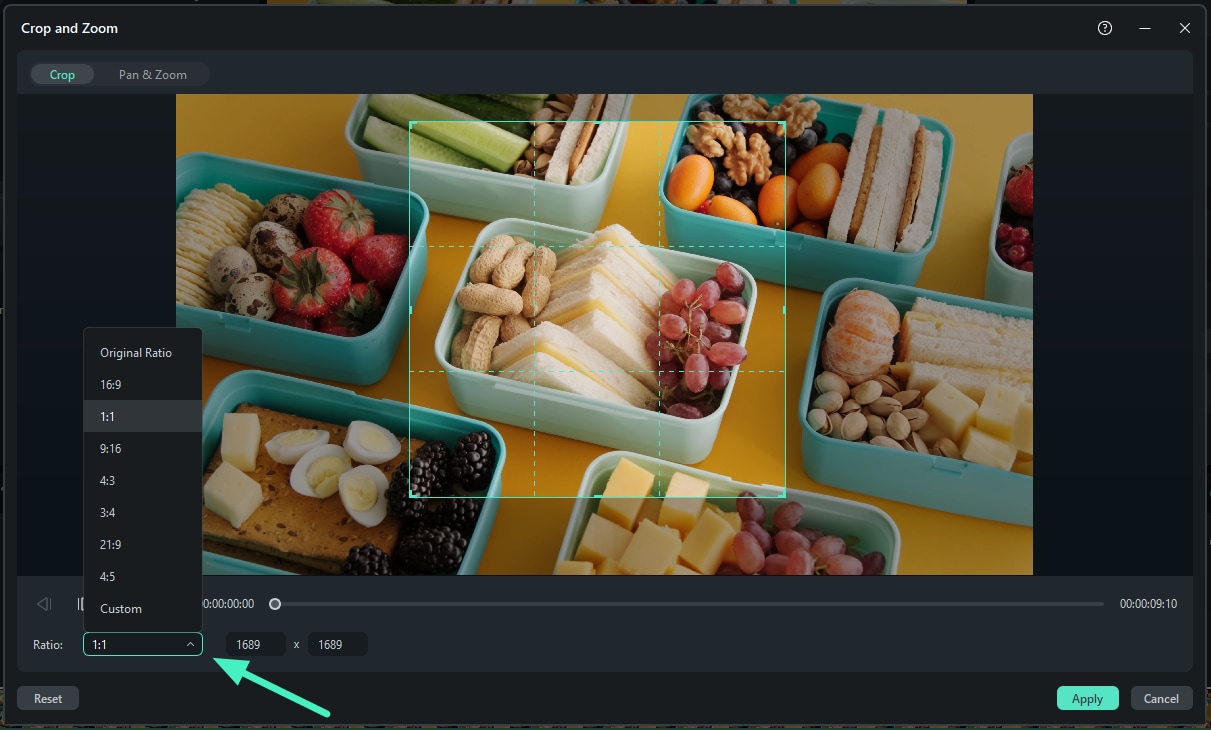
Step4 Click on the “Aspect Ratio“ option and change it to “16:9.”
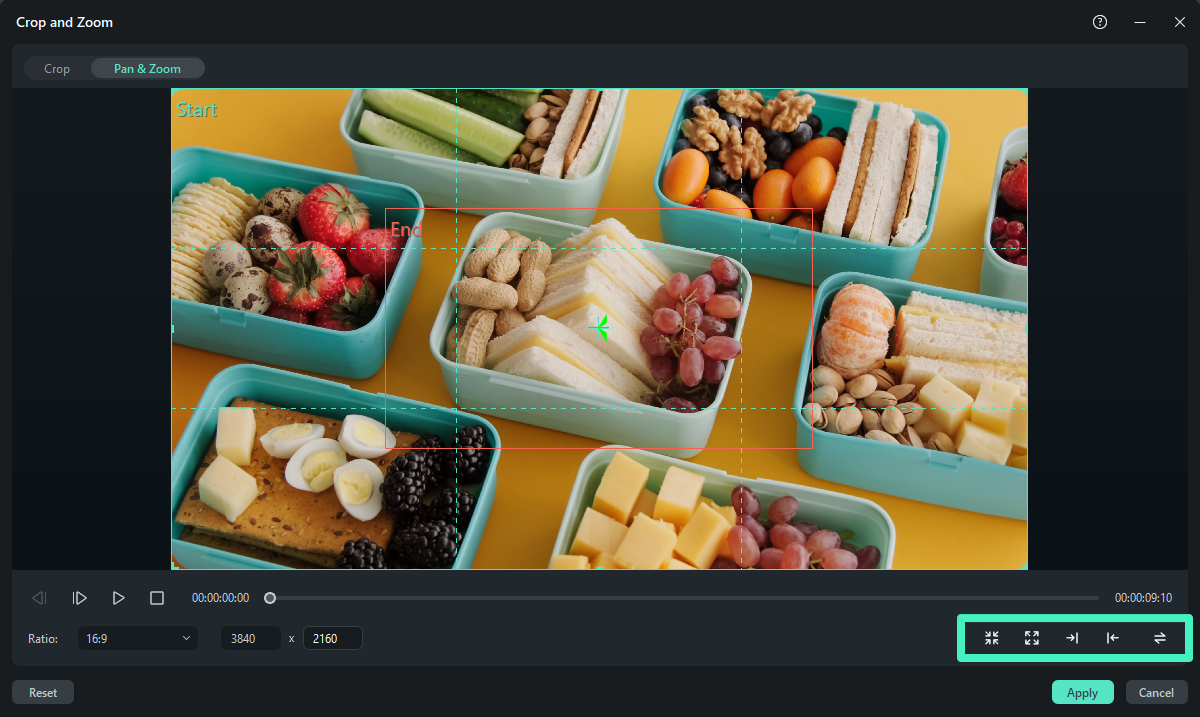
Step5 Keep the video part that you want to focus on, then click “OK.”
Step6 Your vertical video is now horizontal.
Conclusion
Rotating a video in Shotcut or Wondershare Filmora is a simple process. Both video editing software provides a user-friendly interface and various options to achieve the desired result. Shotcut and Filmora can help you achieve the perfect reflection with a few clicks, whether you want to rotate, flip, or make a horizontal or vertical video. So, choose the one that fits your needs and start creating stunning videos.
Free Download For macOS 10.14 or later

With Wondershare Filmora, you’ll be able to rotate your videos with ease, as well as perform a variety of other editing tasks. From adding music, filters, and text to splitting, trimming, and merging videos, Filmora has you covered.
Additionally, you’ll enjoy the user-friendly interface of Filmora that makes it easy to navigate and find the features you need. Whether you’re just starting with video editing or are a seasoned professional, Wondershare Filmora is the perfect solution for rotating videos and more.
How To Rotate or Flip a Video With Wondershare Filmora?
Wondershare Filmora is a great alternative to Shotcut for those looking to rotate or flip their video clips. It offers an intuitive and user-friendly interface, making rotating or flipping a video simple.
To mirror your video in Filmora, you follow a few easy steps. Whether you want to flip your video horizontally or vertically, Filmora’s rotating tool will help you achieve the perfect reflection with just a few clicks.
In addition to its rotating capabilities, Wondershare Filmora also offers a wide range of features for video editing. From basic video editing tools like trimming and cutting to advanced features like color correction and audio editing, Filmora has everything you need to take your video projects to the next level.
With its user-friendly interface and comprehensive feature set, Wondershare Filmora is a great option for anyone looking for an alternative to Shotcut for their video editing needs.
Step1 Choose between “Flip Horizontal“ or “Flip Vertical“ in the “Flip“ section to mirror the clip left to right or turn it upside down.

Step2 Select either the “Clockwise“ or “Counterclockwise“ icon under the “Rotate“ section to rotate the clip.

Step3 Enter a specific angle value in the “Rotate“ tab or adjust the dot in the circle to reach the desired rotation angle.

How To Make a Vertical Video Horizontal With Filmora?
Are you looking for a solution to convert a vertical video into a horizontal one? Filmora is a great video editing software that can help you do that!
Step1 Launch Filmora and import the video.

Step2 Drag the video to the timeline.

Step3 Right-click on the video and then click on “Crop and Zoom.”

Step4 Click on the “Aspect Ratio“ option and change it to “16:9.”

Step5 Keep the video part that you want to focus on, then click “OK.”
Step6 Your vertical video is now horizontal.
Conclusion
Rotating a video in Shotcut or Wondershare Filmora is a simple process. Both video editing software provides a user-friendly interface and various options to achieve the desired result. Shotcut and Filmora can help you achieve the perfect reflection with a few clicks, whether you want to rotate, flip, or make a horizontal or vertical video. So, choose the one that fits your needs and start creating stunning videos.
| How to Livestream Zoom on Facebook?
Abundant Video Effects - Wondershare Filmora
Provide abundant video effects - A creative video editor
Powerful color correction and grading
Detailed tutorials provided by the official channel
There are numerous ways to connect with viewers across the globe through online platforms. One such platform is Facebook live stream videos through which a single person can connect with the whole world and can talk to the people live. Through live stream videos on Facebook, people can show cooking or makeup tutorials that millions of people can join to watch easily.
Also, through such videos, many teachers prefer to demonstrate a particular concept so that students can respond instantly. However, if you want a clearer vision for better understanding, you can zoom on Facebook live stream videos by reading instructions from this article.
In this article
Part 1: Zoom in Facebook Livestream from Browser
Part 2: How to Zoom in Facebook Livestream on Android
Part 3: How to Zoom in Facebook Livestream on iPhone
Part 1: Zoom in Facebook Livestream from Browser
The easiest way to zoom in on Facebook Livestream videos is via browser. In this part, we will describe two methods for zooming in on Facebook Livestream videos that are manual and through a browser extension.
Method 1: Manual Method
In this first method, you can zoom on Facebook videos through your desktop manually. Read the following steps to perform this method:
Step 1: Open your Facebook account by entering your username and password. Now play the livestream video on which you want to zoom in.
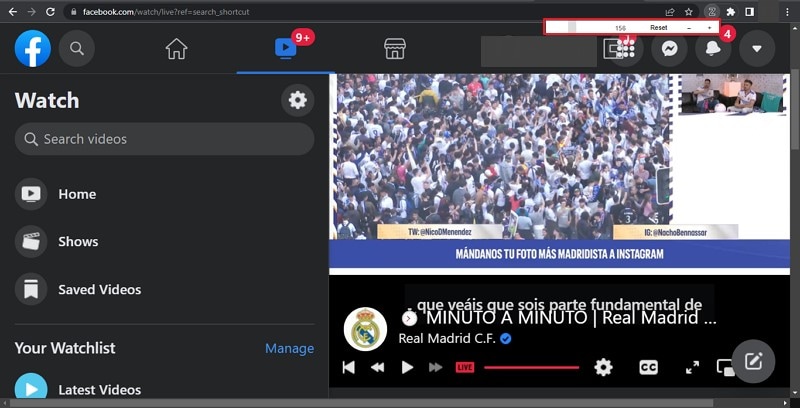
Step 2: For Windows users, press the “CTRL” and “+” buttons simultaneously to zoom on the Facebook video. Whereas, for Mac users, press the “COMMAND” and “+” buttons at the same time to zoom in. A small pop-up window will display at the top right corner from where you can control the zoom value.

Method 2: Browser Extension
In this particular method, we will use a browser extension called “Zoom,” through which you can quickly enjoy the zoom experience on the Facebook live stream videos. This special browser extension is a lightweight extension that can assist you in browsing the web pages by zooming in and out conveniently. By using this extension, you can change the zoom value through its slider up to 400 easily.
Step 1: First, you need to install the browser extension of Zoom on your PC. Click on the “Add to Chrome” option to download and install this extension on your Chrome browser.

Step 2: Open your Facebook account and play your live stream video. On the top right corner, you can see the “Extension” icon where all your added extensions are pinned. Select Zoom extension, and through its displayed slider, you can increase the zoom value easily. You can also press the “+” button from your keyboard to zoom in on the Facebook video through this extension.
Part 2: How to Zoom in Facebook Livestream on Android
If you are watching live stream videos of Facebook on an Android device, you can also zoom in by modifying your phone’s settings. To do so, here are basic steps:
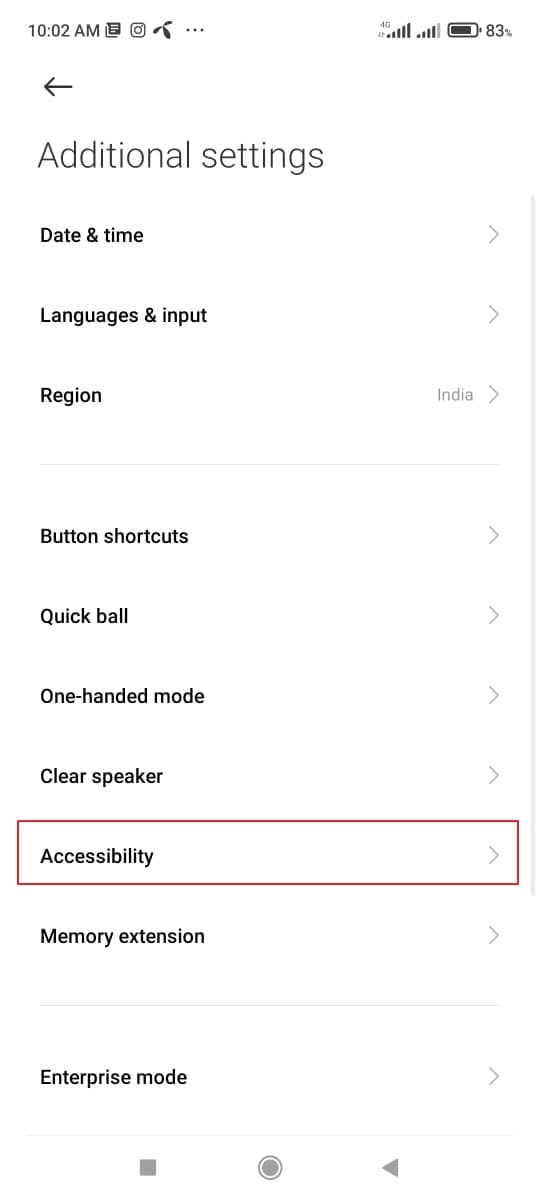
Step 1: From your Android phone, reach out to the “Settings” to open its menu. From this menu, find the option of “Accessibility” from “Additional Settings” and click on it.
Step 2: On the accessibility screen, tap on the option of “Vision” and then locate the section called “Display.”

Step 3: Now, find the option of “Magnification” and tap on it. Afterward, select the “Magnification Shortcut” and turn on the toggle of magnification.

Step 4: Now, go back to your Facebook account to use your accessibility feature. You have to first tap on the icon of the small person at the bottom right corner of your screen. Now you can tap anywhere on your screen to zoom in.

Step 5: To zoom in on a live stream video of Facebook, expand your two fingers by placing them on the screen. Thus you can easily zoom in on any specific part of the Facebook video easily. For zooming out, move your fingers in an inward direction to pinch the screen. Also, to zoom back into a default mode, click on the accessibility feature.

Part 3: How to Zoom in Facebook Livestream on iPhone
As Android devices give options to zoom in and out easily, iPhone users can also change their settings to use the accessibility feature quickly. To use the accessibility button on iPhone devices, use the following steps:
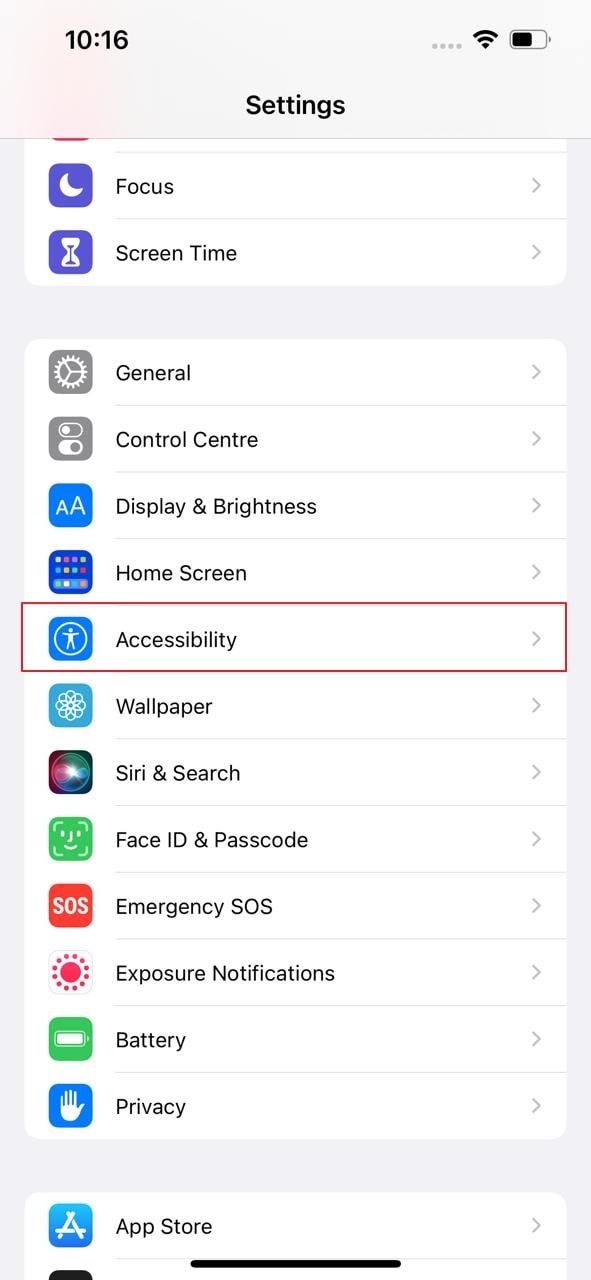
Step 1: On your iPhone, go to the “Settings” and scroll down its menu. Here you can find the option of “Accessibility,” so tap on it to open its menu.
Step 2: From the accessibility menu, locate the option of “Zoom” and click on it. Now tap on its toggle to turn it on.
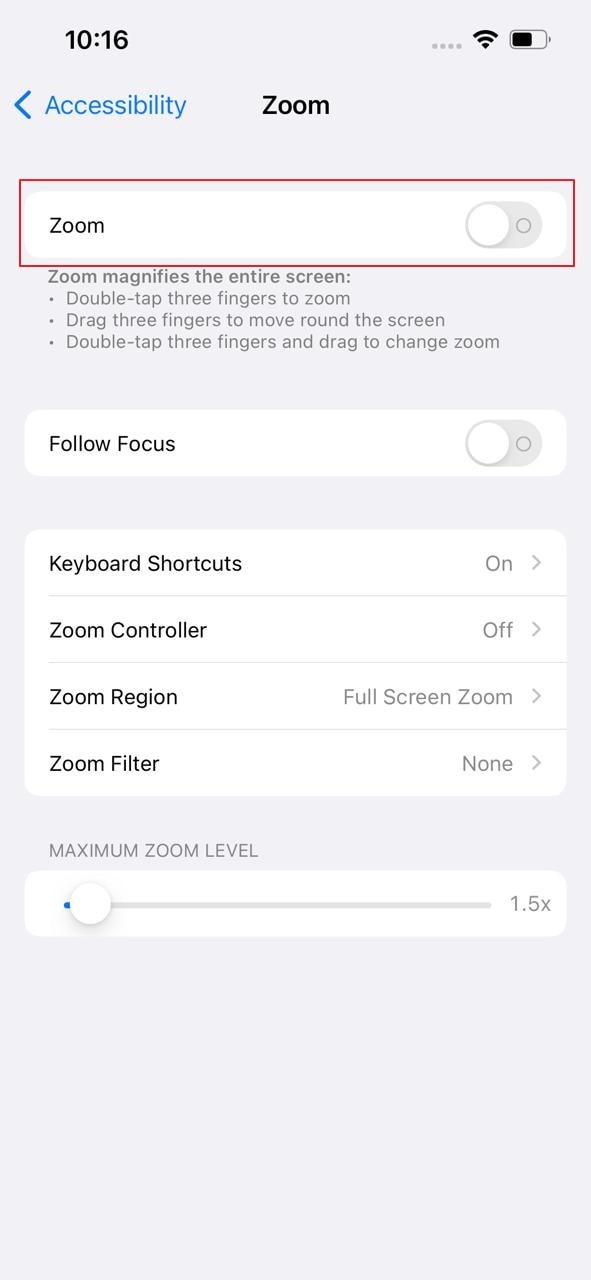
Step 3: Afterward, click on “Zoom Region” and then tap the option of “Full Screen Zoom.” Now leave your settings and go back to your Facebook account.

Step 4: To zoom on Facebook portal, double-tap from your three fingers on any specific part of your screen that will activate the accessibility feature.
Step 5: To change the zoom value, you have to triple-tap the screen with your three fingers. Options will pop up from where you can use the magnifying slider to change the zoom level by either moving it to the right or left.
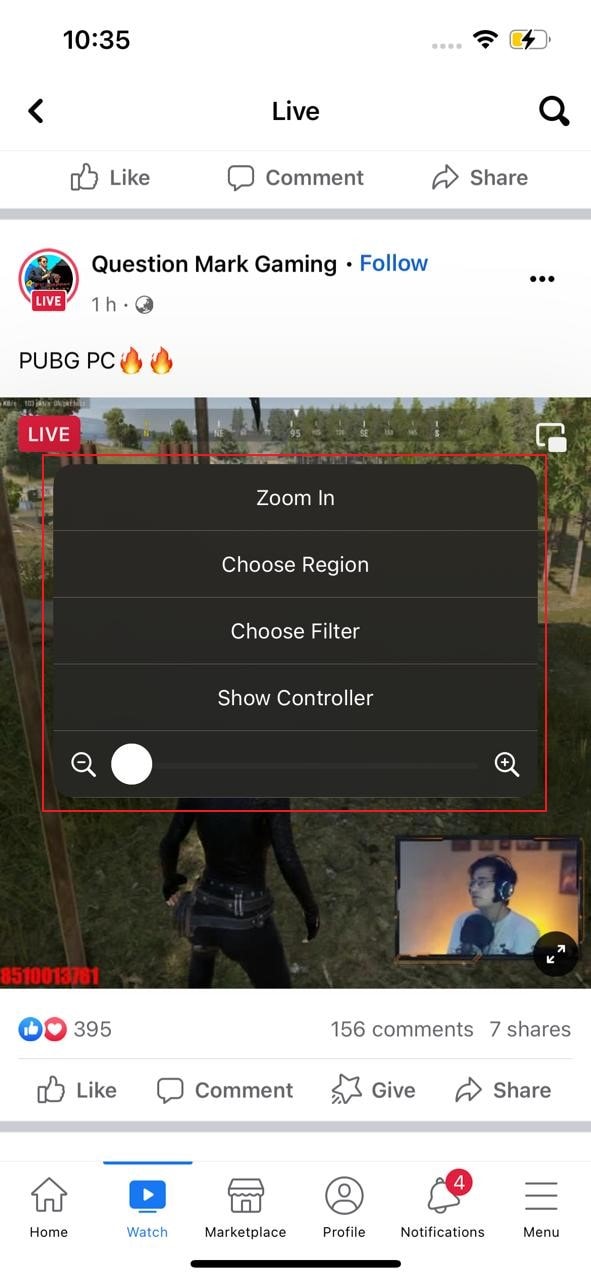
Step 6: If you want to navigate to any part of the screen while zoomed in, use your three fingers and move them around. Also, to return to the default value of the zoom, double-tap on any part of your screen using three fingers.
Conclusion
Facebook is the most popular app across the globe that offers a single and enhanced platform for sharing and posting various kinds of information. Through Facebook live stream videos, users can get details and related information instantly through a live video.
However, if you are struggling to catch a clear vision in live stream videos, you can zoom on Facebook app by using our provided guidelines in this article. Thus, you can have a clear and focused vision by zooming in on live stream videos on Facebook.
There are numerous ways to connect with viewers across the globe through online platforms. One such platform is Facebook live stream videos through which a single person can connect with the whole world and can talk to the people live. Through live stream videos on Facebook, people can show cooking or makeup tutorials that millions of people can join to watch easily.
Also, through such videos, many teachers prefer to demonstrate a particular concept so that students can respond instantly. However, if you want a clearer vision for better understanding, you can zoom on Facebook live stream videos by reading instructions from this article.
In this article
Part 1: Zoom in Facebook Livestream from Browser
Part 2: How to Zoom in Facebook Livestream on Android
Part 3: How to Zoom in Facebook Livestream on iPhone
Part 1: Zoom in Facebook Livestream from Browser
The easiest way to zoom in on Facebook Livestream videos is via browser. In this part, we will describe two methods for zooming in on Facebook Livestream videos that are manual and through a browser extension.
Method 1: Manual Method
In this first method, you can zoom on Facebook videos through your desktop manually. Read the following steps to perform this method:
Step 1: Open your Facebook account by entering your username and password. Now play the livestream video on which you want to zoom in.
Step 2: For Windows users, press the “CTRL” and “+” buttons simultaneously to zoom on the Facebook video. Whereas, for Mac users, press the “COMMAND” and “+” buttons at the same time to zoom in. A small pop-up window will display at the top right corner from where you can control the zoom value.

Method 2: Browser Extension
In this particular method, we will use a browser extension called “Zoom,” through which you can quickly enjoy the zoom experience on the Facebook live stream videos. This special browser extension is a lightweight extension that can assist you in browsing the web pages by zooming in and out conveniently. By using this extension, you can change the zoom value through its slider up to 400 easily.
Step 1: First, you need to install the browser extension of Zoom on your PC. Click on the “Add to Chrome” option to download and install this extension on your Chrome browser.

Step 2: Open your Facebook account and play your live stream video. On the top right corner, you can see the “Extension” icon where all your added extensions are pinned. Select Zoom extension, and through its displayed slider, you can increase the zoom value easily. You can also press the “+” button from your keyboard to zoom in on the Facebook video through this extension.

Part 2: How to Zoom in Facebook Livestream on Android
If you are watching live stream videos of Facebook on an Android device, you can also zoom in by modifying your phone’s settings. To do so, here are basic steps:
Step 1: From your Android phone, reach out to the “Settings” to open its menu. From this menu, find the option of “Accessibility” from “Additional Settings” and click on it.

Step 2: On the accessibility screen, tap on the option of “Vision” and then locate the section called “Display.”

Step 3: Now, find the option of “Magnification” and tap on it. Afterward, select the “Magnification Shortcut” and turn on the toggle of magnification.

Step 4: Now, go back to your Facebook account to use your accessibility feature. You have to first tap on the icon of the small person at the bottom right corner of your screen. Now you can tap anywhere on your screen to zoom in.

Step 5: To zoom in on a live stream video of Facebook, expand your two fingers by placing them on the screen. Thus you can easily zoom in on any specific part of the Facebook video easily. For zooming out, move your fingers in an inward direction to pinch the screen. Also, to zoom back into a default mode, click on the accessibility feature.

Part 3: How to Zoom in Facebook Livestream on iPhone
As Android devices give options to zoom in and out easily, iPhone users can also change their settings to use the accessibility feature quickly. To use the accessibility button on iPhone devices, use the following steps:
Step 1: On your iPhone, go to the “Settings” and scroll down its menu. Here you can find the option of “Accessibility,” so tap on it to open its menu.

Step 2: From the accessibility menu, locate the option of “Zoom” and click on it. Now tap on its toggle to turn it on.

Step 3: Afterward, click on “Zoom Region” and then tap the option of “Full Screen Zoom.” Now leave your settings and go back to your Facebook account.

Step 4: To zoom on Facebook portal, double-tap from your three fingers on any specific part of your screen that will activate the accessibility feature.
Step 5: To change the zoom value, you have to triple-tap the screen with your three fingers. Options will pop up from where you can use the magnifying slider to change the zoom level by either moving it to the right or left.

Step 6: If you want to navigate to any part of the screen while zoomed in, use your three fingers and move them around. Also, to return to the default value of the zoom, double-tap on any part of your screen using three fingers.
Conclusion
Facebook is the most popular app across the globe that offers a single and enhanced platform for sharing and posting various kinds of information. Through Facebook live stream videos, users can get details and related information instantly through a live video.
However, if you are struggling to catch a clear vision in live stream videos, you can zoom on Facebook app by using our provided guidelines in this article. Thus, you can have a clear and focused vision by zooming in on live stream videos on Facebook.
There are numerous ways to connect with viewers across the globe through online platforms. One such platform is Facebook live stream videos through which a single person can connect with the whole world and can talk to the people live. Through live stream videos on Facebook, people can show cooking or makeup tutorials that millions of people can join to watch easily.
Also, through such videos, many teachers prefer to demonstrate a particular concept so that students can respond instantly. However, if you want a clearer vision for better understanding, you can zoom on Facebook live stream videos by reading instructions from this article.
In this article
Part 1: Zoom in Facebook Livestream from Browser
Part 2: How to Zoom in Facebook Livestream on Android
Part 3: How to Zoom in Facebook Livestream on iPhone
Part 1: Zoom in Facebook Livestream from Browser
The easiest way to zoom in on Facebook Livestream videos is via browser. In this part, we will describe two methods for zooming in on Facebook Livestream videos that are manual and through a browser extension.
Method 1: Manual Method
In this first method, you can zoom on Facebook videos through your desktop manually. Read the following steps to perform this method:
Step 1: Open your Facebook account by entering your username and password. Now play the livestream video on which you want to zoom in.
Step 2: For Windows users, press the “CTRL” and “+” buttons simultaneously to zoom on the Facebook video. Whereas, for Mac users, press the “COMMAND” and “+” buttons at the same time to zoom in. A small pop-up window will display at the top right corner from where you can control the zoom value.

Method 2: Browser Extension
In this particular method, we will use a browser extension called “Zoom,” through which you can quickly enjoy the zoom experience on the Facebook live stream videos. This special browser extension is a lightweight extension that can assist you in browsing the web pages by zooming in and out conveniently. By using this extension, you can change the zoom value through its slider up to 400 easily.
Step 1: First, you need to install the browser extension of Zoom on your PC. Click on the “Add to Chrome” option to download and install this extension on your Chrome browser.

Step 2: Open your Facebook account and play your live stream video. On the top right corner, you can see the “Extension” icon where all your added extensions are pinned. Select Zoom extension, and through its displayed slider, you can increase the zoom value easily. You can also press the “+” button from your keyboard to zoom in on the Facebook video through this extension.

Part 2: How to Zoom in Facebook Livestream on Android
If you are watching live stream videos of Facebook on an Android device, you can also zoom in by modifying your phone’s settings. To do so, here are basic steps:
Step 1: From your Android phone, reach out to the “Settings” to open its menu. From this menu, find the option of “Accessibility” from “Additional Settings” and click on it.

Step 2: On the accessibility screen, tap on the option of “Vision” and then locate the section called “Display.”

Step 3: Now, find the option of “Magnification” and tap on it. Afterward, select the “Magnification Shortcut” and turn on the toggle of magnification.

Step 4: Now, go back to your Facebook account to use your accessibility feature. You have to first tap on the icon of the small person at the bottom right corner of your screen. Now you can tap anywhere on your screen to zoom in.

Step 5: To zoom in on a live stream video of Facebook, expand your two fingers by placing them on the screen. Thus you can easily zoom in on any specific part of the Facebook video easily. For zooming out, move your fingers in an inward direction to pinch the screen. Also, to zoom back into a default mode, click on the accessibility feature.

Part 3: How to Zoom in Facebook Livestream on iPhone
As Android devices give options to zoom in and out easily, iPhone users can also change their settings to use the accessibility feature quickly. To use the accessibility button on iPhone devices, use the following steps:
Step 1: On your iPhone, go to the “Settings” and scroll down its menu. Here you can find the option of “Accessibility,” so tap on it to open its menu.

Step 2: From the accessibility menu, locate the option of “Zoom” and click on it. Now tap on its toggle to turn it on.

Step 3: Afterward, click on “Zoom Region” and then tap the option of “Full Screen Zoom.” Now leave your settings and go back to your Facebook account.

Step 4: To zoom on Facebook portal, double-tap from your three fingers on any specific part of your screen that will activate the accessibility feature.
Step 5: To change the zoom value, you have to triple-tap the screen with your three fingers. Options will pop up from where you can use the magnifying slider to change the zoom level by either moving it to the right or left.

Step 6: If you want to navigate to any part of the screen while zoomed in, use your three fingers and move them around. Also, to return to the default value of the zoom, double-tap on any part of your screen using three fingers.
Conclusion
Facebook is the most popular app across the globe that offers a single and enhanced platform for sharing and posting various kinds of information. Through Facebook live stream videos, users can get details and related information instantly through a live video.
However, if you are struggling to catch a clear vision in live stream videos, you can zoom on Facebook app by using our provided guidelines in this article. Thus, you can have a clear and focused vision by zooming in on live stream videos on Facebook.
There are numerous ways to connect with viewers across the globe through online platforms. One such platform is Facebook live stream videos through which a single person can connect with the whole world and can talk to the people live. Through live stream videos on Facebook, people can show cooking or makeup tutorials that millions of people can join to watch easily.
Also, through such videos, many teachers prefer to demonstrate a particular concept so that students can respond instantly. However, if you want a clearer vision for better understanding, you can zoom on Facebook live stream videos by reading instructions from this article.
In this article
Part 1: Zoom in Facebook Livestream from Browser
Part 2: How to Zoom in Facebook Livestream on Android
Part 3: How to Zoom in Facebook Livestream on iPhone
Part 1: Zoom in Facebook Livestream from Browser
The easiest way to zoom in on Facebook Livestream videos is via browser. In this part, we will describe two methods for zooming in on Facebook Livestream videos that are manual and through a browser extension.
Method 1: Manual Method
In this first method, you can zoom on Facebook videos through your desktop manually. Read the following steps to perform this method:
Step 1: Open your Facebook account by entering your username and password. Now play the livestream video on which you want to zoom in.
Step 2: For Windows users, press the “CTRL” and “+” buttons simultaneously to zoom on the Facebook video. Whereas, for Mac users, press the “COMMAND” and “+” buttons at the same time to zoom in. A small pop-up window will display at the top right corner from where you can control the zoom value.

Method 2: Browser Extension
In this particular method, we will use a browser extension called “Zoom,” through which you can quickly enjoy the zoom experience on the Facebook live stream videos. This special browser extension is a lightweight extension that can assist you in browsing the web pages by zooming in and out conveniently. By using this extension, you can change the zoom value through its slider up to 400 easily.
Step 1: First, you need to install the browser extension of Zoom on your PC. Click on the “Add to Chrome” option to download and install this extension on your Chrome browser.

Step 2: Open your Facebook account and play your live stream video. On the top right corner, you can see the “Extension” icon where all your added extensions are pinned. Select Zoom extension, and through its displayed slider, you can increase the zoom value easily. You can also press the “+” button from your keyboard to zoom in on the Facebook video through this extension.

Part 2: How to Zoom in Facebook Livestream on Android
If you are watching live stream videos of Facebook on an Android device, you can also zoom in by modifying your phone’s settings. To do so, here are basic steps:
Step 1: From your Android phone, reach out to the “Settings” to open its menu. From this menu, find the option of “Accessibility” from “Additional Settings” and click on it.

Step 2: On the accessibility screen, tap on the option of “Vision” and then locate the section called “Display.”

Step 3: Now, find the option of “Magnification” and tap on it. Afterward, select the “Magnification Shortcut” and turn on the toggle of magnification.

Step 4: Now, go back to your Facebook account to use your accessibility feature. You have to first tap on the icon of the small person at the bottom right corner of your screen. Now you can tap anywhere on your screen to zoom in.

Step 5: To zoom in on a live stream video of Facebook, expand your two fingers by placing them on the screen. Thus you can easily zoom in on any specific part of the Facebook video easily. For zooming out, move your fingers in an inward direction to pinch the screen. Also, to zoom back into a default mode, click on the accessibility feature.

Part 3: How to Zoom in Facebook Livestream on iPhone
As Android devices give options to zoom in and out easily, iPhone users can also change their settings to use the accessibility feature quickly. To use the accessibility button on iPhone devices, use the following steps:
Step 1: On your iPhone, go to the “Settings” and scroll down its menu. Here you can find the option of “Accessibility,” so tap on it to open its menu.

Step 2: From the accessibility menu, locate the option of “Zoom” and click on it. Now tap on its toggle to turn it on.

Step 3: Afterward, click on “Zoom Region” and then tap the option of “Full Screen Zoom.” Now leave your settings and go back to your Facebook account.

Step 4: To zoom on Facebook portal, double-tap from your three fingers on any specific part of your screen that will activate the accessibility feature.
Step 5: To change the zoom value, you have to triple-tap the screen with your three fingers. Options will pop up from where you can use the magnifying slider to change the zoom level by either moving it to the right or left.

Step 6: If you want to navigate to any part of the screen while zoomed in, use your three fingers and move them around. Also, to return to the default value of the zoom, double-tap on any part of your screen using three fingers.
Conclusion
Facebook is the most popular app across the globe that offers a single and enhanced platform for sharing and posting various kinds of information. Through Facebook live stream videos, users can get details and related information instantly through a live video.
However, if you are struggling to catch a clear vision in live stream videos, you can zoom on Facebook app by using our provided guidelines in this article. Thus, you can have a clear and focused vision by zooming in on live stream videos on Facebook.
Add Selective Color Effect to Your Videos Using Filmora
Selective color is an effect that lets you desaturate all the colors in a photo or video while preserving one or more colors of your choice. It is done by isolating a specific color of your choice in the frame while all other colors turn into black and white, just like this.

By using this effect, we can draw viewers’ attention to a specific point in the clip. If you want your video do the same, Filmora can be a good helper. Alright, we’ll be creating selective color effects in two examples. Let’s get started.
Tutorial 1 on making color isolation by selective color effect
In this first example, we are going to use stock footage showing a subject on a bike.
To add a selective color effect, download Wondershare Filmora on your PC or Mac. Now follow the steps as explained below to add this effect and isolate the color of your choice.
Free Download For Win 7 or later(64-bit)
Free Download For macOS 10.14 or later
Step1 Launch Wondershare Filmora and drag and drop your clip to the timeline.
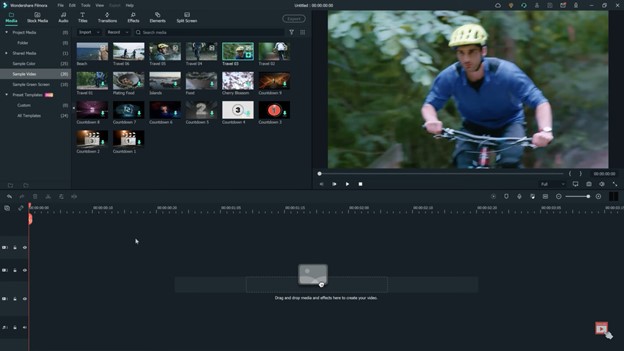
Step2 Go to effects and then click “NewBlue FX” option and select Newblue filters.
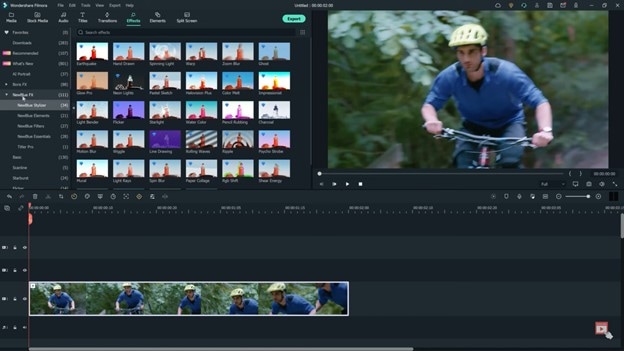
Step3 Find the Selective Color Effect and drag it onto the clip. The effect will be instantly applied.
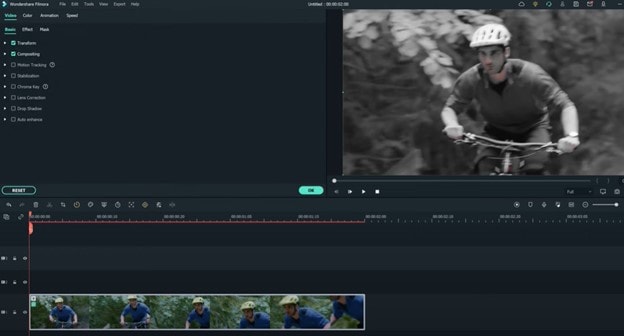
Step4 Next, double-click on the clip and check out the effects menu at the top of the screen.
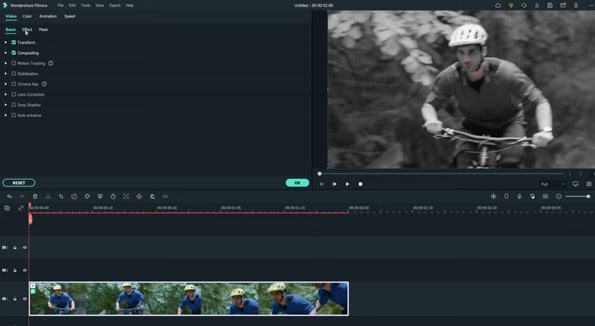
Step5 Open the preset drop-down menu. There will be a lot of presets with different colors. Select the preset you want to use. In this scenario, let us select Just Blue.
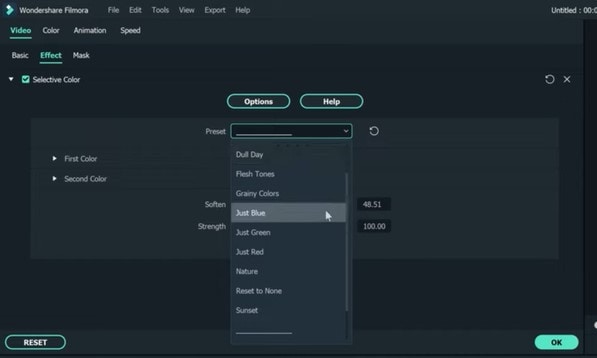
Step6 If you see a blue tint at a place or object which you want to be white and black, click on the first color.
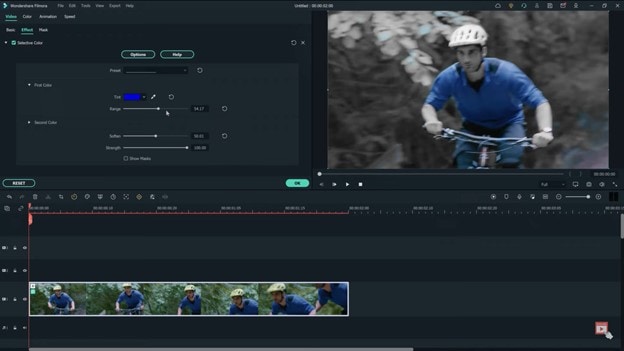
Step7 Now adjust the range slider to decrease the number of unwanted tints.
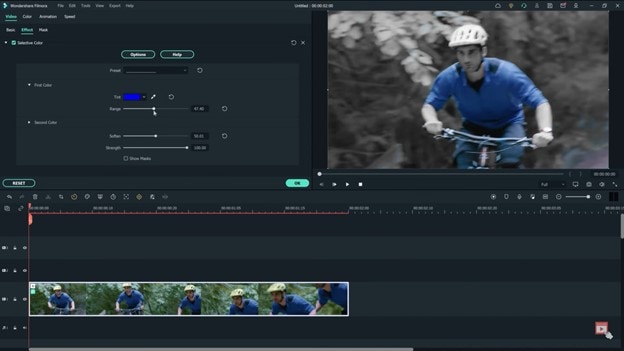
Step8 To blur the edges of the effects, turn up the softened slider and remove any unwanted tint previously remaining.
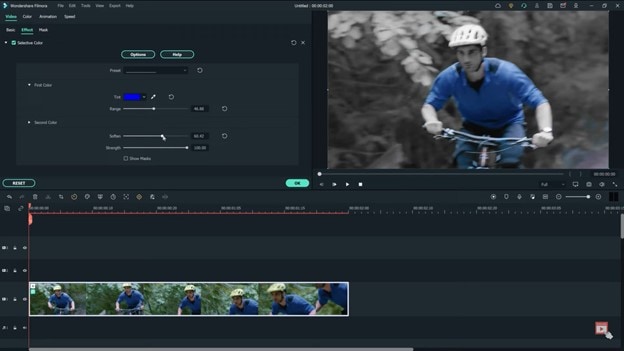
In this way, you can add a selective color effect to your video clips and isolate the color of your choice.
Tutorial 2 on make color isolation using eyedropper tool
You might ask how do we use the eyedropper tool here. It can sample colors from anywhere in a video or an image and add them to your swatch panel. The steps to use the eyedropper tool to add a selective color to your video are below.
Step1 As same as the first one, launching Wondershare Filmora is the first priority. And drag your clip to the timeline.
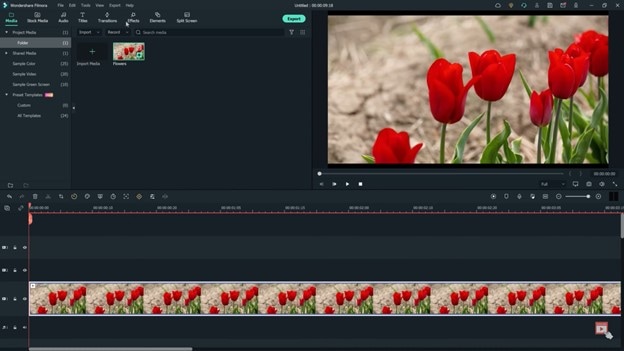
Step2 Go to effects at the top, and find Newblue effects, and click on the Newblue filters.
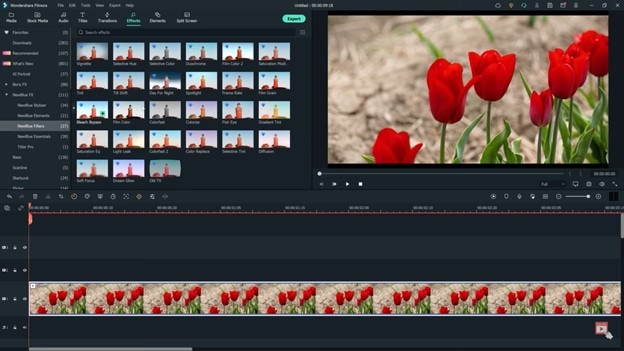
Step3 Find the selective color effect and drag it to the clip.

Step4 Double-click on the clip and visit the effects menu at the top of the screen.

Step5 Click on the ‘first color’ and select the eye dropper tool. This will allow us to select the red flower in the preview window. You can also click different parts of the image to get the color that we want.
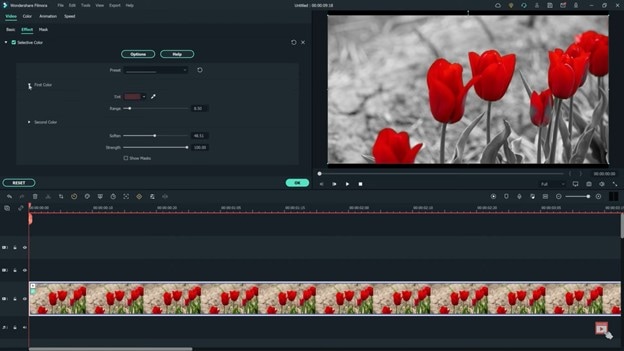
Step6 Next, try selecting a second color to isolate within our shot. In this example, we are going to make the stems on the flowers stand out as well. Select second color and go to the tint section. And find a color that is close to the second color, which will be green in this case.
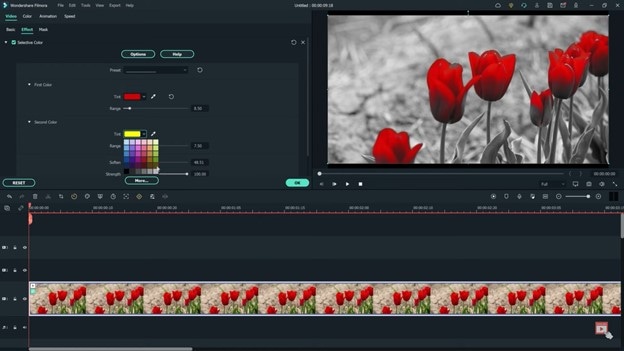
Step7 Pick the eyedropper tool and click it on the green part of the clip. Then adjust the range slider as needed.
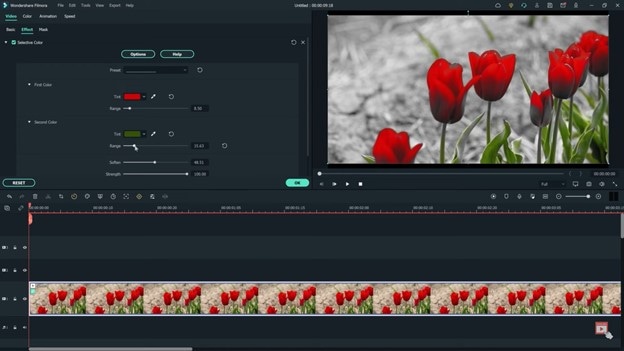
Alright, let’s watch back the video to see how both colors are now isolated.

Follow all the steps in the correct order. This is how you can use NewBlue effects for color isolation using Wondershare Filmora. The color isolation using the selective color effect defines the point of interest in the clip for the viewers.
Free Download For macOS 10.14 or later
Step1 Launch Wondershare Filmora and drag and drop your clip to the timeline.

Step2 Go to effects and then click “NewBlue FX” option and select Newblue filters.

Step3 Find the Selective Color Effect and drag it onto the clip. The effect will be instantly applied.

Step4 Next, double-click on the clip and check out the effects menu at the top of the screen.

Step5 Open the preset drop-down menu. There will be a lot of presets with different colors. Select the preset you want to use. In this scenario, let us select Just Blue.

Step6 If you see a blue tint at a place or object which you want to be white and black, click on the first color.

Step7 Now adjust the range slider to decrease the number of unwanted tints.

Step8 To blur the edges of the effects, turn up the softened slider and remove any unwanted tint previously remaining.

In this way, you can add a selective color effect to your video clips and isolate the color of your choice.
Tutorial 2 on make color isolation using eyedropper tool
You might ask how do we use the eyedropper tool here. It can sample colors from anywhere in a video or an image and add them to your swatch panel. The steps to use the eyedropper tool to add a selective color to your video are below.
Step1 As same as the first one, launching Wondershare Filmora is the first priority. And drag your clip to the timeline.

Step2 Go to effects at the top, and find Newblue effects, and click on the Newblue filters.

Step3 Find the selective color effect and drag it to the clip.

Step4 Double-click on the clip and visit the effects menu at the top of the screen.

Step5 Click on the ‘first color’ and select the eye dropper tool. This will allow us to select the red flower in the preview window. You can also click different parts of the image to get the color that we want.

Step6 Next, try selecting a second color to isolate within our shot. In this example, we are going to make the stems on the flowers stand out as well. Select second color and go to the tint section. And find a color that is close to the second color, which will be green in this case.

Step7 Pick the eyedropper tool and click it on the green part of the clip. Then adjust the range slider as needed.

Alright, let’s watch back the video to see how both colors are now isolated.

Follow all the steps in the correct order. This is how you can use NewBlue effects for color isolation using Wondershare Filmora. The color isolation using the selective color effect defines the point of interest in the clip for the viewers.
Also read:
- Updated In 2024, How To Edit Youtube Videos In Simple Steps
- 2024 Approved A Guide to Understanding Efectum App and Some Top Alternatives
- New The Ultimate Guide to Make a Text Collage for 2024
- In 2024, Are You Interested in the Best LUTs ? Do You Want to Enhance Your Photos and Images with High-End Quality? Then, Quickly Step Into This Article for Mind-Blowing Facts on It
- New In 2024, An Ultimate Guide To Edit a Music Video Aspect Ratio and First Cut
- New 2024 Approved How to Polish Your Music Video Edits Using Filmora
- Updated 10 Best Text to Robot Voice Generators Windows, Mac, Android, iPhone & Online
- New 100 Workable How to Mask Track with Adobe Premiere Pro for 2024
- New In 2024, 4 Ways to Loop a Video on Vimeo
- 2024 Approved How to Upload the Video to Twitch? Well, if You Dont Know the Process, This Detailed Guide Will Help You. While Explaining the Process, This Article Will Also Let You Know some Twitch Video Upload Guidelines
- Updated How Can You Create Outstanding Educational Teaching Videos, In 2024
- How to Change the Speed of Video in DaVinci Resolve?
- Best Software or Website to Convert Video Format
- New Mastering the Technique Playing Videos in Slow Motion on Your iPhone Like a Pro
- New 2024 Approved Create Intro Video with Flixpress
- New Best Text Animations In After Effects
- New How to Blur a Still or Moving Part of Video for 2024
- In 2024, Little Tricks to Create Canva Slideshow No One Is Telling You
- The Upcoming Generation of AR and VR Is Going to Define Augmented Reality Conferencing as the New Normal for All Business Purposes. With a Global Perspective to Build Better Communication, AR Can Be the Future of Collaborative Workspace for 2024
- New MP3 Cutter Download
- 2024 Approved Blender Tips - How to Make Blender Render Transparent Background
- New 2024 Approved Best Ai Generated Memes
- New In 2024, The Ultimate Guide to Slideshow Maker with Music
- How To Fix Part of the Touch Screen Not Working on Samsung Galaxy M34 5G | Dr.fone
- Top 5 Xiaomi Redmi A2+ Bypass FRP Tools for PC That Actually Work
- How to Change/Fake Your Honor Magic 6 Pro Location on Viber | Dr.fone
- How to Downgrade iPhone 14 Pro to the Previous iOS Version? | Dr.fone
- In 2024, How to Track Vivo V30 by Phone Number | Dr.fone
- Home Button Not Working on Realme Note 50? Here Are Real Fixes | Dr.fone
- Play Store Not Working On Motorola Moto G13? 8 Solutions Inside | Dr.fone
- How to Rescue Lost Pictures from Honor X50i+?
- Everything You Need to Know about Lock Screen Settings on your Nokia 130 Music
- How To Pause Life360 Location Sharing For Oppo F23 5G | Dr.fone
- How to Detect and Remove Spyware on Apple iPhone 14 Pro? | Dr.fone
- In 2024, Top 6 Apps/Services to Trace Any Vivo X100 Pro Location By Mobile Number | Dr.fone
- 2 Ways to Monitor ZTE Nubia Flip 5G Activity | Dr.fone
- In 2024, How to Track a Lost OnePlus Open for Free? | Dr.fone
- In 2024, Apple ID is Greyed Out On Apple iPhone 13 Pro How to Bypass?
- How to Bypass FRP from Tecno Pova 5 Pro?
- In 2024, Pokémon Go Cooldown Chart On Samsung Galaxy A24 | Dr.fone
- Title: Updated How to Make Video Slow Motion? Complete Guide
- Author: Chloe
- Created at : 2024-04-24 07:08:12
- Updated at : 2024-04-25 07:08:12
- Link: https://ai-editing-video.techidaily.com/updated-how-to-make-video-slow-motion-complete-guide/
- License: This work is licensed under CC BY-NC-SA 4.0.


