
:max_bytes(150000):strip_icc():format(webp)/jens-kreuter-85328-c5ada5fb87224444a49aaa4ad1e16897.jpg)
Updated How to Make Your CSGO Montage Impressive
How to Make Your CSGO Montage Impressive
CSGO (Counter-Strike: Global Offensive) is a popular objective-based multiplayer FPS (first-person shooter) released in 2012. The developers of this game are Hidden Path Entertainment and Valve. It’s one of the world’s most popular global eSports video games remains one of the most popular global esports, with millions of people playing it. Many people also love watching other skilled gamers play CSGO as montage videos.
With that in mind, we’ll explain how you can make CSGO montage videos and add effects to make them stand out and engaging.
How to Make Your CSGO Montage
If you are wondering: How can I create a CSGO montage video? Follow these steps:
Step1Record Your CSGO Gameplay
CSGO is compatible with Linux, PlayStation 3, Xbox 360, macOS, and Windows. You can record the CSGO demo by going to the top menu. The application will ask you to select the Capture option. Here, you can define the area you want to record and the audio settings. Specify a location where you want to save your recorded file.
You can also use a screen capture tool, such as Wondershare DemoCreator, to record your CSGO gameplay. The software saves the video clips you have captured on your PC’s hard drive.
To record your CSGO gameplay using DemoCreator, follow the steps below:
- Open the software and click “Capture.” You can set various specifications, including the audio settings for your recording and the recorded area.

Record Screen with Democreator
- Specify the location where you would like to save your recorded file.
- Press F10 or click the start capturing option to start the recording. By indicating you’re recording a game, you’ll be able to increase the frame rate.
- Click on F10 to stop the recording. The program will save the file on your PC.
Step2Choose Background Music that Fits Your CSGO Montage
The capability of music conveying emotions, authentic interactions, and a sense of realism is crucial to the viewers’ watching experience. It holds the attention of viewers and makes them want to continue watching your gaming montage.
Make sure the music you choose fits the theme of your CSGO montage video. The right music will provide a constant through-line that ties numerous CSGO gameplay clips together. What’s more? It can lend your montage a level of professionalism while giving it a polish.
Only use royalty-free music in your montage video, as this means you won’t pay any ongoing royalties when you use the music track. There are loads of royalty-free music libraries online, where you can find non-copyrighted montage music. These include StoryBlocks, FreeSound, and SoundCloud.
Once you’ve found the music you like, download it and use it in your CSGO montage video.
Step3Download Video Editing Software
You’ll need video editing software to put your series of CSGO gameplay clips together and make a montage video. While you’ll find numerous desktop-based video editing programs available, choose the best one.
A reliable video editing software should be user-friendly. The last thing you want is to get a video editing program that will make you spend months trying to learn how to edit your first montage video.
Pick a program with video editing templates; this will allow you to create CSGO montage videos swiftly because you only have to substitute the existing placeholder media with the content you are making. It should also have special effects and music.
If you’re tired of the plain and common video editing effects, check out Filmora. This video editing software has tons of cool effects that you can add to your CSGO montage videos.
Why We Need to Add Effects to Our CSGO Montage
Adding effects to your CSGO montage is crucial because of various reasons. They produce powerful entertainment for viewers. Special effects provide a creative way to spice up your gaming montage views. You can use them to captivate your audience and make them feel like your video is realistic.
Effects also help you add emotions and personality to your CSGO montage videos. You can also use them to set the tone and ensure your audience enjoys an exhilarating viewing experience.
Additionally, effects help you set the stage for your next scene, convey a mood, and move the story along. You can use them to emphasize the action occurring in the video and make viewers focus on it.
Useful Effects in Filmora that Can Make Your CSGO Video Impressive
We’ll now explore some of the effects Filmora offers on their video editing software. You can use them to make epic CSGO montage videos. Let’s dive in.
1. Split Screen Effect
Also known as video overlaying or picture-in-picture effect, Filmora’s split-screen effect allows you to display two or more video clips simultaneously in up-down style or side by side. You can use it to tell your story creatively by showing multiple viewpoints.
Filmora offers a range of animated split-screen layouts that you can use in your gaming montage video. You can also add multiple split screens.

Split Screen
2. Pan and Zoom
Also known as the Ken Burns effect, Fimora’s Pan and Zoom effect allows users to focus on specific parts of their CSGO montage video. You can use this feature to zoom in on an object or scenery to create movement or evoke emotional storytelling experiences in the video.
3. Fast Motion
Filmora’s time-lapse or fast motion effect makes your video clip play faster. The software allows you to increase the speed of your montage video by dragging the speed slider or the duration you need.
4. Transitions
Transitions improve the flow of your montage video and help you capture the viewers’ attention, as they make it look professional and cinematic. Filmora has loads of transitions that you can add between video clips to add interest and improve the flow of your montage video.
5. Overlays
Filmora has tons of overlays that you can apply to your CSGO montage videos. You can overlay a video clip on a video and an image or photo on your video. You can also size and mask the video overlay, adjust the position of the overlay, and add elements and animation to your video overlay.
6. Filters
The software allows you to add as many filters as you want to your montage video. These filters can dramatically change the feel and look of your gaming montage in a couple of clicks. You can add glitch effects, make your video shake or black and white, and much more.
Wondershare Filmora11 Express Better
Achieve More
Grow Together
Free Download Free Download Learn More

![]()
Step-By-Step Guide to Adding Effects to Your CSGO Montage Using Filmora
Applying transitions, overlays, filters, and transitions is a breeze. Just follow the steps below.
- Launch Filmora and import your video file. You can do this by pressing Ctrl+I. A window will then pop up and allow you to find your video.
- Select the video and click on the Open button to import it to Filmora’s media library.
- Drag your CSGO montage and drop it to the timeline.

Import Media
- To add transitions, head to the Transition tab. Here, you will find tons of transitions that you can use.

Add Transition
- Choose the transition you want, then drag it to the beginning or end of the gaming montage in your timeline.
- To add an overlay to your montage video, go to Effects>Overlay. You’ll find several categories here; click on one subcategory to check the available overlays. To add the effect, drag the overlay you like to your timeline. You can also take your mouse on the overlay effect, then click the plus icon to add the effect to your video.

Add Overlays
- To add a filter effect to your montage, go to Effects and select the Filters option on your left side menu. Here, you’ll find several categories of filters. Choose the one you like and drag it to the video on your timeline. Double-click on the effect if you want to make changes to the filter.

Add Filters
- To pan and zoom your video, right-click on your video in the timeline, then select the Video option and click on Crop and Zoom. Now select the Pan & Zoom option. You’ll see frames marked blue and orange over the video clip viewer. Click the Start frame, then modify the pan and zoom with the resizer and dragger to get the desired results before clicking the End frame.

Pan & Zoom
- To add the Fast Motion effect, right-click on your montage video on the timeline and select Speed. Click on the Uniform Speed option. Now, drag the speed slider to the right side to increase the speed of your video.

Fast Motion
Once you have made all the changes in your CSGO montage, click Export. This option allows you to export and save your video on your computer.
Closing Thoughts:
You can make an impressive CSGO montage video that will capture the attention of viewers and get lots of views. Use Filmora to add effects that will make your gaming montage stand out and keep viewers watching until the end of the video.
Free Download Free Download Learn More
![]()
Step-By-Step Guide to Adding Effects to Your CSGO Montage Using Filmora
Applying transitions, overlays, filters, and transitions is a breeze. Just follow the steps below.
- Launch Filmora and import your video file. You can do this by pressing Ctrl+I. A window will then pop up and allow you to find your video.
- Select the video and click on the Open button to import it to Filmora’s media library.
- Drag your CSGO montage and drop it to the timeline.
Import Media
- To add transitions, head to the Transition tab. Here, you will find tons of transitions that you can use.
Add Transition
- Choose the transition you want, then drag it to the beginning or end of the gaming montage in your timeline.
- To add an overlay to your montage video, go to Effects>Overlay. You’ll find several categories here; click on one subcategory to check the available overlays. To add the effect, drag the overlay you like to your timeline. You can also take your mouse on the overlay effect, then click the plus icon to add the effect to your video.
Add Overlays
- To add a filter effect to your montage, go to Effects and select the Filters option on your left side menu. Here, you’ll find several categories of filters. Choose the one you like and drag it to the video on your timeline. Double-click on the effect if you want to make changes to the filter.
Add Filters
- To pan and zoom your video, right-click on your video in the timeline, then select the Video option and click on Crop and Zoom. Now select the Pan & Zoom option. You’ll see frames marked blue and orange over the video clip viewer. Click the Start frame, then modify the pan and zoom with the resizer and dragger to get the desired results before clicking the End frame.
Pan & Zoom
- To add the Fast Motion effect, right-click on your montage video on the timeline and select Speed. Click on the Uniform Speed option. Now, drag the speed slider to the right side to increase the speed of your video.
Fast Motion
Once you have made all the changes in your CSGO montage, click Export. This option allows you to export and save your video on your computer.
Closing Thoughts:
You can make an impressive CSGO montage video that will capture the attention of viewers and get lots of views. Use Filmora to add effects that will make your gaming montage stand out and keep viewers watching until the end of the video.
How to Use LUTs in VN Editor – Complete Guide and Best LUTs Download
Hello and welcome to another article full of information and excitement. The topic of this article is LUT for the VN editor. So it will be exciting for those who want to use LUTs in their video to make them look nice and well. As we will discuss today that what is VN editor and how you can add LUTs to your videos using it on the devices it is compatible for. Moreover, where you can download some fantastic LUTs like moody LUTs, which help your videos to look nice, and which software you should use for this purpose if you are running a device on which the VN editor is not compatible. So let’s begin!
Part 1. What is VN editor?
VN editor is one of the best choices for video editing on mobiles and Mac. Fast editing, transitions, effects, filters, colors, subtitles, music, and many other features make the VN video editing app a great tool for producing and editing videos. It aims to make editing shorter and more feature-rich, empowering everyone to take control of their own lives. You cannot only produce great videos but good films as well. In the following, we will discuss how you can add LUTs to your videos using it.

Part 2. How to use LUTs in VN editor?
First, we must know that it is compatible with which platforms. So, it is now available for Android, iOS, and Mac OS only. However, you can also use it on Windows with some Android or iOS emulators, but it is not a very continent way in our suggestions. Even after doing this, it does not work well on your Windows. Maybe you will face some glitches or malfunctioning problems. So it is better to use it on only those platforms for which it is primarily available. Please read the instructions below since we will go through how to use LUTs in it later on.
On Mac:
First of all, we will learn how you can do it on Mac:
- Download the VN Editor for Mac and open it.
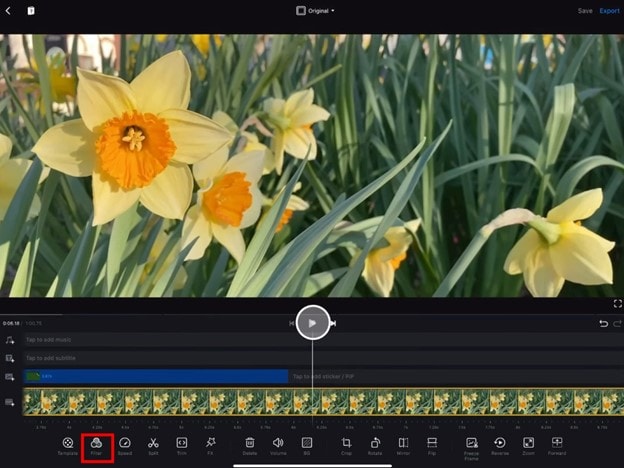
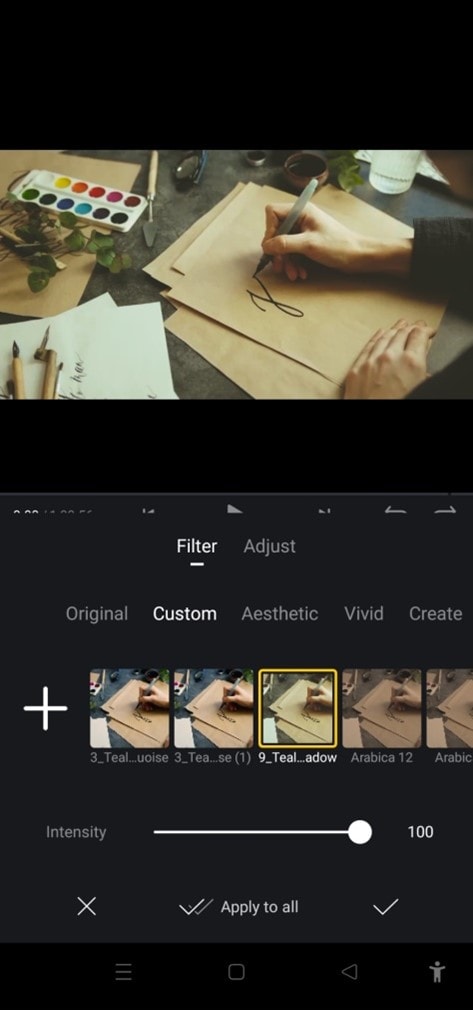
- Add your video and then tap the filters option.
- Now choose custom filters and then select the LUTs pack.

- Select the desired LUT and apply.
On Mobile:
Secondly, we will discuss how we can do this on our mobiles (Android or iOS). The procedure on both devices (Android or iOS) is almost comparable. Therefore, we will discuss the steps from the perspective of both of these here:
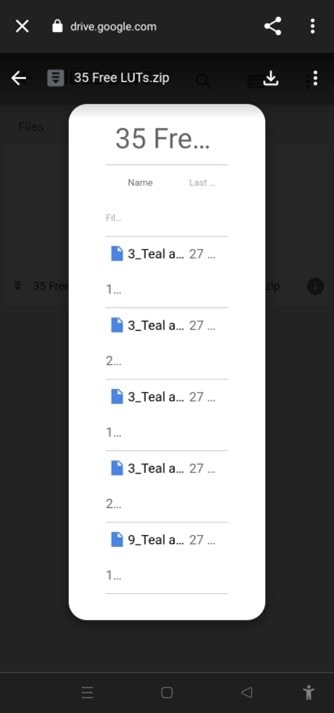
- First, download the VN editor from your mobile app store (Android or iOS) and the LUTs pack you want to use in your video.
- After downloading them on your mobile, open the VN editor application.
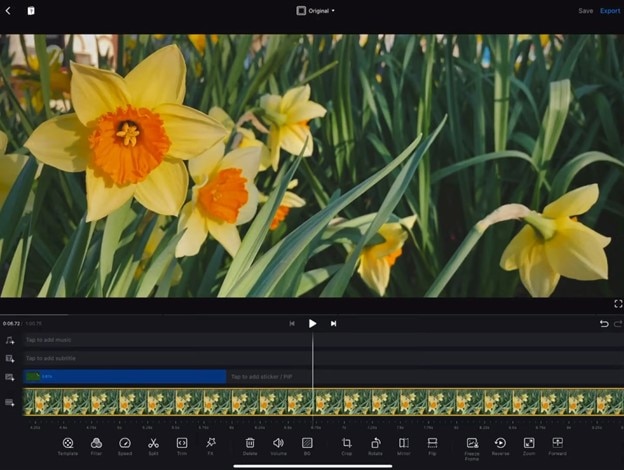
- Create a new project and add your video to it.

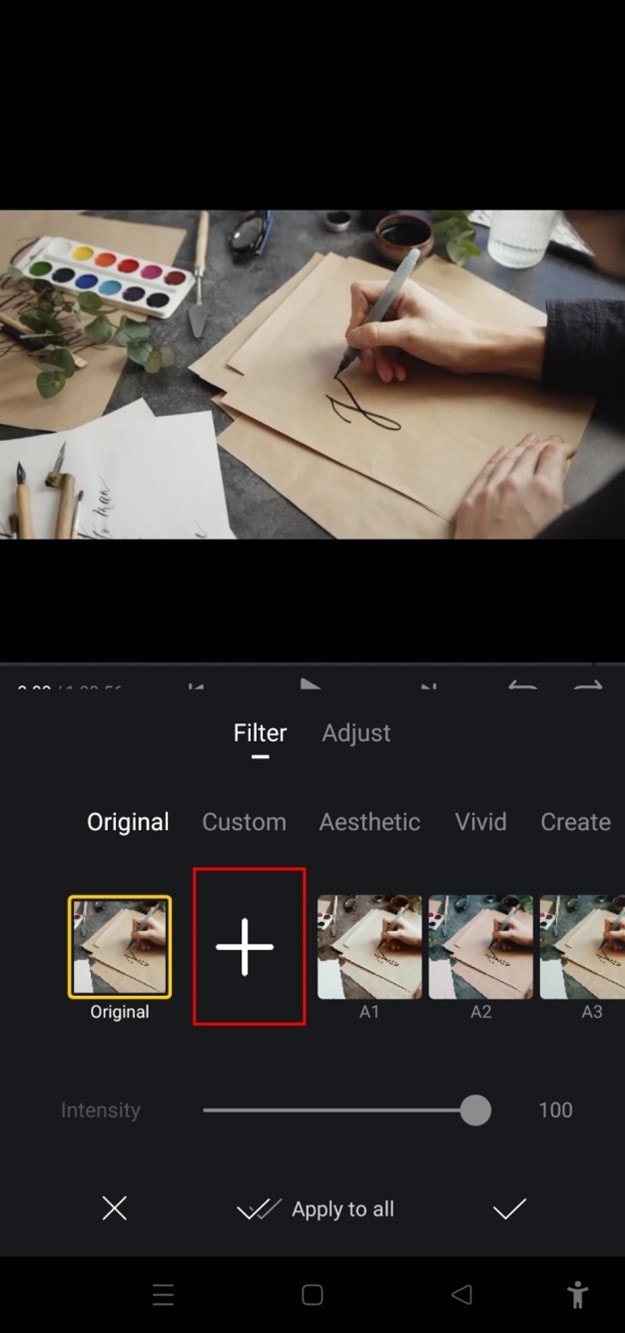
- Then click on the Filters option and select add external or custom filters option next to the existing filters.
- It will take you to the File manager of your mobile, from which you have to find the folder in which you have stored your LUTs.
- After finding them, you can select those LUTs you want to use in your video and then click on the done or select button.
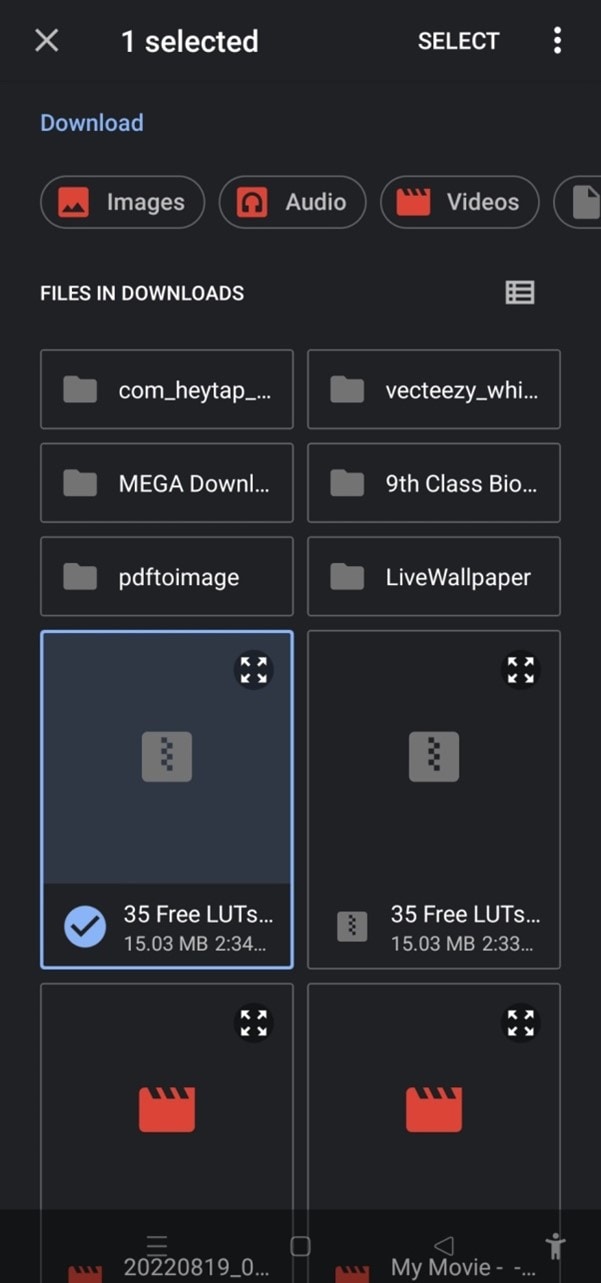
- Your downloaded LUTs start showing in the VN editor, and you can use them in your videos as you want.
Part 3. Best LUTs resource for VN video editor
1. Presets Store
Presets Store is an online platform that helps you with various Filters, LUTs, and other presets. So you can download LUTs for your videos for the VN editor using it. However, it’s not a free service. You have to pay for the LUTs you want to download from here. You can visit their YouTube channel to follow the latest LUTs, Filters and other presets on this platform.
2. Apna Editz
Apna Editz is another online platform you can use for this purpose. It also provides you with a fantastic variety of Presets like LUTs, Filters, and many other similar effects, which you can use in your video using the VN editor. The main Pros of this recommendation are that it’s a free website. So you can download LUTs for your videos from it for free. Keep an eye on their YouTube channel to be updated about the latest LUTs.
3. Lut Preset
Lut Preset is another alternative to all the above ones. You can get almost all your favorite LUTs for VN editor for free here and then use them in your videos as you want. They also share the latest LUTs on their YouTube Channel.
4. Pencil Hub
Pencil Hub is also a good option in this concern. However, it does not have too much variety of VN LUTs, but you can still use it to download some of the best LUTs for VN editors. To get informed of their every new effect and LUTs, their YouTube channel is the primary source.
5. YRP EDITZ
YRP ETIDZ is another good option if you are still looking for some fantastic VN LUTs. They, too not have a large variety of presets and LUTs. However, if you want some most commonly used LUTs for VN Editor, then they are a good option. You’ll notify of their most website updates by checking their YouTube channel.
Part 4. How to add LUTs to the best alternative to the VN editor?
VN Editor is undoubtedly an excellent choice to add LUTs to your videos. However, the VN editor is best suitable for mobile devices. To enhance your LUTs and effects, it would be great if you used some desktop software. Wondershare Filmora offers a great variety of built-in LUTs to choose from. Let’s look at how we can use Filmora to add LUTs:
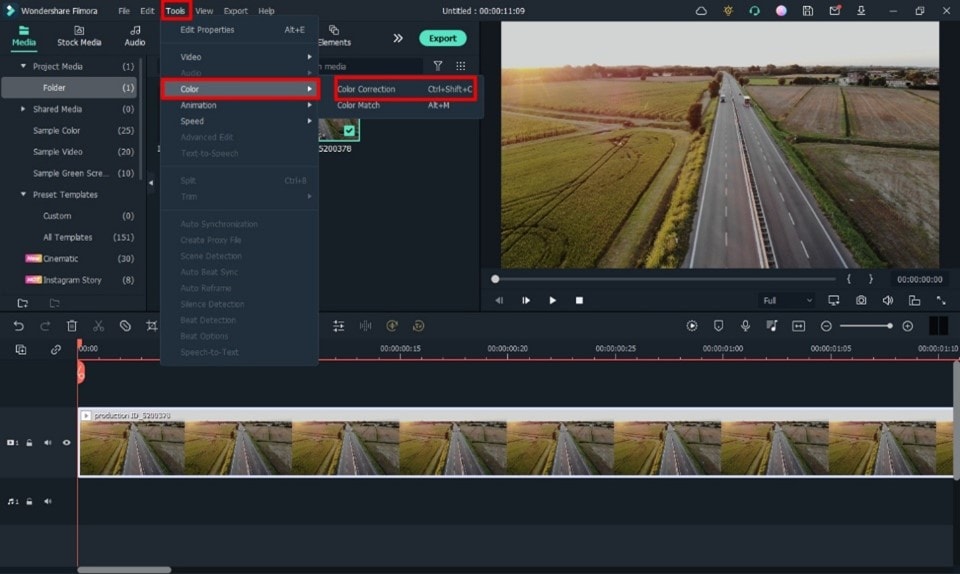
- Add your video and tap the tools, then click the Color option.
- Now select the Color Correction option and then choose 3D LUT.
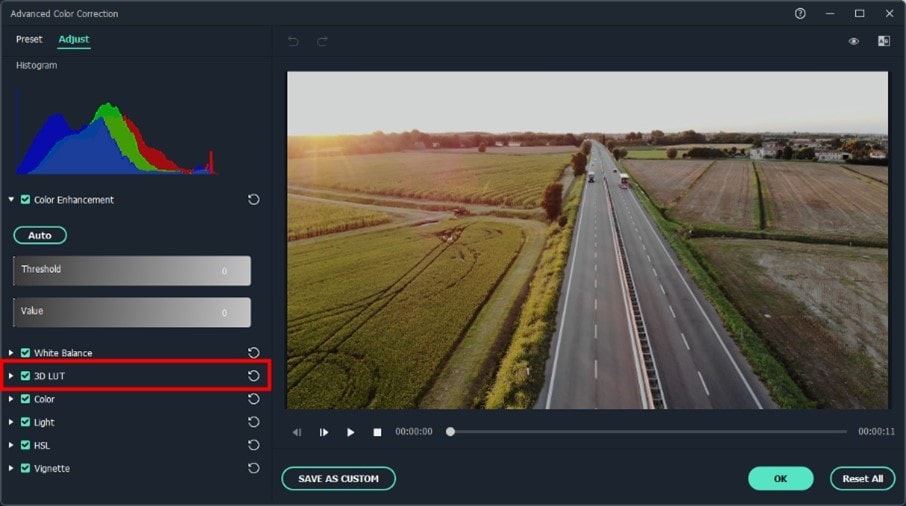
- Click the drop-down menu and select the Load new LUT option. Here you can import other downloaded preset LUTs to use
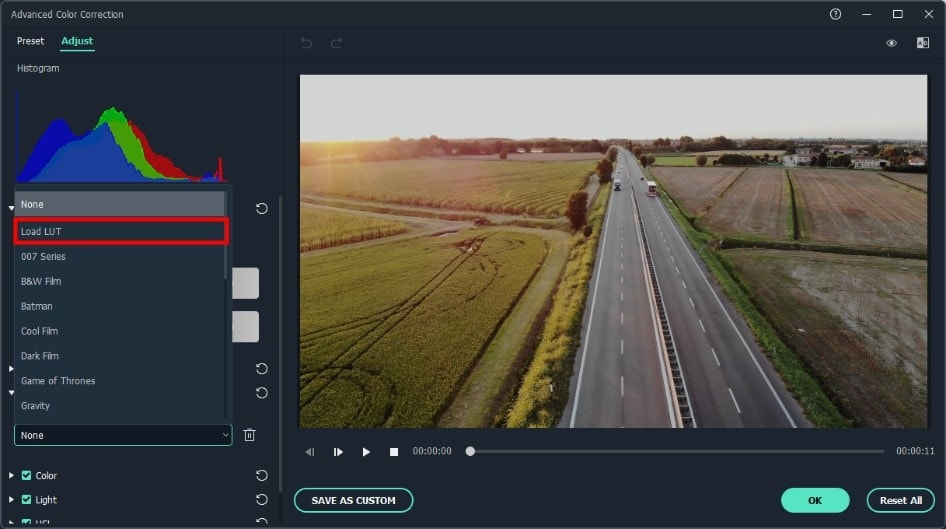
- Choose the LUT and click OK. Your new fantastic video is ready now.

Closing Thoughts
This post recommends several lut resources and demonstrates how to import them if you are a devoted user of VN editor and want to learn how to utilize it for video color grading. The more potent desktop editor Wondershare Filmora, which offers a range of built-in LUT sources and supports color grading settings, is of course recommended if you want to take your videos to the next level. Thanks for reading.
Free Download For Win 7 or later(64-bit)
Free Download For macOS 10.14 or later
2. Apna Editz
Apna Editz is another online platform you can use for this purpose. It also provides you with a fantastic variety of Presets like LUTs, Filters, and many other similar effects, which you can use in your video using the VN editor. The main Pros of this recommendation are that it’s a free website. So you can download LUTs for your videos from it for free. Keep an eye on their YouTube channel to be updated about the latest LUTs.
3. Lut Preset
Lut Preset is another alternative to all the above ones. You can get almost all your favorite LUTs for VN editor for free here and then use them in your videos as you want. They also share the latest LUTs on their YouTube Channel.
4. Pencil Hub
Pencil Hub is also a good option in this concern. However, it does not have too much variety of VN LUTs, but you can still use it to download some of the best LUTs for VN editors. To get informed of their every new effect and LUTs, their YouTube channel is the primary source.
5. YRP EDITZ
YRP ETIDZ is another good option if you are still looking for some fantastic VN LUTs. They, too not have a large variety of presets and LUTs. However, if you want some most commonly used LUTs for VN Editor, then they are a good option. You’ll notify of their most website updates by checking their YouTube channel.
Part 4. How to add LUTs to the best alternative to the VN editor?
VN Editor is undoubtedly an excellent choice to add LUTs to your videos. However, the VN editor is best suitable for mobile devices. To enhance your LUTs and effects, it would be great if you used some desktop software. Wondershare Filmora offers a great variety of built-in LUTs to choose from. Let’s look at how we can use Filmora to add LUTs:
- Add your video and tap the tools, then click the Color option.
- Now select the Color Correction option and then choose 3D LUT.
- Click the drop-down menu and select the Load new LUT option. Here you can import other downloaded preset LUTs to use
- Choose the LUT and click OK. Your new fantastic video is ready now.
Closing Thoughts
This post recommends several lut resources and demonstrates how to import them if you are a devoted user of VN editor and want to learn how to utilize it for video color grading. The more potent desktop editor Wondershare Filmora, which offers a range of built-in LUT sources and supports color grading settings, is of course recommended if you want to take your videos to the next level. Thanks for reading.
Free Download For Win 7 or later(64-bit)
Free Download For macOS 10.14 or later
Why Vimeo Slideshow Maker Become More and More Popular
Why Vimeo Slideshow Maker Become Popular
An easy yet powerful editor
Numerous effects to choose from
Detailed tutorials provided by the official channel
Have you recently heard about Vimeo from any of your friends or colleagues? Or have you come through it and want to know more about it? Then here you can get all information needed about the platform. Vimeo slideshow creator is a wonderful tool launched by a group of filmmakers in 2004.

It has gained a lot of popularity over the past decade and appears as the competitor of largest video sharing giant YouTube. The platform has approximately 80 million users and 1 million subscribers. In some ways, Vimeo is even better than YouTube.
In this article
01 [What Is Vimeo for & Why It Become Popular](#Part 1)
02 [Tips for a Great Slideshow Video](#Part 2)
Part 1: What Is Vimeo for & Why It Become Popular
Vimeo is an online video streaming and editing tool which is designed for video creators and artists. The platform provides various tools to its users including monetization, marketing, collaboration, post-production, management, storage, etc. It provides a great user experience because it is ad-free. The mode of revenue for the owners of Vimeo is a software as a service (SaaS). They provide paid subscription plans for creating and editing videos, broadcasting tools, connecting with clients, etc.

It works in a “freemium” model. That means the users have limited access to the platform if they are using it for free. For example, a basic free membership allows the user to have access to a total of 5GB of storage and can upload 500MB on a weekly basis. As a free or paid member of Vimeo Slideshow maker, you can like, comment on videos, and at the same time save, watch, and upload them. Also, you can create playlists. What features you will be able to access totally depends on your membership level and plan.
Vimeo is becoming popular due to the following reasons:
01Vimeo offers better encoding and video quality
Vimeo is more focused on the quality of the video that gets uploaded on it. Its processing load is lighter and it follows strict guidelines to accept videos. The platform uses better encoding techniques to maximize the quality of the video.
02Vimeo offers greater prestige
Being on Vimeo is a matter of prestige. Vimeo videos are considered more professional as compared to Youtube. There is a limit on what kind of channels one can run on Vimeo.
03Vimeo has a more sophisticated audience
Because of the high quality of videos and its prestigious nature, Vimeo has a more sophisticated fan base. The content offered by the platform is more knowledgeable and determined. The audience here is more sophisticated. Also, the creators are more insightful, mature, and constructive.
04Vimeo offers greater artistic freedom
Vimeo always welcomes the creators with their videos to show their art. It offers artistic freedom to its users. The platform checks the artistic value of the video and talent of the creator and allows them to upload, unlike Youtube.
05Vimeo boasts unique features and customizations
There are certain unique features of YouTube which make it a great platform for its users.
● Plus, Pro, Business, Premium Plans
Vimeo is funded by its community and you have to purchase the plan to use it apart from the free features. Different Vimeo plans are:
Vimeo - $7/month
Pro - $20/month
Business - $50/month
Top-tier Vimeo Premium - $75/month.
● Make money with pay per view
Just like Google’s PPC program, Vimeo also features a pay per program view where viewers need to pay in order to watch certain videos. With this, you can sell your art anywhere in the country or worldwide and make money with it.
● Advanced analytics
The subscribers of Vimeo are offered different levels of analytics. You will get the analytics according to your subscription level. The analytics levels on Vimeo consist of Google Analytics integration, engagement graphs, custom reports, and a traffic dashboard.
● Web player branding
Vimeo allows the users to use their own branding and logo in their videos. It makes all the embedded videos share the same look and ends with an unsightly suggestions page.
● Domain-restricted embeds
Vimeo offers the users a feature of domain-restricted embeds. It means the users can set the domains to embed any particular or a set of videos. This feature lets you hide the video on Vimeo and make it visible on the allowed domain.
● Password protection
It is an extraordinary feature that Vimeo offers. The user can set a password for the particular video to restrict the video’s visibility. Only those people who will have access to the password will be able to watch that particular video.
● Replace video but keep URL
This one is also an amazing and unique feature of Vimeo. With this feature, you can replace any existing video with the new one by keeping the same URL. Also, it will keep the stats, comments, likes, etc as it is.
Part 2 Tips for a Great Slideshow Video
Videos are gaining much popularity these days. It is an easy way to connect with people and show emotions to them. In the same way, slideshow videos also are important in their place. Slides are the collection of traditional photos or negatives which are out of trend now. And slideshow videos are the perfect way to use those slides and relieve those faded memories with loved ones. Creating the slideshow video is also easy and can be done easily with the help of some tools. You don’t need to be professional, but the only need is to follow certain tips carefully. Here, we are sharing the essential tips to prepare a great slideshow video. Also, you will get to know about the best tool for video creation.
● Tell a story
Prepare the slideshow video in the form of storytelling. Whatever is the theme of your slideshow, prepare the script of the video right from the start. Make a meaningful and impressive story. Select and collect the raw materials according to the requirement.
● Keep it cohesive
The cohesion of photos or images is very important in a video slideshow. It is advised not to mix and match still photos and videos in 1 slideshow. Also, choose the photos belonging to the same color family. Mixing different varieties of photos divert the attention of the viewer. Also, one warm photo, then one cool and so on are not the efficient choices for a slideshow. All the images should appear as part of one color family and are similar to one another. Always maintain the quality of photos throughout the slideshow. Gradual jumps between grainy portrait mode photos and some screenshots, meanwhile photos of other modes lead to distracting the viewer and blurring their experience.
● Make it personal
Video slideshows are a powerful tool to show your personality and your personal message. The videos should contain your feelings. So, customize them and make them as personal as you can. Give your uniqueness to your slideshows. For this, you can customize the color palette, text, etc and make them unique and personal. So that the people with whom you share the videos may also feel your touch.
● Keep slideshow videos short
There might be different aims for creating a slideshow video. You might want to share it with loved ones or any of your friends’ circle. Or you might be wanting it to post as an ad on social media platforms such as Instagram, or Facebook. Whatever the purpose of your making the video, keep them concise and short. Short video clips are best for grabbing the attention of the viewers. Everyone does not find it interesting to watch long-form videos. If you are aiming to make a longer-form video slideshow which contains both images and video clips, then keep each photo for 3 to 5 seconds and each video clip a maximum of 20 seconds. It is recommended to maintain the user’s interest throughout.
● Create a storyboard to plan your slideshow video
As we have already discussed in the above point, the video should depict your story. Also, it should be in sync to make it more compelling. Creating a storyboard or outline is the perfect way to predict the right flow as well as choose the right elements for the video.
The storyboard helps to prepare a plan and develop the logical sequence of the photos. Also, if you want to add photos, video clips, texts, etc in a single slideshow, the storyboard can help to outline the sequence. With this, you will be able to create a video that will be logically correct.
● Add text to videos and images to convey your message clearly
Text or captions are very crucial to be added to the slideshow especially if you are preparing them for social media. People these days do watch the videos by keeping the sound off on social media. So, they will not be able to get your message without captions. Keep all your key messages highlighted in the video. The first few seconds of the video play an important role. It is the deciding factor whether the viewer will watch the whole video or will just bounce back. So, give a captivating hook to the slideshow to capture the viewer’s attention and make them hit the unmute button.
Wondershare Filmora Video Editor is an effective tool which can help you to create wonderful video slideshows. It provides all the functionalities which you need to make the slideshow convincing. You can make appealing videos to show your impressions to the viewers. It enables you to create slideshows with photos, videos, and captions. The color correction and gradient option in the Filmora allow you to change the look of the photos or old slides according to your choices. You can edit the slides with this tool, to make them cohesively right and create a slideshow out of them. In short, Filmora is the perfect way to make a slideshow video that can be interesting and engaging for the viewers.
For Win 7 or later (64-bit)
For macOS 10.12 or later

● Ending Thoughts →
● So, here we can conclude that Vimeo slideshow maker is an impressive platform. Despite having a smaller user base, it is gaining much popularity because of its unique features.
● Moreover, you can generate great videos by following the tips we have shared. By uploading those videos on Vimeo, you will be able to gain a decent audience base. If you are aiming to have a genuine and sophisticated fanbase for your videos, then Vimeo would be a great choice.
● Using Filmora will make your process of creating slideshows easy. The variety of features available by the tool will let you create wonderful storytelling out of your old memories.
Have you recently heard about Vimeo from any of your friends or colleagues? Or have you come through it and want to know more about it? Then here you can get all information needed about the platform. Vimeo slideshow creator is a wonderful tool launched by a group of filmmakers in 2004.
It has gained a lot of popularity over the past decade and appears as the competitor of largest video sharing giant YouTube. The platform has approximately 80 million users and 1 million subscribers. In some ways, Vimeo is even better than YouTube.
In this article
01 [What Is Vimeo for & Why It Become Popular](#Part 1)
02 [Tips for a Great Slideshow Video](#Part 2)
Part 1: What Is Vimeo for & Why It Become Popular
Vimeo is an online video streaming and editing tool which is designed for video creators and artists. The platform provides various tools to its users including monetization, marketing, collaboration, post-production, management, storage, etc. It provides a great user experience because it is ad-free. The mode of revenue for the owners of Vimeo is a software as a service (SaaS). They provide paid subscription plans for creating and editing videos, broadcasting tools, connecting with clients, etc.
It works in a “freemium” model. That means the users have limited access to the platform if they are using it for free. For example, a basic free membership allows the user to have access to a total of 5GB of storage and can upload 500MB on a weekly basis. As a free or paid member of Vimeo Slideshow maker, you can like, comment on videos, and at the same time save, watch, and upload them. Also, you can create playlists. What features you will be able to access totally depends on your membership level and plan.
Vimeo is becoming popular due to the following reasons:
01Vimeo offers better encoding and video quality
Vimeo is more focused on the quality of the video that gets uploaded on it. Its processing load is lighter and it follows strict guidelines to accept videos. The platform uses better encoding techniques to maximize the quality of the video.
02Vimeo offers greater prestige
Being on Vimeo is a matter of prestige. Vimeo videos are considered more professional as compared to Youtube. There is a limit on what kind of channels one can run on Vimeo.
03Vimeo has a more sophisticated audience
Because of the high quality of videos and its prestigious nature, Vimeo has a more sophisticated fan base. The content offered by the platform is more knowledgeable and determined. The audience here is more sophisticated. Also, the creators are more insightful, mature, and constructive.
04Vimeo offers greater artistic freedom
Vimeo always welcomes the creators with their videos to show their art. It offers artistic freedom to its users. The platform checks the artistic value of the video and talent of the creator and allows them to upload, unlike Youtube.
05Vimeo boasts unique features and customizations
There are certain unique features of YouTube which make it a great platform for its users.
● Plus, Pro, Business, Premium Plans
Vimeo is funded by its community and you have to purchase the plan to use it apart from the free features. Different Vimeo plans are:
Vimeo - $7/month
Pro - $20/month
Business - $50/month
Top-tier Vimeo Premium - $75/month.
● Make money with pay per view
Just like Google’s PPC program, Vimeo also features a pay per program view where viewers need to pay in order to watch certain videos. With this, you can sell your art anywhere in the country or worldwide and make money with it.
● Advanced analytics
The subscribers of Vimeo are offered different levels of analytics. You will get the analytics according to your subscription level. The analytics levels on Vimeo consist of Google Analytics integration, engagement graphs, custom reports, and a traffic dashboard.
● Web player branding
Vimeo allows the users to use their own branding and logo in their videos. It makes all the embedded videos share the same look and ends with an unsightly suggestions page.
● Domain-restricted embeds
Vimeo offers the users a feature of domain-restricted embeds. It means the users can set the domains to embed any particular or a set of videos. This feature lets you hide the video on Vimeo and make it visible on the allowed domain.
● Password protection
It is an extraordinary feature that Vimeo offers. The user can set a password for the particular video to restrict the video’s visibility. Only those people who will have access to the password will be able to watch that particular video.
● Replace video but keep URL
This one is also an amazing and unique feature of Vimeo. With this feature, you can replace any existing video with the new one by keeping the same URL. Also, it will keep the stats, comments, likes, etc as it is.
Part 2 Tips for a Great Slideshow Video
Videos are gaining much popularity these days. It is an easy way to connect with people and show emotions to them. In the same way, slideshow videos also are important in their place. Slides are the collection of traditional photos or negatives which are out of trend now. And slideshow videos are the perfect way to use those slides and relieve those faded memories with loved ones. Creating the slideshow video is also easy and can be done easily with the help of some tools. You don’t need to be professional, but the only need is to follow certain tips carefully. Here, we are sharing the essential tips to prepare a great slideshow video. Also, you will get to know about the best tool for video creation.
● Tell a story
Prepare the slideshow video in the form of storytelling. Whatever is the theme of your slideshow, prepare the script of the video right from the start. Make a meaningful and impressive story. Select and collect the raw materials according to the requirement.
● Keep it cohesive
The cohesion of photos or images is very important in a video slideshow. It is advised not to mix and match still photos and videos in 1 slideshow. Also, choose the photos belonging to the same color family. Mixing different varieties of photos divert the attention of the viewer. Also, one warm photo, then one cool and so on are not the efficient choices for a slideshow. All the images should appear as part of one color family and are similar to one another. Always maintain the quality of photos throughout the slideshow. Gradual jumps between grainy portrait mode photos and some screenshots, meanwhile photos of other modes lead to distracting the viewer and blurring their experience.
● Make it personal
Video slideshows are a powerful tool to show your personality and your personal message. The videos should contain your feelings. So, customize them and make them as personal as you can. Give your uniqueness to your slideshows. For this, you can customize the color palette, text, etc and make them unique and personal. So that the people with whom you share the videos may also feel your touch.
● Keep slideshow videos short
There might be different aims for creating a slideshow video. You might want to share it with loved ones or any of your friends’ circle. Or you might be wanting it to post as an ad on social media platforms such as Instagram, or Facebook. Whatever the purpose of your making the video, keep them concise and short. Short video clips are best for grabbing the attention of the viewers. Everyone does not find it interesting to watch long-form videos. If you are aiming to make a longer-form video slideshow which contains both images and video clips, then keep each photo for 3 to 5 seconds and each video clip a maximum of 20 seconds. It is recommended to maintain the user’s interest throughout.
● Create a storyboard to plan your slideshow video
As we have already discussed in the above point, the video should depict your story. Also, it should be in sync to make it more compelling. Creating a storyboard or outline is the perfect way to predict the right flow as well as choose the right elements for the video.
The storyboard helps to prepare a plan and develop the logical sequence of the photos. Also, if you want to add photos, video clips, texts, etc in a single slideshow, the storyboard can help to outline the sequence. With this, you will be able to create a video that will be logically correct.
● Add text to videos and images to convey your message clearly
Text or captions are very crucial to be added to the slideshow especially if you are preparing them for social media. People these days do watch the videos by keeping the sound off on social media. So, they will not be able to get your message without captions. Keep all your key messages highlighted in the video. The first few seconds of the video play an important role. It is the deciding factor whether the viewer will watch the whole video or will just bounce back. So, give a captivating hook to the slideshow to capture the viewer’s attention and make them hit the unmute button.
Wondershare Filmora Video Editor is an effective tool which can help you to create wonderful video slideshows. It provides all the functionalities which you need to make the slideshow convincing. You can make appealing videos to show your impressions to the viewers. It enables you to create slideshows with photos, videos, and captions. The color correction and gradient option in the Filmora allow you to change the look of the photos or old slides according to your choices. You can edit the slides with this tool, to make them cohesively right and create a slideshow out of them. In short, Filmora is the perfect way to make a slideshow video that can be interesting and engaging for the viewers.
For Win 7 or later (64-bit)
For macOS 10.12 or later
● Ending Thoughts →
● So, here we can conclude that Vimeo slideshow maker is an impressive platform. Despite having a smaller user base, it is gaining much popularity because of its unique features.
● Moreover, you can generate great videos by following the tips we have shared. By uploading those videos on Vimeo, you will be able to gain a decent audience base. If you are aiming to have a genuine and sophisticated fanbase for your videos, then Vimeo would be a great choice.
● Using Filmora will make your process of creating slideshows easy. The variety of features available by the tool will let you create wonderful storytelling out of your old memories.
Learn How to Create Inspiring Motivational Videos Using AI. Explore Tools Like Midjourney, Runway Gen2, Chat-GPT, and Filmora AI for Seamless Content Creation. Start Your Journey
In the buzzing realm of social media, motivational videos have risen as a beacon of hope and inspiration for millions. Scrolling through your feeds, you’ve likely encountered a motivational video status that tugged at your heartstrings or ignited a spark of ambition. But why are these videos so compelling?
The answer lies in the innate human desire for encouragement. These videos often blend heartwarming visuals with potent words of wisdom, creating an emotional cocktail that resonates deeply with viewers. As the dawn of 2023 approaches, the ease with which we can produce these motivational status videos is becoming unparalleled, thanks to the advancements in artificial intelligence.
- Part 2: Use Runway Gen2 to convert pictures to videos
- Part 3: Use Chat-GPT to generate motivational quotes
- Part 4: Quick solution: Filmora AI Editing tool
- Part 5: Summary
Part 1: Use Midjourney to generate motivation status images
Enter Midjourney is a cutting-edge platform that harnesses AI to generate enchanting images that capture the essence of motivation. Whether you’re looking to convey an athlete’s grit or a scholar’s determination, Midjourney has an array of templates to cater to your needs.
To begin, simply navigate to the Midjourney homepage. From here, choose a theme or emotion you want to convey. You can input keywords like “determination,” “strength,” or any word that resonates with your desired sentiment. The platform will then utilize its AI algorithms to generate images that align with your keyword, giving you a wealth of visuals.
Remember the importance of keeping the motivation status video download feature in mind. Users love to save and share these videos, and starting with a captivating image ensures your video gets the traction it deserves.
Part 2: Use Runway Gen2 to convert pictures to videos
With your motivation status image, it’s time to bring it to life! That’s where Runway Gen2 steps in. This platform is designed to seamlessly convert static images into dynamic videos, enriching the user experience.
Start by uploading your chosen image from Midjourney. The intuitive interface of Runway Gen2 will guide you through the process. You can choose the movement or animation you want to infuse into your image. Whether it’s a subtle breeze causing ripples in a flag on Republic Day status videos or the emphatic beat of a heart symbolizing passion – the possibilities are endless.
The beauty of Runway Gen2 is that it does all the heavy lifting. Within moments, your static image evolves into a mesmerizing video clip. Perfect for those looking to create motivational status videos that inspire and captivate the viewer’s attention.
By harnessing AI tools like Midjourney and Runway Gen2, anyone can now become a creator of powerful motivational content.
Part 3: Use Chat-GPT to generate motivational quotes
Now that we have the visual backbone for our motivational video, the next step is to infuse it with words that resonate, inspire, and motivate. And who better to turn to than Chat-GPT, the AI writing virtuoso?
Chat-GPT’s prowess lies in producing human-like text that strikes a chord. It’s not just about churning out words; it’s about curating sentiments that align with the intended emotion.
To get started with Chat-GPT for your motivation status video:
- Navigate to the Chat-GPT portal.
- In the prompt box, specify the kind of quote you’re seeking. For instance, “Generate a motivational quote about perseverance.”
- You’ll receive a tailor-made quote for your video’s theme within moments.
Imagine having the capability to request specific quotes on themes like “overcoming challenges” or “embracing change” and receiving phrases that could potentially go viral on social media! With Chat-GPT, you have a personal quote-generator at your fingertips.
But what if you’re targeting events? For those creating Republic Day status videos, you can request patriotic quotes that ignite national pride or reflect upon the nation’s journey.
Part 4: Quick solution: Filmora AI Editing tool
For those in a hurry or those who might not incline to traverse through various platforms, there’s a one-stop solution: Filmora AI Editing tool. This all-encompassing tool streamlines the process of creating compelling motivational videos.
Create AI Captions For Win 7 or later(64-bit)
Create AI Captions For macOS 10.14 or later
Step 1: Use AI writing tools to generate motivational quotes
Begin with Filmora’s in-built AI writing tool. Like Chat-GPT, this tool provides many quotes based on the emotion or theme you’re targeting. Simply input a keyword and watch as the AI curates a list of quotes suitable for motivation status video download.
Step 2: Search for motivational footage in stock media
Filmora comes equipped with a rich library of stock media. Whether you’re hunting for serene landscapes, bustling cityscapes, or intimate close-ups, there’s a high chance you’ll find the perfect clip that complements your quote. These visuals are curated keeping in mind the trends and preferences of viewers in 2024, ensuring your video remains relevant and engaging.
Step 3: One-click generation using templates
For those who are not seasoned video editors, Filmora offers a range of templates designed specifically for motivational content. By selecting a template, the AI takes over, meshing together the quote and the footage to create a cohesive and professional video. The one-click generation feature is a godsend for those seeking a quick turnaround without compromising quality.
With the tools and techniques available in 2024, creating motivational videos has never been more accessible. Whether you’re a seasoned creator or a novice dipping your toes into the world of content creation, the AI-driven platforms mentioned above ensure that your motivation status video stands out and leaves an indelible mark on your audience.
Part 5: Summary
AI-driven tools have democratized motivational content creation. No longer exclusive to professionals, crafting inspiring motivational videos status is now accessible to all. These AI-enhanced videos serve as beacons of hope and encouragement, resonating deeply across various audience demographics.
In this digital era, harnessing AI simplifies content creation and amplifies its impact, making every message more poignant and every story more compelling. Embrace this AI revolution and let your creativity shine in 2024.
Also read:
- Updated How to Add VHS Green Screen to Your Video for 2024
- New 2024 Approved How to Add Green Screen Effects In Phhotoshop
- 2024 Approved How to Record Clips Using Your Camera and Edit Them Using Wondershare Filmora to Make a Loop Video? A Complete Guide for Beginners
- New In 2024, How to Combine Several Xvid Files Into One Windows, Mac,Android, iPhone & Online
- In 2024, Mask Tracking with Adobe Premiere Pro A Detailed Guide
- Updated Good Ways to Make Sure Your Video Editing Course Is Worthing to Watch
- In 2024, Do You Want to Create a Motion Blur Effect in Your Videos? Read This Well-Described Guide to Learn How to Add Motion Blur on CapCut on iPhone and Android Devices
- In 2024, New Video Inspiration for Birthday Slideshow
- New 2024 Approved How to Create Cinematic Style Videos? Easy Guide for Beginners
- 2024 Approved Are You Looking to Find Out How to Loop YouTube Videos on iPhone? Learn How to Loop Your Favorite YouTube Video on Your iPhone, so You Can Play that Part over and Over
- Vintage Film Effect 1920S - How to Make
- How To Change Sky Background With Adobe Photoshop Best Ways for 2024
- New In 2024, Create Chroma Key Written Text Effects in Filmora
- 2024 Approved Blender Green Screen Effects
- 2024 Approved Find a Video Background Change Online that Works for You. This Article Contains Tools that Can Edit Video Backgrounds Online with Little Effort
- New In 2024, How Windows Movie Maker Save MP4 File
- Updated Working Out All Important Details of Slowing Down Video in After Effects
- 2024 Approved Top 22 Free Video Editing Software
- Updated In 2024, Comprehensive Guide to Add LUTs in Premiere Pro with Ease
- In 2024, Guide Adding Audio in Wondershare Filmora
- In 2024, 11 Tools To Create Radial Blur Photo Mobile And Desktop
- New How to Convert Time-Lapse to Normal Video for 2024
- In 2024, Movavi Slideshow Maker Is a Powerful Video Editing Tool that Can Be Used to Add Rich Effects to Videos Easily. This Guide Will Introduce the Features and Show You How to Apply Effects to Videos with This Tool
- 2024 Approved Add Flesh to Your Video Content Before Posting Them for Your Audience to See Using Meme Texts. Use the Tutorial Guide Shared in This Post
- New Top 10 Online And PC Cartoon Video Maker 2022 For Beginner
- Updated Green Screens Are a Fun Way for Creators to Bring Their Personality to Their Stream, Allowing Them to Dynamically Alter Their Stream Background and Make Their Content Appear Even More Engaging and Polished
- 2024 Approved Easy Steps to Create Intro Video with After Effects
- New A Complete Guideline About QuickTime Player
- In 2024, | Best WMV to GIF Converters
- 2024 Approved Best Options to Replace Sky of Any Photo Online + Offline
- 2024 Approved Repeated Text Animation Tutorial in Filmora
- SRT Not Displaying How to Open and Use SRT File in VLC for 2024
- How to Factory Reset Oppo Reno 9A without Losing Data | Dr.fone
- How to Retrieve deleted photos on Honor V Purse
- Pokémon Go Cooldown Chart On Vivo Y77t | Dr.fone
- Wondering the Best Alternative to Hola On Realme GT 5? Here Is the Answer | Dr.fone
- What To Do When Tecno Camon 20 Has Black Screen of Death? | Dr.fone
- 9 Solutions to Fix Process System Isnt Responding Error on Infinix Smart 8 HD | Dr.fone
- Best Fixes For Vivo V27 Hard Reset | Dr.fone
- Complete guide for recovering messages files on Honor 90 Lite
- Updated The Best 20 Motion Graphics Companies & Studios for 2024
- In 2024, How to Come up With the Best Pokemon Team On Xiaomi Redmi Note 12 Pro 5G? | Dr.fone
- Overview of the Best Xiaomi 14 Screen Mirroring App | Dr.fone
- Undeleted lost videos from A78
- How to Downgrade iPhone 6 to the Previous iOS Version? | Dr.fone
- How to Transfer Photos from Motorola Razr 40 Ultra to New Android? | Dr.fone
- Top 15 Augmented Reality Games Like Pokémon GO To Play On Tecno Spark 10 Pro | Dr.fone
- How to Stop Life360 from Tracking You On Apple iPhone XR? | Dr.fone
- In 2024, Here are Some Pro Tips for Pokemon Go PvP Battles On Poco C65 | Dr.fone
- 9 Best Free Android Monitoring Apps to Monitor Phone Remotely For your Realme Narzo 60 Pro 5G | Dr.fone
- 3uTools Virtual Location Not Working On Itel P40? Fix Now | Dr.fone
- Additional Tips About Sinnoh Stone For Tecno Spark 10 Pro | Dr.fone
- Title: Updated How to Make Your CSGO Montage Impressive
- Author: Chloe
- Created at : 2024-05-20 03:38:11
- Updated at : 2024-05-21 03:38:11
- Link: https://ai-editing-video.techidaily.com/updated-how-to-make-your-csgo-montage-impressive/
- License: This work is licensed under CC BY-NC-SA 4.0.
