
Updated How To Quickly Create A Screen Print Effect In Photoshop Detailed Gui

How To Quickly Create A Screen Print Effect In Photoshop: Detailed Gui
Screen printing is a unique method that uses a mesh to transfer ink onto a surface and is commonly used to print designs onto t-shirts or other garments, such as hoodies, tote bags, and even sneakers.
Nowadays, digital means such as Photoshop or Illustrator are used to create the screen print effect, which is achieved by using a layer mask to cut out a portion of the image and filling it with the color or pattern of your choice. The design is then printed onto fabric using water-based CMYK (cyan, magenta, yellow, black) inks with inkjet printers.
Suppose you’ve ever wanted to create the screen print effect in Photoshop to give that artistic look to your pictures and embed them in your clothes or other accessories but don’t know where to start or are not familiar with the process. In that case, this guide can surely help you figure this out quickly!
So without any delay, let’s get on with it!
How To Use Photoshop To Create The Print Effect
Below we’ve provided a detailed guide using Adobe Photoshop to create the print effect with easy step-by-step instructions.
What Are The Requirements For Creating the Print Effect In PhotoShop?
Before we discuss the complete process of creating the print effect while using Photoshop, here are the resources you have to arrange.
- Picture of the object: We will cut out the object from the original image using the Lasso tool and unsaturate it. However, you have to ensure that the object is clear and easily detectable within the picture.
- A background image: You will need a background image to add the object to. For this, you can use a solid background, capture scenery, etc.
- Fonts: You can also add fonts to the final image to add your ideas or thoughts, making your final project more eye-catching and engaging.
- Photoshop latest version: For this tutorial, we will use the Photoshop CC 2021 version, so make sure to download and install it to your computer immediately!
What Are The Steps To Create Print Effect in PhotoShop?
Now that you know the necessary resources, the following are the steps to create the print effect in Photoshop:
Step1 Launch thePhotoshop program on your laptop/desktop and click “Create New” on the software dashboard. Next, select the page size, such as “letter,” and click “Open.”

Now, click the “File” option in the top toolbar, and from the drop-down menu, select “Open.” Next, choose the image you want to apply the screen print effect by browsing to its location on your computer.

Step2 Next, click the “Lasso” tool from the left-side menu to create the selection around the object in the image.

Press the CMD/Ctrl + C on your computer’s keyboard to copy the selection. Next, click the “Layer“ option in the top toolbar, select “New,” and click “Layer via Copy.”

Step3 Now, hide the background layer in the “Layers” panel on the right-hand side, and you will get your object without any BG. Click the “Image” option in the top toolbar and select “Adjustments.”
Click “Threshold…” from the drop-down menu, and set the “Threshold level.” Alternatively, you can click “Cmd/ctrl+Shift+U” on the keyboard to desaturate the image.

Step4 Next, select the “Magic Eraser Tool” from the left-side menu and remove the white parts to smooth down the background. Afterward, choose the “Move Tool” from the menu and drag your object to a new layer.
To add the background image, click “File” and select “Open.” Next, select the file and again click “Open.”
Step5 Select the object using the “Move Tool” and drag it to the background image layer. If the thing is too large and you want to resize it, select the object using the “CMD/Ctrl” key and click “Edit” from the top toolbar. From the drop-down menu, choose “Transform” and click “Scale.”

Next, drag the handles to adjust the size of the object on the Background image.
Step6 Click the “T” icon from the left-hand side menu and set the font style, color, and size. You can also click the “3D” option to convert your text to a three-dimensional form.

Try removing the left-out white patches on the object using the “Magic Eraser Tool” to give a polished look to the print screen effect. Once you are satisfied, click the “File” option from the top toolbar panel and select “Save As.”
Type in the file name and select the file type from the drop-down menu next to “Save As Type.” Choose the storage location, click “Save” to export your final project, and you’re done!
Conclusion
In this article, we’ve explored what the screen print effect is and how it is used in digital art. We’ve also discussed the requirements and resources you need to use and then demonstrated a step-by-step process of how to create the screen print effect in Photoshop with simple and easy-to-follow instructions.
To make things easy for you, we also added original screenshots while creating a sample project on the software.
Hopefully, this article helped resolve your queries, and you can now give a vintage or retro look to your images using the screen print effect in Photoshop.
Free Download For Win 7 or later(64-bit)
Free Download For macOS 10.14 or later
Free Download For macOS 10.14 or later
Methods on How to Speed Up Video on Splice
Controlling the speed of the video enables viewers to engage with the content much more actively. There are instances when you may have a lengthy video scene or audio segment that includes little-to-no essential information, and you wish to speed it up. The whole video or audio file can be sped up or slowed down, or only specific sections can. It is simple to perform with a splice speed up video. As a result, the project size and duration are reduced, and viewers are given clearer instructions on how to speed up the video on Splice.

This article will emphasize how to speed up videos on Splice, covering the procedures and alternatives that will assist you in producing splice speed up videos.
Part I. Beginner’s Guide to Splice
Free video editing software for iPhone and iPad is called Splice. Users may edit HD photos and videos with this simple-to-use tool to create a polished film perfect for sharing online. Transitions, cuts, borders, audio effects, background music, and voiceover are just a few of the many capabilities offered by the program. Videos are a great method to grab a potential client’s interest when using online marketing strategies. Splice makes it simple to combine images and videos from your iPhone to create a professional-looking video that will impress your viewers.
Splice has many fantastic tools that make editing videos simple. It offers several choices that video producers would find useful. The essential features are as follows.
- Add Music
You have two options: choose a song from a streaming provider, or record your voiceovers. Additionally, the Splice app offers a huge selection of music from its catalog.
- Edit Videos
Other fundamental editing features include the ability to merge, change the speed, and trim.
- Add Text
Text can be added to your video to further illustrate a certain event.
- Add an Image or Video Overlay
By including picture overlays, you may get more creative.
- Apply Cutting-edge Effects
You may edit, chop, or even merge your films using Splice. Similarly, you may add titles, change the tempo, and even highlight particular moments by slowing down your videos. You can also add effects for even more attractive looks.
- Upload your Video to Social Media
This function is quite helpful for showcasing your writing abilities to friends and possible clients.
![]()
Note: For a thorough review of the Splice video editing app, visit this full review passage.
Part II. How to Change Video Speed Using Splice App
Users can generate eye-catching videos for usage and export with Splice’s various effects and tools.
Here are the steps on how to speed up the video on Splice.
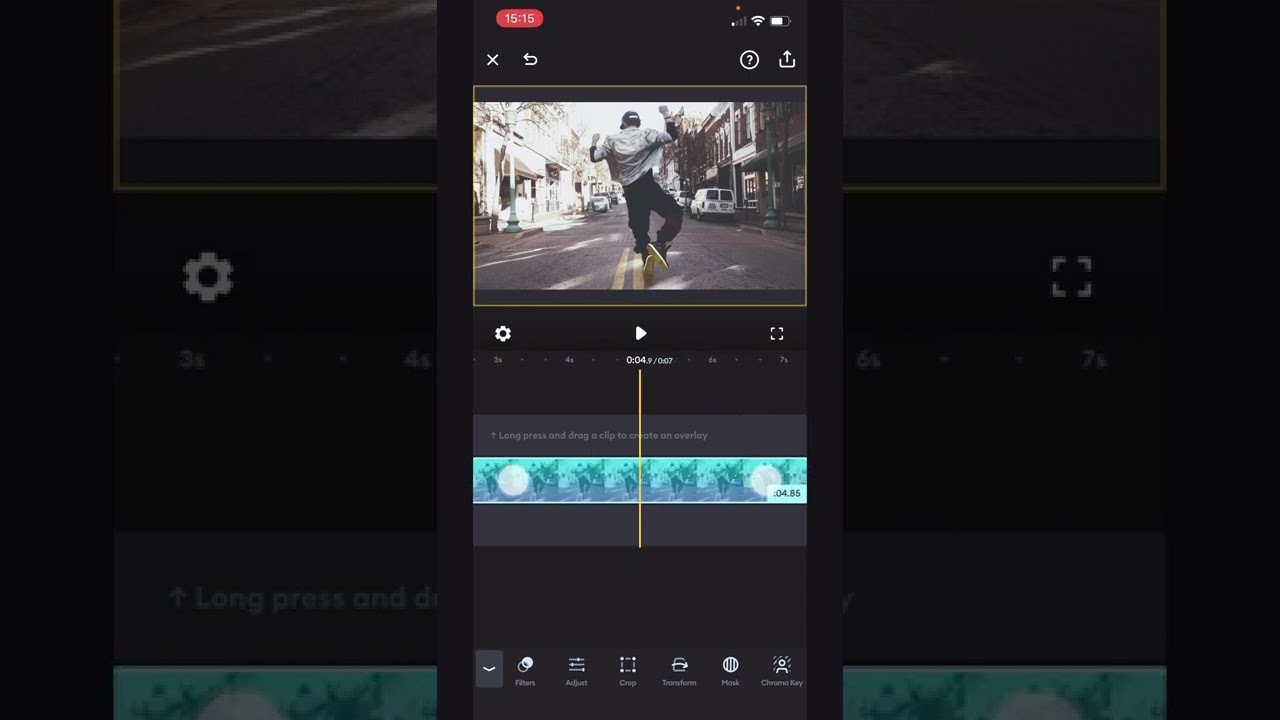
Step1 Tap the video you want to modify the pace of in the timeline, and it turns blue.
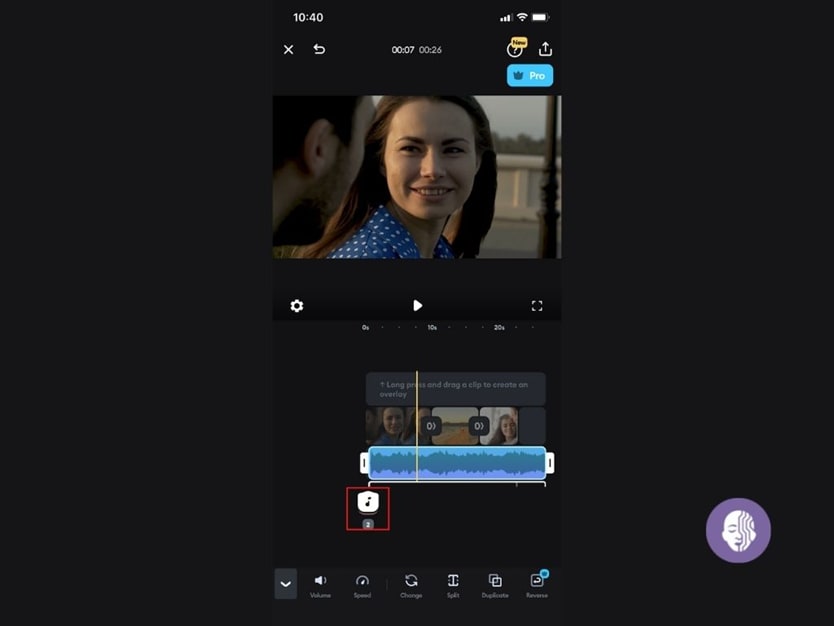
Step2 From the editing toolbar, choose Speed. Utilize the slider beneath the timeline to change the speed.
Best Alternative to Splice Video Editor For Changing Speed Of Videos
Splice was distinctive during this time. It has significantly reduced peoples’ travel costs compared to desktop video editing software because you never have to take a heavy laptop with you. Splice is different from a desktop editing program. If you purchase a desktop app, you’ll have access to more sophisticated tools and the capacity to store your data. Splice will only work for you if you want to make lengthy movies with loads of intricate effects.
However, you can use alternative editing programs instead of utilizing them on your computer. The Filmora video editor is a unique example with sufficient effects and plugins. Filmora’s user-friendly interface allows you to swiftly edit whatever video to a professional standard. Use its extensive resource packs to make your video a specific result.
Free Download For Win 7 or later(64-bit)
Free Download For macOS 10.14 or later
Ultimate Guide to Customize Video Speed in Filmora
Method 1. Click the “Fast” or “Slow” Options to Change the Speed Automatically
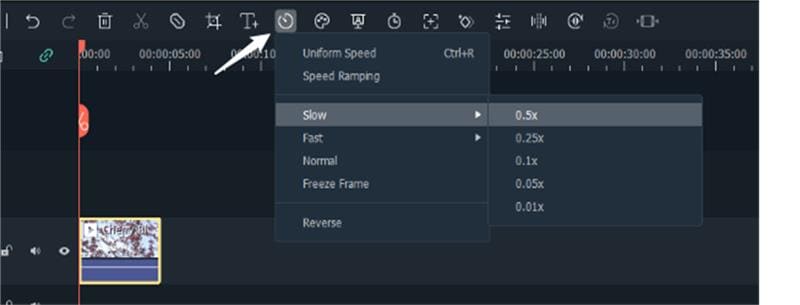
Upon clicking your video clip, a tab will display several options to modify the speed of your video. You can choose from slow to fast options. Click each option to choose from the specific speed you want
Method 2. Change the Speed Uniformly with “Uniform Speed”
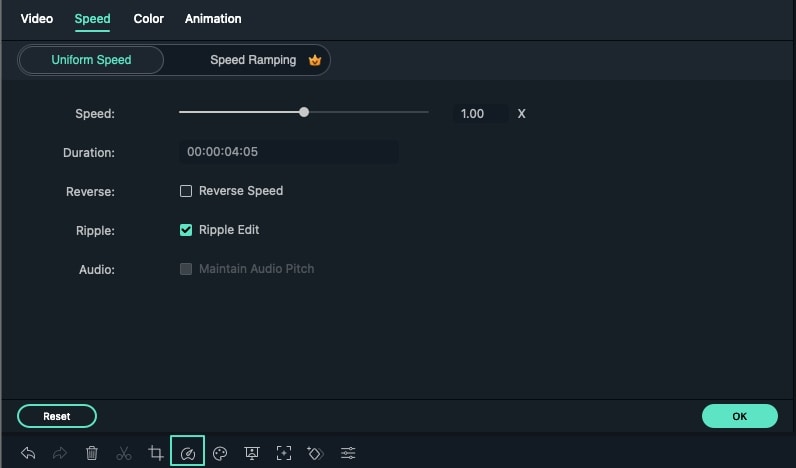
If you wish to change the uniform speed of your video clip, double-clip the video to access the Speed Panel. Adjust the speed slider based on your speed uniform preference.
Method 3. Use Speed Ramping In Filmora for Better Video Results
Speed ramping is evident as the action switches between slow, regular speed, and fast motion in innumerable action films and sports videos. When you progressively increase the pace of a video clip, this is called speed ramping. You have the option of changing pace swiftly or consistently in Filmora. It can vary the pace of the audio or video clips. Use the Speed Ramping feature in Filmora.
Double-click the media you want to speed up - choose Speed > Speed Ramping. Alternatively, right-click on the media and choose Speed Ramping. Another option is clicking the Speed icon > Speed Ramping in the toolbar.
The Speed Ramping tab will let you customize the speed line. Also, it provides you with 6 different templates you can use to enhance action footage. The templates are Bullet Time, Montage, Jumper, Hero Moment, Flash in, and Flash out. In case none of the templates appeal to you, you can create your own preset and save it.
The best thing about this feature is Filmora allows you to maintain the original audio pitch. Thus, it would not sound strange after speed-ramping the media.

Here’s how you can use the customization mode on the Speed Ramping panel.
- Click Customize.
- Place the playhead on the part of the video clip which you want to speed up or slow down.
- Click Add to add a speed keyframe in that spot. Filmora will mark Speed Ramping on the media.
- Drag the white dot in the adjustment panel to change the video speed. Drag it upwards to accelerate the video speed or downwards to decelerate it.

Splice Video Editor FAQs
1. Why can’t I upload projects when using Splice?
Relinking your Splice folder could help if you experience problems downloading or uploading projects. The cache folder in your Splice app can also be cleared to resolve most download problems. Splice may require more space than is available before exporting the movie, relying on your export preferences. Any stored files that are kept may also use space. For instance, the app may require up to 2 GB of storage space if your finished film is 1 GB.
If you’re experiencing trouble downloading samples from the website, check that your Splice account is logged in on both the website and the desktop client. If you’re not logged onto the same profile on both the website and the app, samples/packs you’ve purchased online won’t appear.
2. How to remove watermarks on my video saved from Splice?
- Android
You can choose between utilizing the Splice app and learning how to speed up video on the splice app or an online watermark removal tool to remove a watermark from Splice. Launch the application and choose the video you wish to modify. To erase any watermarks from your movie, click the three dots in the right corner of your screen and select “Watermarks.” Following that, you must submit your video to the software and adhere to the watermark removal instructions. Following that, you must submit your video to the software and adhere to the watermark removal instructions.
- iPhone
You must confirm that Splice is already loaded on your iPhone and is the most recent version. Open the program after installation, browse the project with the watermark and learn how to speed up video on iPhone with Splice. After selecting the watermark with a tap, click “Edit” from the menu in the screen’s top right-hand corner. You’ll now see a new tab labeled “Effects” immediately below the “Audio” tab; tap on it, and scroll down until you find the “Watermark” slider. To remove the watermark, slide it the entire way to the left. Your project is now free of the watermark.
Bottom Line
Most people need help to produce high-quality videos on their devices. Most often, they’ll need to transfer them to their computers for extensive editing and polishing. That’s no longer the case, particularly with the emergence of mobile editing programs like the Splice app. You can quickly and effortlessly produce high-quality video material with a few clicks.
Part II. How to Change Video Speed Using Splice App
Users can generate eye-catching videos for usage and export with Splice’s various effects and tools.
Here are the steps on how to speed up the video on Splice.
Step1 Tap the video you want to modify the pace of in the timeline, and it turns blue.

Step2 From the editing toolbar, choose Speed. Utilize the slider beneath the timeline to change the speed.

Best Alternative to Splice Video Editor For Changing Speed Of Videos
Splice was distinctive during this time. It has significantly reduced peoples’ travel costs compared to desktop video editing software because you never have to take a heavy laptop with you. Splice is different from a desktop editing program. If you purchase a desktop app, you’ll have access to more sophisticated tools and the capacity to store your data. Splice will only work for you if you want to make lengthy movies with loads of intricate effects.
However, you can use alternative editing programs instead of utilizing them on your computer. The Filmora video editor is a unique example with sufficient effects and plugins. Filmora’s user-friendly interface allows you to swiftly edit whatever video to a professional standard. Use its extensive resource packs to make your video a specific result.
Free Download For Win 7 or later(64-bit)
Free Download For macOS 10.14 or later
Ultimate Guide to Customize Video Speed in Filmora
Method 1. Click the “Fast” or “Slow” Options to Change the Speed Automatically
Upon clicking your video clip, a tab will display several options to modify the speed of your video. You can choose from slow to fast options. Click each option to choose from the specific speed you want

Method 2. Change the Speed Uniformly with “Uniform Speed”
If you wish to change the uniform speed of your video clip, double-clip the video to access the Speed Panel. Adjust the speed slider based on your speed uniform preference.

Method 3. Use Speed Ramping In Filmora for Better Video Results
Speed ramping is evident as the action switches between slow, regular speed, and fast motion in innumerable action films and sports videos. When you progressively increase the pace of a video clip, this is called speed ramping. You have the option of changing pace swiftly or consistently in Filmora. It can vary the pace of the audio or video clips. Use the Speed Ramping feature in Filmora.
Double-click the media you want to speed up - choose Speed > Speed Ramping. Alternatively, right-click on the media and choose Speed Ramping. Another option is clicking the Speed icon > Speed Ramping in the toolbar.
The Speed Ramping tab will let you customize the speed line. Also, it provides you with 6 different templates you can use to enhance action footage. The templates are Bullet Time, Montage, Jumper, Hero Moment, Flash in, and Flash out. In case none of the templates appeal to you, you can create your own preset and save it.
The best thing about this feature is Filmora allows you to maintain the original audio pitch. Thus, it would not sound strange after speed-ramping the media.

Here’s how you can use the customization mode on the Speed Ramping panel.
- Click Customize.
- Place the playhead on the part of the video clip which you want to speed up or slow down.
- Click Add to add a speed keyframe in that spot. Filmora will mark Speed Ramping on the media.
- Drag the white dot in the adjustment panel to change the video speed. Drag it upwards to accelerate the video speed or downwards to decelerate it.

Splice Video Editor FAQs
1. Why can’t I upload projects when using Splice?
Relinking your Splice folder could help if you experience problems downloading or uploading projects. The cache folder in your Splice app can also be cleared to resolve most download problems. Splice may require more space than is available before exporting the movie, relying on your export preferences. Any stored files that are kept may also use space. For instance, the app may require up to 2 GB of storage space if your finished film is 1 GB.
If you’re experiencing trouble downloading samples from the website, check that your Splice account is logged in on both the website and the desktop client. If you’re not logged onto the same profile on both the website and the app, samples/packs you’ve purchased online won’t appear.
2. How to remove watermarks on my video saved from Splice?
- Android
You can choose between utilizing the Splice app and learning how to speed up video on the splice app or an online watermark removal tool to remove a watermark from Splice. Launch the application and choose the video you wish to modify. To erase any watermarks from your movie, click the three dots in the right corner of your screen and select “Watermarks.” Following that, you must submit your video to the software and adhere to the watermark removal instructions. Following that, you must submit your video to the software and adhere to the watermark removal instructions.
- iPhone
You must confirm that Splice is already loaded on your iPhone and is the most recent version. Open the program after installation, browse the project with the watermark and learn how to speed up video on iPhone with Splice. After selecting the watermark with a tap, click “Edit” from the menu in the screen’s top right-hand corner. You’ll now see a new tab labeled “Effects” immediately below the “Audio” tab; tap on it, and scroll down until you find the “Watermark” slider. To remove the watermark, slide it the entire way to the left. Your project is now free of the watermark.
Bottom Line
Most people need help to produce high-quality videos on their devices. Most often, they’ll need to transfer them to their computers for extensive editing and polishing. That’s no longer the case, particularly with the emergence of mobile editing programs like the Splice app. You can quickly and effortlessly produce high-quality video material with a few clicks.
Best Online YouTube Video Trimmer 2024
Since the shift in interest from on-site jobs to content creators and exploring opportunities to take advantage of better and improved career growth opportunities, YouTube is one of the most popular social media platforms to get started.
But how do people face difficulties in finding an affordable and quick online YouTube video trimmer? Are you also facing issues with trimming your video before uploading it to get more views?
This is an ultimate guide on online YouTube video trimmer software and how you can trim your YouTube videos in no time.
Part 1. What is a YouTube trimmer?
Before diving into any details, it is important to introduce you to what is a YouTube trimmer and why it is important to trim your video. A YouTube trimmer is an easy and fast video editing tool that allows you to trim, crop, and share your favorite video parts online. You can also create custom links to YouTube Crops to embed on your website.
There are two popular online YouTube trimmers available; one only allows you to edit the YouTube link, which means you can only view the edited video online, while the other allows you to do related operations on the video file and download and save it as an mp4 or other file type for offline viewing.
Part 2. How to online trim YouTube videos?
1. Online YouTube trimmer (no edit and download)
Using these two websites, you can easily find the YouTube video clip you want to keep, but there is no way to download the video or add more editing to the clip. However, it works well for sharing links online or adding them to your website and using them to describe the part that best fits the topic.
The straightforward interface has just one function. Enter the start and end times in the box after entering the right YouTube link, then click “Crop!” to create a string of links.

The video’s beginning and ending times are selected in the same way as on the previous website. However, this website offers some basic code that you may copy and paste into your web pages to suit your demands in order to add YouTube videos.

Once you are done trimming your videos, you can download or export your videos in different formats, depending on your preference. It can be in mp4, mp3, or any other supported format.
2. Online YouTube trimmer (edit and download)
The websites that are listed after that combine an online YouTube downloader with a video editor, allowing you to make a variety of further edits to the selected video clip before downloading it locally.
- Veed.io :
Anyone can make powerful videos and expand their audiences thanks to the online video editing application Veed. It has some useful capabilities, such as the capacity to cut videos and filter them using different aesthetics. Users can crop, add text, make drawings, and even add photos to the movies. In addition, Veed serves as a tool for producing social media films that may be customized for each channel where they will be shared.
Additionally, they are free to play with various tools like rotate, trim, add photos, stickers, emojis, and more. Through the program, users may even create video memes online by uploading a target movie, modifying it using a variety of features, and downloading the altered video after a brief rendering.
Step1Launch veed.io on your web browser. Click on ‘Upload Your Video‘ to upload the video file you want to edit.
Step2You will notice a button to upload your media file once you are taken to the editing page.

Step3You can trim your video section by dragging the mark after you’ve uploaded the media file.

Step4Now, delete the unwanted video segment and click on ‘Export’ to save the trimmed video.
- Kapwing :
An effective, non-linear editing workflow is supported by the online video editor Kapwing. Upload your audio, video, and image files, then edit everything in one location. Since Kapwing is entirely online, content creators may access and edit their work from any computer or mobile device.
Step1Launch Kapwing.com on your web browser. If you are not directed to the trim video section, then go to the ‘Tools‘ menu and select ‘Trim Video‘. Now, click on ‘Choose a Video.’
Step2From the main page, click ‘Click to upload’ to upload the media file.

Step3After uploading the media file, Click on ‘Trim’ from the editing section on the right side of the screen.

Step4A pop-up screen will appear on your screen labeled as Trim Video. Trim the parts of the video as per your requirement and Click ‘Trim’ to finish.

Step5Once you have completed editing, click on ‘Export’ to save the video to your device.
Part 3. How to trim YouTube videos on a desktop?
Using an online video trimmer has been one of the last options that anyone would consider, but due to the expensive software, they have turned out to be a friendly and easy approach to editing videos. But the online video trimmers still rank at the bottom of the list because they’re unstable, and you can’t save the project at any time. If the online program breaks down, all your effort will be wasted. But desktop programs such as Filmora will never make you encounter such problems unless you experience a technical glitch.
With the help of a variety of strong editing tools and Wondershare Filmora , users may quickly and easily make outstanding videos. With Wondershare Filmora, anyone can learn how to be an excellent video editor, thanks to its wonderfully simple design.
You can follow these easy steps to trim your video:
Step1Click “Import” on the main windows and then select the desired video files from your computer to add video files to the Timeline for cutting. Movies can also be dropped directly into the Media Library.

Step2By moving the playhead over the unwanted section and choosing the trash can icon, you can delete it.

Step3When you’re through trimming, click “Export”, then select a location to store the edited video.
Conclusion
Depending on the comparison of how different software work, it is justifiable to conclude that Filmora is the best video editing software by all means. It offers a wide range of editing tools and ensures that progress has not been lost. If you are looking forward to trimming a video, download Filmora on your device to get started.
Free Download For Win 7 or later(64-bit)
Free Download For macOS 10.14 or later
Free Download For macOS 10.14 or later
Also read:
- [New] Crossing the Line-Free Verifying Video Rights on TikTok for 2024
- [New] In 2024, The Complete Guide to Crafting Perfect Instagram Stories
- Central Points for Virtual World Engagement for 2024
- Easy Steps to Screen Save Your Work in Windows 8 for 2024
- Excellence in Image Making via Premium Grid Makers
- How to Add Effects on TikTok
- How to Successfully Set Up Your New iPad: A Step-by-Step Guide
- If You Want to Make an Intro Video, Then Adobe After Effects Will Be a Great Choice. This Article Will Show the Steps to Create an Intro Video with After Effects by Your Own
- In 2024, Proven Techniques for Stunning Timelapses in GoPro Studio
- L'Exil occidental | Free Book
- New 2024 Approved Guide To Creating the Best Video Collages
- New How to Create Vintage Film Effect 1950S
- New In 2024, Best Ideas for Time Lapse Video
- New In 2024, How to Add Effects on TikTok
- Starfield Won't Play? Solve Your Game Launch Issues with This Comprehensive Guide (Steam & Xbox)
- Updated Add Camera Shake to Video in Adobe After Effects for 2024
- Updated Motion Tracking Is the Process of Tracking the Movements of a Project in a Video. This Article Will Show You How to Apply Motion Tracking Effect Into Videos
- Title: Updated How To Quickly Create A Screen Print Effect In Photoshop Detailed Gui
- Author: Chloe
- Created at : 2025-01-17 03:28:36
- Updated at : 2025-01-23 20:51:36
- Link: https://ai-editing-video.techidaily.com/updated-how-to-quickly-create-a-screen-print-effect-in-photoshop-detailed-gui/
- License: This work is licensed under CC BY-NC-SA 4.0.