
:max_bytes(150000):strip_icc():format(webp)/GettyImages-758317893-3ab5c26f770448db8b4a58205fb549f1.jpg)
Updated How to Reduce the Size of Video Files Online? In This Article, Well Share the Top 10 Free Online Video Compressors that You Can Use Anywhere at Any Time and on Any Device
How to Reduce the Size of Video Files Online? In This Article, We’ll Share the Top 10 Free Online Video Compressors that You Can Use Anywhere at Any Time and on Any Device
Powerful Video Editor - Wondershare Filmora
Provide abundant video effects - A creative video editor
Powerful color correction and grading
Detailed tutorials are provided by the official channel
Introduction
Are you aware that the videos you record with your iPad, iPhone, or other camera are often larger than 1GB when captured in high resolution? However, some social-media networks often have video size limitations. Therefore, if your video exceeds the video size limitation of the platform, you will be required to shorten that video’s size to meet the specifications of a particular social network using the best video compressor.
Additionally, there are various video compressors online and some video compression software for Windows 10 and Mac that you can use. So, there is no need to spend a lot of money on professional video editing software if you need a quick way to downsize your videos. Besides, tasks can be performed online for free regardless of the operating system used.
In this article, we will assist you through the best free video compressor that you can choose from and learn:
In this article
01 Best Online Video Compressors
02 How to Compress a Large Video File Online and Free Using Wondershare Media.io?

Part 1: Best Online Video Compressors
1. Wondershare Media.io
This video compressor for free allows you to shrink audio and video files effortlessly. Additionally, it supports more than a thousand audio and video file formats, meaning that you can compress videos with Online Uniconverter recorded on different devices. However, compressing videos more extensive than 100MB is not an option.
Price: 2 Free and 3 pricing plans if you intend to subscribe to the pro version starting at $9.99 / Month
Supported Formats: MP4, MOV, WEBM, AVI, WMV, MP3, etc.
Features:
- Uses HTTPS secure socket layer
- It supports multiple devices
- The free version helps quickly compress up to 100MB file
- Without signing up, upload, and edit unlimited image file size
- No watermark even in the free version
- Conversion speed up to 30 times faster in the premium version.
Pros
- It has a quick download and upload speed
- Over a thousand video and audio files supported
- Supports 5 and 10 file editing per day for non-registered and no sign-up users.
- 100% secure
- Voted 4.7 of 5 in quality.
Cons
- Importing clips from Google Drive or Dropbox is not an option
- The file size limit is 100MB
- The free version of io online video compressorhas limited options

2. FreeConvert
This is a straightforward and primary online compression tool for your content, including audio, images, documents, or videos. Although its outlook is quite intimidating, it is pretty simple and easy to use. It also allows you to convert your audio or video file into any format and size. If you are looking for the top MP4 compressor, go for this.
It also ensures that your privacy remains intact by deleting your uploaded files from their server after the processing.
Price: Free and three pricing plans if you intend to subscribe to the pro version starting at $9.99 / Month
Supported Formats: MP4, MOV, WEBM, AVI, WMV, MP3, etc.
Features
- It is available online only
- Supports many output formats.
- Video, audio, image converter
- Files are uploaded securely via HTTPS protocol.
Pros
- It is effortless, fast, and easy to use
- According to user reviews, this tool is excellent for those looking for free MP4 video compressors.
- No pop-up ads when converting
- It delivers excellent quality compressed videos.
Cons
- You get limited to 25 minutes of converted files in the free version

3. VEED.IO Free Online Video Compressor
This online video editing tool offers a free, fast, and easy online video compressor. Since it is online software, you do not need to have a specific type of laptop or desktop to use it. In addition, it does not use up precious storage space since it’s cloud-based.
Price: Free, and a free trial version is available, and three pricing plans if you intend to subscribe to the pro version starting at $12 / Month
Supported Formats: MP4, MKV, MOV, FLV, AVI
Features
- Captions are autogenerated
- Customer service support is excellent
- Add music, text, and photos to videos.
- Offers music visualizer, effects and removes background voices.
- Record via screen, webcam, voice, or even teleprompter.
- Crop, trim, copy, compress, join, loop, or rotate your videos.
- Innumerable features for adding subtitles and transcribing.
Pros
- The best spec is their subtitle tools that automatically generate captions for videos.
- It is swift to use
- It has an excellent support service.
- It’s a straightforward but powerful video editor.
Cons
- The pro version is quite expensive

4. Clideo Video Compressor Online
This web-based video editing application allows users to efficiently perform basic video editing tasks. Aside from rotating, trimming, or merging videos, users can also use Clideo to compress video files.
Price: Pricing plans start at $9,00 per month
Supported Formats: WAV, OGG, MP3, FLAC, AIFF, OOFF, etc.
Features
- There are umpteen features in this tool, like fast compression, previewing the work before saving, etc.
- Easy sign-in process
- Secure as you will only have access to the files.
- Fast and simple online video compressor, so no downloading or installing.
Pros
- The video compression process is quick
- Provides video editing tools
- The easy sign-in process via Facebook or Google
- Offers tons of methods of reducing the size of video files
Cons
- Not possible to choose the video file format
- There is a watermark in the accessible version

5. Compress Video
This free online video compression tool lets users process video files online and delete unnecessary video parts to compress them into the file size you want. It offers various video file formats where users can set the size of the output video file. In addition, this tool will compress the video to the specified size and try to ensure quality. Compress video is also very safe as you do not need to upload your files.
Price: Free
Supported Formats: MP4, MOV, WMV, FLV, AVI, AVCHD, WebM, MKV, etc.
Features
- Safe and easy to use
- It uses HTML5 Technology and FFMPEG JS Technology for extra safety
- Available in different formats.
- Works with Windows, Linux, Mac, and other systems.
Pros
- The video files do not need to get uploaded to the server but are processed directly in the browser
- Only four steps to compress your file.
- Save the video to your local device post-processing.
- 100% free tool.
Cons
- Has limited features

6. Online Converter
If you need a video compressor that is easy to use and reliable, you should not look much further than the Online Converter. With this tool, users can upload videos saved in MP4, MOV, WMV, and other file formats either from a URL or from your computer.
Price: Free
Supported Formats: MP3 to WAV, M4A to MP3, etc.
Features
- Video size output is set directly
- Support different file format.
- Easy to use, choose a file, select your desired video size and click compress.
- It offers an audio quality of 32kbps to 128kbps.
- No compromise on original audio quality.
Pros
- The uploads are smooth
- Supports a range of video file formats
- Allows users set their desired output video size directly
Cons
- Limit the file size to 200MB
- It slows the video compression process
- It does not allow users to choose the file format of the output video
- There is no support for encrypted video files

7. XConvert
XConvert is a free online file conversion and video compressor tool provider specializing in converting, compressing, and splitting files into various formats.
Price: Free
Supported Formats: WeBM, Mp3, MP4, JPG, PNG
Features:
- Simply add files and start your job.
- A completely free online video compressor.
- Select , , VP8, or VP9 basis convert to file format.
- A rating of 4.7 of 5 by users.
Pros
- Allows the conversion to different files format
- It is a multipurpose editing tool.
- Download files individually or in zip format.
Cons
- The website is compact
- Lots of ads on the interface

8. Flixier Online Video Compressor
This is a cloud-powered video editor that dramatically speeds up your video editing process. In addition, it processes your videos on powerful cloud computers to enable you to run it smoothly on any device ranging from slower PC or Chromebooks to Macbooks or any powerful desktop PCs.
Also, it is perfect for anyone that wants to grow a YouTube channel and create marketing or sales videos. The interface is smooth but still offers advanced features, including color adjustments, picture in picture, green screen, horizontal, vertical, and square videos to take your content to the next level.
Price: Free, Pricing plans start at $9.00 per month
Supported Formats: MP4, MOV, MKV, and WEBM,
Features
- Perfect for content marketing and sales
- Works on any device
- No need to open an account to start.
- No download or installation needed.
- No loss of audio or video quality with this video compressor.
- You can trim, crop, and add music, images, and text to videos.
- Its advanced settings options let you optimize CRF and bitrate that suits you.
Pros
- Allows users to record and edit their voice on a microphone or webcam
- Users can edit any video content from their smartphone or camera
- Publish to YouTube, Vimeo, Google Drive, or Dropbox in seconds.
- Only a three-step and three minutes, lightning-fast best video compressor.
- You can develop Facebook ads and add text to videos.
Cons
- Watermark in the free version
- Limited feature in free version

9. Fastreel Video Compressor
Fastreel Video Compressor, a simple video editor, is available for everyone and is an easy-to-use online video editor. Additionally, it helps create video montages like a pro.
Price: Free
Supported Formats: MP4, MOV, MKV, AVI, and WMV files
Features
- Easy to use
- Perfect for creating a montage
- You get to choose three types of compression quality: high, medium, or low.
- Three steps to video compression, add a video file, choose the level, and export.
- It is free. Just drop or add files to start the process.
Pros
- It is free and straightforward to use
- It has an intuitive interface
- It encourages people to express their creativity and bring business ideas to life
- It helps users promote their brand, get more YouTube subscribers, and increase conversion rates.
- It is fast to use
Cons
- Watermark in the free version
- Limited features in the free version
- The high compression level reduces the quality significantly.

10. VideoSmaller
VideoSmaller is an online free service that allows you to reduce video file size online and compress video file size without losing quality. With this service, users can reduce video file size and make video files smaller. Additionally, users can also reduce the size of MP4 videos captured with an iPhone or Android.
Price: Free
Supported Formats: MP4, AVI, MPEG, MOV formats
Features
- Reduce the video size for free.
- Compress the videos right from the browser
- Safe as uploaded files vanish after a few hours.
Pros
- This free online video compressoris simple to use
- VideoSmaller helps compress files without losing quality
Cons
- File upload is limited to 500MB
- Limited features

Media.io is the top online video compressor from the 10 that was listed as it allows you to compress video files without losing quality. Additionally, it is simple, accessible, and easy to use.
Part 2: How to Compress a Large Video File Online and Free Using Wondershare Media.io?
Now, let us see how you can use this video compressor in just three quick steps and get an excellent output for your video files.
Step 1: Open Media.io to Add Files
Click on Media.io video compressor and add Video Files, then click on Choose Files button to upload video file(s) from your network disk or library.

Step 2: Edit the Video File
Reduce Video Size Online and set the custom video resolution, size, bitrate, and output format required in compressing the video, then click the Compress button.
Step 3: Export and Save the Compressed Clip
Save your compressed video(s) by clicking on the Download button to save the resultant video(s) locally, to Dropbox or Google Drive.
Thus, with Media.io, you can compress your videos without downloading any software. It is a 100% safe and secure tool from one of the top software companies, called Wondershare. This free video compressor tool is a must-try for a new video maker.
Part 3: People Also Want to Know
This section shall go through some FAQs that you may come across about video compressors.
Which free video compressor is the best?
Media.io is the top online video compressor that allows you to compress video files without losing quality. Additionally, it is simple, accessible, and easy to use.
What is a video compressor used for?
It is a tool used to reduce the total number of bits needed to represent a given video or image sequence. Additionally, it helps to reduce file size so that it does not occupy too much space.
Conclusion
Thus, as you saw, in this report, we clubbed and summarized a few essential points regarding video compressors. You learned:
- The video compressor online for freethat you should know of.
- The ten best video compressorsto choose from.
- Why is Media.io an excellent online video compressor, and how does it work?
- Lastly, a few FAQs to make you understand the process and tool better.
So, use these tips and start sharing your in-house video-making talent with your family and the world.
Introduction
Are you aware that the videos you record with your iPad, iPhone, or other camera are often larger than 1GB when captured in high resolution? However, some social-media networks often have video size limitations. Therefore, if your video exceeds the video size limitation of the platform, you will be required to shorten that video’s size to meet the specifications of a particular social network using the best video compressor.
Additionally, there are various video compressors online and some video compression software for Windows 10 and Mac that you can use. So, there is no need to spend a lot of money on professional video editing software if you need a quick way to downsize your videos. Besides, tasks can be performed online for free regardless of the operating system used.
In this article, we will assist you through the best free video compressor that you can choose from and learn:
In this article
01 Best Online Video Compressors
02 How to Compress a Large Video File Online and Free Using Wondershare Media.io?
Part 1: Best Online Video Compressors
1. Wondershare Media.io
This video compressor for free allows you to shrink audio and video files effortlessly. Additionally, it supports more than a thousand audio and video file formats, meaning that you can compress videos with Online Uniconverter recorded on different devices. However, compressing videos more extensive than 100MB is not an option.
Price: 2 Free and 3 pricing plans if you intend to subscribe to the pro version starting at $9.99 / Month
Supported Formats: MP4, MOV, WEBM, AVI, WMV, MP3, etc.
Features:
- Uses HTTPS secure socket layer
- It supports multiple devices
- The free version helps quickly compress up to 100MB file
- Without signing up, upload, and edit unlimited image file size
- No watermark even in the free version
- Conversion speed up to 30 times faster in the premium version.
Pros
- It has a quick download and upload speed
- Over a thousand video and audio files supported
- Supports 5 and 10 file editing per day for non-registered and no sign-up users.
- 100% secure
- Voted 4.7 of 5 in quality.
Cons
- Importing clips from Google Drive or Dropbox is not an option
- The file size limit is 100MB
- The free version of io online video compressorhas limited options
2. FreeConvert
This is a straightforward and primary online compression tool for your content, including audio, images, documents, or videos. Although its outlook is quite intimidating, it is pretty simple and easy to use. It also allows you to convert your audio or video file into any format and size. If you are looking for the top MP4 compressor, go for this.
It also ensures that your privacy remains intact by deleting your uploaded files from their server after the processing.
Price: Free and three pricing plans if you intend to subscribe to the pro version starting at $9.99 / Month
Supported Formats: MP4, MOV, WEBM, AVI, WMV, MP3, etc.
Features
- It is available online only
- Supports many output formats.
- Video, audio, image converter
- Files are uploaded securely via HTTPS protocol.
Pros
- It is effortless, fast, and easy to use
- According to user reviews, this tool is excellent for those looking for free MP4 video compressors.
- No pop-up ads when converting
- It delivers excellent quality compressed videos.
Cons
- You get limited to 25 minutes of converted files in the free version
3. VEED.IO Free Online Video Compressor
This online video editing tool offers a free, fast, and easy online video compressor. Since it is online software, you do not need to have a specific type of laptop or desktop to use it. In addition, it does not use up precious storage space since it’s cloud-based.
Price: Free, and a free trial version is available, and three pricing plans if you intend to subscribe to the pro version starting at $12 / Month
Supported Formats: MP4, MKV, MOV, FLV, AVI
Features
- Captions are autogenerated
- Customer service support is excellent
- Add music, text, and photos to videos.
- Offers music visualizer, effects and removes background voices.
- Record via screen, webcam, voice, or even teleprompter.
- Crop, trim, copy, compress, join, loop, or rotate your videos.
- Innumerable features for adding subtitles and transcribing.
Pros
- The best spec is their subtitle tools that automatically generate captions for videos.
- It is swift to use
- It has an excellent support service.
- It’s a straightforward but powerful video editor.
Cons
- The pro version is quite expensive
4. Clideo Video Compressor Online
This web-based video editing application allows users to efficiently perform basic video editing tasks. Aside from rotating, trimming, or merging videos, users can also use Clideo to compress video files.
Price: Pricing plans start at $9,00 per month
Supported Formats: WAV, OGG, MP3, FLAC, AIFF, OOFF, etc.
Features
- There are umpteen features in this tool, like fast compression, previewing the work before saving, etc.
- Easy sign-in process
- Secure as you will only have access to the files.
- Fast and simple online video compressor, so no downloading or installing.
Pros
- The video compression process is quick
- Provides video editing tools
- The easy sign-in process via Facebook or Google
- Offers tons of methods of reducing the size of video files
Cons
- Not possible to choose the video file format
- There is a watermark in the accessible version
5. Compress Video
This free online video compression tool lets users process video files online and delete unnecessary video parts to compress them into the file size you want. It offers various video file formats where users can set the size of the output video file. In addition, this tool will compress the video to the specified size and try to ensure quality. Compress video is also very safe as you do not need to upload your files.
Price: Free
Supported Formats: MP4, MOV, WMV, FLV, AVI, AVCHD, WebM, MKV, etc.
Features
- Safe and easy to use
- It uses HTML5 Technology and FFMPEG JS Technology for extra safety
- Available in different formats.
- Works with Windows, Linux, Mac, and other systems.
Pros
- The video files do not need to get uploaded to the server but are processed directly in the browser
- Only four steps to compress your file.
- Save the video to your local device post-processing.
- 100% free tool.
Cons
- Has limited features
6. Online Converter
If you need a video compressor that is easy to use and reliable, you should not look much further than the Online Converter. With this tool, users can upload videos saved in MP4, MOV, WMV, and other file formats either from a URL or from your computer.
Price: Free
Supported Formats: MP3 to WAV, M4A to MP3, etc.
Features
- Video size output is set directly
- Support different file format.
- Easy to use, choose a file, select your desired video size and click compress.
- It offers an audio quality of 32kbps to 128kbps.
- No compromise on original audio quality.
Pros
- The uploads are smooth
- Supports a range of video file formats
- Allows users set their desired output video size directly
Cons
- Limit the file size to 200MB
- It slows the video compression process
- It does not allow users to choose the file format of the output video
- There is no support for encrypted video files
7. XConvert
XConvert is a free online file conversion and video compressor tool provider specializing in converting, compressing, and splitting files into various formats.
Price: Free
Supported Formats: WeBM, Mp3, MP4, JPG, PNG
Features:
- Simply add files and start your job.
- A completely free online video compressor.
- Select , , VP8, or VP9 basis convert to file format.
- A rating of 4.7 of 5 by users.
Pros
- Allows the conversion to different files format
- It is a multipurpose editing tool.
- Download files individually or in zip format.
Cons
- The website is compact
- Lots of ads on the interface
8. Flixier Online Video Compressor
This is a cloud-powered video editor that dramatically speeds up your video editing process. In addition, it processes your videos on powerful cloud computers to enable you to run it smoothly on any device ranging from slower PC or Chromebooks to Macbooks or any powerful desktop PCs.
Also, it is perfect for anyone that wants to grow a YouTube channel and create marketing or sales videos. The interface is smooth but still offers advanced features, including color adjustments, picture in picture, green screen, horizontal, vertical, and square videos to take your content to the next level.
Price: Free, Pricing plans start at $9.00 per month
Supported Formats: MP4, MOV, MKV, and WEBM,
Features
- Perfect for content marketing and sales
- Works on any device
- No need to open an account to start.
- No download or installation needed.
- No loss of audio or video quality with this video compressor.
- You can trim, crop, and add music, images, and text to videos.
- Its advanced settings options let you optimize CRF and bitrate that suits you.
Pros
- Allows users to record and edit their voice on a microphone or webcam
- Users can edit any video content from their smartphone or camera
- Publish to YouTube, Vimeo, Google Drive, or Dropbox in seconds.
- Only a three-step and three minutes, lightning-fast best video compressor.
- You can develop Facebook ads and add text to videos.
Cons
- Watermark in the free version
- Limited feature in free version
9. Fastreel Video Compressor
Fastreel Video Compressor, a simple video editor, is available for everyone and is an easy-to-use online video editor. Additionally, it helps create video montages like a pro.
Price: Free
Supported Formats: MP4, MOV, MKV, AVI, and WMV files
Features
- Easy to use
- Perfect for creating a montage
- You get to choose three types of compression quality: high, medium, or low.
- Three steps to video compression, add a video file, choose the level, and export.
- It is free. Just drop or add files to start the process.
Pros
- It is free and straightforward to use
- It has an intuitive interface
- It encourages people to express their creativity and bring business ideas to life
- It helps users promote their brand, get more YouTube subscribers, and increase conversion rates.
- It is fast to use
Cons
- Watermark in the free version
- Limited features in the free version
- The high compression level reduces the quality significantly.
10. VideoSmaller
VideoSmaller is an online free service that allows you to reduce video file size online and compress video file size without losing quality. With this service, users can reduce video file size and make video files smaller. Additionally, users can also reduce the size of MP4 videos captured with an iPhone or Android.
Price: Free
Supported Formats: MP4, AVI, MPEG, MOV formats
Features
- Reduce the video size for free.
- Compress the videos right from the browser
- Safe as uploaded files vanish after a few hours.
Pros
- This free online video compressoris simple to use
- VideoSmaller helps compress files without losing quality
Cons
- File upload is limited to 500MB
- Limited features
Media.io is the top online video compressor from the 10 that was listed as it allows you to compress video files without losing quality. Additionally, it is simple, accessible, and easy to use.
Part 2: How to Compress a Large Video File Online and Free Using Wondershare Media.io?
Now, let us see how you can use this video compressor in just three quick steps and get an excellent output for your video files.
Step 1: Open Media.io to Add Files
Click on Media.io video compressor and add Video Files, then click on Choose Files button to upload video file(s) from your network disk or library.
Step 2: Edit the Video File
Reduce Video Size Online and set the custom video resolution, size, bitrate, and output format required in compressing the video, then click the Compress button.
Step 3: Export and Save the Compressed Clip
Save your compressed video(s) by clicking on the Download button to save the resultant video(s) locally, to Dropbox or Google Drive.
Thus, with Media.io, you can compress your videos without downloading any software. It is a 100% safe and secure tool from one of the top software companies, called Wondershare. This free video compressor tool is a must-try for a new video maker.
Part 3: People Also Want to Know
This section shall go through some FAQs that you may come across about video compressors.
Which free video compressor is the best?
Media.io is the top online video compressor that allows you to compress video files without losing quality. Additionally, it is simple, accessible, and easy to use.
What is a video compressor used for?
It is a tool used to reduce the total number of bits needed to represent a given video or image sequence. Additionally, it helps to reduce file size so that it does not occupy too much space.
Conclusion
Thus, as you saw, in this report, we clubbed and summarized a few essential points regarding video compressors. You learned:
- The video compressor online for freethat you should know of.
- The ten best video compressorsto choose from.
- Why is Media.io an excellent online video compressor, and how does it work?
- Lastly, a few FAQs to make you understand the process and tool better.
So, use these tips and start sharing your in-house video-making talent with your family and the world.
How to Use Visual Effect for Zoom
Zoom, a video calling software, has been quite popular over the last several months and is still one of the most used videos calling applications by millions of people worldwide. The site is a favorite among working professionals, but it is also utilized by individuals to connect with their friends and loved ones. Additionally, despite the app’s abundance of practical built-in tools and functions, it lacks the fun filters and special effects that the majority of users are used to when using a camera. Zoom has ingrained itself in our vocabulary during the last year. It seemed almost inevitable given that everything, from meetings to parties, has moved online.
You don’t need to seek farther than Zoom visual effects to inject a little jazz into the routine Zoom meetings during these hard times. By making adjustments to your Video configuration either before or during a video call, you may add visual effects in Zoom. Zoom meetings may be tedious to conduct over extended periods of time. Additionally, it would be helpful if you recorded the condition of your room before any Zoom meetings. You wouldn’t want to reveal your disorganized space while in a meeting. In these situations, adding visual effects will keep your private area private while also making your Zoom meetings entertaining and exciting. It will also prevent others from seeing your filthy room. This tutorial will walk you through the process of adding visual effects to Zoom step-by-step. In addition, you will get acquainted with the numerous camera functions and visual effects that you may employ during a Zoom video conversation.
- 1. What apps can add visual effect on Zoom?
- 2. How do I add visual effects to Zoom in Mobile?
- 3. How do you download Zoom effects?
Part 1: Popular Visual Effects you can add to Zoom
You may apply one of four main graphic effects to your Zoom meetings. The visual effects that you may use in your next Zoom video chat are briefly summarized below.
1. Visual Backgrounds
Virtual backdrops may transform any plain wall into an artistic setting. Zoom provides you the choice to add photographs to your backdrop in addition to offering you a few pre-made backdrops. Zoom lets you add a movie to your backdrop in addition to simply photographs. With the help of this imaginative feature, gather your pals and enjoy your favorite meme or video. A presentation’s collection of photos, a video, or a single image may all serve as virtual backdrops. A green screen would often be used as your real backdrop and consistent lighting would be required.
To avoid having to reveal your real surroundings while in a conference, you may add any picture or video as a virtual backdrop in Zoom. You have the option of adding own photos and movies or selecting from the pre-existing backdrop films and images. The file type for video backgrounds should be MP4 or MOV, and the resolution should range from 360p to a maximum of 1080p. Ensure that the mirroring of your video is deselected in the Zoom’s Video settings if your backdrop picture has text that may be read. By using virtual backdrops, you may alter the background of your video as it appears to the audience member with whom you are speaking. During the video conference you’re in, the other participants will be able to view your face and body overlaid on the backdrop of your choice.
2. Filters
With these filters, you can have fun in all of your Zoom meetings! Filters are a fun way to spend time with loved ones who are far away, particularly at a period when maintaining social distance is crucial. Filters are the modifications you make to yourself during Zoom meetings (such as a mustache, beard, etc.). They enliven the proceedings and contribute to the fun and memorability of your Zoom meetings.
Your films’ colors may be changed, and video filters can also add new aspects. By selecting a filter appropriate for each event, like team meetings or game nights, you may create the right atmosphere. You may embellish your face in the video with flowers or animal traits by using Zoom’s various filters. Alternately, you might just convert your video’s color to black and white. The video filters from a different program, however, allow you to apply more vibrant filters and place a greater emphasis on special effects.
3. Lighting and Touch-ups
The Lighting function enhances lighting effects and makes adjustments for low light situations to make you seem more professional during a Zoom conference. Similar to this, Touch-up enhances your facial characteristics by making your skin shine, erasing wrinkles, and giving your face a radiant appearance.
On your Zoom videos, changing your lighting and applying touch-ups may improve how you seem. By adjusting your lighting, you can make even dim illumination look bright. By doing touch-ups, you may get a smoother skin texture and get rid of any obvious imperfections.
4. Studio Effects
Zoom has been developing on a new feature called Studio Effects that would give customers the option of using virtual cosmetics in their movies. They are still checking it out before formally releasing it since it is still in beta. However, it is still available to users under the Backgrounds & Filters area. You may adjust the opacity as you like. You have the option to choose a new color or one of the predefined colors. Additionally, you may decide to employ the face effects in all of your next meetings, albeit doing so might be problematic if you use Zoom for business. Don’t worry if you’re running late. Zoom can give your face a natural-looking cosmetic makeover in only one minute!
This function is intended for less formal settings, such as gatherings of friends or family. Anyone who wants to seem more professional during meetings has access to Studio Effects, which offers the choice of various eyebrow colors, beards, and lipsticks. These are a few recently added features. You may add mustaches, beards, and brows in a variety of designs, hues, and intensities. Additionally, you have the option of coloring your lips.
Part 2: How to Add Visual Effects to Zoom
Along with facilitating online meetings, the Zoom program also lets you play with its visual effects. You just need to make a few adjustments to the video settings or utilize another third-party program to be ready to go.
Step1Start a Zoom meeting
You can download Zoom, install it on your computer, and log into your account if you don’t already have it if you don’t already have it.
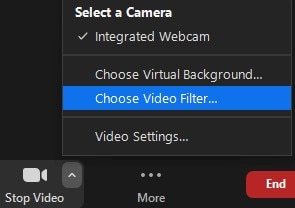
Step2Tap Background and Filters
After logging in to Zoom, use these settings. - Options > Camera > Video

Step3Faucet Filters
Here, you may play with a variety of visual effects and customize them to suit your tastes. Pick one of the numerous filters that are offered. To activate the filter, tap it.
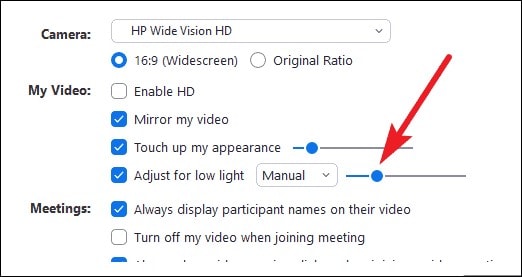
Step4Set Lighting Effects to on
Select “Adjust for low light” in the video options. For your lighting, you may choose between Auto and Manual effects. Zoom will automatically detect and adapt for the lighting in your room if you choose Auto.
Use Zoom’s noise reduction option to keep your conversation focused during your video conference in addition to adding visual elements. To do this, go to “Audio Settings” and choose “High” under “Suppress background noise.” Once you start speaking during the video conference, this essentially cancels out any background noise.
Part 3: Related FAQs
1. What apps can add visual effect on Zoom?
Following is the list of top three apps that you can use to utilize visual effects Zoom application:
Snap Camera is regarded as the most user-friendly. It is a software that you can download for Windows or Mac that works with live broadcasts and video chats. Because it was created by the people who founded Snapchat, it shares a broad variety of filters with that platform.
Link: Snap Camera
The Mac is the only platform on which CamTwist may be used. You may also use it to give your movies additional filters and unique effects. This program lets you pick from a variety of pre-made effects while also allowing you to create your own.
Link: CamTwist
Another desktop application that lets you change and even blur your backdrop is ManyCam. It enables you to apply digital effects, filters, and 3-D masks to your face. Using this tool, you can also build layers and presets.
Link: ManyCam
2. How do I add visual effects to Zoom in Mobile?
Zoom includes a function that might be useful if you don’t want to tidy up or want to add some entertainment to your calls. You may utilize Zoom virtual backdrops to alter your surroundings and take you to a more pleasant location on both the desktop and mobile apps. After joining one on a mobile device, pick Virtual backdrop by tapping the More icon in the bottom right corner. Choose a photo from the list of choices, or click the plus sign (+) to add a photo or video from your gallery.
3. How do you download Zoom effects?
Pressing the Studio Effects button after installing Zoom for the first time will prompt a pop-up asking you to download the Studio Effects package. Several filters, suited for both business meetings and conversations with friends, let you customize the video and audio during your video calls. To start downloading the Effects bundle, click the Download button. The “Studio Effects” window will appear on the right-hand side of the Background & Filter page after the download is finished. All the face components and choices are available in this Studio Effects window.
Conclusion
The most popular video meeting tool worldwide is Zoom. Family, friends, coworkers, and any two people who want to video chat utilize it. Zoom visual effects are the ideal tool for injecting some humor into otherwise dull Zoom sessions and meetings. A few simple steps will get you a striking backdrop, a humorous filter, and some interesting effects. Since the majority of formal work is now completed from home, Zoom has taken over as the standard video conferencing program. Try out as many of the effects as you like, and use this page as a companion and a map to help you along the way.
- 1. What apps can add visual effect on Zoom?
- 2. How do I add visual effects to Zoom in Mobile?
- 3. How do you download Zoom effects?
Part 1: Popular Visual Effects you can add to Zoom
You may apply one of four main graphic effects to your Zoom meetings. The visual effects that you may use in your next Zoom video chat are briefly summarized below.
1. Visual Backgrounds
Virtual backdrops may transform any plain wall into an artistic setting. Zoom provides you the choice to add photographs to your backdrop in addition to offering you a few pre-made backdrops. Zoom lets you add a movie to your backdrop in addition to simply photographs. With the help of this imaginative feature, gather your pals and enjoy your favorite meme or video. A presentation’s collection of photos, a video, or a single image may all serve as virtual backdrops. A green screen would often be used as your real backdrop and consistent lighting would be required.
To avoid having to reveal your real surroundings while in a conference, you may add any picture or video as a virtual backdrop in Zoom. You have the option of adding own photos and movies or selecting from the pre-existing backdrop films and images. The file type for video backgrounds should be MP4 or MOV, and the resolution should range from 360p to a maximum of 1080p. Ensure that the mirroring of your video is deselected in the Zoom’s Video settings if your backdrop picture has text that may be read. By using virtual backdrops, you may alter the background of your video as it appears to the audience member with whom you are speaking. During the video conference you’re in, the other participants will be able to view your face and body overlaid on the backdrop of your choice.
2. Filters
With these filters, you can have fun in all of your Zoom meetings! Filters are a fun way to spend time with loved ones who are far away, particularly at a period when maintaining social distance is crucial. Filters are the modifications you make to yourself during Zoom meetings (such as a mustache, beard, etc.). They enliven the proceedings and contribute to the fun and memorability of your Zoom meetings.
Your films’ colors may be changed, and video filters can also add new aspects. By selecting a filter appropriate for each event, like team meetings or game nights, you may create the right atmosphere. You may embellish your face in the video with flowers or animal traits by using Zoom’s various filters. Alternately, you might just convert your video’s color to black and white. The video filters from a different program, however, allow you to apply more vibrant filters and place a greater emphasis on special effects.
3. Lighting and Touch-ups
The Lighting function enhances lighting effects and makes adjustments for low light situations to make you seem more professional during a Zoom conference. Similar to this, Touch-up enhances your facial characteristics by making your skin shine, erasing wrinkles, and giving your face a radiant appearance.
On your Zoom videos, changing your lighting and applying touch-ups may improve how you seem. By adjusting your lighting, you can make even dim illumination look bright. By doing touch-ups, you may get a smoother skin texture and get rid of any obvious imperfections.
4. Studio Effects
Zoom has been developing on a new feature called Studio Effects that would give customers the option of using virtual cosmetics in their movies. They are still checking it out before formally releasing it since it is still in beta. However, it is still available to users under the Backgrounds & Filters area. You may adjust the opacity as you like. You have the option to choose a new color or one of the predefined colors. Additionally, you may decide to employ the face effects in all of your next meetings, albeit doing so might be problematic if you use Zoom for business. Don’t worry if you’re running late. Zoom can give your face a natural-looking cosmetic makeover in only one minute!
This function is intended for less formal settings, such as gatherings of friends or family. Anyone who wants to seem more professional during meetings has access to Studio Effects, which offers the choice of various eyebrow colors, beards, and lipsticks. These are a few recently added features. You may add mustaches, beards, and brows in a variety of designs, hues, and intensities. Additionally, you have the option of coloring your lips.
Part 2: How to Add Visual Effects to Zoom
Along with facilitating online meetings, the Zoom program also lets you play with its visual effects. You just need to make a few adjustments to the video settings or utilize another third-party program to be ready to go.
Step1Start a Zoom meeting
You can download Zoom, install it on your computer, and log into your account if you don’t already have it if you don’t already have it.
Step2Tap Background and Filters
After logging in to Zoom, use these settings. - Options > Camera > Video
Step3Faucet Filters
Here, you may play with a variety of visual effects and customize them to suit your tastes. Pick one of the numerous filters that are offered. To activate the filter, tap it.
Step4Set Lighting Effects to on
Select “Adjust for low light” in the video options. For your lighting, you may choose between Auto and Manual effects. Zoom will automatically detect and adapt for the lighting in your room if you choose Auto.
Use Zoom’s noise reduction option to keep your conversation focused during your video conference in addition to adding visual elements. To do this, go to “Audio Settings” and choose “High” under “Suppress background noise.” Once you start speaking during the video conference, this essentially cancels out any background noise.
Part 3: Related FAQs
1. What apps can add visual effect on Zoom?
Following is the list of top three apps that you can use to utilize visual effects Zoom application:
Snap Camera is regarded as the most user-friendly. It is a software that you can download for Windows or Mac that works with live broadcasts and video chats. Because it was created by the people who founded Snapchat, it shares a broad variety of filters with that platform.
Link: Snap Camera
The Mac is the only platform on which CamTwist may be used. You may also use it to give your movies additional filters and unique effects. This program lets you pick from a variety of pre-made effects while also allowing you to create your own.
Link: CamTwist
Another desktop application that lets you change and even blur your backdrop is ManyCam. It enables you to apply digital effects, filters, and 3-D masks to your face. Using this tool, you can also build layers and presets.
Link: ManyCam
2. How do I add visual effects to Zoom in Mobile?
Zoom includes a function that might be useful if you don’t want to tidy up or want to add some entertainment to your calls. You may utilize Zoom virtual backdrops to alter your surroundings and take you to a more pleasant location on both the desktop and mobile apps. After joining one on a mobile device, pick Virtual backdrop by tapping the More icon in the bottom right corner. Choose a photo from the list of choices, or click the plus sign (+) to add a photo or video from your gallery.
3. How do you download Zoom effects?
Pressing the Studio Effects button after installing Zoom for the first time will prompt a pop-up asking you to download the Studio Effects package. Several filters, suited for both business meetings and conversations with friends, let you customize the video and audio during your video calls. To start downloading the Effects bundle, click the Download button. The “Studio Effects” window will appear on the right-hand side of the Background & Filter page after the download is finished. All the face components and choices are available in this Studio Effects window.
Conclusion
The most popular video meeting tool worldwide is Zoom. Family, friends, coworkers, and any two people who want to video chat utilize it. Zoom visual effects are the ideal tool for injecting some humor into otherwise dull Zoom sessions and meetings. A few simple steps will get you a striking backdrop, a humorous filter, and some interesting effects. Since the majority of formal work is now completed from home, Zoom has taken over as the standard video conferencing program. Try out as many of the effects as you like, and use this page as a companion and a map to help you along the way.
Everything That You Need to Know About Video Montages- Ideas, Techniqu
Video montages are one of the best types of video formats people enjoy, and they are useful for different occasions. Whether you want to create a montage of your memories as an anniversary gift or create a montage of product photos for promotions, uses are multiple here. This prompts the need for users to learn how to make a montage, and that is what we will cover in this post.
These videos, with a series of shots and information edited together cohesively in sequence, are useful for showcasing storyline progress. Here, you will learn about use cases of the process, like a birthday video montage, more ideas, and the process of making them. Read on if any of that interests you.

Part 1. Classic Montage Ideas in Art and Film
Video montages play a major role in films, art productions, and gaming, like the call of duty montage.
In terms of the first example, when you watch movies, you might notice this technique used in many movies, utilized more prominently since the 1920s when Sergei Eisenstein coined the term first. These scenes appear as stitched-together shots of the characters showing time passage, enjoying activities or memories.
Different techniques are common, like rhythmic, metric, intellectual, or tonal. For example, the 2000 movie “Requiem for a Dream” showcased an intellectual/metric style of video montage to show the disorientating effect of the character under drug influence. A relatively recent example would be Benedict Cumberbatch’s 2016 movie “Doctor Strange”, where the montage shows the titular character’s interaction with the villain (no spoilers).
3 Top Montages in Film for All Times
If the above two examples did not fully express what is a montage video, seeing more examples should help. For this, here are three of the top montage examples available in Film History, each version representing a separate video montage style.
1. Rocky (1976)
One of the most notable montages is available in the 1976 action movie, the Sylvester Stallone-starrer “Rocky”. The type of video montage that is visible in this movie is rhythmic in nature, showcasing the training the character undergoes. This is edited with a musical background score, summarising some shots’ full training progression process.
To add an emotive tone to the video, music is added to the video clip that engages audiences to feel the character’s passion. A rhythmic style of video montage technique is used to cut the shorts as per the content. The lengths of each clip are not similar and differ as per the action going on in the scene.
2. Mulan (1998)
Video montages are also visible in animated movies, as seen in the 1998 version of Disney’s “Mulan”. The scene in question is where the song “I’ll Make a Man Out of You” plays while Mulan undergoes strict training for the military from the male lead. A sequence of shots showing her progress is shown.
Here, the video montage is shown with the background music that perfectly aligns with what is occurring in the video. The visuals and the audio in the background cohesively show the main character’s struggle, which creates an emotional response in the audience. Therefore, the style of video montage here falls under tonal or overtonal categories.
Watch this video to get an idea of how music and visuals can partner for tonal video montages.
3. Creed (2015)
Like in the Rocky movie, its 2015 sequel, “Creed”, also has a video montage. Here, the clips in the sequence are also used to depict the intense training progress. However, where it differs from the rhythmic formula is that the sequence highlights the emotional journey or determination of Adonis Creed to succeed.
Plus, this video montage is a homage to the original version; the tonal effect is further noticeable in the scene of Rocky’s health deterioration against Creed’s training. Thus, it juxtaposes the two scenes, creating an emotional impact on viewers to root for the main character.
Watch this video to understand what is a montage video of the tonal type.
Part 2. Creative Montage Ideas for Social Media
Of course, movies and TV shows are the only types of media where video montage techniques are useful. Many non-professionals use options like a fortnite montage editor to create and edit montage videos for other projects they can share across platforms. Some even create video montages to create videos for social media.
These include vlog-like videos that people record and then edit together into a montage which different techniques. Plus, some users create montages of different things that interest them, like gameplay. Then, they share those videos across social media for views, like on TikTok or YouTube.
· Gaming Montages
Different creators focus on developing gaming montages to create projects for the games they operate. These can include videos showcasing the skills or gameplays of the creation, all explaining a specific theme in some cases.
There are different games that the users focus on for showcasing their gaming prowess in action. Common examples include Fortnite, Call of Duty, CSGO, or PUBG montage videos.
Watch this video to get an idea.
· Wedding Montages
Many users turn to edit video montages for specific occasions, adding clips of different moments instead of one long-running documentary. They incorporate stylish effects like slow motion and transitions, incorporate a moving background score, and more.
Many top influencers and celebrities have used this technique for their wedding videos on social media. Additionally, regular people also adopt the style.
Watch this video as an example.
· Birthday Montages
Like wedding videos, users can try out the video montage technique to create videos for birthdays. These can include scenes of the main creator throughout their preparation phase for the party. Alternately, some users create video montages of their experience leading up to the video celebration, through a longer period or the same day.
Watch this video to understand how these videos may look.
Part 3. How Can I Create Easily a Montage Video?
After understanding the types of video montage techniques and ideas, the next point of concern is learning how to make a montage.
One of the best editing software to use for this process is Wondershare Filmora . With this editor, you can create different video montages as per the theme, customized or instantly. Filmora includes premium-quality effects and transitions, including free stock media that you can also add. Plus, the software allows the ability to record voiceover and adjust background scores in the video.
You can also choose the aspect ratio for the video, depending on the platform you post it on. For example, if you are creating a full professional-level scene montage, use the widescreen (16:9) aspect ratio, like in YouTube videos. Or, use the portrait (9:16) for mobile-based videos for TikTok videos or a 1:1 aspect ratio for Instagram videos.
Watch this video to know how it works.
Free Download For Win 7 or later(64-bit)
Free Download For macOS 10.14 or later
Features of Filmora for Video Montage Making
There are multiple top-quality features available in the Filmora software that is useful for creating and editing video montages. Use them and create dynamic videos.
1. Screen Recorder
The Screen Recorder feature is accessible through the home page of the Filmora software after launching. Since the first stage of making a montage involves getting the video clips for it, you can use this to record the video. For example, if you have a movie saved on your desktop, use the screen recorder and tap the Play button to record the screen.

You can adjust further settings, like which headphone or speaker to use for the audio recording.
2. Preset Templates
Next comes the editing process. After completing the recording process for the montage video, you can use preset templates on Filmora via Instant Mode. This is useful for users who do not have enough time to fully edit a long montage video or have the technical skills for it.
You can click on the Instant Mode tab on the home page. Then, choose the specific theme of the video montage you will create, like Birthday, Wedding, Business, etc. After selecting the theme, you can insert multiple video clips into the editor. Adjust the clips in sequence and press the “Auto-Create” button.

3. Abundant Video Effects and Music Resources
If you want to customize the video montage video manually, you can use the various effects and advanced features in the main editor timeline. For example, click on the Effects tab to find your options.

After importing the file(s) into the editor and dragging it to the timeline, you can use the Crop icon to cut clips. Then, rearrange them and merge them. Plus, further editing features are available for premium-level edits, like the Chroma Key. Click on it and add a green screen in the background.

The AI Portrait feature is also available, automatically detecting the main character and accurately removing the background.
You can adjust the speed of transitions in the video with the Speed Ramping function. Many high-quality effects are available under the Effects tab, and you can add audio to the video through the Media tab.

Conclusion
Video montages are one of the tried-and-tested methods used in film-making, gaming videos, and social media videos. You can use Filmora to create such video montages based on the type of video montage technique that fits it. Then, share it directly to YouTube or save it for transferring across different platforms.
Free Download For Win 7 or later(64-bit)
Free Download For macOS 10.14 or later
Part 1. Classic Montage Ideas in Art and Film
Video montages play a major role in films, art productions, and gaming, like the call of duty montage.
In terms of the first example, when you watch movies, you might notice this technique used in many movies, utilized more prominently since the 1920s when Sergei Eisenstein coined the term first. These scenes appear as stitched-together shots of the characters showing time passage, enjoying activities or memories.
Different techniques are common, like rhythmic, metric, intellectual, or tonal. For example, the 2000 movie “Requiem for a Dream” showcased an intellectual/metric style of video montage to show the disorientating effect of the character under drug influence. A relatively recent example would be Benedict Cumberbatch’s 2016 movie “Doctor Strange”, where the montage shows the titular character’s interaction with the villain (no spoilers).
3 Top Montages in Film for All Times
If the above two examples did not fully express what is a montage video, seeing more examples should help. For this, here are three of the top montage examples available in Film History, each version representing a separate video montage style.
1. Rocky (1976)
One of the most notable montages is available in the 1976 action movie, the Sylvester Stallone-starrer “Rocky”. The type of video montage that is visible in this movie is rhythmic in nature, showcasing the training the character undergoes. This is edited with a musical background score, summarising some shots’ full training progression process.
To add an emotive tone to the video, music is added to the video clip that engages audiences to feel the character’s passion. A rhythmic style of video montage technique is used to cut the shorts as per the content. The lengths of each clip are not similar and differ as per the action going on in the scene.
2. Mulan (1998)
Video montages are also visible in animated movies, as seen in the 1998 version of Disney’s “Mulan”. The scene in question is where the song “I’ll Make a Man Out of You” plays while Mulan undergoes strict training for the military from the male lead. A sequence of shots showing her progress is shown.
Here, the video montage is shown with the background music that perfectly aligns with what is occurring in the video. The visuals and the audio in the background cohesively show the main character’s struggle, which creates an emotional response in the audience. Therefore, the style of video montage here falls under tonal or overtonal categories.
Watch this video to get an idea of how music and visuals can partner for tonal video montages.
3. Creed (2015)
Like in the Rocky movie, its 2015 sequel, “Creed”, also has a video montage. Here, the clips in the sequence are also used to depict the intense training progress. However, where it differs from the rhythmic formula is that the sequence highlights the emotional journey or determination of Adonis Creed to succeed.
Plus, this video montage is a homage to the original version; the tonal effect is further noticeable in the scene of Rocky’s health deterioration against Creed’s training. Thus, it juxtaposes the two scenes, creating an emotional impact on viewers to root for the main character.
Watch this video to understand what is a montage video of the tonal type.
Part 2. Creative Montage Ideas for Social Media
Of course, movies and TV shows are the only types of media where video montage techniques are useful. Many non-professionals use options like a fortnite montage editor to create and edit montage videos for other projects they can share across platforms. Some even create video montages to create videos for social media.
These include vlog-like videos that people record and then edit together into a montage which different techniques. Plus, some users create montages of different things that interest them, like gameplay. Then, they share those videos across social media for views, like on TikTok or YouTube.
· Gaming Montages
Different creators focus on developing gaming montages to create projects for the games they operate. These can include videos showcasing the skills or gameplays of the creation, all explaining a specific theme in some cases.
There are different games that the users focus on for showcasing their gaming prowess in action. Common examples include Fortnite, Call of Duty, CSGO, or PUBG montage videos.
Watch this video to get an idea.
· Wedding Montages
Many users turn to edit video montages for specific occasions, adding clips of different moments instead of one long-running documentary. They incorporate stylish effects like slow motion and transitions, incorporate a moving background score, and more.
Many top influencers and celebrities have used this technique for their wedding videos on social media. Additionally, regular people also adopt the style.
Watch this video as an example.
· Birthday Montages
Like wedding videos, users can try out the video montage technique to create videos for birthdays. These can include scenes of the main creator throughout their preparation phase for the party. Alternately, some users create video montages of their experience leading up to the video celebration, through a longer period or the same day.
Watch this video to understand how these videos may look.
Part 3. How Can I Create Easily a Montage Video?
After understanding the types of video montage techniques and ideas, the next point of concern is learning how to make a montage.
One of the best editing software to use for this process is Wondershare Filmora . With this editor, you can create different video montages as per the theme, customized or instantly. Filmora includes premium-quality effects and transitions, including free stock media that you can also add. Plus, the software allows the ability to record voiceover and adjust background scores in the video.
You can also choose the aspect ratio for the video, depending on the platform you post it on. For example, if you are creating a full professional-level scene montage, use the widescreen (16:9) aspect ratio, like in YouTube videos. Or, use the portrait (9:16) for mobile-based videos for TikTok videos or a 1:1 aspect ratio for Instagram videos.
Watch this video to know how it works.
Free Download For Win 7 or later(64-bit)
Free Download For macOS 10.14 or later
Features of Filmora for Video Montage Making
There are multiple top-quality features available in the Filmora software that is useful for creating and editing video montages. Use them and create dynamic videos.
1. Screen Recorder
The Screen Recorder feature is accessible through the home page of the Filmora software after launching. Since the first stage of making a montage involves getting the video clips for it, you can use this to record the video. For example, if you have a movie saved on your desktop, use the screen recorder and tap the Play button to record the screen.
You can adjust further settings, like which headphone or speaker to use for the audio recording.
2. Preset Templates
Next comes the editing process. After completing the recording process for the montage video, you can use preset templates on Filmora via Instant Mode. This is useful for users who do not have enough time to fully edit a long montage video or have the technical skills for it.
You can click on the Instant Mode tab on the home page. Then, choose the specific theme of the video montage you will create, like Birthday, Wedding, Business, etc. After selecting the theme, you can insert multiple video clips into the editor. Adjust the clips in sequence and press the “Auto-Create” button.
3. Abundant Video Effects and Music Resources
If you want to customize the video montage video manually, you can use the various effects and advanced features in the main editor timeline. For example, click on the Effects tab to find your options.
After importing the file(s) into the editor and dragging it to the timeline, you can use the Crop icon to cut clips. Then, rearrange them and merge them. Plus, further editing features are available for premium-level edits, like the Chroma Key. Click on it and add a green screen in the background.
The AI Portrait feature is also available, automatically detecting the main character and accurately removing the background.
You can adjust the speed of transitions in the video with the Speed Ramping function. Many high-quality effects are available under the Effects tab, and you can add audio to the video through the Media tab.
Conclusion
Video montages are one of the tried-and-tested methods used in film-making, gaming videos, and social media videos. You can use Filmora to create such video montages based on the type of video montage technique that fits it. Then, share it directly to YouTube or save it for transferring across different platforms.
Free Download For Win 7 or later(64-bit)
Free Download For macOS 10.14 or later
Best Ever Ways Make Tiktok Slideshow [Solved]
Best Ever Ways Make Tiktok Slideshow [Solved] 2022
An easy yet powerful editor
Numerous effects to choose from
Detailed tutorials provided by the official channel
Tiktok is the most amazing and popular social media platform because it has stunning features. It is used by many people like social media influencer to common man. Tiktok helps the content creator in making them and their content viral. It is used for gaining followers and becoming popular.
In this article
01 [How to Make Tiktok Photo Slideshow Faster](#Part 1)
02 [Five Recommended Tiktok Slideshow Effects](#Part 2)
03 [How to Adjust Sound on Tiktok Slideshow](#Part 3)
04 [FAQ of Making Tiktok Slideshow](#Part 4)
Part 1 How To Make Tiktok Photo Slideshow Faster?
01How can you make fast slideshow of pictures on Tiktok 2022?
Do you want to create fast slideshow of pictures on Tiktok? Here is the step by step process to make a fast slideshow of pictures:
Step 1: Open the Tiktok app
Click on the Tiktok logo in your device to open Tiktok app.

Step 2: Click on plus icon.
Now, you will start seeing the videos from “Following” or “For you” on your Home Screen.
Click on the “+” Plus icon in the bottom of the screen.

Step 3: Click on templates
On the right side of “Red Shoot Button” you will see template option, click on templates.

Step 4: Select Template
After clicking on the “Template” option, you will see photo and videos from the gallery on your device. Tap on images to select images.

Step 5: Select Images from your gallery
Tap on the “Radio Button” to select images, you can also choose videos if you want.
To explore all the images on your gallery, you can click on the swipe up or drop down menu.

Step 6: Click on OK Button
When you are done selecting all images from the gallery, at the bottom right you see the OK button. To proceed, click on the OK button.

Step 7: Edit the Slideshow Video
Now you can see a slideshow photo video of the images which you have selected. Now, you can edit the video: you can change the sound, add different effects and add text or any stickers to your slideshow video.

Step 8: Click on Next Button
After completing your photo video slideshow, click on the Next button.
Step 9: Click on the Post button
After clicking on the Next button now you will see two options, Drafts and Post button.
● Drafts: If you don’t want to post the video then add #hashtags, mention your friend name and click on the drafts button.
● Posts: If you want to post the video then add #hashtags, mention your friends and click on post button to publish.

Step 10: Done
You have successfully completed making a fast photo video slideshow.
02How can you make tiktok slideshow faster in 2022?
To faster tiktok photo slideshow follow the given steps:
● Go to Play Store or App Store.
● Search for “Video Speed” Application on your device.
● Download any app, from the search list.
● Open the app and select your Tiktok video for editing.
● Edit the video from the instructions which are given on-screen.
● Download it for free on your device.
● Add it on Tiktok to share.
So, these were the given steps from which you can make your photo slideshow faster.
Part 2 Five Recommended Tiktok Slideshow Effects
01Bling Effect on Tiktok
If you use Tiktok actively then you must have seen the Bling Effect as they look glittery and conspicuous. If you are not aware about the Bling effect on Tiktok, it is an effect which gives sparkly look. Bling Effect works better on videos which emit light. Things that emit light are jewellery, LED lights, glasses etc.

Make sure that your Tiktok is updated with the latest version to get the Bling Effect. Then follow the given steps:
● Open Tiktok on your device and click on the “+” icon to add a new video.
● Click on the “Effects” button at the bottom left side and then open the “Trending” tab of Tiktok effect.
● Keep scrolling until you do not get the Bling effect icon.
● When you get the Bling effect tap to download it, and after that it’s ready to use.
● To add an effect in your favourites, click on the white Bookmark which is given while the Bling effect is alive.
Now, you can use the Bling effect while recording your videos.
02Face Zoom Effect on Tiktok
The Face Zoom Effect is what it sounds like; it’s an effect on Tiktok which is used to automatically zoom the camera on your face. Face Zoom effect can make your videos stand out from other people videos. If you use the Face Zoom effect and hold on to the camera up to your face and pull your phone back slowly, your face will look totally different.

Here are the steps to get the Face Zoom Effect on Tiktok:
● Open the Tiktok on your device.
● Tap on the “+” button on the home screen.
● Then you will see the “Effects” section, click on it.
● In the Effects section you will see various other filters also.
● Keep searching for it and when you get it, select it.
● Now, you can make videos and publish them**.**
03Face Morph Effect on Tiktok
Face Morph Filter is which morphs 2 pictures and make transitions to the pictures at that time. When you use this filter, you can see that it make changes but still you have the same face. Your face remains the same but the transitions look very even and amazing.

Follow the given steps to use the Face Morph Effect:
● Open the Tiktok app on your device.
● Click on the “+” icon at the bottom of the screen.
● Scroll on the right side on the Templates.
● Keep scrolling until you get the Morph Effect.
● Click to select photos.
● Select at least 5 photos from your camera roll.
● Click OK at the bottom right corner
● Now edit and publish your Tiktok.
04 Beauty Effects
Beauty effects are used to beautify your face and changes you into completely different person. If you don’t want to wear makeup just to record one video, in that case you can use this effect. Basically it completely changes your overall appearance.

Steps to follow to use beauty effects:
● Open Tiktok app on your device.
● Click on the “+” button at the bottom- center of the screen.
● Click on the “Effects” section.
● Keep searching for “Beauty Effect” and after that select it.
● Now, you can record your video and publish them.
05Green Effect
Green effects allow you to change the background of any image or you can also add any video to your background of your choice. With the help of Green Screen, users have been able to film their videos wherever they want.

● Open Tiktok application.
● On the bottom center, click on the “+” icon.
● On the bottom left corner, click on “effects”.
● Click on the “Green Screen” from the Effects menu.
● Select Green Screen effect.
● Now you can film videos using Green Screen.
Part 3 How To Adjust Sound On Tiktok Slideshow
Once you have selected the sound, you may need to do some adjustments.
To edit which part of the song you are using:
● Click on the “Trim” button given at the right side of the screen.
● Drag the cursor to adjust which part of the song you want your video to begin at.
● Click on the checkmark to confirm.
To edit the volume of the sound:
● Once you have completed filming your video, in the bottom left corner click on the sounds button.
● Click the “volume” tab and use the cursor to adjust how much loud the sound is compared to the original audio.
● Click on the screen again to confirm.
These were the steps for adjusting sound, the way you want to customize it.
Part 4 FAQ’S of making Tiktok Slideshow
Q1. How can you trim the audio on a Tiktok Sideshow?
A. To trim sound on a Tiktok slideshow, first add a sound to a Tiktok slideshow, click on the ‘Trim” button at the right side of the screen. Then drag the cursor to select which part of the audio you want for your video. Listen to the sound after trimming. If you liked the trimmed song, tap to the next button to add it in your Tiktok slideshow.
Q2. How can you add text to the Tiktok slideshow?
A. Steps to add text to your Tiktok slideshow:
● Open Tiktok app.
● Click on the “+” icon.
● Click on upload.
● Select an image from your gallery.
● Click on the “Next” button.
● Now click on the “Text” to add text.
● After that type the text.
● Choose any font or color of your choice.
● Tap on the “Done “button”.
● Now your video is ready to publish.
Q3. How can we add music to slideshow videos on Tiktok?
A. Yes you can add music to your slideshow video. Before posting it you will find the edit option.
When you select images from your gallery > click next > click on the sound option > choose music from sounds and add it to your slideshow video.
Q4. How many images can you add to a Tiktok slideshow?
A. Select the images to add to the slideshow. You can also add videos to your slideshow from the videos section. Keep in mind that the images you are selecting are in perfect order as you want to see them appear in a slideshow. You can add up to 35 images and videos.
Q5. What are the best recommended slideshow effects on Tiktok?
A. There are a lot of effects on Tiktok but here are some best slideshow effects of Tiktok like Green Screen, Spilt Screen, Face Zoom effect, Bling effect, Trio effect, Beauty effect, Long Face effect, Trisection effect and Face Morph effect.
Tiktok is a great choice for making photo video slideshow but if you want to try something new you can consider using Wondershare Filmora Video Editor . As it have amazing transitions and its own music gallery, it allows you to record your own voiceover. Filmora allows you to make engaging slideshow using different features automatically or manually. It has voice removal, audio mixer, and video stabilization features that add to the output. The 4K editing feature allows you to export the video of resolution of up to 4K.
For Win 7 or later (64-bit)
For macOS 10.12 or later
● Ending Thoughts →
● Tiktok is an amazing and popular social media platform which allows you to create your own content and with the help of this platform your content can reach a wide range of people.
● You can make an attractive photo slideshow with the help of Tiktok because it has amazing features like different effects, and you can also add text and sound to it.
● Tiktok is a great choice but you can also consider an alternate option like, Filmora as you can create your slideshow with its amazing features.
Tiktok is the most amazing and popular social media platform because it has stunning features. It is used by many people like social media influencer to common man. Tiktok helps the content creator in making them and their content viral. It is used for gaining followers and becoming popular.
In this article
01 [How to Make Tiktok Photo Slideshow Faster](#Part 1)
02 [Five Recommended Tiktok Slideshow Effects](#Part 2)
03 [How to Adjust Sound on Tiktok Slideshow](#Part 3)
04 [FAQ of Making Tiktok Slideshow](#Part 4)
Part 1 How To Make Tiktok Photo Slideshow Faster?
01How can you make fast slideshow of pictures on Tiktok 2022?
Do you want to create fast slideshow of pictures on Tiktok? Here is the step by step process to make a fast slideshow of pictures:
Step 1: Open the Tiktok app
Click on the Tiktok logo in your device to open Tiktok app.
Step 2: Click on plus icon.
Now, you will start seeing the videos from “Following” or “For you” on your Home Screen.
Click on the “+” Plus icon in the bottom of the screen.
Step 3: Click on templates
On the right side of “Red Shoot Button” you will see template option, click on templates.
Step 4: Select Template
After clicking on the “Template” option, you will see photo and videos from the gallery on your device. Tap on images to select images.
Step 5: Select Images from your gallery
Tap on the “Radio Button” to select images, you can also choose videos if you want.
To explore all the images on your gallery, you can click on the swipe up or drop down menu.
Step 6: Click on OK Button
When you are done selecting all images from the gallery, at the bottom right you see the OK button. To proceed, click on the OK button.
Step 7: Edit the Slideshow Video
Now you can see a slideshow photo video of the images which you have selected. Now, you can edit the video: you can change the sound, add different effects and add text or any stickers to your slideshow video.
Step 8: Click on Next Button
After completing your photo video slideshow, click on the Next button.
Step 9: Click on the Post button
After clicking on the Next button now you will see two options, Drafts and Post button.
● Drafts: If you don’t want to post the video then add #hashtags, mention your friend name and click on the drafts button.
● Posts: If you want to post the video then add #hashtags, mention your friends and click on post button to publish.
Step 10: Done
You have successfully completed making a fast photo video slideshow.
02How can you make tiktok slideshow faster in 2022?
To faster tiktok photo slideshow follow the given steps:
● Go to Play Store or App Store.
● Search for “Video Speed” Application on your device.
● Download any app, from the search list.
● Open the app and select your Tiktok video for editing.
● Edit the video from the instructions which are given on-screen.
● Download it for free on your device.
● Add it on Tiktok to share.
So, these were the given steps from which you can make your photo slideshow faster.
Part 2 Five Recommended Tiktok Slideshow Effects
01Bling Effect on Tiktok
If you use Tiktok actively then you must have seen the Bling Effect as they look glittery and conspicuous. If you are not aware about the Bling effect on Tiktok, it is an effect which gives sparkly look. Bling Effect works better on videos which emit light. Things that emit light are jewellery, LED lights, glasses etc.
Make sure that your Tiktok is updated with the latest version to get the Bling Effect. Then follow the given steps:
● Open Tiktok on your device and click on the “+” icon to add a new video.
● Click on the “Effects” button at the bottom left side and then open the “Trending” tab of Tiktok effect.
● Keep scrolling until you do not get the Bling effect icon.
● When you get the Bling effect tap to download it, and after that it’s ready to use.
● To add an effect in your favourites, click on the white Bookmark which is given while the Bling effect is alive.
Now, you can use the Bling effect while recording your videos.
02Face Zoom Effect on Tiktok
The Face Zoom Effect is what it sounds like; it’s an effect on Tiktok which is used to automatically zoom the camera on your face. Face Zoom effect can make your videos stand out from other people videos. If you use the Face Zoom effect and hold on to the camera up to your face and pull your phone back slowly, your face will look totally different.
Here are the steps to get the Face Zoom Effect on Tiktok:
● Open the Tiktok on your device.
● Tap on the “+” button on the home screen.
● Then you will see the “Effects” section, click on it.
● In the Effects section you will see various other filters also.
● Keep searching for it and when you get it, select it.
● Now, you can make videos and publish them**.**
03Face Morph Effect on Tiktok
Face Morph Filter is which morphs 2 pictures and make transitions to the pictures at that time. When you use this filter, you can see that it make changes but still you have the same face. Your face remains the same but the transitions look very even and amazing.
Follow the given steps to use the Face Morph Effect:
● Open the Tiktok app on your device.
● Click on the “+” icon at the bottom of the screen.
● Scroll on the right side on the Templates.
● Keep scrolling until you get the Morph Effect.
● Click to select photos.
● Select at least 5 photos from your camera roll.
● Click OK at the bottom right corner
● Now edit and publish your Tiktok.
04 Beauty Effects
Beauty effects are used to beautify your face and changes you into completely different person. If you don’t want to wear makeup just to record one video, in that case you can use this effect. Basically it completely changes your overall appearance.
Steps to follow to use beauty effects:
● Open Tiktok app on your device.
● Click on the “+” button at the bottom- center of the screen.
● Click on the “Effects” section.
● Keep searching for “Beauty Effect” and after that select it.
● Now, you can record your video and publish them.
05Green Effect
Green effects allow you to change the background of any image or you can also add any video to your background of your choice. With the help of Green Screen, users have been able to film their videos wherever they want.
● Open Tiktok application.
● On the bottom center, click on the “+” icon.
● On the bottom left corner, click on “effects”.
● Click on the “Green Screen” from the Effects menu.
● Select Green Screen effect.
● Now you can film videos using Green Screen.
Part 3 How To Adjust Sound On Tiktok Slideshow
Once you have selected the sound, you may need to do some adjustments.
To edit which part of the song you are using:
● Click on the “Trim” button given at the right side of the screen.
● Drag the cursor to adjust which part of the song you want your video to begin at.
● Click on the checkmark to confirm.
To edit the volume of the sound:
● Once you have completed filming your video, in the bottom left corner click on the sounds button.
● Click the “volume” tab and use the cursor to adjust how much loud the sound is compared to the original audio.
● Click on the screen again to confirm.
These were the steps for adjusting sound, the way you want to customize it.
Part 4 FAQ’S of making Tiktok Slideshow
Q1. How can you trim the audio on a Tiktok Sideshow?
A. To trim sound on a Tiktok slideshow, first add a sound to a Tiktok slideshow, click on the ‘Trim” button at the right side of the screen. Then drag the cursor to select which part of the audio you want for your video. Listen to the sound after trimming. If you liked the trimmed song, tap to the next button to add it in your Tiktok slideshow.
Q2. How can you add text to the Tiktok slideshow?
A. Steps to add text to your Tiktok slideshow:
● Open Tiktok app.
● Click on the “+” icon.
● Click on upload.
● Select an image from your gallery.
● Click on the “Next” button.
● Now click on the “Text” to add text.
● After that type the text.
● Choose any font or color of your choice.
● Tap on the “Done “button”.
● Now your video is ready to publish.
Q3. How can we add music to slideshow videos on Tiktok?
A. Yes you can add music to your slideshow video. Before posting it you will find the edit option.
When you select images from your gallery > click next > click on the sound option > choose music from sounds and add it to your slideshow video.
Q4. How many images can you add to a Tiktok slideshow?
A. Select the images to add to the slideshow. You can also add videos to your slideshow from the videos section. Keep in mind that the images you are selecting are in perfect order as you want to see them appear in a slideshow. You can add up to 35 images and videos.
Q5. What are the best recommended slideshow effects on Tiktok?
A. There are a lot of effects on Tiktok but here are some best slideshow effects of Tiktok like Green Screen, Spilt Screen, Face Zoom effect, Bling effect, Trio effect, Beauty effect, Long Face effect, Trisection effect and Face Morph effect.
Tiktok is a great choice for making photo video slideshow but if you want to try something new you can consider using Wondershare Filmora Video Editor . As it have amazing transitions and its own music gallery, it allows you to record your own voiceover. Filmora allows you to make engaging slideshow using different features automatically or manually. It has voice removal, audio mixer, and video stabilization features that add to the output. The 4K editing feature allows you to export the video of resolution of up to 4K.
For Win 7 or later (64-bit)
For macOS 10.12 or later
● Ending Thoughts →
● Tiktok is an amazing and popular social media platform which allows you to create your own content and with the help of this platform your content can reach a wide range of people.
● You can make an attractive photo slideshow with the help of Tiktok because it has amazing features like different effects, and you can also add text and sound to it.
● Tiktok is a great choice but you can also consider an alternate option like, Filmora as you can create your slideshow with its amazing features.
Also read:
- New How to Create a PowerPoint Looping Slideshow for 2024
- Updated Tips to Make Cinematic Color Grading
- Updated 2024 Approved Steps to Remove Background Noise From Video Sony Vegas
- Updated Easy Guide to Use a Stabilization Tool in Filmora for 2024
- Updated 2024 Approved Adobe Lightroom Color Grading Tutorial
- New What Are the Best 15 Slideshow Presentation Examples Your Audience Will Love for 2024
- Updated Reviewing Efectum App and The Best Alternatives for Smartphone Users
- New 2024 Approved Clone Yourself in Videos with Filmora
- New 2024 Approved How to Use the Logo Intro Templates for Your Next Video
- Updated What Is the Best Filmora Slideshow Templates? Experts Choice for 2024
- Updated In 2024, 7 Best MP4 Editors for Mac Edit MP4 in Mac
- New In 2024, Unlock Your Video Editing Potential With Wondershare Filmora
- Fast Method to Match Color in Photoshop
- New Do You Wish to Create High-Quality Videos and Experience Effective Videos with Editing? No Problem at All because the Keyboard Shortcuts Listed Here Will Assist You
- Updated Looking for the Best Alternatives of iPad Compatible Slideshow Applications to Design High End Graphic Presentations? Rest Assured, You Have Landed at the Correct Spot
- New In 2024, Ultimate Guide on Magic Effects Video Making
- Most-Used 3 Ways to Compress Video for Instagram Story, Feed, and IGTV
- Wondering How to Rotate a Video in Windows at Any Desired Angle and Save It Permanently? Find Out All the Different Ways to Rotate Videos Temporarily as Well as Permanently for 2024
- Updated How to Make a Smooth Speed Ramping in Premiere Pro, In 2024
- How to Get VHS Filter and Glitch Filter to Your Images or Videos for 2024
- 2024 Approved 3 Ways to Combine 2 or 3 Videos Into 1
- Updated 2024 Approved Free Green Screen Mobile Frame Downloads
- 2024 Approved Top 10 Transparent Image Online Tools That Help You A Lot
- Updated Rotate Video in iMovie
- In 2024, How to Make Random Letter Reveal Intro?
- New In 2024, The Best Way to Remove Audio From Your Videos
- Updated Top Best Free LUTs For Premiere Pro
- All About GIF Keyboard That You May Want to Know for 2024
- New Top 8 Video Editor with Useful Masking
- Working Out All Important Details of Slowing Down Video in After Effects for 2024
- Updated In 2024, Easy Way to Combine Several Xvid Files Into One Windows, Mac,Android
- New Funny Content Ideas for YouTube Videos
- Updated 2024 Approved Easy Ways to Make Procreate GIFs
- Updated In 2024, Easy Steps to Create Intro Video with After Effects
- Top 10 Picks for Flawless Slow Motion Video Generation for 2024
- 2024 Approved Steps to Remove Background Noise From Video Sony Vegas
- Updated In 2024, How to Make Split Screen Videos in Filmora
- New In 2024, Mastering the Technique Playing Videos in Slow Motion on Your iPhone Like a Pro
- Updated 2024 Approved 7 Solutions to Cut Video on Mac without Using FFmpeg?
- New Detailed Guide to Crop Video in Sony Vegas Pro
- Updated Hard to Remove Black Background in After Effects, In 2024
- In 2024, Some Leading AI Tools to Replace Sky Backgrounds
- Updated 2024 Approved Introduction to The Best Cinematic LUTs in The Market
- Updated 8 Best Video Editor with Useful Masking
- 2024 Approved Complete Guide to Converting GIF to SVG With Ease
- New Blender Is a 3D Animation Software that Can Be Used to Create Stunning 3D Models and Videos
- Updated In 2024, How Does the YouTube AI Algorithm Work
- Green Screen Is a Widely Used Effect in After Effects. Many Professional Photographers Use It to Make Creative Video Effects. This Guide Will Show You How to Use Green Screen to Videos in After Effects
- What Does Enter PUK Code Mean And Why Did The Sim Get PUK Blocked On Samsung Device
- CatchEmAll Celebrate National Pokémon Day with Virtual Location On Nokia C300 | Dr.fone
- In 2024, 3 Effective Methods to Fake GPS location on Android For your Realme 12 Pro+ 5G | Dr.fone
- In 2024, Ultimate Guide to Catch the Regional-Located Pokemon For Samsung Galaxy A14 5G | Dr.fone
- In 2024, 3 Ways of How to Get Someones Apple ID Off iPhone 7 Plus without Password
- New 2024 Approved Best 4 Elon Musk Voice Generators to Make You Sound Like the Billionaire
- How to Get and Use Pokemon Go Promo Codes On Realme 12 5G | Dr.fone
- In 2024, Full Guide to Bypass Infinix Hot 30i FRP
- In 2024, Can I Bypass a Forgotten Phone Password Of Xiaomi Redmi 13C 5G?
- Why Your WhatsApp Location is Not Updating and How to Fix On Realme C33 2023 | Dr.fone
- In 2024, How Can You Transfer Files From Vivo Y200 To iPhone 15/14/13? | Dr.fone
- In 2024, How to Reset Gmail Password on Nubia Red Magic 8S Pro+ Devices
- How to Fake Snapchat Location without Jailbreak On Samsung Galaxy A23 5G | Dr.fone
- How to Watch Hulu Outside US On Apple iPhone 13 | Dr.fone
- Tecno Pova 5 Pro Camera Not Working Unexpected Error? Fix It Now | Dr.fone
- Change Location on Yik Yak For your Motorola Razr 40 to Enjoy More Fun | Dr.fone
- In 2024, 3 Ways to Unlock iPhone 14 Pro without Passcode or Face ID | Dr.fone
- How To Recover iPhone 13 Pro Data From iCloud? | Dr.fone
- In 2024, Reset iTunes Backup Password Of Apple iPhone 11 Prevention & Solution
- How to Screen Mirroring Vivo Y100i? | Dr.fone
- 4 Feasible Ways to Fake Location on Facebook For your Xiaomi Redmi Note 13 Pro 5G | Dr.fone
- Authentication Error Occurred on Vivo V29 Pro? Here Are 10 Proven Fixes | Dr.fone
- In 2024, How to Reset Gmail Password on Samsung Galaxy M34 5G Devices
- In 2024, How To Bypass Activation Lock On Apple Watch Or iPhone 15 Pro?
- Top 11 Free Apps to Check IMEI on Vivo V27 Phones
- New What Is AI Advertising? | Wondershare Virbo Glossary for 2024
- Does Airplane Mode Turn off GPS Location On Infinix Smart 8 Pro? | Dr.fone
- How to Mirror Your Google Pixel 8 Pro Screen to PC with Chromecast | Dr.fone
- How To Fix Unresponsive Touch Screen on Poco C51 | Dr.fone
- How To Open Your iPhone 15 Pro Max Without a Home Button
- How Do You Remove Restricted Mode on Apple iPhone 11 Pro | Dr.fone
- In 2024, Apple ID is Greyed Out From iPhone XS How to Bypass?
- In 2024, Ways to stop parent tracking your Samsung Galaxy F54 5G | Dr.fone
- Easy Guide How To Bypass Itel P55 5G FRP Android 10/11/12/13
- Edit and Send Fake Location on Telegram For your Honor 80 Pro Straight Screen Edition in 3 Ways | Dr.fone
- Title: Updated How to Reduce the Size of Video Files Online? In This Article, Well Share the Top 10 Free Online Video Compressors that You Can Use Anywhere at Any Time and on Any Device
- Author: Chloe
- Created at : 2024-04-24 07:08:20
- Updated at : 2024-04-25 07:08:20
- Link: https://ai-editing-video.techidaily.com/updated-how-to-reduce-the-size-of-video-files-online-in-this-article-well-share-the-top-10-free-online-video-compressors-that-you-can-use-anywhere-at-any-ti/
- License: This work is licensed under CC BY-NC-SA 4.0.
