
:max_bytes(150000):strip_icc():format(webp)/TikTok-vs-YouTube-a42ac0c72a4f4b1d9da8b7ae85b4205e.jpg)
Updated How To Split Screen On Tiktok
How To Split Screen On Tiktok
TikTok is probably the most popular video-sharing app in the world right now. Many TikTokers have become famous for making videos that have a significant impact and encourage creativity and new ideas. One of the most popular TikTok trends is the split-screen effect. You’ve probably seen a lot of TikTok split-screen videos with cool effects that made you wonder how the user split their screen. Becoming skilled in using TikTok effects is not as difficult as it might look. It only requires a significant amount of practice. Read on as we show you how to make a TikTok split-screen video.
Using CapCut To Split Screen
CapCut is the official free TikTok Video Maker and Video Editor with Music for TikTok that is multifunctional. Its interface is quite similar and easy to use.
CapCut includes free advanced capabilities such as keyframe animation, stabilization, and Picture-in-Picture (PIP). These are in addition to its fundamental functions, such as video editing, adding stickers, text, and music.
Steps to Split Screen Video with CapCut On Android and IOS Devices
- To use the app, you need to install it first. iPhone and Android users can download CapCut. Navigate to the appropriate app store of your choice and download CapCut.
- After installation, launch the app.
- Then go ahead and grant CapCut permission to view your camera roll. Incorporating video clips into your project has never been easier. Go to the app’s main screen and select “New Project“ from the drop-down menu.
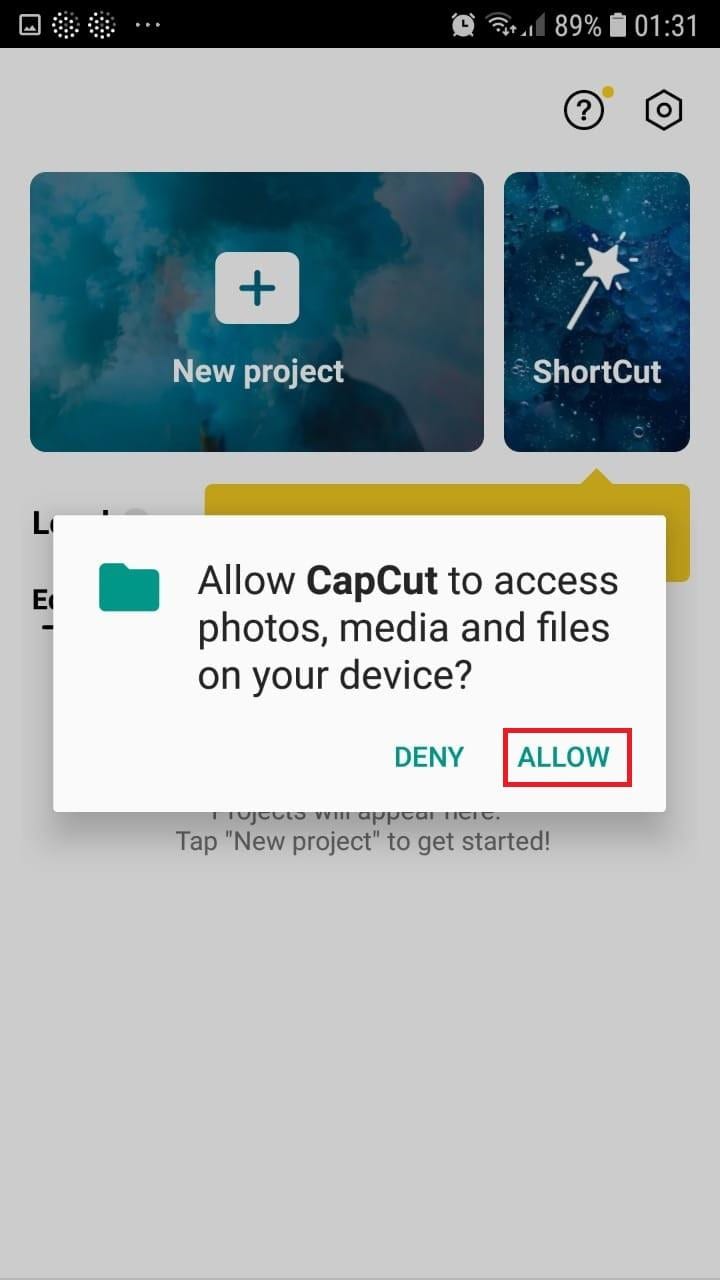
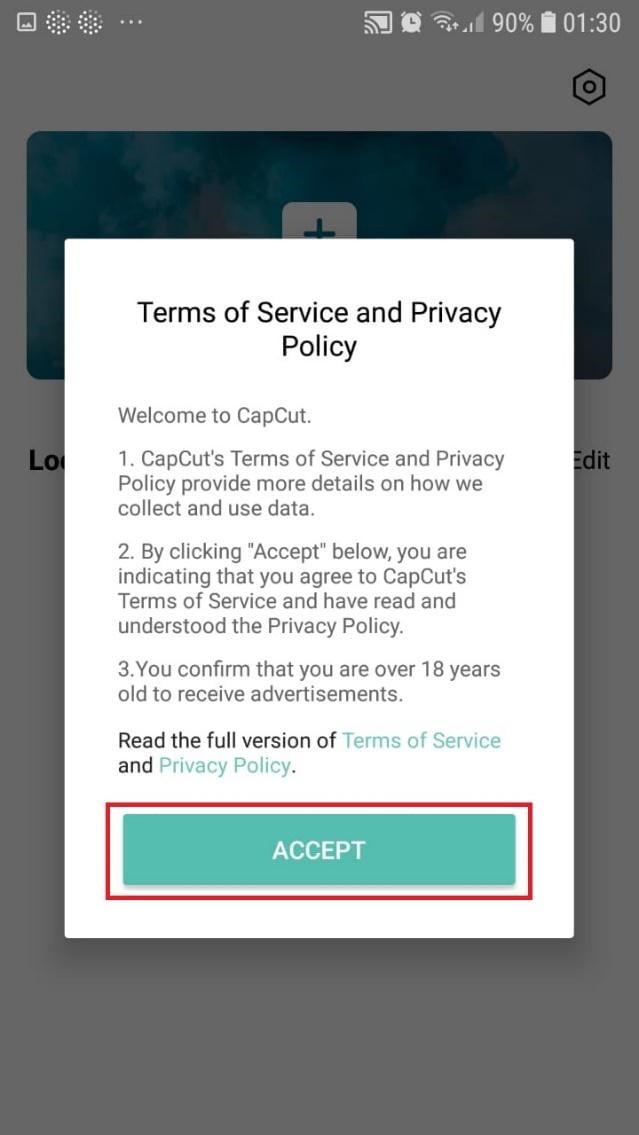
- To confirm your selection, click the green Accept This confirms that CapCut requires access to your photographs to function correctly. Tap on the button on the following pop-up window to gain access to all the photos. This is a one-time process that must be carried out the first time you launch the application.
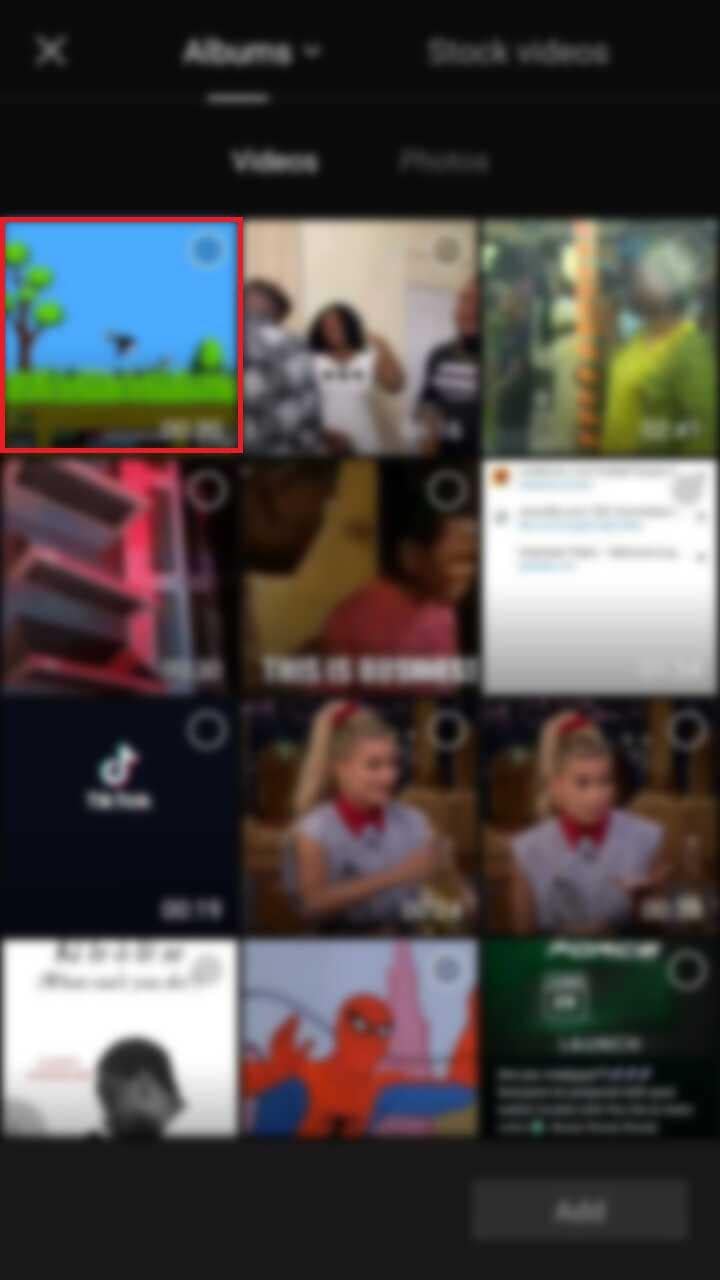
- Begin a New Project. After opening the app, press the “New Project“ icon to bring up a new screen showing your device’s videos.

- Choose a video clip. Locate the desired video clip for your project by scrolling through the pages displaying your camera roll. Tap the video’s thumbnail and then tap the “Add“ icon in the screen’s lower part.
- Get familiar with your workspace. Upon uploading your first clip, CapCut leads you to the primary workspace. This is where you will spend most of your time within the app. The preview panel, the timeline, and the toolbar are in order from top to bottom.
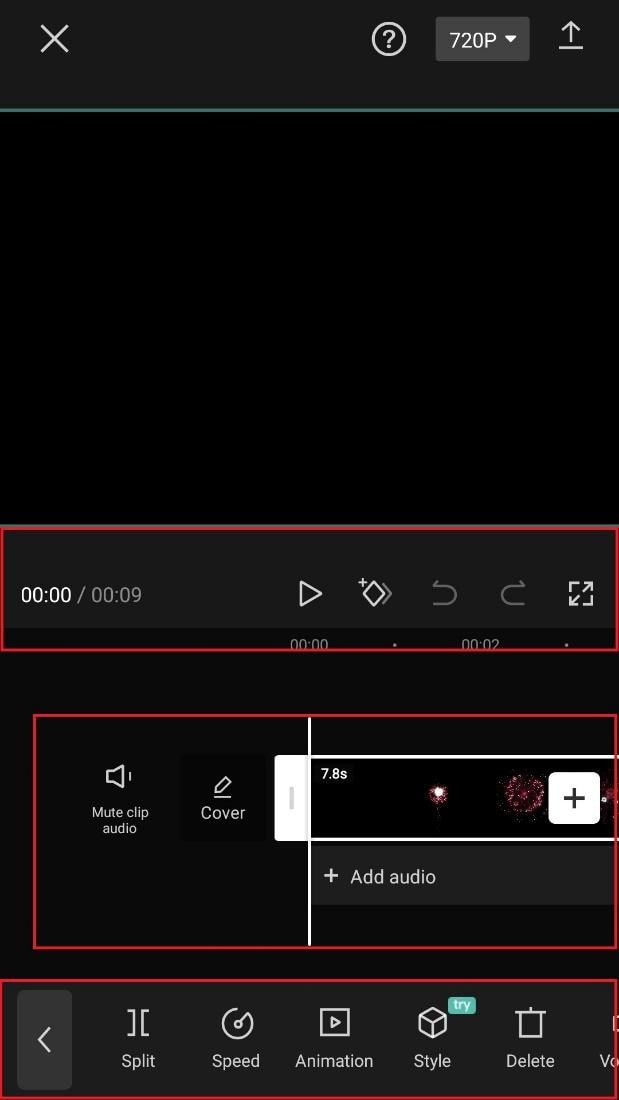
- View the toolbar and timeline. They represent your screen’s bottom half. The timeline, located below the preview panel, is where you’ll make all your adjustments. You can access all your video editing tools, including split, text, audio, effects, stickers, and more, on the toolbar at the bottom of your screen.
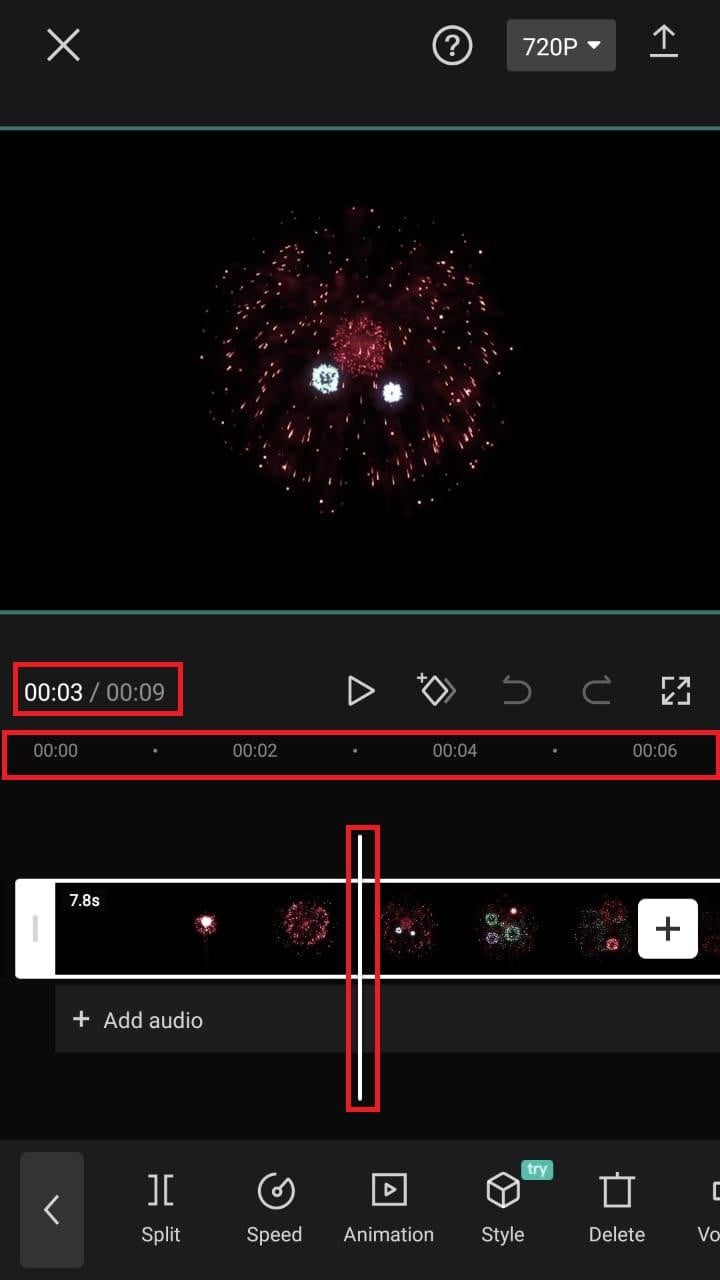
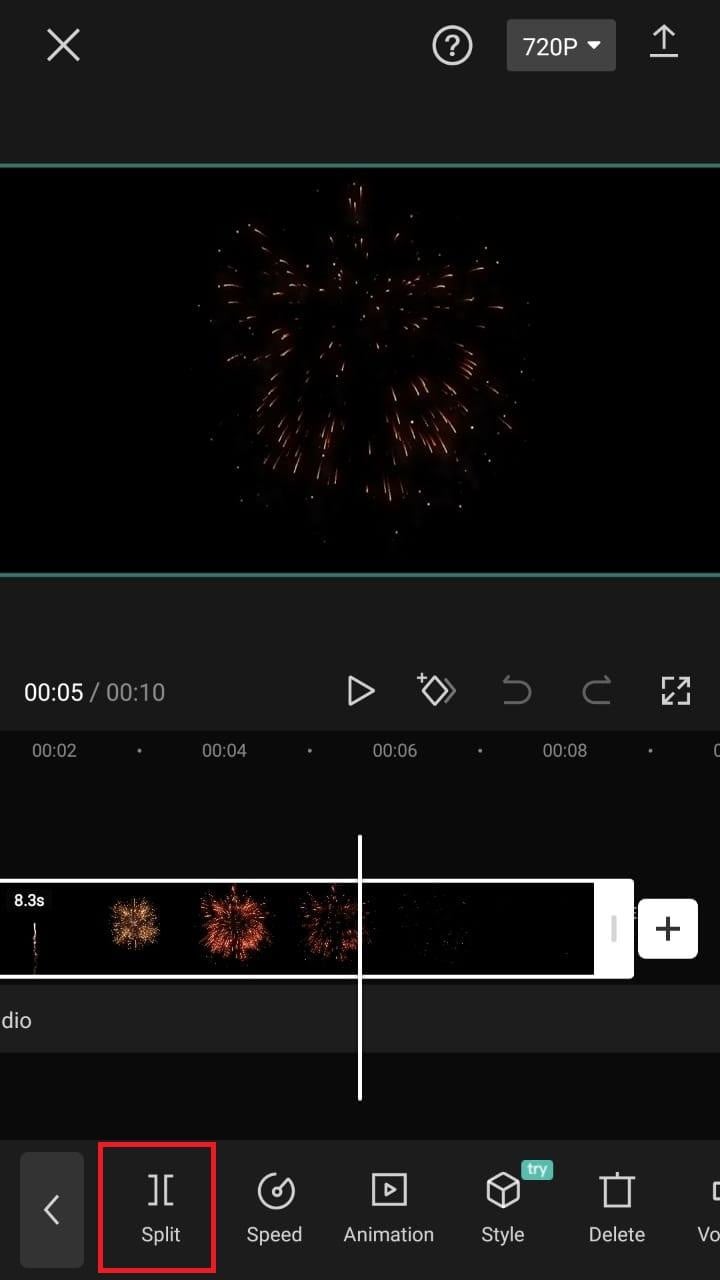
- Split video clips. To split a video clip in half, move the play head to the desired location on the timeline. Tap on your clip, then press the “Split“ toolbar icon. Your result now shows two different clips, not just one.
A Better Split-Screen Effect Video Editor
Filmora is one of the best free HD video makers and video editors with several functionalities, including text, backgrounds, filters, special effects, emoji, audio, and special effects.
Filmora is a feature-packed video editor which has a variety of tools to work with. With this video editor, producing memes, videos with images, pictures, music, stickers, and sound effects and editing videos for YouTube, Twitter, WhatsApp, Facebook, TikTok, and Instagram is simple and entertaining.
Free Download For Win 7 or later(64-bit)
Free Download For macOS 10.14 or later
Steps to Split Screen Video with Filmora
- Download Filmora from the App store
- After installation, launch it.
- Click on “Continue” to continue to use the app.

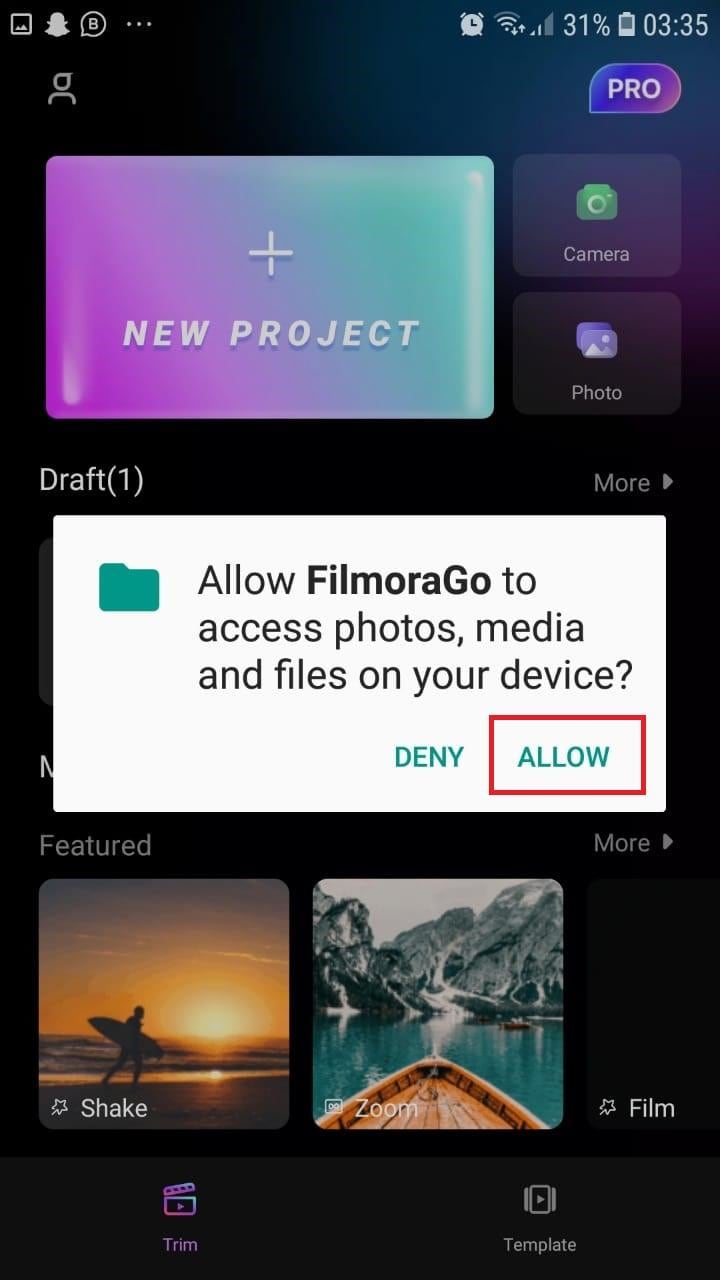
- Click on Allow to grant Filmora access to your photos and videos.
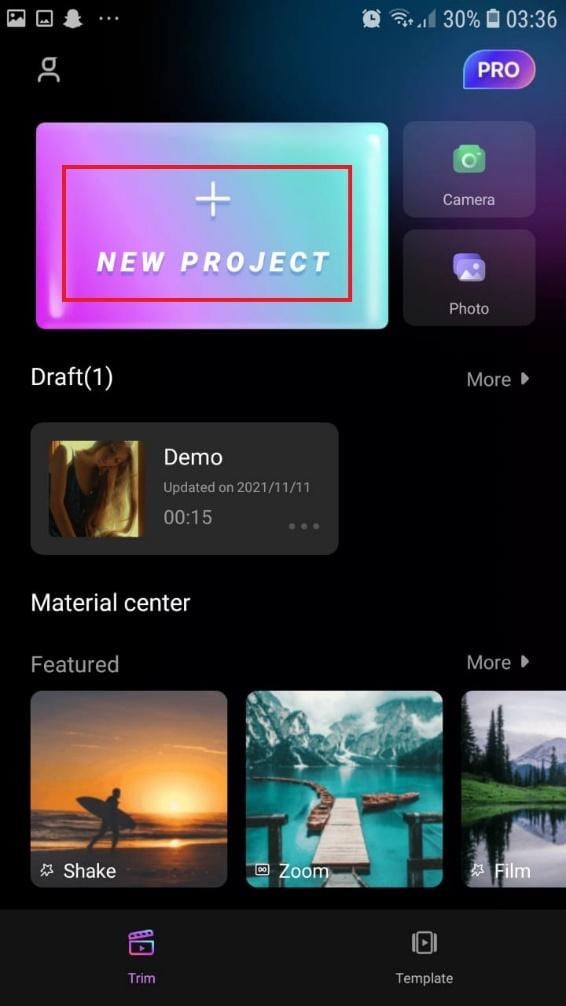
- You can now tap on “New Project” with the + Symbol.
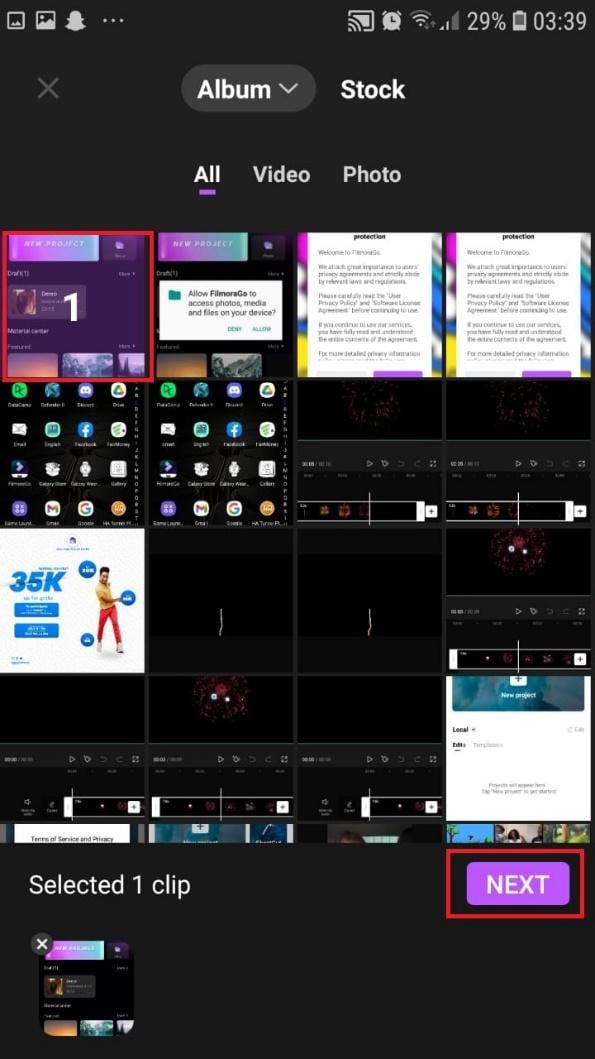
- Select your desired video and tap on “Next” at the bottom right of your screen
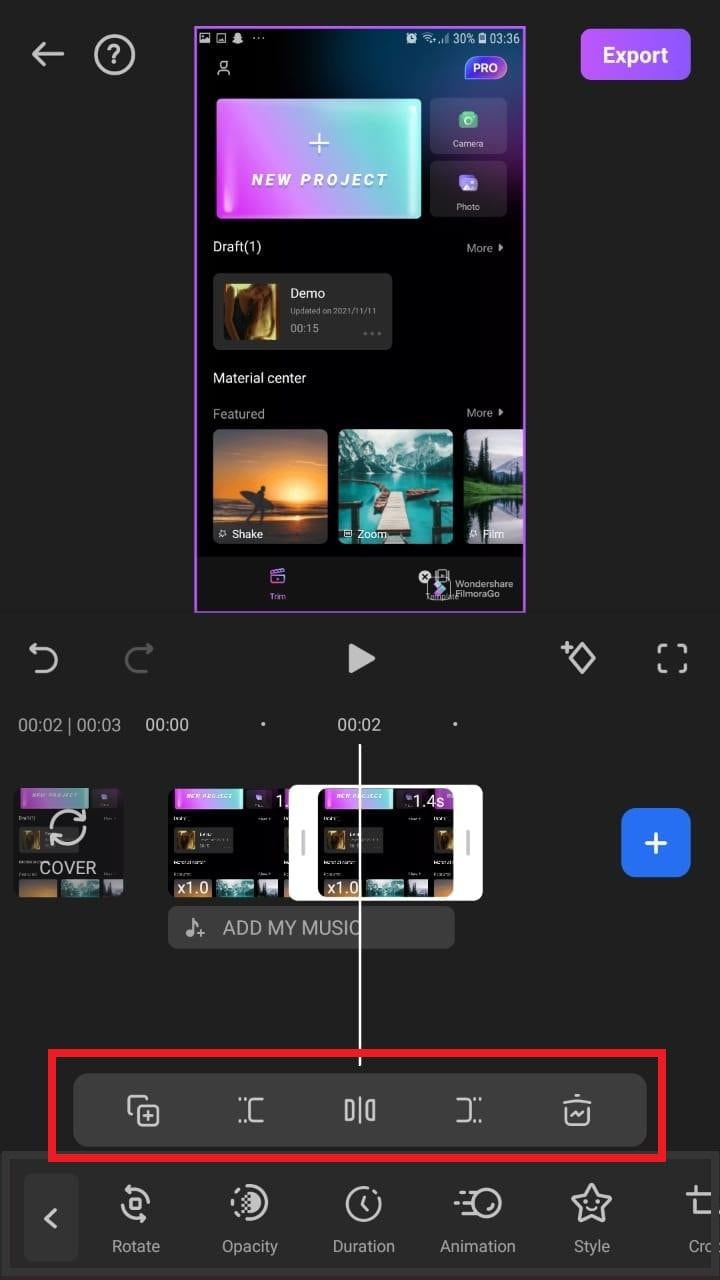
- You can select various options from the bottom of your screen to edit the selected video the way you like.

- Click on trim, and then you will see the different split-screen and collage feature options. Pick any that appeals to you.
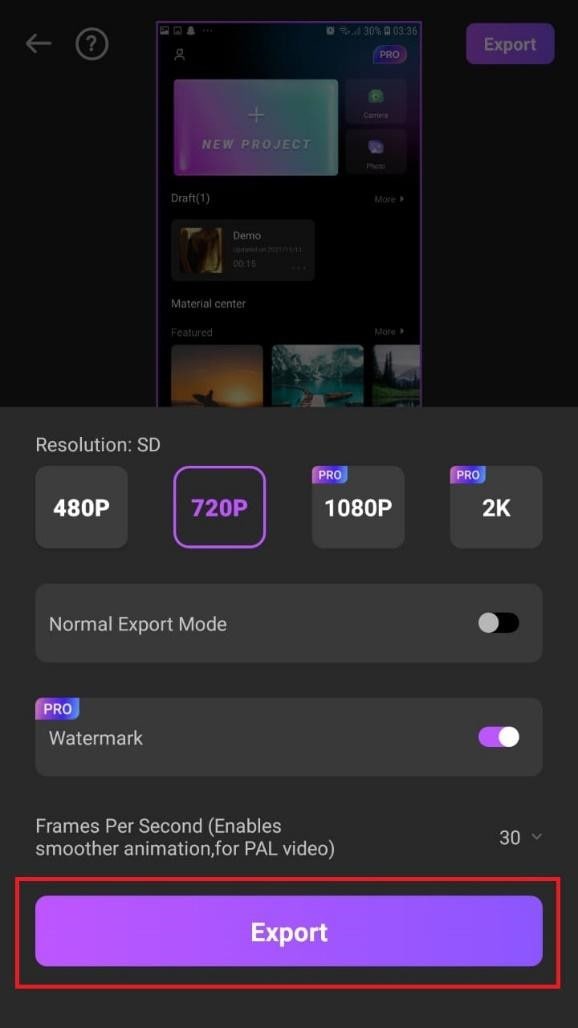
- When you are done with the editing, tap on “Export” at the top right of your screen.

- Go ahead and tap on “Export” on the next screen. Your video will be successfully exported and saved to your camera roll.
Using Filmora is very efficient in splitting your videos and making collage features for TikTok. It is a very simplified app available on both the Google Play Store and Apple Appstore.
Conclusion
TikTok is a platform that users use worldwide to create and share content. It could be pictures, videos, reels, or any other media type. Some people create videos for their audience on TikTok to educate them, while others do it to entertain them.
In any case, the goal is to build a more significant following on TikTok and garner greater attention from its users. You could even make money off the app.
One of the methods to impress your fans and explore multiple possibilities to build unique reels is to use the TikTok split-screen and collage feature effect available on TikTok. Although there are a few different ways to create a Split Screen on TikTok, the steps highlighted in this article are the most straightforward.
Free Download For macOS 10.14 or later
Steps to Split Screen Video with Filmora
- Download Filmora from the App store
- After installation, launch it.
- Click on “Continue” to continue to use the app.
- Click on Allow to grant Filmora access to your photos and videos.
- You can now tap on “New Project” with the + Symbol.
- Select your desired video and tap on “Next” at the bottom right of your screen
- You can select various options from the bottom of your screen to edit the selected video the way you like.
- Click on trim, and then you will see the different split-screen and collage feature options. Pick any that appeals to you.
- When you are done with the editing, tap on “Export” at the top right of your screen.
- Go ahead and tap on “Export” on the next screen. Your video will be successfully exported and saved to your camera roll.
Using Filmora is very efficient in splitting your videos and making collage features for TikTok. It is a very simplified app available on both the Google Play Store and Apple Appstore.
Conclusion
TikTok is a platform that users use worldwide to create and share content. It could be pictures, videos, reels, or any other media type. Some people create videos for their audience on TikTok to educate them, while others do it to entertain them.
In any case, the goal is to build a more significant following on TikTok and garner greater attention from its users. You could even make money off the app.
One of the methods to impress your fans and explore multiple possibilities to build unique reels is to use the TikTok split-screen and collage feature effect available on TikTok. Although there are a few different ways to create a Split Screen on TikTok, the steps highlighted in this article are the most straightforward.
Tiktok Aspect Ratio Is a Crucial Element to Succeeding in the Tiktok Algorithm. Here Are some Suggestions to Improve Video Quality and Land on the for You Page
Versatile Video Editor - Wondershare Filmora
TikTok is one of the most popular social media apps for short-form video sharing. Its popularity has been well received by those under thirty. A Beijing-based company, ByteDance, owns it. It has been downloaded over 315 million times by users worldwide. It generates over $50 million in revenue from users.
This leads us towards a discussion of how the platform works and, more specifically, how to create a video with the correct TikTok aspect ratios to gain popularity. This article covers essential tips about video size ratio and other little tricks to make your videos better.
In this article
01 [TikTok: Brief Definition ](#Part 1)
02 [TikTok Video Tips You Should Know](#Part 2)
Part 1 TikTok: Brief Definition
Social media is one of the fastest ways to gain popularity. Using TikTok challenges and trends, content creators and businesses can drive their profits, popularity, and high visibility. The app allows users to create, edit and share short videos, which are made more entertaining with filters and music, dancing, and lipsyncing.
Tiktok has a certain prescribed video width and height to make videos. This TikTok ratio allows users to be perceived favorably in the program algorithm. The main reason why users are drawn to TikTok is for entertainment and to foster a sense of community.
The brief 15-60 second videos can offer entertainment for any duration, no matter how short. It remains a popular site frequented by teenagers and young adults. Thanks to the popularity of challenge videos and honest product reviews, it becomes a go-to haven for them. This makes Tiktok an ideal platform for marketing aimed at that demographic.
Part 2 TikTok Video Tips You Should Know
In TikTok, the video creation editing process goes hand in hand. You can edit a video as you create it. As you start and stop your video, your videos are going to be automatically ‘stitched’ together. This does not mean you can’t trim the videos and edit them after they are made.
Similarly, if you’re not happy with how the video turned out, you can select the backspace button to delete the video on the app. Now let’s dive into the TikTok Video ratios that will make your videos shine.
Another thing that helps you form video ratios for TikTok is to know the audience. The TikTok gender ratio among US viewers is skewed to be 61% female and 39% male.
2.1 TikTok Video Format
There is a difference in the specification of videos for android and ios. For example, TikTok allows 72 MB on Android or 287.6 MB in size for iOS. The videos are designed to be viewed on mobile so aiming for vertical videos helps promote your videos on the algorithm.
The frame size for a TikTok video should be 1080 x1920 pixels. This gives the highest quality video output. As a content creator, it is advised to record videos in the .mp4 file format. Ad-creators should look into the .avi and .gif formats for better placements.
You can use premium video editing software like Wondershare Filmora to edit your videos. It offers cutting-edge features like motion tracking, color matching videos, and offering a split screen in the same video. This can help push your creativity to its full potential.
Wondershare Filmora
Get started easily with Filmora’s powerful performance, intuitive interface, and countless effects!
Try It Free Try It Free Try It Free Learn More about Filmora>

2.2 Titktok Video Aspect Ratios & How To Resize It
The width of an image or video frame in relation to its height is known as the aspect ratio. It defines the proportion of your content asset. This can be important as it influences how nice the video turns out when viewed. It determines the final shape of your video.
Finding the correct video dimensions for TikTok can be a challenge. This section deals with the aspect ratios of video and what you can do to have the perfect video ratio for TikTok.
Finding the proper aspect ratio is important because it influences how your videos look on different platforms, which drives your TikTok like to follower ratio. Users prefer videos that offer a pleasant viewing experience.
You can use software like Wondershare Filmora to change the aspect ratio without any image or video distortion. This makes the video quality a lot better. By learning the video aspect ratio, you can avoid image and video distortion. This can boost your video’s rating in the algorithm and, in turn, skyrocket your popularity on the platform.
Let’s say a creator is in possession of a video they made. They realize that the video is not in the correct TikTok video ratio. The algorithm approves a specific TikTok video width and height.
For Win 7 or later (64-bit)
For macOS 10.12 or later
They can do one of two things, upload the video as is, and hope for the best. They can also choose to resize the aspect ratio using the Filmora software so they can get the best quality output and get featured on the For You Page. Adobe AfterEffects for tikTok is an alternative you can use to change the video aspect ratio as well.
2.3 Change Tiktok Video From Landscape To Portrait
Tiktok can support videos made in portrait or landscape mode. However, creators should focus on creating videos in portrait mode. This is because TikTok’s algorithm favors vertical videos over horizontal ones.
Considering TikTok users use their mobiles to view the video, this makes portrait mode the better option for ensuring video success.
Tiktok allows users to create a video in portrait mode and editing after. You can also create a video in landscape mode for TikTok. Tiktok also enables users to upload a video in landscape mode.
Alternatively, you can use a video editing app like Wondershare Filmora. This video editing app makes it easy to convert the file from your previous aspect ratio to those favored by TikTok, YouTube, or Instagram.
It helps retain the high definition with smaller file size and better effects. If you want to post across platforms, using Filmora video editing can help you save valuable editing time. Thanks to its auto-editing options, even beginners can create professional-level videos.
Another way to change the TikTok size is to use Adobe Premiere Pro. Premiere Pro is capable of performing all of the everyday video editing operations required to create high-definition footage. It allows inputs that can then be exported to the appropriate medium and format different platforms.

2.4 Make Fullscreen Tiktok Video
It can be a frustrating experience to watch a Tiktok video when you have the For you tab at the top, blocking your video. The like button and share buttons all do a number on your valuable screen space at the sides. The comment section with the scrolling ribbons of comments is the worst offender at making the TikTok video seem unappealing.
One way you can make your TikTok experience better is through full-screen viewing of your TikTok video. You can do this by simply saving the video to your phone. Save the video by pressing the share button. In the second half of the share section, you have the “save video” option, and you can select this for a blissful video viewing experience.
One other way users can view TikTok on full screen is to go to their android’s ‘settings’ page. Go into the ‘Display and Brightness’ settings. Look for the tab titled ‘Full-Screen Display”. In this section, scroll down to TikTok and select. Once there, enable ‘Notch Area Display.’
There you go, your TikTok account can now be graced with full-screen videos. This will make the user experience a lot better.
Conclusion
One of the keys to creating high-quality content for your brand on social media is recognizing how much aspect ratio brings to the table and how to apply it to your videos and images. There is no doubt that using videos for promotion is the most effective technique to increase brand engagement nowadays.
To make it easy to cut, edit, and even design your images and movies for the most outstanding performance, use an excellent online video editor like Wondershare Filmora. It’s one of the best video editors for both beginners and experienced professionals.
TikTok is one of the most popular social media apps for short-form video sharing. Its popularity has been well received by those under thirty. A Beijing-based company, ByteDance, owns it. It has been downloaded over 315 million times by users worldwide. It generates over $50 million in revenue from users.
This leads us towards a discussion of how the platform works and, more specifically, how to create a video with the correct TikTok aspect ratios to gain popularity. This article covers essential tips about video size ratio and other little tricks to make your videos better.
In this article
01 [TikTok: Brief Definition ](#Part 1)
02 [TikTok Video Tips You Should Know](#Part 2)
Part 1 TikTok: Brief Definition
Social media is one of the fastest ways to gain popularity. Using TikTok challenges and trends, content creators and businesses can drive their profits, popularity, and high visibility. The app allows users to create, edit and share short videos, which are made more entertaining with filters and music, dancing, and lipsyncing.
Tiktok has a certain prescribed video width and height to make videos. This TikTok ratio allows users to be perceived favorably in the program algorithm. The main reason why users are drawn to TikTok is for entertainment and to foster a sense of community.
The brief 15-60 second videos can offer entertainment for any duration, no matter how short. It remains a popular site frequented by teenagers and young adults. Thanks to the popularity of challenge videos and honest product reviews, it becomes a go-to haven for them. This makes Tiktok an ideal platform for marketing aimed at that demographic.
Part 2 TikTok Video Tips You Should Know
In TikTok, the video creation editing process goes hand in hand. You can edit a video as you create it. As you start and stop your video, your videos are going to be automatically ‘stitched’ together. This does not mean you can’t trim the videos and edit them after they are made.
Similarly, if you’re not happy with how the video turned out, you can select the backspace button to delete the video on the app. Now let’s dive into the TikTok Video ratios that will make your videos shine.
Another thing that helps you form video ratios for TikTok is to know the audience. The TikTok gender ratio among US viewers is skewed to be 61% female and 39% male.
2.1 TikTok Video Format
There is a difference in the specification of videos for android and ios. For example, TikTok allows 72 MB on Android or 287.6 MB in size for iOS. The videos are designed to be viewed on mobile so aiming for vertical videos helps promote your videos on the algorithm.
The frame size for a TikTok video should be 1080 x1920 pixels. This gives the highest quality video output. As a content creator, it is advised to record videos in the .mp4 file format. Ad-creators should look into the .avi and .gif formats for better placements.
You can use premium video editing software like Wondershare Filmora to edit your videos. It offers cutting-edge features like motion tracking, color matching videos, and offering a split screen in the same video. This can help push your creativity to its full potential.
Wondershare Filmora
Get started easily with Filmora’s powerful performance, intuitive interface, and countless effects!
Try It Free Try It Free Try It Free Learn More about Filmora>
2.2 Titktok Video Aspect Ratios & How To Resize It
The width of an image or video frame in relation to its height is known as the aspect ratio. It defines the proportion of your content asset. This can be important as it influences how nice the video turns out when viewed. It determines the final shape of your video.
Finding the correct video dimensions for TikTok can be a challenge. This section deals with the aspect ratios of video and what you can do to have the perfect video ratio for TikTok.
Finding the proper aspect ratio is important because it influences how your videos look on different platforms, which drives your TikTok like to follower ratio. Users prefer videos that offer a pleasant viewing experience.
You can use software like Wondershare Filmora to change the aspect ratio without any image or video distortion. This makes the video quality a lot better. By learning the video aspect ratio, you can avoid image and video distortion. This can boost your video’s rating in the algorithm and, in turn, skyrocket your popularity on the platform.
Let’s say a creator is in possession of a video they made. They realize that the video is not in the correct TikTok video ratio. The algorithm approves a specific TikTok video width and height.
For Win 7 or later (64-bit)
For macOS 10.12 or later
They can do one of two things, upload the video as is, and hope for the best. They can also choose to resize the aspect ratio using the Filmora software so they can get the best quality output and get featured on the For You Page. Adobe AfterEffects for tikTok is an alternative you can use to change the video aspect ratio as well.
2.3 Change Tiktok Video From Landscape To Portrait
Tiktok can support videos made in portrait or landscape mode. However, creators should focus on creating videos in portrait mode. This is because TikTok’s algorithm favors vertical videos over horizontal ones.
Considering TikTok users use their mobiles to view the video, this makes portrait mode the better option for ensuring video success.
Tiktok allows users to create a video in portrait mode and editing after. You can also create a video in landscape mode for TikTok. Tiktok also enables users to upload a video in landscape mode.
Alternatively, you can use a video editing app like Wondershare Filmora. This video editing app makes it easy to convert the file from your previous aspect ratio to those favored by TikTok, YouTube, or Instagram.
It helps retain the high definition with smaller file size and better effects. If you want to post across platforms, using Filmora video editing can help you save valuable editing time. Thanks to its auto-editing options, even beginners can create professional-level videos.
Another way to change the TikTok size is to use Adobe Premiere Pro. Premiere Pro is capable of performing all of the everyday video editing operations required to create high-definition footage. It allows inputs that can then be exported to the appropriate medium and format different platforms.
2.4 Make Fullscreen Tiktok Video
It can be a frustrating experience to watch a Tiktok video when you have the For you tab at the top, blocking your video. The like button and share buttons all do a number on your valuable screen space at the sides. The comment section with the scrolling ribbons of comments is the worst offender at making the TikTok video seem unappealing.
One way you can make your TikTok experience better is through full-screen viewing of your TikTok video. You can do this by simply saving the video to your phone. Save the video by pressing the share button. In the second half of the share section, you have the “save video” option, and you can select this for a blissful video viewing experience.
One other way users can view TikTok on full screen is to go to their android’s ‘settings’ page. Go into the ‘Display and Brightness’ settings. Look for the tab titled ‘Full-Screen Display”. In this section, scroll down to TikTok and select. Once there, enable ‘Notch Area Display.’
There you go, your TikTok account can now be graced with full-screen videos. This will make the user experience a lot better.
Conclusion
One of the keys to creating high-quality content for your brand on social media is recognizing how much aspect ratio brings to the table and how to apply it to your videos and images. There is no doubt that using videos for promotion is the most effective technique to increase brand engagement nowadays.
To make it easy to cut, edit, and even design your images and movies for the most outstanding performance, use an excellent online video editor like Wondershare Filmora. It’s one of the best video editors for both beginners and experienced professionals.
How to Edit GoPro Videos on Mac
Having a well-polished video is beyond just shooting the video. Once you shoot your GoPro videos, the next thing to do is use a video editor to make necessary corrections. These video editors’ effects and stabilizations turn your videos into a sophisticated presentation. However, there are several GoPro video editors for different video formats. So if you are thinking about how to edit GoPro videos on Mac, you’re in luck.
In this article, we’ll help you through editing your GoPro video on Mac and a list of these GoPro video editors. We will also explore paid and free GoPro video editors to help pick the right editor. So, if you are ready to impress audiences with your outstanding videos, let’s begin.
Import GoPro Videos to Mac before Editing
After filming your GoPro videos, you probably wonder how to send them to your Mac to begin editing. There are two ways you can about importing your GoPro videos to Mac before editing. The use of SD adapter and GoPro quick app. Use any of these methods to import your GoPro videos before you can begin editing. So with no further ado, let’s quickly dive into importing GoPro videos to Mac using an SD adapter and GoPro quick app.
Import GoPro Videos to Mac Before Editing – SD Adapter
This is actually one of the easiest ways to import GoPro videos to Mac. How does it work? It simply works by connecting GoPro’s SD card to the Mac. Simply remove the GoPro’s SD card and input it to Mac. By doing this, all content on the SD card will display on the Mac as external files. Let’s look at the step-by-step method of importing GoPro videos to Mac with an SD adapter.
- Step 1: First thing first, you have to power off the device
- Step 2: Next, you have to open the opening presentation just at the bottom of the GoPro camera. After successfully unlocking it, then direct access to the SD card.
- Step 3: This is where you insert the SD card into the SD card adapter or reader.
- Step 4: Now, you connect the SD card adapter or reader to your Mac
- Step 5: After a successful connection, it will display on your Mac desktop. Now, click on it to open all its content for accessibility.

- Step 6: Once you open it, two folders will display. These folders are DCIM and MISC.

- Step 7: Click on the DCIM folder to find all videos stored on the device.

- Step 8: Finally, you can now begin uploading all your GoPro videos to Mac by simply copying and pasting.

Import GoPro Videos to Mac before editing – GoPro Quick App
Another option to import GoPro videos to Mac is the GoPro Quick app. GoPro quick app is a tool by GoPro designed to help view GoPro videos on Mac and import them. Having this app on your Mac device is relatively easy. First, you have to download its setup from the GoPro website and install it. So far, this app is one of the best tools to view and import GoPro files to your Mac device. Here are the steps to importing GoPro videos to Mac while getting set to edit.
- Step 1: First thing first, Launch the app. However, if you have not installed the app, you should quickly download and install the app.

- Step 2: Now, you can connect the GoPro camera to your Mac. You can do this by using a USB cable.
- Step 3: After launching the app, you will see an icon labeled Import Filesdisplayed at the interface.

- Step 4: from here on, you will also see an icon to import the videos from your GoPro camera into your Mac device.
When the import is complete, you can now locate your GoPro videos in the folder of your choice. Now, you can close the GoPro quick app, unplug the GoPro camera and get ready to edit your videos.
Best GoPro Video Editor on Mac
A lot of people understand that GoPro is the best way to make your video look like a professional shot. After shooting the video, you’ll obviously want to make some edits to make them look more professional before sharing them. After all, no one wants to watch poor-quality videos, bad noises, and other unprofessional clips. Therefore, we have a list of the best GoPro editor for Mac in this article. Keep reading to learn about the best GoPro video editor on Mac.
Best GoPro Video Editor on Mac – Filmora Video Editor

Supported System: Mac and Windows
A lot of free video editing software usually comes as either too straightforward or too challenging to understand. While other video editing software lacks vital editing features such as color correction and audio or noise editing features. However, the Filmora Video Editor for Mac bridges the gap and is undoubtedly the best GoPro Video editor on Mac.
This video editing software is an easy-to-use editing tool totally equipped with a lot of video editing functions. With Filmora, you can edit your GoPro videos on your Mac like an expert and expect a professional outcome. Filmora offers excellent performance and enhances video quality taking the user experience to a whole new level.
Additionally, Filmora is an editing tool with helpful functionality taking the user experience to a whole new level. Finally, this tool is indispensable due to its speed, intuitive user interface, and other file format support.
For Win 7 or later (64-bit)
For macOS 10.14 or later
Filmora Features
- Filmora editing tool is versatile and supports other video formats like MP4, MOV, MKV, AVCHD, etc.
- You can cut, crop, split, trim, and even combine clips with just a few clicks.
- Filmora has access to several advanced video effects such as royalty-free music, transition, animated titles, and motion elements.
- With Filmora color tuning features, your videos can look like professional Hollywood videos.
- You can also edit sounds on your video with a noise removal feature, audio equalizer, and audio keyframing tools.
- You get 500+ free special video effects to create and customize your videos yourself.
- Filmora has access to advanced video effects like PIP, audio mixer, and green screen, which you can add to your videos.
- Access to 1000+ effects downloading resources to make videos in any desired styles.
Steps to Editing Videos on Mac Using Filmora
Want to edit your GoPro videos the right way? Editing your GoPro videos on Mac with Filmora is relatively easy and will only take a few clicks. Read and follow these steps below to learn to edit GoPro videos on Mac with this easy-to-use GoPro video editor.
- Step 1: Import the GoPro video files
First, you launch the GoPro video editor and then click the “Import Media here” button. This will upload the GoPro video clips to the program. You can save these files in a suitable location for easy access before you begin editing.

- Step 2: Edit the GoPro Video clips

Secondly, you should drag the GoPro video clips from the folder or User’s album to the timeline and begin editing.
To trim your GoPro videos, simply mouser over the clip from the beginning to the end of the video. You should do this until the trim icon is displayed. The trim icon is labeled as “I” on the editing timeline. You can drag the trim icon forward or backward to trim the video as you desire.
Aside from the trimming option, you can also apply split footage, video stabilization, and even add transitions between two clips. You can also combine GoPro videos and rotate GoPro videos by simply tapping the icons respectively.

- Step 3: Export the edited GoPro video files

Once you finish editing, you can now navigate to the “Export” icon. Furthermore, you can also select the save path and file format from the displayed output window. After this selection, you can finally choose the “Export” icon. Once you complete this, you can find your edited video file in the same path.
More Free GoPro video editor on Mac to Edit Gopro Videos
In this section, we will list out some of the best free GoPro video editors to successfully edit your videos on Mac. These programs are, but you will have to download them to enjoy all the editing tools.
PowerDirector

Supported System: Windows and Mac
We have PowerDirector as the best overall editor on our list of best free GoPro video editors on Mac. This free GoPro video editor is compatible with Mac and has a robust video editing program. If you are looking for a free GoPro video editor with a wide range of exciting editing features, this is one of the best options. One of the benefits of using this GoPro video editor is that it comes with an Action Camera Center.
It has tons of cool effects, titles, filters, and templates to explore, especially if you want to make more action camera masterpieces. In addition, this video editor has special editing and effects tools to improve your action camera video. For example, you can stabilize your shaky video, apply cool speed effects, and correct fish-eye distortion in some minutes. You can also use the slow-motion effect, zoom, correct color problems, and freeze frame with just a few clicks.
The GoPro editor also comes with noise correction and video denoise to make your video crystal clear and remove unwanted audio noise. In addition, PowerDirector has thousands of royalty-free stock assets such as sound effects and background music. In essence, PowerDirector is a GoPro video editor that offers everything you need to produce, enhance and cut thrilling action videos. It is versatile, best for action footage editing, and supports several video formats.
Pros
- It is beginner-friendly
- It comes with easy-to-use action camera-specific editing tools
Cons
- While it is free, you need a subscription to enjoy the latest features.
Steps to Edit using PowerDirector
- Step 1: Launch the app and select ‘full mode’ to begin editing your video
- Step 2: Select’ import media folder’ to get the videos you wish to edit
- Step 3: You can now browse the folder on your Mac device and select the folder with the videos. Then Click ‘Select folder’ to move them into the editor’s media library.

- Step 4: Now, the editing process can begin. You can stabilize and change the speed of your videos with PowerDirector.

- You can add title text and motion blur to your GoPro videos if you like that.

- If you want to include transitions, you can do so by selecting the transition room.
- Step 5: Next, select the ‘produce’ button to export your video once you are sure that the editing is complete.

- Step 6: Change the video format before exporting.

Once you select the video format you prefer, you will be able to save your GoPro video.
VideoProc Vlogger

Supported System: Windows and Mac
VideoProc Vlogger is the best GoPro editor for anyone looking for speed adjustment. The video editor uses visualized speed ramping to alter the speed throughout a clip. This program contains over 20-speed features to help you quickly change the tone and tempo of your GoPro video. Furthermore, VideoProc Vlogger is beginner-friendly with a lot of advanced editing features. These features include automatic keyframes and flexible Bezier curves to slow parts of a video without splitting it.
This free GoPro video editor can simulate motion roll, dolly, tilt, and even truck effects. You can also push in and out and stylize your video clips with rotation, fast zooms, and shakes. With VideoProc Vlogger, you fix grain video, remove fish-eye, extract audio and apply motion crops to your video. The video editor is best at creating new motion trails to change the action of the video.
Although VideoProc Vlogger is a free video editor, it definitely lacks some advanced editing features. For example, you can edit your videos without the annoying ads or watermarks. In addition, the video editor is designed for beginners, content creators, and hobbyists as it lacks features like video stabilization. So while the video editor is not for professionals, it’s worth trying out.
Pros
- Requires low system requirements
- It is entirely free with no ads and watermarks
Cons
- It lacks advanced editing features
- Rendering is somewhat slow
Steps to Edit using VideoProc Vlogger
- Step 1: First, import your GoPro videos from your Mac device to VideoProc Vlogger.

Simply Launch VideoProc Vlogger on your Mac, hit the plus icon in the media library, and add and import the videos.
- Step 2: Now, split and cut the GoPro Videos.

Simply drag the video clips to the timeline and begin editing. Now, put the playhead to exactly where you want to split the video and tap the split button.
- Step 3: You can also fix GoPro lens distortion.

If you feel that your video looks distorted, tick the lens distortion box to resolve the issue.

- Step 4: You can do the color correction or grading for any dark GoPro videos. Simply apply a preset aesthetic filter or simply adjust color normally.
- Step 5: Adjust the speed of the GoPro video.

To adjust the speed of the video, click speed in the toolbar to open the speed editor. Then change as you desire.
- Step 6: You can also add transitions, titles, and effects by opening the panels of transitions, effects, and tiles.

- Then drag a transition to the space between two video clips, same with titles to the subtitle and effect to the effect track.

- Step 7: Next, remove noise and background music by clicking the video track and tapping “detach” to separate the audio from the video.

- You can also add music to replace the background noise.
- Step 8: Finally, after the editing, you can export the GoPro video to your Mac device by setting the file name, format, file location, and video quality.

iMovie

Supported System: Mac only
This editor is designed to ensure an excelling editing process for Mac users. Therefore, beginners, content creators, and even hobbyists can utilize this video editor to edit their videos. Although iMovie is a free GoPro video editor, it offers incredible editing features to make your video look more professional. These features include HD and 4K video support and speed adjustment tools that can slow down or speed up your video clips.
Although it comes free on all Mac devices, iMovie also has tons of themes, templates, and presets to make editing a breeze. For example, you can select the video clips that will be automatically styled and edited with titles, transitions, and music. You can make all these changes with just a few clicks. In addition, you can also rearrange, trim, split, and even delete your ready-made video clips.
Furthermore, you can always modify the shift focus and depth of field while editing your video. However, it lacks some advanced features you will need while editing, such as Multicam, motion tracking, and 360 editing. On the other hand, it has a user-friendly interface with essential editing functions.
Pros
- It has a simple and user-friendly interface
- It is definitely beginner-friendly
Cons
- It lacks essential and advanced GoPro editing features and functions
Steps to Edit using iMovie
- Step 1: first, you have to launch the iMovie and create a video project.

- Step 2: Now, you can click the Import button to import your GoPro video files from your Mac to it.

- Step 3: Drag the video files from the program media library to the timeline for editing.

- Step 4: Load a song to the audio track if you wish to add background music to your video.
- Step 5: To split your video into smaller parts, right-click on a clip.
- Step 6: to edit your GoPro video with advanced tools like color correction, crop, grading, speed, and volume, simply move to the toolbar just above the timeline.
- Step 7: to add title, and transitions, you can drag a title and transition to the desired space between two clips.
- Step 8: preview and export your GoPro video from iMovie in the preferred format.

More Paid GoPro video editor on Mac to Cut MP4 Videos
If you desire GoPro video editors that offer more than just the basic editing features, you should try the paid GoPro video editors. The paid GoPro video editors offer more professional editing features for Mac users. In this section, you’ll learn about our top three paid GoPro video editors to edit your GoPro videos on Mac.
Adobe Premiere Pro

Supported System: Windows and Mac
This paid GoPro video editor is best for professionals who have experience creating video projects. This GoPro editing tool is compatible with Mac and Windows devices and also supports several video formats. Professionals use this video editor to edit top-notch videos such as Hollywood action movies and TV shows. In addition, it offers a long list of powerful features ideal for standard and action video editing.
Some of these professional features include Multicam, 360-degree, VR editing, and will export in up to 8k. The GoPro video editors also have a lot of sophisticated video stabilization tools, such as the warp stabilizer effect. The video stabilizer function help reduce camera shake, especially when zooming in. Other features include unlimited video tracks, lens distortion, access to the creative cloud and will match video to music.
In addition, the GoPro video editor only offers a 7-days free trial and is relatively expensive. Although Adobe Premiere Pro video editor is professional and high-quality, it has a steep learning curve. The steep learning curve is not appropriate for beginners.
Pros
- It supports all video formats
- It supports real-time video editing
Cons
- The system requirements are resource-intensive
- Not ideal for beginners
Steps to Edit using Adobe Premiere Pro
- Step 1: Import and cut your video files on PowerDirector. You can begin by cutting out any unnecessary parts from the video. You can also add text transitions, text, and other edits.

- Step 2: Next, stabilize the video using the Warp stabilizer. Double click on Warp stabilizer on the Effects menu to stabile the video.

- Step 3: Finally, you can add audio and export the edited video file. Click on file, tap on export and select the format, presets, and the location to export your file.

Adobe After Effect

Supported System: Windows and Mac
This GoPro editor is compatible with Mac and offers many basic video editing features to ensure top-notch results. This GoPro editor is great for editors who want to add special effects like motion tracking to their videos. The after-effect function allows you to add a graphical element to a moving person, animal, car, or camera. You can also create cartoon effects, logos, stickers, or text to move seamlessly with the action onscreen.
In addition to its essential editing tools, you can also remove elements from your video with the pro-level digital rotoscoping tools. You can also use the after-effect to add elements to the missing video. Other features include 360, 3D, VR editing, transitions, lens distortions, and distortion effects for professional editing.
This GoPro video editor is an effective software and is best for adding visual effects to action camera videos. However, it lacks some essential video editing tools that you might need to make your video Hollywood standard. In addition, it also has a steep learning curve which makes it not ideal for beginners. Furthermore, as a GoPro video editor looking to do just the basic edits, then the After Effects is definitely not for you.
Pros
- It comes with realistic special effects
- It has a high-quality noise reduction
Cons
- It is not for beginners due to the steep learning curve
- It comes with only a 7-day free trial
- It is quite expensive
Steps to Edit using Adobe After Effects
- Step 1: Import your video by going to ‘file’ on the menu and clicking ‘import’ from the dropdown menu.

- You can begin by cutting out any unnecessary parts from the video. You can also add text transitions, text, and other edits.

- Step 2: Next, you can apply necessary editing such as trimming, transitioning, and other edits.

- Step 3: Finally, you can add audio and export the edited video file. Click on file, tap on export and select the format, presets, and the location to export your file.

Final Cut Pro

Supported System: Mac only
The Final Cut Pro is another best-paid GoPro video editor for editing GoPro videos on Mac. This video editor is ideal for editing 360 GoPro videos. This is because it offers all the editing tools you need to edit, import, and deliver both stereoscopic and monoscopic 360 videos. The GoPro video editors come with a lot of powerful features such as background noise removal, Multicam editing, color adjustment tools, and an object tracker.
You can use the GoPro video editor to visualize, remove camera rigs, change orientation, or straighten the horizon. Final Cut Pro can also easily apply graphics and effects to 360 videos and add 360 videos to regular videos with the tiny planet effect. With electronic stabilization, you can clean up your video and enhance your audience’s viewing experience. The magnetic timeline feature eliminates clip collisions and streamlines the video editing process.
Although the GoPro video editor has some notable GoPro features, it is expensive to purchase. However, it has a generous 90-day free trial to explore. It is also not beginner-friendly and requires time to learn, especially for new GoPro editors to understand. In addition, it supports several Video formats.
Pros
- It has convenient asset management functions
- Precision editing is sure with the magnetic timeline function
Cons
- It is expensive
- It is not ideal for GoPro beginners
Steps to Edit using Final Cut Pro
- Step 1: First, Launch the program
- Step 2: Import your video files to the timeline and begin editing.

- Step 3: Next, you can apply necessary editing such as trimming, transitioning, and other edits.

- Step 4: Finally, you can add audio and export the edited video file. Click on file, tap on export and select the format, presets, and the location to export your file.

Which should I Choose: Free or Paid GoPro Video Editor?
Many of these GoPro video editors for Mac (free and paid) are available on the internet. Therefore, it can be hard sometimes to choose the right GoPro video editor for Mac. However, you’ll need to consider factors before making your choice. Here are some of these factors.
Level of Expertise
This is a vital factor you should put into consideration before choosing a GoPro video editor. As a beginner, you wouldn’t need a GoPro editor that offers complex editing functions that you can’t use. Also, as a professional, you shouldn’t go for an editor that lacks the necessary editing tools to meet your editing needs. As an editor, you should totally be on the lookout for an editor that supports both beginners and professionals. This will remove the need to search for a new video editor at any experience level.
Interface
Another factor to consider is the user interface of your chosen video editor. When you go for a more friendly user interface, you will be saving yourself the time to get familiar with the software. Is the video editor free or paid? Regardless of the answer, check out the user interface before choosing one.
Formats
You also need to ensure that the editing software doesn’t limit you to specific video formats. You should go for a GoPro video editor that supports the common and trendy video formats. This will allow you to convert your edited videos when you need to share them.
Now, most free GoPro video editors offer just limited features to users, limiting your editing course. Furthermore, most paid GoPro video editors focus on a professional level, making it difficult for new editors to use. Therefore, you should totally opt for a GoPro video editor that succinctly supports all your editing needs.
FAQs About Editing Gopro Videos
- Can I edit GoPro videos like a Professional? Yes, you can. Learn to use advanced video editing features. The ideal thing to do is pick a GoPro video editor with a user-friendly interface to enable you to learn these professional methods.
- What is the best GoPro video editor for Mac? The best GoPro video editor for Mac devices depends on your level of expertise and what you want to achieve.
- Can I edit a GoPro video? Yes, you can. Find a GoPro editing software compatible with your Mac devices and ideal for your level of experience.
Conclusion
There are several GoPro video editors, and the editor you choose depends on your needs and your budget. It also depends on your level of experience and the equipment on the ground. However, we have a list of different GoPro video editors for you. Examine our reviews of these GoPro video editors and see which is perfect for you.
- Step 6: Once you open it, two folders will display. These folders are DCIM and MISC.
- Step 7: Click on the DCIM folder to find all videos stored on the device.
- Step 8: Finally, you can now begin uploading all your GoPro videos to Mac by simply copying and pasting.
Import GoPro Videos to Mac before editing – GoPro Quick App
Another option to import GoPro videos to Mac is the GoPro Quick app. GoPro quick app is a tool by GoPro designed to help view GoPro videos on Mac and import them. Having this app on your Mac device is relatively easy. First, you have to download its setup from the GoPro website and install it. So far, this app is one of the best tools to view and import GoPro files to your Mac device. Here are the steps to importing GoPro videos to Mac while getting set to edit.
- Step 1: First thing first, Launch the app. However, if you have not installed the app, you should quickly download and install the app.
- Step 2: Now, you can connect the GoPro camera to your Mac. You can do this by using a USB cable.
- Step 3: After launching the app, you will see an icon labeled Import Filesdisplayed at the interface.
- Step 4: from here on, you will also see an icon to import the videos from your GoPro camera into your Mac device.
When the import is complete, you can now locate your GoPro videos in the folder of your choice. Now, you can close the GoPro quick app, unplug the GoPro camera and get ready to edit your videos.
Best GoPro Video Editor on Mac
A lot of people understand that GoPro is the best way to make your video look like a professional shot. After shooting the video, you’ll obviously want to make some edits to make them look more professional before sharing them. After all, no one wants to watch poor-quality videos, bad noises, and other unprofessional clips. Therefore, we have a list of the best GoPro editor for Mac in this article. Keep reading to learn about the best GoPro video editor on Mac.
Best GoPro Video Editor on Mac – Filmora Video Editor
Supported System: Mac and Windows
A lot of free video editing software usually comes as either too straightforward or too challenging to understand. While other video editing software lacks vital editing features such as color correction and audio or noise editing features. However, the Filmora Video Editor for Mac bridges the gap and is undoubtedly the best GoPro Video editor on Mac.
This video editing software is an easy-to-use editing tool totally equipped with a lot of video editing functions. With Filmora, you can edit your GoPro videos on your Mac like an expert and expect a professional outcome. Filmora offers excellent performance and enhances video quality taking the user experience to a whole new level.
Additionally, Filmora is an editing tool with helpful functionality taking the user experience to a whole new level. Finally, this tool is indispensable due to its speed, intuitive user interface, and other file format support.
For Win 7 or later (64-bit)
For macOS 10.14 or later
Filmora Features
- Filmora editing tool is versatile and supports other video formats like MP4, MOV, MKV, AVCHD, etc.
- You can cut, crop, split, trim, and even combine clips with just a few clicks.
- Filmora has access to several advanced video effects such as royalty-free music, transition, animated titles, and motion elements.
- With Filmora color tuning features, your videos can look like professional Hollywood videos.
- You can also edit sounds on your video with a noise removal feature, audio equalizer, and audio keyframing tools.
- You get 500+ free special video effects to create and customize your videos yourself.
- Filmora has access to advanced video effects like PIP, audio mixer, and green screen, which you can add to your videos.
- Access to 1000+ effects downloading resources to make videos in any desired styles.
Steps to Editing Videos on Mac Using Filmora
Want to edit your GoPro videos the right way? Editing your GoPro videos on Mac with Filmora is relatively easy and will only take a few clicks. Read and follow these steps below to learn to edit GoPro videos on Mac with this easy-to-use GoPro video editor.
- Step 1: Import the GoPro video files
First, you launch the GoPro video editor and then click the “Import Media here” button. This will upload the GoPro video clips to the program. You can save these files in a suitable location for easy access before you begin editing.
- Step 2: Edit the GoPro Video clips
Secondly, you should drag the GoPro video clips from the folder or User’s album to the timeline and begin editing.
To trim your GoPro videos, simply mouser over the clip from the beginning to the end of the video. You should do this until the trim icon is displayed. The trim icon is labeled as “I” on the editing timeline. You can drag the trim icon forward or backward to trim the video as you desire.
Aside from the trimming option, you can also apply split footage, video stabilization, and even add transitions between two clips. You can also combine GoPro videos and rotate GoPro videos by simply tapping the icons respectively.
- Step 3: Export the edited GoPro video files
Once you finish editing, you can now navigate to the “Export” icon. Furthermore, you can also select the save path and file format from the displayed output window. After this selection, you can finally choose the “Export” icon. Once you complete this, you can find your edited video file in the same path.
More Free GoPro video editor on Mac to Edit Gopro Videos
In this section, we will list out some of the best free GoPro video editors to successfully edit your videos on Mac. These programs are, but you will have to download them to enjoy all the editing tools.
PowerDirector
Supported System: Windows and Mac
We have PowerDirector as the best overall editor on our list of best free GoPro video editors on Mac. This free GoPro video editor is compatible with Mac and has a robust video editing program. If you are looking for a free GoPro video editor with a wide range of exciting editing features, this is one of the best options. One of the benefits of using this GoPro video editor is that it comes with an Action Camera Center.
It has tons of cool effects, titles, filters, and templates to explore, especially if you want to make more action camera masterpieces. In addition, this video editor has special editing and effects tools to improve your action camera video. For example, you can stabilize your shaky video, apply cool speed effects, and correct fish-eye distortion in some minutes. You can also use the slow-motion effect, zoom, correct color problems, and freeze frame with just a few clicks.
The GoPro editor also comes with noise correction and video denoise to make your video crystal clear and remove unwanted audio noise. In addition, PowerDirector has thousands of royalty-free stock assets such as sound effects and background music. In essence, PowerDirector is a GoPro video editor that offers everything you need to produce, enhance and cut thrilling action videos. It is versatile, best for action footage editing, and supports several video formats.
Pros
- It is beginner-friendly
- It comes with easy-to-use action camera-specific editing tools
Cons
- While it is free, you need a subscription to enjoy the latest features.
Steps to Edit using PowerDirector
- Step 1: Launch the app and select ‘full mode’ to begin editing your video
- Step 2: Select’ import media folder’ to get the videos you wish to edit
- Step 3: You can now browse the folder on your Mac device and select the folder with the videos. Then Click ‘Select folder’ to move them into the editor’s media library.
- Step 4: Now, the editing process can begin. You can stabilize and change the speed of your videos with PowerDirector.
- You can add title text and motion blur to your GoPro videos if you like that.
- If you want to include transitions, you can do so by selecting the transition room.
- Step 5: Next, select the ‘produce’ button to export your video once you are sure that the editing is complete.
- Step 6: Change the video format before exporting.
Once you select the video format you prefer, you will be able to save your GoPro video.
VideoProc Vlogger
Supported System: Windows and Mac
VideoProc Vlogger is the best GoPro editor for anyone looking for speed adjustment. The video editor uses visualized speed ramping to alter the speed throughout a clip. This program contains over 20-speed features to help you quickly change the tone and tempo of your GoPro video. Furthermore, VideoProc Vlogger is beginner-friendly with a lot of advanced editing features. These features include automatic keyframes and flexible Bezier curves to slow parts of a video without splitting it.
This free GoPro video editor can simulate motion roll, dolly, tilt, and even truck effects. You can also push in and out and stylize your video clips with rotation, fast zooms, and shakes. With VideoProc Vlogger, you fix grain video, remove fish-eye, extract audio and apply motion crops to your video. The video editor is best at creating new motion trails to change the action of the video.
Although VideoProc Vlogger is a free video editor, it definitely lacks some advanced editing features. For example, you can edit your videos without the annoying ads or watermarks. In addition, the video editor is designed for beginners, content creators, and hobbyists as it lacks features like video stabilization. So while the video editor is not for professionals, it’s worth trying out.
Pros
- Requires low system requirements
- It is entirely free with no ads and watermarks
Cons
- It lacks advanced editing features
- Rendering is somewhat slow
Steps to Edit using VideoProc Vlogger
- Step 1: First, import your GoPro videos from your Mac device to VideoProc Vlogger.
Simply Launch VideoProc Vlogger on your Mac, hit the plus icon in the media library, and add and import the videos.
- Step 2: Now, split and cut the GoPro Videos.
Simply drag the video clips to the timeline and begin editing. Now, put the playhead to exactly where you want to split the video and tap the split button.
- Step 3: You can also fix GoPro lens distortion.
If you feel that your video looks distorted, tick the lens distortion box to resolve the issue.
- Step 4: You can do the color correction or grading for any dark GoPro videos. Simply apply a preset aesthetic filter or simply adjust color normally.
- Step 5: Adjust the speed of the GoPro video.
To adjust the speed of the video, click speed in the toolbar to open the speed editor. Then change as you desire.
- Step 6: You can also add transitions, titles, and effects by opening the panels of transitions, effects, and tiles.
- Then drag a transition to the space between two video clips, same with titles to the subtitle and effect to the effect track.
- Step 7: Next, remove noise and background music by clicking the video track and tapping “detach” to separate the audio from the video.
- You can also add music to replace the background noise.
- Step 8: Finally, after the editing, you can export the GoPro video to your Mac device by setting the file name, format, file location, and video quality.
iMovie
Supported System: Mac only
This editor is designed to ensure an excelling editing process for Mac users. Therefore, beginners, content creators, and even hobbyists can utilize this video editor to edit their videos. Although iMovie is a free GoPro video editor, it offers incredible editing features to make your video look more professional. These features include HD and 4K video support and speed adjustment tools that can slow down or speed up your video clips.
Although it comes free on all Mac devices, iMovie also has tons of themes, templates, and presets to make editing a breeze. For example, you can select the video clips that will be automatically styled and edited with titles, transitions, and music. You can make all these changes with just a few clicks. In addition, you can also rearrange, trim, split, and even delete your ready-made video clips.
Furthermore, you can always modify the shift focus and depth of field while editing your video. However, it lacks some advanced features you will need while editing, such as Multicam, motion tracking, and 360 editing. On the other hand, it has a user-friendly interface with essential editing functions.
Pros
- It has a simple and user-friendly interface
- It is definitely beginner-friendly
Cons
- It lacks essential and advanced GoPro editing features and functions
Steps to Edit using iMovie
- Step 1: first, you have to launch the iMovie and create a video project.
- Step 2: Now, you can click the Import button to import your GoPro video files from your Mac to it.
- Step 3: Drag the video files from the program media library to the timeline for editing.
- Step 4: Load a song to the audio track if you wish to add background music to your video.
- Step 5: To split your video into smaller parts, right-click on a clip.
- Step 6: to edit your GoPro video with advanced tools like color correction, crop, grading, speed, and volume, simply move to the toolbar just above the timeline.
- Step 7: to add title, and transitions, you can drag a title and transition to the desired space between two clips.
- Step 8: preview and export your GoPro video from iMovie in the preferred format.
More Paid GoPro video editor on Mac to Cut MP4 Videos
If you desire GoPro video editors that offer more than just the basic editing features, you should try the paid GoPro video editors. The paid GoPro video editors offer more professional editing features for Mac users. In this section, you’ll learn about our top three paid GoPro video editors to edit your GoPro videos on Mac.
Adobe Premiere Pro
Supported System: Windows and Mac
This paid GoPro video editor is best for professionals who have experience creating video projects. This GoPro editing tool is compatible with Mac and Windows devices and also supports several video formats. Professionals use this video editor to edit top-notch videos such as Hollywood action movies and TV shows. In addition, it offers a long list of powerful features ideal for standard and action video editing.
Some of these professional features include Multicam, 360-degree, VR editing, and will export in up to 8k. The GoPro video editors also have a lot of sophisticated video stabilization tools, such as the warp stabilizer effect. The video stabilizer function help reduce camera shake, especially when zooming in. Other features include unlimited video tracks, lens distortion, access to the creative cloud and will match video to music.
In addition, the GoPro video editor only offers a 7-days free trial and is relatively expensive. Although Adobe Premiere Pro video editor is professional and high-quality, it has a steep learning curve. The steep learning curve is not appropriate for beginners.
Pros
- It supports all video formats
- It supports real-time video editing
Cons
- The system requirements are resource-intensive
- Not ideal for beginners
Steps to Edit using Adobe Premiere Pro
- Step 1: Import and cut your video files on PowerDirector. You can begin by cutting out any unnecessary parts from the video. You can also add text transitions, text, and other edits.
- Step 2: Next, stabilize the video using the Warp stabilizer. Double click on Warp stabilizer on the Effects menu to stabile the video.
- Step 3: Finally, you can add audio and export the edited video file. Click on file, tap on export and select the format, presets, and the location to export your file.
Adobe After Effect
Supported System: Windows and Mac
This GoPro editor is compatible with Mac and offers many basic video editing features to ensure top-notch results. This GoPro editor is great for editors who want to add special effects like motion tracking to their videos. The after-effect function allows you to add a graphical element to a moving person, animal, car, or camera. You can also create cartoon effects, logos, stickers, or text to move seamlessly with the action onscreen.
In addition to its essential editing tools, you can also remove elements from your video with the pro-level digital rotoscoping tools. You can also use the after-effect to add elements to the missing video. Other features include 360, 3D, VR editing, transitions, lens distortions, and distortion effects for professional editing.
This GoPro video editor is an effective software and is best for adding visual effects to action camera videos. However, it lacks some essential video editing tools that you might need to make your video Hollywood standard. In addition, it also has a steep learning curve which makes it not ideal for beginners. Furthermore, as a GoPro video editor looking to do just the basic edits, then the After Effects is definitely not for you.
Pros
- It comes with realistic special effects
- It has a high-quality noise reduction
Cons
- It is not for beginners due to the steep learning curve
- It comes with only a 7-day free trial
- It is quite expensive
Steps to Edit using Adobe After Effects
- Step 1: Import your video by going to ‘file’ on the menu and clicking ‘import’ from the dropdown menu.
- You can begin by cutting out any unnecessary parts from the video. You can also add text transitions, text, and other edits.
- Step 2: Next, you can apply necessary editing such as trimming, transitioning, and other edits.
- Step 3: Finally, you can add audio and export the edited video file. Click on file, tap on export and select the format, presets, and the location to export your file.
Final Cut Pro
Supported System: Mac only
The Final Cut Pro is another best-paid GoPro video editor for editing GoPro videos on Mac. This video editor is ideal for editing 360 GoPro videos. This is because it offers all the editing tools you need to edit, import, and deliver both stereoscopic and monoscopic 360 videos. The GoPro video editors come with a lot of powerful features such as background noise removal, Multicam editing, color adjustment tools, and an object tracker.
You can use the GoPro video editor to visualize, remove camera rigs, change orientation, or straighten the horizon. Final Cut Pro can also easily apply graphics and effects to 360 videos and add 360 videos to regular videos with the tiny planet effect. With electronic stabilization, you can clean up your video and enhance your audience’s viewing experience. The magnetic timeline feature eliminates clip collisions and streamlines the video editing process.
Although the GoPro video editor has some notable GoPro features, it is expensive to purchase. However, it has a generous 90-day free trial to explore. It is also not beginner-friendly and requires time to learn, especially for new GoPro editors to understand. In addition, it supports several Video formats.
Pros
- It has convenient asset management functions
- Precision editing is sure with the magnetic timeline function
Cons
- It is expensive
- It is not ideal for GoPro beginners
Steps to Edit using Final Cut Pro
- Step 1: First, Launch the program
- Step 2: Import your video files to the timeline and begin editing.
- Step 3: Next, you can apply necessary editing such as trimming, transitioning, and other edits.
- Step 4: Finally, you can add audio and export the edited video file. Click on file, tap on export and select the format, presets, and the location to export your file.
Which should I Choose: Free or Paid GoPro Video Editor?
Many of these GoPro video editors for Mac (free and paid) are available on the internet. Therefore, it can be hard sometimes to choose the right GoPro video editor for Mac. However, you’ll need to consider factors before making your choice. Here are some of these factors.
Level of Expertise
This is a vital factor you should put into consideration before choosing a GoPro video editor. As a beginner, you wouldn’t need a GoPro editor that offers complex editing functions that you can’t use. Also, as a professional, you shouldn’t go for an editor that lacks the necessary editing tools to meet your editing needs. As an editor, you should totally be on the lookout for an editor that supports both beginners and professionals. This will remove the need to search for a new video editor at any experience level.
Interface
Another factor to consider is the user interface of your chosen video editor. When you go for a more friendly user interface, you will be saving yourself the time to get familiar with the software. Is the video editor free or paid? Regardless of the answer, check out the user interface before choosing one.
Formats
You also need to ensure that the editing software doesn’t limit you to specific video formats. You should go for a GoPro video editor that supports the common and trendy video formats. This will allow you to convert your edited videos when you need to share them.
Now, most free GoPro video editors offer just limited features to users, limiting your editing course. Furthermore, most paid GoPro video editors focus on a professional level, making it difficult for new editors to use. Therefore, you should totally opt for a GoPro video editor that succinctly supports all your editing needs.
FAQs About Editing Gopro Videos
- Can I edit GoPro videos like a Professional? Yes, you can. Learn to use advanced video editing features. The ideal thing to do is pick a GoPro video editor with a user-friendly interface to enable you to learn these professional methods.
- What is the best GoPro video editor for Mac? The best GoPro video editor for Mac devices depends on your level of expertise and what you want to achieve.
- Can I edit a GoPro video? Yes, you can. Find a GoPro editing software compatible with your Mac devices and ideal for your level of experience.
Conclusion
There are several GoPro video editors, and the editor you choose depends on your needs and your budget. It also depends on your level of experience and the equipment on the ground. However, we have a list of different GoPro video editors for you. Examine our reviews of these GoPro video editors and see which is perfect for you.
How To Remove Audio From Video
Extracting audio from video lets you focus on the main video. Moreover, it also protects privacy and addresses copyright problems. Thus, controlling the audio is a crucial skill for video editors. One approach to making the video seem better is to remove the noise. Well, it isn’t just about reducing background noise. Instead, it’s a calculated move to make your editing more precise. So, how do you remove audio from a video? Don’t worry if you are a newcomer in the video editing field! This post is your go-to guide to effortlessly eliminating audio from your video content.
Extracting audio from video lets you focus on the main video. Moreover, it also protects privacy and addresses copyright problems. Thus, controlling the audio is a crucial skill for video editors. One approach to making the video seem better is to remove the noise. Well, it isn’t just about reducing background noise. Instead, it’s a calculated move to make your editing more precise. So, how do you remove audio from a video? Don’t worry if you are a newcomer in the video editing field! This post is your go-to guide to effortlessly eliminating audio from your video content.
In this article
- Part 1: Why Is It Necessary to Remove Audio from a Video?
- Part 2: How Can You Improve Storytelling With Silent Videos?
- Part 3: How to Use Filmora to Remove Audio from Your Video?
Remove Audio Now For Win 7 or later(64-bit)
Remove Audio Now For macOS 10.14 or later
Why Is It Necessary to Remove Audio from a Video?
You can make a video far more versatile and successful for many different things by removing the audio.
Your Video Becomes Multipurpose
Taking the audio out of a video makes it more versatile. Presentations, slide decks, and instructional videos may all benefit from this. The original audio or background noise might be too distracting in such videos.
No Language Issues
The muted or removed audio lets you reach viewers who speak a different language. By removing the original audio, the video becomes language-neutral. Thus, you save time adding subtitles or dubbing without disturbing the narration.
Place Emphasis on the Video Itself
Cutting off the sound may make the video’s visuals the main attraction. It may be beneficial when creating tutorials or instructional videos. That’s because viewers may prefer to see the demos without the sound.
Eliminating Excessive Background Noise
The video might get dull with background noises, echoes, or unwanted sounds. Deleting the audio stream helps to eliminate distractions. As a result, viewers get a cleaner viewing experience.
Keeping Copyright Concerns at Bay
Businesses can avoid copyright infringement problems by eliminating audio from videos. Removing someone’s audio work before using it in public venues is necessary. It supports copyright laws on audio material by limiting display to visual components.
Content Personalization
Creators can let viewers add their soundtracks or voiceovers by removing audio. Thus, it can make the watching experience more customized. It suits projects that need a high degree of personalization or user-generated content.
Confidential Data Security
Sometimes, a video might capture sensitive conversations or information. So, it’s essential to remove the audio to protect privacy. Remember, sharing the visual footage does not compromise confidentiality. It hides the crucial discussions or data from the original audio.
As you can see, removing audio from a video has several benefits. Many options are available when you mute the audio in a video. By eliminating background noise, you’re freeing your imagination.
So, how do silent videos improve your video production strategies? Let’s find out!
How Can You Improve Storytelling With Silent Videos?
There is a much unrealized narrative potential in silent videos. Most videos rely only on visual elements to convey narratives. Thus, mute clips have a unique ability to captivate audiences. It also offers many possibilities for storytelling, allowing for a more immersive experience.
Setting a Narrative
Videos without sound force viewers to rely more on their visual perception of the tale. It can draw your viewers closer to the visuals. Moreover, it also heightens their involvement with the story as it develops.
Improving Stories
Silence directs the viewer’s attention to certain visual aspects. When you remove all sound distractions, the audience can focus on the pictures. It helps you highlight essential story aspects.
For instance, rely on more than just dialogue to convey emotion. Instead, you can take a modest close-up of the character’s face.
Build Emotions With No Audio
One effective method of building intense emotions is the complete absence of sound. Remember, silent clips can keep viewers on the top of their seats. The audience may get more invested in the story’s raw essence when a scene unfolds in silence. In short, this technique aims to evoke a range of emotions in the audience.
Add Metaphor
The lack of audio permits the use of symbolic language only via visual representations. You can use each picture to convey information. It eliminates the need for dialogue or background music.
The audience can interact with the story on a deeper level via interpretation. Here, video scenes, objects, or actions work as symbols.
Simplify Complex Stories
Silent videos let storytellers elicit strong emotional reactions from audiences. They can co-create the story by deciphering visual cues. Besides, they can also add thoughts, emotions, and interpretations in silent videos. Without words, silent videos can help you convey stories that captivate audiences.
How to Use Filmora to Remove Audio from Your Video?
Two main approaches are available for using this software. You can start by downloading Wondershare Filmora for free to try it out. Here is how to remove audio in a video editor.
Remove Audio Now For Win 7 or later(64-bit)
Remove Audio Now For macOS 10.14 or later
Method 1: Use the “Mute” Button
The first method is using the “Mute” function available in Filmora. You can start by importing the local video file into this software.
Drop the file into Filmora’s video editing timeline. You can mute the file by right-clicking on it. Once you’ve finished, choose a format to save the file in.
As you can see, the mute option stands out as a fantastic one-click feature. It removes the necessity for specialized video editing skills. Anyone can effortlessly remove audio from their videos with ease.

Method 2: Use the Audio Detach feature
Now, let’s turn our focus to a different, efficient way. The Audio Detach function becomes a potent feature for separating audio from videos. Let’s check out its detailed instructions for precisely separating audio and video.
Step1Upload Your Video
First, select the video clip whose audio you want to extract. You can start by clicking “Import” and then navigating to the relevant folder on your hard drive.
While you pick more files, keep the “Ctrl” button down to select them all at once. The main editing dashboard will show thumbnails of all the currently loaded files. You can see a preview in the right-hand window when you double-click them.

Step2Cut Out the Music
Now, you should drag videos from the dashboard into the Video Timeline. After that, you can right-click the video to choose the “Audio Detach” option.
The Music Timeline will immediately display a new audio file. Here, you can see the original video’s soundtrack. Now, pressing the “Delete” button can remove the sounds.
You can also detach audio from multiple video files. Remember, all the files will mesh together perfectly on the Video Timeline.
Thus, you need to click the application icon on the left-hand side of the screen and choose “Save As…” to create new project files if you need to extract audio from more than one file. Then, export each output file individually after reloading the project file.

Step3Download the Video
To be sure this is what you need, double-tap the file in the Video Timeline. You can add suitable music files to the clip if needed. To save only the video track, click the “Create” option directly. A popup will open up, asking you to choose a format before you can save it to your PC.
The Music Timeline will immediately display a new audio file. Here, you can see the original video’s soundtrack. Now, pressing the “Delete” button can remove the sounds.
You can also detach audio from multiple video files. Remember, all the files will mesh together perfectly on the Video Timeline.
Thus, you need to click the application icon on the left-hand side of the screen and choose “Save As…” to create new project files if you need to extract audio from more than one file. Then, export each output file individually after reloading the project file.
Now you know how to remove audio from videos in Wondershare Filmora. As you can see, removing background noise from videos is a breeze using Filmora. You don’t need extensive experience or expensive software packages.
Follow the simple steps outlined above, even if this is your first time. You may remove distracting or unnecessary audio from your file in just a few minutes.
Conclusion
As you can see, your ability to control the audio in video editing defines the viewing experience. It is about not just transforming video material but also expanding possibilities. This silent space is where imagination soars.
It’s a technique to make your video clips more adaptable. Thus, they can transcend language obstacles, legal limitations, and distractions.
Think of a vacation video where the beautiful sights and sounds of the busy streets are in front. It will allow the audience to lose themselves in the lively atmosphere completely. If you remove the audio from this clip, it can become livelier.
In short, sound removal is crucial in creating a more engaging story. It changes the viewer’s experience by focusing on visuals and increasing engagement. You can use Filmora’s powerful audio removal features. The software streamlines the editing process without compromising the quality of the video. Learn to use silence as a tool to tell stories and make people feel things in your videos.
- Part 2: How Can You Improve Storytelling With Silent Videos?
- Part 3: How to Use Filmora to Remove Audio from Your Video?
Remove Audio Now For Win 7 or later(64-bit)
Remove Audio Now For macOS 10.14 or later
Why Is It Necessary to Remove Audio from a Video?
You can make a video far more versatile and successful for many different things by removing the audio.
Your Video Becomes Multipurpose
Taking the audio out of a video makes it more versatile. Presentations, slide decks, and instructional videos may all benefit from this. The original audio or background noise might be too distracting in such videos.
No Language Issues
The muted or removed audio lets you reach viewers who speak a different language. By removing the original audio, the video becomes language-neutral. Thus, you save time adding subtitles or dubbing without disturbing the narration.
Place Emphasis on the Video Itself
Cutting off the sound may make the video’s visuals the main attraction. It may be beneficial when creating tutorials or instructional videos. That’s because viewers may prefer to see the demos without the sound.
Eliminating Excessive Background Noise
The video might get dull with background noises, echoes, or unwanted sounds. Deleting the audio stream helps to eliminate distractions. As a result, viewers get a cleaner viewing experience.
Keeping Copyright Concerns at Bay
Businesses can avoid copyright infringement problems by eliminating audio from videos. Removing someone’s audio work before using it in public venues is necessary. It supports copyright laws on audio material by limiting display to visual components.
Content Personalization
Creators can let viewers add their soundtracks or voiceovers by removing audio. Thus, it can make the watching experience more customized. It suits projects that need a high degree of personalization or user-generated content.
Confidential Data Security
Sometimes, a video might capture sensitive conversations or information. So, it’s essential to remove the audio to protect privacy. Remember, sharing the visual footage does not compromise confidentiality. It hides the crucial discussions or data from the original audio.
As you can see, removing audio from a video has several benefits. Many options are available when you mute the audio in a video. By eliminating background noise, you’re freeing your imagination.
So, how do silent videos improve your video production strategies? Let’s find out!
How Can You Improve Storytelling With Silent Videos?
There is a much unrealized narrative potential in silent videos. Most videos rely only on visual elements to convey narratives. Thus, mute clips have a unique ability to captivate audiences. It also offers many possibilities for storytelling, allowing for a more immersive experience.
Setting a Narrative
Videos without sound force viewers to rely more on their visual perception of the tale. It can draw your viewers closer to the visuals. Moreover, it also heightens their involvement with the story as it develops.
Improving Stories
Silence directs the viewer’s attention to certain visual aspects. When you remove all sound distractions, the audience can focus on the pictures. It helps you highlight essential story aspects.
For instance, rely on more than just dialogue to convey emotion. Instead, you can take a modest close-up of the character’s face.
Build Emotions With No Audio
One effective method of building intense emotions is the complete absence of sound. Remember, silent clips can keep viewers on the top of their seats. The audience may get more invested in the story’s raw essence when a scene unfolds in silence. In short, this technique aims to evoke a range of emotions in the audience.
Add Metaphor
The lack of audio permits the use of symbolic language only via visual representations. You can use each picture to convey information. It eliminates the need for dialogue or background music.
The audience can interact with the story on a deeper level via interpretation. Here, video scenes, objects, or actions work as symbols.
Simplify Complex Stories
Silent videos let storytellers elicit strong emotional reactions from audiences. They can co-create the story by deciphering visual cues. Besides, they can also add thoughts, emotions, and interpretations in silent videos. Without words, silent videos can help you convey stories that captivate audiences.
How to Use Filmora to Remove Audio from Your Video?
Two main approaches are available for using this software. You can start by downloading Wondershare Filmora for free to try it out. Here is how to remove audio in a video editor.
Remove Audio Now For Win 7 or later(64-bit)
Remove Audio Now For macOS 10.14 or later
Method 1: Use the “Mute” Button
The first method is using the “Mute” function available in Filmora. You can start by importing the local video file into this software.
Drop the file into Filmora’s video editing timeline. You can mute the file by right-clicking on it. Once you’ve finished, choose a format to save the file in.
As you can see, the mute option stands out as a fantastic one-click feature. It removes the necessity for specialized video editing skills. Anyone can effortlessly remove audio from their videos with ease.
Method 2: Use the Audio Detach feature
Now, let’s turn our focus to a different, efficient way. The Audio Detach function becomes a potent feature for separating audio from videos. Let’s check out its detailed instructions for precisely separating audio and video.
Step1Upload Your Video
First, select the video clip whose audio you want to extract. You can start by clicking “Import” and then navigating to the relevant folder on your hard drive.
While you pick more files, keep the “Ctrl” button down to select them all at once. The main editing dashboard will show thumbnails of all the currently loaded files. You can see a preview in the right-hand window when you double-click them.
Step2Cut Out the Music
Now, you should drag videos from the dashboard into the Video Timeline. After that, you can right-click the video to choose the “Audio Detach” option.
The Music Timeline will immediately display a new audio file. Here, you can see the original video’s soundtrack. Now, pressing the “Delete” button can remove the sounds.
You can also detach audio from multiple video files. Remember, all the files will mesh together perfectly on the Video Timeline.
Thus, you need to click the application icon on the left-hand side of the screen and choose “Save As…” to create new project files if you need to extract audio from more than one file. Then, export each output file individually after reloading the project file.
Step3Download the Video
To be sure this is what you need, double-tap the file in the Video Timeline. You can add suitable music files to the clip if needed. To save only the video track, click the “Create” option directly. A popup will open up, asking you to choose a format before you can save it to your PC.
The Music Timeline will immediately display a new audio file. Here, you can see the original video’s soundtrack. Now, pressing the “Delete” button can remove the sounds.
You can also detach audio from multiple video files. Remember, all the files will mesh together perfectly on the Video Timeline.
Thus, you need to click the application icon on the left-hand side of the screen and choose “Save As…” to create new project files if you need to extract audio from more than one file. Then, export each output file individually after reloading the project file.
Now you know how to remove audio from videos in Wondershare Filmora. As you can see, removing background noise from videos is a breeze using Filmora. You don’t need extensive experience or expensive software packages.
Follow the simple steps outlined above, even if this is your first time. You may remove distracting or unnecessary audio from your file in just a few minutes.
Conclusion
As you can see, your ability to control the audio in video editing defines the viewing experience. It is about not just transforming video material but also expanding possibilities. This silent space is where imagination soars.
It’s a technique to make your video clips more adaptable. Thus, they can transcend language obstacles, legal limitations, and distractions.
Think of a vacation video where the beautiful sights and sounds of the busy streets are in front. It will allow the audience to lose themselves in the lively atmosphere completely. If you remove the audio from this clip, it can become livelier.
In short, sound removal is crucial in creating a more engaging story. It changes the viewer’s experience by focusing on visuals and increasing engagement. You can use Filmora’s powerful audio removal features. The software streamlines the editing process without compromising the quality of the video. Learn to use silence as a tool to tell stories and make people feel things in your videos.
Also read:
- In 2024, How to Rotate Video in iMovie with Alternative
- New How to Remove Audio From Videos with FFmpeg?
- 4 Methods to Crop a Video on Android Easily for 2024
- 2024 Approved Top 10 Picks for Flawless Slow Motion Video Generation
- Updated Using VN Editor To Add Luts for Video Editing
- Recording Videos with Your Smartphones Is Fun and Fantastic. But Did You Know that Recording in Slo-Mo Has Become a Trend Nowadays? Read More to Learn About How to Convert Videos to Slow Motion Here for 2024
- 2024 Approved How To Make a Video by Mouse in Filmora?
- How to Use Lumetri Color in After Effects
- Updated Top List 20 Best LUTs for Music Videos for 2024
- Updated In 2024, How to Loop a Video on Vimeo?
- New Add Fade in Windows Video Editor for 2024
- How To Split Videos in Premier Pro for 2024
- Want to Add an Exciting Countdown Timer to Your Wedding, Product Launch or Any Other Video Using After Effects or an Alternative Tool? This Article Will Help You Learn All About After Effects Countdown and the Procedure for 2024
- Updated 4 Ways to Rotate Videos on Windows PC for 2024
- 2024 Approved How To Film a Slow Motion Video
- Updated Do You Want to Know All About Video Frame Rates and Speed? Wondershare Filmora Will Help You to Get More Information on This Matter
- Updated What Are the Best 15 Slideshow Presentation Examples Your Audience Will Love
- Updated Top Tools To Create Blend Image Collage
- Updated Step by Step to Split a Clip in VLC
- New 22 Free Video Editing Software to Save Your Money and Time for 2024
- New KineMaster Templates 101 How to Get the Most Out of Video Templates
- New How to Turn On/Off Motion Blur in Dying Light 2?
- In 2024, How To Polish Your Music Video Edits Using Filmora
- New How Windows Movie Maker Save MP4 File
- 2024 Approved Want to Loop a Video to Extend Its Duration? You Can Use iMovie to Loop a Video on Your Mac and iPhone and We Will Illustrate How to Loop a Video in iMovie
- Simple Tricks Make 3D GIF Production of Inspiration Pop Up
- There Are Several Video Players that You Can Use to Watch Videos on Your PC. To Have a Better Experience Viewing Videos and Enhancing Them Across a Similar Platform, You Can Try Out VLC Media Player for PC for 2024
- New Now, You Can Also Apply the Stranger Things Upside Down Effect to Your Video! This Effect Combines Camera Tricks and Video Editing Within Filmora to Transition From the Normal World Into the Upside Down
- In 2024, Embrace Creativity in Your Media by Replacing Backgrounds. Learn to Replace the Sky in Lightroom Through the Steps and Details Discussed in This Article
- New How to Resize FLV Videos Efficiently Windows, Mac,Android, iPhone & Online
- New A Complete Guide to the Best Brand Story Videos |2023| for 2024
- In 2024, How to Delete White Background in Photoshop. How to Create a Transparent Background in Photoshop? Steps to Get Rid of White Background in Photoshop
- Updated 2024 Approved 20 Best Text To Speech Software Windows, Mac, Android, iPhone & O
- 2024 Approved How to Make a Slideshow with Icecream Slideshow Maker
- 2024 Approved How to Combine Multiple Videos Into One on Instagram
- 20 Best Text To Speech Software Windows, Mac, Android, iPhone & O for 2024
- In 2024, Are You Searching for Professional Subtitle Apps? Read This Article to Explore Various Compatible Subtitle Apps that You Can Run on Multiple Platforms
- New Do You Also Use Android to Create and Edit Videos? Read About the Efectum Video Effects Editor, Which Is Available in Your App Stores for Seamless Editing
- Updated In 2024, How to Do Masking in After Effects Alternative Provided
- 2024 Approved How to Export iMovie?
- The Craziest 10 AI Editors Youve Ever Seen for 2024
- New 2024 Approved AI Features of Filmora - Silence Detection in Videos
- 2024 Approved Top Silence Detection Tools for Better Film Production
- Updated Slowing Down GIF With The Best Available Methods
- Play Store Stuck on Downloading Of Samsung Galaxy A05s? 7 Ways to Resolve | Dr.fone
- How To Enable USB Debugging on a Locked Vivo S18 Pro Phone
- In 2024, Easy Tutorial for Activating iCloud on iPhone 14 Pro Max Safe and Legal
- How to Easily Hard reset my Asus ROG Phone 8 | Dr.fone
- Your Complete Guide To Reset OnePlus Nord N30 SE | Dr.fone
- Top 10 Fixes for Phone Keep Disconnecting from Wi-Fi On Oppo Reno 8T | Dr.fone
- Complete Review & Guide to Techeligible FRP Bypass and More For Vivo Y100i
- 3 Ways to Unlock Your Apple iPhone 12 Pro Max for Free
- Is GSM Flasher ADB Legit? Full Review To Bypass Your Itel S23+ Phone FRP Lock
- In 2024, Ultimate Guide from Honor Play 7T FRP Bypass
- In 2024, How to Intercept Text Messages on OnePlus Nord CE 3 Lite 5G | Dr.fone
- 5 Ways to Restart Realme 11 Pro+ Without Power Button | Dr.fone
- How to identify missing your drivers with Windows Device Manager in Windows 11/10
- How to Retrieve deleted photos on Google Pixel 7a
- In 2024, How to Reset Gmail Password on Xiaomi 13T Devices
- How to remove Google FRP Lock on Honor 90 Pro
- In 2024, 5 Ways To Teach You To Transfer Files from Xiaomi Redmi Note 13 Pro+ 5G to Other Android Devices Easily | Dr.fone
- How to Screen Mirroring Tecno Phantom V Fold? | Dr.fone
- How To Bypass iCloud By Checkra1n Even On Apple iPhone SE (2020) If Youve Tried Everything
- In 2024, Pokemon Go No GPS Signal? Heres Every Possible Solution On Honor 90 GT | Dr.fone
- Guide on How To Change Your Apple ID Email Address On Apple iPhone SE
- New In 2024, How to Make Explainer Videos—Step by Step Guide
- In 2024, Can I use iTools gpx file to catch the rare Pokemon On Oppo Reno 11 5G | Dr.fone
- How To Change Oppo A59 5G Lock Screen Password?
- How to Fake Snapchat Location without Jailbreak On Apple iPhone 11 | Dr.fone
- Updated Top 10 Classical Animated Cartoon Types With Examples for 2024
- Spoofing Life360 How to Do it on Vivo X Fold 2? | Dr.fone
- Fixing Foneazy MockGo Not Working On Infinix Zero 5G 2023 Turbo | Dr.fone
- In 2024, How to Bypass FRP on Vivo S17e?
- How To Unlock Any Vivo S18 Pro Phone Password Using Emergency Call
- What To Do When Samsung Galaxy A24 Has Black Screen of Death? | Dr.fone
- How to Screen Mirroring Xiaomi Redmi 13C to PC? | Dr.fone
- In 2024, How To Use Special Features - Virtual Location On Asus ROG Phone 7 Ultimate? | Dr.fone
- How To Unlock The Apple iPhone SE (2022) SIM Lock 4 Easy Methods
- In 2024, How to Remove the Activation Lock On your iPad and iPhone 7 Plus without Apple Account
- In 2024, How to Bypass Google FRP Lock from Motorola Moto G23 Devices
- Title: Updated How To Split Screen On Tiktok
- Author: Chloe
- Created at : 2024-04-24 07:08:12
- Updated at : 2024-04-25 07:08:12
- Link: https://ai-editing-video.techidaily.com/updated-how-to-split-screen-on-tiktok/
- License: This work is licensed under CC BY-NC-SA 4.0.
