
Updated How to Start a Vlog
How to Start a Vlog
I’m Maya of Mayang Dyosa on YouTube channel, vlogger since 2017 and I started my vlogging career out of boredom. I give up my managerial career so that I can watch over my child. That’s the time I thought of videoing what I’m doing at home and uploading it to YouTube for me to watch all over again, I accidentally made the videos public and I was surprised that there were viewers. Until I continued to upload and others requested the video what they want to see on my channel.

How to Start a Vlog
Let us find out what you need to be a vlogger?
You need to be able to add value and focus to the topic. This means that you must tap onto your own experience and talk or showcase that through your vlogs. Do take note you need to ensure that whatever you are voicing out to your vlog is factual and justified. It is easy to others to verify your claims online these days, and the last thing you’ll want to be known for is vlogger who isn’t knowledgeable in his/her field. That is why you need to pick a topic or content that you can explain well and based on your experiences.
Here’s the step or tips on how to start to vlog
- Determine your vlogging Niche
- Create your YouTube channel
- Get the right vlogging equipment
- Shoot & Edit your First Vlog
- Publish and promote your vlog

Determine Your Vlogging Niche
1. Determine Your Vlogging Niche
You can refer to some popular vlogger or vlogging categories on YouTube, like gaming fitness, food, make-up travel etc., just picks the best that suits to your interest and experiences. The audience can easily understand what you want to show from your vlog when you have a clear niche, which will give you a greater chance of getting relevant audience to subscribe to your channel

Determine Your Vlogging Niche2
2. Create Your YouTube Channel
You can now create your YouTube channel through Gmail account on YouTube and its free. Make sure to create a unique name and do more customize to make it look like your channel and not someone else’s. You can put profile pictures and a banner to brand yourself and make your vlog channel stand out from the rest. Also you can add subscribe watermark that appears at the bottom right corner of your every video.

Create Your YouTube Channel
3. Get The Right Vlogging Equipment
If you want to start vlogging make sure to have vlogging equipment, smartphone with clear video and audio to start up will do, a camera tripod or selfie stick, also find a venue or a place where you can vlog without disturbance. Because when your start your first ever vlog, you will be a bit stuttering or you will have difficulty speaking in front of the camera and when there are people you will be ashamed to speak. Last a microphone to ensure you good and clear audio.

Get The Right Vlogging Equipment
4. Shoot And Edit Vlog
When all the equipment is ready you can now start recording your first video. Always make sure to create your intro to attract viewers, be yourself just do want you want to do or to say naturally as if your talking to a friend or a family. Focus on your topic and be true to all information you share to your audience. Don’t forget to have a good lighting and a clear audio so your audience understand what your video all about. And if you’re not comfortable you can try and practice many times. You can say anything and everything, because after that you can also edit and delete unnecessary ones.
5. Edit Vlogs
One of the most important of being a YouTuber or vlogger is on how to edit a vlog you can refer to my article tittle What is my best vlog editing software?
![]()
Tips: Editing is part of being a vlogger, you need to learn to enhance your videos so you can attract more subscriber. There are a lot of editing software that can be downloaded from google.
I recommend the best ending software that I personally used up until now is Wondershare Filmora.
This fort ware is good for the beginners, because this is easy to use and you will enjoy all the great features of this software. Filmora has so many tools that you can use to enhance your videos and be attractive to your viewers. This may help you create a quality, creative and unique video content.

Edit Vlogs
6. Publish And Promote Your Vlogs
It is very important for us to Publish and to Promote our video publicly so that many can see our hard-earned video.
There are many site where you can promote your video example. Facebook, Instagram, Twitter, Tikor etc. This sites always have many users and this is the best site to promote or to post your video content, just make sure to public your post, put link of your videos and a short description of the video so your viewer can easily understand what your video all about.
![]()
Tips: Remember when many people will notice your video, there are many ways you can get another big opportunity like, you can be a brand ambassador or some sponsorship for you channel.
Conclusion
Conclusion Ⅰ
Vlogging remains one of the most popular ways for creative to have their voices heard. in a short two to three minutes’ video, vloggers can not only showcase a skill or a product, but the can also educate their viewers with visual tips and tricks in their respective fields. For some vloggers, this has become a full time career.
Conclusion Ⅱ
Anyone can be a vlogger what is important is that you have a story to tell and a passion for your topic of interest. Starting out will be though, so you need the determination to see it through. For a lot of vloggers, the view counts at the start may be low, and some may give up at this stage. But if you can recognize your uniqueness and showcase that through your vlogs, your viewership and subscribers will steadily climb. Just be patient and enjoy every step of the way and always remember “Success Doesn’t happen overnight”.
Here’s the step or tips on how to start to vlog
- Determine your vlogging Niche
- Create your YouTube channel
- Get the right vlogging equipment
- Shoot & Edit your First Vlog
- Publish and promote your vlog
Determine Your Vlogging Niche
1. Determine Your Vlogging Niche
You can refer to some popular vlogger or vlogging categories on YouTube, like gaming fitness, food, make-up travel etc., just picks the best that suits to your interest and experiences. The audience can easily understand what you want to show from your vlog when you have a clear niche, which will give you a greater chance of getting relevant audience to subscribe to your channel
Determine Your Vlogging Niche2
2. Create Your YouTube Channel
You can now create your YouTube channel through Gmail account on YouTube and its free. Make sure to create a unique name and do more customize to make it look like your channel and not someone else’s. You can put profile pictures and a banner to brand yourself and make your vlog channel stand out from the rest. Also you can add subscribe watermark that appears at the bottom right corner of your every video.
Create Your YouTube Channel
3. Get The Right Vlogging Equipment
If you want to start vlogging make sure to have vlogging equipment, smartphone with clear video and audio to start up will do, a camera tripod or selfie stick, also find a venue or a place where you can vlog without disturbance. Because when your start your first ever vlog, you will be a bit stuttering or you will have difficulty speaking in front of the camera and when there are people you will be ashamed to speak. Last a microphone to ensure you good and clear audio.
Get The Right Vlogging Equipment
4. Shoot And Edit Vlog
When all the equipment is ready you can now start recording your first video. Always make sure to create your intro to attract viewers, be yourself just do want you want to do or to say naturally as if your talking to a friend or a family. Focus on your topic and be true to all information you share to your audience. Don’t forget to have a good lighting and a clear audio so your audience understand what your video all about. And if you’re not comfortable you can try and practice many times. You can say anything and everything, because after that you can also edit and delete unnecessary ones.
5. Edit Vlogs
One of the most important of being a YouTuber or vlogger is on how to edit a vlog you can refer to my article tittle What is my best vlog editing software?
![]()
Tips: Editing is part of being a vlogger, you need to learn to enhance your videos so you can attract more subscriber. There are a lot of editing software that can be downloaded from google.
I recommend the best ending software that I personally used up until now is Wondershare Filmora.
This fort ware is good for the beginners, because this is easy to use and you will enjoy all the great features of this software. Filmora has so many tools that you can use to enhance your videos and be attractive to your viewers. This may help you create a quality, creative and unique video content.
Edit Vlogs
6. Publish And Promote Your Vlogs
It is very important for us to Publish and to Promote our video publicly so that many can see our hard-earned video.
There are many site where you can promote your video example. Facebook, Instagram, Twitter, Tikor etc. This sites always have many users and this is the best site to promote or to post your video content, just make sure to public your post, put link of your videos and a short description of the video so your viewer can easily understand what your video all about.
![]()
Tips: Remember when many people will notice your video, there are many ways you can get another big opportunity like, you can be a brand ambassador or some sponsorship for you channel.
Conclusion
Conclusion Ⅰ
Vlogging remains one of the most popular ways for creative to have their voices heard. in a short two to three minutes’ video, vloggers can not only showcase a skill or a product, but the can also educate their viewers with visual tips and tricks in their respective fields. For some vloggers, this has become a full time career.
Conclusion Ⅱ
Anyone can be a vlogger what is important is that you have a story to tell and a passion for your topic of interest. Starting out will be though, so you need the determination to see it through. For a lot of vloggers, the view counts at the start may be low, and some may give up at this stage. But if you can recognize your uniqueness and showcase that through your vlogs, your viewership and subscribers will steadily climb. Just be patient and enjoy every step of the way and always remember “Success Doesn’t happen overnight”.
How to Make A Tattoo Disappear Like A Magic
Do you have any tattoos that you don’t like anymore? Have you ever wished you had the superpower to make unwanted tattoos vanish? Then, keep reading this article since this article will provide you with how to use masking and colour correction to make a tattoo disappear in Filmora .
Part 1: What You’ll Need to Getting ready
Step1 The first thing you need is a video clip of your arm. Next, place the camera on a tripod, and tilt down to show the table from the top.

Step2 After that, put the arm on the tableand keep it still while filming. Meanwhile, have another hand perform on the other side of the frame and pretend to use magic to remove the tattoo.

Step3 Next, you need a picture of a tattoo. Indeed, it would be better to have the tattoo in the same position on the arm so it can match the video clip we just filmed.

After preparing everything, you need to go to Filmora 11 and start editing. If you haven’t downloaded Filmora already, you can visit filmora.wondershare.com.

Part 2: Editing Tutorial
Step1 First, drag and drop the arm video clip onto the first video track and the tattoo picture on the second video track.

Step2 Add a mask around the tattoo part from the picture. You must hide the first video track to see the mask clearly.Then, double-click on the picture on the timeline and go to the setting window on the top left. Find the Mask Section and select the circle shape. Now you can see the mask is applied.

Step3 Adjust the position and size of the mask to reveal only the tattoo part. Then you must change the “Blur Strength” to add more blur to the edge of the mask.

Step4 With the mask finalized,unhide the first video track with the arm video clip. Next, adjust the position and size of the tattoo and make it fit the arm clip.

Step5 Go to do colour correction on the tattoo image so that it matches better with the arm skin. Double-click on the tattoo on the timeline and go to the setting window on the top left. Find the “Color” Section and open the “Tone” menu. First, you have to adjust the brightness first.

Step6 Afterwards, open the “White Balance”menu and adjust the temperature. Indeed, you can also adjust the contrast and saturation if needed. Once done, click “OK.” The tattoo should look like it blends into the arm video.

Part 3: Make the tattoo disappear
Step1 Move the play head to where you want the tattoo fades, and adjust the length of the tattoo picture there.

Step2 Next, find the “Evaporate 1” from the “Transitions” window. Drag and drop it to the end of the tattoo clip.

Step3 Adjust the length if needed. Finally, Let’s playback and see how it looks!

Summary
That’s how to make a tattoo disappear in Filmora 11. With Filmora 11, you can get as many new tattoos as possible. Indeed, you can follow all the steps above carefully to get the perfect result.
Free Download For Win 7 or later(64-bit)
Free Download For macOS 10.14 or later
Free Download For macOS 10.14 or later
How to Add a Green Screen to Zoom
If you are a regular user of Zoom app because you have to attend meetings and video conferences every now and then, you should know how to create a green screen for Zoom calls. There are going to be times when you would not want to show what is in your background because it might look distracting. Besides, changing the background from time to time breaks the monotony of your Zoom calls.
Zoom app allows you to change your background and set any available virtual background. However, the effect of virtual background may not be accurate and smooth unless you have a uniform background color. If you use green screen background for Zoom, you can replace it with any virtual background that will look very realistic to your audiences. We will illustrate how to create a green screen background for Zoom.
Part 1. How to add green screen to Zoom on computer?
Regular Zoom users prefer arranging and attending video conferences from their computers. Zoom desktop app makes it more convenient to attend Zoom conference with a wider screen and better visibility. Make sure you have a uniform green screen in your background before attending Zoom call so that you can replace it with any available virtual background on Zoom. Here are the steps on how to create a green screen for Zoom app on your computer.
Step1Open Zoom app and make sure you are logged into your account. Adjust the webcam so that only you and your green screen should be visible in the frame.
Step2Click on Settings (gear icon) located in the top-right corner.

Step3Once Settings window opens, click on Virtual background option on the left panel.
Step4Turn on the option “I have a green screen” located at the bottom. Thereafter, choose a virtual background with which you want to replace the green screen in your video.

Step5Apart from the present virtual background, you can add photo or video to replace green screen background.

Step6Close Settings window and you will see that your green screen is replaced by your selected virtual background.
Part 2. How to add green screen to Zoom on mobile?
If you are an occasional Zoom user, you are more likely to use your smartphone to attend Zoom conferences. If you want green screen effect on your Zoom call, make sure you have a sizeable green screen in your background. This is because even if you happen to move your phone during the meeting, green screen background should come in the video frame all the time.
It is recommended to use a tripod to keep your smartphone fixed in one spot for better and consistent green screen effect. Here are the steps to answer your question how do you add a green screen to Zoom app on your mobile phone. The steps are the same for Android and iOS users.
Step1Open Zoom app on your smartphone and make sure you are signed into your account.
Step2Start a Zoom meeting and tap on More option located in the bottom-right corner.

Step3Tap on Virtual background and you can select any preset virtual background.

Step4If you want to replace green screen with a customized background, tap on “+” icon and select any photo or video from your phone.

Step5Tap on Close option and the selected virtual background will be applied to your Zoom video.
Part 3. Tips to use green screen on Zoom video
Here are some important tips to use green screen on Zoom video for a better outcome.
Buy Large Green Screen - Since you are going to invest in buying green screen, you should buy a large green screen instead of buying two. Firstly, when you have one large green screen, you can set it up without any wrinkles or overlaps.
Secondly, a large green screen means greater surface area, and even when you slightly change the angle of your camera, your background will still have green screen instead of the exterior wall showing up and ruining virtual background effect.
Buy Green Screen Stand - Along with green screen, you should buy a sizeable green screen stand. A regular green screen stand contains two vertical supports at both ends and one horizontal support where you hand the green screen.
You can buy it according to the size of green screen you have bought. And you need to buy stand because you cannot fix the green screen on the wall properly. If you use any other means, there are going to be wrinkles and uneven virtual background effect.
Green Screen Quality - You can purchase any shade of green screen, but we recommend you opt for vibrant green color for a better outcome. Most importantly, the color should be even across the surface, and there should not be light and dark patches to dampen the virtual background effect and make it look unrealistic. That is why you should not compromise with quality.
Avoid Green Objects - You should not wear anything green. If your green screen has a lighter shade, you can wear deep color dresses and vice versa. Most importantly, you should not keep anything that is green while attending Zoom attending as it will disturb the green screen effect and it will look embarrassing. If you need to keep any green objects in your Zoom meetings, you should have blue screen instead of green screen.
Focus On Lighting - Lighting is extremely important when you want to use green screen. You should place the light so that it spreads evenly across the green screen. Otherwise, there are going to be light and dark patches, and the effect can get disturbed. Make sure you do not cast any shadow on the green screen by positioning the green screen accordingly.
Select A Proper Background - Last but not least, when you change your green screen to any virtual background photo or video, make sure you keep your audiences in mind. If you are attending a meeting, you should keep a professional-looking background. The background should not be distracting and match the theme of your meeting.
Conclusion
We have answered your question, “How do you add a green screen to zoom?” You can use green screen on your Zoom desktop app as well as smartphone app. This will help you to make your usual background cover up with green screen and replace green screen with any virtual background. Keep in mind all the tips we have provided you so that the green screen effect is perfect.
Free Download For Win 7 or later(64-bit)
Free Download For macOS 10.14 or later
How to Zoom Webcam on PC
Making certain our digital presence is the best it can be pays dividends as more and more of what we do online; similar is the case with how to zoom out webcam windows 10. The majority of experts advise against using the built-in camera that comes with your laptop or computer and instead advocate getting a webcam or an HD camera. These, however, may be hard to come by and pricy if you locate a nice one. If the built-in camera on your laptop doesn’t perform effectively during Zoom meetings, you may want to consider about investing in a separate, better webcam. Webcams offer automatic settings that are intended to function with the largest variety of lighting situations possible. This suggests that they average out a great number of responses to the content of the frame. Because of this, we have incorporated basic PC webcam zooming settings. These answers may be found in the portions that follow.
It’s vital to know how to zoom in on a webcam before visiting there. The camera wasn’t always as vital as it is today, and only very large corporations could afford to employ it as a convenience. But today, nearly everyone, from huge organizations to little firms, acknowledges its value. Everybody needs a webcam that works properly. The camera control software you are using determines the zoom function. The resolution of your picture window and the capabilities of the application dictate how far you can zoom in on the webcam’s video image. You can zoom in and out on camera photos using tools like YouCam and Windows Live Messenger. The most critical camera capabilities for the ideal video conferencing experience are zoom in and zoom out, which at first look may appear trivial. Here, we’ll walk you through each step, in detail. Continue reading, and we’ll check your understanding of webcam zoom in and zoom out skills!
Way 1: Zoom with Windows Live Messenger
When utilizing a camera for video conferencing, you may zoom in on a user’s face to get rid of the background. Webcam settings are not accessible by default in Microsoft Windows. However, camera zoom settings may be changed in instant chat systems. Through an instant messaging tool, such as Windows Live Messenger, you may simply access these options. This application provides private offline chat, video messaging, image and video sharing, and video chatting.
Step1Start Windows Live Messenger on your PC or laptop first. Enter your login name and password by clicking the “Sign In” button.

Step2On the top menu bar, pick “Tools.” And then select the “Audio and Video Setup”. Drag the slider next to “Speaker” to modify the speaker volume. Drag the slider next to “Microphone” to modify the microphone sensitivity. Press “Next.”

Step3From the drop-down list, pick the webcam. The “Camera Control” option is situated on the top; pick “Webcam Settings” after that.
Step4Now, to alter the zoom settings, drag the “Zoom” slider. To zoom in or out, drag the slider to the left or right. Press “OK.”
Way 2: Use Windows 10 Camera App
Wondering how to zoom your camera in the Windows 10 Camera app? The Camera app enables you to zoom in or out on your webcam in both image and video modes. To accomplish so, click or push the Magnification button, and then use the slider to modify the webcam’s zoom level. To operate the zoom feature manually, pick “Manual Zoom.” In the preview window, a square appears when you pick this option. To zoom in on a specific region of the capture window, drag the square there. To expand the image that was acquired by the webcam, slide the slider bar. In simply, The Camera app enables you zoom in or out of photographs and movies shot with your webcam. To do this, click on the “Zoom” button and drag the slider to the left or right as appropriate on your Windows 10 camera. the following steps:
Step1To open the “Start Menu,” make a right-click on “Start.” Now, to access the Camera app, type “Camera App” into the start menu’s search box.

Step2Tap the Camera Control icon when you start or join a meeting. To zoom and pan the camera to the appropriate spot, utilize the icons on the Camera Control panel.
![]()
Step3To exit the Camera Control window and return to the Meeting Controls, touch outside of it.
Way 3: Zoom with YouCam
Unfortunately, the default cameras or webcams bundled with the majority of Windows laptops and desktops don’t have an automatic zoom option. In fact, the only method to adjust their crop is to switch from “Standard” to “Widescreen,” which does slightly zoom in on you but not in the manner we’d want. This makes it inescapable that the only method to manually alter a webcam’s magnification is to acquire one separately and apply its software settings. , like YouCam. YouCam provides video calling, streaming, and broadcasting. includes an integrated app. To employ Zoom with YouCam, refer to the methods given below:
Step1Launch the YouCam camera program and activate the webcam.

Step2In the camera preview window, pick Settings. Then, select “Enable Video Zoom” from the menu.
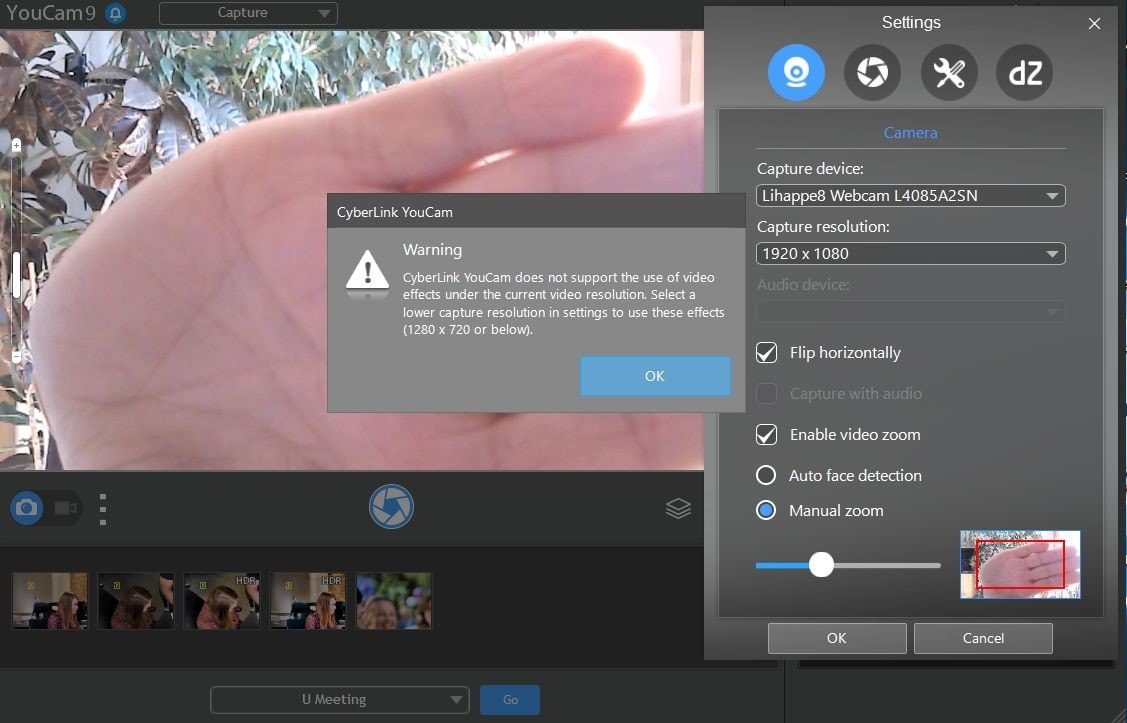
Step3Select “Automatic Face Detection” from the menu. As you wander about in the capture window, the camera watches your face and automatically zooms in on your photo as shown above.
Step4To handle the zoom feature manually, pick “Manual Zoom.” In the preview window, a square appears when you pick this option. To zoom in on a specific region of the capture window, drag the square there. To expand the image that was acquired by the webcam, slide the slider bar.

Way 4: Use iGlasses on Mac
For the perfect webcam look on a MAC, install the Chrome plugin iGlasses for video effects and style tweaks. Your videos will appear better on Zoom as a consequence. You may instantly enhance the appearance of your video interactions by utilizing the digital zoom on your iGlasses. Digital pan, tilt, and zoom are all possible with easy controls. For Macs that support it, an Apple Remote may be used to operate. iGlasses will become an option in Zoom’s video settings when it has been installed. You may improve your camera by altering the settings in iGlasses. You may experiment with a range of amusing effects, like 3-D distortions, using the virtual camera. Let’s learn how to utilize iGlasses on a Mac:
Step1Installing Ecamm’s iGlasses on a MacBook in the first step.
Step2To activate the camera, go to your video settings and pick iGlasses.
Step3Choose the Zoom window and execute the appropriate operations using the Zoom and Flip options. You may now zoom in and out using the camera on your MacBook as you like.

Conclusion
In conclusion, so many people currently take part in online conferences and virtual meetings. You want to create a lasting impression, don’t you? Not or whether you are the host of an online meeting or event, you must now maintain a professional image to prevent turning off attendees. You have discovered how to utilize the tools at your disposal to boost the zoom in and out quality of your camera in this post. However, as will be explained in the sections ahead, you may do it without the third-party plugins. With just one quick plugin, you can significantly transform how you look on a camera. Hence, try out the easy method from the above enlisted ones to get hold on your PC webcam to zoom in or out purposes.
Making certain our digital presence is the best it can be pays dividends as more and more of what we do online; similar is the case with how to zoom out webcam windows 10. The majority of experts advise against using the built-in camera that comes with your laptop or computer and instead advocate getting a webcam or an HD camera. These, however, may be hard to come by and pricy if you locate a nice one. If the built-in camera on your laptop doesn’t perform effectively during Zoom meetings, you may want to consider about investing in a separate, better webcam. Webcams offer automatic settings that are intended to function with the largest variety of lighting situations possible. This suggests that they average out a great number of responses to the content of the frame. Because of this, we have incorporated basic PC webcam zooming settings. These answers may be found in the portions that follow.
It’s vital to know how to zoom in on a webcam before visiting there. The camera wasn’t always as vital as it is today, and only very large corporations could afford to employ it as a convenience. But today, nearly everyone, from huge organizations to little firms, acknowledges its value. Everybody needs a webcam that works properly. The camera control software you are using determines the zoom function. The resolution of your picture window and the capabilities of the application dictate how far you can zoom in on the webcam’s video image. You can zoom in and out on camera photos using tools like YouCam and Windows Live Messenger. The most critical camera capabilities for the ideal video conferencing experience are zoom in and zoom out, which at first look may appear trivial. Here, we’ll walk you through each step, in detail. Continue reading, and we’ll check your understanding of webcam zoom in and zoom out skills!
Way 1: Zoom with Windows Live Messenger
When utilizing a camera for video conferencing, you may zoom in on a user’s face to get rid of the background. Webcam settings are not accessible by default in Microsoft Windows. However, camera zoom settings may be changed in instant chat systems. Through an instant messaging tool, such as Windows Live Messenger, you may simply access these options. This application provides private offline chat, video messaging, image and video sharing, and video chatting.
Step1Start Windows Live Messenger on your PC or laptop first. Enter your login name and password by clicking the “Sign In” button.
Step2On the top menu bar, pick “Tools.” And then select the “Audio and Video Setup”. Drag the slider next to “Speaker” to modify the speaker volume. Drag the slider next to “Microphone” to modify the microphone sensitivity. Press “Next.”
Step3From the drop-down list, pick the webcam. The “Camera Control” option is situated on the top; pick “Webcam Settings” after that.
Step4Now, to alter the zoom settings, drag the “Zoom” slider. To zoom in or out, drag the slider to the left or right. Press “OK.”
Way 2: Use Windows 10 Camera App
Wondering how to zoom your camera in the Windows 10 Camera app? The Camera app enables you to zoom in or out on your webcam in both image and video modes. To accomplish so, click or push the Magnification button, and then use the slider to modify the webcam’s zoom level. To operate the zoom feature manually, pick “Manual Zoom.” In the preview window, a square appears when you pick this option. To zoom in on a specific region of the capture window, drag the square there. To expand the image that was acquired by the webcam, slide the slider bar. In simply, The Camera app enables you zoom in or out of photographs and movies shot with your webcam. To do this, click on the “Zoom” button and drag the slider to the left or right as appropriate on your Windows 10 camera. the following steps:
Step1To open the “Start Menu,” make a right-click on “Start.” Now, to access the Camera app, type “Camera App” into the start menu’s search box.
Step2Tap the Camera Control icon when you start or join a meeting. To zoom and pan the camera to the appropriate spot, utilize the icons on the Camera Control panel.
![]()
Step3To exit the Camera Control window and return to the Meeting Controls, touch outside of it.
Way 3: Zoom with YouCam
Unfortunately, the default cameras or webcams bundled with the majority of Windows laptops and desktops don’t have an automatic zoom option. In fact, the only method to adjust their crop is to switch from “Standard” to “Widescreen,” which does slightly zoom in on you but not in the manner we’d want. This makes it inescapable that the only method to manually alter a webcam’s magnification is to acquire one separately and apply its software settings. , like YouCam. YouCam provides video calling, streaming, and broadcasting. includes an integrated app. To employ Zoom with YouCam, refer to the methods given below:
Step1Launch the YouCam camera program and activate the webcam.
Step2In the camera preview window, pick Settings. Then, select “Enable Video Zoom” from the menu.
Step3Select “Automatic Face Detection” from the menu. As you wander about in the capture window, the camera watches your face and automatically zooms in on your photo as shown above.
Step4To handle the zoom feature manually, pick “Manual Zoom.” In the preview window, a square appears when you pick this option. To zoom in on a specific region of the capture window, drag the square there. To expand the image that was acquired by the webcam, slide the slider bar.
Way 4: Use iGlasses on Mac
For the perfect webcam look on a MAC, install the Chrome plugin iGlasses for video effects and style tweaks. Your videos will appear better on Zoom as a consequence. You may instantly enhance the appearance of your video interactions by utilizing the digital zoom on your iGlasses. Digital pan, tilt, and zoom are all possible with easy controls. For Macs that support it, an Apple Remote may be used to operate. iGlasses will become an option in Zoom’s video settings when it has been installed. You may improve your camera by altering the settings in iGlasses. You may experiment with a range of amusing effects, like 3-D distortions, using the virtual camera. Let’s learn how to utilize iGlasses on a Mac:
Step1Installing Ecamm’s iGlasses on a MacBook in the first step.
Step2To activate the camera, go to your video settings and pick iGlasses.
Step3Choose the Zoom window and execute the appropriate operations using the Zoom and Flip options. You may now zoom in and out using the camera on your MacBook as you like.
Conclusion
In conclusion, so many people currently take part in online conferences and virtual meetings. You want to create a lasting impression, don’t you? Not or whether you are the host of an online meeting or event, you must now maintain a professional image to prevent turning off attendees. You have discovered how to utilize the tools at your disposal to boost the zoom in and out quality of your camera in this post. However, as will be explained in the sections ahead, you may do it without the third-party plugins. With just one quick plugin, you can significantly transform how you look on a camera. Hence, try out the easy method from the above enlisted ones to get hold on your PC webcam to zoom in or out purposes.
Also read:
- [New] 2024 Approved Essential GIF Tool Guide Tips From the Experts
- [New] FirefoxVidRecorder Plugins
- [New] Lighting the Way Enhancing Your YouTube Videos with Pro Tips
- [New] Photo Masters List The Best 6 4K DSLR Cameras Today
- [Updated] Jumpstart with VRecorder Easy Installation Walkthrough for 2024
- 2024 Approved How to Make Glitch Effect with Filmora
- Decoding the History of AI: How Old Is This Revolutionary Tech?
- Get Your Hands on Discounted Apple Watch SE This Memorial Day for Just $60 Less | Top Tech Pick of 2N't
- How to to Mimic Professional Filming Gears for 2024
- In 2024, How To Remove Screen Lock PIN On Xiaomi 14 Like A Pro 5 Easy Ways
- Local vs Global: Is a Local Large Language Model Right for Your Needs?
- New 2024 Approved Add Text Animation to A Video Online
- New 2024 Approved How to Add Filter to Video Online
- New How to Add the Popular Video Text Effects to Your Video, In 2024
- New In 2024, How to Create the Night-to-Day Effect Video
- Solutions to restore deleted files from Honor X8b
- The Ultimate Walkthrough for Sharing Steam Game Cards Online
- Title: Updated How to Start a Vlog
- Author: Chloe
- Created at : 2024-12-05 04:53:16
- Updated at : 2024-12-12 05:28:40
- Link: https://ai-editing-video.techidaily.com/updated-how-to-start-a-vlog/
- License: This work is licensed under CC BY-NC-SA 4.0.