:max_bytes(150000):strip_icc():format(webp)/reddit-app-for-andoird-652f6fcd646245e9807afbac25a072ee.jpg)
Updated How to Use Adjustment Layer in Final Cut Pro

How to Use Adjustment Layer in Final Cut Pro
Final Cut Pro is an advanced editing software that is available for Mac users exclusively. Using this high-end software, you can create compelling storytelling in your video clips. It offers different features through which you can effortlessly add audio and motion graphics to your videos. You can also add cinematic effects to your videos using Final Cut Pro to modify their focus points.
You can also add adjustment layers in Final Cut Pro to efficiently add the effects in video clips. By reading this article, you will learn how to add an adjustment layer in Final Cut Pro.

Part 1: What is Adjustment Layer in Final Cut Pro?
The adjustment layer in video editing can provide you with great ease as you can apply effects to multiple videos using this particular layer. Using the adjustment layer, you can apply effects and color grading to your video clips that come beneath this layer. So, apart from adding effects and executing color correction to individual clips, you can use an adjustment layer to generate quicker results.
After creating an adjustment layer in any video editor, you can easily cut and extend it like any other clip. You can also remove it anytime from your timeline with a single tap. In Final Cut Pro, you cannot insert adjustment layers in its timeline directly, like in Premiere Pro or After Effects.
To do so, you have to use third-party tools to create adjustment layers from scratch in Final Cut Pro. The process of creating an adjustment layer in Final Cut Pro is a little bit longer compared to other editors. To learn more about the adjustment layer in FCPX, continue reading this article.

Part 2: How to Add an Adjustment Layer in Final Cut Pro?
Are you eager to know how to add adjustment layers in Final Cut Pro? In this section, you can find simple instructions to generate an adjustment layer in Final Cut Pro without hassle.
Step1 First, click on this link to download the adjustment layer in your MacBook. Once done, copy your “Adjustment Layer” folder to the “User” folder. Afterward, move it to “Movies” and then “Motion Templates.” Once done, copy it to the “Titles” folder eventually.

Step2 Now open Final Cut Pro and locate the “Adjustment Layer” under the “Titles” section. After locating it, drag and drop it into the timeline. This adjustment layer was created as a title layer in Apple Motion that got published in Final Cut Pro using the built-in publishing tools.

Step3 Once you have created the adjustment layer, you can apply any sort of effects to the video clips. However, you should make sure to place the adjustment layer above in the layers stack.

Bonus Tips – How to Use Adjustment Layers in the Best Alternative to FCPX?
If you want to use an alternative to Final Cut Pro for creating the adjustment layer, you can try Wondershare Filmora 12 . You can edit your videos in an advanced and secure environment using this tool. It supports all multiple platforms, such as Windows, Mac, Android, and iOS. You can do color correction in your videos to manage the saturation, brightness, contrast, exposure, and other factors in Filmora.
Free Download For Win 7 or later(64-bit)
Free Download For macOS 10.14 or later
Moreover, you can also create 3D animated titles in Filmora to give your project a unique look. It also provides a wide range of keyboard shortcut presets through which you can make your editing easier and faster. Apart from editing and modifying your videos, you can also increase their vibrancy by using Filmora effects. You can explore and select a diverse range of visual effects in Filmora to give a new dimension to your video clips.
Key Features of Filmora
- Filmora offers cloud services that allow you to collaborate with your team members effectively. On its workspace cloud platform, you can share and review the edited video clips with your team members in a comfortable environment.
- It offers a pen tool through which you can draw complex mask shapes, such as straight lines or curves around the objects.
- Using the AI Smart Cutout feature, you can use advanced technology to select people or objects in the video effectively.
- Are you annoyed by the background noises in your video clips? You can try the AI Denoise feature of Filmora that can help you to eradicate background noises from the video clips precisely.
How to Add an Adjustment Layer Using Filmora
To create and use the adjustment layer in Wondershare Filmora 12, you can proceed to the following steps:
Step1 Import the Video Clip
Launch Filmora and click on the “New Project” button. Afterward, upload the video file on the project media and then drag and drop it into the timeline.

Step2 Add the Adjustment Layer
Now head to the “Media” section on the left side, where you can find the option of the “Adjustment Layer.” Next, drag and drop the adjustment layer into the timeline. You can double-click on it to change its settings effectively.

Step3 Add Multiple Presets to Adjustment Layer
From the settings, you can change blending mode, rotation, position, and opacity easily. Moreover, you can add different presets to the adjustment layer for more modifications. You can use the color match tool to adjust the colors in your video clip. With this tool, you can also add a border across the video clips using the adjustment layer. Also, you can color code the adjustment layer to create a more attractive look in the video clip.

Conclusion
Adjustment layers can make your editing process easy and fast. If you want to pursue video editing as your profession, you should know how to use the adjustment layer in famous tools like Final Cut Pro. After reading this article, you have learned how to create an adjustment layer in Final Cut Pro without complications.
However, if you want a more compatible and easier-to-use tool to generate adjustment layers, you can try Wondershare Filmora. It’s a powerful video editor that you can use to perform professional editing using adjustment layers.
Free Download For macOS 10.14 or later
Moreover, you can also create 3D animated titles in Filmora to give your project a unique look. It also provides a wide range of keyboard shortcut presets through which you can make your editing easier and faster. Apart from editing and modifying your videos, you can also increase their vibrancy by using Filmora effects. You can explore and select a diverse range of visual effects in Filmora to give a new dimension to your video clips.
Key Features of Filmora
- Filmora offers cloud services that allow you to collaborate with your team members effectively. On its workspace cloud platform, you can share and review the edited video clips with your team members in a comfortable environment.
- It offers a pen tool through which you can draw complex mask shapes, such as straight lines or curves around the objects.
- Using the AI Smart Cutout feature, you can use advanced technology to select people or objects in the video effectively.
- Are you annoyed by the background noises in your video clips? You can try the AI Denoise feature of Filmora that can help you to eradicate background noises from the video clips precisely.
How to Add an Adjustment Layer Using Filmora
To create and use the adjustment layer in Wondershare Filmora 12, you can proceed to the following steps:
Step1 Import the Video Clip
Launch Filmora and click on the “New Project” button. Afterward, upload the video file on the project media and then drag and drop it into the timeline.

Step2 Add the Adjustment Layer
Now head to the “Media” section on the left side, where you can find the option of the “Adjustment Layer.” Next, drag and drop the adjustment layer into the timeline. You can double-click on it to change its settings effectively.

Step3 Add Multiple Presets to Adjustment Layer
From the settings, you can change blending mode, rotation, position, and opacity easily. Moreover, you can add different presets to the adjustment layer for more modifications. You can use the color match tool to adjust the colors in your video clip. With this tool, you can also add a border across the video clips using the adjustment layer. Also, you can color code the adjustment layer to create a more attractive look in the video clip.

Conclusion
Adjustment layers can make your editing process easy and fast. If you want to pursue video editing as your profession, you should know how to use the adjustment layer in famous tools like Final Cut Pro. After reading this article, you have learned how to create an adjustment layer in Final Cut Pro without complications.
However, if you want a more compatible and easier-to-use tool to generate adjustment layers, you can try Wondershare Filmora. It’s a powerful video editor that you can use to perform professional editing using adjustment layers.
Step by Step to Crop a Video with CyberLink PowerDirector
Video Editing is an art form dependent on various elements and factors that are part of your video; this means people, items, or objects in the background can often make or break the viewing experience.
Can you imagine having shot a scene with impeccable attention to detail, but a small uncontrollable action leaves a portion of an unwanted cable or equipment in the frame? Bummer, right? But luckily, due to the power of video editing software, it is not hard to deal with such problems.
A way to work with such clips is to use the crop function while editing, as it can help emphasize or detract attention from a particular part of any video project.
Author’s Note: While filming, try to capture footage in the highest resolution allowed by the available camera hardware; this will give you more room to play with while using the crop function.
To preface, CyberLink PowerDirector is a free video editing tool capable of accomplishing this and providing a professional touch to your video projects. And like other competing software, the program not only allows you to crop into clips but also uses keyframes to modify aspects like panning and zoom. So to help you perform this action, in this article, we list the steps you will need for cropping into video clips with PowerDirector. As an added bonus, we have also included the method to perform the same actions in WonderShare Filmora.
Note: We documented the steps in this guide with PowerDirector 365 and WonderShare Filmora X.
How to Crop Videos with CyberLink PowerDirector?
The idea of cropping into clips has always been an easy action to perform; once you have PowerDirector 365 open, follow the steps listed below.
If you do not already have CyberLink PowerDirector 365, download the software by visiting Cyberlink’s official website.
Step 1: Create a new video project in Cyberlink PowerDirector 365 by choosing Full Mode.

Note: Full Mode in Cyberlink PowerDirector 365 provides access to a full-featured video editing tool, similar to Wondershare Filmora. The other available options cater to distinct video types.
Step 2: Import media onto the Timeline from the Media Library; in this guide, we have gone ahead and used the pre-existing stock footage.

Step 3: Now, click on the video file on the Timeline; this will activate the video toolbar giving you access to the various controls built into PowerDirector 365. Hover over the tools open, following which you need to click on the Crop, Zoom, and Pan option.

Step 4: Pick either corner of the frame visible around the video and set the area you want the clip to focus upon; following this, click Save.
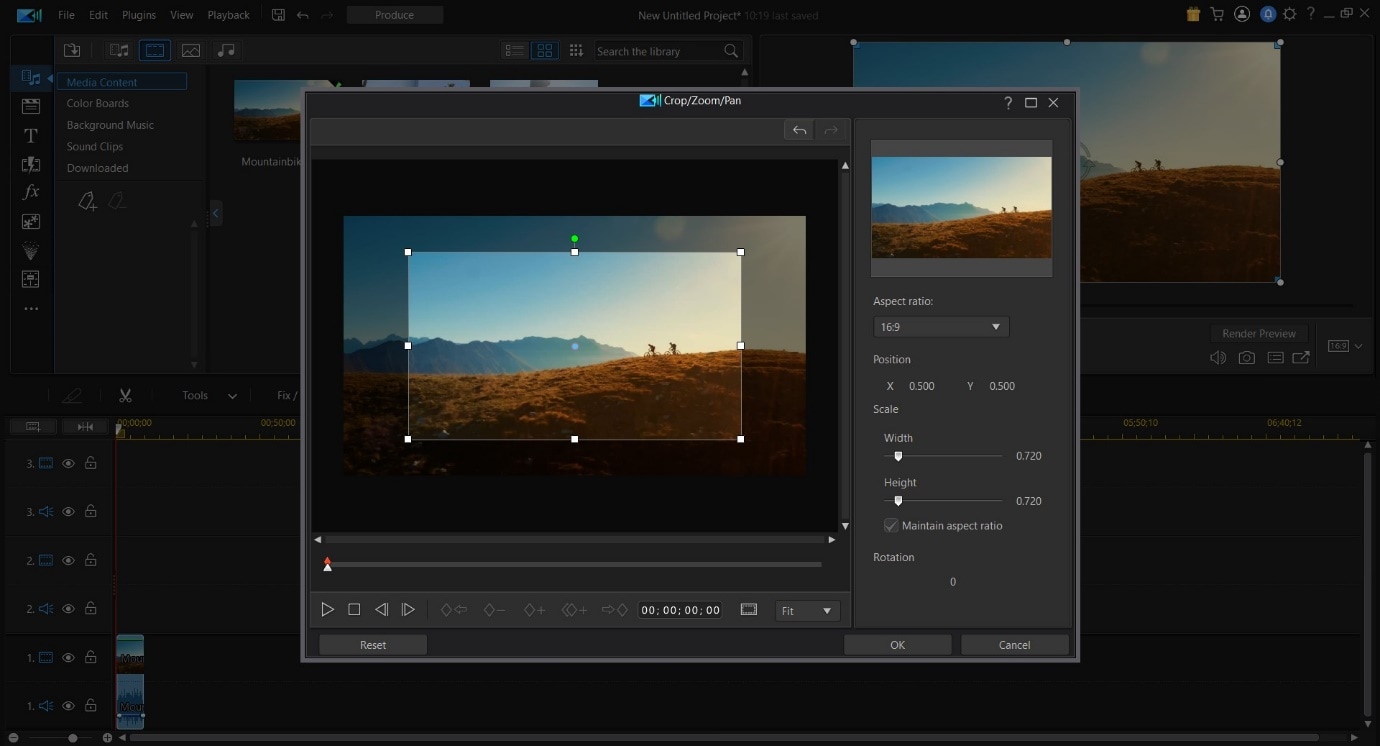
This action will crop the video clip according to your desired size.
Tip:
The activation of Keyframes while cropping will allow you to create an effect that slowly zooms into the footage. To do this, set Keyframe Point 1 at a specific time (say the fifth second) and at one zoom level (say zero) and create Keyframe Point 2 at another time (fifteenth second) and a different zoom level (say fifty). So, between the fifth second and fifteenth second, the zoom will steadily increase and raise emphasis on an object. You can also add an element of position to this action if you want the focus to be on something not in the center of the screen.
Definition: Keyframes while Video Editing is a software-based feature that allows you to set In and Out Points, giving clips between the two positions different properties that change as the playhead continues to move. These properties can be increased zoom, rotation, different colors, or even a gradual pan.
We recommend experimenting with this feature if you want to bring a more dynamic feeling to your video project.
An Easier Way to Crop Video with Wondershare Filmora
While Cyberlink PowerDirector 365 is a powerful video editing tool, in our experience, its menus are not as simple to navigate as some of the other competing video editing tools available, Wondershare Filmora Video Editor included.
An emphasis on quick accessibility is present with Filmora, and we believe this is a huge plus for beginning creators. The use of iconography resemblant to mobile software is another aspect that helps increase familiarity.
If you do not already have Wondershare Filmora, you can download the software by visiting the official website.
Now, to help you learn how to use the Crop Tool and to show you an example of what we mean, here is how you can use the feature Wondershare Filmora to get the desired output.
For Win 7 or later (64-bit)
For macOS 10.14 or later
Once you have the software open, follow the steps listed below.
Step 1: Import the Media File into your Video Project.

Step 2: Drag the clip onto the Timeline and then select it to activate further interactions.

Step 3: Choose the Crop Options (marked in Red) to open the Crop window.
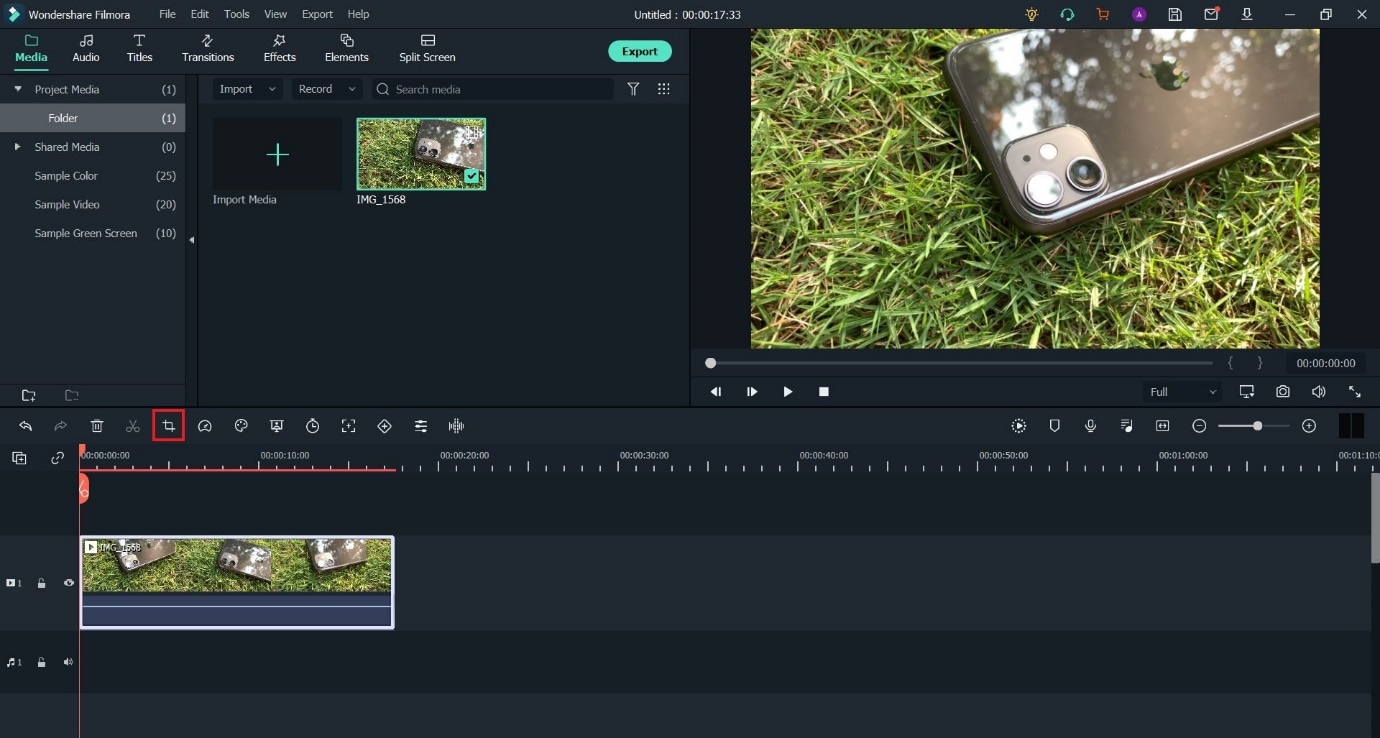
Step 4: Pick any edge within the visible box and resize them to select the portion you want to keep in the clip.
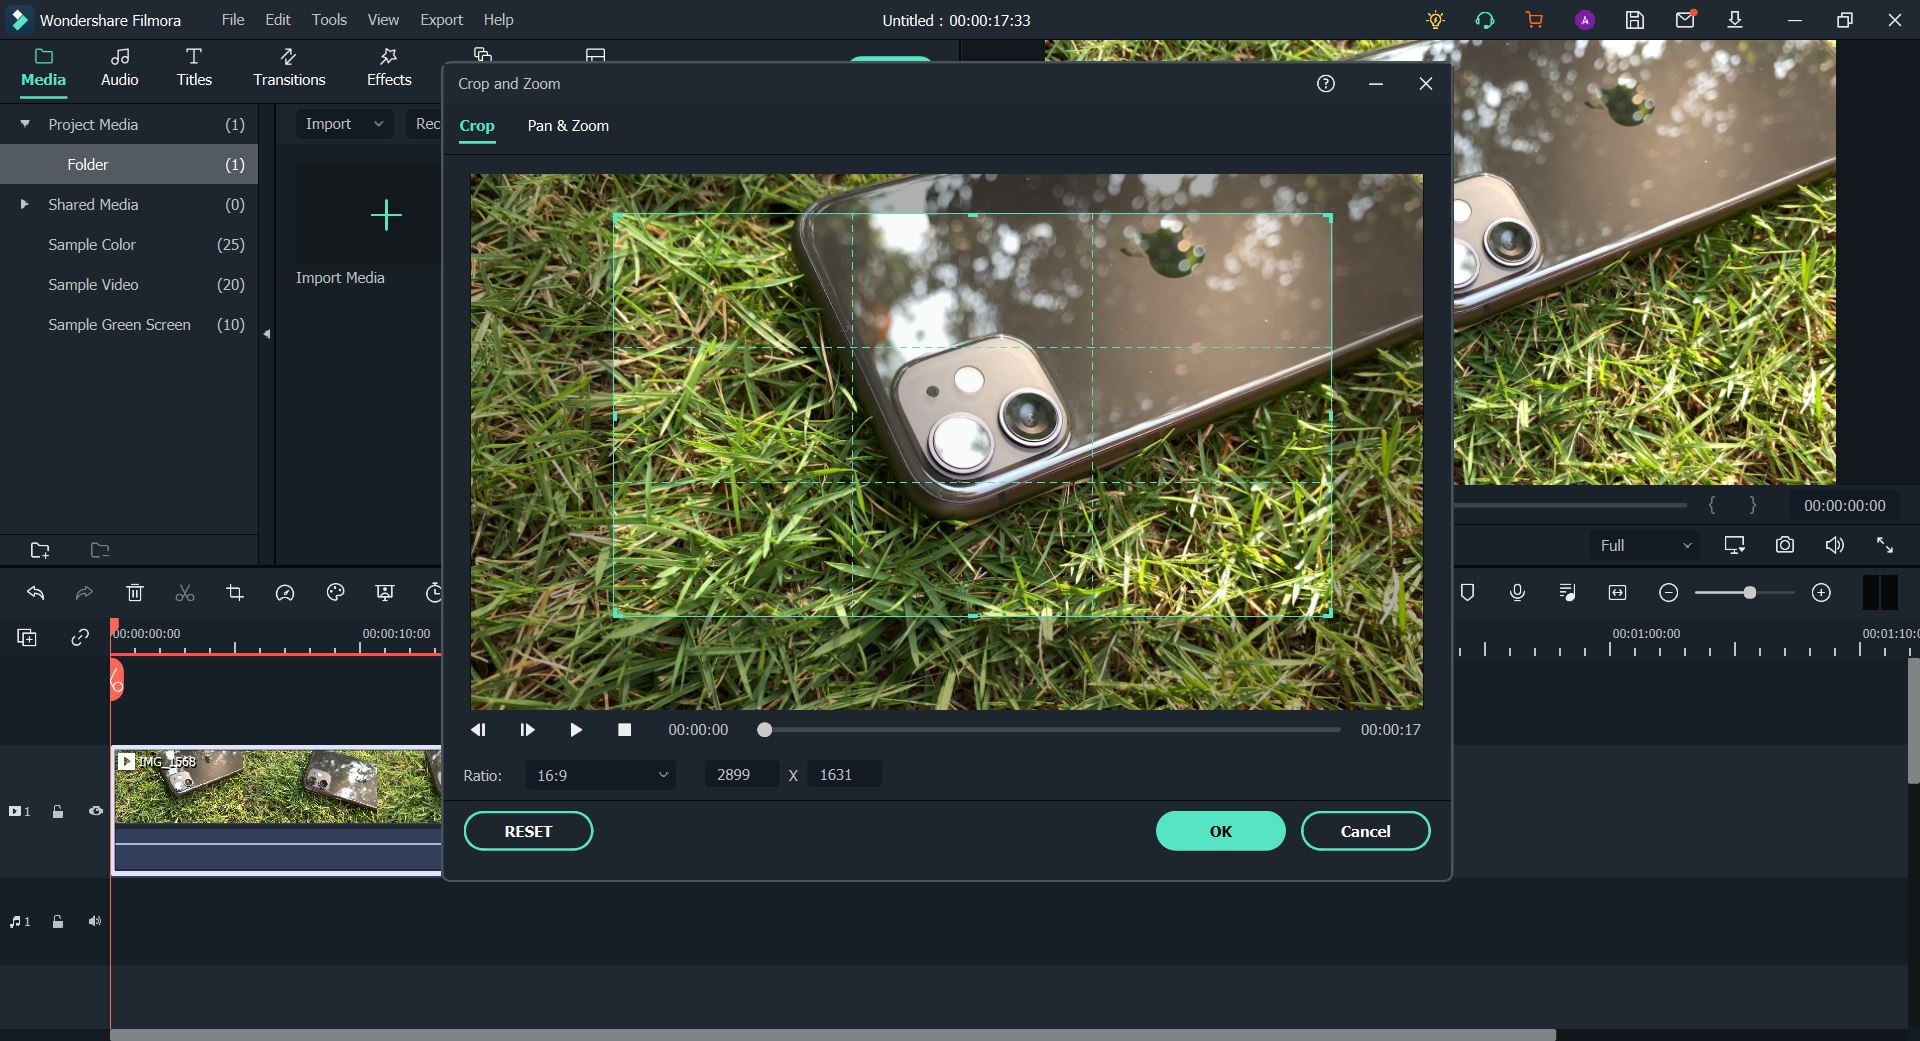
Having read this bit of the guide, we believe you may have noticed how Filmora is more convenient due to the easier access it provides to the crop function.
The Bottom Line
So, at the end of the day, both software listed in this article are fully functional and highly-capable video editing tools, but saving time spent in front of the computer is a huge factor for any video editor.
And Wondershare Filmora does just that with its modern iconography and increased accessibility. With its thoughtful, less-frills approach, Filmora is the one to pick if you do not want to be bogged down by needless menus and have to hunt for actions that will help you create a video that you would want to watch yourself.
Note: Full Mode in Cyberlink PowerDirector 365 provides access to a full-featured video editing tool, similar to Wondershare Filmora. The other available options cater to distinct video types.
Step 2: Import media onto the Timeline from the Media Library; in this guide, we have gone ahead and used the pre-existing stock footage.

Step 3: Now, click on the video file on the Timeline; this will activate the video toolbar giving you access to the various controls built into PowerDirector 365. Hover over the tools open, following which you need to click on the Crop, Zoom, and Pan option.

Step 4: Pick either corner of the frame visible around the video and set the area you want the clip to focus upon; following this, click Save.

This action will crop the video clip according to your desired size.
Tip:
The activation of Keyframes while cropping will allow you to create an effect that slowly zooms into the footage. To do this, set Keyframe Point 1 at a specific time (say the fifth second) and at one zoom level (say zero) and create Keyframe Point 2 at another time (fifteenth second) and a different zoom level (say fifty). So, between the fifth second and fifteenth second, the zoom will steadily increase and raise emphasis on an object. You can also add an element of position to this action if you want the focus to be on something not in the center of the screen.
Definition: Keyframes while Video Editing is a software-based feature that allows you to set In and Out Points, giving clips between the two positions different properties that change as the playhead continues to move. These properties can be increased zoom, rotation, different colors, or even a gradual pan.
We recommend experimenting with this feature if you want to bring a more dynamic feeling to your video project.
An Easier Way to Crop Video with Wondershare Filmora
While Cyberlink PowerDirector 365 is a powerful video editing tool, in our experience, its menus are not as simple to navigate as some of the other competing video editing tools available, Wondershare Filmora Video Editor included.
An emphasis on quick accessibility is present with Filmora, and we believe this is a huge plus for beginning creators. The use of iconography resemblant to mobile software is another aspect that helps increase familiarity.
If you do not already have Wondershare Filmora, you can download the software by visiting the official website.
Now, to help you learn how to use the Crop Tool and to show you an example of what we mean, here is how you can use the feature Wondershare Filmora to get the desired output.
For Win 7 or later (64-bit)
For macOS 10.14 or later
Once you have the software open, follow the steps listed below.
Step 1: Import the Media File into your Video Project.

Step 2: Drag the clip onto the Timeline and then select it to activate further interactions.

Step 3: Choose the Crop Options (marked in Red) to open the Crop window.

Step 4: Pick any edge within the visible box and resize them to select the portion you want to keep in the clip.

Having read this bit of the guide, we believe you may have noticed how Filmora is more convenient due to the easier access it provides to the crop function.
The Bottom Line
So, at the end of the day, both software listed in this article are fully functional and highly-capable video editing tools, but saving time spent in front of the computer is a huge factor for any video editor.
And Wondershare Filmora does just that with its modern iconography and increased accessibility. With its thoughtful, less-frills approach, Filmora is the one to pick if you do not want to be bogged down by needless menus and have to hunt for actions that will help you create a video that you would want to watch yourself.
Note: Full Mode in Cyberlink PowerDirector 365 provides access to a full-featured video editing tool, similar to Wondershare Filmora. The other available options cater to distinct video types.
Step 2: Import media onto the Timeline from the Media Library; in this guide, we have gone ahead and used the pre-existing stock footage.

Step 3: Now, click on the video file on the Timeline; this will activate the video toolbar giving you access to the various controls built into PowerDirector 365. Hover over the tools open, following which you need to click on the Crop, Zoom, and Pan option.

Step 4: Pick either corner of the frame visible around the video and set the area you want the clip to focus upon; following this, click Save.

This action will crop the video clip according to your desired size.
Tip:
The activation of Keyframes while cropping will allow you to create an effect that slowly zooms into the footage. To do this, set Keyframe Point 1 at a specific time (say the fifth second) and at one zoom level (say zero) and create Keyframe Point 2 at another time (fifteenth second) and a different zoom level (say fifty). So, between the fifth second and fifteenth second, the zoom will steadily increase and raise emphasis on an object. You can also add an element of position to this action if you want the focus to be on something not in the center of the screen.
Definition: Keyframes while Video Editing is a software-based feature that allows you to set In and Out Points, giving clips between the two positions different properties that change as the playhead continues to move. These properties can be increased zoom, rotation, different colors, or even a gradual pan.
We recommend experimenting with this feature if you want to bring a more dynamic feeling to your video project.
An Easier Way to Crop Video with Wondershare Filmora
While Cyberlink PowerDirector 365 is a powerful video editing tool, in our experience, its menus are not as simple to navigate as some of the other competing video editing tools available, Wondershare Filmora Video Editor included.
An emphasis on quick accessibility is present with Filmora, and we believe this is a huge plus for beginning creators. The use of iconography resemblant to mobile software is another aspect that helps increase familiarity.
If you do not already have Wondershare Filmora, you can download the software by visiting the official website.
Now, to help you learn how to use the Crop Tool and to show you an example of what we mean, here is how you can use the feature Wondershare Filmora to get the desired output.
For Win 7 or later (64-bit)
For macOS 10.14 or later
Once you have the software open, follow the steps listed below.
Step 1: Import the Media File into your Video Project.

Step 2: Drag the clip onto the Timeline and then select it to activate further interactions.

Step 3: Choose the Crop Options (marked in Red) to open the Crop window.

Step 4: Pick any edge within the visible box and resize them to select the portion you want to keep in the clip.

Having read this bit of the guide, we believe you may have noticed how Filmora is more convenient due to the easier access it provides to the crop function.
The Bottom Line
So, at the end of the day, both software listed in this article are fully functional and highly-capable video editing tools, but saving time spent in front of the computer is a huge factor for any video editor.
And Wondershare Filmora does just that with its modern iconography and increased accessibility. With its thoughtful, less-frills approach, Filmora is the one to pick if you do not want to be bogged down by needless menus and have to hunt for actions that will help you create a video that you would want to watch yourself.
Note: Full Mode in Cyberlink PowerDirector 365 provides access to a full-featured video editing tool, similar to Wondershare Filmora. The other available options cater to distinct video types.
Step 2: Import media onto the Timeline from the Media Library; in this guide, we have gone ahead and used the pre-existing stock footage.

Step 3: Now, click on the video file on the Timeline; this will activate the video toolbar giving you access to the various controls built into PowerDirector 365. Hover over the tools open, following which you need to click on the Crop, Zoom, and Pan option.

Step 4: Pick either corner of the frame visible around the video and set the area you want the clip to focus upon; following this, click Save.

This action will crop the video clip according to your desired size.
Tip:
The activation of Keyframes while cropping will allow you to create an effect that slowly zooms into the footage. To do this, set Keyframe Point 1 at a specific time (say the fifth second) and at one zoom level (say zero) and create Keyframe Point 2 at another time (fifteenth second) and a different zoom level (say fifty). So, between the fifth second and fifteenth second, the zoom will steadily increase and raise emphasis on an object. You can also add an element of position to this action if you want the focus to be on something not in the center of the screen.
Definition: Keyframes while Video Editing is a software-based feature that allows you to set In and Out Points, giving clips between the two positions different properties that change as the playhead continues to move. These properties can be increased zoom, rotation, different colors, or even a gradual pan.
We recommend experimenting with this feature if you want to bring a more dynamic feeling to your video project.
An Easier Way to Crop Video with Wondershare Filmora
While Cyberlink PowerDirector 365 is a powerful video editing tool, in our experience, its menus are not as simple to navigate as some of the other competing video editing tools available, Wondershare Filmora Video Editor included.
An emphasis on quick accessibility is present with Filmora, and we believe this is a huge plus for beginning creators. The use of iconography resemblant to mobile software is another aspect that helps increase familiarity.
If you do not already have Wondershare Filmora, you can download the software by visiting the official website.
Now, to help you learn how to use the Crop Tool and to show you an example of what we mean, here is how you can use the feature Wondershare Filmora to get the desired output.
For Win 7 or later (64-bit)
For macOS 10.14 or later
Once you have the software open, follow the steps listed below.
Step 1: Import the Media File into your Video Project.

Step 2: Drag the clip onto the Timeline and then select it to activate further interactions.

Step 3: Choose the Crop Options (marked in Red) to open the Crop window.

Step 4: Pick any edge within the visible box and resize them to select the portion you want to keep in the clip.

Having read this bit of the guide, we believe you may have noticed how Filmora is more convenient due to the easier access it provides to the crop function.
The Bottom Line
So, at the end of the day, both software listed in this article are fully functional and highly-capable video editing tools, but saving time spent in front of the computer is a huge factor for any video editor.
And Wondershare Filmora does just that with its modern iconography and increased accessibility. With its thoughtful, less-frills approach, Filmora is the one to pick if you do not want to be bogged down by needless menus and have to hunt for actions that will help you create a video that you would want to watch yourself.
How to Spruce Up Your Telegram Profile
Telegram Profile Picture is a great way to show your friends and family who you are. You can add a picture to your profile, change it at any time, and even hide it from certain people.
A profile picture for Telegram might interest you as it adds a personal touch to your searchable profile and invokes others to show more interest. However, some users don’t know how to edit their DPs.
In this article, we’ll discuss how to add a short video to your Telegram profile as well as change, delete and hide your profile picture with step-by-step instructions.
Part 1. How To Set A Short Video As Your Profile
The Detailed Steps
Following a few simple steps below, it is possible to set a video profile on Telegram instead of a regular photo profile. Let’s give your profile more magic touch:
Step1 On your device, launch the Telegram app and tap the three-line Menu icon.
Step2 Tap your profile or go to Settings and tap “Set Profile Photo.”
Step3 Tap the “Camera” icon to shoot a new video or select from your Camera Roll.
Step4 Trim the video to the required length and adjust it in the circular frame.
Step5 Select the “Brush” icon to apply stickers or text, and tap Done. You can also flip, rotate, or adjust the color of your video. Once done, tap the Check icon to upload the video and wait a few minutes to complete the uploading process.
Creating Telegram Profile Video with the Best Video Editor - Filmora
After knowing how to set the video as your profile, you may want to try it immediately. Here, we sincerely recommend an excellent video editor to create a stunning video for your Telegram profile - Wondershare Filmora . The software has an intuitive interface which makes it beginner-friendly and easy to use. You can start your Telegram profile video creation journey immediately!
Here’s how you can use Filmora to edit a video:
Step1 Download the Filmora software’s latest version on your PC and launch it. Select “New Project” from the main Menu, click the “Plus” icon, or drag and drop your media file to import it.

Step2 Select your media file and drop it in the Timeline, and from the top menu ribbon, add effects, filters, titles, and music to your videos.
Step3 Once satisfied with your edits, click the Export option to save the video on your PC.
Part 2. Complete Guide - How to add, change, delete, and hide Telegram Profile Pictures
After knowing how to make a video profile on Telegram and realise it with a user-friendly video editor, let’s see how to spruce up your Telegram profile with a complete guidance - the detailed steps to add, change, delete and hide you Telegram profile pictures.
- How To Add Telegram Profile Pictures
- How To Change Your Telegram Profile Pictures
- How To Delete Your Telegram Profile Pictures
- How To Hide Your Telegram Profile Pictures
How To Add Telegram Profile Pictures
Compared with making an impressing profile video, changing your profile pictures is a quick and easy process. Follow the steps below to add a profile picture for your Telegram account and have a new DP in no time:
Step1 On your device, open the Telegram app and tap the Menu icon in the top left corner.
Step2 Head to Settings and tap “Set profile photo.”

Step3 Now, select the image you want to use from your gallery, or click the Camera icon and take a picture to upload.
Step4 Once you’ve selected your image, you can crop and resize it to fit your Telegram profile.
![]()
Note: You can choose to add stickers to your Profile Pictures by tapping the Stickers icon. If you want to know how to find more exciting Telegram stickers, you can read this article: Best Telegram Sticker Sets and How to Find Stickers on Telegram.
Step5 When you’re happy with the way your image looks, tap the Done icon to save your changes.
How To Change Your Telegram Profile Pictures
If you are getting tired of the current profile, it is really easy for you to change it. Here’s how to do it:
Step1 Open the Telegram app and go to your Profile (tap the three lines and choose your username at the top of the screen).
Step2 Tap “Set Profile Photo” and select whether you want to take a new photo or choose one from your camera roll
Step3 Once you’ve selected or taken a new photo, crop it as desired or edit it. Finally, tap “Done” to change your profile picture for Telegram.

How To Delete Your Telegram Profile Pictures
When it comes to a point where you want to start over, you choose to delete all of your Telegram profile images. Here’s a quick guide on how to remove all your Telegram profile pictures:
Step1 On your device, launch the Telegram app and tap the “Menu” icon.
Step2 Select your Profile Picture and swipe to the right to find the picture you want to delete.
Step3 Now, tap the three-dots Menu icon at the top right side of the screen. Select the “Delete” option from the Menu.

Step4 Tap “Delete” again on the pop-up message to confirm your action.
How To Hide Your Telegram Profile Pictures
Telegram’s security function allows you to hide your profile picture so that only people who you approve can see it, which is a great way to keep your privacy and avoid unwanted attention.
Follow the instructions below step-by-step to hide your Telegram profile picture on iPhone and Android.
iPhone
Step1 On your iPhone, launch the Telegram app and go to the “Settings” tab at the bottom right of the screen.
Step2 Select “Privacy and Security” and tap the “Profile Photo” option.
Step3 If you want to keep your profile picture private, choose the “My Contacts” option. This way, only people in your contact book will be able to see it.
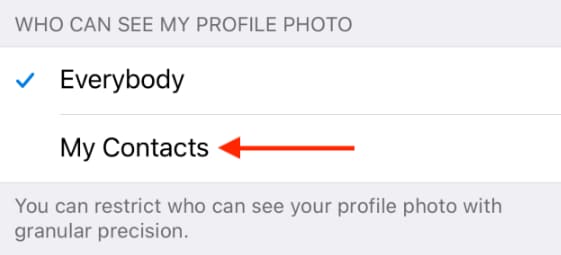
Step4 You can add exceptions to your privacy settings from the “Exceptions” section. To hide your Telegram profile picture from certain users/contacts or groups, tap the “Never Share With” button. This will help prevent someone who is harassing you from seeing your profile picture.
Now, choose “Add Users or Groups,” search for and select their name from your list of contacts. Finally, tap “Done” to apply your changes.
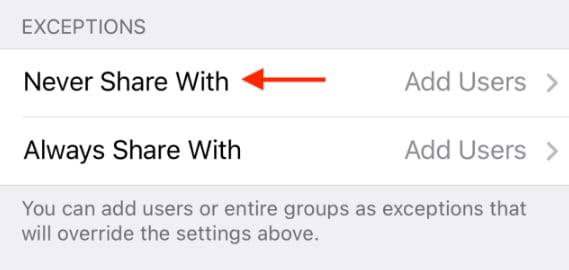
Step5 If you want to always share your profile picture with a particular user or group, you can select the “Always Share With” option.
To add contacts, tap the “Add Users or Groups” option. Next, search for and select the contacts you want to add. Finally, tap “Done” to save your changes. Your profile picture will now only be visible to the selected people.
Android
Step1 Open the Telegram app on your Android device.
Step2 In the top left corner of the screen, tap the three lines to open the Menu.
Step3 Scroll down and tap the “Settings” option.
Step4 Now, tap “Privacy and Security” and select the “Profile Photo” option. If you want to share your profile picture with only your contacts, choose the “My Contacts” option. This will hide your photo from everyone else on Telegram.

Step5 Telegram offers two great options for managing who can see your profile picture: “Always Allow” and “Never Allow.”
The “Always Allow” feature lets you add specific users or groups who will always be able to see your profile picture, even if they’re not in your contact book.
Simply tap the “Always Allow” option and search for contacts using their usernames to add them to your list. Tap the “Check” icon to apply your changes.

Step6 You can also choose the “Never Allow” feature to add contacts, users, or groups from whom you wish to hide your profile picture.
To do this, search for and select the contacts (or users) from whom you want to hide your profile picture. Tap the Checkmark icon to apply your changes.
Once you’re done customizing the settings, tap the Checkmark icon from the top-right corner to save the settings. Now only people who you approve will be able to see your profile picture.
Conclusion
In conclusion, this article has outlined how to set a video as yourt Telegram profile. We’ve also discussed how to add, change, delete, and hide profile picture for Telegram.
Your DP is perhaps the most important feature to personalize your profile on the messaging app, so hopefully, you’ve enjoyed this comprehensive guide and learned how to manage your Telegram account’s profile section without any issues.
Step5 When you’re happy with the way your image looks, tap the Done icon to save your changes.
How To Change Your Telegram Profile Pictures
If you are getting tired of the current profile, it is really easy for you to change it. Here’s how to do it:
Step1 Open the Telegram app and go to your Profile (tap the three lines and choose your username at the top of the screen).
Step2 Tap “Set Profile Photo” and select whether you want to take a new photo or choose one from your camera roll
Step3 Once you’ve selected or taken a new photo, crop it as desired or edit it. Finally, tap “Done” to change your profile picture for Telegram.

How To Delete Your Telegram Profile Pictures
When it comes to a point where you want to start over, you choose to delete all of your Telegram profile images. Here’s a quick guide on how to remove all your Telegram profile pictures:
Step1 On your device, launch the Telegram app and tap the “Menu” icon.
Step2 Select your Profile Picture and swipe to the right to find the picture you want to delete.
Step3 Now, tap the three-dots Menu icon at the top right side of the screen. Select the “Delete” option from the Menu.

Step4 Tap “Delete” again on the pop-up message to confirm your action.
How To Hide Your Telegram Profile Pictures
Telegram’s security function allows you to hide your profile picture so that only people who you approve can see it, which is a great way to keep your privacy and avoid unwanted attention.
Follow the instructions below step-by-step to hide your Telegram profile picture on iPhone and Android.
iPhone
Step1 On your iPhone, launch the Telegram app and go to the “Settings” tab at the bottom right of the screen.
Step2 Select “Privacy and Security” and tap the “Profile Photo” option.
Step3 If you want to keep your profile picture private, choose the “My Contacts” option. This way, only people in your contact book will be able to see it.

Step4 You can add exceptions to your privacy settings from the “Exceptions” section. To hide your Telegram profile picture from certain users/contacts or groups, tap the “Never Share With” button. This will help prevent someone who is harassing you from seeing your profile picture.
Now, choose “Add Users or Groups,” search for and select their name from your list of contacts. Finally, tap “Done” to apply your changes.

Step5 If you want to always share your profile picture with a particular user or group, you can select the “Always Share With” option.
To add contacts, tap the “Add Users or Groups” option. Next, search for and select the contacts you want to add. Finally, tap “Done” to save your changes. Your profile picture will now only be visible to the selected people.
Android
Step1 Open the Telegram app on your Android device.
Step2 In the top left corner of the screen, tap the three lines to open the Menu.
Step3 Scroll down and tap the “Settings” option.
Step4 Now, tap “Privacy and Security” and select the “Profile Photo” option. If you want to share your profile picture with only your contacts, choose the “My Contacts” option. This will hide your photo from everyone else on Telegram.

Step5 Telegram offers two great options for managing who can see your profile picture: “Always Allow” and “Never Allow.”
The “Always Allow” feature lets you add specific users or groups who will always be able to see your profile picture, even if they’re not in your contact book.
Simply tap the “Always Allow” option and search for contacts using their usernames to add them to your list. Tap the “Check” icon to apply your changes.

Step6 You can also choose the “Never Allow” feature to add contacts, users, or groups from whom you wish to hide your profile picture.
To do this, search for and select the contacts (or users) from whom you want to hide your profile picture. Tap the Checkmark icon to apply your changes.
Once you’re done customizing the settings, tap the Checkmark icon from the top-right corner to save the settings. Now only people who you approve will be able to see your profile picture.
Conclusion
In conclusion, this article has outlined how to set a video as yourt Telegram profile. We’ve also discussed how to add, change, delete, and hide profile picture for Telegram.
Your DP is perhaps the most important feature to personalize your profile on the messaging app, so hopefully, you’ve enjoyed this comprehensive guide and learned how to manage your Telegram account’s profile section without any issues.
Elevate Your Designs with Feather Shapes in After Effects
Feathering shapes in After Effects can greatly enhance your designs’ overall look and feel. This technique involves creating a soft, blurred edge around the shapes, which adds a sense of depth and dimension. Whether you’re a beginner or an experienced After Effects user, understanding how to feather shapes is a valuable skill to have in your arsenal.
This guide will cover everything you need about feathering shapes in After Effects. From the basics to advanced techniques, you’ll learn how to add a professional touch to your designs and take your skills to the next level.
Whether you’re creating a logo, animation, or visual effect, the ability to feather shapes will help you achieve the desired look and feel for your project. So, let’s dive in and explore the world of feathering in After Effects!
What Is Mask Edge Feather in After Effects?
Mask Edge Feather in After Effects is a feature that enables you to create a soft or blurred transition between the masked and unmasked areas of your composition. The mask feather setting can be found in the properties and is measured in pixels. Increasing the feather value increases the softness or blurriness of the mask’s edges, creating a smoother transition between the masked and unmasked parts of the image.
One of the key benefits of feathering masks is that it allows you to blend the masked object with its background, making the effect look more natural and convincing. The mask feather tool can also create custom feather shapes anywhere along the edge of the mask. To access the mask feather tool, switch to the pen tool by pressing the “G“ key and selecting the feather pen.
The mask edge feather feature in After Effects is a powerful and versatile tool that can help you achieve a wide range of creative effects. Whether you’re creating an animation or visual effect, or want to add a professional touch to your designs, understanding how to use the mask feather tool is an essential skill in your After Effects toolkit.
How To Feather a Shape in After Effects?
Feathering a shape in After Effects is a simple process that can greatly enhance the look and feel of your designs. By following these steps, you’ll be able to easily feather shapes in After Effects and add a professional touch to your designs.
Keep in mind that the feather value can be adjusted to your preference and the needs of your project, so feel free to experiment and see what works best for you.
There are two options to feather the edge in After Effects:
A. Adding a Mask to Shape Layer
Step1 Add a mask to create a feathered edge.

Step2 Edit the feather parameter under the mask in the composition panel.

B. Applying Fast Box Blur Effect
Step1 Go to the “Effects and Preset“ tab and search for the “Fast Box Blur“ effect.
Step2 Increase the “Blur Radius“ to see the edges feather.
How To Use Variable Mask Feather in After Effects?
Variable mask feather in After Effects allows you to create masks with variable feathering. It means you can have different feather values for different parts of the same mask. This feature gives you greater control and flexibility over your masks, allowing you to easily create complex effects and transitions.
With variable mask feathers, you can create complex effects, such as a shape that feathers more in one direction than the other. Or you can create a mask with a soft transition in one area and a hard transition in another.
By experimenting with different feather values and mask shapes, you can achieve a wide range of creative effects in After Effects. To use variable mask feather in After Effects, you’ll need to follow these steps:
Step1 Use the pen tool to create corner points.
Step2 Create the Mask Feather points.
Step3 Adjust the Feather Parameter.
Step4 Go to “Pen Tool“ > “Mask Feather Tool“ and click anywhere on the mask path.
Step5 Drag the mask point feathering around the focus.
This tutorial came from Crish Design . For more tutorials about After Effects tips and techniques, you can refer to the Crish Design YouTube channel.
Need an Alternative? Try Wondershare Filmora
If you’re looking for a more accessible and user-friendly alternative to After Effects, consider using Wondershare Filmora . Filmora is a powerful video editing software that offers many of the same features as After Effects, including an edge feather feature that’s a great alternative to the mask edge feather in After Effects.
Free Download For Win 7 or later(64-bit)
Free Download For macOS 10.14 or later
The edge feather in Filmora is known as the “Blur Strength” and can be found in the “Masks” tab of the editor. Like the mask edge feather in After Effects, the Blur Strength in Filmora is measured in pixels and determines the softness or blurriness of the edges of the mask.

Filmora also offers a wide range of other features that make it a great choice for video editings, such as a user-friendly interface, an extensive library of special effects, and support for multiple file formats. Whether you’re a beginner or an experienced editor, Filmora has everything you need to create professional-quality videos.
So, if you’re looking for an alternative to After Effects that’s easier to use and more accessible, consider giving Wondershare Filmora a try. Its powerful edge-feature feature and user-friendly interface make it the perfect choice for creating professional-quality videos without the hassle of using complex and time-consuming software.
How To Use Shape Feather Tool in Wondershare Filmora?
The Shape Feather Tool in Wondershare Filmora is a great way to create a soft, gradual transition between different shapes in your video. This tool can be used to create a variety of effects, from gentle fades to complex animations.
Whether creating a simple animation or a complex visual effect, this tool gives you the control and flexibility you need to create professional-quality videos. To use the Shape Feather Tool in Filmora, follow these steps:
Step1 Open Wondershare Filmora and create a new project. Import the video and drag it to the timeline.

Step2 Double-click the video in the Player Window. In the editing window, click “Video“> “Mask“ and add a shape mask.

Step3 Scroll down to find the “Blur Strength“ option, and adjust the blur value.

How To Use Variable Mask Feather in Wondershare Filmora?
Wondershare Filmora also allows you to use variable mask feathers to create a smooth, gradual transition between different parts of your video.
But first, understand the process of using the pen tool. When using the pen tool to draw shapes in Filmora, you can customize the shape and feather to your specifications. To do this, select the pen tool and use it to draw the shape you want. You can adjust the feathering by moving the feathering control points and fine-tuning the Blur Strength in the “Mask“ tab.
To use Variable Mask Feather in Filmora, follow these steps:
Step1 Select the “Draw Mask“ option under the Mask tab, and use the pen tool to draw whatever shape you like in the video.

Step2 Adjust the “Blur Strength“ value.

Conclusion
Feathering shapes in After Effects and Wondershare Filmora are powerful tools for creating smooth, seamless transitions in your videos. With the mask feather setting in After Effects and the Shape Feather Tool in Filmora, you have the flexibility and control you need to create the exact look you want.
Whether you’re looking to feather shapes in After Effects or prefer the convenience of using Wondershare Filmora, there’s a solution for you. So why wait? Start feathering your shapes today and bring your video editing skills to the next level!
Free Download For macOS 10.14 or later
The edge feather in Filmora is known as the “Blur Strength” and can be found in the “Masks” tab of the editor. Like the mask edge feather in After Effects, the Blur Strength in Filmora is measured in pixels and determines the softness or blurriness of the edges of the mask.

Filmora also offers a wide range of other features that make it a great choice for video editings, such as a user-friendly interface, an extensive library of special effects, and support for multiple file formats. Whether you’re a beginner or an experienced editor, Filmora has everything you need to create professional-quality videos.
So, if you’re looking for an alternative to After Effects that’s easier to use and more accessible, consider giving Wondershare Filmora a try. Its powerful edge-feature feature and user-friendly interface make it the perfect choice for creating professional-quality videos without the hassle of using complex and time-consuming software.
How To Use Shape Feather Tool in Wondershare Filmora?
The Shape Feather Tool in Wondershare Filmora is a great way to create a soft, gradual transition between different shapes in your video. This tool can be used to create a variety of effects, from gentle fades to complex animations.
Whether creating a simple animation or a complex visual effect, this tool gives you the control and flexibility you need to create professional-quality videos. To use the Shape Feather Tool in Filmora, follow these steps:
Step1 Open Wondershare Filmora and create a new project. Import the video and drag it to the timeline.

Step2 Double-click the video in the Player Window. In the editing window, click “Video“> “Mask“ and add a shape mask.

Step3 Scroll down to find the “Blur Strength“ option, and adjust the blur value.

How To Use Variable Mask Feather in Wondershare Filmora?
Wondershare Filmora also allows you to use variable mask feathers to create a smooth, gradual transition between different parts of your video.
But first, understand the process of using the pen tool. When using the pen tool to draw shapes in Filmora, you can customize the shape and feather to your specifications. To do this, select the pen tool and use it to draw the shape you want. You can adjust the feathering by moving the feathering control points and fine-tuning the Blur Strength in the “Mask“ tab.
To use Variable Mask Feather in Filmora, follow these steps:
Step1 Select the “Draw Mask“ option under the Mask tab, and use the pen tool to draw whatever shape you like in the video.

Step2 Adjust the “Blur Strength“ value.

Conclusion
Feathering shapes in After Effects and Wondershare Filmora are powerful tools for creating smooth, seamless transitions in your videos. With the mask feather setting in After Effects and the Shape Feather Tool in Filmora, you have the flexibility and control you need to create the exact look you want.
Whether you’re looking to feather shapes in After Effects or prefer the convenience of using Wondershare Filmora, there’s a solution for you. So why wait? Start feathering your shapes today and bring your video editing skills to the next level!
Also read:
- New The Right Ways to Slow Down a Video on iPhone for 2024
- New 6 Tips for Your First Facebook Ads for 2024
- New The Article Shall Offer an Overview to Create a Promising Sports Intro and Edit a YouTube Outro for a Sports Channel. There Will Also Be Three Recommended Apps to Download Background Music for Exercise
- Updated Looking for a Free and Open Source Video Editor with Cross-Platform Support? Kdenlive Video Editor Is Great but Is It the Best? Find Out From Our Complete Kdenlive Review
- How to Create The Best Video Collages ?
- Updated Best iOS Slow Motion Apps To Work With for 2024
- New How to Edit A Time Lapse Video on iPhone?
- Updated Repeated Text Animation Tutorial in Filmora
- Updated In 2024, How to Convert Images Into Video - Kapwing Tutorial
- New In 2024, Guaranteed 10 Storyboard Creators To Make Animation Easier
- Updated Looking Forward to Making up Your Career in Video Editing? Land in Here to Learn About the Credibility of some Popular Video Editing Courses
- Step by Step to Cut a Video in Lightworks
- New In 2024, Guide to Making Cinematography for Music Video
- Updated How to Create Photoshop GIF The 100 Easy Way
- Updated 2024 Approved Camtasia Video Editor Review
- Follow a Few Simple Steps and Learn How to Create a Professional Glowing Edge Effect to Your Videos in Filmora
- New How to Turn Text Into a Podcast
- Updated List of Supported Whatsapp Video Format You May Want to Know for 2024
- In 2024, Have You Ever Created a Slow Motion Video on Your Phonr or Camera? This Article Will Show You some Knowledge About Slow Motion Photography
- 2024 Approved Hitfilm Express - A Guide to Download, Install, Key Features
- Updated Best Dark Moody LUTs During Editing for 2024
- New You Are Planning to Convert an AVI to GIF Online but You Are Not Sure How? If You Are Looking for an Idea on How to Do It, You Have Come to the Right Place
- 2024 Approved 5 Methods to Denoise a Video
- New 2024 Approved Find The Best Free Canon LUTs
- New How Have Game Recording Software Improved Their Stature in the Market? An Overview
- New In This Article, You Will Learn About Splitting the Video Into the Frames in FFmpeg and Mentioning the Easy Option for Doing the Same Task in a Few Seconds by Wondershare Filmora
- New In 2024, Best 8 AR Apps for Android and iOS | Help You See the World of AR
- In 2024, How to Make Boring Videos Look Cool By B Rolls
- In 2024, 4 Methods How To Make a Recap Video
- Complete Guide to Change Video Resolution in Filmora for 2024
- Updated Funny Content Ideas for YouTube Videos and Funny Music Background
- New How to Create a Vacation Slideshow in 5 Minutes for 2024
- How to Zoom Desktop Screen for 2024
- 2024 Approved Are You Looking to Turn on the Motion Blur Effect in Minecraft? Learn How You Can Turn the Effect on or Off with the Help of the Best Methods
- New Guide Adding Audio in Wondershare Filmora
- New 2024 Approved How To Quickly Create A Screen Print Effect In Photoshop Detailed Guide
- 2024 Approved 4 Ways to Add White Border to Video on Mobile and Desktop
- A Full Guide to Funcall Voice Changer and Its Alternatives
- Best Free Slow Motion Apps For Android and iPhone for 2024
- Updated In 2024, 15 Best CapCut Templates for Slow Motion Editing
- Updated Do You Want to Remove the Unnecessary Scene From Your TikTok Video? This Article Will Help You to Adjust the Length of TikTok Clip by Providing Easy Methods
- In 2024, How to Unlock iPhone XR with a Mask On
- Dose Life360 Notify Me When Someone Checks My Location On OnePlus 12? | Dr.fone
- Complete Review & Guide to Techeligible FRP Bypass and More For Samsung Galaxy A05
- Ultimate guide to get the meltan box pokemon go For Oppo Reno 11 5G | Dr.fone
- In 2024, Can You Unlock iPhone 11 After Forgetting the Passcode? | Dr.fone
- Overview of the Best Honor X9a Screen Mirroring App | Dr.fone
- In 2024, How to Share/Fake Location on WhatsApp for Nokia G42 5G | Dr.fone
- Which is the Best Fake GPS Joystick App On Nokia G310? | Dr.fone
- How to Successfully Bypass iCloud Activation Lock on iPhone 13 Pro
- How to Transfer Photos from Honor X8b to Laptop Without USB | Dr.fone
- How to Unlock iPhone 12 without Passcode or Face ID | Dr.fone
- 4 Methods to Turn off Life 360 On Samsung Galaxy S23 Tactical Edition without Anyone Knowing | Dr.fone
- In 2024, How to Change Location On Facebook Dating for your OnePlus 12 | Dr.fone
- Preparation to Beat Giovani in Pokemon Go For Meizu 21 | Dr.fone
- How To Install the Latest iOS Beta Version on Apple iPhone 14 Plus? | Dr.fone
- Fix Unfortunately Settings Has Stopped on Xiaomi Redmi Note 13 Pro 5G Quickly | Dr.fone
- How To Remove Screen Lock PIN On Vivo G2 Like A Pro 5 Easy Ways
- How Do I SIM Unlock My Apple iPhone 13 Pro Max?
- In 2024, How does the stardust trade cost In pokemon go On OnePlus Ace 2? | Dr.fone
- In 2024, How To Unlock a Vivo Y36i Easily?
- In 2024, 8 Best Apps for Screen Mirroring ZTE Nubia Flip 5G PC | Dr.fone
- In 2024, How to Fake Snapchat Location without Jailbreak On OnePlus Nord N30 5G | Dr.fone
- In 2024, 3 Easy Methods to Unlock iCloud Locked iPhone 12 mini/iPad/iPod
- How to Bypass Android Lock Screen Using Emergency Call On Nokia G22?
- How to Hard Reset Oppo Find N3 Without Password | Dr.fone
- In 2024, 5 Ways to Transfer Music from Itel S23 to Other Android Devices Easily | Dr.fone
- Simple ways to get lost files back from Vivo Y17s
- In 2024, How to Unlock iCloud Activation Lock and iCloud Account From Apple iPhone SE (2022)?
- In 2024, Full Guide to Fix iToolab AnyGO Not Working On OnePlus Nord 3 5G | Dr.fone
- In 2024, How to Transfer Contacts from Xiaomi Redmi 13C 5G to iPhone XS/11 | Dr.fone
- List of Pokémon Go Joysticks On Honor 100 Pro | Dr.fone
- Undelete lost messages from Honor X50i+
- 8 Solutions to Fix Find My Friends Location Not Available On Apple iPhone 15 | Dr.fone
- In 2024, Top 5 Tracking Apps to Track OnePlus Nord N30 SE without Them Knowing | Dr.fone
- Title: Updated How to Use Adjustment Layer in Final Cut Pro
- Author: Chloe
- Created at : 2024-04-24 07:08:12
- Updated at : 2024-04-25 07:08:12
- Link: https://ai-editing-video.techidaily.com/updated-how-to-use-adjustment-layer-in-final-cut-pro/
- License: This work is licensed under CC BY-NC-SA 4.0.


