Updated How to Use Rule of Thirds in Video

How to Use Rule of Thirds in Video
So you have your work flow sorted out and you’re well on your way with Filmora but you’re not quite happy with your results or something just seems off when you watch your videos back. You may be missing an important element of all visual media and that’s composition. This is where the building blocks of every frame come together to make a visually pleasing piece for the viewer and helps the eyes concentrate on the content rather than trying to figure out what they are looking at.
I’m sure you may have heard of the rule of thirds for art or photography and you may not know or understand what it is. You may even be wondering how the rule of thirds can help you with your video creation. Well, that is what I’m going to show and explain to you today.
What is the rule of thirds
At its core the rule of thirds is a guide to follow whenever you create something visual.
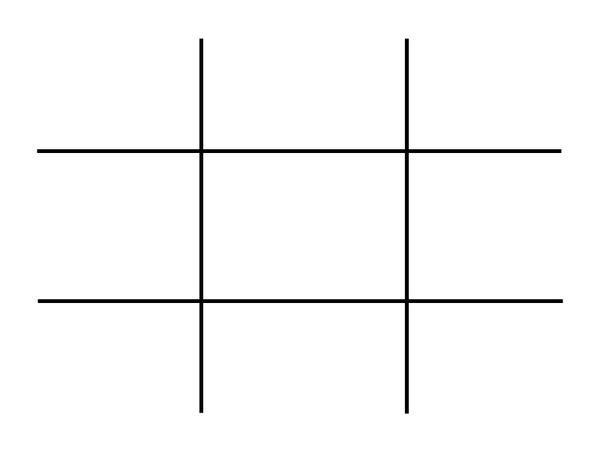
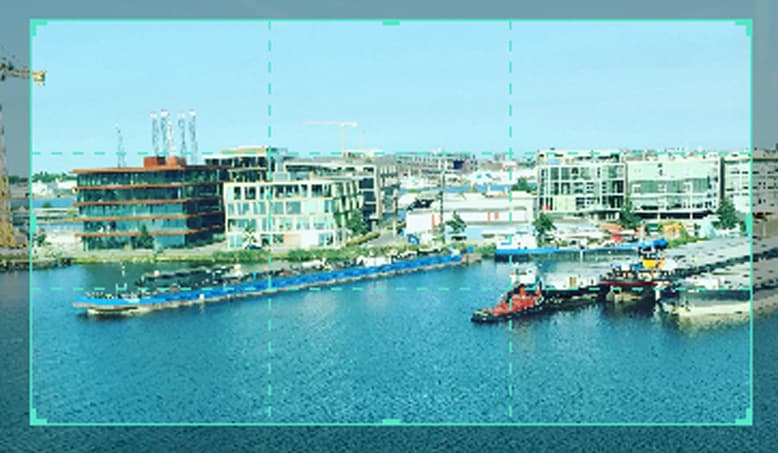
You break an image into thirds both horizontally and vertically, in doing this you are left with nine boxes and four gridlines, the rule states that by placing key elements in line with gridlines you will have an overall better composition.
To gain a better understanding of this here is a visual example of the gridlines and nine boxes.
This may seem simple but is often overlooked due to time restraints and eagerness to get that video out there. By following these guidelines your overall composition will gain interesting and pleasing results that can help with viewer engagement. This is only one piece of the puzzle but as any photography professional or artist will tell you, It’s the small things that add up.
How to use the rule of thirds
To show how to use the rule of thirds I will be showing an image with and without the use of the guidelines. In doing this you will be able to see how impactful this system is and how it can help with your own creations within Filmora .
This will be our scene example, you can see buildings, boats, water and skyline. This may be typical of a backdrop or an insert for a holiday picture amongst many other things.
I will now show this picture with no compositional thought and without the use of the thirds system.
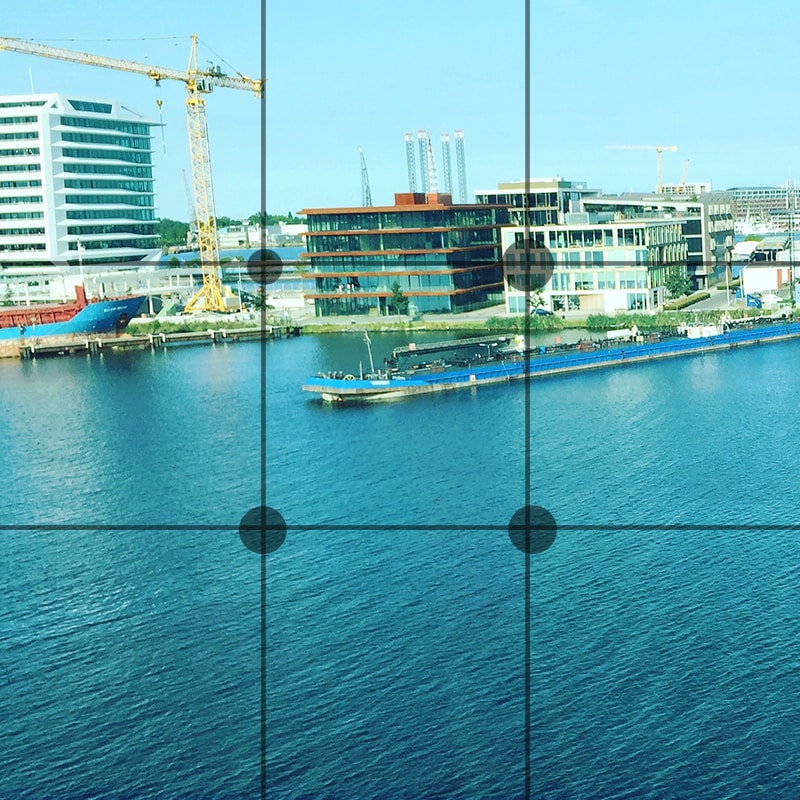
Notice how all the elements are in the scene but it just looks interesting and something just seems off when you look at it. You may find yourself searching for understanding of the image rather than taking the image in and concentrating on what the creator intended. This is seen commonly due to the need to fit every element in the scene but sometimes it is best to sacrifice something you may see as important for the sake of the whole picture.
We will now look at the example image with the rule of thirds in place and see if overall this makes a more interesting scene.
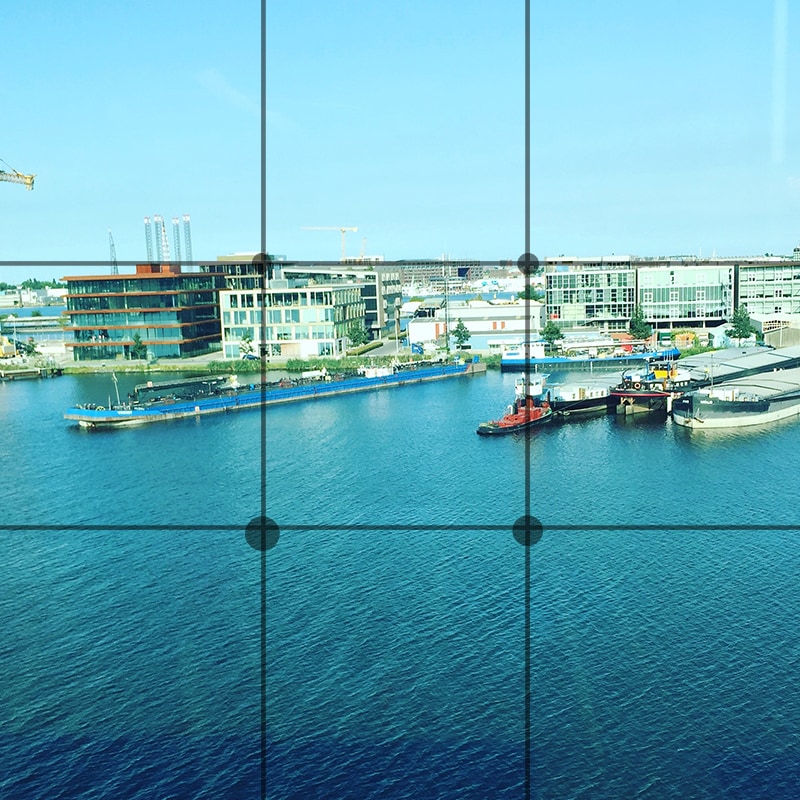
We have aligned the skyline with the first horizontal grid line and aligned the boats with the vertical grid lines. We have sacrificed the crane in the scene but overall I’m sure you can agree that this is more pleasing and makes more sense when you’re viewing this. The whole middle section of the scene now has information within it and the contrast between the middle and the rest of the scene directs your eyes to what was intended to be viewed, This is called effect use of empty space. In doing this you save yourself time from adding more information to direct the viewer.
Placing key elements directly in the center of your scene can seem static and boring but by placing elements to one side or using the first and second horizontal grid lines you create something called Dynamism , where the viewer sees an element along the grid and takes a journey through the rest of the image.
Studies have shown that this is the humans natural way of viewing imagery, we first find something interesting to look at and then journey around that. So by using this rule you are creating a more natural process for your viewer.
Tips when starting using the rule of thirds
The first tip I would say is to view other videos, YouTube is a good starting point. Watch interviews and notice where the chairs are aligned. Watch reviewers and notice where they position themselves in the scene. Lastly watch movies and pause on an interesting scene and try to deconstruct where everything is placed and why they chose that composition.
The idea with the rule is to have it become something you do naturally, by always considering the form you save yourself time in the editing process. The key things you have in your mind whenever you make a scene should be.
1. What is the key element in my scene or what am I trying to make the viewer focus on.
2. where do I intend to place these in my scene?
3. Have I created a balanced scene with enough negative space to direct the eye.
If you consider this with every video you make then in time this will become as natural as drinking water on a hot day. As a practice you could open some old projects and apply this rule to your video to see the results and you may find yourself impressed with the change.
When is it best to not use the rule of thirds?
The rule is very useful when you’re aiming to grab the attention towards a certain element but that being said, when you have a symmetrical scene you can get away with not using the rule as your eyes can make sense of symmetry very well.
Even when working with a symmetrical scene you can incorporate the rule within for elements such as people or key figures but in this situation it is down to the creator to figure what they feel is best in any given shot.
How to Use Rule of Thirds in Filmora
The tools provided within Filmora are generous and one great feature is the crop and size tool.
When inserting an image or movie file you can right click on the timeline and select crop and size bringing up a handy screen with the gridlines already there for you. It’s just a matter of aligning your shot for the best composition.
For reference I will show you what this looks like.
First right click the timeline on the image you want to reposition. Alternatively you can select the desired insert and press Alt+C this will also bring up the same editing box.
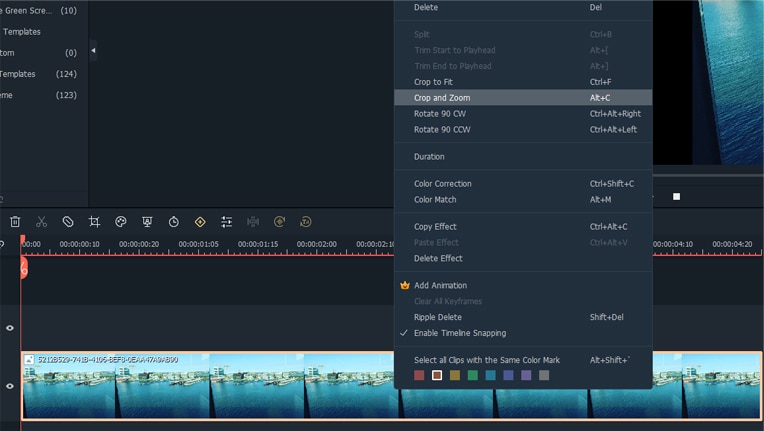
Now click on the crop and zoom option and this editor will appear.
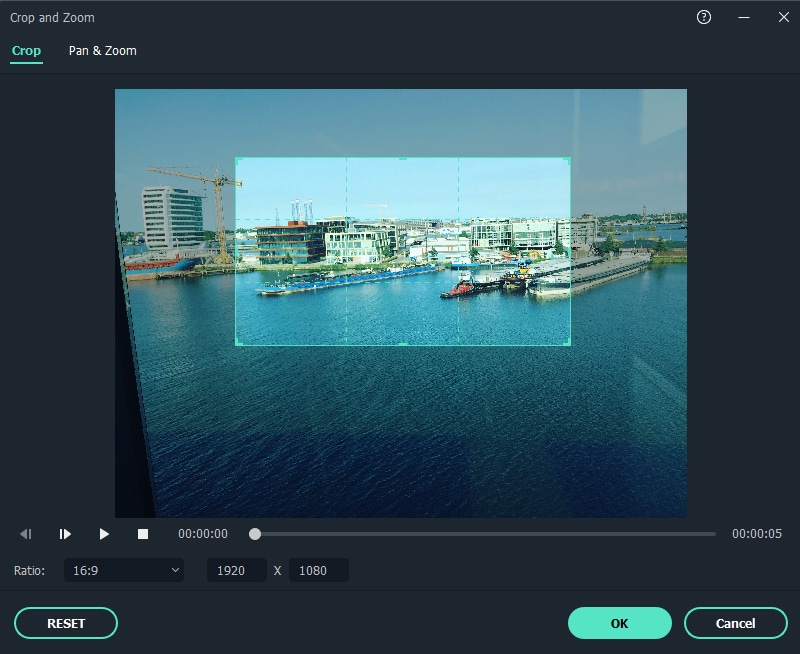
As you can see you are able to align the shot and change the aspect ratio to align with your project. For a better look at the built in grid lines see image below.
Conclusion
To conclude, the rule of thirds is very important within visual media and is tough within the fundamentals of art and photography from beginner level right up to the highest point of education, Practice thinking about your placement of key elements within your videos and how this affects your overall composition. The goal is to have this as an automatic thought when shooting your videos or still images. This is a small change you can make but has a big impact on how a viewer engages your content and in return leaves a positive opinion towards your creativity and eye for detail.
Free Download For Win 7 or later(64-bit)
Free Download For macOS 10.14 or later
Free Download For macOS 10.14 or later
Make Time-Lapse Video on MacBook [Complete Guide]
The process of time-lapse speeds up the passage of time so that events seem to be happening faster. A time-lapse video is to create photos at regular intervals and assemble them into the video to record changes that would be slow for the human eye to see. Time-Lapse video shows the technique of slow-motion videos using the same principle.
Time-lapse is usually for several purposes but mostly it is utilized to show the passage of time in a fast-forward format. time-lapse means that the camera takes the picture and then combined them into one video that seems to something happen in quickly. The lapse is set into video form in post-production, so movie mode is not necessary. Once the lapse is finished, it’s time to take it into post-production to bring it to life.
Part 1. Use QuickTime Player to Create Timelapse Video
QuickTime player creates a high-resolution video file from the series of photos without having to render the photos twice. The result of QuickTime is a much higher quality result. With this toolkit, after the recording is done, the illusion of fast-moving footage i-e time-lapse is to be created. QuickTime will always ask you what frame rate would you like to video in.
Steps to Create Timelapse Video with QuickTime Player:
To produce a timelapse movie using QuickTime Player, follow these steps:
Step 1: Launch the Recording
By selecting the File * New Screen Recording option in QuickTime, you may record your screen. After choosing the region to record, your screen will start to be recorded. Real-time video will be captured, and it will be archived.
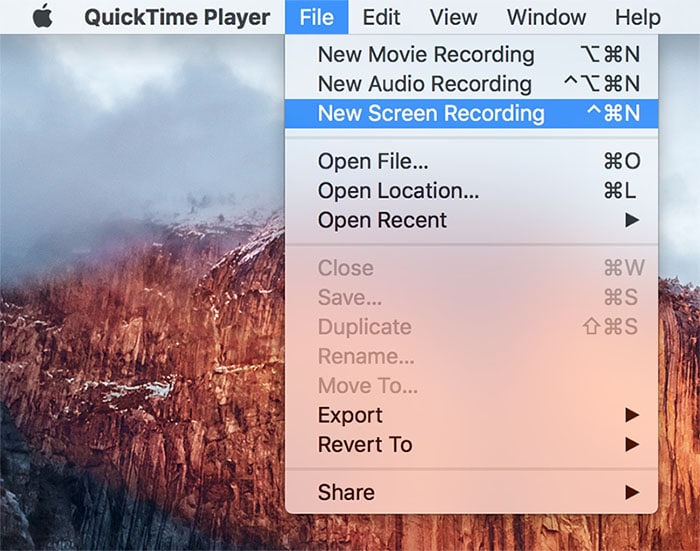
Step 2: Import the Files
Go to the file > Open Image Sequence menu after starting QuickTime. One of the video files you want to turn into a time-lapse should be opened in QuickTime Player. “Open File.” may be found by clicking the File menu link in the menu bar.
Step 3: Create the Timelapse
Within QuickTime, the series of images will be turned into time-lapse films. Choose one picture from the series, and then change the settings as necessary. Use the Higher Quality Apple Pro Resolution video codec, Actual size resolution, and 25 frames per second.

Step 4: Export Your Video
Finally, you may access the Speed option by selecting Tools>Edit from the top menu’s Imported section. At the conclusion, this will produce your time-lapse, and then choose Save under File. This will open a window where you can choose the codec you want to export it in.

Part 2. Create Timelapse Video with iMovie
To make an iMovie time-lapse on Mac, you have to capture the video and create a time-lapse out of it. For a multiple-hour recording in a few seconds to be fit, you will need software of time-lapse. Timelapse is utilized for accelerated or slow-motion videos with changes in the frame rate and playback videos in speed. The time-lapse software is available to handle the tasks without sacrificing the quality, size, and format of the video.
Steps To Create Timelapse Video with iMovie
Step 1: Launch iMovie
On your Mac, launch the iMovie application, and then import the video clip from the library that you wish to use to create a time-lapse. Drag the video to the timeline. Then you may see additional frames in the timeline by clicking the setting bar below.

Step 2: Import videos and adjust
By clicking the icon that resembles a camera below the Viewer panel, drag images into the project library. Drag the desired images to the Project Library. By choosing File and then selecting Project Properties, you may modify the default settings. Set the first picture location to Fit Frame and the transition length to 1 second.

Step 3: Modify the Clips’ Speed
Select it if you wish to alter the clip’s pace. On the preview window’s top toolbar, tap the clock symbol. You may pick “8x” for the default frame rate or “20x” for “Speed” > “Fast.” In iMovie, the minimum time is 0.1 seconds or around 10 frames. As a result, you must first export the time-lapse sequence before speeding up the clip.

Step 4: Share the Video
Using the Share option at the bottom, you can then save, export, or share your slowed-down time-lapse film. Refer to the “Share” option to decide whether to store or immediately share the iMovie time-lapse.

Part 3. Turn Video into Timelapse with Filmora
Time-Lapse videos can be easily created using Wondershare Filmora which is a very powerful video editing tool . The speed change feature of Filmora works well for time-lapse video editing. Filmora software can be used on both Windows and Mac platforms, it contains the features of a wide range of video effects with filters. it allows you to produce and create amazing video creations from images or video clips.
Filmora is packed with a plethora of editing features that will make your time lapses more appalling. The color tuning feature can be used to adjust the white balance and dynamic range of the video clips. The advanced text editor allows you to edit the size, font, color, and even the animation of text. The feature of video stabilization eliminates the effects of the camera shake. All in all, you can have an all-in-one editor to create your timelapse handily.
Wondershare Filmora Best Way to Make Timelapse Video on Computer.
Free Download Free Download Learn More

Steps to Create a Timelapse Video with Filmora:
Step 1: Launch Filmora Editor
Download the program and launch Filmora in full feature mode. Drag and drop the video clip into the application after selecting the Import option from the software’s menu. Drag the imported video clip to the timeline below, as seen in the figure above.

Free Download For Win 7 or later(64-bit)
Free Download For macOS 10.14 or later
Step 2: Setup the Footage Speed
To adjust the speed, drag the video clip into the timeline by clicking twice, and then slide the speed tool to the desired speed for your time-lapse. The speed is changed to be 100 times faster.

Step 3: Render the Timelapse
The Render Timeline button is recognized by the window’s preview when you click it to guarantee the speed changes your clip has to be adjusted to. You would take off the audio that was in the original video. Utilizing the image’s visible volume tool button, change the volume and then render it again by hitting the render icon as shown here:
Step 4: Edit the Video
To change the perspective of the video to wherever you want it, click right on the video clip on the timeline and choose Crop & Zoom, followed by Pan & Zoom. Additionally, you may add text using the text and title tool that is already built-in, add music using royalty-free music files or apply filters and other features.

Step 5: Share your Timelapse
As you can see, you can drag and drop the pre-built templates from the library onto the timeline. Next, click the Export button at the top to start exporting. The Filmora’s features include support for 4K editing, GIF compatibility, noise reduction, color tuning, a sophisticated text editor, an audio mixer, video stabilization, scene identification, and audio equalization.
Conclusion
Time-lapse is the video editing technique in that the speed is lower and the frequency of video and picture. A time-lapse software, Filmora is a video editor that lets you create a smooth time-lapse where time appears to be passing quickly. This app is very helpful to create the video on time-lapse, making the appearance in the series of quick succession about a long term or period to denote something that happens over a long period.
Free Download Free Download Learn More

Steps to Create a Timelapse Video with Filmora:
Step 1: Launch Filmora Editor
Download the program and launch Filmora in full feature mode. Drag and drop the video clip into the application after selecting the Import option from the software’s menu. Drag the imported video clip to the timeline below, as seen in the figure above.

Free Download For Win 7 or later(64-bit)
Free Download For macOS 10.14 or later
Step 2: Setup the Footage Speed
To adjust the speed, drag the video clip into the timeline by clicking twice, and then slide the speed tool to the desired speed for your time-lapse. The speed is changed to be 100 times faster.

Step 3: Render the Timelapse
The Render Timeline button is recognized by the window’s preview when you click it to guarantee the speed changes your clip has to be adjusted to. You would take off the audio that was in the original video. Utilizing the image’s visible volume tool button, change the volume and then render it again by hitting the render icon as shown here:
Step 4: Edit the Video
To change the perspective of the video to wherever you want it, click right on the video clip on the timeline and choose Crop & Zoom, followed by Pan & Zoom. Additionally, you may add text using the text and title tool that is already built-in, add music using royalty-free music files or apply filters and other features.

Step 5: Share your Timelapse
As you can see, you can drag and drop the pre-built templates from the library onto the timeline. Next, click the Export button at the top to start exporting. The Filmora’s features include support for 4K editing, GIF compatibility, noise reduction, color tuning, a sophisticated text editor, an audio mixer, video stabilization, scene identification, and audio equalization.
Conclusion
Time-lapse is the video editing technique in that the speed is lower and the frequency of video and picture. A time-lapse software, Filmora is a video editor that lets you create a smooth time-lapse where time appears to be passing quickly. This app is very helpful to create the video on time-lapse, making the appearance in the series of quick succession about a long term or period to denote something that happens over a long period.
Get 15 Absolutely-Free LUTs From This Article as Well as Get an Insight on How Cinematic LUTs Affect Your Film
Create High-Quality Video - Wondershare Filmora
An easy and powerful YouTube video editor
Numerous video and audio effects to choose from
Detailed tutorials are provided by the official channel
A significant way of creating cinematic looks for your project is by using LUTs. And with a single click, you will transform your footage into an absolute masterpiece. By using free LUTs, not only will you save on cost but also on the hassle and bustle of having to color grade your film.
LUTs function to create a uniform color throughout a film while enhancing or preserving skin tones. You don’t have to use all the LUTs in this world to create splendid films. Besides, most professional video editors and colorists prefer to work with a handful of LUTs and create stunning films. By going through this article, you will come to learn about 15 free cinematic LUTs for your film.

In this article
01 How Cinematic LUTs Affect Your Film
02 15 Free Cinematic LUTs for Your Film
03 Edit Your Film with Filmora and its Cinematic LUTs
How Cinematic LUTs Affect Your Film
When it comes to marketing, videos often tend to play a huge role. And to market your brand effectively, you need to have top-notch videos. It doesn’t mean that you should go and study to become a colorist or a video editor. Besides, there are professional colorists and video editors who gave in their time and effort to design powerful LUTs and offer them for free.
You can use those free LUTs to create mesmerizing videos and photos for your projects. And depending on the nature of your project, you will find here a free LUT that will work best for you.
There are two types of LUTs;
- 1. Conversion LUTs
Conversion LUTs function by correcting the Log color space back to the standard color space. Professional colorists often use this LUT to obtain a high dynamic range by maintaining more details in the highlights and shadows. - 2. Creative LUTs
Creative LUTs are essentially used in bringing out the creative colors of footage. Color styles in creative LUT are of a wide range, such as moody, cinematic, vintage, and summer, among others.
Creative LUTs is the one that is often used in many cases.

Filmora 3D LUT
Empower your videos with a new mood using different LUTs
Filmora now offers 800+ top-quality LUTs cover a broad range of scenarios. Transform your videos with Filmora’s powerful 3D LUTs.
Apply LUT on Videos Apply LUT on Videos Learn More >
15 Free Cinematic LUTs for Your Film
A good LUT is one that can be applied to several setups and different lighting situations. Besides, it doesn’t mean that a single LUT should be applied to every project; instead, it should be able to produce several perfect matches to your project.
Here are some of the top-tier free cinematic LUTs that you can apply to your film.
1. 40 Free Instagram LUTs
Create amazing Instagram footage using these 40 free LUTs. Besides, you can use these free LUTs in a couple of applications, including Adobe Premiere Pro, Wondershare Filmora, Photoshop, and Da Vinci Resolve.
After applying these LUTs, you can carry out bits of basic corrections such as brightness and contrast to your footage.
2. 3 Eyes and Teeth Whitening LUTs
Eye and teeth whitening LUTs are often used in movies and quality photos. Whiten the color of your teeth and eyes using these three free LUTs.
These LUTs are very simple to use, and when you effectively incorporate them, you are assured of creating magnificent photos.

3. 70 Free Hollywood Film LUTs
Do you have a project file and want it to appear like the ones in Hollywood films? You need not to worry since here are 70 eye-catching LUTs that you can add to your project and get that ‘Hollywood” look you’ve always wanted.
4. Free Summer LUTs
Summer clips perfectly match the orange, teal look. Here, you will get summer LUTs that will work perfectly with your project.
You can use these LUTs in Adobe Premiere, Wondershare Filmora, Da Vinci Resolve, and Lightroom.
5. Free Moody Green LUTs
Footages taken in the jungle work ideally with the moody green LUTs. Here are some of the amazing LUTs you can incorporate into your project.
6. Moody Blue LUTs
When it comes to appreciating nature, moody blue LUTs tend to be the perfect resort. Create cinematic scenes for your videos using these LUTs for free.
The LUTs here are protected with a password, what you do is to watch that video to completion, and you will come across the password.
7. 3 Free Urban Dark Cinematic LUTs
Often in many movies, you will come across urban scenes that are moody, dark, and portrayed as something out-of-this-world. You can also create such scenes with these three free urban dark cinematic LUTs.
You can use these three free cinema LUTs to your Wondershare Filmora or Adobe Premiere.
8. 10 Free Winter LUTs
Footages shot in winter outdoors don’t just work with any LUTs. Besides, there are LUTs designed explicitly for winter footage, and here are the ten best winters LUTs.
Download the LUTs and apply one that you find the perfect match for your project.
9. 20 Free Travel LUTs
When traveling, you may capture several photos and videos that are not very appealing – This may hinder you from sharing them with your friends or family. Besides, you don’t have to discard those footage since you can give them a new mind-blowing look using these 20 free travel LUTs.
To access all the 20 LUTs, you only need to subscribe to their YouTube channel, and you are good to go.
10. Free Korean Tone LUT
Korean movies are enticing because of their unique, bewildering LUT mood. You can also employ this LUT to your footage and leave your followers jaw-dropping.
Here, this free LUT pack is protected, and the only catch is to watch the YouTube video and get the password.
11. 5 Free Wedding LUTs
Wedding footages often require that romantic mood. Get the best five free wedding LUTs here.
The LUT file pack here is protected by a password. So to access the password, watch the YouTube video to completion and access it. Often, it is displayed in the top-right corner of the clip.
12. Free Sunset LUTs
Sunsets footages go simultaneously with the golden light or dark violet colors. Here, you will access the free sunset LUTs that you can incorporate into your project.
After downloading the file, you will realize it is protected. What you do is only watch this YouTube video and access the password.
13. Vintage LUTs
One of the commonly used LUTs in movies is the vintage LUTs. Access over 28 free vintage LUTs here and give your footage that brilliant vintage appearance.
14. Free Warm LUT
Warm LUTs do create a sensational atmosphere in the footage. Incorporate this LUT into your footage and get jaw-dropping results.
After downloading this free LUT pack, input the password displayed in the top-right corner of this YouTube video.
15. Free Music LUTs
In music, fans are always allured by the quality of the video. Besides, you may also gain or lose fans through your video quality. Improve the quality of your music video using this free LUT pack.
To download it for free, input 0$ under the payout bar and click “Buy Now.” Complete the other forms and download your music LUT for free.

Edit Your Film with Filmora and its Cinematic LUTs
Wondershare Filmora is an award-winning video editing software that allows its users to create stunning videos through its wide array of powerful video editing tools. The platform is well aware of all your video editing needs and provides easy-to-use functionalities that include LUTs.
For Win 7 or later (64-bit)
For macOS 10.14 or later
Use LUTs in Wondershare Filmora to express your intended video ideas.
Here are the simple steps on how to edit your film with Filmora:
Step 1. Download Wondershare Filmora
First, download Wondershare Fimora to your computer and allow it to run.
Step 2. Add your Footage to the Timeline
Load your video to Filmora. Drag and drop them to your timeline.

Step 3. Access your LUT Library
To access your LUT library, open “Color Correction.” Then click on “3D LUT.”

Step 4. Add your preferred LUT to your Project video
After clicking on “3D LUT,” a drop-down list showing all the available LUTs will be displayed. Scroll and select your preferred LUT.

When you want to apply your LUTs in Filmora, click on “Load new LUT,” which is still under “3D LUTs.” You will be directed to your computer storage space to select the folder containing your LUTs.
After selecting your preferred LUT folder, hit the “OK” button to apply.
Conclusion
● Worry no more when you have a small budget and a tight deadline for your project. Depending on your project’s type, nature, and requirements, create bewildering footage using the above 15 LUTs. After applying your favorite LUT, carry out small basic adjustments such as the white balance, brightness, and contrast to your footage when necessary. By doing so, you are going to leave your clients and viewers ground rooted.
● A few of these free LUTs have a catch: watching the YouTube video and getting a password for unlocking their free LUT pack. The password is often displayed on the top-right corners of the YouTube videos.
A significant way of creating cinematic looks for your project is by using LUTs. And with a single click, you will transform your footage into an absolute masterpiece. By using free LUTs, not only will you save on cost but also on the hassle and bustle of having to color grade your film.
LUTs function to create a uniform color throughout a film while enhancing or preserving skin tones. You don’t have to use all the LUTs in this world to create splendid films. Besides, most professional video editors and colorists prefer to work with a handful of LUTs and create stunning films. By going through this article, you will come to learn about 15 free cinematic LUTs for your film.

In this article
01 How Cinematic LUTs Affect Your Film
02 15 Free Cinematic LUTs for Your Film
03 Edit Your Film with Filmora and its Cinematic LUTs
How Cinematic LUTs Affect Your Film
When it comes to marketing, videos often tend to play a huge role. And to market your brand effectively, you need to have top-notch videos. It doesn’t mean that you should go and study to become a colorist or a video editor. Besides, there are professional colorists and video editors who gave in their time and effort to design powerful LUTs and offer them for free.
You can use those free LUTs to create mesmerizing videos and photos for your projects. And depending on the nature of your project, you will find here a free LUT that will work best for you.
There are two types of LUTs;
- 1. Conversion LUTs
Conversion LUTs function by correcting the Log color space back to the standard color space. Professional colorists often use this LUT to obtain a high dynamic range by maintaining more details in the highlights and shadows. - 2. Creative LUTs
Creative LUTs are essentially used in bringing out the creative colors of footage. Color styles in creative LUT are of a wide range, such as moody, cinematic, vintage, and summer, among others.
Creative LUTs is the one that is often used in many cases.

Filmora 3D LUT
Empower your videos with a new mood using different LUTs
Filmora now offers 800+ top-quality LUTs cover a broad range of scenarios. Transform your videos with Filmora’s powerful 3D LUTs.
Apply LUT on Videos Apply LUT on Videos Learn More >
15 Free Cinematic LUTs for Your Film
A good LUT is one that can be applied to several setups and different lighting situations. Besides, it doesn’t mean that a single LUT should be applied to every project; instead, it should be able to produce several perfect matches to your project.
Here are some of the top-tier free cinematic LUTs that you can apply to your film.
1. 40 Free Instagram LUTs
Create amazing Instagram footage using these 40 free LUTs. Besides, you can use these free LUTs in a couple of applications, including Adobe Premiere Pro, Wondershare Filmora, Photoshop, and Da Vinci Resolve.
After applying these LUTs, you can carry out bits of basic corrections such as brightness and contrast to your footage.
2. 3 Eyes and Teeth Whitening LUTs
Eye and teeth whitening LUTs are often used in movies and quality photos. Whiten the color of your teeth and eyes using these three free LUTs.
These LUTs are very simple to use, and when you effectively incorporate them, you are assured of creating magnificent photos.

3. 70 Free Hollywood Film LUTs
Do you have a project file and want it to appear like the ones in Hollywood films? You need not to worry since here are 70 eye-catching LUTs that you can add to your project and get that ‘Hollywood” look you’ve always wanted.
4. Free Summer LUTs
Summer clips perfectly match the orange, teal look. Here, you will get summer LUTs that will work perfectly with your project.
You can use these LUTs in Adobe Premiere, Wondershare Filmora, Da Vinci Resolve, and Lightroom.
5. Free Moody Green LUTs
Footages taken in the jungle work ideally with the moody green LUTs. Here are some of the amazing LUTs you can incorporate into your project.
6. Moody Blue LUTs
When it comes to appreciating nature, moody blue LUTs tend to be the perfect resort. Create cinematic scenes for your videos using these LUTs for free.
The LUTs here are protected with a password, what you do is to watch that video to completion, and you will come across the password.
7. 3 Free Urban Dark Cinematic LUTs
Often in many movies, you will come across urban scenes that are moody, dark, and portrayed as something out-of-this-world. You can also create such scenes with these three free urban dark cinematic LUTs.
You can use these three free cinema LUTs to your Wondershare Filmora or Adobe Premiere.
8. 10 Free Winter LUTs
Footages shot in winter outdoors don’t just work with any LUTs. Besides, there are LUTs designed explicitly for winter footage, and here are the ten best winters LUTs.
Download the LUTs and apply one that you find the perfect match for your project.
9. 20 Free Travel LUTs
When traveling, you may capture several photos and videos that are not very appealing – This may hinder you from sharing them with your friends or family. Besides, you don’t have to discard those footage since you can give them a new mind-blowing look using these 20 free travel LUTs.
To access all the 20 LUTs, you only need to subscribe to their YouTube channel, and you are good to go.
10. Free Korean Tone LUT
Korean movies are enticing because of their unique, bewildering LUT mood. You can also employ this LUT to your footage and leave your followers jaw-dropping.
Here, this free LUT pack is protected, and the only catch is to watch the YouTube video and get the password.
11. 5 Free Wedding LUTs
Wedding footages often require that romantic mood. Get the best five free wedding LUTs here.
The LUT file pack here is protected by a password. So to access the password, watch the YouTube video to completion and access it. Often, it is displayed in the top-right corner of the clip.
12. Free Sunset LUTs
Sunsets footages go simultaneously with the golden light or dark violet colors. Here, you will access the free sunset LUTs that you can incorporate into your project.
After downloading the file, you will realize it is protected. What you do is only watch this YouTube video and access the password.
13. Vintage LUTs
One of the commonly used LUTs in movies is the vintage LUTs. Access over 28 free vintage LUTs here and give your footage that brilliant vintage appearance.
14. Free Warm LUT
Warm LUTs do create a sensational atmosphere in the footage. Incorporate this LUT into your footage and get jaw-dropping results.
After downloading this free LUT pack, input the password displayed in the top-right corner of this YouTube video.
15. Free Music LUTs
In music, fans are always allured by the quality of the video. Besides, you may also gain or lose fans through your video quality. Improve the quality of your music video using this free LUT pack.
To download it for free, input 0$ under the payout bar and click “Buy Now.” Complete the other forms and download your music LUT for free.

Edit Your Film with Filmora and its Cinematic LUTs
Wondershare Filmora is an award-winning video editing software that allows its users to create stunning videos through its wide array of powerful video editing tools. The platform is well aware of all your video editing needs and provides easy-to-use functionalities that include LUTs.
For Win 7 or later (64-bit)
For macOS 10.14 or later
Use LUTs in Wondershare Filmora to express your intended video ideas.
Here are the simple steps on how to edit your film with Filmora:
Step 1. Download Wondershare Filmora
First, download Wondershare Fimora to your computer and allow it to run.
Step 2. Add your Footage to the Timeline
Load your video to Filmora. Drag and drop them to your timeline.

Step 3. Access your LUT Library
To access your LUT library, open “Color Correction.” Then click on “3D LUT.”

Step 4. Add your preferred LUT to your Project video
After clicking on “3D LUT,” a drop-down list showing all the available LUTs will be displayed. Scroll and select your preferred LUT.

When you want to apply your LUTs in Filmora, click on “Load new LUT,” which is still under “3D LUTs.” You will be directed to your computer storage space to select the folder containing your LUTs.
After selecting your preferred LUT folder, hit the “OK” button to apply.
Conclusion
● Worry no more when you have a small budget and a tight deadline for your project. Depending on your project’s type, nature, and requirements, create bewildering footage using the above 15 LUTs. After applying your favorite LUT, carry out small basic adjustments such as the white balance, brightness, and contrast to your footage when necessary. By doing so, you are going to leave your clients and viewers ground rooted.
● A few of these free LUTs have a catch: watching the YouTube video and getting a password for unlocking their free LUT pack. The password is often displayed on the top-right corners of the YouTube videos.
A significant way of creating cinematic looks for your project is by using LUTs. And with a single click, you will transform your footage into an absolute masterpiece. By using free LUTs, not only will you save on cost but also on the hassle and bustle of having to color grade your film.
LUTs function to create a uniform color throughout a film while enhancing or preserving skin tones. You don’t have to use all the LUTs in this world to create splendid films. Besides, most professional video editors and colorists prefer to work with a handful of LUTs and create stunning films. By going through this article, you will come to learn about 15 free cinematic LUTs for your film.

In this article
01 How Cinematic LUTs Affect Your Film
02 15 Free Cinematic LUTs for Your Film
03 Edit Your Film with Filmora and its Cinematic LUTs
How Cinematic LUTs Affect Your Film
When it comes to marketing, videos often tend to play a huge role. And to market your brand effectively, you need to have top-notch videos. It doesn’t mean that you should go and study to become a colorist or a video editor. Besides, there are professional colorists and video editors who gave in their time and effort to design powerful LUTs and offer them for free.
You can use those free LUTs to create mesmerizing videos and photos for your projects. And depending on the nature of your project, you will find here a free LUT that will work best for you.
There are two types of LUTs;
- 1. Conversion LUTs
Conversion LUTs function by correcting the Log color space back to the standard color space. Professional colorists often use this LUT to obtain a high dynamic range by maintaining more details in the highlights and shadows. - 2. Creative LUTs
Creative LUTs are essentially used in bringing out the creative colors of footage. Color styles in creative LUT are of a wide range, such as moody, cinematic, vintage, and summer, among others.
Creative LUTs is the one that is often used in many cases.

Filmora 3D LUT
Empower your videos with a new mood using different LUTs
Filmora now offers 800+ top-quality LUTs cover a broad range of scenarios. Transform your videos with Filmora’s powerful 3D LUTs.
Apply LUT on Videos Apply LUT on Videos Learn More >
15 Free Cinematic LUTs for Your Film
A good LUT is one that can be applied to several setups and different lighting situations. Besides, it doesn’t mean that a single LUT should be applied to every project; instead, it should be able to produce several perfect matches to your project.
Here are some of the top-tier free cinematic LUTs that you can apply to your film.
1. 40 Free Instagram LUTs
Create amazing Instagram footage using these 40 free LUTs. Besides, you can use these free LUTs in a couple of applications, including Adobe Premiere Pro, Wondershare Filmora, Photoshop, and Da Vinci Resolve.
After applying these LUTs, you can carry out bits of basic corrections such as brightness and contrast to your footage.
2. 3 Eyes and Teeth Whitening LUTs
Eye and teeth whitening LUTs are often used in movies and quality photos. Whiten the color of your teeth and eyes using these three free LUTs.
These LUTs are very simple to use, and when you effectively incorporate them, you are assured of creating magnificent photos.

3. 70 Free Hollywood Film LUTs
Do you have a project file and want it to appear like the ones in Hollywood films? You need not to worry since here are 70 eye-catching LUTs that you can add to your project and get that ‘Hollywood” look you’ve always wanted.
4. Free Summer LUTs
Summer clips perfectly match the orange, teal look. Here, you will get summer LUTs that will work perfectly with your project.
You can use these LUTs in Adobe Premiere, Wondershare Filmora, Da Vinci Resolve, and Lightroom.
5. Free Moody Green LUTs
Footages taken in the jungle work ideally with the moody green LUTs. Here are some of the amazing LUTs you can incorporate into your project.
6. Moody Blue LUTs
When it comes to appreciating nature, moody blue LUTs tend to be the perfect resort. Create cinematic scenes for your videos using these LUTs for free.
The LUTs here are protected with a password, what you do is to watch that video to completion, and you will come across the password.
7. 3 Free Urban Dark Cinematic LUTs
Often in many movies, you will come across urban scenes that are moody, dark, and portrayed as something out-of-this-world. You can also create such scenes with these three free urban dark cinematic LUTs.
You can use these three free cinema LUTs to your Wondershare Filmora or Adobe Premiere.
8. 10 Free Winter LUTs
Footages shot in winter outdoors don’t just work with any LUTs. Besides, there are LUTs designed explicitly for winter footage, and here are the ten best winters LUTs.
Download the LUTs and apply one that you find the perfect match for your project.
9. 20 Free Travel LUTs
When traveling, you may capture several photos and videos that are not very appealing – This may hinder you from sharing them with your friends or family. Besides, you don’t have to discard those footage since you can give them a new mind-blowing look using these 20 free travel LUTs.
To access all the 20 LUTs, you only need to subscribe to their YouTube channel, and you are good to go.
10. Free Korean Tone LUT
Korean movies are enticing because of their unique, bewildering LUT mood. You can also employ this LUT to your footage and leave your followers jaw-dropping.
Here, this free LUT pack is protected, and the only catch is to watch the YouTube video and get the password.
11. 5 Free Wedding LUTs
Wedding footages often require that romantic mood. Get the best five free wedding LUTs here.
The LUT file pack here is protected by a password. So to access the password, watch the YouTube video to completion and access it. Often, it is displayed in the top-right corner of the clip.
12. Free Sunset LUTs
Sunsets footages go simultaneously with the golden light or dark violet colors. Here, you will access the free sunset LUTs that you can incorporate into your project.
After downloading the file, you will realize it is protected. What you do is only watch this YouTube video and access the password.
13. Vintage LUTs
One of the commonly used LUTs in movies is the vintage LUTs. Access over 28 free vintage LUTs here and give your footage that brilliant vintage appearance.
14. Free Warm LUT
Warm LUTs do create a sensational atmosphere in the footage. Incorporate this LUT into your footage and get jaw-dropping results.
After downloading this free LUT pack, input the password displayed in the top-right corner of this YouTube video.
15. Free Music LUTs
In music, fans are always allured by the quality of the video. Besides, you may also gain or lose fans through your video quality. Improve the quality of your music video using this free LUT pack.
To download it for free, input 0$ under the payout bar and click “Buy Now.” Complete the other forms and download your music LUT for free.

Edit Your Film with Filmora and its Cinematic LUTs
Wondershare Filmora is an award-winning video editing software that allows its users to create stunning videos through its wide array of powerful video editing tools. The platform is well aware of all your video editing needs and provides easy-to-use functionalities that include LUTs.
For Win 7 or later (64-bit)
For macOS 10.14 or later
Use LUTs in Wondershare Filmora to express your intended video ideas.
Here are the simple steps on how to edit your film with Filmora:
Step 1. Download Wondershare Filmora
First, download Wondershare Fimora to your computer and allow it to run.
Step 2. Add your Footage to the Timeline
Load your video to Filmora. Drag and drop them to your timeline.

Step 3. Access your LUT Library
To access your LUT library, open “Color Correction.” Then click on “3D LUT.”

Step 4. Add your preferred LUT to your Project video
After clicking on “3D LUT,” a drop-down list showing all the available LUTs will be displayed. Scroll and select your preferred LUT.

When you want to apply your LUTs in Filmora, click on “Load new LUT,” which is still under “3D LUTs.” You will be directed to your computer storage space to select the folder containing your LUTs.
After selecting your preferred LUT folder, hit the “OK” button to apply.
Conclusion
● Worry no more when you have a small budget and a tight deadline for your project. Depending on your project’s type, nature, and requirements, create bewildering footage using the above 15 LUTs. After applying your favorite LUT, carry out small basic adjustments such as the white balance, brightness, and contrast to your footage when necessary. By doing so, you are going to leave your clients and viewers ground rooted.
● A few of these free LUTs have a catch: watching the YouTube video and getting a password for unlocking their free LUT pack. The password is often displayed on the top-right corners of the YouTube videos.
A significant way of creating cinematic looks for your project is by using LUTs. And with a single click, you will transform your footage into an absolute masterpiece. By using free LUTs, not only will you save on cost but also on the hassle and bustle of having to color grade your film.
LUTs function to create a uniform color throughout a film while enhancing or preserving skin tones. You don’t have to use all the LUTs in this world to create splendid films. Besides, most professional video editors and colorists prefer to work with a handful of LUTs and create stunning films. By going through this article, you will come to learn about 15 free cinematic LUTs for your film.

In this article
01 How Cinematic LUTs Affect Your Film
02 15 Free Cinematic LUTs for Your Film
03 Edit Your Film with Filmora and its Cinematic LUTs
How Cinematic LUTs Affect Your Film
When it comes to marketing, videos often tend to play a huge role. And to market your brand effectively, you need to have top-notch videos. It doesn’t mean that you should go and study to become a colorist or a video editor. Besides, there are professional colorists and video editors who gave in their time and effort to design powerful LUTs and offer them for free.
You can use those free LUTs to create mesmerizing videos and photos for your projects. And depending on the nature of your project, you will find here a free LUT that will work best for you.
There are two types of LUTs;
- 1. Conversion LUTs
Conversion LUTs function by correcting the Log color space back to the standard color space. Professional colorists often use this LUT to obtain a high dynamic range by maintaining more details in the highlights and shadows. - 2. Creative LUTs
Creative LUTs are essentially used in bringing out the creative colors of footage. Color styles in creative LUT are of a wide range, such as moody, cinematic, vintage, and summer, among others.
Creative LUTs is the one that is often used in many cases.

Filmora 3D LUT
Empower your videos with a new mood using different LUTs
Filmora now offers 800+ top-quality LUTs cover a broad range of scenarios. Transform your videos with Filmora’s powerful 3D LUTs.
Apply LUT on Videos Apply LUT on Videos Learn More >
15 Free Cinematic LUTs for Your Film
A good LUT is one that can be applied to several setups and different lighting situations. Besides, it doesn’t mean that a single LUT should be applied to every project; instead, it should be able to produce several perfect matches to your project.
Here are some of the top-tier free cinematic LUTs that you can apply to your film.
1. 40 Free Instagram LUTs
Create amazing Instagram footage using these 40 free LUTs. Besides, you can use these free LUTs in a couple of applications, including Adobe Premiere Pro, Wondershare Filmora, Photoshop, and Da Vinci Resolve.
After applying these LUTs, you can carry out bits of basic corrections such as brightness and contrast to your footage.
2. 3 Eyes and Teeth Whitening LUTs
Eye and teeth whitening LUTs are often used in movies and quality photos. Whiten the color of your teeth and eyes using these three free LUTs.
These LUTs are very simple to use, and when you effectively incorporate them, you are assured of creating magnificent photos.

3. 70 Free Hollywood Film LUTs
Do you have a project file and want it to appear like the ones in Hollywood films? You need not to worry since here are 70 eye-catching LUTs that you can add to your project and get that ‘Hollywood” look you’ve always wanted.
4. Free Summer LUTs
Summer clips perfectly match the orange, teal look. Here, you will get summer LUTs that will work perfectly with your project.
You can use these LUTs in Adobe Premiere, Wondershare Filmora, Da Vinci Resolve, and Lightroom.
5. Free Moody Green LUTs
Footages taken in the jungle work ideally with the moody green LUTs. Here are some of the amazing LUTs you can incorporate into your project.
6. Moody Blue LUTs
When it comes to appreciating nature, moody blue LUTs tend to be the perfect resort. Create cinematic scenes for your videos using these LUTs for free.
The LUTs here are protected with a password, what you do is to watch that video to completion, and you will come across the password.
7. 3 Free Urban Dark Cinematic LUTs
Often in many movies, you will come across urban scenes that are moody, dark, and portrayed as something out-of-this-world. You can also create such scenes with these three free urban dark cinematic LUTs.
You can use these three free cinema LUTs to your Wondershare Filmora or Adobe Premiere.
8. 10 Free Winter LUTs
Footages shot in winter outdoors don’t just work with any LUTs. Besides, there are LUTs designed explicitly for winter footage, and here are the ten best winters LUTs.
Download the LUTs and apply one that you find the perfect match for your project.
9. 20 Free Travel LUTs
When traveling, you may capture several photos and videos that are not very appealing – This may hinder you from sharing them with your friends or family. Besides, you don’t have to discard those footage since you can give them a new mind-blowing look using these 20 free travel LUTs.
To access all the 20 LUTs, you only need to subscribe to their YouTube channel, and you are good to go.
10. Free Korean Tone LUT
Korean movies are enticing because of their unique, bewildering LUT mood. You can also employ this LUT to your footage and leave your followers jaw-dropping.
Here, this free LUT pack is protected, and the only catch is to watch the YouTube video and get the password.
11. 5 Free Wedding LUTs
Wedding footages often require that romantic mood. Get the best five free wedding LUTs here.
The LUT file pack here is protected by a password. So to access the password, watch the YouTube video to completion and access it. Often, it is displayed in the top-right corner of the clip.
12. Free Sunset LUTs
Sunsets footages go simultaneously with the golden light or dark violet colors. Here, you will access the free sunset LUTs that you can incorporate into your project.
After downloading the file, you will realize it is protected. What you do is only watch this YouTube video and access the password.
13. Vintage LUTs
One of the commonly used LUTs in movies is the vintage LUTs. Access over 28 free vintage LUTs here and give your footage that brilliant vintage appearance.
14. Free Warm LUT
Warm LUTs do create a sensational atmosphere in the footage. Incorporate this LUT into your footage and get jaw-dropping results.
After downloading this free LUT pack, input the password displayed in the top-right corner of this YouTube video.
15. Free Music LUTs
In music, fans are always allured by the quality of the video. Besides, you may also gain or lose fans through your video quality. Improve the quality of your music video using this free LUT pack.
To download it for free, input 0$ under the payout bar and click “Buy Now.” Complete the other forms and download your music LUT for free.

Edit Your Film with Filmora and its Cinematic LUTs
Wondershare Filmora is an award-winning video editing software that allows its users to create stunning videos through its wide array of powerful video editing tools. The platform is well aware of all your video editing needs and provides easy-to-use functionalities that include LUTs.
For Win 7 or later (64-bit)
For macOS 10.14 or later
Use LUTs in Wondershare Filmora to express your intended video ideas.
Here are the simple steps on how to edit your film with Filmora:
Step 1. Download Wondershare Filmora
First, download Wondershare Fimora to your computer and allow it to run.
Step 2. Add your Footage to the Timeline
Load your video to Filmora. Drag and drop them to your timeline.

Step 3. Access your LUT Library
To access your LUT library, open “Color Correction.” Then click on “3D LUT.”

Step 4. Add your preferred LUT to your Project video
After clicking on “3D LUT,” a drop-down list showing all the available LUTs will be displayed. Scroll and select your preferred LUT.

When you want to apply your LUTs in Filmora, click on “Load new LUT,” which is still under “3D LUTs.” You will be directed to your computer storage space to select the folder containing your LUTs.
After selecting your preferred LUT folder, hit the “OK” button to apply.
Conclusion
● Worry no more when you have a small budget and a tight deadline for your project. Depending on your project’s type, nature, and requirements, create bewildering footage using the above 15 LUTs. After applying your favorite LUT, carry out small basic adjustments such as the white balance, brightness, and contrast to your footage when necessary. By doing so, you are going to leave your clients and viewers ground rooted.
● A few of these free LUTs have a catch: watching the YouTube video and getting a password for unlocking their free LUT pack. The password is often displayed on the top-right corners of the YouTube videos.
TikTok Velocity Dance Tutorial| Filmora
Preparation
What you need to prepare:
- A computer (Windows or macOS)
- Your video materials.
- Filmora video editor
Step 1
First, download the Filmora Video Editor . Run it and click on “New Project”.
Step 2
Import the video and audio you want to use for your edit.

Step 3
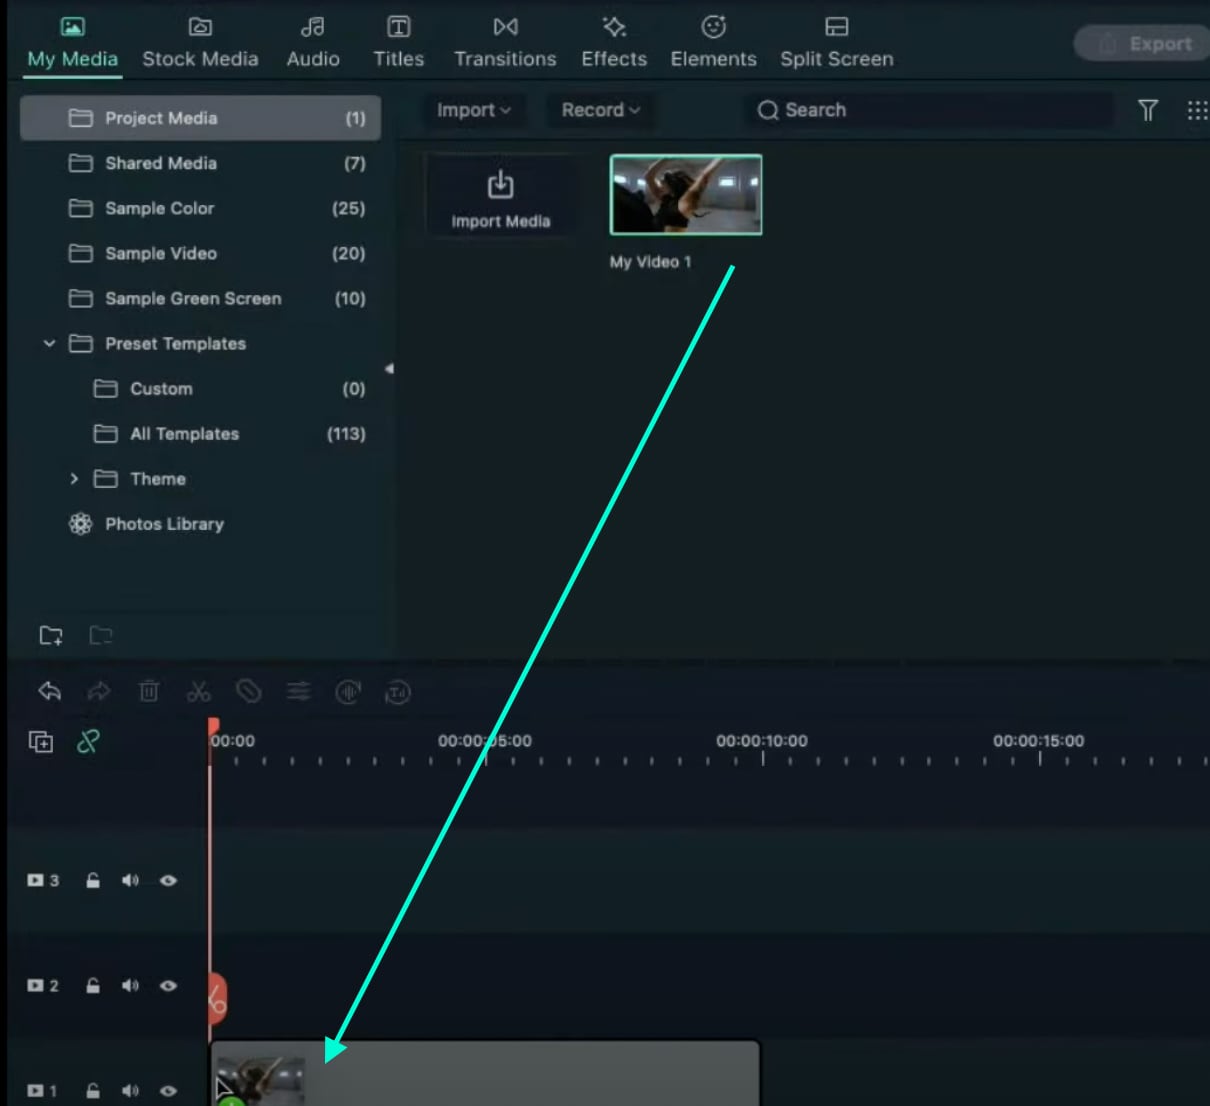
Drag the Audio into the Timeline. Then, Drag your Video clip to Track 1 on the Timeline.
Step 4
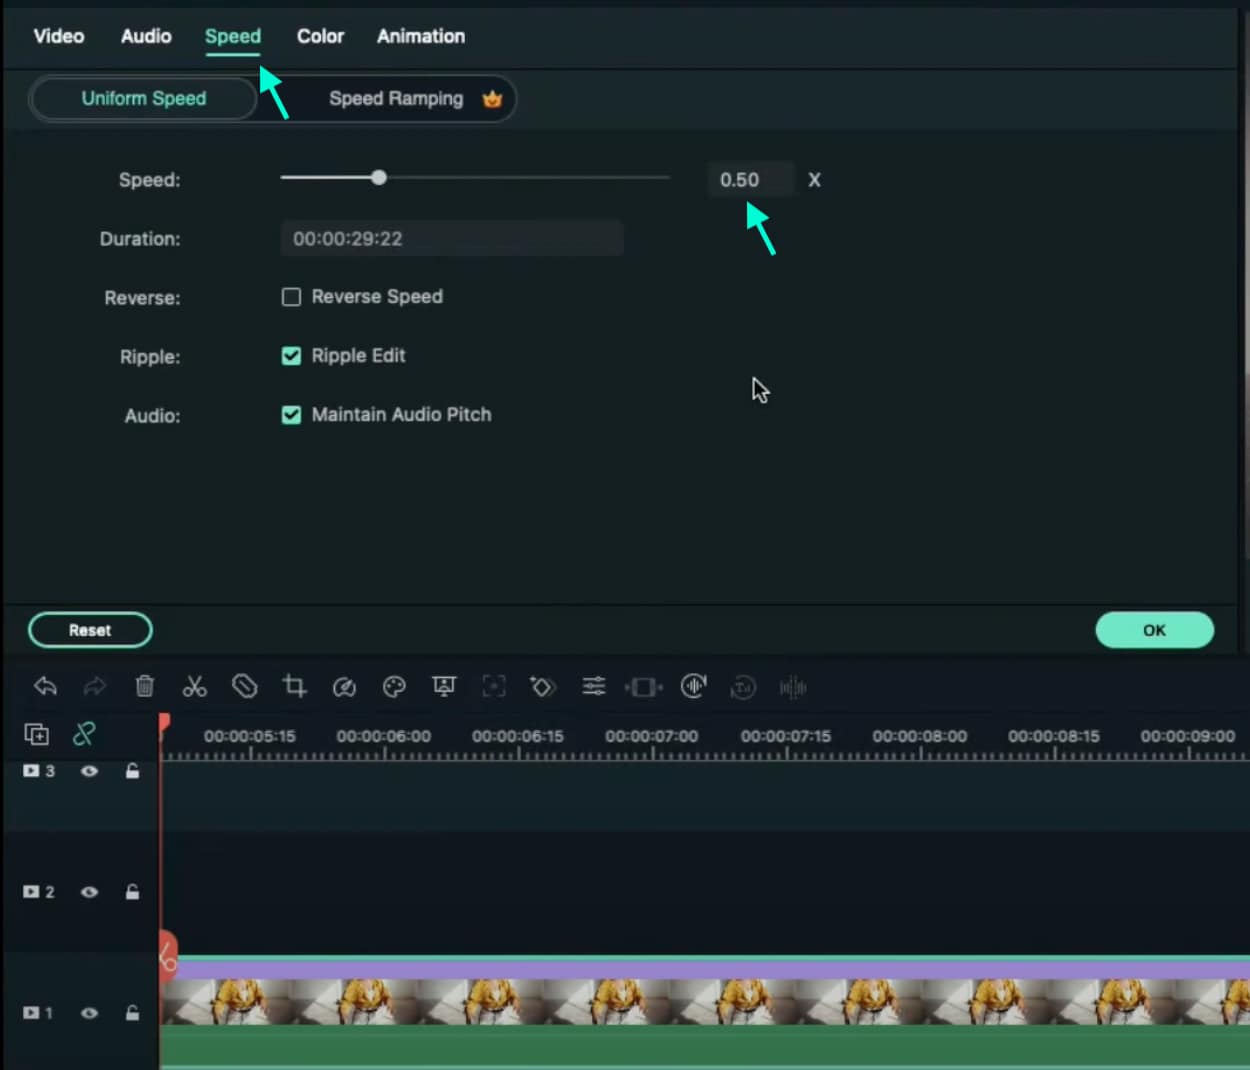
Double-click on the Video clip, go to the Speed tab, and change the Speed value to “0.50”. Click on OK.
Step 5
Next, place the Playhead one frame before the first spike (beat) on the Audio clip. Here, split the Video clip. Click on the Video from the right, go to Speed and change it to “8”.

Step 6
Move the Playhead three frames forward → Split the video → click on the clip from the right → go to Speed → change it back to “0.50”. Do this same process as in Steps 5 and 6 to every Audio spike (beat) you see on the audio clip.
Step 7
That’s it! Render the video and you can watch the final preview. Congratulations on creating a TikTok velocity dance effect in Filmora.

Summary
What you’ve learned:
- How to create a unique velocity dance effect in Filmora
- How to edit video based on unique audio clips
- Edit the speed settings of a video clip in Filmora
What you need to prepare:
- A computer (Windows or macOS)
- Your video materials.
- Filmora video editor
Step 1
First, download the Filmora Video Editor . Run it and click on “New Project”.
Step 2
Import the video and audio you want to use for your edit.

Step 3
Drag the Audio into the Timeline. Then, Drag your Video clip to Track 1 on the Timeline.

Step 4
Double-click on the Video clip, go to the Speed tab, and change the Speed value to “0.50”. Click on OK.

Step 5
Next, place the Playhead one frame before the first spike (beat) on the Audio clip. Here, split the Video clip. Click on the Video from the right, go to Speed and change it to “8”.

Step 6
Move the Playhead three frames forward → Split the video → click on the clip from the right → go to Speed → change it back to “0.50”. Do this same process as in Steps 5 and 6 to every Audio spike (beat) you see on the audio clip.
Step 7
That’s it! Render the video and you can watch the final preview. Congratulations on creating a TikTok velocity dance effect in Filmora.

Summary
What you’ve learned:
- How to create a unique velocity dance effect in Filmora
- How to edit video based on unique audio clips
- Edit the speed settings of a video clip in Filmora
What you need to prepare:
- A computer (Windows or macOS)
- Your video materials.
- Filmora video editor
Step 1
First, download the Filmora Video Editor . Run it and click on “New Project”.
Step 2
Import the video and audio you want to use for your edit.

Step 3
Drag the Audio into the Timeline. Then, Drag your Video clip to Track 1 on the Timeline.

Step 4
Double-click on the Video clip, go to the Speed tab, and change the Speed value to “0.50”. Click on OK.

Step 5
Next, place the Playhead one frame before the first spike (beat) on the Audio clip. Here, split the Video clip. Click on the Video from the right, go to Speed and change it to “8”.

Step 6
Move the Playhead three frames forward → Split the video → click on the clip from the right → go to Speed → change it back to “0.50”. Do this same process as in Steps 5 and 6 to every Audio spike (beat) you see on the audio clip.
Step 7
That’s it! Render the video and you can watch the final preview. Congratulations on creating a TikTok velocity dance effect in Filmora.

Summary
What you’ve learned:
- How to create a unique velocity dance effect in Filmora
- How to edit video based on unique audio clips
- Edit the speed settings of a video clip in Filmora
What you need to prepare:
- A computer (Windows or macOS)
- Your video materials.
- Filmora video editor
Step 1
First, download the Filmora Video Editor . Run it and click on “New Project”.
Step 2
Import the video and audio you want to use for your edit.

Step 3
Drag the Audio into the Timeline. Then, Drag your Video clip to Track 1 on the Timeline.

Step 4
Double-click on the Video clip, go to the Speed tab, and change the Speed value to “0.50”. Click on OK.

Step 5
Next, place the Playhead one frame before the first spike (beat) on the Audio clip. Here, split the Video clip. Click on the Video from the right, go to Speed and change it to “8”.

Step 6
Move the Playhead three frames forward → Split the video → click on the clip from the right → go to Speed → change it back to “0.50”. Do this same process as in Steps 5 and 6 to every Audio spike (beat) you see on the audio clip.
Step 7
That’s it! Render the video and you can watch the final preview. Congratulations on creating a TikTok velocity dance effect in Filmora.

Summary
What you’ve learned:
- How to create a unique velocity dance effect in Filmora
- How to edit video based on unique audio clips
- Edit the speed settings of a video clip in Filmora
Also read:
- New 2024 Approved Guide To Using Free Luts for OBS
- New Top Tricks for Learning Photo Slideshow for 2024
- 2024 Approved Many People Choose Video Editing or Post-Editing as Their Career in These Days. Is This a Good Choice? How to Start a Video Editing Career? This Article Will Tell You the Complete Details
- Updated In 2024, 15 Camera Shake Preset for Adobe Premiere Pro
- Updated 2024 Approved How to Choose A Nice GoPro for Vlogging?
- Updated Reviewing Efectum App For Smartphone Users Create Slow Motion Videos
- In 2024, Is Augmented Reality Conferencing the Future of Workplace Collaboratio
- New One of the Latest Tools for Editing Video and Images Is AI Composite Video App Which Is Popular Among Users. Learn All About This Tool and Its Functioning
- New 2024 Approved Elevate Your Designs with Feather Shapes in After Effects
- New Separate Audio From Video in DaVinci Resolve Step by Step
- 2024 Approved How to Add Filters on iMovie
- Updated How Did AI Video Games Act More Human Than Human for 2024
- Ultimate Guide on Making A Slideshow Video
- Updated The Ultimate Guide to Using Shotcut To Rotate Videos
- Camtasia Review – Is It The Best Video Editor, In 2024
- New How to Split a Clip in DaVinci Resolve Step by Step
- 2024 Approved Troubleshoot Snapchat Camera Zoomed in Issue
- Updated 2024 Approved How to Convert Videos to Slow Motion? Complete Guide
- Updated Top 5 Video Filter Software Enhance Your Videos
- New Adding Slow Motion in DaVinci Resolve A Comprehensive Overview
- 2024 Approved Detailed Guide to Rotate Videos in Blender
- 2024 Approved Best Ways to Slow Down Motion in CapCut
- New 8 Excellent Video and Photo Mergers on Desktop/Mobile/Online
- New Best Video Title Generators
- Updated How to Animate Your Designs With Canva GIF
- New 6 Instant Ways to Make Windows 10 Slideshow
- New 10 Best Free Video Player for Windows 11
- New How to Loop Videos with iMovie
- New What Should Be Considered to Choose A Nice GoPro for Vlogging?
- 2024 Approved Demystifying the Vectorscope A Comprehensive Guide for Premiere Pro Color Correction
- In 2024, 15 Best Vloggers That You Should Follow for Travel
- Detailed Tutorial to Crop a Video Using Openshot, In 2024
- In 2024, Detailed Tutorial to Rotate Videos in Cyberlink PowerDirector
- New In 2024, How to Create Custom Lower Thirds in Filmora
- Updated In 2024, Create A Freeze Frame Sequence In Your Videos
- Updated In 2024, Best 5 Tips to Freeze-Frame in After Effects
- Updated In 2024, Easy Ways to Create Procreate GIFs
- Add Selective Color Effect to Your Videos Using Filmora
- Phone Aspect Ratio Vertical Definition, Types and Tips for 2024
- New Advancements in Game Recording Software A Comprehensive Overview
- New Methods to Make Sure Your Recording Slideshow in Powerpoint Is Not Wro
- Do You Want to Add a Motion Blur Effect in Valorant? Read This Guide to Find Out How to Create a Motion Blur Effect in Valorant without Any Hassle for 2024
- New How To Polish Your Music Video Edits Using Filmora for 2024
- New 2024 Approved Guide to Create a Timelapse Video in After Effects
- Updated How to Get VHS Filter and Glitch Filter to Your Images or Videos for 2024
- How to Factory Reset Vivo V29 without Losing Data | Dr.fone
- In 2024, Does Life360 Notify When You Log Out On Meizu 21 Pro? | Dr.fone
- Restore Missing App Icon on Samsung Galaxy A23 5G Step-by-Step Solutions | Dr.fone
- How Can I Catch the Regional Pokémon without Traveling On Realme 11 5G | Dr.fone
- In 2024, How to Unlock Apple iPhone 13 Pro When We Dont Have Apple ID or Password?
- In 2024, The Updated Method to Bypass Oppo A38 FRP
- Guide to Mirror Your Vivo V30 Lite 5G to Other Android devices | Dr.fone
- In 2024, How to Check Distance and Radius on Google Maps For your Motorola Razr 40 Ultra | Dr.fone
- In 2024, How to Change Sony Xperia 1 V Location on Skout | Dr.fone
- Will the iPogo Get You Banned and How to Solve It On Apple iPhone 6 Plus | Dr.fone
- How to Change GPS Location on Motorola Moto G84 5G Easily & Safely | Dr.fone
- In 2024, How To Change Your Apple ID on Apple iPhone 14 With or Without Password | Dr.fone
- How To Change Your SIM PIN Code on Your Itel P40 Phone
- Things You Should Know When Unlocking Total Wireless Of Apple iPhone 6 Plus
- How To Erase an iPhone 6 Plus Without Apple ID Password?
- In 2024, Why does the pokemon go battle league not available On Apple iPhone XS | Dr.fone
- In 2024, How to Unlock Vivo V30 Phone Pattern Lock without Factory Reset
- How To Fix Auto Lock Greyed Out on Apple iPhone SE (2020)
- 8 Safe and Effective Methods to Unlock Your Apple iPhone 11 Without a Passcode | Dr.fone
- How to Stop Life360 from Tracking You On Lava Agni 2 5G? | Dr.fone
- In 2024, A Comprehensive Guide to Mastering iPogo for Pokémon GO On Apple iPhone X | Dr.fone
- In 2024, How to Fix Locked Apple ID on iPhone 14 Pro
- 7 Fixes to No GPS - Showing Approximate Location on Apple iPhone 8 Waze | Dr.fone
- In 2024, How To Activate and Use Life360 Ghost Mode On Samsung Galaxy F34 5G | Dr.fone
- How To Fix Apple iPhone 15 Plus Unavailable Issue With Ease
- How to retrieve lost files from Vivo V27 Pro?
- In 2024, 10 Easy-to-Use FRP Bypass Tools for Unlocking Google Accounts On Vivo Y78 5G
- How To Fix Part of the Touch Screen Not Working on Samsung Galaxy A34 5G | Dr.fone
- Best Pokemons for PVP Matches in Pokemon Go For Xiaomi 14 Ultra | Dr.fone
- In 2024, How and Where to Find a Shiny Stone Pokémon For Vivo X Fold 2? | Dr.fone
- 2024 Approved Stunning Ideas About Creating Personalised WhatsApp GIF Sticker
- In 2024, Is pgsharp legal when you are playing pokemon On Vivo Y100 5G? | Dr.fone
- How To Create an Apple Developer Account On Apple iPhone 6s Plus
- How to Perform Hard Reset on Realme Narzo 60 Pro 5G? | Dr.fone
- Title: Updated How to Use Rule of Thirds in Video
- Author: Chloe
- Created at : 2024-06-26 06:24:15
- Updated at : 2024-06-27 06:24:15
- Link: https://ai-editing-video.techidaily.com/updated-how-to-use-rule-of-thirds-in-video/
- License: This work is licensed under CC BY-NC-SA 4.0.


