
:max_bytes(150000):strip_icc():format(webp)/best-time-of-day-to-instagram-3485858-1-5bb3cc9046e0fb002612537d.jpg)
Updated How to Use Twixtor Effect to Create Super Slow-Motion Video for 2024
How to Use Twixtor Effect to Create Super Slow-Motion Video?
Twixtor is a plug-in program for the After Effects software that allows you to create slow-motion effects from any video clip by adjusting the settings of the plug-in software. But what Twixtor is and why it is utilized are the topics we will cover in this article.
In addition, we will learn how to manipulate its characteristics to get the best possible outcome for our working composition in the Premiere Pro and After Effects plug-ins. Without any further ado, let’s get straight to the business!
In this article
01 What is Twixtor and How Does It Work?
02 How to Use Twixtor to Create Super Slow-Mo in Adobe Premiere Pro?
03 How to Create Super Slow Motion in After Effects with Twixtor?
04 How to Get the Twixtor Style Effect on iPhone?
Part 1: What is Twixtor and How Does It Work?
Twixtor is a plug-in developed by RevisionFX. It is available for purchase. The plug-in gives users the ability to speed up, slow down, or convert the frame rate of picture sequences, all with special effects. Twixtor can visually estimate what a video is meant to look like in a slow-motion setting using video analysis and interoperability.
Due to the need for unparalleled image quality, RE: Vision Effects developed unique tracking technology that determines every individual pixel’s motion. This technology allows Twixtor to synthesize new innovative frames by warping and interpolating frames from the original sequence, resulting in unprecedented image quality.
Reset the clock to a single-speed setting. Always remember that you can customize the retiming on a frame-by-frame basis!
When items are crossing in the scene, Twixtor is more accurate and shows fewer artifacts than other rendering engines. This reduces the ripping and stretching of items when they cross the frame or exit it completely.
But how does Twixtor work is the million-dollar question! While Premiere includes the ability to slow down your film and has a newer, better-quality version dubbed Optical Flow, it cannot zoom in on your footage (called Pixel Motion in After Effects).
The slow-motion quality is undoubtedly superior to that of simple frame blending, but it is not the finest grade slow motion available. The TWIXTOR from Re: Vision Effects has long been the go-to solution for the most excellent post-slow motion. It is pricey, but it is well worth it.
The Pro edition provides you with the opportunity to fine-tune the pitch of the auto track, as well as the option to employ mattes and alphas to enrich your tracks and the ability to deal with motion vectors from a 3D system, among other features.
Part 2: How to Use Twixtor to Create Super Slow-Mo in Adobe Premiere Pro?
As we’ve already mentioned, we will be analyzing how Twixtor makes slow mos; we will be starting with the Adobe Premiere Pro. The following are the steps you need to learn to perform it yourself.
Step 1: After importing the video to the timeline, do some basic editing such as trimming and removing audio from the video.

Step 2: Nest the sequence to convert the video into a new sequence automatically.
Step 3: Go to the Effects tab and search for Twixtor, and then drop the Twixtor Pro to the video clip in the timeline.

Step 5: Right-click the video in the timeline again and scroll down to Show Clip Keyframes to enable the Speed option under Time Remapping. You can now enable the GPU acceleration to fast rendering.
Step 6: Click the Keyframe icon to mark the points where you want to begin with the slow-motion effect, and then mark the end part of the slow-motion effect video.

Step 7: Now, drag the line lower to add a slo-mo effect to video.

Remember that your video can sometimes lag if you set the video speed at a meager percentage. To avoid that, utilize settings in a better way to ensure your video works flawlessly.
Part 3: How to Create Super Slow Motion in After Effects with Twixtor?
When working with After Effects software, Twixtor is a convenient plug-in since it allows us to create slow-motion effects from any video source.
We’ll look at an example to better comprehend what we’re talking about in this post. Before we begin our study of the Twixtor plug-in, let us get acquainted with the software’s operating screen to quickly understand the content of this article as we go through our assessment of the Twixtor plug-in.
Step 1: When you launch After Effects, go to File>Import>File to import your footage. Here you can see the actual frame rate of your film. You may drag your film onto the timeline by right-clicking it and selecting New Comp from Selection.
Step 2: Select your video from the timeline in the composition, then go to Effects & Presets pane to search Twixtor, and you will find Twixtor or Twixtor Pro under RE: Vision plug-ins, depending on your version. Drag and drop it to the video in the timeline.

Step 3: In the Twixtor effect controls, enter the frame rate of the film you found previously. The faster and better your slowed footage will become, the higher the frame rate.
For organizational reasons, After Effects employs the “tree-ing“ concept, sometimes known as drop-down menus. Click on the yellow number next to Input: Frame Rate under Source Control. It should be set to 29.97 by default. Please set it to the frame rate you discovered previously in the tutorial.

You can then adjust the speed and time remap mode accordingly. For more information, you can watch the video tutorial below to find out how to create smooth Twixtor effects in Adobe After Effects.
Part 4: How to Get the Twixtor Style Effect on iPhone?
It is possible to shoot videos in slow motion and then play them back at average speed using SloPro – 1000fps Slow Motion Video from Sand Mountain Studios, a fantastic video editing effects tool.
Inserting slow motion cues and changing playback speeds without waiting is possible with renderless editing. It allows you to produce slow-motion films and enables you to insert extremely rapid sequences and cycle between various speeds.
SloPro even enables you to edit your films as they are being recorded, allowing you to choose between slow and fast motion while recording.
This program provides complete support for sharing through social media platforms such as Facebook, Twitter, and YouTube, allowing you to show off your impressive video creations to the rest of the world. It has already been established that SloPro is one of the few videos editing software that includes optical flow as a stand-alone effect.

Step 1: After you’ve imported your video, click on the red Edit button in the top-right corner of the screen to bring up the editing window.
Step 2: Trim the video down to the section that you wish to modify if required using the Clip In and Clip Out functions. It is divided into clips using the speed in and speeds out controls.
Step 3: Tap on the top-left box to bring up a list of fast and slow speed choices. Drag the cursor over the clip to bring up a fast and slow speed options list.
Step 4: If you want to use a slow speed, press the box in the upper right corner and choose Optical Flow from the menu.
This will render the clip with optical flow, resulting in the smooth Twixtor effect you are familiar with. There will be a watermark on your video if you use the program’s free version, but you can easily crop it out.
Conclusion
Slow-Mo videos are undoubtedly watch-worthy. They allow us to observe the fine details and appreciate the video content. But creating one isn’t child’s play. So, we decided to compile this article to inform our worthy readers on how they can get started using Twixtor on Adobe Premiere Pro and After Effects. We hope you had a fun time learning!
02 How to Use Twixtor to Create Super Slow-Mo in Adobe Premiere Pro?
03 How to Create Super Slow Motion in After Effects with Twixtor?
04 How to Get the Twixtor Style Effect on iPhone?
Part 1: What is Twixtor and How Does It Work?
Twixtor is a plug-in developed by RevisionFX. It is available for purchase. The plug-in gives users the ability to speed up, slow down, or convert the frame rate of picture sequences, all with special effects. Twixtor can visually estimate what a video is meant to look like in a slow-motion setting using video analysis and interoperability.
Due to the need for unparalleled image quality, RE: Vision Effects developed unique tracking technology that determines every individual pixel’s motion. This technology allows Twixtor to synthesize new innovative frames by warping and interpolating frames from the original sequence, resulting in unprecedented image quality.
Reset the clock to a single-speed setting. Always remember that you can customize the retiming on a frame-by-frame basis!
When items are crossing in the scene, Twixtor is more accurate and shows fewer artifacts than other rendering engines. This reduces the ripping and stretching of items when they cross the frame or exit it completely.
But how does Twixtor work is the million-dollar question! While Premiere includes the ability to slow down your film and has a newer, better-quality version dubbed Optical Flow, it cannot zoom in on your footage (called Pixel Motion in After Effects).
The slow-motion quality is undoubtedly superior to that of simple frame blending, but it is not the finest grade slow motion available. The TWIXTOR from Re: Vision Effects has long been the go-to solution for the most excellent post-slow motion. It is pricey, but it is well worth it.
The Pro edition provides you with the opportunity to fine-tune the pitch of the auto track, as well as the option to employ mattes and alphas to enrich your tracks and the ability to deal with motion vectors from a 3D system, among other features.
Part 2: How to Use Twixtor to Create Super Slow-Mo in Adobe Premiere Pro?
As we’ve already mentioned, we will be analyzing how Twixtor makes slow mos; we will be starting with the Adobe Premiere Pro. The following are the steps you need to learn to perform it yourself.
Step 1: After importing the video to the timeline, do some basic editing such as trimming and removing audio from the video.
Step 2: Nest the sequence to convert the video into a new sequence automatically.
Step 3: Go to the Effects tab and search for Twixtor, and then drop the Twixtor Pro to the video clip in the timeline.
Step 5: Right-click the video in the timeline again and scroll down to Show Clip Keyframes to enable the Speed option under Time Remapping. You can now enable the GPU acceleration to fast rendering.
Step 6: Click the Keyframe icon to mark the points where you want to begin with the slow-motion effect, and then mark the end part of the slow-motion effect video.
Step 7: Now, drag the line lower to add a slo-mo effect to video.
Remember that your video can sometimes lag if you set the video speed at a meager percentage. To avoid that, utilize settings in a better way to ensure your video works flawlessly.
Part 3: How to Create Super Slow Motion in After Effects with Twixtor?
When working with After Effects software, Twixtor is a convenient plug-in since it allows us to create slow-motion effects from any video source.
We’ll look at an example to better comprehend what we’re talking about in this post. Before we begin our study of the Twixtor plug-in, let us get acquainted with the software’s operating screen to quickly understand the content of this article as we go through our assessment of the Twixtor plug-in.
Step 1: When you launch After Effects, go to File>Import>File to import your footage. Here you can see the actual frame rate of your film. You may drag your film onto the timeline by right-clicking it and selecting New Comp from Selection.
Step 2: Select your video from the timeline in the composition, then go to Effects & Presets pane to search Twixtor, and you will find Twixtor or Twixtor Pro under RE: Vision plug-ins, depending on your version. Drag and drop it to the video in the timeline.
Step 3: In the Twixtor effect controls, enter the frame rate of the film you found previously. The faster and better your slowed footage will become, the higher the frame rate.
For organizational reasons, After Effects employs the “tree-ing“ concept, sometimes known as drop-down menus. Click on the yellow number next to Input: Frame Rate under Source Control. It should be set to 29.97 by default. Please set it to the frame rate you discovered previously in the tutorial.
You can then adjust the speed and time remap mode accordingly. For more information, you can watch the video tutorial below to find out how to create smooth Twixtor effects in Adobe After Effects.
Part 4: How to Get the Twixtor Style Effect on iPhone?
It is possible to shoot videos in slow motion and then play them back at average speed using SloPro – 1000fps Slow Motion Video from Sand Mountain Studios, a fantastic video editing effects tool.
Inserting slow motion cues and changing playback speeds without waiting is possible with renderless editing. It allows you to produce slow-motion films and enables you to insert extremely rapid sequences and cycle between various speeds.
SloPro even enables you to edit your films as they are being recorded, allowing you to choose between slow and fast motion while recording.
This program provides complete support for sharing through social media platforms such as Facebook, Twitter, and YouTube, allowing you to show off your impressive video creations to the rest of the world. It has already been established that SloPro is one of the few videos editing software that includes optical flow as a stand-alone effect.
Step 1: After you’ve imported your video, click on the red Edit button in the top-right corner of the screen to bring up the editing window.
Step 2: Trim the video down to the section that you wish to modify if required using the Clip In and Clip Out functions. It is divided into clips using the speed in and speeds out controls.
Step 3: Tap on the top-left box to bring up a list of fast and slow speed choices. Drag the cursor over the clip to bring up a fast and slow speed options list.
Step 4: If you want to use a slow speed, press the box in the upper right corner and choose Optical Flow from the menu.
This will render the clip with optical flow, resulting in the smooth Twixtor effect you are familiar with. There will be a watermark on your video if you use the program’s free version, but you can easily crop it out.
Conclusion
Slow-Mo videos are undoubtedly watch-worthy. They allow us to observe the fine details and appreciate the video content. But creating one isn’t child’s play. So, we decided to compile this article to inform our worthy readers on how they can get started using Twixtor on Adobe Premiere Pro and After Effects. We hope you had a fun time learning!
How to Zoom Webcam on PC
Making certain our digital presence is the best it can be pays dividends as more and more of what we do online; similar is the case with how to zoom out webcam windows 10. The majority of experts advise against using the built-in camera that comes with your laptop or computer and instead advocate getting a webcam or an HD camera. These, however, may be hard to come by and pricy if you locate a nice one. If the built-in camera on your laptop doesn’t perform effectively during Zoom meetings, you may want to consider about investing in a separate, better webcam. Webcams offer automatic settings that are intended to function with the largest variety of lighting situations possible. This suggests that they average out a great number of responses to the content of the frame. Because of this, we have incorporated basic PC webcam zooming settings. These answers may be found in the portions that follow.
It’s vital to know how to zoom in on a webcam before visiting there. The camera wasn’t always as vital as it is today, and only very large corporations could afford to employ it as a convenience. But today, nearly everyone, from huge organizations to little firms, acknowledges its value. Everybody needs a webcam that works properly. The camera control software you are using determines the zoom function. The resolution of your picture window and the capabilities of the application dictate how far you can zoom in on the webcam’s video image. You can zoom in and out on camera photos using tools like YouCam and Windows Live Messenger. The most critical camera capabilities for the ideal video conferencing experience are zoom in and zoom out, which at first look may appear trivial. Here, we’ll walk you through each step, in detail. Continue reading, and we’ll check your understanding of webcam zoom in and zoom out skills!
Way 1: Zoom with Windows Live Messenger
When utilizing a camera for video conferencing, you may zoom in on a user’s face to get rid of the background. Webcam settings are not accessible by default in Microsoft Windows. However, camera zoom settings may be changed in instant chat systems. Through an instant messaging tool, such as Windows Live Messenger, you may simply access these options. This application provides private offline chat, video messaging, image and video sharing, and video chatting.
Step1Start Windows Live Messenger on your PC or laptop first. Enter your login name and password by clicking the “Sign In” button.

Step2On the top menu bar, pick “Tools.” And then select the “Audio and Video Setup”. Drag the slider next to “Speaker” to modify the speaker volume. Drag the slider next to “Microphone” to modify the microphone sensitivity. Press “Next.”

Step3From the drop-down list, pick the webcam. The “Camera Control” option is situated on the top; pick “Webcam Settings” after that.
Step4Now, to alter the zoom settings, drag the “Zoom” slider. To zoom in or out, drag the slider to the left or right. Press “OK.”
Way 2: Use Windows 10 Camera App
Wondering how to zoom your camera in the Windows 10 Camera app? The Camera app enables you to zoom in or out on your webcam in both image and video modes. To accomplish so, click or push the Magnification button, and then use the slider to modify the webcam’s zoom level. To operate the zoom feature manually, pick “Manual Zoom.” In the preview window, a square appears when you pick this option. To zoom in on a specific region of the capture window, drag the square there. To expand the image that was acquired by the webcam, slide the slider bar. In simply, The Camera app enables you zoom in or out of photographs and movies shot with your webcam. To do this, click on the “Zoom” button and drag the slider to the left or right as appropriate on your Windows 10 camera. the following steps:
Step1To open the “Start Menu,” make a right-click on “Start.” Now, to access the Camera app, type “Camera App” into the start menu’s search box.

Step2Tap the Camera Control icon when you start or join a meeting. To zoom and pan the camera to the appropriate spot, utilize the icons on the Camera Control panel.
![]()
Step3To exit the Camera Control window and return to the Meeting Controls, touch outside of it.
Way 3: Zoom with YouCam
Unfortunately, the default cameras or webcams bundled with the majority of Windows laptops and desktops don’t have an automatic zoom option. In fact, the only method to adjust their crop is to switch from “Standard” to “Widescreen,” which does slightly zoom in on you but not in the manner we’d want. This makes it inescapable that the only method to manually alter a webcam’s magnification is to acquire one separately and apply its software settings. , like YouCam. YouCam provides video calling, streaming, and broadcasting. includes an integrated app. To employ Zoom with YouCam, refer to the methods given below:
Step1Launch the YouCam camera program and activate the webcam.

Step2In the camera preview window, pick Settings. Then, select “Enable Video Zoom” from the menu.
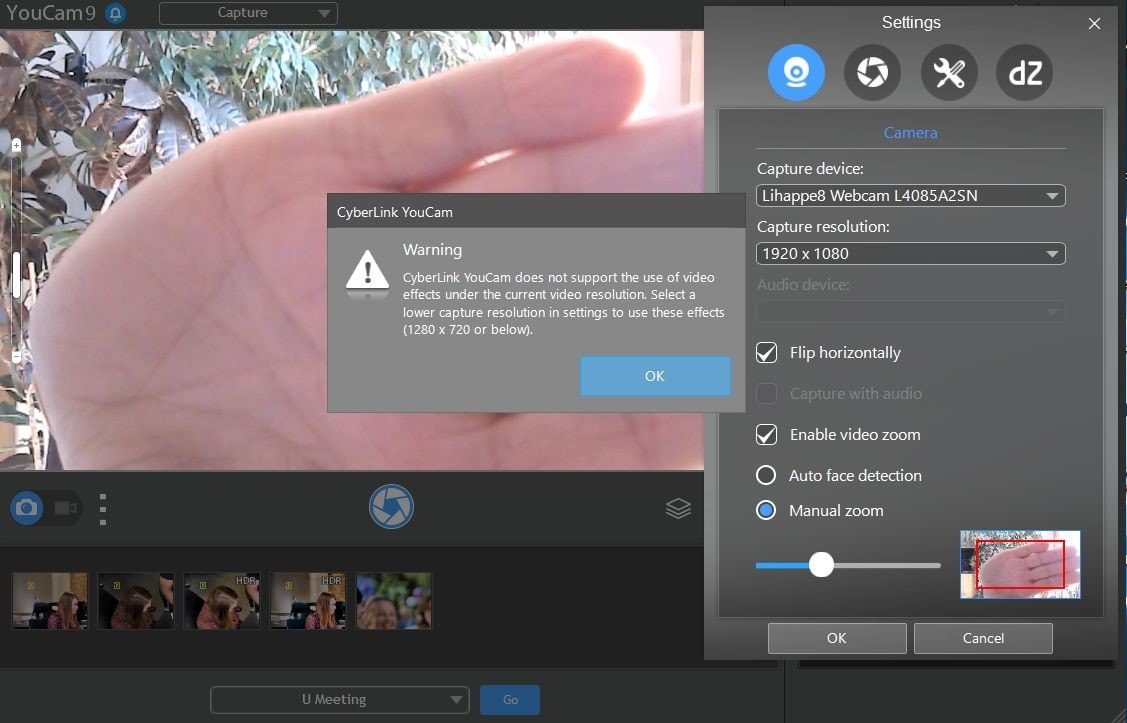
Step3Select “Automatic Face Detection” from the menu. As you wander about in the capture window, the camera watches your face and automatically zooms in on your photo as shown above.
Step4To handle the zoom feature manually, pick “Manual Zoom.” In the preview window, a square appears when you pick this option. To zoom in on a specific region of the capture window, drag the square there. To expand the image that was acquired by the webcam, slide the slider bar.

Way 4: Use iGlasses on Mac
For the perfect webcam look on a MAC, install the Chrome plugin iGlasses for video effects and style tweaks. Your videos will appear better on Zoom as a consequence. You may instantly enhance the appearance of your video interactions by utilizing the digital zoom on your iGlasses. Digital pan, tilt, and zoom are all possible with easy controls. For Macs that support it, an Apple Remote may be used to operate. iGlasses will become an option in Zoom’s video settings when it has been installed. You may improve your camera by altering the settings in iGlasses. You may experiment with a range of amusing effects, like 3-D distortions, using the virtual camera. Let’s learn how to utilize iGlasses on a Mac:
Step1Installing Ecamm’s iGlasses on a MacBook in the first step.
Step2To activate the camera, go to your video settings and pick iGlasses.
Step3Choose the Zoom window and execute the appropriate operations using the Zoom and Flip options. You may now zoom in and out using the camera on your MacBook as you like.

Conclusion
In conclusion, so many people currently take part in online conferences and virtual meetings. You want to create a lasting impression, don’t you? Not or whether you are the host of an online meeting or event, you must now maintain a professional image to prevent turning off attendees. You have discovered how to utilize the tools at your disposal to boost the zoom in and out quality of your camera in this post. However, as will be explained in the sections ahead, you may do it without the third-party plugins. With just one quick plugin, you can significantly transform how you look on a camera. Hence, try out the easy method from the above enlisted ones to get hold on your PC webcam to zoom in or out purposes.
Making certain our digital presence is the best it can be pays dividends as more and more of what we do online; similar is the case with how to zoom out webcam windows 10. The majority of experts advise against using the built-in camera that comes with your laptop or computer and instead advocate getting a webcam or an HD camera. These, however, may be hard to come by and pricy if you locate a nice one. If the built-in camera on your laptop doesn’t perform effectively during Zoom meetings, you may want to consider about investing in a separate, better webcam. Webcams offer automatic settings that are intended to function with the largest variety of lighting situations possible. This suggests that they average out a great number of responses to the content of the frame. Because of this, we have incorporated basic PC webcam zooming settings. These answers may be found in the portions that follow.
It’s vital to know how to zoom in on a webcam before visiting there. The camera wasn’t always as vital as it is today, and only very large corporations could afford to employ it as a convenience. But today, nearly everyone, from huge organizations to little firms, acknowledges its value. Everybody needs a webcam that works properly. The camera control software you are using determines the zoom function. The resolution of your picture window and the capabilities of the application dictate how far you can zoom in on the webcam’s video image. You can zoom in and out on camera photos using tools like YouCam and Windows Live Messenger. The most critical camera capabilities for the ideal video conferencing experience are zoom in and zoom out, which at first look may appear trivial. Here, we’ll walk you through each step, in detail. Continue reading, and we’ll check your understanding of webcam zoom in and zoom out skills!
Way 1: Zoom with Windows Live Messenger
When utilizing a camera for video conferencing, you may zoom in on a user’s face to get rid of the background. Webcam settings are not accessible by default in Microsoft Windows. However, camera zoom settings may be changed in instant chat systems. Through an instant messaging tool, such as Windows Live Messenger, you may simply access these options. This application provides private offline chat, video messaging, image and video sharing, and video chatting.
Step1Start Windows Live Messenger on your PC or laptop first. Enter your login name and password by clicking the “Sign In” button.
Step2On the top menu bar, pick “Tools.” And then select the “Audio and Video Setup”. Drag the slider next to “Speaker” to modify the speaker volume. Drag the slider next to “Microphone” to modify the microphone sensitivity. Press “Next.”
Step3From the drop-down list, pick the webcam. The “Camera Control” option is situated on the top; pick “Webcam Settings” after that.
Step4Now, to alter the zoom settings, drag the “Zoom” slider. To zoom in or out, drag the slider to the left or right. Press “OK.”
Way 2: Use Windows 10 Camera App
Wondering how to zoom your camera in the Windows 10 Camera app? The Camera app enables you to zoom in or out on your webcam in both image and video modes. To accomplish so, click or push the Magnification button, and then use the slider to modify the webcam’s zoom level. To operate the zoom feature manually, pick “Manual Zoom.” In the preview window, a square appears when you pick this option. To zoom in on a specific region of the capture window, drag the square there. To expand the image that was acquired by the webcam, slide the slider bar. In simply, The Camera app enables you zoom in or out of photographs and movies shot with your webcam. To do this, click on the “Zoom” button and drag the slider to the left or right as appropriate on your Windows 10 camera. the following steps:
Step1To open the “Start Menu,” make a right-click on “Start.” Now, to access the Camera app, type “Camera App” into the start menu’s search box.
Step2Tap the Camera Control icon when you start or join a meeting. To zoom and pan the camera to the appropriate spot, utilize the icons on the Camera Control panel.
![]()
Step3To exit the Camera Control window and return to the Meeting Controls, touch outside of it.
Way 3: Zoom with YouCam
Unfortunately, the default cameras or webcams bundled with the majority of Windows laptops and desktops don’t have an automatic zoom option. In fact, the only method to adjust their crop is to switch from “Standard” to “Widescreen,” which does slightly zoom in on you but not in the manner we’d want. This makes it inescapable that the only method to manually alter a webcam’s magnification is to acquire one separately and apply its software settings. , like YouCam. YouCam provides video calling, streaming, and broadcasting. includes an integrated app. To employ Zoom with YouCam, refer to the methods given below:
Step1Launch the YouCam camera program and activate the webcam.
Step2In the camera preview window, pick Settings. Then, select “Enable Video Zoom” from the menu.
Step3Select “Automatic Face Detection” from the menu. As you wander about in the capture window, the camera watches your face and automatically zooms in on your photo as shown above.
Step4To handle the zoom feature manually, pick “Manual Zoom.” In the preview window, a square appears when you pick this option. To zoom in on a specific region of the capture window, drag the square there. To expand the image that was acquired by the webcam, slide the slider bar.
Way 4: Use iGlasses on Mac
For the perfect webcam look on a MAC, install the Chrome plugin iGlasses for video effects and style tweaks. Your videos will appear better on Zoom as a consequence. You may instantly enhance the appearance of your video interactions by utilizing the digital zoom on your iGlasses. Digital pan, tilt, and zoom are all possible with easy controls. For Macs that support it, an Apple Remote may be used to operate. iGlasses will become an option in Zoom’s video settings when it has been installed. You may improve your camera by altering the settings in iGlasses. You may experiment with a range of amusing effects, like 3-D distortions, using the virtual camera. Let’s learn how to utilize iGlasses on a Mac:
Step1Installing Ecamm’s iGlasses on a MacBook in the first step.
Step2To activate the camera, go to your video settings and pick iGlasses.
Step3Choose the Zoom window and execute the appropriate operations using the Zoom and Flip options. You may now zoom in and out using the camera on your MacBook as you like.
Conclusion
In conclusion, so many people currently take part in online conferences and virtual meetings. You want to create a lasting impression, don’t you? Not or whether you are the host of an online meeting or event, you must now maintain a professional image to prevent turning off attendees. You have discovered how to utilize the tools at your disposal to boost the zoom in and out quality of your camera in this post. However, as will be explained in the sections ahead, you may do it without the third-party plugins. With just one quick plugin, you can significantly transform how you look on a camera. Hence, try out the easy method from the above enlisted ones to get hold on your PC webcam to zoom in or out purposes.
Best iOS Slow Motion Apps To Work With
iPhone is undoubtedly an awesome device to capture moments. Regardless of the iOS you are using; it has better lens and resolution sensors than Android. The launch of the iPhone 5S enables users to record video in slow motion with their smartphones. Although it is best in capturing and editing slow-mo, people still look for third-party apps .
The reason might be that the iPhone slow motion app offers certain additional features. Maybe they provide more advanced settings and personalization. To find an answer, you should read this article, which lists the best iPhone slow-mo apps.
Slow Motion Video Maker Slow your video’s speed with better control of your keyframes to create unique cinematic effects!
Make A Slow Motion Video Make A Slow Motion Video More Features

Part 1: [Top 10] Slowing Down Videos With Finest iPhone Slow Motion Apps
Are you an enthusiastic user of the iPhone and want to create videos across it to save time? Provided are some quick and effective iPhone slow-motion apps that you can go with. These applications will help you create the best slow-motion content without taking up much effort:
- Slow Motion Video Fx Editor
- SloMo Slow Motion Video Editor
- Slow Motion Video Editor
- Slow Motion’ Video Editor
- Slow Motion Video FX Edit
- Slow Fast Motion Video Editor
- Slow-Fast Motion Video Editor
- TimeFreeze
- Vidma – Video Editor Music
- Vizmato: Video Editor & Maker
1. Slow Motion Video Fx Editor
If you are seeking an iPhone slo-mo app, then this application holds all the relevant features. The application is designed to assist users in achieving slow motion and other speed effects. For precise and accurate slow motion, it offers basic slider and timeline settings. You can slow down a video at any scene by incorporating Advanced or Basic options.

Key Features
- The application offers to manipulate frame rate by 240 fps and 12x slower.
- Users can improve videos by incorporating music using its music library of 170+ tracks.
- The platform provides sharing options along social platforms like Instagram and Facebook.
2. SloMo Slow Motion Video Editor
This iPhone slow-motion app has all the abilities to slow down videos and enhance them. It provides two options to slow down a video via playback speed or video frame rate. The playback speed slows a video instantly while the frame rates smoothen it. You can also choose a specific period for adding the slow-motion effect.

Key Features
- The frame manipulation goes up to 120 fps, and the playback speed goes 12x.
- The application offers 40 color filters to enhance your video’s visual outlook.
- There are multiple ratio options to export a video to upload it to different platforms.
3. Slow Motion Video Editor
Create ultra-slow motion or ultra-high motion videos with this iPhone slo-mo app. It offers distinct speed manipulation options, such as up to 10x to slow down a video. In addition, the application offers built-in speed templates to help you add speed effects to dance videos. Users can also retain the original audio of the videos after speed alteration.

Key Features
- An intuitive user interface that offers a seamless slo-mo editing method.
- Import music from iTunes into this iPhone slo-mo app and add it to your videos.
- Publish your slo-mos directly to other editing apps like GoPro and InShot for additional editing.
4. Slow Motion’ Video Editor
Make professional-grade slow-motion videos using this iPhone slow-motion app. The application can record and edit videos at 60 to 240 fps, ensuring smooth, slow motions. With its modern and accessible user interface, achieving slow motions is easy. Other speed settings include split-second freezing frames and time-lapse videos.

Key Features
- The application passes subscription charges via iTunes for a seamless and trusted process.
- You can trim the unnecessary parts of the video using its Trim tool.
- Offers one-click functionality to share videos across Instagram, YouTube, Facebook, or Email.
5. Slow Motion Video FX Edit
Do you want to be in control of your slow-motion videos while editing? This iPhone slow motion app offers custom speed manipulation options like 12x and 240 fps. You can add freeze frames if you want to highlight a specific part of the video. With its interface, speed manipulation is just as simple as dragging a slider.

Key Features
- Enhance your video’s visuals with up to 40 stunning visual filters to enhance colors.
- The application offers weekly, monthly, and yearly plans to suit your requirements.
- You can add music from your library to videos or specific scenes via this app.
6. Slow Fast Motion Video Editor
Apply slow motion effect to the specific parts of your videos using this iPhone slow motion app. You can access it on the app store; the application is free to download. It features a timeline editing interface and a playback speed of up to 8x for Slomo. It separates the video frames, and you can change their speed, and afterward, it merges them.

Key Features
- The ability to incorporate music from your music library into videos with this app.
- You can manually trim out video segments and merge them back.
- Showcase your creativity to other social platforms directly from the app.
7. Slow-Fast Motion Video Editor
This iPhone slow-motion app download unlocks a professional way of creating slo-mos. The user interface is professional and accessible for all types of editors. It displays a velocity graph to change the playback speed to 8x at specific video frames. This application slows down video to 1/10th of its actual speed. It also maintains the pitch of audio while creating fast or slow-motion videos.

Key Features
- There is no restriction on video length to edit in this iPhone slow-motion app.
- It doesn’t export video with Watermark addition, which is remarkable for branding.
- You can edit and export a video in Portrait or Landscape display.
8. TimeFreeze
If you want to create slow-motion videos effectively, then this iPhone slow-motion app can do it. It works by manipulating the video frame rates from 24 fps to 120 fps. Along with slowing down videos, you can slow down high-motion video to normal as well. The user interface is basic and lacks technicalities to be accessed by skilled people.

Key Features
- The application supports all iOS 12.1, macOS 12.1, and newer versions.
- Uses advanced image processing algorithms for video frame manipulation.
- The application is free to use and only takes up 25.3 MB of your iPhone’s storage.
9. Vidma - Video Editor Music
You have read about many applications that offer to transform normal videos into slow motions. However, this iPhone slo-mo app is much more than just a speed changer. It slows down your videos via a velocity graph and maintains the audio pitch during the process. Using this application, you can slow down videos to 0.1x while also having video reverse options.

Key Features
- With 1000+ music tracks and hundreds of visual effects and filters, your videos can stand out.
- Along with the slow motion, you can also create time-lapse and apply speed ramping presets.
- Export your video in high-quality 4K resolution without any quality loss.
10. Vizmato: Video Editor & Maker
Vizmato stands as a multipurpose video editing app with slow-motion capabilities. Beyond the creation of compelling slow-motion scenes, Vizmato adds dramatic flair by reversing the speed. Furthermore, the software extends the speed manipulation feature via a custom option. In this way, everyone gets a chance to design their videos per their preferences.

Key Features
- It offers 20+ visual themes, 40+ effects, and 140+ music assets to uplift your videos.
- The tool can transform images into slideshows, making a video of your memories.
- You can record and add voiceovers with this iPhone slow-motion app.
Bonus Part: Wondershare Filmora and Slow Motion Video Making: A Simple Connection
Having no fun while editing video with the iPhone slow-motion app? It’s obvious because such applications are limited to slowing down your videos. So, using Wondershare Filmora could change the game in video editing of all types. Users from every field can rely on Filmora to get unique and polished content. This editing platform is available online for Windows, macOS, and mobile phone users.
Wondershare Filmora is integrated with artificial intelligence to boost your productivity in editing. You can use Filmora’s asset library to get media or create your own with AI. Using Filmora will amaze you at every step of editing and creating engaging media.
Free Download For Win 7 or later(64-bit)
Free Download For macOS 10.14 or later
Steps to Slow Down Video with Speed Ramping in Filmora
Speed ramping is a way to slow down or speed up videos smoothly. A slow change in videos gives a more professional outlook to videos. Have you observed this feature in any of the above-discussed iPhone slow-motion apps? The answer is no, so let’s benefit from speed ramping in Filmora by following the given steps.
Step 1Start Working on the New Project
Begin your video editing journey after downloading Filmora on your device. After downloading, open this platform and select “New Project.” This way, you will access its editing screen to begin working. Start with importing your video and bringing it to the timeline.

Step 2Discover the Speed Ramping Option with Templates
Place your cursor on the video and right-click to choose “Speed Ramping” from the list. Now, you can see an editing screen on your right. Pick any of the templates for effortless speed ramping.

Step 3Customize Speed Ramping to Smoothly Slow Down Videos
Otherwise, hit the “Customize” and direct downward. Go to the editing panel and hold the dots to move downward if you want to slow down. You can speed up video portions by holding the dots upward. Meanwhile, you can play the video to see the changes.

Step 4Use Optical Flow for Good Quality and Move to Save Changes
Extend the “AI Frame Interpolation” menu and hit the “Optical Flow.” That’s how you will get a high-quality video with slow speed. Keep editing or save changes through the “Export” button on the upper right.

Find Core Functionalities of Wondershare Filmora
Before using Filmora, it’s important to explore it to avoid confusion. Considering this point, you should discover some of its main features below:
1. AI Copywriting
Except for AI, no one can provide you with an engaging script on short notice. Thus, Filmora integrates an AI copywriting feature for generating the desired script within seconds. It accepts natural language prompts, not limiting experts to giving commands. This feature is considered professional in creating YouTube descriptions to rank the content.
2. AI Copilot Editing
Humans typically need suggestions in editing, whether they are beginners or professionals. What could be better than having an AI as your personal editing assistant? Filmora offers an AI copilot editor that answers your editing-related queries. Besides, it navigates you toward practical solutions by providing links or buttons.
3. AI Audio Denoise
Sometimes, background noises ruin the vocals of the audio. Remove that noise with the help of AI, which can detect the noise type for exact results. This feature can enhance your audio by performing reverb reduction. It can make the voice clear that is present in surroundings, like electrical voices from devices. Audio denoise proves vital in recording podcasts and online course recording scenarios.
4. AI Portrait
It’s a human urge to look beautiful, and video editing apps are not denying it. Filmora also provides more than 70 AI portrait effects to beautify facial features. Moreover, it can assist you in removing the background and keeping humans in video frames. Some AI stickers include Heart eyes, Emojis, and Sunglasses that can evoke humorous emotions.
Conclusion
Until now, you might find your answer about using iPhone slow-motion apps. The overview of such premium apps has guided you to select an app that best aligns with your needs. If you are still confused, use Wondershare Filmora, an incredible video editor. This platform is available for iPhone, Android, Windows, and macOS with its limitless editing tools.
Make A Slow Motion Video Make A Slow Motion Video More Features
Part 1: [Top 10] Slowing Down Videos With Finest iPhone Slow Motion Apps
Are you an enthusiastic user of the iPhone and want to create videos across it to save time? Provided are some quick and effective iPhone slow-motion apps that you can go with. These applications will help you create the best slow-motion content without taking up much effort:
- Slow Motion Video Fx Editor
- SloMo Slow Motion Video Editor
- Slow Motion Video Editor
- Slow Motion’ Video Editor
- Slow Motion Video FX Edit
- Slow Fast Motion Video Editor
- Slow-Fast Motion Video Editor
- TimeFreeze
- Vidma – Video Editor Music
- Vizmato: Video Editor & Maker
1. Slow Motion Video Fx Editor
If you are seeking an iPhone slo-mo app, then this application holds all the relevant features. The application is designed to assist users in achieving slow motion and other speed effects. For precise and accurate slow motion, it offers basic slider and timeline settings. You can slow down a video at any scene by incorporating Advanced or Basic options.
Key Features
- The application offers to manipulate frame rate by 240 fps and 12x slower.
- Users can improve videos by incorporating music using its music library of 170+ tracks.
- The platform provides sharing options along social platforms like Instagram and Facebook.
2. SloMo Slow Motion Video Editor
This iPhone slow-motion app has all the abilities to slow down videos and enhance them. It provides two options to slow down a video via playback speed or video frame rate. The playback speed slows a video instantly while the frame rates smoothen it. You can also choose a specific period for adding the slow-motion effect.
Key Features
- The frame manipulation goes up to 120 fps, and the playback speed goes 12x.
- The application offers 40 color filters to enhance your video’s visual outlook.
- There are multiple ratio options to export a video to upload it to different platforms.
3. Slow Motion Video Editor
Create ultra-slow motion or ultra-high motion videos with this iPhone slo-mo app. It offers distinct speed manipulation options, such as up to 10x to slow down a video. In addition, the application offers built-in speed templates to help you add speed effects to dance videos. Users can also retain the original audio of the videos after speed alteration.
Key Features
- An intuitive user interface that offers a seamless slo-mo editing method.
- Import music from iTunes into this iPhone slo-mo app and add it to your videos.
- Publish your slo-mos directly to other editing apps like GoPro and InShot for additional editing.
4. Slow Motion’ Video Editor
Make professional-grade slow-motion videos using this iPhone slow-motion app. The application can record and edit videos at 60 to 240 fps, ensuring smooth, slow motions. With its modern and accessible user interface, achieving slow motions is easy. Other speed settings include split-second freezing frames and time-lapse videos.
Key Features
- The application passes subscription charges via iTunes for a seamless and trusted process.
- You can trim the unnecessary parts of the video using its Trim tool.
- Offers one-click functionality to share videos across Instagram, YouTube, Facebook, or Email.
5. Slow Motion Video FX Edit
Do you want to be in control of your slow-motion videos while editing? This iPhone slow motion app offers custom speed manipulation options like 12x and 240 fps. You can add freeze frames if you want to highlight a specific part of the video. With its interface, speed manipulation is just as simple as dragging a slider.
Key Features
- Enhance your video’s visuals with up to 40 stunning visual filters to enhance colors.
- The application offers weekly, monthly, and yearly plans to suit your requirements.
- You can add music from your library to videos or specific scenes via this app.
6. Slow Fast Motion Video Editor
Apply slow motion effect to the specific parts of your videos using this iPhone slow motion app. You can access it on the app store; the application is free to download. It features a timeline editing interface and a playback speed of up to 8x for Slomo. It separates the video frames, and you can change their speed, and afterward, it merges them.
Key Features
- The ability to incorporate music from your music library into videos with this app.
- You can manually trim out video segments and merge them back.
- Showcase your creativity to other social platforms directly from the app.
7. Slow-Fast Motion Video Editor
This iPhone slow-motion app download unlocks a professional way of creating slo-mos. The user interface is professional and accessible for all types of editors. It displays a velocity graph to change the playback speed to 8x at specific video frames. This application slows down video to 1/10th of its actual speed. It also maintains the pitch of audio while creating fast or slow-motion videos.
Key Features
- There is no restriction on video length to edit in this iPhone slow-motion app.
- It doesn’t export video with Watermark addition, which is remarkable for branding.
- You can edit and export a video in Portrait or Landscape display.
8. TimeFreeze
If you want to create slow-motion videos effectively, then this iPhone slow-motion app can do it. It works by manipulating the video frame rates from 24 fps to 120 fps. Along with slowing down videos, you can slow down high-motion video to normal as well. The user interface is basic and lacks technicalities to be accessed by skilled people.
Key Features
- The application supports all iOS 12.1, macOS 12.1, and newer versions.
- Uses advanced image processing algorithms for video frame manipulation.
- The application is free to use and only takes up 25.3 MB of your iPhone’s storage.
9. Vidma - Video Editor Music
You have read about many applications that offer to transform normal videos into slow motions. However, this iPhone slo-mo app is much more than just a speed changer. It slows down your videos via a velocity graph and maintains the audio pitch during the process. Using this application, you can slow down videos to 0.1x while also having video reverse options.
Key Features
- With 1000+ music tracks and hundreds of visual effects and filters, your videos can stand out.
- Along with the slow motion, you can also create time-lapse and apply speed ramping presets.
- Export your video in high-quality 4K resolution without any quality loss.
10. Vizmato: Video Editor & Maker
Vizmato stands as a multipurpose video editing app with slow-motion capabilities. Beyond the creation of compelling slow-motion scenes, Vizmato adds dramatic flair by reversing the speed. Furthermore, the software extends the speed manipulation feature via a custom option. In this way, everyone gets a chance to design their videos per their preferences.
Key Features
- It offers 20+ visual themes, 40+ effects, and 140+ music assets to uplift your videos.
- The tool can transform images into slideshows, making a video of your memories.
- You can record and add voiceovers with this iPhone slow-motion app.
Bonus Part: Wondershare Filmora and Slow Motion Video Making: A Simple Connection
Having no fun while editing video with the iPhone slow-motion app? It’s obvious because such applications are limited to slowing down your videos. So, using Wondershare Filmora could change the game in video editing of all types. Users from every field can rely on Filmora to get unique and polished content. This editing platform is available online for Windows, macOS, and mobile phone users.
Wondershare Filmora is integrated with artificial intelligence to boost your productivity in editing. You can use Filmora’s asset library to get media or create your own with AI. Using Filmora will amaze you at every step of editing and creating engaging media.
Free Download For Win 7 or later(64-bit)
Free Download For macOS 10.14 or later
Steps to Slow Down Video with Speed Ramping in Filmora
Speed ramping is a way to slow down or speed up videos smoothly. A slow change in videos gives a more professional outlook to videos. Have you observed this feature in any of the above-discussed iPhone slow-motion apps? The answer is no, so let’s benefit from speed ramping in Filmora by following the given steps.
Step 1Start Working on the New Project
Begin your video editing journey after downloading Filmora on your device. After downloading, open this platform and select “New Project.” This way, you will access its editing screen to begin working. Start with importing your video and bringing it to the timeline.
Step 2Discover the Speed Ramping Option with Templates
Place your cursor on the video and right-click to choose “Speed Ramping” from the list. Now, you can see an editing screen on your right. Pick any of the templates for effortless speed ramping.
Step 3Customize Speed Ramping to Smoothly Slow Down Videos
Otherwise, hit the “Customize” and direct downward. Go to the editing panel and hold the dots to move downward if you want to slow down. You can speed up video portions by holding the dots upward. Meanwhile, you can play the video to see the changes.
Step 4Use Optical Flow for Good Quality and Move to Save Changes
Extend the “AI Frame Interpolation” menu and hit the “Optical Flow.” That’s how you will get a high-quality video with slow speed. Keep editing or save changes through the “Export” button on the upper right.
Find Core Functionalities of Wondershare Filmora
Before using Filmora, it’s important to explore it to avoid confusion. Considering this point, you should discover some of its main features below:
1. AI Copywriting
Except for AI, no one can provide you with an engaging script on short notice. Thus, Filmora integrates an AI copywriting feature for generating the desired script within seconds. It accepts natural language prompts, not limiting experts to giving commands. This feature is considered professional in creating YouTube descriptions to rank the content.
2. AI Copilot Editing
Humans typically need suggestions in editing, whether they are beginners or professionals. What could be better than having an AI as your personal editing assistant? Filmora offers an AI copilot editor that answers your editing-related queries. Besides, it navigates you toward practical solutions by providing links or buttons.
3. AI Audio Denoise
Sometimes, background noises ruin the vocals of the audio. Remove that noise with the help of AI, which can detect the noise type for exact results. This feature can enhance your audio by performing reverb reduction. It can make the voice clear that is present in surroundings, like electrical voices from devices. Audio denoise proves vital in recording podcasts and online course recording scenarios.
4. AI Portrait
It’s a human urge to look beautiful, and video editing apps are not denying it. Filmora also provides more than 70 AI portrait effects to beautify facial features. Moreover, it can assist you in removing the background and keeping humans in video frames. Some AI stickers include Heart eyes, Emojis, and Sunglasses that can evoke humorous emotions.
Conclusion
Until now, you might find your answer about using iPhone slow-motion apps. The overview of such premium apps has guided you to select an app that best aligns with your needs. If you are still confused, use Wondershare Filmora, an incredible video editor. This platform is available for iPhone, Android, Windows, and macOS with its limitless editing tools.
How To Remove Audio From Video
Extracting audio from video lets you focus on the main video. Moreover, it also protects privacy and addresses copyright problems. Thus, controlling the audio is a crucial skill for video editors. One approach to making the video seem better is to remove the noise. Well, it isn’t just about reducing background noise. Instead, it’s a calculated move to make your editing more precise. So, how do you remove audio from a video? Don’t worry if you are a newcomer in the video editing field! This post is your go-to guide to effortlessly eliminating audio from your video content.
Extracting audio from video lets you focus on the main video. Moreover, it also protects privacy and addresses copyright problems. Thus, controlling the audio is a crucial skill for video editors. One approach to making the video seem better is to remove the noise. Well, it isn’t just about reducing background noise. Instead, it’s a calculated move to make your editing more precise. So, how do you remove audio from a video? Don’t worry if you are a newcomer in the video editing field! This post is your go-to guide to effortlessly eliminating audio from your video content.
In this article
- Part 1: Why Is It Necessary to Remove Audio from a Video?
- Part 2: How Can You Improve Storytelling With Silent Videos?
- Part 3: How to Use Filmora to Remove Audio from Your Video?
Remove Audio Now For Win 7 or later(64-bit)
Remove Audio Now For macOS 10.14 or later
Why Is It Necessary to Remove Audio from a Video?
You can make a video far more versatile and successful for many different things by removing the audio.
Your Video Becomes Multipurpose
Taking the audio out of a video makes it more versatile. Presentations, slide decks, and instructional videos may all benefit from this. The original audio or background noise might be too distracting in such videos.
No Language Issues
The muted or removed audio lets you reach viewers who speak a different language. By removing the original audio, the video becomes language-neutral. Thus, you save time adding subtitles or dubbing without disturbing the narration.
Place Emphasis on the Video Itself
Cutting off the sound may make the video’s visuals the main attraction. It may be beneficial when creating tutorials or instructional videos. That’s because viewers may prefer to see the demos without the sound.
Eliminating Excessive Background Noise
The video might get dull with background noises, echoes, or unwanted sounds. Deleting the audio stream helps to eliminate distractions. As a result, viewers get a cleaner viewing experience.
Keeping Copyright Concerns at Bay
Businesses can avoid copyright infringement problems by eliminating audio from videos. Removing someone’s audio work before using it in public venues is necessary. It supports copyright laws on audio material by limiting display to visual components.
Content Personalization
Creators can let viewers add their soundtracks or voiceovers by removing audio. Thus, it can make the watching experience more customized. It suits projects that need a high degree of personalization or user-generated content.
Confidential Data Security
Sometimes, a video might capture sensitive conversations or information. So, it’s essential to remove the audio to protect privacy. Remember, sharing the visual footage does not compromise confidentiality. It hides the crucial discussions or data from the original audio.
As you can see, removing audio from a video has several benefits. Many options are available when you mute the audio in a video. By eliminating background noise, you’re freeing your imagination.
So, how do silent videos improve your video production strategies? Let’s find out!
How Can You Improve Storytelling With Silent Videos?
There is a much unrealized narrative potential in silent videos. Most videos rely only on visual elements to convey narratives. Thus, mute clips have a unique ability to captivate audiences. It also offers many possibilities for storytelling, allowing for a more immersive experience.
Setting a Narrative
Videos without sound force viewers to rely more on their visual perception of the tale. It can draw your viewers closer to the visuals. Moreover, it also heightens their involvement with the story as it develops.
Improving Stories
Silence directs the viewer’s attention to certain visual aspects. When you remove all sound distractions, the audience can focus on the pictures. It helps you highlight essential story aspects.
For instance, rely on more than just dialogue to convey emotion. Instead, you can take a modest close-up of the character’s face.
Build Emotions With No Audio
One effective method of building intense emotions is the complete absence of sound. Remember, silent clips can keep viewers on the top of their seats. The audience may get more invested in the story’s raw essence when a scene unfolds in silence. In short, this technique aims to evoke a range of emotions in the audience.
Add Metaphor
The lack of audio permits the use of symbolic language only via visual representations. You can use each picture to convey information. It eliminates the need for dialogue or background music.
The audience can interact with the story on a deeper level via interpretation. Here, video scenes, objects, or actions work as symbols.
Simplify Complex Stories
Silent videos let storytellers elicit strong emotional reactions from audiences. They can co-create the story by deciphering visual cues. Besides, they can also add thoughts, emotions, and interpretations in silent videos. Without words, silent videos can help you convey stories that captivate audiences.
How to Use Filmora to Remove Audio from Your Video?
Two main approaches are available for using this software. You can start by downloading Wondershare Filmora for free to try it out. Here is how to remove audio in a video editor.
Remove Audio Now For Win 7 or later(64-bit)
Remove Audio Now For macOS 10.14 or later
Method 1: Use the “Mute” Button
The first method is using the “Mute” function available in Filmora. You can start by importing the local video file into this software.
Drop the file into Filmora’s video editing timeline. You can mute the file by right-clicking on it. Once you’ve finished, choose a format to save the file in.
As you can see, the mute option stands out as a fantastic one-click feature. It removes the necessity for specialized video editing skills. Anyone can effortlessly remove audio from their videos with ease.

Method 2: Use the Audio Detach feature
Now, let’s turn our focus to a different, efficient way. The Audio Detach function becomes a potent feature for separating audio from videos. Let’s check out its detailed instructions for precisely separating audio and video.
Step1Upload Your Video
First, select the video clip whose audio you want to extract. You can start by clicking “Import” and then navigating to the relevant folder on your hard drive.
While you pick more files, keep the “Ctrl” button down to select them all at once. The main editing dashboard will show thumbnails of all the currently loaded files. You can see a preview in the right-hand window when you double-click them.

Step2Cut Out the Music
Now, you should drag videos from the dashboard into the Video Timeline. After that, you can right-click the video to choose the “Audio Detach” option.
The Music Timeline will immediately display a new audio file. Here, you can see the original video’s soundtrack. Now, pressing the “Delete” button can remove the sounds.
You can also detach audio from multiple video files. Remember, all the files will mesh together perfectly on the Video Timeline.
Thus, you need to click the application icon on the left-hand side of the screen and choose “Save As…” to create new project files if you need to extract audio from more than one file. Then, export each output file individually after reloading the project file.

Step3Download the Video
To be sure this is what you need, double-tap the file in the Video Timeline. You can add suitable music files to the clip if needed. To save only the video track, click the “Create” option directly. A popup will open up, asking you to choose a format before you can save it to your PC.
The Music Timeline will immediately display a new audio file. Here, you can see the original video’s soundtrack. Now, pressing the “Delete” button can remove the sounds.
You can also detach audio from multiple video files. Remember, all the files will mesh together perfectly on the Video Timeline.
Thus, you need to click the application icon on the left-hand side of the screen and choose “Save As…” to create new project files if you need to extract audio from more than one file. Then, export each output file individually after reloading the project file.
Now you know how to remove audio from videos in Wondershare Filmora. As you can see, removing background noise from videos is a breeze using Filmora. You don’t need extensive experience or expensive software packages.
Follow the simple steps outlined above, even if this is your first time. You may remove distracting or unnecessary audio from your file in just a few minutes.
Conclusion
As you can see, your ability to control the audio in video editing defines the viewing experience. It is about not just transforming video material but also expanding possibilities. This silent space is where imagination soars.
It’s a technique to make your video clips more adaptable. Thus, they can transcend language obstacles, legal limitations, and distractions.
Think of a vacation video where the beautiful sights and sounds of the busy streets are in front. It will allow the audience to lose themselves in the lively atmosphere completely. If you remove the audio from this clip, it can become livelier.
In short, sound removal is crucial in creating a more engaging story. It changes the viewer’s experience by focusing on visuals and increasing engagement. You can use Filmora’s powerful audio removal features. The software streamlines the editing process without compromising the quality of the video. Learn to use silence as a tool to tell stories and make people feel things in your videos.
- Part 2: How Can You Improve Storytelling With Silent Videos?
- Part 3: How to Use Filmora to Remove Audio from Your Video?
Remove Audio Now For Win 7 or later(64-bit)
Remove Audio Now For macOS 10.14 or later
Why Is It Necessary to Remove Audio from a Video?
You can make a video far more versatile and successful for many different things by removing the audio.
Your Video Becomes Multipurpose
Taking the audio out of a video makes it more versatile. Presentations, slide decks, and instructional videos may all benefit from this. The original audio or background noise might be too distracting in such videos.
No Language Issues
The muted or removed audio lets you reach viewers who speak a different language. By removing the original audio, the video becomes language-neutral. Thus, you save time adding subtitles or dubbing without disturbing the narration.
Place Emphasis on the Video Itself
Cutting off the sound may make the video’s visuals the main attraction. It may be beneficial when creating tutorials or instructional videos. That’s because viewers may prefer to see the demos without the sound.
Eliminating Excessive Background Noise
The video might get dull with background noises, echoes, or unwanted sounds. Deleting the audio stream helps to eliminate distractions. As a result, viewers get a cleaner viewing experience.
Keeping Copyright Concerns at Bay
Businesses can avoid copyright infringement problems by eliminating audio from videos. Removing someone’s audio work before using it in public venues is necessary. It supports copyright laws on audio material by limiting display to visual components.
Content Personalization
Creators can let viewers add their soundtracks or voiceovers by removing audio. Thus, it can make the watching experience more customized. It suits projects that need a high degree of personalization or user-generated content.
Confidential Data Security
Sometimes, a video might capture sensitive conversations or information. So, it’s essential to remove the audio to protect privacy. Remember, sharing the visual footage does not compromise confidentiality. It hides the crucial discussions or data from the original audio.
As you can see, removing audio from a video has several benefits. Many options are available when you mute the audio in a video. By eliminating background noise, you’re freeing your imagination.
So, how do silent videos improve your video production strategies? Let’s find out!
How Can You Improve Storytelling With Silent Videos?
There is a much unrealized narrative potential in silent videos. Most videos rely only on visual elements to convey narratives. Thus, mute clips have a unique ability to captivate audiences. It also offers many possibilities for storytelling, allowing for a more immersive experience.
Setting a Narrative
Videos without sound force viewers to rely more on their visual perception of the tale. It can draw your viewers closer to the visuals. Moreover, it also heightens their involvement with the story as it develops.
Improving Stories
Silence directs the viewer’s attention to certain visual aspects. When you remove all sound distractions, the audience can focus on the pictures. It helps you highlight essential story aspects.
For instance, rely on more than just dialogue to convey emotion. Instead, you can take a modest close-up of the character’s face.
Build Emotions With No Audio
One effective method of building intense emotions is the complete absence of sound. Remember, silent clips can keep viewers on the top of their seats. The audience may get more invested in the story’s raw essence when a scene unfolds in silence. In short, this technique aims to evoke a range of emotions in the audience.
Add Metaphor
The lack of audio permits the use of symbolic language only via visual representations. You can use each picture to convey information. It eliminates the need for dialogue or background music.
The audience can interact with the story on a deeper level via interpretation. Here, video scenes, objects, or actions work as symbols.
Simplify Complex Stories
Silent videos let storytellers elicit strong emotional reactions from audiences. They can co-create the story by deciphering visual cues. Besides, they can also add thoughts, emotions, and interpretations in silent videos. Without words, silent videos can help you convey stories that captivate audiences.
How to Use Filmora to Remove Audio from Your Video?
Two main approaches are available for using this software. You can start by downloading Wondershare Filmora for free to try it out. Here is how to remove audio in a video editor.
Remove Audio Now For Win 7 or later(64-bit)
Remove Audio Now For macOS 10.14 or later
Method 1: Use the “Mute” Button
The first method is using the “Mute” function available in Filmora. You can start by importing the local video file into this software.
Drop the file into Filmora’s video editing timeline. You can mute the file by right-clicking on it. Once you’ve finished, choose a format to save the file in.
As you can see, the mute option stands out as a fantastic one-click feature. It removes the necessity for specialized video editing skills. Anyone can effortlessly remove audio from their videos with ease.
Method 2: Use the Audio Detach feature
Now, let’s turn our focus to a different, efficient way. The Audio Detach function becomes a potent feature for separating audio from videos. Let’s check out its detailed instructions for precisely separating audio and video.
Step1Upload Your Video
First, select the video clip whose audio you want to extract. You can start by clicking “Import” and then navigating to the relevant folder on your hard drive.
While you pick more files, keep the “Ctrl” button down to select them all at once. The main editing dashboard will show thumbnails of all the currently loaded files. You can see a preview in the right-hand window when you double-click them.
Step2Cut Out the Music
Now, you should drag videos from the dashboard into the Video Timeline. After that, you can right-click the video to choose the “Audio Detach” option.
The Music Timeline will immediately display a new audio file. Here, you can see the original video’s soundtrack. Now, pressing the “Delete” button can remove the sounds.
You can also detach audio from multiple video files. Remember, all the files will mesh together perfectly on the Video Timeline.
Thus, you need to click the application icon on the left-hand side of the screen and choose “Save As…” to create new project files if you need to extract audio from more than one file. Then, export each output file individually after reloading the project file.
Step3Download the Video
To be sure this is what you need, double-tap the file in the Video Timeline. You can add suitable music files to the clip if needed. To save only the video track, click the “Create” option directly. A popup will open up, asking you to choose a format before you can save it to your PC.
The Music Timeline will immediately display a new audio file. Here, you can see the original video’s soundtrack. Now, pressing the “Delete” button can remove the sounds.
You can also detach audio from multiple video files. Remember, all the files will mesh together perfectly on the Video Timeline.
Thus, you need to click the application icon on the left-hand side of the screen and choose “Save As…” to create new project files if you need to extract audio from more than one file. Then, export each output file individually after reloading the project file.
Now you know how to remove audio from videos in Wondershare Filmora. As you can see, removing background noise from videos is a breeze using Filmora. You don’t need extensive experience or expensive software packages.
Follow the simple steps outlined above, even if this is your first time. You may remove distracting or unnecessary audio from your file in just a few minutes.
Conclusion
As you can see, your ability to control the audio in video editing defines the viewing experience. It is about not just transforming video material but also expanding possibilities. This silent space is where imagination soars.
It’s a technique to make your video clips more adaptable. Thus, they can transcend language obstacles, legal limitations, and distractions.
Think of a vacation video where the beautiful sights and sounds of the busy streets are in front. It will allow the audience to lose themselves in the lively atmosphere completely. If you remove the audio from this clip, it can become livelier.
In short, sound removal is crucial in creating a more engaging story. It changes the viewer’s experience by focusing on visuals and increasing engagement. You can use Filmora’s powerful audio removal features. The software streamlines the editing process without compromising the quality of the video. Learn to use silence as a tool to tell stories and make people feel things in your videos.
Also read:
- And when It Comes to Voice Changers for Discord, None Is as Easy to Operate as the Voicemod. Here Is a Detailed Guide About How to Use Voicemod on Discord on Mobile and Desktop Devices
- 2024 Approved Learn About Splice Video Online and Its Advantages. Also, Check Out the Best Online Apps for Splice Editing
- In 2024, How to Use Rules of Thirds
- How To Create A Green Screen Video In After Effects for 2024
- In 2024, Camera Shake Effects in Videos Helps to Showcase Aesthetics and Vibes. Do You Wish to Add a Camera Shake in Videos? Consider Using the Video Editor Discussed Here for This
- New In 2024, Why Your Transparent GIF Is Hard to Remove and How to Do With It
- In 2024, Top 10 Movie Trailer Voice Generators Windows, Mac, Android, iPhone
- Updated In 2024, Adobe Premiere Pro Guide to Slow-Down Video
- 2024 Approved How To Export Video in Filmora
- A Complete Guide to Use Distortion Effect in Premiere Pro for 2024
- 2024 Approved How To Fade Audio In Kinemaster
- New How to Use LUTs in Adobe Premiere Pro
- New SRT File Translation Could Be a Tedious Task if You Dont Know the Right Steps. Lets Discuss Few Effective Ways to Do It Like a Pro
- 2024 Approved Blender Green Screen Effects
- New Bandicut Video Editor Review for 2024
- New How to Create an URL for Your Video for 2024
- In 2024, What Can Be Better than Converting Apple Video Format Into Other Formats so that You Can Use the Files Easily. We Have a Few Options that You Can Use for This Purpose
- Learn How to Merge Audio and Video Like a Pro with This Step-by-Step Guide to Using FFmpeg. Create Seamless Videos and Improve Your Video Production Skills
- Top Free Video Editing Software Enhance Your Content with These Essential Tools
- Updated 2024 Approved How to Add a Lower Third to Your Video
- New Easy Way to Add Transitions to Videos for 2024
- How to Zoom in on PowerPoint Easy Ways for 2024
- New Adding Slow Motion in DaVinci Resolve A Comprehensive Overview
- New In 2024, LumaFusion Color Grading Achieving It Through LUTs
- Updated 2024 Approved 5 Excellent Tools To Convert Video to 60 FPS
- 2024 Approved 2 Effective Ways to Make SRT File Translation Like a Pro
- New Best AR Video App - Top 10 Picks
- Do You Have a Sony Camera and Want to Try Different LUTs on Your Digital Content? Youre at the Right Place, as You Can Apply Sony HLG LUTs to Your Media
- New You Can Match Paint Colors From Pictures for Your Wall, as Well as for Your Videos. And to Know How to Do Both, We Have Laid Down the Following Discussion
- 2024 Approved How Can You Create Outstanding Educational Teaching Videos?
- Do You Want to Blur Faces in Your Videos? Read This Article to Find Out the Easiest Way to Blur the Faces in Videos Using Adobe Premiere Pro
- 2024 Approved Find The Best Free Canon LUTs
- New Easily Cut Large Videos Faster on Mac 7 Solutions Included for 2024
- Here Are the Steps to Crop a Video in Sony Vegas Pro Step 1 Click on Import and Import the Video to Be Edited. Click on It and Drag-Drop to Timeline for 2024
- New Top 6 End Screen Makers
- In 2024, Weve Picked up the Best Online as Well as Offline MOV to GIF Converters . These Converters Are Easy to Use and Have No Limitations on Size. Get Your One
- Updated In 2024, 10 Crazy-Cool Examples of AR Video
- 2024 Approved How to Animate Designs With Canva GIF
- New 2024 Approved Split a Clip in DaVinci Resolve Step by Step
- In 2024, Explore Our Comprehensive Guide to the 10 Best Cameras . Unlock the World of Advanced Technology Perfect for Capturing Slow-Motion Footage in Various Scenarios
- New 2024 Approved What Is Animated GIF | GIF Example & Advantages of GIF
- Updated Add a Miniature Effect on Your Video for Filmy Looks. To Add This Effect, Read the Complete Guide and Make Your Video Cinematic by Wondershare Filmora for 2024
- 2024 Approved How to Use Rule of Thirds in Video
- How to Start a Video Editing Career
- How to Reset a Locked Xiaomi Redmi Note 13 5G Phone
- Top 11 Free Apps to Check IMEI on iPhone SE
- How to Mirror Your Realme V30 Screen to PC with Chromecast | Dr.fone
- The 6 Best SIM Unlock Services That Actually Work On Your Vivo T2 5G Device
- How Can I Catch the Regional Pokémon without Traveling On Nokia 130 Music | Dr.fone
- In 2024, Complete Tutorial to Use VPNa to Fake GPS Location On Apple iPhone 15 Plus | Dr.fone
- Hard Resetting an Honor Magic5 Ultimate Device Made Easy | Dr.fone
- What is Geo-Blocking and How to Bypass it On Apple iPhone SE (2020)? | Dr.fone
- Top 15 Augmented Reality Games Like Pokémon GO To Play On Apple iPhone SE (2020) | Dr.fone
- In 2024, How to Lock Apps on Tecno Spark Go (2023) to Protect Your Individual Information
- How to Reset a ZTE Blade A73 5G Phone That Is Locked | Dr.fone
- Wondering the Best Alternative to Hola On Vivo Y100t? Here Is the Answer | Dr.fone
- Super Easy Ways To Deal with Honor X7b Unresponsive Screen | Dr.fone
- In 2024, How I Transferred Messages from Tecno Phantom V Fold to iPhone 12/XS (Max) in Seconds | Dr.fone
- How to Change GPS Location on Vivo Y56 5G Easily & Safely | Dr.fone
- In 2024, How to Turn Off Google Location to Stop Tracking You on Xiaomi 14 | Dr.fone
- Ways To Find Unlocking Codes For Samsung Galaxy S23 FE Phones
- Little Known Techniques of Motion Graphics in Premiere Pro for 2024
- In 2024, Ultimate Guide to Catch the Regional-Located Pokemon For Apple iPhone 14 Pro | Dr.fone
- How to Recover Deleted Photos from Android Gallery App on C51
- In 2024, How to Unlock AT&T iPhone 14 Plus with 3 Methods
- In 2024, New Multiple Ways How To Remove iCloud Activation Lock On your Apple iPhone 6s
- In 2024, Top 5 Car Locator Apps for OnePlus Ace 2V | Dr.fone
- In 2024, How to Turn Off Google Location to Stop Tracking You on Motorola Moto G24 | Dr.fone
- In 2024, 9 Best Phone Monitoring Apps for Vivo S18 | Dr.fone
- How to Hard Reset Samsung Galaxy S24 Ultra Without Password | Dr.fone
- How to Remove Forgotten PIN Of Your Vivo X Flip
- How to Remove a Previously Synced Google Account from Your Xiaomi Redmi Note 13 5G
- How to Simulate GPS Movement in AR games On Poco X5 Pro? | Dr.fone
- How To Unlock Any Oppo A38 Phone Password Using Emergency Call
- In 2024, How To Pause Life360 Location Sharing For Samsung Galaxy S23 | Dr.fone
- How to Vivo S17t Get Deleted photos Back with Ease and Safety?
- Here are Some of the Best Pokemon Discord Servers to Join On Oppo F23 5G | Dr.fone
- 3 Methods to Mirror Vivo S18 to Roku | Dr.fone
- Can Life360 Track You When Your Honor 100 is off? | Dr.fone
- In 2024, How to Intercept Text Messages on Lenovo ThinkPhone | Dr.fone
- In 2024, Ultimate Guide to Catch the Regional-Located Pokemon For OnePlus Ace 2 Pro | Dr.fone
- A Complete Guide To OEM Unlocking on Nokia C300
- In 2024, 9 Mind-Blowing Tricks to Hatch Eggs in Pokemon Go Without Walking On Apple iPhone 15 Plus | Dr.fone
- In 2024, 5 Easy Ways to Copy Contacts from OnePlus Nord N30 5G to iPhone 14 and 15 | Dr.fone
- Android Safe Mode - How to Turn off Safe Mode on Honor Magic V2? | Dr.fone
- Full guide to Apple iPhone 13 iCloud Bypass
- Title: Updated How to Use Twixtor Effect to Create Super Slow-Motion Video for 2024
- Author: Chloe
- Created at : 2024-04-24 07:08:37
- Updated at : 2024-04-25 07:08:37
- Link: https://ai-editing-video.techidaily.com/updated-how-to-use-twixtor-effect-to-create-super-slow-motion-video-for-2024/
- License: This work is licensed under CC BY-NC-SA 4.0.
