:max_bytes(150000):strip_icc():format(webp)/GettyImages-1164718779-aa87dac78cd44ad7b71e76c27adc7e9a.jpg)
Updated In 2024,

Text Animation Intro Tutorial in Filmora
Preparation
What you need to prepare:
- A computer (Windows or macOS)
- Your video materials.
- Filmora video editor
Step 1
Download and Install the Filmora video editor . Then, click on New Project once the program starts.
Step 2
Go to Titles and drag the Default Title to the Timeline. Then, double-click on the Default Title clip to open its settings. Here, type in your text → change the text color to Black → click OK → take a snapshot.

Step 3
Double-click on the Default Title once more and simply change the text color to anything other than black this time. Then, click OK and take another snapshot. After this, delete the Default Title from the Timeline.
Step 4
Next, go to Sample Color and drag the White color to the Timeline. Increase the White Color clip’s duration to 10 seconds by dragging the tail of the clip to the right.

Step 5
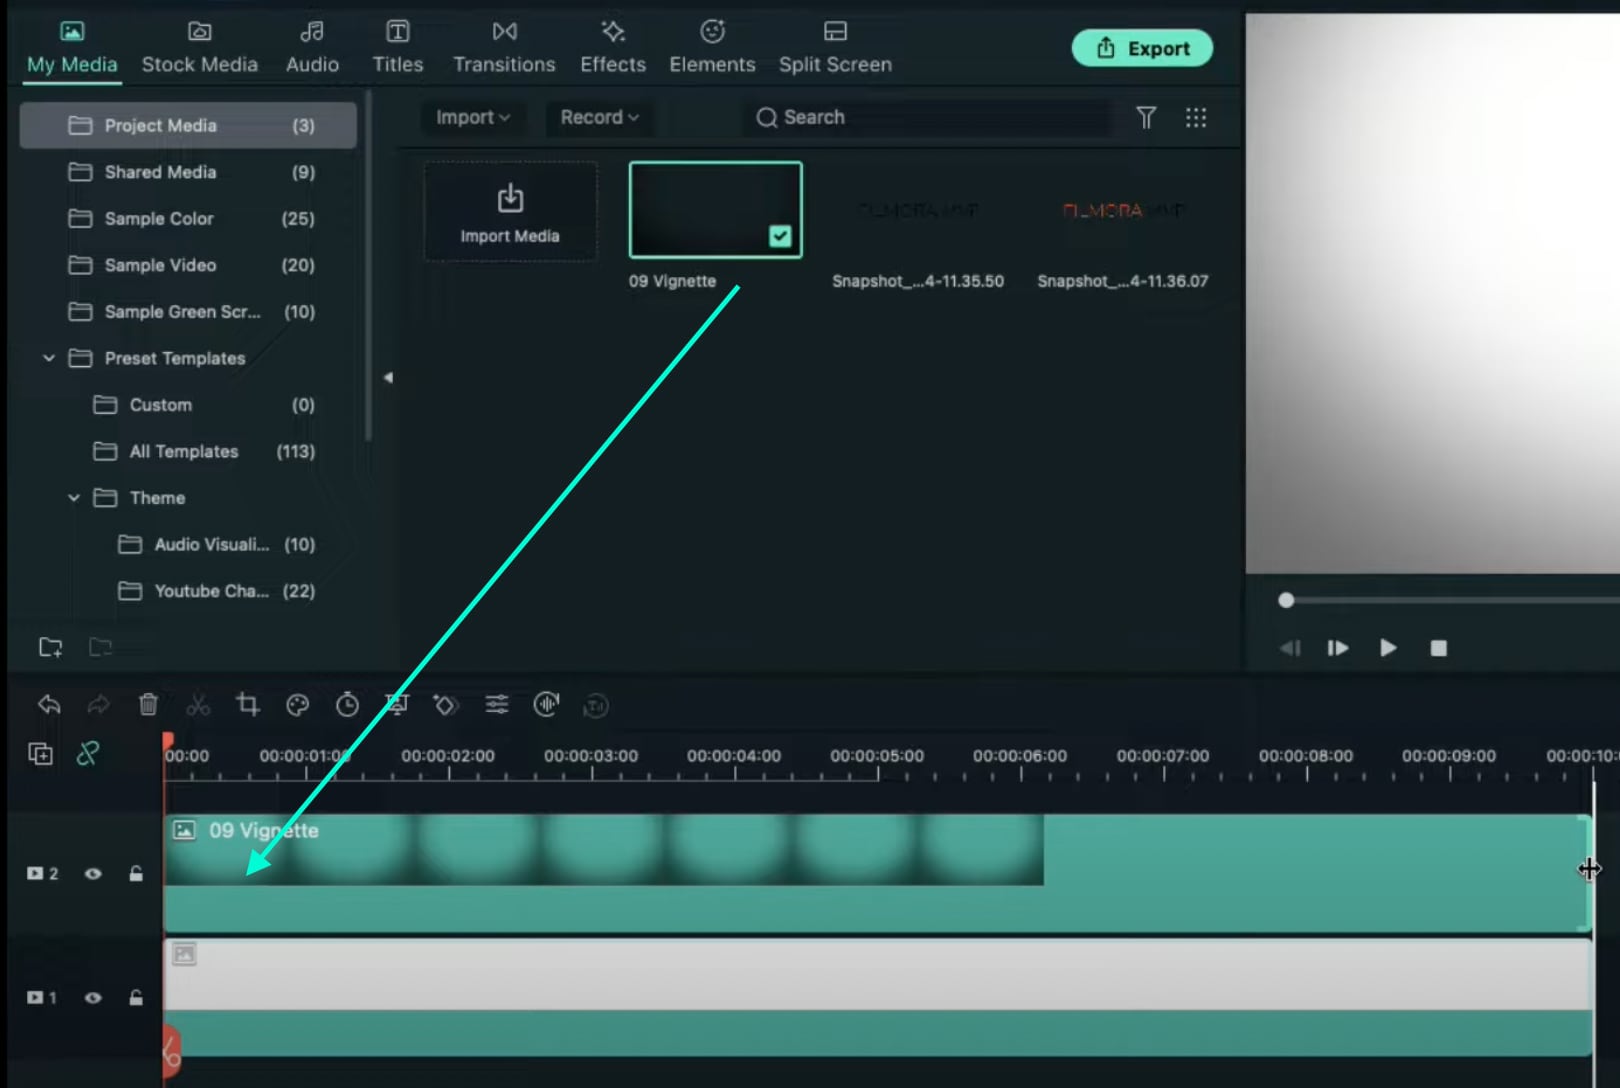
For the next step, you need to download a simple Vignette png image . Then, import the Vignette image into Filmora. Go to My Media and click on Import Media. Import it and drag the image to the Timeline. Then, move that clip to Track 3.
Step 6
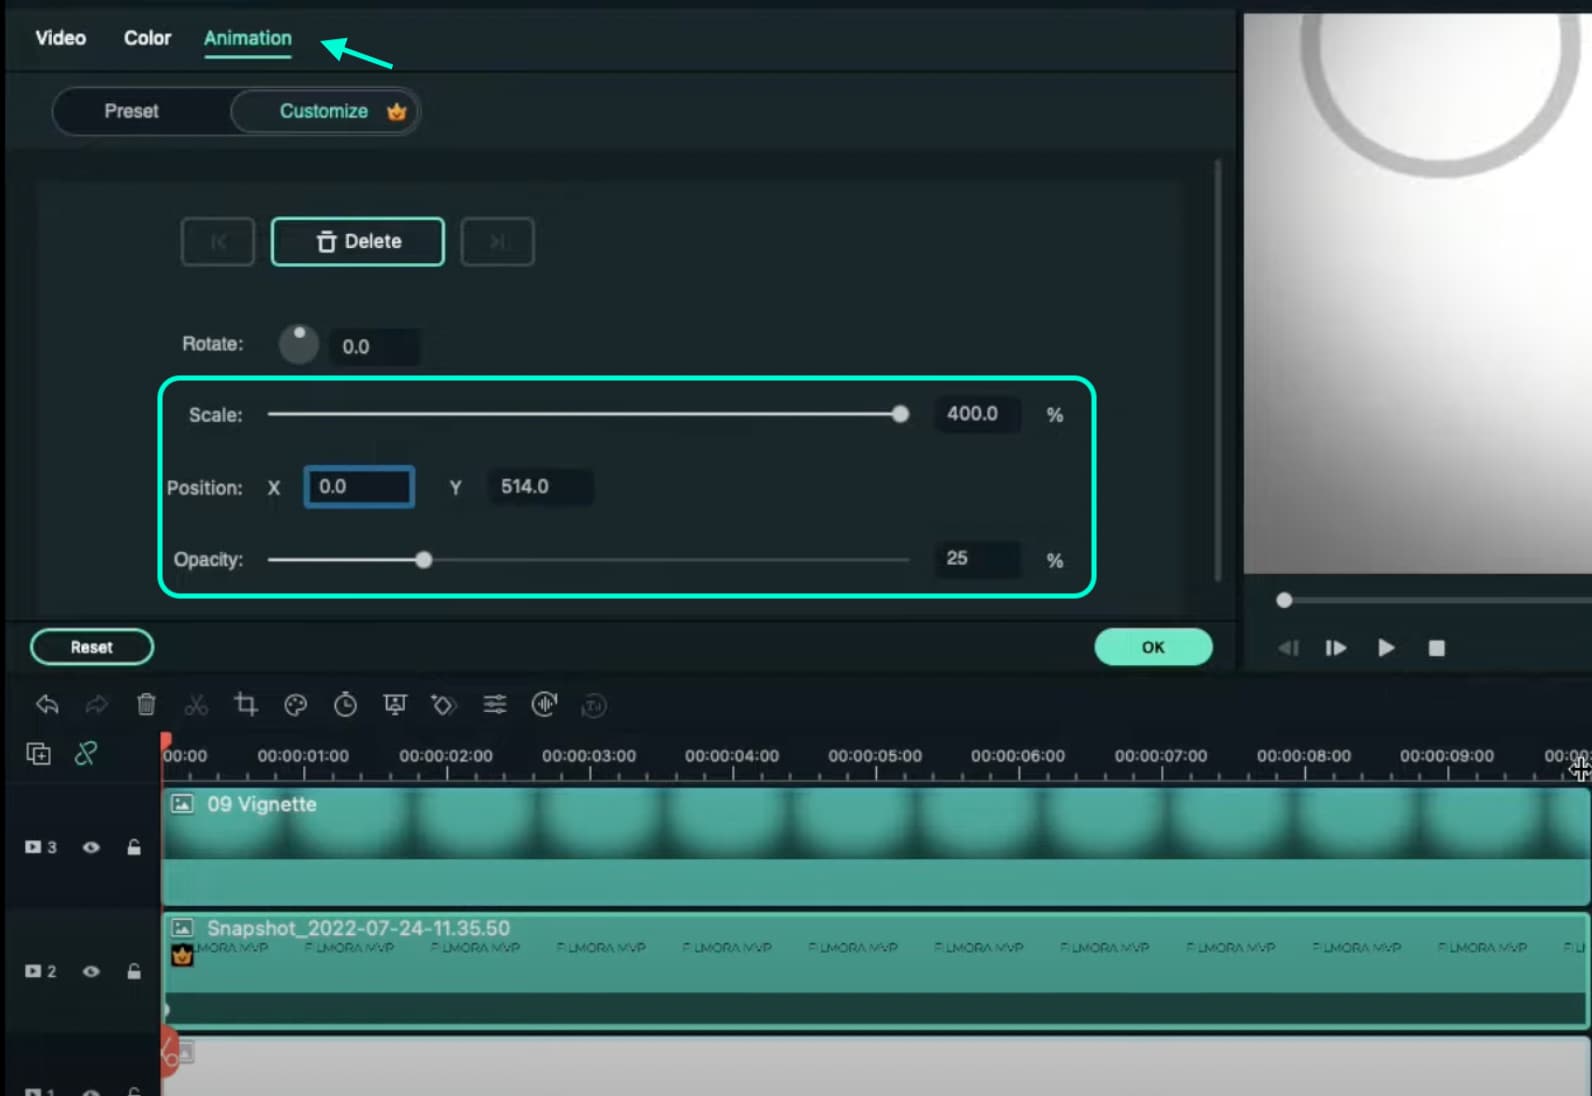
Drop the Black snapshot you took earlier to Track 2. Double-click on it, go to Animation, and apply these settings. After this, move the Playhead to the end of the clip and change the X-axis value to “-800”.
Step 7
Go to Effects and drag the Square Blur effect to Track 4 on the Timeline. Increase its duration to match the other clips. Then, click on the effect and change its Size bar value to 4. Click OK.

Step 8
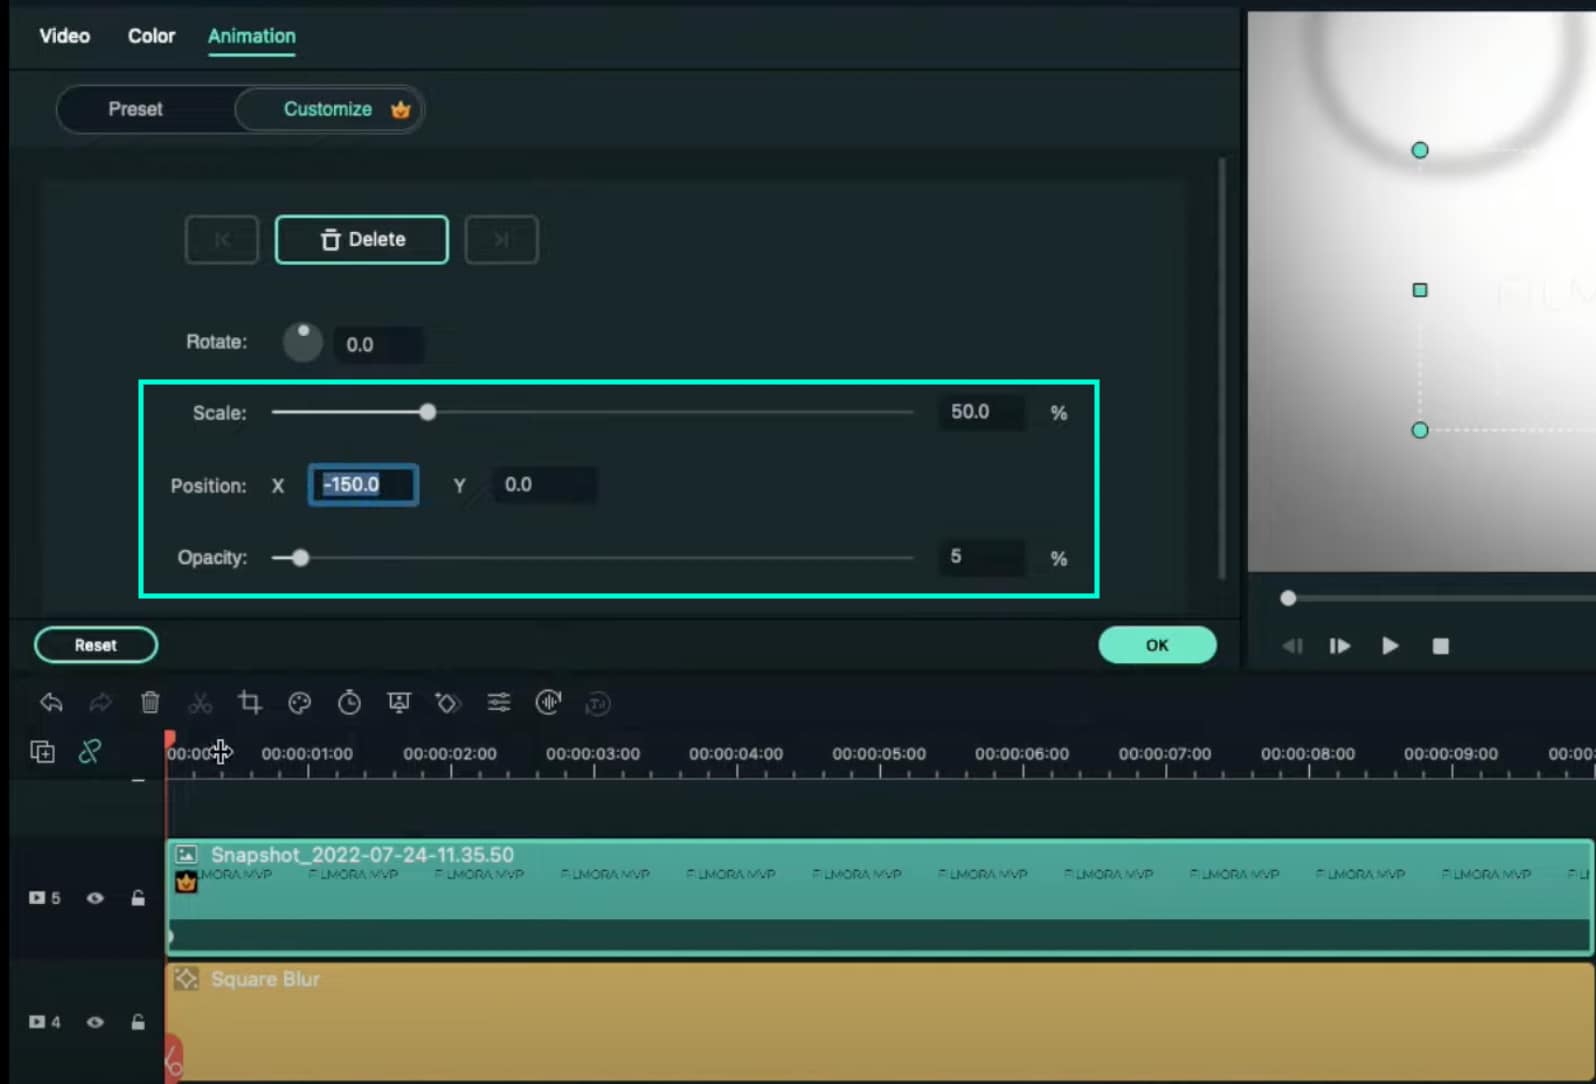
Place the Playhead at the beginning of the clip. Go to My Media and drag the Black snapshot to Track 5. Double-click on it → go to Animation and change the settings to look like this. Then, move the Playhead to 9 seconds. Here, change the X-axis to “150” and the Scale to 75%.
Step 9
Now, place the Playhead at the starting point and drag the colored snapshot in Track 6. Double-click on it and change the Scale to 50%. Then, move the Playhead to 9 seconds again and change the Scale to 75%. Click OK.
Step 10
Go to Sample Color and drag “Gradient 4” to Track 7 on the Timeline. Double-click on it → go to the Video tab → change the Blending Mode to Overlay → decrease the Opacity to 25%. Click OK.

Step 11
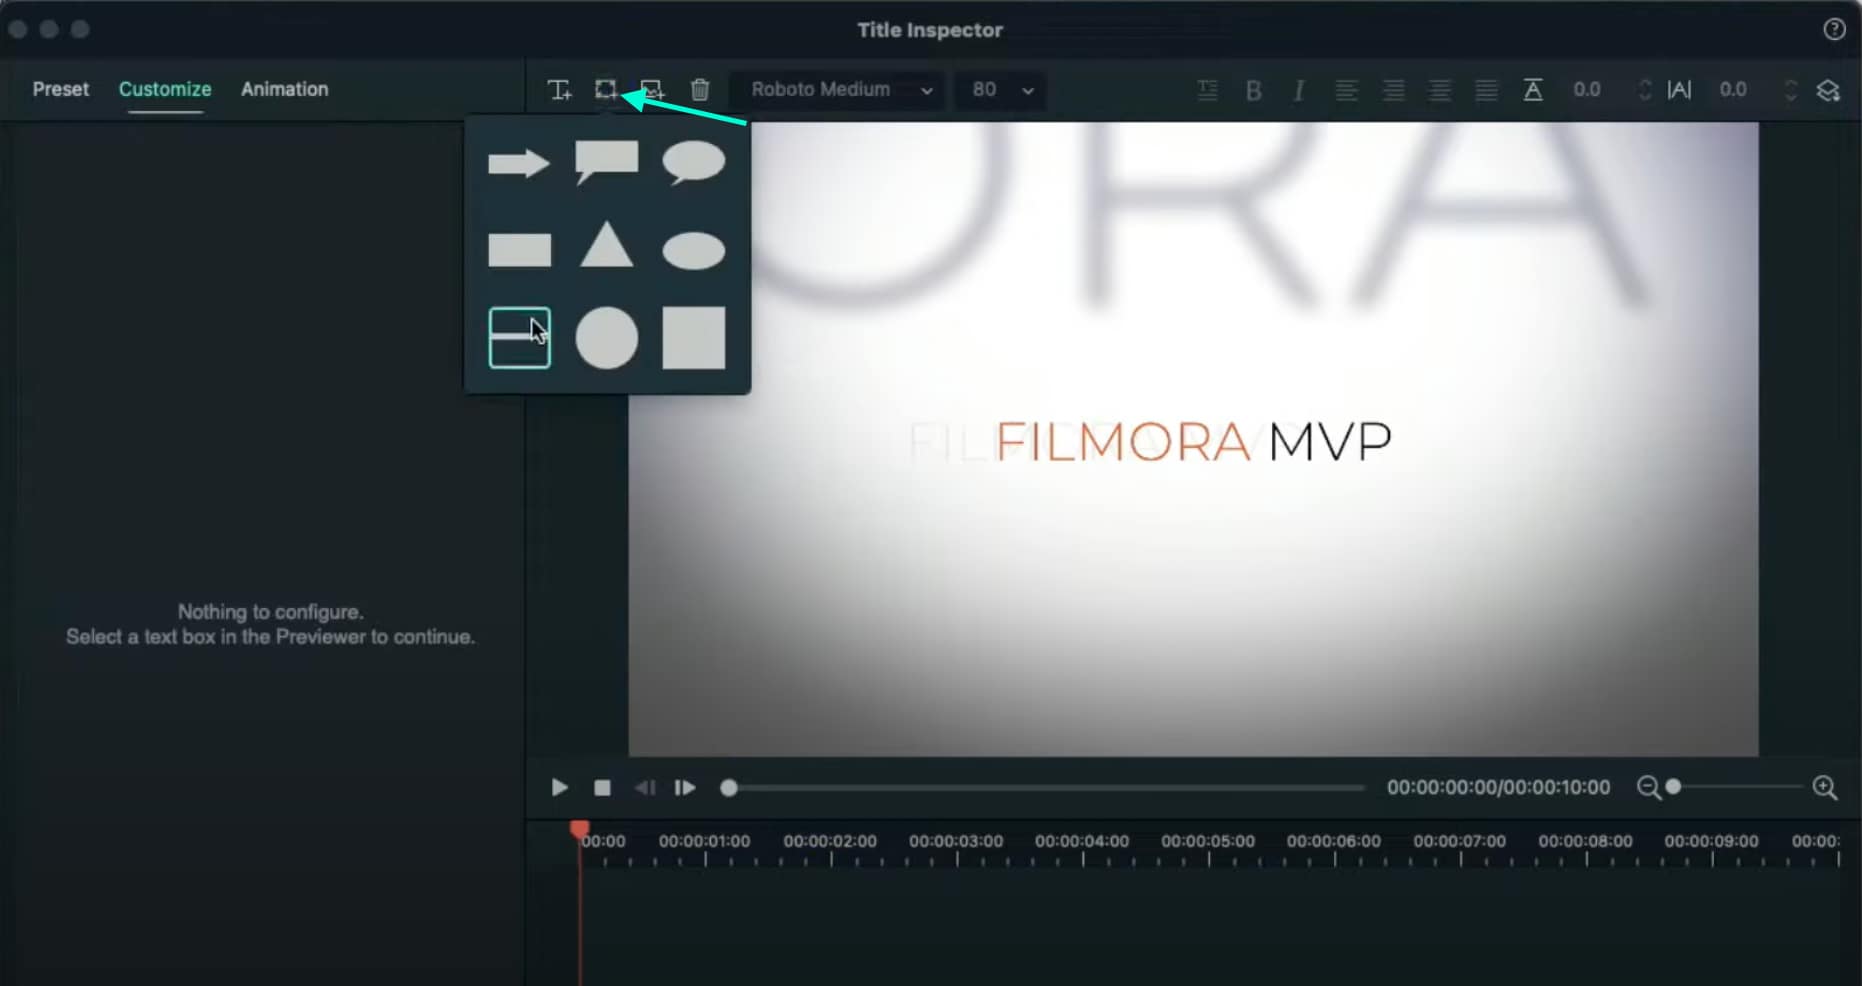
Drag a Default Title to Track 8 and double-click on it to open its Advanced settings. From here, delete the yellow text clip located under the video. Then, insert a Line shape.
Step 12
Increase the Line’s length to be almost as long as the screen. Then adjust its position until half of the Line is visible on the screen. Like this.
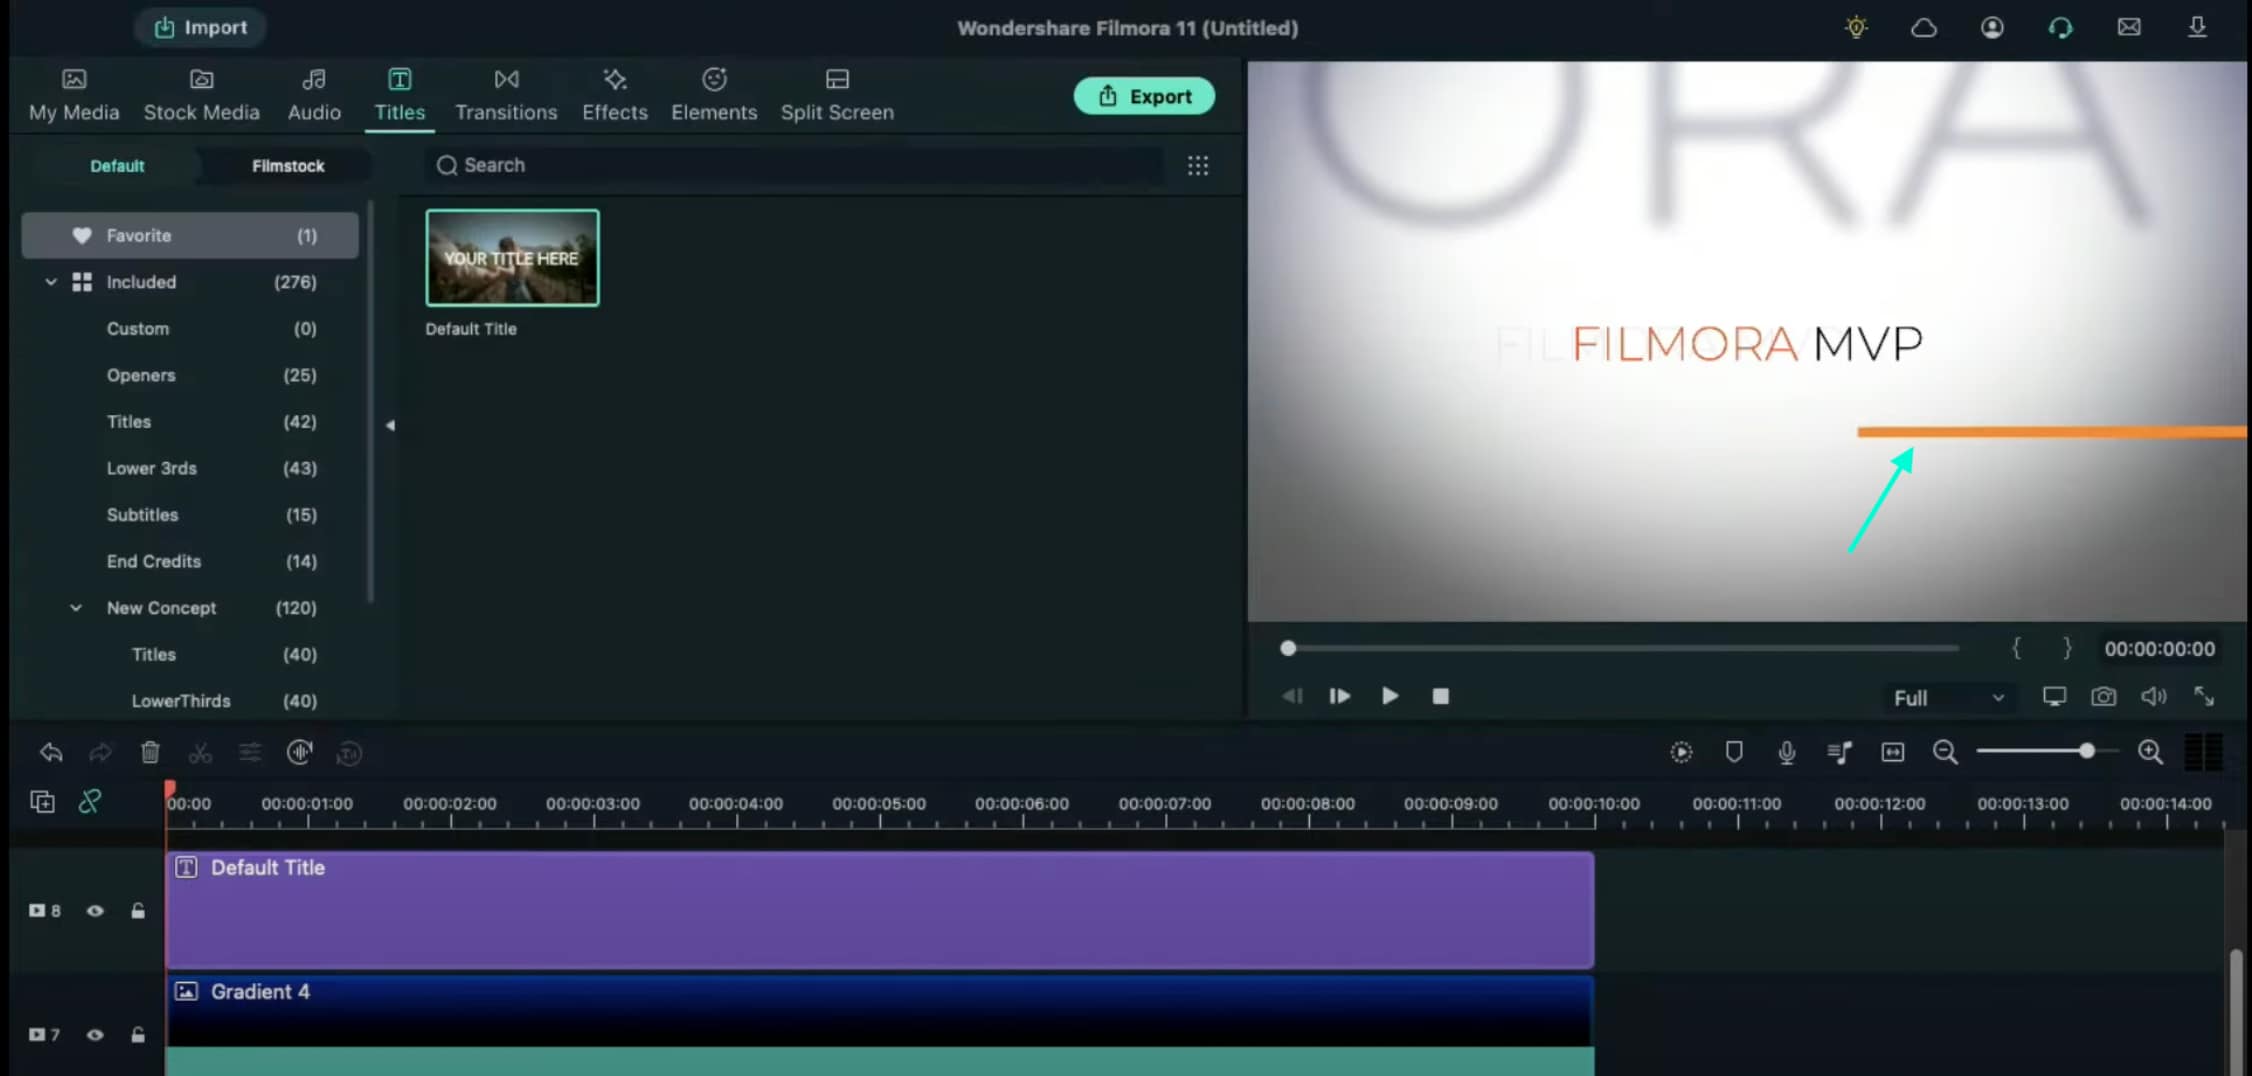
Step 13
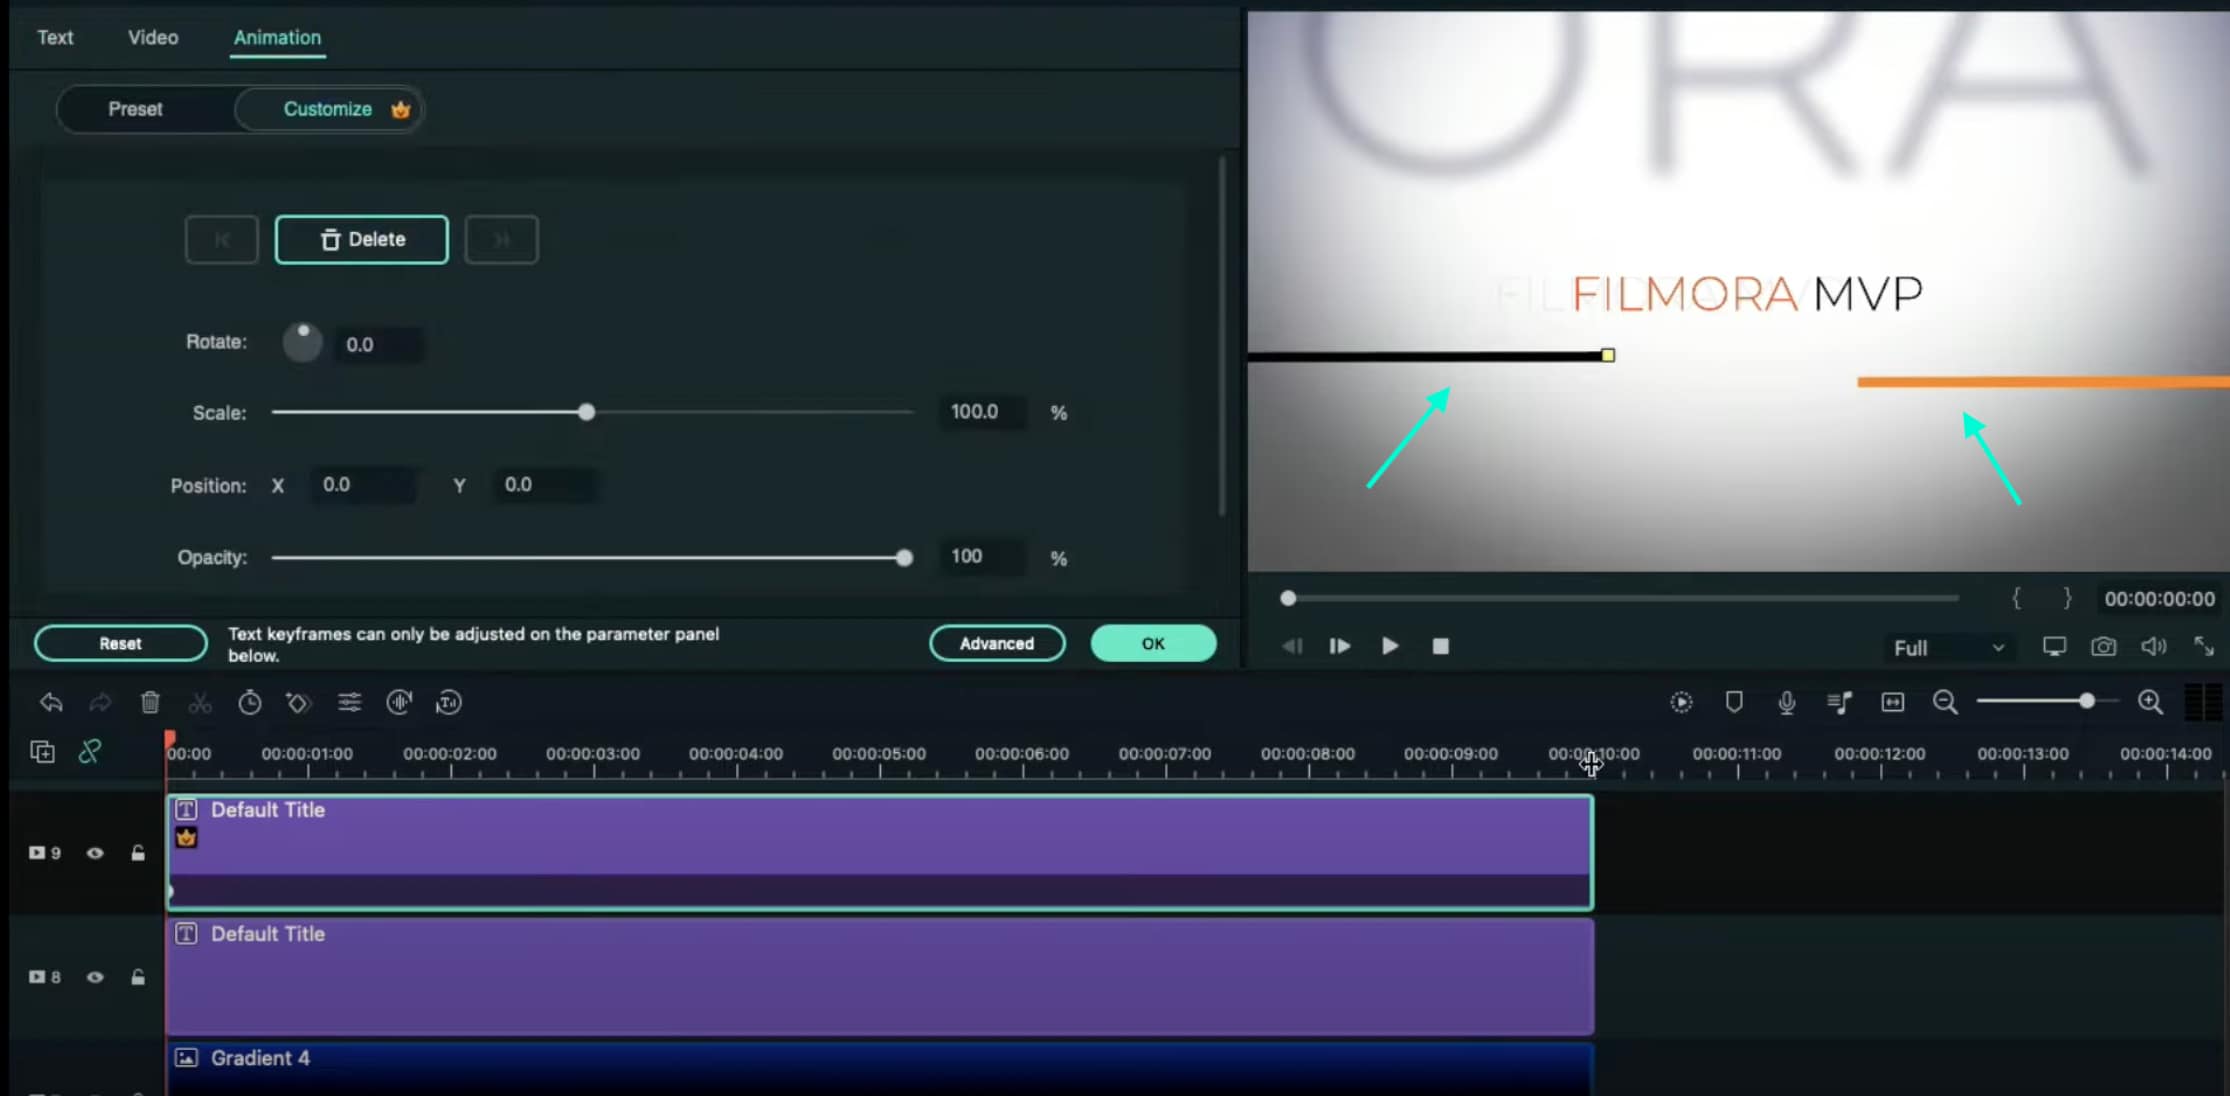
Copy this Default Title and paste it into Track 9. Open its Advanced settings and change the Line color to something different than the previous one. Then, move it to the other side of the screen, slightly above the previous line. Click OK.
Step 14
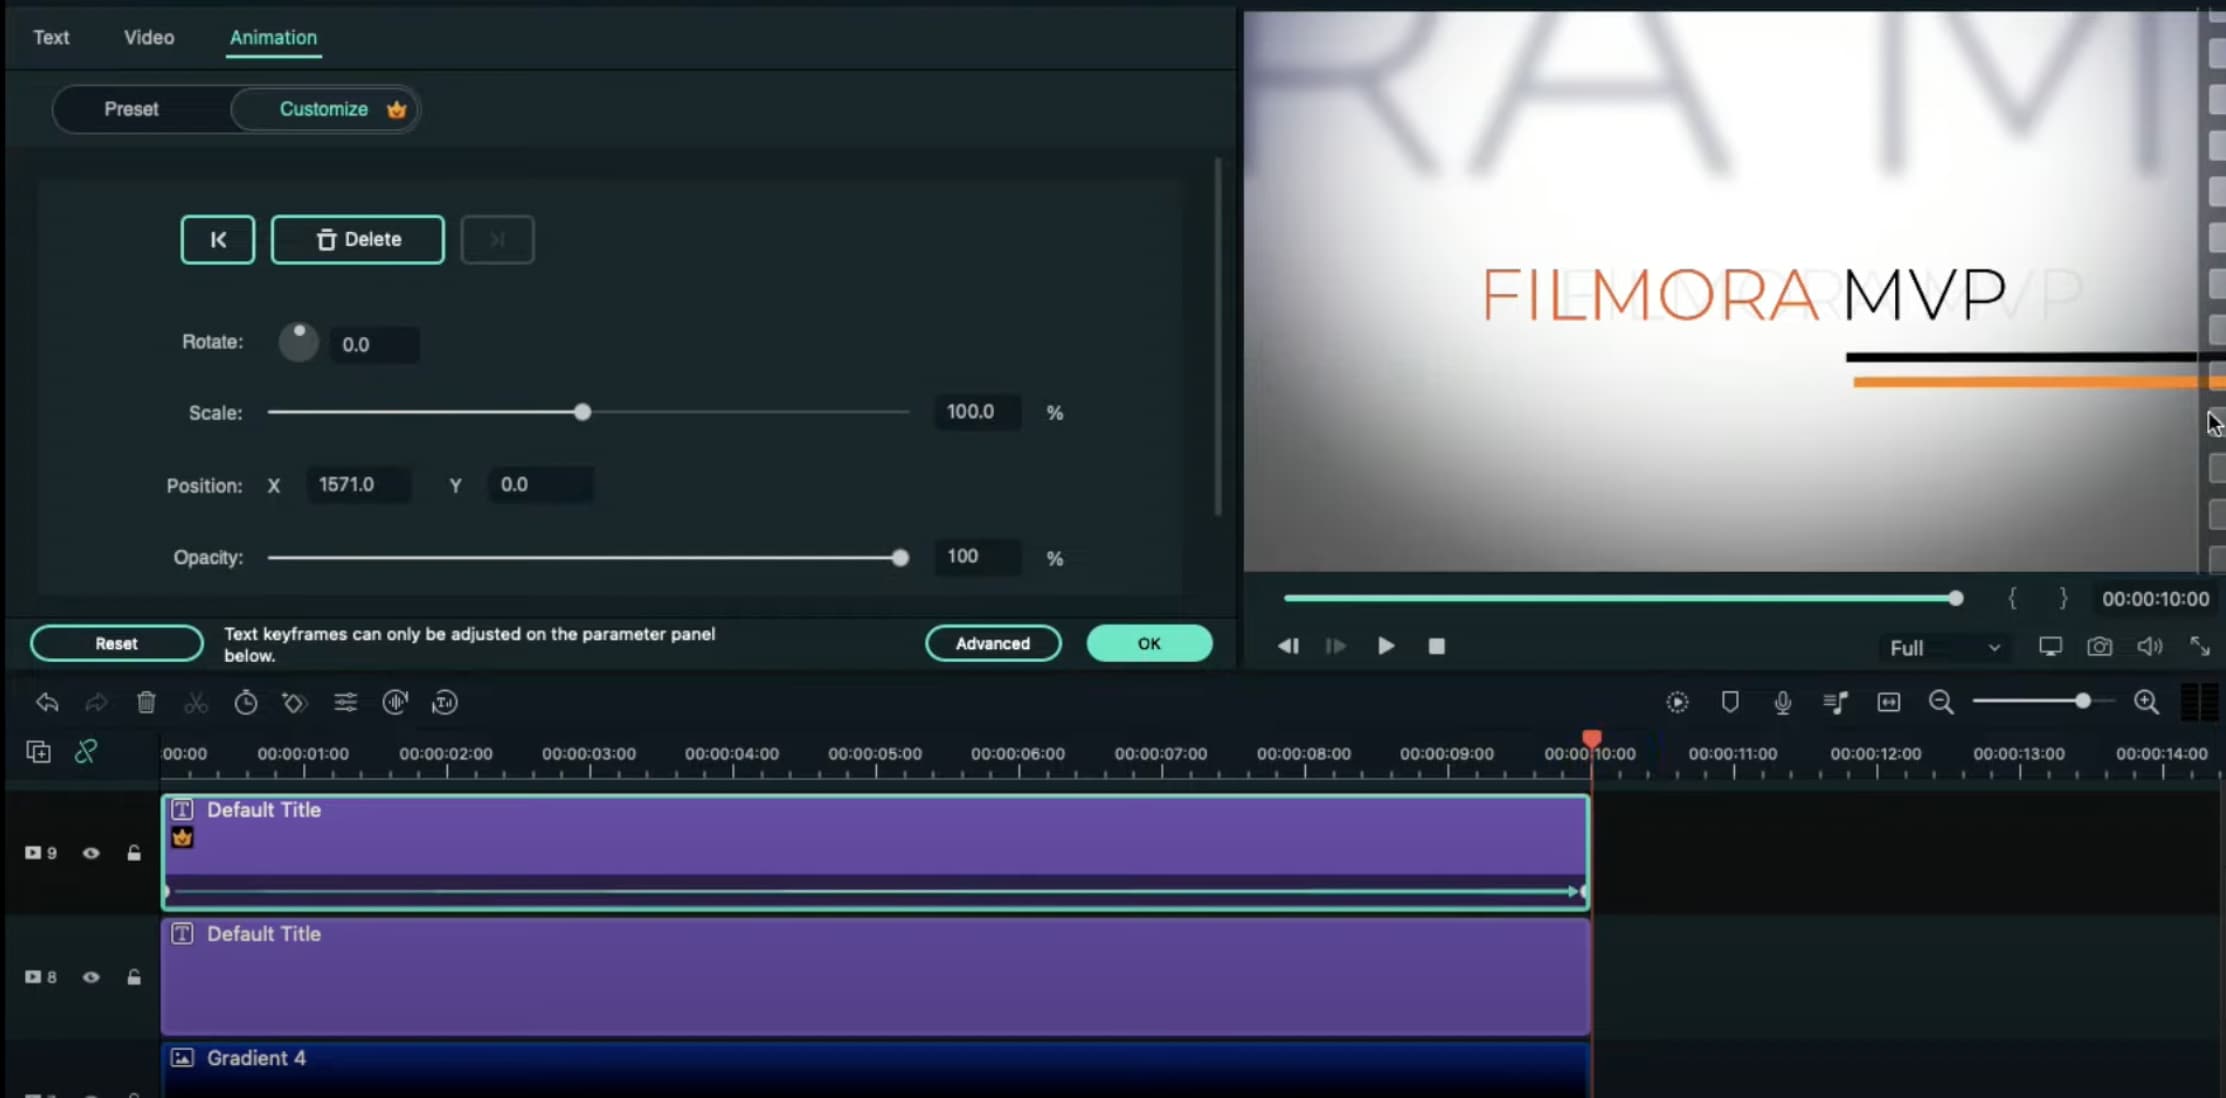
Now, select the Default Title on Track 9, double-click it, and go to the Animation tab. Move the Playhead at the starting point of the Timeline and add a keyframe. Then, move the Playhead to the end of the clip. Drag the X-axis position to the right until the Line shape moves all the way to the right side of the screen.
Do the same for the Default Title on Track 8. But this time, drag the X-axis position toward the other side. When you’re done, press OK.
Step 15
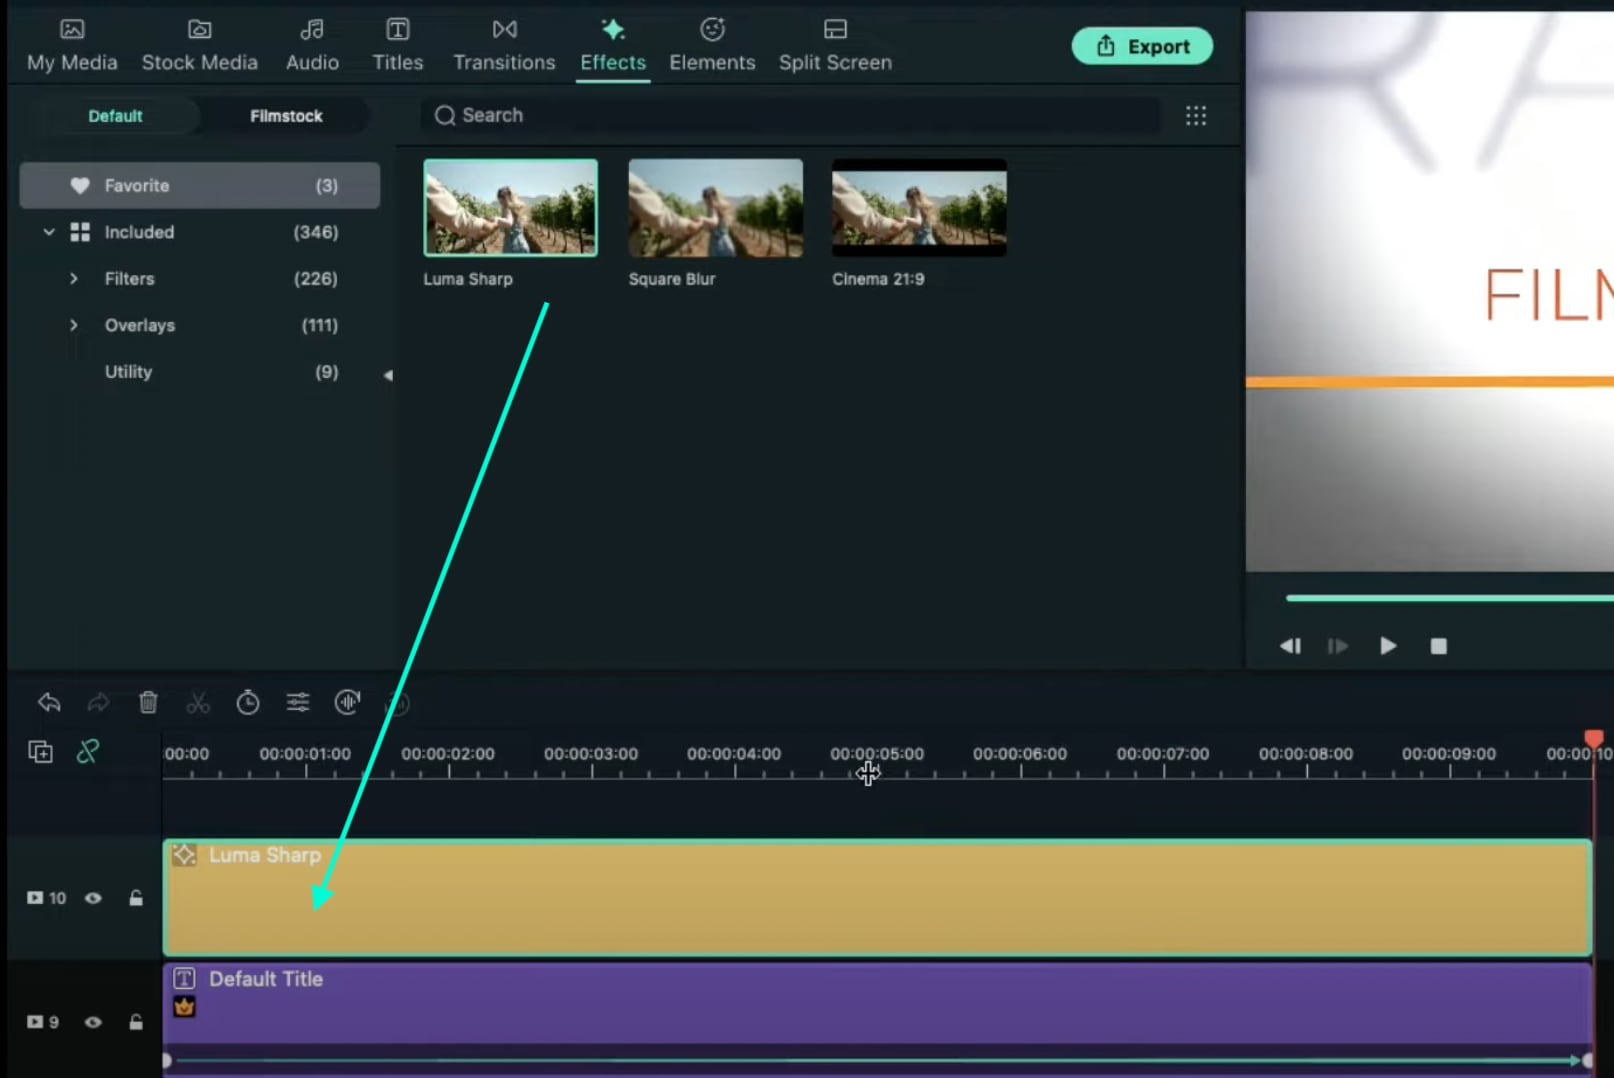
Go to the Effects tab → drag the Luma Sharp effect to Track 10. Click it and change its Intensity to 10.
Step 16
You’re all done. Click on the Render button to render all the clips and finally preview your creation. Congratulations on creating a text animation intro in Filmora.

Summary
What you’ve learned:
- Create a unique text animation intro in Filmora
- Animate text and titles
- How to add and animate different shapes in Filmora
- Edit the advanced settings of elements in the Filmora video editor
What you need to prepare:
- A computer (Windows or macOS)
- Your video materials.
- Filmora video editor
Step 1
Download and Install the Filmora video editor . Then, click on New Project once the program starts.
Step 2
Go to Titles and drag the Default Title to the Timeline. Then, double-click on the Default Title clip to open its settings. Here, type in your text → change the text color to Black → click OK → take a snapshot.

Step 3
Double-click on the Default Title once more and simply change the text color to anything other than black this time. Then, click OK and take another snapshot. After this, delete the Default Title from the Timeline.
Step 4
Next, go to Sample Color and drag the White color to the Timeline. Increase the White Color clip’s duration to 10 seconds by dragging the tail of the clip to the right.

Step 5
For the next step, you need to download a simple Vignette png image . Then, import the Vignette image into Filmora. Go to My Media and click on Import Media. Import it and drag the image to the Timeline. Then, move that clip to Track 3.

Step 6
Drop the Black snapshot you took earlier to Track 2. Double-click on it, go to Animation, and apply these settings. After this, move the Playhead to the end of the clip and change the X-axis value to “-800”.

Step 7
Go to Effects and drag the Square Blur effect to Track 4 on the Timeline. Increase its duration to match the other clips. Then, click on the effect and change its Size bar value to 4. Click OK.

Step 8
Place the Playhead at the beginning of the clip. Go to My Media and drag the Black snapshot to Track 5. Double-click on it → go to Animation and change the settings to look like this. Then, move the Playhead to 9 seconds. Here, change the X-axis to “150” and the Scale to 75%.

Step 9
Now, place the Playhead at the starting point and drag the colored snapshot in Track 6. Double-click on it and change the Scale to 50%. Then, move the Playhead to 9 seconds again and change the Scale to 75%. Click OK.
Step 10
Go to Sample Color and drag “Gradient 4” to Track 7 on the Timeline. Double-click on it → go to the Video tab → change the Blending Mode to Overlay → decrease the Opacity to 25%. Click OK.

Step 11
Drag a Default Title to Track 8 and double-click on it to open its Advanced settings. From here, delete the yellow text clip located under the video. Then, insert a Line shape.

Step 12
Increase the Line’s length to be almost as long as the screen. Then adjust its position until half of the Line is visible on the screen. Like this.

Step 13
Copy this Default Title and paste it into Track 9. Open its Advanced settings and change the Line color to something different than the previous one. Then, move it to the other side of the screen, slightly above the previous line. Click OK.

Step 14
Now, select the Default Title on Track 9, double-click it, and go to the Animation tab. Move the Playhead at the starting point of the Timeline and add a keyframe. Then, move the Playhead to the end of the clip. Drag the X-axis position to the right until the Line shape moves all the way to the right side of the screen.
Do the same for the Default Title on Track 8. But this time, drag the X-axis position toward the other side. When you’re done, press OK.

Step 15
Go to the Effects tab → drag the Luma Sharp effect to Track 10. Click it and change its Intensity to 10.

Step 16
You’re all done. Click on the Render button to render all the clips and finally preview your creation. Congratulations on creating a text animation intro in Filmora.

Summary
What you’ve learned:
- Create a unique text animation intro in Filmora
- Animate text and titles
- How to add and animate different shapes in Filmora
- Edit the advanced settings of elements in the Filmora video editor
What you need to prepare:
- A computer (Windows or macOS)
- Your video materials.
- Filmora video editor
Step 1
Download and Install the Filmora video editor . Then, click on New Project once the program starts.
Step 2
Go to Titles and drag the Default Title to the Timeline. Then, double-click on the Default Title clip to open its settings. Here, type in your text → change the text color to Black → click OK → take a snapshot.

Step 3
Double-click on the Default Title once more and simply change the text color to anything other than black this time. Then, click OK and take another snapshot. After this, delete the Default Title from the Timeline.
Step 4
Next, go to Sample Color and drag the White color to the Timeline. Increase the White Color clip’s duration to 10 seconds by dragging the tail of the clip to the right.

Step 5
For the next step, you need to download a simple Vignette png image . Then, import the Vignette image into Filmora. Go to My Media and click on Import Media. Import it and drag the image to the Timeline. Then, move that clip to Track 3.

Step 6
Drop the Black snapshot you took earlier to Track 2. Double-click on it, go to Animation, and apply these settings. After this, move the Playhead to the end of the clip and change the X-axis value to “-800”.

Step 7
Go to Effects and drag the Square Blur effect to Track 4 on the Timeline. Increase its duration to match the other clips. Then, click on the effect and change its Size bar value to 4. Click OK.

Step 8
Place the Playhead at the beginning of the clip. Go to My Media and drag the Black snapshot to Track 5. Double-click on it → go to Animation and change the settings to look like this. Then, move the Playhead to 9 seconds. Here, change the X-axis to “150” and the Scale to 75%.

Step 9
Now, place the Playhead at the starting point and drag the colored snapshot in Track 6. Double-click on it and change the Scale to 50%. Then, move the Playhead to 9 seconds again and change the Scale to 75%. Click OK.
Step 10
Go to Sample Color and drag “Gradient 4” to Track 7 on the Timeline. Double-click on it → go to the Video tab → change the Blending Mode to Overlay → decrease the Opacity to 25%. Click OK.

Step 11
Drag a Default Title to Track 8 and double-click on it to open its Advanced settings. From here, delete the yellow text clip located under the video. Then, insert a Line shape.

Step 12
Increase the Line’s length to be almost as long as the screen. Then adjust its position until half of the Line is visible on the screen. Like this.

Step 13
Copy this Default Title and paste it into Track 9. Open its Advanced settings and change the Line color to something different than the previous one. Then, move it to the other side of the screen, slightly above the previous line. Click OK.

Step 14
Now, select the Default Title on Track 9, double-click it, and go to the Animation tab. Move the Playhead at the starting point of the Timeline and add a keyframe. Then, move the Playhead to the end of the clip. Drag the X-axis position to the right until the Line shape moves all the way to the right side of the screen.
Do the same for the Default Title on Track 8. But this time, drag the X-axis position toward the other side. When you’re done, press OK.

Step 15
Go to the Effects tab → drag the Luma Sharp effect to Track 10. Click it and change its Intensity to 10.

Step 16
You’re all done. Click on the Render button to render all the clips and finally preview your creation. Congratulations on creating a text animation intro in Filmora.

Summary
What you’ve learned:
- Create a unique text animation intro in Filmora
- Animate text and titles
- How to add and animate different shapes in Filmora
- Edit the advanced settings of elements in the Filmora video editor
What you need to prepare:
- A computer (Windows or macOS)
- Your video materials.
- Filmora video editor
Step 1
Download and Install the Filmora video editor . Then, click on New Project once the program starts.
Step 2
Go to Titles and drag the Default Title to the Timeline. Then, double-click on the Default Title clip to open its settings. Here, type in your text → change the text color to Black → click OK → take a snapshot.

Step 3
Double-click on the Default Title once more and simply change the text color to anything other than black this time. Then, click OK and take another snapshot. After this, delete the Default Title from the Timeline.
Step 4
Next, go to Sample Color and drag the White color to the Timeline. Increase the White Color clip’s duration to 10 seconds by dragging the tail of the clip to the right.

Step 5
For the next step, you need to download a simple Vignette png image . Then, import the Vignette image into Filmora. Go to My Media and click on Import Media. Import it and drag the image to the Timeline. Then, move that clip to Track 3.

Step 6
Drop the Black snapshot you took earlier to Track 2. Double-click on it, go to Animation, and apply these settings. After this, move the Playhead to the end of the clip and change the X-axis value to “-800”.

Step 7
Go to Effects and drag the Square Blur effect to Track 4 on the Timeline. Increase its duration to match the other clips. Then, click on the effect and change its Size bar value to 4. Click OK.

Step 8
Place the Playhead at the beginning of the clip. Go to My Media and drag the Black snapshot to Track 5. Double-click on it → go to Animation and change the settings to look like this. Then, move the Playhead to 9 seconds. Here, change the X-axis to “150” and the Scale to 75%.

Step 9
Now, place the Playhead at the starting point and drag the colored snapshot in Track 6. Double-click on it and change the Scale to 50%. Then, move the Playhead to 9 seconds again and change the Scale to 75%. Click OK.
Step 10
Go to Sample Color and drag “Gradient 4” to Track 7 on the Timeline. Double-click on it → go to the Video tab → change the Blending Mode to Overlay → decrease the Opacity to 25%. Click OK.

Step 11
Drag a Default Title to Track 8 and double-click on it to open its Advanced settings. From here, delete the yellow text clip located under the video. Then, insert a Line shape.

Step 12
Increase the Line’s length to be almost as long as the screen. Then adjust its position until half of the Line is visible on the screen. Like this.

Step 13
Copy this Default Title and paste it into Track 9. Open its Advanced settings and change the Line color to something different than the previous one. Then, move it to the other side of the screen, slightly above the previous line. Click OK.

Step 14
Now, select the Default Title on Track 9, double-click it, and go to the Animation tab. Move the Playhead at the starting point of the Timeline and add a keyframe. Then, move the Playhead to the end of the clip. Drag the X-axis position to the right until the Line shape moves all the way to the right side of the screen.
Do the same for the Default Title on Track 8. But this time, drag the X-axis position toward the other side. When you’re done, press OK.

Step 15
Go to the Effects tab → drag the Luma Sharp effect to Track 10. Click it and change its Intensity to 10.

Step 16
You’re all done. Click on the Render button to render all the clips and finally preview your creation. Congratulations on creating a text animation intro in Filmora.

Summary
What you’ve learned:
- Create a unique text animation intro in Filmora
- Animate text and titles
- How to add and animate different shapes in Filmora
- Edit the advanced settings of elements in the Filmora video editor
Top 8 AI Video Denoise Software
Best 8 AI Video Denoise Software
An easy yet powerful editor
Numerous effects to choose from
Detailed tutorials provided by the official channel
Several times the two same videos captured from the same phone or a camera may appear different. One video may appear to be perfectly clean and sharp while the other one looks a little blurred or grainy? Do you wonder why? This is because of the noise in the video which makes it look grainy.
So, if you too have videos with disturbing noise, there is AI-based software available that can help correct the issue. The following parts of the topic will help you learn about such tools.
In this article
01 [What’s AI Video Denoise?](#Part 1)
02 [Top AI Video Denoise Software](#Part 2)
03 [Other Effective Denoise software](#Part 3)
Part 1 What’s AI Video Denoise?
An AI video denoise tool is an AI-based software that helps to correct and remove the noise in the videos. Many times, when you shoot a video using your DSLR or a phone, a lot of noise is present and this mainly happens when there are low light conditions, higher ISO settings, and similar other situations.
The common noise type in your videos can be internal noise or interference noise which can be further divided into different types like fixed-pattern noise, salt & pepper noise, anisotropic noise, and more.
Whatever may be the noise type of a situation you would need a good noise reduction tool to enhance the video watching experience. Several AI-based and non -AI denoise software are
available and depending on what are your requirements, you can choose the best one.
Part 2 Top AI Video Denoise Software
AI Video Denoise software are the tools that use AI technology to detect and remove the noise from your videos. These programs automatically remove the noise for improving the video quality.
Below listed are the top tools in the category.
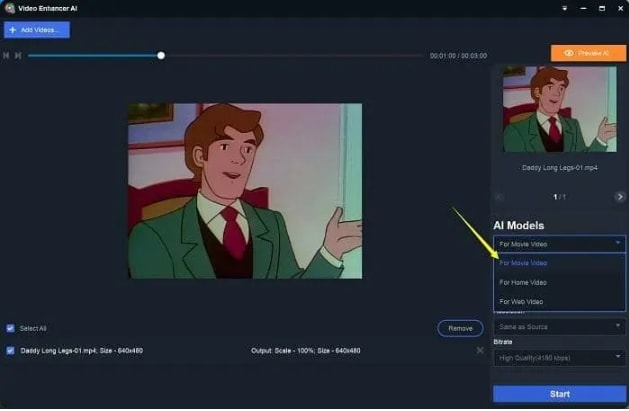
01DVDFab Video Enhancer
This is one of the widely used AI Denoise software that uses the latest artificial intelligence technology and algorithms for identifying and removing the noise from your videos. All types of noise can be automatically removed using the software. Other key features include the capability to upscale the low-resolution videos up to high 4K quality, comes with neural networks infilled, allows removing the blurs and noise along with color corrections, facilitates improvement and upscaling, improves video brightness, saturation, and other quality parameters.
02AVCLabs Video Enhancer AI
This Windows and Mac-based tool use AI technology for enhancing and improving the overall look of your video and this also includes denoise the footage along with other functions. Using the software, you can deblur your video frame by frame and also upscale the files from 480p to 1080p, 4K, and 8K quality. The low-resolution videos can be upscaled without compromising on the quality and you can even retouch the faces in your videos. The powerful features of the software are easy and quick to use.

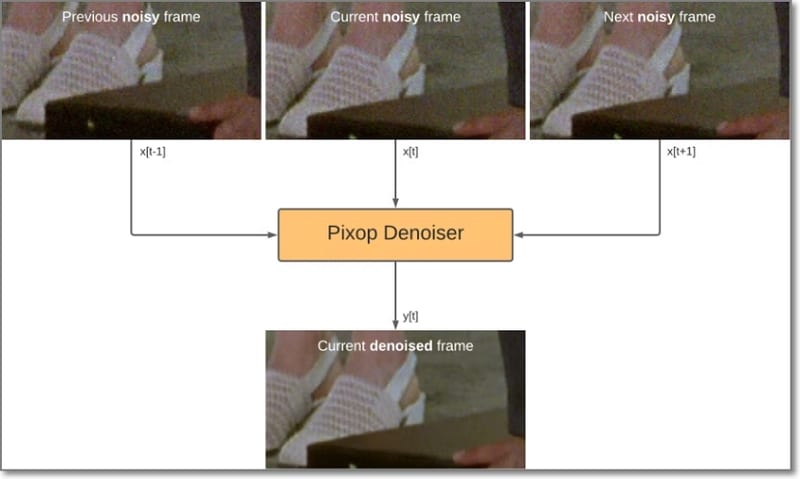
03Pixop Denoiser
This is an excellent software for reducing and removing the digital noise which will make the videos crystal clear and sharp. The software is capable of removing the Gaussian noise, aliasing artifacts, jittering, and others for enhancing overall video quality. The program can denoise the files up to UHD 4K and everything is done automatically thanks to the AI technology. No manual tweaks or settings are required.
Part 3 Other Effective Denoise software
In addition to AI tools, several other denoise software are available as well. Check out the list as below.
01****Wondershare Filmora Video Editor **
Wondershare Filmora is an excellent video editing tool that supports multiple functions that also included denoising. Its video denoise feature will let you remove all the unwanted noise from a video that too while maintaining the video quality. Further the program support advanced features like automatic audio sync, audio compression, audio transitions, adding filters, motion tracking, adding animations, masking, and much more. The software can be quickly downloaded on your Windows and Mac systems and help you process the files in a user-friendly manner.
For Win 7 or later (64-bit)
For macOS 10.12 or later
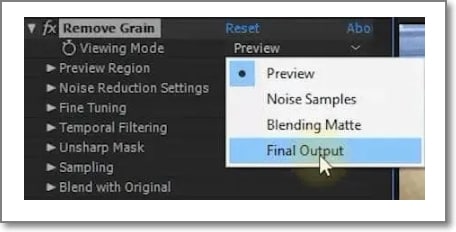
02Adobe After Effects
When it comes to video editing, Adobe After Effects is the most widely used tool as it comes packed in with all needed features. Using the software’s Remove Grain feature, the variables of the video can be changed for fixing the noise and the grain. Though the software smooths out the noise artifacts, the downside is that it also leads to blurring of the footage along with reduced sharpness. Using the right variables may help to maintain the details and the quality of the footage.
03Final Cut Pro X
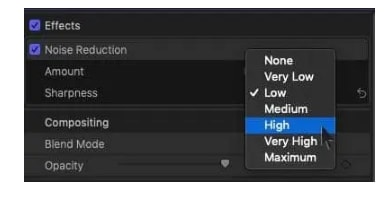
If you are editing your videos on a Mac system, Final Cut Pro X is the best tool. The program supports multiple professional functions including video denoising. The Noise Reduction filter is added from the 10.4.4 version of the program and the process of getting the task done is also simple and quick. The tool gives you the option to select the amount of noise that you want to remove from the footage.
04DaVinci Resolve Studio
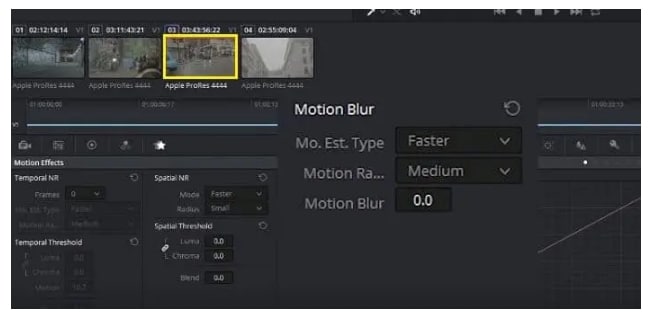
Another editing tool that can be used for removing the noise and for other tasks is DaVinci Resolve Studio. The paid version of the program supports the feature where you can control the Temporal NR and Spatial NR which will help reduce the noise.
05Neat Video Plugin
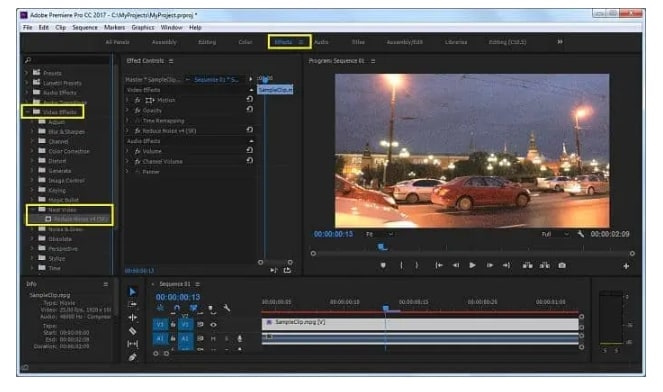
Neat Video is available as a plugin for popular tools like Final Cut Pro(X), Adobe Premiere, After Effects, and more. This special filter helps in removing the grains and the noise from the video footage that are captured using the TV Tuners, VHS, DSLRs as well as digital video cameras.
● Ending Thoughts →
● When light conditions are not appropriate, one of the common issues that you may encounter is grainy and noisy footage.
● To help you correct and resolve this, several AI and other denoising software and programs are available.
● The AI-based denoising software works automatically to remove the noise while with the others you need to tweak and make the adjustments to remove the grains and the noise.
Several times the two same videos captured from the same phone or a camera may appear different. One video may appear to be perfectly clean and sharp while the other one looks a little blurred or grainy? Do you wonder why? This is because of the noise in the video which makes it look grainy.
So, if you too have videos with disturbing noise, there is AI-based software available that can help correct the issue. The following parts of the topic will help you learn about such tools.
In this article
01 [What’s AI Video Denoise?](#Part 1)
02 [Top AI Video Denoise Software](#Part 2)
03 [Other Effective Denoise software](#Part 3)
Part 1 What’s AI Video Denoise?
An AI video denoise tool is an AI-based software that helps to correct and remove the noise in the videos. Many times, when you shoot a video using your DSLR or a phone, a lot of noise is present and this mainly happens when there are low light conditions, higher ISO settings, and similar other situations.
The common noise type in your videos can be internal noise or interference noise which can be further divided into different types like fixed-pattern noise, salt & pepper noise, anisotropic noise, and more.
Whatever may be the noise type of a situation you would need a good noise reduction tool to enhance the video watching experience. Several AI-based and non -AI denoise software are
available and depending on what are your requirements, you can choose the best one.
Part 2 Top AI Video Denoise Software
AI Video Denoise software are the tools that use AI technology to detect and remove the noise from your videos. These programs automatically remove the noise for improving the video quality.
Below listed are the top tools in the category.
01DVDFab Video Enhancer
This is one of the widely used AI Denoise software that uses the latest artificial intelligence technology and algorithms for identifying and removing the noise from your videos. All types of noise can be automatically removed using the software. Other key features include the capability to upscale the low-resolution videos up to high 4K quality, comes with neural networks infilled, allows removing the blurs and noise along with color corrections, facilitates improvement and upscaling, improves video brightness, saturation, and other quality parameters.

02AVCLabs Video Enhancer AI
This Windows and Mac-based tool use AI technology for enhancing and improving the overall look of your video and this also includes denoise the footage along with other functions. Using the software, you can deblur your video frame by frame and also upscale the files from 480p to 1080p, 4K, and 8K quality. The low-resolution videos can be upscaled without compromising on the quality and you can even retouch the faces in your videos. The powerful features of the software are easy and quick to use.

03Pixop Denoiser
This is an excellent software for reducing and removing the digital noise which will make the videos crystal clear and sharp. The software is capable of removing the Gaussian noise, aliasing artifacts, jittering, and others for enhancing overall video quality. The program can denoise the files up to UHD 4K and everything is done automatically thanks to the AI technology. No manual tweaks or settings are required.

Part 3 Other Effective Denoise software
In addition to AI tools, several other denoise software are available as well. Check out the list as below.
01****Wondershare Filmora Video Editor **
Wondershare Filmora is an excellent video editing tool that supports multiple functions that also included denoising. Its video denoise feature will let you remove all the unwanted noise from a video that too while maintaining the video quality. Further the program support advanced features like automatic audio sync, audio compression, audio transitions, adding filters, motion tracking, adding animations, masking, and much more. The software can be quickly downloaded on your Windows and Mac systems and help you process the files in a user-friendly manner.
For Win 7 or later (64-bit)
For macOS 10.12 or later
02Adobe After Effects
When it comes to video editing, Adobe After Effects is the most widely used tool as it comes packed in with all needed features. Using the software’s Remove Grain feature, the variables of the video can be changed for fixing the noise and the grain. Though the software smooths out the noise artifacts, the downside is that it also leads to blurring of the footage along with reduced sharpness. Using the right variables may help to maintain the details and the quality of the footage.

03Final Cut Pro X
If you are editing your videos on a Mac system, Final Cut Pro X is the best tool. The program supports multiple professional functions including video denoising. The Noise Reduction filter is added from the 10.4.4 version of the program and the process of getting the task done is also simple and quick. The tool gives you the option to select the amount of noise that you want to remove from the footage.

04DaVinci Resolve Studio
Another editing tool that can be used for removing the noise and for other tasks is DaVinci Resolve Studio. The paid version of the program supports the feature where you can control the Temporal NR and Spatial NR which will help reduce the noise.

05Neat Video Plugin
Neat Video is available as a plugin for popular tools like Final Cut Pro(X), Adobe Premiere, After Effects, and more. This special filter helps in removing the grains and the noise from the video footage that are captured using the TV Tuners, VHS, DSLRs as well as digital video cameras.

● Ending Thoughts →
● When light conditions are not appropriate, one of the common issues that you may encounter is grainy and noisy footage.
● To help you correct and resolve this, several AI and other denoising software and programs are available.
● The AI-based denoising software works automatically to remove the noise while with the others you need to tweak and make the adjustments to remove the grains and the noise.
Several times the two same videos captured from the same phone or a camera may appear different. One video may appear to be perfectly clean and sharp while the other one looks a little blurred or grainy? Do you wonder why? This is because of the noise in the video which makes it look grainy.
So, if you too have videos with disturbing noise, there is AI-based software available that can help correct the issue. The following parts of the topic will help you learn about such tools.
In this article
01 [What’s AI Video Denoise?](#Part 1)
02 [Top AI Video Denoise Software](#Part 2)
03 [Other Effective Denoise software](#Part 3)
Part 1 What’s AI Video Denoise?
An AI video denoise tool is an AI-based software that helps to correct and remove the noise in the videos. Many times, when you shoot a video using your DSLR or a phone, a lot of noise is present and this mainly happens when there are low light conditions, higher ISO settings, and similar other situations.
The common noise type in your videos can be internal noise or interference noise which can be further divided into different types like fixed-pattern noise, salt & pepper noise, anisotropic noise, and more.
Whatever may be the noise type of a situation you would need a good noise reduction tool to enhance the video watching experience. Several AI-based and non -AI denoise software are
available and depending on what are your requirements, you can choose the best one.
Part 2 Top AI Video Denoise Software
AI Video Denoise software are the tools that use AI technology to detect and remove the noise from your videos. These programs automatically remove the noise for improving the video quality.
Below listed are the top tools in the category.
01DVDFab Video Enhancer
This is one of the widely used AI Denoise software that uses the latest artificial intelligence technology and algorithms for identifying and removing the noise from your videos. All types of noise can be automatically removed using the software. Other key features include the capability to upscale the low-resolution videos up to high 4K quality, comes with neural networks infilled, allows removing the blurs and noise along with color corrections, facilitates improvement and upscaling, improves video brightness, saturation, and other quality parameters.

02AVCLabs Video Enhancer AI
This Windows and Mac-based tool use AI technology for enhancing and improving the overall look of your video and this also includes denoise the footage along with other functions. Using the software, you can deblur your video frame by frame and also upscale the files from 480p to 1080p, 4K, and 8K quality. The low-resolution videos can be upscaled without compromising on the quality and you can even retouch the faces in your videos. The powerful features of the software are easy and quick to use.

03Pixop Denoiser
This is an excellent software for reducing and removing the digital noise which will make the videos crystal clear and sharp. The software is capable of removing the Gaussian noise, aliasing artifacts, jittering, and others for enhancing overall video quality. The program can denoise the files up to UHD 4K and everything is done automatically thanks to the AI technology. No manual tweaks or settings are required.

Part 3 Other Effective Denoise software
In addition to AI tools, several other denoise software are available as well. Check out the list as below.
01****Wondershare Filmora Video Editor **
Wondershare Filmora is an excellent video editing tool that supports multiple functions that also included denoising. Its video denoise feature will let you remove all the unwanted noise from a video that too while maintaining the video quality. Further the program support advanced features like automatic audio sync, audio compression, audio transitions, adding filters, motion tracking, adding animations, masking, and much more. The software can be quickly downloaded on your Windows and Mac systems and help you process the files in a user-friendly manner.
For Win 7 or later (64-bit)
For macOS 10.12 or later
02Adobe After Effects
When it comes to video editing, Adobe After Effects is the most widely used tool as it comes packed in with all needed features. Using the software’s Remove Grain feature, the variables of the video can be changed for fixing the noise and the grain. Though the software smooths out the noise artifacts, the downside is that it also leads to blurring of the footage along with reduced sharpness. Using the right variables may help to maintain the details and the quality of the footage.

03Final Cut Pro X
If you are editing your videos on a Mac system, Final Cut Pro X is the best tool. The program supports multiple professional functions including video denoising. The Noise Reduction filter is added from the 10.4.4 version of the program and the process of getting the task done is also simple and quick. The tool gives you the option to select the amount of noise that you want to remove from the footage.

04DaVinci Resolve Studio
Another editing tool that can be used for removing the noise and for other tasks is DaVinci Resolve Studio. The paid version of the program supports the feature where you can control the Temporal NR and Spatial NR which will help reduce the noise.

05Neat Video Plugin
Neat Video is available as a plugin for popular tools like Final Cut Pro(X), Adobe Premiere, After Effects, and more. This special filter helps in removing the grains and the noise from the video footage that are captured using the TV Tuners, VHS, DSLRs as well as digital video cameras.

● Ending Thoughts →
● When light conditions are not appropriate, one of the common issues that you may encounter is grainy and noisy footage.
● To help you correct and resolve this, several AI and other denoising software and programs are available.
● The AI-based denoising software works automatically to remove the noise while with the others you need to tweak and make the adjustments to remove the grains and the noise.
Several times the two same videos captured from the same phone or a camera may appear different. One video may appear to be perfectly clean and sharp while the other one looks a little blurred or grainy? Do you wonder why? This is because of the noise in the video which makes it look grainy.
So, if you too have videos with disturbing noise, there is AI-based software available that can help correct the issue. The following parts of the topic will help you learn about such tools.
In this article
01 [What’s AI Video Denoise?](#Part 1)
02 [Top AI Video Denoise Software](#Part 2)
03 [Other Effective Denoise software](#Part 3)
Part 1 What’s AI Video Denoise?
An AI video denoise tool is an AI-based software that helps to correct and remove the noise in the videos. Many times, when you shoot a video using your DSLR or a phone, a lot of noise is present and this mainly happens when there are low light conditions, higher ISO settings, and similar other situations.
The common noise type in your videos can be internal noise or interference noise which can be further divided into different types like fixed-pattern noise, salt & pepper noise, anisotropic noise, and more.
Whatever may be the noise type of a situation you would need a good noise reduction tool to enhance the video watching experience. Several AI-based and non -AI denoise software are
available and depending on what are your requirements, you can choose the best one.
Part 2 Top AI Video Denoise Software
AI Video Denoise software are the tools that use AI technology to detect and remove the noise from your videos. These programs automatically remove the noise for improving the video quality.
Below listed are the top tools in the category.
01DVDFab Video Enhancer
This is one of the widely used AI Denoise software that uses the latest artificial intelligence technology and algorithms for identifying and removing the noise from your videos. All types of noise can be automatically removed using the software. Other key features include the capability to upscale the low-resolution videos up to high 4K quality, comes with neural networks infilled, allows removing the blurs and noise along with color corrections, facilitates improvement and upscaling, improves video brightness, saturation, and other quality parameters.

02AVCLabs Video Enhancer AI
This Windows and Mac-based tool use AI technology for enhancing and improving the overall look of your video and this also includes denoise the footage along with other functions. Using the software, you can deblur your video frame by frame and also upscale the files from 480p to 1080p, 4K, and 8K quality. The low-resolution videos can be upscaled without compromising on the quality and you can even retouch the faces in your videos. The powerful features of the software are easy and quick to use.

03Pixop Denoiser
This is an excellent software for reducing and removing the digital noise which will make the videos crystal clear and sharp. The software is capable of removing the Gaussian noise, aliasing artifacts, jittering, and others for enhancing overall video quality. The program can denoise the files up to UHD 4K and everything is done automatically thanks to the AI technology. No manual tweaks or settings are required.

Part 3 Other Effective Denoise software
In addition to AI tools, several other denoise software are available as well. Check out the list as below.
01****Wondershare Filmora Video Editor **
Wondershare Filmora is an excellent video editing tool that supports multiple functions that also included denoising. Its video denoise feature will let you remove all the unwanted noise from a video that too while maintaining the video quality. Further the program support advanced features like automatic audio sync, audio compression, audio transitions, adding filters, motion tracking, adding animations, masking, and much more. The software can be quickly downloaded on your Windows and Mac systems and help you process the files in a user-friendly manner.
For Win 7 or later (64-bit)
For macOS 10.12 or later
02Adobe After Effects
When it comes to video editing, Adobe After Effects is the most widely used tool as it comes packed in with all needed features. Using the software’s Remove Grain feature, the variables of the video can be changed for fixing the noise and the grain. Though the software smooths out the noise artifacts, the downside is that it also leads to blurring of the footage along with reduced sharpness. Using the right variables may help to maintain the details and the quality of the footage.

03Final Cut Pro X
If you are editing your videos on a Mac system, Final Cut Pro X is the best tool. The program supports multiple professional functions including video denoising. The Noise Reduction filter is added from the 10.4.4 version of the program and the process of getting the task done is also simple and quick. The tool gives you the option to select the amount of noise that you want to remove from the footage.

04DaVinci Resolve Studio
Another editing tool that can be used for removing the noise and for other tasks is DaVinci Resolve Studio. The paid version of the program supports the feature where you can control the Temporal NR and Spatial NR which will help reduce the noise.

05Neat Video Plugin
Neat Video is available as a plugin for popular tools like Final Cut Pro(X), Adobe Premiere, After Effects, and more. This special filter helps in removing the grains and the noise from the video footage that are captured using the TV Tuners, VHS, DSLRs as well as digital video cameras.

● Ending Thoughts →
● When light conditions are not appropriate, one of the common issues that you may encounter is grainy and noisy footage.
● To help you correct and resolve this, several AI and other denoising software and programs are available.
● The AI-based denoising software works automatically to remove the noise while with the others you need to tweak and make the adjustments to remove the grains and the noise.
Top 5 Best Video to PPT Converters
Almost three decades after its debut, Microsoft PowerPoint has become a hallmark of professionalism and quality in the presentation software industry. Traditional PPT files produced by PowerPoint have many drawbacks, including the fact that the content of your presentations may be readily edited and reused by others.
The Save to Video option in 2010 and subsequent versions of PowerPoint addresses this problem by allowing users to produce video files that may be readily shared on social media, video sharing sites, or utilized in eLearning courses. The built-in PPT file conversion function in newer versions of PowerPoint has several restrictions that prohibit you from picking the video file type or incorporating embedded media files in the PowerPoint presentation video.
That’s why we’ve compiled a list of the top five video to ppt converter to make the process of turning a PowerPoint presentation into a movie as simple and enjoyable as possible.
Top 5 Best Video to PPT Converters
1.Moyea
Price: $49.95, Free trial available
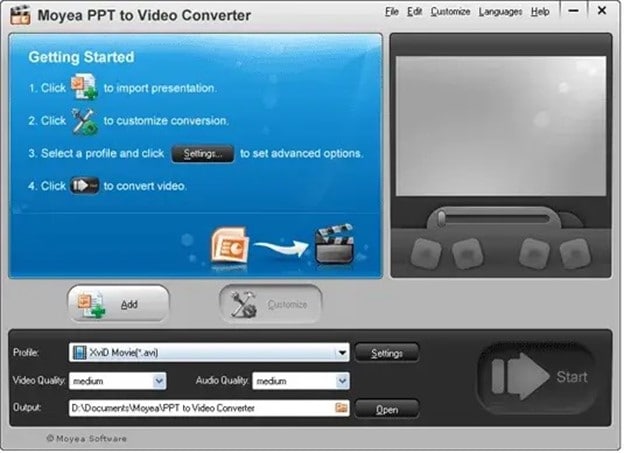
This extremely effective program allows you to convert any documents written with PowerPoint versions up to 2013 and PowerPoint viewer. Convert the presentations to various common file formats, including MP4, WMV, and AVI. All sound files, transitions, and animations from your original presentation are preserved using this Windows-based tool.
In order to tailor the video quality and frame rates to your project’s requirements, Moyea Video to PowerPoint Converter gives you total control over the output video parameters. PPT to Video Converter makes it easy to include logos, watermarks, music and voiceovers in your PowerPoint films.
Pros
Options for converting files with a lot of power
It is possible to convert many files at once.
Cons
There aren’t any HD output choices available.
To be able to convert presentations, you must have PowerPoint installed.
2.Leawo Video to PPT Pro

Price: $44.95
PowerPoint presentations in PPT, PPTX, PPTM, POT, or POTX file formats may be converted to practically any video file type with our video to ppt converter. PowerPoint 2000 through 2016 (both 64-bit and 32-bit) are all supported, as are all versions of the program.
Leawo Video to PPT Pro’s video files is compatible with iPhone and Android smartphones, tablets, gaming consoles, and Apple TV. You can turn your PowerPoint presentations into high-definition films with narration and other audio files using this program. Share your movies with the world through the likes of DailyMotion, Vimeo, YouTube, and Metacafe.
Pros
The ability to do unlimited batch conversions at once.
Allows you to brand converted films with custom logos and watermarks.
Cons
The Mac OS cannot run this program.
Requirements for a complicated system.
3.iSpring River
Price: $97 for a single lifetime license
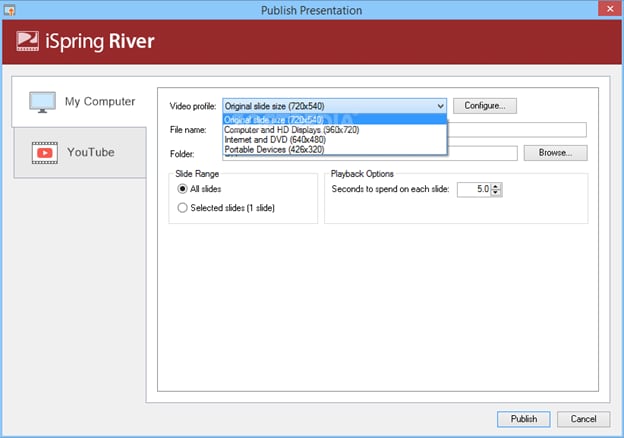
Installing iSpring River on your PC turns it into a PowerPoint add-on that you can use from the ribbon. This isn’t a limitation since iSpring River allows you to convert PPT files to widely suitable video file formats like MP4 or AVI, even though it’s not stand-alone computer software. In addition, you may choose the video size and compression parameters before each file conversion using the add-video on’s settings.
All of the original PowerPoint presentation’s animations and audio files, as well as transitions and font and text formatting, will be included in the final film. Video files exported from iSpring River may be uploaded straight to YouTube, but no other social media services such as Dropbox or Google Drive are supported.
Pros
It’s quick and simple to use.
Upload YouTube videos directly from your computer’s hard disc.
Cons
Cannot be used as a standalone application.
There isn’t any support for high-definition video.
4.RZ PowerPoint Converter
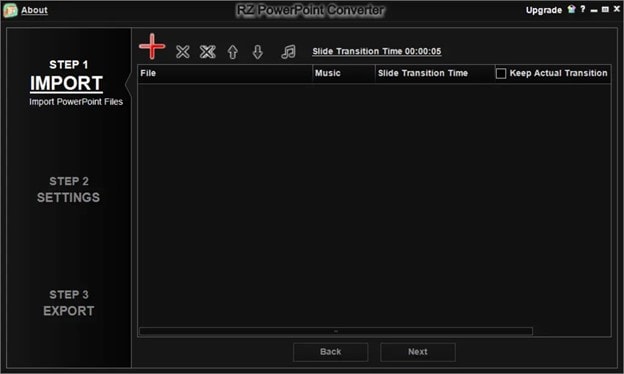
Price: There is a free version available, and prices begin at $29.99.
Using this sophisticated converter, any PPT files made with 2013 or previous versions of PowerPoint may be quickly converted to movies. RZ PowerPoint video to ppt converter also allows you to create HD video files that can be readily shared online, as well as files that can be burnt to DVDs.
Any current video playback device can play videos generated with this program, and the quality is so outstanding that you can play them on huge LCD displays. Though this video to ppt converter is accessible for free, its free edition lacks all of the capabilities that make this program an excellent alternative for professionals that prepare PowerPoint presentations on a consistent basis. It’s possible to get the commercial edition of this Windows-based tool and have all of the multimedia you include in the presentations converted to video without losing any quality.
Pros
You may use this to burn DVDs.
All PowerPoint file types are supported.
Cons
However, basic PPT to video file conversion is only available in the free edition of the product.
There is no possibility to convert many files at once.
5.Camtasia Studio

Price: A free trial is offered, and a single-user license is $249.
There is much more to Camtasia Studio than simply a video to ppt converter in it. An unencumbered trial edition of this video editing program helps you create professional-looking films from PowerPoint presentations. Camtasia Studio’s single-user license is a good alternative for those who just need to convert a few presentations for free, but if you’re searching for a full-featured video to ppt converter, you should consider purchasing Camtasia.
When using the software’s premium edition, you may add multimedia files, such as PowerPoint presentations and webcam footage to your final video project. With Camtasia Studio, you can easily post your films in nearly any video file type on social media.
Pros
With Camtasia Studio, adding transitions, callouts, or text effects is a cinch.
Advanced video editing tools are available.
Cons
Only 30 days are included in the free trial.
Expensive.
Conclusions
When looking for the best PowerPoint conversion software, there are a lot of factors to consider. The output quality, the ability to use PowerPoint effects, compatibility with new devices, & one publishing are all key considerations. Get a free trial of iSpring Converter Pro, the number one choice on our list, if you need a dependable video to ppt converter that can handle any amount of slides and animations in your presentation.
For Win 7 or later (64-bit)
For macOS 10.12 or later
Price: $49.95, Free trial available
This extremely effective program allows you to convert any documents written with PowerPoint versions up to 2013 and PowerPoint viewer. Convert the presentations to various common file formats, including MP4, WMV, and AVI. All sound files, transitions, and animations from your original presentation are preserved using this Windows-based tool.
In order to tailor the video quality and frame rates to your project’s requirements, Moyea Video to PowerPoint Converter gives you total control over the output video parameters. PPT to Video Converter makes it easy to include logos, watermarks, music and voiceovers in your PowerPoint films.
Pros
Options for converting files with a lot of power
It is possible to convert many files at once.
Cons
There aren’t any HD output choices available.
To be able to convert presentations, you must have PowerPoint installed.
2.Leawo Video to PPT Pro

Price: $44.95
PowerPoint presentations in PPT, PPTX, PPTM, POT, or POTX file formats may be converted to practically any video file type with our video to ppt converter. PowerPoint 2000 through 2016 (both 64-bit and 32-bit) are all supported, as are all versions of the program.
Leawo Video to PPT Pro’s video files is compatible with iPhone and Android smartphones, tablets, gaming consoles, and Apple TV. You can turn your PowerPoint presentations into high-definition films with narration and other audio files using this program. Share your movies with the world through the likes of DailyMotion, Vimeo, YouTube, and Metacafe.
Pros
The ability to do unlimited batch conversions at once.
Allows you to brand converted films with custom logos and watermarks.
Cons
The Mac OS cannot run this program.
Requirements for a complicated system.
3.iSpring River

Price: $97 for a single lifetime license
Installing iSpring River on your PC turns it into a PowerPoint add-on that you can use from the ribbon. This isn’t a limitation since iSpring River allows you to convert PPT files to widely suitable video file formats like MP4 or AVI, even though it’s not stand-alone computer software. In addition, you may choose the video size and compression parameters before each file conversion using the add-video on’s settings.
All of the original PowerPoint presentation’s animations and audio files, as well as transitions and font and text formatting, will be included in the final film. Video files exported from iSpring River may be uploaded straight to YouTube, but no other social media services such as Dropbox or Google Drive are supported.
Pros
It’s quick and simple to use.
Upload YouTube videos directly from your computer’s hard disc.
Cons
Cannot be used as a standalone application.
There isn’t any support for high-definition video.
4.RZ PowerPoint Converter

Price: There is a free version available, and prices begin at $29.99.
Using this sophisticated converter, any PPT files made with 2013 or previous versions of PowerPoint may be quickly converted to movies. RZ PowerPoint video to ppt converter also allows you to create HD video files that can be readily shared online, as well as files that can be burnt to DVDs.
Any current video playback device can play videos generated with this program, and the quality is so outstanding that you can play them on huge LCD displays. Though this video to ppt converter is accessible for free, its free edition lacks all of the capabilities that make this program an excellent alternative for professionals that prepare PowerPoint presentations on a consistent basis. It’s possible to get the commercial edition of this Windows-based tool and have all of the multimedia you include in the presentations converted to video without losing any quality.
Pros
You may use this to burn DVDs.
All PowerPoint file types are supported.
Cons
However, basic PPT to video file conversion is only available in the free edition of the product.
There is no possibility to convert many files at once.
5.Camtasia Studio

Price: A free trial is offered, and a single-user license is $249.
There is much more to Camtasia Studio than simply a video to ppt converter in it. An unencumbered trial edition of this video editing program helps you create professional-looking films from PowerPoint presentations. Camtasia Studio’s single-user license is a good alternative for those who just need to convert a few presentations for free, but if you’re searching for a full-featured video to ppt converter, you should consider purchasing Camtasia.
When using the software’s premium edition, you may add multimedia files, such as PowerPoint presentations and webcam footage to your final video project. With Camtasia Studio, you can easily post your films in nearly any video file type on social media.
Pros
With Camtasia Studio, adding transitions, callouts, or text effects is a cinch.
Advanced video editing tools are available.
Cons
Only 30 days are included in the free trial.
Expensive.
Conclusions
When looking for the best PowerPoint conversion software, there are a lot of factors to consider. The output quality, the ability to use PowerPoint effects, compatibility with new devices, & one publishing are all key considerations. Get a free trial of iSpring Converter Pro, the number one choice on our list, if you need a dependable video to ppt converter that can handle any amount of slides and animations in your presentation.
For Win 7 or later (64-bit)
For macOS 10.12 or later
Price: $49.95, Free trial available
This extremely effective program allows you to convert any documents written with PowerPoint versions up to 2013 and PowerPoint viewer. Convert the presentations to various common file formats, including MP4, WMV, and AVI. All sound files, transitions, and animations from your original presentation are preserved using this Windows-based tool.
In order to tailor the video quality and frame rates to your project’s requirements, Moyea Video to PowerPoint Converter gives you total control over the output video parameters. PPT to Video Converter makes it easy to include logos, watermarks, music and voiceovers in your PowerPoint films.
Pros
Options for converting files with a lot of power
It is possible to convert many files at once.
Cons
There aren’t any HD output choices available.
To be able to convert presentations, you must have PowerPoint installed.
2.Leawo Video to PPT Pro

Price: $44.95
PowerPoint presentations in PPT, PPTX, PPTM, POT, or POTX file formats may be converted to practically any video file type with our video to ppt converter. PowerPoint 2000 through 2016 (both 64-bit and 32-bit) are all supported, as are all versions of the program.
Leawo Video to PPT Pro’s video files is compatible with iPhone and Android smartphones, tablets, gaming consoles, and Apple TV. You can turn your PowerPoint presentations into high-definition films with narration and other audio files using this program. Share your movies with the world through the likes of DailyMotion, Vimeo, YouTube, and Metacafe.
Pros
The ability to do unlimited batch conversions at once.
Allows you to brand converted films with custom logos and watermarks.
Cons
The Mac OS cannot run this program.
Requirements for a complicated system.
3.iSpring River

Price: $97 for a single lifetime license
Installing iSpring River on your PC turns it into a PowerPoint add-on that you can use from the ribbon. This isn’t a limitation since iSpring River allows you to convert PPT files to widely suitable video file formats like MP4 or AVI, even though it’s not stand-alone computer software. In addition, you may choose the video size and compression parameters before each file conversion using the add-video on’s settings.
All of the original PowerPoint presentation’s animations and audio files, as well as transitions and font and text formatting, will be included in the final film. Video files exported from iSpring River may be uploaded straight to YouTube, but no other social media services such as Dropbox or Google Drive are supported.
Pros
It’s quick and simple to use.
Upload YouTube videos directly from your computer’s hard disc.
Cons
Cannot be used as a standalone application.
There isn’t any support for high-definition video.
4.RZ PowerPoint Converter

Price: There is a free version available, and prices begin at $29.99.
Using this sophisticated converter, any PPT files made with 2013 or previous versions of PowerPoint may be quickly converted to movies. RZ PowerPoint video to ppt converter also allows you to create HD video files that can be readily shared online, as well as files that can be burnt to DVDs.
Any current video playback device can play videos generated with this program, and the quality is so outstanding that you can play them on huge LCD displays. Though this video to ppt converter is accessible for free, its free edition lacks all of the capabilities that make this program an excellent alternative for professionals that prepare PowerPoint presentations on a consistent basis. It’s possible to get the commercial edition of this Windows-based tool and have all of the multimedia you include in the presentations converted to video without losing any quality.
Pros
You may use this to burn DVDs.
All PowerPoint file types are supported.
Cons
However, basic PPT to video file conversion is only available in the free edition of the product.
There is no possibility to convert many files at once.
5.Camtasia Studio

Price: A free trial is offered, and a single-user license is $249.
There is much more to Camtasia Studio than simply a video to ppt converter in it. An unencumbered trial edition of this video editing program helps you create professional-looking films from PowerPoint presentations. Camtasia Studio’s single-user license is a good alternative for those who just need to convert a few presentations for free, but if you’re searching for a full-featured video to ppt converter, you should consider purchasing Camtasia.
When using the software’s premium edition, you may add multimedia files, such as PowerPoint presentations and webcam footage to your final video project. With Camtasia Studio, you can easily post your films in nearly any video file type on social media.
Pros
With Camtasia Studio, adding transitions, callouts, or text effects is a cinch.
Advanced video editing tools are available.
Cons
Only 30 days are included in the free trial.
Expensive.
Conclusions
When looking for the best PowerPoint conversion software, there are a lot of factors to consider. The output quality, the ability to use PowerPoint effects, compatibility with new devices, & one publishing are all key considerations. Get a free trial of iSpring Converter Pro, the number one choice on our list, if you need a dependable video to ppt converter that can handle any amount of slides and animations in your presentation.
For Win 7 or later (64-bit)
For macOS 10.12 or later
Price: $49.95, Free trial available
This extremely effective program allows you to convert any documents written with PowerPoint versions up to 2013 and PowerPoint viewer. Convert the presentations to various common file formats, including MP4, WMV, and AVI. All sound files, transitions, and animations from your original presentation are preserved using this Windows-based tool.
In order to tailor the video quality and frame rates to your project’s requirements, Moyea Video to PowerPoint Converter gives you total control over the output video parameters. PPT to Video Converter makes it easy to include logos, watermarks, music and voiceovers in your PowerPoint films.
Pros
Options for converting files with a lot of power
It is possible to convert many files at once.
Cons
There aren’t any HD output choices available.
To be able to convert presentations, you must have PowerPoint installed.
2.Leawo Video to PPT Pro

Price: $44.95
PowerPoint presentations in PPT, PPTX, PPTM, POT, or POTX file formats may be converted to practically any video file type with our video to ppt converter. PowerPoint 2000 through 2016 (both 64-bit and 32-bit) are all supported, as are all versions of the program.
Leawo Video to PPT Pro’s video files is compatible with iPhone and Android smartphones, tablets, gaming consoles, and Apple TV. You can turn your PowerPoint presentations into high-definition films with narration and other audio files using this program. Share your movies with the world through the likes of DailyMotion, Vimeo, YouTube, and Metacafe.
Pros
The ability to do unlimited batch conversions at once.
Allows you to brand converted films with custom logos and watermarks.
Cons
The Mac OS cannot run this program.
Requirements for a complicated system.
3.iSpring River

Price: $97 for a single lifetime license
Installing iSpring River on your PC turns it into a PowerPoint add-on that you can use from the ribbon. This isn’t a limitation since iSpring River allows you to convert PPT files to widely suitable video file formats like MP4 or AVI, even though it’s not stand-alone computer software. In addition, you may choose the video size and compression parameters before each file conversion using the add-video on’s settings.
All of the original PowerPoint presentation’s animations and audio files, as well as transitions and font and text formatting, will be included in the final film. Video files exported from iSpring River may be uploaded straight to YouTube, but no other social media services such as Dropbox or Google Drive are supported.
Pros
It’s quick and simple to use.
Upload YouTube videos directly from your computer’s hard disc.
Cons
Cannot be used as a standalone application.
There isn’t any support for high-definition video.
4.RZ PowerPoint Converter

Price: There is a free version available, and prices begin at $29.99.
Using this sophisticated converter, any PPT files made with 2013 or previous versions of PowerPoint may be quickly converted to movies. RZ PowerPoint video to ppt converter also allows you to create HD video files that can be readily shared online, as well as files that can be burnt to DVDs.
Any current video playback device can play videos generated with this program, and the quality is so outstanding that you can play them on huge LCD displays. Though this video to ppt converter is accessible for free, its free edition lacks all of the capabilities that make this program an excellent alternative for professionals that prepare PowerPoint presentations on a consistent basis. It’s possible to get the commercial edition of this Windows-based tool and have all of the multimedia you include in the presentations converted to video without losing any quality.
Pros
You may use this to burn DVDs.
All PowerPoint file types are supported.
Cons
However, basic PPT to video file conversion is only available in the free edition of the product.
There is no possibility to convert many files at once.
5.Camtasia Studio

Price: A free trial is offered, and a single-user license is $249.
There is much more to Camtasia Studio than simply a video to ppt converter in it. An unencumbered trial edition of this video editing program helps you create professional-looking films from PowerPoint presentations. Camtasia Studio’s single-user license is a good alternative for those who just need to convert a few presentations for free, but if you’re searching for a full-featured video to ppt converter, you should consider purchasing Camtasia.
When using the software’s premium edition, you may add multimedia files, such as PowerPoint presentations and webcam footage to your final video project. With Camtasia Studio, you can easily post your films in nearly any video file type on social media.
Pros
With Camtasia Studio, adding transitions, callouts, or text effects is a cinch.
Advanced video editing tools are available.
Cons
Only 30 days are included in the free trial.
Expensive.
Conclusions
When looking for the best PowerPoint conversion software, there are a lot of factors to consider. The output quality, the ability to use PowerPoint effects, compatibility with new devices, & one publishing are all key considerations. Get a free trial of iSpring Converter Pro, the number one choice on our list, if you need a dependable video to ppt converter that can handle any amount of slides and animations in your presentation.
For Win 7 or later (64-bit)
For macOS 10.12 or later
If You Are Experiencing a Color Distortion in Your Video, You Are in the Right Place. We Have Provided a Detailed Guide with Three Methods that Will Help You Correct This Issue
Create High-Quality Video - Wondershare Filmora
An easy and powerful YouTube video editor
Numerous video and audio effects to choose from
Detailed tutorials are provided by the official channel
Nothing is more satisfying than seeing the final cut of a video and realizing that everything we filmed is crystal clear, with vibrant colors and balanced light. Unfortunately, whether you are editing on your own or collaborating with a team, this can be difficult to achieve because color problems often occur. Unlike photo editors, where one photo can easily be fixed without affecting the rest of an album, video editing requires adjusting to fix one problem. We’ll look at three different methods to correct color distortion in videos.
In this article
02 How will Color Distortion Affect Your Videos?
03 Different Methods to Correct Color Distortion in Videos
What Is Color Distortion
Color distortion, also called chromatic aberration (CA), happens when the camera’s lens cannot resolve the wavelengths of light that it is recording. It occurs due to dispersion, which is when the lens elements’ refractive index varies with the light wavelength.
The refractive index of transparent materials often reduces with increasing wavelength. Because a lens’ focal length depends on the index of refraction, this variation in refraction index affects focusing.
There are two types of CA: transverse (lateral) and axial (longitudinal). Axial aberration happens when different wavelengths of light focus at different distances from a lens (focus shift). Essentially, longitudinal aberration is often at long focal lengths.
On the other hand, transverse aberration happens when different wavelengths focus at different places in the focal plane due to the magnification or distortion of the lens varying with wavelength. Ideally, transverse aberration is often at short focal lengths.
The two types of CA have different characteristics, and they may occur together. Axial chromatic aberration occurs throughout an image, and you can reduce it by stopping down, hence increasing the depth of the field so that although the different wavelengths are focusing at different distances, they’re still in acceptable focus.
When it comes to transverse chromatic aberration, it doesn’t occur in the middle of the image, and it increases towards the edge. What’s more? Stopping down does not affect it.
How will Color Distortion Affect Your Videos?
Colour distortion displays itself as “fringes” of color on the boundaries separating bright and dark parts of the image in a video. Color distortion can also occur when adding effects to a video, such as the use of a green screen. By using the green screen to replace the real thing, the colors in the video can appear a little off.
Different Methods to Correct Color Distortion in Videos
There are several methods to correct color distortion in your video. They include.
Method 1: Correct Color Distortion in Videos Using Filmora
Filmora is user-friendly software with powerful tools that allow users to tweak the color settings and correct color distortion. Follow the steps below to learn how to correct color distortion in videos using Filmora.
Step 1. Download and Install Filmora
Head to https://filmora.wondershare.net/ and download Filmora. Once you have finished downloading the software, install Filmora on your device and launch it.
Step 2. Import Your videos to Filmora
Select the New Project option to create a new project file. Click on the Import Media Files Here to find and load your videos to the Filmora’s media library. Alternatively, you can drag and drop your video file to the media library, and then put it on the timeline.

Step 3. Correct Color Distortions with Your Preferences
Navigate to the timeline and double-click your video. You’ll see the video editing window. Select the Color panel; you’ll see several parameters that you can tweak.
- Contrast allows you to control the difference in brightness and color in different areas of your video image. The Brightness setting lets you customize the overall darkness or lightness of the video image.
- With the Saturation setting, you can make the colors in your video image appear more inconspicuous or saturated.
- If the color in your video image is set too high, it will look oversaturated. The colors will be washed out and muted if it’s set to low. The Tint control in Filmora allows you to adjust the balance between these two chroma channels.
- Additionally, you can employ Hollywood film-looking color sets for videos from Sparta 300, Walking Dead, Game of Thrones, Star Wars, and much more.
- Preview and Save Your Edited Video

Once you have finished correcting the color distortion in your video, you can hit the Play symbol to view the changes in the previewing window. Click the Export button if you are content with the results. You can click on Settings to change the settings if you want.
Filmora allows you to save your videos in different formats. To do this, navigate to the Format tab. The software has the option of uploading videos directly to Vimeo or YouTube. Alternatively, you can burn it to DVD or export it to a portable device.

For Win 7 or later (64-bit)
For macOS 10.12 or later
Method 2: Correct Color Distortion in Videos Using Premiere Pro
Premiere Pro provides color correction tools that allow users to edit footage directly on their timeline. To learn how to correct color distortion in video using Premiere Pro, follow these steps:
Step 1. Import Your Video Files
Use the Import command to bring video files on your device into your project; this will make the video files available to the Premiere Pro project. This timeline-based video editing software application allows you to import an entire folder, multiple files, or a single file. You can import video files using the Import command or the Media Browser.
Step 2. Head to Color Correction Effect
Once you have imported your video, place it on the timeline. Apply color correction effects to the video you placed in the Timeline. You can also select your video and drag and drop the effect you want to the Video Effects selection under the Effects Control Panel. Here are some of the color correction effects you can apply:
Brightness and Contrast Effect: With this effect, you can adjust the contrast and brightness of your video. Using this effect allows you to make adjustments to all pixel values in your video image at once — mid-tones, shadows, and highlights.
Color Balance Effect: This effect changes the amount of blue, green, and red in the shadow, highlights of an image, and mid-tones. Preserve Luminosity preserves the average brightness of your video image and changes the color. It maintains the tonal balance in your video image.

Method 3: Correct Color Distortion in Videos Using Final Cut Pro
Developed by Macromedia and later Apple, Final Cut Pro is a non-linear video editing software that allows you to log and transfer videos onto a hard drive, where you can edit them, process them, and output the videos to various formats.
The software provides non-destructive and non-linear editing of QuickTime-compatible video formats. These include 8K, 5K, 4K, 2K, XDCAM (via plug-in), P2 MXF (DVCProHD), HDV, and DV film formats. Final Cut Pro can also import projects from iMovie for iPadOS and iOS. It also comes with multiple color correction tools, such as color wheels, video scopes, and sliders and curves.
With that in mind, let’s look at how to correct color distortion in videos using Final Cut Pro.
Step 1. Open Your Video in Final Cut Pro
Click on the ‘Window’ tab at the top of your screen and select the video you’d like to edit from the drop-down menu.
Step 2. Switch to Color Effects Work Space

Go to the Window panel and select the Workspaces option. Then, choose the Color & Effects option. Here, you can adjust a range of scopes, including the Luma Waveform, Vectorscope, and RGB Overlay.

Step 3. Correct the Color
Head to the color panel and click the drop-down menu next to No Corrections. Select Color Wheels, where you’ll be able to control various parts of your video clips individually.

The Shadows wheel allows you to control the darker shades of your footage, Highlights controls the bright shades of your footage, and the Midtones wheel allows you to adjust the Luma channels in the middle of your video clip. The Master wheel allows you to adjust hue, saturation, and Luma channel (exposure).

In addition to the color wheels, you’ll find more controls below that help you adjust the white balance.
Step 4. Save Your New Video File
After you’ve made these adjustments to your video, it’s time to save and export the file. Click on the ‘File’ tab at the top of your screen and choose ‘Export. Once you click ‘Export,’ you’ll be saving the file to your hard drive. Once it’s done, click ‘Save.’ The file will automatically be saved on your desktop.
Conclusion
● If you are experiencing color distortion, you can use any of the three methods above to correct it. Filmora is one of the most popular video edit tools that people use to correct color distortion videos.
Nothing is more satisfying than seeing the final cut of a video and realizing that everything we filmed is crystal clear, with vibrant colors and balanced light. Unfortunately, whether you are editing on your own or collaborating with a team, this can be difficult to achieve because color problems often occur. Unlike photo editors, where one photo can easily be fixed without affecting the rest of an album, video editing requires adjusting to fix one problem. We’ll look at three different methods to correct color distortion in videos.
In this article
02 How will Color Distortion Affect Your Videos?
03 Different Methods to Correct Color Distortion in Videos
What Is Color Distortion
Color distortion, also called chromatic aberration (CA), happens when the camera’s lens cannot resolve the wavelengths of light that it is recording. It occurs due to dispersion, which is when the lens elements’ refractive index varies with the light wavelength.
The refractive index of transparent materials often reduces with increasing wavelength. Because a lens’ focal length depends on the index of refraction, this variation in refraction index affects focusing.
There are two types of CA: transverse (lateral) and axial (longitudinal). Axial aberration happens when different wavelengths of light focus at different distances from a lens (focus shift). Essentially, longitudinal aberration is often at long focal lengths.
On the other hand, transverse aberration happens when different wavelengths focus at different places in the focal plane due to the magnification or distortion of the lens varying with wavelength. Ideally, transverse aberration is often at short focal lengths.
The two types of CA have different characteristics, and they may occur together. Axial chromatic aberration occurs throughout an image, and you can reduce it by stopping down, hence increasing the depth of the field so that although the different wavelengths are focusing at different distances, they’re still in acceptable focus.
When it comes to transverse chromatic aberration, it doesn’t occur in the middle of the image, and it increases towards the edge. What’s more? Stopping down does not affect it.
How will Color Distortion Affect Your Videos?
Colour distortion displays itself as “fringes” of color on the boundaries separating bright and dark parts of the image in a video. Color distortion can also occur when adding effects to a video, such as the use of a green screen. By using the green screen to replace the real thing, the colors in the video can appear a little off.
Different Methods to Correct Color Distortion in Videos
There are several methods to correct color distortion in your video. They include.
Method 1: Correct Color Distortion in Videos Using Filmora
Filmora is user-friendly software with powerful tools that allow users to tweak the color settings and correct color distortion. Follow the steps below to learn how to correct color distortion in videos using Filmora.
Step 1. Download and Install Filmora
Head to https://filmora.wondershare.net/ and download Filmora. Once you have finished downloading the software, install Filmora on your device and launch it.
Step 2. Import Your videos to Filmora
Select the New Project option to create a new project file. Click on the Import Media Files Here to find and load your videos to the Filmora’s media library. Alternatively, you can drag and drop your video file to the media library, and then put it on the timeline.

Step 3. Correct Color Distortions with Your Preferences
Navigate to the timeline and double-click your video. You’ll see the video editing window. Select the Color panel; you’ll see several parameters that you can tweak.
- Contrast allows you to control the difference in brightness and color in different areas of your video image. The Brightness setting lets you customize the overall darkness or lightness of the video image.
- With the Saturation setting, you can make the colors in your video image appear more inconspicuous or saturated.
- If the color in your video image is set too high, it will look oversaturated. The colors will be washed out and muted if it’s set to low. The Tint control in Filmora allows you to adjust the balance between these two chroma channels.
- Additionally, you can employ Hollywood film-looking color sets for videos from Sparta 300, Walking Dead, Game of Thrones, Star Wars, and much more.
- Preview and Save Your Edited Video

Once you have finished correcting the color distortion in your video, you can hit the Play symbol to view the changes in the previewing window. Click the Export button if you are content with the results. You can click on Settings to change the settings if you want.
Filmora allows you to save your videos in different formats. To do this, navigate to the Format tab. The software has the option of uploading videos directly to Vimeo or YouTube. Alternatively, you can burn it to DVD or export it to a portable device.

For Win 7 or later (64-bit)
For macOS 10.12 or later
Method 2: Correct Color Distortion in Videos Using Premiere Pro
Premiere Pro provides color correction tools that allow users to edit footage directly on their timeline. To learn how to correct color distortion in video using Premiere Pro, follow these steps:
Step 1. Import Your Video Files
Use the Import command to bring video files on your device into your project; this will make the video files available to the Premiere Pro project. This timeline-based video editing software application allows you to import an entire folder, multiple files, or a single file. You can import video files using the Import command or the Media Browser.
Step 2. Head to Color Correction Effect
Once you have imported your video, place it on the timeline. Apply color correction effects to the video you placed in the Timeline. You can also select your video and drag and drop the effect you want to the Video Effects selection under the Effects Control Panel. Here are some of the color correction effects you can apply:
Brightness and Contrast Effect: With this effect, you can adjust the contrast and brightness of your video. Using this effect allows you to make adjustments to all pixel values in your video image at once — mid-tones, shadows, and highlights.
Color Balance Effect: This effect changes the amount of blue, green, and red in the shadow, highlights of an image, and mid-tones. Preserve Luminosity preserves the average brightness of your video image and changes the color. It maintains the tonal balance in your video image.

Method 3: Correct Color Distortion in Videos Using Final Cut Pro
Developed by Macromedia and later Apple, Final Cut Pro is a non-linear video editing software that allows you to log and transfer videos onto a hard drive, where you can edit them, process them, and output the videos to various formats.
The software provides non-destructive and non-linear editing of QuickTime-compatible video formats. These include 8K, 5K, 4K, 2K, XDCAM (via plug-in), P2 MXF (DVCProHD), HDV, and DV film formats. Final Cut Pro can also import projects from iMovie for iPadOS and iOS. It also comes with multiple color correction tools, such as color wheels, video scopes, and sliders and curves.
With that in mind, let’s look at how to correct color distortion in videos using Final Cut Pro.
Step 1. Open Your Video in Final Cut Pro
Click on the ‘Window’ tab at the top of your screen and select the video you’d like to edit from the drop-down menu.
Step 2. Switch to Color Effects Work Space

Go to the Window panel and select the Workspaces option. Then, choose the Color & Effects option. Here, you can adjust a range of scopes, including the Luma Waveform, Vectorscope, and RGB Overlay.

Step 3. Correct the Color
Head to the color panel and click the drop-down menu next to No Corrections. Select Color Wheels, where you’ll be able to control various parts of your video clips individually.

The Shadows wheel allows you to control the darker shades of your footage, Highlights controls the bright shades of your footage, and the Midtones wheel allows you to adjust the Luma channels in the middle of your video clip. The Master wheel allows you to adjust hue, saturation, and Luma channel (exposure).

In addition to the color wheels, you’ll find more controls below that help you adjust the white balance.
Step 4. Save Your New Video File
After you’ve made these adjustments to your video, it’s time to save and export the file. Click on the ‘File’ tab at the top of your screen and choose ‘Export. Once you click ‘Export,’ you’ll be saving the file to your hard drive. Once it’s done, click ‘Save.’ The file will automatically be saved on your desktop.
Conclusion
● If you are experiencing color distortion, you can use any of the three methods above to correct it. Filmora is one of the most popular video edit tools that people use to correct color distortion videos.
Nothing is more satisfying than seeing the final cut of a video and realizing that everything we filmed is crystal clear, with vibrant colors and balanced light. Unfortunately, whether you are editing on your own or collaborating with a team, this can be difficult to achieve because color problems often occur. Unlike photo editors, where one photo can easily be fixed without affecting the rest of an album, video editing requires adjusting to fix one problem. We’ll look at three different methods to correct color distortion in videos.
In this article
02 How will Color Distortion Affect Your Videos?
03 Different Methods to Correct Color Distortion in Videos
What Is Color Distortion
Color distortion, also called chromatic aberration (CA), happens when the camera’s lens cannot resolve the wavelengths of light that it is recording. It occurs due to dispersion, which is when the lens elements’ refractive index varies with the light wavelength.
The refractive index of transparent materials often reduces with increasing wavelength. Because a lens’ focal length depends on the index of refraction, this variation in refraction index affects focusing.
There are two types of CA: transverse (lateral) and axial (longitudinal). Axial aberration happens when different wavelengths of light focus at different distances from a lens (focus shift). Essentially, longitudinal aberration is often at long focal lengths.
On the other hand, transverse aberration happens when different wavelengths focus at different places in the focal plane due to the magnification or distortion of the lens varying with wavelength. Ideally, transverse aberration is often at short focal lengths.
The two types of CA have different characteristics, and they may occur together. Axial chromatic aberration occurs throughout an image, and you can reduce it by stopping down, hence increasing the depth of the field so that although the different wavelengths are focusing at different distances, they’re still in acceptable focus.
When it comes to transverse chromatic aberration, it doesn’t occur in the middle of the image, and it increases towards the edge. What’s more? Stopping down does not affect it.
How will Color Distortion Affect Your Videos?
Colour distortion displays itself as “fringes” of color on the boundaries separating bright and dark parts of the image in a video. Color distortion can also occur when adding effects to a video, such as the use of a green screen. By using the green screen to replace the real thing, the colors in the video can appear a little off.
Different Methods to Correct Color Distortion in Videos
There are several methods to correct color distortion in your video. They include.
Method 1: Correct Color Distortion in Videos Using Filmora
Filmora is user-friendly software with powerful tools that allow users to tweak the color settings and correct color distortion. Follow the steps below to learn how to correct color distortion in videos using Filmora.
Step 1. Download and Install Filmora
Head to https://filmora.wondershare.net/ and download Filmora. Once you have finished downloading the software, install Filmora on your device and launch it.
Step 2. Import Your videos to Filmora
Select the New Project option to create a new project file. Click on the Import Media Files Here to find and load your videos to the Filmora’s media library. Alternatively, you can drag and drop your video file to the media library, and then put it on the timeline.

Step 3. Correct Color Distortions with Your Preferences
Navigate to the timeline and double-click your video. You’ll see the video editing window. Select the Color panel; you’ll see several parameters that you can tweak.
- Contrast allows you to control the difference in brightness and color in different areas of your video image. The Brightness setting lets you customize the overall darkness or lightness of the video image.
- With the Saturation setting, you can make the colors in your video image appear more inconspicuous or saturated.
- If the color in your video image is set too high, it will look oversaturated. The colors will be washed out and muted if it’s set to low. The Tint control in Filmora allows you to adjust the balance between these two chroma channels.
- Additionally, you can employ Hollywood film-looking color sets for videos from Sparta 300, Walking Dead, Game of Thrones, Star Wars, and much more.
- Preview and Save Your Edited Video

Once you have finished correcting the color distortion in your video, you can hit the Play symbol to view the changes in the previewing window. Click the Export button if you are content with the results. You can click on Settings to change the settings if you want.
Filmora allows you to save your videos in different formats. To do this, navigate to the Format tab. The software has the option of uploading videos directly to Vimeo or YouTube. Alternatively, you can burn it to DVD or export it to a portable device.

For Win 7 or later (64-bit)
For macOS 10.12 or later
Method 2: Correct Color Distortion in Videos Using Premiere Pro
Premiere Pro provides color correction tools that allow users to edit footage directly on their timeline. To learn how to correct color distortion in video using Premiere Pro, follow these steps:
Step 1. Import Your Video Files
Use the Import command to bring video files on your device into your project; this will make the video files available to the Premiere Pro project. This timeline-based video editing software application allows you to import an entire folder, multiple files, or a single file. You can import video files using the Import command or the Media Browser.
Step 2. Head to Color Correction Effect
Once you have imported your video, place it on the timeline. Apply color correction effects to the video you placed in the Timeline. You can also select your video and drag and drop the effect you want to the Video Effects selection under the Effects Control Panel. Here are some of the color correction effects you can apply:
Brightness and Contrast Effect: With this effect, you can adjust the contrast and brightness of your video. Using this effect allows you to make adjustments to all pixel values in your video image at once — mid-tones, shadows, and highlights.
Color Balance Effect: This effect changes the amount of blue, green, and red in the shadow, highlights of an image, and mid-tones. Preserve Luminosity preserves the average brightness of your video image and changes the color. It maintains the tonal balance in your video image.

Method 3: Correct Color Distortion in Videos Using Final Cut Pro
Developed by Macromedia and later Apple, Final Cut Pro is a non-linear video editing software that allows you to log and transfer videos onto a hard drive, where you can edit them, process them, and output the videos to various formats.
The software provides non-destructive and non-linear editing of QuickTime-compatible video formats. These include 8K, 5K, 4K, 2K, XDCAM (via plug-in), P2 MXF (DVCProHD), HDV, and DV film formats. Final Cut Pro can also import projects from iMovie for iPadOS and iOS. It also comes with multiple color correction tools, such as color wheels, video scopes, and sliders and curves.
With that in mind, let’s look at how to correct color distortion in videos using Final Cut Pro.
Step 1. Open Your Video in Final Cut Pro
Click on the ‘Window’ tab at the top of your screen and select the video you’d like to edit from the drop-down menu.
Step 2. Switch to Color Effects Work Space

Go to the Window panel and select the Workspaces option. Then, choose the Color & Effects option. Here, you can adjust a range of scopes, including the Luma Waveform, Vectorscope, and RGB Overlay.

Step 3. Correct the Color
Head to the color panel and click the drop-down menu next to No Corrections. Select Color Wheels, where you’ll be able to control various parts of your video clips individually.

The Shadows wheel allows you to control the darker shades of your footage, Highlights controls the bright shades of your footage, and the Midtones wheel allows you to adjust the Luma channels in the middle of your video clip. The Master wheel allows you to adjust hue, saturation, and Luma channel (exposure).

In addition to the color wheels, you’ll find more controls below that help you adjust the white balance.
Step 4. Save Your New Video File
After you’ve made these adjustments to your video, it’s time to save and export the file. Click on the ‘File’ tab at the top of your screen and choose ‘Export. Once you click ‘Export,’ you’ll be saving the file to your hard drive. Once it’s done, click ‘Save.’ The file will automatically be saved on your desktop.
Conclusion
● If you are experiencing color distortion, you can use any of the three methods above to correct it. Filmora is one of the most popular video edit tools that people use to correct color distortion videos.
Nothing is more satisfying than seeing the final cut of a video and realizing that everything we filmed is crystal clear, with vibrant colors and balanced light. Unfortunately, whether you are editing on your own or collaborating with a team, this can be difficult to achieve because color problems often occur. Unlike photo editors, where one photo can easily be fixed without affecting the rest of an album, video editing requires adjusting to fix one problem. We’ll look at three different methods to correct color distortion in videos.
In this article
02 How will Color Distortion Affect Your Videos?
03 Different Methods to Correct Color Distortion in Videos
What Is Color Distortion
Color distortion, also called chromatic aberration (CA), happens when the camera’s lens cannot resolve the wavelengths of light that it is recording. It occurs due to dispersion, which is when the lens elements’ refractive index varies with the light wavelength.
The refractive index of transparent materials often reduces with increasing wavelength. Because a lens’ focal length depends on the index of refraction, this variation in refraction index affects focusing.
There are two types of CA: transverse (lateral) and axial (longitudinal). Axial aberration happens when different wavelengths of light focus at different distances from a lens (focus shift). Essentially, longitudinal aberration is often at long focal lengths.
On the other hand, transverse aberration happens when different wavelengths focus at different places in the focal plane due to the magnification or distortion of the lens varying with wavelength. Ideally, transverse aberration is often at short focal lengths.
The two types of CA have different characteristics, and they may occur together. Axial chromatic aberration occurs throughout an image, and you can reduce it by stopping down, hence increasing the depth of the field so that although the different wavelengths are focusing at different distances, they’re still in acceptable focus.
When it comes to transverse chromatic aberration, it doesn’t occur in the middle of the image, and it increases towards the edge. What’s more? Stopping down does not affect it.
How will Color Distortion Affect Your Videos?
Colour distortion displays itself as “fringes” of color on the boundaries separating bright and dark parts of the image in a video. Color distortion can also occur when adding effects to a video, such as the use of a green screen. By using the green screen to replace the real thing, the colors in the video can appear a little off.
Different Methods to Correct Color Distortion in Videos
There are several methods to correct color distortion in your video. They include.
Method 1: Correct Color Distortion in Videos Using Filmora
Filmora is user-friendly software with powerful tools that allow users to tweak the color settings and correct color distortion. Follow the steps below to learn how to correct color distortion in videos using Filmora.
Step 1. Download and Install Filmora
Head to https://filmora.wondershare.net/ and download Filmora. Once you have finished downloading the software, install Filmora on your device and launch it.
Step 2. Import Your videos to Filmora
Select the New Project option to create a new project file. Click on the Import Media Files Here to find and load your videos to the Filmora’s media library. Alternatively, you can drag and drop your video file to the media library, and then put it on the timeline.

Step 3. Correct Color Distortions with Your Preferences
Navigate to the timeline and double-click your video. You’ll see the video editing window. Select the Color panel; you’ll see several parameters that you can tweak.
- Contrast allows you to control the difference in brightness and color in different areas of your video image. The Brightness setting lets you customize the overall darkness or lightness of the video image.
- With the Saturation setting, you can make the colors in your video image appear more inconspicuous or saturated.
- If the color in your video image is set too high, it will look oversaturated. The colors will be washed out and muted if it’s set to low. The Tint control in Filmora allows you to adjust the balance between these two chroma channels.
- Additionally, you can employ Hollywood film-looking color sets for videos from Sparta 300, Walking Dead, Game of Thrones, Star Wars, and much more.
- Preview and Save Your Edited Video

Once you have finished correcting the color distortion in your video, you can hit the Play symbol to view the changes in the previewing window. Click the Export button if you are content with the results. You can click on Settings to change the settings if you want.
Filmora allows you to save your videos in different formats. To do this, navigate to the Format tab. The software has the option of uploading videos directly to Vimeo or YouTube. Alternatively, you can burn it to DVD or export it to a portable device.

For Win 7 or later (64-bit)
For macOS 10.12 or later
Method 2: Correct Color Distortion in Videos Using Premiere Pro
Premiere Pro provides color correction tools that allow users to edit footage directly on their timeline. To learn how to correct color distortion in video using Premiere Pro, follow these steps:
Step 1. Import Your Video Files
Use the Import command to bring video files on your device into your project; this will make the video files available to the Premiere Pro project. This timeline-based video editing software application allows you to import an entire folder, multiple files, or a single file. You can import video files using the Import command or the Media Browser.
Step 2. Head to Color Correction Effect
Once you have imported your video, place it on the timeline. Apply color correction effects to the video you placed in the Timeline. You can also select your video and drag and drop the effect you want to the Video Effects selection under the Effects Control Panel. Here are some of the color correction effects you can apply:
Brightness and Contrast Effect: With this effect, you can adjust the contrast and brightness of your video. Using this effect allows you to make adjustments to all pixel values in your video image at once — mid-tones, shadows, and highlights.
Color Balance Effect: This effect changes the amount of blue, green, and red in the shadow, highlights of an image, and mid-tones. Preserve Luminosity preserves the average brightness of your video image and changes the color. It maintains the tonal balance in your video image.

Method 3: Correct Color Distortion in Videos Using Final Cut Pro
Developed by Macromedia and later Apple, Final Cut Pro is a non-linear video editing software that allows you to log and transfer videos onto a hard drive, where you can edit them, process them, and output the videos to various formats.
The software provides non-destructive and non-linear editing of QuickTime-compatible video formats. These include 8K, 5K, 4K, 2K, XDCAM (via plug-in), P2 MXF (DVCProHD), HDV, and DV film formats. Final Cut Pro can also import projects from iMovie for iPadOS and iOS. It also comes with multiple color correction tools, such as color wheels, video scopes, and sliders and curves.
With that in mind, let’s look at how to correct color distortion in videos using Final Cut Pro.
Step 1. Open Your Video in Final Cut Pro
Click on the ‘Window’ tab at the top of your screen and select the video you’d like to edit from the drop-down menu.
Step 2. Switch to Color Effects Work Space

Go to the Window panel and select the Workspaces option. Then, choose the Color & Effects option. Here, you can adjust a range of scopes, including the Luma Waveform, Vectorscope, and RGB Overlay.

Step 3. Correct the Color
Head to the color panel and click the drop-down menu next to No Corrections. Select Color Wheels, where you’ll be able to control various parts of your video clips individually.

The Shadows wheel allows you to control the darker shades of your footage, Highlights controls the bright shades of your footage, and the Midtones wheel allows you to adjust the Luma channels in the middle of your video clip. The Master wheel allows you to adjust hue, saturation, and Luma channel (exposure).

In addition to the color wheels, you’ll find more controls below that help you adjust the white balance.
Step 4. Save Your New Video File
After you’ve made these adjustments to your video, it’s time to save and export the file. Click on the ‘File’ tab at the top of your screen and choose ‘Export. Once you click ‘Export,’ you’ll be saving the file to your hard drive. Once it’s done, click ‘Save.’ The file will automatically be saved on your desktop.
Conclusion
● If you are experiencing color distortion, you can use any of the three methods above to correct it. Filmora is one of the most popular video edit tools that people use to correct color distortion videos.
Also read:
- Updated Turn Your Text Into a Podcast Made Possible (+ EASY Editing Tips) for 2024
- 2024 Approved Do You Want Your Music Videos to Look Like Professional Music Videos? You Can Always Choose From Music Videos LUTs to Give Your Videos a Cinematic Touch
- Updated Easiest Fix Included! Top 5 Ways to Convert HDR to SDR Videos for 2024
- In 2024, Techniques You Never Heard of for Learning YouTube AI Marketing
- Top 5 Tools to Help You Know More Freeze-Frame Video Editing Skills
- New In 2024, 8 Frame Rate Video Converters for a Professional Finish
- 2024 Approved Srt File Creator
- Updated 6 Instant Ways to Make Windows 10 Slideshow
- Updated 2024 Approved How Long Does It Take To Edit A Video
- Updated In 2024, How to Add Miniature Effect in Video with Filmora
- Updated This Article Introduce You the Best Video Trimmers to Use on Different Devices, Check Them Out and Choose Your Favoriate One
- 2024 Approved Steps to Denoise in Final Cut Pro – Reduce Video and Audio Noise
- 2024 Approved In This Article, We Will Show You How to Rotate Videos Using Obs
- Updated How to Convert Images Into Video - Kapwing Tutorial
- Mastering OpenCV Object Tracking A Comprehensive Guide for Beginners and Experts for 2024
- 2024 Approved SRT File Translation Could Be a Tedious Task if You Dont Know the Right Steps. Lets Discuss Few Effective Ways to Do It Like a Pro
- How to Make Text Reveal Effect for Your Video for 2024
- New In 2024, Mastering OpenCV Object Tracking A Comprehensive Guide for Beginners and Experts
- New 2024 Approved Final Cut Pro - How to Download and Install It?
- New 2024 Approved A Countdown Effect Is Widely Used in Gaming and Report Videos. So How to Create Your Own Countdown Video? This Article Will Tell You some Ideas About Contdown Video Editing
- Updated Vintage Film Effect 1990S - How to Make for 2024
- The Top Tools for Converting Slides to Digital - 2024 Review
- New In 2024, How to DIY VHS Overlay in After Effects?
- Top Tricks for Learning Photo Slideshow
- New Every Compositor Should Know The Tips of Color Match in After Effects for 2024
- Updated How to Add Expression in After Effects
- New In 2024, Mastering the Technique Playing Videos in Slow Motion on Your iPhone Like a Pro
- Using Adobe After Effects as a Pro-Level Editing Platforms Demands You to Add Expressions in After Effects. If Youre Looking for the Solutions on After Effects How to Add Expressions Then Weve Got You Covered. Learn More Here
- Adobe Premiere Pro Guide to Slow-Down Video
- A Complete Guideline To Better Use QuickTime Player for 2024
- 9 Mind-Blowing Tricks to Hatch Eggs in Pokemon Go Without Walking On Tecno Spark 20C | Dr.fone
- In 2024, 5 Most Effective Methods to Unlock iPhone 12 in Lost Mode
- In 2024, A Complete Guide To OEM Unlocking on Infinix Note 30
- How To Remove iCloud From iPhone 12 Pro Smoothly
- How To Simulate GPS Movement With Location Spoofer On Vivo V30 Pro? | Dr.fone
- In 2024, How to Watch Hulu Outside US On Tecno Spark 10 4G | Dr.fone
- Can Life360 Track Or See Text Messages? What Can You Do with Life360 On Tecno Camon 20 Premier 5G? | Dr.fone
- New Guide How To Check iCloud Activation Lock Status On Your iPhone 8 Plus
- Life360 Learn How Everything Works On Oppo Reno 11 5G | Dr.fone
- How to Unlock Vivo V30 Pro Phone with Broken Screen
- How to Fix Unfortunately, Contacts Has Stopped Error on Sony Xperia 5 V | Dr.fone
- 3 Methods to Mirror OnePlus Nord CE 3 5G to Roku | Dr.fone
- In 2024, Detailed guide of ispoofer for pogo installation On OnePlus Nord N30 5G | Dr.fone
- In 2024, A Step-by-Step Guide on Using ADB and Fastboot to Remove FRP Lock from your Lava Blaze Pro 5G
- Is GSM Flasher ADB Legit? Full Review To Bypass Your Vivo Y28 5G Phone FRP Lock
- How to Transfer Photos from Lava Blaze Pro 5G to Laptop Without USB | Dr.fone
- How to Transfer Videos from Tecno Pova 6 Pro 5G to iPad | Dr.fone
- In 2024, 5 Techniques to Transfer Data from Oppo Reno 11F 5G to iPhone 15/14/13/12 | Dr.fone
- How to Change Credit Card from Your Apple iPhone 8 Plus Apple ID and Apple Pay
- Title: Updated In 2024,
- Author: Chloe
- Created at : 2024-04-24 07:08:30
- Updated at : 2024-04-25 07:08:30
- Link: https://ai-editing-video.techidaily.com/updated-in-2024/
- License: This work is licensed under CC BY-NC-SA 4.0.

