
:max_bytes(150000):strip_icc():format(webp)/free-disk-partition-software-tools-2624950-fad3ccc557d34ed89d53eff7538f5fdb.png)
Updated In 2024, 10+ Top Unlimited FCPX Slideshow Templates
10+ Top Unlimited FCPX Slideshow Templates
10+ Best Unlimited FCPX Slideshow Templates
An easy yet powerful editor
Numerous effects to choose from
Detailed tutorials provided by the official channel
The Final Cut Pro is one of the best and the most well-known tools or software for editing and making slideshows and videos. And making slideshows with fcpx leads to the production of the finest and the most creative slideshow videos!
The best part about using fcpx is that one can use the best of the best fcpx slideshow template for free. The software includes a large variety of templates which makes your slideshows look unique, and you will find templates that will suit every necessary purpose for the slideshow.
In this article
01 [10+ Best Final Cut Pro Slideshow Templates in 2022](#Part 1)
02 [How to Create a Slideshow in Final Cut Pro?](#Part 2)
03 [FAQ of FCPX Slideshow Templates](#Part 3)
Part 1 Best Final Cut Pro Slideshow Templates in 2022
Let us begin our discussion with the best Final Cut Pro slideshow templates in 2022. We will put forth the names of the templates and a short description of them so that you know what they are best suitable for.
So, here are the best Final Cut Pro slideshow templates for 2022.
01Colorful Liquid Slideshow
The Colorful Liquid Slideshow is the template best suited for any slideshow video for promotional purposes on social media. It has a very attractive design and components that quickly draws attention. And it is needed for any promotional videos on social media platforms.
The template is all about vibrant colours and beautiful transitions, making it ideal for fashion and lifestyle videos.

02Freestyle Slideshow
If you want to play with different transitional effects on your slideshow, the Freestyle Slideshow template of FCPX is best suited for your purpose. It has many transition effects that make your slideshow look highly engaging and jaw-dropping.
It is compatible with Apple Motion also and is best for making casual and fun slideshow videos.

03Smooth Colourful Slideshow
To present a modern touch to your slideshow, the Smooth Colourful Slideshow template of FCPX is the best option. It has the integration of vibrant colours, with a sophisticated modern touch to the use and design of the template. This template works the best to draw the necessary attention for any branding purposes.

04Beautiful Slideshow
As its name suggests, the Beautiful Slideshow template emits a sense and aura of soothing and pleasantness through its design. It is best suitable for any travelling slideshow videos, as it has an old-school film theme. It has a vintage vibe, and the best feature is that it is available for free. It consists of 10 placeholders for texts and media.

05Fast Dynamic Slideshow
The Fast Dynamic Slideshow consists of all the quick transitional effects. So, if you want to make a slideshow video that would have some action, this template will be best suitable for the purpose. The template and its transitions are sure to catch the audience’s attention, and the clean and quick transitions make this template one of the best on the list.
06Colorful Slideshow
The Colourful Slideshow template of FCPX is a template that is simple yet elegant. The design has a modern theme to it. So, if you want to create a simple but modern and elegant styled slideshow, this template can help you the best. You can readily make edits in the template, and it includes sufficient place for media and text holder.

07Urban Fashion Promo
As its name suggests, the Urban Fashion Promo slideshow template of FCPX is best suited for making slideshows for stylish themes with an urban touch to it. It is ideal for making any fashion slideshow videos. The template is customizable with different slide layout styles and customizable colours. The template is compatible with Apple Motion which makes it possible for you to customize it on Apple Motion.

08Multi-Screen Slideshow
The inspiration behind this fantastic Multi-Screen Template design of FCPX is the popular ongoing trend. The template has 32 media placeholders and as many as 26 text placeholders. Additionally, one can readily customize and edit the template to make it more attractive and eye-catching. It is best suitable for making any action-oriented slideshow and the ones that require grasping the audience’s attention.

09Dynamic Slideshow Opener
If you want to make trendy slideshow videos and involve the game of colours, the Dynamic Slideshow Opener template is best suitable for it. The creative effects of the template are added with an urban style which can create unique slideshows. It is ideal for videos on social media platforms.

10AI Technology Slideshow
When you are to make a slideshow for any exhibitions, presentations or any other professional purpose, the AI Technology Slideshow is the best option. The the template has a design related to tech backgrounds, so it is also ideal for any slideshows involving the showcasing of technological components or topics.

11Typography Slides
The Typography Slides of FCPX are best for making slideshow videos for professional purposes and business projects. It consists of various layouts that are ideal for showcasing various products, services, brands and the like. The resolution compatible with this template is 4K, and one can use this template on Apple Motion.

12Portfolio Video Slideshow Template
The Portfolio Video Slideshow Template of FCPX is best suited for making the best portfolio videos. It has all the elements that can significantly help you create your portfolio. The template is available in 4K resolution and allows you to integrate different slides together to create the best slideshow.
Part 2 How to Create a Slideshow in Final Cut Pro?
Now, we will discuss the different steps that will help you make a slideshow in Final Cut Pro. The steps are easy to follow. So, the following are the steps for creating an fcpx slideshow.
Step 1: Create a new project in the Final Cut Pro. For that, select “File” and then select “New Project”.
Step 2: The next step is about importing the photos you want to include in your slideshow. for this, use the option “Import” in “File” and import all the images you want for your slideshow.
Step 3: Create the timeline for your slideshow. Drag the images into the order you prefer, and it will make the photos appear in the sequence you want in your slideshow.
Step 4: Add the different transitions, effects, filters and the other elements of editing the slideshow. You can also integrate the various templates that are available at fcpx.
Step 5: It is the last step, which requires you to export the slideshow you just made. For that, go to “File”, sleet “Export”, choose “QuickTime Movie” and the quality you would prefer.
Part 3 FAQ of FCPX Slideshow Templates
Let us now look into some common questions related to FCPX slideshow templates. Some of the common questions about the fcpx slideshow template is as follows.
01Can I create a slideshow using Final Cut Pro?
Yes, one can effortlessly create the best and the most inimitable slideshows with Final Cut Pro. There are only five steps involved, and all the steps are easy to follow, as we have mentioned earlier.
02Are there templates like fcpx available at Filmora?
Filmora has a large variety of equally excellent templates, like fcpx’s. One can create the best and the most incredible slideshows in Wondershare Filmora Video Editor with its endless array of templates.
03What can we understand by fcpx templates?
The fcpx slideshow templates help you integrate different transitions, effects, texts, and other editing components and make your slideshow appear more engaging and extraordinary.
04Can I make slideshows in Wondershare Filmora Video Editor ?
Yes, one can make the most fantastic slideshow videos at Filmora with its incomparable professional yet simple-to-use features with which it is wholly loaded.
For Win 7 or later (64-bit)
For macOS 10.12 or later
Now, let us discuss the best tool with which you can make excellent slideshow videos and edit them. The tool we are talking about is Filmora. And it has the best features for video editing and making slideshow videos, and it is suitable for beginners and also professionals.
The features and elements for editing are simple to use but are the most advanced and proficient ones. The templates at Filmora are innumerable and are equally incredible, and you will find templates that will perfectly fit every purpose. You can readily avail yourself of the free version of Filmora and try out the free trial version of the paid version of the tool, which offers you the most excellent tools for editing.
● Ending Thoughts →
● We have covered the topics in our discussion that are given below.
● The best Final Cut Pro slideshow templates of 2022 and their description.
● The steps with which you can create a sideshow in the Final Cut Pro software.
● We have discussed the solutions to the common questions relating to the FCPX slideshow templates, and we introduced Filmora, the best tool for creating and editing incredible slideshow videos.
The Final Cut Pro is one of the best and the most well-known tools or software for editing and making slideshows and videos. And making slideshows with fcpx leads to the production of the finest and the most creative slideshow videos!
The best part about using fcpx is that one can use the best of the best fcpx slideshow template for free. The software includes a large variety of templates which makes your slideshows look unique, and you will find templates that will suit every necessary purpose for the slideshow.
In this article
01 [10+ Best Final Cut Pro Slideshow Templates in 2022](#Part 1)
02 [How to Create a Slideshow in Final Cut Pro?](#Part 2)
03 [FAQ of FCPX Slideshow Templates](#Part 3)
Part 1 Best Final Cut Pro Slideshow Templates in 2022
Let us begin our discussion with the best Final Cut Pro slideshow templates in 2022. We will put forth the names of the templates and a short description of them so that you know what they are best suitable for.
So, here are the best Final Cut Pro slideshow templates for 2022.
01Colorful Liquid Slideshow
The Colorful Liquid Slideshow is the template best suited for any slideshow video for promotional purposes on social media. It has a very attractive design and components that quickly draws attention. And it is needed for any promotional videos on social media platforms.
The template is all about vibrant colours and beautiful transitions, making it ideal for fashion and lifestyle videos.
02Freestyle Slideshow
If you want to play with different transitional effects on your slideshow, the Freestyle Slideshow template of FCPX is best suited for your purpose. It has many transition effects that make your slideshow look highly engaging and jaw-dropping.
It is compatible with Apple Motion also and is best for making casual and fun slideshow videos.
03Smooth Colourful Slideshow
To present a modern touch to your slideshow, the Smooth Colourful Slideshow template of FCPX is the best option. It has the integration of vibrant colours, with a sophisticated modern touch to the use and design of the template. This template works the best to draw the necessary attention for any branding purposes.
04Beautiful Slideshow
As its name suggests, the Beautiful Slideshow template emits a sense and aura of soothing and pleasantness through its design. It is best suitable for any travelling slideshow videos, as it has an old-school film theme. It has a vintage vibe, and the best feature is that it is available for free. It consists of 10 placeholders for texts and media.
05Fast Dynamic Slideshow
The Fast Dynamic Slideshow consists of all the quick transitional effects. So, if you want to make a slideshow video that would have some action, this template will be best suitable for the purpose. The template and its transitions are sure to catch the audience’s attention, and the clean and quick transitions make this template one of the best on the list.
06Colorful Slideshow
The Colourful Slideshow template of FCPX is a template that is simple yet elegant. The design has a modern theme to it. So, if you want to create a simple but modern and elegant styled slideshow, this template can help you the best. You can readily make edits in the template, and it includes sufficient place for media and text holder.
07Urban Fashion Promo
As its name suggests, the Urban Fashion Promo slideshow template of FCPX is best suited for making slideshows for stylish themes with an urban touch to it. It is ideal for making any fashion slideshow videos. The template is customizable with different slide layout styles and customizable colours. The template is compatible with Apple Motion which makes it possible for you to customize it on Apple Motion.
08Multi-Screen Slideshow
The inspiration behind this fantastic Multi-Screen Template design of FCPX is the popular ongoing trend. The template has 32 media placeholders and as many as 26 text placeholders. Additionally, one can readily customize and edit the template to make it more attractive and eye-catching. It is best suitable for making any action-oriented slideshow and the ones that require grasping the audience’s attention.
09Dynamic Slideshow Opener
If you want to make trendy slideshow videos and involve the game of colours, the Dynamic Slideshow Opener template is best suitable for it. The creative effects of the template are added with an urban style which can create unique slideshows. It is ideal for videos on social media platforms.
10AI Technology Slideshow
When you are to make a slideshow for any exhibitions, presentations or any other professional purpose, the AI Technology Slideshow is the best option. The the template has a design related to tech backgrounds, so it is also ideal for any slideshows involving the showcasing of technological components or topics.
11Typography Slides
The Typography Slides of FCPX are best for making slideshow videos for professional purposes and business projects. It consists of various layouts that are ideal for showcasing various products, services, brands and the like. The resolution compatible with this template is 4K, and one can use this template on Apple Motion.
12Portfolio Video Slideshow Template
The Portfolio Video Slideshow Template of FCPX is best suited for making the best portfolio videos. It has all the elements that can significantly help you create your portfolio. The template is available in 4K resolution and allows you to integrate different slides together to create the best slideshow.
Part 2 How to Create a Slideshow in Final Cut Pro?
Now, we will discuss the different steps that will help you make a slideshow in Final Cut Pro. The steps are easy to follow. So, the following are the steps for creating an fcpx slideshow.
Step 1: Create a new project in the Final Cut Pro. For that, select “File” and then select “New Project”.
Step 2: The next step is about importing the photos you want to include in your slideshow. for this, use the option “Import” in “File” and import all the images you want for your slideshow.
Step 3: Create the timeline for your slideshow. Drag the images into the order you prefer, and it will make the photos appear in the sequence you want in your slideshow.
Step 4: Add the different transitions, effects, filters and the other elements of editing the slideshow. You can also integrate the various templates that are available at fcpx.
Step 5: It is the last step, which requires you to export the slideshow you just made. For that, go to “File”, sleet “Export”, choose “QuickTime Movie” and the quality you would prefer.
Part 3 FAQ of FCPX Slideshow Templates
Let us now look into some common questions related to FCPX slideshow templates. Some of the common questions about the fcpx slideshow template is as follows.
01Can I create a slideshow using Final Cut Pro?
Yes, one can effortlessly create the best and the most inimitable slideshows with Final Cut Pro. There are only five steps involved, and all the steps are easy to follow, as we have mentioned earlier.
02Are there templates like fcpx available at Filmora?
Filmora has a large variety of equally excellent templates, like fcpx’s. One can create the best and the most incredible slideshows in Wondershare Filmora Video Editor with its endless array of templates.
03What can we understand by fcpx templates?
The fcpx slideshow templates help you integrate different transitions, effects, texts, and other editing components and make your slideshow appear more engaging and extraordinary.
04Can I make slideshows in Wondershare Filmora Video Editor ?
Yes, one can make the most fantastic slideshow videos at Filmora with its incomparable professional yet simple-to-use features with which it is wholly loaded.
For Win 7 or later (64-bit)
For macOS 10.12 or later
Now, let us discuss the best tool with which you can make excellent slideshow videos and edit them. The tool we are talking about is Filmora. And it has the best features for video editing and making slideshow videos, and it is suitable for beginners and also professionals.
The features and elements for editing are simple to use but are the most advanced and proficient ones. The templates at Filmora are innumerable and are equally incredible, and you will find templates that will perfectly fit every purpose. You can readily avail yourself of the free version of Filmora and try out the free trial version of the paid version of the tool, which offers you the most excellent tools for editing.
● Ending Thoughts →
● We have covered the topics in our discussion that are given below.
● The best Final Cut Pro slideshow templates of 2022 and their description.
● The steps with which you can create a sideshow in the Final Cut Pro software.
● We have discussed the solutions to the common questions relating to the FCPX slideshow templates, and we introduced Filmora, the best tool for creating and editing incredible slideshow videos.
A Complete Guide to Use Distortion Effect in Premiere Pro
Create High-Quality Video - Wondershare Filmora
An easy and powerful YouTube video editor
Numerous video and audio effects to choose from
Detailed tutorials are provided by the official channel
Premiere Pro is one of the most popular timeline-based video editing software, with over 9 million users. It’s the successor to Adobe Premiere, and it comes with cool distortion effects. We’ll look at Premiere Pro distortion effects and how to use them.
In this article
01 How to Use Distortion Effect in Premiere Pro?
02 Bonus! Free Distortion Effects for Premiere Pro
Adobe Premiere Pro offers a wide variety of beneficial editing tools and effects. Below are some of the impressive distortion effects you’ll find in Premiere Pro and how to use them in your project.
1. Corner Pin Effect
This effect distorts your image by simply changing the position of its corners. You can use the Corner pin effect to twist, skew, shrink, or stretch an image. Additionally, you can use it to simulate movement or perspective pivoting from the edge of your clip like a door opening.
You can directly manipulate the properties of the Corner Pin effect in the Program monitor by clicking the Transform right next to Corner Pin. To adjust the properties, drag one of the corner handles.
- To use this effect, open Premiere Pro and click File. Choose Import from the drop-down menu. The File Explorer window will open and allow you to find your footage. Select the video file you want to import, then click Open.
- Go to Effects Control and click Distortion. Choose Corner Pin Effect from the drop-down menu.

- You can now pin each corner from its original point to another specific point by adjusting the slider on the Upper Left, Upper Right, Lower Left, and Lower Right. You can also highlight your selection tool when working with the Corner Pin effect.

2. Lens Distortion Effect
This distortion effect Premiere Pro simulates the distorted lens through which people view the clip.
1. Go to Effects Control>Distortion>Lens Distortion Effect.
2. Choose the settings you want to use from the available options and adjust the slider.
- The Vertical and Horizontal Decentering control displaces the lens’ focal and makes the image bend and smear. The image will wrap in on itself at extreme settings.
- The Curvature setting alters the curvature of the lens. You can specify a positive value to make the image convex, while the negative value makes the image concave.
- The Vertical and Horizontal Prism FX setting created results similar to horizontal decentering and vertical, but the image does not wrap in on itself at extreme values.
- Use the Fill Color option to specify the background color, and Fill Alpha to make your background transparent.

3. Magnify Effect
This effect allows you to enlarge a selected area of your clip. The Magnify effect acts as a magnifying glass set over an area of an image. You can also use this effect to scale the whole image far beyond 100 percent and still maintain resolution.
1. To use this effect, go to Effect Control>Distortion>Magnify.
2. Next, go to the left side of the Effects Control panel and make the necessary adjustments to suit your preferences.
- Shape: This control specifies the magnified area shape.
- Center: The Center control allows you to specify the center of the magnified section.
- Magnification: This setting lets users specify the percentage of the magnification of the area they have selected, while the values represent the scale percentage.
- Link: The Link control allows you to specify how the effect will link the Size, Feather, and Magnification amount, to enable them to decrease or increase proportionally. You will disable the Resize Layer option if you set the Link control to any of the available settings except None. Setting the Link control to any setting except None disables Resize Layer. Size & Feather To Magnification allows you to specify that the edge feather and size of the magnified section decrease or increase proportionally regarding the magnification adjustment.
- Size: This control allows you to specify the magnified area size in pixels.
- Feather: With the Feather option, you can specify the amount of feather the effect applies to the magnified area edge. Lower values will sharpen the edge. Higher values will soften the edge while blending the edge with the layer that’s behind it.
- Opacity: This control allows you to specify the transparency of the magnified region.
- Scaling: Use this option to specify the kind of scaling the effect is using to magnify an image.
- Blending Mode: Use this control to specify the blend mode the effect will use to combine the original clip with the magnified area. The None option shows transparent pixels around the magnified section.
- Resize Layer: Selecting this option means the effect will only use the boundaries as the clip’s edge when the magnified region extends beyond the original boundaries of the clip. Deselecting the Resize Layer means that the boundaries of the clip will crop any area of your image outside the bounding box of the original clip.

4. Mirror Effect
This distortion Premiere Pro effect splits an image along a line while reflecting one side onto the other. Where the reflection appears and which side will be reflected is determined by the reflection angles.
1. Head over to Effect Control>Distortion>Mirror to use this effect.
2. Adjust the controls until you get the results you desire.
- Reflection Angle: With the Reflection Angle control, you can specify the angle of reflection and where it appears on the clip. A zero-degree angle reflects the left-hand side on the right.
- Reflection Center: This control allows you to specify the position of the line. You need to click the box, then drag the resulting crosshair up to the area in the image where you would like to place the line.

5. Offset Effect
This effect pans your image within a clip, and visual details pushed off one side of this image will appear on the opposite side. You have to perform the offset with subpixel precision at the best quality.
Also, you can use Offset with a combination of other effects. Head over to Effect Control>Distortion>Offset to use this effect.

6. Spherize Effect
The Spherize effect allows users to wrap a video clip around a spherical shape. You can use it to give texts and objects a three-dimensional effect. Go to Effect Control>Distortion>Spherize and adjust the radius and center of the sphere.

7. Transform Effect
This effect applies 2-dimensional geometric transformations to your clip. You can use this effect to skew clips along any axis.
1. Go to Effect Control>Distortion>Transform to apply this effect to your clip.
2. Use Transform settings to adjust Opacity, Skew, Rotation, Scale, Anchor Point, and more.

8. Turbulent Displace Effect
This fun effect utilizes fractal noise to create turbulent Premiere Pro distortion effects in your image. You can use the Turbulent Displace effect to add movement to your clip.
1. Head to Effect Control>Distortion>Turbulent Displace.
2. Adjust the following controls:
- Displacement
- Amount
- Size
- Offset (Turbulence)
- Complexity
- Evolution
- Pinning
- Resize Layer
- Antialiasing For Best Quality

9. Twirl Effect
The Twirl effect allows you to rotate your clip around its center. It rotates the image more sharply in the middle than at the edge. You can use it on faces to make a funny clip. Navigate to Effect Control>Distortion>Twirl to start using this effect. Next, use the settings to adjust how much angle it twirls and the radius.

10. Wave Warp Effect
This effect is one of the most popular Premiere Pro distortion effects. It generates the appearance of a wave as it’s traveling across an image. The Wave Warp effect allows you to produce various wave shapes, including sine, circular, and square waves.
It’s automatically animated at a steady speed across the time range, and that’s without frames. You need to set keyframes to vary speeds.
1. Head to Effect Control>Distortion>Wave Warp to apply this effect in your video clip.
2. Now, change the wave speed, direction, height, width, and type to suit your preference.

Bonus! Free Distortion Effects for Premiere Pro
1. Liquid Distortion Effect
This effect can distort the content in a clip and can be used to shift into the next clip. It could be utilized in editing or used as a transition.

2. Earthquake Effect
This effect adds a shaking motion to the video clip you add it to; it works as a transition but could also be a useful editing tool.

3. Glass Effect
This effect can add various blurs to the video clip and be used to transition from one clip to the next.

4. TV Effect
This effect imitates the view of a television being turned on or off. You can use it to introduce a new video clip. It would also be a great start or end to the entire video.

5. Glitch Effect
This effect adds a glitch to the video clip. You can use it in editing or as a transition from one clip to the next.

Conclusion
● You can add any of these Premiere Pro distortion effects to make your videos more catchy. In turn, they will get more attention and views. Premiere Pro comes with tons of distortion effects and a responsive interface.
Premiere Pro is one of the most popular timeline-based video editing software, with over 9 million users. It’s the successor to Adobe Premiere, and it comes with cool distortion effects. We’ll look at Premiere Pro distortion effects and how to use them.
In this article
01 How to Use Distortion Effect in Premiere Pro?
02 Bonus! Free Distortion Effects for Premiere Pro
Adobe Premiere Pro offers a wide variety of beneficial editing tools and effects. Below are some of the impressive distortion effects you’ll find in Premiere Pro and how to use them in your project.
1. Corner Pin Effect
This effect distorts your image by simply changing the position of its corners. You can use the Corner pin effect to twist, skew, shrink, or stretch an image. Additionally, you can use it to simulate movement or perspective pivoting from the edge of your clip like a door opening.
You can directly manipulate the properties of the Corner Pin effect in the Program monitor by clicking the Transform right next to Corner Pin. To adjust the properties, drag one of the corner handles.
- To use this effect, open Premiere Pro and click File. Choose Import from the drop-down menu. The File Explorer window will open and allow you to find your footage. Select the video file you want to import, then click Open.
- Go to Effects Control and click Distortion. Choose Corner Pin Effect from the drop-down menu.
- You can now pin each corner from its original point to another specific point by adjusting the slider on the Upper Left, Upper Right, Lower Left, and Lower Right. You can also highlight your selection tool when working with the Corner Pin effect.
2. Lens Distortion Effect
This distortion effect Premiere Pro simulates the distorted lens through which people view the clip.
1. Go to Effects Control>Distortion>Lens Distortion Effect.
2. Choose the settings you want to use from the available options and adjust the slider.
- The Vertical and Horizontal Decentering control displaces the lens’ focal and makes the image bend and smear. The image will wrap in on itself at extreme settings.
- The Curvature setting alters the curvature of the lens. You can specify a positive value to make the image convex, while the negative value makes the image concave.
- The Vertical and Horizontal Prism FX setting created results similar to horizontal decentering and vertical, but the image does not wrap in on itself at extreme values.
- Use the Fill Color option to specify the background color, and Fill Alpha to make your background transparent.
3. Magnify Effect
This effect allows you to enlarge a selected area of your clip. The Magnify effect acts as a magnifying glass set over an area of an image. You can also use this effect to scale the whole image far beyond 100 percent and still maintain resolution.
1. To use this effect, go to Effect Control>Distortion>Magnify.
2. Next, go to the left side of the Effects Control panel and make the necessary adjustments to suit your preferences.
- Shape: This control specifies the magnified area shape.
- Center: The Center control allows you to specify the center of the magnified section.
- Magnification: This setting lets users specify the percentage of the magnification of the area they have selected, while the values represent the scale percentage.
- Link: The Link control allows you to specify how the effect will link the Size, Feather, and Magnification amount, to enable them to decrease or increase proportionally. You will disable the Resize Layer option if you set the Link control to any of the available settings except None. Setting the Link control to any setting except None disables Resize Layer. Size & Feather To Magnification allows you to specify that the edge feather and size of the magnified section decrease or increase proportionally regarding the magnification adjustment.
- Size: This control allows you to specify the magnified area size in pixels.
- Feather: With the Feather option, you can specify the amount of feather the effect applies to the magnified area edge. Lower values will sharpen the edge. Higher values will soften the edge while blending the edge with the layer that’s behind it.
- Opacity: This control allows you to specify the transparency of the magnified region.
- Scaling: Use this option to specify the kind of scaling the effect is using to magnify an image.
- Blending Mode: Use this control to specify the blend mode the effect will use to combine the original clip with the magnified area. The None option shows transparent pixels around the magnified section.
- Resize Layer: Selecting this option means the effect will only use the boundaries as the clip’s edge when the magnified region extends beyond the original boundaries of the clip. Deselecting the Resize Layer means that the boundaries of the clip will crop any area of your image outside the bounding box of the original clip.
4. Mirror Effect
This distortion Premiere Pro effect splits an image along a line while reflecting one side onto the other. Where the reflection appears and which side will be reflected is determined by the reflection angles.
1. Head over to Effect Control>Distortion>Mirror to use this effect.
2. Adjust the controls until you get the results you desire.
- Reflection Angle: With the Reflection Angle control, you can specify the angle of reflection and where it appears on the clip. A zero-degree angle reflects the left-hand side on the right.
- Reflection Center: This control allows you to specify the position of the line. You need to click the box, then drag the resulting crosshair up to the area in the image where you would like to place the line.
5. Offset Effect
This effect pans your image within a clip, and visual details pushed off one side of this image will appear on the opposite side. You have to perform the offset with subpixel precision at the best quality.
Also, you can use Offset with a combination of other effects. Head over to Effect Control>Distortion>Offset to use this effect.
6. Spherize Effect
The Spherize effect allows users to wrap a video clip around a spherical shape. You can use it to give texts and objects a three-dimensional effect. Go to Effect Control>Distortion>Spherize and adjust the radius and center of the sphere.
7. Transform Effect
This effect applies 2-dimensional geometric transformations to your clip. You can use this effect to skew clips along any axis.
1. Go to Effect Control>Distortion>Transform to apply this effect to your clip.
2. Use Transform settings to adjust Opacity, Skew, Rotation, Scale, Anchor Point, and more.
8. Turbulent Displace Effect
This fun effect utilizes fractal noise to create turbulent Premiere Pro distortion effects in your image. You can use the Turbulent Displace effect to add movement to your clip.
1. Head to Effect Control>Distortion>Turbulent Displace.
2. Adjust the following controls:
- Displacement
- Amount
- Size
- Offset (Turbulence)
- Complexity
- Evolution
- Pinning
- Resize Layer
- Antialiasing For Best Quality
9. Twirl Effect
The Twirl effect allows you to rotate your clip around its center. It rotates the image more sharply in the middle than at the edge. You can use it on faces to make a funny clip. Navigate to Effect Control>Distortion>Twirl to start using this effect. Next, use the settings to adjust how much angle it twirls and the radius.
10. Wave Warp Effect
This effect is one of the most popular Premiere Pro distortion effects. It generates the appearance of a wave as it’s traveling across an image. The Wave Warp effect allows you to produce various wave shapes, including sine, circular, and square waves.
It’s automatically animated at a steady speed across the time range, and that’s without frames. You need to set keyframes to vary speeds.
1. Head to Effect Control>Distortion>Wave Warp to apply this effect in your video clip.
2. Now, change the wave speed, direction, height, width, and type to suit your preference.
Bonus! Free Distortion Effects for Premiere Pro
1. Liquid Distortion Effect
This effect can distort the content in a clip and can be used to shift into the next clip. It could be utilized in editing or used as a transition.
2. Earthquake Effect
This effect adds a shaking motion to the video clip you add it to; it works as a transition but could also be a useful editing tool.
3. Glass Effect
This effect can add various blurs to the video clip and be used to transition from one clip to the next.
4. TV Effect
This effect imitates the view of a television being turned on or off. You can use it to introduce a new video clip. It would also be a great start or end to the entire video.
5. Glitch Effect
This effect adds a glitch to the video clip. You can use it in editing or as a transition from one clip to the next.
Conclusion
● You can add any of these Premiere Pro distortion effects to make your videos more catchy. In turn, they will get more attention and views. Premiere Pro comes with tons of distortion effects and a responsive interface.
Top 12 AI Video Generators to Pick
Top 12 AI Video Generators to Pick
An easy yet powerful editor
Numerous effects to choose from
Detailed tutorials provided by the official channel
It is a fact that video editing can sometimes be laborious and time-consuming. Even when using the best video editing software, it still requires human effort to get an impressive result. But luckily for us, the invention of the AI video generator has now made a lot of things easier. The AI video generators are the next level as they allow users to automate video creation and editing without compromising quality.
This article will discuss the best AI text to video generators for free that will help make your life easier. Thus, this will soon help you create engaging videos for your personal or business use in just a few clicks.
In this article
01 [What Is an AI Video Generator](#Part 1)
02 [How Does the AI Video Maker Work](#Part 2)
03 [The 12 Best AI Video Generator](#Part 3)
Part 1 What Is an AI Video Generator
AI video generator is the process of using artificial intelligence (AI) to create professional videos. With an AI video generator for free, you do not need any equipment, an editing studio, or a premium video editing application to be able to create a video.
All that is required is that you feed input to the AI tool, and it will automatically help you generate a video. You can edit a blog post into a video within a few minutes with any of these tools listed. In addition, it won’t incur any high costs for video productions because the AI tool will help you carry out most of the tasks.
Part 2 How Does the AI Video Maker Work
Professional AI video editors, are trained by showing them various examples and then providing them feedback by telling them what is wrong and good. The machine then takes note of it and remembers it. However, as the machine continues to learn, it picks the results and then improves itself based on the feedback. Ultimately the device becomes very good or even better than the human that creates it. Here are some breakdowns of the ways video editors work:
● The AI video maker tool, can augment your videos with AR effects, including AR masks, face and color filters, face touch-ups, etc. The tool uses neural networks and computer vision to interrupt, extract, and understand the video content.
● This AI subtitle generator can allow interviews to be delivered and analyzed to the editor fully transcribed, searchable by word or even sentences. Video editors can use AI for keyword extraction, speech-to-text conversion, facial recognition, sentiment analysis, image recognition, and emotion detection.
● AI-video editors can pull sections of a video clip from any source automatically. These AI systems can also detect emotions that allow the creation of warm, appealing videos.
Part 3 The 12 Best AI Video Generator
There are top AI video generators for free that you can choose from for your video editing. These video editors complete work quickly and easily. In addition, if you need video editing software to help you edit your generated videos after generating them, we recommend that you try out Filmora from Wondershare. Wondershare Filmora Video Editor is a perfect video editing software with tons of new features, like keyframing, split video, and adding animations and effects to help you carry out your video editing seamlessly.
For Win 7 or later (64-bit)
For macOS 10.12 or later
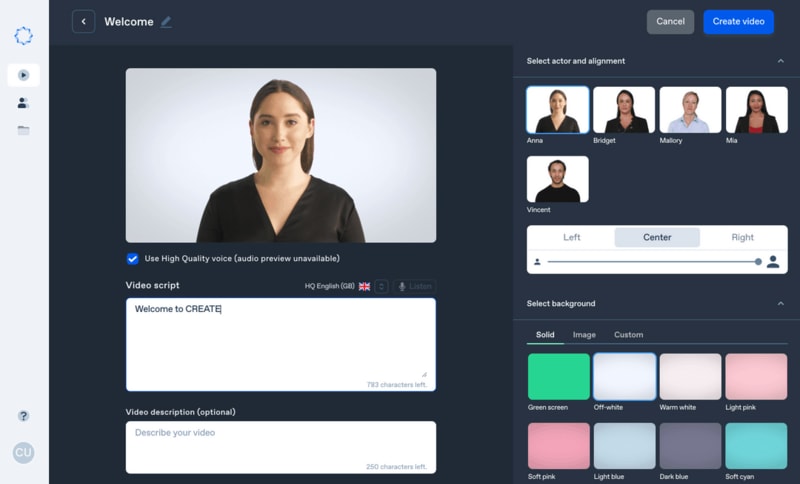
01Sora
Sora is an artificial intelligence model that generates videos with textual descriptions, developed by OpenAI. It is a US-based artificial intelligence research organization. Sora stands out as a game-changing platform. It can seamlessly convert text into captivating videos, blending convenience with creativity.
Features
● With Sora, transforming written content into engaging videos is swift and efficient.
● Unlike traditional video editing tools, Sora is designed for users of all levels, eliminating the need for prior video production experience.
● Sora offers a plethora of customization options.
● Generates videos up to 60 seconds long
● Generates complex scenes with multiple characters, motions, and accurate details of the subject
● Creates multiple shots within a single generated video
● Generating videos from text instructions by utilizing the recaptioning technique from DALL·E 3
Pros
● Highly realistic video generation with impressive visual quality
● Text-based control over the content of the video, allowing for precise video generation
● A highly versatile tool that handles a wide range of prompts and styles
Cons
● Lacks implicit understanding of the rules of physics
This software is best realistic and imaginative scenes.
02Wondershare Filmora
Wondershare Filmora is a highly efficient video editing software that comes with AI text to video generation. The software is friendly to both beginner and intermediate creations, offering you a wide range of intuitive features.
Pricing
● Subscription Plan: US$19.99 per month
● Cross-Platform Plan: US$69.99 per year
● Perpetual Plan: US$19.99 Onetime Payment
Features
● User-friendly interface that is easy to learn and use
● Wide range of features for creating and editing videos, including transitions, effects, and text overlays.
● Large stock library of royalty-free music and stock footage
● Readily available templates and presets to quickly generate videos
● Easily export videos directly to popular platforms like YouTube and TikTok
Pros
● User-friendly interface with a learning curve suitable for all kinds of creators
● Extensive library of free and paid assets to enhance your videos
● Wide range of features for video editing
Cons
● Lacks advanced features for AI video prompt generation
This software is best for video creation and editing for freelancers, SMBs, markters.
For Win 7 or later (64-bit)
For macOS 10.12 or later
How to Use Filmora’s AI to Video Feature : AI Video Prompt Sample
Here is a brief step-by-step guide on how to use Filmora to generate AI videos. The process is as simple as writing a text prompt and getting the video ready:
Step 1: Lauch Filmora AI Text-to-Video Features
Once you launch on your PC Filmora, click the AI Text-to-Video option to start the video generation process.
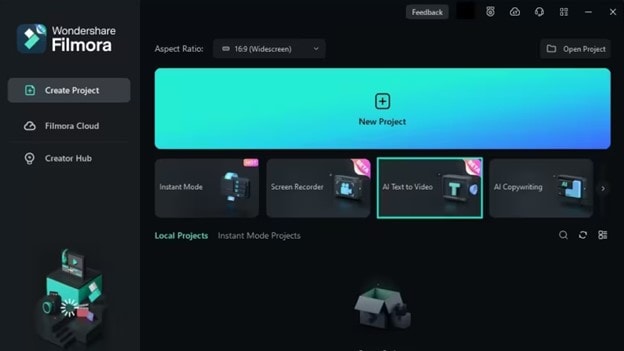
Step 2: Add a Text Prompt or Video Script
On the AI Text-to-Video video, add your text prompt. You can also modify other settings such as text language and video voice. Then click the Text to Video button at the bottom to prompt Filmora to generate the video.
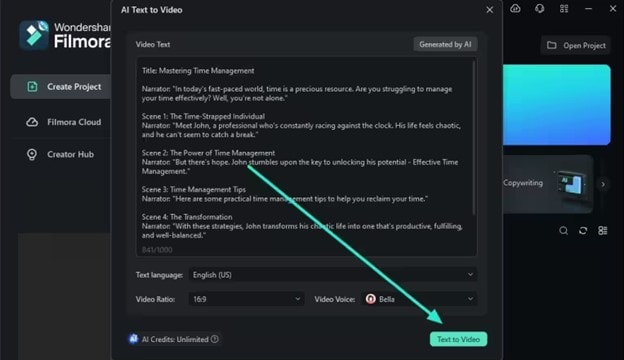
Step 3: Preview the Generated Video
Filmora generates the video based on your prompt and a new editing window. You can now a preview video and make any further editing needed.
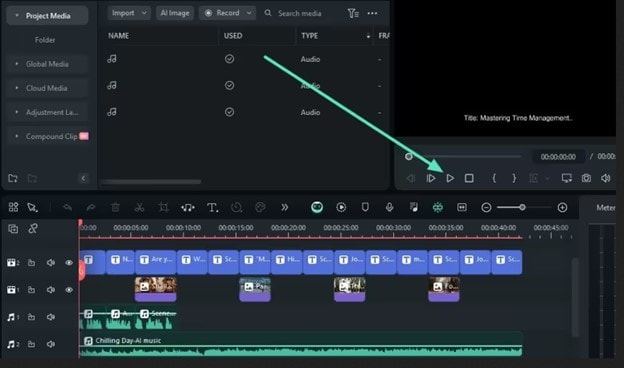
AI Video Prompt Sample Using Filmora
Prompt: A young man at his 20s is sitting on a piece of cloud in the sky, reading a book.
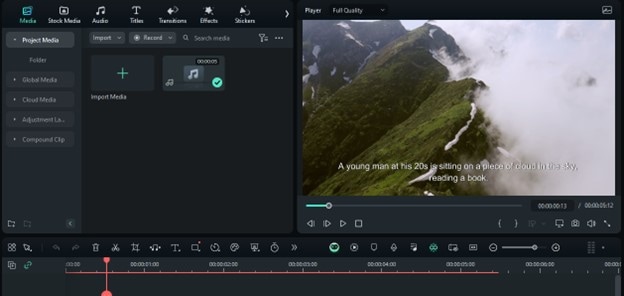
When prompted to generate a video of a young man in his 20s sitting on a piece of cloud in the sky, reading a book, Filmora generated a narration video from the point of view of the young man as shown above.
03Synthesia
This is a web-app video generator AI from a text supporting AI-driven video creation used by experts and beginners. Rather than filming content utilizing a microphone and camera, this software AI technology helps to simulate human presenters and real-life videos. Thus, it saves video creators hours of work.
Pricing
● Personal Plan: $30 monthly
● Corporate Plan: custom pricing
Features
● Over 40 supported languages
● Allows template customizations
● Allows users to make their avatars
● It has 50 built-in presenters
● Allows you to create realistic AI videos
● Offers live chat support
● Allows download in Mp4
● Enables users to create videos automatically using integrations with APIs
● Allows the addition of backgrounds
● Users can share their videos on other social media platforms
● Allows the addition of images, shapes, and texts to videos
Pros
● Great for beginners are you do not need prior knowledge
Cons
● It supports only front-facing poses
This software is best for freelancers, agencies, marketers, and content creators looking to create high-quality video content.
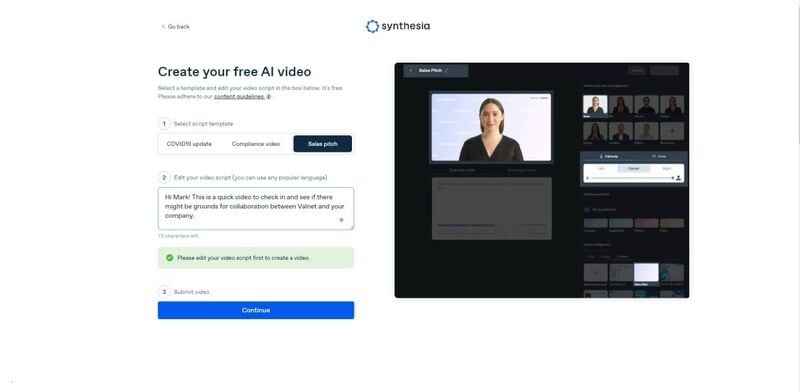
04Synths Video
This is an AI video-generating tool primarily concerned with helping users drive leads and traffic from YouTube. It is an AI YouTube title generator that allows users to create professional-looking videos from blog posts on YouTube.
Pricing
● YouTube Start: $399 monthly.
● Premium Custom Package: Custom Pricing.
Features
● Video generation from URLs
● It has built-in integration with YouTube
● 20+ avatars are available
● Allows video upload in HD quality
● Over 40+ languages supported
Cons
● No free plan is available
Best for the owners of YouTube channels.
05Rephrase.ai
Rephrase.ai is a video editing software that uses a sophisticated deep learning engine to create professional videos.
Pricing
● Starter plan: $25 monthly
● Enterprise plan: Custom Pricing
Features
● Produces high-resolution videos
● Supports functionality for presenter customization
● Multiple-use cases supported
● Allows users to select their preferred AI voice
● Support varieties of video editing tools
Cons
● It has a complex pricing plan
It is best for agencies seeking to create customizable and personalized professional videos for marketing and advertising.
06Lumen5
Lumen5 is one of the top AI video-creating tools available for beginners and uses Natural Language Processing algorithms to convert text into high-quality videos.
Pricing
● Free Plan
● Creator plan: $15 monthly.
● Premium plan: $79 monthly.
● Business plan: $199 monthly.
● Enterprise plan: Custom Pricing.
Features
● Transforms text to video within minutes
● Numerous templates are available
● Allows customization of videos resolution, color, and font
Cons
● Limited features in the free plan
Best for beginners who are looking to generate short-duration of videos for social media platforms.
07Designs.ai
This is an AI-powered video maker that is useful for users that do not have any experience in design.
Pricing
● Basic plan: $29 monthly
● Pro plan: $69 monthly
● Enterprise plan: Custom Pricing
Features
● It has an attractive and modern user interface
● Allows the creation of videos from pre-designed templates
● Helps video creation from your custom video files
● Over 20 languages supported
● Coverts texts to video
Cons
● Only allows video download in a paid plan.
This tool is best for creators and designers who are willing to create quick AI videos.
08InVideo
This is a perfect AI generator used for creating explainers or marketing videos easily and quickly. The platform helps produce high-quality videos with varieties of style options to make the ideal video according to your requirements.
Pricing
● Free: Free with watermarks on your videos.
● Business: $15 monthly with no watermarks.
● Unlimited: $30 monthly with unlimited video exports.
Features
● Very affordable
● Comprises an online drag-and-drop video editor
● Over 50 AI-powered themes that help to convert text to video in 3 minutes
● Full iStock media library available in all plans
Cons
● Requires internet connection to use
09Pictory.ai
This AI subtitle generator converts your text and turns it into an AI-generated video. This program is simple and easy to get started, requiring no software download. Paste your text into the editor and get started.
Pricing
● Free trial: Only use 3 videos.
● Standard Plan: $29 per month.
● Premium Plan: $59 per month.
Features
● It has a simple user interface.
● Over 6M licensed Shutterstock available
● Unlimited and affordable videos in the premium plan
Cons
● It is quite expensive compared to other tools
10Veed.io
Veed.io is not specifically an AI video generator but a video editing tool that utilizes AI to simplify the entire process and allows users to create high-quality videos within seconds.
Pricing
● Free: Free with watermarks!
● Basic: $18 monthly.
● Pro: $30 monthly
Features
● It has lots of video templates and a music library to choose
● Easy to learn, user-friendly interface
● Video rendering times are quite fast
● The basic plan has a high-quality resolution
Cons
● Not a typical AI video generator
● Not for beginners
11Wisecut
This free AI video generator platform allows you to turn your text into video. Type in your text and choose a voice actor, and then Wisecut will take care of the rest. It offers excellent editing tools for users to tweak your video until it’s just right.
Pricing
● Basic: Free.
● Professional: $57 per month.
Features
● This platform is easy to use
● It has a simple drag and drops user-interface
● Allows auto subtitles and auto cut silences
● Allows integration with YouTube
● Subtitles auto-translation
● Excellent video quality
Cons
● Has limited effects
12Flexclip
FlexClip makes video creation and editing easy with-it millions of royalty-free stock media and thousands of templates for you to choose from.
Pricing
● Free
● Basic: $5.99 per month.
● Plus: $9.99 per month
● Business: $19.99 per month.
Features
● Thousands of available templates
● Simple tool for creating and editing videos
● Use for creating engaging videos
● Provides millions of royalty stock media
● Versatile and Flexible
Cons
● Not for beginners
● Ending Thoughts →
● In this post, we have listed the top text to video generators that you can choose from to help you perform tasks within minutes.
● The report also explains all you need to know about video AI generators and recommends Filmora as a perfect tool for editing your videos.
It is a fact that video editing can sometimes be laborious and time-consuming. Even when using the best video editing software, it still requires human effort to get an impressive result. But luckily for us, the invention of the AI video generator has now made a lot of things easier. The AI video generators are the next level as they allow users to automate video creation and editing without compromising quality.
This article will discuss the best AI text to video generators for free that will help make your life easier. Thus, this will soon help you create engaging videos for your personal or business use in just a few clicks.
In this article
01 [What Is an AI Video Generator](#Part 1)
02 [How Does the AI Video Maker Work](#Part 2)
03 [The 12 Best AI Video Generator](#Part 3)
Part 1 What Is an AI Video Generator
AI video generator is the process of using artificial intelligence (AI) to create professional videos. With an AI video generator for free, you do not need any equipment, an editing studio, or a premium video editing application to be able to create a video.
All that is required is that you feed input to the AI tool, and it will automatically help you generate a video. You can edit a blog post into a video within a few minutes with any of these tools listed. In addition, it won’t incur any high costs for video productions because the AI tool will help you carry out most of the tasks.
Part 2 How Does the AI Video Maker Work
Professional AI video editors, are trained by showing them various examples and then providing them feedback by telling them what is wrong and good. The machine then takes note of it and remembers it. However, as the machine continues to learn, it picks the results and then improves itself based on the feedback. Ultimately the device becomes very good or even better than the human that creates it. Here are some breakdowns of the ways video editors work:
● The AI video maker tool, can augment your videos with AR effects, including AR masks, face and color filters, face touch-ups, etc. The tool uses neural networks and computer vision to interrupt, extract, and understand the video content.
● This AI subtitle generator can allow interviews to be delivered and analyzed to the editor fully transcribed, searchable by word or even sentences. Video editors can use AI for keyword extraction, speech-to-text conversion, facial recognition, sentiment analysis, image recognition, and emotion detection.
● AI-video editors can pull sections of a video clip from any source automatically. These AI systems can also detect emotions that allow the creation of warm, appealing videos.
Part 3 The 12 Best AI Video Generator
There are top AI video generators for free that you can choose from for your video editing. These video editors complete work quickly and easily. In addition, if you need video editing software to help you edit your generated videos after generating them, we recommend that you try out Filmora from Wondershare. Wondershare Filmora Video Editor is a perfect video editing software with tons of new features, like keyframing, split video, and adding animations and effects to help you carry out your video editing seamlessly.
For Win 7 or later (64-bit)
For macOS 10.12 or later
01Sora
Sora is an artificial intelligence model that generates videos with textual descriptions, developed by OpenAI. It is a US-based artificial intelligence research organization. Sora stands out as a game-changing platform. It can seamlessly convert text into captivating videos, blending convenience with creativity.
Features
● With Sora, transforming written content into engaging videos is swift and efficient.
● Unlike traditional video editing tools, Sora is designed for users of all levels, eliminating the need for prior video production experience.
● Sora offers a plethora of customization options.
● Generates videos up to 60 seconds long
● Generates complex scenes with multiple characters, motions, and accurate details of the subject
● Creates multiple shots within a single generated video
● Generating videos from text instructions by utilizing the recaptioning technique from DALL·E 3
Pros
● Highly realistic video generation with impressive visual quality
● Text-based control over the content of the video, allowing for precise video generation
● A highly versatile tool that handles a wide range of prompts and styles
Cons
● Lacks implicit understanding of the rules of physics
This software is best realistic and imaginative scenes.
02Wondershare Filmora
Wondershare Filmora is a highly efficient video editing software that comes with AI text to video generation. The software is friendly to both beginner and intermediate creations, offering you a wide range of intuitive features.
Pricing
● Subscription Plan: US$19.99 per month
● Cross-Platform Plan: US$69.99 per year
● Perpetual Plan: US$19.99 Onetime Payment
Features
● User-friendly interface that is easy to learn and use
● Wide range of features for creating and editing videos, including transitions, effects, and text overlays.
● Large stock library of royalty-free music and stock footage
● Readily available templates and presets to quickly generate videos
● Easily export videos directly to popular platforms like YouTube and TikTok
Pros
● User-friendly interface with a learning curve suitable for all kinds of creators
● Extensive library of free and paid assets to enhance your videos
● Wide range of features for video editing
Cons
● Lacks advanced features for AI video prompt generation
This software is best for video creation and editing for freelancers, SMBs, markters.
For Win 7 or later (64-bit)
For macOS 10.12 or later
How to Use Filmora’s AI to Video Feature : AI Video Prompt Sample
Here is a brief step-by-step guide on how to use Filmora to generate AI videos. The process is as simple as writing a text prompt and getting the video ready:
Step 1: Lauch Filmora AI Text-to-Video Features
Once you launch on your PC Filmora, click the AI Text-to-Video option to start the video generation process.
Step 2: Add a Text Prompt or Video Script
On the AI Text-to-Video video, add your text prompt. You can also modify other settings such as text language and video voice. Then click the Text to Video button at the bottom to prompt Filmora to generate the video.
Step 3: Preview the Generated Video
Filmora generates the video based on your prompt and a new editing window. You can now a preview video and make any further editing needed.
AI Video Prompt Sample Using Filmora
Prompt: A young man at his 20s is sitting on a piece of cloud in the sky, reading a book.
When prompted to generate a video of a young man in his 20s sitting on a piece of cloud in the sky, reading a book, Filmora generated a narration video from the point of view of the young man as shown above.
03Synthesia
This is a web-app video generator AI from a text supporting AI-driven video creation used by experts and beginners. Rather than filming content utilizing a microphone and camera, this software AI technology helps to simulate human presenters and real-life videos. Thus, it saves video creators hours of work.
Pricing
● Personal Plan: $30 monthly
● Corporate Plan: custom pricing
Features
● Over 40 supported languages
● Allows template customizations
● Allows users to make their avatars
● It has 50 built-in presenters
● Allows you to create realistic AI videos
● Offers live chat support
● Allows download in Mp4
● Enables users to create videos automatically using integrations with APIs
● Allows the addition of backgrounds
● Users can share their videos on other social media platforms
● Allows the addition of images, shapes, and texts to videos
Pros
● Great for beginners are you do not need prior knowledge
Cons
● It supports only front-facing poses
This software is best for freelancers, agencies, marketers, and content creators looking to create high-quality video content.
04Synths Video
This is an AI video-generating tool primarily concerned with helping users drive leads and traffic from YouTube. It is an AI YouTube title generator that allows users to create professional-looking videos from blog posts on YouTube.
Pricing
● YouTube Start: $399 monthly.
● Premium Custom Package: Custom Pricing.
Features
● Video generation from URLs
● It has built-in integration with YouTube
● 20+ avatars are available
● Allows video upload in HD quality
● Over 40+ languages supported
Cons
● No free plan is available
Best for the owners of YouTube channels.
05Rephrase.ai
Rephrase.ai is a video editing software that uses a sophisticated deep learning engine to create professional videos.
Pricing
● Starter plan: $25 monthly
● Enterprise plan: Custom Pricing
Features
● Produces high-resolution videos
● Supports functionality for presenter customization
● Multiple-use cases supported
● Allows users to select their preferred AI voice
● Support varieties of video editing tools
Cons
● It has a complex pricing plan
It is best for agencies seeking to create customizable and personalized professional videos for marketing and advertising.
06Lumen5
Lumen5 is one of the top AI video-creating tools available for beginners and uses Natural Language Processing algorithms to convert text into high-quality videos.
Pricing
● Free Plan
● Creator plan: $15 monthly.
● Premium plan: $79 monthly.
● Business plan: $199 monthly.
● Enterprise plan: Custom Pricing.
Features
● Transforms text to video within minutes
● Numerous templates are available
● Allows customization of videos resolution, color, and font
Cons
● Limited features in the free plan
Best for beginners who are looking to generate short-duration of videos for social media platforms.
07Designs.ai
This is an AI-powered video maker that is useful for users that do not have any experience in design.
Pricing
● Basic plan: $29 monthly
● Pro plan: $69 monthly
● Enterprise plan: Custom Pricing
Features
● It has an attractive and modern user interface
● Allows the creation of videos from pre-designed templates
● Helps video creation from your custom video files
● Over 20 languages supported
● Coverts texts to video
Cons
● Only allows video download in a paid plan.
This tool is best for creators and designers who are willing to create quick AI videos.
08InVideo
This is a perfect AI generator used for creating explainers or marketing videos easily and quickly. The platform helps produce high-quality videos with varieties of style options to make the ideal video according to your requirements.
Pricing
● Free: Free with watermarks on your videos.
● Business: $15 monthly with no watermarks.
● Unlimited: $30 monthly with unlimited video exports.
Features
● Very affordable
● Comprises an online drag-and-drop video editor
● Over 50 AI-powered themes that help to convert text to video in 3 minutes
● Full iStock media library available in all plans
Cons
● Requires internet connection to use
09Pictory.ai
This AI subtitle generator converts your text and turns it into an AI-generated video. This program is simple and easy to get started, requiring no software download. Paste your text into the editor and get started.
Pricing
● Free trial: Only use 3 videos.
● Standard Plan: $29 per month.
● Premium Plan: $59 per month.
Features
● It has a simple user interface.
● Over 6M licensed Shutterstock available
● Unlimited and affordable videos in the premium plan
Cons
● It is quite expensive compared to other tools
10Veed.io
Veed.io is not specifically an AI video generator but a video editing tool that utilizes AI to simplify the entire process and allows users to create high-quality videos within seconds.
Pricing
● Free: Free with watermarks!
● Basic: $18 monthly.
● Pro: $30 monthly
Features
● It has lots of video templates and a music library to choose
● Easy to learn, user-friendly interface
● Video rendering times are quite fast
● The basic plan has a high-quality resolution
Cons
● Not a typical AI video generator
● Not for beginners
11Wisecut
This free AI video generator platform allows you to turn your text into video. Type in your text and choose a voice actor, and then Wisecut will take care of the rest. It offers excellent editing tools for users to tweak your video until it’s just right.
Pricing
● Basic: Free.
● Professional: $57 per month.
Features
● This platform is easy to use
● It has a simple drag and drops user-interface
● Allows auto subtitles and auto cut silences
● Allows integration with YouTube
● Subtitles auto-translation
● Excellent video quality
Cons
● Has limited effects
12Flexclip
FlexClip makes video creation and editing easy with-it millions of royalty-free stock media and thousands of templates for you to choose from.
Pricing
● Free
● Basic: $5.99 per month.
● Plus: $9.99 per month
● Business: $19.99 per month.
Features
● Thousands of available templates
● Simple tool for creating and editing videos
● Use for creating engaging videos
● Provides millions of royalty stock media
● Versatile and Flexible
Cons
● Not for beginners
● Ending Thoughts →
● In this post, we have listed the top text to video generators that you can choose from to help you perform tasks within minutes.
● The report also explains all you need to know about video AI generators and recommends Filmora as a perfect tool for editing your videos.
Premiere Pro Text Effects Beginner Guide
If you want to edit your raw video footage and turn ordinary clips into eye-catching videos, you will need a professional video editor. Adobe Premiere Pro is the most commonly used premium video editor that most professionals prefer. When it comes to editing videos, text effects play a major role along with video effects and animations.
If you are new to Adobe Premiere Pro, you will experience a steep learning curve. This is because the user interface is specially designed for professional video editors. Therefore, you might not get Premiere Pro text effects readily available. In this article, we will illustrate how you can add Adobe Premiere Pro text effects to your video project. We will also state the best alternative to Premiere Pro to add stunning text effects easily.
Part 1. Steps to Add Text Effects to Adobe Premiere
Text effects are an essential part of videos to enhance the video content immensely. You can add opening titles and end credits with text effects and animations. You can display the dialogues on the screen as subtitles. Showing location information and shooting date through text effects is quite regular these days. Besides, the use of lower thirds for social media promotion in videos is common. Without further ado, let us look at the steps to add Premiere text effects.
Step1 Add Your Text
First of all, you need to import your video and add text to it and apply different text effects. Here we are starting from scratch for better illustration. Go to Window> Essential Graphics> Text Tool(T). Type your text as per your requirements. You will notice a new text layer appearing under Edit tab.

Select the text layer and you will see all the properties that you can tweak. For example, go to Align and Transform section to reposition and resize your text properly. Go to Text section to change the style of the text. Similarly, there is an Appearance section to adjust color, shadow, and much more.
Step2 Apply Pre-Animated Template
Go to Graphics> Essential Graphics and browser through the title templates available to match your requirements. Once you have selected one title template, drag and drop it into your timeline above your video clip.

Double-click on the text to edit the content and type your title. Go to Essential Graphics panel and customize the text effect as per your preference. You can also choose the available elements included in the template to enhance the text effects as you think fit.
Step3 Edit the Text Effect and Animation
Select the text layer on your timeline to check out the keyframes applied in the template. Go to Effects Control panel and open Keyframe box by dragging it to the right. Adjust the keyframe to speed up or slow down the animation.

Bring the keyframes closer or spread them apart respectively. You can also adjust Velocity Controls present under different text properties as per the speed requirements.
Part 2. Alternative Way to Make Text Effects
If you are new to Adobe Premiere Pro, you will find title effects Premiere Pro difficult to add and edit as per your requirements. It is very common for amateur video editors to look for an easy alternative to Premiere Pro. We recommend Wondershare Filmora as the best alternative to Adobe Premiere text effects.
Filmora has a super intuitive user interface that is suitable for everyone including those who do not have prior video editing experience. There are more text effects and animations available that you can customize to get the desired effect. Here are the steps to add text effects to your video on Filmora.
Free Download For Win 7 or later(64-bit)
Free Download For macOS 10.14 or later
Step1 Download and install Wondershare Filmora and it is available for both Windows and macOS. Launch the application and click on New Project on the welcome screen.

Step2 Drag and drop your video clips under Project Media folder and then onto the timeline. Go to Titles and you will see different categories of text effects and templates.

Step3 Select a template whichever you think is perfect for your project and drop it on the timeline. Adjust its position on the timeline as per where you want it to appear. Double-click on it to edit the title and type in your text. Similarly, you can reposition the text from Viewer as per your need.

Select the text style as well as adjust fonts and settings to get different styles for your texts. There is also an Advanced section available for detailed editing and getting the desired text effect.
Step4 You can animate the texts in your video from Animation section. Choose from the animation presets to animate individual text in the video. Besides, you can also add keyframes and animate the text as per your preference.

Part 3. Related FAQs on Adobe Premiere Pro
1. How do you make text look good in Premiere Pro?
There are several steps you need to take to make text look good in Premiere Pro. First of all, the color of the text should be in contrast to the background. You can add a rectangle highlighter in the background. Experiment with font and text of the text. Apply a text effect from the different templates available. Customize the effect to get the desired result.
2. How do you add typing effects in Premiere?
Add your text to your video so that a text layer appears on the timeline. Animate the text Effects> Video Effects> Liner Wipe and double-click to get the typing effect. Tweak the parameters like transition completion, wipe angle, and others to smoothen out the animation. Draw a cursor icon using rectangle tool and animation it to move with the text using keyframes.
3. How do I open text effects controls in Premiere Pro?
Select the text layer from the timeline of the project. From the main menu, go to Windows> Effects Control option to open effect controls for text. Otherwise, you can directly go to Effects Control tab located below the menu bar after selecting your text layer.
The Bottom Line
Adding text effects in Premiere Pro can be slightly overwhelming for an amateur video editor who does not have enough experience with Premiere Pro. We have stated the simple steps to apply Premiere Pro text effects to your video project. However, we recommend Wondershare Filmora as the best and the easiest alternative to Premiere Pro where you get more text effects and add them instantly and effortlessly.
Free Download For macOS 10.14 or later
Step1 Download and install Wondershare Filmora and it is available for both Windows and macOS. Launch the application and click on New Project on the welcome screen.
Step2 Drag and drop your video clips under Project Media folder and then onto the timeline. Go to Titles and you will see different categories of text effects and templates.
Step3 Select a template whichever you think is perfect for your project and drop it on the timeline. Adjust its position on the timeline as per where you want it to appear. Double-click on it to edit the title and type in your text. Similarly, you can reposition the text from Viewer as per your need.
Select the text style as well as adjust fonts and settings to get different styles for your texts. There is also an Advanced section available for detailed editing and getting the desired text effect.
Step4 You can animate the texts in your video from Animation section. Choose from the animation presets to animate individual text in the video. Besides, you can also add keyframes and animate the text as per your preference.
Part 3. Related FAQs on Adobe Premiere Pro
1. How do you make text look good in Premiere Pro?
There are several steps you need to take to make text look good in Premiere Pro. First of all, the color of the text should be in contrast to the background. You can add a rectangle highlighter in the background. Experiment with font and text of the text. Apply a text effect from the different templates available. Customize the effect to get the desired result.
2. How do you add typing effects in Premiere?
Add your text to your video so that a text layer appears on the timeline. Animate the text Effects> Video Effects> Liner Wipe and double-click to get the typing effect. Tweak the parameters like transition completion, wipe angle, and others to smoothen out the animation. Draw a cursor icon using rectangle tool and animation it to move with the text using keyframes.
3. How do I open text effects controls in Premiere Pro?
Select the text layer from the timeline of the project. From the main menu, go to Windows> Effects Control option to open effect controls for text. Otherwise, you can directly go to Effects Control tab located below the menu bar after selecting your text layer.
The Bottom Line
Adding text effects in Premiere Pro can be slightly overwhelming for an amateur video editor who does not have enough experience with Premiere Pro. We have stated the simple steps to apply Premiere Pro text effects to your video project. However, we recommend Wondershare Filmora as the best and the easiest alternative to Premiere Pro where you get more text effects and add them instantly and effortlessly.
Also read:
- Create Amazing Slow-Motion Videos 8 Affordable Slow-Motion Cameras for 2024
- Updated Where To Find The Best Free Canon LUTs? Learn More for 2024
- Updated While Emojis Have High End Credibility Towards Different Media Utilities, People Also Ask About Ways and Methods to Add Emoji to iPhone. Be Here to Get the Easiest Solutions to the Query
- Updated How to Animate Your Designs With Canva GIF for 2024
- New In 2024, Reviewing Efectum App For Smartphone Users Create Slow Motion Videos
- New 2024 Approved 2 Methods to Crop Video in VLC
- Updated 15 Amazing GIF Splitter Examples You Need to Bookmark for 2024
- New Step by Step to Crop a Video with CyberLink PowerDirector
- Updated 6 Ways to Mimic Professional Filming Gears
- 3GP Video Format What Is 3GP Format And How To Play It for 2024
- New Ideas to Make A Perfect Café Vlog for 2024
- Templates Take Your Music Video From Drab to Fab and Add some Spice to the Catchy Song. Here Are some Templates You Could Use to Make Your Music Video Popular
- New In 2024, An Ultimate Guide to Edit a Music Video Aspect Ratio and First Cut
- New In 2024, The Best Way To Color Grading & Color Correction in Filmora
- Updated How to Make a Video by Mouse with Filmora
- 2024 Approved How to Google Meet Green Screen
- Updated 2024 Approved 15 Best Free Cinematic LUTs for Your Film
- New Top 9 Best Solutions To Go For When Creating an AI Thumbnail
- New How to Make a Slideshow with Icecream Slideshow Maker
- How to Add Text Effects in Adobe Premiere Pro, In 2024
- Updated 2024 Approved Step by Step to Cut Video in Adobe Premiere Pro
- Updated 2024 Approved How To Cut Videos For Instagram On Mac
- 2024 Approved Funny Content Ideas for YouTube Videos and Funny Music Background
- Easy Guide to Use a Stabilization Tool in Filmora
- What If YouTube Zoom to Fill Not Working, In 2024
- How to Make Text Reveal Effect Easily for 2024
- New Step by Step to Rotate Videos Using OBS
- How to Make a Movie with Windows Movie Maker for 2024
- Updated In 2024, Guide To Using Free Luts for OBS
- How to Add Freeze Frame to Your Video From Any Device?
- New In 2024, Detailed Steps to Add Border to Video Using Premiere Pro
- How to Make A Jaw-Dropping Time Lapse Video, In 2024
- 2024 Approved Do You Want to Create Slow-Motion Videos? This Article Shows Methods to Create Slow-Mo Videos without Changing the Medias Quality
- New 2024 Approved How To Make Ninja Jump Effect
- New Best 9 Amv Makers for Computer for 2024
- Updated In 2024, 11 Ways To Radial Blur To Images (iPhone/Android/Mac/Windows)
- New 2024 Approved Unlink Audio and Video in DaVinci Resolve Detailed Steps
- In 2024, How to Achieve GoPro Slow Motion With Quality
- New How to Create Chroma Key Written Text Effects in Filmora
- Updated Have a Desire to Uplift Your Editing Creativity with Trying Hands at Working with Storyboards? Keep Reading to Have a Comprehensive Understating of the Workflow Through Stepwise User Guides
- How Can You DIY VHS Overlay in After Effects, In 2024
- A Comprehensive Guide on VHS Technology and Its Influence on Video Editing for 2024
- Free Ways To Split Video For Whatsapp Status On All Platforms
- Updated 10 Catchy Pixel Art Wallpapers and How to Custom Your Own with Ease
- Easy Fixes How To Recover Forgotten iCloud Password On your Apple iPhone XS Max
- In 2024, Delete Gmail Account With/Without Password On Itel P55+
- Best Android Data Recovery - undelete lost call logs from Oppo A18
- In 2024, How to Transfer Contacts from Google Pixel 8 To Phone | Dr.fone
- In 2024, 6 Ways To Transfer Contacts From Google Pixel 8 Pro to iPhone | Dr.fone
- In 2024, 5 Most Effective Methods to Unlock Apple iPhone 15 Plus in Lost Mode
- In 2024, How to Bypass FRP on Motorola Moto E13?
- In 2024, How to Get and Use Pokemon Go Promo Codes On Vivo Y28 5G | Dr.fone
- Full Tutorial to Bypass Your Poco F5 5G Face Lock?
- In 2024, How to Mirror PC to Apple iPhone SE? | Dr.fone
- Solved Warning Camera Failed on Tecno Spark 10 5G | Dr.fone
- 3 Best Tools to Hard Reset Tecno Camon 30 Pro 5G | Dr.fone
- Guide How To Unbrick a Bricked Itel A60s Phone | Dr.fone
- In 2024, Your Account Has Been Disabled in the App Store and iTunes On iPhone 7?
- Pokemon Go Error 12 Failed to Detect Location On Apple iPhone 11 Pro Max? | Dr.fone
- How to sign .svd file by digital signature
- In 2024, Fixing Foneazy MockGo Not Working On Nokia 105 Classic | Dr.fone
- Why Apple Account Disabled From your Apple iPhone 13 Pro? How to Fix
- How to Fix Pokemon Go Route Not Working On Vivo S17 Pro? | Dr.fone
- In 2024, Protecting Your Privacy How To Remove Apple ID From Apple iPhone 15 Plus
- Title: Updated In 2024, 10+ Top Unlimited FCPX Slideshow Templates
- Author: Chloe
- Created at : 2024-04-24 07:08:26
- Updated at : 2024-04-25 07:08:26
- Link: https://ai-editing-video.techidaily.com/updated-in-2024-10plus-top-unlimited-fcpx-slideshow-templates/
- License: This work is licensed under CC BY-NC-SA 4.0.
