
:max_bytes(150000):strip_icc():format(webp)/GettyImages-515810476-aabe0e5a88b44bb1ae49a5bfa97bec62.jpg)
Updated In 2024, 12 Impressive AI Video Ideas for Making Engaging Video Content
12 Impressive AI Video Ideas for Making Engaging Video Content
12 Impressive AI Video Ideas for Creating Engaging Video Content
An easy yet powerful editor
Numerous effects to choose from
Detailed tutorials provided by the official channel
In recent times, AI technology has become more useful for content creators to get more effective and engaging AI video ideas. Various AI video idea generator tools like Jasper, WeShare, etc., save con-tent creators time by giving the latest trending video ideas. These tools made content creators work easy as they need not spend much time on video ideas.
Most of us know AI-Artificial Intelligence and its role in achieving better and fast results in different areas. This article will let us know the position of YouTube video idea generator AI in generating engaging video content using Artificial Intelligence. Nowadays, these tools also help add audio/video summary and animations for the videos.
In this article
01 [What’s Video Ideas Generator and How to Use This Tool to Get More Views](#Part 1)
02 [12 Great AI Video Ideas to Bring More Traffic](#Part 2)
Part 1 What’s Video Ideas Generator and How to Use This Tool to Get More Views
It’s not enough to create a YouTube channel and post some video that does not have informative content. Sometimes, even though the video has informative content, the content might not be attractive to the viewers for various reasons, like the content might be routine and does not have more reach, likes, or shares. Along with good content, we also need new and creative ideas to get more viewers. Thus, we have some tools to provide unique and innovative ideas based on the niche you choose.
Videos Idea Generator is a tool that gives ideas for YouTube videos, and it works based on AI technology (Neural Networks). This tool will be more beneficial for the content creators to get more AI video ideas. Naturally, you might be out of ideas for your channel, or sometimes it takes more time to get an idea, or it could be a routine idea that does not sound interesting to the viewers. In such cases, an AI video idea generator is more helpful in suggesting new and innovative ideas for the content creators based on their interesting topics.
Some of the advantages of a video idea generator are:
● Time-saving – as one can utilize the time in other work, such as editing the video/ adding subtitles, etc., instead of thinking of an idea.
● Engaging with the audience – can utilize the time in engaging with the audience by answering their questions.
● Promote videos – can utilize time to promote their videos on other social media platforms or collaborate with other content creators for promotions.
● Add animations – animations and other visual effects can be added to the videos using AI. Also, we can add video and audio summaries after each video so that the viewers can get brief detailing of the whole video.
How to use Videos Idea Generator:
There are different AI video idea generator tools, and most of them work similarly. The most common steps are:
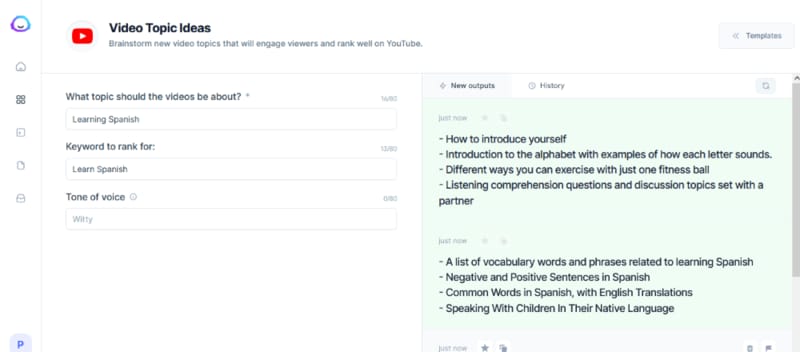
Step 1: Provide Topic
Here you need to provide the topic’s name on which we are planning to create the video.
Step 2: Provide Keywords
After providing a topic, give the keywords required for publishing. The video needs to have all the keywords so that the main content of the video can project adequately.
Based on the topic name and keywords, the tool will generate suggestions for the video ideas using the Neural Network concept of Artificial Learning.
Part 2 12 Great AI Video Ideas to Bring More Traffic
Now, let us know 12 AI video ideas that can become viral and get more likes and views :
01Idea 1: Know your Interest
Before starting a YouTube channel or posting a video, know your area of interest first. Once you get clarity on the area of interest, it’s easy to pick a topic from that and create an innovative video. Try to be more specific in the topic you choose. Also, have clarity on the section of audience you want to target.
For example, if your topic is more related to children, add more animations of animals/ cartoons that interest children. If you choose a related topic, do not add more animations that might confuse the audience. Add more reference links so that they can refer to those and be more particular on the specific topic you are trying to explain through the video. Similarly, if you choose a gaming-related topic, do not be more general about gaming.
Be specific towards a particular section of games like mobile gaming/ desktop/ virtual to reach more audience, and it does not seem boring to the audience.
02Idea 2: Interview Questions
As many students graduate every year, the competition for jobs has increased. People are more interested in getting an appointment as soon as possible, and for that, they need to prepare for the interview thoroughly. A video containing the main topics for the discussion that has references for the interview questions would benefit the students. It can engage with people within no time. Also, if the video is more specific to the department-wise interview questions/ job-level interview questions, it would reach more people and be more helpful to them.
03Idea 3: Full Course in Any Technology
Apart from the entertainment-related videos, education-related videos will be more helpful and engaging. Any video related to any technology course can get more views. Using the YouTube video idea generator AI tool, you can generate more unique videos related to education. Instead of giving a brief idea of the technology, it’s better to pick up a few topics and explain them in detail so that it would be helpful for interviews too. You can use AI technology to add a voice-over and a small summary at the end of the video so that the main points get revised once again.
04Idea 4: Cooking Ideas
Cooking is one of the most trending topics on YouTube. Whatever the language might be, cooking-related videos can get more views, create more creativity, and engage with the audience. You can choose a dish from any cuisine and make a video. You can add slow motion/ fast forward actions and small creative animations using AI. Using AI video ideas tools, you can get more creative ideas related to cooking that can increase views, as viewers will be more interested if the videos are innovative.
05Idea 5: Art and Craft ideas
Recently, people have seem more interested in the interior design of the house. For such people, art and craft ideas might be more helpful. Also, nowadays, schools are encouraging students in other circular activities and studies. These videos might be more attractive to the school’s students. Also, in crafts, select a specific area and make videos on that so that the video will be short and crisp, and easily understandable to the viewers. You can also add a voice-over while doing the craftwork to make it more transparent for the viewers.
06Idea 6: Photo and Video Editing Related Videos
People have become more addicted to taking photos and storing them. Any video related to editing the photos/ videos will engage more with viewers as it is not associated with any section of people. Anyone from any place and with any qualification can understand such videos. Consider a few topics related to the editing and give a detailed description/ explanation of those ideas, or consider any photo/ video editing app and explain how the app works in the video so that it might be helpful for the people who are using the app for the first time. Also, please reply to the frequently asked questions related to the app in the form of comments or summary so that it can reach more people, and there is a chance that the viewers might suggest the video to others who are about to use the app.
07Idea 7: Movies Related Videos
In every country, people are more addicted to movies regardless of language. Movies have become a part of daily life for almost all people. Some of the movie-related video ideas can be:
● Video regarding actor interviews.
● Video regarding the movie review/ collections.
● Video regarding highlights/ mistakes in the movie.
● Video related to small clips/ songs in the film.
● Video related to the spoof of the central theme of the film.
Any video related to a movie can be more viral. To create new content, use AI video idea generator tools so that the videos can be more engaging and creative.
08Idea 8: Lifehacks Related Videos
Simple daily life hack idea-related videos will be more helpful to people irrespective of their living. Any statements about keeping the house clean/clothing/makeup/skincare can be beneficial. You can take simple concepts related to our daily life like:
● How to use a few tools in our everyday life.
● Simple cleaning techniques.
● Folding clothes easily saves time.
09Idea 9: Earning Related Ideas
Videos related to earning can get more views and become more viral among people. Any detailed description of any earning app/ small startup ideas can be helpful. The video ideas generator tool can give more suggestions related to such trending topics.
10Idea 10: Sports related ideas
A large population is into sports, like football and cricket. People enjoy watching and playing these sports regularly from young to old age. It will be a good idea if you can try videos on sports. Using the video generator AI, you can generate animation videos playing cricket and add small clips of old generation cricket players as examples. You may also create small teaching videos on other sports for children. Through animation, giving the latest sports updates worldwide will also be a better idea to get more views for videos.
11Idea 11: Current Affairs Related Videos
Current affairs and general knowledge-related videos will be more helpful to people preparing for competitive exams as most people are learning through the internet rather than from books. If you can take a specific subject and give a detailed description of its past and current updates, it can be helpful for many people. And also, while doing such information-related videos, you get a chance to research it, and it will help improve your knowledge of the subject and searching skills.
12Idea 12: Gadget And Product Review Ideas
Reportedly, there has been a tremendous increase in new products related to mobiles, laptops, TV, other hardware tools, skin, hair care products, etc. You can take a specific product and create innovative ideas on how to use the product using animations/ cartoons and give a short review of the product. Through this, you can earn as you promote a company product, and people will know about the product. This is beneficial in both ways. If the product is related to electronic gadgets, make a video explaining the product’s features and how to use them. If it is hair or skincare related, include the ingredients used, advantages of the product, how to use the product, and any disadvantages, etc. Based on the product you choose, the content of the video should change.
Bonus Idea:
Use an innovative and powerful tool like Wondershare Filmora Video Editor to beautify your AI videos in the shortest time frame.
Filmora’s latest version offers various upgraded tools like:
● Instant Mode to create accessible and quick videos.
● A shop of preset templates to power up your videos.
● The Filmora Auto Beat Sync can match your clip with music.
● Adjust the speed of your video and introduce cinematic effects.
● You can even record your screen with Filmora and use that in your AI videos ideas.

Wondershare Filmora - Best Video Editor for Mac/Windows
5,481,435 people have downloaded it.
Build unique custom animations without breaking a sweat.
Focus on creating epic stories and leave the details to Filmora’s auto features.
Start a creative adventure with drag & drop effects and endless possibilities.
Filmora simplifies advanced features to save you time and effort.
Filmora cuts out repetition so you can move on to your next creative breakthrough.
● Ending Thoughts →
● Finally, that you have a fair idea of what a YouTube video idea generator is about and how it helps content creators in daily life get more innovative ideas for YouTube videos.
● Make use of this tool to get more engaging and creative content and more AI video ideas so that the views for the video increase and the audience receives good knowledge through the videos. Try out these ideas, use Filmora to create exceptional animations on your videos, and watch your YouTube channel grow as expected.
In recent times, AI technology has become more useful for content creators to get more effective and engaging AI video ideas. Various AI video idea generator tools like Jasper, WeShare, etc., save con-tent creators time by giving the latest trending video ideas. These tools made content creators work easy as they need not spend much time on video ideas.
Most of us know AI-Artificial Intelligence and its role in achieving better and fast results in different areas. This article will let us know the position of YouTube video idea generator AI in generating engaging video content using Artificial Intelligence. Nowadays, these tools also help add audio/video summary and animations for the videos.
In this article
01 [What’s Video Ideas Generator and How to Use This Tool to Get More Views](#Part 1)
02 [12 Great AI Video Ideas to Bring More Traffic](#Part 2)
Part 1 What’s Video Ideas Generator and How to Use This Tool to Get More Views
It’s not enough to create a YouTube channel and post some video that does not have informative content. Sometimes, even though the video has informative content, the content might not be attractive to the viewers for various reasons, like the content might be routine and does not have more reach, likes, or shares. Along with good content, we also need new and creative ideas to get more viewers. Thus, we have some tools to provide unique and innovative ideas based on the niche you choose.
Videos Idea Generator is a tool that gives ideas for YouTube videos, and it works based on AI technology (Neural Networks). This tool will be more beneficial for the content creators to get more AI video ideas. Naturally, you might be out of ideas for your channel, or sometimes it takes more time to get an idea, or it could be a routine idea that does not sound interesting to the viewers. In such cases, an AI video idea generator is more helpful in suggesting new and innovative ideas for the content creators based on their interesting topics.
Some of the advantages of a video idea generator are:
● Time-saving – as one can utilize the time in other work, such as editing the video/ adding subtitles, etc., instead of thinking of an idea.
● Engaging with the audience – can utilize the time in engaging with the audience by answering their questions.
● Promote videos – can utilize time to promote their videos on other social media platforms or collaborate with other content creators for promotions.
● Add animations – animations and other visual effects can be added to the videos using AI. Also, we can add video and audio summaries after each video so that the viewers can get brief detailing of the whole video.
How to use Videos Idea Generator:
There are different AI video idea generator tools, and most of them work similarly. The most common steps are:
Step 1: Provide Topic
Here you need to provide the topic’s name on which we are planning to create the video.
Step 2: Provide Keywords
After providing a topic, give the keywords required for publishing. The video needs to have all the keywords so that the main content of the video can project adequately.
Based on the topic name and keywords, the tool will generate suggestions for the video ideas using the Neural Network concept of Artificial Learning.
Part 2 12 Great AI Video Ideas to Bring More Traffic
Now, let us know 12 AI video ideas that can become viral and get more likes and views :
01Idea 1: Know your Interest
Before starting a YouTube channel or posting a video, know your area of interest first. Once you get clarity on the area of interest, it’s easy to pick a topic from that and create an innovative video. Try to be more specific in the topic you choose. Also, have clarity on the section of audience you want to target.
For example, if your topic is more related to children, add more animations of animals/ cartoons that interest children. If you choose a related topic, do not add more animations that might confuse the audience. Add more reference links so that they can refer to those and be more particular on the specific topic you are trying to explain through the video. Similarly, if you choose a gaming-related topic, do not be more general about gaming.
Be specific towards a particular section of games like mobile gaming/ desktop/ virtual to reach more audience, and it does not seem boring to the audience.
02Idea 2: Interview Questions
As many students graduate every year, the competition for jobs has increased. People are more interested in getting an appointment as soon as possible, and for that, they need to prepare for the interview thoroughly. A video containing the main topics for the discussion that has references for the interview questions would benefit the students. It can engage with people within no time. Also, if the video is more specific to the department-wise interview questions/ job-level interview questions, it would reach more people and be more helpful to them.
03Idea 3: Full Course in Any Technology
Apart from the entertainment-related videos, education-related videos will be more helpful and engaging. Any video related to any technology course can get more views. Using the YouTube video idea generator AI tool, you can generate more unique videos related to education. Instead of giving a brief idea of the technology, it’s better to pick up a few topics and explain them in detail so that it would be helpful for interviews too. You can use AI technology to add a voice-over and a small summary at the end of the video so that the main points get revised once again.
04Idea 4: Cooking Ideas
Cooking is one of the most trending topics on YouTube. Whatever the language might be, cooking-related videos can get more views, create more creativity, and engage with the audience. You can choose a dish from any cuisine and make a video. You can add slow motion/ fast forward actions and small creative animations using AI. Using AI video ideas tools, you can get more creative ideas related to cooking that can increase views, as viewers will be more interested if the videos are innovative.
05Idea 5: Art and Craft ideas
Recently, people have seem more interested in the interior design of the house. For such people, art and craft ideas might be more helpful. Also, nowadays, schools are encouraging students in other circular activities and studies. These videos might be more attractive to the school’s students. Also, in crafts, select a specific area and make videos on that so that the video will be short and crisp, and easily understandable to the viewers. You can also add a voice-over while doing the craftwork to make it more transparent for the viewers.
06Idea 6: Photo and Video Editing Related Videos
People have become more addicted to taking photos and storing them. Any video related to editing the photos/ videos will engage more with viewers as it is not associated with any section of people. Anyone from any place and with any qualification can understand such videos. Consider a few topics related to the editing and give a detailed description/ explanation of those ideas, or consider any photo/ video editing app and explain how the app works in the video so that it might be helpful for the people who are using the app for the first time. Also, please reply to the frequently asked questions related to the app in the form of comments or summary so that it can reach more people, and there is a chance that the viewers might suggest the video to others who are about to use the app.
07Idea 7: Movies Related Videos
In every country, people are more addicted to movies regardless of language. Movies have become a part of daily life for almost all people. Some of the movie-related video ideas can be:
● Video regarding actor interviews.
● Video regarding the movie review/ collections.
● Video regarding highlights/ mistakes in the movie.
● Video related to small clips/ songs in the film.
● Video related to the spoof of the central theme of the film.
Any video related to a movie can be more viral. To create new content, use AI video idea generator tools so that the videos can be more engaging and creative.
08Idea 8: Lifehacks Related Videos
Simple daily life hack idea-related videos will be more helpful to people irrespective of their living. Any statements about keeping the house clean/clothing/makeup/skincare can be beneficial. You can take simple concepts related to our daily life like:
● How to use a few tools in our everyday life.
● Simple cleaning techniques.
● Folding clothes easily saves time.
09Idea 9: Earning Related Ideas
Videos related to earning can get more views and become more viral among people. Any detailed description of any earning app/ small startup ideas can be helpful. The video ideas generator tool can give more suggestions related to such trending topics.
10Idea 10: Sports related ideas
A large population is into sports, like football and cricket. People enjoy watching and playing these sports regularly from young to old age. It will be a good idea if you can try videos on sports. Using the video generator AI, you can generate animation videos playing cricket and add small clips of old generation cricket players as examples. You may also create small teaching videos on other sports for children. Through animation, giving the latest sports updates worldwide will also be a better idea to get more views for videos.
11Idea 11: Current Affairs Related Videos
Current affairs and general knowledge-related videos will be more helpful to people preparing for competitive exams as most people are learning through the internet rather than from books. If you can take a specific subject and give a detailed description of its past and current updates, it can be helpful for many people. And also, while doing such information-related videos, you get a chance to research it, and it will help improve your knowledge of the subject and searching skills.
12Idea 12: Gadget And Product Review Ideas
Reportedly, there has been a tremendous increase in new products related to mobiles, laptops, TV, other hardware tools, skin, hair care products, etc. You can take a specific product and create innovative ideas on how to use the product using animations/ cartoons and give a short review of the product. Through this, you can earn as you promote a company product, and people will know about the product. This is beneficial in both ways. If the product is related to electronic gadgets, make a video explaining the product’s features and how to use them. If it is hair or skincare related, include the ingredients used, advantages of the product, how to use the product, and any disadvantages, etc. Based on the product you choose, the content of the video should change.
Bonus Idea:
Use an innovative and powerful tool like Wondershare Filmora Video Editor to beautify your AI videos in the shortest time frame.
Filmora’s latest version offers various upgraded tools like:
● Instant Mode to create accessible and quick videos.
● A shop of preset templates to power up your videos.
● The Filmora Auto Beat Sync can match your clip with music.
● Adjust the speed of your video and introduce cinematic effects.
● You can even record your screen with Filmora and use that in your AI videos ideas.
Wondershare Filmora - Best Video Editor for Mac/Windows
5,481,435 people have downloaded it.
Build unique custom animations without breaking a sweat.
Focus on creating epic stories and leave the details to Filmora’s auto features.
Start a creative adventure with drag & drop effects and endless possibilities.
Filmora simplifies advanced features to save you time and effort.
Filmora cuts out repetition so you can move on to your next creative breakthrough.
● Ending Thoughts →
● Finally, that you have a fair idea of what a YouTube video idea generator is about and how it helps content creators in daily life get more innovative ideas for YouTube videos.
● Make use of this tool to get more engaging and creative content and more AI video ideas so that the views for the video increase and the audience receives good knowledge through the videos. Try out these ideas, use Filmora to create exceptional animations on your videos, and watch your YouTube channel grow as expected.
[Top-Search] The Best Game Screen Recording Tools for PC
You’re likely familiar with recording gameplays if you’re involved in the gaming community. The desire to share our gameplay adventures has never been more widely spread. YouTube and Twitch serve as popular hubs for gamers to showcase their skills and build communities.
However, with various game recorders, finding the perfect fit for your next gameplay recording can be challenging. We’ve tested many options to ease your search and made a list to enhance your gaming experience.
In this article
- Part 1. Discussing the Advancements in Game Recording in the Digital Realm
- Part 2. Top Best Game Recorders To Consider for Efficient Recording
- Part 3. Make Screen Recording Simple and Easy: Wondershare Filmora
- Conclusion
Part 1: Discussing the Advancements in Game Recording in the Digital Realm
Game recording has evolved from basic methods to sophisticated tools. In the past, gamers used VHS recorders connected to consoles. Moreover, screen capture software like Fraps became popular in the early 2000s. Afterward, built-in recording features within PlayStation 4 and Xbox One simplified the process.
Platforms like Twitch emerged for live streaming in the late 2010s. Cloud gaming services have revolutionized recording by allowing gameplay on remote servers. Finally, modern game recorders emerged to provide instant replay and webcam integration.
Chronological Understanding of the Advancements in Game Recordings
- Users can now capture gameplay in stunning 4K resolution for top-notch visual quality.
- Frame rate settings ensure smooth playback of recorded videos.
- Bitrate settings let you control recording quality and file size.
- Players can use GPU power for faster and more efficient video encoding.
- Multi-channel audio recording lets you record gameplay audio, microphone input, and other sources. Also, it separates tracks for easy editing and control.
- An infusion of overlays in the webcam adds a personalized touch to gameplay videos, building competition in quality offering.
- Network switching within software is possible without any cross-platform shift, from recording to live streaming.
Example
PewDiePie is one of the leading stars in YouTube stardom. His game screen recording is proof of how online entertainment has changed. He earned his initial fame by playing horror games with funny commentary. People loved his infectious personality and unique style. Furthermore, he expanded his content to include games, vlogs, and entertaining stuff. Now, he has a fan base of 111M, positioning him as the most influential figure in online gaming.
Part 2: Top Best Game Recorders To Consider for Efficient Recording
Most of us play games for fun while wanting to share the gameplay with friends. The game screen recorder helps you share the screen with others to enjoy with them. Let’s go through the options of tools that can record gameplay screens efficiently:
Best Game Recorders for PC
1.Movavi
2.OBS
3.Bandicam
4.XSplit
5.Aqua Demo
6.GoPlay
7.Action! Game Recorder
8.Wondershare DemoCreator
1.Movavi
Movavi lets you do full-screen or custom area recording with various functionalities. Using this tool, you can annotate the screen while recording for real-time experience. For improving viewer’s attention, you can also illuminate mouse cursor and keystrokes within the recording screen. It also features a noise reduction feature to get rid of intrusive voices. Movavi can take scrolling screenshots to capture content that doesn’t fit on one screen.

Pros
- This game screen recording tool has a user-friendly interface and is easy to use without the need for training.
- The tool allows you to capture audio and video simultaneously and separately.
Con
- It offers limited features when it comes to video manipulation while recording games.
2.OBS Studio
Open Broadcaster Software is the best screen recorder for games when it comes to finding open-source recorders. This recorder enables you to record multiple scenes at a time. It offers seamless transitions to switch between the scenes. Users can use the audio mixer feature of the tool for noise suppression and gain. The tool also provides the configuration option to add new sources and replace existing ones.

Pros
- You can capture multiple windows simultaneously with the help of this tool, giving diversified opportunities.
- This screen recorder allows you to preview sources and scenes before live streaming.
Con
- OBS is challenging for beginners due to its steep learning curve.
3.Bandicam
Gamers can record high-resolution gameplay in 4K UHD and 480FPS with Bandicam. Upon utilizing this tool, they record gameplay and voice to share with friends on YouTube. This Lolio game recorder uses a webcam and mic to record gameplay with the player’s live face and voice. Plus, you can also save the audio track of the gameplay record in separate WAV files.

Pros
- This game recorder compresses high-quality video to save space.
- Bandicam supports the latest hardware acceleration from AMD, Intel, and NVIDIA.
Con
- It only works on Windows and does not support Mac, Android, or Linux.
4.XSplit
Content creators and game players can use this all-in-one streaming and recording tool. This video game recorder allows you to switch from a solo camera to a podcast easily. You can start streaming to any broadcast platform with the native plugin of the tool. XSplit Broadcaster enables you to add multiple animation and broadcast effects to your scenes.

Pros
- Users can record multiple scenes at the same time with this screen recorder. This helps you in covering more content in similar timeframes.
- You can do custom transitions of various scenes with the help of this tool.
Con
- Installing XSplit Broadcaster in your system slows down the running of the PC dramatically.
5.Aqua Demo
Aqua Demo is the best way to record gameplay on a PC to produce high-quality video. You can easily record gameplay as the interface of the tool is intuitive and easy to use. It supports various video formats, including AVI, MP4, and MOV, to save the recordings. Users can do editing while recording to make it engaging and interactive.

Image Name: best-game-recorder-for-pc-2024-5.jpg
Image Alt:
Pros
- This tool allows you to record video using the sound of a PC, microphone, or both.
- You can easily schedule when video recording should take place with this tool.
Con
- AceThinker Aqua Demo offers a limited trial version to its users for screen recording.
6.GoPlay
GoPlay is the best software to record gameplay as it allows you to record yourself while gaming. With the help of this software, users can do basic editing of the video before live streaming. Plus, it allows you to record fast-paced games up to 60fps for smooth results. The software offers the feature to remove unwanted noise in the video.

Pros
- This screen recorder offers you the option to dub your own voice within the video recording.
- It helps to adjust the audio of each track on the timeline.
Con
- Unlike other screen recorders, it has a small number of transitions and effects.
7.Action! – Game Recorder
Action! stands out as one of the best screen recorder for games, as it uses low CPU space. Gamers can record smooth HD video of gameplay up to 120fps. You can make 20 times smaller video recordings with the help of this tool. Also, users are able to apply different editing effects to the recorder clips. This tool even enables you to control video recording with a smartphone.

Image Name: best-game-recorder-for-pc-2024-7.jpg
Image Alt:
Pros
- Action supports the webcam and microphone commentary during recording.
- It displays current and average FPS while playing games and saves benchmark results.
Con
- People face usability issues like problems with frame rate drops while recording.
8.Wondershare DemoCreator
Users can use DemoCreator on Windows and Mac to record the screen of gameplay. No doubt, it is a cool game recording software available to users. It also offers lag-free recording for uninterrupted gameplay records. You can plan and automate recording sessions with the help of this software. This game recorder provides a dynamic cursor effect for a visual guide of your audience.

Pros
- Wondershare DemoCreator offers dual monitor recording for an expanded view.
- User can create their own virtual avatars for presenting the content through video.
Con
- The tool has limited functionality in the free version, so you have to buy its premium subscription.
10+ Screen Recorder without Watermark
https://www.youtube.com/watch?v=CVmVxhxfnlU
Part 3: Make Screen Recording Simple and Easy: Wondershare Filmora
Gaming has made a significant impact on people as the associated industry keep producing new games with the latest technology. Moreover, the popularity of streaming games online has also increased. In this case, gamers need an effective game recorder software. Wondershare Filmora is the most efficient solution to effective screen recording. This video game recorder tool can capture any area of your selection.
Filmora also has various built-in editing tools and recording effects. You can also customize the ratio and size of your recording screen by changing the height and width. This tool records the screen and captures the audio from your microphone at the same time. Gamers can schedule their recording with the Record Timer feature. Moreover, you can customize your keystrokes and make hotkey combinations.
Other Features of Wondershare Filmora
- Split Screen: The Split Screen feature has up to 250+ pre-made templates that help you create animated video collages. You can have up to 6 screens for gameplaying or live chat channels on your screen. There are thousands of effects and filters you add to each of the screens.

- AI Thumbnail Creator: Filmora provides a Thumbnail feature that can generate exclusive thumbnails for your videos. It supports advanced text and image editing tools with 58+ templates. You can get stunning thumbnails for your gameplay in seconds with the help of AI.

- AI Vocal Remover: If you are having trouble with unnecessary background noise, remove it with the AI vocal remover feature. Streamers can separate the vocals from their microphone and gameplay. Also, you can dub videos freely without losing audio quality.

Steps-by-Step Guide to Screen Record With Wondershare Filmora
Wondershare Filmora provides the best way to record gameplay on your PC, as it gives you the necessary features. So, let’s discuss the steps on how to record a professional gameplay recording. The following are the steps to record gameplay with Filmora:
Step 1 Launch and Create a New Project on Filmora
After downloading Filmora on your PC and launching the software, go to the “Create Project” tab on the left-side panel. Here, you can click the “New Project” option to open the main editing interface.

Step 2 Record Gameplay on Your PC
On the main interface, click the “Record” option above the media panel. From the drop-down panel, select the “Record PC Screen” option. After that, a small panel screen with the name “Wondershare Screen Recorder” will appear on your PC.

Step 3 Adjust Recording Settings for Gaming
Now, adjust the screen recording settings according to your preference. You can change the screen’s dimensions from full screen to target window. Also, choose to turn on the microphone, audio, and camera by clicking on their icons. Now, hit the dropdown menu of “Settings,” and change the frame rate and other video options. Once you are satisfied with the settings, hit the “Start Recording” button to start.

Conclusion
Gamers need to find the best tool to share their gaming moments in 2024. Filmora is a standout choice among the game recording software for PCs. The software is reliable and enriched with features that are easy to use. You can record, edit, and share your exciting gameplay adventures with the audience. If you’re on the lookout for the best game recorder for your PC, Filmora is a solid recommendation.
- Part 2. Top Best Game Recorders To Consider for Efficient Recording
- Part 3. Make Screen Recording Simple and Easy: Wondershare Filmora
- Conclusion
Part 1: Discussing the Advancements in Game Recording in the Digital Realm
Game recording has evolved from basic methods to sophisticated tools. In the past, gamers used VHS recorders connected to consoles. Moreover, screen capture software like Fraps became popular in the early 2000s. Afterward, built-in recording features within PlayStation 4 and Xbox One simplified the process.
Platforms like Twitch emerged for live streaming in the late 2010s. Cloud gaming services have revolutionized recording by allowing gameplay on remote servers. Finally, modern game recorders emerged to provide instant replay and webcam integration.
Chronological Understanding of the Advancements in Game Recordings
- Users can now capture gameplay in stunning 4K resolution for top-notch visual quality.
- Frame rate settings ensure smooth playback of recorded videos.
- Bitrate settings let you control recording quality and file size.
- Players can use GPU power for faster and more efficient video encoding.
- Multi-channel audio recording lets you record gameplay audio, microphone input, and other sources. Also, it separates tracks for easy editing and control.
- An infusion of overlays in the webcam adds a personalized touch to gameplay videos, building competition in quality offering.
- Network switching within software is possible without any cross-platform shift, from recording to live streaming.
Example
PewDiePie is one of the leading stars in YouTube stardom. His game screen recording is proof of how online entertainment has changed. He earned his initial fame by playing horror games with funny commentary. People loved his infectious personality and unique style. Furthermore, he expanded his content to include games, vlogs, and entertaining stuff. Now, he has a fan base of 111M, positioning him as the most influential figure in online gaming.
Part 2: Top Best Game Recorders To Consider for Efficient Recording
Most of us play games for fun while wanting to share the gameplay with friends. The game screen recorder helps you share the screen with others to enjoy with them. Let’s go through the options of tools that can record gameplay screens efficiently:
Best Game Recorders for PC
1.Movavi
2.OBS
3.Bandicam
4.XSplit
5.Aqua Demo
6.GoPlay
7.Action! Game Recorder
8.Wondershare DemoCreator
1.Movavi
Movavi lets you do full-screen or custom area recording with various functionalities. Using this tool, you can annotate the screen while recording for real-time experience. For improving viewer’s attention, you can also illuminate mouse cursor and keystrokes within the recording screen. It also features a noise reduction feature to get rid of intrusive voices. Movavi can take scrolling screenshots to capture content that doesn’t fit on one screen.
Pros
- This game screen recording tool has a user-friendly interface and is easy to use without the need for training.
- The tool allows you to capture audio and video simultaneously and separately.
Con
- It offers limited features when it comes to video manipulation while recording games.
2.OBS Studio
Open Broadcaster Software is the best screen recorder for games when it comes to finding open-source recorders. This recorder enables you to record multiple scenes at a time. It offers seamless transitions to switch between the scenes. Users can use the audio mixer feature of the tool for noise suppression and gain. The tool also provides the configuration option to add new sources and replace existing ones.
Pros
- You can capture multiple windows simultaneously with the help of this tool, giving diversified opportunities.
- This screen recorder allows you to preview sources and scenes before live streaming.
Con
- OBS is challenging for beginners due to its steep learning curve.
3.Bandicam
Gamers can record high-resolution gameplay in 4K UHD and 480FPS with Bandicam. Upon utilizing this tool, they record gameplay and voice to share with friends on YouTube. This Lolio game recorder uses a webcam and mic to record gameplay with the player’s live face and voice. Plus, you can also save the audio track of the gameplay record in separate WAV files.
Pros
- This game recorder compresses high-quality video to save space.
- Bandicam supports the latest hardware acceleration from AMD, Intel, and NVIDIA.
Con
- It only works on Windows and does not support Mac, Android, or Linux.
4.XSplit
Content creators and game players can use this all-in-one streaming and recording tool. This video game recorder allows you to switch from a solo camera to a podcast easily. You can start streaming to any broadcast platform with the native plugin of the tool. XSplit Broadcaster enables you to add multiple animation and broadcast effects to your scenes.
Pros
- Users can record multiple scenes at the same time with this screen recorder. This helps you in covering more content in similar timeframes.
- You can do custom transitions of various scenes with the help of this tool.
Con
- Installing XSplit Broadcaster in your system slows down the running of the PC dramatically.
5.Aqua Demo
Aqua Demo is the best way to record gameplay on a PC to produce high-quality video. You can easily record gameplay as the interface of the tool is intuitive and easy to use. It supports various video formats, including AVI, MP4, and MOV, to save the recordings. Users can do editing while recording to make it engaging and interactive.
Image Name: best-game-recorder-for-pc-2024-5.jpg
Image Alt:
Pros
- This tool allows you to record video using the sound of a PC, microphone, or both.
- You can easily schedule when video recording should take place with this tool.
Con
- AceThinker Aqua Demo offers a limited trial version to its users for screen recording.
6.GoPlay
GoPlay is the best software to record gameplay as it allows you to record yourself while gaming. With the help of this software, users can do basic editing of the video before live streaming. Plus, it allows you to record fast-paced games up to 60fps for smooth results. The software offers the feature to remove unwanted noise in the video.
Pros
- This screen recorder offers you the option to dub your own voice within the video recording.
- It helps to adjust the audio of each track on the timeline.
Con
- Unlike other screen recorders, it has a small number of transitions and effects.
7.Action! – Game Recorder
Action! stands out as one of the best screen recorder for games, as it uses low CPU space. Gamers can record smooth HD video of gameplay up to 120fps. You can make 20 times smaller video recordings with the help of this tool. Also, users are able to apply different editing effects to the recorder clips. This tool even enables you to control video recording with a smartphone.
Image Name: best-game-recorder-for-pc-2024-7.jpg
Image Alt:
Pros
- Action supports the webcam and microphone commentary during recording.
- It displays current and average FPS while playing games and saves benchmark results.
Con
- People face usability issues like problems with frame rate drops while recording.
8.Wondershare DemoCreator
Users can use DemoCreator on Windows and Mac to record the screen of gameplay. No doubt, it is a cool game recording software available to users. It also offers lag-free recording for uninterrupted gameplay records. You can plan and automate recording sessions with the help of this software. This game recorder provides a dynamic cursor effect for a visual guide of your audience.
Pros
- Wondershare DemoCreator offers dual monitor recording for an expanded view.
- User can create their own virtual avatars for presenting the content through video.
Con
- The tool has limited functionality in the free version, so you have to buy its premium subscription.
10+ Screen Recorder without Watermark
https://www.youtube.com/watch?v=CVmVxhxfnlU
Part 3: Make Screen Recording Simple and Easy: Wondershare Filmora
Gaming has made a significant impact on people as the associated industry keep producing new games with the latest technology. Moreover, the popularity of streaming games online has also increased. In this case, gamers need an effective game recorder software. Wondershare Filmora is the most efficient solution to effective screen recording. This video game recorder tool can capture any area of your selection.
Filmora also has various built-in editing tools and recording effects. You can also customize the ratio and size of your recording screen by changing the height and width. This tool records the screen and captures the audio from your microphone at the same time. Gamers can schedule their recording with the Record Timer feature. Moreover, you can customize your keystrokes and make hotkey combinations.
Other Features of Wondershare Filmora
- Split Screen: The Split Screen feature has up to 250+ pre-made templates that help you create animated video collages. You can have up to 6 screens for gameplaying or live chat channels on your screen. There are thousands of effects and filters you add to each of the screens.
- AI Thumbnail Creator: Filmora provides a Thumbnail feature that can generate exclusive thumbnails for your videos. It supports advanced text and image editing tools with 58+ templates. You can get stunning thumbnails for your gameplay in seconds with the help of AI.
- AI Vocal Remover: If you are having trouble with unnecessary background noise, remove it with the AI vocal remover feature. Streamers can separate the vocals from their microphone and gameplay. Also, you can dub videos freely without losing audio quality.
Steps-by-Step Guide to Screen Record With Wondershare Filmora
Wondershare Filmora provides the best way to record gameplay on your PC, as it gives you the necessary features. So, let’s discuss the steps on how to record a professional gameplay recording. The following are the steps to record gameplay with Filmora:
Step 1 Launch and Create a New Project on Filmora
After downloading Filmora on your PC and launching the software, go to the “Create Project” tab on the left-side panel. Here, you can click the “New Project” option to open the main editing interface.
Step 2 Record Gameplay on Your PC
On the main interface, click the “Record” option above the media panel. From the drop-down panel, select the “Record PC Screen” option. After that, a small panel screen with the name “Wondershare Screen Recorder” will appear on your PC.
Step 3 Adjust Recording Settings for Gaming
Now, adjust the screen recording settings according to your preference. You can change the screen’s dimensions from full screen to target window. Also, choose to turn on the microphone, audio, and camera by clicking on their icons. Now, hit the dropdown menu of “Settings,” and change the frame rate and other video options. Once you are satisfied with the settings, hit the “Start Recording” button to start.
Conclusion
Gamers need to find the best tool to share their gaming moments in 2024. Filmora is a standout choice among the game recording software for PCs. The software is reliable and enriched with features that are easy to use. You can record, edit, and share your exciting gameplay adventures with the audience. If you’re on the lookout for the best game recorder for your PC, Filmora is a solid recommendation.
AVI Editor for Windows 11/10/8.1/8/7: Easily Edit AVI Files on PC
Video is continually changing the way we express and communicate with the world. Several people record vlogs and share them with their family and friends. The same goes for YouTubers and business owners who create videos to boost their business online. Due to this, different video editors are available for various video formats. A common video format is AVI, and if you’re wondering what the best AVI editor for different Window versions is, you’re in luck.
If you’re new to the video editing space, you might be wondering which is the best choice for your Windows format. This article explores the best AVI editors available. We cover both paid and free editors that you can use to edit AVI files on PC easily. So without further ado, let’s begin.
Best AVI Editor to Edit AVI Video on Windows - Filmroa Video Editor

Supported System: Windows and Mac
Most free editing software is usually too simple to meet your immediate demands, or they’re too challenging for you to understand the workflow. Some AVI editors for Windows lack crucial editing features like audio editing and color correction features. An AVI editor that successfully bridges the gap to become the best AVI editor for Windows on our list is Filmora Video Editor .
This editor offers excellent performance and a fast editing process that takes user experience to a new level. It is ideal for beginners because of its intuitive interface. Additionally, intermediate and professional AVI editors can also use this video editor to create stylish videos and utilize its built-in professional effects.
For Win 7 or later (64-bit)
For macOS 10.14 or later
Wondershare Filmora Features
- It is versatile and supports other video formats like MKV, MP4, MOV, etc.
- Users can crop, cut, trim, split, and combine with just a few clicks.
- Access to advanced video effects like motion elements, royalty-free music, transition, animated titles, and more
- Footage can look like Hollywood videos with Filmora color tuning features.
- With background noise removal, audio keyframing, and the audio equalizer tool, you can edit sounds.
- It provides you with real-time rending to ensure a smooth editing experience.
- You can burn videos to DVD, transfer them to various devices or upload them on YouTube or other video streaming platforms.
How to Edit Videos on Windows 11/10/8/7 Using Wondershare Filmora
Editing your videos on Filmora is relatively easy and takes just a few minutes. Keep reading to learn how to edit AVI videos on Windows 11/10/8/7 using Wondershare Filmora.
Step 1: Import AVI Video
The first step you have to take is adding the AVI video you would like to edit with Filmora. You can do this by creating a new project. Then, click on New Project on the homepage.

Once it opens a new page, click the + icon to browse the files on your device or import them from an external device.

Step 2: Edit AVI Videos
After importing your videos, you can start editing and arranging elements in your video timeline. You can overwrite, append, and carry out other editing options.

You can also add effects, titles, filters, and music using Filmora.

Step 3: Save and Share Edited AVI Video Files

Once you’re done editing your video using Filmora Video Editor, you’re ready to save your file. You can choose to save your video in a new format. There are different video formats available to choose from. You can either save it to a select location on your PC or export it to any preferred device. Filmora Video Editor also allows you to upload directly to a video streaming platform or burn to a DVD.
More Free AVI Editor for Windows to Edit AVI Videos
This section will list some of the best free AVI editors for Windows to successfully edit your AVI editors. You would have to download these programs as they offer you more editing tools than an online AVI editor.
Microsoft Windows 10/11 Photos App

Supported System: Windows
This free AVI video editor is compatible with Windows 10/11 and comes prebuilt into your Windows 10 PC. If you’re looking for free AVI editing software, this is one of the best options you would find. One of the benefits of using this AVI video editor is that it eliminates the need for additional downloads. It comes pre-installed. However, if you can’t find this Photos App on your Windows 10/11, you can download it from Microsoft Store.
It is lightweight and allows you easily edit your AVI videos. You can also convert images into an AVI video under the Automatic Video mode. This helps save time if you don’t want to do much editing. However, if there are features you would like to edit in your video, you can use the custom video mode to trim, change audio volume, resize video, and include filters, motion, text, and several 3D effects in your AVI video.
However, you should note that there’s no timeline, and there are some advanced features like video stabilization, split tools, and much more missing on this free AVI editor for Windows. However, it is versatile and supports several other video formats.
Pros
- It supports several video formats, including AVI, MPE, MPG, ASF, MP2, and many more
- It is entirely free
- Ideal for beginners with few editing needs
- There’s no need for a new download as it comes built-in
Cons
- It doesn’t support several modern file formats
- The output formats are limited
- It lacks advanced video editing features
How to Edit Using Microsoft Windows 10/11 Photos App
Editing your AVI video with Microsoft Photos App is relatively easy; follow the steps below.
- First, click the ‘add’ button in the left corner of the page and select the video you want to edit

- Next, check the media elements necessary for your video and then tap on ‘place in storyboard.’

- Now you can start editing your video. One of the ways to edit your video is to extend the duration of your video by clicking the duration button.

- You can also add motion to the video under the ‘storyboard’ section. Select the media element you would like to edit and hit the ‘motions’ button. You can then select different motion effects.

- Additionally, you can add filters under the storyboard section.

- Editors can also trim and split AVI video on this Photos app.

- Once you’re done editing, click on ‘save as’ to save your edited AVI video.
OpenShot – Open Source Video Editor

Supported System: Windows, Mac and Linus
If you want an AVI editor compatible with Windows 10/11/8/7, you should try OpenShot – Open Source Video Editor. It is ideal for carrying out basic video editing like trimming and slicing. This video editor also offers several transitions and audio effects to help you make simple videos.
There are unlimited video tracks available on OpenShot; this means you can add as many audio and video clips.
It also offers you tile templates and video formats. If you want to add more touches to your video, this free AVI editor for Windows will help you achieve that. Other impressive editing features are available on this AVI editor, like slow-motion effects, blending modes, 3D animations, and many more. Additionally, the frame and keyframes accuracy feature helps you create detailed edits. You’ll easily customize your AVI video to your preference with this platform.
When exporting your file, you can export it in varying formats. You can also upload your AVI video directly to YouTube or your social media accounts. Despite the professional-level tool, the user interface is intuitive, which simplifies the editing process. However, you might find that it lacks some of the advanced editing features you would find in other AVI editors.
Pros
- It features an intuitive user interface
- It offers several editing tools for beginners and intermediate users
- It allows you to add as many audio and video tracks as you would prefer
- It is entirely free
- There are varying output formats for your selection
Cons
- Limited advanced editing tools
- OpenShot can be slow and laggy sometimes
How to Edit AVI Video With OpenShot
Using OpenShot to edit your AVI videos is relatively easy. The steps below will explain the basics and how you can edit within minutes.
- First, you have to import your media file into OpenShot.

- Next, arrange the videos on the timeline. If two or more clips overlap, this AVI editor automatically creates a smooth fade between them.

- You can then edit using the different available tools. OpenShot also allows you to add music to the timeline.

- After editing, preview the video project and export. You can also share directly to streaming platforms like YouTube, Vimeo, and more.

VSDC Video Editor – Free Movie Editor

Supported System: Windows and Mac
This AVI video editor is designed to ensure an excelling editing process for users on Windows 10. Therefore, even beginners can utilize this video editor to edit their media projects. Although it is free, it offers powerful editing features to take your AVI video to the next level. There are many features like filters, transition effects, overlays, color correction, and many more you can use.
Although it supports AVI video files, it also supports several popular media file formats. You can also save your AVI video in a new format after editing due to its effective video converter tools. Additionally, VSDC Video Editor is a non-linear tool that allows you to easily place video clips in the timeline.
You can save your edited AVI videos to your PC or upload them directly to different video streaming platforms like YouTube, Instagram, Vimeo, etc. We also love that it allows you to edit HD and 4k videos without compromising the quality. This isn’t a common feature with most free AVI video editing software.
Pros
- It is a free video editing software for Windows 10
- It is versatile and supports different video and audio formats
- There is an excellent selection of filters, effects, and transitions
- You can convert AVI videos to a new format with its built-in video converter
- It features an intuitive interface that’s friendly to beginners
Cons
- Technical support isn’t free
- It doesn’t offer professional video editing tools
Steps to Edit AVI Videos Using VSDC Video Editor
This is a simple AVI editor to use, and the steps below simplify the process for you even further; let’s take a look.
- Firstly, import your video into the VSDC Video editor by clicking the ‘import content’ button.

- Once you choose a file on your Windows PC, the app will ask if you would like to change the resolution and several more parameters.
- You can start editing your videos with the different tools available, like cutting and splitting.

- You can also crop the video if necessary.

- Another option is to apply different effects and transitions to your AVI video.

- Once you’re done editing your video, you can then export it. VSDC allows you to choose the output format. This is the best time to select a different format if that’s the goal.

- Alternatively, you can share your video directly to YouTube and other video streaming platforms.
More Paid AVI Editor for Windows to Edit AVI Videos
Although there are free AVI editors, they usually come with limited editing features. If you want an AVI editor that offers more editing features for professionals, you should try paid AVI editor for Windows. This section explores the top three paid AVI editors you can use to edit AVI videos on Windows.
Movavi Video Editor Plus

Supported System: Windows and Mac
This paid AVI video editor is compatible with Windows 10 and higher. It is an AVI editing tool that offers a user-friendly interface and advanced editing features for professionals. This video editor is compatible with Windows and Mac and supports all the popular video codecs to provide more options. It is pretty easy to navigate and master, so beginners can also utilize this AVI editor to improve their editing skills.
The best part is that you don’t need it offers all you need for basic editing and advanced video enhancement. You can expect a professional quality when you utilize this editing tool. It is great for all experience levels. You can integrate various visual and audio effects in your video using Movavi Video Editor Plus. It also allows you easily edit, trim, crop, and rotate your videos. Additionally, you can include subtitles, headings, and titles in your AVI video.
If you want to take your video to the next level, you can explore the different media options like filters, animations, music, transitions, and many more from its library. You can also save your AVI video to your PC or share it directly to YouTube to save space on your PC.
Pros
- It offers you an easy to use and intuitive interface
- Ideal for beginners and professionals
- Ensures professional and top-quality results
- It supports various file formats
- Allows direct sharing to video streaming platforms
Cons
- The free trial is relatively limited
- It doesn’t allow more than one project at a time
Steps to Edit AVI Video Using Movavi Video Editor Plus
Using this AVI editor for Windows is quite easy. However, the step-by-step guide below will help you get through the editing process within minutes.
- First, install the Movavi Video Editor Plus software on your PC
- Next, click ‘add files’ to add your AVI video files. Afterward, drag the selected video into the video editor timeline.

- You can then start editing your video by applying filters, enhancing the quality, adding filters and transitions, etc.

- After editing, save your video by hitting the ‘export’ button. Choose how you would like to save your video and hit ‘start.

This will save your video to your chosen location.
PowerDirector 365

Supported System: Windows and Mac
An AVI editor compatible with Windows 11/10/8/8.1 or 7 is PowerDirector 365. It offers an intuitive user interface and advanced video editing features. Using this editing software is quite easy, making it ideal for beginners, intermediates, and professionals. In addition, it is compatible with Windows and Mac OS, making it a versatile choice. You can easily create Hollywood-level videos from your Windows computer using PowerDirector 365.
Some of the editing features on this AVI editor include green-screen, royalty-free music, and many more advanced visual filters. It also offers thousands of templates, overlay effects, and built-in transitions to speed up the editing process. It is an excellent option if you’re looking to enhance your raw footage using cool filters and graphics. Additionally, PowerDirector 365 offers users a dual-screen and customizable editing workspace for streamlining your AVI video editing process.
While it preserves the quality of your AVI video, it allows you to save the output in other high-resolution formats like Ultra HD 4K and many more. You can also share your video directly to various streaming platforms to save you time and space on your device.
Pros
- User-friendly interface and ideal for professionals, intermediate, and beginners
- Access to built-in transitions and overlay effects
- Compatible with Windows and Mac
- Allows users to save output AVI files in higher resolution video formats
- Access to royalty-free iStock and Shutterstock library
Cons
- Limited free version
- It can be complex for beginners to understand
Steps to Edit Using PowerDirector 365
- Firstly, launch the app and choose ‘full mode’ to begin the editing process.

- Next, select ‘import media folder’ to import the media files you want to edit.

- Browse the folders on your PC and choose the folder with the videos you want; click ‘select folder’ to import them into the editor’s media library.

- Now you can select the video you want to edit from the media library and drag it into the video timeline.

- The editing process can begin. PowerDirector 365 allows you to split and trim your video clips.

- You can also add transitions between the clips by selecting the transition room.

- You can also add title texts to your AVI video if you prefer.

- After editing, select the ‘produce’ tab to export your video.

- You can choose to change the video format before exporting.

- Once you choose your preferred format, it will save your edited AVI video file.
Which Should I Choose: Free or Paid AVI Editor?
Many AVI editors for Windows (free and paid) are available on the internet. Therefore, it can be pretty challenging to determine the right AVI editor for Windows to choose. You need to consider many factors to make your choice, and below are some of them.
- Experience Level: One of the most crucial features you need to consider is your experience level. If you’re a beginner, you don’t want an AVI editor that offers complex features you can use. The same goes for professionals; you don’t want an editor without comprehensive editing tools to meet your editing needs. You should lookout for an editor that supports beginners and professionals. This will eliminate the need to look for a new editor once your skills improve.
- Interface: You also need to consider the user interface of your video editor before choosing between paid and free AVI editors for Windows. A friendly user interface can save you a lot of time getting familiar with the editing software. Check out the user interface to determine how easy it would be to navigate when editing your AVI videos.
- Formats: Ensure that the software you choose doesn’t limit you to specific video formats. You want an AVI editor that also supports the common and modern video formats. This allows you to convert your AVI videos when you need to share your video to streaming platforms that don’t support AVI file formats.
Most free AVI editors offer limited features to users, limiting your editing process. Additionally, some paid AVI editors focuses on professional and makes it difficult for beginners to use. Always opt for an AVI editor that succinctly supports all your editing needs and allows you to develop your skills.
Conclusion
Although AVI is an old video format, it is quite popular. Therefore, it’s crucial to have an AVI video editor if you prefer this file format. This article covered the best free and paid AVI editor for Windows. Most of the reviewed editing software offers you unique features to fulfill your editing needs. We also mentioned the pros and cons of each AVI editor for Windows to help you determine which option suits you best. If you want a video editor that will help you take your videos to the next level, you will need an editor that provides you with access to many special effects and unique editing tools. Filmora Video Editor provides you with an intuitive interface and a feature-packed library to start editing your AVI videos.
FAQs About Editing AVI Video
- How can I edit AVI videos like a pro? To edit an AVI video like a pro, you need to learn to use advanced editing features. One of the ideal ways is to pick an AVI editor with an intuitive interface that allows you to master professional concepts.
- What is the best AVI video editor for Windows 10? The best AVI editor for Windows 10 depends on your experience and if you’re looking for free or paid software.
- Can I edit an AVI file? Yes, you can. You need to find an AVI editing software compatible with your operating system and version. Also, you need to ensure it is ideal for your level of experience.
Supported System: Windows and Mac
Most free editing software is usually too simple to meet your immediate demands, or they’re too challenging for you to understand the workflow. Some AVI editors for Windows lack crucial editing features like audio editing and color correction features. An AVI editor that successfully bridges the gap to become the best AVI editor for Windows on our list is Filmora Video Editor .
This editor offers excellent performance and a fast editing process that takes user experience to a new level. It is ideal for beginners because of its intuitive interface. Additionally, intermediate and professional AVI editors can also use this video editor to create stylish videos and utilize its built-in professional effects.
For Win 7 or later (64-bit)
For macOS 10.14 or later
Wondershare Filmora Features
- It is versatile and supports other video formats like MKV, MP4, MOV, etc.
- Users can crop, cut, trim, split, and combine with just a few clicks.
- Access to advanced video effects like motion elements, royalty-free music, transition, animated titles, and more
- Footage can look like Hollywood videos with Filmora color tuning features.
- With background noise removal, audio keyframing, and the audio equalizer tool, you can edit sounds.
- It provides you with real-time rending to ensure a smooth editing experience.
- You can burn videos to DVD, transfer them to various devices or upload them on YouTube or other video streaming platforms.
How to Edit Videos on Windows 11/10/8/7 Using Wondershare Filmora
Editing your videos on Filmora is relatively easy and takes just a few minutes. Keep reading to learn how to edit AVI videos on Windows 11/10/8/7 using Wondershare Filmora.
Step 1: Import AVI Video
The first step you have to take is adding the AVI video you would like to edit with Filmora. You can do this by creating a new project. Then, click on New Project on the homepage.
Once it opens a new page, click the + icon to browse the files on your device or import them from an external device.
Step 2: Edit AVI Videos
After importing your videos, you can start editing and arranging elements in your video timeline. You can overwrite, append, and carry out other editing options.
You can also add effects, titles, filters, and music using Filmora.
Step 3: Save and Share Edited AVI Video Files
Once you’re done editing your video using Filmora Video Editor, you’re ready to save your file. You can choose to save your video in a new format. There are different video formats available to choose from. You can either save it to a select location on your PC or export it to any preferred device. Filmora Video Editor also allows you to upload directly to a video streaming platform or burn to a DVD.
More Free AVI Editor for Windows to Edit AVI Videos
This section will list some of the best free AVI editors for Windows to successfully edit your AVI editors. You would have to download these programs as they offer you more editing tools than an online AVI editor.
Microsoft Windows 10/11 Photos App
Supported System: Windows
This free AVI video editor is compatible with Windows 10/11 and comes prebuilt into your Windows 10 PC. If you’re looking for free AVI editing software, this is one of the best options you would find. One of the benefits of using this AVI video editor is that it eliminates the need for additional downloads. It comes pre-installed. However, if you can’t find this Photos App on your Windows 10/11, you can download it from Microsoft Store.
It is lightweight and allows you easily edit your AVI videos. You can also convert images into an AVI video under the Automatic Video mode. This helps save time if you don’t want to do much editing. However, if there are features you would like to edit in your video, you can use the custom video mode to trim, change audio volume, resize video, and include filters, motion, text, and several 3D effects in your AVI video.
However, you should note that there’s no timeline, and there are some advanced features like video stabilization, split tools, and much more missing on this free AVI editor for Windows. However, it is versatile and supports several other video formats.
Pros
- It supports several video formats, including AVI, MPE, MPG, ASF, MP2, and many more
- It is entirely free
- Ideal for beginners with few editing needs
- There’s no need for a new download as it comes built-in
Cons
- It doesn’t support several modern file formats
- The output formats are limited
- It lacks advanced video editing features
How to Edit Using Microsoft Windows 10/11 Photos App
Editing your AVI video with Microsoft Photos App is relatively easy; follow the steps below.
- First, click the ‘add’ button in the left corner of the page and select the video you want to edit
- Next, check the media elements necessary for your video and then tap on ‘place in storyboard.’
- Now you can start editing your video. One of the ways to edit your video is to extend the duration of your video by clicking the duration button.
- You can also add motion to the video under the ‘storyboard’ section. Select the media element you would like to edit and hit the ‘motions’ button. You can then select different motion effects.
- Additionally, you can add filters under the storyboard section.
- Editors can also trim and split AVI video on this Photos app.
- Once you’re done editing, click on ‘save as’ to save your edited AVI video.
OpenShot – Open Source Video Editor
Supported System: Windows, Mac and Linus
If you want an AVI editor compatible with Windows 10/11/8/7, you should try OpenShot – Open Source Video Editor. It is ideal for carrying out basic video editing like trimming and slicing. This video editor also offers several transitions and audio effects to help you make simple videos.
There are unlimited video tracks available on OpenShot; this means you can add as many audio and video clips.
It also offers you tile templates and video formats. If you want to add more touches to your video, this free AVI editor for Windows will help you achieve that. Other impressive editing features are available on this AVI editor, like slow-motion effects, blending modes, 3D animations, and many more. Additionally, the frame and keyframes accuracy feature helps you create detailed edits. You’ll easily customize your AVI video to your preference with this platform.
When exporting your file, you can export it in varying formats. You can also upload your AVI video directly to YouTube or your social media accounts. Despite the professional-level tool, the user interface is intuitive, which simplifies the editing process. However, you might find that it lacks some of the advanced editing features you would find in other AVI editors.
Pros
- It features an intuitive user interface
- It offers several editing tools for beginners and intermediate users
- It allows you to add as many audio and video tracks as you would prefer
- It is entirely free
- There are varying output formats for your selection
Cons
- Limited advanced editing tools
- OpenShot can be slow and laggy sometimes
How to Edit AVI Video With OpenShot
Using OpenShot to edit your AVI videos is relatively easy. The steps below will explain the basics and how you can edit within minutes.
- First, you have to import your media file into OpenShot.
- Next, arrange the videos on the timeline. If two or more clips overlap, this AVI editor automatically creates a smooth fade between them.
- You can then edit using the different available tools. OpenShot also allows you to add music to the timeline.
- After editing, preview the video project and export. You can also share directly to streaming platforms like YouTube, Vimeo, and more.
VSDC Video Editor – Free Movie Editor
Supported System: Windows and Mac
This AVI video editor is designed to ensure an excelling editing process for users on Windows 10. Therefore, even beginners can utilize this video editor to edit their media projects. Although it is free, it offers powerful editing features to take your AVI video to the next level. There are many features like filters, transition effects, overlays, color correction, and many more you can use.
Although it supports AVI video files, it also supports several popular media file formats. You can also save your AVI video in a new format after editing due to its effective video converter tools. Additionally, VSDC Video Editor is a non-linear tool that allows you to easily place video clips in the timeline.
You can save your edited AVI videos to your PC or upload them directly to different video streaming platforms like YouTube, Instagram, Vimeo, etc. We also love that it allows you to edit HD and 4k videos without compromising the quality. This isn’t a common feature with most free AVI video editing software.
Pros
- It is a free video editing software for Windows 10
- It is versatile and supports different video and audio formats
- There is an excellent selection of filters, effects, and transitions
- You can convert AVI videos to a new format with its built-in video converter
- It features an intuitive interface that’s friendly to beginners
Cons
- Technical support isn’t free
- It doesn’t offer professional video editing tools
Steps to Edit AVI Videos Using VSDC Video Editor
This is a simple AVI editor to use, and the steps below simplify the process for you even further; let’s take a look.
- Firstly, import your video into the VSDC Video editor by clicking the ‘import content’ button.
- Once you choose a file on your Windows PC, the app will ask if you would like to change the resolution and several more parameters.
- You can start editing your videos with the different tools available, like cutting and splitting.
- You can also crop the video if necessary.
- Another option is to apply different effects and transitions to your AVI video.
- Once you’re done editing your video, you can then export it. VSDC allows you to choose the output format. This is the best time to select a different format if that’s the goal.
- Alternatively, you can share your video directly to YouTube and other video streaming platforms.
More Paid AVI Editor for Windows to Edit AVI Videos
Although there are free AVI editors, they usually come with limited editing features. If you want an AVI editor that offers more editing features for professionals, you should try paid AVI editor for Windows. This section explores the top three paid AVI editors you can use to edit AVI videos on Windows.
Movavi Video Editor Plus
Supported System: Windows and Mac
This paid AVI video editor is compatible with Windows 10 and higher. It is an AVI editing tool that offers a user-friendly interface and advanced editing features for professionals. This video editor is compatible with Windows and Mac and supports all the popular video codecs to provide more options. It is pretty easy to navigate and master, so beginners can also utilize this AVI editor to improve their editing skills.
The best part is that you don’t need it offers all you need for basic editing and advanced video enhancement. You can expect a professional quality when you utilize this editing tool. It is great for all experience levels. You can integrate various visual and audio effects in your video using Movavi Video Editor Plus. It also allows you easily edit, trim, crop, and rotate your videos. Additionally, you can include subtitles, headings, and titles in your AVI video.
If you want to take your video to the next level, you can explore the different media options like filters, animations, music, transitions, and many more from its library. You can also save your AVI video to your PC or share it directly to YouTube to save space on your PC.
Pros
- It offers you an easy to use and intuitive interface
- Ideal for beginners and professionals
- Ensures professional and top-quality results
- It supports various file formats
- Allows direct sharing to video streaming platforms
Cons
- The free trial is relatively limited
- It doesn’t allow more than one project at a time
Steps to Edit AVI Video Using Movavi Video Editor Plus
Using this AVI editor for Windows is quite easy. However, the step-by-step guide below will help you get through the editing process within minutes.
- First, install the Movavi Video Editor Plus software on your PC
- Next, click ‘add files’ to add your AVI video files. Afterward, drag the selected video into the video editor timeline.
- You can then start editing your video by applying filters, enhancing the quality, adding filters and transitions, etc.
- After editing, save your video by hitting the ‘export’ button. Choose how you would like to save your video and hit ‘start.
This will save your video to your chosen location.
PowerDirector 365
Supported System: Windows and Mac
An AVI editor compatible with Windows 11/10/8/8.1 or 7 is PowerDirector 365. It offers an intuitive user interface and advanced video editing features. Using this editing software is quite easy, making it ideal for beginners, intermediates, and professionals. In addition, it is compatible with Windows and Mac OS, making it a versatile choice. You can easily create Hollywood-level videos from your Windows computer using PowerDirector 365.
Some of the editing features on this AVI editor include green-screen, royalty-free music, and many more advanced visual filters. It also offers thousands of templates, overlay effects, and built-in transitions to speed up the editing process. It is an excellent option if you’re looking to enhance your raw footage using cool filters and graphics. Additionally, PowerDirector 365 offers users a dual-screen and customizable editing workspace for streamlining your AVI video editing process.
While it preserves the quality of your AVI video, it allows you to save the output in other high-resolution formats like Ultra HD 4K and many more. You can also share your video directly to various streaming platforms to save you time and space on your device.
Pros
- User-friendly interface and ideal for professionals, intermediate, and beginners
- Access to built-in transitions and overlay effects
- Compatible with Windows and Mac
- Allows users to save output AVI files in higher resolution video formats
- Access to royalty-free iStock and Shutterstock library
Cons
- Limited free version
- It can be complex for beginners to understand
Steps to Edit Using PowerDirector 365
- Firstly, launch the app and choose ‘full mode’ to begin the editing process.
- Next, select ‘import media folder’ to import the media files you want to edit.
- Browse the folders on your PC and choose the folder with the videos you want; click ‘select folder’ to import them into the editor’s media library.
- Now you can select the video you want to edit from the media library and drag it into the video timeline.
- The editing process can begin. PowerDirector 365 allows you to split and trim your video clips.
- You can also add transitions between the clips by selecting the transition room.
- You can also add title texts to your AVI video if you prefer.
- After editing, select the ‘produce’ tab to export your video.
- You can choose to change the video format before exporting.
- Once you choose your preferred format, it will save your edited AVI video file.
Which Should I Choose: Free or Paid AVI Editor?
Many AVI editors for Windows (free and paid) are available on the internet. Therefore, it can be pretty challenging to determine the right AVI editor for Windows to choose. You need to consider many factors to make your choice, and below are some of them.
- Experience Level: One of the most crucial features you need to consider is your experience level. If you’re a beginner, you don’t want an AVI editor that offers complex features you can use. The same goes for professionals; you don’t want an editor without comprehensive editing tools to meet your editing needs. You should lookout for an editor that supports beginners and professionals. This will eliminate the need to look for a new editor once your skills improve.
- Interface: You also need to consider the user interface of your video editor before choosing between paid and free AVI editors for Windows. A friendly user interface can save you a lot of time getting familiar with the editing software. Check out the user interface to determine how easy it would be to navigate when editing your AVI videos.
- Formats: Ensure that the software you choose doesn’t limit you to specific video formats. You want an AVI editor that also supports the common and modern video formats. This allows you to convert your AVI videos when you need to share your video to streaming platforms that don’t support AVI file formats.
Most free AVI editors offer limited features to users, limiting your editing process. Additionally, some paid AVI editors focuses on professional and makes it difficult for beginners to use. Always opt for an AVI editor that succinctly supports all your editing needs and allows you to develop your skills.
Conclusion
Although AVI is an old video format, it is quite popular. Therefore, it’s crucial to have an AVI video editor if you prefer this file format. This article covered the best free and paid AVI editor for Windows. Most of the reviewed editing software offers you unique features to fulfill your editing needs. We also mentioned the pros and cons of each AVI editor for Windows to help you determine which option suits you best. If you want a video editor that will help you take your videos to the next level, you will need an editor that provides you with access to many special effects and unique editing tools. Filmora Video Editor provides you with an intuitive interface and a feature-packed library to start editing your AVI videos.
FAQs About Editing AVI Video
- How can I edit AVI videos like a pro? To edit an AVI video like a pro, you need to learn to use advanced editing features. One of the ideal ways is to pick an AVI editor with an intuitive interface that allows you to master professional concepts.
- What is the best AVI video editor for Windows 10? The best AVI editor for Windows 10 depends on your experience and if you’re looking for free or paid software.
- Can I edit an AVI file? Yes, you can. You need to find an AVI editing software compatible with your operating system and version. Also, you need to ensure it is ideal for your level of experience.
[7 Ways] Add Subtitles to MKV Videos on All Platforms
Many people use MKV files as it’s an open-source format and does not require licenses. This file format functions as a multimedia file container that can help you in storing audio and video tracks. However, there are some key disadvantages of using MKV files, as this format is not supported by various platforms or devices. So, the most suitable video file formats that you can use are FLV and MP4. These two formats offer high-quality results and are supported by multiple platforms.
If you still want to use MKV files and want to add subtitles, this article can assist you. By reading this article, you can learn how to add subtitles to MKV with different methods.
Part 1: How to Add Subtitles to MKV on Windows?
Are you a Windows user and want to add subtitles to MKV? Read this section to find out compatible tools that can add subtitles to your MKV videos efficiently.
1. Wondershare Filmora
Free Download For Win 7 or later(64-bit)
Free Download For macOS 10.14 or later
Wondershare Filmora is a popular tool that provides you with multiple options to edit video files. If you are interested in adding subtitles to your MKV files, you can navigate to its “Speech-to-Text” feature. This feature automatically transcribes the voice used in the video into subtitles. It supports 16 different languages for creating subtitles through this feature.
This feature can also enhance your editing efficiency as you don’t have to write the subtitles on your own. Moreover, the STT feature utilizes advanced algorithms that help the tool create subtitles with high precision. Furthermore, you can also manually add the subtitles to your MKV file using this MKV subtitle editor.
Key Features
- Filmora offers various effects, such as a green screen that can help you to change your background dramatically.
- If you want to resize your videos efficiently, this tool provides the Auto Reframe feature.
- Filmora also offers various preset templates that can help you to craft captivating videos easily.
Step-by-Step Guide to Add Subtitles Using Filmora
Step1 Create a New Filmora Project
Download and install Filmora on your PC and click “Create Project.” Afterward, import the MKV video from your PC to this tool by clicking on the “Arrow” icon.

Step2 Go to Titles Tab
After importing the video, drag it to the timeline. Once done, click on the “Titles” section given on top. Afterward, click on “Subtitles” from the left section. Now you will be able to see different types of subtitles on your screen. Select your favorite style of subtitles and tap on its “Download” icon.

Step3 Choose the Preferred Subtitle Style
After that, tap on the “Plus” icon to add your selected subtitle style to the timeline. Double-click on the added subtitles, which will open the settings. You can manually add the subtitles on the “Input Text” box easily. Moreover, you can easily change the text font, color, opacity, and alignment.

Step4 Export and Save Video
Once you have created subtitles for your imported video, click the “Export” button on top. Using this option, you can save the video file to your device or share it on other platforms.

2. Cisdem Video Converter
Cisdem is an efficient tool that can be used by content creators for various purposes. Along with editing the videos, this tool can help you add subtitles to your video files in any format. It supports various formats for adding subtitles, such as MKV, MP4, AVI, etc. This tool also offers a built-in editor to modify the MKV videos flawlessly. Hence, it’s a basic tool that generates quality results instantly.
Key Features
- Cisdem can function as a video converter that supports more than 300 file formats. You can convert to and from MKV files using this platform easily.
- Through this software, you can professionally add watermarks to your MKV files. It provides various options to add a customized watermark to your desired video files.
- It offers a built-in media player that allows you to play and watch MKV files without interruption.
Steps to Add Subtitles to MKV Using Cisdem Video Converter
Step1 Launch the Cisdem tool on your system and navigate to its “Converter”. Afterward, import the MKV file instantly. Now tap on the “Pencil” icon given on top to open the editing window.

Step2 From the editing window, go to “Subtitle and Audio” and click on “No subtitles.” From the drop-down box, click on “Load Subtitles” to upload your SRT or ASS subtitle file from your system.

Step3 Now press the “Save” button to proceed. As the default output format in this tool is MP4, navigate to the “General Video” section to change it. From this option, select “MKV Video” as the output format. Afterward, hit the “Convert” button to embed the added subtitles easily.

3. VLC Media Player
The VLC Media Player is a commonly used platform that offers various functions. It can be easily accessed and shows compatibility with tons of platforms. It has a simple interface that allows you to operate it easily. Through this tool, you can also add subtitles to MKV proficiently. This MKV subtitle editor supports various caption formats such as VobSub, SubRip, SubViewer, etc.
Key Features
- While watching a video on the VLC media player, you can take instant snapshots of your favorite moments in high resolution.
- This tool offers a screen recorder through which you can capture your activities on a desktop. You can also choose the frame rate and output format for your screen recording.
- You can enhance your video files by adding effects from this tool. Along with applying attractive video effects, you can also change the brightness and hue of your video.
Step-by-Step Guide to Add Subtitles Using VLC
Step1 Open your VLC media player and click on the “Media” tab given on top. From there, tap on the “Convert/Save” option.

Step2 A new dialogue box will open regarding “Open Media.” Now you can instantly upload your MKV file on this tool. By staying on the same window, check the box saying, “Use a subtitle file.” Afterward, browse the SRT file from your computer.

Step3 Now tap on the “Convert/Save” arrowhead and choose the “Convert” option from the drop-down menu. A new window will open from where you have to tap on the “Wretch” icon. On the “Encapsulation” section, select “MKV.”

Step4 By going to the “Audio codec” and “Video codec” sections, check the box “keep original video or audio track.” Now go to the “Subtitle” section and enable the option of “Overlay subtitles on the video.” Once done, hit the “Create” button.

Part 2: How to Add Subtitles to MKV on Mac?
Are you looking for MKV subtitle editors that are compatible with Mac? In this section, you can learn how to add subtitles to MKV on your Mac devices easily.
1. HD Video Converter Deluxe
This tool is highly compatible with Mac users and provides tons of advanced features. Besides being a great video editor, this tool can help you add subtitles to your MKV video files. It supports popular subtitle formats such as ASS, SSA, and SRT. If you want to embed hardcode subtitles into your MKV files, this is the most compatible tool.
Key Features
- If you want to decrease the video file size without harming its high quality, you can use this platform. This tool offers a video compressor through which you can reduce file sizes effectively.
- To combine your various video chunks or clips, this software offers a reliable video merger.
- If you are facing audio problems in your video, this tool can permanently adjust the volume according to your preference.
Step-by-Step Guide to Add Subtitles Using HD Video Converter Deluxe
Step1 Start by launching HD Video Converter Deluxe on your MacBook. Afterward, tap on the “+Video” button to import your MKV file.

Step2 On the Output Profile window, choose “MKV” as your output format. Click on the “OK” button to proceed. Now navigate to the “Edit” tab and select “Subtitle.” From there, check “Enable Subtitle.” Also, check “Extra” and then click on the “Add” button. Now you can import the subtitle file to this tool.

Step3 Click the “Done” button and then hit the “RUN” button to embed the subtitles.

2. Wondershare UniConverter
UniConverter is one of the famous tools that many people prefer due to its high reliability. Among its various advanced features, you can use its “Subtitle Editor” to add subtitles to MKV videos. You can create subtitles manually in your preferred font. Moreover, it provides an auto generator to create subtitles by extracting audio from the video file. This feature supports more than 100 languages to offer more diversity.
Key Features
- The MKV subtitle editor of UniConverter is also capable of converting text into subtitle lines through its TXT to SRT feature.
- You can remove backgrounds from your video and add a new one with a few clicks. This can make your video more captivating.
- It offers a vocal remover that can separate instrumental sounds and vocals from an audio or video file easily.
Step-by-Step Guide to Use the Subtitle Editor of UniConverter
Step1 Run UniConverter on your PC and click on “Subtitle Editor” from its homepage. A new window will open in which you have to import the MKV video file.

Step2 You can click on the “Manual Subtitles” button to add your subtitles with respect to the time duration. Or, you can tap on ‘Import Subtitles’ to upload the subtitles file from your MacBook. Other options are also available such as Text to Subtitles and Auto Subtitles.

Step3 You can edit the added subtitles by going to the “Styles” section. Here, you can change the font, color, and style of your subtitles. Once done, click on the “Save” button.

Part 3: How to Add Subtitles to MKV Online?
If you want to use online platforms to merge subtitles with MKV, here are the top two online tools.
1. Veed
Veed is an easy-to-use online tool that allows you to edit your video clips with high accuracy. Through this online tool, you can add subtitles to your MKV files in 3 different ways. You can upload subtitle files in formats like VVT, TXT, SSA, SRT, and ASS. Otherwise, you can enter the subtitles manually by selecting their color, font, size, and time duration. Moreover, you can use its voice recognition software to auto-create subtitles instantly.
Key Features
- To make your video clips funny and engaging, this tool enables you to add various emojis and stickers to your video files.
- You can explain the content in your video by adding annotations such as text boxes using this tool.
- To remove unwanted objects from your video, you can use the crop feature of Veed.
Step-by-Step Guide to Add Subtitles Using Veed
Step1 Access the official website of Veed and click on “Add Subtitles To video” from its tools. Afterward, click the “Choose Files” button and import your MKV file.

Step2 Once done with uploading, click on “Upload Subtitle File.” You can upload any of its supported subtitle files. Also, choose the language from the given box.

Step3 After importing the subtitles, you can modify them by altering their text color, color effect, style, and alignment. Once done, hit the “Export” button.

2. Flixier
Do you want an interesting tool to create subtitles? Flixier is an efficient online tool that can edit your video and audio files. Without making a user account, you can use this tool to add subtitles to MKV video files. You can upload MKV files from different platforms, such as your device, Google Drive, Zoom, Dropbox, etc. This tool also provides different ways to flawlessly create subtitles for your video files.
Key Features
- The subtitle editor of this tool offers more than 1000 fonts. Thus, you can make your subtitles look stylish by choosing a preferred font.
- To edit your videos, this tool allows you to collaborate with your friends in real-time.
- It offers more than 50 transitions that you can apply to your videos easily.
Step-by-Step Guide to Add Subtitles Using Flixier
Step1 Visit the website of Flixier and click on “Add subtitles to your videos” from its tools. Afterward, tap on “Get Started” to proceed. The tool will ask you to upload your video file.

Step2 Once you have uploaded the MKV video, click on “Text” given on the left side. Afterward, tap “Add Subtitle” to create subtitles for your video. You can add text to the given space to create subtitles. You can also tap on the “Import Subtitle” button to upload the subtitle file. To change the properties of your subtitles, you can edit them from the provided options on your screen.

Step3 Once done with creating and adjusting subtitles, click on the “Export” button.

Conclusion
Subtitles are shown at the bottom of a video and help make the video content comprehensive. If you are dealing with MKV files and want to add subtitles in an instant way, this article has provided all the details. By reading this guide, you can learn how to add subtitles to MKV files on different platforms.
To attain the best results and utilize advanced features, we will highly recommend you use Wondershare Filmora. This tool creates a comfortable environment and gives an intuitive interface to create subtitles.
Part 1: How to Add Subtitles to MKV on Windows?
Are you a Windows user and want to add subtitles to MKV? Read this section to find out compatible tools that can add subtitles to your MKV videos efficiently.
1. Wondershare Filmora
Free Download For Win 7 or later(64-bit)
Free Download For macOS 10.14 or later
Wondershare Filmora is a popular tool that provides you with multiple options to edit video files. If you are interested in adding subtitles to your MKV files, you can navigate to its “Speech-to-Text” feature. This feature automatically transcribes the voice used in the video into subtitles. It supports 16 different languages for creating subtitles through this feature.
This feature can also enhance your editing efficiency as you don’t have to write the subtitles on your own. Moreover, the STT feature utilizes advanced algorithms that help the tool create subtitles with high precision. Furthermore, you can also manually add the subtitles to your MKV file using this MKV subtitle editor.
Key Features
- Filmora offers various effects, such as a green screen that can help you to change your background dramatically.
- If you want to resize your videos efficiently, this tool provides the Auto Reframe feature.
- Filmora also offers various preset templates that can help you to craft captivating videos easily.
Step-by-Step Guide to Add Subtitles Using Filmora
Step1 Create a New Filmora Project
Download and install Filmora on your PC and click “Create Project.” Afterward, import the MKV video from your PC to this tool by clicking on the “Arrow” icon.
Step2 Go to Titles Tab
After importing the video, drag it to the timeline. Once done, click on the “Titles” section given on top. Afterward, click on “Subtitles” from the left section. Now you will be able to see different types of subtitles on your screen. Select your favorite style of subtitles and tap on its “Download” icon.
Step3 Choose the Preferred Subtitle Style
After that, tap on the “Plus” icon to add your selected subtitle style to the timeline. Double-click on the added subtitles, which will open the settings. You can manually add the subtitles on the “Input Text” box easily. Moreover, you can easily change the text font, color, opacity, and alignment.
Step4 Export and Save Video
Once you have created subtitles for your imported video, click the “Export” button on top. Using this option, you can save the video file to your device or share it on other platforms.
2. Cisdem Video Converter
Cisdem is an efficient tool that can be used by content creators for various purposes. Along with editing the videos, this tool can help you add subtitles to your video files in any format. It supports various formats for adding subtitles, such as MKV, MP4, AVI, etc. This tool also offers a built-in editor to modify the MKV videos flawlessly. Hence, it’s a basic tool that generates quality results instantly.
Key Features
- Cisdem can function as a video converter that supports more than 300 file formats. You can convert to and from MKV files using this platform easily.
- Through this software, you can professionally add watermarks to your MKV files. It provides various options to add a customized watermark to your desired video files.
- It offers a built-in media player that allows you to play and watch MKV files without interruption.
Steps to Add Subtitles to MKV Using Cisdem Video Converter
Step1 Launch the Cisdem tool on your system and navigate to its “Converter”. Afterward, import the MKV file instantly. Now tap on the “Pencil” icon given on top to open the editing window.
Step2 From the editing window, go to “Subtitle and Audio” and click on “No subtitles.” From the drop-down box, click on “Load Subtitles” to upload your SRT or ASS subtitle file from your system.
Step3 Now press the “Save” button to proceed. As the default output format in this tool is MP4, navigate to the “General Video” section to change it. From this option, select “MKV Video” as the output format. Afterward, hit the “Convert” button to embed the added subtitles easily.
3. VLC Media Player
The VLC Media Player is a commonly used platform that offers various functions. It can be easily accessed and shows compatibility with tons of platforms. It has a simple interface that allows you to operate it easily. Through this tool, you can also add subtitles to MKV proficiently. This MKV subtitle editor supports various caption formats such as VobSub, SubRip, SubViewer, etc.
Key Features
- While watching a video on the VLC media player, you can take instant snapshots of your favorite moments in high resolution.
- This tool offers a screen recorder through which you can capture your activities on a desktop. You can also choose the frame rate and output format for your screen recording.
- You can enhance your video files by adding effects from this tool. Along with applying attractive video effects, you can also change the brightness and hue of your video.
Step-by-Step Guide to Add Subtitles Using VLC
Step1 Open your VLC media player and click on the “Media” tab given on top. From there, tap on the “Convert/Save” option.
Step2 A new dialogue box will open regarding “Open Media.” Now you can instantly upload your MKV file on this tool. By staying on the same window, check the box saying, “Use a subtitle file.” Afterward, browse the SRT file from your computer.
Step3 Now tap on the “Convert/Save” arrowhead and choose the “Convert” option from the drop-down menu. A new window will open from where you have to tap on the “Wretch” icon. On the “Encapsulation” section, select “MKV.”
Step4 By going to the “Audio codec” and “Video codec” sections, check the box “keep original video or audio track.” Now go to the “Subtitle” section and enable the option of “Overlay subtitles on the video.” Once done, hit the “Create” button.
Part 2: How to Add Subtitles to MKV on Mac?
Are you looking for MKV subtitle editors that are compatible with Mac? In this section, you can learn how to add subtitles to MKV on your Mac devices easily.
1. HD Video Converter Deluxe
This tool is highly compatible with Mac users and provides tons of advanced features. Besides being a great video editor, this tool can help you add subtitles to your MKV video files. It supports popular subtitle formats such as ASS, SSA, and SRT. If you want to embed hardcode subtitles into your MKV files, this is the most compatible tool.
Key Features
- If you want to decrease the video file size without harming its high quality, you can use this platform. This tool offers a video compressor through which you can reduce file sizes effectively.
- To combine your various video chunks or clips, this software offers a reliable video merger.
- If you are facing audio problems in your video, this tool can permanently adjust the volume according to your preference.
Step-by-Step Guide to Add Subtitles Using HD Video Converter Deluxe
Step1 Start by launching HD Video Converter Deluxe on your MacBook. Afterward, tap on the “+Video” button to import your MKV file.
Step2 On the Output Profile window, choose “MKV” as your output format. Click on the “OK” button to proceed. Now navigate to the “Edit” tab and select “Subtitle.” From there, check “Enable Subtitle.” Also, check “Extra” and then click on the “Add” button. Now you can import the subtitle file to this tool.
Step3 Click the “Done” button and then hit the “RUN” button to embed the subtitles.
2. Wondershare UniConverter
UniConverter is one of the famous tools that many people prefer due to its high reliability. Among its various advanced features, you can use its “Subtitle Editor” to add subtitles to MKV videos. You can create subtitles manually in your preferred font. Moreover, it provides an auto generator to create subtitles by extracting audio from the video file. This feature supports more than 100 languages to offer more diversity.
Key Features
- The MKV subtitle editor of UniConverter is also capable of converting text into subtitle lines through its TXT to SRT feature.
- You can remove backgrounds from your video and add a new one with a few clicks. This can make your video more captivating.
- It offers a vocal remover that can separate instrumental sounds and vocals from an audio or video file easily.
Step-by-Step Guide to Use the Subtitle Editor of UniConverter
Step1 Run UniConverter on your PC and click on “Subtitle Editor” from its homepage. A new window will open in which you have to import the MKV video file.
Step2 You can click on the “Manual Subtitles” button to add your subtitles with respect to the time duration. Or, you can tap on ‘Import Subtitles’ to upload the subtitles file from your MacBook. Other options are also available such as Text to Subtitles and Auto Subtitles.
Step3 You can edit the added subtitles by going to the “Styles” section. Here, you can change the font, color, and style of your subtitles. Once done, click on the “Save” button.
Part 3: How to Add Subtitles to MKV Online?
If you want to use online platforms to merge subtitles with MKV, here are the top two online tools.
1. Veed
Veed is an easy-to-use online tool that allows you to edit your video clips with high accuracy. Through this online tool, you can add subtitles to your MKV files in 3 different ways. You can upload subtitle files in formats like VVT, TXT, SSA, SRT, and ASS. Otherwise, you can enter the subtitles manually by selecting their color, font, size, and time duration. Moreover, you can use its voice recognition software to auto-create subtitles instantly.
Key Features
- To make your video clips funny and engaging, this tool enables you to add various emojis and stickers to your video files.
- You can explain the content in your video by adding annotations such as text boxes using this tool.
- To remove unwanted objects from your video, you can use the crop feature of Veed.
Step-by-Step Guide to Add Subtitles Using Veed
Step1 Access the official website of Veed and click on “Add Subtitles To video” from its tools. Afterward, click the “Choose Files” button and import your MKV file.
Step2 Once done with uploading, click on “Upload Subtitle File.” You can upload any of its supported subtitle files. Also, choose the language from the given box.
Step3 After importing the subtitles, you can modify them by altering their text color, color effect, style, and alignment. Once done, hit the “Export” button.
2. Flixier
Do you want an interesting tool to create subtitles? Flixier is an efficient online tool that can edit your video and audio files. Without making a user account, you can use this tool to add subtitles to MKV video files. You can upload MKV files from different platforms, such as your device, Google Drive, Zoom, Dropbox, etc. This tool also provides different ways to flawlessly create subtitles for your video files.
Key Features
- The subtitle editor of this tool offers more than 1000 fonts. Thus, you can make your subtitles look stylish by choosing a preferred font.
- To edit your videos, this tool allows you to collaborate with your friends in real-time.
- It offers more than 50 transitions that you can apply to your videos easily.
Step-by-Step Guide to Add Subtitles Using Flixier
Step1 Visit the website of Flixier and click on “Add subtitles to your videos” from its tools. Afterward, tap on “Get Started” to proceed. The tool will ask you to upload your video file.
Step2 Once you have uploaded the MKV video, click on “Text” given on the left side. Afterward, tap “Add Subtitle” to create subtitles for your video. You can add text to the given space to create subtitles. You can also tap on the “Import Subtitle” button to upload the subtitle file. To change the properties of your subtitles, you can edit them from the provided options on your screen.
Step3 Once done with creating and adjusting subtitles, click on the “Export” button.
Conclusion
Subtitles are shown at the bottom of a video and help make the video content comprehensive. If you are dealing with MKV files and want to add subtitles in an instant way, this article has provided all the details. By reading this guide, you can learn how to add subtitles to MKV files on different platforms.
To attain the best results and utilize advanced features, we will highly recommend you use Wondershare Filmora. This tool creates a comfortable environment and gives an intuitive interface to create subtitles.
Also read:
- Updated In 2024, 10 Creative AR Teaching Examples to Tell You What Is AR in Teaching
- Updated How to Make Discord GIF Avatar in Depth Guide
- New Find The Best LUTs for Lightroom
- How to Make a Video Slideshow in iMovie
- Updated 2024 Approved Camtasia Vs Captivate Which Is Better
- New How to Create Datamoshing Effect to Your Footage in After Effects?
- Best Ways to Blur Zoom Background for Free for 2024
- Updated In 2024, Best Android Apps For Creating Slow Motion Videos
- Updated 2024 Approved TOP 10 Types of Video Framing From Novice to Master
- New 8 Ways To Live Stream Pre-Recorded Video for 2024
- Want to Buy a Drone for Better Videography Creating? This Article Will Review 6 of the Best Drones on the Market for You to Consider for 2024
- New 2024 Approved How to Create Loop Videos with Filmora
- New In 2024, Phone Aspect Ratio Vertical Definition, Types and Tips
- New 2024 Approved Finding Best GIF Websites Is Easy as Pie
- New Here Is a Step-by-Step Guide to Color Correct and Color Grade a Video Professionally with Wondershare Filmora. Lets Get Going
- How to Edit Facebook eCommerce Video Ads for 2024
- Updated In 2024, Easy Ways to Create Procreate GIFs
- Detailed Steps to Rotate Videos Using OBS for 2024
- Detailed Steps to Cut a Video in QuickTime
- Updated In 2024, Discover the Top Slow Motion Camera App to Use
- Updated Detailed Guide to Merge Videos in VLC Media Player
- 2024 Approved How to Use LUTs in Premiere Pro
- New Do You Know Anything About the Video Format Supported by WhatsApp? If Not, Then This Is the Right Time to Learn About WhatsApp-Supported Video Formats for 2024
- 2024 Approved Camtasia Video Editor Review
- Updated Wondering About How to Easily Create a Slideshow on Your iPhone? Well, Take Note of some of the Finest Apps to Turn Your Vision Into Reality
- New In 2024, Competitive Guide To Use Slow Motion in After Effects
- How to Download Windows Movie Maker 2012 Version
- New Step by Step to Rotate Video in Google Photos for 2024
- Updated 7 Solutions to Cut Video on Mac without Using FFmpeg for 2024
- Updated VN Editor A Prominent Option for Adding Luts for Video Editing for 2024
- In 2024, 5 Ways to Denoise a Video
- 2024 Approved Looking for Final Cut Pro Alternative App for Your Android Smartphone or iPhone? Here Is the List of the Best FCP Alternative Apps for Android and iOS Users
- New How To Edit Youtube Videos In Easy Steps
- In 2024, Brightening a Video Doesnt Need to Be Complicated. This Article Will Discuss How to Brighten up Your Videos Easily Using Premiere Pro
- 2024 Approved Guide Create The Perfect VHS Effect Look in Premiere Pro
- New How Much Information Do You Have About MP4 Digital File Storage? Let Us Tell You More About the MP4 File Format; Get Ready to Increase Your Knowledge
- Updated Phone Aspect Ratio Vertical Definition, Types and Tips for 2024
- In 2024, New Multiple Ways How To Remove iCloud Activation Lock On your Apple iPhone 13
- In 2024, 5 Ways To Teach You To Transfer Files from Motorola Razr 40 Ultra to Other Android Devices Easily | Dr.fone
- How to Track Samsung Galaxy A54 5G Location by Number | Dr.fone
- All Things You Need to Know about Wipe Data/Factory Reset For Poco C55 | Dr.fone
- How do I reset my Realme Note 50 Phone without technical knowledge? | Dr.fone
- In 2024, How to Turn Off Google Location to Stop Tracking You on OnePlus Ace 2 | Dr.fone
- In 2024, 3 Methods to Mirror Vivo Y27s to Roku | Dr.fone
- Bypass iPhone XR activation lock with a professional tool
- In 2024, How To Enable USB Debugging on a Locked Vivo S18e Phone
- In 2024, The Most Useful Tips for Pokemon Go Ultra League On Nokia C12 Pro | Dr.fone
- In 2024, How to Transfer Data After Switching From Oppo A18 to Latest Samsung | Dr.fone
- Complete Review & Guide to Techeligible FRP Bypass and More For Samsung
- How To Restore Missing Call Logs from Oppo F23 5G
- In 2024, The Ultimate Guide to Get the Rare Candy on Pokemon Go Fire Red On Google Pixel 8 | Dr.fone
- Title: Updated In 2024, 12 Impressive AI Video Ideas for Making Engaging Video Content
- Author: Chloe
- Created at : 2024-04-24 07:08:26
- Updated at : 2024-04-25 07:08:26
- Link: https://ai-editing-video.techidaily.com/updated-in-2024-12-impressive-ai-video-ideas-for-making-engaging-video-content/
- License: This work is licensed under CC BY-NC-SA 4.0.
