Updated In 2024, 3 Best Effects to Appear on Camera

3 Best Effects to Appear on Camera
We all want to improve our video editing skills and give them more of a wow factor. A fantastic method of achieving this is using different effects and tricks on Filmora .
Appearance effects are optical illusions used to replicate imagined occurrences in a narrative or made-up universe. These effects can be effective narrative devices. As a result, they are widely employed in the theater, film, television, and video game industries. Here is what you need to do to add appearance effects to your videos:
Part 1: Why are Appearance Effects Important?
A good branding and advertising strategy must include video. You can raise the caliber of clients who utilize your product by improving the image you provide.
How can video help you build your brand? How well do you look? Although there is no quick fix to seem nice on-screen instantly, you can employ several appearance effects to enhance the general flow of your videos. Appearance effects are significant because they add a slight twist to your videos. They can help you stand out, add some humor and draw attention from your audience. These simple tricks could add extra fun and Spark to your videos.
Part 2: How to Make Cloth Appearance
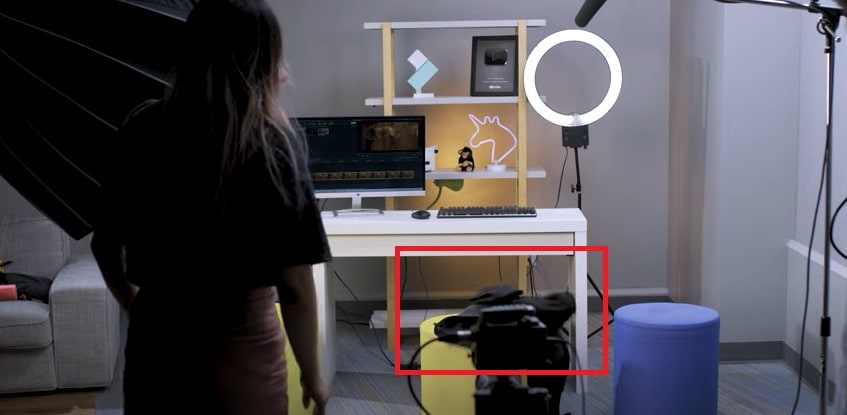
Let’s start with the first one. Before you start, make sure you put the camera on a tripod or a steady surface, so it doesn’t move while filming.
Step1 For the first shot, you must throw a jacket on a stool. Make sure it lands on the stool or wherever your talent is going to sit.
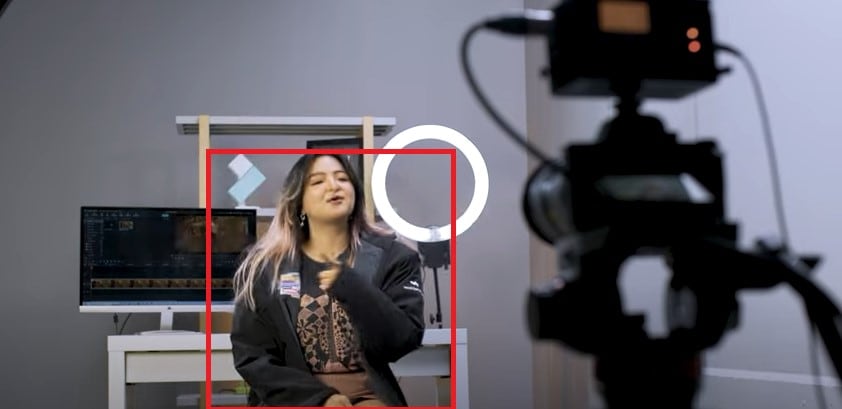
Step2 Make a shot of your talent appearing from where the jacket landed. You can add some acting skills to make this shot more realistic.
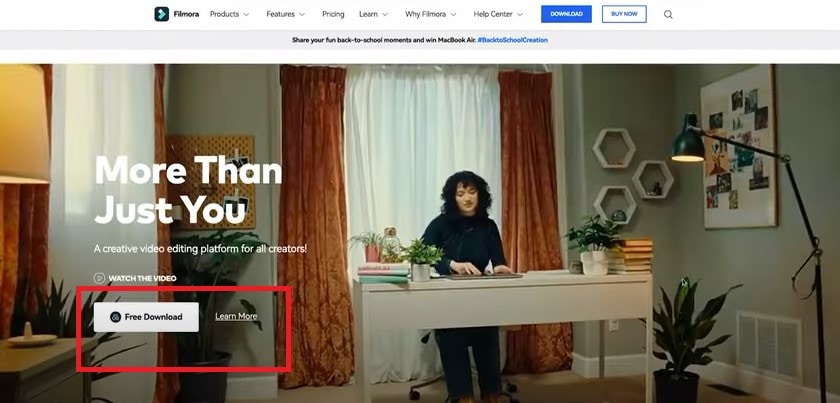
Step3 Download Filmora to edit your footage. You can get started by going to their official website.
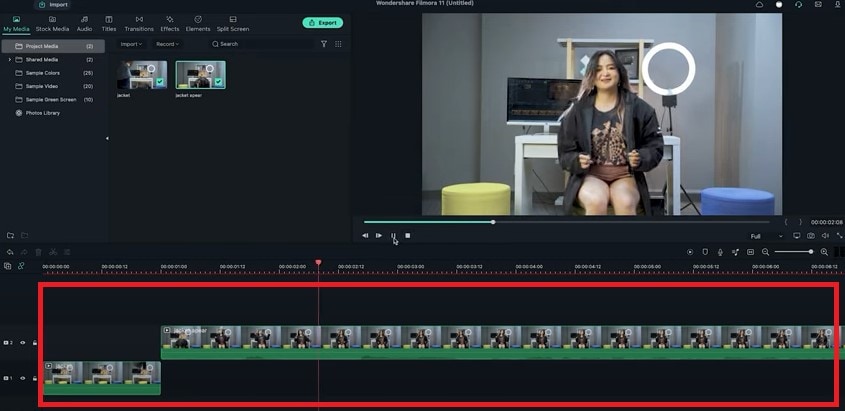
Step4 Now split the first clip on the frame where your jacket lands on the stool. Place it on the first track.
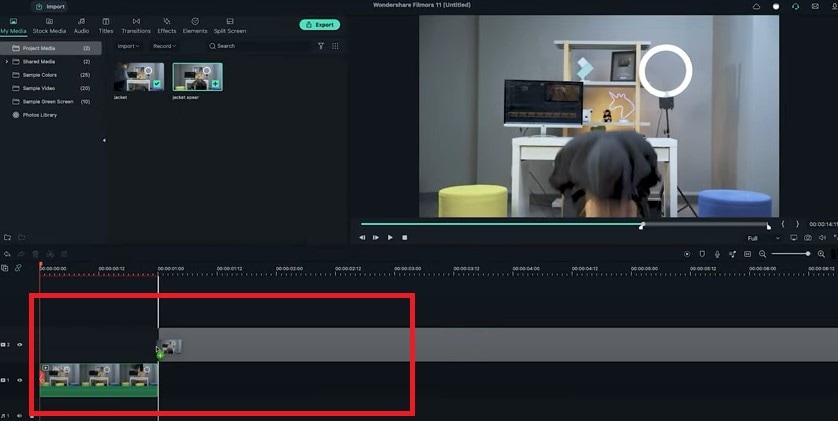
Step5 Trim the second shot until the talents start acting and place it on the second track to match the first clip.
Part 3: How to Make an Explosion Appearance
Step1 This effect is the easiest. You need to film the empty plate with just a background. Then let the talent enter the frame and jump into the place.
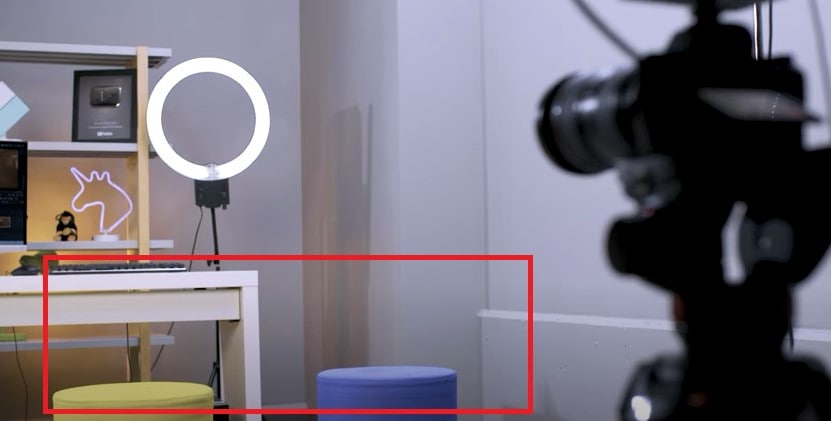
Step2 Now import the clip into Filmora and place it onto the first video track.
Step3 Freeze the frame of the empty plate with just the background and extend it as necessary. Place the clip onto the second video track and trim it until the action of the talent jump starts.
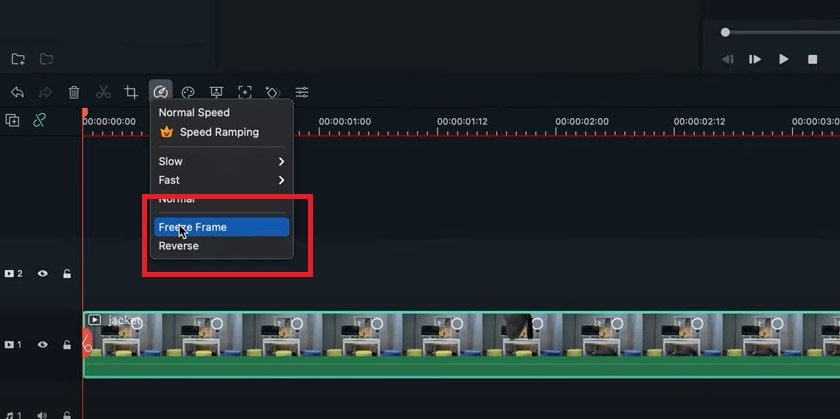
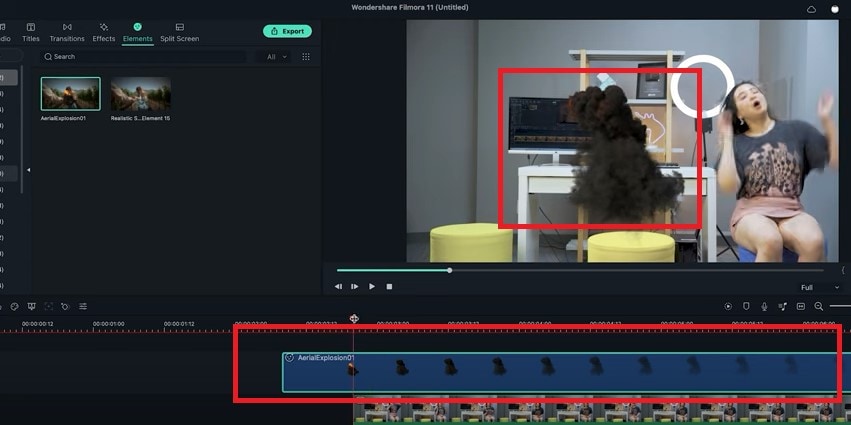
Step4 Delete the rest on the left. The trick is to use some explosion or smoke effect to hide the transition.
Step5 Use the green screen sample in the default menu here. Add some smoke effects available in film stock. Place it on the third video track and move it to hide the transition.
Part 4: How to Make Roof Appearance
The last trick here is combining the techniques from the two previous effects.
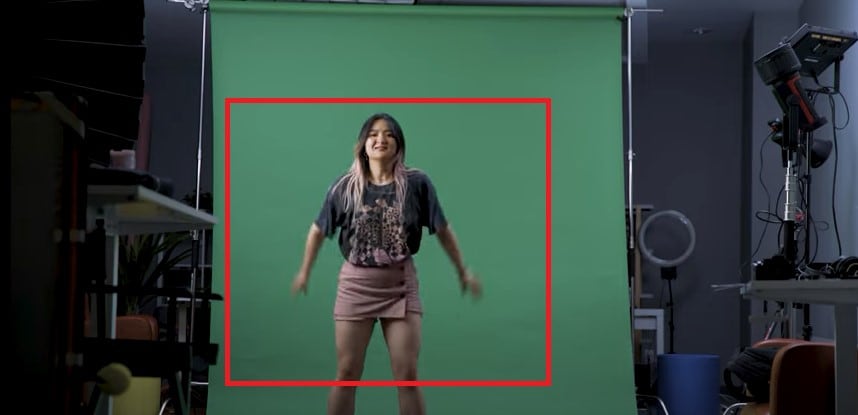
Step1 First, record the empty plate with just a background. Let the talent jump in the frame and set up a green screen for the talent to jump in front of it. It will look like they’re falling from the ceiling.
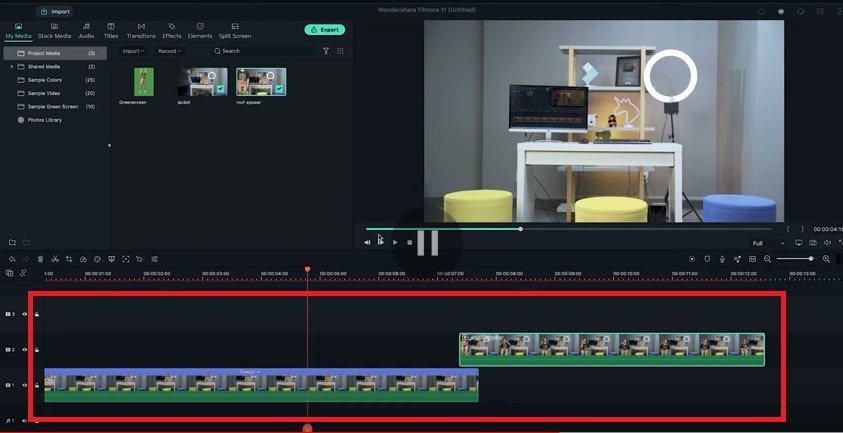
Step2 Now import the clip into Filmora again. Follow the steps from the second example so we have the subject appearing on the screen like this.
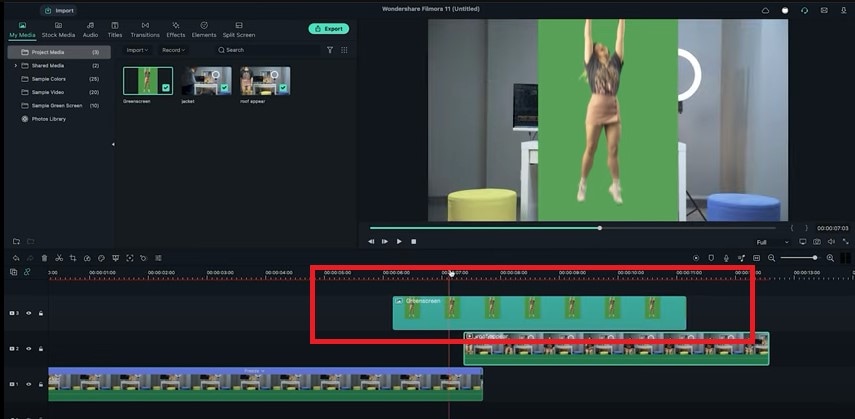
Step3 Add the green screenshot onto the third video track.
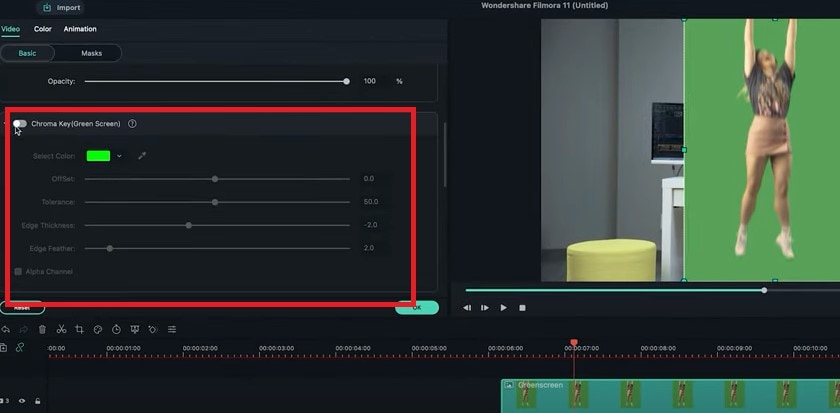
Step4 Double-click on it, activate the setting window and then key out the background using the chroma key feature.
Step5 Move the clip until it covers only the first frame of the appearing clip. Now keyframe the following subject from the outer frame to the final position.
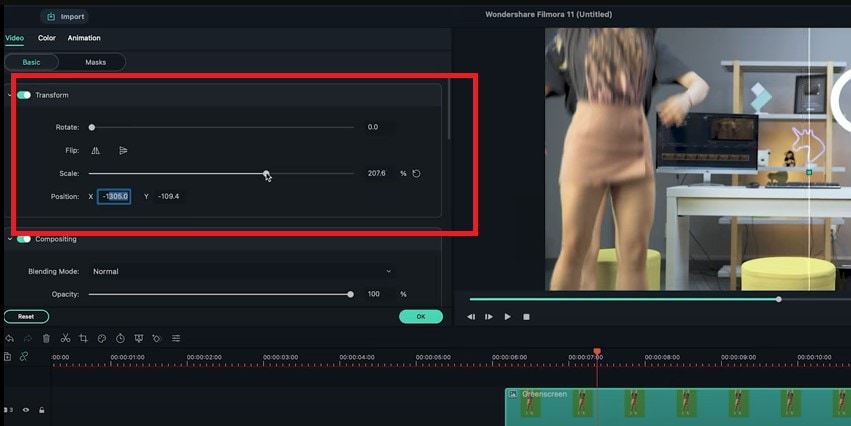
Step6 Now search for some smoke effects and put it upside down. So it looks like the ceiling is broken when the subject falls. Then add some camera shake to the fall.
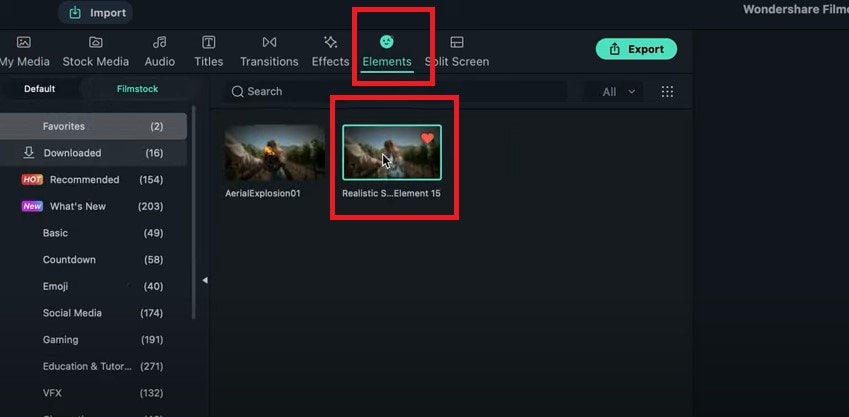
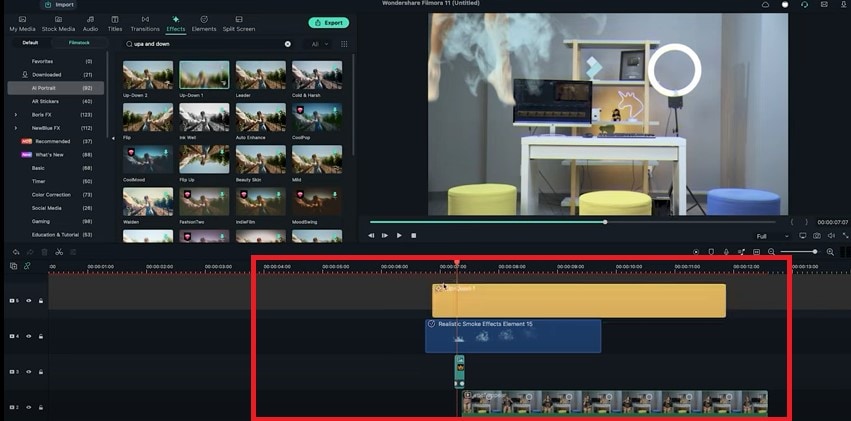
Step7 Drag the camera shake effect back to the top track and shorten it to an ideal length. You can also add some sound effects if you want to this video.
Part 5: Tips to Look Good in Your Next Video
1. Be Clear About the Topic
Intellectuals frequently complain that everyone has attention deficit disorder due to the Internet. According to studies, we only have an attention span of 8 seconds today. You need a punchy, concise message to keep viewers watching your video.
2. Don’t Forget to Smile
Individuals who smile frequently are perceived to be more confident and successful. Therefore, showing your audience that you are confident in your company and services is the best method to gain their trust.
3. Look into the Camera
Direct eye contact with the camera lens is essential. Although it may seem enticing, your sole audience is the person directly in front of you when you’re speaking.
Be mindful of the camera’s confined area. Bring it up to eye level and keep your gaze there rather than elsewhere.
Summary
There are several fantastic camera effects that you can experiment with in your videos. While some are well-known, others are less well-known and often used. We have mentioned the three fun ways to appear on camera above. We suggest using video editing software like Filmora to use these effects more effectively. You can use these appearance effects to create an atmosphere, make your story more understandable, or spice up the video.
Free Download For Win 7 or later(64-bit)
Free Download For macOS 10.14 or later
Free Download For macOS 10.14 or later
4 Simple Methods for Making a High-Quality Recap Video
Recap videos are a great way to capture the highlights of an event and share them with a wider audience. Whether you’re a professional videographer or a hobbyist, creating a recap video can be a fun and rewarding experience. But with so many different techniques and approaches, knowing where to start can be challenging.
In this article, we’ll explore four methods for making a recap video to help you capture the essence of your event and keep your audience engaged. From planning and scripting to shooting and editing, we’ll cover all the key steps in creating a high-quality recap video. Whether a seasoned pro or a beginner, you can find something valuable in this guide.
Method 1. How To Make a Recap Video from Scratch Using Filmora for Desktop
One approach to creating a recap video is to start from scratch using video editing software like Wondershare Filmora for Desktop. This powerful software offers a wide range of tools and features that allow you to create professional-looking videos easily.
Free Download For Win 7 or later(64-bit)
Free Download For macOS 10.14 or later
Whether you’re a beginner or an experienced video editor, Filmora for Desktop provides all the tools you need to create a stunning recap video that showcases the best moments from your event. With its intuitive interface and easy-to-use features, Filmora for Desktop makes it simple to bring your vision to life and create a video that truly captures the spirit of your event.
Here’s how to make the recap video from scratch using Wondershare Filmora for Desktop:
Step1 Download New Year Memory Book Pack from FilmStock

Step2 Open Filmora and go to “Effects“ > “FilmStock“ > “New Year Memory Book.”
Step3 Drag and drop media like clips, overlay, and tracks to the timeline

Step4 Import photos and videos.

Step5 Add the imported media and edit the clip.
Step6 Add some effects and overlay to the timeline

Step7 Adjust the Overlay duration of the clip.
Step8 Apply all the transitions and overlay to the clip. Edit the text and save it.

For more detailed instructions, you can watch the video tutorial:
Method 2. How To Make an Event Recap Video Using Filmora Templates on a Desktop
Another approach to creating a recap video is using templates from Filmora for Desktop. Filmora offers various templates specifically designed for event recap videos, making it easy to create a professional-looking video without spending hours editing.
These templates come pre-designed with stunning graphics, animations, and transitions and can be easily customized to match your event. With the help of the templates, you can create an event recap video in a matter of minutes without needing any prior editing experience.
Step1 Begin by creating a new project in Filmora and importing your photos and footage into the software.
Step2 Next, navigate to the “Templates“ tab and search for “Retro“ or “Recap“ to find a template that suits your event. Drag the desired template to the timeline.
Step3 Drag your footage onto the timeline, and when prompted, select “Replace“ to replace the sample footage with your own.
Step4 Customize the texts in the template to match the details of your event.
Step5 Preview the final result in the player window, and if satisfied, click “Export“ and adjust the output settings in the “Output Settings“ window.
Method 3. How to Create an End-of-Year Recap Video With Filmora for Mobile
Creating a recap video doesn’t have to be limited to desktop editing software. With Filmora for mobile, you can create a professional-looking end-of-year recap video from the convenience of your mobile device.
With Filmora for mobile, you have access to a wide range of editing tools and features, including filters, transitions, and text options, so you can create a video that truly captures the essence of your event. So whether you’re on the go or prefer to edit on your mobile device, Filmora for mobile makes it easy to create a high-quality recap video that you can share with your audience.
Step1 Start by launching the Filmora for mobile app and selecting the “Templates“ option.

Step2 Tap the “New Year“ panel for an end-of-year recap video template.

Step3 Select the template and tap on “Make Video“ to start editing.
Step4 Add your photos and footage to the template, then tap “Go.”

Step5 Preview the output. Tap “Pro Export“

Step6 Users can share the video on social platforms or tap “More“ to download the video.

Step7 Save the final video to your device

Method 4. How To Create a Memories Recap Video on Instagram Reel
Another way to create a memories recap video is using the Instagram Reel feature. Instagram Reel is a short-form video feature that allows users to create and share videos up to 60 seconds long. With Instagram Reel, you can easily create a recap video of your event by compiling short clips, adding music and text, and sharing it with your followers.
Instagram Reel provides a platform to reach a wider audience and create engaging content. It’s a great way to engage with your followers and share the highlights of your event in a creative and visually appealing way.
Step1 Start a new Reel on Instagram

Step2 Choose a template

Step3 Compile clips, add music, text, and effects

Step4 Post and share the Reel on Instagram and other platforms.

Tips for Making Event Recap Videos
When creating an event recap video, there are key tips to remember to ensure that your video is engaging and effective.
- Know your audience: Tailor the content of your video to your audience to ensure that it resonates with them.
- Highlight the key moments: Be selective and focus on your event’s most memorable and impactful moments.
- Music and Sound Design: The right music can help set the tone and mood of your video and can greatly enhance the overall impact of your video.
- Quality Footage: Make sure to focus on the quality of your footage and use various shots and angles to keep the video interesting and engaging.
- Editing: Keep the pacing of your video brisk and engaging, and use transitions, special effects, and text overlays to help tie the various elements of your video together.
- Plan the video: Careful planning is crucial for creating a great event recap video.
- Use the right tools: Use the appropriate software and equipment to create a professional-looking video.
- Test the video: Preview the video before publishing and make any necessary adjustments to ensure it meets your standards.
- Post-production: After filming, spend time on post-production, such as color correction, audio mixing, and adding text.
- Share it widely: Share the video on different platforms to reach a wider audience.
By following these tips and working with the right tools and techniques, you can create a video that truly captures the essence of your event and resonates with your audience.
Conclusion
Creating an engaging event recap video is an excellent way to share the highlights of your event with a wider audience. With the right tools and techniques, you can create a professional-looking video that truly captures the essence of your event.
Filmora for desktop, Filmora for mobile, and Instagram Reel are all great options that provide a wide range of editing tools and features to help you create a high-quality video. Whether a seasoned pro or a beginner, these tools make it easy to bring your vision to life and create a video that resonates with your audience.
Free Download For macOS 10.14 or later
Whether you’re a beginner or an experienced video editor, Filmora for Desktop provides all the tools you need to create a stunning recap video that showcases the best moments from your event. With its intuitive interface and easy-to-use features, Filmora for Desktop makes it simple to bring your vision to life and create a video that truly captures the spirit of your event.
Here’s how to make the recap video from scratch using Wondershare Filmora for Desktop:
Step1 Download New Year Memory Book Pack from FilmStock

Step2 Open Filmora and go to “Effects“ > “FilmStock“ > “New Year Memory Book.”
Step3 Drag and drop media like clips, overlay, and tracks to the timeline

Step4 Import photos and videos.

Step5 Add the imported media and edit the clip.
Step6 Add some effects and overlay to the timeline

Step7 Adjust the Overlay duration of the clip.
Step8 Apply all the transitions and overlay to the clip. Edit the text and save it.

For more detailed instructions, you can watch the video tutorial:
Method 2. How To Make an Event Recap Video Using Filmora Templates on a Desktop
Another approach to creating a recap video is using templates from Filmora for Desktop. Filmora offers various templates specifically designed for event recap videos, making it easy to create a professional-looking video without spending hours editing.
These templates come pre-designed with stunning graphics, animations, and transitions and can be easily customized to match your event. With the help of the templates, you can create an event recap video in a matter of minutes without needing any prior editing experience.
Step1 Begin by creating a new project in Filmora and importing your photos and footage into the software.
Step2 Next, navigate to the “Templates“ tab and search for “Retro“ or “Recap“ to find a template that suits your event. Drag the desired template to the timeline.
Step3 Drag your footage onto the timeline, and when prompted, select “Replace“ to replace the sample footage with your own.
Step4 Customize the texts in the template to match the details of your event.
Step5 Preview the final result in the player window, and if satisfied, click “Export“ and adjust the output settings in the “Output Settings“ window.
Method 3. How to Create an End-of-Year Recap Video With Filmora for Mobile
Creating a recap video doesn’t have to be limited to desktop editing software. With Filmora for mobile, you can create a professional-looking end-of-year recap video from the convenience of your mobile device.
With Filmora for mobile, you have access to a wide range of editing tools and features, including filters, transitions, and text options, so you can create a video that truly captures the essence of your event. So whether you’re on the go or prefer to edit on your mobile device, Filmora for mobile makes it easy to create a high-quality recap video that you can share with your audience.
Step1 Start by launching the Filmora for mobile app and selecting the “Templates“ option.

Step2 Tap the “New Year“ panel for an end-of-year recap video template.

Step3 Select the template and tap on “Make Video“ to start editing.
Step4 Add your photos and footage to the template, then tap “Go.”

Step5 Preview the output. Tap “Pro Export“

Step6 Users can share the video on social platforms or tap “More“ to download the video.

Step7 Save the final video to your device

Method 4. How To Create a Memories Recap Video on Instagram Reel
Another way to create a memories recap video is using the Instagram Reel feature. Instagram Reel is a short-form video feature that allows users to create and share videos up to 60 seconds long. With Instagram Reel, you can easily create a recap video of your event by compiling short clips, adding music and text, and sharing it with your followers.
Instagram Reel provides a platform to reach a wider audience and create engaging content. It’s a great way to engage with your followers and share the highlights of your event in a creative and visually appealing way.
Step1 Start a new Reel on Instagram

Step2 Choose a template

Step3 Compile clips, add music, text, and effects

Step4 Post and share the Reel on Instagram and other platforms.

Tips for Making Event Recap Videos
When creating an event recap video, there are key tips to remember to ensure that your video is engaging and effective.
- Know your audience: Tailor the content of your video to your audience to ensure that it resonates with them.
- Highlight the key moments: Be selective and focus on your event’s most memorable and impactful moments.
- Music and Sound Design: The right music can help set the tone and mood of your video and can greatly enhance the overall impact of your video.
- Quality Footage: Make sure to focus on the quality of your footage and use various shots and angles to keep the video interesting and engaging.
- Editing: Keep the pacing of your video brisk and engaging, and use transitions, special effects, and text overlays to help tie the various elements of your video together.
- Plan the video: Careful planning is crucial for creating a great event recap video.
- Use the right tools: Use the appropriate software and equipment to create a professional-looking video.
- Test the video: Preview the video before publishing and make any necessary adjustments to ensure it meets your standards.
- Post-production: After filming, spend time on post-production, such as color correction, audio mixing, and adding text.
- Share it widely: Share the video on different platforms to reach a wider audience.
By following these tips and working with the right tools and techniques, you can create a video that truly captures the essence of your event and resonates with your audience.
Conclusion
Creating an engaging event recap video is an excellent way to share the highlights of your event with a wider audience. With the right tools and techniques, you can create a professional-looking video that truly captures the essence of your event.
Filmora for desktop, Filmora for mobile, and Instagram Reel are all great options that provide a wide range of editing tools and features to help you create a high-quality video. Whether a seasoned pro or a beginner, these tools make it easy to bring your vision to life and create a video that resonates with your audience.
Adobe Lightroom Color Grading Tutorial
The main focus of color grading is changing the colors and tones in your photographs. Recent updates to Lightroom and Photoshop’s color grading functionality have improved its use and increased its capabilities. Color grading is ideal for giving your photograph a bit extra interest and improving the lighting.
All forms of photography benefit from and depend on color grading. The color grading tools in Lightroom and Photoshop will be especially appreciated by landscape and portrait photographers. If you’re wondering what happened to split toning, it was replaced by the Color Grading module, which is why split toning is now referred to as color grading.
1. Getting to Color Grading
Select the photo you want to modify and go to the develop module in Lightroom to access the Color Grading tool. Then, move your cursor down to the Color Grading menu on the right side of the screen. To see three separate color wheels, choose this.
The same choices are available in Photoshop’s Camera Raw Filter. Simply scroll down on the right side of the screen once you’ve opened a photo in the Camera Raw Filter until you see Color Grading. The process of color grading is identical in Photoshop and Lightroom. I’ll be using Lightroom to demonstrate the example photographs for the purposes of this blog article.
2. How to Use Color Grading
The first thing you’ll notice is that there are actually three identical color wheels. Each color wheel, though, has a distinct purpose. Midtones are controlled by the top wheel, shadows, and highlights by the left and right wheels, respectively.
Before moving on to the color grading stage, it’s crucial to notice that you should balance the temperature and tint of your image. Instead of balancing the colors to create the image, color grading is a technique for enhancing the colors in the image.
Avoid using the midtones color wheel when using the Color Grading tool for the first time. First, try modifying only the highlights and shadows wheel. Warm hues in the highlights and cold colors in the shadows appear great in the majority of photographs. However, when using these sliders to create some truly incredible photos, you may let your creativity run wild!
I’ve added some yellow (warmth) to the highlights and some blue (coolness) to the shadows in this particular example. As a result, the sunlight in my image appears to be very warm and inviting, and the shadows take on a colder, bluer appearance.
The color wheels are actually fairly easy to use. To select a color, merely click and drag it anywhere on the color wheel. The color will become stronger the further you are from the circle’s center. Each circle has a hidden slider bar underneath it. This modifies the related color wheel’s brightness value. In other words, you can brighten or darken the highlights by adjusting the bar underneath the highlights color wheel. The ability to quickly change the brightness levels in the highlights, shadows, or midtones is a convenient feature.
Blending and balancing are the other two parameters that you can modify. You can alter how well the color in the highlights, midtones, or shadows blend with one another with the blending slider. The colors will blend in more naturally by moving the blending slider higher.
The amount of the image that is judged to be in the highlights, shadows, or midtones can be changed with the balance slider. For instance, if I move the balance slider to the right, less of the highlights will show the adjustment. Only the highlights with the highest brightness will be affected by the change.
3. HSL/Color Panel
Move to the HSL/Color Panel, which stands for Hue, Saturation, and Luminance, after your image is ready to use. It is located under Tone Curve in the Develop Panel. This adjustment panel, in contrast to the ones stated before, will let you change different colors in your image independently of one another. Hue, Saturation, and Luminance are the three modifications that each color will receive.
4. Hue
Hue is measured in terms of the color wheel’s degrees. It’s possible to change the color’s real shade in this panel. For instance, you can modify the turquoise or blue to a more greenish tone if your scenario is a beach (as in our example photo). It’s advisable to begin making adjustments to your panel’s Hue before moving on to the others.
5. Saturation
The strength of the hue is known as saturation. (Remember that this HSL panel modification only affects the saturation of individual colors, not the saturation of the entire image.) In order to achieve a more subdued, muted appearance for this example, I reduced the Saturation on the aqua, blue, and green hues. To increase the intensity of your shot, you can do the exact reverse. Find the tweaks that suit your photo and the appearance you want to achieve best.
6. Luminance
Each color’s luminance measures how brightly it reflects light. Use this tool to brighten or darken specific areas of your image (it works especially well to provide contrast to black and white images). To make the water and sky behind the model darker in this example photograph, I decreased the Luminance setting on the aqua panel.
7. Adjustment Brush
Further isolate a section of your image using the Adjustment Brush so that you can change the Hue and any other parameters you like. Your Adjustment Brush is the final brush icon on the top of your editing panel. Adjust your Hue and begin painting on your image where you wish to change the color to begin color grading.(At the bottom of the Adjustment Brush Panel, you can adjust the brush’s size or feathering.)
This is perfect if you only want to edit one part of your shot. You can keep using the adjustments after you’ve painted your image to witness more changes as they happen in real time.
Here are a few tips to set you on the correct course because color grading might take some time and practice to master. Shooting in RAW will give you the most dynamic control over your colors, so be sure to do this. Try your best to start with a good photograph and to alter your default settings so that the canvas is even. Use color psychology to visually transmit the mood or feeling you wish to portray through color grading.
Utilize each panel to practice and experiment. There is no right or wrong method to color grade; it all depends on how you want your photographs to look stylistically. Press the Reset button in the right -hand corner of your panel to return to your original image.
Free Download For Win 7 or later(64-bit)
Free Download For macOS 10.14 or later
Free Download For macOS 10.14 or later
How To Add Scrolling Text Effect
Almost every video has some titles and texts to show to the viewers. Instead of showing static texts on the video, everyone loves to add animated texts so that the video looks attractive and engaging. If you want to show credits and titles in intro and outro of the video, you will usually see texts scrolling vertically on the video.
If you want to show any text repeatedly, you can add horizontal scrolling text effect to your video so that the repeated text does not look weird. You will need a video editor to add scrolling rolling text effect to texts and titles in your video. We will illustrate in simple steps how to animate text on scroll using free as well as premium video editors.
Part 1. Add Scrolling Text to Video with Filmora
Wondershare Filmora is a professional video editor and if you are a Windows PC or Mac user, you can use Filmora to add scrolling text effect. In fact, Filmora is the most intuitive video editor where you can add scrolling text effect instantly without any prior experience in video editing.
Filmora has the best collection of text effects and you can add scrolling text anywhere and customize the effect as per your requirements. As a matter of fact, you can create a video with scrolling text effects only from scratch. Here are the steps to add scrolling text to video using Filmora.
Free Download For Win 7 or later(64-bit)
Free Download For macOS 10.14 or later
Step1 Download and install Filmora on your Windows PC or Mac. Launch the application and click on New Project on the welcome screen. You can also go to File> New option to get started.

Step2 Go to File> Import Media option to bring in your video file user Project Media folder. Thereafter, drag and drop the file into Timeline to get started.

Step3 Go to Titles option located at the top, and on the left panel, go to End Credits option. You will see various scrolling text effects. Place your mouse pointer on them to check their preview.

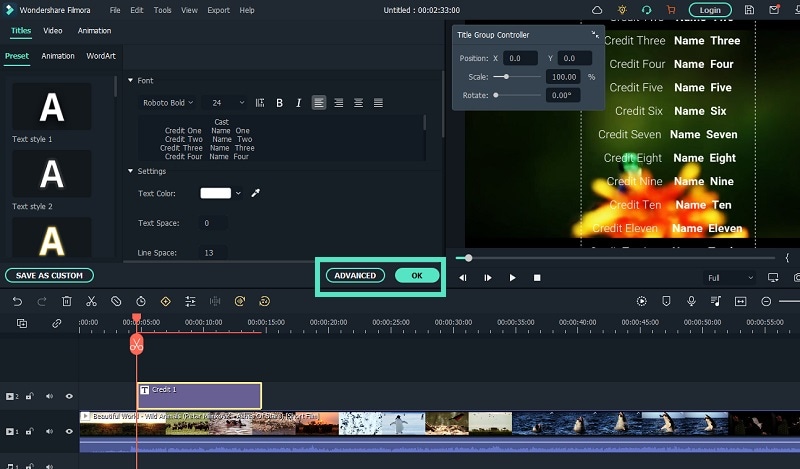
Step4 Once you are satisfied with any scrolling text effects, drag and drop it into Timeline above the video clip layer. Adjust the position of the text effect so that it appears on the video as expected. You can stretch the duration of the effect as per your preference.
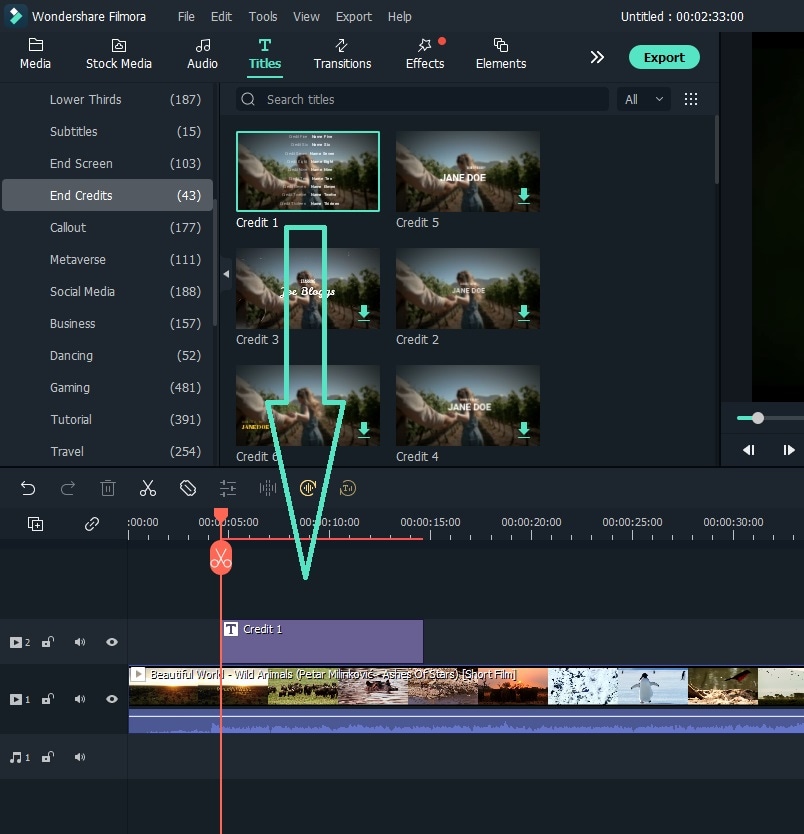
Step5 Double-click on the text layer on Timeline and customize the text and style as you feel. Thereafter, you can click on Advanced button for more customization. Finally, click on OK button.
Part 2. Use After Effects to Create Scrolling Text
Adobe Affect Effects is an extremely popular video editor and there are so many different text effects available to apply to your video. After Effects scrolling text effects come with different variations so that your titles and texts look amazing on the screen. Apart from the available text effects, you can also download and get more text effects from external sources. Here are the steps to add text scroll after effects to your video.
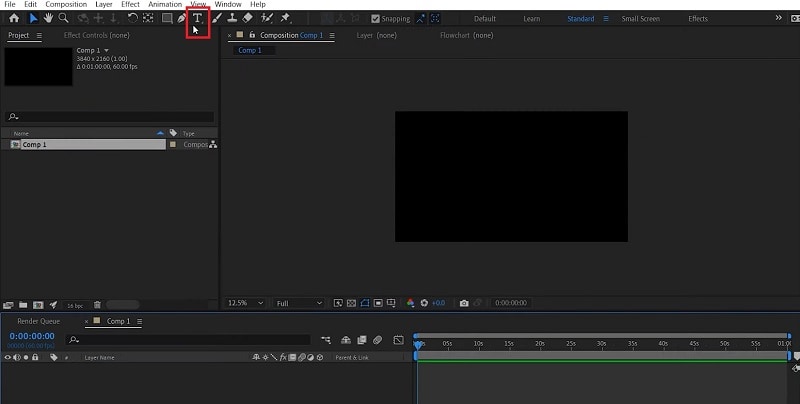
Step1 Launch After Effects and type your text with the Text tool from the top bar.
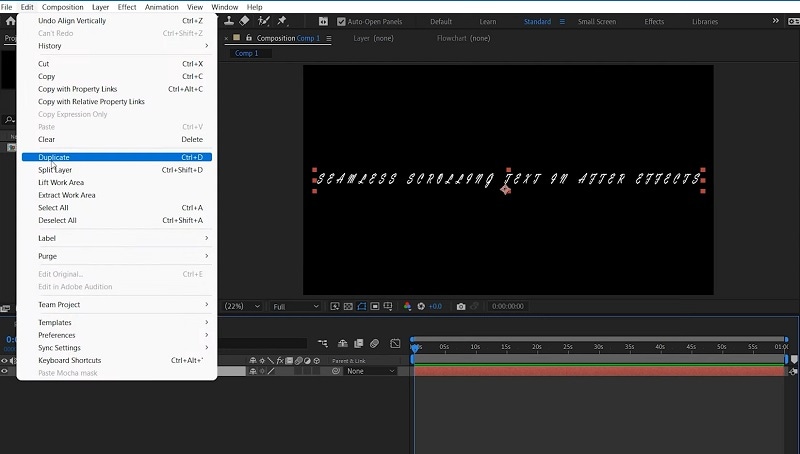
Step2 Duplicate the written text by going to Edit> Duplicate.
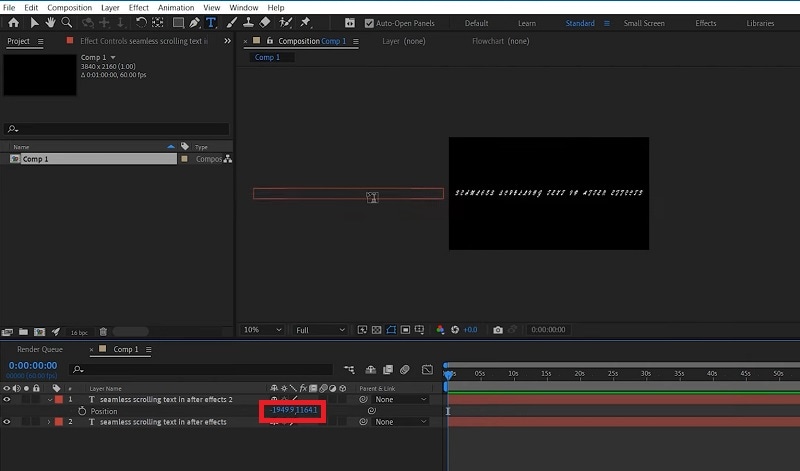
Step3 Move the duplicate text out of the visible screen to the left by changing its position value.
Step4 Turn on Position option and change the duration and add a keyframe.
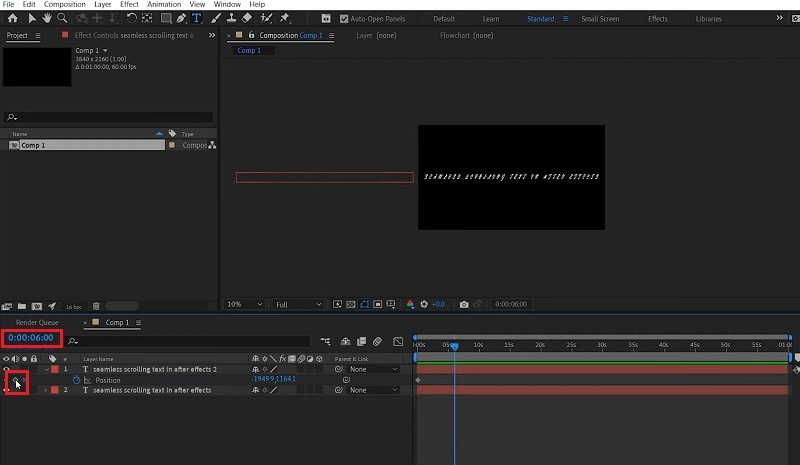
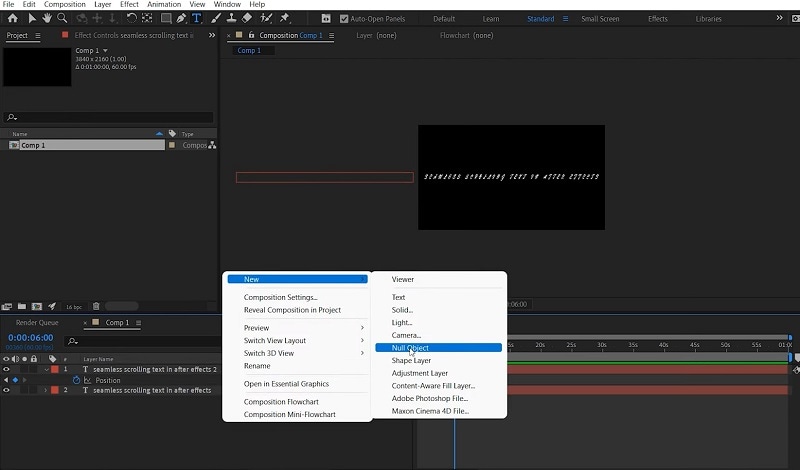
Step5 Right-click on Composition setting and go to New> Null Object. Change the duration and make it the same as the Duplicate layer and add a keyframe there. Besides, move the null object out of the visible screen to the right.
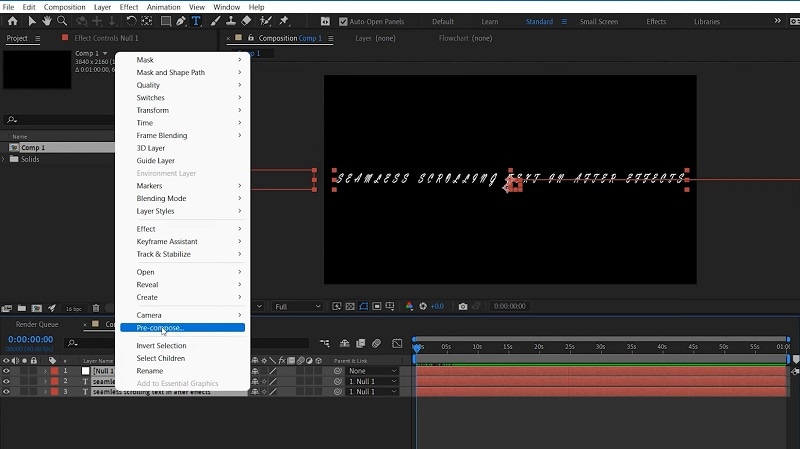
Step6 Select all layers and right-click and select Pre-compose.
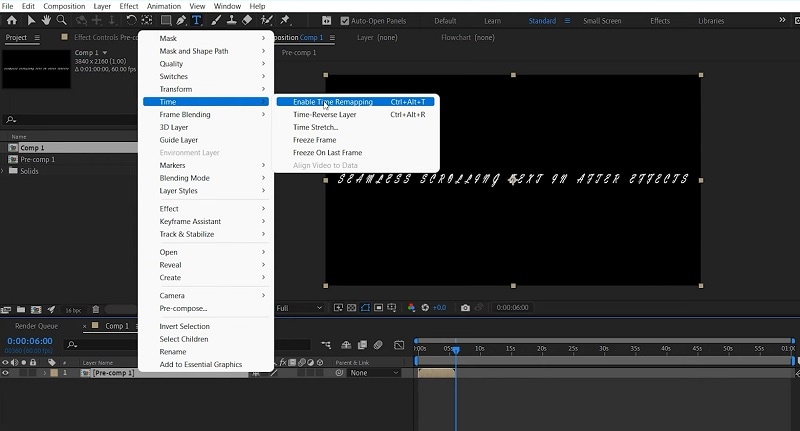
Step7 Right-click on Pre-comp and go to Time> Enable Time Remapping. Play the video and you will see the scrolling effects that you see in end credits in videos.
The above-mentioned steps are for horizontal scrolling text effect. If you want vertical scrolling text After Effects, you have to position the duplicate text and null object vertically and the required text will scroll vertically.
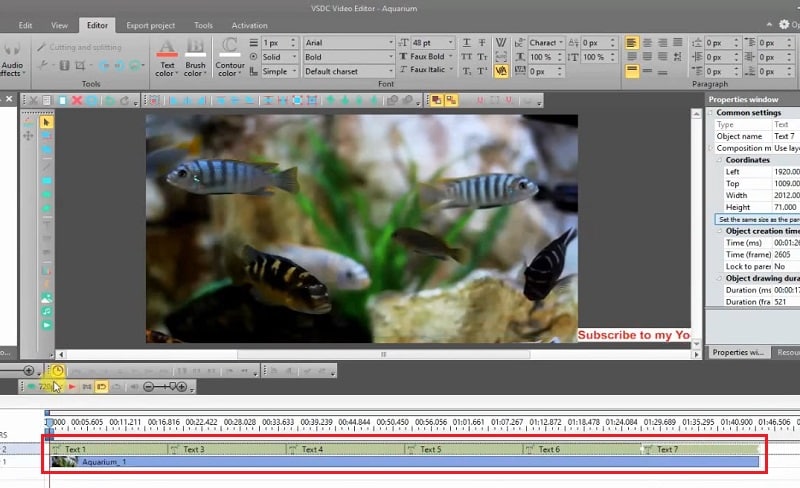
Part 3. Add Scrolling Text Effect with VSDC Free Video Editor
So far, we have mentioned premium video editors to add scrolling effect to the text in your video. Now we are going to mention a free video editor where you can add scrolling effect instantly. If you are a Windows user, you can install VSDC free video editor. There are several scrolling text effects available on the video editor through which you can move the text horizontal and vertical. Here are the steps to animate text on scroll using VSDC free video editor.
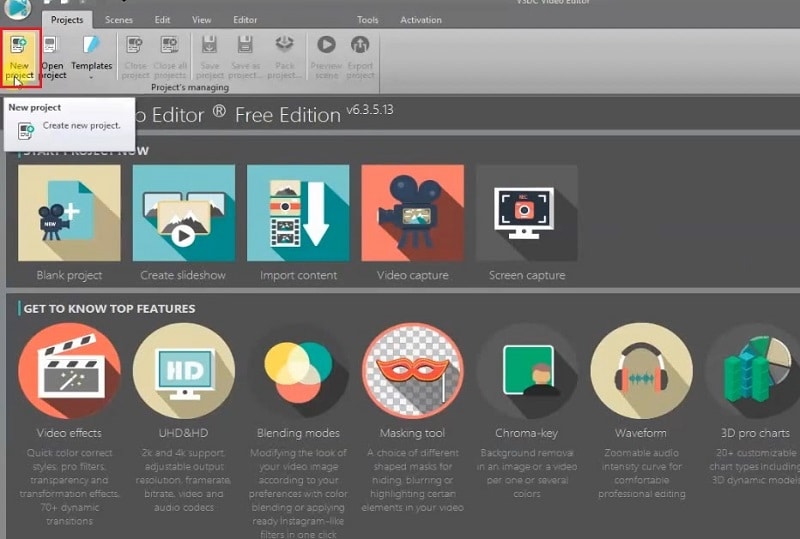
Step1 Install VSDC free video editor and click on New Project option. Click on Finish button and select the video from your hard drive where you want to add text.
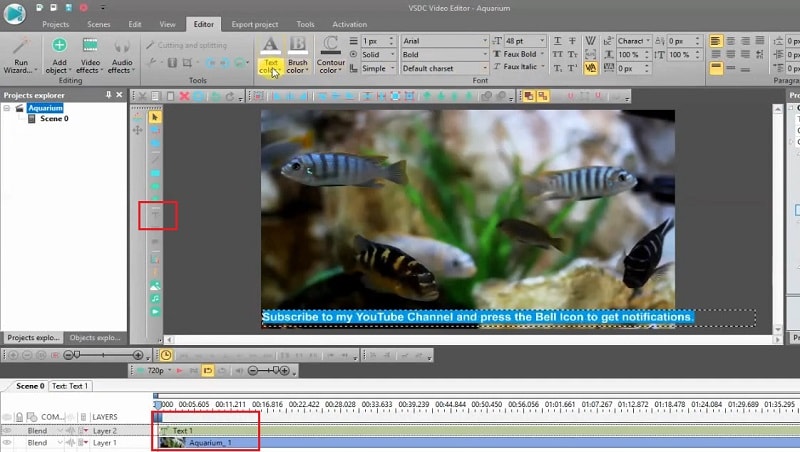
Step2 Select Type tool from the left panel and draw a box on the video where you can type your text. Make sure the text layer is on top of the video layer in Timeline.
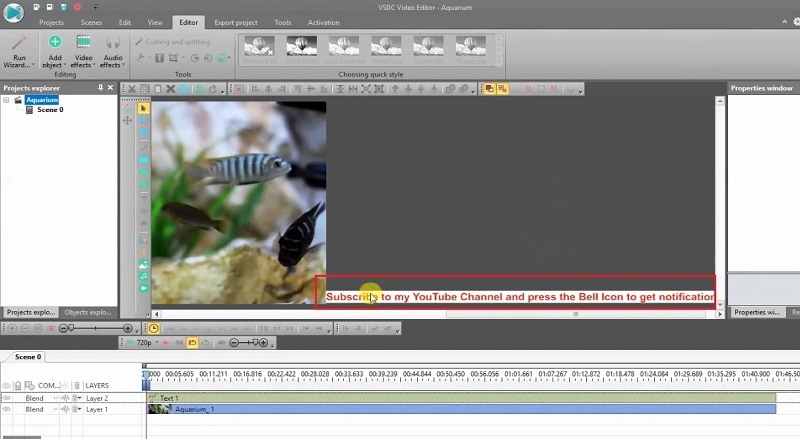
Step3 Type your text and if you want to scroll it like horizontal scrolling text After Effects, place the text out of the viewer on the right side.
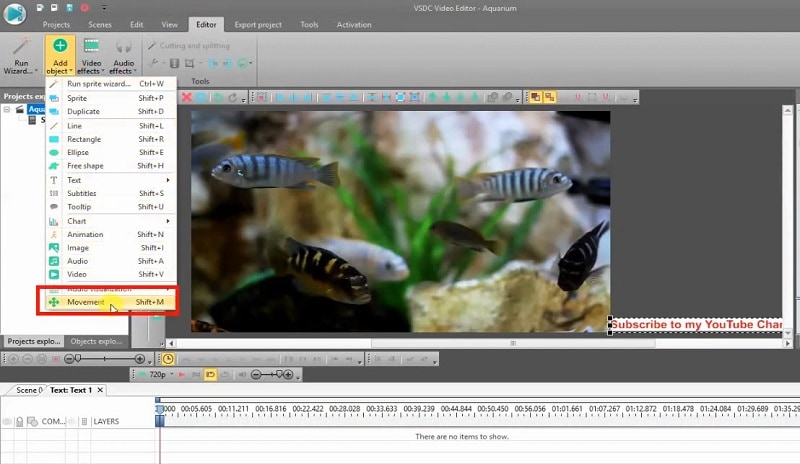
Step4 Double-click on text layer and go to Add Object and click on Movement.
Step5 You will find the mouse pointer change and you have to click on the spot to the left side where you want the text to go in scrolling effect.

Step6 Shorten the duration of the text layer and then copy the text layer from Timeline. Paste it again and again until you cover the video layer completely so that the scroll effect goes on as long as the video runs.
Takeaway
Adding scrolling text to your video should no more be an issue for you. If you are using After Effects, we have illustrated how you can create horizontal and vertical scrolling effect for text in your video perfectly. If you prefer a free video editor, you can use VSDC free video editor as well. But we recommend Wondershare Filmora where you can add scrolling effects to your text instantly, and there is a wide range of amazing scrolling effects available to apply to your video.
Free Download For macOS 10.14 or later
Step1 Download and install Filmora on your Windows PC or Mac. Launch the application and click on New Project on the welcome screen. You can also go to File> New option to get started.

Step2 Go to File> Import Media option to bring in your video file user Project Media folder. Thereafter, drag and drop the file into Timeline to get started.

Step3 Go to Titles option located at the top, and on the left panel, go to End Credits option. You will see various scrolling text effects. Place your mouse pointer on them to check their preview.

Step4 Once you are satisfied with any scrolling text effects, drag and drop it into Timeline above the video clip layer. Adjust the position of the text effect so that it appears on the video as expected. You can stretch the duration of the effect as per your preference.

Step5 Double-click on the text layer on Timeline and customize the text and style as you feel. Thereafter, you can click on Advanced button for more customization. Finally, click on OK button.

Part 2. Use After Effects to Create Scrolling Text
Adobe Affect Effects is an extremely popular video editor and there are so many different text effects available to apply to your video. After Effects scrolling text effects come with different variations so that your titles and texts look amazing on the screen. Apart from the available text effects, you can also download and get more text effects from external sources. Here are the steps to add text scroll after effects to your video.
Step1 Launch After Effects and type your text with the Text tool from the top bar.

Step2 Duplicate the written text by going to Edit> Duplicate.

Step3 Move the duplicate text out of the visible screen to the left by changing its position value.

Step4 Turn on Position option and change the duration and add a keyframe.

Step5 Right-click on Composition setting and go to New> Null Object. Change the duration and make it the same as the Duplicate layer and add a keyframe there. Besides, move the null object out of the visible screen to the right.

Step6 Select all layers and right-click and select Pre-compose.

Step7 Right-click on Pre-comp and go to Time> Enable Time Remapping. Play the video and you will see the scrolling effects that you see in end credits in videos.

The above-mentioned steps are for horizontal scrolling text effect. If you want vertical scrolling text After Effects, you have to position the duplicate text and null object vertically and the required text will scroll vertically.
Part 3. Add Scrolling Text Effect with VSDC Free Video Editor
So far, we have mentioned premium video editors to add scrolling effect to the text in your video. Now we are going to mention a free video editor where you can add scrolling effect instantly. If you are a Windows user, you can install VSDC free video editor. There are several scrolling text effects available on the video editor through which you can move the text horizontal and vertical. Here are the steps to animate text on scroll using VSDC free video editor.
Step1 Install VSDC free video editor and click on New Project option. Click on Finish button and select the video from your hard drive where you want to add text.

Step2 Select Type tool from the left panel and draw a box on the video where you can type your text. Make sure the text layer is on top of the video layer in Timeline.

Step3 Type your text and if you want to scroll it like horizontal scrolling text After Effects, place the text out of the viewer on the right side.

Step4 Double-click on text layer and go to Add Object and click on Movement.

Step5 You will find the mouse pointer change and you have to click on the spot to the left side where you want the text to go in scrolling effect.

Step6 Shorten the duration of the text layer and then copy the text layer from Timeline. Paste it again and again until you cover the video layer completely so that the scroll effect goes on as long as the video runs.

Takeaway
Adding scrolling text to your video should no more be an issue for you. If you are using After Effects, we have illustrated how you can create horizontal and vertical scrolling effect for text in your video perfectly. If you prefer a free video editor, you can use VSDC free video editor as well. But we recommend Wondershare Filmora where you can add scrolling effects to your text instantly, and there is a wide range of amazing scrolling effects available to apply to your video.
Also read:
- [New] In 2024, From Bland to Brilliant Elevate Your Images in Canva
- [Updated] In 2024, Now’s VR Tech Landscape
- 2024 Approved How to Create Intro with Legend Intro Maker
- 2024 Approved Learn How to Make Modern TikTok Velocity Dance Videos in Filmora Just Like the Ones You See on TikTok and Instagram Reels
- Create Slide Masking Effect Intro
- How to Download and Use Windows Movie Maker 10 for 2024
- In 2024, 3 Ways to Change Location on Facebook Marketplace for Realme 12 5G | Dr.fone
- In 2024, How to Change Lock Screen Wallpaper on Vivo
- In 2024, How to Migrate Android Data From Tecno Spark 10 5G to New Android Phone? | Dr.fone
- Learn the Ins and Outs of Online Photo Cropting Tools
- Shoot in Slow Motion Essential GoPro Hero 10 Techniques
- Updated Best Ideas for Time Lapse Video
- Updated Have You Ever Tried Using the Premiere Pro Motion Blur Plugin? Read This Article to Learn How to Efficiently Use the ReelSmart Motion Blur Plugin in Premiere Pro
- Title: Updated In 2024, 3 Best Effects to Appear on Camera
- Author: Chloe
- Created at : 2025-02-27 22:44:25
- Updated at : 2025-03-04 09:31:48
- Link: https://ai-editing-video.techidaily.com/updated-in-2024-3-best-effects-to-appear-on-camera/
- License: This work is licensed under CC BY-NC-SA 4.0.
