
:max_bytes(150000):strip_icc():format(webp)/YoungAsianmanusinglaptopandreadingnewspaperonplane-59960904685fbe00103478bd.jpg)
Updated In 2024, 5 Best Video Denoisers
Top 5 Best Video Denoisers
We all know that our recorded videos are not always perfect – when we use a mobile phone or digital cameras to shoot, our clips may contain hiss, compression and particles. These are the impurities that make our videos look uncomfortable, but it’s not a final result impossible to altar – help can come in the form of several video denoise software.
Editing is the guarantor that makes sure we can do different operations and achieve our desired results – computer programs, tools, opportunities that give us a hand in this process are kind of endless.
So, sometimes it’s really difficult to choose among so many options that come into waves. And if we choose our preferred ways, some people might not agree with us. Even so that it is quite subjective, we can still explain which tools and software we like to modify our videos, and fight with the impurities they have.
It looks amateur if the video is grainy, even if it is night shooting. We can get rid of the noise when we add lights or shoot in well-lit places, but there are some situations we can just depend on the ISO. So, for these grainy videos, there is a thing called denoising – when you get rid of the grains and make your shots as clear as possible. There are different ways to do this, and that happens in different software as well. What are the 5 best video denoisers in 2024 for us to work with? That, as we have already mentioned, might be something very subjective, but here is our selection: Wondershare Filmora, Neat Video, Shotcut, Adobe Premiere Pro, and DaVinci Resolve
Wondershare Filmora X
Wondershare Filmora X offers to change our damaged scene into something more acceptable. How to operate it? - You need to go to the Effects panel and type: “Smart Denoise”. right-click on the video and choose Edit Properties.

This ensures you see the Smart Denoise, where you can change opacity of the clip, threshold and radius.

Reduce Opacity until you are satisfied with the result. The box next to Smart Denoise will show you the scene before and after the effect.
Bonus tip: Wondershare Filmora audio denoise
We already explained how video denoising works, and we will go on with our selection and explanatory article about the process, but, as we are on the Filmora topic, we might as well mention that denoising might mean another thing too – which, in this case, regards audio background noise. It means to remove unwanted hum from the audio in order for it to become more hearable. So, doing this in Wondershare Filmora works in a quite easy way. Use the guideline:
Drag and drop your video into the timeline. Right-click on the clip and hit Detach Audio, which will let you separate audio and video from one another and make sure you can work on them one by one.

Double-click on the audio track and have access to the editing panel, where you can see Remove background noise – it is not needed to emphasize what this option does for you!

That’s it – you are done, but keep in mind that there is a second way to achieve the same result as well, but this in case you don’t want to detach the audio: Double-click on the video clip in the timeline, the editing panel opens, so switch to Audio. Checking the box next to Remove background noise will show that there are three levels – weak, mid, and strong, and of course, you can choose to your liking!
If the voice recording doesn’t sound natural anymore, you can do the following: Click on Customize and Customize Equalizer window will open.

On the left, you can see the low tunes, while the highs are on the right. Background noises are often on the left, so you can lower them to get rid of them, but in order to have a more natural sound, raise the middle ones a little – and you are done when you are content with the sound!

So, hmm… back to the original topic – denoising a video, shall we?..
Neat video
Neat Video kind of, speaks for itself… it is a powerful video editing tool suitable for Windows, macOS and Linux. It aims to reduce the digital noise, flicker, dust, scratches and other defects in the captured videos to improve the visual quality of the videos.
It is a plug-in for Premiere Pro, that does more or less what the product noise says: it makes grainy video look neater. It’s very easy to use and
How to do that in Neat Video? Here are the steps:
Find the clip you want to reduce the noise of and search for the neat video effect in the Effects Panel.

The video editors mostly use the SR version of it, because it seems faster and has kind of a better performance.

Then, you’ll have to drag the neat video plug-in to the clip to your choosing, take your attention to the Effect Controls panel on the left, and find: fx Reduce Noise v5 (SR) – press the button saying Prepare and this will open up the Build button as well, which wil open the Neat video effect window.

There, you’ll need to click on the Auto Profile. Selection window will appear, which you can move around the scene and resize, in order to select the noisy area of your footage. It is recommended to find the darkest or grainiest area there and select judging by this.

On the left side, you will find Filter Settings: under Spatial, you can play with the Noise Reduction Amount and Noise Level.

Then, you will hit Apply and – done, you can instantly see the results!
Shotcut
What about Shotcut? It is a free, open-source and cross-platform video denoiser for Windows operating system. It is also an outstanding video editor with trimming, splitting, color correction and other tools.
In order to reduce the noise there, do the following: first off, find filters, open that window and type in: Noise. This will open the options, and several of them are for noise reduction.


Choose Reduce Noise: Wavelet, add it to the Video and then feel free to modify the settings, such as: Decompose, Threshold, Percent. You can check and uncheck the effect in order to see the before-after difference. Then, click Apply button and it is ready to go!
Anyway, you can also try other similar effects such as Reduce Noise: HQDN3D and Reduce Noise: Smart Blur.
Adobe Premiere Pro
Even though we discussed video denoising in Adobe Premier Pro but with the help of a plug-in called Neat Video, reducing the noise in the video in this software can be achieved without the plug-in as well, through using effect which is called Median. And, Premiere Pro kind of deserves to be mentioned, so, let’s go for it!
Add the desired footage into the Timeline of Premiere Pro. Then, find the Effects Panel, where our wanted Median can be found –drag and drop the effect to the clip.

The Median should modify the grainiest parts of the whole clip, so in order to do this, we need to use masks. In the Effects Control panel, select the mask shape for the clip – the options are: rectangle, circle, or pen tool. With Pen tool, you move the Mask around the screen and resize it – the covered area will be affected.

If you change Feather setting to 100, the effect will lose a sharp edge and instead, there will be a smooth border.

So, you might think it is needed to repeat these steps several time to create masks in different areas, in order to cover all of the grainy space of the scene.
And, at last, to reduce the noise, adjust the effect settings.

Actually, Median just blurs the grainy parts, without directly taking them away. Lastly, you can get to know the Radios settings, which will help you to achieve your most desired look!
Davinci Resolve
DaVinci Resolve is also worth mentioning in this list, in a way because it is also different from other video editors. Let’s see how it works and, meanwhile, differs:
Add the footage into the timeline. Find the fusion tab underneath the timeline panel.

There, MediaIn1 and MediaOut1 will appear, and first, click on MediaIn1, - the scene will be shown in the first viewer – and MediaOut1 by default is appearing in the second. So, stay on MediaIn1, hit shift+spacebar, and find Remove Noise (RN). Click Add, which adds the Remove Noise1 node. On the top right corner there is an Inspector, which opens all the properties you can modify.

After going only into the second viewer, and in the top bar there is channel icons. Open it and click on red, but don’t get alarmed when your footage turns black and white – it’s just for a while. Go back to the Inspector, increase Softness Red and Detail Red.

This step helps remove grain from the red channel. Then repeat the same for green and blue channels. After finishing go to the same channel button and set it to “back to color”. The clip will be colorized again and now be clearer, compared to the first viewer.

So, Evrika – we hot to know 5 best video denoisers in 2024, with the addition of audio background noise removal in Wondershare Filmora – hope you enjoyed it, and hope this will help you create better videos for yourself and your viewers!
This ensures you see the Smart Denoise, where you can change opacity of the clip, threshold and radius.
Reduce Opacity until you are satisfied with the result. The box next to Smart Denoise will show you the scene before and after the effect.
Bonus tip: Wondershare Filmora audio denoise
We already explained how video denoising works, and we will go on with our selection and explanatory article about the process, but, as we are on the Filmora topic, we might as well mention that denoising might mean another thing too – which, in this case, regards audio background noise. It means to remove unwanted hum from the audio in order for it to become more hearable. So, doing this in Wondershare Filmora works in a quite easy way. Use the guideline:
Drag and drop your video into the timeline. Right-click on the clip and hit Detach Audio, which will let you separate audio and video from one another and make sure you can work on them one by one.
Double-click on the audio track and have access to the editing panel, where you can see Remove background noise – it is not needed to emphasize what this option does for you!
That’s it – you are done, but keep in mind that there is a second way to achieve the same result as well, but this in case you don’t want to detach the audio: Double-click on the video clip in the timeline, the editing panel opens, so switch to Audio. Checking the box next to Remove background noise will show that there are three levels – weak, mid, and strong, and of course, you can choose to your liking!
If the voice recording doesn’t sound natural anymore, you can do the following: Click on Customize and Customize Equalizer window will open.
On the left, you can see the low tunes, while the highs are on the right. Background noises are often on the left, so you can lower them to get rid of them, but in order to have a more natural sound, raise the middle ones a little – and you are done when you are content with the sound!
So, hmm… back to the original topic – denoising a video, shall we?..
Neat video
Neat Video kind of, speaks for itself… it is a powerful video editing tool suitable for Windows, macOS and Linux. It aims to reduce the digital noise, flicker, dust, scratches and other defects in the captured videos to improve the visual quality of the videos.
It is a plug-in for Premiere Pro, that does more or less what the product noise says: it makes grainy video look neater. It’s very easy to use and
How to do that in Neat Video? Here are the steps:
Find the clip you want to reduce the noise of and search for the neat video effect in the Effects Panel.
The video editors mostly use the SR version of it, because it seems faster and has kind of a better performance.
Then, you’ll have to drag the neat video plug-in to the clip to your choosing, take your attention to the Effect Controls panel on the left, and find: fx Reduce Noise v5 (SR) – press the button saying Prepare and this will open up the Build button as well, which wil open the Neat video effect window.
There, you’ll need to click on the Auto Profile. Selection window will appear, which you can move around the scene and resize, in order to select the noisy area of your footage. It is recommended to find the darkest or grainiest area there and select judging by this.
On the left side, you will find Filter Settings: under Spatial, you can play with the Noise Reduction Amount and Noise Level.
Then, you will hit Apply and – done, you can instantly see the results!
Shotcut
What about Shotcut? It is a free, open-source and cross-platform video denoiser for Windows operating system. It is also an outstanding video editor with trimming, splitting, color correction and other tools.
In order to reduce the noise there, do the following: first off, find filters, open that window and type in: Noise. This will open the options, and several of them are for noise reduction.
Choose Reduce Noise: Wavelet, add it to the Video and then feel free to modify the settings, such as: Decompose, Threshold, Percent. You can check and uncheck the effect in order to see the before-after difference. Then, click Apply button and it is ready to go!
Anyway, you can also try other similar effects such as Reduce Noise: HQDN3D and Reduce Noise: Smart Blur.
Adobe Premiere Pro
Even though we discussed video denoising in Adobe Premier Pro but with the help of a plug-in called Neat Video, reducing the noise in the video in this software can be achieved without the plug-in as well, through using effect which is called Median. And, Premiere Pro kind of deserves to be mentioned, so, let’s go for it!
Add the desired footage into the Timeline of Premiere Pro. Then, find the Effects Panel, where our wanted Median can be found –drag and drop the effect to the clip.
The Median should modify the grainiest parts of the whole clip, so in order to do this, we need to use masks. In the Effects Control panel, select the mask shape for the clip – the options are: rectangle, circle, or pen tool. With Pen tool, you move the Mask around the screen and resize it – the covered area will be affected.
If you change Feather setting to 100, the effect will lose a sharp edge and instead, there will be a smooth border.
So, you might think it is needed to repeat these steps several time to create masks in different areas, in order to cover all of the grainy space of the scene.
And, at last, to reduce the noise, adjust the effect settings.
Actually, Median just blurs the grainy parts, without directly taking them away. Lastly, you can get to know the Radios settings, which will help you to achieve your most desired look!
Davinci Resolve
DaVinci Resolve is also worth mentioning in this list, in a way because it is also different from other video editors. Let’s see how it works and, meanwhile, differs:
Add the footage into the timeline. Find the fusion tab underneath the timeline panel.
There, MediaIn1 and MediaOut1 will appear, and first, click on MediaIn1, - the scene will be shown in the first viewer – and MediaOut1 by default is appearing in the second. So, stay on MediaIn1, hit shift+spacebar, and find Remove Noise (RN). Click Add, which adds the Remove Noise1 node. On the top right corner there is an Inspector, which opens all the properties you can modify.
After going only into the second viewer, and in the top bar there is channel icons. Open it and click on red, but don’t get alarmed when your footage turns black and white – it’s just for a while. Go back to the Inspector, increase Softness Red and Detail Red.
This step helps remove grain from the red channel. Then repeat the same for green and blue channels. After finishing go to the same channel button and set it to “back to color”. The clip will be colorized again and now be clearer, compared to the first viewer.
So, Evrika – we hot to know 5 best video denoisers in 2024, with the addition of audio background noise removal in Wondershare Filmora – hope you enjoyed it, and hope this will help you create better videos for yourself and your viewers!
Change Background Color in After Effects
Adobe After Effects is a powerful video editor. After Effects is particularly popular for its special effects that you can add to your videos and blow the mind of your audience. In any video, the background plays a major role in enhancing the overall frame and scene. If you are planning to change background color After Effects or add special effects, you must shoot your video with a solid color background.
During the post-production phase, you can change the background uniformly to any color scheme or special effect as per the requirement of the scene. Since the learning curve for After Effects is slightly steeper, you should know the exact steps to change After Effects background color. We will explain the process in simple steps and provide you with an alternative way to change background color.
Part 1. How to change video BG color in After Effects?
After Effects is widely used for professionals to add animations and special effects to videos during video editing phase. Starting from editing social media videos and YouTube videos to short films and even movies, After Effects finds its application in every field of video editing. Changing background color in After Effects is super simple even though other video editing techniques could be slightly complex for beginners. Here are the steps on how to change background color in After Effects.
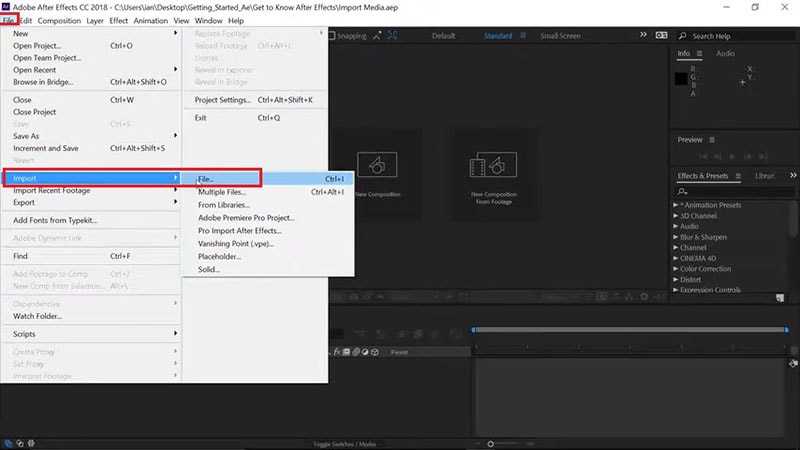
Step1 Open After Effects on your computer. Go to File> Import> File. Select the video file from your hard drive and it will appear under Project tab.
Step2 Drag and drop your video into Timeline. Select the video clip and right-click on Video Composition option located below Project tab.
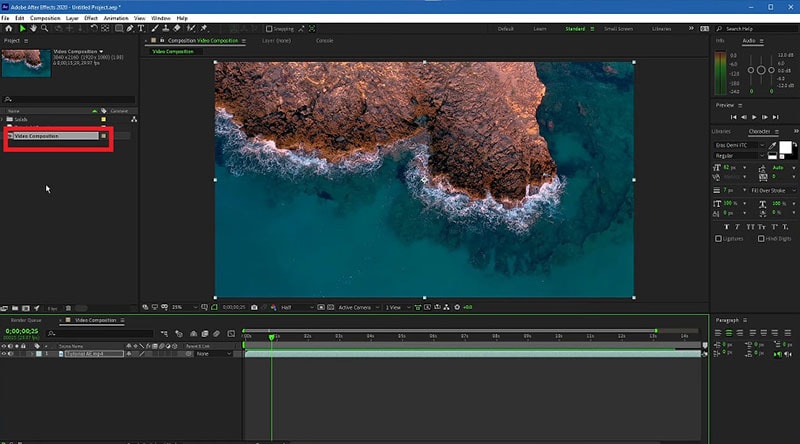
Step3 From the menu, click on Composition Settings option. You can also use Ctrl + K(Windows) or Command + K(Mac) key combination to open Composition Settings directly.

Step4 On Composition Settings window, go to Background Color and set the color as per your preference. You can also use a color picker as well to select any color from the video directly.
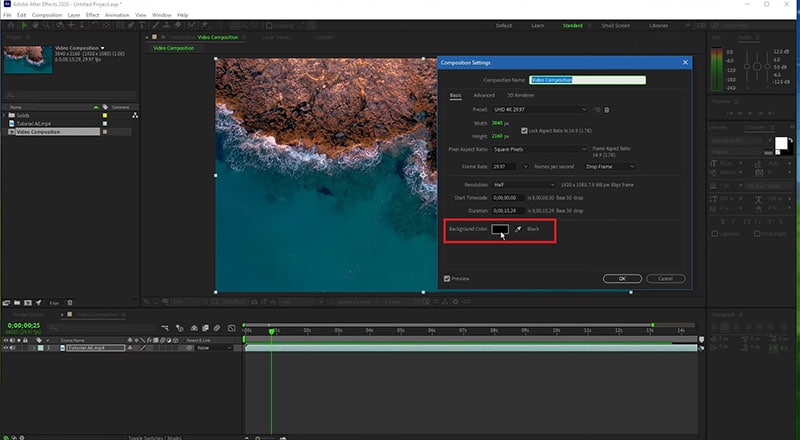
Step5 Click on Ok to set the new background color. Depending on the transparency of your video scene or the transition effect such as fade in and out, the background color will be more prominent.
Part 2. Alternative way to change background color
The best alternative to After Effects is Wondershare Filmora as Filmora has a wide range of special effects and animations. Filmora is a professional video editor where you can perform all basic as well as advanced video editing work. Most importantly, Filmora comes with an intuitive user interface so that even amateurs can use it easily.
There are several ways you can change background color in your video. For example, you can remove background color even when you do not have a solid color. If your video has a solid color, you can change background color to any color or graphical element using Chroma key. Here are the steps to change background color in Filmora .
Free Download For Win 7 or later(64-bit)
Free Download For macOS 10.14 or later
Step1 Download and install Filmora and it is available for Windows and Mac. Launch Filmora and click on New Project.

Step2 Import your video under Project Media folder and drag and drop into Timeline.
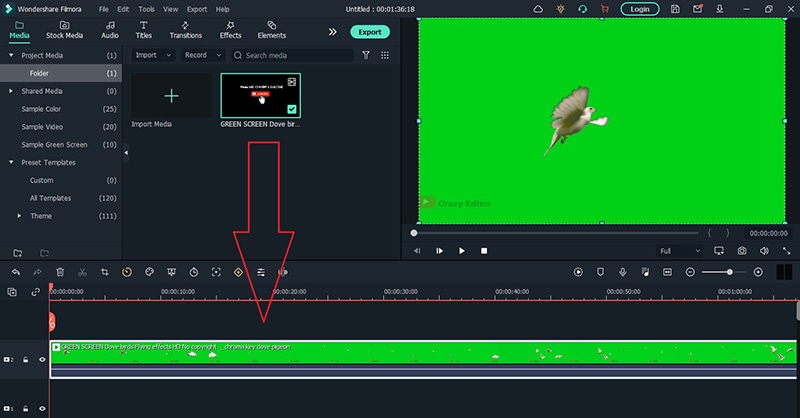
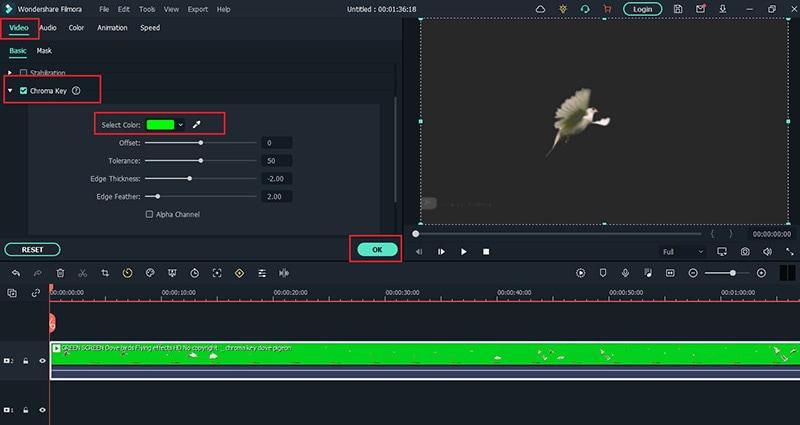
Step3 Double-click on the video clip and go to Video tab and turn on Chroma Key option. Select the solid color present in the background of the video and click on Ok button.
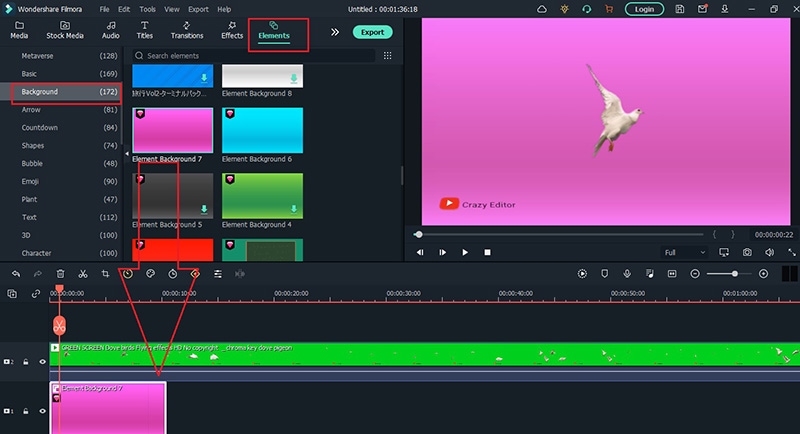
Step4 You will see the background color of the video disappear. Go to Elements> Background and drag and drop any background into Timeline. Make sure it is placed below the video clip and extend the duration of the background color as per your requirements.
Step5 Finally, play the video and click on Export button to save the video.
Part 3. FAQs about Video Background Colors
1. How do I remove background color in After Effects?
Import your video clip with a solid background color and place it on Timeline. Go to Effect menu> Keying> Keylight option. In Effects window and under Keylight, you will see Screen Colour option. Click on the eyedropper icon and select the background color you want to remove.
2. How do I change a solid background in After Effects?
The steps for After Effects how to change background color solid involve removing the background color and adding a layer of solid color to replace the transparency of the video. Go to Layer> New> Solid. Under Solid Settings window, go to Color and select the desired color from Color option and click on OK button. The new color will get reflected in the background of the video.
3. How do you add a white background in After Effects?
Go to Layer> New> Solid and add a white color solid first. However, this white color layer will not be visible unless you turn the background of your video transparent. Go to Effects & Presets and search for Luma Key and drop Luma Key on your video. Set Key type as Brighter and the threshold of the Lema key as per suitability on your video to see the white background appear.
Free Download For macOS 10.14 or later
Step1 Download and install Filmora and it is available for Windows and Mac. Launch Filmora and click on New Project.
Step2 Import your video under Project Media folder and drag and drop into Timeline.
Step3 Double-click on the video clip and go to Video tab and turn on Chroma Key option. Select the solid color present in the background of the video and click on Ok button.
Step4 You will see the background color of the video disappear. Go to Elements> Background and drag and drop any background into Timeline. Make sure it is placed below the video clip and extend the duration of the background color as per your requirements.
Step5 Finally, play the video and click on Export button to save the video.
Part 3. FAQs about Video Background Colors
1. How do I remove background color in After Effects?
Import your video clip with a solid background color and place it on Timeline. Go to Effect menu> Keying> Keylight option. In Effects window and under Keylight, you will see Screen Colour option. Click on the eyedropper icon and select the background color you want to remove.
2. How do I change a solid background in After Effects?
The steps for After Effects how to change background color solid involve removing the background color and adding a layer of solid color to replace the transparency of the video. Go to Layer> New> Solid. Under Solid Settings window, go to Color and select the desired color from Color option and click on OK button. The new color will get reflected in the background of the video.
3. How do you add a white background in After Effects?
Go to Layer> New> Solid and add a white color solid first. However, this white color layer will not be visible unless you turn the background of your video transparent. Go to Effects & Presets and search for Luma Key and drop Luma Key on your video. Set Key type as Brighter and the threshold of the Lema key as per suitability on your video to see the white background appear.
DaVinci Resolve Scopes Have Undergone Significant Improvements. Find Out How to Use These Scopes and Improve Your Video Editing Skills
How do you set up DaVinci scopes? The internal color scopes in Resolve are flexible and customizable but can be confusing. The built-in DaVinci Resolve scope used to be limited only a few possibilities. However, the new 9-scope view offers a wider range of choice, making them a powerful tool for video editing. In this article, we will explore how to set up DaVinci scopes to achieve better color results.
Color Correction Editor An easy-to-use video editor helps you make color correction and color grading experience for videos!
Free Download Use Vectorscope in Filmora Try Color Correction

Part 1. Unlocking Color Precision: Exploring the Improved Scopes in DaVinci Resolve
The Blackmagic Design continues to improve the Resolve to make it better with every iteration. The new features improve colorist workflow in less powerful ways. The major improvements include a major facelift to the scope, allowing professions to do more with DaVinci resolve. Let’s have a look at some of these changes:
1. CIE 1931 Color Space
The inclusion of the CIE chromaticity diagram is perhaps the biggest change to DaVinci scopes. It displays the gamut of the project as set in the Color Management preferences. This makes it a useful alternate way of looking at the trace of an image to judge when the values are out of legal range. It also functions as an educational tool for learning about the range of color spaces.

2. Low Pass Filter
The wavefront and parade scopes now have a low pass filter, which reduces noise in the trace. This visually sharpens the display of the scopes, allowing easier detection of elements in the frame.

The image above shows the major improvements. The second set of waveforms has more defined lines. These have the low-pass filter activated, which makes the scopes easier to read.
3. High, Mid, and Low Views in Vectorscope
The vectorscope has been added to the ability to toggle the mid-tones, shadows, and highlights of the image independently. You can set the ranges with greater visualization control.

As seen in the picture above, the vectorscope controls allow you to select the low, mid, or high range of the image. You can also set the low and high ranges as desired.
4. Histograms Over Curves
Another great DaVinci scope is the histogram, which now appears outside of the scope panel. The new improvements have embedded the histogram inside the Curves tab on the bottom Palette. Click on the three dots in the Custom Curves tab. The pulldown menu that appears includes the Input or Output of the histogram. With these settings, you can find the element in the frame that helps you make adjustments quickly.

5. Scope Quality
The GPU-accelerated scopes engine allows the scopes to respond quickly. Users have the option to set the quality to high, medium, or low and the scopes will respond to a range of hardware systems. Depending on whether you are working on a stationary short or looking to see how the scopes react in real-time, you will be able to toggle the modes quickly and easily.

6. YRGB View in Histogram and Parade
The histogram and parade now come with the ability to view luminance together with the red, green, and blue channels. Users also have the option for YCbCr mode in the Parade.

7. Extents
These are weak elements in the signore, which are of lesser importance compared to the stronger elements. However, Danvici now allows them to be revealed for a full illustration of the information that lies in the image. Consequently, extents can be used to determine whether the data is being clipped beyond legal limits.

Part 2. Mastering Scopes in DaVinci Resolve: A Brief Guide
DaVinci scopes help you to analyze images as a basis for color correction. When used properly, scopes help in fixing white balance issues and checking saturation. They also allow you to get the correct exposure and check details like skin tone. To use scopes in DaVinci Resolve, go to the color page in the bottom right corner. You can also click on the small graph icon to view the scope. Here is how to use them:
1. Waveform
The Waveform represents the brightness or luminance of your image. In this video scope, the brightest parts are at the top while the darkest are at the bottom. The pixels are represented from left to right.

The Waveform scope on DaVinci Resolve is helpful when you are checking for clipping. This simply means finding out whether the image is too bright or too dark. The waveform also ensures that the image is properly exposed. The colorize feature of the waveform shows the colors of the image while the extent shows the darkest or lightest parts of the image.
2. Parade (RGB)
The RGB Parade comprises 3 waveforms that represent the luminance of red, green, and blue channels. The approach for reading the parade video scope is similar to that of the waveform. However, you now look at the balance between the colors correct the white balance, and check for a color cast.

The Parade works almost in a similar manner as the waveform. It displays the red, green, and blue channels of the image as separate waveforms. This way, you can easily identify and correct color casts while ensuring the colors in the image are balanced. The video scope provides useful information to decide which parts of the image need to be corrected or tweaked further.
3. Vectorscope
Vectorscope in DaVinci Resolve shows hue and saturation on a circular graph. Hues (the colors) are indicated outside of the color wheel for easier color correction. Saturation is indicated by how far the graph extends from the center.

By displaying the hue and saturation of the image as a vector, this video scope helps check skin tones. The scope specifically checks whether skin tones are shifted toward colors such as yellow, magenta, or green. It allows you to make sure that the colors in your subject skin tones are not too saturated or desaturated.
4. Histogram
Histogram is a video scope in DaVinci Resolve that displays the brightness or luminance of an image from left to right for the RGB channel. The video scope is based on the number of pixels that the colors red, blue, and green have in an image.

Using the histogram video scope on DaVinci Resolve allows you to check for overexposure or underexposure in your image. You can also ensure that the image has a good overall brightness range. The scope provides a graphical representation of tonal distribution in each channel. This way, you can evaluate the tone in detail for more accurate brightness and contrast adjustments.
Part 3: Edit Like a Pro: Mastering Video Scopes in Filmora
When working on video projects, Wondershare Filmora is a great editing software. It comes with unique features to color-correct your videos on the go as you edit it. From AI-powered features to royalty-free music, there is so much more you can do with Filmora.
Free Download For Win 7 or later(64-bit)
Free Download For macOS 10.14 or later
How to Use Video Scopes on Filmora
Using video scopes on Filmora is easy. The software offers four video scope options, allowing you to color-correct and grade your visual images properly. They include parade RGB, waveform, vectorscope, and histogram. When editing videos on Filmora, the video scopes can be accessed by clicking on the video scopes icon. The icon is found on the top right corner of the media player.

Filmora has made it easy for users to manage video scopes, and color-correct videos quickly. Users can change the layout options of the video scopes to match the editing needs of their project. You can also expand the button to show the name of the scope. As you manage the scopes, you can start with the Parade to make the necessary adjustments. Then move on to waveform, vectorscope, and histogram.

The uses of the video scope on Filmora are as follows:
- Parade – Cahnge the color channel from RBG to YRGB or YCbCr
- Vectorscope – Identify skin tone
- Waveform – Adjust color channels in a different way
- Histogram – Display the multiple color adjustments in a graphical way
Conclusion
Scopes are indeed valuable to video editors and colorists. While viewing images on a monitor can be subjective, scopes allow you to analyze and define them objectively. This gives you the power to color grade and correct to ensure that viewers look at the image with a clear representation. When working on or editing your videos, we recommend Wondershare Filmora. The video editing software comes with a wide range of features and video scopes that allow you to do everything on the same platform.
Free Download Use Vectorscope in Filmora Try Color Correction
Part 1. Unlocking Color Precision: Exploring the Improved Scopes in DaVinci Resolve
The Blackmagic Design continues to improve the Resolve to make it better with every iteration. The new features improve colorist workflow in less powerful ways. The major improvements include a major facelift to the scope, allowing professions to do more with DaVinci resolve. Let’s have a look at some of these changes:
1. CIE 1931 Color Space
The inclusion of the CIE chromaticity diagram is perhaps the biggest change to DaVinci scopes. It displays the gamut of the project as set in the Color Management preferences. This makes it a useful alternate way of looking at the trace of an image to judge when the values are out of legal range. It also functions as an educational tool for learning about the range of color spaces.
2. Low Pass Filter
The wavefront and parade scopes now have a low pass filter, which reduces noise in the trace. This visually sharpens the display of the scopes, allowing easier detection of elements in the frame.
The image above shows the major improvements. The second set of waveforms has more defined lines. These have the low-pass filter activated, which makes the scopes easier to read.
3. High, Mid, and Low Views in Vectorscope
The vectorscope has been added to the ability to toggle the mid-tones, shadows, and highlights of the image independently. You can set the ranges with greater visualization control.
As seen in the picture above, the vectorscope controls allow you to select the low, mid, or high range of the image. You can also set the low and high ranges as desired.
4. Histograms Over Curves
Another great DaVinci scope is the histogram, which now appears outside of the scope panel. The new improvements have embedded the histogram inside the Curves tab on the bottom Palette. Click on the three dots in the Custom Curves tab. The pulldown menu that appears includes the Input or Output of the histogram. With these settings, you can find the element in the frame that helps you make adjustments quickly.
5. Scope Quality
The GPU-accelerated scopes engine allows the scopes to respond quickly. Users have the option to set the quality to high, medium, or low and the scopes will respond to a range of hardware systems. Depending on whether you are working on a stationary short or looking to see how the scopes react in real-time, you will be able to toggle the modes quickly and easily.
6. YRGB View in Histogram and Parade
The histogram and parade now come with the ability to view luminance together with the red, green, and blue channels. Users also have the option for YCbCr mode in the Parade.
7. Extents
These are weak elements in the signore, which are of lesser importance compared to the stronger elements. However, Danvici now allows them to be revealed for a full illustration of the information that lies in the image. Consequently, extents can be used to determine whether the data is being clipped beyond legal limits.
Part 2. Mastering Scopes in DaVinci Resolve: A Brief Guide
DaVinci scopes help you to analyze images as a basis for color correction. When used properly, scopes help in fixing white balance issues and checking saturation. They also allow you to get the correct exposure and check details like skin tone. To use scopes in DaVinci Resolve, go to the color page in the bottom right corner. You can also click on the small graph icon to view the scope. Here is how to use them:
1. Waveform
The Waveform represents the brightness or luminance of your image. In this video scope, the brightest parts are at the top while the darkest are at the bottom. The pixels are represented from left to right.
The Waveform scope on DaVinci Resolve is helpful when you are checking for clipping. This simply means finding out whether the image is too bright or too dark. The waveform also ensures that the image is properly exposed. The colorize feature of the waveform shows the colors of the image while the extent shows the darkest or lightest parts of the image.
2. Parade (RGB)
The RGB Parade comprises 3 waveforms that represent the luminance of red, green, and blue channels. The approach for reading the parade video scope is similar to that of the waveform. However, you now look at the balance between the colors correct the white balance, and check for a color cast.
The Parade works almost in a similar manner as the waveform. It displays the red, green, and blue channels of the image as separate waveforms. This way, you can easily identify and correct color casts while ensuring the colors in the image are balanced. The video scope provides useful information to decide which parts of the image need to be corrected or tweaked further.
3. Vectorscope
Vectorscope in DaVinci Resolve shows hue and saturation on a circular graph. Hues (the colors) are indicated outside of the color wheel for easier color correction. Saturation is indicated by how far the graph extends from the center.
By displaying the hue and saturation of the image as a vector, this video scope helps check skin tones. The scope specifically checks whether skin tones are shifted toward colors such as yellow, magenta, or green. It allows you to make sure that the colors in your subject skin tones are not too saturated or desaturated.
4. Histogram
Histogram is a video scope in DaVinci Resolve that displays the brightness or luminance of an image from left to right for the RGB channel. The video scope is based on the number of pixels that the colors red, blue, and green have in an image.
Using the histogram video scope on DaVinci Resolve allows you to check for overexposure or underexposure in your image. You can also ensure that the image has a good overall brightness range. The scope provides a graphical representation of tonal distribution in each channel. This way, you can evaluate the tone in detail for more accurate brightness and contrast adjustments.
Part 3: Edit Like a Pro: Mastering Video Scopes in Filmora
When working on video projects, Wondershare Filmora is a great editing software. It comes with unique features to color-correct your videos on the go as you edit it. From AI-powered features to royalty-free music, there is so much more you can do with Filmora.
Free Download For Win 7 or later(64-bit)
Free Download For macOS 10.14 or later
How to Use Video Scopes on Filmora
Using video scopes on Filmora is easy. The software offers four video scope options, allowing you to color-correct and grade your visual images properly. They include parade RGB, waveform, vectorscope, and histogram. When editing videos on Filmora, the video scopes can be accessed by clicking on the video scopes icon. The icon is found on the top right corner of the media player.
Filmora has made it easy for users to manage video scopes, and color-correct videos quickly. Users can change the layout options of the video scopes to match the editing needs of their project. You can also expand the button to show the name of the scope. As you manage the scopes, you can start with the Parade to make the necessary adjustments. Then move on to waveform, vectorscope, and histogram.
The uses of the video scope on Filmora are as follows:
- Parade – Cahnge the color channel from RBG to YRGB or YCbCr
- Vectorscope – Identify skin tone
- Waveform – Adjust color channels in a different way
- Histogram – Display the multiple color adjustments in a graphical way
Conclusion
Scopes are indeed valuable to video editors and colorists. While viewing images on a monitor can be subjective, scopes allow you to analyze and define them objectively. This gives you the power to color grade and correct to ensure that viewers look at the image with a clear representation. When working on or editing your videos, we recommend Wondershare Filmora. The video editing software comes with a wide range of features and video scopes that allow you to do everything on the same platform.
Learn How to Rotate Videos with Ease Using Shotcut with Our Comprehensive Guide. Discover Tips and Tricks to Get the Perfect Footage Every Time. Start Using Shotcut Today
Video editing has come a long way in recent years, and with the advancement of technology, it’s now easier than ever to produce high-quality videos. However, one common issue that many video editors encounter is uneven footage. Various reasons can cause this, but the solution is simple - rotating your videos. Shotcut is a powerful video editing software that provides various tools to help you rotate your videos easily.
This guide will explore the ins and outs of using Shotcut to rotate your videos. Whether you’re a seasoned editor or just starting, this guide will provide you with everything you need to know to get the perfect shot every time. This guide has everything from rotating your footage to more advanced tips and tricks. So, if you’re ready to take your video editing skills to the next level, keep reading!

Overview of Shotcut Video Editor
Shotcut is a free, open-source video editing software that offers a range of features for basic video editing. Before downloading Shotcut, it is important to know its features to determine if it suits your video editing needs. Here are the key features of Shotcut that stand out:

- Video Capture. Shotcut allows for screen and webcam capture and audio capture from the system or external microphone. It supports 4K resolution.
- Standard Editing. Shotcut allows for trimming, cutting/copying/pasting of clips and keyframes for video filters and markers. It also uses proxy editing for high-resolution video files.
- Audio Features. Shotcut includes several audio filters for enhancing audio clips and volume control, audio mixing, tone generator, and pitch adjustment options.
- Video Effects. Shotcut offers a range of effects and filters, including blending modes, track compositing, and transitions. It also supports 360-degree filters, reverse video clips, and video scopes.
- Wide Support. Shotcut supports a variety of video and audio formats, as well as photo file formats. The multi-format timeline allows for the mixing of different parameters, and the software supports network streaming and alpha-channel videos.
Shotcut is a versatile video editor that offers a range of features for basic video editing and is a great choice for those looking for a free and open-source video editor.
How To Rotate Videos in Shotcut?
Rotating videos in Shotcut is a simple process. With its user-friendly interface, you can quickly and easily adjust the orientation of your videos to get the perfect shot every time. Whether you need to rotate your footage 90 degrees or make more subtle adjustments, Shotcut has all the tools you need to get the job done.
In this section, we’ll walk you through the steps to rotate your videos in Shotcut and provide you with tips and tricks to ensure that your footage is perfectly aligned every time. So, if you’re ready to rotate your videos, let’s get started!
Step1 Start a new Shotcut project and import the video

Step2 Drag the video to the Timeline

Step3 Go to “Filters“ and press the “+” icon

Step4 Search for “Rotate“ and select “Size, Position & Rotate.”

Step5 Use the bar or enter degrees in numbers to rotate the video.

How To Mirror or Flip Videos in Shotcut?
Do you want to flip or mirror your videos in Shotcut? This feature can add a creative twist to your footage and make your videos stand out. Luckily, Shotcut makes it easy to mirror or flip your videos with just a few simple steps.
Whether you want to add a reflection effect or change the direction of your footage, Shotcut has the tools you need to get the job done. So, get ready to take your videos to the next level with Shotcut’s mirroring and flipping capabilities!
For Steps 1-3, follow the steps from the “How To Rotate Videos in Shotcut?“ section.
Step4 Search for the “Mirror“ effect.

Step5 Select the “Mirror“ effect, and your video will be automatically flipped or mirrored.

How To Make a Vertical Video Horizontal in Shotcut
Are you tired of having a vertical video that doesn’t fit the standard aspect ratio? Don’t worry; Shotcut makes it easy to convert your vertical video into a horizontal format. By converting your vertical video into a horizontal format, you’ll be able to showcase your footage in a more professional and visually appealing manner.
In this section, we’ll walk you through making your vertical video horizontal in Shotcut. With these simple steps, you’ll be able to turn your vertical footage into a horizontal masterpiece in no time!
Step1 Drag the video to the timeline

Step2 Go to “Filters“ and press the “+” icon. Search for the “Crop Source“ effect.

Step3 Toggle “Center“ and notice that it removed the black padding of the horizontal video.

Step4 Adjust the part you want your video to focus on.

Wondershare Filmora – Shotcut’s Alternative To Rotate Videos
If you’re looking for an alternative to Shotcut for rotating your videos, consider Wondershare Filmora . This powerful video editing software is packed with features and is ideal for both beginners and professionals. While Shotcut is a great option for rotating videos, Filmora offers additional capabilities that make it an excellent choice for those who need a more advanced video editing solution.
Free Download For Win 7 or later(64-bit)
Free Download For macOS 10.14 or later
With Wondershare Filmora, you’ll be able to rotate your videos with ease, as well as perform a variety of other editing tasks. From adding music, filters, and text to splitting, trimming, and merging videos, Filmora has you covered.
Additionally, you’ll enjoy the user-friendly interface of Filmora that makes it easy to navigate and find the features you need. Whether you’re just starting with video editing or are a seasoned professional, Wondershare Filmora is the perfect solution for rotating videos and more.
How To Rotate or Flip a Video With Wondershare Filmora?
Wondershare Filmora is a great alternative to Shotcut for those looking to rotate or flip their video clips. It offers an intuitive and user-friendly interface, making rotating or flipping a video simple.
To mirror your video in Filmora, you follow a few easy steps. Whether you want to flip your video horizontally or vertically, Filmora’s rotating tool will help you achieve the perfect reflection with just a few clicks.
In addition to its rotating capabilities, Wondershare Filmora also offers a wide range of features for video editing. From basic video editing tools like trimming and cutting to advanced features like color correction and audio editing, Filmora has everything you need to take your video projects to the next level.
With its user-friendly interface and comprehensive feature set, Wondershare Filmora is a great option for anyone looking for an alternative to Shotcut for their video editing needs.
Step1 Choose between “Flip Horizontal“ or “Flip Vertical“ in the “Flip“ section to mirror the clip left to right or turn it upside down.

Step2 Select either the “Clockwise“ or “Counterclockwise“ icon under the “Rotate“ section to rotate the clip.

Step3 Enter a specific angle value in the “Rotate“ tab or adjust the dot in the circle to reach the desired rotation angle.

How To Make a Vertical Video Horizontal With Filmora?
Are you looking for a solution to convert a vertical video into a horizontal one? Filmora is a great video editing software that can help you do that!
Step1 Launch Filmora and import the video.

Step2 Drag the video to the timeline.

Step3 Right-click on the video and then click on “Crop and Zoom.”

Step4 Click on the “Aspect Ratio“ option and change it to “16:9.”

Step5 Keep the video part that you want to focus on, then click “OK.”
Step6 Your vertical video is now horizontal.
Conclusion
Rotating a video in Shotcut or Wondershare Filmora is a simple process. Both video editing software provides a user-friendly interface and various options to achieve the desired result. Shotcut and Filmora can help you achieve the perfect reflection with a few clicks, whether you want to rotate, flip, or make a horizontal or vertical video. So, choose the one that fits your needs and start creating stunning videos.
Free Download For macOS 10.14 or later
With Wondershare Filmora, you’ll be able to rotate your videos with ease, as well as perform a variety of other editing tasks. From adding music, filters, and text to splitting, trimming, and merging videos, Filmora has you covered.
Additionally, you’ll enjoy the user-friendly interface of Filmora that makes it easy to navigate and find the features you need. Whether you’re just starting with video editing or are a seasoned professional, Wondershare Filmora is the perfect solution for rotating videos and more.
How To Rotate or Flip a Video With Wondershare Filmora?
Wondershare Filmora is a great alternative to Shotcut for those looking to rotate or flip their video clips. It offers an intuitive and user-friendly interface, making rotating or flipping a video simple.
To mirror your video in Filmora, you follow a few easy steps. Whether you want to flip your video horizontally or vertically, Filmora’s rotating tool will help you achieve the perfect reflection with just a few clicks.
In addition to its rotating capabilities, Wondershare Filmora also offers a wide range of features for video editing. From basic video editing tools like trimming and cutting to advanced features like color correction and audio editing, Filmora has everything you need to take your video projects to the next level.
With its user-friendly interface and comprehensive feature set, Wondershare Filmora is a great option for anyone looking for an alternative to Shotcut for their video editing needs.
Step1 Choose between “Flip Horizontal“ or “Flip Vertical“ in the “Flip“ section to mirror the clip left to right or turn it upside down.
Step2 Select either the “Clockwise“ or “Counterclockwise“ icon under the “Rotate“ section to rotate the clip.
Step3 Enter a specific angle value in the “Rotate“ tab or adjust the dot in the circle to reach the desired rotation angle.
How To Make a Vertical Video Horizontal With Filmora?
Are you looking for a solution to convert a vertical video into a horizontal one? Filmora is a great video editing software that can help you do that!
Step1 Launch Filmora and import the video.
Step2 Drag the video to the timeline.
Step3 Right-click on the video and then click on “Crop and Zoom.”
Step4 Click on the “Aspect Ratio“ option and change it to “16:9.”
Step5 Keep the video part that you want to focus on, then click “OK.”
Step6 Your vertical video is now horizontal.
Conclusion
Rotating a video in Shotcut or Wondershare Filmora is a simple process. Both video editing software provides a user-friendly interface and various options to achieve the desired result. Shotcut and Filmora can help you achieve the perfect reflection with a few clicks, whether you want to rotate, flip, or make a horizontal or vertical video. So, choose the one that fits your needs and start creating stunning videos.
Also read:
- 2024 Approved Track Mattes The Ultimate Guide For After Effects
- Updated In 2024, Detailed Steps to Rotate Videos in Lightworks
- Updated Premiere Pro Is a Powerful Video Editing Software. In This Article, You Will Learn About How to Use, Save and Export LUTs in Adobe Premiere Pro
- New In 2024, Best Tools To Create Blend Image Collage
- The Article Is a Guide About the Split of the Videos in VLC. There Is Also a Particular Description of Its Alternative Wondershare Filmora. It Is Suitable as Well as Reasonable
- Updated Recording Video in Slow Motion Some Considerable Points
- New 3GP Video Format What Is 3GP Format And How To Play It for 2024
- 2024 Approved Right Tools for Converting 60FPS Frame Rate in Videos
- 2024 Approved Get to Know How Excellent Sparkle Video Effects Can Significantly Impact Different Projects. Its Miraculous. Read Below to Learn More and Add Sparkle Effect to Your Videos
- New Discover Vintage LUTs Premiere Pro Free and Paid Options Available
- Updated 20 Must-Have Graduation Songs for 2024
- How to Make Discord GIF Avatar in Depth Guide for 2024
- In 2024, Do You Want to Create a Zoom Motion Blur Effect Using Photoshop? If You Are Unaware of How to Do This, Read This Article to Learn Simple yet Authentic Instructions
- New How to Add Custom Subtitles to Netflix
- 2024 Approved Best GIF to AVI Converters
- Updated Replacing Sky Background Using Adobe Photoshop A Comprehensive Guide for 2024
- In 2024, Right Tools for Converting 60FPS Frame Rate in Videos
- Updated This Article Introduce You the Best Video Trimmers to Use on Different Devices, Check Them Out and Choose Your Favoriate One
- New 2024 Approved How to Build A Video Editing Career
- New 2024 Approved How to Trim Video in Quicktime Player on Mac
- 2024 Approved Land Into the Thrill of Creating Stunning GIFs with Ezgif
- New How to Create Discord GIF Avatar in Depth Guide
- New 2024 Approved Best Photo Video Maker Apps with Song PC, Mobile, Online
- Updated 2024 Approved Get Creative with These 10 Video Editing App With Templates
- In 2024, 5 Tips for Aquasoft Slideshow
- Updated In 2024, 10 Best Suggestions for AI Video Interviews
- New Green Screen Is a Widely Used Effect in After Effects. Many Professional Photographers Use It to Make Creative Video Effects. This Guide Will Show You How to Use Green Screen to Videos in After Effects
- New 2024 Approved How to Create and Add an Adjustment Layer in Final Cut Pro
- Updated A Complete Guideline About QuickTime Player
- 2024 Approved 3 Best Motion Blur Plugins for Adobe After Effects
- 2024 Approved Frame Rates, Speed, and Wondershare Filmora An Overview
- Updated In 2024, Zoom In and Out on Snapchat
- New How to Create a Glitch Text Effect, In 2024
- How to Make A Tattoo Disappear Like A Magic
- This Review Post Introduces You to EasyHDR to Review and Customize Your HDR Photos. Youll Also Learn the Best Desktop Application to Edit Your HDR Videos Effortlessly for 2024
- Updated A Guide to Create Your Own LOL Montage Video
- In 2024, How To Make a Photo Collage in Microsoft Word
- New 2024 Approved IMovie Review – Is It The Best Video Editor for Mac Users?
- 2024 Approved Learn How to Create Custom Titles in Filmora and Add a Unique Lower Third Animation Effect in Six Simple Steps
- New 2024 Approved Ways to Learn Discord Game Bots – Even if Youre Just Starting Out
- Updated Tips to Make Cinematic Color Grading
- New How to Create Cinematic Style Videos, In 2024
- 2024 Approved 10 Best Free Video Player for Windows 11
- In 2024, How to Use Visual Effect for Zoom
- In 2024, Different Ways To Trim Video In Premiere Pro
- How to Unlock Poco M6 Pro 4G Phone Password Without Factory Reset?
- Android Safe Mode - How to Turn off Safe Mode on Honor X50? | Dr.fone
- Fix Cannot Paste the Data Error in Microsoft Excel 2019 | Stellar
- In 2024, How to Unlock Nokia C12 Phone without PIN
- Apple iPhone 15 Pro Max iCloud Activation Lock Bypass
- Guide to Mirror Your Gionee F3 Pro to Other Android devices | Dr.fone
- Complete Tutorial to Use VPNa to Fake GPS Location On Honor 100 Pro | Dr.fone
- Best 10 Mock Location Apps Worth Trying On Realme Narzo 60x 5G | Dr.fone
- How to Fix My Realme Narzo N53 Location Is Wrong | Dr.fone
- The way to get back lost data from Honor
- In 2024, A Working Guide For Pachirisu Pokemon Go Map On Oppo Find X7 Ultra | Dr.fone
- Home Button Not Working on Honor 90 GT? Here Are Real Fixes | Dr.fone
- How to Bypass iCloud Lock on iPhone 15
- Undelete lost contacts from Nubia Red Magic 8S Pro+.
- Top-Notch Solutions for Disabled Apple ID From iPhone 13 Pro Max Making It Possible
- How to Resolve Infinix Smart 8 Pro Screen Not Working | Dr.fone
- In 2024, Is Fake GPS Location Spoofer a Good Choice On Infinix Zero 5G 2023 Turbo? | Dr.fone
- In 2024, A Guide Nokia G310 Wireless and Wired Screen Mirroring | Dr.fone
- How To Transfer WhatsApp From iPhone 11 Pro to other iPhone 15 Pro Max devices? | Dr.fone
- In 2024, How to Track Samsung Galaxy A14 4G Location without Installing Software? | Dr.fone
- In 2024, 4 Ways to Unlock Apple iPhone 13 mini to Use USB Accessories Without Passcode | Dr.fone
- Delete Gmail Account With/Without Password On Oppo Find N3 Flip
- How To Update or Downgrade iPhone 13 Pro Max Without iTunes? | Dr.fone
- How to Factory Reset Samsung Galaxy A14 5G If I Forgot Security Code or Password? | Dr.fone
- Unlock Your Disabled Apple iPhone 15 Pro Without iTunes in 5 Ways
- All You Need To Know About Mega Greninja For Infinix Note 30 | Dr.fone
- In 2024, How To Unlock Any Vivo S17 Phone Password Using Emergency Call
- How Samsung Galaxy S23+ Mirror Screen to PC? | Dr.fone
- New 2024 Approved Tips That Show Anybody How to Get Awesome Background for Slideshow in PowerPoint
- How to Upgrade iPhone 7 to the Latest iOS/iPadOS Version? | Dr.fone
- How to Change/Add Location Filters on Snapchat For your Realme GT 5 Pro | Dr.fone
- In 2024, Recommended Best Applications for Mirroring Your Honor Magic 6 Lite Screen | Dr.fone
- How to fix iCloud lock from your iPhone 6 and iPad
- In 2024, Full Guide to Unlock Your Vivo Y100A
- Complete Fixes To Solve Apple iPhone 13 Pro Max Randomly Asking for Apple ID Password
- Title: Updated In 2024, 5 Best Video Denoisers
- Author: Chloe
- Created at : 2024-04-24 07:08:27
- Updated at : 2024-04-25 07:08:27
- Link: https://ai-editing-video.techidaily.com/updated-in-2024-5-best-video-denoisers/
- License: This work is licensed under CC BY-NC-SA 4.0.
