
Updated In 2024, Clone Yourself in Videos with Filmora

How to Clone Yourself in Videos with Filmora?
With the help of video editing programs like Filmora , you can create clones of yourself. Whether you’re looking to create a funny skit or a serious video, cloning yourself can add much production value to your project.
In this article, we’ll walk you through the process of how to clone yourself in videos using Filmora.
Part 1: How to Film Clips for Cloning Effects?
To make cloning effects, you will need to take two different shots and use a tripod to place the camera, so the frame doesn’t change.
Shooting the first clip
For the first shot, stay on one side of the frame and do the first action. For example, you can pretend to yank and take off your jacket. Then, drop the jacket to the other side of the frame.

To make it more realistic, make an interaction by reacting to the “clone” while facing the other direction.

Shooting the second clip
Then, shoot for the second clip without changing the frame. You will have to go to the place where you dropped the jacket from the first shot.

Act as if you have just appeared there and give a reaction to the other side as well.
Part 2: How to Do the Clone Effect with Filmora?
After you have shot the necessary film clips, bring the clips into Filmora 11. If you haven’t installed Filmora yet, you can go to their website and download it here:
Free Download For Win 7 or later(64-bit)
Free Download For macOS 10.14 or later
Once you have opened Filmora 11, follow the steps below:
Step1 Bring the first clip to the timeline and cut the clip where you pretend to yank and take off the jacket. Select and delete the unnecessary clip.
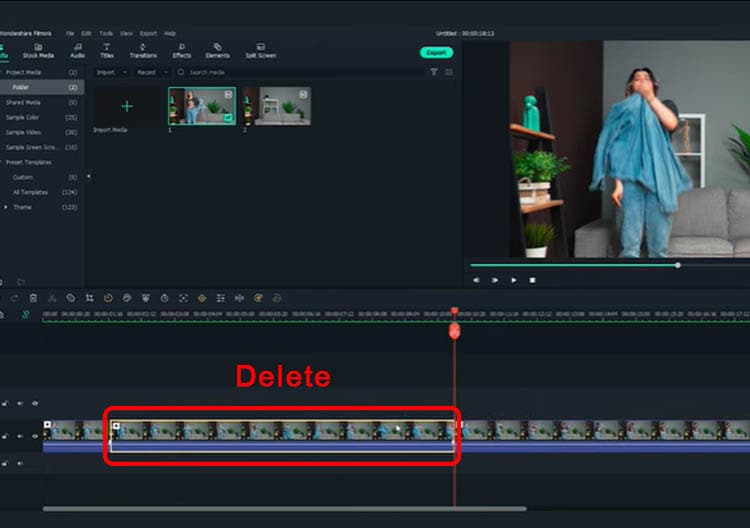
Step2 After you have the first part of the effect ready, let’s start working on the clone part using masking.
First, place the second clip on a different window track, and the starting point is where you react to the “clone.”
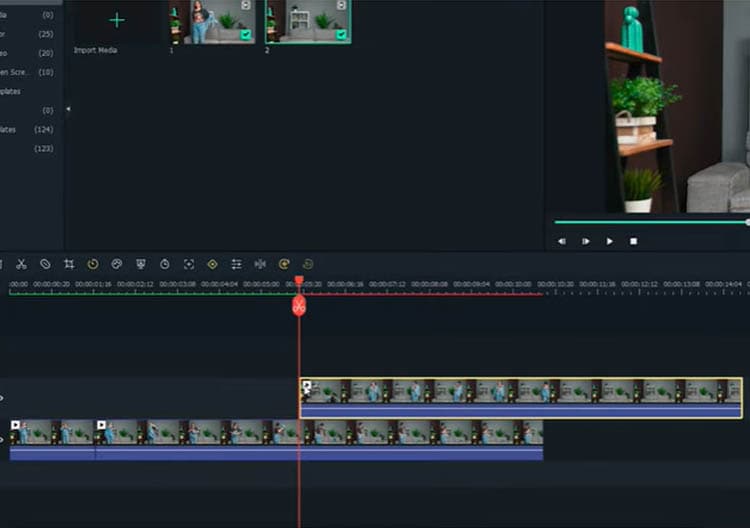
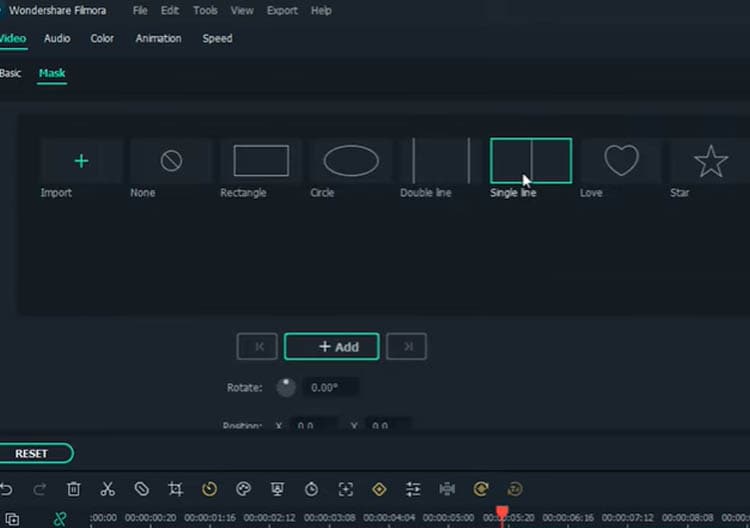
Then, double-click the second clip and go to the Filmora setting window. Tap on the Mask section > Single line.
On the preview screen, adjust the position of the mask to only show “the clone.”
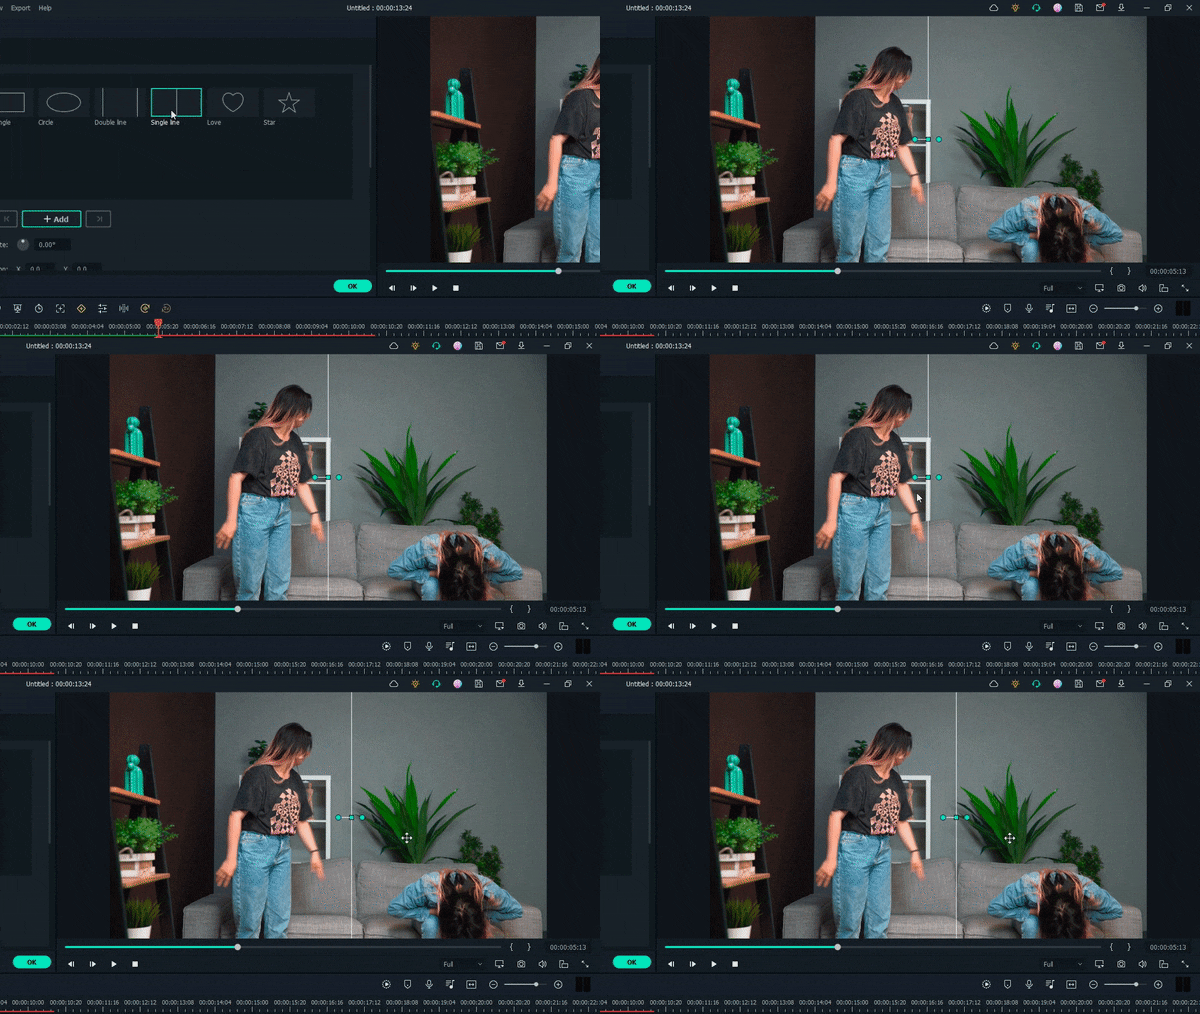
Set the blur strength on the setting to make a smoother edge transition.
Step3 If the timing of the two clips doesn’t match, you can fix it using the speed ramping feature on Filmora 11. To use it, double-click the second clip and select Speed > Speed Ramping > Customize.
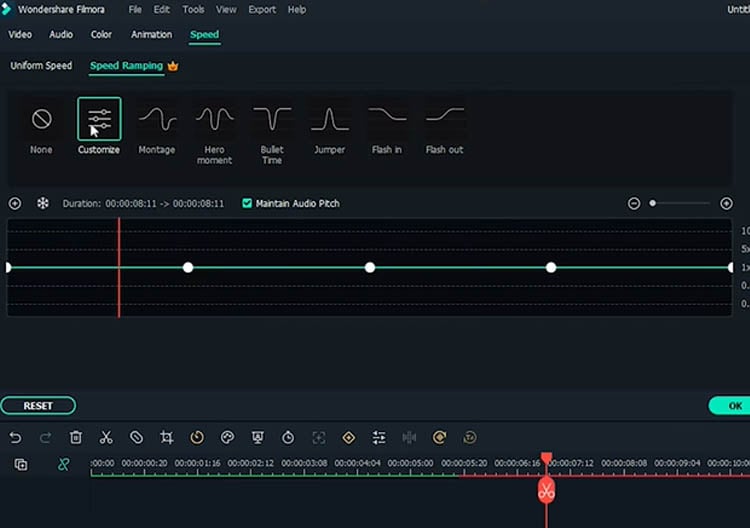
Move the keyframe up to increase the speed. You can adjust it according to your needs.
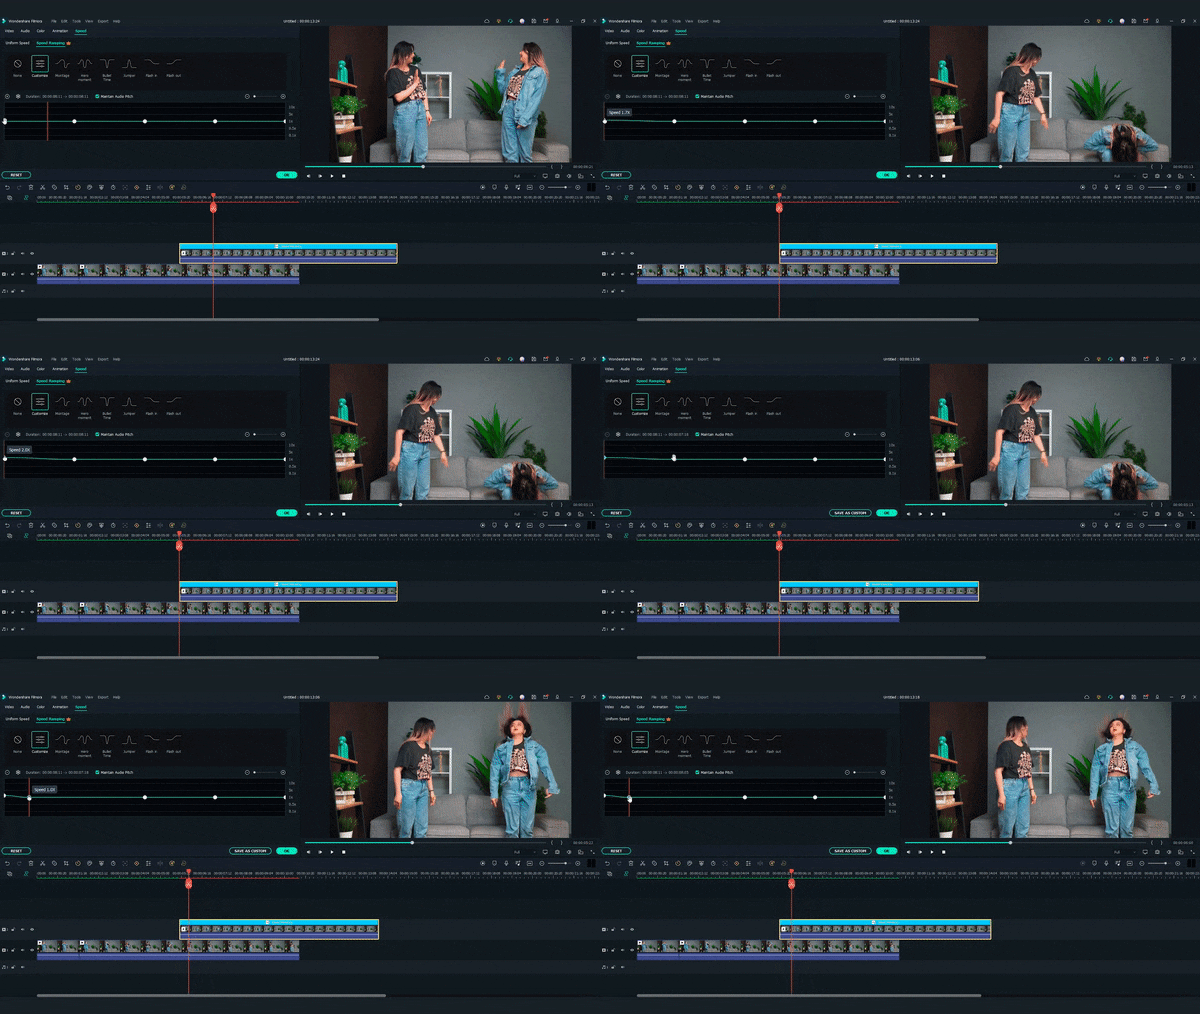
Step4 Once you are satisfied, adjust the clip length on the timeline and make sure that both clips finish at the same time.
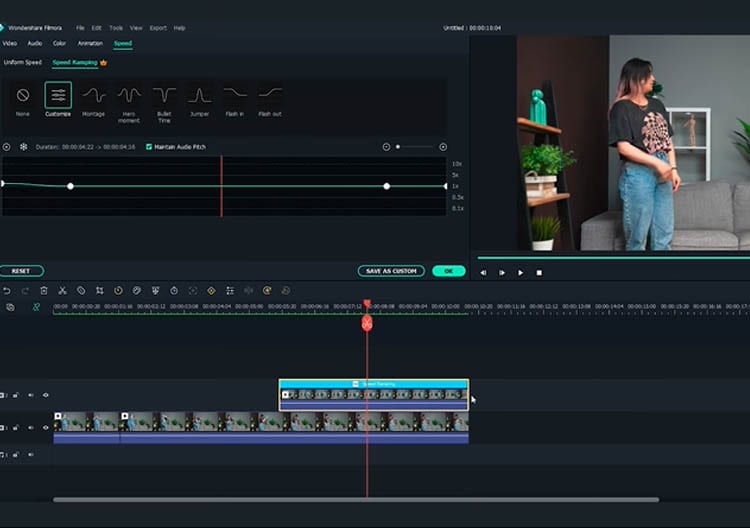
Extra tip: Add one more effect to make it more magical.
Step1 Open the Effects window and search for “up down 1.”
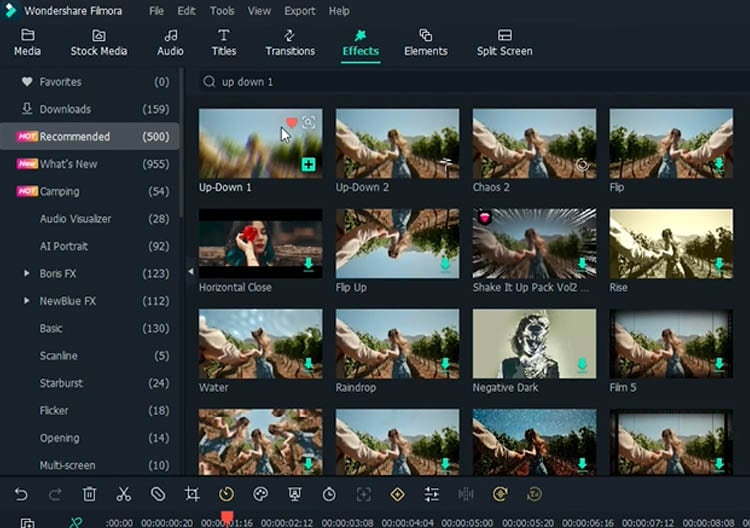
Step2 Drag and drop the effect onto the timeline where the first cut is set. Adjust the effect length to match the action.
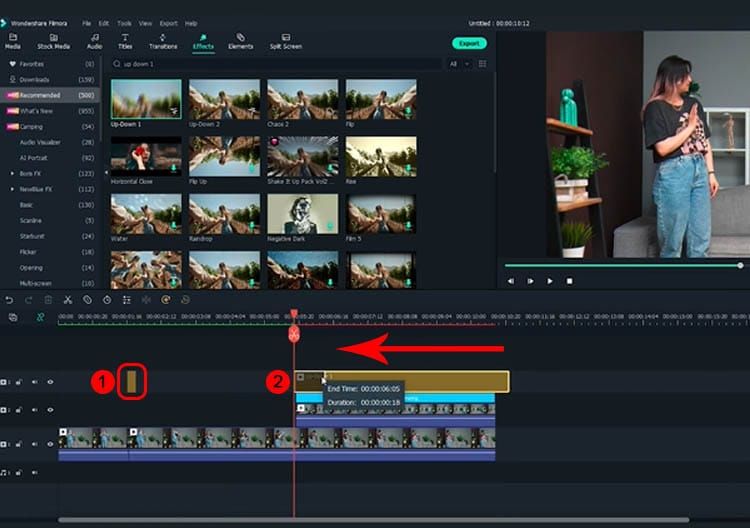
Then, drag and drop the effect again in the transition between the first and the second clip. Adjust it to the appropriate length, then it will give a more dramatic effect.
Step3 You can playback and see how it looks on the preview screen.
Summary
Making a clone effect on video is easy using Filmora. You can use the same trick to create a fashion lookbook video or other creative content to make them more engaging. Let us know if you want to see more tutorials.
Free Download For Win 7 or later(64-bit)
Free Download For macOS 10.14 or later
Free Download For macOS 10.14 or later
Once you have opened Filmora 11, follow the steps below:
Step1 Bring the first clip to the timeline and cut the clip where you pretend to yank and take off the jacket. Select and delete the unnecessary clip.

Step2 After you have the first part of the effect ready, let’s start working on the clone part using masking.
First, place the second clip on a different window track, and the starting point is where you react to the “clone.”

Then, double-click the second clip and go to the Filmora setting window. Tap on the Mask section > Single line.

On the preview screen, adjust the position of the mask to only show “the clone.”

Set the blur strength on the setting to make a smoother edge transition.
Step3 If the timing of the two clips doesn’t match, you can fix it using the speed ramping feature on Filmora 11. To use it, double-click the second clip and select Speed > Speed Ramping > Customize.

Move the keyframe up to increase the speed. You can adjust it according to your needs.

Step4 Once you are satisfied, adjust the clip length on the timeline and make sure that both clips finish at the same time.

Extra tip: Add one more effect to make it more magical.
Step1 Open the Effects window and search for “up down 1.”

Step2 Drag and drop the effect onto the timeline where the first cut is set. Adjust the effect length to match the action.

Then, drag and drop the effect again in the transition between the first and the second clip. Adjust it to the appropriate length, then it will give a more dramatic effect.
Step3 You can playback and see how it looks on the preview screen.
Summary
Making a clone effect on video is easy using Filmora. You can use the same trick to create a fashion lookbook video or other creative content to make them more engaging. Let us know if you want to see more tutorials.
Free Download For Win 7 or later(64-bit)
Free Download For macOS 10.14 or later
Best Video Title Generators
The ranking of videos in search results depends on the quality of their titles; making video title maker an essentiality. Similar to metadata, titles provide important information about your video, like its genre, subject, etc., to YouTube, Google, and TikTok viewers. The likelihood that the audience will locate and watch your film will rise if you provide the appropriate titles. To assist you in choosing which option will work best for you, we have included video title makers online in this post.
The process of making video titles may be laborious and time-consuming. However, not with the video title maker online free. You can utilize one of the title video makers online for free and your social media videos might rank higher and get more views altogether. But even when you know where to start, there are so many different factors that it may be perplexing. Fortunately, the fantastic video title generator provided in this post will make the process fast and simple.
Part 1. Tools to Generate Video Titles
1. TubeRanker Title Generator
A collection of YouTube SEO tools called TubeRanker may be used to optimize videos on Facebook, YouTube, and TikTok. Creators may utilize the short bursts of video title suggestions provided by the TubeRanker Title Generator in the names of their YouTube videos. Creators of videos may arrange and produce flawless, SEO-optimized video descriptions with the aid of the TubeRanker Video Description Generator. With the help of its title generator tool, TubeRanker can extract and display the meta tags connected to any public movie.
Steps to Use TubeRanker:
Step1 Visit the Website
In the first step, refer to the TubeRanker official website and you will be shown to the following UI. As a result, it’s a good idea to start with some keyword research instructions; you can read the TubeRanker title generator instructions to do so.

Step2 Launch the Title Generator
Your video’s ranking on search engine results pages in TubeRanker depends heavily on your keywords, which also assist viewers determine if the post is relevant to them. From the webpage, refer to the title generator as shown here:

Step3 Generate Video Title
Simply enter your keyword into the title generator and press the red button to complete this phase. You’ll see many titles as soon as you do that and begin reading the headlines. Write down the ones that make sense as you go down. Make a few minor edits to ensure that they are grammatically sound. Run a search using the niche and after that the automatically created titles are getting in the way as shown here:

Step4 Copy the Title (s)
After that, you’ll have a lot of options from which to choose. Some individuals push for names that are SEO-friendly, while others try for titles that are distinctive to stand out from the throng. maintain a careful balance. Both include a powerful keyword and making your title stand out should be your goals.

2. TunePocket Title Generator
For background music for your video and YouTube video SEO, TunePocket might be a top-notch tool. Additionally, the fact that it is free to use and that no account creation is necessary is beneficial. A stock music library, TunePocket provides a variety of music services. Additionally, we have discovered some incredible YouTube tools, such as YouTube tag generators. The fact that you can use this tag generator on YouTube without creating an account is what made us appreciate it even more.
Steps to Use TunePocket:
Step1 Visit the Website
The title generating procedure for your films may be started by first visiting the official TunePocket website, as illustrated here:
image name: visit-tunepocket.jpg
Step2 Launch the Title Generator
While on the webpage, you can refer to the YouTube title generator section. This will let you enter the topic of your video in the referred box as shown here:

Step3 Generate Video Title
You may save a lot of time by using TunePocket title generator to create creative titles. Simply type in your target term, choose your desired region, and language, then click “Get Titles.” There will be a list of useful keywords returned by TunePocket. You can run again the generator in order to get the desired results. For that, click on the Run again button down the line as shown here:

Step4 Copy the Title to Clipboard
A title generator may be processed in a matter of seconds and a few clicks. You don’t need to spend hours and hours coming up with numerous titles; you can copy more than one in a matter of minutes. Simply hit the Copy to Clipboard and get done with the title:

Part 2. Tips to Create Video Titles
Whether you’ve been video marketing for years or are just starting out, coming up with catchy video titles might be the most difficult aspect of the process. The title of a video has a significant role in whether or not viewers choose to click the play button, making it more than simply a minor feature. Poor titles make it difficult to attract views and expand your following, regardless of how fantastic your videos are. Here are the best scrutinized tips for creating best ranking titles for your videos:
1. Optimize the title using keywords for improved SEO
It might be difficult to come up with a title that is original, concise, and descriptive. However, a strong video title stays something original. Keywords are crucial for more than simply your website. They are important for video titles, too. If you want people to see your videos when they search for certain phrases, those keywords should be in the title because Google and YouTube can’t watch videos and grasp the content (yet).
2. Perfectly Match the Content
A excellent video title explains to viewers what to anticipate from the video. It’s unambiguous, straightforward, and sincere. Additionally, if you are familiar with your target demographic, you will be able to generate a lot more hits to your videos. Using a vague or confusing title is problematic as people are busy and need a reason to watch your movie. Similar to false content, misleading headlines deceive viewers and damage your reputation.
3. Attempt to pique interest
Keep in mind that compelling video titles are an art form that appeals to viewers’ emotions rather than being a precise SEO science. Try answering the questions on your own to get a catchy video title. People are more inclined to watch a video if you make reference to a secret or exceptional knowledge that you will disclose in it. Keep in mind that your goal is not to deceive viewers into viewing your video.
4. Increase the Click Through Rate
The finest titles are those that best expose the vulnerabilities of the reader. Consider it a little preview for your video. If you are creating a how-to or instructive video that answers a question or gives information, you may want to consider include the question in the title. It also makes it simple to think up video concept.
5. Attempt to utilize cue (triggering) words
Your title and description should both include your target keyword. You’ll probably start to generate some ideas for a real video title after you begin your keyword research. To determine how persuasive these concepts are, use a trigger analyzer. You’ll need to do study in order to accomplish this. As for the knowledge gap, consider how your target audience would respond.
The Bottom Line
In this article, we’ve compiled a list of the best tag generators for videos, including everything from video names and descriptions to titles, thumbnail design elements, and video ideas. You may get some useful tips as well for creating the greatest video titles by using this guide to the video title generator to obtain the ideal title for your social media videos. Find out the best suitable video title maker online free in the post above and tweak your video titles for social platforms rankings.
Free Download For Win 7 or later(64-bit)
Free Download For macOS 10.14 or later
1. TubeRanker Title GeneratorA collection of YouTube SEO tools called TubeRanker may be used to optimize videos on Facebook, YouTube, and TikTok. Creators may utilize the short bursts of video title suggestions provided by the TubeRanker Title Generator in the names of their YouTube videos. Creators of videos may arrange and produce flawless, SEO-optimized video descriptions with the aid of the TubeRanker Video Description Generator. With the help of its title generator tool, TubeRanker can extract and display the meta tags connected to any public movie.
Steps to Use TubeRanker:
Step1 Visit the Website
In the first step, refer to the TubeRanker official website and you will be shown to the following UI. As a result, it’s a good idea to start with some keyword research instructions; you can read the TubeRanker title generator instructions to do so.

Step2 Launch the Title Generator
Your video’s ranking on search engine results pages in TubeRanker depends heavily on your keywords, which also assist viewers determine if the post is relevant to them. From the webpage, refer to the title generator as shown here:

Step3 Generate Video Title
Simply enter your keyword into the title generator and press the red button to complete this phase. You’ll see many titles as soon as you do that and begin reading the headlines. Write down the ones that make sense as you go down. Make a few minor edits to ensure that they are grammatically sound. Run a search using the niche and after that the automatically created titles are getting in the way as shown here:

Step4 Copy the Title (s)
After that, you’ll have a lot of options from which to choose. Some individuals push for names that are SEO-friendly, while others try for titles that are distinctive to stand out from the throng. maintain a careful balance. Both include a powerful keyword and making your title stand out should be your goals.

2. TunePocket Title Generator
For background music for your video and YouTube video SEO, TunePocket might be a top-notch tool. Additionally, the fact that it is free to use and that no account creation is necessary is beneficial. A stock music library, TunePocket provides a variety of music services. Additionally, we have discovered some incredible YouTube tools, such as YouTube tag generators. The fact that you can use this tag generator on YouTube without creating an account is what made us appreciate it even more.
Steps to Use TunePocket:
Step1 Visit the Website
The title generating procedure for your films may be started by first visiting the official TunePocket website, as illustrated here:
image name: visit-tunepocket.jpg
Step2 Launch the Title Generator
While on the webpage, you can refer to the YouTube title generator section. This will let you enter the topic of your video in the referred box as shown here:

Step3 Generate Video Title
You may save a lot of time by using TunePocket title generator to create creative titles. Simply type in your target term, choose your desired region, and language, then click “Get Titles.” There will be a list of useful keywords returned by TunePocket. You can run again the generator in order to get the desired results. For that, click on the Run again button down the line as shown here:

Step4 Copy the Title to Clipboard
A title generator may be processed in a matter of seconds and a few clicks. You don’t need to spend hours and hours coming up with numerous titles; you can copy more than one in a matter of minutes. Simply hit the Copy to Clipboard and get done with the title:

Part 2. Tips to Create Video Titles
Whether you’ve been video marketing for years or are just starting out, coming up with catchy video titles might be the most difficult aspect of the process. The title of a video has a significant role in whether or not viewers choose to click the play button, making it more than simply a minor feature. Poor titles make it difficult to attract views and expand your following, regardless of how fantastic your videos are. Here are the best scrutinized tips for creating best ranking titles for your videos:
1. Optimize the title using keywords for improved SEO
It might be difficult to come up with a title that is original, concise, and descriptive. However, a strong video title stays something original. Keywords are crucial for more than simply your website. They are important for video titles, too. If you want people to see your videos when they search for certain phrases, those keywords should be in the title because Google and YouTube can’t watch videos and grasp the content (yet).
2. Perfectly Match the Content
A excellent video title explains to viewers what to anticipate from the video. It’s unambiguous, straightforward, and sincere. Additionally, if you are familiar with your target demographic, you will be able to generate a lot more hits to your videos. Using a vague or confusing title is problematic as people are busy and need a reason to watch your movie. Similar to false content, misleading headlines deceive viewers and damage your reputation.
3. Attempt to pique interest
Keep in mind that compelling video titles are an art form that appeals to viewers’ emotions rather than being a precise SEO science. Try answering the questions on your own to get a catchy video title. People are more inclined to watch a video if you make reference to a secret or exceptional knowledge that you will disclose in it. Keep in mind that your goal is not to deceive viewers into viewing your video.
4. Increase the Click Through Rate
The finest titles are those that best expose the vulnerabilities of the reader. Consider it a little preview for your video. If you are creating a how-to or instructive video that answers a question or gives information, you may want to consider include the question in the title. It also makes it simple to think up video concept.
5. Attempt to utilize cue (triggering) words
Your title and description should both include your target keyword. You’ll probably start to generate some ideas for a real video title after you begin your keyword research. To determine how persuasive these concepts are, use a trigger analyzer. You’ll need to do study in order to accomplish this. As for the knowledge gap, consider how your target audience would respond.
The Bottom Line
In this article, we’ve compiled a list of the best tag generators for videos, including everything from video names and descriptions to titles, thumbnail design elements, and video ideas. You may get some useful tips as well for creating the greatest video titles by using this guide to the video title generator to obtain the ideal title for your social media videos. Find out the best suitable video title maker online free in the post above and tweak your video titles for social platforms rankings.
Free Download For Win 7 or later(64-bit)
Free Download For macOS 10.14 or later
How To Make Ninja Jump Effect with Filmora
Superpower scenes derived from movies are trending these days. Everyone wants to add these superpower effects to their clips. We have covered several of these tutorials, and here we are with a new one; the Super/Ninja Jump effect.
This effect is for the quick movement of a subject from one position to another. Naruto is the prime example where ninjas are made to move around by this effect. Anime creators use this ninja effect a lot.
This article includes tutorials on what to shoot and how to add the Super Jump effect using Wondershare Filmora . The use of tools like masking, time ramping, keyframing, and the new version addition, the Boris FX Pack, makes it super easy to get a perfect super jump effect.
Shots Required For Super Jump Effect
You can use either a mobile phone or a camera for shooting, but you have to keep these things in mind:
Keep the following important tips in mind while shooting clips using your phone or camera.
● Use Wide-Angle
Always use the wide-angle view to ensure everything is in focus with a good depth of field.
● The Camera Should Be Steady
Make sure that the phone or camera is on a steady surface to avoid any turbulence or frame shifting.
● Sufficient Light
Make sure there is sufficient light and ambiance. Once you have set your camera, these are the three shots you have to take:
Shot 1: Jump Into the Air at a Distance
The subject will jump into the air at a distance from the camera. He should jump as high as he can, folding his legs so his body is in a ball position while in the air. The distance should be proper—not very far away.

Shot 2: Jump and Act Like You Are Landing
The subject should jump and act like he is landing on the floor. This shot has to be taken directly in front of the camera.

Shot 3: Empty Background Clip
This is an empty background clip. This clip includes only background settings without the subject. We need this clip to make layers while editing.

How To Edit These Clips On Filmora?
Once the shots have been taken, we move towards editing these clips, and for this purpose, we are using Filmora. Here is a step-by-step guide for editing these shots.
Steps To Edit These Clips
The tools we are going to use in this editing are masking, time ramping, speed ramping, keyframing, the Boris FX effect, and many more.
Open Wondershare Filmora and Add Video Tracks
Steps
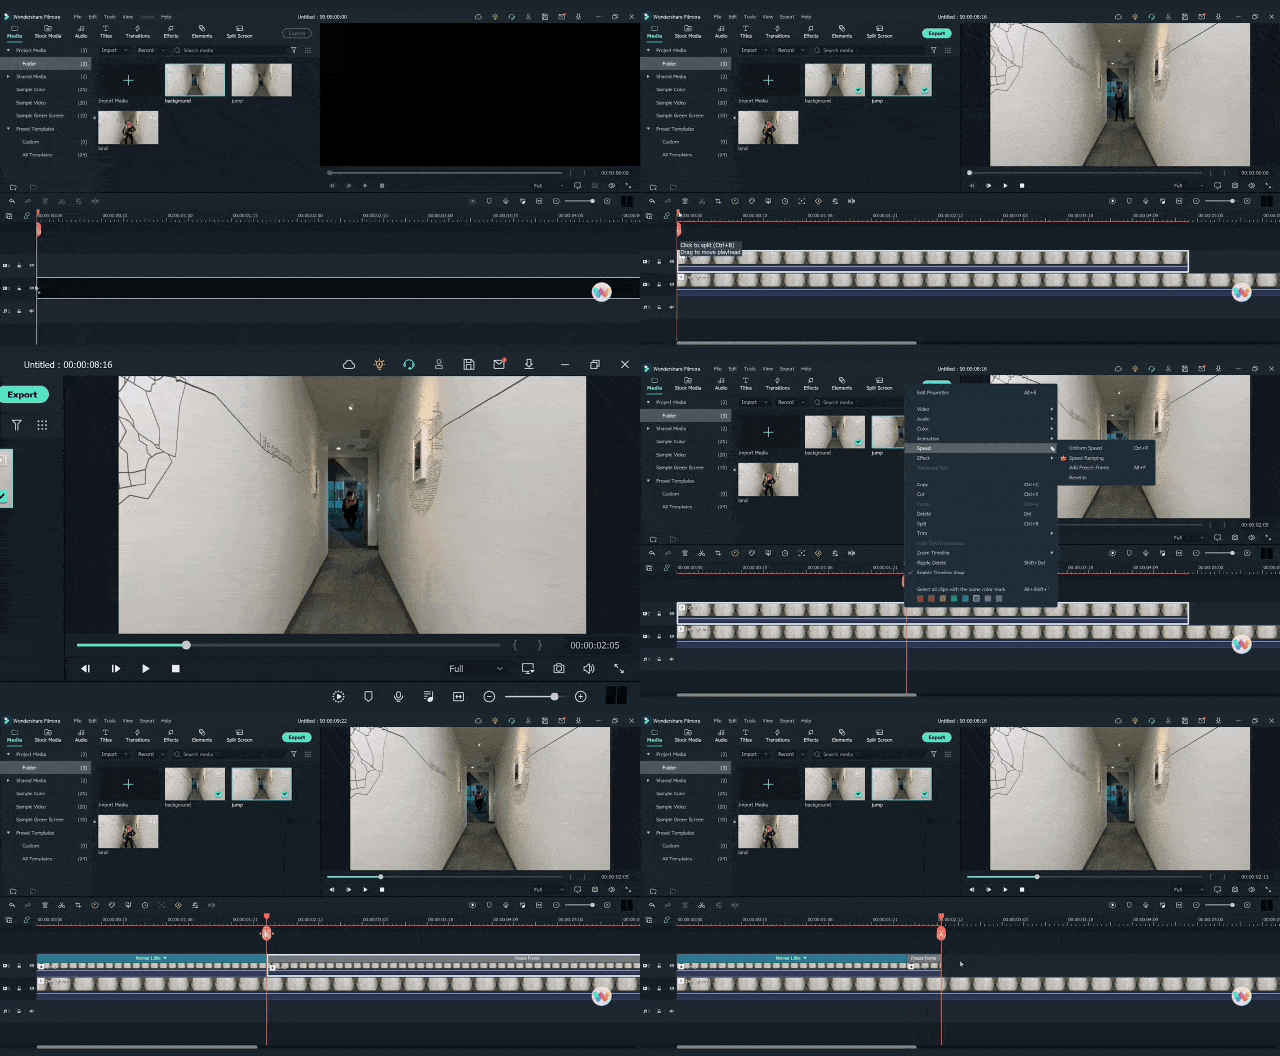
Step1 Select the empty background clip (shot 3) and place it on the first video track timeline.
Step2 Now place the jumping clip (shot 4) on the top.
Adding a Freeze Frame
A freeze frame is a type of still image that is created by simply freezing the action. Most of the time, this is used in the last shot of a movie to capture a moment in time. Here are the steps to adding a free frame.
Steps
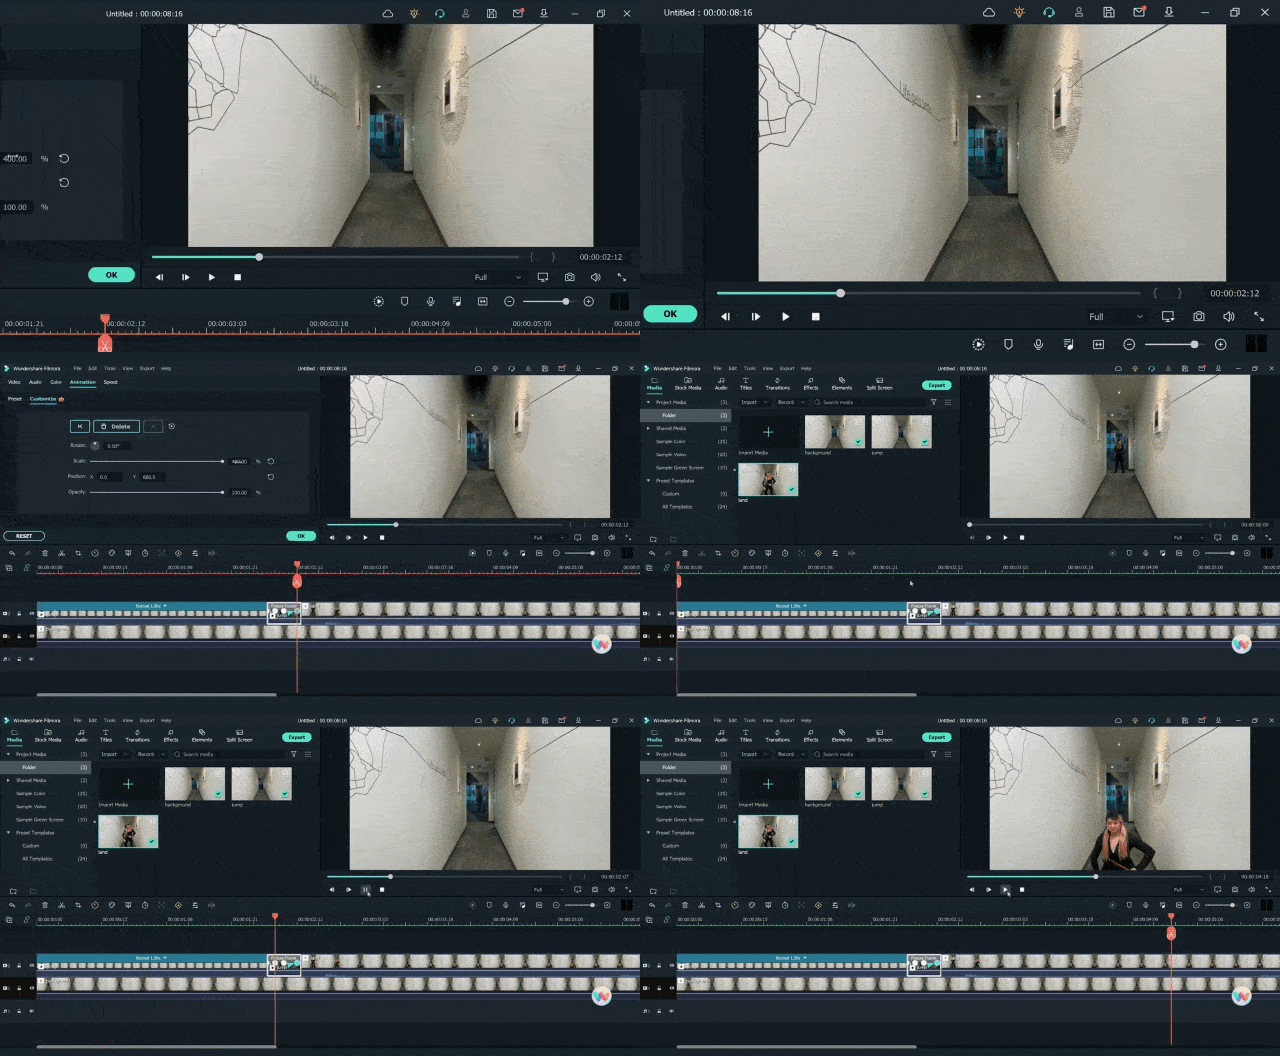
Step1 Move the playhead up to the point where the subject’s body appears smallest.
Step2 Add a freeze frame at this point by right-clicking on the playhead and selecting the speed option.
Step3 Make a cut at the start of the freeze frame, keep it for 8 frames and delete the rest.
Masking of the Video Clips
Masking is a tool in editing software that allows you to hide, duplicate, show, or adjust footage by selecting a specific section of the video or using video overlays. The steps for adding the masking effect are given below:
Steps
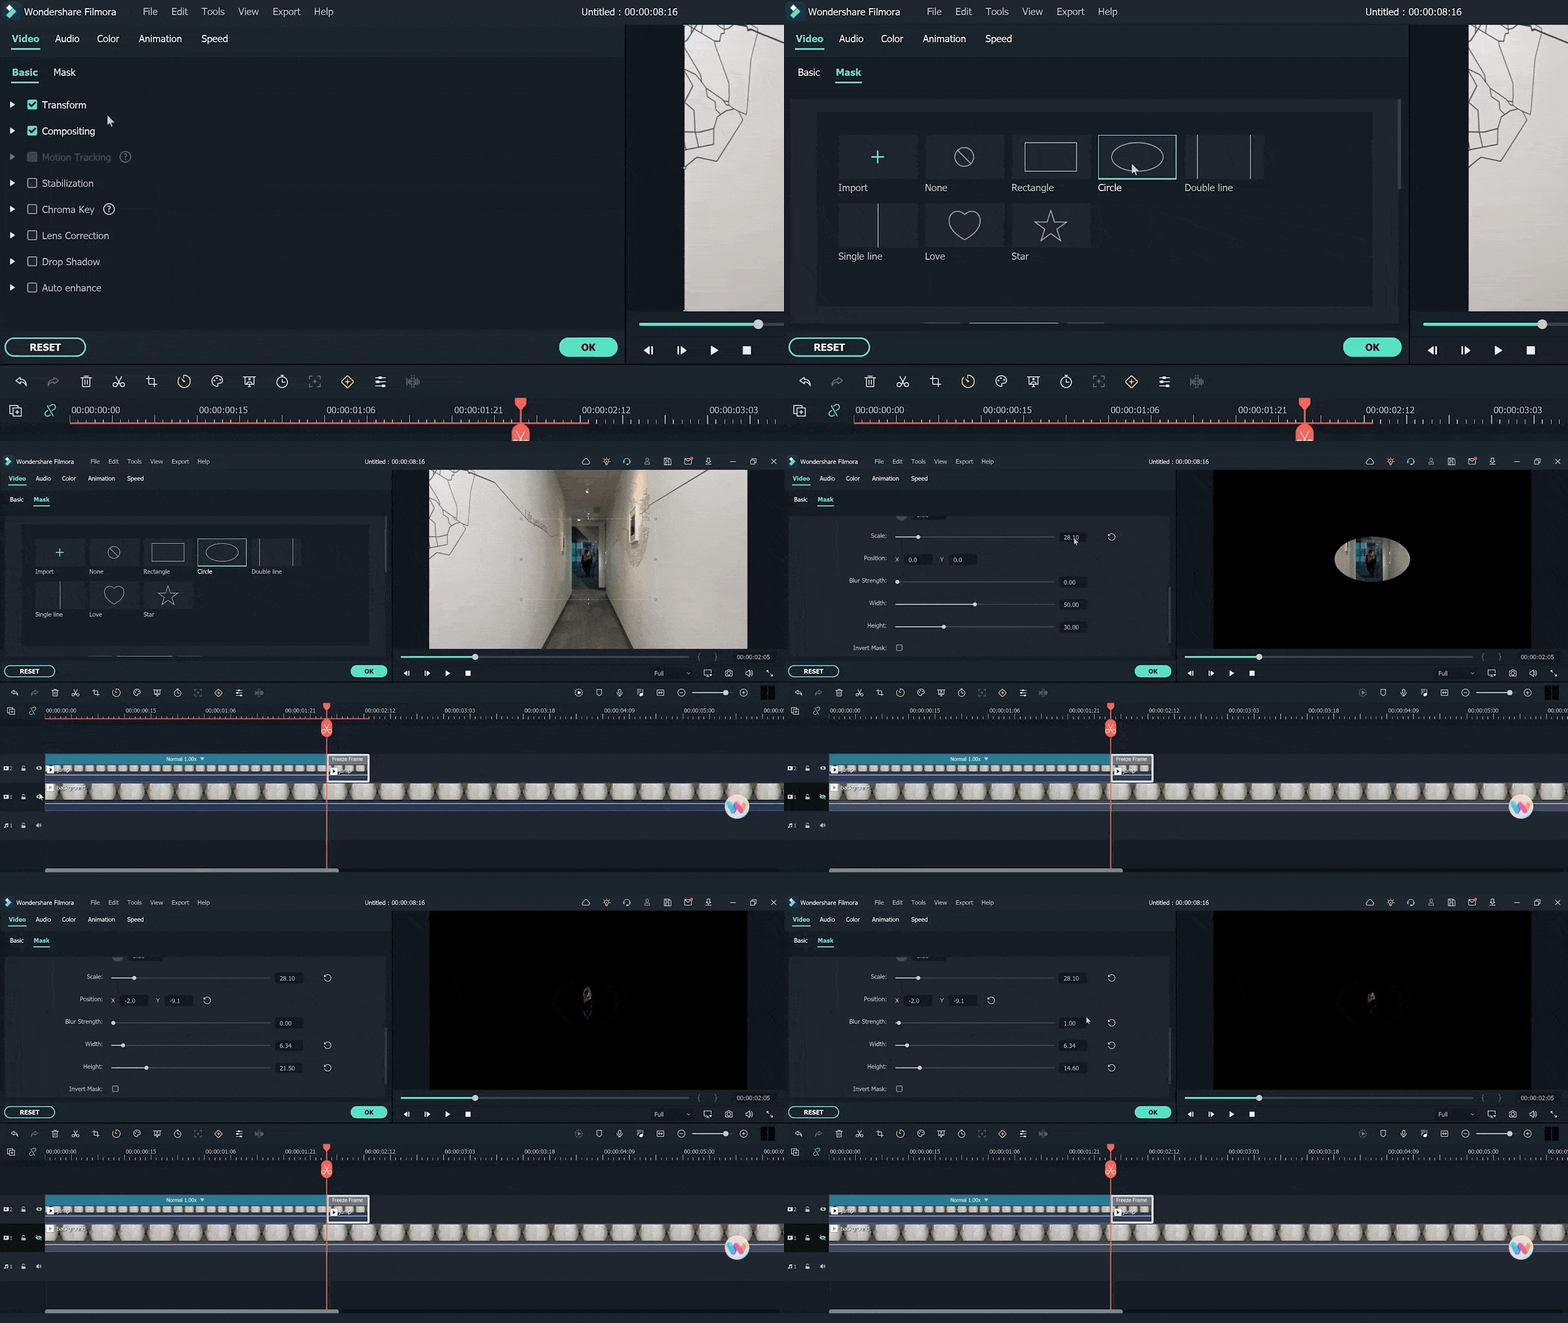
Step1 Now click on the clip view to open the “settings” window.
Step2 Click on the “mask” section and select the circle mask and create the mask of the jumping subject.
Step3 Hide the first track clip so that mask can be viewed better and edited effectively.
Step4 Adjust the scale, position, and shape of the mask and make the edges smoother to match the object.
Boris Fx Effect
Boris FX is a video editing and visual effects software. Filmora supports six continuum units-professional quality effects plugins from award-winning developer Boris FX.
To add these effects to your videos, follow the steps below:
Steps
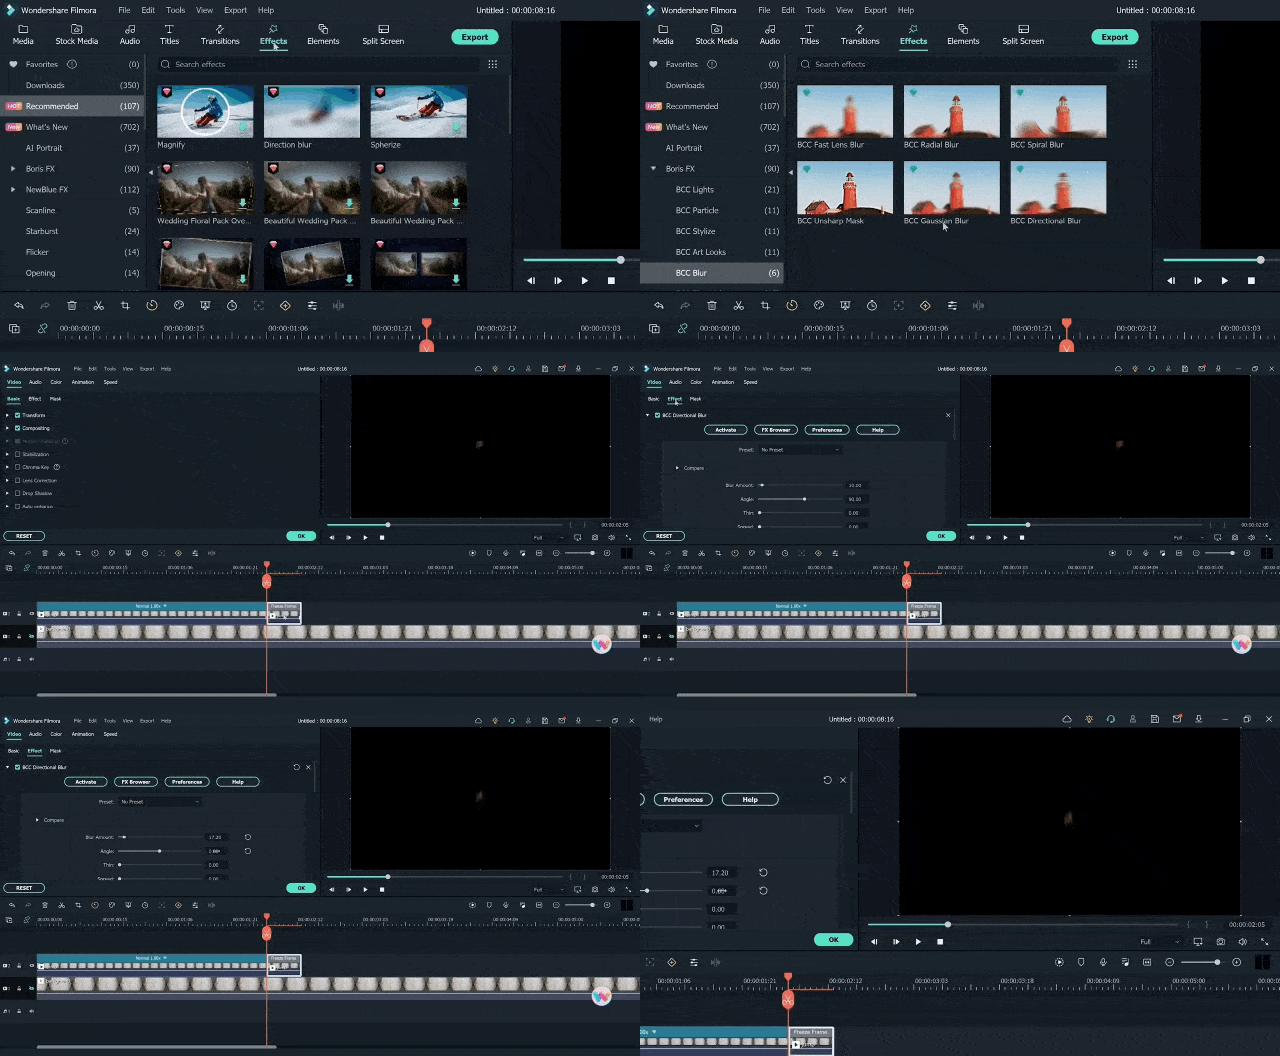
Step1 Go to the “effects” window and open the Boris FX effects.
Step2 Select the directional blur from the bcc blur category.
Step3 Drag the effect to the freeze frame.
Step4 Now clicking on freeze frame, its settings will open.
Step5 Adjust the degree and angle of blur to get a perfect mask object. Turn ON the first video track.
Step6 Add the landing clip (shot 2) on top of the first video track after the freezing frame.
Step7 Find the point where the subject starts to descend toward the floor. Cut the clip here and delete the previous part.
Step8 Move the clip next to the freeze frame clip.
Keyframing
Now we have to add animation in the freezing frame so that the masked shadow can be shown moving from the back towards the front, a speedy moving shadow. This is probably the most crucial step in editing.
Steps
Step1 Click on the freezing frame, and in the settings window, open “animation.”
Step2 Click on the customized option. Add the first keyframe at the start of the clip.
Step3 Now move two frames and add another keyframe with the position of the masked shadow as it is moving out of frame.
Step4 Now move two frames keeping the settings the same.
Step5 Add another keyframe at the end with your masked shadow appearing half from the top of the frame.
This step is a bit tricky to understand, but the most important. Once it is done, your animation will give the impression of an object moving like a flash from the back to the front of view.
Speed Ramping
Once the keyframing is done, your super jump effect is roughly ready. All you have to do now is synchronize the speed of jumping, moving shadow, and landing. Here we will use the “speed ramping” tool.
Steps
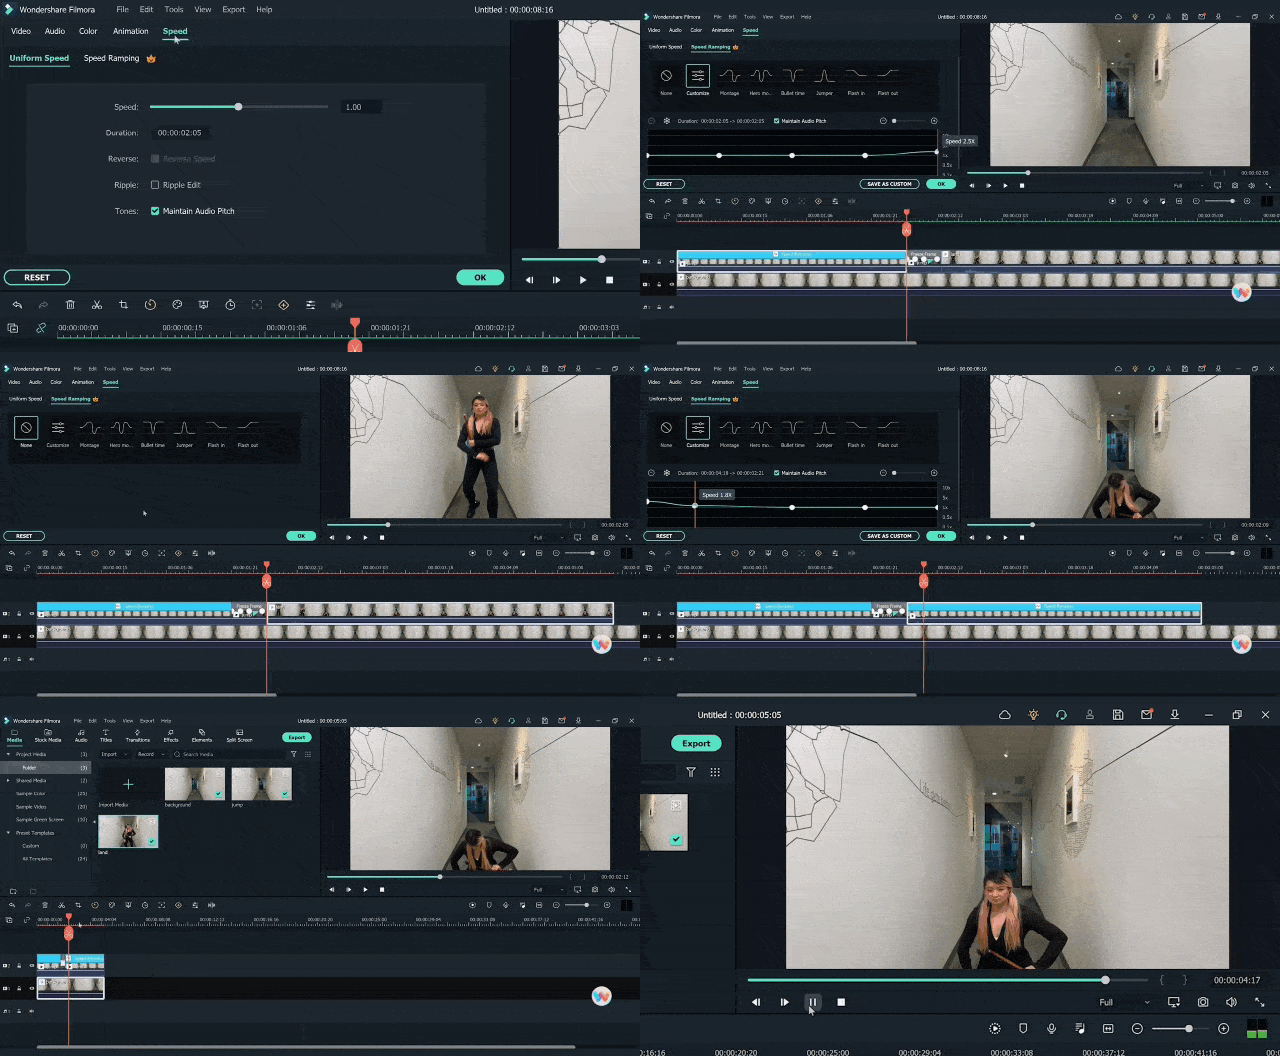
Step1 Click on the clip, and in the settings window, choose “speed.”
Step2 Click on customize and increase the speed of any frame or clip.
Step3 Move the play head on the frame that you intend to increase the speed of, and move the frame on the speed window to speed up that part.
Once you have done speed ramping on both clips, your editing is done. Now play the video and see how the clip looks and if your super jump effect is remarkable or not.
Final Words
Make sure you follow all these steps in the correct order. You can get Filmora from the Filmora website, but its cracked versions are also available. While editing, try to make the transitions and clips as smooth and synchronized as you can. Also, if you find this article helpful, do not forget to share these tips with your friends.
Free Download For Win 7 or later(64-bit)
Free Download For macOS 10.14 or later
Free Download For macOS 10.14 or later
Do You Want to Use a Video Editor for Your iOS Device? This Article Introduces LumaFusion, a Perfect Multi-Track Video Editor Designed to Cater to Your Needs
LumaFusion makes itself known as a multi-track video editor available for iOS users. While it presents other compatible versions, it provides some of the most professional video editing and enhancement features that make editing proficient on mobile devices. Its easy-to-use interface, combined with advanced functions of editing videos, adding audio, and adjusting speed, gives a perfect non-linear editing experience.
Pros
- Manageable and Proficient user interface
- Image stabilization is available to enhance performance
- Can add third-party plugins for video enhancement
- Trim unused media before exporting the video
- Videos can be exported directly to Final Cut Pro
Cons
- The user has to pay for the app to download
- Audio synchronization issues in large videos
- You can only add up to 6 audio/video tracks to the timeline
Part 1: What is LumaFusion?
LumaFusion is a multi-track video editing mobile application providing a professional video editing experience on portable devices. It gives uses a platform to create the perfect storyline and environments for bringing out the perfect features of the story that is held by the video. So, while you get a platform with interactive features and tools to work with, video editing simultaneously gets extensive and simple.
People who are not having the time to bring in a professional video editor to work on a task can look forward to this progressive tool designed for portable video editing. While you do not confuse it with a basic video editor, you can find tools that can help you adjust parameters such as the aspect ratio.

Download LumaFusion: Android | iOS
You can download this proficient video editor for your iPhone and iPad. It can also be enjoyed on Mac devices, which are now available on Android devices. LumaFusion has scaled its support and compatibility of devices over time.
Pricing Plan
If you intend to use the LumaFusion app to inject creativity into your videos, you must have to pay a single-time price of $19.99 to get access to the application. Apart from that, there are several in-app purchases that you can look forward to for increasing the hold on different tools and features, as per the requirement.
System Requirements of LumaFusion iOS
| iPhone | Requires iOS 15.4 or later. |
|---|---|
| iPad | Requires iPadOS 15.4 or later. |
| iPod Touch | Requires iOS 15.4 or later. |
| Mac | Requires macOS 12.3 or later and a Mac with Apple M1 chip or later. |
| Size | 192.9 MB |
Part 2: Key Features of LumaFusion Video Editor
We will now highlight some essential features that can be considered about the LumaFusion video editor. These features will give a better understanding of the tool and provide a guideline on how to utilize the best functions with ease:
1. Interface
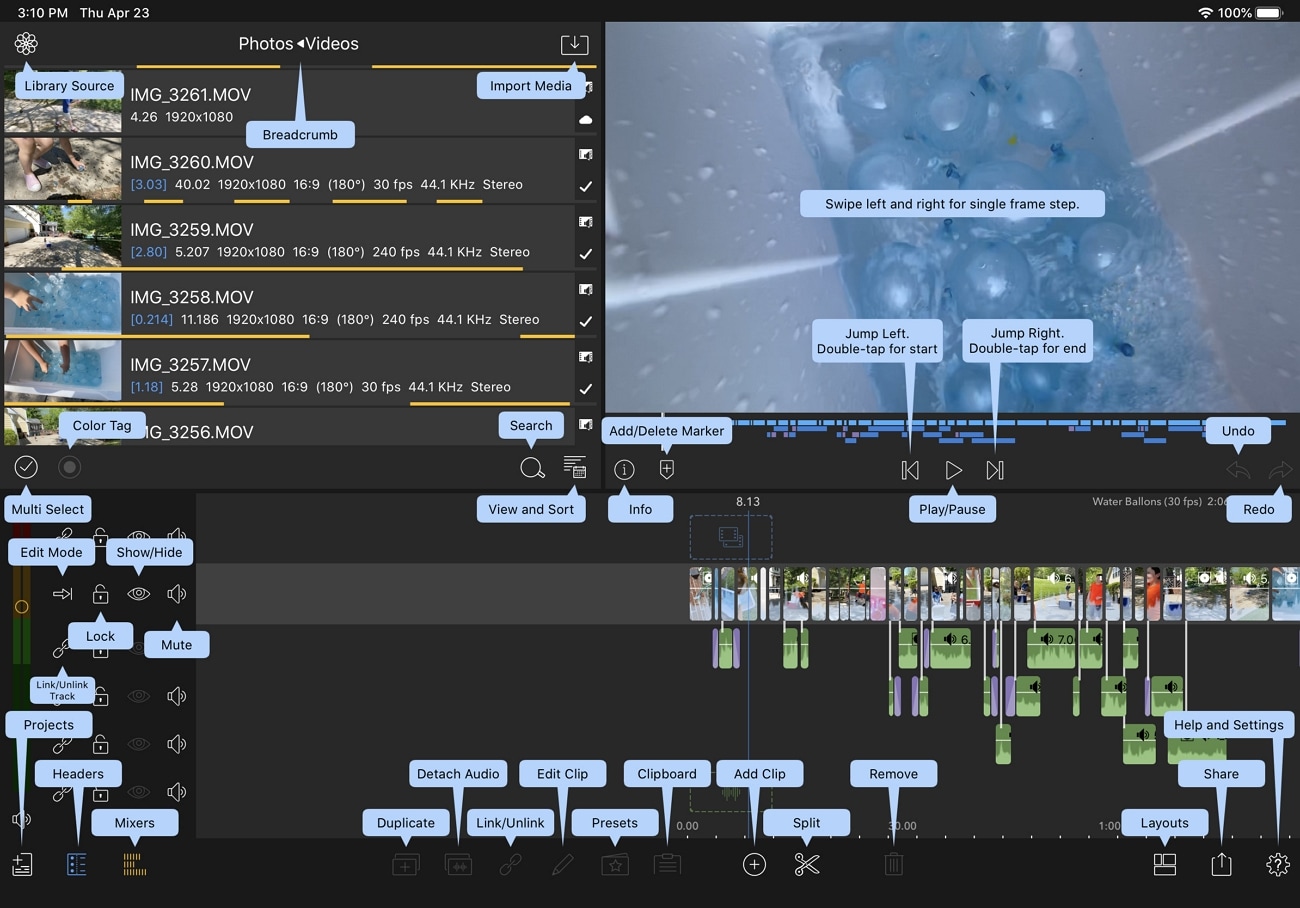
When understanding the interface of the LumaFusion app on iOS, many would think the application won’t provide extensive tools to work with. This video editor does not come with a bland user interface but provides some great functions and features on an interface that allows you to create professional-level videos.
With the option of adding titles, transitions, color grading, and effects, LumaFusion is a complete video editor that provides features that are not commonly observed in many desktop-based video editors. Regardless, it presents an efficient workspace that has managed all the functions properly in rows and different sections.
2. Video’s Layers
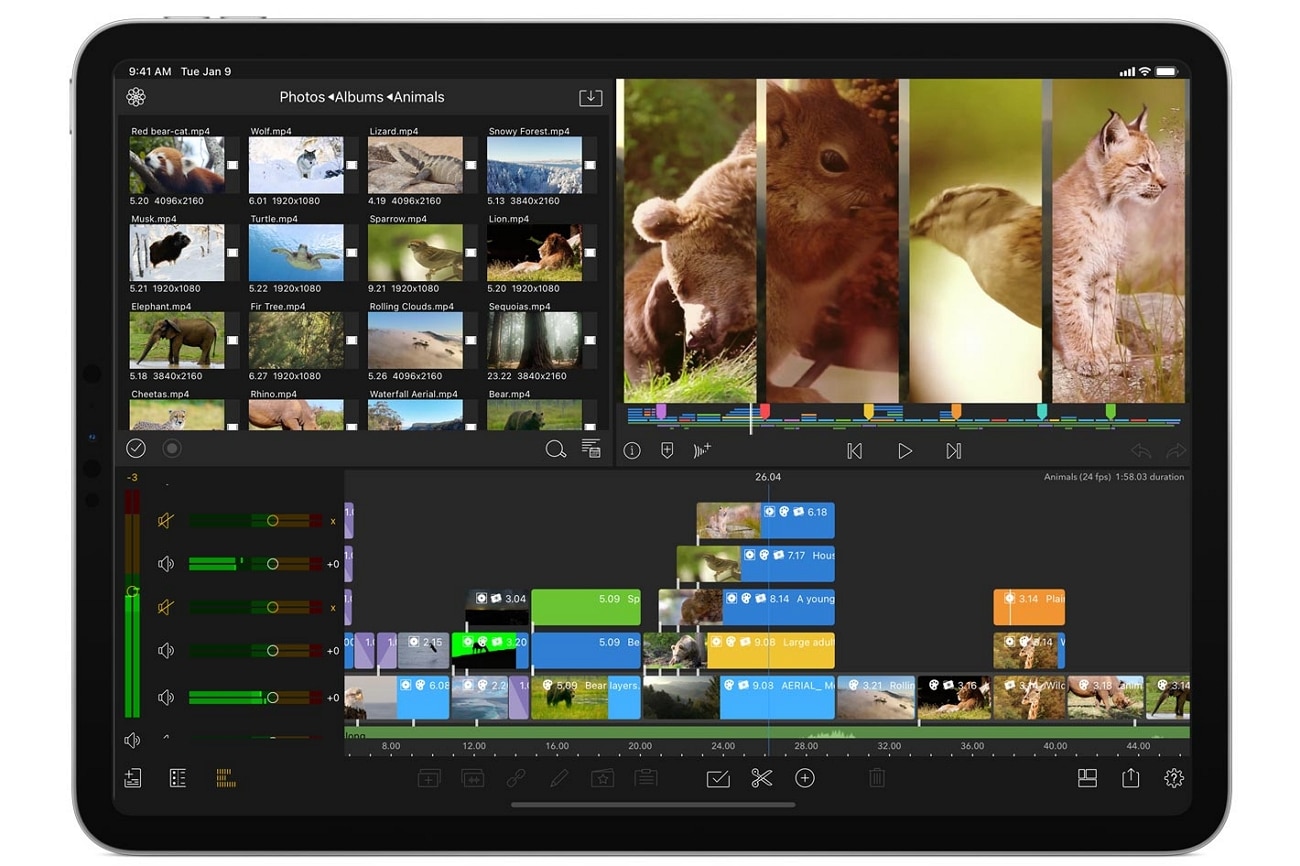
Creating proper movies on your iOS device is not difficult with LumaFusion. With the option of including six layers of video in the timeline, a lot can be done with them for improvising different sequences and multiple effects. Its picture-in-picture presets, layered transitions, graphic equalizer, and the use of additional plugins allow you to create complete videos with proper control.
Talking about some renowned iOS video editors in the market, you will find LumaFusion a much better option. iMovie, the dedicated video editor for iOS devices, can only embed two layers of videos in the timeline. This clearly explains why LumaFusion is a much better option with its video layers.
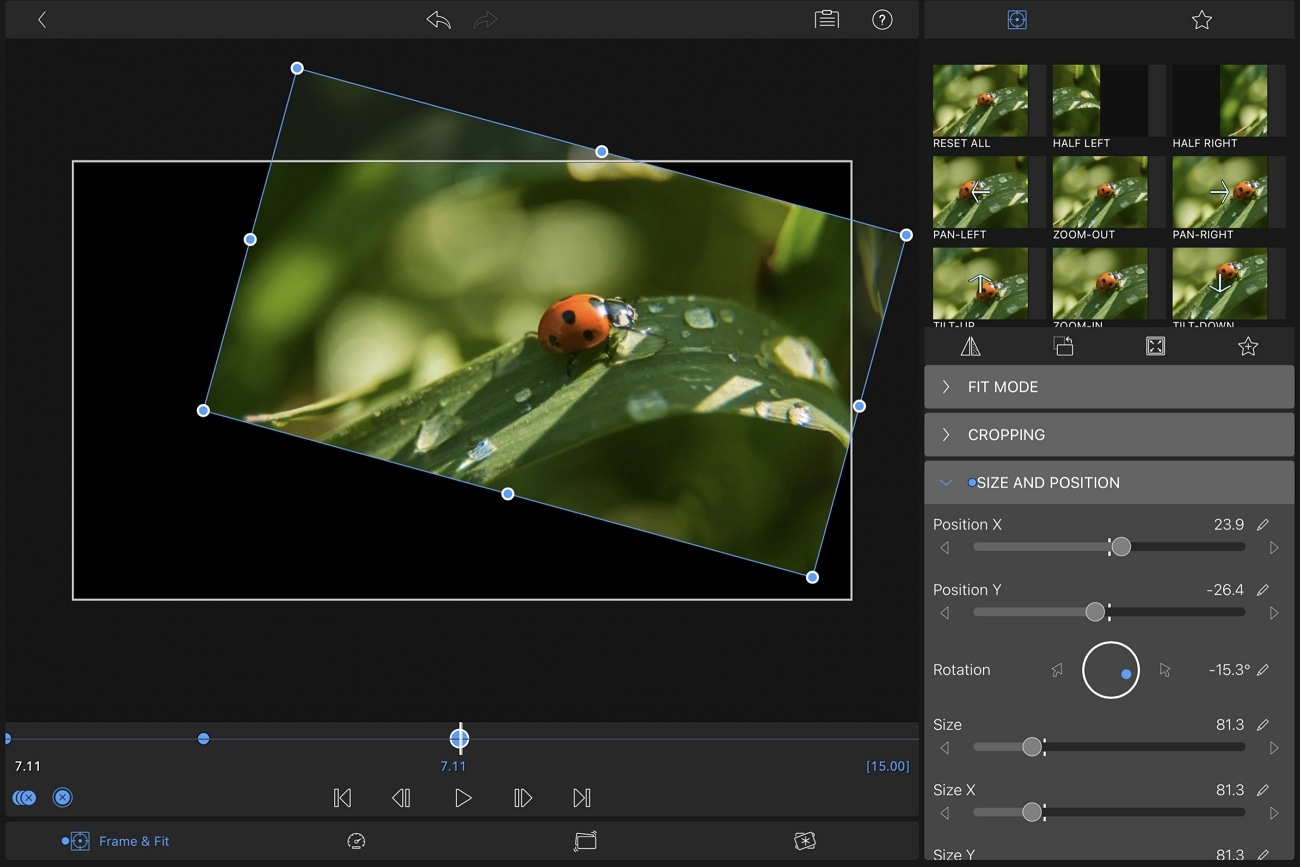
3. Powerful Keyframe
The keyframes function on LumaFusion is not challenging to work with on the video editor. You can ecstatically create animating effects with the help of the keyframe sounds within the application. These effects, once created, can be saved and used on other videos within the platform. To improve your effects on the mobile video editor, you can use the powerful keyframe feature of LumaFusion to create the best results.
With a small price to pay for the video editor, you can gain access to a diversity of keyframes that can help you design the perfect effects for your video.
4. Export to Final Cut Pro
Another impressive and touching feature this video editor provides to its users is its integration with Final Cut Pro - a proficient desktop video editor offered on macOS. You can easily export your created video to Final Cut Pro as an FCPXML.zip file directly after paying a one-time price. Users who are having a rough time editing the file on LumaFusion can easily shift to Final Cut Pro.
This process has disadvantages, regardless of the extensive control and accessibility provided between the applications. If you seek to use Final Cut Pro after editing a video on the LumaFusion app, you will have to add all the assets on FCP when you shift the file onto the platform.
Also, you might have to include many effects such as LUTs, Chroma key, and other relevant features. With this effort, you can easily put your video from LumaFusion to Final Cut Pro.
Part 3: Advantages and Disadvantages of LumaFusion Video Editor
Suppose you are considering using the LumaFusion video editor on your iOS device. In that case, there are a few advantages and disadvantages you must look into to understand more about the tool and get to an absolute decision:
Pros
- You can add third-party plugins to your video editor to enhance the video editing features. This allows you to put better effects, transitions, and enhancement elements in your video.
- It can create smooth slow-motion videos with 120fps and 240fps results.
- Multi-layer titles can be created within the platform and used in further actions.
- The display of the edited video can be previewed across an external monitor.
- It provides stability in video editing by using color tags within frame rates up to 18fps.
Cons
- For large video files, you might face lagging issues and audio synchronization within videos.
- To access the complete library of music and clips, you will have to subscribe to their additional plans.
- The tool is already available at a price tag, which is associated with more subscription plans, making it a devalued option.
Part 4: What’s New in LumaFusion 3.2 Version
The latest iteration of the LumaFusion app brings new and exciting features to the market. To learn more about these features, you will know better how the video editor is improving its operations:
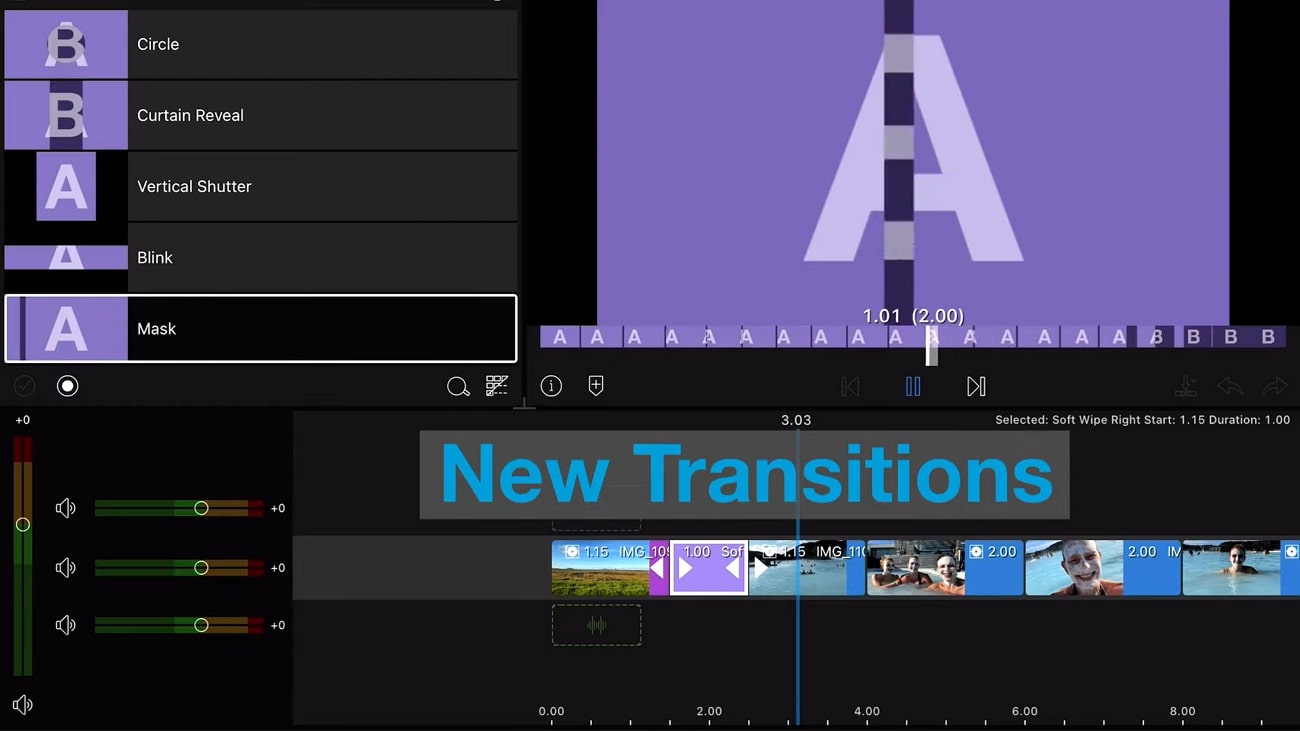
1. 35+ New Transitions
LumaFusion 3.2 comes with a new set of transitions, with almost 35 in number. With different blur transitions, there are some new introductions in the transition section that offers multiple motions.
2. iCloud Backups
If you are confused about how to sustain the storage space on your iOS device, LumaFusion now provides iCloud Drive support and allows the user to back up their data. The data from the iCloud Drive can also be restored directly from the platform.

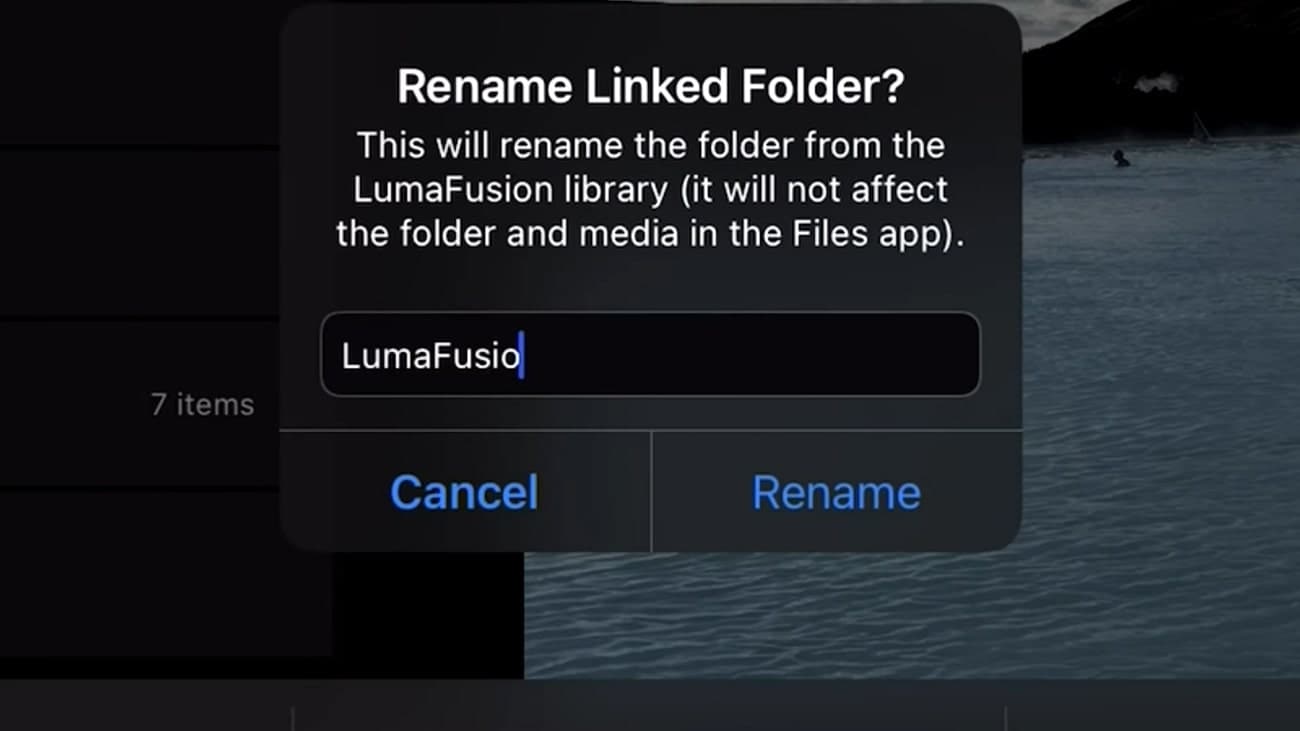
3. Rename Linked Folders
In the previous versions of LumaFusion, you could not rename the linked folders, or the platform incorrectly named them. With this update, you can now easily rename the linked folders by selecting and holding them within the interface.
4. Localizations for 2 New Versions
Traditional Chinese and Brazilian Portuguese are now among the added localizations in the video editor. The wide range of language support is helping this application set up a new precedent in the market for other mobile video editors.
Part 5: Best Alternative to LumaFusion Video Editor for iOS
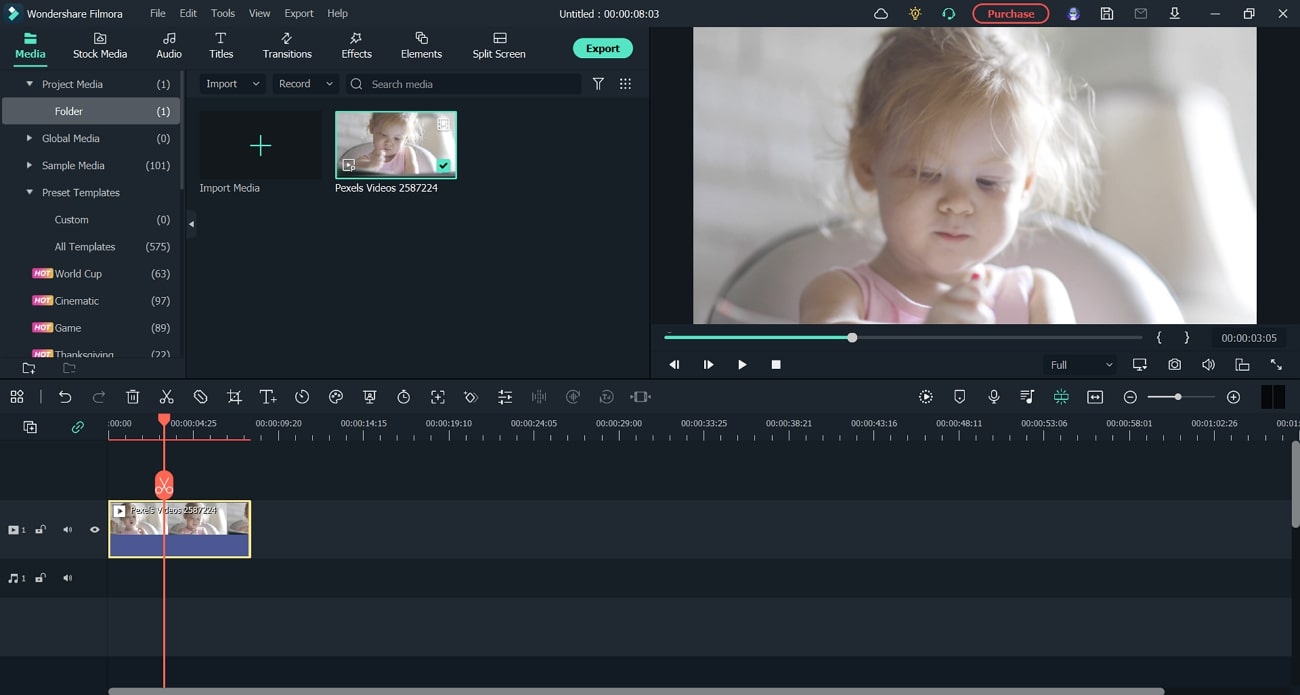
LumaFusion video editor is a great option, but its drawbacks restrict it to some extent. To answer this, Wondershare Filmora provides a better option for video editing, offering compatibility on Windows and all other platforms supported by the LumaFusion video editing application. To know more about how good Filmora is, look ahead.
Wondershare Filmora is a complete, easy-to-use video editor providing many features and creativity options. For example, you can find the perfect set of effects and transitions on the platform by supporting a diversity of filters and text overlays. With other options, such as PIP mode and video beautification, Wondershare Filmora supports many file formats for video editing.
Free Download For Win 7 or later(64-bit)
Free Download For macOS 10.14 or later
Conclusion
This article has provided a prominent overview of the LumaFusion review, a video editor that has made video editing operations easier on smartphones. While it is a great iOS video editor, you can find other prominent functions with extensive layered support, intuitive keyframes, and consolidated connectivity to other platforms. As a better option, this article has offered Wondershare Filmora as a more potent tool with better compatibility and inexpensive features.
People Also Want to Know
1. How to download LumaFusion on Windows?
LumaFusion is unavailable on the Windows platform, where you can only find it on Mac, iOS, and Android. As an alternative to this video editor, you can try using Wondershare Filmora.
2. Can LumaFusion edit 4K?
You can easily edit, manage, and export 4K videos within the platform. LumaFusion provides extensive support for managing a broad range of video resolutions.
Part 1: What is LumaFusion?
LumaFusion is a multi-track video editing mobile application providing a professional video editing experience on portable devices. It gives uses a platform to create the perfect storyline and environments for bringing out the perfect features of the story that is held by the video. So, while you get a platform with interactive features and tools to work with, video editing simultaneously gets extensive and simple.
People who are not having the time to bring in a professional video editor to work on a task can look forward to this progressive tool designed for portable video editing. While you do not confuse it with a basic video editor, you can find tools that can help you adjust parameters such as the aspect ratio.

Download LumaFusion: Android | iOS
You can download this proficient video editor for your iPhone and iPad. It can also be enjoyed on Mac devices, which are now available on Android devices. LumaFusion has scaled its support and compatibility of devices over time.
Pricing Plan
If you intend to use the LumaFusion app to inject creativity into your videos, you must have to pay a single-time price of $19.99 to get access to the application. Apart from that, there are several in-app purchases that you can look forward to for increasing the hold on different tools and features, as per the requirement.
System Requirements of LumaFusion iOS
| iPhone | Requires iOS 15.4 or later. |
|---|---|
| iPad | Requires iPadOS 15.4 or later. |
| iPod Touch | Requires iOS 15.4 or later. |
| Mac | Requires macOS 12.3 or later and a Mac with Apple M1 chip or later. |
| Size | 192.9 MB |
Part 2: Key Features of LumaFusion Video Editor
We will now highlight some essential features that can be considered about the LumaFusion video editor. These features will give a better understanding of the tool and provide a guideline on how to utilize the best functions with ease:
1. Interface
When understanding the interface of the LumaFusion app on iOS, many would think the application won’t provide extensive tools to work with. This video editor does not come with a bland user interface but provides some great functions and features on an interface that allows you to create professional-level videos.
With the option of adding titles, transitions, color grading, and effects, LumaFusion is a complete video editor that provides features that are not commonly observed in many desktop-based video editors. Regardless, it presents an efficient workspace that has managed all the functions properly in rows and different sections.

2. Video’s Layers
Creating proper movies on your iOS device is not difficult with LumaFusion. With the option of including six layers of video in the timeline, a lot can be done with them for improvising different sequences and multiple effects. Its picture-in-picture presets, layered transitions, graphic equalizer, and the use of additional plugins allow you to create complete videos with proper control.
Talking about some renowned iOS video editors in the market, you will find LumaFusion a much better option. iMovie, the dedicated video editor for iOS devices, can only embed two layers of videos in the timeline. This clearly explains why LumaFusion is a much better option with its video layers.

3. Powerful Keyframe
The keyframes function on LumaFusion is not challenging to work with on the video editor. You can ecstatically create animating effects with the help of the keyframe sounds within the application. These effects, once created, can be saved and used on other videos within the platform. To improve your effects on the mobile video editor, you can use the powerful keyframe feature of LumaFusion to create the best results.
With a small price to pay for the video editor, you can gain access to a diversity of keyframes that can help you design the perfect effects for your video.

4. Export to Final Cut Pro
Another impressive and touching feature this video editor provides to its users is its integration with Final Cut Pro - a proficient desktop video editor offered on macOS. You can easily export your created video to Final Cut Pro as an FCPXML.zip file directly after paying a one-time price. Users who are having a rough time editing the file on LumaFusion can easily shift to Final Cut Pro.
This process has disadvantages, regardless of the extensive control and accessibility provided between the applications. If you seek to use Final Cut Pro after editing a video on the LumaFusion app, you will have to add all the assets on FCP when you shift the file onto the platform.
Also, you might have to include many effects such as LUTs, Chroma key, and other relevant features. With this effort, you can easily put your video from LumaFusion to Final Cut Pro.
Part 3: Advantages and Disadvantages of LumaFusion Video Editor
Suppose you are considering using the LumaFusion video editor on your iOS device. In that case, there are a few advantages and disadvantages you must look into to understand more about the tool and get to an absolute decision:
Pros
- You can add third-party plugins to your video editor to enhance the video editing features. This allows you to put better effects, transitions, and enhancement elements in your video.
- It can create smooth slow-motion videos with 120fps and 240fps results.
- Multi-layer titles can be created within the platform and used in further actions.
- The display of the edited video can be previewed across an external monitor.
- It provides stability in video editing by using color tags within frame rates up to 18fps.
Cons
- For large video files, you might face lagging issues and audio synchronization within videos.
- To access the complete library of music and clips, you will have to subscribe to their additional plans.
- The tool is already available at a price tag, which is associated with more subscription plans, making it a devalued option.
Part 4: What’s New in LumaFusion 3.2 Version
The latest iteration of the LumaFusion app brings new and exciting features to the market. To learn more about these features, you will know better how the video editor is improving its operations:
1. 35+ New Transitions
LumaFusion 3.2 comes with a new set of transitions, with almost 35 in number. With different blur transitions, there are some new introductions in the transition section that offers multiple motions.

2. iCloud Backups
If you are confused about how to sustain the storage space on your iOS device, LumaFusion now provides iCloud Drive support and allows the user to back up their data. The data from the iCloud Drive can also be restored directly from the platform.

3. Rename Linked Folders
In the previous versions of LumaFusion, you could not rename the linked folders, or the platform incorrectly named them. With this update, you can now easily rename the linked folders by selecting and holding them within the interface.

4. Localizations for 2 New Versions
Traditional Chinese and Brazilian Portuguese are now among the added localizations in the video editor. The wide range of language support is helping this application set up a new precedent in the market for other mobile video editors.
Part 5: Best Alternative to LumaFusion Video Editor for iOS
LumaFusion video editor is a great option, but its drawbacks restrict it to some extent. To answer this, Wondershare Filmora provides a better option for video editing, offering compatibility on Windows and all other platforms supported by the LumaFusion video editing application. To know more about how good Filmora is, look ahead.
Wondershare Filmora is a complete, easy-to-use video editor providing many features and creativity options. For example, you can find the perfect set of effects and transitions on the platform by supporting a diversity of filters and text overlays. With other options, such as PIP mode and video beautification, Wondershare Filmora supports many file formats for video editing.
Free Download For Win 7 or later(64-bit)
Free Download For macOS 10.14 or later

Conclusion
This article has provided a prominent overview of the LumaFusion review, a video editor that has made video editing operations easier on smartphones. While it is a great iOS video editor, you can find other prominent functions with extensive layered support, intuitive keyframes, and consolidated connectivity to other platforms. As a better option, this article has offered Wondershare Filmora as a more potent tool with better compatibility and inexpensive features.
People Also Want to Know
1. How to download LumaFusion on Windows?
LumaFusion is unavailable on the Windows platform, where you can only find it on Mac, iOS, and Android. As an alternative to this video editor, you can try using Wondershare Filmora.
2. Can LumaFusion edit 4K?
You can easily edit, manage, and export 4K videos within the platform. LumaFusion provides extensive support for managing a broad range of video resolutions.
Also read:
- [Updated] 2024 Approved How to Capture and Stream in Stunning HD (FB)
- [Updated] In 2024, Snap Up Humor - Kapwing’s Meme Mastery Tool
- 2 Ways to Transfer Text Messages from Nubia Red Magic 9 Pro+ to iPhone 15/14/13/12/11/X/8/ | Dr.fone
- 2024 Approved Learn to Use Montage with These Movies
- Best Value Laptop Cooler TopMate C302 Evaluation
- Expert Advice for Repairing a Non-Functional USB Port on Dell Devices
- For People Wanting to Mock GPS on Realme V30T Devices | Dr.fone
- How To Create Quiz Videos Detailed Guide for 2024
- How to Rescue Lost Photos from Nokia C210?
- New In 2024, How to Make a Slow Motion Video Complete Guide
- New TEXT REVEAL Animation | Easy Masking Filmora
- Title: Updated In 2024, Clone Yourself in Videos with Filmora
- Author: Chloe
- Created at : 2025-03-01 18:58:35
- Updated at : 2025-03-03 23:35:17
- Link: https://ai-editing-video.techidaily.com/updated-in-2024-clone-yourself-in-videos-with-filmora/
- License: This work is licensed under CC BY-NC-SA 4.0.