Updated In 2024, Create the Night-to-Day Effect Videos

Create the Night-to-Day Effect Videos
Do you wish you could control when it’s nighttime to daytime? It would make getting ready in the morning much faster! This tutorial will show you how to use the keyframe and mask feature in Filmora to make a remarkable night-to-day transition.
How-to Guide
1) Preparation
For this effect, you will need to shoot two footage shots with the same frame. The first is for the daytime clip, and the second is for nighttime.
But before that, you need to prepare some things, such as:
- Tripod to ensure your camera stays at the same point, so the frame doesn’t change.
- Mark the place where you want to shoot the scene. You can put a marker on the floor to ensure that you perform at the same spot in different shots.
Once done, let’s start shooting to get the footage.
2) Steps
Shooting footages
First, get the daytime shot. For this tutorial, we will pretend that you are walking and transitioning into nighttime at the spot you have marked.

Now, let’s film the nighttime clip. You will walk through the living room and do the same movement again at the same spot. You can dim the light and change the camera’s white balance settings to bluer to create a night feeling.

After you have both clips that you need, let’s go to Filmora and start editing.
Night-to-day transition
Step1 Launch Filmora and import the footage into the program. If you haven’t installed it, you can download Filmora on their website here: https://filmora.wondershare.com
Step2 Place the nighttime video clip on the first video track of the timeline and place the daytime clip on the top.

Step3 Find the spot where you want to create a transition between the day and nighttime. Then, you can delete the unwanted part.

Step4 Since the transition for this tutorial is where the subject started waving, make sure to place the daytime clip at the same time the subject started waving in the nighttime clip. Hence, the timing in both clips syncs.
Masking transition
For the next step, we will make a masking transition with the Filmora mask feature.
Step1 Double-click the daytime clip on the timeline. In the Filmora setting, find the Mask section > Circle. You can see the mask is applied in the preview screen.

Step2 Scroll down the setting and click add a keyframe at the beginning of the clip.

Step3 Change the scale of the mask to the smallest number and adjust the Width and Height down to 0. You can set the blur strength to 15 to make the transition edge smoother.

Step4 Move the play head to find the spot where you want the mask fully opens up, then add another keyframe. Change the scale of the mask to 2 and the Width and Height to 50. Make sure the mask occupies the whole frame.

Now, if you play back, you can see the nighttime becomes daytime through the mask.

If the movement in the two clips is a bit off, you can fix it by adding more keyframes on the mask.
3) Pro tips
You can add one more effect in Filmora to make it more magical. To do this, open the Effects window on the top left and find “Heartbeat” under the Basic section.

Drag and drop it onto the third video track and start the effect when the mask opens up. Then, trim the effect length to match the movement. Adjust the speed of this effect if needed.

The final result will look like this:

Summary
That is how to do this night-to-day transition night-to-day time shift effect in Filmora. By the end of this tutorial, you should be able to use the masking transition technique. You can apply and adjust it based on your needs.
Free Download For Win 7 or later(64-bit)
Free Download For macOS 10.14 or later
Free Download For macOS 10.14 or later
Finding The Best LUTs for Wondershare Filmora
Colors play an important role by bringing life and vibrancy to our videos and photos. They can add emotions, set moods, and create appealing content. That is why color grading is important, allowing us to refine and transform the colors. Additionally, color grading is the application of Look-Up Tables, commonly known as LUTs.
There are various types of LUTs, each offering a different color tone and scheme. Moreover, for utilizing LUTs and color grading, Wondershare Filmora is a popular choice. You can download LUTs from its in-built library with over 200 LUTs available. However, there are also numerous Filmora LUTs available on the internet that can be downloaded and used.
- Part 2: How to Use 3D LUTs on Wondershare Filmora?
- Part 3: The Best LUTs Available for Filmora - Comprehensive List
- Part 4: Top Build-in Resource LUTs of Wondershare Filmora
Part 1: What Is Wondershare Filmora Offering in the LUTs Section?
Enhancing the visual appeal of your videos through color grading is essential. It adds mood and emotion, creating amazing content. Wondershare Filmora , a popular video editing tool, allows applying LUTs directly onto your files. You can explore a wide range of over 200 LUTs available in Filmora’s library. Additionally, you can download various LUTs from the internet and even change their intensity.
Apart from Filmora LUTs, it also offers other remarkable video editing capabilities. With this tool, you can effortlessly change the background of your video without a green screen. Furthermore, it provides filters and effects that you can apply to improve your edits. In addition, this fantastic tool offers over 10 billion stock media files you can use.
Key Features of Wondershare Filmora
- Wondershare Filmora has amazing features, such as the AI Audio Stretch feature. This feature stretches your background songs to fit the length of your videos.
- Another amazing feature is that you can reframe any video easily. With its Auto Reframe, you can change the aspect ratio of your videos automatically.
- Moreover, this tool can detect silence in your videos. Its silence detection features detect awkward silences or pauses in your videos and trim that part.
Free Download For Win 7 or later(64-bit)
Free Download For macOS 10.14 or later
Part 2: How to Use 3D LUTs on Wondershare Filmora
You can apply LUTs directly onto your videos using Wondershare Filmora. To apply Filmora X LUTs on your media files, follow these steps. There are two different methods for using 3D LUTs using this tool.
Method 1: The Effects Tab Method
Step1 Import Your Video
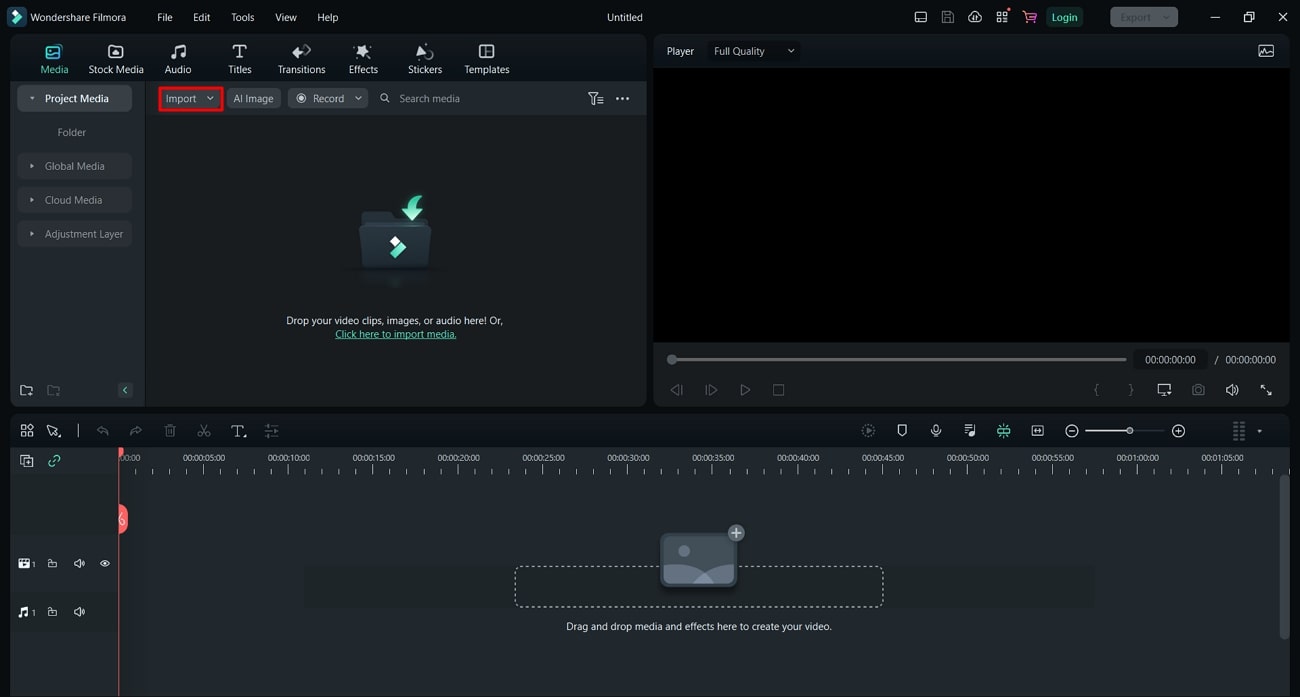
To import your video to apply LUTs, firstly, you have to open Wondershare Filmora. Once opened, go to the “Create Project” section and select “New Project.” After that, a new window will pop up. Furthermore, select the “Import” button in this window to import your video.
Step2 Choose Your LUT from the Effects Tab
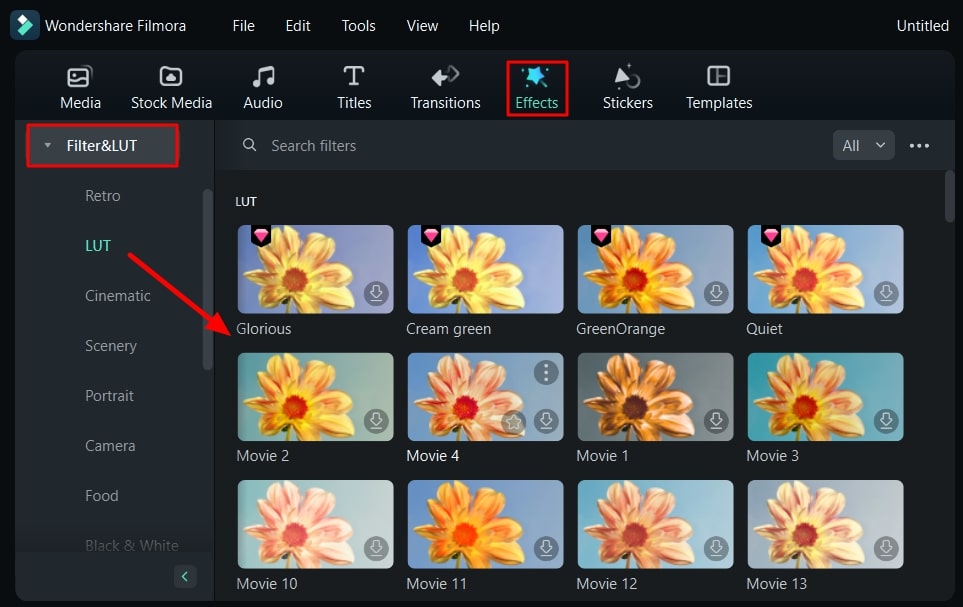
Once you’ve imported your media into the tool, on the top of the screen, select the “Effects” tab. Furthermore, select the “Filters&LUT” option on the left sidebar and go to the “LUT” option. There you will see different LUTs that you can apply. Choose your desired LUT from the section.
Step3 Apply Your LUT
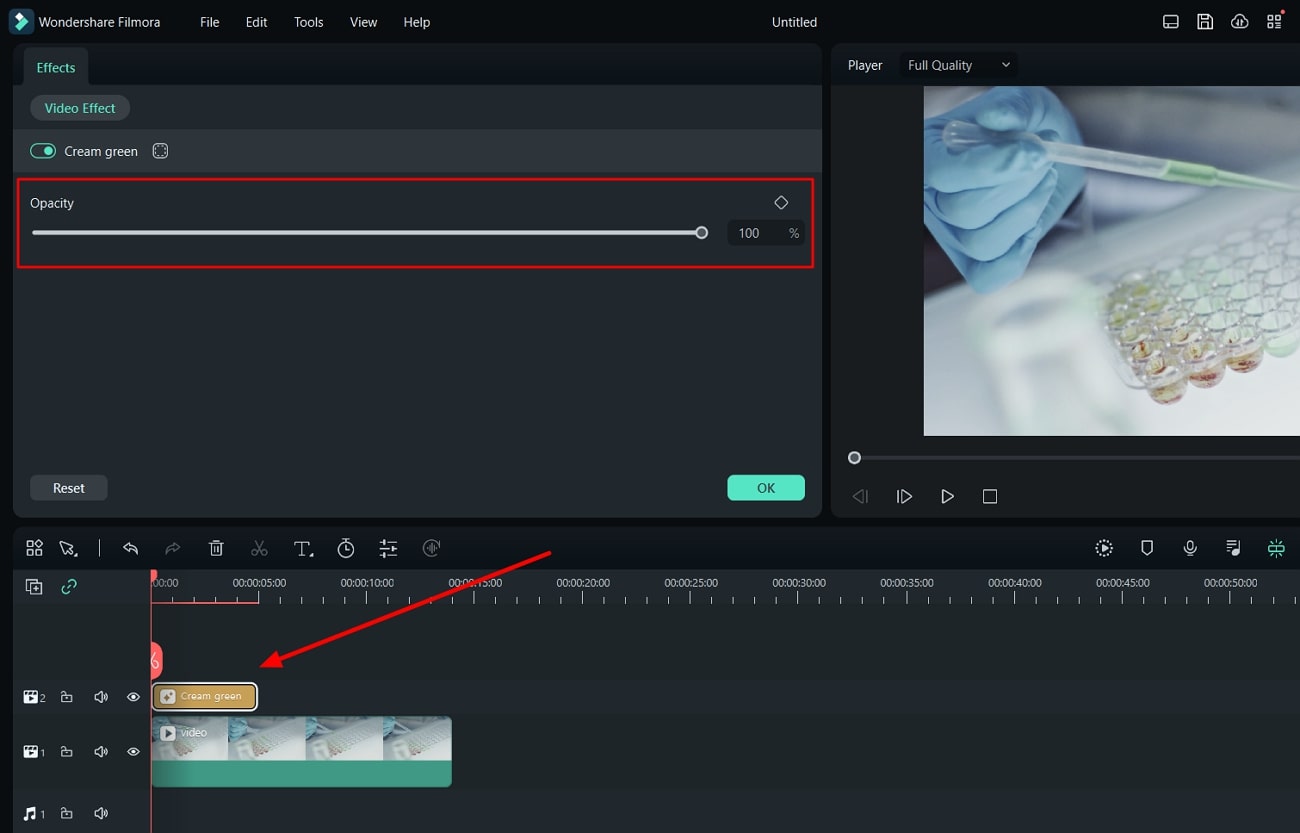
After selecting your desired LUT, click on the “Download” button. Once downloaded, drag that LUT and drop it on top of your video to apply the LUT. You can change your LUT’s intensity by double-clicking your LUT and moving the “Opacity” slider.
Method 2: The Video Settings Method
Step1 Access Video Settings
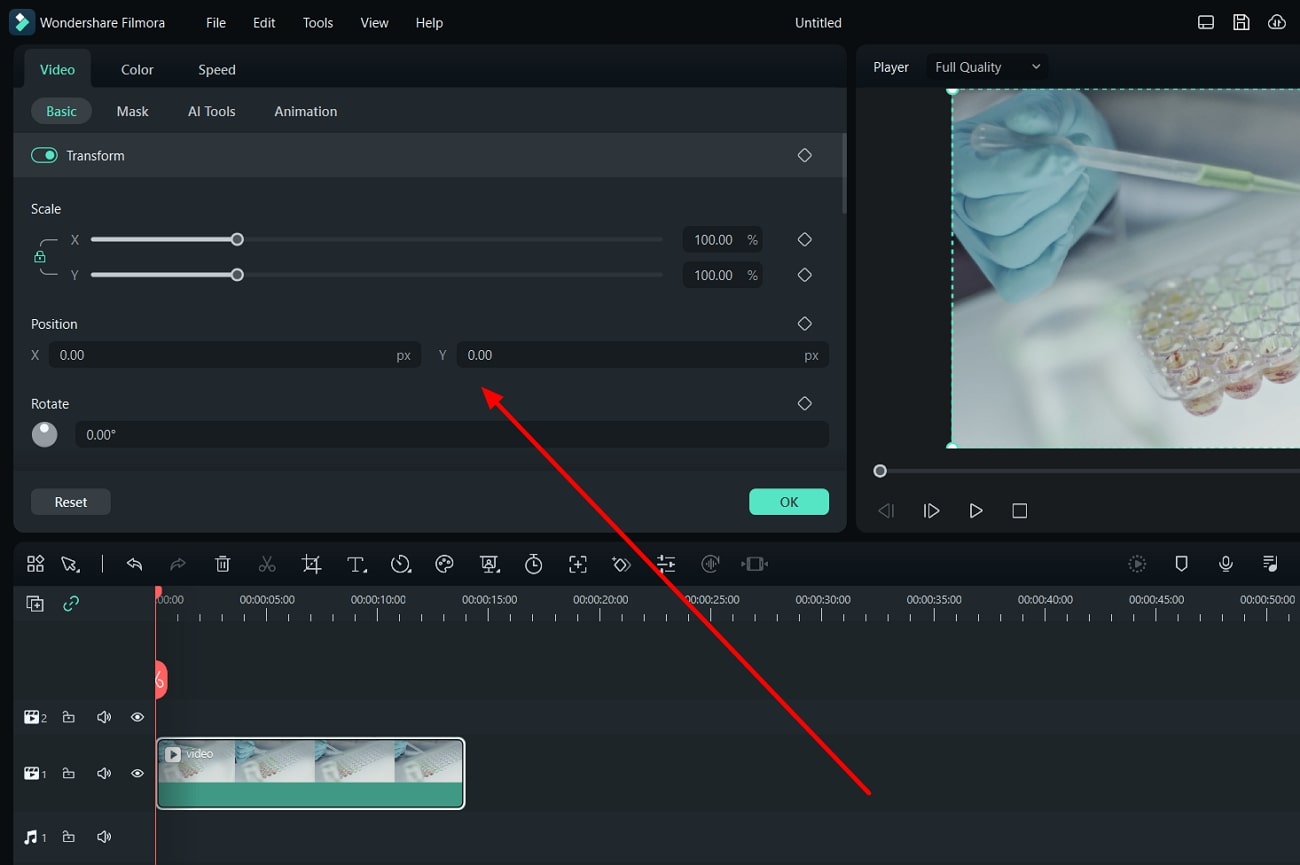
Open the tool and add your video to the timeline. Once you have imported the video, double-click the video, this will open the video settings.
Step2 Open LUT Settings
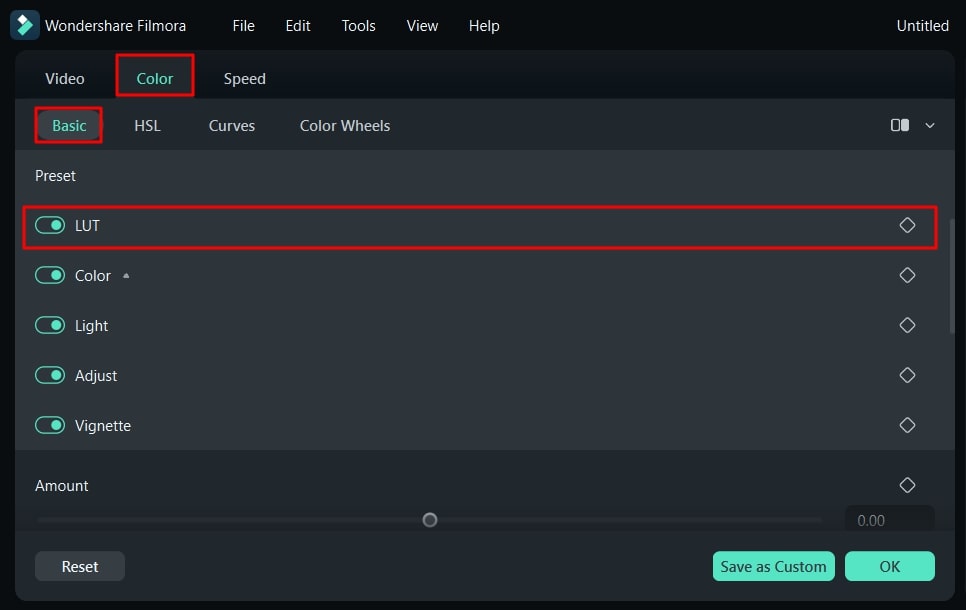
In the video settings window, navigate to the “Color” section. Furthermore, go to the “Basic” tab and toggle right to turn on the “LUT” option.
Step3 Apply the Desired LUT
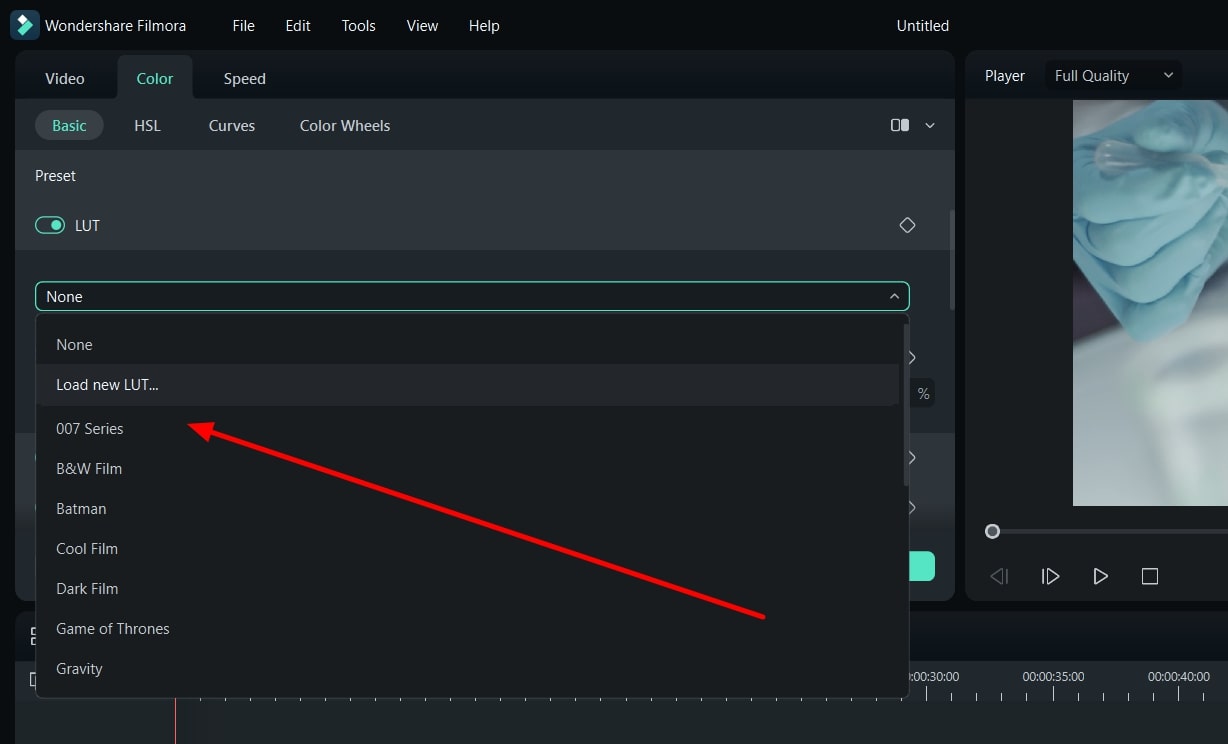
To continue applying LUT, choose your desired LUT from the list. Additionally, you can add your favorite LUT from your system by choosing the “Load new LUT” option from the drop-down menu. In this way, you can apply the LUT to your video.
Part 3: Top Build-in Resource LUTs of Wondershare Filmora
There are 200+ LUTs available that can be imported from the in-built resources of the video editor. These presets come in different styles and color tones. Here are some of the top color grading presets that you can download.
Cold Mountains 01
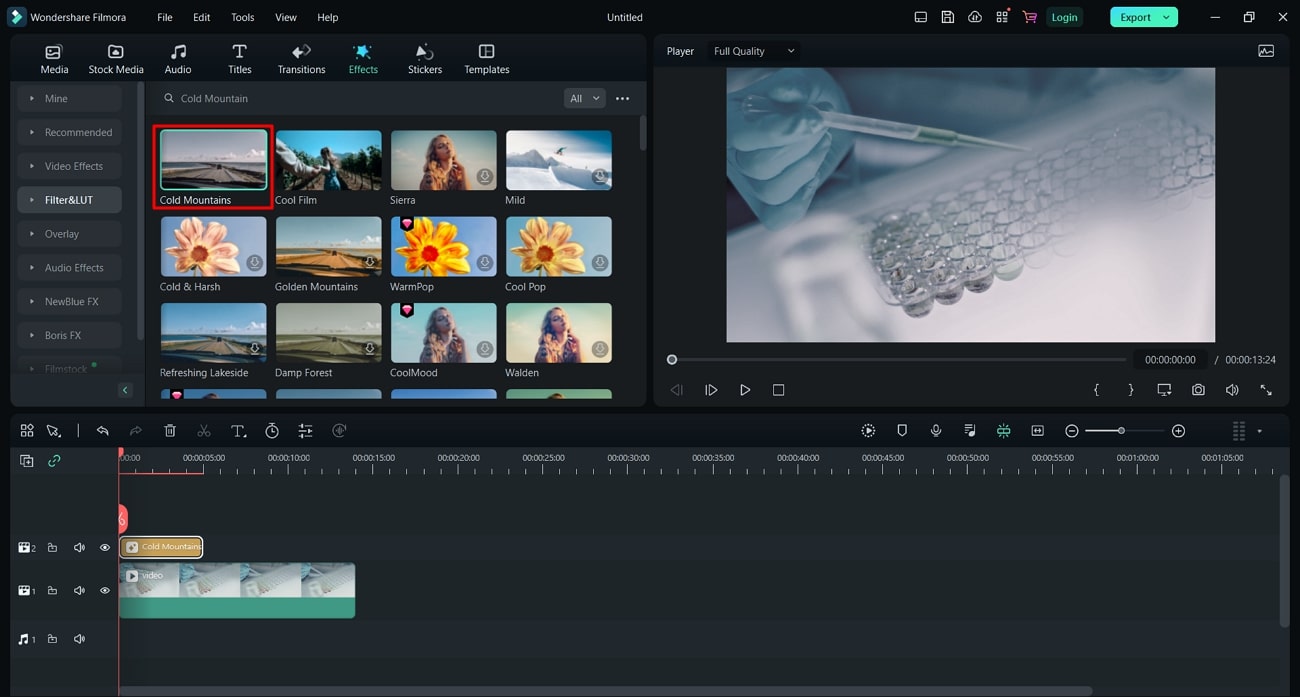
It is a great LUT pack that you can download for free using Wondershare Filmora. This color grading preset adds a hint of blushing tone to your videos. Moreover, this LUT increases the contrasts and enhances the shadows. With this, you get the perfect dramatic look with a hint of blue tone.
Criminal Record 01
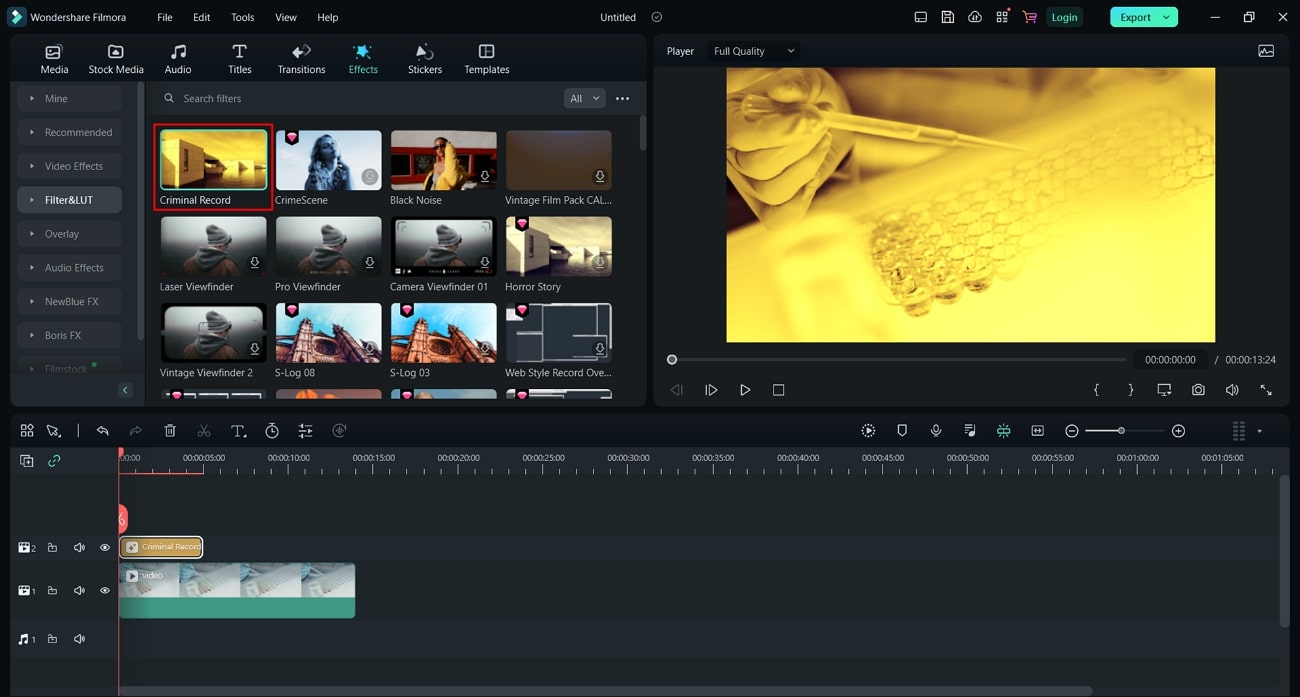
If you want to give your videos the late 90s crime movies vibe, this is the right preset. Criminal Record is a LUT that will transform your color tone into monochrome. It will change your color scheme into a yellow hue, giving them the Hollywood crime movie touch.
Deluxe High Tea 01
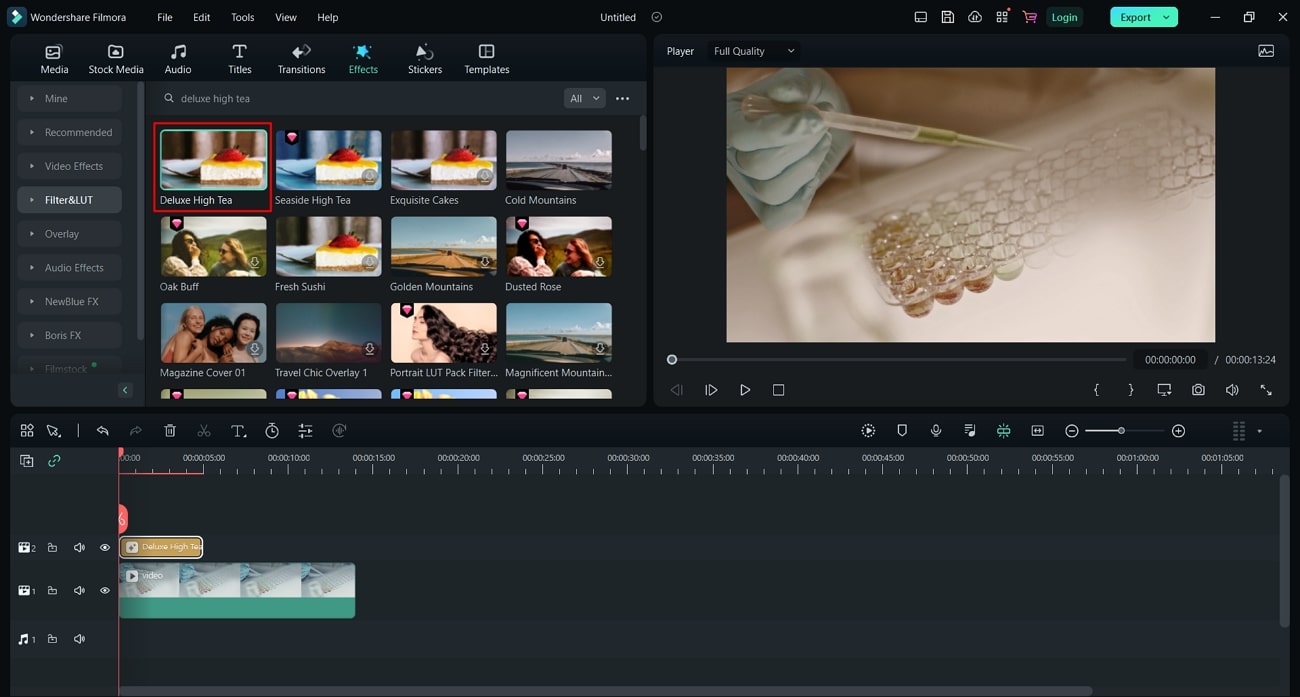
It is yet another amazing LUT preset that you can use for free. This LUT is designed to give your food the right color scheme. Furthermore, it brightens color and increases the intensity of redness in your videos. Moreover, it gives your food a fresher look by enhancing colors.
Neon Room 01
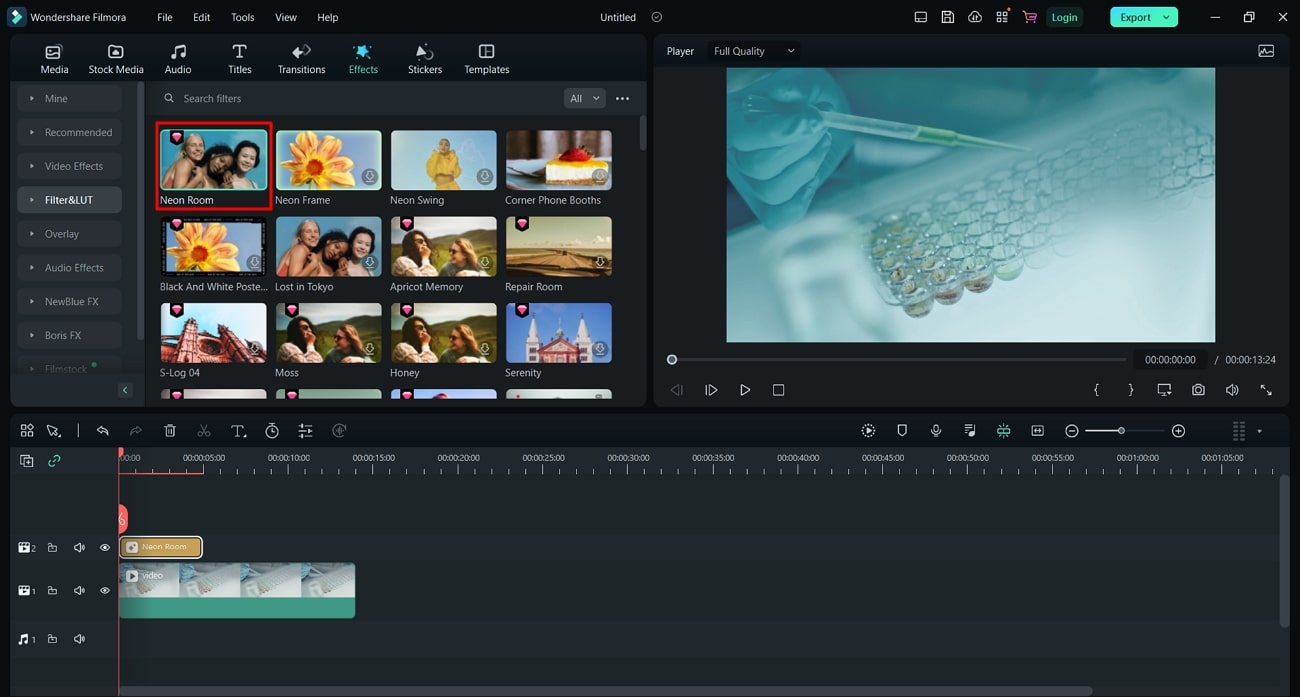
Neon Room is a LUT that gives your videos a cinematic feel. It is a paid LUT, which adds green shades to your content. Moreover, it corrects the white balance so your videos don’t look overexposed. Furthermore, it increases contrast and underexposes to give your video a more professional feel.
Repair Room 01
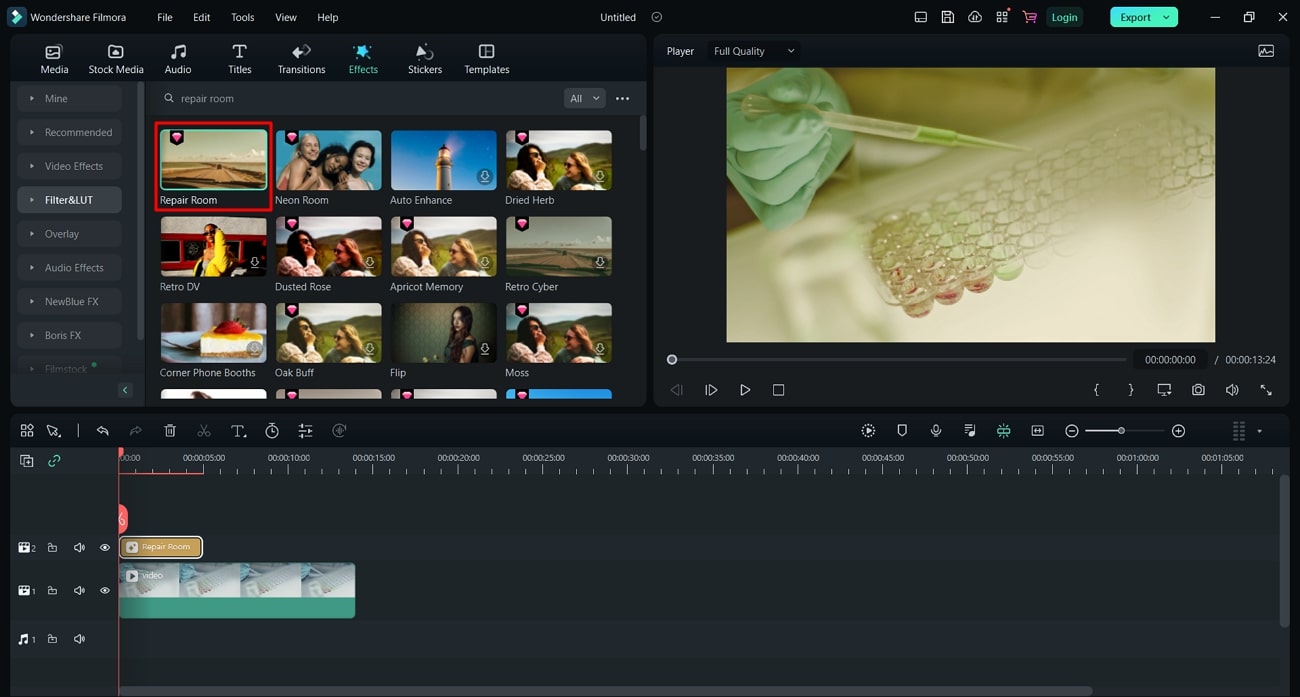
This is one of the best LUT available on Filmora to give your content a retro feel. One unique about this LUT is that it does not add black and white or sepia effect to your videos. Contrary to this, it fades the colors and highlights the red colors in your videos. Moreover, the faded redness creates a vintage 80s look.
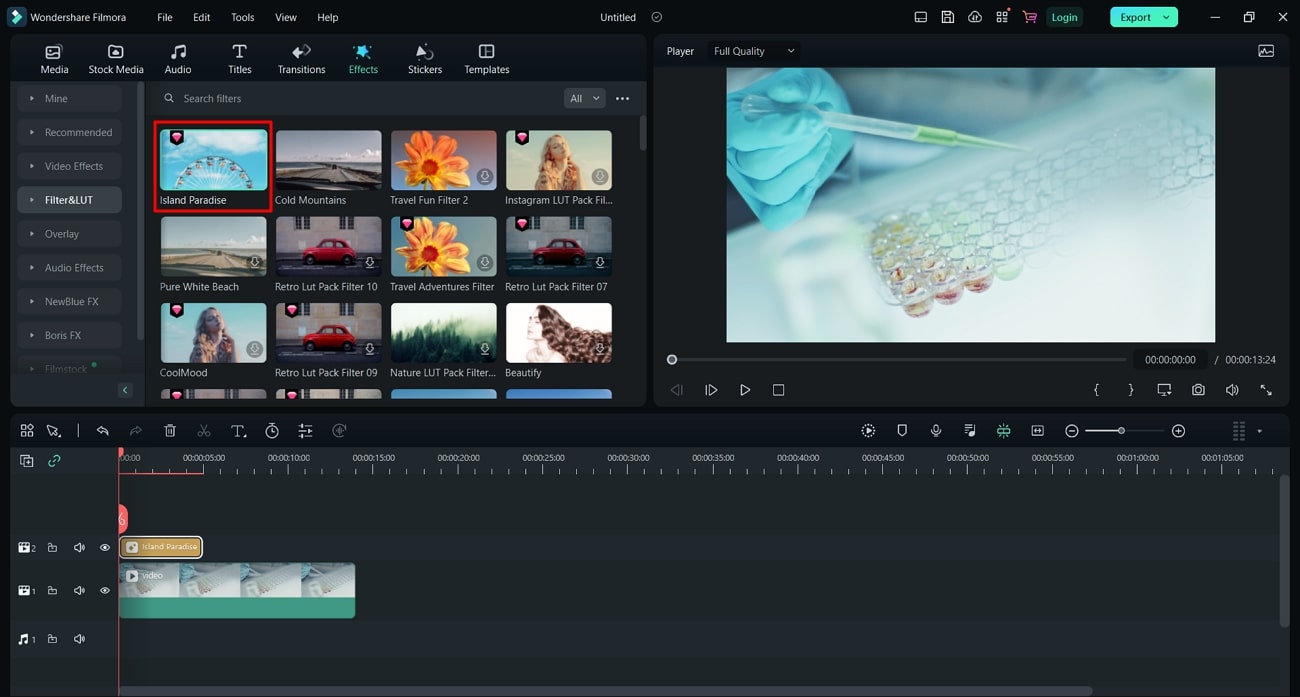
Island Paradise Filter 01
It is a great LUT if you are a fan of more loud and vibrant colors. This preset makes your color speak out by enhancing their intensity. Moreover, it increases the vibrance of your colors to give you an extra hit of colors. Additionally, it makes your color live and pop out more in your videos.
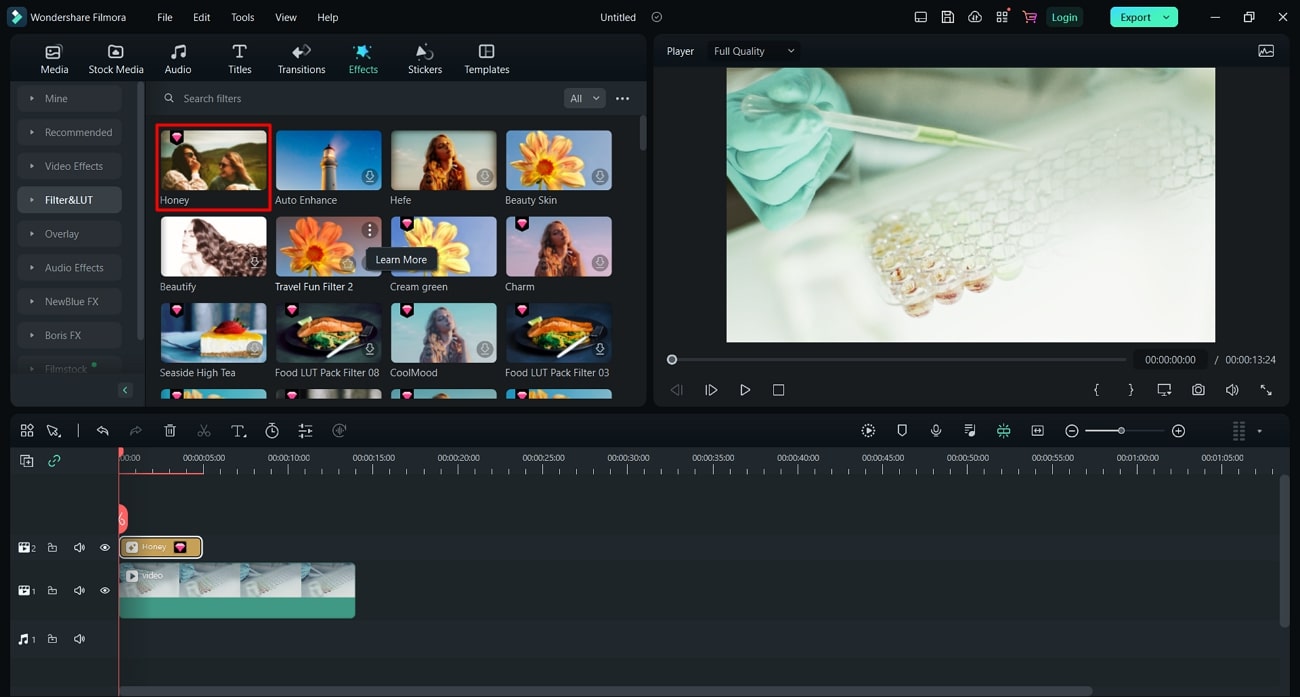
Honey Filter 01
If you are looking to add a vintage golden glow to your digital media, then this is the LUT for you. You can achieve the perfect honey-like golden color grading with this LUT. In addition, this LUT enhances the brown and yellowish shades to give your media an old yet glowy-look.
Empower your videos with a new mood using different LUTs. Filmora now offers 100+ top-quality 3D LUTs cover a broad range of scenarios. Transform your videos with Filmora’s powerful 3D LUTs.
Apply LUT on Videos Apply LUT on Videos Learn More

Part 4: The Best LUTs Available for Filmora - Comprehensive List
Apart from hundreds of in-built LUTs in Filmora, you can also load customized LUTs into Filmora. You don’t need to keep searching the web for the best LUTs for Filmora. This list will provide you with some of the best LUTs available for Wondershare Filmora.
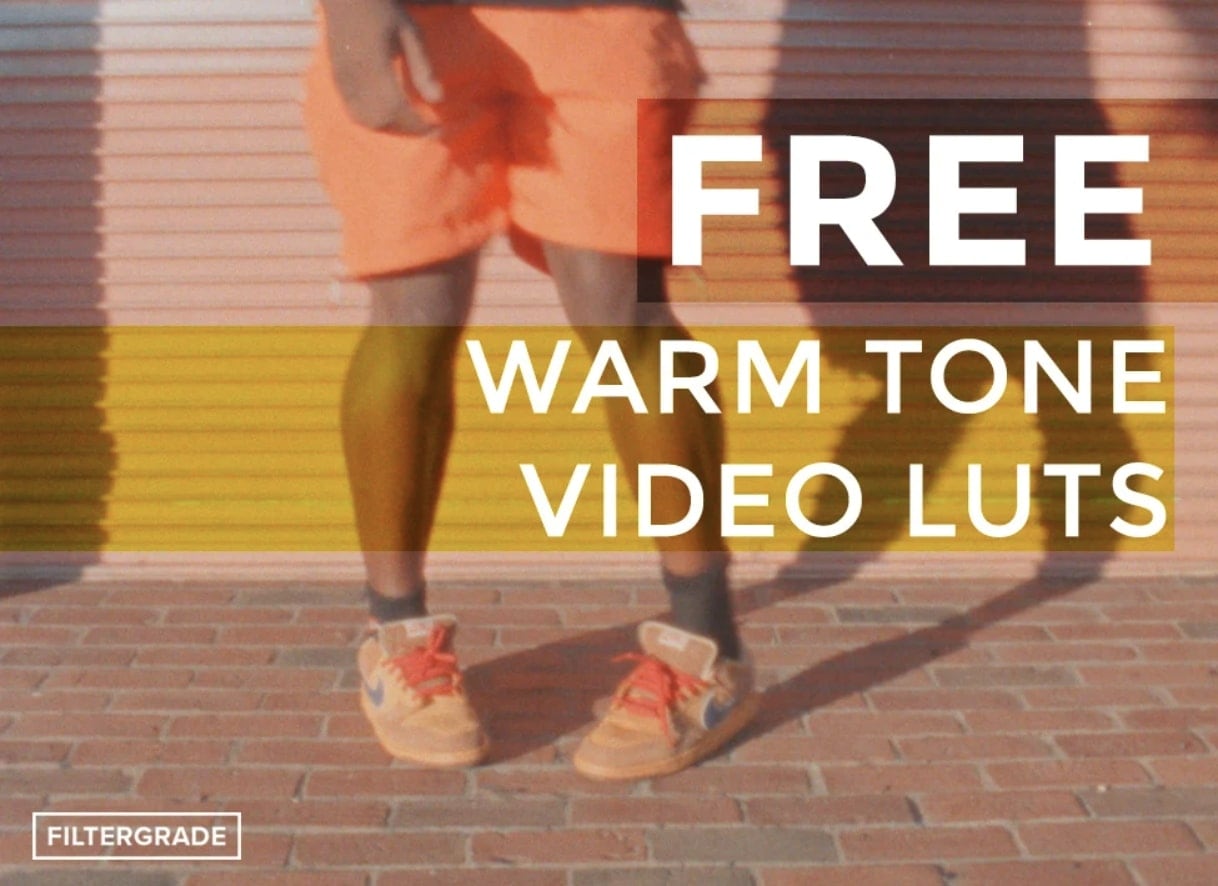
FREE Warm Tone Video LUTs
This pack of LUTs is characterized by its warm and inviting color composition. It adds a cozy and warm atmosphere to your videos and photos. Moreover, it is a perfect pack for capturing memorable family moments or creating a cozy feel. Furthermore, this pack has three free LUTs that create a sense of warmth and an inviting environment.
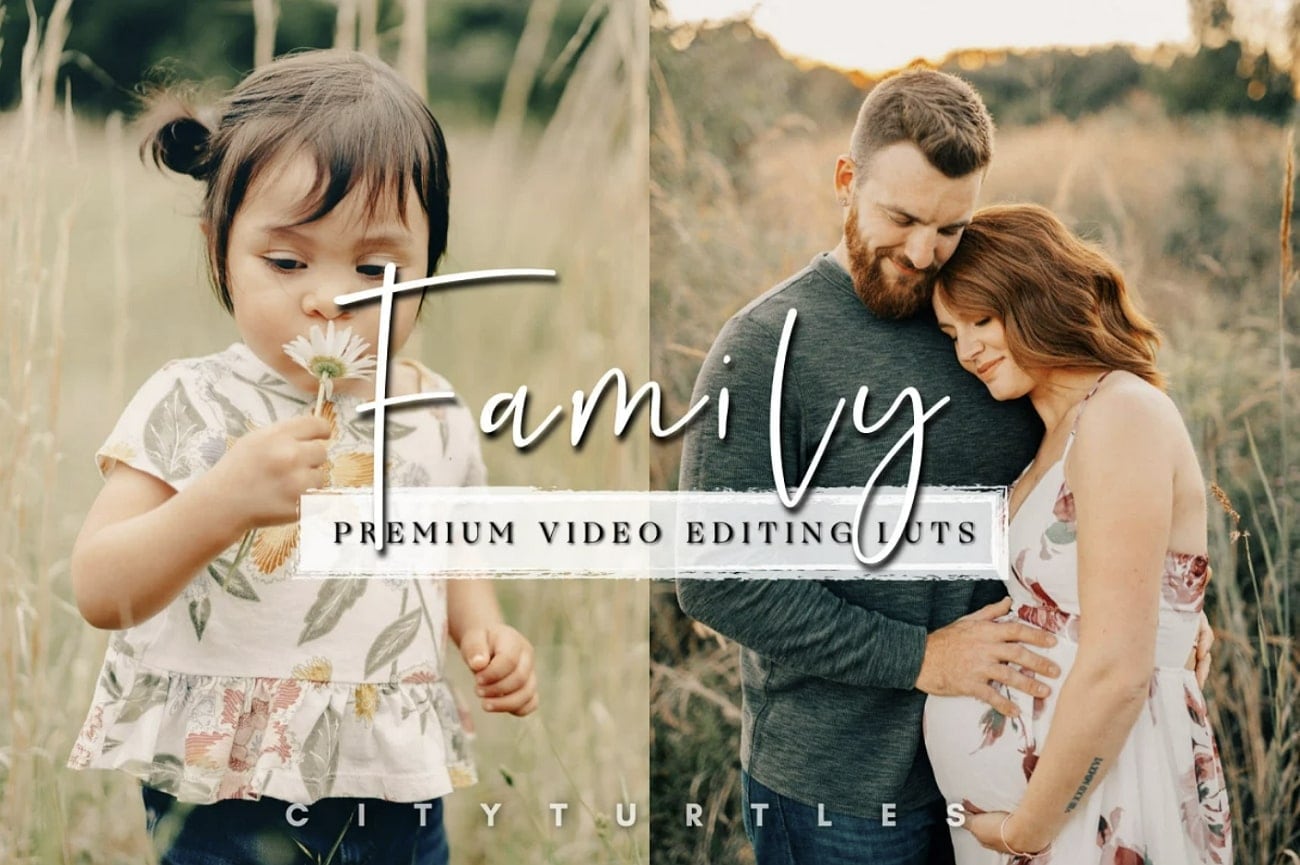
Natural Outdoor Video LUTs Pack
Natural Outdoor Video LUTs Pack offers a cool and serene color grading. This pack enhances the natural beauty of landscapes and outdoor scenes. Additionally, it gives your videos a calmer and more peaceful feel. You don’t need to manually change your camera setting when you have this color grading pack. Moreover, it will help you achieve a refreshing and soothing color tone.
Film Look LUTs & Footages
If you aim to give your videos a professional and cinematic touch, Film Look LUTs is a great choice. It matches the color grading of popular movies to give your media a cinematic look. In addition to this, Film Look LUTs offers over 30 different cinematic LUTs. You can use these LUTs to improve your storytelling by highlighting the emotions with suitable color grading.
Bold & Vibrant LUTs for Photo & Video
The pack offers a vibrant and dynamic color scheme for photos and videos. This pack can inject energy and liveliness into your media files. It is perfect for capturing energetic events and celebrations or creating content that demands attention. Moreover, the Bold & Vibrant LUT pack brings the best out of your content with its bold and expressive tones.

Conclusion
In conclusion, colors are a vital component of our digital media to improve our work. You can change and refine colors through color grading to achieve specific looks and moods. LUTs are essential tools in this process, allowing us to apply predefined color transformations. Moreover, you can color-grade your content with the availability of LUTs for Filmora.
- Part 3: The Best LUTs Available for Filmora - Comprehensive List
- Part 4: Top Build-in Resource LUTs of Wondershare Filmora
Part 1: What Is Wondershare Filmora Offering in the LUTs Section?
Enhancing the visual appeal of your videos through color grading is essential. It adds mood and emotion, creating amazing content. Wondershare Filmora , a popular video editing tool, allows applying LUTs directly onto your files. You can explore a wide range of over 200 LUTs available in Filmora’s library. Additionally, you can download various LUTs from the internet and even change their intensity.
Apart from Filmora LUTs, it also offers other remarkable video editing capabilities. With this tool, you can effortlessly change the background of your video without a green screen. Furthermore, it provides filters and effects that you can apply to improve your edits. In addition, this fantastic tool offers over 10 billion stock media files you can use.
Key Features of Wondershare Filmora
- Wondershare Filmora has amazing features, such as the AI Audio Stretch feature. This feature stretches your background songs to fit the length of your videos.
- Another amazing feature is that you can reframe any video easily. With its Auto Reframe, you can change the aspect ratio of your videos automatically.
- Moreover, this tool can detect silence in your videos. Its silence detection features detect awkward silences or pauses in your videos and trim that part.
Free Download For Win 7 or later(64-bit)
Free Download For macOS 10.14 or later
Part 2: How to Use 3D LUTs on Wondershare Filmora
You can apply LUTs directly onto your videos using Wondershare Filmora. To apply Filmora X LUTs on your media files, follow these steps. There are two different methods for using 3D LUTs using this tool.
Method 1: The Effects Tab Method
Step1 Import Your Video
To import your video to apply LUTs, firstly, you have to open Wondershare Filmora. Once opened, go to the “Create Project” section and select “New Project.” After that, a new window will pop up. Furthermore, select the “Import” button in this window to import your video.

Step2 Choose Your LUT from the Effects Tab
Once you’ve imported your media into the tool, on the top of the screen, select the “Effects” tab. Furthermore, select the “Filters&LUT” option on the left sidebar and go to the “LUT” option. There you will see different LUTs that you can apply. Choose your desired LUT from the section.

Step3 Apply Your LUT
After selecting your desired LUT, click on the “Download” button. Once downloaded, drag that LUT and drop it on top of your video to apply the LUT. You can change your LUT’s intensity by double-clicking your LUT and moving the “Opacity” slider.

Method 2: The Video Settings Method
Step1 Access Video Settings
Open the tool and add your video to the timeline. Once you have imported the video, double-click the video, this will open the video settings.

Step2 Open LUT Settings
In the video settings window, navigate to the “Color” section. Furthermore, go to the “Basic” tab and toggle right to turn on the “LUT” option.

Step3 Apply the Desired LUT
To continue applying LUT, choose your desired LUT from the list. Additionally, you can add your favorite LUT from your system by choosing the “Load new LUT” option from the drop-down menu. In this way, you can apply the LUT to your video.

Part 3: Top Build-in Resource LUTs of Wondershare Filmora
There are 200+ LUTs available that can be imported from the in-built resources of the video editor. These presets come in different styles and color tones. Here are some of the top color grading presets that you can download.
Cold Mountains 01
It is a great LUT pack that you can download for free using Wondershare Filmora. This color grading preset adds a hint of blushing tone to your videos. Moreover, this LUT increases the contrasts and enhances the shadows. With this, you get the perfect dramatic look with a hint of blue tone.

Criminal Record 01
If you want to give your videos the late 90s crime movies vibe, this is the right preset. Criminal Record is a LUT that will transform your color tone into monochrome. It will change your color scheme into a yellow hue, giving them the Hollywood crime movie touch.

Deluxe High Tea 01
It is yet another amazing LUT preset that you can use for free. This LUT is designed to give your food the right color scheme. Furthermore, it brightens color and increases the intensity of redness in your videos. Moreover, it gives your food a fresher look by enhancing colors.

Neon Room 01
Neon Room is a LUT that gives your videos a cinematic feel. It is a paid LUT, which adds green shades to your content. Moreover, it corrects the white balance so your videos don’t look overexposed. Furthermore, it increases contrast and underexposes to give your video a more professional feel.

Repair Room 01
This is one of the best LUT available on Filmora to give your content a retro feel. One unique about this LUT is that it does not add black and white or sepia effect to your videos. Contrary to this, it fades the colors and highlights the red colors in your videos. Moreover, the faded redness creates a vintage 80s look.

Island Paradise Filter 01
It is a great LUT if you are a fan of more loud and vibrant colors. This preset makes your color speak out by enhancing their intensity. Moreover, it increases the vibrance of your colors to give you an extra hit of colors. Additionally, it makes your color live and pop out more in your videos.

Honey Filter 01
If you are looking to add a vintage golden glow to your digital media, then this is the LUT for you. You can achieve the perfect honey-like golden color grading with this LUT. In addition, this LUT enhances the brown and yellowish shades to give your media an old yet glowy-look.

Empower your videos with a new mood using different LUTs. Filmora now offers 100+ top-quality 3D LUTs cover a broad range of scenarios. Transform your videos with Filmora’s powerful 3D LUTs.
Apply LUT on Videos Apply LUT on Videos Learn More

Part 4: The Best LUTs Available for Filmora - Comprehensive List
Apart from hundreds of in-built LUTs in Filmora, you can also load customized LUTs into Filmora. You don’t need to keep searching the web for the best LUTs for Filmora. This list will provide you with some of the best LUTs available for Wondershare Filmora.
FREE Warm Tone Video LUTs
This pack of LUTs is characterized by its warm and inviting color composition. It adds a cozy and warm atmosphere to your videos and photos. Moreover, it is a perfect pack for capturing memorable family moments or creating a cozy feel. Furthermore, this pack has three free LUTs that create a sense of warmth and an inviting environment.

Natural Outdoor Video LUTs Pack
Natural Outdoor Video LUTs Pack offers a cool and serene color grading. This pack enhances the natural beauty of landscapes and outdoor scenes. Additionally, it gives your videos a calmer and more peaceful feel. You don’t need to manually change your camera setting when you have this color grading pack. Moreover, it will help you achieve a refreshing and soothing color tone.

Film Look LUTs & Footages
If you aim to give your videos a professional and cinematic touch, Film Look LUTs is a great choice. It matches the color grading of popular movies to give your media a cinematic look. In addition to this, Film Look LUTs offers over 30 different cinematic LUTs. You can use these LUTs to improve your storytelling by highlighting the emotions with suitable color grading.

Bold & Vibrant LUTs for Photo & Video
The pack offers a vibrant and dynamic color scheme for photos and videos. This pack can inject energy and liveliness into your media files. It is perfect for capturing energetic events and celebrations or creating content that demands attention. Moreover, the Bold & Vibrant LUT pack brings the best out of your content with its bold and expressive tones.

Conclusion
In conclusion, colors are a vital component of our digital media to improve our work. You can change and refine colors through color grading to achieve specific looks and moods. LUTs are essential tools in this process, allowing us to apply predefined color transformations. Moreover, you can color-grade your content with the availability of LUTs for Filmora.
Best Online YouTube Video Trimmer 2024
Since the shift in interest from on-site jobs to content creators and exploring opportunities to take advantage of better and improved career growth opportunities, YouTube is one of the most popular social media platforms to get started.
But how do people face difficulties in finding an affordable and quick online YouTube video trimmer? Are you also facing issues with trimming your video before uploading it to get more views?
This is an ultimate guide on online YouTube video trimmer software and how you can trim your YouTube videos in no time.
Part 1. What is a YouTube trimmer?
Before diving into any details, it is important to introduce you to what is a YouTube trimmer and why it is important to trim your video. A YouTube trimmer is an easy and fast video editing tool that allows you to trim, crop, and share your favorite video parts online. You can also create custom links to YouTube Crops to embed on your website.
There are two popular online YouTube trimmers available; one only allows you to edit the YouTube link, which means you can only view the edited video online, while the other allows you to do related operations on the video file and download and save it as an mp4 or other file type for offline viewing.
Part 2. How to online trim YouTube videos?
1. Online YouTube trimmer (no edit and download)
Using these two websites, you can easily find the YouTube video clip you want to keep, but there is no way to download the video or add more editing to the clip. However, it works well for sharing links online or adding them to your website and using them to describe the part that best fits the topic.
The straightforward interface has just one function. Enter the start and end times in the box after entering the right YouTube link, then click “Crop!” to create a string of links.

The video’s beginning and ending times are selected in the same way as on the previous website. However, this website offers some basic code that you may copy and paste into your web pages to suit your demands in order to add YouTube videos.

Once you are done trimming your videos, you can download or export your videos in different formats, depending on your preference. It can be in mp4, mp3, or any other supported format.
2. Online YouTube trimmer (edit and download)
The websites that are listed after that combine an online YouTube downloader with a video editor, allowing you to make a variety of further edits to the selected video clip before downloading it locally.
- Veed.io :
Anyone can make powerful videos and expand their audiences thanks to the online video editing application Veed. It has some useful capabilities, such as the capacity to cut videos and filter them using different aesthetics. Users can crop, add text, make drawings, and even add photos to the movies. In addition, Veed serves as a tool for producing social media films that may be customized for each channel where they will be shared.
Additionally, they are free to play with various tools like rotate, trim, add photos, stickers, emojis, and more. Through the program, users may even create video memes online by uploading a target movie, modifying it using a variety of features, and downloading the altered video after a brief rendering.
Step1Launch veed.io on your web browser. Click on ‘Upload Your Video‘ to upload the video file you want to edit.
Step2You will notice a button to upload your media file once you are taken to the editing page.

Step3You can trim your video section by dragging the mark after you’ve uploaded the media file.

Step4Now, delete the unwanted video segment and click on ‘Export’ to save the trimmed video.
- Kapwing :
An effective, non-linear editing workflow is supported by the online video editor Kapwing. Upload your audio, video, and image files, then edit everything in one location. Since Kapwing is entirely online, content creators may access and edit their work from any computer or mobile device.
Step1Launch Kapwing.com on your web browser. If you are not directed to the trim video section, then go to the ‘Tools‘ menu and select ‘Trim Video‘. Now, click on ‘Choose a Video.’
Step2From the main page, click ‘Click to upload’ to upload the media file.

Step3After uploading the media file, Click on ‘Trim’ from the editing section on the right side of the screen.

Step4A pop-up screen will appear on your screen labeled as Trim Video. Trim the parts of the video as per your requirement and Click ‘Trim’ to finish.

Step5Once you have completed editing, click on ‘Export’ to save the video to your device.
Part 3. How to trim YouTube videos on a desktop?
Using an online video trimmer has been one of the last options that anyone would consider, but due to the expensive software, they have turned out to be a friendly and easy approach to editing videos. But the online video trimmers still rank at the bottom of the list because they’re unstable, and you can’t save the project at any time. If the online program breaks down, all your effort will be wasted. But desktop programs such as Filmora will never make you encounter such problems unless you experience a technical glitch.
With the help of a variety of strong editing tools and Wondershare Filmora , users may quickly and easily make outstanding videos. With Wondershare Filmora, anyone can learn how to be an excellent video editor, thanks to its wonderfully simple design.
You can follow these easy steps to trim your video:
Step1Click “Import” on the main windows and then select the desired video files from your computer to add video files to the Timeline for cutting. Movies can also be dropped directly into the Media Library.

Step2By moving the playhead over the unwanted section and choosing the trash can icon, you can delete it.

Step3When you’re through trimming, click “Export”, then select a location to store the edited video.
Conclusion
Depending on the comparison of how different software work, it is justifiable to conclude that Filmora is the best video editing software by all means. It offers a wide range of editing tools and ensures that progress has not been lost. If you are looking forward to trimming a video, download Filmora on your device to get started.
Free Download For Win 7 or later(64-bit)
Free Download For macOS 10.14 or later
Free Download For macOS 10.14 or later
Top 6 Drones for Videography
Drones are all the rage these days and for good reason. They’re a lot of fun to fly, and they can be a great addition to your toolkit for capturing aerial footage. But with so many different drones on the market, it can be tough to know which one is right for you.
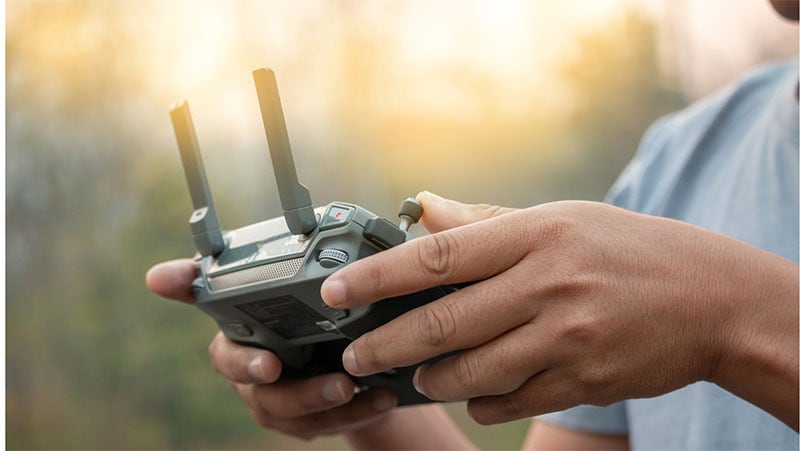
That’s why we’ve put together this guide to the best drones on the market for every budget. Whether you’re looking for an entry-level drone that won’t break the bank or a top-of-the-line model that will let you capture stunning 4K footage, we’ve got you covered. So read on to find the perfect drone for you!
Buyers Guide: The Best 6 Drones on the Market for Every Budget
#1. DJI Air 2S: Among the best options for most people.
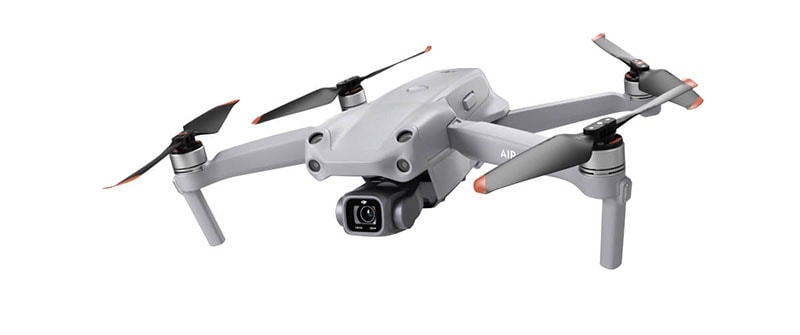
The DJI’s new Air 2S is our top pick. It finds the ideal compromise in terms of size, weight, picture quality, intelligent features, and price. The camera on the Air 2S isn’t as nice as the Mavic 2 Pro’s, which has a variable aperture for more flexible shooting in sunny conditions and includes neutral density filters to help make up for it.
1.3 pounds might not seem like much, but the Air 2S is a force to be reckoned with- it’s durable enough to fly in light winds and can stay up for 30 minutes! Plus, the new collision-avoidance system will keep you safe even when there are trees around, and the 1 inch 20 mp sensor captures amazing 5K video or still photos.
#2. Skydio 2+ Drone: If you want your flights to be handled automatically.
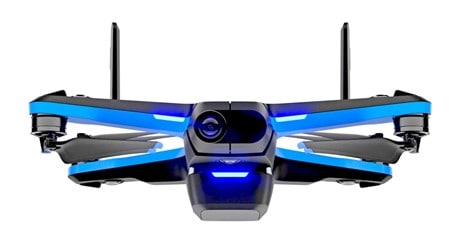
The Skydio 2+ has the best collision-avoidance system, far outperforming any other drone on the market. If you want a drone that can follow your mountain bike off-road or quickly maneuver through obstacles without your help, this is it. Its 27-minute flight time and 6-mile range make it restrictions for some people, but plenty for most. The 1/2.3-inch sensor on this camera is good enough for 4K footage at 60 frames per second, but it’s not as great as the 1-inch sensor in the Air 2S and Evo Lite+. D-log support is also absent, so video professionals might want to keep that in mind.
However, if you can live without D-log and don’t mind the slower sensor, this drone is capable of flying in places where other drones can’t. For certain applications, a smaller sensor may be preferable to having a great one.
#3. DJI Mini 3 Pro: The Best Ultralight Drone for Most People
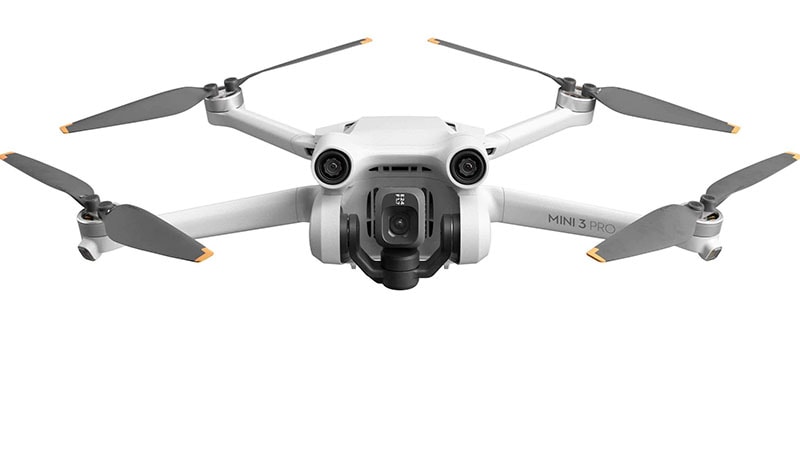
The DJI Mavic Mini 3 Pro is the third version of the name, and it has been greatly improved from its original state. It features a 4K/60p footage with 1/1.3” sensor as well capture 12.1 megapixel RAW photographs. The Mini 3 Pro also has a 48-megapixel mode that improves image quality, but loses some camera functions. A faster F/1.7 lens is now on the front of the drone, and it also incorporates three-direction obstacle avoidance and a gimbal that allows for vertical shooting–all while weighing in at less than 250 grams. This number is important because, in many areas, a drone under 250 grams does not need to be registered (however, you should always check your local laws).
I was ecstatic about the performance of the Mini 3 Pro. It can fly in an impressive 45 minutes when using its extended battery–which is a dramatic improvement from the 32 minutes I got with the standard battery. Not to mention, it’s delightful to fly because it maneuvers so effortlessly in even high winds. The only issue I have with it is that its price has risen since DJI released Mini 2; however, they still sell both models.
#4. DJI Mini 2: Most Affordable Drone
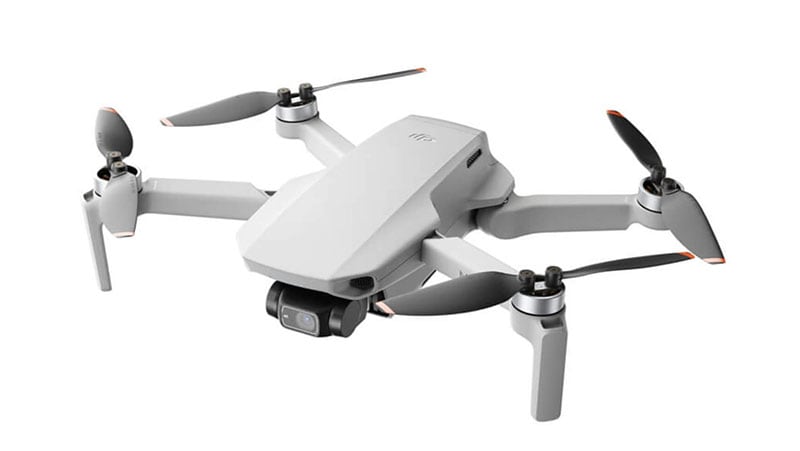
The Mavic Air 2S has advanced collision-avoidance tech, but at a high cost. Even the new Mini 3 Pro sells for $750. If budget is more important to you than features, DJI’s Mini 2 would be your best bet. It flies compared to its larger siblings, though wind gusts that wouldn’t bother bigger drones like the Mavic 2 Pro will ground the Mini. The lack of collision-avoidance sensors makes it better suited for experienced pilots.
Even with those minor drawbacks, the Mini 2 is still a great beginner drone. It’s enjoyable to fly, captures 4K video footage, and can be stored in smaller spaces than many smartphones. And that last part is essential because the best drones are ones that you’ll actually bring with you instead of leaving at home. The Mini 2 only weighs 249 grams so it’s easy to transport, and you don’t even need to register it with the Federal Aviation Administration
#5. DJI Mavic 3: The Most Luxurious Drone
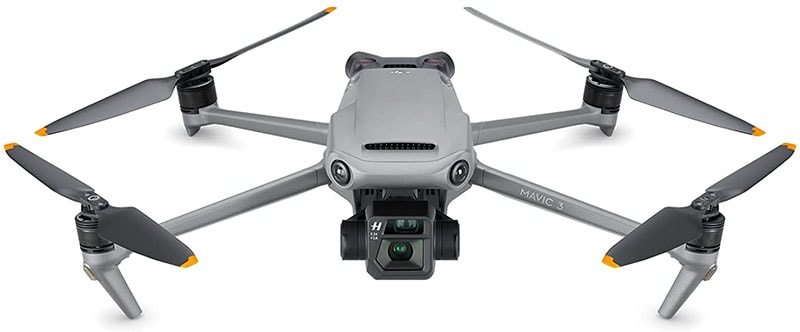
The DJI Mavic 3 Pro is a cut above the rest. It’s the finest drone on the market right now. The new 20-megapixel Four Thirds sensor produces outstanding image and video quality, and 45 miles per hour mobility allows you to follow and track objects without missing a beat.
If you’re willing to spend the money, this drone is definitely worth it. It has a 45-minute flying time and can avoid obstacles in all directions. The Cine model also supports Pro Res video and comes with 1TB of storage space- perfect for filmmakers or anyone who wants to capture high-quality footage.
#6. Autel Evo Lite+: Great for Long Flights
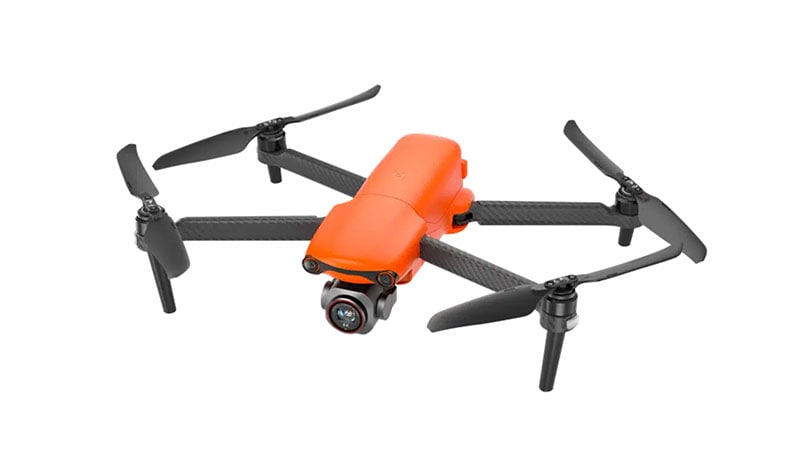
The Evo Lite+ is your best bet if you want to stay airborne as long as possible. Its massive battery provides a 40-minute flight duration, and the additional weight makes it more stable in the wind (though not by much). The Evo Lite+ features a fantastic camera with variable aperture controls, a 1-inch sensor, and night mode for better low-light photos.
The control does resemble an Xbox controller, which is nice, but it lacks the storage capacity for detachable joysticks that you get with DJI drones. It’s still perfectly functional, and Autel’s software will be familiar to anyone who has used a DJI drone.
Some Final Suggestions
Drones can be used for a variety of purposes, from shooting landscapes and cityscapes to capturing footage of sporting events or outdoor activities. They can also be used for wedding videos, real estate videos, and other types of commercial work. And if you’re just looking for some fun footage to add to your home movies, drones are the perfect way to do it.
Of course, not all drones are created equal. If you’re looking for a drone that can shoot high-quality video on a budget, there are a few things you need to keep in mind.
- First, make sure the drone has a high-resolution camera.
- Second, make sure the drone has a long battery life so that you can get plenty of shots without having to recharge.
- Third, make sure the drone is lightweight and easy to control so that you can get the perfect shot every time.
So, what’s the best drone for you? It depends on your budget and your needs. If you want a high-quality camera that can shoot in low light, the DJI Mavic 3 Pro is a perfect choice. If you’re looking for a long-flight drone, the Autel Evo Lite+ is a great option. And if you’re just starting out, the DJI Mini 2 is an affordable and easy-to-use drone that anyone can fly. With that said, happy flying!
Free Download For Win 7 or later(64-bit)
Free Download For macOS 10.14 or later
Free Download For macOS 10.14 or later
Also read:
- [New] Sony A6400 Fixing the Invisible Video Playback
- [Updated] Installation Instructions for Snapchat on a Mac for 2024
- [Updated] Thriving in the Social Media Jungle Facebook's Essentials
- Create a Stunning Light Sweep Effect in Filmora. Use Simple and Easy Steps to Export a High-Quality Video that Will Impress Even Pro Video Editors for 2024
- Exploring the Crème De La Crème of Computers in 2Er 2024: A Head-to-Head Comparison Between Apple and Others
- Exporting & Sharing Made Easy: 4 Must-Have Apps for ChatGPT Conversation Management
- How To Make a Video by Mouse in Filmora?
- How to Track Lava Blaze 2 5G Location by Number | Dr.fone
- In 2024, How To Simulate GPS Movement With Location Spoofer On Apple iPhone 15 Pro? | Dr.fone
- New Best Practical Tips to Improve Your Lighting in the Sun for 2024
- New In 2024, How to Add Filter to Video Online
- New In 2024, Top 8 Sites to Download Glitch Transition for Premiere Pro
- New Step by Step to Split Clips in VLC for 2024
- New Whats The Best Laptops For Video Editing for 2024
- ProArt PA 329Q Review The Ultimate 4K Workstation Display for 2024
- Transform Your Favorite 4K YouTube Music Into Premium MP3 Files
- Updated 2024 Approved Best Ideas on Using Green Screen with Filmora
- Updated How to Create Loop Videos with Filmora for 2024
- Where Is the Best Place to Catch Dratini On Xiaomi 13T Pro | Dr.fone
- Title: Updated In 2024, Create the Night-to-Day Effect Videos
- Author: Chloe
- Created at : 2025-03-02 00:37:28
- Updated at : 2025-03-03 18:55:46
- Link: https://ai-editing-video.techidaily.com/updated-in-2024-create-the-night-to-day-effect-videos/
- License: This work is licensed under CC BY-NC-SA 4.0.

