
:max_bytes(150000):strip_icc():format(webp)/GettyImages-1253176532-e5ce8e507433489f87c8b37818c13a01.jpg)
Updated In 2024, Detailed Steps to Resize Video in Davinci Resolve
Detailed Steps to Resize Video in Davinci Resolve
While editing videos, you may change the aspect ratio of the video to change the size of the video to upload on different platforms like YouTube, Facebook, Pinterest, and Instagram. Videos come in different sizes and shapes. Some videos are portraits while the others are landscapes. Similarly, videos are captured in different places with different devices. So, we need to set a certain size of the video.
Definitely, a very large video can make delays in the work, similarly, a small size video can result in low resolution and bad quality. Resizing a video saves a lot of time and money whether you have a business, a YouTube channel, a short film, or a feature film. Today, we shall discuss how to resize the videos?
The two free ways to resize the video…
Here are a number of tools used in the market to resize the videos. We are going to teach How to resize the video in Davinci resolve and Fimora wondershare. Once you have mastered How to resize a video, it would be as simple as the ‘click’.
Now the good news is, you can dramatically export the videos in the same resolution in a very short time.
Let’s dive in !
Part 1. How to resize video in Davinci Resolve
Davinci Resolve is a very powerful tool to edit videos. Let’s suppose, you have some videos shots and all the videos have different sizes, some of the videos fit in the timeline and some are out of the timeline. No matter, you are going to make a video on the same scale with the same size.
Resize the video can be done in three ways:
- Zoom in zoom out
- Cropping
- Retime and scaling
1. Zoom in and Zoom out
First of all, select the videos in your timeline. You should stay in the middle of the frame to set it because it’s too wide. The timeline moves forward and backward. Let your video be 4k, go to the bottom-right corner and click on timeline format. Select timeline resolution, select ultra HD, or whatever you want from the drop-down list.

Go to the inspector from the up-right corner and select Transform under the video section. Here you can resize your image. Place the mouse over zoom x (Horizontal) and zoom y (vertical) values to drag left or right for zoom in or zoom out. The video can be resized accordingly.
Here you can also change its rotation.

2. Cropping
Go to the inspector from the up-right corner and select Transform. Now choose Cropping. Here are four options Crop left, crop right, crop Bottom, and crop Top. You can drag the scale from left to right to adjust the crop settings according to the desired result.

3. Retime and scaling
Go to the inspector from the up-right corner and select retime and scaling. You can choose stretch, Fit, Fill, or crop for cropping the video from the drop-down list.
- The Crop function is used to remove the unnecessary or uneven part of the video.
- The Fit function is to have the video auto-center and the selected clips are formatted according to the screen dimensions.
- Stretch Function allows changing the length of the certain clip at a certain duration.

After transforming, cropping, and resizing the videos, you can copy the same settings without repeating the above steps for each video.
Part 2. An alternative way to resize videos with Wondershare
Filmora Video Editor is another great video editing software. It is very easy to use. It offers many different features to resize the videos. Moreover, it allows zooming in the video to highlight the best part of your video. It allows the edited video to export on other devices or YouTube channels.
For Win 7 or later (64-bit)
For macOS 10.14 or later
You can resize your video in three ways:
- Resize video by cropping
- Scale in Scale-out
- Resize by changing Aspect Ratio
1. Resize video by cropping
- Import the videos from your storage by using the import button.
- Drag the videos in the timeline.
- Right-click on the desired video, crop and zoom option will appear in the menu.
- Select crop tab.

- Grab the corner of the crop inwards, and move to adjust as desired.
- Press the OK tab and your video is cropped.

2. Scale-in and scale-out
- Select the video in the timeline.
- Select the settings
- Click on the Transform tab under image section**.**

- Move the pointer from left to right on the Scale to zoom in and zoom out the video. You can remove the unwanted portion of the video.
- Press OK tab.

3. Resize video by changing aspect ratio
Some videos are 4k, 6k, and 8k but exporting them in the same resolution and waiting for a long time is really difficult. You need to resize the video to change its width and height. As different social media platforms require a different sizes for videos. We can say, resizing the video in terms of Giga bites and mega bites. You can do it by changing the Project Aspect Ratio. It is a very powerful technique to resize the videos in the timeline.
You can change the Project Aspect ratio like 16:9(wide-screen), 1:1(Instagram), 9:16(Portrait), 4:3(standard), 21:9(Cinema), or custom.

- Select the Aspect Ratio
- Change the ratio 16:9, 1:1, 9:16, 4:3, 21:9, or custom as desired.
- Select OK.

Conclusion
At this time, every business is using marketing to boost the economy, but video marketing is at its climax. Therefore, it is essential to take advantage of video editing tools to increase productivity and efficiency of work.
The Davinci Resolve and Filmora Wonder Share are the best video editing tools to resize the videos. You can easily use these tools on your laptop, tablets, or smartphones in a very short time. Along with this, you can share your compressed videos on different social media platforms like Facebook, Twitter, YouTube, Instagram, and LinkedIn. Moreover, you can enjoy the magical effects of these free tools at the ease of your smartphone. It is beneficial at both small and large businesses for the following
- Time saver
- Economical
- Good video quality
- Presentable
- Increase engagement
Hope the content would be useful for you. If you like the article please leave a comment.
Go to the inspector from the up-right corner and select Transform under the video section. Here you can resize your image. Place the mouse over zoom x (Horizontal) and zoom y (vertical) values to drag left or right for zoom in or zoom out. The video can be resized accordingly.
Here you can also change its rotation.
2. Cropping
Go to the inspector from the up-right corner and select Transform. Now choose Cropping. Here are four options Crop left, crop right, crop Bottom, and crop Top. You can drag the scale from left to right to adjust the crop settings according to the desired result.
3. Retime and scaling
Go to the inspector from the up-right corner and select retime and scaling. You can choose stretch, Fit, Fill, or crop for cropping the video from the drop-down list.
- The Crop function is used to remove the unnecessary or uneven part of the video.
- The Fit function is to have the video auto-center and the selected clips are formatted according to the screen dimensions.
- Stretch Function allows changing the length of the certain clip at a certain duration.
After transforming, cropping, and resizing the videos, you can copy the same settings without repeating the above steps for each video.
Part 2. An alternative way to resize videos with Wondershare
Filmora Video Editor is another great video editing software. It is very easy to use. It offers many different features to resize the videos. Moreover, it allows zooming in the video to highlight the best part of your video. It allows the edited video to export on other devices or YouTube channels.
For Win 7 or later (64-bit)
For macOS 10.14 or later
You can resize your video in three ways:
- Resize video by cropping
- Scale in Scale-out
- Resize by changing Aspect Ratio
1. Resize video by cropping
- Import the videos from your storage by using the import button.
- Drag the videos in the timeline.
- Right-click on the desired video, crop and zoom option will appear in the menu.
- Select crop tab.
- Grab the corner of the crop inwards, and move to adjust as desired.
- Press the OK tab and your video is cropped.
2. Scale-in and scale-out
- Select the video in the timeline.
- Select the settings
- Click on the Transform tab under image section**.**
- Move the pointer from left to right on the Scale to zoom in and zoom out the video. You can remove the unwanted portion of the video.
- Press OK tab.
3. Resize video by changing aspect ratio
Some videos are 4k, 6k, and 8k but exporting them in the same resolution and waiting for a long time is really difficult. You need to resize the video to change its width and height. As different social media platforms require a different sizes for videos. We can say, resizing the video in terms of Giga bites and mega bites. You can do it by changing the Project Aspect Ratio. It is a very powerful technique to resize the videos in the timeline.
You can change the Project Aspect ratio like 16:9(wide-screen), 1:1(Instagram), 9:16(Portrait), 4:3(standard), 21:9(Cinema), or custom.
- Select the Aspect Ratio
- Change the ratio 16:9, 1:1, 9:16, 4:3, 21:9, or custom as desired.
- Select OK.
Conclusion
At this time, every business is using marketing to boost the economy, but video marketing is at its climax. Therefore, it is essential to take advantage of video editing tools to increase productivity and efficiency of work.
The Davinci Resolve and Filmora Wonder Share are the best video editing tools to resize the videos. You can easily use these tools on your laptop, tablets, or smartphones in a very short time. Along with this, you can share your compressed videos on different social media platforms like Facebook, Twitter, YouTube, Instagram, and LinkedIn. Moreover, you can enjoy the magical effects of these free tools at the ease of your smartphone. It is beneficial at both small and large businesses for the following
- Time saver
- Economical
- Good video quality
- Presentable
- Increase engagement
Hope the content would be useful for you. If you like the article please leave a comment.
Create Glitch Text Effect
Glitch text effect is a trending video effect whereby the texts get distorted for a few seconds. The effect is comparable to the glitch you face when your screen starts to malfunction, and the screen appears to be wavy and disoriented. A glitch text effect is better than a regular animated text effect as it helps to get the attention of the viewers immediately and get the message across clearly.
The glitch effect can be applied to the entire video as well as the text as per your preference. There are several video editors available where the glitch text effect comes pre-loaded. All you need to do is to apply it to the text and get it done in a few steps. We will illustrate how to add glitch text effect Premiere Pro. But we recommend Filmora for the best glitter text effect that you can add to your video instantly.
Part 1. Create Glitch Text in Video with Filmora
We have already stated that Wondershare Filmora is the best video editor for the best glitch text effect download and apply to your video in simple steps. Filmora is a premium video editor that is widely used by amateur and professional video editors. You can get all glitch text effect After Effects and add them to your video conveniently in comparison to After Effects.
As a matter of fact, there are literally unlimited video and text effects available, and you can find different types of glitch text effects to apply to your titles and texts. Filmora is available for both Windows and mac users. Here are the steps to create glitch text in video with Filmora.
Free Download For Win 7 or later(64-bit)
Free Download For macOS 10.14 or later
Step1 Download and install Filmora on your computer. Go to File> New Project from the menu bar to start video editing project.

Step2 Go to File> Import Media > Import Media Files to import the video clips where you want to add glitch text effect. Drop the clip into the Timeline to get started.

Step3 Go to Titles tab located at the top. From the left panel, click on Titles option. Search “glitch” in the search field and you will see all the glitch text effects that you can apply to the text in your video.
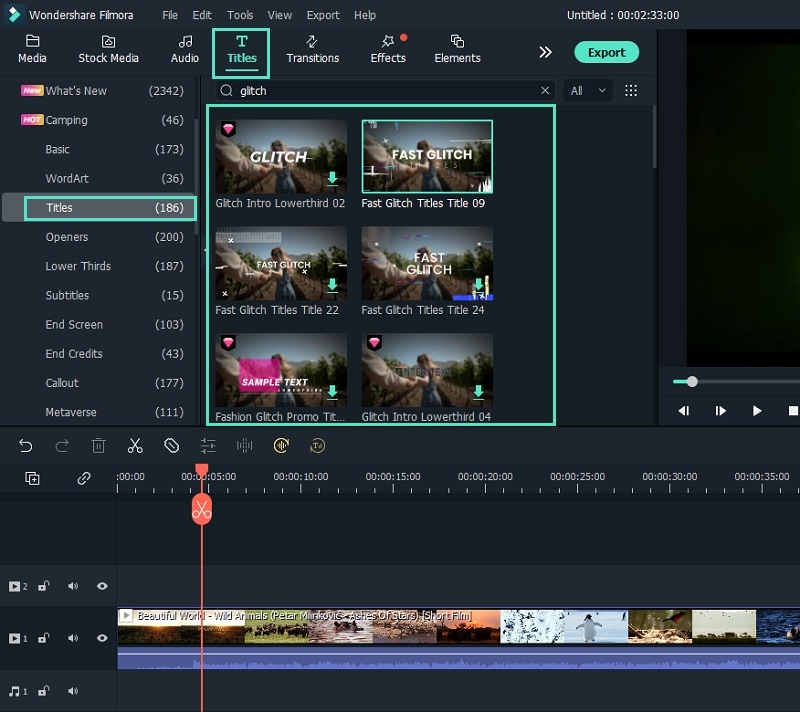
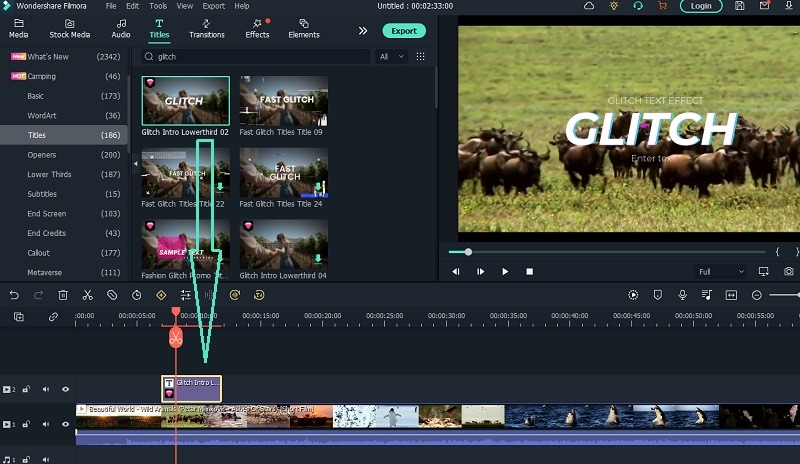
Step4 Select any glitch text effect and drop it into the Timeline above the video clip exactly where you want the text and the effect to appear.
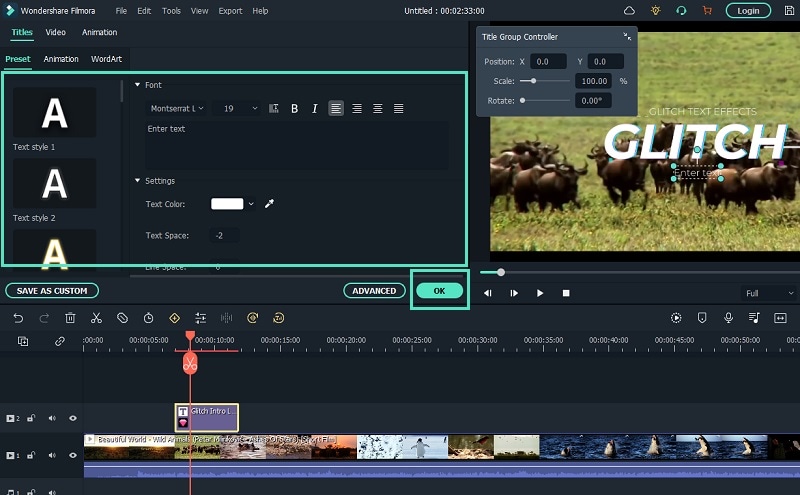
Step5 Double-click on the glitch text effect located on Timeline and edit the text, style, and other parameters as per your preference. Click on Ok and play the video to see your edited video with the glitch text effect.
Part 2. How to Make Glitch Text Effect with Premiere Pro
Adobe Premiere Pro is another renowned video editor where you can add glitch text effect to your video. Premiere Pro is strictly for professional video editors as the user interface is not as intuitive as Filmora . The learning curve is steep, and therefore, you need to go through the steps to add glitch text effect Premiere Pro. There are several glitch text effect presets available that you can apply to any text on your video to make them engaging. Here are the steps to make glitch text effect with Premiere Pro.
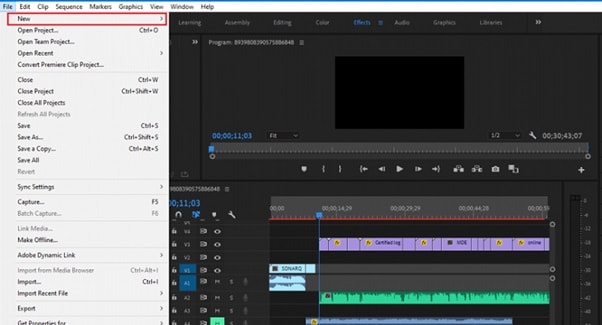
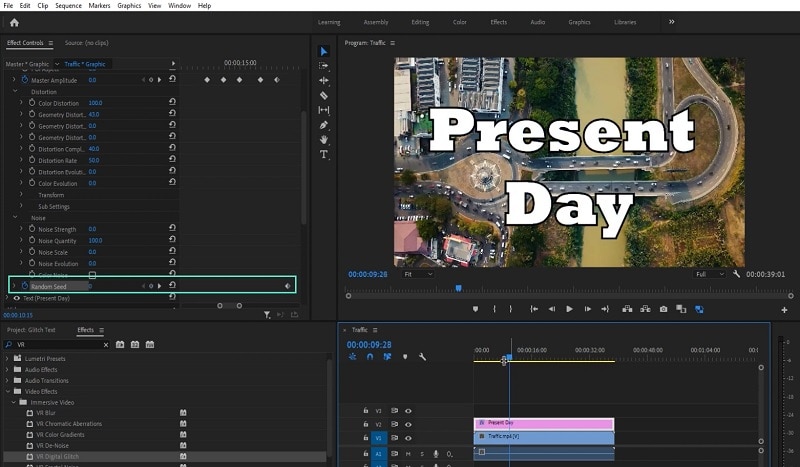
Step1 Launch Adobe Premiere Pro and go to New> Project to get started. Import your video and drop it into Timeline.
Step2 Use the Type tool to write any text on your video to add glitch text effect. You should have a text layer on Timeline.
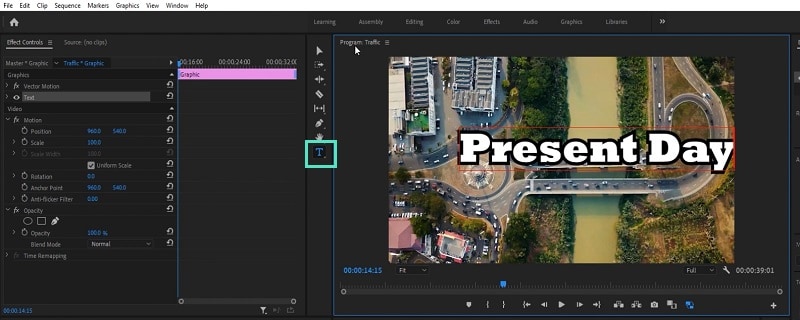
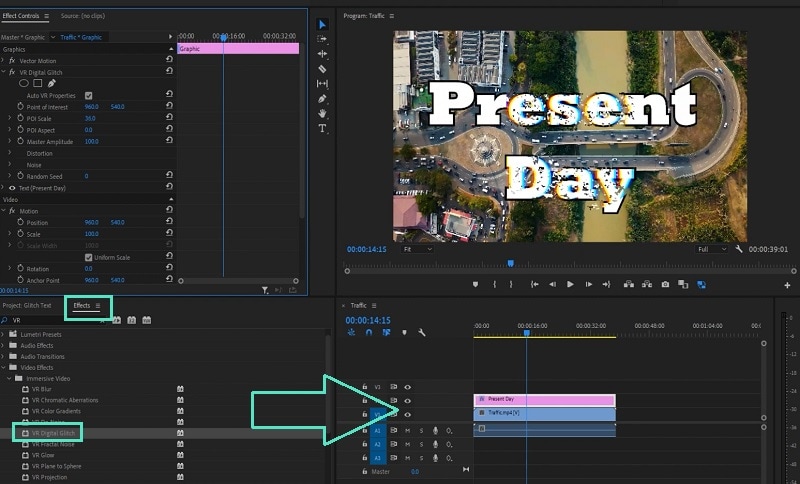
Step3 Go to Effects> Immersive Video> VR Digital Glitch option. Drag and drop the effect to text layer.
Step4 Under Effect Controls tab, you will find all the different parameters that you can adjust to get the glitch text effect perfectly.
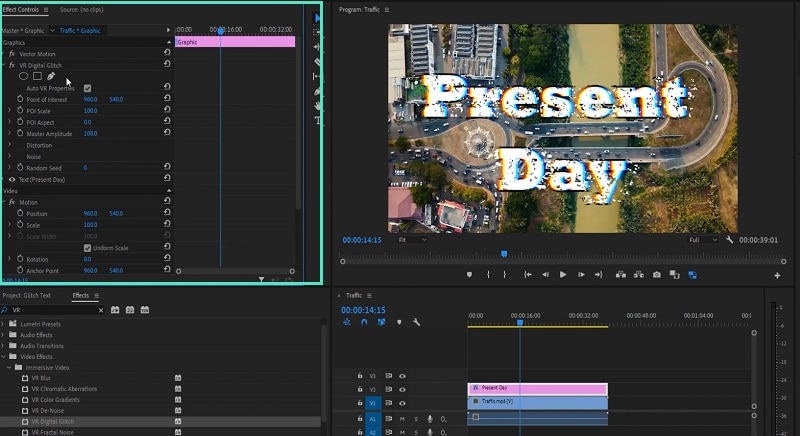
Step5 Turn on Master Amplitude and add multiple keyframes as different points in the Timeline and change the distortion value to make the effect prominent.
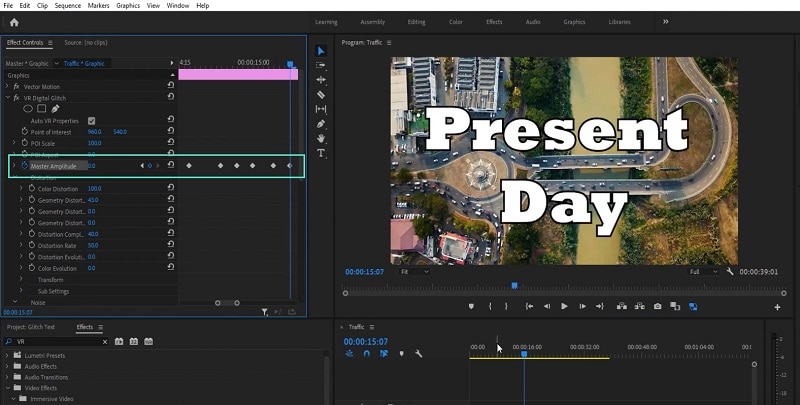
Step6 Go to the first keyframe and turn on Random Seed effect. Go to the last keyframe and turn on Random Seed effect and change the value to 75. Play the video to check the entire video with glitch text effect.
Part 3. Use VSDC Video Editor to Create Glitch Text
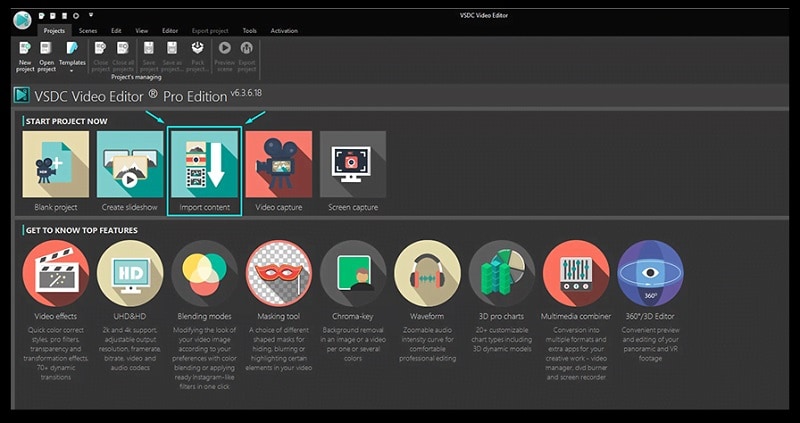
If you do not have any premium video editor on your computer and you do not want to purchase any premium video editor, you can still get glitter text effect free. You need to download and install VSDC free video editor on your computer. But the steps to create glitch text on VSDC video editor are slightly complicated as the user interface is not as intuitive as Filmora . Here are the steps to add free glitch text effect on your video.
Step1 Download and install VSDC video editor. Launch the editor and click on New Project to get started. Import your video to your project where you want to add glitch text effect.
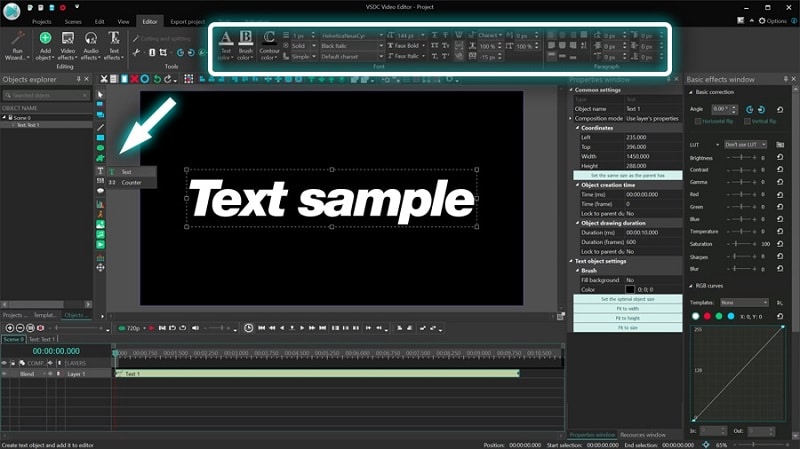
Step2 Use Type tool to write a text on the video. You can press Shift+T shortcut as well. After typing the text, adjust the text style as per your preference.
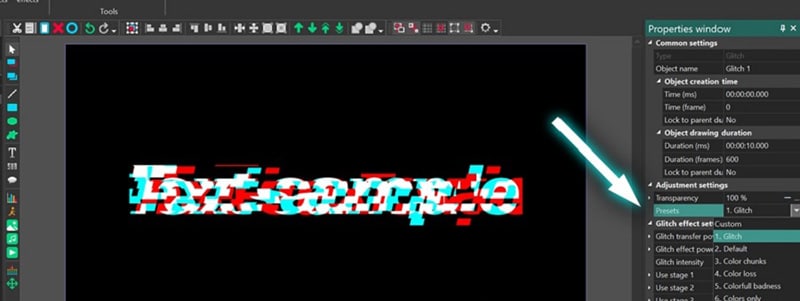
Step3 Double-click on the text layer on Timeline and go to Video Effects> Special FX and click on Glitch option.
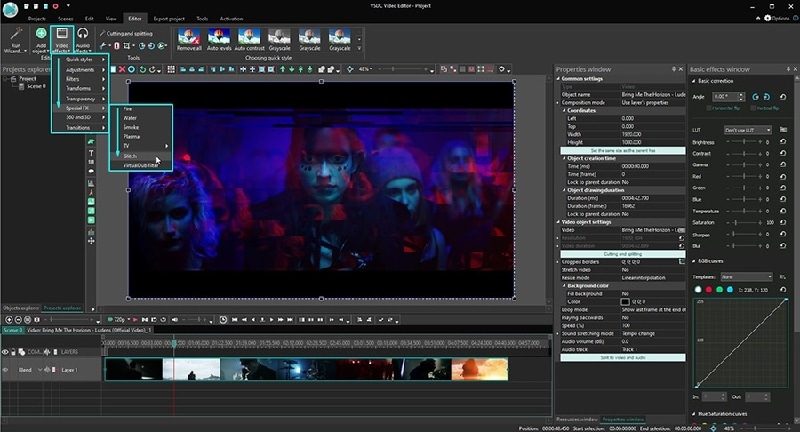
Step4 A window will appear where you can set the starting point, duration, and different parameters. Click on Ok button.
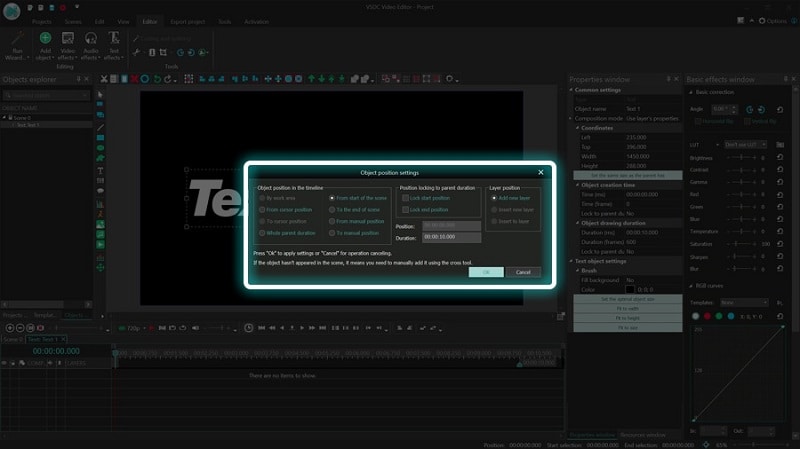
Step5 Go to Properties Windows and click on Presets to select different types of glitch text effects. You can also adjust the intensity of the text effects and other parameters as you feel.
Part 4. Related FAQs about Glitch Text
1. How do you animate glitch text?
If you want to animate glitch text for free, VSDC video editor is ideal as you can customize the effect on any text in simple steps. If you want to use a premium video editor, we recommend Filmora as there are various glitch text effects available to apply to any text on your video instantly.
2. How do you glitch text on video?
First, you have to import your video in your video editor. Type the desired text and set the style. Thereafter, go to glitch text effect presets available on the video editor and apply it to the text instantly. You can customize the glitch text effect as per your preference to make the animation more prominent.
3. How do you glitch text on Android?
You should first install Glitch Video Effect: Glitch FX app from Play Store. Edit your video on the app to add any text, and thereafter, add glitch text effect instantly. In fact, the glitch text effect is available in almost all popular video editor apps on Android due to the effect being trendy and viral.
Free Download For macOS 10.14 or later
Step1 Download and install Filmora on your computer. Go to File> New Project from the menu bar to start video editing project.
Step2 Go to File> Import Media > Import Media Files to import the video clips where you want to add glitch text effect. Drop the clip into the Timeline to get started.
Step3 Go to Titles tab located at the top. From the left panel, click on Titles option. Search “glitch” in the search field and you will see all the glitch text effects that you can apply to the text in your video.
Step4 Select any glitch text effect and drop it into the Timeline above the video clip exactly where you want the text and the effect to appear.
Step5 Double-click on the glitch text effect located on Timeline and edit the text, style, and other parameters as per your preference. Click on Ok and play the video to see your edited video with the glitch text effect.
Part 2. How to Make Glitch Text Effect with Premiere Pro
Adobe Premiere Pro is another renowned video editor where you can add glitch text effect to your video. Premiere Pro is strictly for professional video editors as the user interface is not as intuitive as Filmora . The learning curve is steep, and therefore, you need to go through the steps to add glitch text effect Premiere Pro. There are several glitch text effect presets available that you can apply to any text on your video to make them engaging. Here are the steps to make glitch text effect with Premiere Pro.
Step1 Launch Adobe Premiere Pro and go to New> Project to get started. Import your video and drop it into Timeline.
Step2 Use the Type tool to write any text on your video to add glitch text effect. You should have a text layer on Timeline.
Step3 Go to Effects> Immersive Video> VR Digital Glitch option. Drag and drop the effect to text layer.
Step4 Under Effect Controls tab, you will find all the different parameters that you can adjust to get the glitch text effect perfectly.
Step5 Turn on Master Amplitude and add multiple keyframes as different points in the Timeline and change the distortion value to make the effect prominent.
Step6 Go to the first keyframe and turn on Random Seed effect. Go to the last keyframe and turn on Random Seed effect and change the value to 75. Play the video to check the entire video with glitch text effect.
Part 3. Use VSDC Video Editor to Create Glitch Text
If you do not have any premium video editor on your computer and you do not want to purchase any premium video editor, you can still get glitter text effect free. You need to download and install VSDC free video editor on your computer. But the steps to create glitch text on VSDC video editor are slightly complicated as the user interface is not as intuitive as Filmora . Here are the steps to add free glitch text effect on your video.
Step1 Download and install VSDC video editor. Launch the editor and click on New Project to get started. Import your video to your project where you want to add glitch text effect.
Step2 Use Type tool to write a text on the video. You can press Shift+T shortcut as well. After typing the text, adjust the text style as per your preference.
Step3 Double-click on the text layer on Timeline and go to Video Effects> Special FX and click on Glitch option.
Step4 A window will appear where you can set the starting point, duration, and different parameters. Click on Ok button.
Step5 Go to Properties Windows and click on Presets to select different types of glitch text effects. You can also adjust the intensity of the text effects and other parameters as you feel.
Part 4. Related FAQs about Glitch Text
1. How do you animate glitch text?
If you want to animate glitch text for free, VSDC video editor is ideal as you can customize the effect on any text in simple steps. If you want to use a premium video editor, we recommend Filmora as there are various glitch text effects available to apply to any text on your video instantly.
2. How do you glitch text on video?
First, you have to import your video in your video editor. Type the desired text and set the style. Thereafter, go to glitch text effect presets available on the video editor and apply it to the text instantly. You can customize the glitch text effect as per your preference to make the animation more prominent.
3. How do you glitch text on Android?
You should first install Glitch Video Effect: Glitch FX app from Play Store. Edit your video on the app to add any text, and thereafter, add glitch text effect instantly. In fact, the glitch text effect is available in almost all popular video editor apps on Android due to the effect being trendy and viral.
Top 5 Video Filter Software: Enhance Your Videos
In today’s tech-savvy world, whether you’re a budding content creator or a seasoned pro, creating eye-catching videos is a must.
And what’s the secret sauce to make your videos stand out? You guessed it – video filters! These nifty tools can transform your raw footage into a visual masterpiece.
So, if you’re ready to take your video editing game up a notch, you’re in the right place.
In this article, we’ll dig into the top 5 video filter software of 2024 that are worth your attention.
Before we jump into the juicy details, let’s get down to basics.
Part 1: Introduction
What exactly are video filters, you ask?
Well, video filters are like Instagram filters for your videos but with much more finesse.
They allow you to tweak various aspects of your video’s appearance, such as color, contrast, saturation, and more, to achieve the desired visual style.
The beauty of video filter software lies in its ability to enhance your video’s overall look and feel. Let’s explore the top contenders in the video filter software arena.
Part 2: Top 5 Video Filter Software
01 Filmora

Our first contender in the world of video filter software is Filmora. Designed with a user-friendly interface, Filmora is the ideal choice for those who want to enhance their videos effortlessly. Let’s take a closer look at what makes it stand out.
Advantages:
- Filmora’s intuitive interface makes it a breeze for beginners to get started. You don’t need to be a tech whiz to dive into video editing; Filmora guides you through the process seamlessly.
- Filmora boasts an extensive library of video presets and color grading presets. This treasure trove of pre-made styles allows you to give your videos that extra flair without the need for in-depth editing skills.
- Time is precious, and Filmora respects that. It offers quick rendering speeds, so you can see the results of your editing efforts in no time.
- Filmora’s simplicity is its strength, but it doesn’t mean it lacks creative potential. You can still go into more advanced features when you’re ready to level up your video editing game. This software gracefully balances accessibility and functionality.
Disadvantages:
So, you might be wondering, what about the downsides? Well, Filmora is so user-friendly that it can make you addicted to editing!
You might find yourself spending hours perfecting your videos, which, to be honest, is more of an advantage disguised as a disadvantage. Who wouldn’t want to get lost in the world of video editing, creating stunning content effortlessly?
02 DaVinci Resolve

When it comes to professional video editing and color correction, DaVinci Resolve stands as a true powerhouse in the world of video filter software.
Renowned for its robust feature set and precision, it’s the go-to choice for filmmakers, colorists, and anyone who demands the highest level of control over their video projects.
Advantages:
- DaVinci Resolve is unrivaled in its color correction and grading capabilities. Whether you’re aiming for a cinematic look or a specific color scheme, the software provides an extensive suite of tools to fine-tune every detail. Its color wheels, curves, and advanced grading panels allow you to achieve the exact visual style you envision.
- It provides a lot of cool stuff for editing sound and video, like fancy tools for fixing audio, working with multiple cameras, and working together with others on the same project. This makes it an all-in-one solution for every aspect of video post-production.
- In a world where teamwork is essential, DaVinci Resolve shines with its collaboration features. Many people can work on a project together at the same time, making it easier for teams working on big video projects to edit smoothly.
Disadvantages:
DaVinci Resolve can be resource-intensive, demanding a powerful computer setup for smooth operation. This could be a great advantage for people with really good computers, but it might be a bit tough for folks with older or less powerful ones.
03 HitFilm Express

If you’re an aspiring filmmaker or content creator looking to dive into the world of video editing and visual effects, HitFilm Express is your ticket to boundless creativity.
This versatile software combines video editing and visual effects seamlessly, allowing you to create stunning, professional-quality videos without breaking the bank.
Advantages:
- HitFilm Express excels in merging video editing and visual effects into one unified platform. This means you can effortlessly incorporate jaw-dropping visual effects into your videos without the need for additional software. Whether you’re adding explosions, futuristic CGI, or enchanting motion graphics, HitFilm Express has you covered.
- It offers a free version that provides access to its fundamental video filter features and VFX capabilities. This is a fantastic opportunity for budding content creators to dip their toes into the world of video editing without any financial commitment.
- HitFilm Express comes with an extensive library of tutorials, making it incredibly user-friendly for those who are new to video editing or visual effects. These tutorials guide you through the software’s features and help you create eye-catching effects like a pro.
Disadvantages:
As for potential downsides, the free version of HitFilm Express may have some limitations compared to the paid version.
While it provides access to essential features, you may find certain advanced options restricted.
However, this can be seen as an advantage because it allows you to explore the software without any upfront costs.
04 Adobe Premiere Pro

Adobe Premiere Pro is a name that resonates deeply within the video editing community. It’s renowned for its versatility and rich feature set, making it a go-to choice for professional video editors and content creators alike.
Advantages:
- When it comes to customization, Adobe Premiere Pro truly shines. The software offers an extensive library of plugins and extensions, allowing you to tailor your video filter effects to your precise liking. Whether you’re into color grading, visual effects, or audio enhancement, you’ll find the tools you need within Adobe’s vast ecosystem.
- If you’re already a part of the Adobe Creative family, you’ll appreciate Premiere Pro’s seamless integration with other Adobe software. Easily import and export assets from Adobe Photoshop or Adobe After Effects, enhancing your workflow and saving you time.
- Adobe is committed to keeping Premiere Pro at the forefront of video editing technology. With regular updates, you can expect a constant influx of new features, improvements, and bug fixes. This ensures that your editing experience remains cutting-edge.
Disadvantages:
There are a few considerations to keep in mind. Adobe Premiere Pro operates on a subscription-based model, which means you’ll need to pay a monthly or annual fee to access the software. While this provides you with ongoing updates and support, it might not be the best fit for those on a strict budget.
Adobe Premiere Pro’s extensive feature set can be overwhelming for beginners. If you’re new to video editing, you may find the learning curve a bit steep. However, with dedication and a wealth of online tutorials available, mastering the software is within reach.
05 Final Cut Pro

If you’re a proud owner of a Mac, Final Cut Pro should be on your radar as the ultimate video filter software. This Apple-exclusive gem is tailored to take your video editing experience to the next level, offering seamless integration with the macOS ecosystem.
Advantages:
- A standout feature of Final Cut Pro is how well it works together with other Apple devices and software, making everything run smoothly. Whether you’re working on your Macbook, iPad, or iPhone, Final Cut Pro keeps your workflow smooth and consistent. This synergy allows you to transfer projects effortlessly between devices, making it a go-to choice for Apple enthusiasts.
- Final Cut Pro is a powerhouse when it comes to handling high-resolution videos. Whether you’re working with 4K or 8K footage, this software handles it with grace and precision. Expect smooth playback and rapid rendering, even with the most demanding video projects.
- Mac users will feel right at home with Final Cut Pro’s sleek and user-friendly interface. The software’s design prioritizes ease of use without compromising on functionality. You can focus on your creative vision rather than wrestling with a complex interface.
Disadvantages:
It’s important to mention that Final Cut Pro is quite expensive, which might not be affordable for people on a tight budget.
Final Cut Pro is exclusive to macOS, which means Windows users will have to explore alternative software options. If you’re committed to the Apple ecosystem and prioritize top-notch video editing, Final Cut Pro is a wise investment.
Part 3: Summary
In a world where visual content rules supreme, having the right video filter software can make all the difference.
Your choice depends on your skill level, preferences, and budget. Whether you’re a newbie or a seasoned pro, there’s a video filter software out there that’s perfect for you. Feel free to dive in, experiment, and let your creativity sparkle in your videos!
Part 1: Introduction
What exactly are video filters, you ask?
Well, video filters are like Instagram filters for your videos but with much more finesse.
They allow you to tweak various aspects of your video’s appearance, such as color, contrast, saturation, and more, to achieve the desired visual style.
The beauty of video filter software lies in its ability to enhance your video’s overall look and feel. Let’s explore the top contenders in the video filter software arena.
Part 2: Top 5 Video Filter Software
01 Filmora
Our first contender in the world of video filter software is Filmora. Designed with a user-friendly interface, Filmora is the ideal choice for those who want to enhance their videos effortlessly. Let’s take a closer look at what makes it stand out.
Advantages:
- Filmora’s intuitive interface makes it a breeze for beginners to get started. You don’t need to be a tech whiz to dive into video editing; Filmora guides you through the process seamlessly.
- Filmora boasts an extensive library of video presets and color grading presets. This treasure trove of pre-made styles allows you to give your videos that extra flair without the need for in-depth editing skills.
- Time is precious, and Filmora respects that. It offers quick rendering speeds, so you can see the results of your editing efforts in no time.
- Filmora’s simplicity is its strength, but it doesn’t mean it lacks creative potential. You can still go into more advanced features when you’re ready to level up your video editing game. This software gracefully balances accessibility and functionality.
Disadvantages:
So, you might be wondering, what about the downsides? Well, Filmora is so user-friendly that it can make you addicted to editing!
You might find yourself spending hours perfecting your videos, which, to be honest, is more of an advantage disguised as a disadvantage. Who wouldn’t want to get lost in the world of video editing, creating stunning content effortlessly?
02 DaVinci Resolve
When it comes to professional video editing and color correction, DaVinci Resolve stands as a true powerhouse in the world of video filter software.
Renowned for its robust feature set and precision, it’s the go-to choice for filmmakers, colorists, and anyone who demands the highest level of control over their video projects.
Advantages:
- DaVinci Resolve is unrivaled in its color correction and grading capabilities. Whether you’re aiming for a cinematic look or a specific color scheme, the software provides an extensive suite of tools to fine-tune every detail. Its color wheels, curves, and advanced grading panels allow you to achieve the exact visual style you envision.
- It provides a lot of cool stuff for editing sound and video, like fancy tools for fixing audio, working with multiple cameras, and working together with others on the same project. This makes it an all-in-one solution for every aspect of video post-production.
- In a world where teamwork is essential, DaVinci Resolve shines with its collaboration features. Many people can work on a project together at the same time, making it easier for teams working on big video projects to edit smoothly.
Disadvantages:
DaVinci Resolve can be resource-intensive, demanding a powerful computer setup for smooth operation. This could be a great advantage for people with really good computers, but it might be a bit tough for folks with older or less powerful ones.
03 HitFilm Express
If you’re an aspiring filmmaker or content creator looking to dive into the world of video editing and visual effects, HitFilm Express is your ticket to boundless creativity.
This versatile software combines video editing and visual effects seamlessly, allowing you to create stunning, professional-quality videos without breaking the bank.
Advantages:
- HitFilm Express excels in merging video editing and visual effects into one unified platform. This means you can effortlessly incorporate jaw-dropping visual effects into your videos without the need for additional software. Whether you’re adding explosions, futuristic CGI, or enchanting motion graphics, HitFilm Express has you covered.
- It offers a free version that provides access to its fundamental video filter features and VFX capabilities. This is a fantastic opportunity for budding content creators to dip their toes into the world of video editing without any financial commitment.
- HitFilm Express comes with an extensive library of tutorials, making it incredibly user-friendly for those who are new to video editing or visual effects. These tutorials guide you through the software’s features and help you create eye-catching effects like a pro.
Disadvantages:
As for potential downsides, the free version of HitFilm Express may have some limitations compared to the paid version.
While it provides access to essential features, you may find certain advanced options restricted.
However, this can be seen as an advantage because it allows you to explore the software without any upfront costs.
04 Adobe Premiere Pro
Adobe Premiere Pro is a name that resonates deeply within the video editing community. It’s renowned for its versatility and rich feature set, making it a go-to choice for professional video editors and content creators alike.
Advantages:
- When it comes to customization, Adobe Premiere Pro truly shines. The software offers an extensive library of plugins and extensions, allowing you to tailor your video filter effects to your precise liking. Whether you’re into color grading, visual effects, or audio enhancement, you’ll find the tools you need within Adobe’s vast ecosystem.
- If you’re already a part of the Adobe Creative family, you’ll appreciate Premiere Pro’s seamless integration with other Adobe software. Easily import and export assets from Adobe Photoshop or Adobe After Effects, enhancing your workflow and saving you time.
- Adobe is committed to keeping Premiere Pro at the forefront of video editing technology. With regular updates, you can expect a constant influx of new features, improvements, and bug fixes. This ensures that your editing experience remains cutting-edge.
Disadvantages:
There are a few considerations to keep in mind. Adobe Premiere Pro operates on a subscription-based model, which means you’ll need to pay a monthly or annual fee to access the software. While this provides you with ongoing updates and support, it might not be the best fit for those on a strict budget.
Adobe Premiere Pro’s extensive feature set can be overwhelming for beginners. If you’re new to video editing, you may find the learning curve a bit steep. However, with dedication and a wealth of online tutorials available, mastering the software is within reach.
05 Final Cut Pro
If you’re a proud owner of a Mac, Final Cut Pro should be on your radar as the ultimate video filter software. This Apple-exclusive gem is tailored to take your video editing experience to the next level, offering seamless integration with the macOS ecosystem.
Advantages:
- A standout feature of Final Cut Pro is how well it works together with other Apple devices and software, making everything run smoothly. Whether you’re working on your Macbook, iPad, or iPhone, Final Cut Pro keeps your workflow smooth and consistent. This synergy allows you to transfer projects effortlessly between devices, making it a go-to choice for Apple enthusiasts.
- Final Cut Pro is a powerhouse when it comes to handling high-resolution videos. Whether you’re working with 4K or 8K footage, this software handles it with grace and precision. Expect smooth playback and rapid rendering, even with the most demanding video projects.
- Mac users will feel right at home with Final Cut Pro’s sleek and user-friendly interface. The software’s design prioritizes ease of use without compromising on functionality. You can focus on your creative vision rather than wrestling with a complex interface.
Disadvantages:
It’s important to mention that Final Cut Pro is quite expensive, which might not be affordable for people on a tight budget.
Final Cut Pro is exclusive to macOS, which means Windows users will have to explore alternative software options. If you’re committed to the Apple ecosystem and prioritize top-notch video editing, Final Cut Pro is a wise investment.
Part 3: Summary
In a world where visual content rules supreme, having the right video filter software can make all the difference.
Your choice depends on your skill level, preferences, and budget. Whether you’re a newbie or a seasoned pro, there’s a video filter software out there that’s perfect for you. Feel free to dive in, experiment, and let your creativity sparkle in your videos!
Discover the Best Video Frame Rate Converters for Smooth Playback, Including Online and Offline Options. Learn How to Convert Frame Rates for Free and Elevate Your Video Quality with These Top 8 Tools
One important aspect to consider when creating high-quality videos is the frame rate. The frame rate, measured in frames per second (fps), determines the smoothness and fluidity of your video. If the frame rate is too low, your video may appear choppy or stutter. On the other hand, a higher frame rate can provide a more cinematic experience.
However, not all cameras or devices record videos at the same frame rate. That’s where frame rate video converters come in. These tools allow you to change the frame rate of your videos so they can be played back on different devices or platforms. With so many options available, it can be overwhelming to know which frame rate converters to use.
In this article, we’ll look at 8 of the best frame rate video converters you must try. These tools will help you achieve the perfect frame rate for your videos, from free online options to paid software.
Unknown Facts About Converting Frame Rates
When converting frame rates, there are a few things to keep in mind that you may need to be made aware of.

1. The Web Doesn’t Care About Frame Rates
First, it’s important to note that the web doesn’t care about frame rates. Most online platforms, such as YouTube and Vimeo, automatically adjust the frame rate of videos to match the viewer’s device or internet connection. This means that even if you have a video with a high frame rate, it may be automatically downgraded when it’s uploaded to the web.
2. Converting Frame Rates in Exact Multiples Is Easy
Another thing to remember is that converting frame rates in exact multiples is relatively easy.
For example, if you have a video recorded at 30 fps and want to convert it to 60 fps, it’s a simple process as it is a 2x multiple. However, if you want to convert your video to a frame rate that is not a multiple of the original, such as 29.97 fps, the process can be more complex and may result in some loss of quality.
3. Frame Rate Is Not “Cinematic”
Lastly, it’s important to note that frame rate is not “cinematic” because a higher frame rate does not automatically make your video look more cinematic. While a higher frame rate can provide a more smooth and more fluid video, it’s just one aspect of creating a cinematic experience. Other elements, such as lighting, composition, and sound design, also play a crucial role in creating a cinematic look.
5 Frame Rate Video Converters for Win/Mac
Many options are available for both Windows and Mac users when converting frame rates. Here are 5 of the best frame rate video converters for both platforms:
1. Wondershare Filmora Video Editor and Frame Rate Converter for Win/Mac
Free Download For Win 7 or later(64-bit)
Free Download For macOS 10.14 or later
Filmora Video Editor and Frame Rate Converter is a versatile tool for Windows and Mac users that allows you to edit and convert your videos easily. It has a user-friendly interface and provides a wide range of video editing functions, such as trimming, cropping, splitting, and merging.
It also allows you to change the frame rate of your videos with a few simple clicks. You can easily adjust the frame rate to match the output device or platform, such as 30fps for YouTube or 60fps for Vimeo. Moreover, it also provides various video effects, transitions, and text/title templates to enhance your video quality. With Filmora, you can easily turn your home videos into professional-looking films.
How To Convert Video Frame Rate With Filmora
Here’s the step-by-step process of converting video frame rate using Filmora:
Step1 Create a new project, then import the video. Right click the video, and click “Properties.”

Step2 Check the current frame rate of the video

Step3 Add the video to the timeline, then click the “Export“ button
Step4 Change the frame rate and then click “Export.”

2. VideoPad Video Editor and Frame Rate Converter for Win/Mac
VideoPad Video Editor, created by NCH Software, is a user-friendly video editing software suitable for professionals and beginners. It offers various editing tools, video transitions and effects, customizable templates, and audio editing options.
One of its key features is the ability to convert the frame rate of your videos during the exporting process, making it a versatile tool for adjusting video playback smoothness. It supports multiple video formats for input and output; a free version is available for non-commercial use only.
Here’s the step-by-step process of converting video frame rate using VideoPad:
Step1 Open VideoPad and import your video to the timeline
Step2 Edit the video as desired, then navigate to “Export Video“ > “Video File.”
Step3 In the “Export File Settings“ window, select the desired frame rate, edit the file name, and choose the output folder, format, and resolution. Click “Create“ to export the video.

3. Frame Rate Converter - MiniTool Video Converter (Windows)

MiniTool Video Converter is a free and versatile tool for converting the frame rate of your videos. It offers multiple FPS options, such as 12, 15, 20, 23.97, 30, 50, and 60, which vary depending on your chosen video format. Not only can it change the frame rate, but it can also convert the video format, allowing you to import a video and then simultaneously change the format and frame rate.
Additionally, MiniTool offers options for video resolution, quality, encoder, and more. Furthermore, this video FPS converter allows you to record your computer screen in various formats, such as MP4, WMV, MKV, AVI, MOV, FLV, and TS in 15, 20, 25, and 30 fps. It also enables you to download videos and audio from YouTube.
Here’s the step-by-step process of converting video frame rate using MiniTool Video Converter:
Step1 Open MiniTool Video Converter, and upload the video you wish to convert by clicking “Add“ or dragging the file into the conversion area.

Step2 Under the Video tab in the new pop-up, select a format and click “Create Custom“ to open the settings window. Choose the desired frame rate.
Step3 Click “Convert,” and once completed, locate the converted video in the “Converted“ tab by clicking “Show in Folder.”

4. VLC Converter Frame Rate Conversion Software

The VLC media player is a well-known free tool for converting frame rates. It’s a versatile player that supports various audio-visual formats, including AVI, MPEG, WMV, DVD, and CD.
VLC also includes additional features such as cropping and de-interlacing, allowing you to configure and edit your files. VLC media players can also remove DRM protection and convert multiple videos in batches. It’s a great option for a free frame rate converter.
Here’s how to change the frame rate of a video using VLC Media Player:
Step1 Open the VLC media player and click on “Media“ > “Capture Device.”
Step2 Select “Convert/Save“ and browse for the video you want to change the frame rate
Step3 Select the desired frame rate in the “Convert/Save“ dialog box and click “Start.”
Step4 Wait for the conversion to finish and click “Convert/Save“ to find the new video with the adjusted frame rate.

5. HandBrake: Open Source Frame Rate Converter

Handbrake is a versatile, open-source video converter that can change the frame rate of a video from nearly any format to MP4, WebM, or MKV. It offers a wide range of frame rate options, from 5 to 120 FPS, making it a great tool for video production needs.
In addition to frame rate conversion, Handbrake also features various filters to enhance video quality, such as reducing noise, sharpening, rotating, flipping videos, adding subtitles, and more. With Handbrake, you can easily change the frame rate of your videos to your desired settings.
Here’s how to change the frame rate of a video using HandBrake:
Step1 Open Handbrake and add your video.
Step2 Select a format, change the frame rate, and choose the output folder.
Step3 Click “Start Encode“ to convert the video frame rate.

3 Video FPS Converters Online
In addition to software-based video frame rate converters, a variety of online video FPS converters can be used for quick and easy frame rate conversions.
These online tools are often user-friendly and require no installation, making them accessible from any device with an internet connection. These tools allow for easy uploading of videos and the ability to select the desired frame rate for conversion. They also offer a variety of output formats and options for video quality, resolution, and more.
1. VEED.IO Video FPS Converter Online
VEED’s online frame rate converter is a simple tool to increase or decrease your video’s frame rate without leaving your browser. It supports popular frame rates such as 16fps, 24fps, 30fps, 60fps, and more.
Lower the frame rate to create a stop-motion video or GIF, or increase it to make the video appear smoother. The tool can upload videos in any format and render them in seconds without installing converter apps or software. It works on Windows 10, Mac, Linux, and mobile devices.
Here’s how to change the video frame rate using Veed.io:
Step1 Import your video, or you can drag and drop your video.

Step2 Click “Export,” then click “switch to advanced settings“ to access frame rate settings. Adjust the frame rate using the framerate limit tool.

Step3 Click “Export Video,” and your video will render in seconds.

2. Video2Edit Video Frame Rate Converter Online Free

Video2Edit is an all-in-one online video solution that offers a variety of editing options such as conversion, rotation, cutting, merging, and audio compression and normalization. Additionally, it is also a highly efficient online video frame rate converter. With Video2edit, you can easily change the frame rate of your videos to match your specific needs.
This tool makes it simple whether you want to increase or decrease the frame rate. It supports a wide range of frame rates, from 16 to 60 fps, and can convert your video to any format you need. With this powerful and versatile tool, you can ensure that your videos look smooth and professional and have the right frame rate for your desired output.
Here’s how to change the video frame rate using Video2Edit:
Step1 On Video2Edit’s website, select “Convert from video“ and upload your file.

Step2 Select an output format and enter a new frame rate (1-120) in the “Change frame rate“ box.

Step3 Click “START“ to begin the conversion process.

3. AConvert Free Video Frame Rate Converter

With AConvert, you can quickly change the frame rate of your video to fit your needs. This online tool offers various frame rates, including 20fps, 24fps, 30fps, 50fps, and more, giving you the flexibility to find the right setting for your video.
Additionally, AConvert offers a range of video editing options, including cutting, merging, rotating, and cropping, allowing you to enhance your video in multiple ways. The process of converting frame rate with AConvert is simple.
Here’s how to change the video frame rate using AConvert:
Step1 Visit the AConvert website, select Video, and upload your video.

Step2 Choose “Change size, bitrate, or frame rate“ and select “Frame Rate“ in the drop-down menu.

Step3 Select a frame rate and click “Convert Now!“ to start the conversion process.

Conclusion
Converting video frame rates can significantly impact your video’s quality and viewing experience. Whether you’re looking to increase or decrease the frame rate, the above options provide easy and efficient ways. Regardless of the tool or software, the process is straightforward, allowing you to change the frame rate with just a few clicks. So go ahead and try out one of these options to improve your video’s frame rate today!
Free Download For macOS 10.14 or later
Filmora Video Editor and Frame Rate Converter is a versatile tool for Windows and Mac users that allows you to edit and convert your videos easily. It has a user-friendly interface and provides a wide range of video editing functions, such as trimming, cropping, splitting, and merging.
It also allows you to change the frame rate of your videos with a few simple clicks. You can easily adjust the frame rate to match the output device or platform, such as 30fps for YouTube or 60fps for Vimeo. Moreover, it also provides various video effects, transitions, and text/title templates to enhance your video quality. With Filmora, you can easily turn your home videos into professional-looking films.
How To Convert Video Frame Rate With Filmora
Here’s the step-by-step process of converting video frame rate using Filmora:
Step1 Create a new project, then import the video. Right click the video, and click “Properties.”
Step2 Check the current frame rate of the video
Step3 Add the video to the timeline, then click the “Export“ button
Step4 Change the frame rate and then click “Export.”
2. VideoPad Video Editor and Frame Rate Converter for Win/Mac
VideoPad Video Editor, created by NCH Software, is a user-friendly video editing software suitable for professionals and beginners. It offers various editing tools, video transitions and effects, customizable templates, and audio editing options.
One of its key features is the ability to convert the frame rate of your videos during the exporting process, making it a versatile tool for adjusting video playback smoothness. It supports multiple video formats for input and output; a free version is available for non-commercial use only.
Here’s the step-by-step process of converting video frame rate using VideoPad:
Step1 Open VideoPad and import your video to the timeline
Step2 Edit the video as desired, then navigate to “Export Video“ > “Video File.”
Step3 In the “Export File Settings“ window, select the desired frame rate, edit the file name, and choose the output folder, format, and resolution. Click “Create“ to export the video.
3. Frame Rate Converter - MiniTool Video Converter (Windows)
MiniTool Video Converter is a free and versatile tool for converting the frame rate of your videos. It offers multiple FPS options, such as 12, 15, 20, 23.97, 30, 50, and 60, which vary depending on your chosen video format. Not only can it change the frame rate, but it can also convert the video format, allowing you to import a video and then simultaneously change the format and frame rate.
Additionally, MiniTool offers options for video resolution, quality, encoder, and more. Furthermore, this video FPS converter allows you to record your computer screen in various formats, such as MP4, WMV, MKV, AVI, MOV, FLV, and TS in 15, 20, 25, and 30 fps. It also enables you to download videos and audio from YouTube.
Here’s the step-by-step process of converting video frame rate using MiniTool Video Converter:
Step1 Open MiniTool Video Converter, and upload the video you wish to convert by clicking “Add“ or dragging the file into the conversion area.
Step2 Under the Video tab in the new pop-up, select a format and click “Create Custom“ to open the settings window. Choose the desired frame rate.
Step3 Click “Convert,” and once completed, locate the converted video in the “Converted“ tab by clicking “Show in Folder.”
4. VLC Converter Frame Rate Conversion Software
The VLC media player is a well-known free tool for converting frame rates. It’s a versatile player that supports various audio-visual formats, including AVI, MPEG, WMV, DVD, and CD.
VLC also includes additional features such as cropping and de-interlacing, allowing you to configure and edit your files. VLC media players can also remove DRM protection and convert multiple videos in batches. It’s a great option for a free frame rate converter.
Here’s how to change the frame rate of a video using VLC Media Player:
Step1 Open the VLC media player and click on “Media“ > “Capture Device.”
Step2 Select “Convert/Save“ and browse for the video you want to change the frame rate
Step3 Select the desired frame rate in the “Convert/Save“ dialog box and click “Start.”
Step4 Wait for the conversion to finish and click “Convert/Save“ to find the new video with the adjusted frame rate.
5. HandBrake: Open Source Frame Rate Converter
Handbrake is a versatile, open-source video converter that can change the frame rate of a video from nearly any format to MP4, WebM, or MKV. It offers a wide range of frame rate options, from 5 to 120 FPS, making it a great tool for video production needs.
In addition to frame rate conversion, Handbrake also features various filters to enhance video quality, such as reducing noise, sharpening, rotating, flipping videos, adding subtitles, and more. With Handbrake, you can easily change the frame rate of your videos to your desired settings.
Here’s how to change the frame rate of a video using HandBrake:
Step1 Open Handbrake and add your video.
Step2 Select a format, change the frame rate, and choose the output folder.
Step3 Click “Start Encode“ to convert the video frame rate.
3 Video FPS Converters Online
In addition to software-based video frame rate converters, a variety of online video FPS converters can be used for quick and easy frame rate conversions.
These online tools are often user-friendly and require no installation, making them accessible from any device with an internet connection. These tools allow for easy uploading of videos and the ability to select the desired frame rate for conversion. They also offer a variety of output formats and options for video quality, resolution, and more.
1. VEED.IO Video FPS Converter Online
VEED’s online frame rate converter is a simple tool to increase or decrease your video’s frame rate without leaving your browser. It supports popular frame rates such as 16fps, 24fps, 30fps, 60fps, and more.
Lower the frame rate to create a stop-motion video or GIF, or increase it to make the video appear smoother. The tool can upload videos in any format and render them in seconds without installing converter apps or software. It works on Windows 10, Mac, Linux, and mobile devices.
Here’s how to change the video frame rate using Veed.io:
Step1 Import your video, or you can drag and drop your video.
Step2 Click “Export,” then click “switch to advanced settings“ to access frame rate settings. Adjust the frame rate using the framerate limit tool.
Step3 Click “Export Video,” and your video will render in seconds.
2. Video2Edit Video Frame Rate Converter Online Free
Video2Edit is an all-in-one online video solution that offers a variety of editing options such as conversion, rotation, cutting, merging, and audio compression and normalization. Additionally, it is also a highly efficient online video frame rate converter. With Video2edit, you can easily change the frame rate of your videos to match your specific needs.
This tool makes it simple whether you want to increase or decrease the frame rate. It supports a wide range of frame rates, from 16 to 60 fps, and can convert your video to any format you need. With this powerful and versatile tool, you can ensure that your videos look smooth and professional and have the right frame rate for your desired output.
Here’s how to change the video frame rate using Video2Edit:
Step1 On Video2Edit’s website, select “Convert from video“ and upload your file.
Step2 Select an output format and enter a new frame rate (1-120) in the “Change frame rate“ box.
Step3 Click “START“ to begin the conversion process.
3. AConvert Free Video Frame Rate Converter
With AConvert, you can quickly change the frame rate of your video to fit your needs. This online tool offers various frame rates, including 20fps, 24fps, 30fps, 50fps, and more, giving you the flexibility to find the right setting for your video.
Additionally, AConvert offers a range of video editing options, including cutting, merging, rotating, and cropping, allowing you to enhance your video in multiple ways. The process of converting frame rate with AConvert is simple.
Here’s how to change the video frame rate using AConvert:
Step1 Visit the AConvert website, select Video, and upload your video.
Step2 Choose “Change size, bitrate, or frame rate“ and select “Frame Rate“ in the drop-down menu.
Step3 Select a frame rate and click “Convert Now!“ to start the conversion process.
Conclusion
Converting video frame rates can significantly impact your video’s quality and viewing experience. Whether you’re looking to increase or decrease the frame rate, the above options provide easy and efficient ways. Regardless of the tool or software, the process is straightforward, allowing you to change the frame rate with just a few clicks. So go ahead and try out one of these options to improve your video’s frame rate today!
Also read:
- New 3 Different Methods to Correct Color Distortion in Videos for 2024
- 2024 Approved Step By Step Guide on Using Media Player Classic To Rotate A Video
- Updated In 2024, Best Ways to Add Meme Text to Videos
- 2024 Approved Do You Wish to Know How FFmpeg Can Remove Audio From a Video? If Yes, Keep Scrolling This Guide to Remove Audio From Video with FFmpeg and Other Alternative Software
- In 2024, Converting VTT to SRT, or in Other Words, Converting a Document File Format Web to Subtitles File with the SRT Format Can Be a Cumbersome Process for Many. It Becomes Difficult when You Are New to This and Dont Have Prior Guidance
- Updated 2024 Approved Adobe Premiere Pro Download and Use Guide
- In 2024, Step by Step to Crop a Video Using Lightworks
- New Full Guide to Discord Boost for 2024
- A Full Guide to Funcall Voice Changer and Its Alternatives
- A Guide to Find a High-Quality Video Marketing Agency for 2024
- Exploring the Best Slow-Motion App for 2024
- What Does It Mean to Color Grade Your Images, and Why Is It so Important? Does It Mean the Same Thing as a Color Correction? Read on to Gather All the Information You Need on Color Grading Photography
- Updated 2024 Approved How to Speed Up and Slow Down a Video
- New In 2024, How to Use Blender Green Screen
- Updated How to Create One Click Video Reverse Effect in Filmora
- New Add Text Animation to A Video Online
- Updated Do You Want to Apply BRAW LUTs to Your Pictures and Video Footage? Here We Will Discuss some of the Best Options Available to Help You Choose the Right One
- In 2024, Looking Forward to Try Hands at Using the Icecream Slideshow Maker Program to Create High End Slideshow Presentations? Stay Here for a Complete Insight Into the Process
- Updated How to Split Videos in Final Cut Pro
- In 2024, So, in This Short Tutorial, Well Learn How to Create a Vintage 1980-Style Video with a Retro Effect that Will Leave Your Audience Yearning for More
- New How to Got Free After Effects Templates Slideshow with Simple Trick for 2024
- 2024 Approved Come And Pick! Best MOV to GIF Converters
- 2024 Approved Competitive Guide To Use Slow Motion in After Effects
- Updated If You Want to Color Grading Your Video, Adobe Lightroom Will Be the Right Choice. This Article Will Teach You How to Use Lightroom to Apply Color Grading to Videos with Ease
- In 2024, 11 Tips to Make Product Ad Videos
- Create Photoshop GIFs with Zero Hustle
- New How to Make A Slideshow Video (+Filmora Techniques)
- New 2024 Approved Make Super Easy Coin Magic With Filmora
- Updated Steps to Create Gold Text Effects After Effects for 2024
- In 2024, How to Zoom Desktop Screen
- 2024 Approved Best AR Video Apps
- New Detailed Guide to Crop Video in Sony Vegas Pro for 2024
- Want to Know How to Slow Down a Video on iPhone or Speed It Up? This Guide Provides Step by Step Method to Do so Using Simple Techniques. Find Out More About It for 2024
- New Discord Is Becoming More Popular with Time with Millions of Users. Are You Thinking of Getting a GIF for Discord Profile? If Yes, Learn From This Piece Since We Have a Conclusive Summary of Getting a GIF Profile Picture for Discord
- Updated 2024 Approved Leading Applications to Create Fast Motion in iPhone
- In 2024, Do You Want a LUT that You Can Use for Your High-Definition Content? You Can Use Rec 709 LUT Premiere Pro for Your HD Digital Media to Give the Perfect Result
- New How to Use Lumetri Color in Adobe After Effects for 2024
- New How to Make Double Exposure Effect in Filmora
- New Gifs Can Convey Your Emotions in a Way that Words Cannot, so They Are Becoming a Popular Way to Express Yourself, and You Must Know How to Make a Gif and You Wont Believe that Its Not Difficult to Do
- Learn How to Merge Audio and Video Like a Pro with This Step-by-Step Guide to Using FFmpeg. Create Seamless Videos and Improve Your Video Production Skills
- 2024 Approved Top 6 Best Alternatives to Clownfish Voice Changer
- New 2024 Approved How to Get VHS Filter and Glitch Filter to Your Images or Videos?
- In 2024, Have You Ever Heard of the Video Format for PowerPoint? Allow Us to Help You Learn More About PowerPoint. It Will Help You Make an Impression by Making Good Slides
- Updated Learn Top Best Free LUTs For Premiere Pro for 2024
- Add Flesh to Your Video Content Before Posting Them for Your Audience to See Using Meme Texts. Use the Tutorial Guide Shared in This Post
- In 2024, Make Super Easy Coin Magic With Filmora
- Updated 2024 Approved 20 Fantastic Video Background Templates to Make Your Video Go Viral
- How to Resolve Sony Xperia 10 V Screen Not Working | Dr.fone
- How Can We Unlock Our Xiaomi Redmi Note 12 4G Phone Screen?
- Why Your WhatsApp Live Location is Not Updating and How to Fix on your Nubia Z50S Pro | Dr.fone
- How To Leave a Life360 Group On Motorola Moto G04 Without Anyone Knowing? | Dr.fone
- In 2024, Full Guide to Fix iToolab AnyGO Not Working On Motorola Defy 2 | Dr.fone
- How to Easily Hard reset my Vivo Y36 | Dr.fone
- In 2024, Solutions to Spy on Vivo S17t with and without jailbreak | Dr.fone
- In 2024, How to Fix the Apple iPhone SE GPS not Working Issue | Dr.fone
- Rootjunky APK To Bypass Google FRP Lock For Realme GT 5
- Methods to Change GPS Location On Infinix Smart 7 HD | Dr.fone
- 8 Solutions to Fix Find My Friends Location Not Available On Vivo Y78t | Dr.fone
- Detailed guide of ispoofer for pogo installation On Nubia Z50S Pro | Dr.fone
- How to Transfer Photos from Infinix Note 30 VIP to Laptop Without USB | Dr.fone
- In 2024, Apple iPhone 6 Asking for Passcode after iOS 17/14 Update, What to Do?
- In 2024, Easy Steps on How To Create a New Apple ID Account On iPhone 11 Pro
- In 2024, Detailed guide of ispoofer for pogo installation On Oppo Reno 11 5G | Dr.fone
- Apple ID Unlock From Apple iPhone XS Max? How to Fix it?
- How to Simulate GPS Movement in AR games On Infinix Smart 8 HD? | Dr.fone
- How to Spy on Text Messages from Computer & Nokia 130 Music | Dr.fone
- Full Guide to Hard Reset Your Honor 80 Pro Straight Screen Edition | Dr.fone
- In 2024, How to Bypass Google FRP Lock from Xiaomi Redmi 12 5G Devices
- Detailed Review of doctorSIM Unlock Service For Apple iPhone 8 Plus
- In 2024, Guide to Mirror Your Motorola Moto G84 5G to Other Android devices | Dr.fone
- How to Transfer Photos from Honor Magic 6 Pro to New Android? | Dr.fone
- In 2024, Why does the pokemon go battle league not available On Realme Narzo 60 Pro 5G | Dr.fone
- How to Change Location on TikTok to See More Content On your Lava Storm 5G | Dr.fone
- In 2024, How To Unlock A Found Apple iPhone XS Max? | Dr.fone
- How to Downgrade Apple iPhone 13 Pro Max without iTunes? | Dr.fone
- Fix the Error of Unfortunately the Process.com.android.phone Has Stopped on Xiaomi 14 | Dr.fone
- In 2024, How to Change/Add Location Filters on Snapchat For your Infinix Smart 8 | Dr.fone
- Best Ways to Bypass iCloud Activation Lock from iPhone 13 mini/iPad/iPod
- In 2024, Ways to trade pokemon go from far away On Apple iPhone SE (2022)? | Dr.fone
- 7 Ways to Unlock a Locked Infinix Hot 30 5G Phone
- Title: Updated In 2024, Detailed Steps to Resize Video in Davinci Resolve
- Author: Chloe
- Created at : 2024-04-24 07:08:42
- Updated at : 2024-04-25 07:08:42
- Link: https://ai-editing-video.techidaily.com/updated-in-2024-detailed-steps-to-resize-video-in-davinci-resolve/
- License: This work is licensed under CC BY-NC-SA 4.0.
