
Updated In 2024, Guide To Using Free Luts for OBS

Guide To Using Free Luts for OBS
LUTs are powerful tools that can significantly enhance the visual appeal of your content. You can use this tool to change the look and feel of your images and videos. Moreover, you can use LUTs to bring out the desired mood, style, and tone to your media content. Additionally, LUTs provide endless possibilities for creativity with different color adjustments and grading.
There are many software and tools available on the market to apply LUTs. These tools let you import and apply LUTs to your images and videos. Furthermore, you can apply LUTs even using streaming software like OBS. Moreover, you can improve live streams, videos, and recordings by applying LUTs using OBS. However, many paid and free LUTs for OBS are available for usage.
Part 1: Why Do We Need to Use LUTs for Editing in OBS?
There are many free OBS LUTs available that you can download and use for your content. The real question is the utility of LUTs in OBS. Here are some of the reasons to use LUTs in this tool.
Efficiency and Consistency
LUTs provide a quick and consistent way to apply color transformations. Instead of manually adjusting individual color settings, you can use LUTs. Similarly, it allows you to instantly and precisely grade and correct colors.
Time-Saving
Using LUTs saves time because they offer pre-defined color transformations. Instead of adjusting colors for each project or image, you can use LUTs. Additionally, they allow you to match your desired look or style easily.
Artistic Control and Creative Freedom
Furthermore, it gives artists, filmmakers, and photographers more control over their work. They allow for experimentation and exploration of different looks and styles. You can be more creative by experimenting with varying tones of color to the same content.
Consistent Color Reproduction
LUTs are essential for maintaining consistent color tones. The good part is it maintains consistency across different devices, software, and platforms. They ensure that colors look the same, no matter what the viewing medium, like monitors, projectors, or mobile screens.
Film Emulation and Replication
Moreover, it can replicate classic film stocks’ characteristics and aesthetics. They allow filmmakers and photographers to recreate iconic films’ color response and tonal range. In this way, everyone can experiment with color tones inspired by famous movies.
Workflow Flexibility and Collaboration
Lookup tables offer flexibility and facilitate collaboration in post-production workflows. They can be easily shared and applied to different projects or sequences. Similarly, it ensures consistent color grading across multiple editors or teams.
Calibration and Color Management
Additionally, LUTs play an important role in color calibration and management processes. It allows you to align color spaces, correct color variations, and maintain color accuracy. Furthermore, it will maintain consistent color grading throughout the project.
Real-time Color Processing
Lastly, LUTs are valuable in applications that require real-time color processing. It can be used in live broadcasts, video streaming, or video games. You can make instant adjustments and enhancements in real time.
Empower your videos with a new mood using different LUTs. Filmora now offers 100+ top-quality 3D LUTs cover a broad range of scenarios. Transform your videos with Filmora’s powerful 3D LUTs.
Apply LUT on Videos Apply LUT on Videos Learn More

Part 2: Discussing Some Top-Notch Best LUTs for OBS?
If you are searching for the best LUTs for OBS, you’re at the right place. Here is a list of some of the best LUTs you can apply using OBS. You can choose from different styles and tones according to your preference:
1. Vintage LUTs
Take a step back in time with this pack of Vintage LUTs. This pack gives your videos and images a nostalgic, retro feel. Moreover, this pack has different classic film presets, including monochrome and b&w. It enhances warm tones, adds a vignette, and introduces a gentle fade effect. Furthermore, this pack gives your media content the perfect retro feel.

2. 13 FREE Custom LUTs for Log Footage
Using these 13 cinematic LUTs, you can unleash the power of the silver screen. With these LUTs, you can bring Hollywood magic to your videos. Additionally, this pack enhances contrast and saturation to create a dramatic and cinematic look. Moreover, it enhances your media with rich colors, deep shadows, and vibrant highlights giving them a movie-like feel.
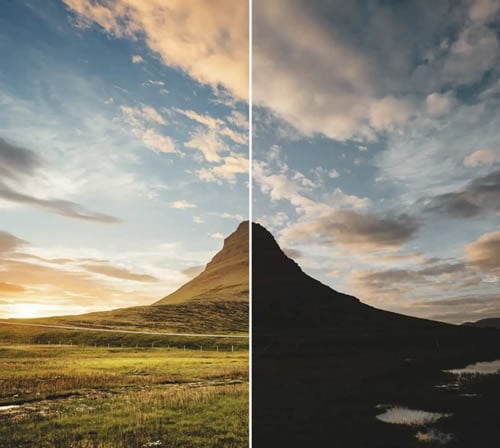
3. Vibrant Nature LUTs for Photo & Video
Vibrant Nature LUTs is an excellent pack that enhances the beauty of nature and the outdoors. It is a pack of five different LUTs specifically used to enhance natural landscapes and environmental shots. Furthermore, this pack highlights the earthy tones, adds depth to greens, and brings out the details of nature. Additionally, you can use this pack to improve the scenery in your pictures and videos.

4. Coastal Haze
Coastal Haze is a fantastic LUT to celebrate love and romance with its color grading. It is an excellent free LUT that enhances the colors and emotions of wedding videos and romantic moments. Moreover, it adds a soft and dreamy touch by improving skin tones. Furthermore, it creates a warm and intimate atmosphere allowing you to beautify your special moments.
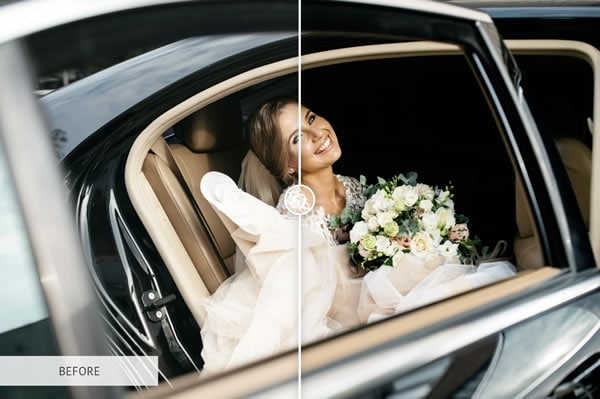
5. 20 Dark Moody LUTs Pack
Dive into the world of moody dark colors with this 20 Dark Moody LUTs Pack. Each LUT has a different tone and feel to it. These LUTs add darkness to create a mysterious and serious ambiance. It enhances shadows, deepens blacks, and adds a subtle color grading to create an intense look. With this Moody LUT pack, you can make more professional-looking dark videos.

Part 3: How to Use LUTs in OBS Studio Properly?
If you’ve found the best free LUTs for OBS, you can apply them directly to your video feed. Here are simple steps to apply LUTs using OBS Studio. Following these steps, you can easily apply a LUT effect to your video feed or live stream in OBS.
Step 1: Open OBS and start your video feed or live stream using a webcam or capture card. Once your video stream is running, right-click the “Video Capture Device” option. After that, select “Filters” from the options that appear. In the Filters menu, locate the “Effect Filters” section and click the “+” button. Choose the “Apply LUT” option from the options that appear to add the LUT effect to your video stream.
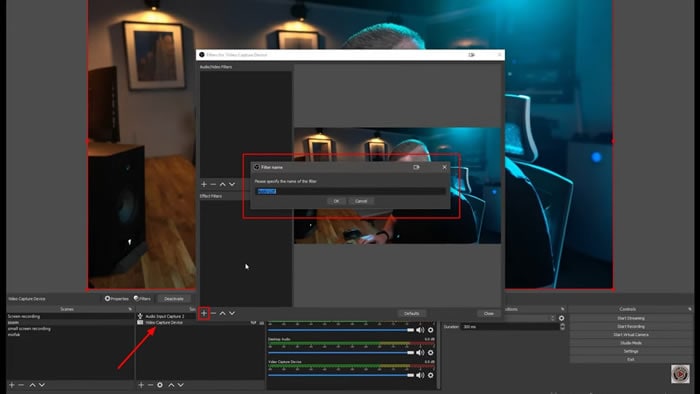
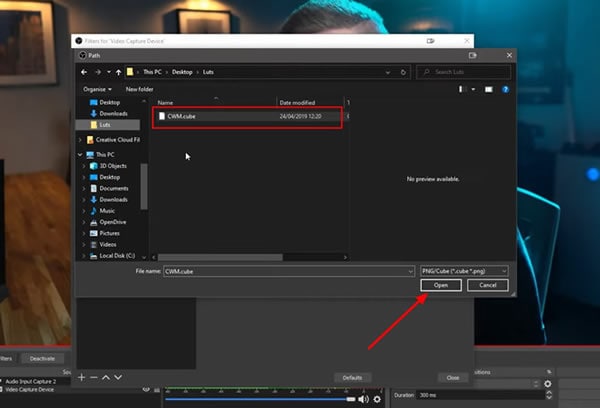
Step 2: A new window will pop up where you can specify the name of your LUT. To select your desired LUT, click the “Browse” button and navigate to its location on your device. Once you’ve found your LUT, click the “Open” button to apply it directly to your video stream. If needed, you can adjust the intensity of the LUT by making changes in the “Preview” screen.
Part 4: Wondershare Filmora: Another Efficient Platform for Adding LUTs on Videos
Wondershare Filmora is an exceptional video editing tool with the additional ability of color grading. With this powerful tool, you can color grade your videos by manually adjusting settings or applying LUTs. The latest update of Wondershare Filmora includes a library of over 200+ LUTs that you can apply to your media files. Furthermore, you can also customize the intensity of the applied LUTs.
Add LUTs on Video For Win 7 or later(64-bit)
Add LUTs on Video For macOS 10.14 or later
Besides color grading, Filmora also provides a variety of effects, filters, and overlays for your videos. These tools allow you to add artistic touches and improve the overall feel of your content. Additionally, it offers professional-grade features such as AI Cutout. This feature enables you to effortlessly select your subject in a video and change their background.

Conclusion
In conclusion, LUTs are useful tools for color-correcting live streams and video editing projects. You can apply LUTs directly to your live streams, and video feeds with OBS. Many free LUTs for OBS are available, each with a different tone and feel. Furthermore, LUTs can also be used in popular video editing tools like Wondershare Filmora. Lastly, LUTs are essential tools to make your content stand out.
Add LUTs on Video For Win 7 or later(64-bit)
Add LUTs on Video For macOS 10.14 or later
Apply LUT on Videos Apply LUT on Videos Learn More

Part 2: Discussing Some Top-Notch Best LUTs for OBS?
If you are searching for the best LUTs for OBS, you’re at the right place. Here is a list of some of the best LUTs you can apply using OBS. You can choose from different styles and tones according to your preference:
1. Vintage LUTs
Take a step back in time with this pack of Vintage LUTs. This pack gives your videos and images a nostalgic, retro feel. Moreover, this pack has different classic film presets, including monochrome and b&w. It enhances warm tones, adds a vignette, and introduces a gentle fade effect. Furthermore, this pack gives your media content the perfect retro feel.

2. 13 FREE Custom LUTs for Log Footage
Using these 13 cinematic LUTs, you can unleash the power of the silver screen. With these LUTs, you can bring Hollywood magic to your videos. Additionally, this pack enhances contrast and saturation to create a dramatic and cinematic look. Moreover, it enhances your media with rich colors, deep shadows, and vibrant highlights giving them a movie-like feel.

3. Vibrant Nature LUTs for Photo & Video
Vibrant Nature LUTs is an excellent pack that enhances the beauty of nature and the outdoors. It is a pack of five different LUTs specifically used to enhance natural landscapes and environmental shots. Furthermore, this pack highlights the earthy tones, adds depth to greens, and brings out the details of nature. Additionally, you can use this pack to improve the scenery in your pictures and videos.

4. Coastal Haze
Coastal Haze is a fantastic LUT to celebrate love and romance with its color grading. It is an excellent free LUT that enhances the colors and emotions of wedding videos and romantic moments. Moreover, it adds a soft and dreamy touch by improving skin tones. Furthermore, it creates a warm and intimate atmosphere allowing you to beautify your special moments.

5. 20 Dark Moody LUTs Pack
Dive into the world of moody dark colors with this 20 Dark Moody LUTs Pack. Each LUT has a different tone and feel to it. These LUTs add darkness to create a mysterious and serious ambiance. It enhances shadows, deepens blacks, and adds a subtle color grading to create an intense look. With this Moody LUT pack, you can make more professional-looking dark videos.

Part 3: How to Use LUTs in OBS Studio Properly?
If you’ve found the best free LUTs for OBS, you can apply them directly to your video feed. Here are simple steps to apply LUTs using OBS Studio. Following these steps, you can easily apply a LUT effect to your video feed or live stream in OBS.
Step 1: Open OBS and start your video feed or live stream using a webcam or capture card. Once your video stream is running, right-click the “Video Capture Device” option. After that, select “Filters” from the options that appear. In the Filters menu, locate the “Effect Filters” section and click the “+” button. Choose the “Apply LUT” option from the options that appear to add the LUT effect to your video stream.

Step 2: A new window will pop up where you can specify the name of your LUT. To select your desired LUT, click the “Browse” button and navigate to its location on your device. Once you’ve found your LUT, click the “Open” button to apply it directly to your video stream. If needed, you can adjust the intensity of the LUT by making changes in the “Preview” screen.

Part 4: Wondershare Filmora: Another Efficient Platform for Adding LUTs on Videos
Wondershare Filmora is an exceptional video editing tool with the additional ability of color grading. With this powerful tool, you can color grade your videos by manually adjusting settings or applying LUTs. The latest update of Wondershare Filmora includes a library of over 200+ LUTs that you can apply to your media files. Furthermore, you can also customize the intensity of the applied LUTs.
Add LUTs on Video For Win 7 or later(64-bit)
Add LUTs on Video For macOS 10.14 or later
Besides color grading, Filmora also provides a variety of effects, filters, and overlays for your videos. These tools allow you to add artistic touches and improve the overall feel of your content. Additionally, it offers professional-grade features such as AI Cutout. This feature enables you to effortlessly select your subject in a video and change their background.

Conclusion
In conclusion, LUTs are useful tools for color-correcting live streams and video editing projects. You can apply LUTs directly to your live streams, and video feeds with OBS. Many free LUTs for OBS are available, each with a different tone and feel. Furthermore, LUTs can also be used in popular video editing tools like Wondershare Filmora. Lastly, LUTs are essential tools to make your content stand out.
Add LUTs on Video For Win 7 or later(64-bit)
Add LUTs on Video For macOS 10.14 or later
How to Create a Glitch Text Effect?
Have you noticed the glitching effect that appears when you play a video or in games, creating a sporadic shaky effect on video edges? While this usually signifies a systematic software issue in these cases, the effect itself can work to create a dynamic visual style for different objects when done intentionally.
In fact, many video editors today use the glitch effect on elements in their videos, like the introductory title in movies or trailers. It creates a futuristic look to the text, which highly appeals to viewers who engage more in the video itself.
Suppose you are looking to add a similar effect to the title of your video project or other text-based content that you will add to your video, use a good tool for that. Wondershare Filmora , in particular, makes adding this effect very simple. Let’s learn how.
1. Launch the Filmora software
Free Download For Win 7 or later(64-bit)
Free Download For macOS 10.14 or later
The first step in preparing a customized glitch text effect is getting your software ready.
Visit the official website of Wondershare Filmora and tap on the Download button at the top to get the free software. The features necessary to create this effect are available under the free version, so you can avoid the plan upgradation process at this point.
After clicking the free download icon, the software’s installer version will save into your device automatically. Double-click on and agree with the related Terms and Conditions prompt. Then, tap on the Install button, and the software will take a few seconds to complete the installation process fully.
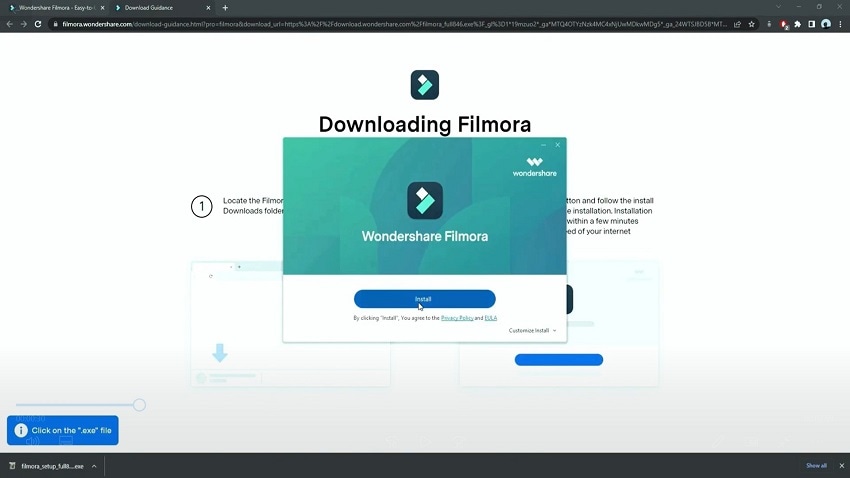
After that, click on the Start Now button to launch the software on your Mac or Windows computer that you are using. Filmora will open on its homepage.
2. Add the default title to timeline
Next, click the Create New Project button on the main page to access the editor section. Then, you have to click on the Titles tab and choose the Default Title option from the menu.
Drag it down from the media library section to the timeline and drop it in the Track 2 row. After that, move the play head with your cursor to the 1-second and the 10th frame on the timeline. Then, hold and move this clip until the end part of the clip is at this mark.

3. Adjust the font of the title
Next, double-click on this clip on the editor timeline to open the text editing window. Here, under the Preset section, change the title font to what to want to first word of your title to be.
Change the font style to a bigger bold option like Impact and increase the font size to 100. Then, scroll a little downward and tap on the Text Spacing option. Increase this value by 5 and press the OK button when you are done.

4. Add and copy all of the word clips
After adjusting the text font, tap on this clip on the timeline and copy it. Then, paste it just after the first clip ends, reducing its duration to around 1 second.
Then, double-click on the copied clip to open the text editing window. Click on the section where you can add the text and change it to the second word of your title. Again, copy this clip and paste it next to it, adjust it to be one second long, double-click on it to adjust the text to read the third word, and so on.

Continue until all of your intro’s words are added in these clip forms.
5. Create and add the snapshots
Following the previous step, click on the My Media section. Then, tap on the first clip in the collection and tap on the Snapshot icon at the end of the editing toolbar right above the timeline. Repeat this step for all the clips you have added until a snapshot of each of the words is stored in the media library.
Next, you have to grab hold of the first snapshot that you click and move it to the Track 1 of the timeline. Use the cursor to hold it and reduce the size of the clip to the same amount as the first clip on Track 1. To be sure, you can place the playhead at this point to see that the ending time for both clips is aligned.

6. Adjust the text effect for the first word
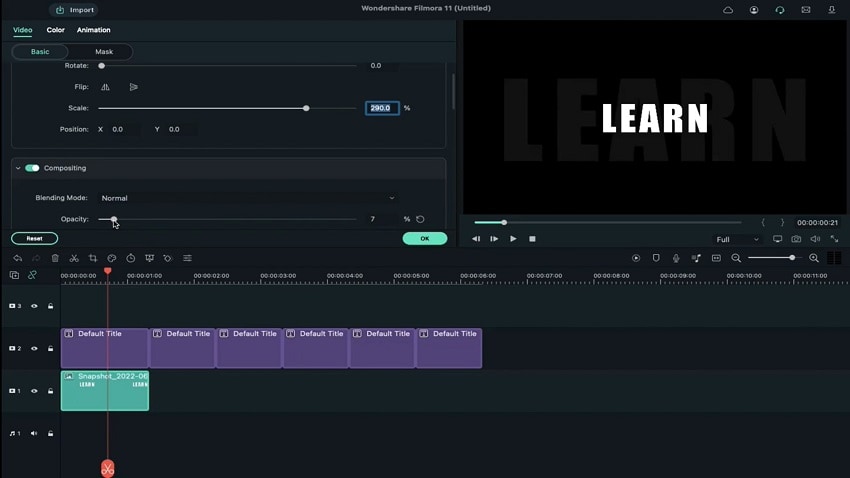
You have to click on the first-word snapshot in Track 1 of the Filmora editing timeline and double-click on it. Next, when the text editing window opens, you must change the Scale section to display the value of 290%. Following that, click on the slider in the Opacity parameter and decrease it to the 7% mark. Then, press the OK button.
On the timeline, right-click on this edited clip and choose the “Copy Effects” option from the drop-down menu.
7. Edit the snapshots for all words
After making changes to the first word, you must take hold of the second word’s snapshot from the media library. Drag and then drop it onto Track 1 of the editing timeline right next to the first clip. Then, hold the edge of this clip and reduce its size to fit the same duration as the second clip adjacent to it on Track 2.
Following that, you must choose this clip on Track 1 and right-click on top of it. Click on the “Paste Effects” option from the next drop-down menu, and the same adjustments will apply to this clip.

Repeat this step with all of the next snapshots of the following words.
8. Add the first effect layer
Next, you have to add stylish effects to your text. For that, you must tap on the Effects tab from the top toolbar of Filmora- a list of many effects collections will appear on the left panel.
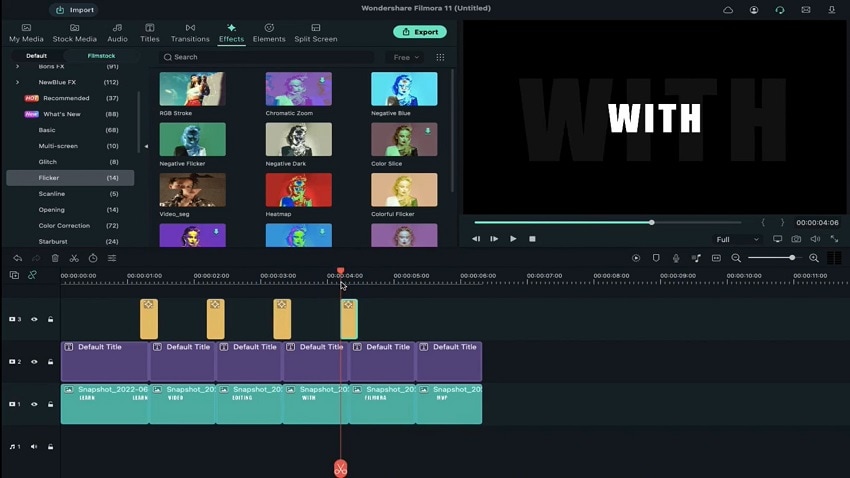
Scroll down until you reach the Filmstock option. You must click on it and find the Flicker option from the list. Under this collection, there are many options available. You must choose the Video_seg effect and drag it to the editing timeline above Track 2.

At this point, ensure the effect falls right above the first and second clip parts in the track below. Tap on the edges of this clip to reduce the size of the video effect, taking careful note to keep the clip 8 frames long overall.
Then, copy the cut-down effect from Track 3 and paste it at every intersectional point between the separated word-based clips in Track 2.
9. Zoom in to edit the first effect layer
Following this, you must zoom into the timeline for a better view and editing control for the next part.
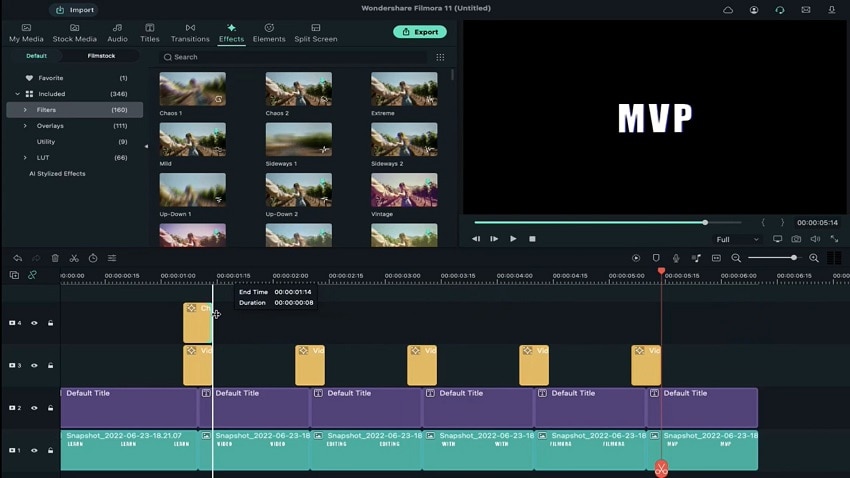
Go to the Effects tab at the top and choose the Filters collection next. Under it, choose the Chaos 1 effect option, drag it down to the timeline, and place it above the previous clip on Track 4. Adjust the starting edge of this clip to have the same starting point as the Video_seg effect on Track 3 with an overall 8-frame duration.
10. Edit the Effect
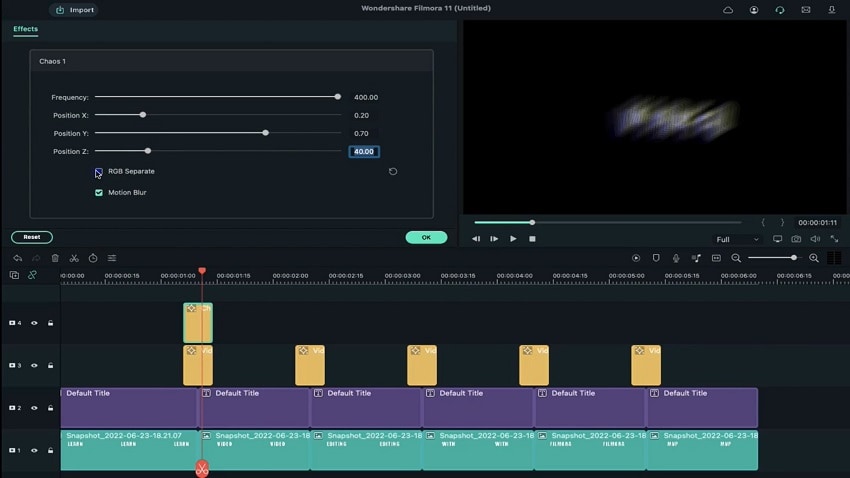
Next, you have to double-click on this clip to open the editing window for this effect. In this section, go to the Frequency parameter and increase the slider to 400. Following that, click on the Position X parameter and move the slider to the 0.20 point. Next, do the same for the Position Y parameter, but to the 0.70 point.
Change the Position Z parameter by typing the value 40 and disable the RGB Separate setting. Then, press the OK button and go to the timeline again.
11. Adjust the Glitch effects
Click on the effect clip on Track 4 and copy it. Please do the same as you did for the effect in Track 3 and paste it at the same locations between the clips in this track.
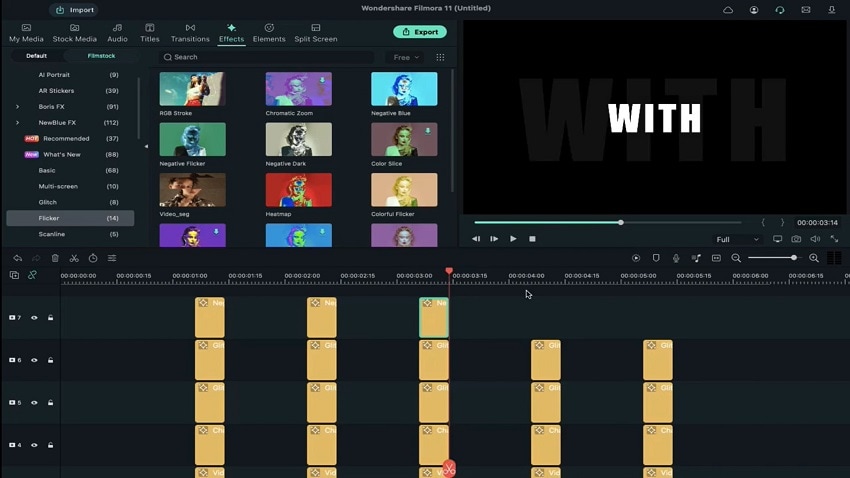
Afterward, go to the Effects tab again and choose the Filmstock tab. Among the collections here, you have to choose the Glitch option and select Glitch Stripe 1 from the collection. For an easier searching experience, you can directly type the effect in the search bar under the Effects tab.

Then, drag and drop it on Track 5 of the timeline right above the previous effect and reduce its duration to the same level as the first two effects. Copy it and then paste the clip again for each clip-to-clip intersection.
After this part, drag the Glitch Dispersion effect down to the timeline. Place it above the previous effect and adjust the clip’s size to the same length. Again, copy the effect and repeat the steps again. Next, repeat the same whole process with the Negative Flicker effect from the Flicker collection on Track 7.
12. See the preview and save the file
Finally, you are done adding all the effects, and you have to click on the Render Preview icon in the toolbar above the timeline. Then, press the Play button on the Preview window to see the full glitch text effect play out properly.

Conclusion
Now, you are done with creating a visually exciting and dynamic look for your introductory or ending title in the video using the glitch effect. For the best results, you should practice this process sometimes to get used to it and even make certain preferential changes to the font style. Ultimately, with the help of this software, you can expect a high-quality title look and use it for further video editing work.
Free Download For macOS 10.14 or later
The first step in preparing a customized glitch text effect is getting your software ready.
Visit the official website of Wondershare Filmora and tap on the Download button at the top to get the free software. The features necessary to create this effect are available under the free version, so you can avoid the plan upgradation process at this point.
After clicking the free download icon, the software’s installer version will save into your device automatically. Double-click on and agree with the related Terms and Conditions prompt. Then, tap on the Install button, and the software will take a few seconds to complete the installation process fully.

After that, click on the Start Now button to launch the software on your Mac or Windows computer that you are using. Filmora will open on its homepage.
2. Add the default title to timeline
Next, click the Create New Project button on the main page to access the editor section. Then, you have to click on the Titles tab and choose the Default Title option from the menu.
Drag it down from the media library section to the timeline and drop it in the Track 2 row. After that, move the play head with your cursor to the 1-second and the 10th frame on the timeline. Then, hold and move this clip until the end part of the clip is at this mark.

3. Adjust the font of the title
Next, double-click on this clip on the editor timeline to open the text editing window. Here, under the Preset section, change the title font to what to want to first word of your title to be.
Change the font style to a bigger bold option like Impact and increase the font size to 100. Then, scroll a little downward and tap on the Text Spacing option. Increase this value by 5 and press the OK button when you are done.

4. Add and copy all of the word clips
After adjusting the text font, tap on this clip on the timeline and copy it. Then, paste it just after the first clip ends, reducing its duration to around 1 second.
Then, double-click on the copied clip to open the text editing window. Click on the section where you can add the text and change it to the second word of your title. Again, copy this clip and paste it next to it, adjust it to be one second long, double-click on it to adjust the text to read the third word, and so on.

Continue until all of your intro’s words are added in these clip forms.
5. Create and add the snapshots
Following the previous step, click on the My Media section. Then, tap on the first clip in the collection and tap on the Snapshot icon at the end of the editing toolbar right above the timeline. Repeat this step for all the clips you have added until a snapshot of each of the words is stored in the media library.
Next, you have to grab hold of the first snapshot that you click and move it to the Track 1 of the timeline. Use the cursor to hold it and reduce the size of the clip to the same amount as the first clip on Track 1. To be sure, you can place the playhead at this point to see that the ending time for both clips is aligned.

6. Adjust the text effect for the first word
You have to click on the first-word snapshot in Track 1 of the Filmora editing timeline and double-click on it. Next, when the text editing window opens, you must change the Scale section to display the value of 290%. Following that, click on the slider in the Opacity parameter and decrease it to the 7% mark. Then, press the OK button.
On the timeline, right-click on this edited clip and choose the “Copy Effects” option from the drop-down menu.

7. Edit the snapshots for all words
After making changes to the first word, you must take hold of the second word’s snapshot from the media library. Drag and then drop it onto Track 1 of the editing timeline right next to the first clip. Then, hold the edge of this clip and reduce its size to fit the same duration as the second clip adjacent to it on Track 2.
Following that, you must choose this clip on Track 1 and right-click on top of it. Click on the “Paste Effects” option from the next drop-down menu, and the same adjustments will apply to this clip.

Repeat this step with all of the next snapshots of the following words.
8. Add the first effect layer
Next, you have to add stylish effects to your text. For that, you must tap on the Effects tab from the top toolbar of Filmora- a list of many effects collections will appear on the left panel.
Scroll down until you reach the Filmstock option. You must click on it and find the Flicker option from the list. Under this collection, there are many options available. You must choose the Video_seg effect and drag it to the editing timeline above Track 2.

At this point, ensure the effect falls right above the first and second clip parts in the track below. Tap on the edges of this clip to reduce the size of the video effect, taking careful note to keep the clip 8 frames long overall.
Then, copy the cut-down effect from Track 3 and paste it at every intersectional point between the separated word-based clips in Track 2.

9. Zoom in to edit the first effect layer
Following this, you must zoom into the timeline for a better view and editing control for the next part.
Go to the Effects tab at the top and choose the Filters collection next. Under it, choose the Chaos 1 effect option, drag it down to the timeline, and place it above the previous clip on Track 4. Adjust the starting edge of this clip to have the same starting point as the Video_seg effect on Track 3 with an overall 8-frame duration.

10. Edit the Effect
Next, you have to double-click on this clip to open the editing window for this effect. In this section, go to the Frequency parameter and increase the slider to 400. Following that, click on the Position X parameter and move the slider to the 0.20 point. Next, do the same for the Position Y parameter, but to the 0.70 point.
Change the Position Z parameter by typing the value 40 and disable the RGB Separate setting. Then, press the OK button and go to the timeline again.

11. Adjust the Glitch effects
Click on the effect clip on Track 4 and copy it. Please do the same as you did for the effect in Track 3 and paste it at the same locations between the clips in this track.
Afterward, go to the Effects tab again and choose the Filmstock tab. Among the collections here, you have to choose the Glitch option and select Glitch Stripe 1 from the collection. For an easier searching experience, you can directly type the effect in the search bar under the Effects tab.

Then, drag and drop it on Track 5 of the timeline right above the previous effect and reduce its duration to the same level as the first two effects. Copy it and then paste the clip again for each clip-to-clip intersection.
After this part, drag the Glitch Dispersion effect down to the timeline. Place it above the previous effect and adjust the clip’s size to the same length. Again, copy the effect and repeat the steps again. Next, repeat the same whole process with the Negative Flicker effect from the Flicker collection on Track 7.

12. See the preview and save the file
Finally, you are done adding all the effects, and you have to click on the Render Preview icon in the toolbar above the timeline. Then, press the Play button on the Preview window to see the full glitch text effect play out properly.

Conclusion
Now, you are done with creating a visually exciting and dynamic look for your introductory or ending title in the video using the glitch effect. For the best results, you should practice this process sometimes to get used to it and even make certain preferential changes to the font style. Ultimately, with the help of this software, you can expect a high-quality title look and use it for further video editing work.
How To Add Scrolling Text Effect
Almost every video has some titles and texts to show to the viewers. Instead of showing static texts on the video, everyone loves to add animated texts so that the video looks attractive and engaging. If you want to show credits and titles in intro and outro of the video, you will usually see texts scrolling vertically on the video.
If you want to show any text repeatedly, you can add horizontal scrolling text effect to your video so that the repeated text does not look weird. You will need a video editor to add scrolling rolling text effect to texts and titles in your video. We will illustrate in simple steps how to animate text on scroll using free as well as premium video editors.
Part 1. Add Scrolling Text to Video with Filmora
Wondershare Filmora is a professional video editor and if you are a Windows PC or Mac user, you can use Filmora to add scrolling text effect. In fact, Filmora is the most intuitive video editor where you can add scrolling text effect instantly without any prior experience in video editing.
Filmora has the best collection of text effects and you can add scrolling text anywhere and customize the effect as per your requirements. As a matter of fact, you can create a video with scrolling text effects only from scratch. Here are the steps to add scrolling text to video using Filmora.
Free Download For Win 7 or later(64-bit)
Free Download For macOS 10.14 or later
Step1 Download and install Filmora on your Windows PC or Mac. Launch the application and click on New Project on the welcome screen. You can also go to File> New option to get started.

Step2 Go to File> Import Media option to bring in your video file user Project Media folder. Thereafter, drag and drop the file into Timeline to get started.

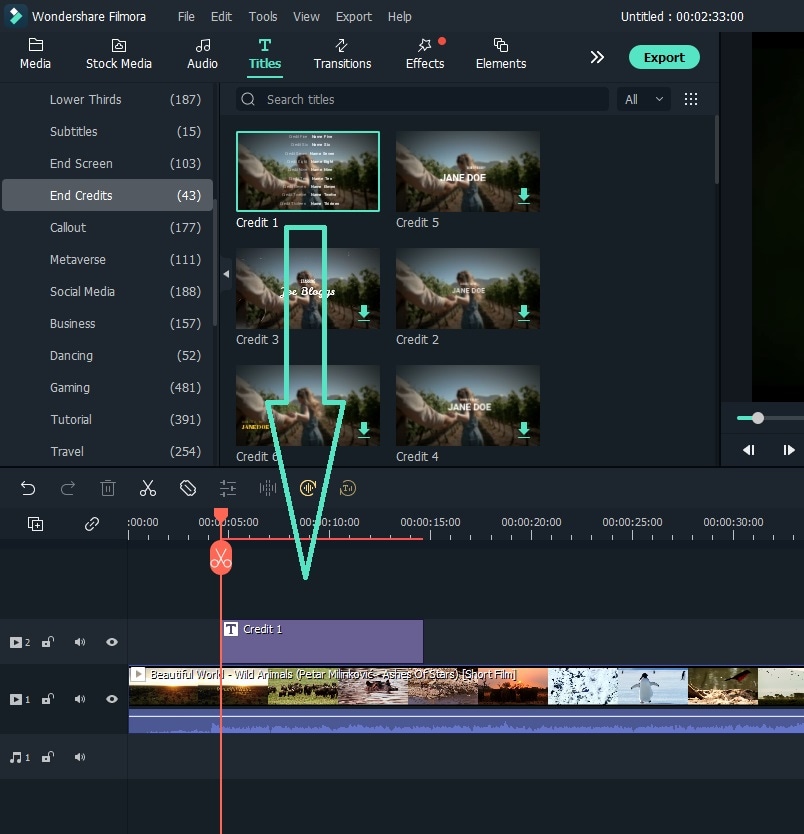
Step3 Go to Titles option located at the top, and on the left panel, go to End Credits option. You will see various scrolling text effects. Place your mouse pointer on them to check their preview.

Step4 Once you are satisfied with any scrolling text effects, drag and drop it into Timeline above the video clip layer. Adjust the position of the text effect so that it appears on the video as expected. You can stretch the duration of the effect as per your preference.
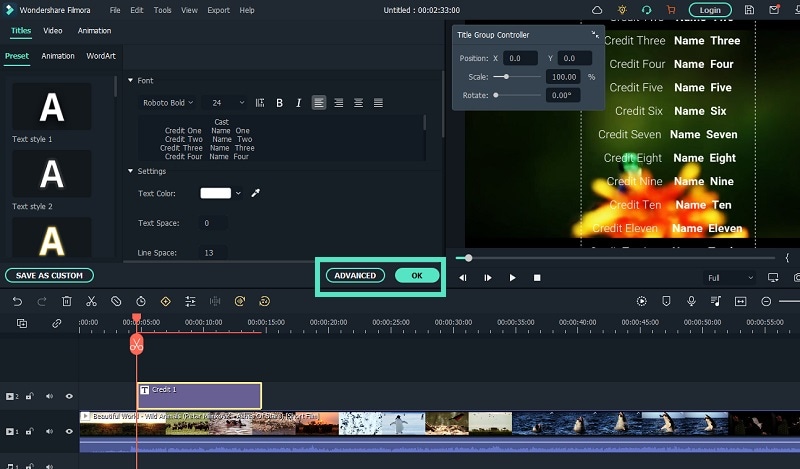
Step5 Double-click on the text layer on Timeline and customize the text and style as you feel. Thereafter, you can click on Advanced button for more customization. Finally, click on OK button.
Part 2. Use After Effects to Create Scrolling Text
Adobe Affect Effects is an extremely popular video editor and there are so many different text effects available to apply to your video. After Effects scrolling text effects come with different variations so that your titles and texts look amazing on the screen. Apart from the available text effects, you can also download and get more text effects from external sources. Here are the steps to add text scroll after effects to your video.
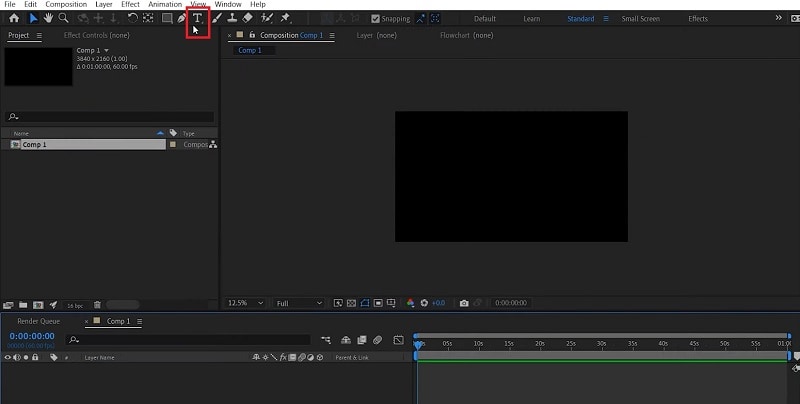
Step1 Launch After Effects and type your text with the Text tool from the top bar.
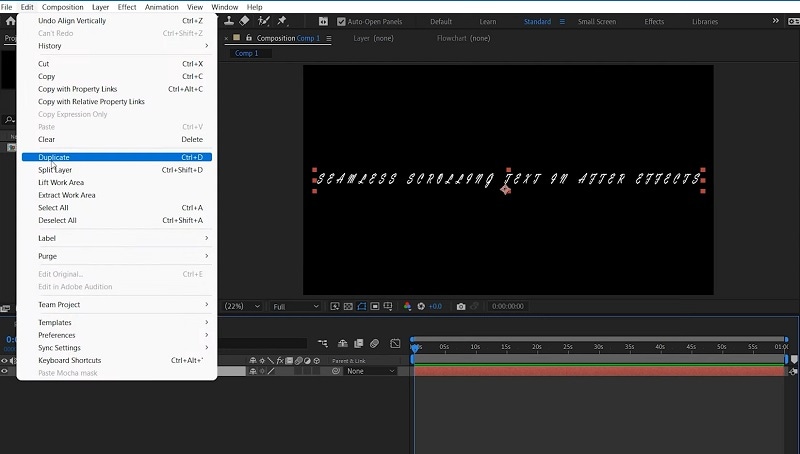
Step2 Duplicate the written text by going to Edit> Duplicate.
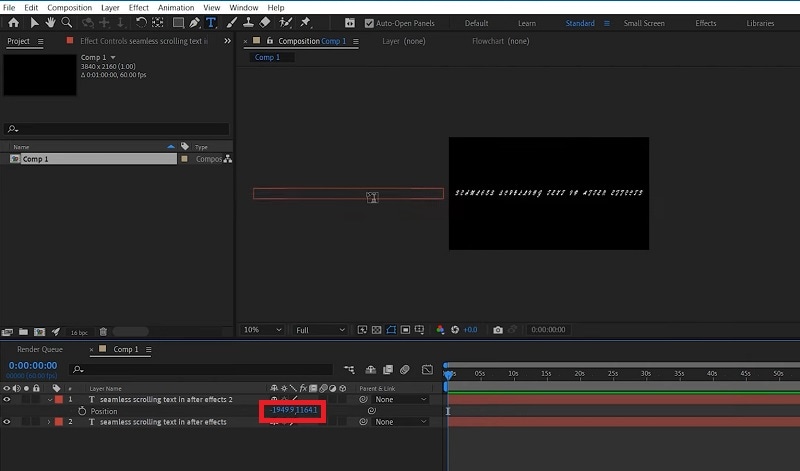
Step3 Move the duplicate text out of the visible screen to the left by changing its position value.
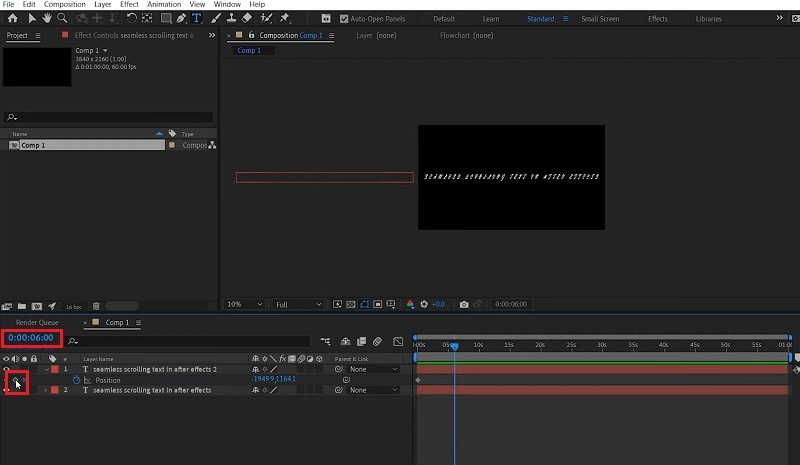
Step4 Turn on Position option and change the duration and add a keyframe.
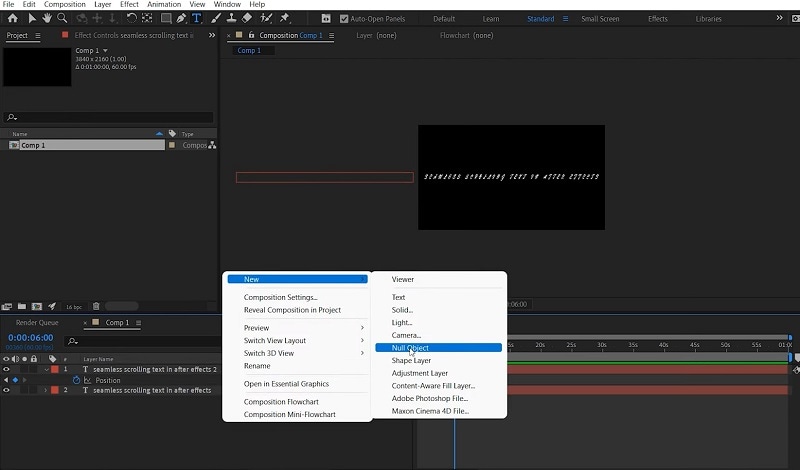
Step5 Right-click on Composition setting and go to New> Null Object. Change the duration and make it the same as the Duplicate layer and add a keyframe there. Besides, move the null object out of the visible screen to the right.
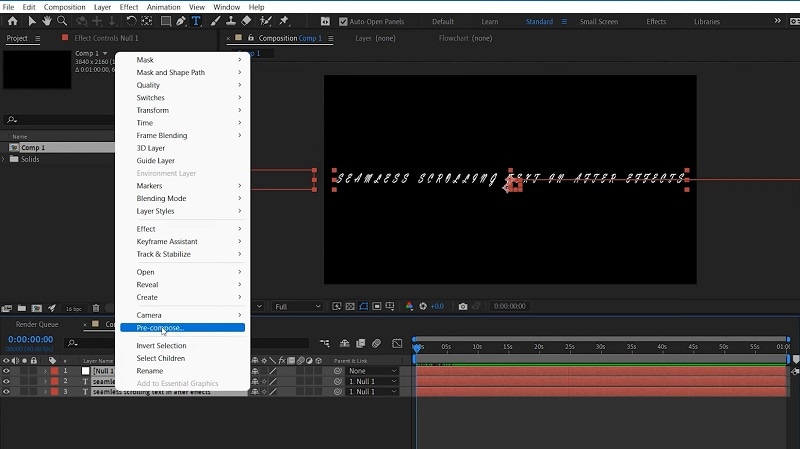
Step6 Select all layers and right-click and select Pre-compose.
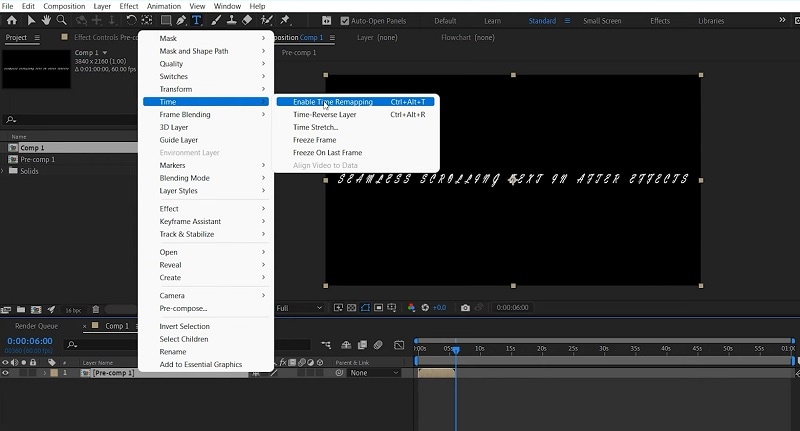
Step7 Right-click on Pre-comp and go to Time> Enable Time Remapping. Play the video and you will see the scrolling effects that you see in end credits in videos.
The above-mentioned steps are for horizontal scrolling text effect. If you want vertical scrolling text After Effects, you have to position the duplicate text and null object vertically and the required text will scroll vertically.
Part 3. Add Scrolling Text Effect with VSDC Free Video Editor
So far, we have mentioned premium video editors to add scrolling effect to the text in your video. Now we are going to mention a free video editor where you can add scrolling effect instantly. If you are a Windows user, you can install VSDC free video editor. There are several scrolling text effects available on the video editor through which you can move the text horizontal and vertical. Here are the steps to animate text on scroll using VSDC free video editor.
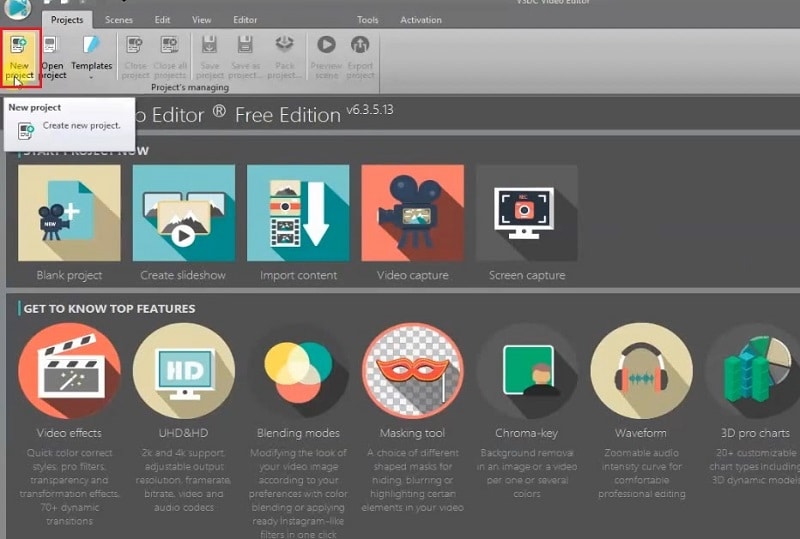
Step1 Install VSDC free video editor and click on New Project option. Click on Finish button and select the video from your hard drive where you want to add text.
Step2 Select Type tool from the left panel and draw a box on the video where you can type your text. Make sure the text layer is on top of the video layer in Timeline.
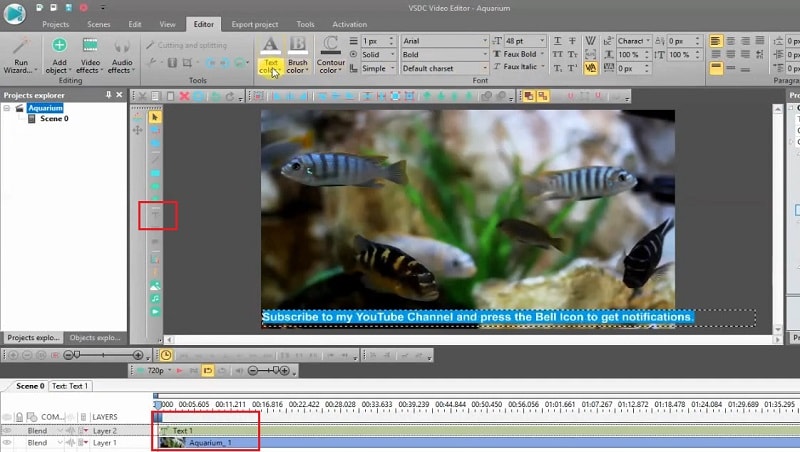
Step3 Type your text and if you want to scroll it like horizontal scrolling text After Effects, place the text out of the viewer on the right side.
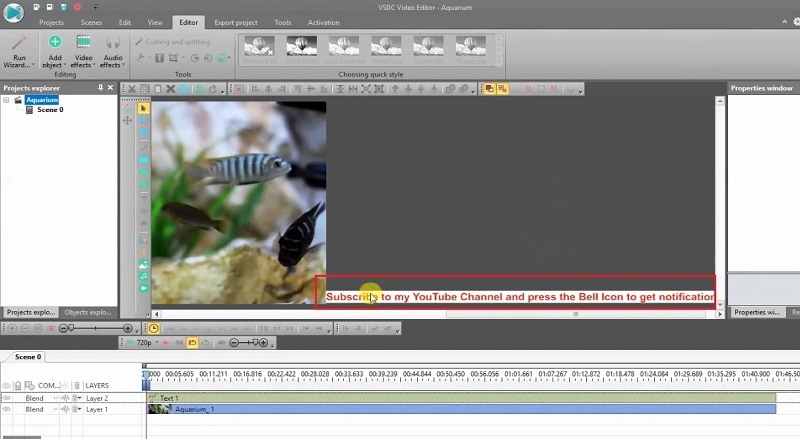
Step4 Double-click on text layer and go to Add Object and click on Movement.
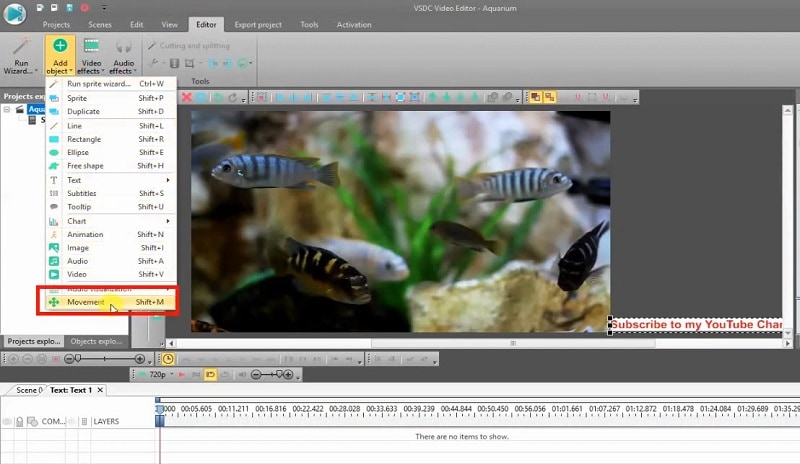
Step5 You will find the mouse pointer change and you have to click on the spot to the left side where you want the text to go in scrolling effect.

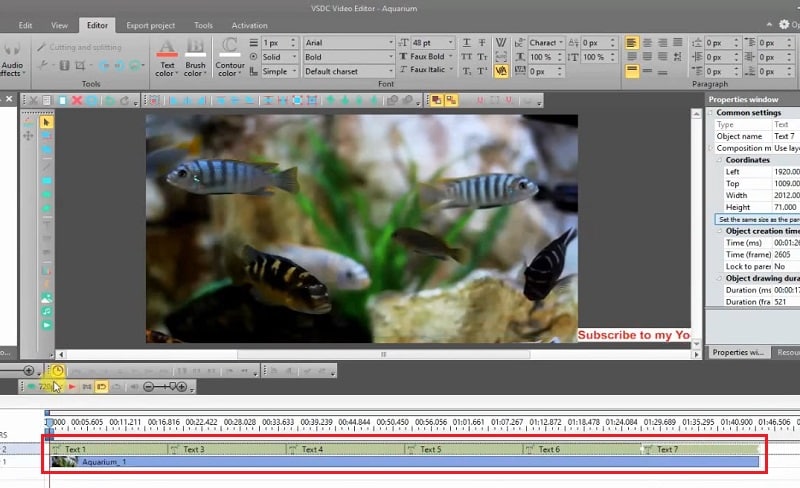
Step6 Shorten the duration of the text layer and then copy the text layer from Timeline. Paste it again and again until you cover the video layer completely so that the scroll effect goes on as long as the video runs.
Takeaway
Adding scrolling text to your video should no more be an issue for you. If you are using After Effects, we have illustrated how you can create horizontal and vertical scrolling effect for text in your video perfectly. If you prefer a free video editor, you can use VSDC free video editor as well. But we recommend Wondershare Filmora where you can add scrolling effects to your text instantly, and there is a wide range of amazing scrolling effects available to apply to your video.
Free Download For macOS 10.14 or later
Step1 Download and install Filmora on your Windows PC or Mac. Launch the application and click on New Project on the welcome screen. You can also go to File> New option to get started.

Step2 Go to File> Import Media option to bring in your video file user Project Media folder. Thereafter, drag and drop the file into Timeline to get started.

Step3 Go to Titles option located at the top, and on the left panel, go to End Credits option. You will see various scrolling text effects. Place your mouse pointer on them to check their preview.

Step4 Once you are satisfied with any scrolling text effects, drag and drop it into Timeline above the video clip layer. Adjust the position of the text effect so that it appears on the video as expected. You can stretch the duration of the effect as per your preference.

Step5 Double-click on the text layer on Timeline and customize the text and style as you feel. Thereafter, you can click on Advanced button for more customization. Finally, click on OK button.

Part 2. Use After Effects to Create Scrolling Text
Adobe Affect Effects is an extremely popular video editor and there are so many different text effects available to apply to your video. After Effects scrolling text effects come with different variations so that your titles and texts look amazing on the screen. Apart from the available text effects, you can also download and get more text effects from external sources. Here are the steps to add text scroll after effects to your video.
Step1 Launch After Effects and type your text with the Text tool from the top bar.

Step2 Duplicate the written text by going to Edit> Duplicate.

Step3 Move the duplicate text out of the visible screen to the left by changing its position value.

Step4 Turn on Position option and change the duration and add a keyframe.

Step5 Right-click on Composition setting and go to New> Null Object. Change the duration and make it the same as the Duplicate layer and add a keyframe there. Besides, move the null object out of the visible screen to the right.

Step6 Select all layers and right-click and select Pre-compose.

Step7 Right-click on Pre-comp and go to Time> Enable Time Remapping. Play the video and you will see the scrolling effects that you see in end credits in videos.

The above-mentioned steps are for horizontal scrolling text effect. If you want vertical scrolling text After Effects, you have to position the duplicate text and null object vertically and the required text will scroll vertically.
Part 3. Add Scrolling Text Effect with VSDC Free Video Editor
So far, we have mentioned premium video editors to add scrolling effect to the text in your video. Now we are going to mention a free video editor where you can add scrolling effect instantly. If you are a Windows user, you can install VSDC free video editor. There are several scrolling text effects available on the video editor through which you can move the text horizontal and vertical. Here are the steps to animate text on scroll using VSDC free video editor.
Step1 Install VSDC free video editor and click on New Project option. Click on Finish button and select the video from your hard drive where you want to add text.

Step2 Select Type tool from the left panel and draw a box on the video where you can type your text. Make sure the text layer is on top of the video layer in Timeline.

Step3 Type your text and if you want to scroll it like horizontal scrolling text After Effects, place the text out of the viewer on the right side.

Step4 Double-click on text layer and go to Add Object and click on Movement.

Step5 You will find the mouse pointer change and you have to click on the spot to the left side where you want the text to go in scrolling effect.

Step6 Shorten the duration of the text layer and then copy the text layer from Timeline. Paste it again and again until you cover the video layer completely so that the scroll effect goes on as long as the video runs.

Takeaway
Adding scrolling text to your video should no more be an issue for you. If you are using After Effects, we have illustrated how you can create horizontal and vertical scrolling effect for text in your video perfectly. If you prefer a free video editor, you can use VSDC free video editor as well. But we recommend Wondershare Filmora where you can add scrolling effects to your text instantly, and there is a wide range of amazing scrolling effects available to apply to your video.
Best Phantom Slow-Mo Camera For Recording Slow Motion Videos
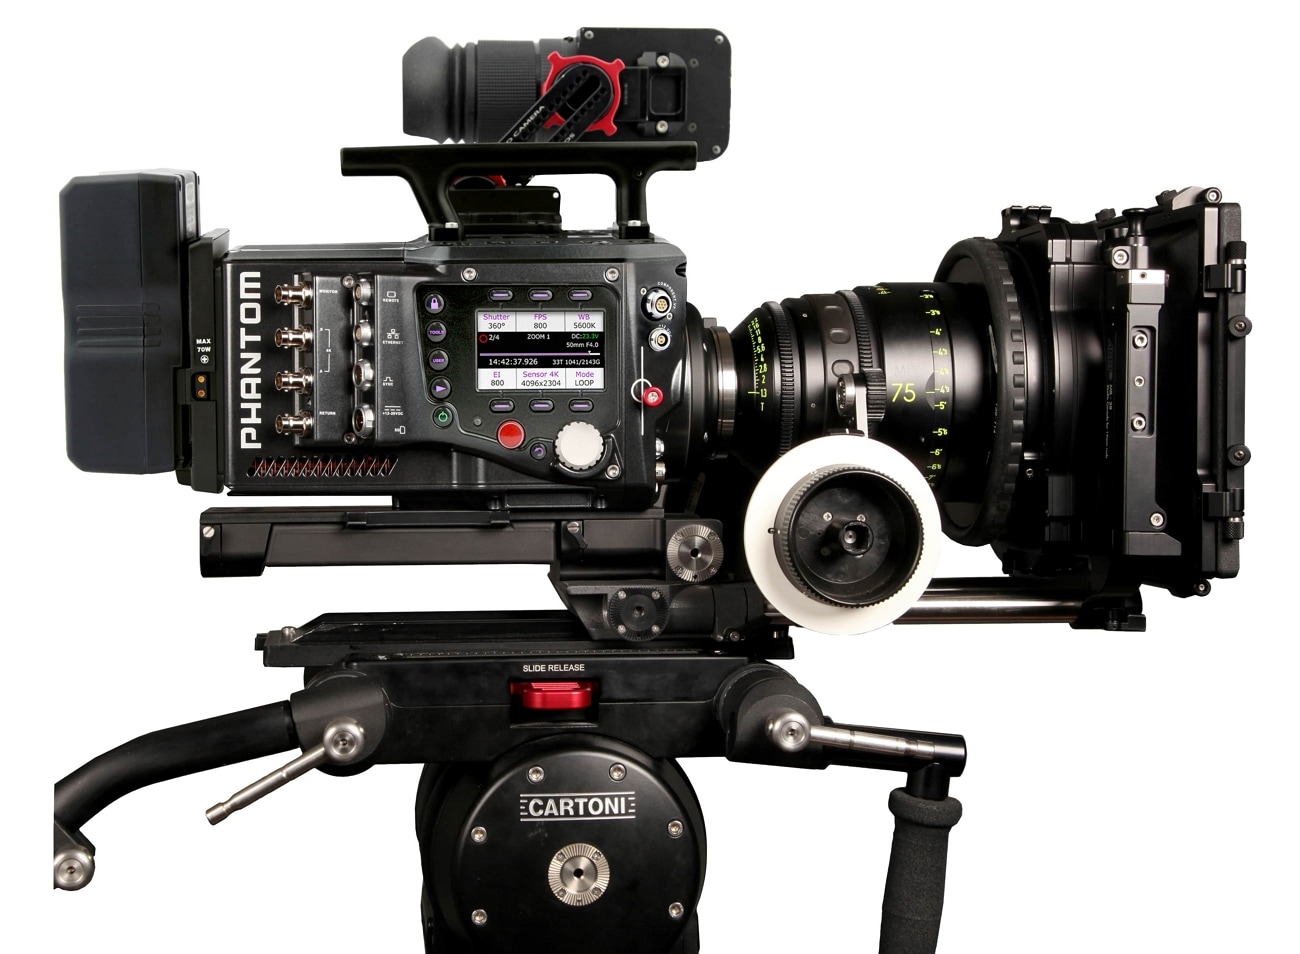
In the media industry, you can find many professional and high-end cameras. Such cameras use advanced mechanisms to create slow-motion videos. Moreover, they capture natural colors and shades in the video with precision. Phantom slow-mo cameras are one of the prominent examples of the industry’s leading camera brand. To learn more about this camera brand, this article will consist of all the details.
With a Phantom slow-motion camera, you can get high-resolution results. Through this guide, you can discover a detailed analysis of the Phantom slo-mo camera. Also, we will suggest an affordable alternative that can make slow-motion videos efficiently.
Slow Motion Video Maker Slow your video’s speed with better control of your keyframes to create unique cinematic effects 

Part 1: What Do You Know About Phantom Camera Company?
Vision Research manufactures a Phantom camera that can be used in many professional fields. This company first came into being in 1950 by the name of “Photographic Analysis Company .”During the initial years, the company produced many cameras that could tackle the need for high-speed photography. However, in 1992, the company decided to create a separate entity to create high-speed cameras that wouldn’t depend on photographic film for imaging.
The US Patent Office acknowledged the use of innovative technology in the Phantom high-speed cameras. The main aim of this company is to produce robust cameras that can capture faster frame rates in high-speed photography. Many industries like defense, academia, and science research use Phantom slow-motion cameras. They are used in microfluidics, transparent flows, imaging, etc.
Part 2: Best Phantom Slow Motion Camera To Try
Phantom offers many slow-motion cameras with different features. This section will list down some of the best Phantom slow-motion cameras with pricing:
- TMX 7510
- T – Series T4040
- Machine Vision S200
- VEO 710
- Micro C and N C321
- 4K and Media Production Flex4K
1. TMX 7510
The TMX 7510 is built to produce high-end videos with different speed combinations. It uses a side-illuminated camera sensor to capture high-definition images. It can deliver 75,000 FPS with 1280 x 800 resolution. It offers up to 512GB RAM to help in making high-speed images. You can use its built-in Binning Mode with flexible options. It also supports many file formats like Cine RAW, TIFF, JPEG, etc.

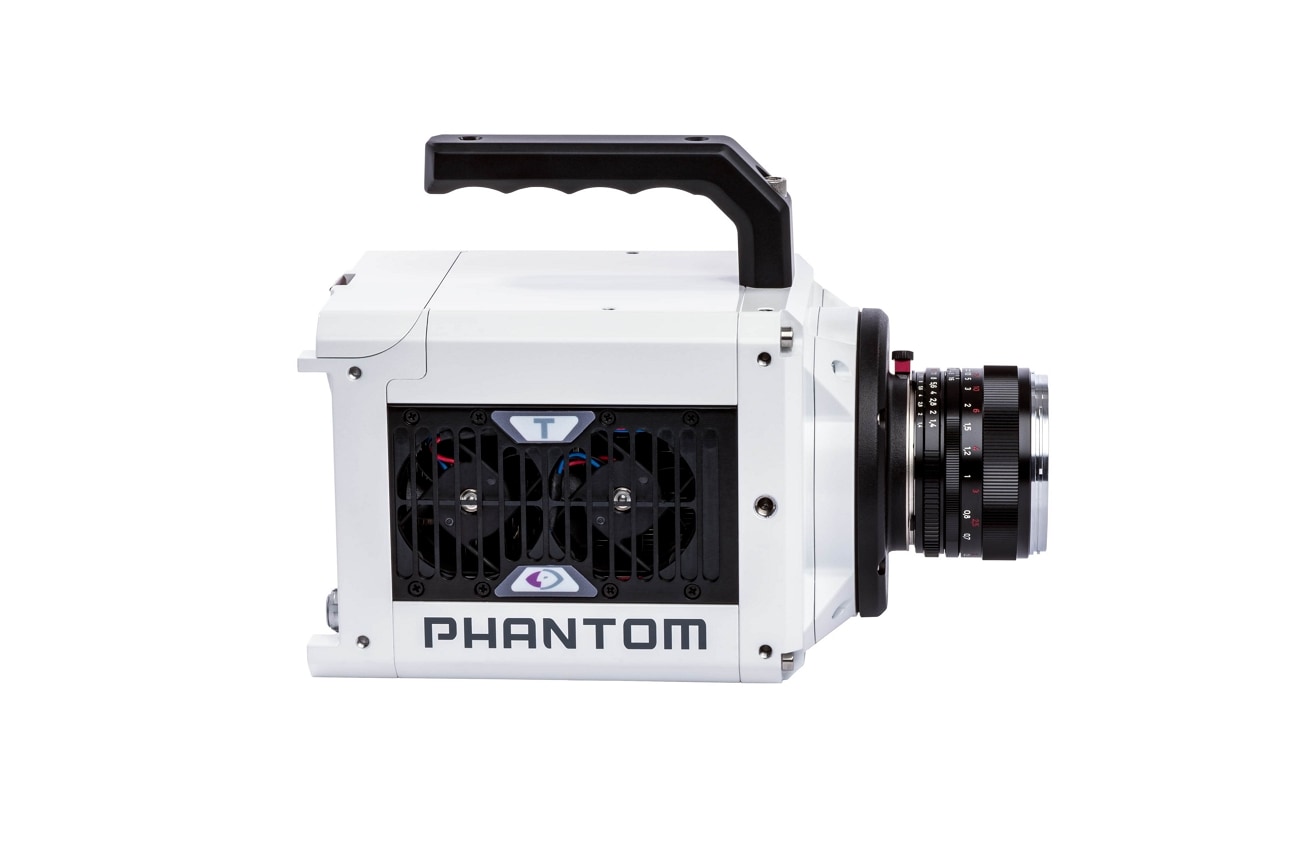
2. T – Series T4040
The T-Series of Phantom includes many features to capture images with precision. The T4040 camera supports 9,350 fps with 2560 x 1664 resolution. It offers a peak Quantum Efficiency rating of 90% that can produce images in low-light conditions. Moreover, this Phantom slow-motion camera uses flow visualization techniques to capture minute details with high precision. It also offers EDR that balances exposure in the saturated areas of the image.
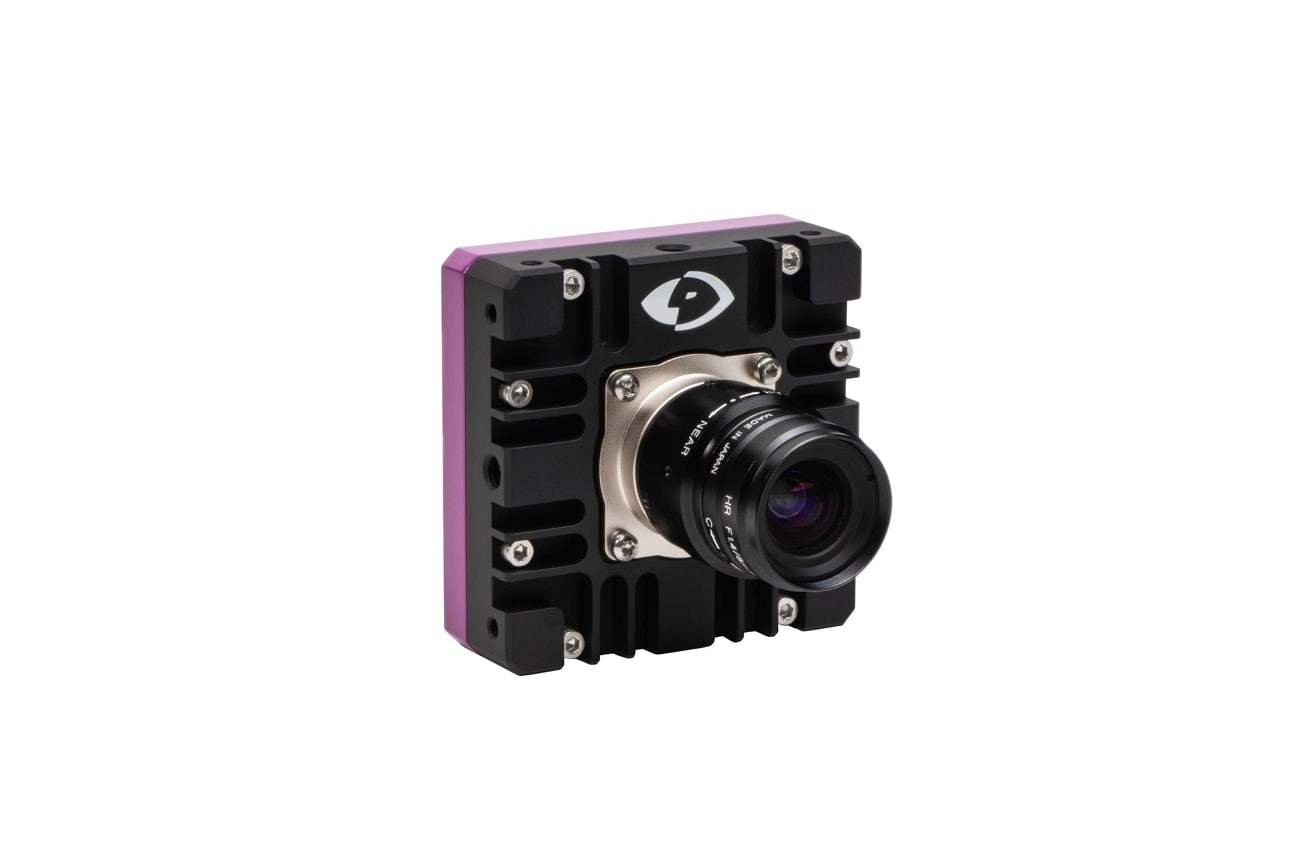
3. Machine Vision S200
This machine vision camera applies CXP technology to capture long-duration high-speed photos. It includes GPIO for events and ready signals. It’s economical and available in a compact size. Users can also use the time stamp on the frame to check the time code. Moreover, it can reach up to 6,950 fps with full resolution. You can trigger the recording with the given software or the GPIO trigger signal.
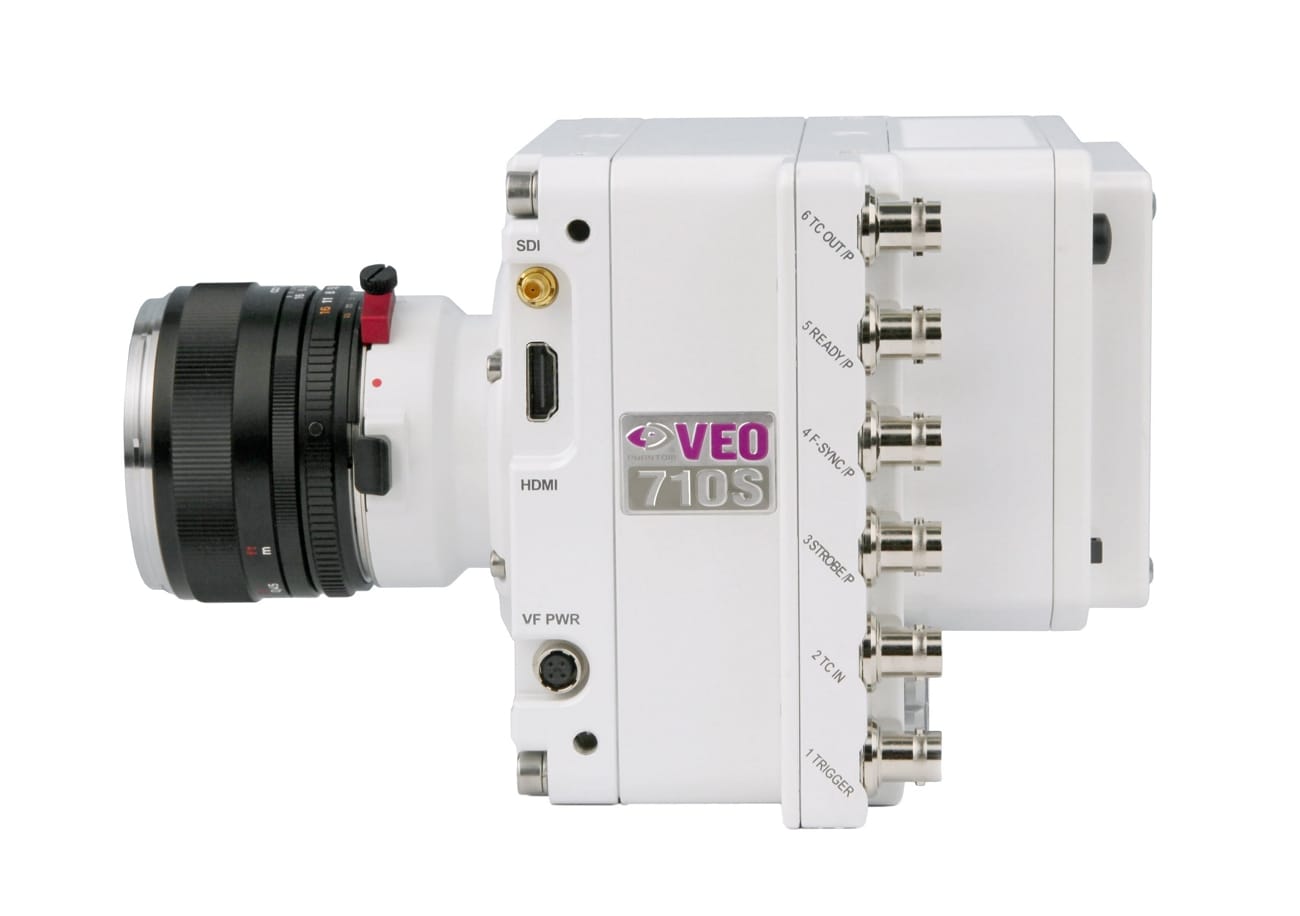
4. VEO 710
VEO series are specifically designed for film production and science laboratories. It has 7,400fps with a 1-Mpx 35mm sensor. The sensor format used in this camera is ideal for high-quality camera lenses. There are two options for the VEO body: S (full) and L (light). By purchasing the S model, you can experience many on-camera controls. Moreover, the body of this camera is made with aluminum to increase its reliability in tougher situations.
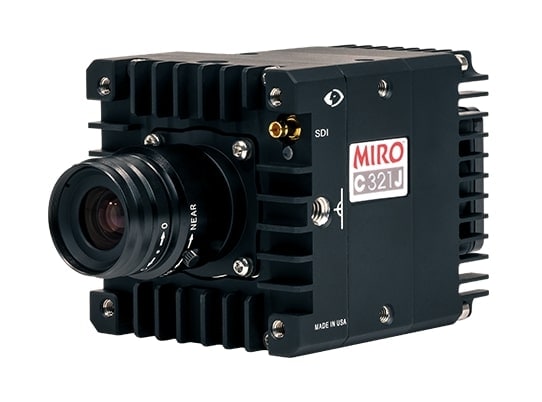
5. Micro C and N C321
The Micro C and N series are built to meet the challenges of using a standard camera. The lightweight body and on-board protection make this camera ideal. It supports a maximum fps of 1480 with full resolution. With high sensitivity, it can capture low-noise images with vibrant colors. The advanced features of this camera can provide high-end images while preserving the natural colors.
6. 4K and Media Production Flex4K
For professional cinema, Phantom has developed the Flex4k camera. This Phantom slo-mo camera supports 4K imaging with up to 1,000 fps. It provides three battery mounts with an on-camera menu system. The produced images are compatible with many color grading and video editing tools. Furthermore, it offers many remote-control options to ease your workflow. All the images that are produced will be delivered in the Cine RAW file format.
Part 3: No Phantom Camera? Still, Create a Slow Motion Video
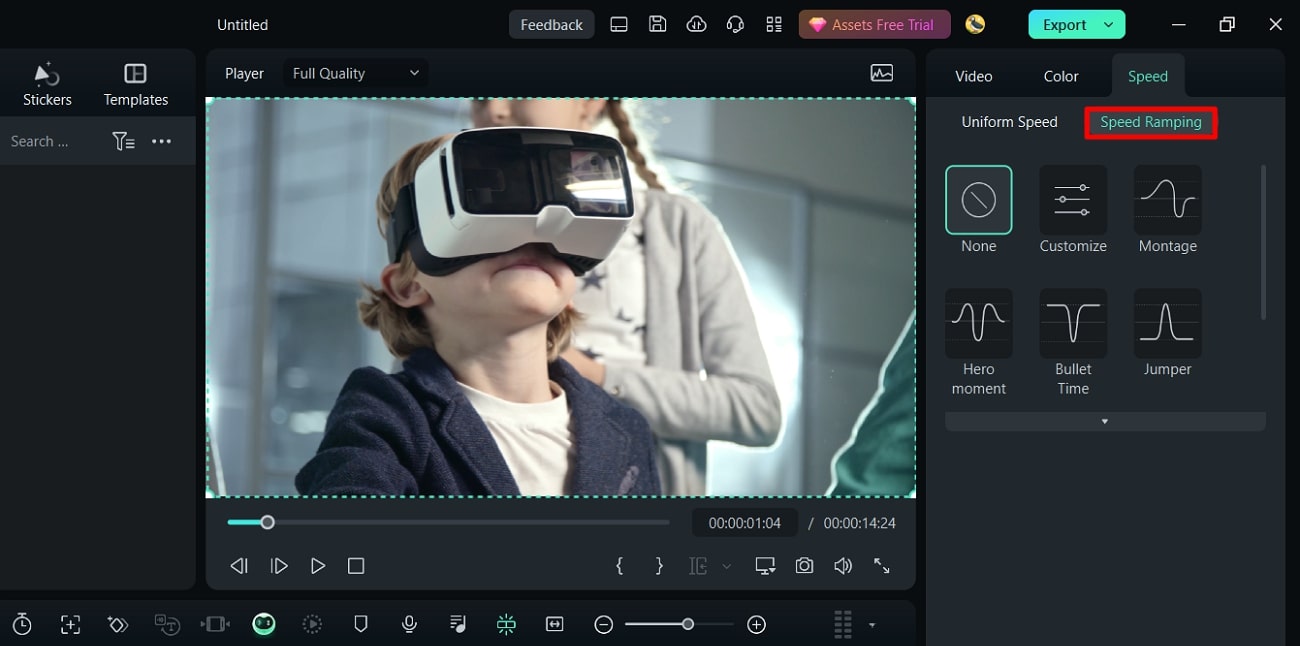
Are you unable to buy a Phantom slow-mo camera? No worries, as Filmora can help you generate slow-motion videos with a normal camera. After recording a video from any standard device, you can add slow-motion effects with this tool. It provides a speed ramping feature that allows you to manage the speed of your video. It contains 6 speed ramping templates that you can try for professional purposes. Moreover, it provides a drag-and-drop interface to provide you with robust controls.
Filmora can make any ordinary video look cinematic. You can incorporate special backgrounds in your video without using a green screen. Furthermore, it can remove all the production flaws from your video within a few taps.
Free Download For Win 7 or later(64-bit)
Free Download For macOS 10.14 or later
Instructions to Produce Slow Motion Video With Speed Ramping
This part of the guide will include all the basic steps to make slow-motion videos . Thus, follow the steps mentioned below:
Step 1Import the Video File
Start by launching Filmora on your desktop. Select “New Project” to open its interface. Once done, press “Ctrl + I” to import the preferred video file.

Step 2Select Speed Ramping
Once done by dragging it to the timeline, right-click on it to open a pop-up menu. Select “Speed” and then choose “Speed Ramping”. From the right panel, you can manage the speed ramping settings.
Step 3Adjust the Speed Settings
Select “Customize” for the preset and scroll a little bit. Here, you can adjust the pointers by using the cursor for speed modification. By dragging the point downwards, you will decrease the speed. In contrast, moving the points upwards will increase the speed.

Step 4Generate Final Results
Navigate into the “AI Frame Interpolation” section to smoothen the effect. From there, select “Optical Flow” to create a slow-motion effect of the best quality. To see the results, choose the “Render Preview” option given on the toolbar of the timeline. After modifying the video, save and export the results.

Key Features of Wondershare Filmora
Auto Reframe: This feature adjusts the aspect ratio of a video in an automated manner. You can make your video vertical for TikTok and YouTube Shorts. In a similar way, it can make videos horizontal to fit to Instagram.
AI Audio Denoise: The AI audio denoise feature is designed to remove specific voices from your video. You can try its AI voice enhancement option to make the vocals prominent. Moreover, it can remove reverb and hiss sounds from the audio in a natural way.
AI Smart Cutout: To remove unnecessary objects from the video, try its AI Smart Cutout feature. After selecting the area, it offers four preview modes. By using these modes, you can make adjustments according to the background.
Color Correction: Filmora provides more than 40 presets for color schemes. You can access the color correction settings to make manual changes. Moreover, you can apply advanced color tuning to adjust the colors of the video deeply.
Conclusion
Phantom slow-motion cameras offer great high-speed image details. The cameras of this brand produce high-definition results with advanced features. However, it cannot be affordable or accessible for many users. Therefore, Filmora is the best choice for students and beginners. With this software, you can make slow-motion videos in a cost-effective manner.
Make A Slow Motion Video Make A Slow Motion Video More Features

Part 1: What Do You Know About Phantom Camera Company?
Vision Research manufactures a Phantom camera that can be used in many professional fields. This company first came into being in 1950 by the name of “Photographic Analysis Company .”During the initial years, the company produced many cameras that could tackle the need for high-speed photography. However, in 1992, the company decided to create a separate entity to create high-speed cameras that wouldn’t depend on photographic film for imaging.
The US Patent Office acknowledged the use of innovative technology in the Phantom high-speed cameras. The main aim of this company is to produce robust cameras that can capture faster frame rates in high-speed photography. Many industries like defense, academia, and science research use Phantom slow-motion cameras. They are used in microfluidics, transparent flows, imaging, etc.
Part 2: Best Phantom Slow Motion Camera To Try
Phantom offers many slow-motion cameras with different features. This section will list down some of the best Phantom slow-motion cameras with pricing:
- TMX 7510
- T – Series T4040
- Machine Vision S200
- VEO 710
- Micro C and N C321
- 4K and Media Production Flex4K
1. TMX 7510
The TMX 7510 is built to produce high-end videos with different speed combinations. It uses a side-illuminated camera sensor to capture high-definition images. It can deliver 75,000 FPS with 1280 x 800 resolution. It offers up to 512GB RAM to help in making high-speed images. You can use its built-in Binning Mode with flexible options. It also supports many file formats like Cine RAW, TIFF, JPEG, etc.

2. T – Series T4040
The T-Series of Phantom includes many features to capture images with precision. The T4040 camera supports 9,350 fps with 2560 x 1664 resolution. It offers a peak Quantum Efficiency rating of 90% that can produce images in low-light conditions. Moreover, this Phantom slow-motion camera uses flow visualization techniques to capture minute details with high precision. It also offers EDR that balances exposure in the saturated areas of the image.

3. Machine Vision S200
This machine vision camera applies CXP technology to capture long-duration high-speed photos. It includes GPIO for events and ready signals. It’s economical and available in a compact size. Users can also use the time stamp on the frame to check the time code. Moreover, it can reach up to 6,950 fps with full resolution. You can trigger the recording with the given software or the GPIO trigger signal.

4. VEO 710
VEO series are specifically designed for film production and science laboratories. It has 7,400fps with a 1-Mpx 35mm sensor. The sensor format used in this camera is ideal for high-quality camera lenses. There are two options for the VEO body: S (full) and L (light). By purchasing the S model, you can experience many on-camera controls. Moreover, the body of this camera is made with aluminum to increase its reliability in tougher situations.

5. Micro C and N C321
The Micro C and N series are built to meet the challenges of using a standard camera. The lightweight body and on-board protection make this camera ideal. It supports a maximum fps of 1480 with full resolution. With high sensitivity, it can capture low-noise images with vibrant colors. The advanced features of this camera can provide high-end images while preserving the natural colors.

6. 4K and Media Production Flex4K
For professional cinema, Phantom has developed the Flex4k camera. This Phantom slo-mo camera supports 4K imaging with up to 1,000 fps. It provides three battery mounts with an on-camera menu system. The produced images are compatible with many color grading and video editing tools. Furthermore, it offers many remote-control options to ease your workflow. All the images that are produced will be delivered in the Cine RAW file format.

Part 3: No Phantom Camera? Still, Create a Slow Motion Video
Are you unable to buy a Phantom slow-mo camera? No worries, as Filmora can help you generate slow-motion videos with a normal camera. After recording a video from any standard device, you can add slow-motion effects with this tool. It provides a speed ramping feature that allows you to manage the speed of your video. It contains 6 speed ramping templates that you can try for professional purposes. Moreover, it provides a drag-and-drop interface to provide you with robust controls.
Filmora can make any ordinary video look cinematic. You can incorporate special backgrounds in your video without using a green screen. Furthermore, it can remove all the production flaws from your video within a few taps.
Free Download For Win 7 or later(64-bit)
Free Download For macOS 10.14 or later
Instructions to Produce Slow Motion Video With Speed Ramping
This part of the guide will include all the basic steps to make slow-motion videos . Thus, follow the steps mentioned below:
Step 1Import the Video File
Start by launching Filmora on your desktop. Select “New Project” to open its interface. Once done, press “Ctrl + I” to import the preferred video file.

Step 2Select Speed Ramping
Once done by dragging it to the timeline, right-click on it to open a pop-up menu. Select “Speed” and then choose “Speed Ramping”. From the right panel, you can manage the speed ramping settings.

Step 3Adjust the Speed Settings
Select “Customize” for the preset and scroll a little bit. Here, you can adjust the pointers by using the cursor for speed modification. By dragging the point downwards, you will decrease the speed. In contrast, moving the points upwards will increase the speed.

Step 4Generate Final Results
Navigate into the “AI Frame Interpolation” section to smoothen the effect. From there, select “Optical Flow” to create a slow-motion effect of the best quality. To see the results, choose the “Render Preview” option given on the toolbar of the timeline. After modifying the video, save and export the results.

Key Features of Wondershare Filmora
Auto Reframe: This feature adjusts the aspect ratio of a video in an automated manner. You can make your video vertical for TikTok and YouTube Shorts. In a similar way, it can make videos horizontal to fit to Instagram.
AI Audio Denoise: The AI audio denoise feature is designed to remove specific voices from your video. You can try its AI voice enhancement option to make the vocals prominent. Moreover, it can remove reverb and hiss sounds from the audio in a natural way.
AI Smart Cutout: To remove unnecessary objects from the video, try its AI Smart Cutout feature. After selecting the area, it offers four preview modes. By using these modes, you can make adjustments according to the background.
Color Correction: Filmora provides more than 40 presets for color schemes. You can access the color correction settings to make manual changes. Moreover, you can apply advanced color tuning to adjust the colors of the video deeply.
Conclusion
Phantom slow-motion cameras offer great high-speed image details. The cameras of this brand produce high-definition results with advanced features. However, it cannot be affordable or accessible for many users. Therefore, Filmora is the best choice for students and beginners. With this software, you can make slow-motion videos in a cost-effective manner.
Also read:
- New Top Applications That Can Help Apply The Best VHS Camera Effect for 2024
- New 2024 Approved Replacing the Sky in Adobe After Effects An Extensive Guide
- In 2024, Discover How to Create Professional Foggy Text Reflection Effects in the Filmora Video Editor
- Step-by-Step Guide | Control Playback Speed in Premiere Pro
- New In 2024, Best Free Video Editing Software for Reddit
- How To Fade Audio With Movavi Editor
- Updated Got No Luck with MP4 Video Joining Software? Try These 6 Best MP4 Mergers to Combine Videos on Your MAC and Windows
- In 2024, How To Cut Videos For Instagram On Mac
- New 2024 Approved 9 Best Sparkle Effects Photo and Video Editors You Should Know
- Updated Explore the Potential of Slow-Motion Video for Different Industries. Read This Guide and Choose the Best Slow-Motion Camera App to Create Stunning Videos
- New 2024 Approved What You Should Know About Speech-to-Text Technology
- Updated Is Windows Movie Maker Still Available?
- Updated In 2024, Turn Your Text Into a Podcast Made Possible (+ EASY Editing Tips)
- Updated In 2024, Take Your Video Editing to the Next Level with Video Scopes
- Speed Control Is Frequently Used in Video Editing. By Speed up or Slow Down the Video Speed, You Can Achieve Different Visual Results. This Article Will Show You How to Control the Speed of a Video
- Do You Want to Edit a TikTok After Posting? This Article Will Provide Multiple Methods Through Which You Can Do It in No Time for 2024
- New How to Create a PowerPoint Looping Slideshow
- The Ultimate Guide How to Bypass Swipe Screen to Unlock on Poco C65 Device
- In 2024, Overview of the Best Samsung Galaxy F04 Screen Mirroring App | Dr.fone
- How to Perform Hard Reset on Xiaomi Redmi Note 12 Pro+ 5G? | Dr.fone
- 4 Methods to Turn off Life 360 On Samsung Galaxy A54 5G without Anyone Knowing | Dr.fone
- Repair Video Tool - Repair all your damaged video files of Realme on Windows
- In 2024, Tips and Tricks for Setting Up your Xiaomi Redmi K70E Phone Pattern Lock
- Tips And Tricks To Tell if Your Apple iPhone 8 Is Unlocked
- How to Unlock Vivo Y200e 5G Phone Pattern Lock without Factory Reset
- How To Transfer Data From Apple iPhone 14 Pro To Other iPhone 14 devices? | Dr.fone
- In 2024, How to Unlock Oppo Find N3 Bootloader Easily
- In 2024, How Screen Mirroring Apple iPhone SE to TV or PC? | Dr.fone
- How to Delete iCloud Account with or without Password from your Apple iPhone SE (2020)/Windows/Mac
- 5 Solutions For Nokia 105 Classic Unlock Without Password
- How to Transfer Data from Vivo Y100 to Samsung Phone | Dr.fone
- Title: Updated In 2024, Guide To Using Free Luts for OBS
- Author: Chloe
- Created at : 2024-06-26 06:24:20
- Updated at : 2024-06-27 06:24:20
- Link: https://ai-editing-video.techidaily.com/updated-in-2024-guide-to-using-free-luts-for-obs/
- License: This work is licensed under CC BY-NC-SA 4.0.


