
Updated In 2024, How to Add Custom Subtitles to Netflix

How to Add Custom Subtitles to Netflix
Netflix is the most popular streaming service in the world. It offers loads of movies and series that you can watch on smartphones, tablets, and computers. Over the years, Netflix has become a one-stop destination for watching movies and TV shows in different languages.
While the user base of Netflix is quite diverse, the platform offers subtitles in limited languages for most movies and series. Suppose you want to view a Korean Drama on Netflix with French subtitles. However, you found that French subtitles are unavailable for that Korean Drama. In such a case, you might wonder if adding custom subtitles to Netflix is possible.
Well, you can add subtitles to Netflix, and there are two different methods to do the same. This guide will help you learn both methods available for adding custom subtitles to Netflix. So, let’s get started!
Method 1. Upload Your Custom Subtitle to Netflix
Before proceeding with this method, you must remember that it only works if you are a Netflix Premium user. Now, let’s discuss how to add subtitles to Netflix with this method.
Key Steps to Follow
Below are the steps for adding custom subtitles to Netflix.
Step 1 First of all, you need to install and add Language Learning with Netflix & YouTube™ extension to your web browser (Chrome or Edge).
Step 2 Make sure the extension is activated.
Step 3 Download the .srt file that contains the subtitles in your preferred language for a particular movie or TV show.
Step 4 Open Netflix on a Chrome or Edge browser and sign into your account.
Step 5 Play the movie or TV show for which you have downloaded the subtitles.
Step 6 Within the Netflix player, you will see a settings icon left to the Subtitles icon. Click on it.
Step 7 Among the various setting options, you need to choose the screen and find the one with the label “Lower Subtitles (Mother Language)”. You need to click on its field and select the “Upload Subtitle” option.
Step 8 You will see a pop-up window at the top of the screen where you need to click the “Choose File” button.
Step 9 You then need to navigate to the directory on your computer where you have downloaded the subtitles file, select it, and click the “Open” button.
Step 10 Click the “Okay” button to upload the subtitles to Netflix.
Step 11 Close the settings window and play the video. You can view the uploaded subtitles at the bottom of the player.
Method 2. Add Custom Subtitles to Netflix with Extensions
If you’re not a Netflix Premium user, you can still add subtitles to Netflix with the help of certain browser extensions. We’ll list them down and discuss the steps for using one of them; the basic steps for using all such extensions are pretty much the same.
1. Substital
Supported web browsers: C hrome | Firefox | Edge
Substital is among the most popular extensions that allow you to add subtitles to several online on-demand video streaming platforms, including Netflix. It has more than 100K users on the Chome Web Store.
Key Features
- Offers a built-in subtitles search feature.
- Supports .srt files and .zip files containing subtitles in the .srt format.
- You can manually sync the subtitles with the video.
- It allows you to customize the appearance of subtitles.
Steps to Add Custom Subtitles to Netflix with Substital
Following are the key steps to add custom subtitles to Netflix using the Substital extension:
Step 1 The first thing you need to do is to download and install the Substital extension on your browser.
Step 2 Open Netflix on the same browser and log in to your account.
Step 3 Play the movie or episode from a TV series for which you want to add custom subtitles.
Step 4 Download the subtitles file for the same movie or episode in your preferred language from the web.
Step 5 Now open the extensions menu in your browser and click on the Substital icon.
Step 6 You will see the name of the movie or TV show that you are watching on Netflix. Click on it.
Step 7 In this step, you need to drag and drop the subtitle file from your system (that you downloaded earlier) to the browser window.
Step 8 Finally, you can notice that the subtitles are loaded in the Netflix player.
2. Super Netflix
Web browsers: Chrome
Super Netflix is yet another reliable extension to add subtitles to Netflix. Apart from adding custom subtitles, this extension allows you to change the video playback speed. Like Substital, the Super Netflix extension on Chrome Web Store also has 100K+ users.
Key Features
- It can help you avoid spoilers by blurring images and episode descriptions.
- You can use the extension to skip intros automatically.
- Offers 5 different video modes.
- You get the option to change the Netflix streaming server.
3. Netflix SubStyler: customize subtitles
Web browsers: Chrome
Unlike the other two extensions mentioned above, Netflix SubStyler only allows you to change the styling of subtitles on Netflix. However, the thing that makes this extension worthy of your attention is that it comes loaded with several customization options.
Key Features
- You can choose a custom text color for the subtitles either with the help of an in-built color picker or by entering the RGB value of the color.
- The extension lets you add text outlines and change the size of the text.
- You can even add a text background and change its color and opacity.
Bonus Tip: How to Edit and Add Subtitles to Videos Available Offline
In certain cases, you may want to edit the subtitles of videos probably because either the subtitles are not available for a certain part of the video, or they are not correct. So, if you want to edit subtitles of videos that you have downloaded with ease, you can consider using Wondershare Filmora .
Free Download For Win 7 or later(64-bit)
Free Download For macOS 10.14 or later

Filmora is one of the most popular and powerful video editors out there. Developed by Wondershare, it allows you to import subtitle files in various formats, including .srt, and edit them directly. Some noteworthy features of Filmora for subtitles and video editing include the manual addition of subtitles, speech-to-text conversion, green screen, video stabilization, and color correction.
Wondershare Filmora also offers several advanced text editing tools that make it possible to customize the appearance of subtitles that you add to a video. You can change the color and size of the fonts and add a gradient effect to the text. Additionally, you can animate text to make it stand out.
Add Custom Subtitles with Filmora: A Step-by-Step Guide
If you want to add subtitles to any video using Filmora, you simply need to follow the steps mentioned below. Please note that for this tutorial, we’ll be using Filmora 11.
Step 1 Launch the Filmora app on your computer and create a new project.
Step 2 You can simply click the “Import media” button and load the video onto it.
Step 3 Hover over the video’s thumbnail and click on the (+) button to add it to the timeline.
Step 4 Now, you need to play the video and find the section of the video where you need to add subtitles. Pause the video and add a mark by pressing the M key on your keyboard. You can also do the same by clicking the marker button, which is located beside the microphone icon in the top right of the timeline tab.
Step 5 To add the subtitle, you need to click on the “Titles” button that you can see at the top of the Filmora window. You can see several subtitle templates available there.
Step 6 Download, preview, and choose a subtitle template that seems most appropriate.
Step 7 You can then drag and drop the subtitle to the timeline above the video timeline. You can also trim the subtitle length from any side of the subtitle timeline box.
Step 8 You need to double-click on the subtitle timeline box to add custom text, change font size, color, and alignment, and add animations.
Step 9 Once done, you can click on the “Ok” button to save the changes.
Step 10 Similarly, you can add subtitles for different sections of the video.
Conclusion
If you want to add custom subtitles to Netflix movies and TV shows, you can achieve the same with the two different methods mentioned above. For the first method to work, you must be a Netflix Premium user. On the other hand, the second method will work fine even if you aren’t a Netflix Premium user. Also, you can add custom subtitles to any offline videos using the Wondershare Filmora video editor.
Free Download For macOS 10.14 or later

Filmora is one of the most popular and powerful video editors out there. Developed by Wondershare, it allows you to import subtitle files in various formats, including .srt, and edit them directly. Some noteworthy features of Filmora for subtitles and video editing include the manual addition of subtitles, speech-to-text conversion, green screen, video stabilization, and color correction.
Wondershare Filmora also offers several advanced text editing tools that make it possible to customize the appearance of subtitles that you add to a video. You can change the color and size of the fonts and add a gradient effect to the text. Additionally, you can animate text to make it stand out.
Add Custom Subtitles with Filmora: A Step-by-Step Guide
If you want to add subtitles to any video using Filmora, you simply need to follow the steps mentioned below. Please note that for this tutorial, we’ll be using Filmora 11.
Step 1 Launch the Filmora app on your computer and create a new project.
Step 2 You can simply click the “Import media” button and load the video onto it.
Step 3 Hover over the video’s thumbnail and click on the (+) button to add it to the timeline.
Step 4 Now, you need to play the video and find the section of the video where you need to add subtitles. Pause the video and add a mark by pressing the M key on your keyboard. You can also do the same by clicking the marker button, which is located beside the microphone icon in the top right of the timeline tab.
Step 5 To add the subtitle, you need to click on the “Titles” button that you can see at the top of the Filmora window. You can see several subtitle templates available there.
Step 6 Download, preview, and choose a subtitle template that seems most appropriate.
Step 7 You can then drag and drop the subtitle to the timeline above the video timeline. You can also trim the subtitle length from any side of the subtitle timeline box.
Step 8 You need to double-click on the subtitle timeline box to add custom text, change font size, color, and alignment, and add animations.
Step 9 Once done, you can click on the “Ok” button to save the changes.
Step 10 Similarly, you can add subtitles for different sections of the video.
Conclusion
If you want to add custom subtitles to Netflix movies and TV shows, you can achieve the same with the two different methods mentioned above. For the first method to work, you must be a Netflix Premium user. On the other hand, the second method will work fine even if you aren’t a Netflix Premium user. Also, you can add custom subtitles to any offline videos using the Wondershare Filmora video editor.
Guide to Create a Timelapse Video in After Effects
Time-Lapse movies are great for a variety of projects; you can use them as establishing shots in sitcoms, corporate marketing videos, and they can make lovely backgrounds for animated slideshows. A time-lapse video is essentially a series of photographs taken at regular intervals to depict how the environment changes gradually over a shorter period of time. In this article, we’ll demonstrate how you may quickly and easily build an After Effects time-lapse effect.
With that said, let’s start!
Step 1. Create a new composition
Calculating your composition length to accommodate the frame rate and number of images is the first step in generating a time-lapse video.
- Verify the number of images you have for your Sequence.
- New Composition Creation. Selecting a frame rate: A time lapse film produced at 30 frames per second will flow smoothly, but you can select any frame rate you like.
- To determine the duration of your composition, divide the number of photographs you have by the frame rate you’ve chosen. For instance, if you use 600 photos at 30 frames per second, your composition will last 20 seconds.
Step 2. Import your images
You are prepared to make a time-lapse sequence if all of your photographs are saved to the same folder and are in the same order. If you are working directly from your Camera, you will likely have Camera Raw files, although this procedure works with PNG and JPEG sequences.
- Press Command/Control I on your keyboard or select File > Import. Find the folder holding your image sequence.
- To begin, select the first picture in the sequence. If all of your images have accurate names, After Effects will be able to identify a sequence of images.
- Make sure the Force Alphabetical Order and Camera Raw Sequence checkboxes are selected. Your Time-Lapse Sequence will display in the Project Browser Panel after you click Import.
- Once you’ve watched how it plays, you can adjust the Frame Rate by right-clicking the Sequence in the Project Browser and selecting Interpret Footage > Main.
- To update your time-lapse, modify the Frame Rate setting and click OK.

Step 3. Create movements
- After Effects’ Time-Lapse Sequence can be used just like any other standalone clip. This implies that you may give your time-lapse clip movement by adding Keyframes and Effects.
- Place your Playhead at the beginning of the clip after choosing the Image Sequence. Make a keyframe for the scale or position.
- To generate a second Keyframe for the value of your choice, move to the end of the clip. Make any necessary Clip modifications.
- Right-click on the timeline, choose New > Adjustment Layer, then add your effects to the Adjustment Layer to add effects like noise and grain.
Step 4. Create slow motion from a video
You can import your video after you’ve shot it to prepare it for editing. The same steps, including naming your photos in order, must be taken for the Time Lapse sequence. It may be advantageous to entirely rename both your Image Sequence and Performer clip.
- Drag the finished Time Lapse sequence to your Timeline after completing it as previously explained.
- Over the Time Lapse, add the Performer Clip to the Timeline.
- Choose Time>Time Stretch by performing a right-click on the performer clip.
- You can alter the Stretch Factor or Duration in the dialogue box. When you alter one parameter, the other will reflect the new Stretch Factor or Duration for you.
Step 5. Make an overlay
You can alter the Stretch Factor or Duration in the dialogue box. When you alter one parameter, the other will reflect the new Stretch Factor or Duration for you.
- Find Luma Key in the Effect Control Panel and drag it to your clip.
- Change the Key Type setting in the Effect Control Panel to Key Out Brighter.
- The Threshold, Tolerance, and Edge settings should be adjusted until only the silhouette is visible.
- Use the Pen or Mask Tool to create a circle around the parts you want to delete if you discover any corners of your clip that are still visible.
- Add any Effects, such as Light Leaks, to your Adjustment Layer by choosing “Right-click > New > Adjustment layer.”

After Effects CC must be opened, a new project must be created, the Import File menu option must be selected, and the appropriate folder containing the altered still images must be located and selected before the time-lapse photos can be turned into a film. You need to make sure that the JPEG Series box is checked, as well as the Force Alphabetical Order box.
Once you have clicked on the first image in the sequence. The time-lapse video that you uploaded appears in the project library. After performing a right-click on the filename, select “New Comp from Selection” from the context menu.
Step 6. Exporting your video
After getting our sequence to perform some kind of slow, understated animation so that it appears as though the camera is moving dramatically, we will need to export a video file. Go to File > Export > Add to Render Queue, then open the Render Queue dialog box by going to Window > Render Queue. From there, you can choose the Output Module and change the settings in the options dialog box. Finally, choose the Output To option and select the location on your computer where you would like to save the video clip that we are currently rendering and exporting.

Conclusion
No matter how you make your time lapse videos, After Effects has a ton of features you can use to modify and enhance the way they look. Now that you are familiar with the fundamentals, you can play with the Frame Rates and Composition options. Check out this helpful manual for more information on Time Stretching and Remapping in After Effects.
Free Download For Win 7 or later(64-bit)
Free Download For macOS 10.14 or later
Free Download For macOS 10.14 or later
How to Turn On/Off Motion Blur in Minecraft?
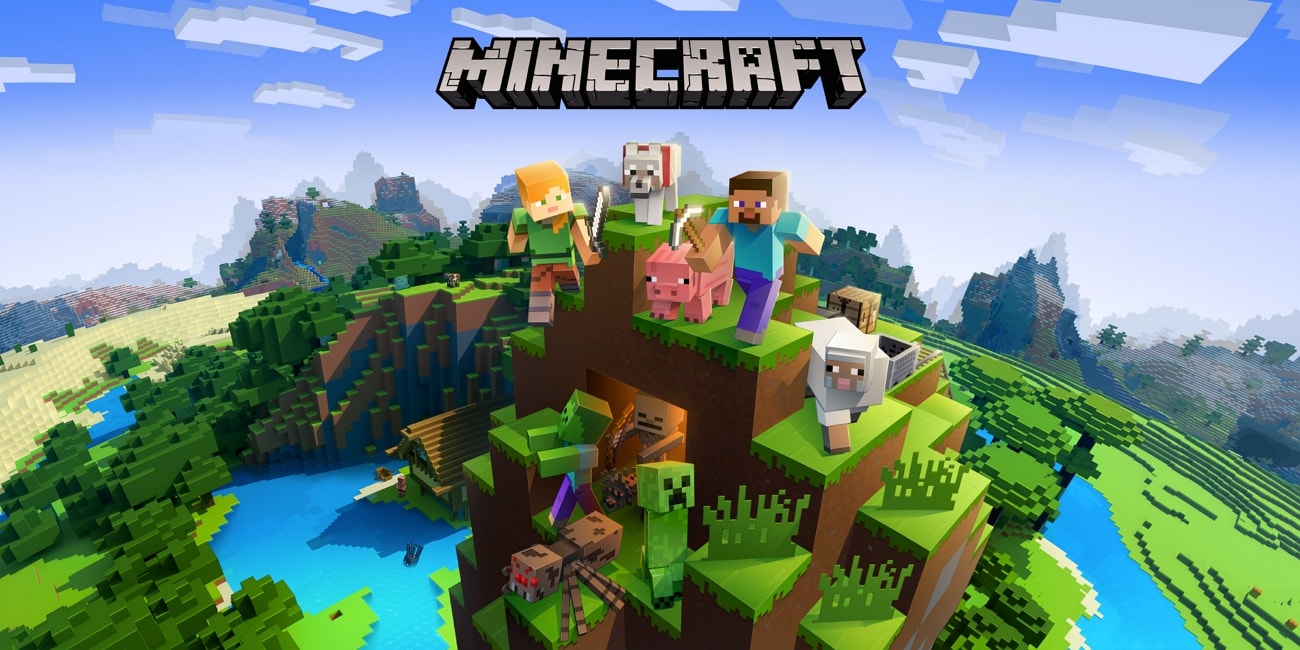
Minecraft has been one of the most played games in the community. Known among hundreds of thousands of users, this game has been a prominent choice of many YouTube gamers. Streamers from all over the world are fond of playing this strategy game.
Although the game tentatively has a very basic graphic system, it has improved a lot with multiple features. Such is the addition of Minecraft motion blur, which has had mixed reviews throughout the community. For this article, we will be working on how to turn on/off the motion blur effect in Minecraft. The discussion covers everything related to the feature and its functionality.
Part 1: What is Motion Blur in Games?
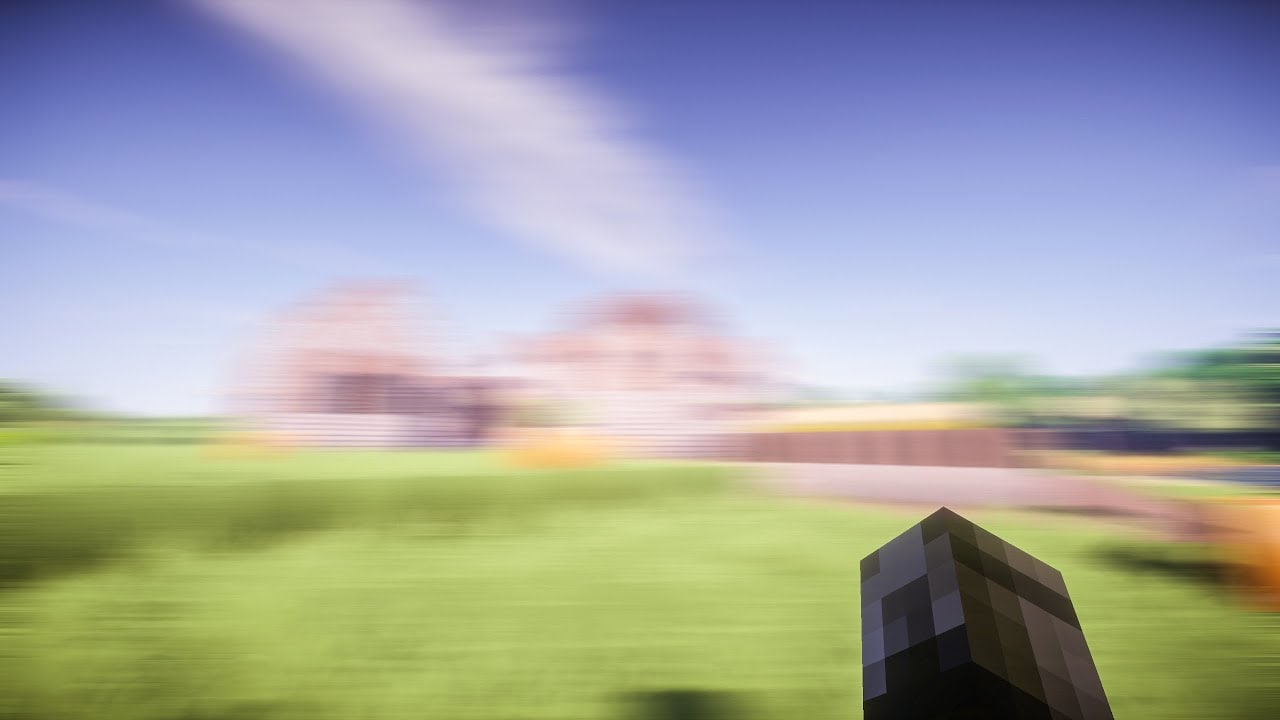
Before you further discuss Minecraft motion blur, it might be vital for you to understand what the effect actually is. Motion blur effect has made a mark in video editing for presenting a realistic approach to videos.
For fast-moving objects, you can consider using the motion blur effect to display their swiftness. The use of the effect is consistently based on improving the user experience and showing objects in a realistic environment. The use of motion blur in games is based on providing a similar experience that was considered for videos.
As most games utilize stop-motion animation, it tends to lag at a lower frame rate. Motion blur enhances the gaming effects and smoothens them in a lower frame rate. This allows users to get a smooth game experience at a lower and adjustable frame rate. Motion blur in games has been added with the objective of smoothening the gameplay.
Part 2: Does Minecraft Have Motion Blur?
Minecraft has provided the option of including the motion blur effect in its game. For a better visual experience, this effect has turned out to be quite beneficial. The existence of motion blur in Minecraft is equivalent to smoother gameplay, which is accomplished under a low frame rate. Rather than having screens with higher frame rates, you can get a low-end option.
All of this is essentially possible with the help of the motion blur effect. Even though Minecraft has a low-graphic display, it does not lag with motion blur. This is why the particular effect is recognized and acknowledged in the market. It has been discovered that Minecraft allows users to add motion blur from the graphic settings.
However, you must ensure that the device you are implementing has the tendency to control and manage the change and smoothness. Improper management of the motion blur under complex conditions will lead to multiple problems.
Part 3: How to Get Motion Blur in Minecraft?
With an overview of the motion blur effect and what it is, we will now see how it can be obtained in the game. For the following steps, it can indeed work on the latest Minecraft versions, but it is precisely for versions 1.7.10 and 1.8.9.
Furthermore, we will focus on two different techniques to go along for getting motion blur in Minecraft. Let’s proceed to find out how to get motion blur in Minecraft by following these two methods:
Method 1: Using PVP Clients
Step1 You can consider using any appropriate PVP client, such as Lunar Client or Badlion , as they provide the appropriate mods to get motion blur in Minecraft. To start the process, you will have to install the PVP client on your computer from their official website.
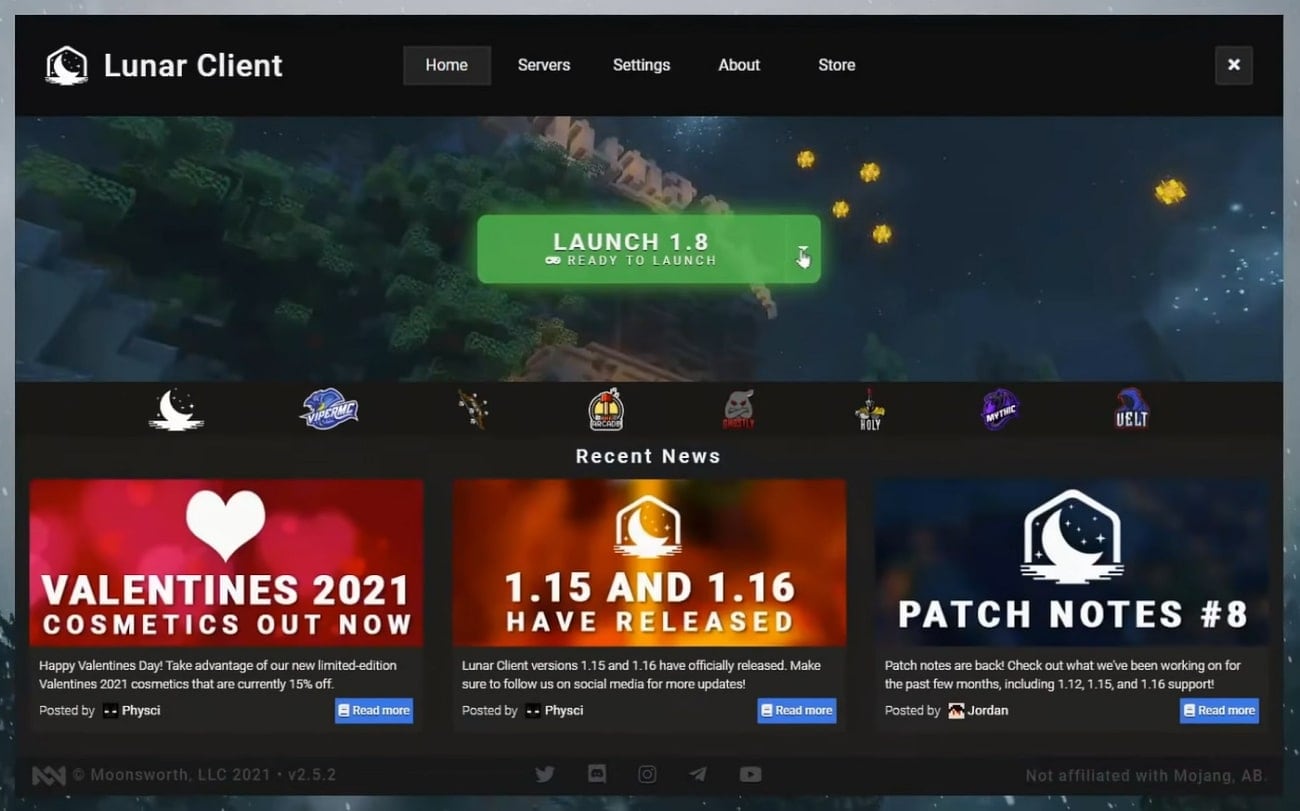
Step2 Launch the client and proceed to select the version of Minecraft you are using and load the game. As you are within the game, move into the “Options” and look for “Video Settings.”
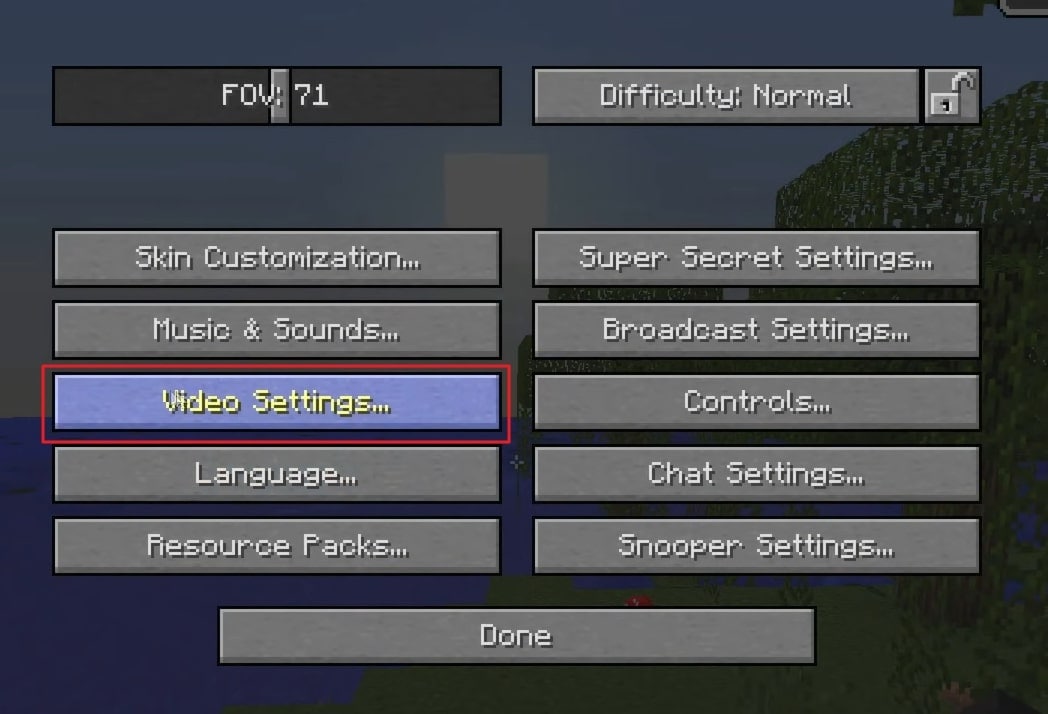
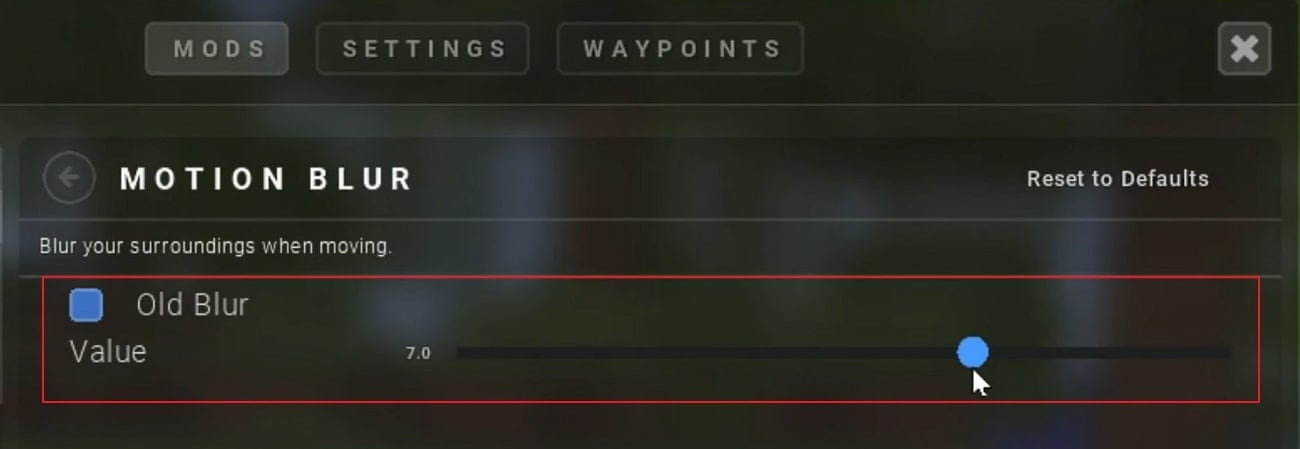
Step3 Look for the “Performance” options in the following settings and turn off “Fast Render” within the options. Once done, use the “Right Shift” button on your keyboard to access the Lunar Client menu. From there, you can set the intensity of motion blur from the available options.
Method 2: Use Forge
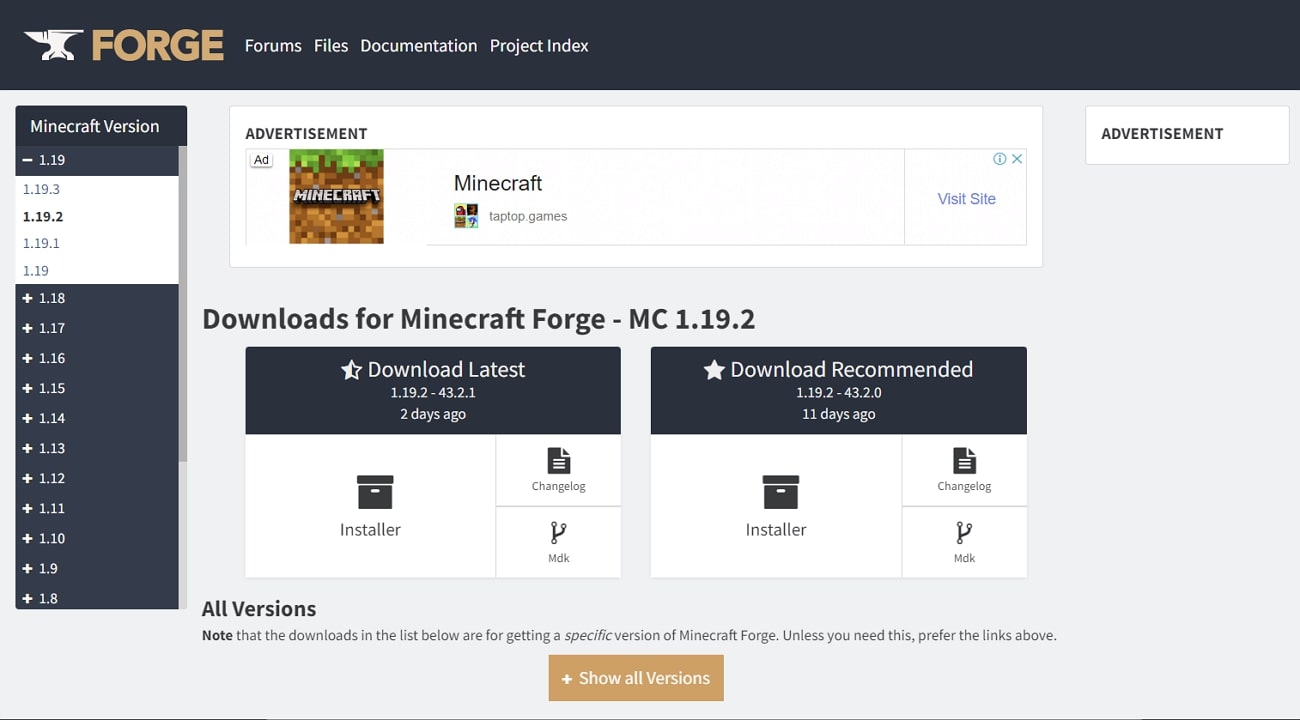
Step1 Another technique existing for getting motion blur within Minecraft is through Forge . While it is pretty common within the gaming community, it provides the option of using motion blur within the game. You must open their official website and download the version you wish to add to your game. In some cases, you might require installing Java on your computer.
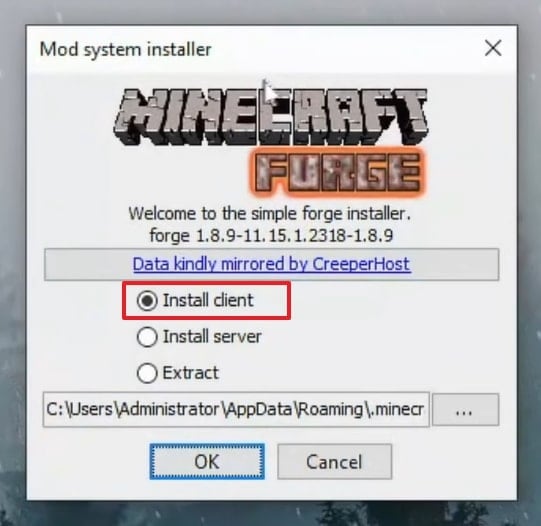
Step2 Following this, open the Forge Installer to access the next screen. Select “Install Client” and continue to boot your Minecraft version where you wish to add motion blur.
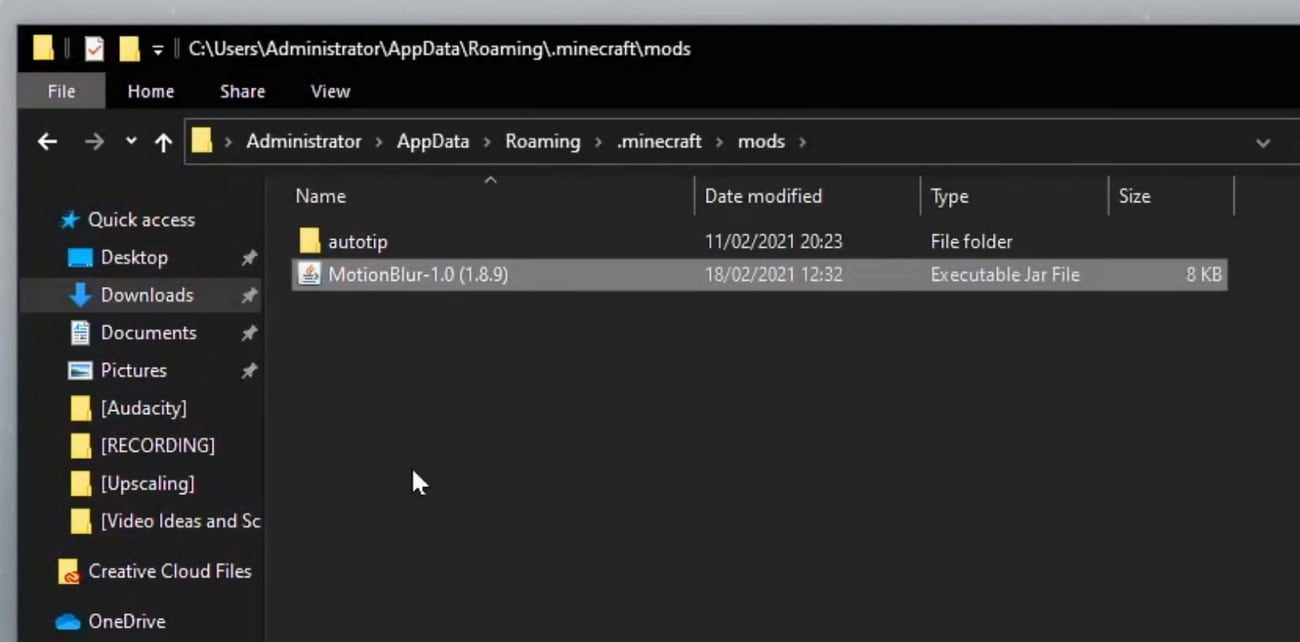
Step3 You must access your Minecraft Launcher and look for “Forge” in the installations. Run the setup and quit the game. Download the motion blur mod to add to Minecraft. Look for the “.minecraft” folder in the “Local Disk (C:)” of your computer. Add the downloaded mod file to the “mods” folder.
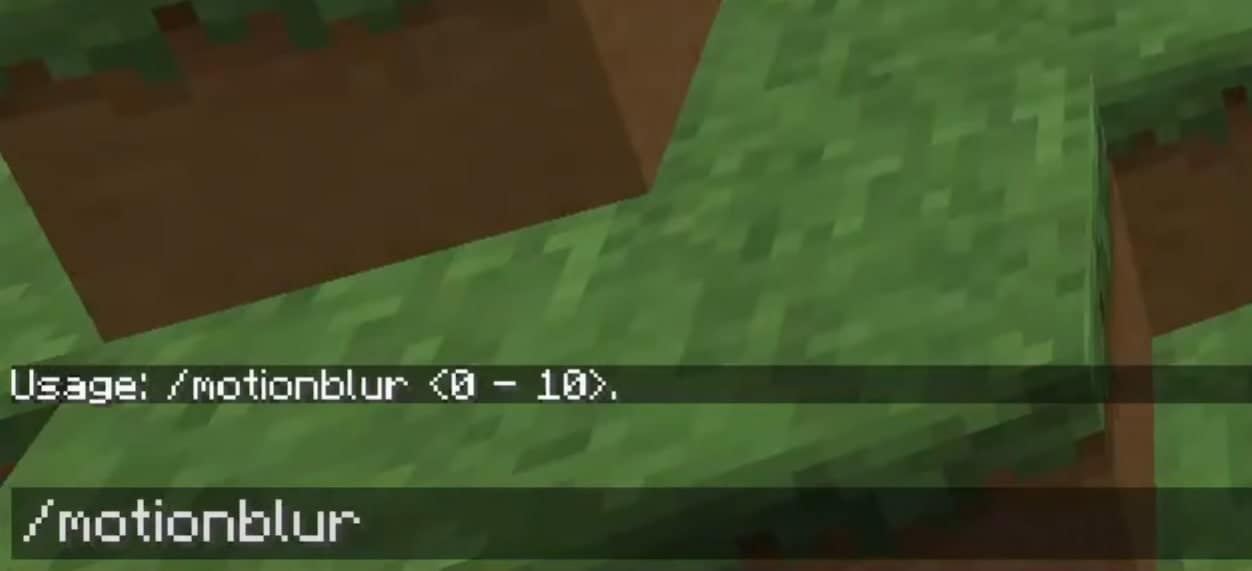
Step4 You must run Minecraft and type “/motionblur” in the chat box. You can set up the intensity of the motion blur from 1 to 10.
Part 4: How to Disable Motion Blur in Minecraft?
What if you are looking for the right technique to disable the motion blur in Minecraft? In some cases, you might feel the issue of disabling the effect within the game as it might be messing with other things. To prevent your gameplay from getting dismantled, you will have to know how to disable it. For that, we will look into a guide showing how to turn off motion blur in Minecraft:
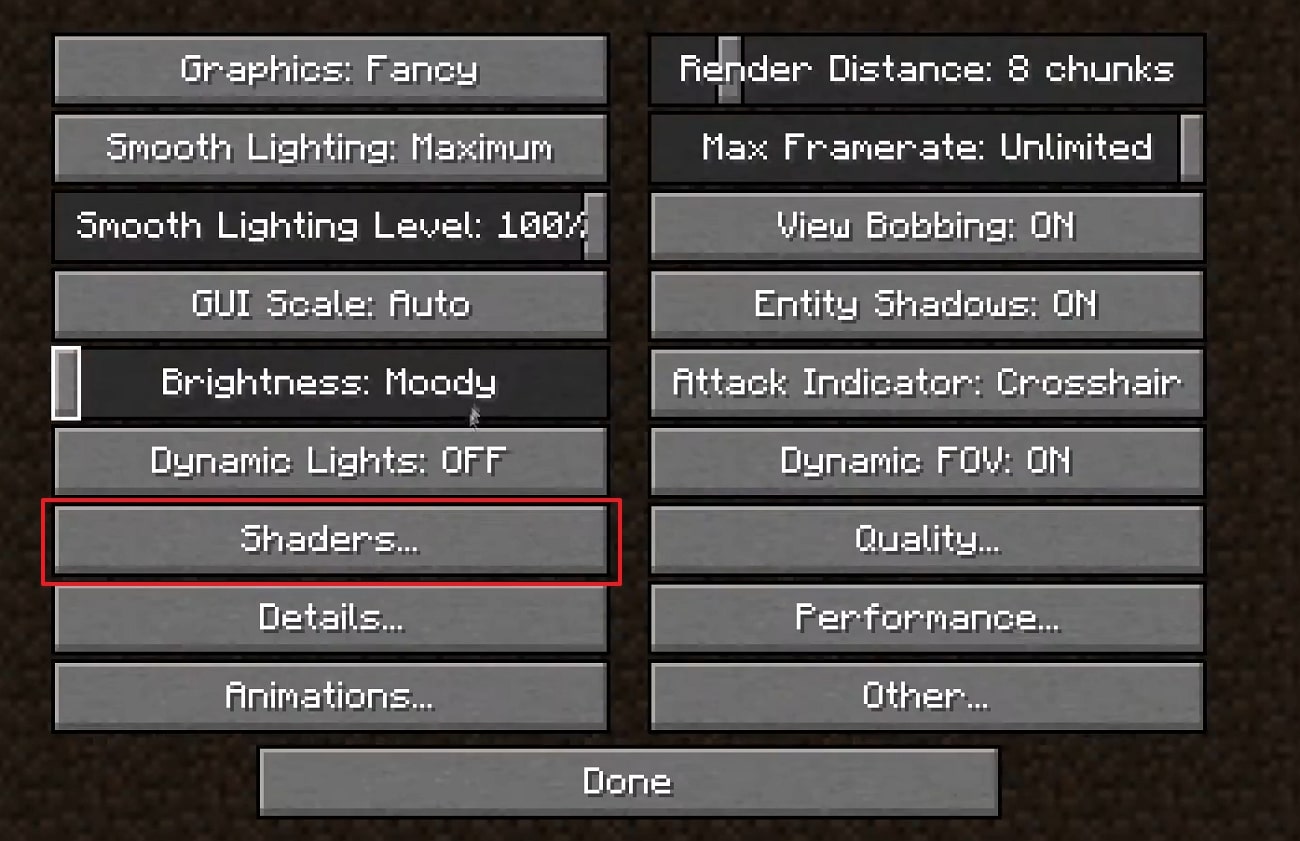
Step1 If you have used “Shaders” to get motion blur within the Minecraft game, you will have to access them. For that, open the game and redirect to its “Settings.” Proceed to the “Video Settings” and load into the “Shaders” menu.
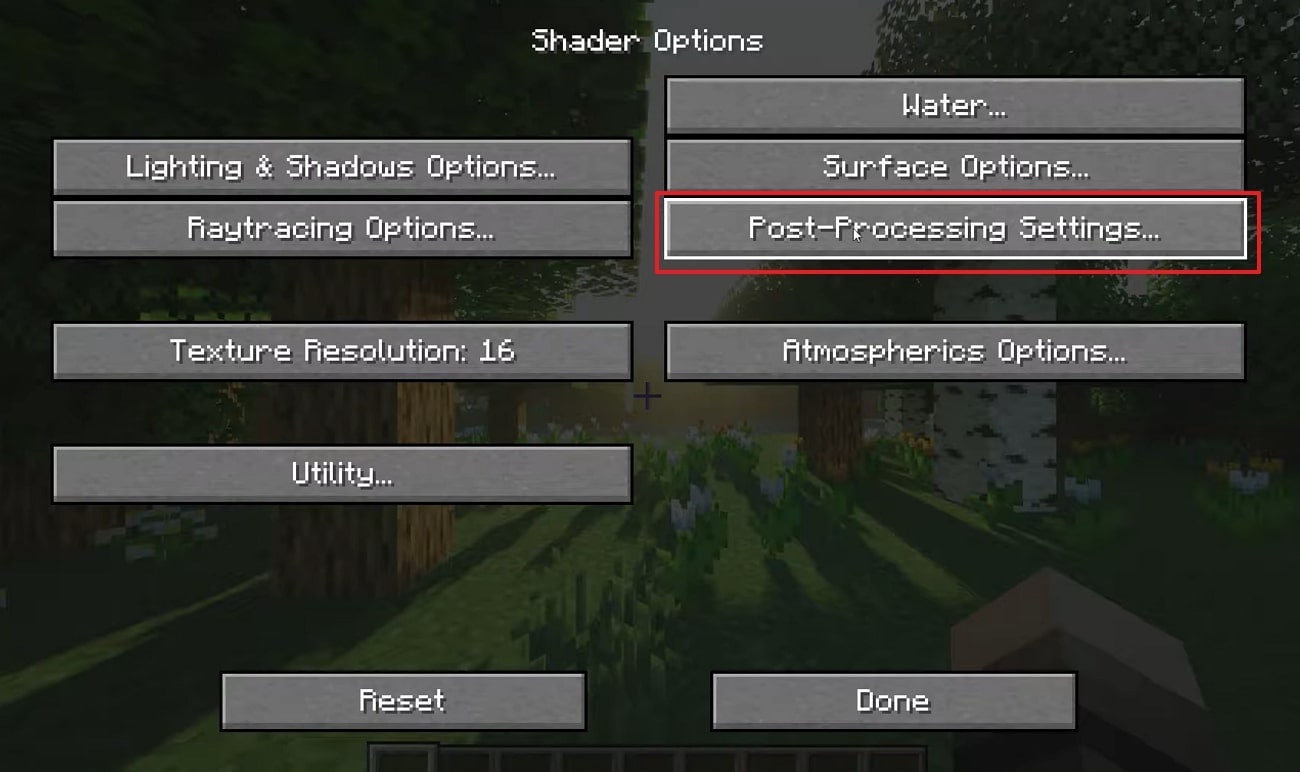
Step2 Next, select “Shader Options” from the bottom-right corner of the screen and find the “Post-Processing Settings.”
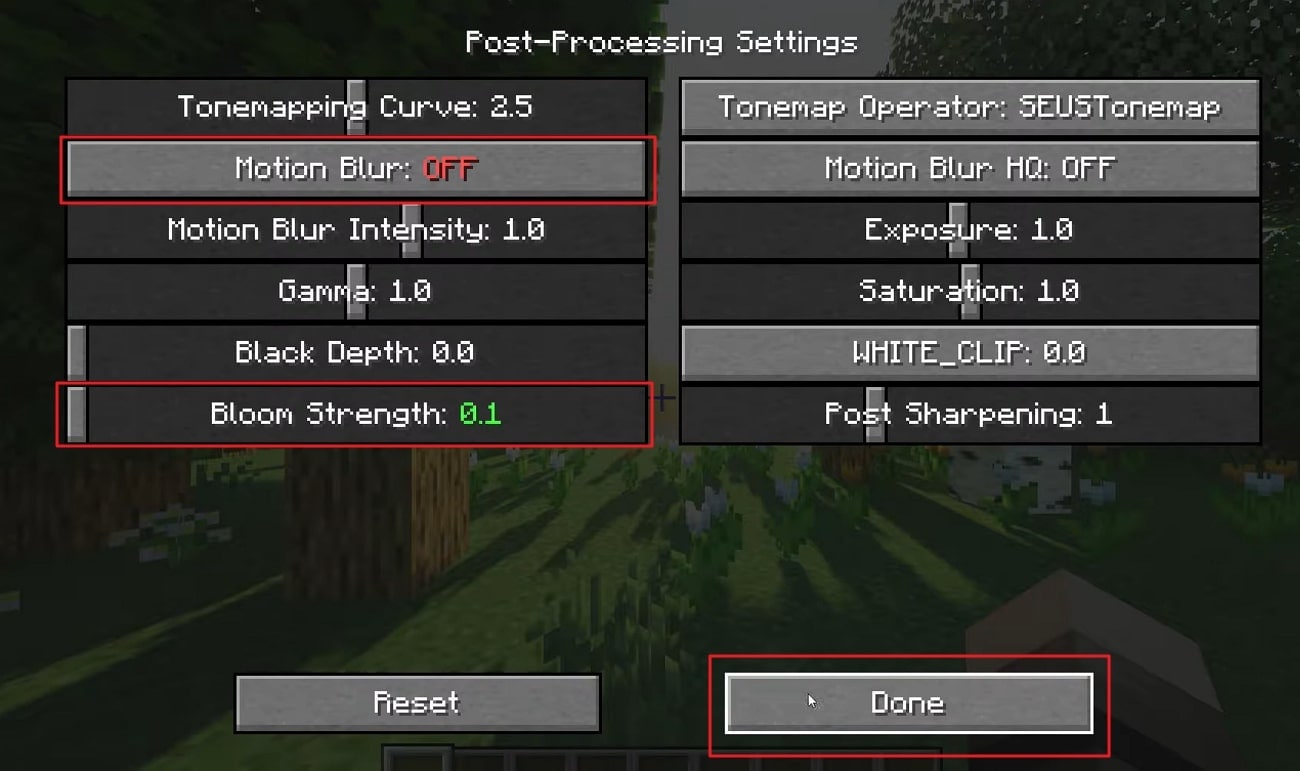
Step3 On the next screen, you will have to turn off the “Motion Blur” option and decrease the “Bloom Strength” to 0.1. Click “Done” to save the settings.
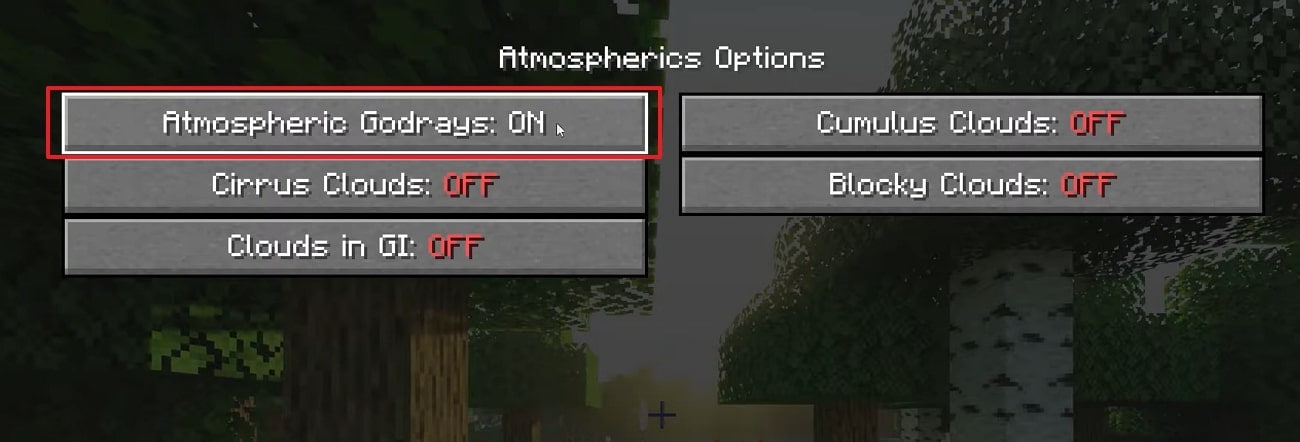
Step4 You can also consider turning off the “Atmospheric Godrays” option from the “Atmospheric Options.” This will completely disable motion blur from Minecraft.
Bonus Tips – How to Add Motion Blur to Your Minecraft Gaming Video
Although you have found some ways to add motion blur to Minecraft, there can be a case where you might have forgotten to add it. You might have recorded the video, which leaves you to add the motion blur through a video editor. For this, Wondershare Filmora provides a perfected, impressive video editing panel that allows you to edit videos to perfection.
Free Download For Win 7 or later(64-bit)
Free Download For macOS 10.14 or later
The video editor contains multiple features which are effective in enhancing the quality of the gaming video. You can export high-quality results with the option of setting the resolution of the video according to any platform or device. Such diversity under a simple interface is a treat to witness.
Key Features that Make Filmora Special
We will look into some quality features which make Wondershare Filmora a unique tool to work with:
- The AI Portrait feature allows the detection of the human within the video and enhances their outlook.
- It comes with the option of synchronizing the audio with the video automatically.
- You can also correct the color of your video to make it look ravishing.
Guide to Add Motion Blur in Minecraft Gaming Video
Following this, you will learn the right way to add Minecraft motion blur in your gaming video with the help of Wondershare Filmora:
Step1 Launch Filmora and Add Minecraft Video
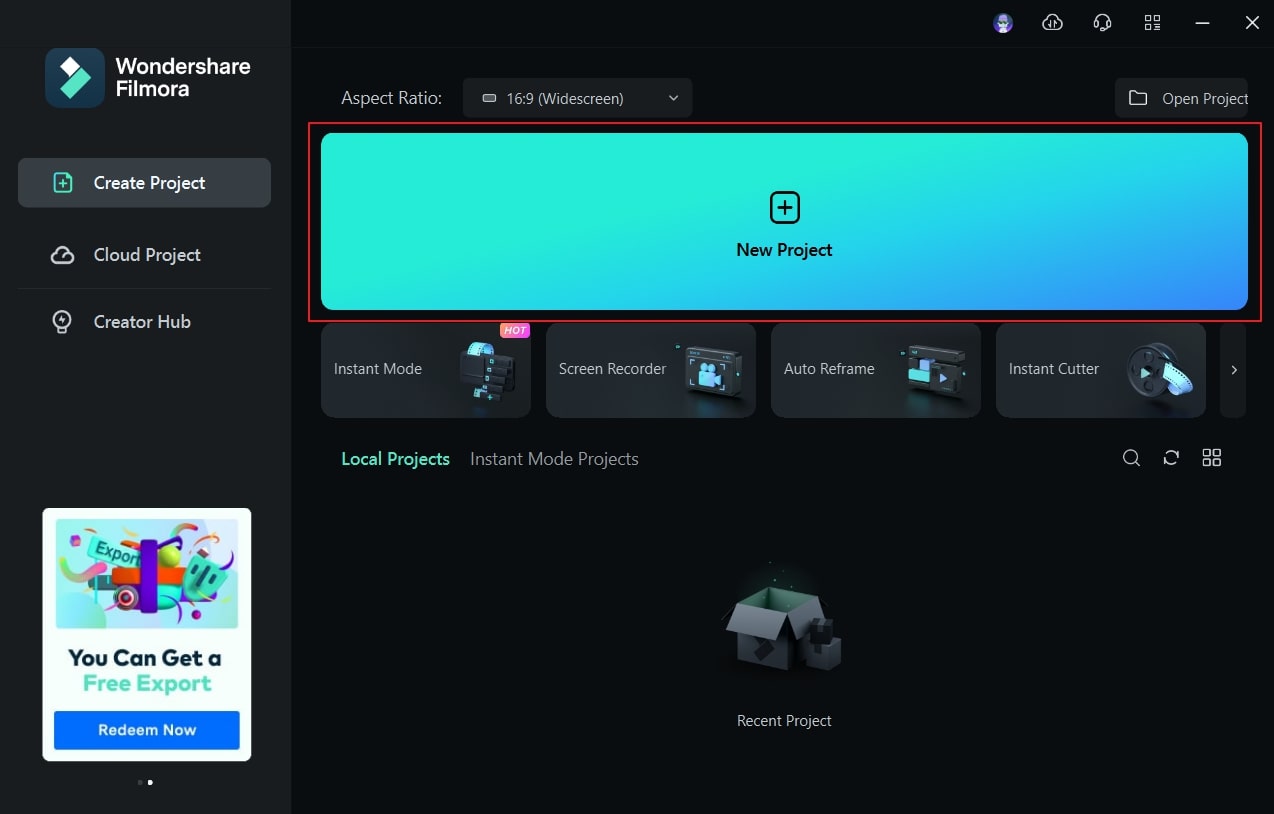
Start by launching the latest Wondershare Filmora on your computer. Click on “New Project” and continue to the next screen. Select the “Import” icon to add the Minecraft gaming video.
Step2 Split Video to Add Effect
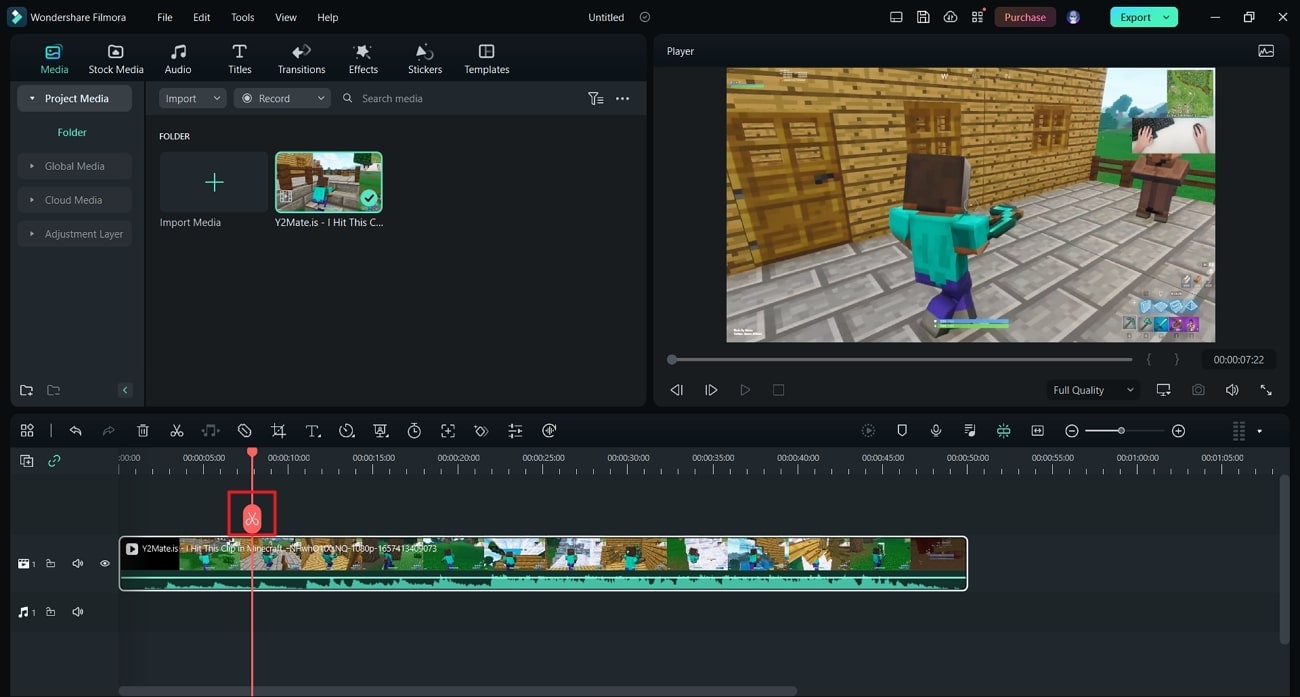
As you have added the video, drag it on the timeline. Following this, use the play head to navigate to the point where you wish to add motion blur. Use the “Scissors” icon to split the video from the point.
Step3 Apply the Motion Blur
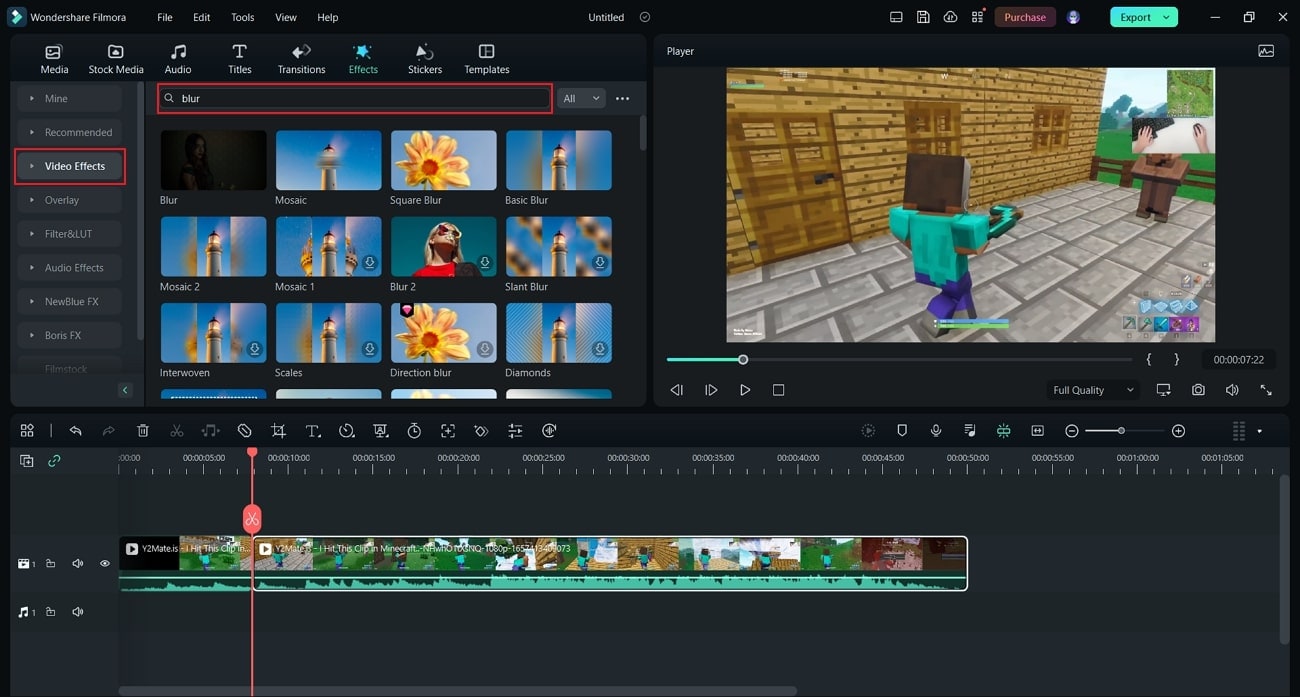
Continue to the “Effects” tab and reach out to “Video Effects” from the left panel. Continue to search for “Blur” from the search bar. Use the first effect in the result and add it to the video in the timeline.
Step4 Add Transition and Export
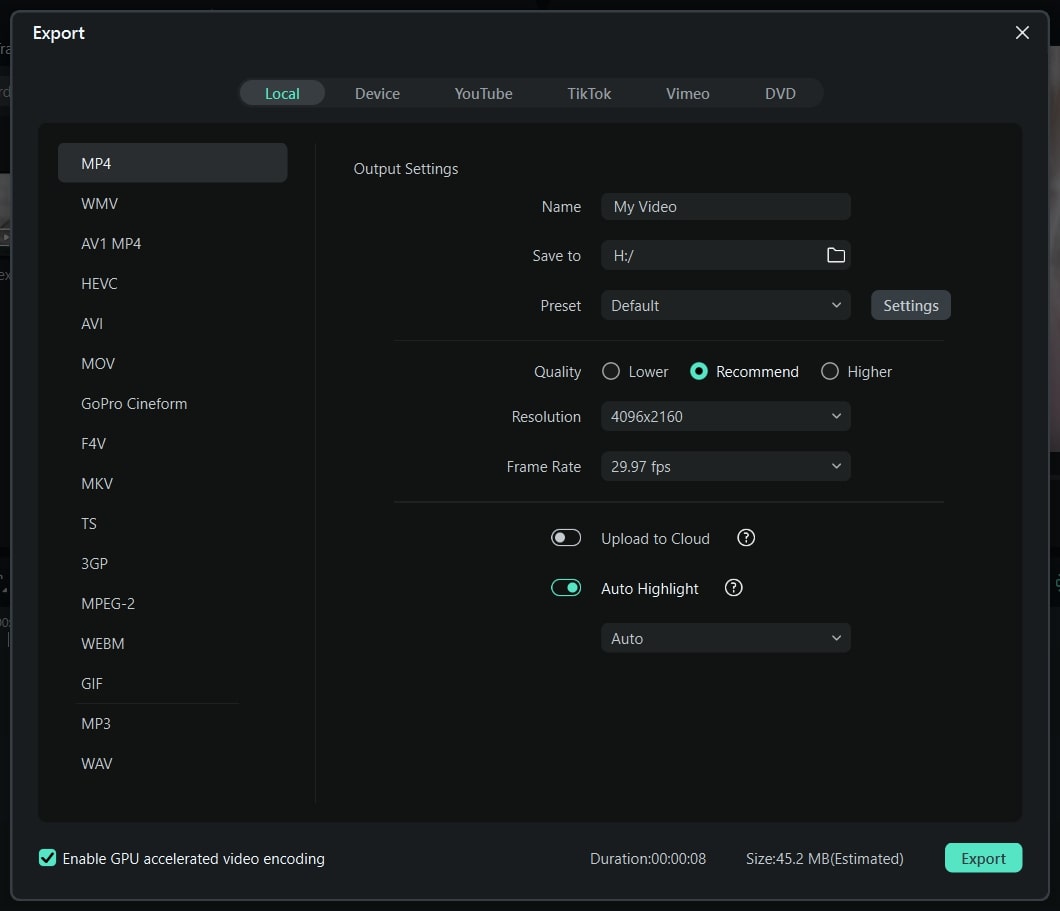
To make your video smooth, look for “Dissolve” in the “Transitions” tab. As you search for it, add it to the part of your video. Once done, use the “Export” button to get the edited gaming video with motion blur.
Last Words
With the guide provided, you will understand how to get motion blur in Minecraft. The offered methods will also help you in disabling this feature. With a clear overview, you will be able to manage your Minecraft game in a better way. Also, if you have forgotten to add motion blur in the game directly, you can include this in the gaming video with the help of Wondershare Filmora.
Free Download For macOS 10.14 or later
The video editor contains multiple features which are effective in enhancing the quality of the gaming video. You can export high-quality results with the option of setting the resolution of the video according to any platform or device. Such diversity under a simple interface is a treat to witness.
Key Features that Make Filmora Special
We will look into some quality features which make Wondershare Filmora a unique tool to work with:
- The AI Portrait feature allows the detection of the human within the video and enhances their outlook.
- It comes with the option of synchronizing the audio with the video automatically.
- You can also correct the color of your video to make it look ravishing.
Guide to Add Motion Blur in Minecraft Gaming Video
Following this, you will learn the right way to add Minecraft motion blur in your gaming video with the help of Wondershare Filmora:
Step1 Launch Filmora and Add Minecraft Video
Start by launching the latest Wondershare Filmora on your computer. Click on “New Project” and continue to the next screen. Select the “Import” icon to add the Minecraft gaming video.

Step2 Split Video to Add Effect
As you have added the video, drag it on the timeline. Following this, use the play head to navigate to the point where you wish to add motion blur. Use the “Scissors” icon to split the video from the point.

Step3 Apply the Motion Blur
Continue to the “Effects” tab and reach out to “Video Effects” from the left panel. Continue to search for “Blur” from the search bar. Use the first effect in the result and add it to the video in the timeline.

Step4 Add Transition and Export
To make your video smooth, look for “Dissolve” in the “Transitions” tab. As you search for it, add it to the part of your video. Once done, use the “Export” button to get the edited gaming video with motion blur.

Last Words
With the guide provided, you will understand how to get motion blur in Minecraft. The offered methods will also help you in disabling this feature. With a clear overview, you will be able to manage your Minecraft game in a better way. Also, if you have forgotten to add motion blur in the game directly, you can include this in the gaming video with the help of Wondershare Filmora.
Also read:
- [New] In 2024, The Chorus of Content Perfecting Music Placement on IG
- [New] Motion Text Generator
- [Updated] 2024 Approved Pioneering Tools to Embellish Photos with Words
- [Updated] 2024 Approved Refine and Revamp Your YouTube Clips Using WM Maker
- [Updated] Understanding LUTs to Amplify Your Photo Quality for 2024
- 1. Step-by-Step Guide: Resetting Your Lenovo G50 Laptop to Original Factory Conditions
- 2024 Approved How to Color Grading in Final Cut Pro
- 2024 Approved This Article Talks in Detail About How to Export iMovie Video From iPhone, Mac, Etc. It Also Covers the Process of Using iMovie Alternative to Edit Videos on Mac. Check Out Now
- Do You Know There Are Websites to Download Free Glitch Transition Effects for Premiere Pro? You Can Easily Download Them and Make Awesome Videos for 2024
- In 2024, 5 Solutions For Xiaomi Redmi Note 12 4G Unlock Without Password
- In 2024, Best 10 Sites to Get Free Images
- In 2024, Overview of FPS for YouTube Videos
- New Easy Way to Add Transitions to Videos for 2024
- New How to Easily Create a Free Eye-Catching Intro Videos with Invideo
- New In 2024, HDR Photography How to Use HDR Mode on Your Android Devices
- New In 2024, How To Change Speed of Video in Final Cut Pro?
- Transform Terminal Picture Background
- Updated Looking For the Best VHS Video Effect Makers? Get To Know the Top List for 2024
- YAC549 - Yamaha'aturboSound II Sound Module Based on the YMF789/YMU789 (DSP + MIDI Synthesader + Codec) and 256 MB of SPIRAM for Sample Storage Instead of ROM. It Also Includes a Second Audio Input Connector
- Title: Updated In 2024, How to Add Custom Subtitles to Netflix
- Author: Chloe
- Created at : 2025-02-27 21:10:02
- Updated at : 2025-03-04 04:11:00
- Link: https://ai-editing-video.techidaily.com/updated-in-2024-how-to-add-custom-subtitles-to-netflix/
- License: This work is licensed under CC BY-NC-SA 4.0.