Updated In 2024, How to Apply Gaussian Blur Effect to Videos In Premiere Pro?

How to Apply Gaussian Blur Effect to Videos In Premiere Pro?
Many professional editors add different types of blur effects to their videos for more enhancements. By adding a suitable blur effect, you can make your video stand out. One of the famous blur effects is the Gaussian blur effect, through which you can smoothen your video efficiently.
To add this effect, you can trust the well-recognized tool such as Adobe Premiere Pro. Thus, by reading this article, you can learn how to create Gaussian blur in Premiere Pro proficiently.
Part 1: What is Gaussian Blur?
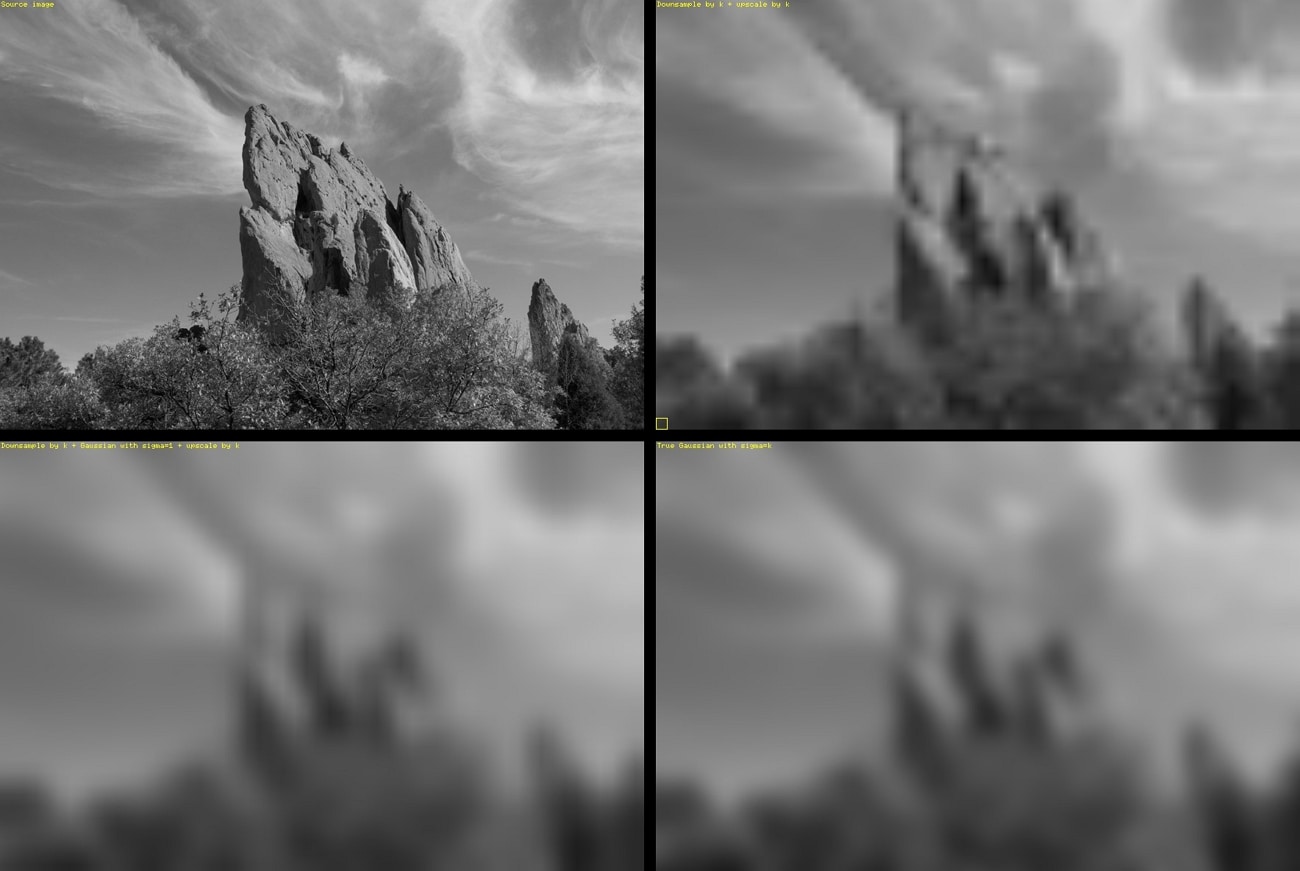
You can apply the Gaussian Blur Effect if you want to soften an image or video. This blur effect was named after a mathematician known as Carl Friedrich Gauss. The Gaussian Blur Effect eliminates the extreme outliers that help in soften the uneven pixels. Hence, it’s a high-end blur effect through which you can eradicate the noise from your video instantly.
Part 2: What Can the Gaussian Blur Be Used For?
In the post-production of videos, many content creators and professionals use the Gaussian blur effect. You can add the Gaussian blur effect to your captured videos within a few clicks. To know about more benefits of the Gaussian blur effect, proceed to the following section:
1. Image Denoising
Image noise can be produced in your videos due to the interference of random signals. These random signals and pixels disturb the human eye in processing the image information. Thus, it can create a bad impression when noise is present in your videos or pictures. To resolve this issue accurately, professionals recommend using the Gaussian blur effect. By adding this effect, you can quickly erase the noise from your videos without any hassle.
2. Add a Natural Transition to Videos
The Gaussian blur effect does not destroy the original harmony of the picture. It adds an average blur to the picture that does not make the video look artificial. Thus, this special blur effect adds a natural transition to the videos effortlessly.
Part 3: How to Create Gaussian Blur Effect in Premiere Pro?
Have you ever used Adobe Premiere Pro? This professional and well-trusted platform is widely used to edit high-end videos using advanced options. On this tool, you can open and edit any video file format, such as 8K and virtual reality. You can add engaging intros and outros to your video clip using this industry-leading tool. Moreover, you can create captions for your videos precisely in your desired way.
Adobe Premiere Pro also allows you to color-correct the videos. You can adjust the elements such as saturation, contrast, hue, and brightness. Furthermore, you can add different types of blur effects, including the Gaussian blur effect. You can also add further alterations to your video file by adding text overlays and other graphics elements.
Steps to Add Gaussian Blur Effect Using Premiere Pro
Are you eager to know how to use Adobe Premiere Pro for Gaussian blur? Read this section to find out the authentic yet easy steps to create the Gaussian blur effect using Premiere Pro:
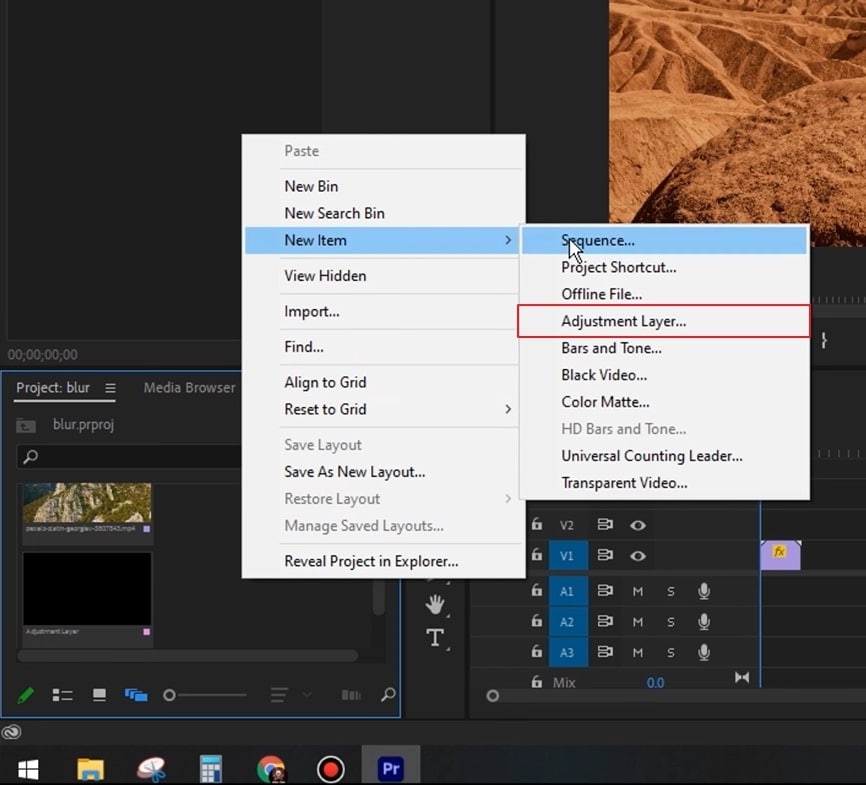
Step1 Proceed to Adobe Premiere Pro tool and upload the video in which you want to add the Gaussian blur effect. Afterward, double-click on the Project Media window and select “New Item.” From there, click on “Adjustment Layer.”
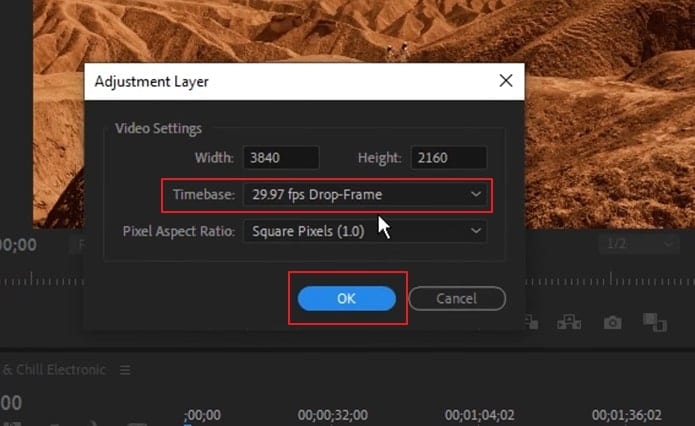
Step2 On the menu of the Adjustment Layer, change the timebase to 60 FPS. Press the “OK” button to proceed. Now add the created adjustment layer to the timeline right above the video clip. Extend it according to the video clip.
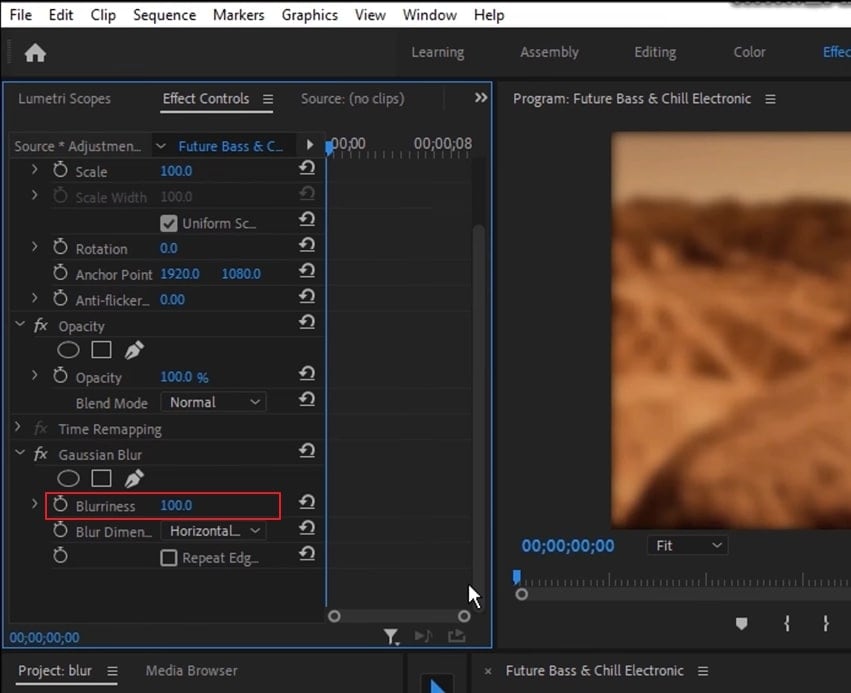
Step3 Now go to the “Effects” section and type “Gaussian” in its search box. From the results, drag and drop the Gaussian blur to the adjustment layer in the timeline. Now you will be able to see the effect controls section on the left side. From there, increase the “Blurriness” to 100%.
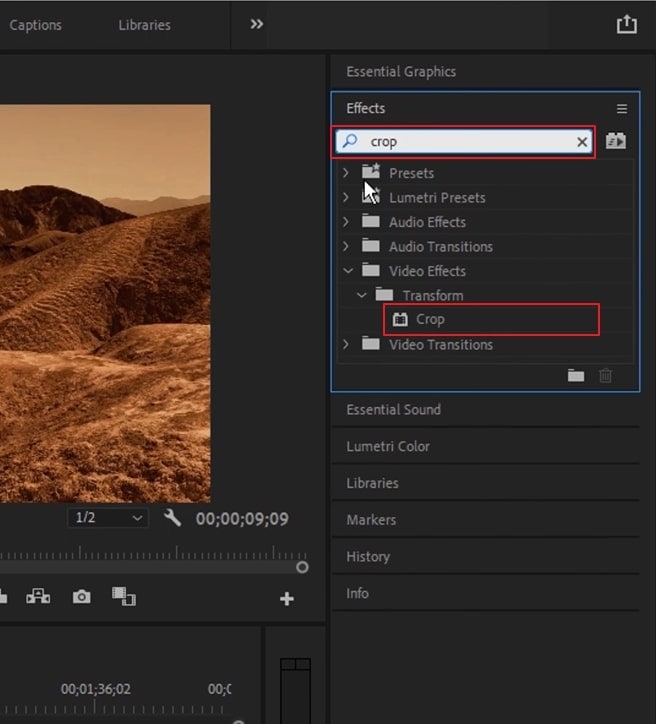
Step4 To create animation, copy your video clip and paste it above the adjustment layer. Head back to the effects section and search for “Crop.” Apply it to the top-most video clip. From the left section, change the “Top” to 0%. Once done, turn on its toggle and move the play head a little bit.
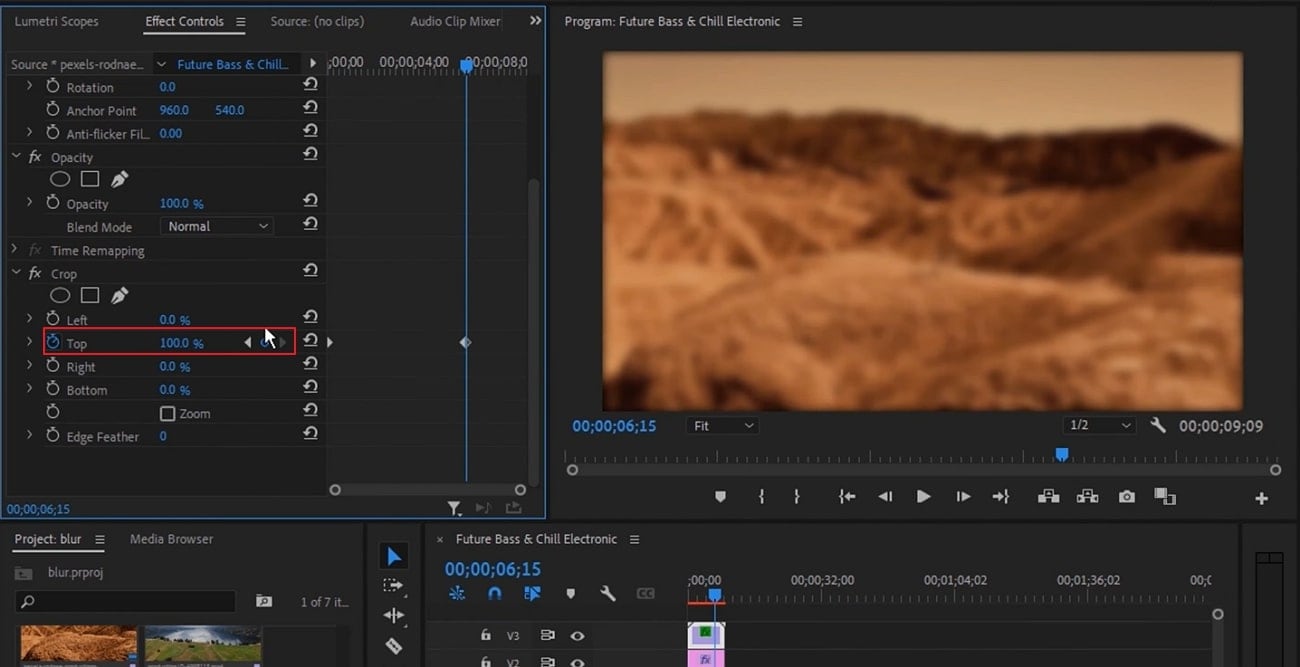
Step5 Add a new keyframe and then change the “Top” to 100%. After rendering the video, you can see the final results in the preview window.
Bonus Tips – The Alternative to Premiere Pro to Create Gaussian Blur Effect
Many beginners may find the interface of Adobe Premiere Pro complicated to use. So, if you want to make the whole process of adding a Gaussian blur simple and smooth, try Wondershare Filmora . This compatible tool consists of various templates that you can use to get inspiration for creating videos. You can also add and sync music tracks to your videos efficiently through this easy-to-use tool.
Free Download For Win 7 or later(64-bit)
Free Download For macOS 10.14 or later
It also contains several kinds of trending effects that can be easily applied to your videos. Also, it does not destroy the original quality of your video. Hence, you should try Filmora, as it has a clean interface that can produce quality results.
Steps to Create Gaussian Blur Effect Using Filmora
Do you want to create Gaussian Blur Effect in your video easily? Read the instructions below for creating it with Filmora:
Step1 Start New Filmora Project
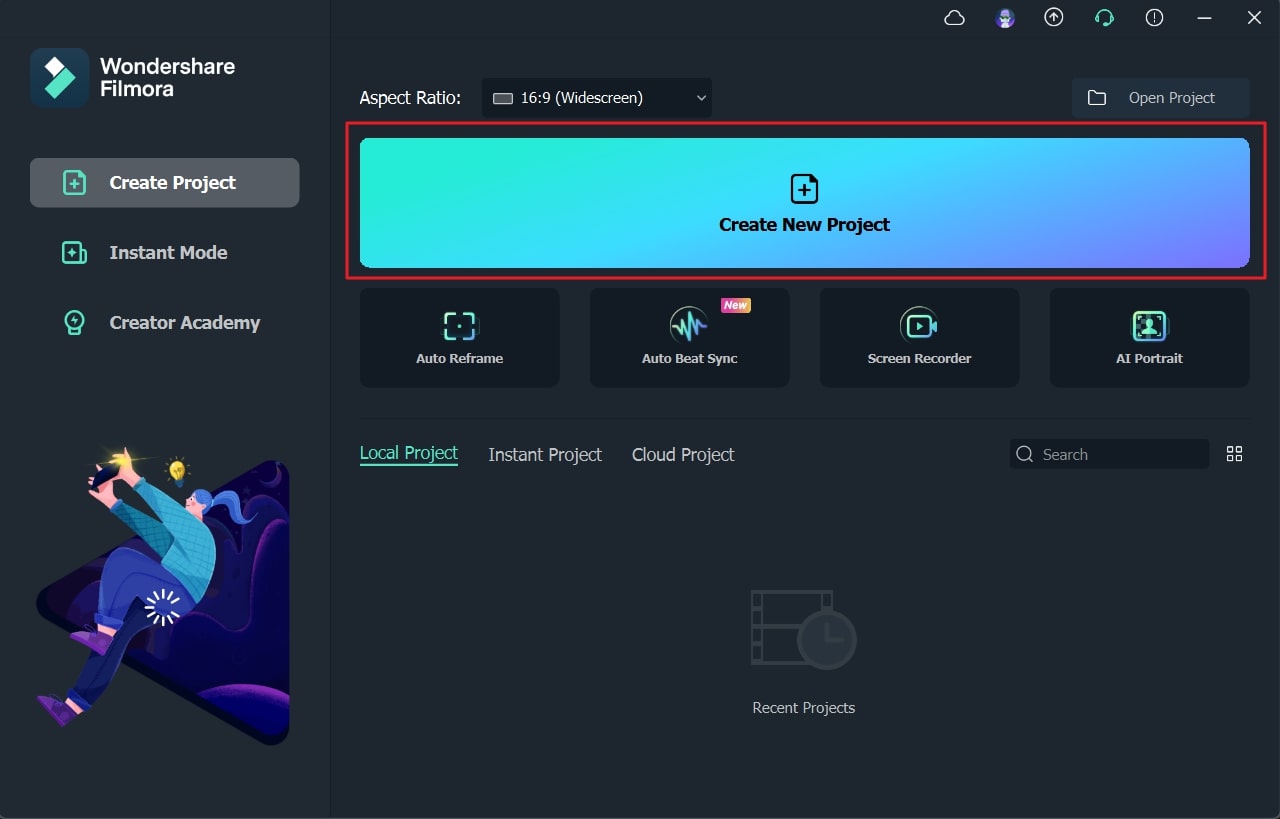
Begin by launching Filmora enhanced video editor on your PC or MacBook. Now click on “Create New Project” and upload the preferred video clip on this tool.
Step2 Search for Square Blur
Following this, drag and drop the imported video on the timeline of Filmora. Afterward, head to the “Effects” tab and search for “Square Blur.” From the results, select Square Blur and apply it to your video clip in the timeline.
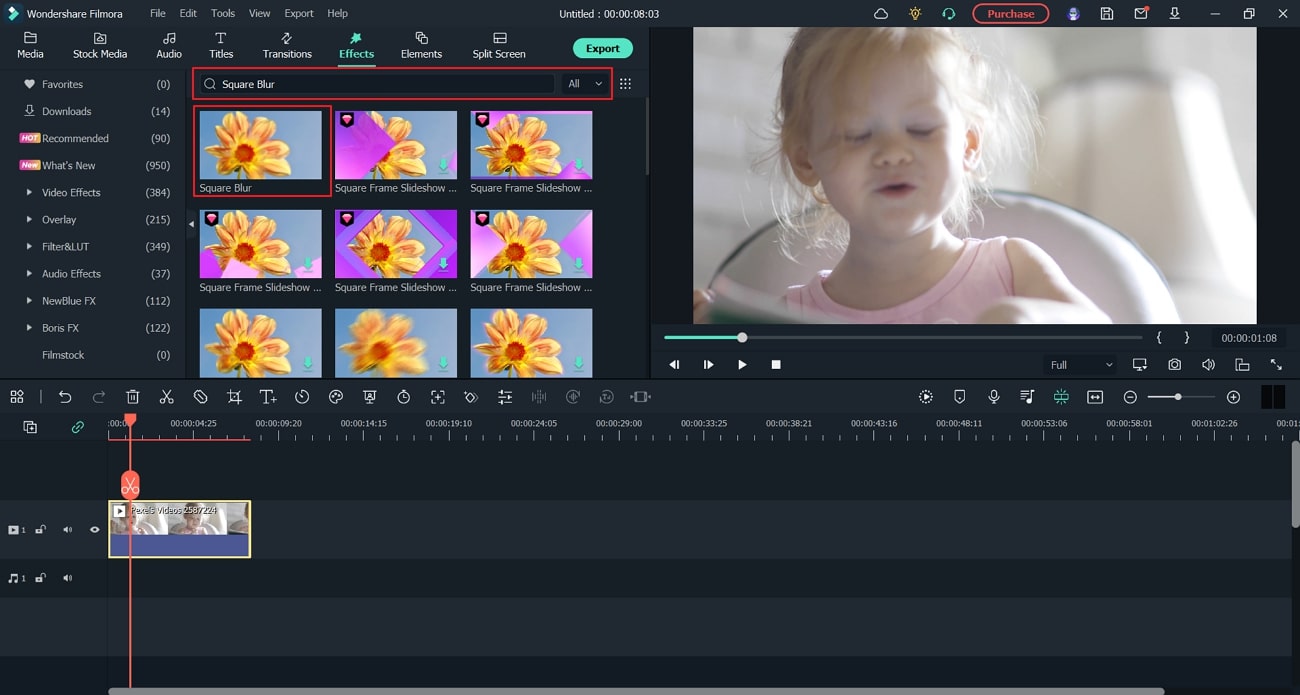
Step3 Adjust the Blur Settings
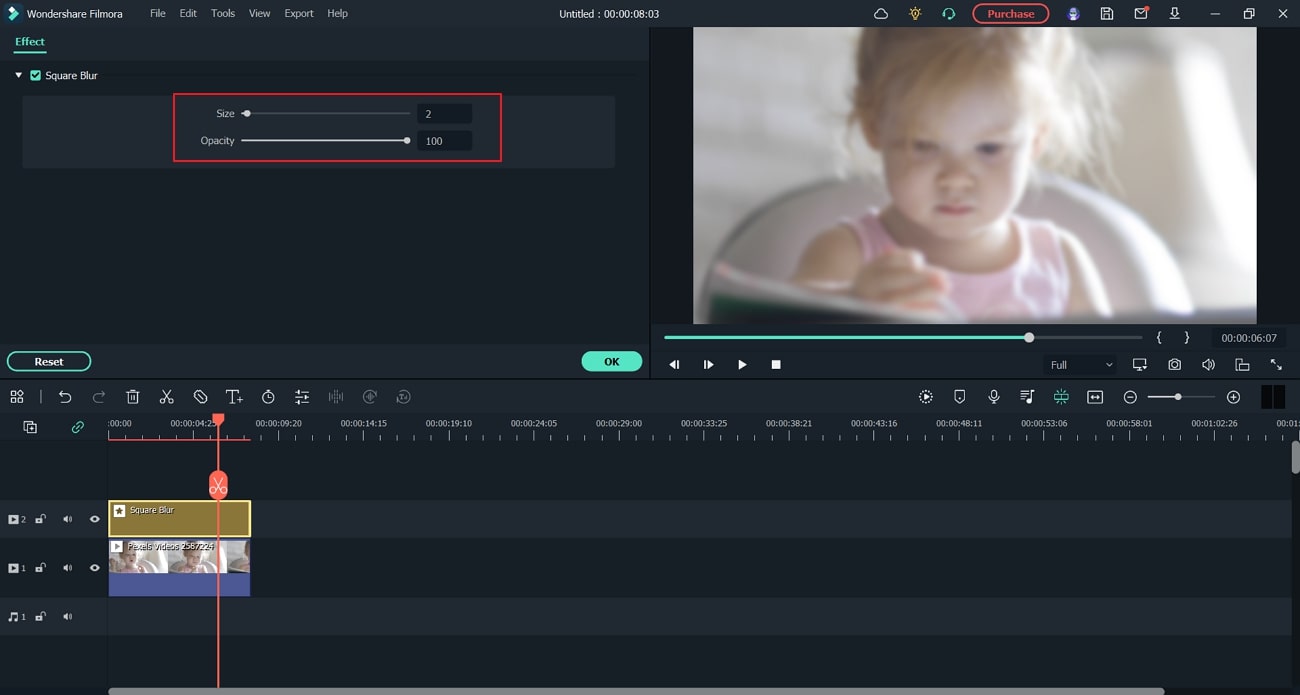
Double-click on the added effect to open its settings. Now you can change the “Opacity” and “Size” according to your preference. Once done, choose the “Export” button to save the video in the desired file format.
Conclusion
Being a professional, you should know the significance of various blur effects. This article has emphasized the Gaussian blur effect that can help you to remove noise from the videos. By reading this article, you can learn how to apply a Gaussian blur effect using Adobe Premiere Pro software. Moreover, we have also discussed Filmora as a better alternative to Adobe Premiere Pro for adding a Gaussian blur effect in the videos.
Free Download For macOS 10.14 or later
It also contains several kinds of trending effects that can be easily applied to your videos. Also, it does not destroy the original quality of your video. Hence, you should try Filmora, as it has a clean interface that can produce quality results.
Steps to Create Gaussian Blur Effect Using Filmora
Do you want to create Gaussian Blur Effect in your video easily? Read the instructions below for creating it with Filmora:
Step1 Start New Filmora Project
Begin by launching Filmora enhanced video editor on your PC or MacBook. Now click on “Create New Project” and upload the preferred video clip on this tool.

Step2 Search for Square Blur
Following this, drag and drop the imported video on the timeline of Filmora. Afterward, head to the “Effects” tab and search for “Square Blur.” From the results, select Square Blur and apply it to your video clip in the timeline.

Step3 Adjust the Blur Settings
Double-click on the added effect to open its settings. Now you can change the “Opacity” and “Size” according to your preference. Once done, choose the “Export” button to save the video in the desired file format.

Conclusion
Being a professional, you should know the significance of various blur effects. This article has emphasized the Gaussian blur effect that can help you to remove noise from the videos. By reading this article, you can learn how to apply a Gaussian blur effect using Adobe Premiere Pro software. Moreover, we have also discussed Filmora as a better alternative to Adobe Premiere Pro for adding a Gaussian blur effect in the videos.
Learn to Use Montage with These Movies
As with many new things in life, Montage isn’t your best friend right off the bat. So, if you want to learn to use montages with movies, they need to be the right ones. If you don’t know what Montage is, it is a way of compressing an action or series of actions into a short amount of time. We look at movies because they are a common type of entertainment everyone has seen before, which makes them easier to understand as a concept.
Using Montage is a great way to create engaging video content. There are many people interested in the topic of Montage, so if you get that video out there, you can easily find an audience. When used in conjunction with YouTube advertising, creating videos about Montage could be an excellent business idea for you.
Learning how to use Montage properly can be challenging. The process isn’t intuitive, and using it can feel like hiding random pieces around your page. But, when you watch the right movies, they can help you understand how to use this tool effectively. So, take some time, check out these movies, and learn how to get the most out of Montage!
What Is A Montage?
The definition of a montage is a “series of short scenes or episodes forming a unified whole.” That definition can lead to different interpretations of a montage and can be applied to any art medium. A “montage” isn’t just for movies. Music artists use montages to tell stories that often describe their emotions and experiences; writers create poetry and prose contained in such an artistic form, and painters often use this art form. However, many people are most familiar with the term associated with movies: a montage is essentially a collection of images or scenes that populate a movie with music.
If you’ve seen any blockbuster Hollywood films in the last ten years, you’ve probably seen some Montage. The Montage is a sequence that takes place over a set period and shows us how the lead character goes from being an ordinary person to an extraordinary one. The difference between these two states is dramatic, so we see so many montages in movies. They are meant to grab your attention and excitingly introduce a character.
Purpose of Montage
Montage movies are made up of a compilation of short yet powerful scenes put together to make one movie or project. Even though these types of movies have become a common genre, there’s a list of reasons why this is popular in movies today.
- Montage has several uses in movies. Of course, Montage can be used to show events such as battles or dancing. It can also describe emotions, including sadness, happiness, and sarcasm. These different uses of Montage do come with their styles, but they all share a few common traits.
- They’re often used to condense periods of storytime into much smaller but more entertaining segments. The word montage is French for “to construct from many parts .”Montages can now be seen everywhere in film and television, from silent films to blockbuster action movies.
- This is frequently used in narratives when the story needs to advance quickly. The characters are going somewhere or doing something else not within the context of the moment in time that represents them. A great example of a montage was used in Rocky when Rocky was training for his fight with Apollo Creed.
- A montage allows filmmakers to explore a theme using several sequential shots that can’t be covered in a single shot.
Learn To Use Montage With These Movies
1. Rocky (1976)
The training montage is popular in cinema. A montage like this helps us follow how the protagonist prepares himself for a life-threatening fight and claims honor in society. Sylvester Stallone plays Robert “Rocky” Balboa, going through the rigorous preparations for his fight. A song by Bill Conti called “Gonna Fly Now” is playing in the background, contributing to the scene’s energy.
Rocky (1976)
2. Scarface (1983)
A fictional Cuban Tony (Al Pacino) becomes a gangster in Brian De Palma’s 1983 film Scarface against the backdrop of the cocaine boom of the 1980s. He is portrayed as a criminal rising to the echelons of the underworld and slowly falling. In this montage sequence, Tony becomes the biggest drug lord in Miami and controls nearly all the cocaine that comes through the city.
Scarface (1983)
3. Goodfellas (1990)
Martin Scorsese’s Goodfellas is a gangster film set in 1950s New York City, one of the best. In it, Irish-Italian Henry Hill (Ray Liotta) is portrayed as he rises through the ranks of the crime branch of his Brooklyn neighborhood. As we watch this Montage, we see Henry and his gang members viciously murdering anyone who stands in their path. This edit is beautifully complemented by Eric Clapton’s “Layla.” voice-over.
Goodfellas (1990)
4. Trainspotting (1996)
Ewan McGregor stars in Danny Boyle’s black comedy, which tells the tale of drug addict Mark Renton (Danny Boyle). Mark tries to get clean and get back on his feet. Despite this, drug enticements and friend influence are major deterrents. Through this introductory Montage, we are introduced to the protagonist’s lifestyle. In addition, the film explores the themes of drug abuse, addiction, and nihilism.
Trainspotting (1996)
5. Run Lola Run (1998)
In his movie Run Lola Run (1998), Tom Tykwer tells the story of Lola (Franka Potente) and Mani (Moritz Bleibtreu) as they face the different possibilities that arise from a single event in their lives. This Montage shows Lola bumping into various people as she begins to sprint. Her encounter has a profound impact on their lives. Through Montage, the film is given a sense of exhilarating pace and multi-layered visual design.
Run Lola Run (1998)
6. Requiem for a Dream (2000)
Hubert Selby Jr.’s titular novel is the source material for Darren Aronofsky’s psychological drama. Four people trapped by their addictions are the focus of the narrative. By watching this Montage, a viewer can get a better sense of the world or the film’s characters. As a result of their drug addictions, four ambitious people will eventually have their dreams dashed. As a result, we gain insight into how addiction takes hold of the characters’ minds and bodies.
Requiem for a Dream (2000)
7. Swades (2004)
Songs have played an integral role in bringing the story of the film to life in the hands of some of India’s most thoughtful filmmakers. Among them is Ashutosh Gowariker. Montage techniques are used to create the title song sequence of his film Swades. The fictional Indian village of Charanpur, where the protagonist Mohan Bhargava (Shahrukh Khan) has lived, is a source of great trauma for the protagonist. As he ends up returning to India, the song signifies his development psychologically.
Swades (2004)
8. Whiplash (2014)
Miles Teller plays Andrew Neiman, a promising young drummer who enrolls in a tough music conservatory. Damien Chazelle directs the film. Terence Fletcher (J. K. Simmons) mentors him, and he is determined to see his students’ dreams come true. Neiman pushes himself to his limits in this Montage, suffering a breakdown as a result. Edited shots and tempo match the visual images to accentuate the protagonist’s mental state.
Whiplash (2014)
9. Gone Girl (2014)
Gillian Flynn’s eponymous novel is the basis for David Fincher’s psychological crime drama. On their fifth wedding anniversary, Amy Elliott Dunne (Rosamund Pike) disappears, and Nicholas Dunne (Ben Affleck) becomes the prime suspect. Amy carefully crafts her new identity in this Montage as we learn she is alive. The Montage ends as Amy sets up her cabin and begins purchasing supplies. After hitting herself with a hammer, the sequence ends.
Whiplash (2014)
10. Parasite (2019)
In Bong Joon-ho’s Oscar-winning dark comedy thriller, the Kim family lives on the edge of poverty. They are suddenly thrown into a world of affluence when a family member gets a job at an affluent family. Moon-Gwang (Lee Jung-Eun) is a long-time housekeeper for the Kim family. The family comes up with a cunning plan to exploit her allergy to peaches. In the closing montage, they convince Mrs. Park (Cho Yeo-Jeong) that Moon-Gwang has tuberculosis.
Whiplash (2014)
Wondershare Filmora11 Express Better
Achieve More
Grow Together
Free Download Free Download Learn More

Summarize:
If you’re thinking about using Montage, check out movies and trailers in the Action and Comedy genres. Keep in mind that finding material that works well with montages is no accident. They are filled with some of the best soundtracks, action scenes, and comedy routines that can help guide your project through its rough spots. Montage can do amazing things for any movie, so it’s important to learn when and where it should be used.
Rocky (1976)
2. Scarface (1983)
A fictional Cuban Tony (Al Pacino) becomes a gangster in Brian De Palma’s 1983 film Scarface against the backdrop of the cocaine boom of the 1980s. He is portrayed as a criminal rising to the echelons of the underworld and slowly falling. In this montage sequence, Tony becomes the biggest drug lord in Miami and controls nearly all the cocaine that comes through the city.
Scarface (1983)
3. Goodfellas (1990)
Martin Scorsese’s Goodfellas is a gangster film set in 1950s New York City, one of the best. In it, Irish-Italian Henry Hill (Ray Liotta) is portrayed as he rises through the ranks of the crime branch of his Brooklyn neighborhood. As we watch this Montage, we see Henry and his gang members viciously murdering anyone who stands in their path. This edit is beautifully complemented by Eric Clapton’s “Layla.” voice-over.
Goodfellas (1990)
4. Trainspotting (1996)
Ewan McGregor stars in Danny Boyle’s black comedy, which tells the tale of drug addict Mark Renton (Danny Boyle). Mark tries to get clean and get back on his feet. Despite this, drug enticements and friend influence are major deterrents. Through this introductory Montage, we are introduced to the protagonist’s lifestyle. In addition, the film explores the themes of drug abuse, addiction, and nihilism.
Trainspotting (1996)
5. Run Lola Run (1998)
In his movie Run Lola Run (1998), Tom Tykwer tells the story of Lola (Franka Potente) and Mani (Moritz Bleibtreu) as they face the different possibilities that arise from a single event in their lives. This Montage shows Lola bumping into various people as she begins to sprint. Her encounter has a profound impact on their lives. Through Montage, the film is given a sense of exhilarating pace and multi-layered visual design.
Run Lola Run (1998)
6. Requiem for a Dream (2000)
Hubert Selby Jr.’s titular novel is the source material for Darren Aronofsky’s psychological drama. Four people trapped by their addictions are the focus of the narrative. By watching this Montage, a viewer can get a better sense of the world or the film’s characters. As a result of their drug addictions, four ambitious people will eventually have their dreams dashed. As a result, we gain insight into how addiction takes hold of the characters’ minds and bodies.
Requiem for a Dream (2000)
7. Swades (2004)
Songs have played an integral role in bringing the story of the film to life in the hands of some of India’s most thoughtful filmmakers. Among them is Ashutosh Gowariker. Montage techniques are used to create the title song sequence of his film Swades. The fictional Indian village of Charanpur, where the protagonist Mohan Bhargava (Shahrukh Khan) has lived, is a source of great trauma for the protagonist. As he ends up returning to India, the song signifies his development psychologically.
Swades (2004)
8. Whiplash (2014)
Miles Teller plays Andrew Neiman, a promising young drummer who enrolls in a tough music conservatory. Damien Chazelle directs the film. Terence Fletcher (J. K. Simmons) mentors him, and he is determined to see his students’ dreams come true. Neiman pushes himself to his limits in this Montage, suffering a breakdown as a result. Edited shots and tempo match the visual images to accentuate the protagonist’s mental state.
Whiplash (2014)
9. Gone Girl (2014)
Gillian Flynn’s eponymous novel is the basis for David Fincher’s psychological crime drama. On their fifth wedding anniversary, Amy Elliott Dunne (Rosamund Pike) disappears, and Nicholas Dunne (Ben Affleck) becomes the prime suspect. Amy carefully crafts her new identity in this Montage as we learn she is alive. The Montage ends as Amy sets up her cabin and begins purchasing supplies. After hitting herself with a hammer, the sequence ends.
Whiplash (2014)
10. Parasite (2019)
In Bong Joon-ho’s Oscar-winning dark comedy thriller, the Kim family lives on the edge of poverty. They are suddenly thrown into a world of affluence when a family member gets a job at an affluent family. Moon-Gwang (Lee Jung-Eun) is a long-time housekeeper for the Kim family. The family comes up with a cunning plan to exploit her allergy to peaches. In the closing montage, they convince Mrs. Park (Cho Yeo-Jeong) that Moon-Gwang has tuberculosis.
Whiplash (2014)
Wondershare Filmora11 Express Better
Achieve More
Grow Together
Free Download Free Download Learn More

Summarize:
If you’re thinking about using Montage, check out movies and trailers in the Action and Comedy genres. Keep in mind that finding material that works well with montages is no accident. They are filled with some of the best soundtracks, action scenes, and comedy routines that can help guide your project through its rough spots. Montage can do amazing things for any movie, so it’s important to learn when and where it should be used.
How to Use LUTs Perfectly in Final Cut Pro
Final Cut Pro is a powerful video editing software available for Mac OS. You can create professional-looking videos using this tool. To give your videos a more professional touch, you can use LUTs as well. It is a quick way to color grade and improve the feel of your media content. They are essentially a set of instructions that apply a particular color grading to your video.
Moreover, with so many options available, you can choose from any color grading style you want. From cinematic to retro, LUTs offer you a variety of color adjustment tones and overlays. All you have to do is to choose from free LUTs for Final Cut Pro and download your preferred one.
- Part 2: How to Apply LUTs on Final Cut Pro
- Part 3: Discussing Wondershare Filmora LUTs - The Best Video Editing Platform
Part 1: Discovering The Top Best LUTs for FCPX
You are at the right place if you’re having trouble finding the best LUTs for FCPX. This section will provide you with one of the best LUTs you can choose for your videos.
1.Free Cinematic LUTs Pack for Video Editing
This free LUT pack is a perfect choice to give your videos a cinematic look. It features a soft blue color grading with high contrast that can make your footage look like it was shot on film. This LUT is especially effective for outdoor scenes and action shots. Moreover, its color grading enhances the drama and feel of your video footage.

2.10 Free Vintage Color Presets for Final Cut Pro
10 Free Vintage Color Presets for Final Cut Pro is a great pack if you’re looking for a vintage or retro feel. It has a warm, yellowish color grading that can give your videos a nostalgic look. This pack is ideal for footage shot in the 70s, 80s, or 90s. It highlights the muddiness and brown shades in your video to add a touch of authenticity to it.

3. Perfect Green Video LUT
Perfect Green Video LUT is a pack of 3 cinematic-style LUTs. This pack is ideal for travel or nature videos as it increases the green tone in your videos. It has a lush, green color grading that can make your videos look vibrant and lively. Additionally, this pack is effective for outdoor scenes as it improves your video’s natural colors and makes it look more dynamic.

4. Cyberpunk Color Grades
Cyberpunk Color Grades is a pack of modern cyberpunk-style LUTs. It is a fantastic LUT pack if you’re working on a music video or a creative project. It has a bold, colorful grading with high saturation that can make your video stand out. This LUT pack is perfect for scenes with many neon lights or bright backgrounds. Moreover, it adds an extra pop of color and makes your videos look more energetic.

5. Pro Retouching Essentials Pack by Prince Meyson
Prince Meyson offers this skin tone enhancer LUT pack. It has a neutral, balanced color grading that can make your videos look more polished and professional. This LUT is ideal for interviews, documentaries, or corporate videos. Moreover, this pack is perfect for portraits and close-up shots. It can enhance the natural colors of your footage and make it look more refined.

Part 2: How to Apply LUTs on Final Cut Pro
Now that you’ve discovered there are many Final Cut Pro LUTs free to download. The most important thing is to learn how to use these free LUTs on your video using FCPX. Here are some methods to learn to apply LUTs using Final Cut Pro in simple steps.
Method 1 Using Custom Layer
Step1
Open Final Cut Pro and import your video. Once the video is imported, click on the clip you want to apply the LUT.

Step2
Go to the “Effect Browser” and search for the LUT option from the search menu. After selecting it, you will get a “Custom LUT” layer. Select the custom LUT layer and drag and drop it onto your video clip. Then, click on the video clip and go to the “Inspector” window.

Step3
Select the “Custom LUT” option in the inspector window and choose your desired LUT from the LUT drop-down menu. Final Cut Pro will apply your desired LUT to your video clip.

Method 2 Using Adjustment Layer
Step1
Click the plugin button once you’ve imported your video clip and choose RT Adjustment Layer. Furthermore, if you don’t have this plugin, you can download it for free.

Step2
An icon will appear once you’ve selected RT Adjustment Layer. Drag and drop this icon on top of your video clip.

Step3
Drag and drop the “Custom LUT” layer onto your RT Adjustment Layer from the Effect Browser. Click on the RT Adjustment Layer and choose your desired LUT from the “Inspector” menu.

Method 3 Change Settings To Enable LUTs
Step1
Import your video into Final Cut Pro and click on your video in the library and open the inspector window.

Step2
In the section of the “Inspector” menu, click the drop-down menu and select the “General” option. It will open up new options in the menu where you have to choose the “Camera LUT” option and select your preferred LUT. After selecting your LUT, save your video by choosing the option.

Part 3: Discussing Wondershare Filmora LUTs - The Best Video Editing Platform
If you’re looking for a great video editing tool, Wondershare Filmora might be just what you need. With many features embedded in it, it makes it easy to create professional-looking videos. Moreover, you can apply LUTs to add a cinematic touch to your footage. With over 200+ LUTs available, you can improve the color grading of your videos. Additionally, this tool allows you to adjust its intensity as well.
Furthermore, Wondershare Filmora offers options for color adjustments and enhancements. You can add transitions, templates, effects, and filters to your videos. In addition to this, it offers over 10 billion free media assets that you can use to enhance your videos. With Wondershare Filmora, you can play around with different features and options to make your content look fantastic.

Empower your videos with a new mood using different LUTs. Filmora now offers 100+ top-quality 3D LUTs cover a broad range of scenarios. Transform your videos with Filmora’s powerful 3D LUTs.
Apply LUT on Videos Apply LUT on Videos Learn More

Conclusion
In conclusion, Final Cut Pro is a powerful tool for video editing. This tool allows you to make color corrections and color adjustments to your videos. Furthermore, Final Cut Pro offers the option to use LUTs for color grading. You can find many best LUTs for FCPX available online to use in this tool. However, Wondershare Filmora is another amazing tool that you use to color-grade your videos professionally.
Part 1: Discovering The Top Best LUTs for FCPX
You are at the right place if you’re having trouble finding the best LUTs for FCPX. This section will provide you with one of the best LUTs you can choose for your videos.
1.Free Cinematic LUTs Pack for Video Editing
This free LUT pack is a perfect choice to give your videos a cinematic look. It features a soft blue color grading with high contrast that can make your footage look like it was shot on film. This LUT is especially effective for outdoor scenes and action shots. Moreover, its color grading enhances the drama and feel of your video footage.

2.10 Free Vintage Color Presets for Final Cut Pro
10 Free Vintage Color Presets for Final Cut Pro is a great pack if you’re looking for a vintage or retro feel. It has a warm, yellowish color grading that can give your videos a nostalgic look. This pack is ideal for footage shot in the 70s, 80s, or 90s. It highlights the muddiness and brown shades in your video to add a touch of authenticity to it.

3. Perfect Green Video LUT
Perfect Green Video LUT is a pack of 3 cinematic-style LUTs. This pack is ideal for travel or nature videos as it increases the green tone in your videos. It has a lush, green color grading that can make your videos look vibrant and lively. Additionally, this pack is effective for outdoor scenes as it improves your video’s natural colors and makes it look more dynamic.

4. Cyberpunk Color Grades
Cyberpunk Color Grades is a pack of modern cyberpunk-style LUTs. It is a fantastic LUT pack if you’re working on a music video or a creative project. It has a bold, colorful grading with high saturation that can make your video stand out. This LUT pack is perfect for scenes with many neon lights or bright backgrounds. Moreover, it adds an extra pop of color and makes your videos look more energetic.

5. Pro Retouching Essentials Pack by Prince Meyson
Prince Meyson offers this skin tone enhancer LUT pack. It has a neutral, balanced color grading that can make your videos look more polished and professional. This LUT is ideal for interviews, documentaries, or corporate videos. Moreover, this pack is perfect for portraits and close-up shots. It can enhance the natural colors of your footage and make it look more refined.

Part 2: How to Apply LUTs on Final Cut Pro
Now that you’ve discovered there are many Final Cut Pro LUTs free to download. The most important thing is to learn how to use these free LUTs on your video using FCPX. Here are some methods to learn to apply LUTs using Final Cut Pro in simple steps.
Method 1 Using Custom Layer
Step1
Open Final Cut Pro and import your video. Once the video is imported, click on the clip you want to apply the LUT.

Step2
Go to the “Effect Browser” and search for the LUT option from the search menu. After selecting it, you will get a “Custom LUT” layer. Select the custom LUT layer and drag and drop it onto your video clip. Then, click on the video clip and go to the “Inspector” window.

Step3
Select the “Custom LUT” option in the inspector window and choose your desired LUT from the LUT drop-down menu. Final Cut Pro will apply your desired LUT to your video clip.

Method 2 Using Adjustment Layer
Step1
Click the plugin button once you’ve imported your video clip and choose RT Adjustment Layer. Furthermore, if you don’t have this plugin, you can download it for free.

Step2
An icon will appear once you’ve selected RT Adjustment Layer. Drag and drop this icon on top of your video clip.

Step3
Drag and drop the “Custom LUT” layer onto your RT Adjustment Layer from the Effect Browser. Click on the RT Adjustment Layer and choose your desired LUT from the “Inspector” menu.

Method 3 Change Settings To Enable LUTs
Step1
Import your video into Final Cut Pro and click on your video in the library and open the inspector window.

Step2
In the section of the “Inspector” menu, click the drop-down menu and select the “General” option. It will open up new options in the menu where you have to choose the “Camera LUT” option and select your preferred LUT. After selecting your LUT, save your video by choosing the option.

Part 3: Discussing Wondershare Filmora LUTs - The Best Video Editing Platform
If you’re looking for a great video editing tool, Wondershare Filmora might be just what you need. With many features embedded in it, it makes it easy to create professional-looking videos. Moreover, you can apply LUTs to add a cinematic touch to your footage. With over 200+ LUTs available, you can improve the color grading of your videos. Additionally, this tool allows you to adjust its intensity as well.
Furthermore, Wondershare Filmora offers options for color adjustments and enhancements. You can add transitions, templates, effects, and filters to your videos. In addition to this, it offers over 10 billion free media assets that you can use to enhance your videos. With Wondershare Filmora, you can play around with different features and options to make your content look fantastic.

Empower your videos with a new mood using different LUTs. Filmora now offers 100+ top-quality 3D LUTs cover a broad range of scenarios. Transform your videos with Filmora’s powerful 3D LUTs.
Apply LUT on Videos Apply LUT on Videos Learn More

Conclusion
In conclusion, Final Cut Pro is a powerful tool for video editing. This tool allows you to make color corrections and color adjustments to your videos. Furthermore, Final Cut Pro offers the option to use LUTs for color grading. You can find many best LUTs for FCPX available online to use in this tool. However, Wondershare Filmora is another amazing tool that you use to color-grade your videos professionally.
How to DIY VHS Overlay in After Effects?
The 90s generation is familiar with Video Home System video. Today, Moviemakers use VHS static overlay to give their videos an antique and vintage look.
The VHS glitch overlay has become increasingly popular as it changes the video’s theme, tone, and whole look. Let’s see how we can add DIY VHS overlay in after effects-
Part 1:Step by Step DIY VHS Overlay in After Effects?
The retro “VHS Look” has become relatively trendy in recent years. The memories associated with the popular VHS trend has helped the trend make a comeback. Creating this effect in After Effects may seem to be a complicated process if you have not tried it before. But we have made it easier for you to add VHS overlay in Adobe After Effects. Follow the steps to add it in after effects-
Before you begin, download and install VHS preset if you haven’t already. Remember that VHS preset only works with After Effects CC 2018 and up. So, make sure you have the recent version of After Effects or the one not older than the 2018 version.
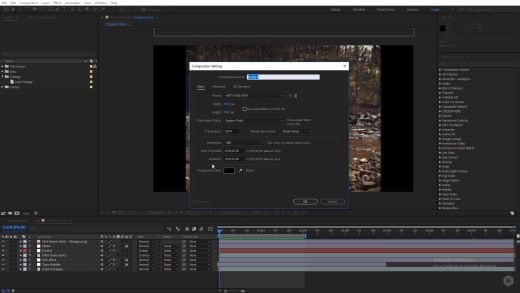
Step 1: To create a VHS look on your video, drop any video of your choice into the project panel and give it a name, let’s say, “VCR static overlay”. Set the width and height to 1920 and 1080 px, respectively.
Step 2: Right-click on your video and select New Comp from Selection. Drag your video to a new composition and then go to Lumetri Color < Basic Correction. Add some contrast. You can set it to 50 or any other number of your choice. Then bring the white level down to -55.
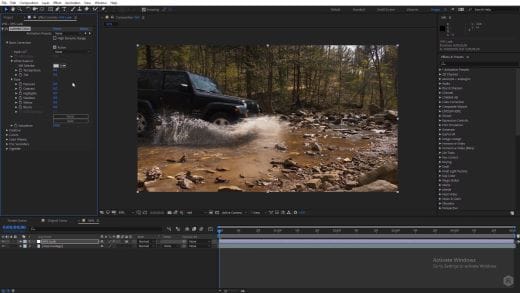
Then open the Creative tab. Increase the faded film to 40. Set sharpening to -70. Bring vibrance to -30.
Note: Here, I changed the number to get the effect I wanted. You can change the numbers and set the values as per your requirements.
Now, click on the Curves option. Drag down the white curve and then align it with the original curve. Move the green curve up a bit and bring down the blue curve. Then comes the Vignette tab. Open it and set the number to -1.
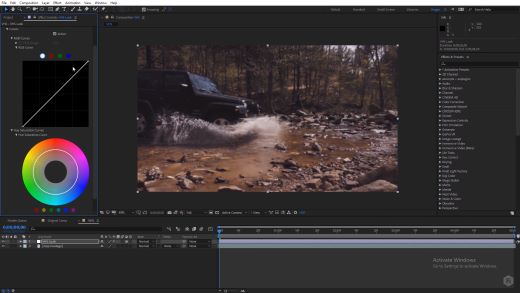
Step 3: Now, we will give our video a subtle RGB spit appearance. For that, we need to use the Channel Blur effect twice. First, go to Effect < Blur & Sharpen < Channel Blur. Set red blurriness to 20. Turn on the repeat edge pixels. Then change the Blur Dimensions from horizontal and vertical to vertical.
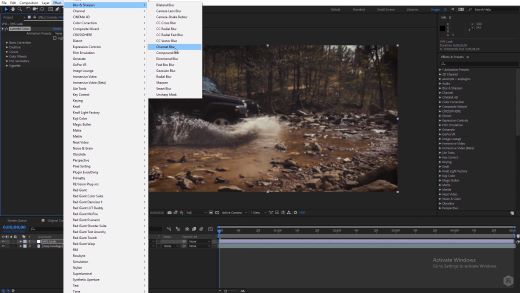
Step 4: Again, go to Effect < Blur & Sharpen < Channel Blur. Set blue blurriness to 30. Repeat the process of checking the repeat edge pixels box. Change the Blue Dimensions from horizontal and vertical to horizontal.
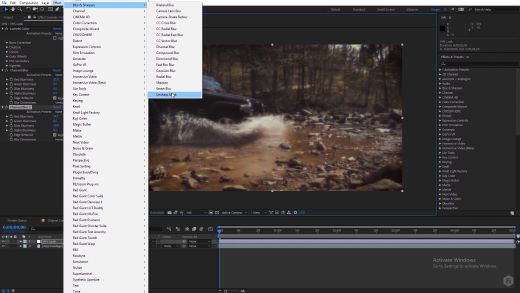
Step 5: Next comes giving the video artificial sharpening look using Unsharp Mask. So, go to Effect < Blur & Sharpen < Unsharp Mask. Under the Unmask Mask menu, set the amount to 100 and the radius to 10.
Step 6: To add a font to your video, simply search VHS font on Google. Look for the one you want to use in your video and download it. To give your video that authentic VHS-style look, we suggest downloading free VCR OSD Mono font and installing the font on your system.
Step 7: Go to Layer < New < Solid and choose any color. We chose white. Now, under Effects & Presets, search for a number. Drag it to the white solid. Choose the font VCR OSD Mono. You can change the number to time or date. You can also add time manually. Select the text tool, go to the source text, hold alt, and click on the stopwatch. Write “timeToCurrentFormat() and time will be displayed on the video. Let us say we want to see the date on the video instead of time. So, change the time to date. Drag the date to the bottom right of the video to give it the look of an old VHS tape.
If you are a beginner and want a simple VHS effect, you can follow these easy steps and create the VHS video that will transport you back to the 90s.
BONUS TIP: How to Add VHS Overlays and Glitch Effects to Make Retro Videos in Filmora Video Editor?
Do you remember the look of the VHS and miss it? You can bring your memories back! With Wondershare Filmora, you can add this effect easily to your videos. Adding a VHS overlay transparent brings drama and creates an atmosphere of distortion. It can significantly change the appearance and feel of your video.
So, if you want to create professional-looking VHS overlay free, the only thing you need is Filmora video editing software . Filmora allows you to add three different overlay VHS effects that you can use along with other overlays to create retro videos.
For Win 7 or later (64-bit)
For macOS 10.12 or later
Do you want to add retro videos on Filmora? It is simple!
To create a VHS overlay video, you should first download the Filmora app for free if you haven’t! Let’s learn how the effect can transform your video. You will have to choose various effects and values to get the final VHS overlay video. These effects can be added to any lyric video, intro, outro, and many others.
Let’s look at the steps:
Open your draft in Filmora software and select sample colors from the Media tab on the top left.
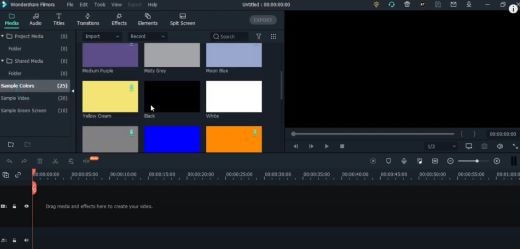
You can drag and drop the photo on a track on the timeline. Then adjust the trim handles to change the duration to match the section of the video to be transformed.
In sequence, add these three overlays by dragging them from the Effects panel at the top to their own individual tracks on the timeline: VHS Distortion Bad (alpha = 25), VHS Distortion (alpha = 35), and VHS Rewind (alpha = 10).
You can also add effects like Strong Glitch, Chromatic Aberration, Glitch Distortion, Distort, etc., to enhance the vintage look of the video.
When finished, click export and choose the format and target folder to save the processed file with the added effects.
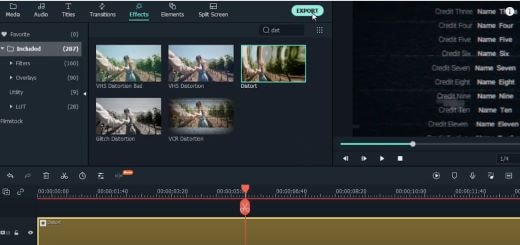
The smart generation has access to HD videos and high-tech devices, yet VHS is an exciting concept for them. The videos created with this effect resemble those from the 90s era. You have to customize everything when you add a VHS effect, including the title, background noise, overlay, and credits.
By choosing a video-editing software like Wondershare Filmora, users can make such videos and add retro glitch overlay professionally. You can also access Filmstock to download any video effects, stock media, templates, or sound effects for Filmora.
Conclusion
Video editing is now easy and fun. The trend of VCR overlay is now back as VHR overlay. With Wondershare Filmora, you can easily create classic videos with 90’s effects. Take your video editing to the next big level with Filmora Video Editor. We can help you make the best use of this tool to create glitch effect videos and add a VHS tape overlay.
Versatile Video Editor - Wondershare Filmora
An easy yet powerful editor
Numerous effects to choose from
Detailed tutorials provided by the official channel
For macOS 10.12 or later
Do you want to add retro videos on Filmora? It is simple!
To create a VHS overlay video, you should first download the Filmora app for free if you haven’t! Let’s learn how the effect can transform your video. You will have to choose various effects and values to get the final VHS overlay video. These effects can be added to any lyric video, intro, outro, and many others.
Let’s look at the steps:
Open your draft in Filmora software and select sample colors from the Media tab on the top left.

You can drag and drop the photo on a track on the timeline. Then adjust the trim handles to change the duration to match the section of the video to be transformed.
In sequence, add these three overlays by dragging them from the Effects panel at the top to their own individual tracks on the timeline: VHS Distortion Bad (alpha = 25), VHS Distortion (alpha = 35), and VHS Rewind (alpha = 10).
You can also add effects like Strong Glitch, Chromatic Aberration, Glitch Distortion, Distort, etc., to enhance the vintage look of the video.
When finished, click export and choose the format and target folder to save the processed file with the added effects.

The smart generation has access to HD videos and high-tech devices, yet VHS is an exciting concept for them. The videos created with this effect resemble those from the 90s era. You have to customize everything when you add a VHS effect, including the title, background noise, overlay, and credits.
By choosing a video-editing software like Wondershare Filmora, users can make such videos and add retro glitch overlay professionally. You can also access Filmstock to download any video effects, stock media, templates, or sound effects for Filmora.
Conclusion
Video editing is now easy and fun. The trend of VCR overlay is now back as VHR overlay. With Wondershare Filmora, you can easily create classic videos with 90’s effects. Take your video editing to the next big level with Filmora Video Editor. We can help you make the best use of this tool to create glitch effect videos and add a VHS tape overlay.
Versatile Video Editor - Wondershare Filmora
An easy yet powerful editor
Numerous effects to choose from
Detailed tutorials provided by the official channel
For macOS 10.12 or later
Do you want to add retro videos on Filmora? It is simple!
To create a VHS overlay video, you should first download the Filmora app for free if you haven’t! Let’s learn how the effect can transform your video. You will have to choose various effects and values to get the final VHS overlay video. These effects can be added to any lyric video, intro, outro, and many others.
Let’s look at the steps:
Open your draft in Filmora software and select sample colors from the Media tab on the top left.

You can drag and drop the photo on a track on the timeline. Then adjust the trim handles to change the duration to match the section of the video to be transformed.
In sequence, add these three overlays by dragging them from the Effects panel at the top to their own individual tracks on the timeline: VHS Distortion Bad (alpha = 25), VHS Distortion (alpha = 35), and VHS Rewind (alpha = 10).
You can also add effects like Strong Glitch, Chromatic Aberration, Glitch Distortion, Distort, etc., to enhance the vintage look of the video.
When finished, click export and choose the format and target folder to save the processed file with the added effects.

The smart generation has access to HD videos and high-tech devices, yet VHS is an exciting concept for them. The videos created with this effect resemble those from the 90s era. You have to customize everything when you add a VHS effect, including the title, background noise, overlay, and credits.
By choosing a video-editing software like Wondershare Filmora, users can make such videos and add retro glitch overlay professionally. You can also access Filmstock to download any video effects, stock media, templates, or sound effects for Filmora.
Conclusion
Video editing is now easy and fun. The trend of VCR overlay is now back as VHR overlay. With Wondershare Filmora, you can easily create classic videos with 90’s effects. Take your video editing to the next big level with Filmora Video Editor. We can help you make the best use of this tool to create glitch effect videos and add a VHS tape overlay.
Versatile Video Editor - Wondershare Filmora
An easy yet powerful editor
Numerous effects to choose from
Detailed tutorials provided by the official channel
For macOS 10.12 or later
Do you want to add retro videos on Filmora? It is simple!
To create a VHS overlay video, you should first download the Filmora app for free if you haven’t! Let’s learn how the effect can transform your video. You will have to choose various effects and values to get the final VHS overlay video. These effects can be added to any lyric video, intro, outro, and many others.
Let’s look at the steps:
Open your draft in Filmora software and select sample colors from the Media tab on the top left.

You can drag and drop the photo on a track on the timeline. Then adjust the trim handles to change the duration to match the section of the video to be transformed.
In sequence, add these three overlays by dragging them from the Effects panel at the top to their own individual tracks on the timeline: VHS Distortion Bad (alpha = 25), VHS Distortion (alpha = 35), and VHS Rewind (alpha = 10).
You can also add effects like Strong Glitch, Chromatic Aberration, Glitch Distortion, Distort, etc., to enhance the vintage look of the video.
When finished, click export and choose the format and target folder to save the processed file with the added effects.

The smart generation has access to HD videos and high-tech devices, yet VHS is an exciting concept for them. The videos created with this effect resemble those from the 90s era. You have to customize everything when you add a VHS effect, including the title, background noise, overlay, and credits.
By choosing a video-editing software like Wondershare Filmora, users can make such videos and add retro glitch overlay professionally. You can also access Filmstock to download any video effects, stock media, templates, or sound effects for Filmora.
Conclusion
Video editing is now easy and fun. The trend of VCR overlay is now back as VHR overlay. With Wondershare Filmora, you can easily create classic videos with 90’s effects. Take your video editing to the next big level with Filmora Video Editor. We can help you make the best use of this tool to create glitch effect videos and add a VHS tape overlay.
Versatile Video Editor - Wondershare Filmora
An easy yet powerful editor
Numerous effects to choose from
Detailed tutorials provided by the official channel
Also read:
- [Updated] 2024 Approved Premium Designers Stellar Instagram HLV Page Builders
- [Updated] Cost-Effective Audio Equipment for Newcomers
- [Updated] In 2024, Instant Inspector - Quick Photo Explorer for Win10
- Dive Into High Definition FB Streaming in 1080P for 2024
- Easy Guide to Zoom Video in VLC
- EasyHDR Review Is This a Good Choice to Create HDR for 2024
- Full-Spectrum Data Salvage System: Next-Level Technical Assistance for Complete Data Recovery
- How to Make a Bokeh Effect for 2024
- How To Teleport Your GPS Location On Xiaomi Redmi Note 13 Pro 5G? | Dr.fone
- In 2024, 10 Best Fake GPS Location Spoofers for Vivo Y27s | Dr.fone
- In 2024, Video Conversion Wizardry From Youtube to IGTV
- New Create Chroma Key Written Text Effects in Filmora
- New Easily Combine Videos and Audios with 5 Simple Online Tools for 2024
- New How To Split Screen On Tiktok
- Professional Grau GmbH Hardware & Software Fixes for Seamless Video Recovery
- The Finest Places to Source High-Quality Vectors
- Tips to Address Steam's File Privilege Problem in Win11
- Updated Easy Way to Create a DIY Green Screen Video Effect
- YL Software Reviews: How To Boost Your Computer’s Speed Like Never Before!
- Title: Updated In 2024, How to Apply Gaussian Blur Effect to Videos In Premiere Pro?
- Author: Chloe
- Created at : 2025-02-24 17:02:56
- Updated at : 2025-03-04 04:13:16
- Link: https://ai-editing-video.techidaily.com/updated-in-2024-how-to-apply-gaussian-blur-effect-to-videos-in-premiere-pro/
- License: This work is licensed under CC BY-NC-SA 4.0.


