
:max_bytes(150000):strip_icc():format(webp)/snork-fa65ca350e2243e1a2deaf6bb7b209b1.jpg)
Updated In 2024, How to Apply Video Filters
How to Apply Video Filters
In the digital age, video editing has become an increasingly popular way for people to express themselves. Technological advances make it easy to apply video filters and effects. In this article, we will find how you can use iPhone video filters, AI video filter, and cartoon video filter in 2024 through filmora quickly and easily. We will discuss the latest version of Filmora – one of the most influential and user-friendly video editors today.
Part 1 Apply Video Filters on Mobile Devices
Applying video filters on mobile devices is a simple process that can significantly enhance the overall look of your videos.
Step1: Download Filmora in the app store
First, you must download a video editing app with different filters. One popular option is Filmora, which can be found in the app store.
Step2: Import your videos
Once you have downloaded the app, you can begin importing your videos. It can typically do this by selecting the “Import” option within the app and choosing the desired videos from your library. You may also record videos directly within the app if desired.
Step3: Add video filter effects
After importing your videos, you can start adding video filter effects. Filmora and similar apps typically offer various filters, such as vintage, black and white, or cinematic effects. To apply a filter, select the desired effect and adjust any accompanying settings to achieve the desired look.
With a few easy and quick taps on your mobile device, you can transform your video filters for iPhone to create visually stunning content.
Part 2 Apply Video Filters on Desktop
To apply video filters on your desktop, you can follow these steps using the software Filmora
Create AI Filter For Win 7 or later(64-bit)
Create AI Filter For macOS 10.14 or later
Step 1: Download Filmora
Start by downloading and installing the Filmora software onto your desktop. This software provides a range of video editing tools, including video filters.
Step 2: Import your videos
Open Filmora and import the videos you want to apply filters to. You can do this by clicking the “Import” button and selecting the video files from your computer.
Step 3: Add video filter effects in 2 ways
Filmora offers two main ways to add video filters to your footage.
1. Add filters in the Effects panel
First, you can add filters in the Effects panel. To do this, select the video clip you want to apply a filter to and click on the “Effects” tab in the upper-left corner.
Please browse through the available filters and click on one to apply it to your video. You can preview the effects in real-time and adjust the intensity or other settings.
2. Add luts and presets in the Color panel
Second, add LUTs (Look-Up Tables) and presets in the Color panel. LUTs are predefined color grading settings that can give your videos a specific look or style. Select the video reel and click the “Color” tab to add a LUT or preset.
Then, click the “LUT” or “Presets” button and choose the desired effect from the available options. Like the Effects panel, you can adjust the settings to customize the product further.
Following these steps, you can easily apply video filters to your footage using Filmora on your desktop. Explore the various options and experiment with different effects to amplify the visual appeal of your videos.
Summary
In the modern digital era, Filmora will be the best video filter editor, thanks to its intuitive interface and comprehensive feature set designed specifically for beginners and professionals! Whether looking to add a subtle touch of personalization to stand out amongst the crowd or simply wanting to enhance the overall quality of production being worked no matter the, rest assured that you are capable of doing the same without breaking the sweat and effort expended hereinabove described stepwise fashion!
How to Loop Video in Canva
Looping a video is a great way to make your content stand out from the competition. The looped video will repeat the same section of the video, which gives it an eerie feeling like an old-timely music box. For example, if you are creating a series of videos about a product launch, you could use loops to create anticipation for when the product will be available.
You can use this feature on Canva to create an eye-catching looped video that you can use in your social media posts and ads. It is great if you need to use a video in your project, but don’t have time to do the editing. In this article, we’ll walk you through how to Loop a video on Canva.
Part 1: How to Loop Video in Canva
Canva is a great video editing tool that allows users to create stunning videos. It has a simple interface that makes it easy to use even for beginners. Looping a video is a great way to make your content more engaging. You can add a looping effect to any video, whether it’s yours or one you find online. Creating the looping video is super easy!
Canva is a great way to create custom designs for your business. It’s also a great way to make a video for your brand. The looping feature in Canva is a great way to create more engaging infographics. By using this feature, you can create a custom loop, which allows you to create an infographic that repeats itself in the same or different sizes.
Step 1: Create an account on Canva and select the video:
Log in to Canva and click on “Create a design”. Import your video into Canva. You can find the import button on the right side of the screen when you’re editing a new project or opening an existing project by clicking “Open.”, then click on the “Add Video” button. The new video will appear underneath your other assets.

Step 2: Choose the “Present” option by clicking on Share:
Click on the drop-down arrow next to the title bar and select “Present” from the list of available options. Then you can select the feature of Present that how your video will appear in front of you or your audience.

Step 3: Loop your video by choosing the feature “Start auto play”:
A new window will pop up and allow you to customize where in your project this loop will be placed: by default, it will start at 0 seconds and play until it reaches 500 seconds; however, you can change this if needed!

Why should we need the Loop video in Canva?
If you’re looking for a way to make your video stand out from the crowd, then you’ve come to the right place! Here are three ways that you can use looping videos in Canva software to create a more compelling piece of content.
- It adds more value to your content because viewers can watch it over and over again without having to do anything else.
- It helps attract new viewers because they’ll feel compelled to watch the whole thing or at least take action after watching part of it (like clicking on a button).
- It increases retention rates because people will remember something much better than just a static image or text string because there’s movement involved in each frame of the image.
Part 2: Alternative Way to Loop a Video
If you’re using a video editing software like Adobe Premiere or Final Cut Pro, it is likely that you have seen the generic technique of looping a video is by splitting it in two and pasting it together again. What if you need to put on repeat just one individual cut? This is where Filmora steps in! It is a handy tool for trimming and adding clips into your recordings.
The Filmora software can be used to quickly create continual sequences of any duration, irrespective of how long the footage is. It makes possible to synchronize sound and video clips, splice them into one another, and even add titles and motion graphics for a special effect. If you utilize Filmora, you do not need to be an expert in video editing to make professional-looking results. Let us explore why Filmora is necessary for video editing.
Filmora is a video editing software that allows you to make professional-looking videos from your footage. It has a loop feature that lets you create seamless loops where each clip in the sequence plays over and over until you stop it. This can be useful for creating music videos, for example, or for creating small clips that loop seamlessly through the whole video.
The loop feature in Filmora software is a great way to put your video editing skills to the test. It allows you to edit a clip of any length and then play it back over and over again, which can be useful when you’re looking for an ideal looping point or want to see how long a clip is before going back to find out why it didn’t work.
Let’s have a look that how can we loop the video on Filmora:
Step 1: Download Filmora for free and Create a project in it:
Free Download For Win 7 or later(64-bit)
Free Download For macOS 10.14 or later
Download the Filmora software from any browser. After installation opens the software and clicks on create a project. Just add a video in your timeline that you would like to loop. With the Loop tool, you can easily add titles and credits, as well as transitions and effects to your videos.

Step 2: Select the video and make copies of it:
Move the play head to the end of your clip and press right-click to copy the video then use CTRL + V to paste the clip and continue pasting as many copies as you want to create.

Step 3: Add Transition to the video to make it more seamless
Lastly, If you want to make your loop more seamless then go to the Transitions tab and type dissolve in the search bar. Drag the dissolve transition between the two clips on the timeline. This can be useful when you want viewers to watch the video repeatedly.

Part 3: FAQs About Video Loop
1. Can you loop animation in Canva?
Yes, we can make loop animation in Canva. Looping animation in Canva software is not difficult, but it does require a little bit of practice. To loop animation in Canva, follow these steps:
- Go to the Animation tab on the left side of the screen.
- Click on the New Animation button in the top right corner of your screen.
- Select the type of animation you want to create from the drop-down menu next to “Create New Animation From.” This will open up a window that allows you to select between several different options for how your animation will appear, choose one that appeals most to you!
2. How do I loop an mp4 video?
Looping the mp4 video is a fairly simple process. First, you need to import the video into your computer. The easiest way to do this is using the .mp4 files that come with your camera or phone. You can also use any other audio file or a preview of the video as an indicator of where you want to start and end your looping.
Once you have imported your video, you can begin looping it. To do this, click on the “play” button and wait until all the videos have been played. Then, click on one of the two buttons below. The bottom button will play one frame forward in time while the top button will play one frame backward in time.
3. How do I make Canva videos longer?
We’ve got a special function in Canva that lets you crop your video while making it longer. Here’s how:
- Go to the video editor by clicking the cog icon on the top right of your screen.
- Select “Crop Video” from the menu.
- Choose how much footage you want to cut out and press “OK.”
- You’re done! Your video is now cropped and longer than before!
Wondershare Filmora Easy Video Looper Software for PC and Mac Users.
Free Download Free Download Learn More

![]()
Conclusion
Looping video generates interest and emotion in the minds of viewers and it is a great tool. According to research, over 80% of internet users watch videos online to get information or because they want to gain knowledge. People’s attention span has diminished significantly, since the invention of gadgets and all these must-have devices. The video will seem like you are editing the video in real-time.
Free Download For macOS 10.14 or later
Download the Filmora software from any browser. After installation opens the software and clicks on create a project. Just add a video in your timeline that you would like to loop. With the Loop tool, you can easily add titles and credits, as well as transitions and effects to your videos.
Step 2: Select the video and make copies of it:
Move the play head to the end of your clip and press right-click to copy the video then use CTRL + V to paste the clip and continue pasting as many copies as you want to create.
Step 3: Add Transition to the video to make it more seamless
Lastly, If you want to make your loop more seamless then go to the Transitions tab and type dissolve in the search bar. Drag the dissolve transition between the two clips on the timeline. This can be useful when you want viewers to watch the video repeatedly.
Part 3: FAQs About Video Loop
1. Can you loop animation in Canva?
Yes, we can make loop animation in Canva. Looping animation in Canva software is not difficult, but it does require a little bit of practice. To loop animation in Canva, follow these steps:
- Go to the Animation tab on the left side of the screen.
- Click on the New Animation button in the top right corner of your screen.
- Select the type of animation you want to create from the drop-down menu next to “Create New Animation From.” This will open up a window that allows you to select between several different options for how your animation will appear, choose one that appeals most to you!
2. How do I loop an mp4 video?
Looping the mp4 video is a fairly simple process. First, you need to import the video into your computer. The easiest way to do this is using the .mp4 files that come with your camera or phone. You can also use any other audio file or a preview of the video as an indicator of where you want to start and end your looping.
Once you have imported your video, you can begin looping it. To do this, click on the “play” button and wait until all the videos have been played. Then, click on one of the two buttons below. The bottom button will play one frame forward in time while the top button will play one frame backward in time.
3. How do I make Canva videos longer?
We’ve got a special function in Canva that lets you crop your video while making it longer. Here’s how:
- Go to the video editor by clicking the cog icon on the top right of your screen.
- Select “Crop Video” from the menu.
- Choose how much footage you want to cut out and press “OK.”
- You’re done! Your video is now cropped and longer than before!
Wondershare Filmora Easy Video Looper Software for PC and Mac Users.
Free Download Free Download Learn More
![]()
Conclusion
Looping video generates interest and emotion in the minds of viewers and it is a great tool. According to research, over 80% of internet users watch videos online to get information or because they want to gain knowledge. People’s attention span has diminished significantly, since the invention of gadgets and all these must-have devices. The video will seem like you are editing the video in real-time.
Steps To Fade Audio In Premier Pro
Audio is a very big part of any video project and it can make or break the video project. This is why it is very important to not just choose a video editor that also offers audio editing, but one that is easy to use and offers a lot of editing options. This way, you can edit the audio in your project to suit your video’s production and end up with a great professional final product.
One of the video editing tools that offer features that can accomplish all that is Adobe Premier Pro. In this article, we will look at how you can use Premier Pro to fade audio in or out.
Steps to Fade Audio in Premier Pro
Premier Pro gives you two different options to fade audio in or out. Let’s look at both options and then you can choose the one that suits you best;
Fade Audio using Crossfade Audio Transition
Step1To begin, open Premier Pro on your computer and then open the audio that you want to edit.
Step2Once it is open, select the audio clip in the timeline and then click on “Sequence” at the top menu and select “Apply Audio Transition.”
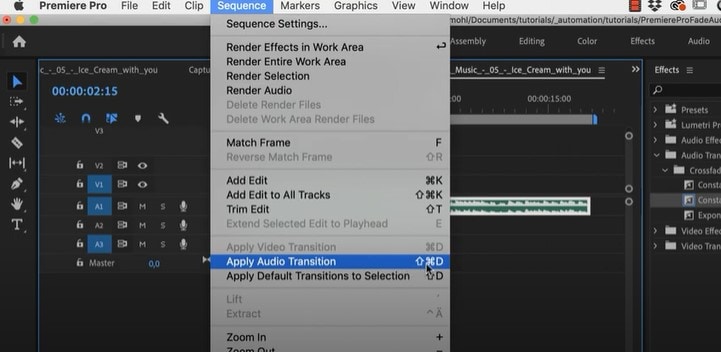
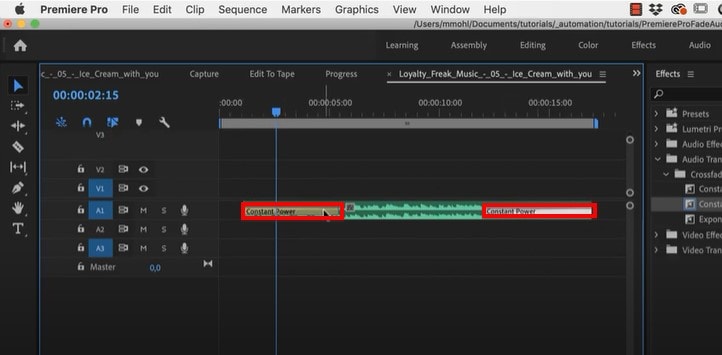
You can also use the keyboard shortcut Shift + Command + D (macOS) or Shift+ Ctrl + D (PC). This will add the “Constant Power Cross Fade” effect at the beginning and the end of the clip.
Step3You can then just change the duration of the effect by simply dragging the end of the transition.
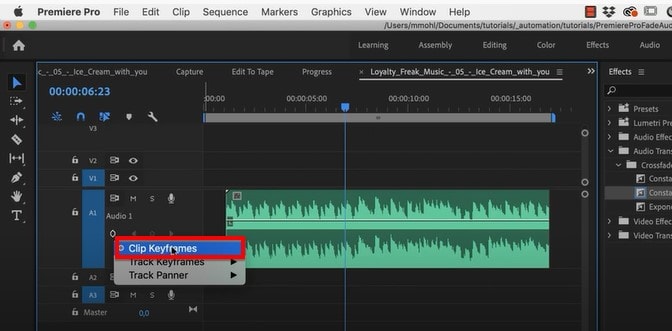
Fade Audio using Clip Keyframes
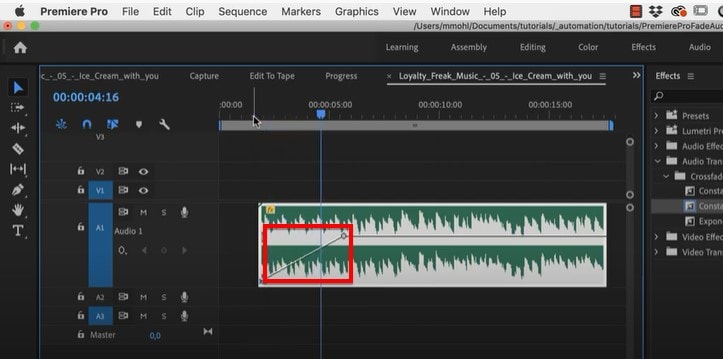
Step1Adobe Premier Pro has two volume keyframes; Track and Clip. Make the audio larger so you can see the volume line and then under the audio name, click on the volume keyframes option to make sure “Clip Keyframes” is enabled.
Step2You can then press down on the Command Key (macOS) or the Control Key (PC) and drag the volume line down to add a fade-in or fade-out effect.
Adobe Premiere Alternative Way to Fade Audio
If you are like most people and you find Adobe Premier Pro to be very difficult you use, we have a tool that is just as effective but also simplifies the process. This is the very simple to use Wondershare Filmora .
Just like Premier Pro, Filmora gives you two options to fade audio in and out. Let’s look at both options;
Adding Fade in and Out in Audio Pane
Step1Download and install Wondershare Filmora onto your computer, open the program and then import the audio clip that you want to edit.
Step2Once the video has been added to the timeline, double-click on it to access the “Audio” editing panel.
Step3Here, you can very simply add the fade-in and fade-out effects by simply dragging the sliders to the desired duration or by manually entering the duration in seconds.

Using the Audio Waveform
You can also use the fade icons on the left and right edges of the audio waveform to quickly add a fade in and out.
To add a fade-in effect, drag the fade-in maker to the right. Then go to the end of the clip to drag the fade-out maker to the left to add a fade-out effect.

Related FAQs about Audio Fade
1. How Do I Fade to Black in Adobe Premiere Pro?
You can easily add the Fade to Black transition in Adobe Premiere Pro using the “Effects” tab. Just open the two clips in Premiere Pro and go to “Effects.” Type in “dip to black” in the search box and when you find the effect, drag it between the two clips in the timeline. The effect will appear on the right side of the project.
You also have several customization options that you can apply to the effect to get it just right. To see these options, go to Effect Controls and you should be able to change the alignment of the effect to “Center at Cut” so that the first video fades out to black before the second video appears.
2. Premiere Pro Audio Fade Not Working?
Sometimes you can complete all the editing steps we have described above but you are unable to tell if the fade-in and fade-out effects are working because you can’t play the audio in Premiere. This is a very common problem that can easily be fixed using the following troubleshooting steps;
Check the master volume on your computer to see if this is the problem
Then check the volume in Premiere to see if the audio meter is moving as you play the clip. It is the green bar usually in the lower right corner.
If your volume is fine but you still can’t hear the audio, you may need to adjust several settings. Go to Edit > Preferences (on PC) or Preferences menu under the main Premiere Pro CC menu (macOS) and select “Audio Hardware” in the options that appear. You can then change the “Default Output” device to something else.
3. How Do You do Audio Transitions in Premiere Pro
Adding audio transitions in Premiere Pro is very easy; just open the audio that you want to edit and then Right-click (PC) or Control- Click (macOS) on either the “Constant Gain” or “Constant Power” effect from the Effects panel. Then choose “Set Selected as Default Transition” from the options in the menu.
To add a duration for the audio transitions, go to Edit > Preferences > Timeline (PC) or Premiere Pro Menu > Preferences (macOS) and enter the duration value under “Audio Transition Default Duration.”
Free Download For Win 7 or later(64-bit)
Free Download For macOS 10.14 or later
Let’s Look at Four Different Ways of Merging Audios and Videos. The Tools Will Help You Craft High-End Videos without Involving Any Complex Steps. You Can Make Your Videos Beautiful by Using the Following Easy to Use Tools
The rising trends in audio and visual effects have introduced the media industry to new dimensions of technology. The screens around us are flickering 24/7 with videos on several topics. But, without the perfect background audios, their underlying message remains unheard. Hence, a balance of sound and picture is necessary to entice the audience and break the monotony. You can also create personalized videos by merging various video clips and adding the background sound afterwards. For this purpose, all you need is a tool that can add audio to your videos.
Let’s look at four different ways of merging audios and videos. The tools will help you craft high-end videos without involving any complex steps. You can make your videos beautiful by using the following easy to use tools.
- Filmora Wondershare
- VLC
- Photos App on Windows 10
- Using the Online Converter
Merge MP4 and MP3 Using Filmora Wondershare
Filmora Video Editor is an editing tool that brings your creativity and productivity to a whole new level. It comes with several editing options for both audio and video. All you need is to let your imagination run wild to give a personalized touch to your videos.
If you want to record podcasts, narration or voiceovers with lowered background music under speech, itsaudio ducking feature comes in handy. Filmora’sauto-synchronization feature is the cherry on top. It facilitates matching your audio with your video in a crispy way. Thus, making the whole experience of customizing video more professional.
Adding more to it, the Filmora Montage maker edits your video automatically to make it smooth with the music of your choice. Thisauto-beat sync feature is user friendly and convenient. Hence, you cannot deny that from beginners to intermediate, Filmora is empowering creators over the globe.
Filmora comes with an in-built audio library that serves the purpose of adding different sounds in the background. Its drag and drop feature make its interface more user friendly.It allows you to add audio files (.MP3, or .WMA) to videos (.Avi, .MP4, .MKV).It supports different audio and video formats that help you create awesome videos.
For Win 7 or later (64-bit)
For macOS 10.14 or later
Here is a step-by-step guide for adding sound to your videos.
Step 1: Importing the Media files (Both Audio and Video)
After you finish installing Wondershare Filmora from the official website on your computer, launch it.
You can import the MP4 and MP3 files by going to the File menu and then selecting import media files.

Tip: The software comes with a huge built-in library. You can also use it to add sound to your project.
Step 2: Adding media files to Timeline
- Now, hover the mouse over the media files that you have imported.
- Use the drag and drop feature to add the mp4 and mp3 files to the timeline.

If you want to modify the audio, the audio panel can be seen by double-tapping the audio from the timeline. This panel will appear at the top of the screen.

You can explore different options ranging from ducking to denoising.
Step 3: Exporting the File
Now that the audio has been added to the video, select the ‘Export’ tab so that you can export your video.

The exported file can be saved in different formats. (MP4, WMV, etc)
Tip: You can rename and define the resolution for better output.
Merge MP4 and MP3 Using VLC Media Player
VLC is an open-source media player that works for different platforms (Windows, Mac and Linux). The media player comes with features ranging from compression to conversion. This multimedia framework supports audio formats like AC-3, DV Audio, FLAC, MP3, Speex, Vorbis. It also supports different video formats.
If your video has no background sound, you can add it to your videos by following simple steps. Not only that, but you can also change the original audio track to make your video an exquisite piece of art.
The majority of people consider VLC as only a media player. But, it works as a video editor as well. Therefore, it allows you to add background sound to your videos. This handy tool supports various streaming protocols along with almost all multimedia files.
Here is a demonstration for adding audio to your video.
Step 1: Installation
The first step would be installing the VLC media player on your computer and launching it afterward.
Click on Media and then select Convert/Save.

A pop-up window will appear in which you have to select the Add option. This will help you load the targeted video.

Step 2: Playing both audio and video in a synchronous manner
- After loading the video, at the bottom of the dialogue box, tick the Show more options.
- Select the option named ‘Play another media synchronously.

Click Browse to import your desired audio. It will open another window.

Step 3: Adding audio
Click + Add on the second Open Media window. It will load the audio files for the video.
- Now, you’ll have your video and audio files in the formats of mp4 and mp3 respectively.

- Click on Convert/Save
- A pop-up window will appear asking about the format you wish to have for your video.

- Also, by selecting Browse, select the destination where you want to save your video.

- Click on Start so that the video and audio can be merged.

Merge MP4 and MP3 Using Windows Photo App
Windows Photo App is home to all audio and video files on your PC. You can view, edit and store your audio and video files in it. It also allows you to share those among your family and friends. The tool comes with an AI-powered assistant to manage your media efficiently. Hence, you can find your required media files faster.
With its editing features, you can bring dull moments to life. It lets you integrate photos and videos into third-party apps so that you may transform your mundane videos into extraordinary ones.
The App also comes with a backup feature that makes it a safe home for your life’s memories.
If you want to merge recordings of small video clips in no time, then Windows Photo App will assist you in doing it in a jiff. It is a built-in app for Windows 10 and comes with the easiest ways of adding sound to your videos.
Have a look at the following steps.
You can find the Windows Photo app on your desktop or press the Windows + S to open the Start menu search and type Photos in the search box.

- Click on the video editor tab.
- Select the New Video project to start a blank project.

A dialogue box will appear asking to add the desired project name. Enter the name.

You’ll see an add button on the left side. By selecting it, a drop-down menu will appear. It will show you different options for adding video to your project.

Select the desired option and add the video clips.

Adjust the order of your videos by dragging the videos in the storyboard.

- You can trim, split and rotate your videos here.
- It also allows you to use various filters, texts and 3D effects.
- After completing the editing, select the finish video button on the menu bar.
- Select your preferred video quality.
You can add audio by selecting the Custom Audio option.

You will see a window-pane on the right side with different options for adding the sound. You can add it by the drag and drop feature or by clicking on the add file option.


- Select Done to complete the process.
- You have successfully added mp3 to your video file**.**
- Tap on Finish video in the upper right corner to complete the process.

- You can also select the quality of your video.

Click on Export to save your file to your desired destination.
Merge MP4 and MP3 Using Using Online Converter
Different online resources on the internet will help combine videos. You do not have to go through the hassle of downloading and installing third-party apps. Online Converter supports different formats like MP4, AVI, FLV, MOV, 3GP, MKV, etc. With it, you can combine multiple video files into a single file in no time. The most popular output format is MP4.
The procedure is simple. You have to upload your video clips on Online Converter in the order that you want in the final output.

You’ll navigate to a page with options for adding the media files by clicking on the choose file.

After uploading the media files. You will also see options for the audio in a drop-down menu.

Select the Add option to merge mp3 to mp4.

After the mp3 is merged to the mp4, you can download the converted file or share it via social media as well.

Disadvantages
- If your internet connectivity is poor, the videos may take longer to upload.
- If the response time is slow, you need to cancel the process and re-submit the data.
- Encrypted or protected video files are not supported for the merger of the videos.
Conclusion
Each tool comes with its pros and cons. With the wide range of video editing options, you can explore these different platforms and add life to your moments. Whether you are a beginner or an intermediate, editing multimedia files has been made easy by these different tools.
For macOS 10.14 or later
Here is a step-by-step guide for adding sound to your videos.
Step 1: Importing the Media files (Both Audio and Video)
After you finish installing Wondershare Filmora from the official website on your computer, launch it.
You can import the MP4 and MP3 files by going to the File menu and then selecting import media files.
Tip: The software comes with a huge built-in library. You can also use it to add sound to your project.
Step 2: Adding media files to Timeline
- Now, hover the mouse over the media files that you have imported.
- Use the drag and drop feature to add the mp4 and mp3 files to the timeline.
If you want to modify the audio, the audio panel can be seen by double-tapping the audio from the timeline. This panel will appear at the top of the screen.
You can explore different options ranging from ducking to denoising.
Step 3: Exporting the File
Now that the audio has been added to the video, select the ‘Export’ tab so that you can export your video.
The exported file can be saved in different formats. (MP4, WMV, etc)
Tip: You can rename and define the resolution for better output.
Merge MP4 and MP3 Using VLC Media Player
VLC is an open-source media player that works for different platforms (Windows, Mac and Linux). The media player comes with features ranging from compression to conversion. This multimedia framework supports audio formats like AC-3, DV Audio, FLAC, MP3, Speex, Vorbis. It also supports different video formats.
If your video has no background sound, you can add it to your videos by following simple steps. Not only that, but you can also change the original audio track to make your video an exquisite piece of art.
The majority of people consider VLC as only a media player. But, it works as a video editor as well. Therefore, it allows you to add background sound to your videos. This handy tool supports various streaming protocols along with almost all multimedia files.
Here is a demonstration for adding audio to your video.
Step 1: Installation
The first step would be installing the VLC media player on your computer and launching it afterward.
Click on Media and then select Convert/Save.
A pop-up window will appear in which you have to select the Add option. This will help you load the targeted video.
Step 2: Playing both audio and video in a synchronous manner
- After loading the video, at the bottom of the dialogue box, tick the Show more options.
- Select the option named ‘Play another media synchronously.
Click Browse to import your desired audio. It will open another window.
Step 3: Adding audio
Click + Add on the second Open Media window. It will load the audio files for the video.
- Now, you’ll have your video and audio files in the formats of mp4 and mp3 respectively.
- Click on Convert/Save
- A pop-up window will appear asking about the format you wish to have for your video.
- Also, by selecting Browse, select the destination where you want to save your video.
- Click on Start so that the video and audio can be merged.
Merge MP4 and MP3 Using Windows Photo App
Windows Photo App is home to all audio and video files on your PC. You can view, edit and store your audio and video files in it. It also allows you to share those among your family and friends. The tool comes with an AI-powered assistant to manage your media efficiently. Hence, you can find your required media files faster.
With its editing features, you can bring dull moments to life. It lets you integrate photos and videos into third-party apps so that you may transform your mundane videos into extraordinary ones.
The App also comes with a backup feature that makes it a safe home for your life’s memories.
If you want to merge recordings of small video clips in no time, then Windows Photo App will assist you in doing it in a jiff. It is a built-in app for Windows 10 and comes with the easiest ways of adding sound to your videos.
Have a look at the following steps.
You can find the Windows Photo app on your desktop or press the Windows + S to open the Start menu search and type Photos in the search box.
- Click on the video editor tab.
- Select the New Video project to start a blank project.
A dialogue box will appear asking to add the desired project name. Enter the name.
You’ll see an add button on the left side. By selecting it, a drop-down menu will appear. It will show you different options for adding video to your project.
Select the desired option and add the video clips.
Adjust the order of your videos by dragging the videos in the storyboard.
- You can trim, split and rotate your videos here.
- It also allows you to use various filters, texts and 3D effects.
- After completing the editing, select the finish video button on the menu bar.
- Select your preferred video quality.
You can add audio by selecting the Custom Audio option.
You will see a window-pane on the right side with different options for adding the sound. You can add it by the drag and drop feature or by clicking on the add file option.
- Select Done to complete the process.
- You have successfully added mp3 to your video file**.**
- Tap on Finish video in the upper right corner to complete the process.
- You can also select the quality of your video.
Click on Export to save your file to your desired destination.
Merge MP4 and MP3 Using Using Online Converter
Different online resources on the internet will help combine videos. You do not have to go through the hassle of downloading and installing third-party apps. Online Converter supports different formats like MP4, AVI, FLV, MOV, 3GP, MKV, etc. With it, you can combine multiple video files into a single file in no time. The most popular output format is MP4.
The procedure is simple. You have to upload your video clips on Online Converter in the order that you want in the final output.
You’ll navigate to a page with options for adding the media files by clicking on the choose file.
After uploading the media files. You will also see options for the audio in a drop-down menu.
Select the Add option to merge mp3 to mp4.
After the mp3 is merged to the mp4, you can download the converted file or share it via social media as well.
Disadvantages
- If your internet connectivity is poor, the videos may take longer to upload.
- If the response time is slow, you need to cancel the process and re-submit the data.
- Encrypted or protected video files are not supported for the merger of the videos.
Conclusion
Each tool comes with its pros and cons. With the wide range of video editing options, you can explore these different platforms and add life to your moments. Whether you are a beginner or an intermediate, editing multimedia files has been made easy by these different tools.
Also read:
- Updated In 2024, 3 Effective Methods to Correct Color Distortion in Videos
- Achieving GoPro Slow Motion with Quality An In-Depth Overview for 2024
- 2024 Approved Several Tips Can Facilitate How You Edit Videos Faster and Easier. All You Need to Do Is to Read This Article to Find Out What They Are
- 2024 Approved The Best Cinematic LUTs in The Market
- New 2024 Approved 4 Ways to Loop a Video on Vimeo
- New In 2024, How to Trim Video in Quicktime Player on Mac
- New You Can Make Attractive Videos by Adding Text Behind Objects. This Article Will Explain How to Use Wondershare Filmora to Create These Videos
- In 2024, Discover the Art of Masking in After Effects A Comprehensive Guide
- How to Trim/Crop Video in Microsoft Powerpoint
- New In 2024, | How to Livestream Zoom on Facebook?
- New How to Find Free Online Slideshow Maker with No Watermark for 2024
- New Fast and Easy Method to Match Color in Photoshop
- Updated In 2024, Add Camera Shake to Video in Adobe After Effects
- How to Remove or Mute Audio in Video with Android Phones for 2024
- In 2024, In This Article, We Will Review Movavi Video Editor and List Out Movavi Video Suites Features
- New In 2024, How to Create and Add an Adjustment Layer in Final Cut Pro
- Updated 2024 Approved How to Create a Dynamic Text Animation in Filmora — Step-By-Step
- Updated In 2024, A Guide To Adopting Lumetri Color Presets in Effective Color Grading
- Updated In 2024, TOP 10 Types of Video Framing From Novice to Master
- New How Does the YouTube AI Algorithm Work for 2024
- New In 2024, How to Add a Slideshow in PowerPoint
- Updated Complete How-To Tutorials of Kapwing Collage Maker for 2024
- Step by Step to Rotate Videos Using Handbrake
- Updated Looking For a Cheap Camera to Make Slow Motion Video? Get It Now
- How to Create an Alternate Reality Effect for 2024
- New How to Add Filters on iMovie
- Steps to Create Makeup Videos
- Updated 2024 Approved Voice Changer for Discord | Use Voicemod on Discord
- In 2024, How to Resize FLV Videos Efficiently Windows, Mac,Android, iPhone & Online
- In 2024, Complete Guide to Converting GIF to SVG With Ease
- Updated A Guide to Create Your Own LOL Montage Video for 2024
- 2024 Approved How to Select and Use The Best BRAW LUTs
- New In 2024, Benefits of Live Streaming on YouTube
- New As a Designer, Color Is the Most Powerful and the Most Diverse Tool at Your Disposal. Here Are Ten Matching Color Combinations to Get You Started on Your Next Project for 2024
- New WMV File Format Has Many Benefits over the Video Industry. If You Are Excited to Know More About the Format and Its Pros and Cons, Then Lets Start the Discussion
- Updated 2024 Approved How to Create An Eye-Catching Intro Videos with InVideo
- In 2024, How Much Wedding Videographer Cost
- In 2024, How to Change Your Motorola Edge 40 Neo Location on life360 Without Anyone Knowing? | Dr.fone
- In 2024, How To Change Your SIM PIN Code on Your OnePlus Nord CE 3 Lite 5G Phone
- In 2024, How to Unlock Realme C51 Bootloader Easily
- How to Fix iPhone 7 Storage Not Loading/Showing | Stellar
- How to Easily Hard reset my Tecno Pova 5 Pro | Dr.fone
- 2 Ways to Transfer Text Messages from Samsung Galaxy F34 5G to iPhone 15/14/13/12/11/X/8/ | Dr.fone
- In 2024, Unlock Your Vivo Y77ts Potential The Top 20 Lock Screen Apps You Need to Try
- How to Update Apple iPhone 14 without iTunes? | Dr.fone
- Home Button Not Working on Tecno Phantom V Fold? Here Are Real Fixes | Dr.fone
- How To Unlock a Xiaomi Redmi Note 12 Pro+ 5G Easily?
- In 2024, 2 Ways to Monitor Apple iPhone 6s Plus Activity | Dr.fone
- Simple ways to get recent calls back from Y17s
- In 2024, Unova Stone Pokémon Go Evolution List and How Catch Them For Poco X5 Pro | Dr.fone
- How to recover lost data from G42 5G?
- In 2024, 10 Fake GPS Location Apps on Android Of your Infinix Note 30 5G | Dr.fone
- Ultimate guide to get the meltan box pokemon go For Oppo A78 5G | Dr.fone
- The Most Effective Ways to Bypass Apple iPhone 15 Plus Activation Lock
- How To Change Your Apple ID Password On your Apple iPhone 12
- How to Transfer Data from Infinix Note 30 VIP to Samsung Phone | Dr.fone
- Complete Tutorial to Use VPNa to Fake GPS Location On Vivo S17t | Dr.fone
- Effective Ways To Fix Checkra1n Error 31 On Apple iPhone 14 Plus
- In 2024, How to Hide/Fake Snapchat Location on Your Oppo K11 5G | Dr.fone
- How Can Lava Storm 5GMirror Share to PC? | Dr.fone
- Does Airplane Mode Turn off GPS Location On Poco M6 5G? | Dr.fone
- How to Transfer Text Messages from Vivo T2 Pro 5G to New Phone | Dr.fone
- Top 12 Prominent Nokia C12 Plus Fingerprint Not Working Solutions
- 7 Top Ways To Resolve Apple ID Not Active Issue For Apple iPhone 12 Pro Max | Dr.fone
- Hard Reset Oppo A2 in 3 Efficient Ways | Dr.fone
- In 2024, How To Fix Auto Lock Greyed Out on iPhone 15 Plus | Dr.fone
- In 2024, About Oppo K11x FRP Bypass
- Title: Updated In 2024, How to Apply Video Filters
- Author: Chloe
- Created at : 2024-04-24 07:08:43
- Updated at : 2024-04-25 07:08:43
- Link: https://ai-editing-video.techidaily.com/updated-in-2024-how-to-apply-video-filters/
- License: This work is licensed under CC BY-NC-SA 4.0.
