Updated In 2024, How To Blur Background in Adobe Premiere Pro Detailed Guide

How To Blur Background in Adobe Premiere Pro: Detailed Guide
Premiere Pro is a powerful editing program that lets you create and edit clips using its wide range of features and tools to make professional-looking videos. The best thing about the software is that you can quickly blur the background of your footage to add a bit of depth and interest, as well as to make your subject stand out more.
To make things simpler for you, we’ve compiled this comprehensive guide to walk you through the step-by-step process of how to blur the background in Premiere Pro so that you notice a big difference in your videos!
Part 1. Why Do You Need To Blur The Video Background?
The blurred background effect is a useful technique used by many professionals to create a focus on the element in the video and remove any distortions. By doing so, they add emphasis on the most important on-screen subject and make it pop on the screen.
You may need to blur the video background for several reasons. Perhaps you’re recording a tutorial and want to add focus on one element, or maybe you’re filming a scene in a crowded public place and wish to minimize distractions in your video.
Blurring the BG can also be a way to add a creative touch to your video or make them more immersive, polished, and professional.
Part 2. How To Blur Your Background In Premiere Pro?
Below, we’ve provided a step-by-step guide to help you blur the background in Premiere Pro:
Step1 In the first step, open a browser and visit the Adobe Premiere Elements download page. Log in with your Adobe ID or create a new one . Choose the platform and language, and click “Download” to get the installation file.
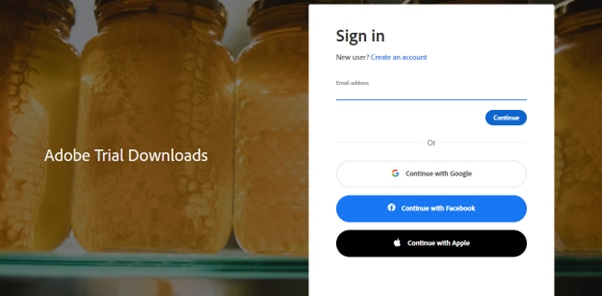
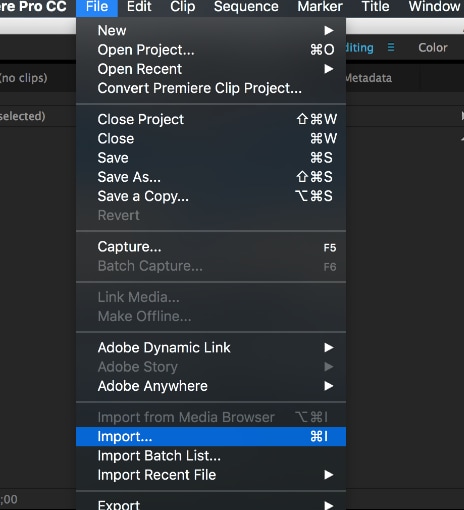
Click the downloaded installer to install the software and launch it. Now, click the “File” option from the top toolbar and select “Import” to open the File Explorer window. Locate your video footage and click “Open” to import it to Adobe Premiere.
Step2 In the next step, click the “Window” option from the top toolbar and select “Effects” from the drop-down menu to open the “Effects Panel.”
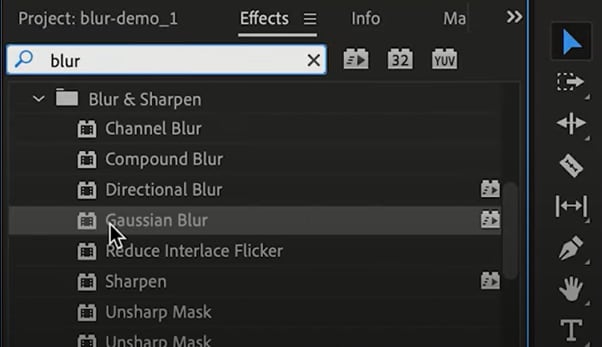
In the Effects Panel, type “Blur” in the search bar and scroll down to find the “Gaussian Blur” effect. Drag and drop the effect on the clip in the timeline to apply.
Step3 Now, click “Window” in the top toolbar and select “Effect Controls” to open its panel. Scroll down to “Gaussian Effect” in the panel and increase the blurriness amount. This will make your entire clip blurry, including the subject/main element.If the edges of your clips become dark, checkmark the “Repeat Edge Pixels” option to resolve this issue.
![]()
Step4 Next, you have to create a mask around the subject to unblur it. To do so, click the “Free
Draw Bezier” under the “Gaussian Blur” option in the Effects Control Panel.
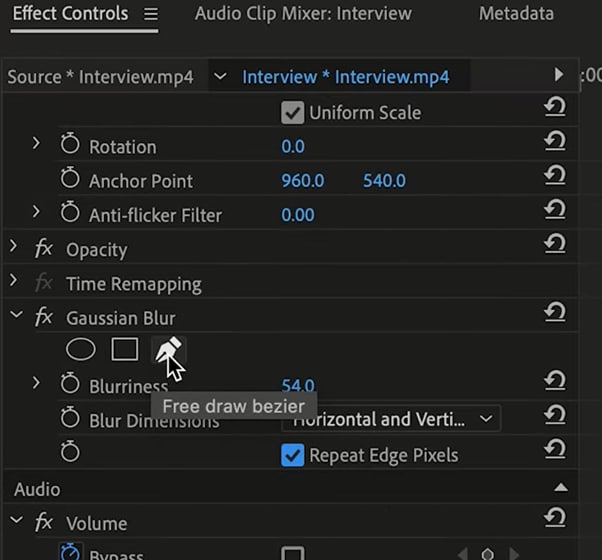
Now, in the Program Monitor window, trace the outline of the element/subject in your video. Make sure to bring the trace line to the original point.
Step5 Checkmark the “Inverted” option under the Mask Expansion header in the Effects Control Panel to make your background blurry. Click the “Play” icon to preview your video and if you find any hard edges around the subject, click “Mask” and choose the selection tool.
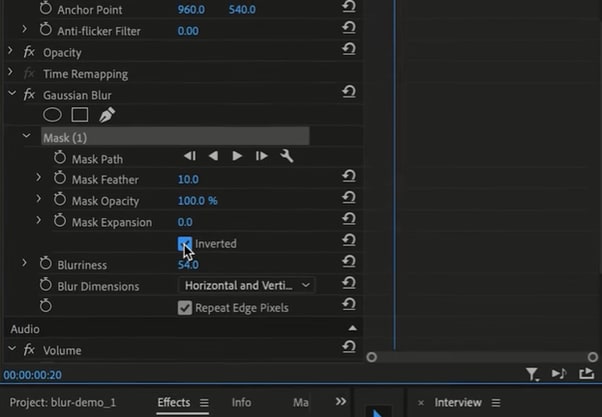
Now, make adjustments to the individual points in the outline. Click “Mask Expansion” and increase its value to expand the mask size. Then, click “Mask Feather” and decrease its value to soften the edges.
Step6 If your subject moves around in some parts, click the toggle next to “Mask Path” to create keyframes. Now, move through the timeline and adjust the mask on the subject to make a professional-looking video.
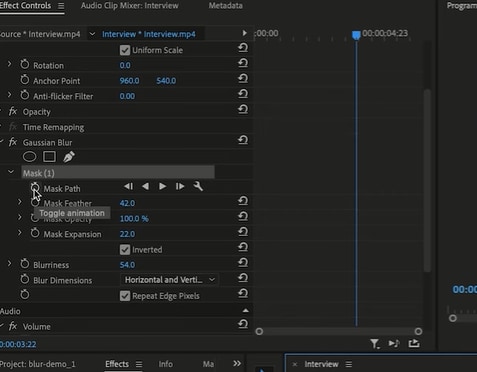
Finally, navigate to “File” > “Export” from the top toolbar, type your file name, specify a location and click “Export” to save your file on your PC.
Bonus Tips – The Alternative To Premiere Pro To Blur The Video Background
If you find the above process complicated and are looking for an easy-to-use alternative to Premiere Pro to blur the video background, try using the Wondershare Filmora software.
Free Download For Win 7 or later(64-bit)
Free Download For macOS 10.14 or later
With this tool, you can instantly blur the background of your video and make the subject stand out. Besides, Filmora comes with an intuitive interface that even novice users can benefit from its vast features.
Here’s how you can use Wondershare Filmora to blur your video background:
Step1 Open the Filmora download page using a web browser, download the installation file and click the downloaded file to begin the installation process.
Launch the software, click “Create New Project,” and select the “Click Here To Import Your Media File” option to import your video clip.
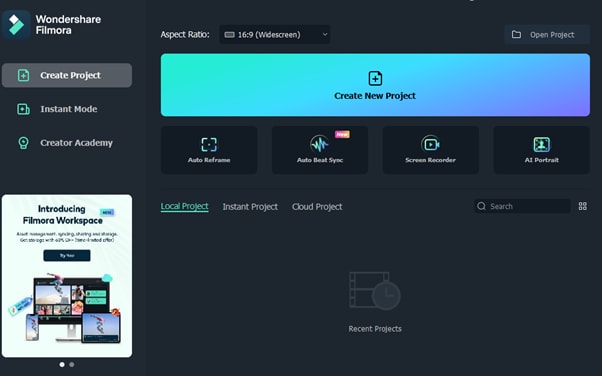
Step2 Once the video is loaded into the program, drag it from the Media Library and drop it into the video editing timeline.
Next, you’ll need to add a Blur Effect to the clip. To do this, click the “Effects” menu, select the “Background Blur” category, and choose the desired blur type. If you are using portrait video, try using the Grey, Diamond, or Mosaic filters to create a visually captivating background.
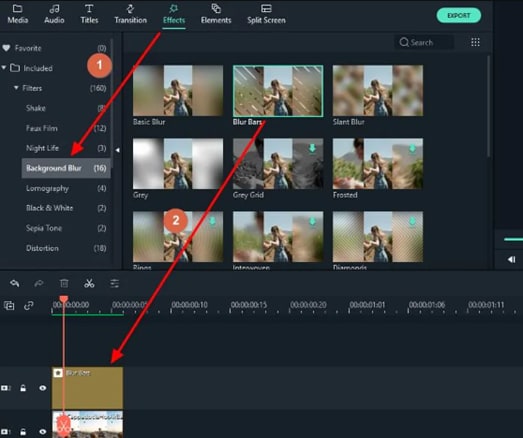
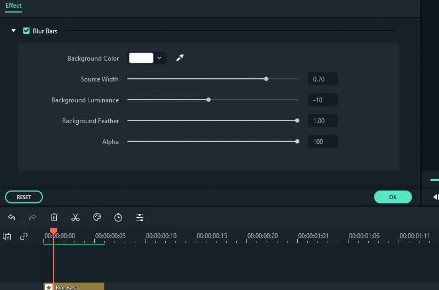
Step3 Once the effect is downloaded, drag and drop it onto the video clip in the timeline and double, click it to open the Effect panel. Here, you can configure the background color, source width, luminance, scale level, background feather, and Alpha blurry settings.
Step4 In the final step, click the “Export” button, go to the “Local” tab, choose a file format and click “Export” again to save your final video clip on your PC.
You can also export your video to your device, YouTube, Vimeo, or DVD.
Last Words
In this detailed guide, we’ve discussed why you need to blur BG in a clip. We also provided an extensive guide on how to blur the background in Premiere Pro to make your video more professional and engaging.
In the end, we explored the step-by-step method of creating blur backgrounds in a video using Filmora software – the best and easy-to-use alternative to Adobe Premiere Pro.
Hopefully, you’ve found this article helpful and can now make engaging videos with blur backgrounds using Adobe Premiere Pro.
Free Download For macOS 10.14 or later
With this tool, you can instantly blur the background of your video and make the subject stand out. Besides, Filmora comes with an intuitive interface that even novice users can benefit from its vast features.
Here’s how you can use Wondershare Filmora to blur your video background:
Step1 Open the Filmora download page using a web browser, download the installation file and click the downloaded file to begin the installation process.
Launch the software, click “Create New Project,” and select the “Click Here To Import Your Media File” option to import your video clip.

Step2 Once the video is loaded into the program, drag it from the Media Library and drop it into the video editing timeline.
Next, you’ll need to add a Blur Effect to the clip. To do this, click the “Effects” menu, select the “Background Blur” category, and choose the desired blur type. If you are using portrait video, try using the Grey, Diamond, or Mosaic filters to create a visually captivating background.

Step3 Once the effect is downloaded, drag and drop it onto the video clip in the timeline and double, click it to open the Effect panel. Here, you can configure the background color, source width, luminance, scale level, background feather, and Alpha blurry settings.

Step4 In the final step, click the “Export” button, go to the “Local” tab, choose a file format and click “Export” again to save your final video clip on your PC.
You can also export your video to your device, YouTube, Vimeo, or DVD.
Last Words
In this detailed guide, we’ve discussed why you need to blur BG in a clip. We also provided an extensive guide on how to blur the background in Premiere Pro to make your video more professional and engaging.
In the end, we explored the step-by-step method of creating blur backgrounds in a video using Filmora software – the best and easy-to-use alternative to Adobe Premiere Pro.
Hopefully, you’ve found this article helpful and can now make engaging videos with blur backgrounds using Adobe Premiere Pro.
Looking Into How Slow Mo Guys Have Changed the Dynamics of Slow-Motion
All the aspects of our lives are inspired by someone, and we try to follow in their footsteps. Sometimes, it can be a person in your life, an influential personality, or YouTube. When it comes to editing, beginners often try to follow those who have mastered it. In a similar way, you might seek inspiration from social media or websites to create slomos.
One of the greatest inspirations in the realm of slow-motion videos is The Slow Mo Guys . Continue reading this article for a brief review of The Slow Mo Guys. In addition, the article will give you a basic guide on creating slo-mos. You can also learn how to create high-quality slo-mo videos like the Slow Motion Guys.
Slow Motion Video Maker Slow your video’s speed with better control of your keyframes to create unique cinematic effects!
Make A Slow Motion Video Make A Slow Motion Video More Features

Part 1: The Slow Mo Guys: A Real-Life Sensation in Creating Slow Motion Videos
The Slow Mo Guys is a YouTube channel with over 14.8M subscribers and is determined to deliver high-quality content. The channel appeared as a collaboration between Gavin Free and Daniel Gruchy. Both had a history of using high-speed slow-motion cameras and set their channel in 2010. The channel began to gain recognition in 2012 and became a living sensation in the slo-mo world.

In this era, if you are looking for a start to create slomos, Slow Motion Guys come to mind. One of the many things that took the channel to heights is their ability to explain everything. The normal slow-mo speed by most editors is either 120 or 240 fps. However, The Slow Mo Guys shoot videos at 1000 fps, which is ultra-slow motion. The channel usually features natural phenomena, pranks, and relevant content.
Part 2: Want to Make Such Slow-Motion Videos on Your Smartphone? Learn How
The most used and dear gadget to all of us in this era is our smartphones. It has also become a requirement to stay connected, and so we often shoot on them. To retain the video quality, we try to edit it through built-in features. This section highlights creating slow-motion videos using iPhone or Android. Learn to create professional slo-mos like Gave Slow Mo Guys here:
Step-by-Step Guide to Create a Slow Motion in iPhone
Apple offers a pre-developed feature to create slomos using a simple method. In this section, we will discuss how to shoot a video in slow motion using an iPhone. Follow the lead and create results like The Slow Mo Guys camera:
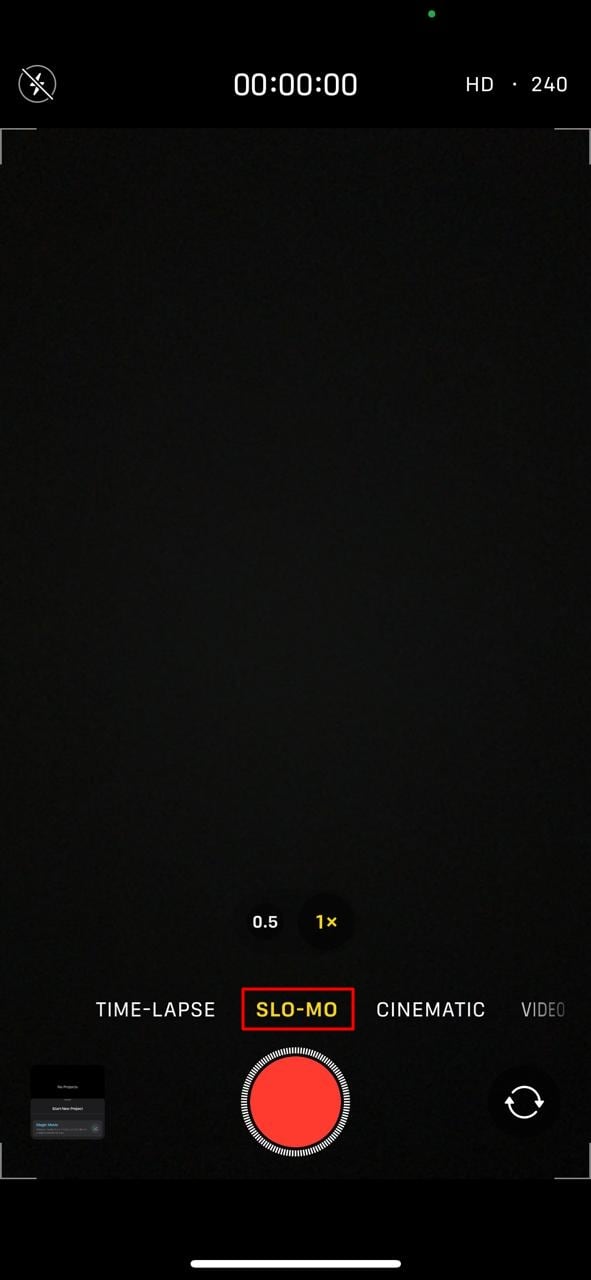
Instruction: Once you launch the “Camera” application, open the recorder and select “SLO-MO.” Now, redirect to your camera and hit the recorder button to start recording a solo.
Step-by-Step Guide to Creating a Slow Motion in Android
The Android has also introduced a slo-mo feature to record content in slow motion. It helps creators in crafting transitions or aesthetic videos. We have given a detailed procedure for recording a slow-motion video in Android:
Step 1
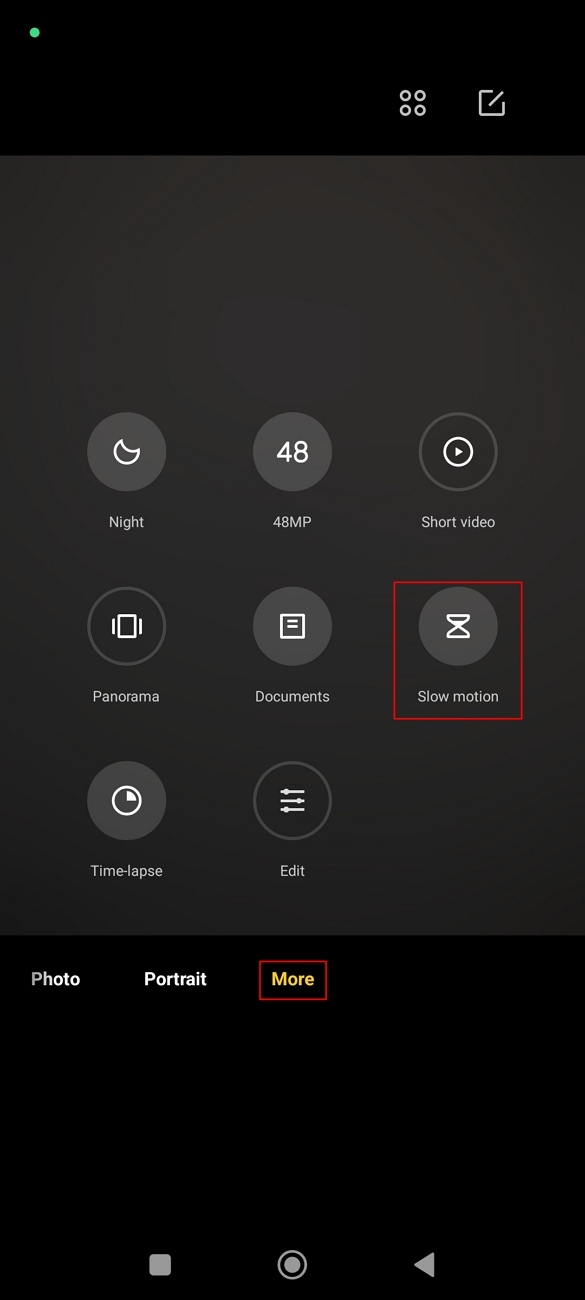
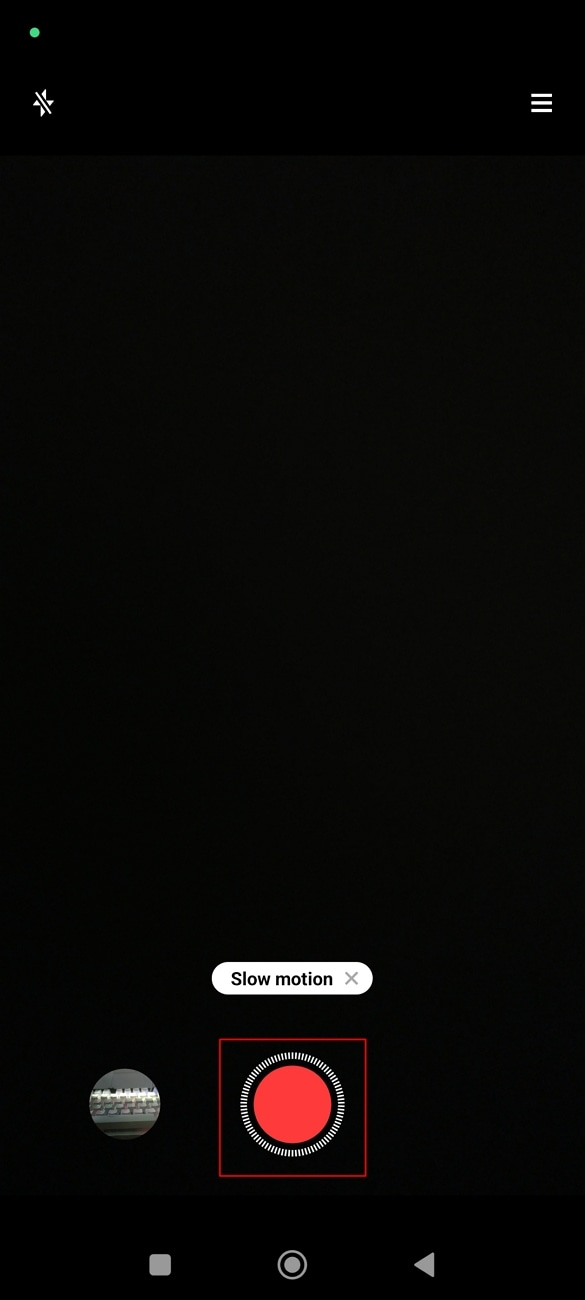
Locate and launch the “Camera” application on your Android. In the bottom bar, you’ll find multiple camera modes and settings. Drag and find the “More” option in this settings bar.
Step 2
In the appearing menu, locate and select the “Slow motion” option. After setting these preferences, hit the recorder button and record the video. The video will record normally, but when you preview it later, you’ll have a slomo.
Part 3: Slow Motion Video Making and Wondershare Filmora: Make Videos Like Slow Mo Guys
All the above methods of creating slow motion are effective, but there is a drawback. You’ll have to record the complete video in slow motion, and there are no custom options. Wondershare Filmora is a professional video editing software that can resolve this. This software will help you create videos similar to Dan Slow Mo Guys.
In addition, you can infuse your slomo with multiple visual effects, transitions, and more. Filmora displays two features to create a slow-motion video, one of which is Uniform Speed. The other feature is Speed Ramping with pre-assembled slow-motion presets. With its AI-backed technology, you can increase the video frame rate as well.
Free Download For Win 7 or later(64-bit)
Free Download For macOS 10.14 or later
Using Uniform Speed to Create a Slow-Motion Video in Filmora
Uniform Speed is the basic method of creating slow motion in Filmora. It simply modifies the playback speed of video with the help of a slider. The procedure of slomo creation, like The Slow Mo Guys in Filmora, is given below:
Step 1Import Media to Start Slomo Creation
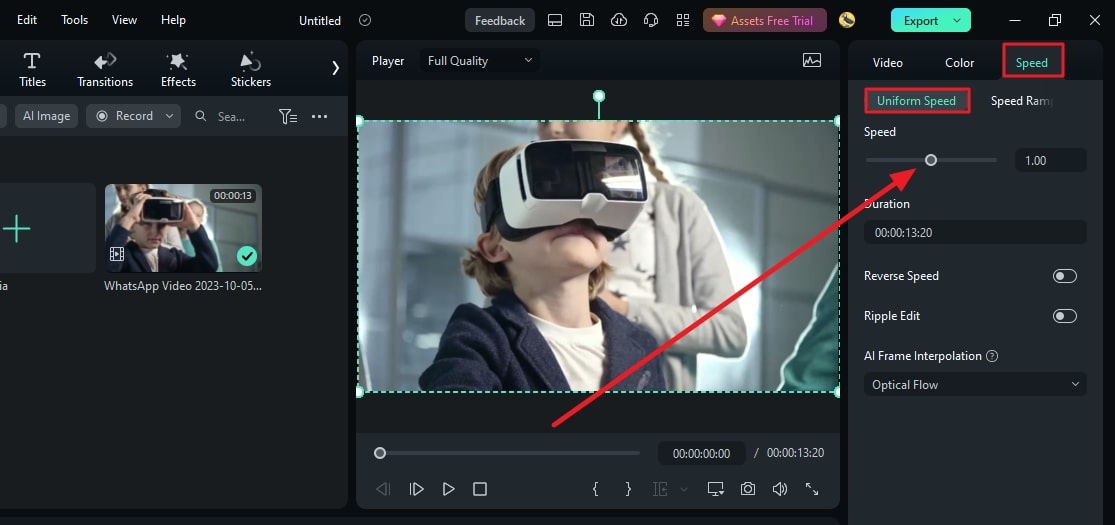
After downloading Filmora on your device, click the “New Project” button to start. From the editing interface, click the “Ctrl + I” keys, choose the video, and bring it to the timeline after import. Select the clip in the timeline and use your cursor to reach the settings panel. Go to the “Uniform Speed” section under the “Speed” tab and change the speed slider settings.
Step 2Start AI Frame Interpolation Settings
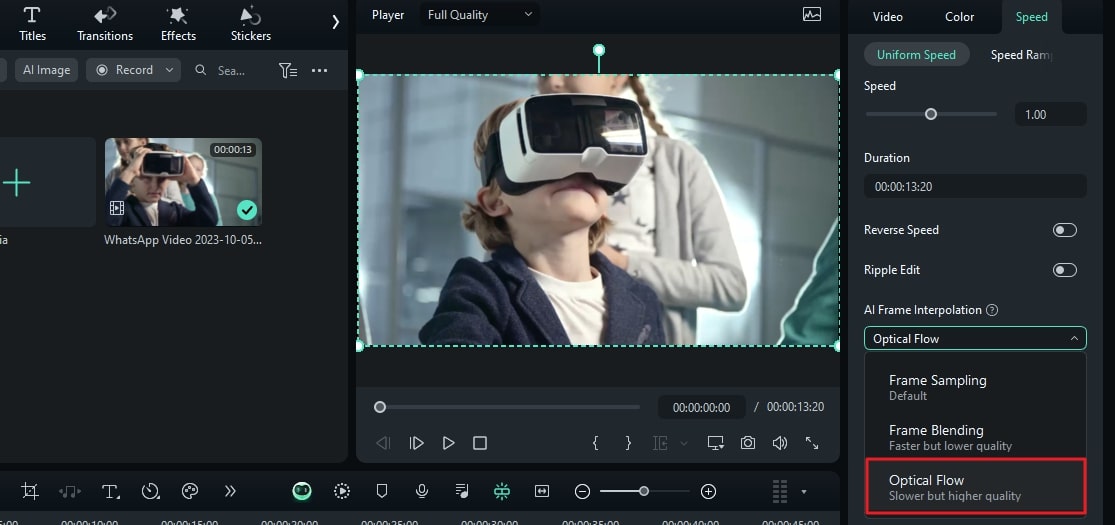
This is the AI feature that increases the video frame rate for a smooth, slow-motion effect. You can access this option at the bottom of Uniform Speed settings. Expand it and select the “Optical Flow” option for your purpose.
Step 3Enable Render Preview to See Results
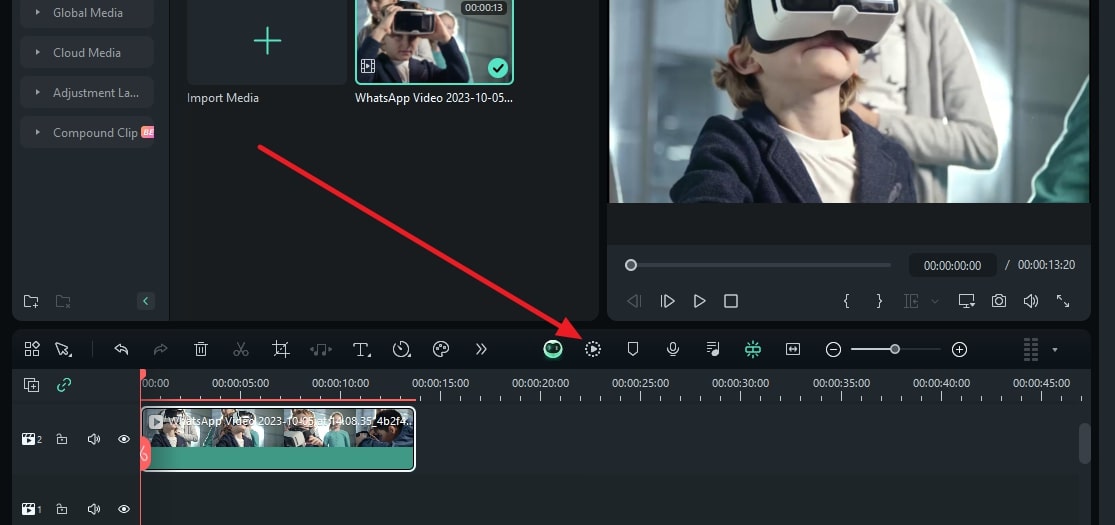
Once all is set and done, navigate towards the timeline panel to select this video again. With the help of your cursor, access the “File” tab at the top toolbar. Select the “Render Preview” option from the expanding menu. After rendering is complete, use the preview screen to observe the slo-mo and export it.
Using Speed Ramping to Create a Slow-Motion Video in Filmora
The second method is also simple, but it has more precise options to create a slow-mo. It uses the velocity graph to rise or decline video speed at certain intervals. Gather the knowledge about how The Slow Mo Guys YouTube creates slow-mo here:
Step 1Access the Speed Ramping Feature
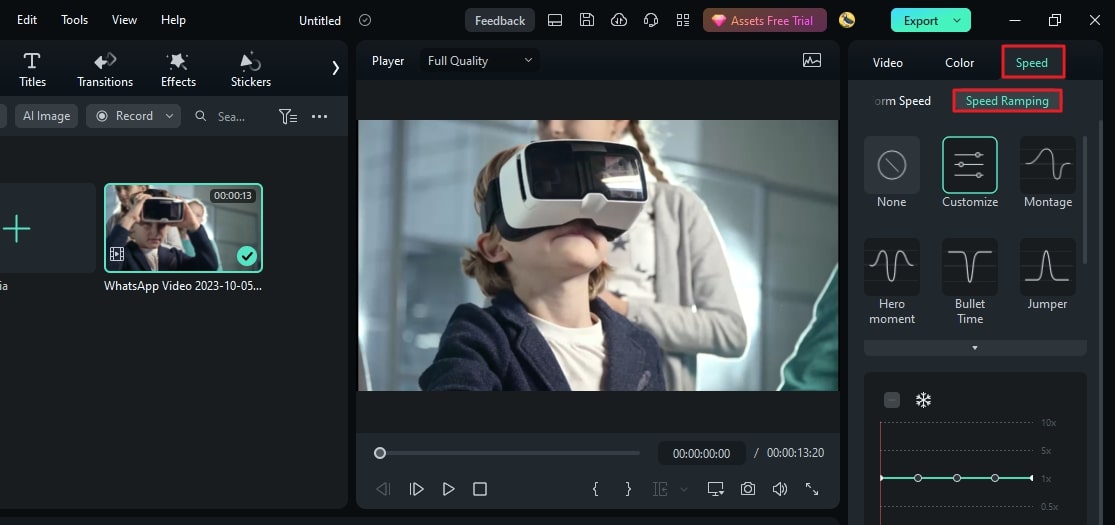
After importing and bringing media to the timeline, select it and reach the settings panel. Access the “Speed” > “Speed Ramping” option to start editing. There, you can find many custom speed presets for automated editing. However, you can also use the “Customize” preset to create from scratch. Then, reach the speed graph and move the slider downward to bring the slo-mo effect.
Step 2Enable the Optical Flow Option
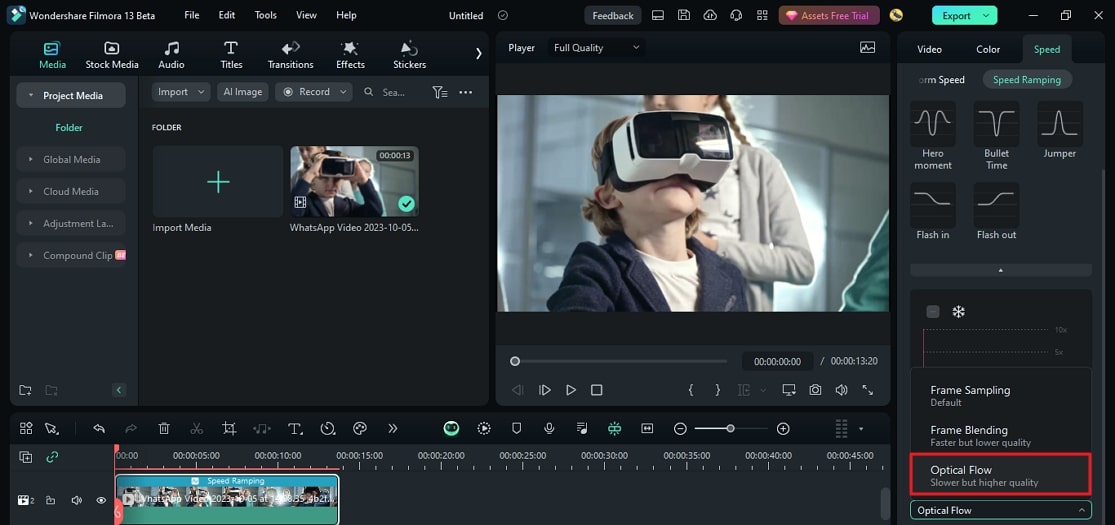
Navigate to the bottom of this panel and expand the AI Frame Interpolation menu. Choose the “Optical Flow” option to achieve your desired outcome.
Step 3Activate Render Preview for Confirmed Results
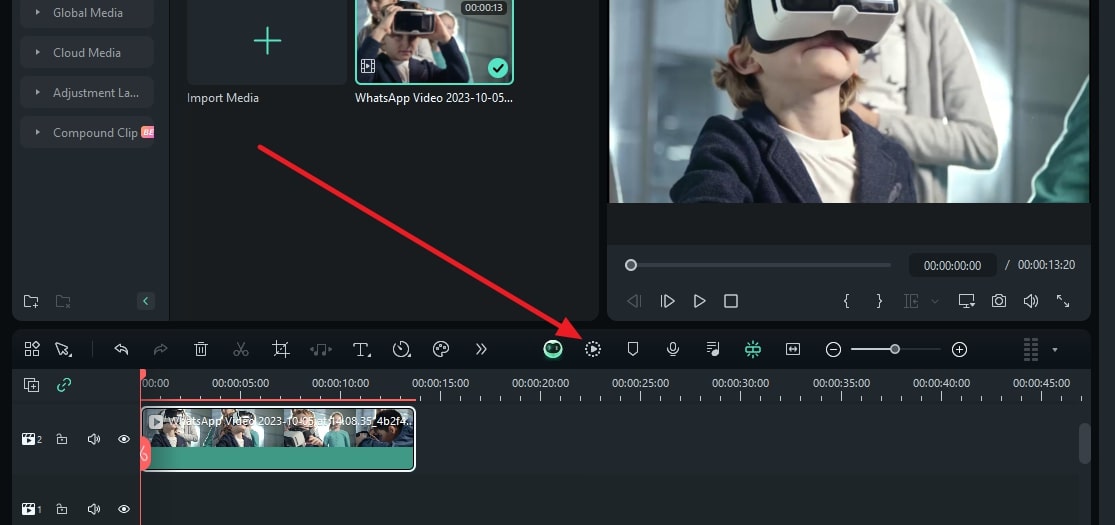
After configuring your settings, return to the timeline panel and reselect the video. From the timeline toolbar, click the “Render Preview” option. Once the rendering process ends, see the preview before exporting.
Conclusion
This article introduced readers to The Slow Mo Guys and their work. If you haven’t heard about them before, you are now familiar with them. You can head over to YouTube to find their channel and see their work. After guiding users on creating slo-mos on Android and iPhone, we introduced Filmora.
It’s a proficient way of creating slo-mo with AI assistance and custom settings. It has recently launched the V13 upgrade, which is full of AI features and editing possibilities. Head over to their official site and download it to edit like The Slow Mo Guys.
Make A Slow Motion Video Make A Slow Motion Video More Features

Part 1: The Slow Mo Guys: A Real-Life Sensation in Creating Slow Motion Videos
The Slow Mo Guys is a YouTube channel with over 14.8M subscribers and is determined to deliver high-quality content. The channel appeared as a collaboration between Gavin Free and Daniel Gruchy. Both had a history of using high-speed slow-motion cameras and set their channel in 2010. The channel began to gain recognition in 2012 and became a living sensation in the slo-mo world.

In this era, if you are looking for a start to create slomos, Slow Motion Guys come to mind. One of the many things that took the channel to heights is their ability to explain everything. The normal slow-mo speed by most editors is either 120 or 240 fps. However, The Slow Mo Guys shoot videos at 1000 fps, which is ultra-slow motion. The channel usually features natural phenomena, pranks, and relevant content.
Part 2: Want to Make Such Slow-Motion Videos on Your Smartphone? Learn How
The most used and dear gadget to all of us in this era is our smartphones. It has also become a requirement to stay connected, and so we often shoot on them. To retain the video quality, we try to edit it through built-in features. This section highlights creating slow-motion videos using iPhone or Android. Learn to create professional slo-mos like Gave Slow Mo Guys here:
Step-by-Step Guide to Create a Slow Motion in iPhone
Apple offers a pre-developed feature to create slomos using a simple method. In this section, we will discuss how to shoot a video in slow motion using an iPhone. Follow the lead and create results like The Slow Mo Guys camera:
Instruction: Once you launch the “Camera” application, open the recorder and select “SLO-MO.” Now, redirect to your camera and hit the recorder button to start recording a solo.

Step-by-Step Guide to Creating a Slow Motion in Android
The Android has also introduced a slo-mo feature to record content in slow motion. It helps creators in crafting transitions or aesthetic videos. We have given a detailed procedure for recording a slow-motion video in Android:
Step 1
Locate and launch the “Camera” application on your Android. In the bottom bar, you’ll find multiple camera modes and settings. Drag and find the “More” option in this settings bar.

Step 2
In the appearing menu, locate and select the “Slow motion” option. After setting these preferences, hit the recorder button and record the video. The video will record normally, but when you preview it later, you’ll have a slomo.

Part 3: Slow Motion Video Making and Wondershare Filmora: Make Videos Like Slow Mo Guys
All the above methods of creating slow motion are effective, but there is a drawback. You’ll have to record the complete video in slow motion, and there are no custom options. Wondershare Filmora is a professional video editing software that can resolve this. This software will help you create videos similar to Dan Slow Mo Guys.
In addition, you can infuse your slomo with multiple visual effects, transitions, and more. Filmora displays two features to create a slow-motion video, one of which is Uniform Speed. The other feature is Speed Ramping with pre-assembled slow-motion presets. With its AI-backed technology, you can increase the video frame rate as well.
Free Download For Win 7 or later(64-bit)
Free Download For macOS 10.14 or later
Using Uniform Speed to Create a Slow-Motion Video in Filmora
Uniform Speed is the basic method of creating slow motion in Filmora. It simply modifies the playback speed of video with the help of a slider. The procedure of slomo creation, like The Slow Mo Guys in Filmora, is given below:
Step 1Import Media to Start Slomo Creation
After downloading Filmora on your device, click the “New Project” button to start. From the editing interface, click the “Ctrl + I” keys, choose the video, and bring it to the timeline after import. Select the clip in the timeline and use your cursor to reach the settings panel. Go to the “Uniform Speed” section under the “Speed” tab and change the speed slider settings.

Step 2Start AI Frame Interpolation Settings
This is the AI feature that increases the video frame rate for a smooth, slow-motion effect. You can access this option at the bottom of Uniform Speed settings. Expand it and select the “Optical Flow” option for your purpose.

Step 3Enable Render Preview to See Results
Once all is set and done, navigate towards the timeline panel to select this video again. With the help of your cursor, access the “File” tab at the top toolbar. Select the “Render Preview” option from the expanding menu. After rendering is complete, use the preview screen to observe the slo-mo and export it.

Using Speed Ramping to Create a Slow-Motion Video in Filmora
The second method is also simple, but it has more precise options to create a slow-mo. It uses the velocity graph to rise or decline video speed at certain intervals. Gather the knowledge about how The Slow Mo Guys YouTube creates slow-mo here:
Step 1Access the Speed Ramping Feature
After importing and bringing media to the timeline, select it and reach the settings panel. Access the “Speed” > “Speed Ramping” option to start editing. There, you can find many custom speed presets for automated editing. However, you can also use the “Customize” preset to create from scratch. Then, reach the speed graph and move the slider downward to bring the slo-mo effect.

Step 2Enable the Optical Flow Option
Navigate to the bottom of this panel and expand the AI Frame Interpolation menu. Choose the “Optical Flow” option to achieve your desired outcome.

Step 3Activate Render Preview for Confirmed Results
After configuring your settings, return to the timeline panel and reselect the video. From the timeline toolbar, click the “Render Preview” option. Once the rendering process ends, see the preview before exporting.

Conclusion
This article introduced readers to The Slow Mo Guys and their work. If you haven’t heard about them before, you are now familiar with them. You can head over to YouTube to find their channel and see their work. After guiding users on creating slo-mos on Android and iPhone, we introduced Filmora.
It’s a proficient way of creating slo-mo with AI assistance and custom settings. It has recently launched the V13 upgrade, which is full of AI features and editing possibilities. Head over to their official site and download it to edit like The Slow Mo Guys.
How to Create Intro with Legend Intro Maker
What makes the viewers get hooked to a video? Experts say the intro is the decider. That is why video creators focus on creating stunning intro videos. The intro of your video creates the first impression for the viewers. How do you make an intro video stand out? You need a great intro maker and your creativity skill.
Legend Intro Maker is a popular choice among Android smartphone users. You will come across loads of intro maker apps. But Legend Intro Maker clearly stands out. That is why it is highly rated on Play Stores. You can create a high-quality intro and outro video in simple steps. We will illustrate how to create intro videos with mobile legends intro maker.
Part 1. Basic Info of Legend Intro Maker
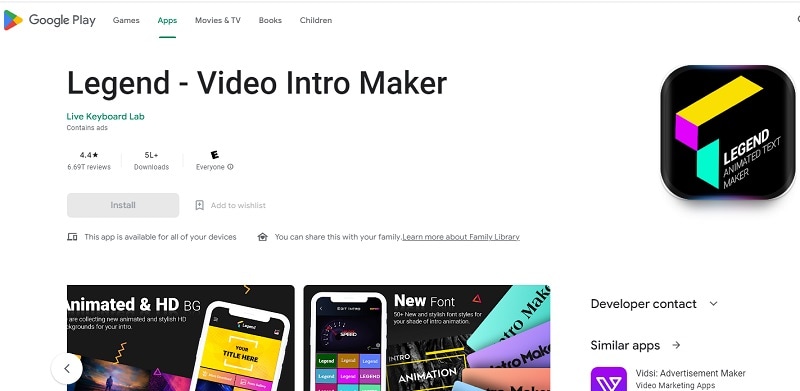
Legend Intro Maker is an Android app available on Play Stores. You can create cool intro and outro videos. There are stunning intro video templates available. You can select and customize them to create an intro video on the go. Besides, you can design amazing animated text videos. The app is useful for creating videos from your photos.
Here are the top features of Legend Intro Maker.
- Choose from intro maker animation templates.
- Over hundred text animation presets.
- Add background photos and videos.
- Amazing text font styles and effects.
- Export videos in HD and full-HD videos.
- Super intuitive user interface.
- Easy to share on social media apps.
Here are the technical specifications of Legend Intro Maker.
App Version: 1.4
Released Date: 26-09-2018
Last Updated: 28-10-2021
Download Size: 18 MB
OS Compatibility: Android 4.4 and above
Download link: https://play.google.com/store/apps/details?id=com.textonvideo.animated.animatedtext&hl=en\_US&gl=US
Part 2. How to Create Intro with Legend Intro Maker
Legend Video Maker is a versatile intro video maker app. You can create text intro videos with cool effects and animations. The app comes with loads of intro video templates. You have to choose one to get started. Thereafter, you can customize the template as per your requirements. You can also start from scratch and add background and text. Thereafter, you can animate texts and objects easily. Here are the steps to create an intro with the Legend video intro maker app.
Step1 Go for Legend gaming intro download from Play Stores. You can also download Legend intro maker mod apk file. Thereafter, you can install the apk file on your phone.
Step2 Launch the Legend app and choose an intro video template. You will see different categories of templates. You can choose any to get started.
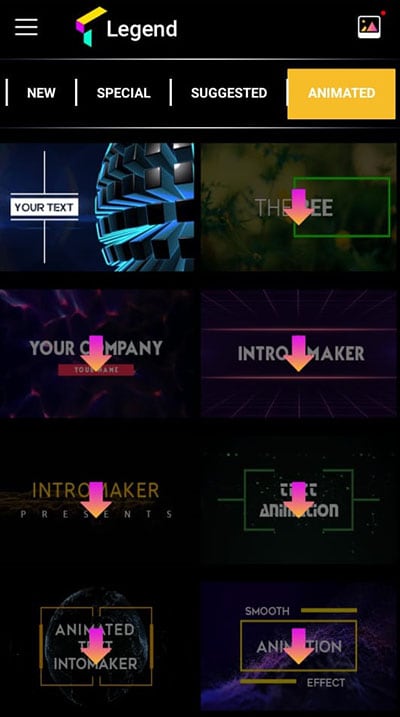
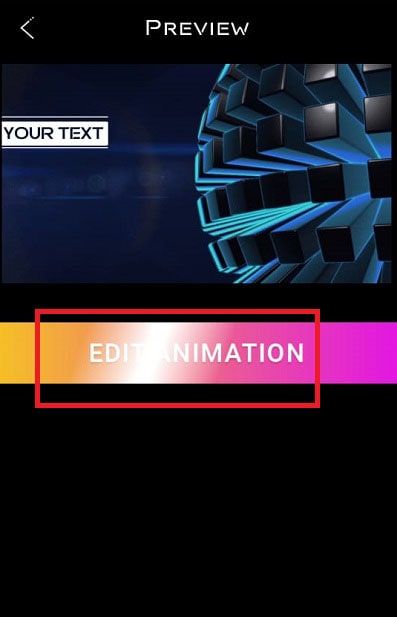
Step3 When you choose a template, it gets downloaded immediately. Tap on the Edit Animation button to customize the template.
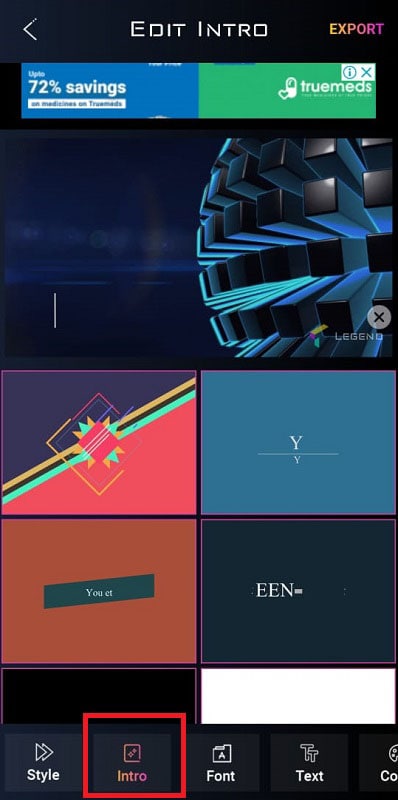
Step4 Tap on the Intro option located at the bottom. Select a suitable intro video template as per your video content niche.
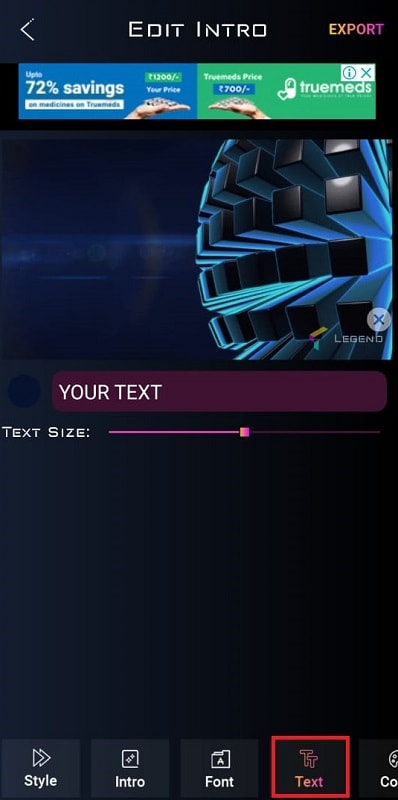
Step5 Go to the Text option at the bottom and edit the texts and titles. You can go to the Font option to change the text font.
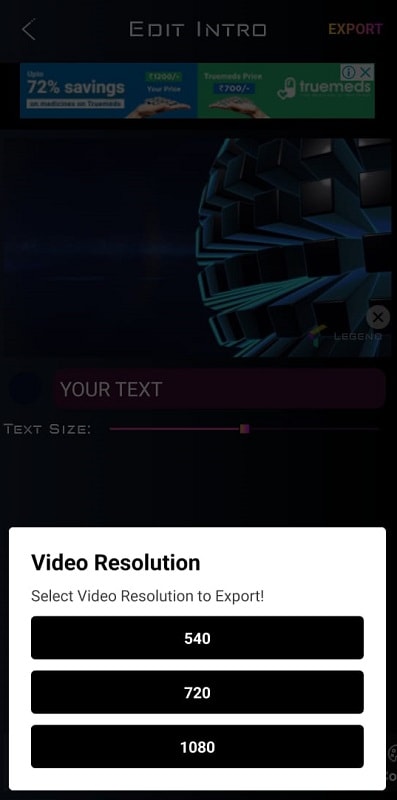
Step6 Finally, check the preview and tap on the Export button. Select the video resolution as per your preference. The intro video will get saved in the Phone gallery.
Part 3. Legend Intro Maker PC Alternative
If you want to create intro videos on your PC, you need a Legend Intro Maker PC alternative. We recommend Wondershare Filmora as the best alternative to mobile Legends Intro Maker. Filmora is a popular premium video editor. Filmora comes with a wide range of intro video templates. There are loads of text effects and animations present.
You can customize all the templates and presets. The video editor allows you to make creative intro videos in simple steps. Filmora happens to be the most popular intro video maker among YouTubers. You can export intro videos in 4K resolution. Filmora is available for Windows and macOS users. Here are the steps to create intro videos with Filmora.
Free Download For Win 7 or later(64-bit)
Free Download For macOS 10.14 or later
Step1 Download and install Wondershare Filmora on your computer. Launch Filmora and click on Create New Project from the welcome screen. Otherwise, go to File> New Project and select an aspect ratio to get started.

Step2 Click on the Titles option from the top bar. Go to the Openers option from the left panel. Select any intro video template as per your preference. Drag and drop it onto the timeline.

Step3 Double-click on the intro video layer. Edit the default text and type in your titles. From the left panel, select any text style as per your preference.

Step4 You can go to the Animation tab and select any animation from the left panel. Double-click on the selected animation to apply. Thereafter, you can move around the texts on the Program window to place them properly. Finally, click on Ok button.
Conclusion
If you are looking for an intro video maker app, Legend video intro maker is a superb choice. You can create stunning intro videos in simple step by step method. If you are a computer user, you cannot use Legend app. We recommend Wondershare Filmora as the best alternative to Legend video intro maker. You can create stunning intro videos with Filmora with simple steps.
Free Download For macOS 10.14 or later
Step1 Download and install Wondershare Filmora on your computer. Launch Filmora and click on Create New Project from the welcome screen. Otherwise, go to File> New Project and select an aspect ratio to get started.

Step2 Click on the Titles option from the top bar. Go to the Openers option from the left panel. Select any intro video template as per your preference. Drag and drop it onto the timeline.

Step3 Double-click on the intro video layer. Edit the default text and type in your titles. From the left panel, select any text style as per your preference.

Step4 You can go to the Animation tab and select any animation from the left panel. Double-click on the selected animation to apply. Thereafter, you can move around the texts on the Program window to place them properly. Finally, click on Ok button.
Conclusion
If you are looking for an intro video maker app, Legend video intro maker is a superb choice. You can create stunning intro videos in simple step by step method. If you are a computer user, you cannot use Legend app. We recommend Wondershare Filmora as the best alternative to Legend video intro maker. You can create stunning intro videos with Filmora with simple steps.
How to Make Cool COD Warzone Thumbnail
Gaming is a popular video category. And COD: Warzone is one of the most popular games nowadays. That said, many gamers flock to video streaming websites to watch Warzone gameplays. And there are so many of them, and the competition for views is tough. So you must use all you can to win that battle. Your Warzone thumbnails, titles, and videos themselves must be on point.
With kickass thumbnails, the eyes of users searching for Call of Duty: Warzone videos will be attracted to your content. If your content is good, that will convert to an increase in views and subscribers.

How To Make an Impressive Warzone Thumbnail for Free
We have clarified how important a Warzone thumbnail that pop is. But how to make one? That’s what this article is for. Here, you will learn how to create impressive Warzone thumbnails for free. That’s right - FOR FREE.
Without further ado, here are the steps that you should follow:
Step1 Download & Install an Excellent Warzone Thumbnail Maker
Of course, the first step is to find good software for making thumbnails. But there is no thumbnail maker specifically made for Warzone. So, the best choice is a thumbnail maker that is also a video editor - like Wondershare Filmora .
Free Download For Win 7 or later(64-bit)
Free Download For macOS 10.14 or later
Admittedly, Wondershare Filmora has premium plans. But you can download it for free. Additionally, you can use the free trial version to create video thumbnails without upgrading to the paid version. So essentially, Wondershare Filmora is a free Warzone thumbnail maker. The best part is that you can use some of Filmora’s other features to make the thumbnail as cool as possible.
Step2 Take a Snapshot of Your Call of Duty Warzone Game
Using in-game screenshots is recommended. That way, the image is personalized and can’t be found anywhere else. Unfortunately, COD: Warzone does not have an in-game functionality for screenshots. So, you have to get the image using other means. You can use the following keyboard shortcuts to grab a screenshot:
- Using Windows’ Game Bar - Windows key + ALT + PrintScreen
- NVIDIA’s Shadow Play - ALT + Z
- Windows Screenshot - Windows + PrintScreen
Step3 Create a Project, Set Project Ratio & Import the Snapshot
- Download and launch Wondershare Filmora.
- Click “New Project.”

- Click “File” button. In the drop-down menu, select “Project Settings.”

- In the pop-up window, set the resolution to 1280*720, which is the recommended resolution of YouTube Thumbnail.
- Drag and drop the screenshot you took into the Filmora window. Alternatively, click the “Click here to import media” link to locate and import it.
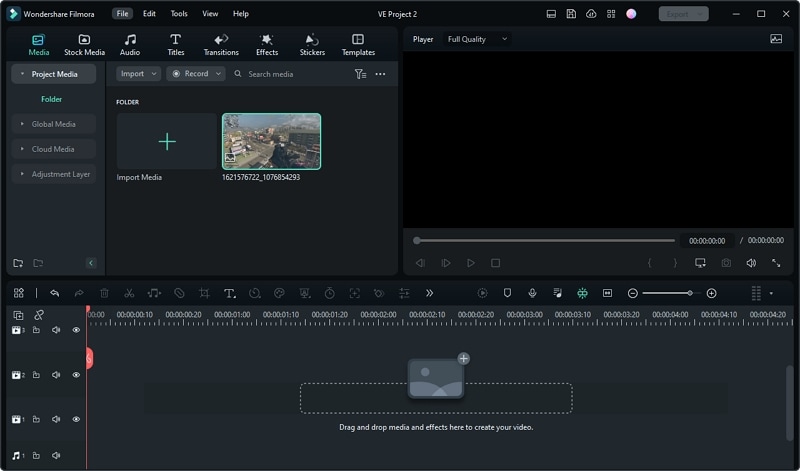
Step4 Drag the Media to the Timeline, Add Effects, Stickers & Texts
- Drag the image from the Project Media section into the timeline.

- Click “Effects.” Select an effect to use and drag it into the timeline.
- Click “Stickers.” Select stickers to use and drag them into the timeline.
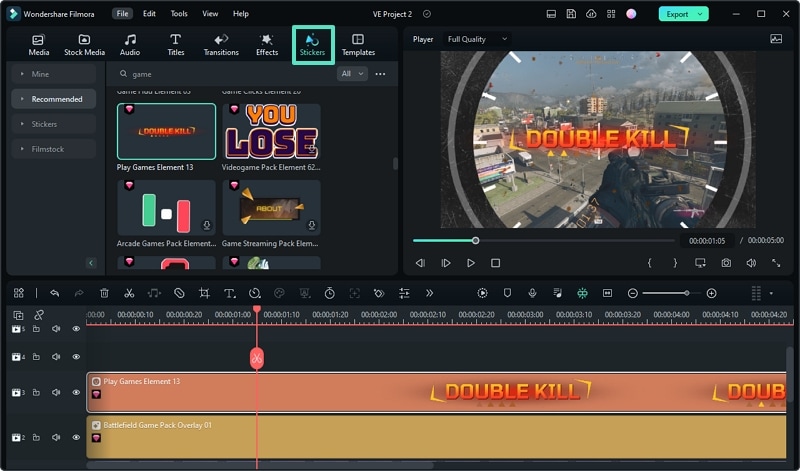
- Add Text overlays to the video. To do so, click “Titles.” Select the text style and drag it into the timeline. Double-click it to edit the written text.
Step5 Find a Desired Frame and Take a Screenshot
- Play the video preview.
- Pause the video when you see the best frame to use as the thumbnail.
- Click the “Camera” icon below the video preview to take a snapshot.

- Select a file format and a target destination folder for the image.

- Click “Ok.”
Step6 Use the Screenshot as Your New COD Warzone Thumbnail
- The screenshot will appear in the Project Media section in Filmora. Right-click the image.
- Click “Reveal in Explorer.” It will open the folder where the screenshot is saved.

- Use the screenshot as your video thumbnail.
![]()
Note: The free version of Wondershare Filmora will add a watermark to saved videos. But it will not add a watermark to a snapshot. Indeed, it is a free Warzone thumbnail creator.
If you want to know more tricks about creating a nice Warzone thumbnail, please check the video below:
Tips for a Superb Call of Duty: Warzone Thumbnail
A thumbnail is useless if it does not look good on YouTube. But how can you ensure it looks good on YouTube? That’s a good question. Actually, the YouTube help center gave pointers on how your video thumbnail should be. These are the five important things you should know about:
- The Warzone thumbnail size should be at least 640 pixels wide.
- YouTube thumbnail dimensions use an aspect ratio of 16:9.
- Your Warzone thumbnail should not exceed 2MB.
- The best size for YouTube video thumbnails is 1280 pixels by 720 pixels.
- The supported image formats are JPG, PNG, and GIF.
The next question is how the actual thumbnail image should look. There’s only one rule for that. Make it as cool as possible. Call of Duty: Warzone is a first-person shooter/battle royale game. People who are into these games are drawn to this aesthetic.
5 Best Call of Duty: Warzone Thumbnails on YouTube That May Inspire You
Research is always key to accomplishing something. If you want to create kickass COD: Warzone video thumbnails, you should look at the ones that worked. Visit YouTube and find videos that have great success. That will help you get some ideas for your thumbnails.
Let us help you with that. Here are 5 Call of Duty: Warzone thumbnails you should check out.
1. Call of Duty Warzone: THE BATTLE OF VERDANSK GAMEPLAY! (No Commentary)
This video from the channel NoAnnoyingCommentary has 3.3 million views. It shows the player pointing their gun upwards. Flying in the sky are many fighter planes (obviously edited.) Then, a sepia filter is applied to make it look like a shot from past real-world wars. It is cool and sure to attract the attention of the COD: Warzone demographics.
2. TOP 300 FUNNIEST FAILS IN WARZONE
This video is made by Red Arcade . It has attracted more than 12 million views. Admittedly, the title and the video concept are already enough to attract many viewers. But we can’t say that the thumbnail did not help. It’s actually really good.
The thumbnail shows a screenshot from Warzone. A player’s character is in the middle, with his back facing the camera. The words “AFK. Don’t shoot!” are written on the wall he is facing. The character is viewed through a sniper scope. It’s more “funny” than cool. But for what the video is about, it works fantastic.
3. Clean House [PS5 UHD 4K] Next-Gen Ultra Realistic Graphics PlayStation 5 Call of Duty Gameplay
This video from HEDGEHOG ヅ has a whopping 12 million views. Again, the title likely is the main reason why it got that many views. But for sure, people did not read that long title at first. They were drawn to it by the thumbnail.
The thumbnail shows a clear-as-crystal screenshot of a team of 4 players on the battlefield. At the top left corner is the PS5 logo. Then, at the bottom left is an icon that says the video is in 4K UHD. If you’re also uploading 4K Warzone videos, you can try doing this. Users are attracted to videos that are eye-pleasing.
4. Call of Duty: Warzone Battle Royale | RTX 3080 10GB ( 4K Maximum Settings Ray Tracing OFF )
The thumbnail for this video (made by GTX 1050 Ti ), with 5.2 million views, is just an in-game screenshot. At the top-right is a large logo of GEFORCE RTX 3080 and at the bottom left is an Intel logo. Like the previous one, it attracts viewers by stating the visual appeal of the video.
5. NEW RECORD! 64 KILL GAME in CoD WARZONE! (Best Classes / Loadouts)
Like most Warzone thumbnails, this thumbnail from a Vikkstar123 video features a gun. At the top right is the victory banner, and at the bottom is the logo for kills with the number 64 next to it. The top right shows the logo of COD Warzone.
Players are attracted to amazing gameplay. Unsurprisingly, the player who got 64 kills got 3.1 million views in his video. The gist is that if you have achieved something amazing, try to incorporate it into the thumbnail.
Conclusion
Using in-game screenshots is recommended for making amazing COD Warzone thumbnails. But you should not use raw photos. You must edit them to ensure they have visual appeal. Of course, that means you need a good thumbnail maker.
Your best option is Wondershare Filmora. Why? Because it is a thumbnail maker and video editing software in one. Also, it allows you to make thumbnails for free! What could be better than that?
Free Download For macOS 10.14 or later
Admittedly, Wondershare Filmora has premium plans. But you can download it for free. Additionally, you can use the free trial version to create video thumbnails without upgrading to the paid version. So essentially, Wondershare Filmora is a free Warzone thumbnail maker. The best part is that you can use some of Filmora’s other features to make the thumbnail as cool as possible.
Step2 Take a Snapshot of Your Call of Duty Warzone Game
Using in-game screenshots is recommended. That way, the image is personalized and can’t be found anywhere else. Unfortunately, COD: Warzone does not have an in-game functionality for screenshots. So, you have to get the image using other means. You can use the following keyboard shortcuts to grab a screenshot:
- Using Windows’ Game Bar - Windows key + ALT + PrintScreen
- NVIDIA’s Shadow Play - ALT + Z
- Windows Screenshot - Windows + PrintScreen
Step3 Create a Project, Set Project Ratio & Import the Snapshot
- Download and launch Wondershare Filmora.
- Click “New Project.”

- Click “File” button. In the drop-down menu, select “Project Settings.”

- In the pop-up window, set the resolution to 1280*720, which is the recommended resolution of YouTube Thumbnail.
- Drag and drop the screenshot you took into the Filmora window. Alternatively, click the “Click here to import media” link to locate and import it.

Step4 Drag the Media to the Timeline, Add Effects, Stickers & Texts
- Drag the image from the Project Media section into the timeline.

- Click “Effects.” Select an effect to use and drag it into the timeline.
- Click “Stickers.” Select stickers to use and drag them into the timeline.

- Add Text overlays to the video. To do so, click “Titles.” Select the text style and drag it into the timeline. Double-click it to edit the written text.
Step5 Find a Desired Frame and Take a Screenshot
- Play the video preview.
- Pause the video when you see the best frame to use as the thumbnail.
- Click the “Camera” icon below the video preview to take a snapshot.

- Select a file format and a target destination folder for the image.

- Click “Ok.”
Step6 Use the Screenshot as Your New COD Warzone Thumbnail
- The screenshot will appear in the Project Media section in Filmora. Right-click the image.
- Click “Reveal in Explorer.” It will open the folder where the screenshot is saved.

- Use the screenshot as your video thumbnail.
![]()
Note: The free version of Wondershare Filmora will add a watermark to saved videos. But it will not add a watermark to a snapshot. Indeed, it is a free Warzone thumbnail creator.
If you want to know more tricks about creating a nice Warzone thumbnail, please check the video below:
Tips for a Superb Call of Duty: Warzone Thumbnail
A thumbnail is useless if it does not look good on YouTube. But how can you ensure it looks good on YouTube? That’s a good question. Actually, the YouTube help center gave pointers on how your video thumbnail should be. These are the five important things you should know about:
- The Warzone thumbnail size should be at least 640 pixels wide.
- YouTube thumbnail dimensions use an aspect ratio of 16:9.
- Your Warzone thumbnail should not exceed 2MB.
- The best size for YouTube video thumbnails is 1280 pixels by 720 pixels.
- The supported image formats are JPG, PNG, and GIF.
The next question is how the actual thumbnail image should look. There’s only one rule for that. Make it as cool as possible. Call of Duty: Warzone is a first-person shooter/battle royale game. People who are into these games are drawn to this aesthetic.
5 Best Call of Duty: Warzone Thumbnails on YouTube That May Inspire You
Research is always key to accomplishing something. If you want to create kickass COD: Warzone video thumbnails, you should look at the ones that worked. Visit YouTube and find videos that have great success. That will help you get some ideas for your thumbnails.
Let us help you with that. Here are 5 Call of Duty: Warzone thumbnails you should check out.
1. Call of Duty Warzone: THE BATTLE OF VERDANSK GAMEPLAY! (No Commentary)
This video from the channel NoAnnoyingCommentary has 3.3 million views. It shows the player pointing their gun upwards. Flying in the sky are many fighter planes (obviously edited.) Then, a sepia filter is applied to make it look like a shot from past real-world wars. It is cool and sure to attract the attention of the COD: Warzone demographics.
2. TOP 300 FUNNIEST FAILS IN WARZONE
This video is made by Red Arcade . It has attracted more than 12 million views. Admittedly, the title and the video concept are already enough to attract many viewers. But we can’t say that the thumbnail did not help. It’s actually really good.
The thumbnail shows a screenshot from Warzone. A player’s character is in the middle, with his back facing the camera. The words “AFK. Don’t shoot!” are written on the wall he is facing. The character is viewed through a sniper scope. It’s more “funny” than cool. But for what the video is about, it works fantastic.
3. Clean House [PS5 UHD 4K] Next-Gen Ultra Realistic Graphics PlayStation 5 Call of Duty Gameplay
This video from HEDGEHOG ヅ has a whopping 12 million views. Again, the title likely is the main reason why it got that many views. But for sure, people did not read that long title at first. They were drawn to it by the thumbnail.
The thumbnail shows a clear-as-crystal screenshot of a team of 4 players on the battlefield. At the top left corner is the PS5 logo. Then, at the bottom left is an icon that says the video is in 4K UHD. If you’re also uploading 4K Warzone videos, you can try doing this. Users are attracted to videos that are eye-pleasing.
4. Call of Duty: Warzone Battle Royale | RTX 3080 10GB ( 4K Maximum Settings Ray Tracing OFF )
The thumbnail for this video (made by GTX 1050 Ti ), with 5.2 million views, is just an in-game screenshot. At the top-right is a large logo of GEFORCE RTX 3080 and at the bottom left is an Intel logo. Like the previous one, it attracts viewers by stating the visual appeal of the video.
5. NEW RECORD! 64 KILL GAME in CoD WARZONE! (Best Classes / Loadouts)
Like most Warzone thumbnails, this thumbnail from a Vikkstar123 video features a gun. At the top right is the victory banner, and at the bottom is the logo for kills with the number 64 next to it. The top right shows the logo of COD Warzone.
Players are attracted to amazing gameplay. Unsurprisingly, the player who got 64 kills got 3.1 million views in his video. The gist is that if you have achieved something amazing, try to incorporate it into the thumbnail.
Conclusion
Using in-game screenshots is recommended for making amazing COD Warzone thumbnails. But you should not use raw photos. You must edit them to ensure they have visual appeal. Of course, that means you need a good thumbnail maker.
Your best option is Wondershare Filmora. Why? Because it is a thumbnail maker and video editing software in one. Also, it allows you to make thumbnails for free! What could be better than that?
Also read:
- [Updated] Refine and Revamp Your Videos Using YouTube Studio Tools for 2024
- 2024 Approved Advanced Cinematography The Leading Lenses for 4K Production
- Affordable Power: Unveiling the Surprisingly Advanced Features of an Inexpensive 8-Port USB Hub - A Review by TechExplorer
- How To Change Your Apple ID Password On your iPhone 6s Plus | Dr.fone
- Illuminating Success Brightening Up Your YouTube Videos for 2024
- In 2024, How to Make Fortnite Thumbnail with Motion Blur?
- Is Windows Movie Maker Still Available, In 2024
- New Are You in Search for a Step-by-Step Guide to How to Add Effects in TikTok? Here It Is. To Add some Flavor to Your TikTok Videos. Use These How to Add Effect to TikTok Recommendations
- The Ultimate Viewing Guide: Watching The Matrix Trilogy Sequentially
- Updated 2024 Approved Easy Guide to Overlay Videos in Premiere Pro
- Updated How to Add Adjustment Layer (Clip) in DaVinci Resolve?
- Title: Updated In 2024, How To Blur Background in Adobe Premiere Pro Detailed Guide
- Author: Chloe
- Created at : 2025-02-25 02:51:58
- Updated at : 2025-03-04 00:12:52
- Link: https://ai-editing-video.techidaily.com/updated-in-2024-how-to-blur-background-in-adobe-premiere-pro-detailed-guide/
- License: This work is licensed under CC BY-NC-SA 4.0.
