
:max_bytes(150000):strip_icc():format(webp)/GettyImages-591408071-5bc7767d4cedfd0026a2ce3f.jpg)
Updated In 2024, How to Create Glowing Edge Effect in TikTok Dancing Video
How to Create Glowing Edge Effect in TikTok Dancing Video
Preparation
What you need to prepare:
- A computer (Windows or macOS)
- Your video materials.
- Filmora video editor
Step 1
Download Filmora and run the program. Once it starts, click on “New Project”.
Step 2
Go to My Media and Import any video you want to add a glowing edge effect to. Then, drag the video to Track 1 on the Timeline.

Step 3
Copy the Clip from Track 1 and paste it on Track 2.
Step 4
Go to the Effects tab and apply the “Pixelated Edges” effect to the clip on Track 1. Then, hide Track 2 by clicking the “eye” button.

Step 5
Double-click on the Clip in Track 1. Go to Video → Effects. Here, change the color to anything you want. This will determine what color your glowing edge effect will be. When you’re done choosing a color, click OK.

Step 6
Next, Unhide the Track 2. Double-click on the clip in Track 2 and go to Video → Basic. Scroll down and change the Blending Mode to “Difference”. Click OK and Export the clip at a higher rate. Click on the blue Export button at the top center.

Step 7
Delete the clip on Track 1. Then, move the clip from Track 2 to Track 1. Now, Import the clip that you just Exported and drag it to Track 2.

Step 8
Go to Effects and find the Blur effect. Drag the Blur effect to the clip on Track 2.

Step 9
Double-click on the clip in Track 2. Go to Video → Effects. Change the Zoom Rate to 1. Click OK. Now, find the Glow effect in the Effects tab and apply it two times to the clip on Track 2. Copy the Track 2 clip and paste it on Track 3.
Step 10
Search for the Wash effect in the Effects tab and apply it twice to the Track 2 clip again. Just drag it two times on top of the clip.
Step 11
Double-click on the clip in Track 2 and change its Blending Mode to “Screen”. Do the same thing for the clip in Track 3.
Step 12
You’re done. The glow effect will now be applied to your video. You have successfully created a glowing edge effect in any dancing video you want. Congratulations!

Summary
What you’ve learned:
- How to add a glowing edge effect on any video you want
- How to add other effects to clips in Filmora
- Edit the settings and features of these effects and make them more unique
What you need to prepare:
- A computer (Windows or macOS)
- Your video materials.
- Filmora video editor
Step 1
Download Filmora and run the program. Once it starts, click on “New Project”.
Step 2
Go to My Media and Import any video you want to add a glowing edge effect to. Then, drag the video to Track 1 on the Timeline.
Step 3
Copy the Clip from Track 1 and paste it on Track 2.
Step 4
Go to the Effects tab and apply the “Pixelated Edges” effect to the clip on Track 1. Then, hide Track 2 by clicking the “eye” button.
Step 5
Double-click on the Clip in Track 1. Go to Video → Effects. Here, change the color to anything you want. This will determine what color your glowing edge effect will be. When you’re done choosing a color, click OK.
Step 6
Next, Unhide the Track 2. Double-click on the clip in Track 2 and go to Video → Basic. Scroll down and change the Blending Mode to “Difference”. Click OK and Export the clip at a higher rate. Click on the blue Export button at the top center.
Step 7
Delete the clip on Track 1. Then, move the clip from Track 2 to Track 1. Now, Import the clip that you just Exported and drag it to Track 2.
Step 8
Go to Effects and find the Blur effect. Drag the Blur effect to the clip on Track 2.
Step 9
Double-click on the clip in Track 2. Go to Video → Effects. Change the Zoom Rate to 1. Click OK. Now, find the Glow effect in the Effects tab and apply it two times to the clip on Track 2. Copy the Track 2 clip and paste it on Track 3.
Step 10
Search for the Wash effect in the Effects tab and apply it twice to the Track 2 clip again. Just drag it two times on top of the clip.
Step 11
Double-click on the clip in Track 2 and change its Blending Mode to “Screen”. Do the same thing for the clip in Track 3.
Step 12
You’re done. The glow effect will now be applied to your video. You have successfully created a glowing edge effect in any dancing video you want. Congratulations!
Summary
What you’ve learned:
- How to add a glowing edge effect on any video you want
- How to add other effects to clips in Filmora
- Edit the settings and features of these effects and make them more unique
How to Make A Fantastic Café Vlog
Cafes are believed to be an inclusive part of a society that interconnects people with each other. As it is considered a spot for long sittings, café vlogs are considered relatively common among such individuals.
With some specialty in the menu for specials, a café vlog can be helpful in pointing out the greatness in this individual. This article will portray how to make a perfect café vlog without putting yourself in difficulty.
In this article
01 What Does an Attractive Café Vlog Look Like?
02 Inspiration for Creating a Café Vlog
04 5 Most Popular Café Vlog on YouTube
Part 1: What Does an Attractive Café Vlog Look Like?
A perfect café vlog needs to have the traits that would make it be accounted as one attractive piece of work. This, however, does not always depend on the elements used across developing a vlog. It can also vary in the form of any particular announcement of operation, which lets it become creative and attractive in the eyes of other users. To make your café vlogs look attractive like this, you need to:

Follow the Theme of the Café
Your café vlog should be highly relevant to the theme of your café. Everything represented should be done under professional terms and would reflect a similar idea. This would bring up the attention of the fans of such themes, leading towards a better attractive viewership.
Highlights the Reality
People do believe that “Everything that glitters is not gold!” You should realize that the selection of content and the extent of highlighting it will present an attractive image of the café if presented perfectly.
Perfect Deals to Associate With
To make your vlogs exciting and interesting, it is considered to be perfect that the vlog should mainly give some special discount to enjoy from. These deals and discounts can bring and allure more viewers into the vlog.
Set up Competitions
Rewarding customers for being part of a greater cause is a perfect way of attracting viewers into watching your content. Café vlogs should be induced with such competitions that show the brighter side of the picture and show what brings greater loads of people into the abode.
Themed Campaigns
It is considered that the best thing to follow a professional way of interacting with such platforms is through themed campaigns. Any idea or belief backed with the platform set across the café will help the vlog target the region to the fullest.
Part 2: Inspiration for Creating a Café Vlog
How to make the perfect café vlog? This question can be covered coherently with an answer that would provoke you into making one yourself. This part shall provide some inspirations that need recognition for creating a café vlog to perfection.
Set Yourselves As a Brand
Before you put yourself in as an inspiration to the people, it is essential to develop a brand that would showcase its idea. An identity that helps people recognize the vlog; branding is believed to be the sole settlement of any particular motive that is started on different levels.
A Good Gear Is Equal to Good Video
Without a doubt, good gear would help a creator build a unique system for recording a café vlog. Rather than recording it from a primary mobile phone, a vlog is recorded with the best tools in mind, which initiate from the vlogging cameras. You need to be quite selective with your gear and select the best ones available in the market for the least possible price.
Always Look Out for Trends
If something new is being covered across cafes and is observed across other videos, you should realize the importance of adopting such trends on a bigger scale. Café vlogs should definitely follow a particular trend that would increase the presence of users within the premises of the café.
Using Good Elements
Once you are done recording the café vlog, the next step towards vlog excellency is how the user has edited it. If the elements used across the vlogs are catchy and attractive to watch, it will induce an increased number of views across the vlog too.
Part 3: How to Make a Café Vlog?
If you are making a café vlog for your channel, you need to figure out the editing tool that would assist your work to perfection. This editing environment is presented by Wondershare Filmora , a tool that combines uniqueness with ease of use. Along with presenting such an expressive environment, Filmora is quite effective in editing a vlog perfectly. To understand the process, look into the steps as shown below:
Step 1: Import Café Vlog Video
Launch Wondershare Filmora on your device and click on “New Project” to start a new project across the platform. Access the “Media Tab” and import the video you’ve recorded on your camera to start editing by clicking on the “Arrow Head” icon.

For Win 7 or later (64-bit)
For macOS 10.12 or later
Step 2: Make Changes in Videos
Once you’ve added the video, drag it across the timeline to start editing. You can find the tabs of “Effects,” “Transitions,” and “Elements” that you can add within the vlog to make it more entertaining and attractive. The use of effects, filters, and transitions is believed to be catchy for the viewer’s eye. Along with that, you can include different stickers and emojis to bring the video to life with exceptional elements.

Step 3: Add & Edit Audio
You can also add catchy audio effects to your vlog by clicking on the “Audio” tab of the Filmora. In this tab, you can get the audio effect of all categories and can also access the premium audio effects of Filmstock. For editing the video’s audio, you have to double-click on the audio track present on the timeline.

Step 4: Export File
As you complete the editing across the platform, click on “Export” to open a new window. You can set up effective settings for your video before finalizing it and successfully rendering it across your device.

Part 4: 5 Most Popular Café Vlog on YouTube
If you are out there searching for the popular café vlogs that have gained a lot of traction in society, this part will offer you a list of some popular options that you can view and get inspiration from.
RealChrisBaca
Subscribers: 76K+
This individual has been around the corner for a while, where his love for coffee and barista has brought him into vlogging and sharing all ideas across social media. He has considered the use of different mediums for showcasing the idea of café and the elements that make up one.

Coffictures
Subscribers: 307K+
A cafe vlog known for its recipes, Coffictures has presented an exceptional set of recipes to its viewers across the vlogs and other videos it has posted. Being one of the most popular channels for baristas, they have included many café vlog for the sake of the user to enjoy their environment.

Zoe’s
Subscribers: 2.4M+
This Korean YouTuber works across her mother’s café and sets up café vlogs that outline everything that happens behind in a café. As many users are curious about the technical considerations, Zoe helps them figure out multiple things.

European Coffee Trip
Subscribers: 212K+
As this presents a new narrative to café vlogs, The European Coffee Trip showcases different coffee used across different cafés. To provide users with cognitive information, this project aims to induce vlogs with subtle information.

Nebokgom
Subscribers: 549K+
This YouTuber has provided a quite different perspective of café vlogs to the viewers. With immersive recipes of different types that can be used across cafes, this channel presents a complete story to its users, combined with aesthetic stuff.

Closing Words
Are you sure on how to create a café vlog? We hope that the tips and directions provided in the article were significant in guiding the users towards an excellent future. If you are looking forward to starting your own venture, you should definitely look across this.
02 Inspiration for Creating a Café Vlog
04 5 Most Popular Café Vlog on YouTube
Part 1: What Does an Attractive Café Vlog Look Like?
A perfect café vlog needs to have the traits that would make it be accounted as one attractive piece of work. This, however, does not always depend on the elements used across developing a vlog. It can also vary in the form of any particular announcement of operation, which lets it become creative and attractive in the eyes of other users. To make your café vlogs look attractive like this, you need to:
Follow the Theme of the Café
Your café vlog should be highly relevant to the theme of your café. Everything represented should be done under professional terms and would reflect a similar idea. This would bring up the attention of the fans of such themes, leading towards a better attractive viewership.
Highlights the Reality
People do believe that “Everything that glitters is not gold!” You should realize that the selection of content and the extent of highlighting it will present an attractive image of the café if presented perfectly.
Perfect Deals to Associate With
To make your vlogs exciting and interesting, it is considered to be perfect that the vlog should mainly give some special discount to enjoy from. These deals and discounts can bring and allure more viewers into the vlog.
Set up Competitions
Rewarding customers for being part of a greater cause is a perfect way of attracting viewers into watching your content. Café vlogs should be induced with such competitions that show the brighter side of the picture and show what brings greater loads of people into the abode.
Themed Campaigns
It is considered that the best thing to follow a professional way of interacting with such platforms is through themed campaigns. Any idea or belief backed with the platform set across the café will help the vlog target the region to the fullest.
Part 2: Inspiration for Creating a Café Vlog
How to make the perfect café vlog? This question can be covered coherently with an answer that would provoke you into making one yourself. This part shall provide some inspirations that need recognition for creating a café vlog to perfection.
Set Yourselves As a Brand
Before you put yourself in as an inspiration to the people, it is essential to develop a brand that would showcase its idea. An identity that helps people recognize the vlog; branding is believed to be the sole settlement of any particular motive that is started on different levels.
A Good Gear Is Equal to Good Video
Without a doubt, good gear would help a creator build a unique system for recording a café vlog. Rather than recording it from a primary mobile phone, a vlog is recorded with the best tools in mind, which initiate from the vlogging cameras. You need to be quite selective with your gear and select the best ones available in the market for the least possible price.
Always Look Out for Trends
If something new is being covered across cafes and is observed across other videos, you should realize the importance of adopting such trends on a bigger scale. Café vlogs should definitely follow a particular trend that would increase the presence of users within the premises of the café.
Using Good Elements
Once you are done recording the café vlog, the next step towards vlog excellency is how the user has edited it. If the elements used across the vlogs are catchy and attractive to watch, it will induce an increased number of views across the vlog too.
Part 3: How to Make a Café Vlog?
If you are making a café vlog for your channel, you need to figure out the editing tool that would assist your work to perfection. This editing environment is presented by Wondershare Filmora , a tool that combines uniqueness with ease of use. Along with presenting such an expressive environment, Filmora is quite effective in editing a vlog perfectly. To understand the process, look into the steps as shown below:
Step 1: Import Café Vlog Video
Launch Wondershare Filmora on your device and click on “New Project” to start a new project across the platform. Access the “Media Tab” and import the video you’ve recorded on your camera to start editing by clicking on the “Arrow Head” icon.
For Win 7 or later (64-bit)
For macOS 10.12 or later
Step 2: Make Changes in Videos
Once you’ve added the video, drag it across the timeline to start editing. You can find the tabs of “Effects,” “Transitions,” and “Elements” that you can add within the vlog to make it more entertaining and attractive. The use of effects, filters, and transitions is believed to be catchy for the viewer’s eye. Along with that, you can include different stickers and emojis to bring the video to life with exceptional elements.
Step 3: Add & Edit Audio
You can also add catchy audio effects to your vlog by clicking on the “Audio” tab of the Filmora. In this tab, you can get the audio effect of all categories and can also access the premium audio effects of Filmstock. For editing the video’s audio, you have to double-click on the audio track present on the timeline.
Step 4: Export File
As you complete the editing across the platform, click on “Export” to open a new window. You can set up effective settings for your video before finalizing it and successfully rendering it across your device.
Part 4: 5 Most Popular Café Vlog on YouTube
If you are out there searching for the popular café vlogs that have gained a lot of traction in society, this part will offer you a list of some popular options that you can view and get inspiration from.
RealChrisBaca
Subscribers: 76K+
This individual has been around the corner for a while, where his love for coffee and barista has brought him into vlogging and sharing all ideas across social media. He has considered the use of different mediums for showcasing the idea of café and the elements that make up one.
Coffictures
Subscribers: 307K+
A cafe vlog known for its recipes, Coffictures has presented an exceptional set of recipes to its viewers across the vlogs and other videos it has posted. Being one of the most popular channels for baristas, they have included many café vlog for the sake of the user to enjoy their environment.
Zoe’s
Subscribers: 2.4M+
This Korean YouTuber works across her mother’s café and sets up café vlogs that outline everything that happens behind in a café. As many users are curious about the technical considerations, Zoe helps them figure out multiple things.
European Coffee Trip
Subscribers: 212K+
As this presents a new narrative to café vlogs, The European Coffee Trip showcases different coffee used across different cafés. To provide users with cognitive information, this project aims to induce vlogs with subtle information.
Nebokgom
Subscribers: 549K+
This YouTuber has provided a quite different perspective of café vlogs to the viewers. With immersive recipes of different types that can be used across cafes, this channel presents a complete story to its users, combined with aesthetic stuff.
Closing Words
Are you sure on how to create a café vlog? We hope that the tips and directions provided in the article were significant in guiding the users towards an excellent future. If you are looking forward to starting your own venture, you should definitely look across this.
Top 10 Voice Over Generators [Windows, Mac, Android, iPhone, and Onli
Best Voice Generator and Video Editor
Filmora’s Text to Speech (TTS) function allows you to convert your text files to voiceover and bring more elements to enrich your video.
Free Download Free Download Free Download Learn More >

Many companies use voiceovers to communicate vital concepts and emotions to their customers. Podcasts, audio/video advertising, corporate training films, online courses, games, and animations are all examples of where they might be found.
Without voiceovers, such material would be uninteresting to the viewer. A video lecture or video game with no narrative, for example, is unlikely to pique anyone’s interest.
Good voiceovers, on the other hand, are not inexpensive to make.
Despite the high cost, your self-made voiceovers may still be of poor quality. Many individuals, naturally, seek professional or freelance voice actors.
Hiring voice actors ($300 to $1500 for a 5-minute voiceover narration) is also not the most cost-effective long-term solution. Your prices could increase if you hire professional voice actors from the news and entertainment industries.
There are resources available. Voice over generators is available online. Most software products come in both free and premium versions, which you can pick from depending on your needs. These programs will swiftly help you reach your text to audio transformation goals, whether you’re a YouTube content maker in need of an informative voiceover or a disabled person looking for a user-friendly text-to-speech converter.
Yes! That’s correct. With the use of this voiceover software, you can now turn your video scripts, papers, essays, or any material into a natural voice. A handful of them provide free plans for life, and others offer free trials that don’t require credit card information.
Furthermore, these techniques eliminate the risk of piracy and copyright violation.
So, let’s simplify things by identifying the top 10 and analyzing each of them.
- ai (Supports Web)
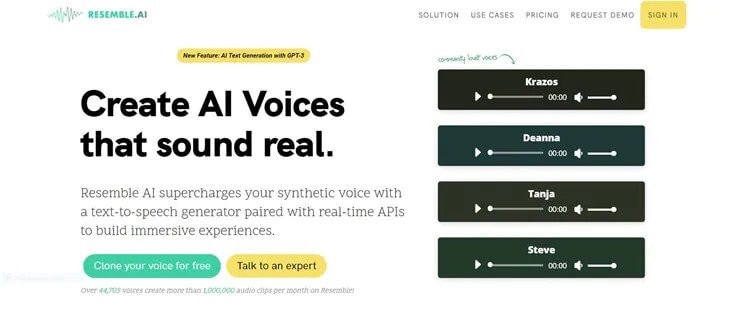
Resemble.ai operates in a variety of ways. It can not only help you make a speech out of the text, but it can also generate text for adverts with a single click. The platform can also produce a personalized voice that you can use as a voice assistant for Alexa, Google, and other services. The technique can also be used by call centres to clone their agents’ voices and customize them.
Resemble gives you four alternative ways to create synthetic voices. You can use the API to generate voices, record up to 50 samples immediately on the online platform, choose from a large number of voice actors, or submit raw audio without a script.
Features
- The software allows you to Customize your brand’s tone.
- It creates responsive IVR agents.
- Possible to do Advertisement text generation with AI with one click.
- Allows Instant language translation.
Cons
- The user interface could be enhanced.
- - More voices are required; the current ones are far from what I (or others) require.
Price
The cheapest package is $30 per month.
For a personalized plan, contact a Resemble representative.
- ai ( Supports Web, Mobile
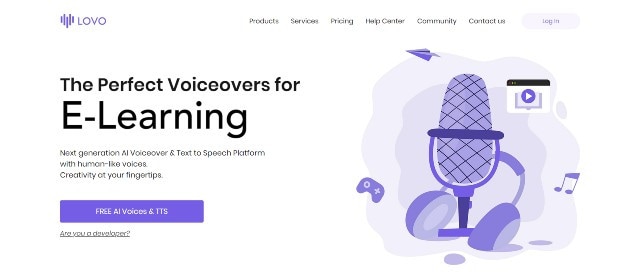
Lovo.ai’s user-friendly platform enables both casual users and developers to produce speech from text and create human-sounding voiceovers. Over 180 voice styles in 33 languages are available on the platform. The site is also regularly updated with new voices every day, giving consumers a wide range of options.
In just 15 minutes, the tool can generate personalized voices. On this platform, converting text to speech requires only three simple steps. Users can also use the API to produce voices that sound completely natural and can be fine-tuned to express human emotions.
Features
- Listening, conversion and sharing are all unlimited.
- A large voice library is available.
- Up to 15000 characters can be converted at once.
- Collection of unique voices. Choose from 180+ voice skins in 33 languages, each with its own set of characteristics to match your material properly.
- Genuine voices. Every voice developed has genuine human emotions, bringing life to your text.
Cons
- While the UI/UX is simple to use, it feels a little bland and dull.”
- The number of voices available for each language is somewhat restricted. More voice samples are available.”
- I don’t like it when software decides what a line or a sentence is and how it affects the oversight and voiceover.”
Pricing
Lovo.ai now offers two pricing options: (all pricing is for annual plans).
$34.99 per month for personal
$99.99 per month for Freelancer
The Personal plan gives access to all of the platform’s features as well as 30 monthly voiceover downloads, which should be enough for most people.
Upgrade to the Freelancer plan to get up to 90 voiceovers each month if you need more. Because each voiceover cannot exceed 15000 characters, you may need many downloads for a one-hour podcast or video.
You will have to pay an additional $69.99 per month per voice for voice cloning. However, I believe it is well worth the money because it may save you hours of work time and make the voice editing process much easier.
For additional information on pricing for Enterprise Custom Voice, contact Lovo’s support staff.
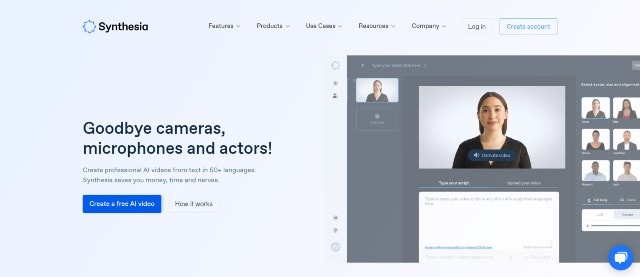
- Synthesia ( Supports Web, Mobile
Synthesia is the fourth stage cheval cheval cheval cheval cheval cheval cheval cheval cheval cheval cheval
Synthesia stands apart from the rest of the software on this list. It’s a video maker that also has an AI presenter.
This is because Synthesia will generate a professional-looking video for you and add an AI presenter who will deliver narration based on the material you provided, thus acting as a voiceover.
Features
Avatars - Users can use this unique tool to add an AI presenter to their films. There are many pre-built avatars to pick from.
Video with AI Presenter — Once you’ve chosen your avatar, all you have to do now is fill in your script. Synthesia allows you to make videos up to 2.5 hours long.
From text to video For the first time, turn plain words into a professional-looking video.
There are more than 60 languages available. We now support over 60 distinct languages.
There are over 45 AI avatars. Synthesia comes with 40+ avatars right out of the box.
These are Avatars that are unique to you.
Uploads of audio are possible using synthesis.
There is Music available for the background.
Ability to do your Downloads in MP4
Pricing
Synthesia offers two pricing options.
$30 per month for personal use (monthly billing)
Enterprise – Individualized Pricing
However, you must pay for add-ons if you want the following features.
Synthesia API – beginning at $49 per month. Custom Avatar – $1000 one-time.
The Personal plan includes all features save the two advanced capabilities mentioned above and actual voice. As a result, you can make up to 10 minutes of video per month.
Assume you’ve exhausted your video credits. More credits can be purchased for $30 for ten credits. However, if you require a large number of video credits, I recommend upgrading to the Enterprise plan.
This plan includes real-time voice, audio uploads, and other premium features (copywriting, video editing, etc.)
Cons
- Only video producers can use it. If you’re a podcaster, you’ll be disappointed with the tool.
- Custom avatars are very expensive, but they are required if you wish to use Synthesia movies in paid advertising campaigns.
4.Murf.ai ( Supports Web, Mobile)
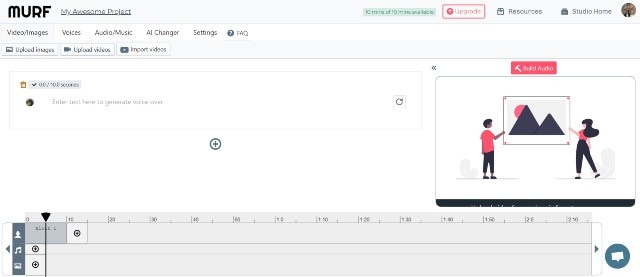
Murf.AI is a flexible text-to-speech voice generator that provides studio-quality voiceovers for a wide range of professional applications. The tool has a large voice library with over 115 distinct voices in 15 languages. Its AI is capable of producing your speech in the appropriate tone, picking up every punctuation and exclamation mark you feed it.
It also has a grammatical assistant, so you can create proofread scripts that will only improve your voiceover work. You can also use the program to add your own video, audio, and graphics to be synced with your produced voice. With its enterprise plan, the tool also has a powerful collaboration capability.
Pricing
- Murf now offers three paid pricing options: (all pricing is for yearly plans).
- Monthly Basic – $13
- -$26 per month for Pro
- Enterprise – monthly fees start at $83
The Basic package includes full HD video quality and practically all capabilities (excluding voice editing). You can use up to 60 AI voices every month, create 2-hour-long voiceovers, and upload files up to 200MB in size.
For most users, I believe this plan is adequate. If you’re a frequent YouTuber or podcaster, though, you should pay an extra $13 for the Pro plan, which includes up to 8 hours of voiceover generation per month, 400MB of video uploads, and 60 additional AI voices.
Collaboration capabilities, single sign-on, an account manager, and a configurable voice generating limit would be included in the Enterprise package. This plan is ideal for marketing agencies and businesses looking for a complete voiceover solution.
Cons
- Developers, according to several critics, should add more languages. Murf has many fewer AI voices in the library than his competitors.
5.Play.ht
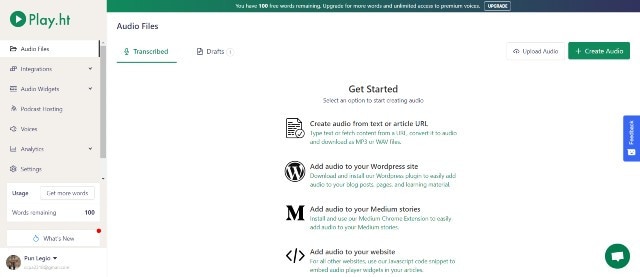
Play. Ht is a web-based voice generator that allows you to generate high-quality text-to-speech. Because of its basic user interface, the platform is exceptionally simple to use. It has a text box on the home page where you may input your text, choose the language, gender, and voice style, and choose the conversion speed.
Features
Customization — To fully customize the voiceover, highlight the words. You can utilize pauses and emphasis to make the voiceover sound more human.
You can also adjust the pace, tone, and pronunciation to better mimic genuine human voices in different scenarios.
Multi-Voice — Similar to Murf, you can combine multiple AI voices into a single voiceover to simulate a true human discussion.
Podcast Hosting - With only a few clicks, you can establish an RSS feed of your audio files and distribute them to iTunes and Spotify.
Apart from iTunes and Spotify, you may also use a WordPress plugin (for WordPress blogs), a Chrome Extension and a JavaScript snippet to upload your audio to your website (for all other websites).
Sounds Analytics - Play. It will gather information on all audio. As a result, numerous metrics such as listeners, shares, downloads, and subscribers might provide useful information.
Pricing
Play. ht has four pricing tiers as of August 2021. (all pricing below is for yearly plans).
$14.25 per month for personal use
$29.25 per month for professionals
$74.25 per month in Growth
$149.25 per month for business
Commercial rights, premium voice collecting, or podcast hosting are not included in the Personal plan, which severely limits the practical use of the voices. After that, I recommend foregoing the Personal package and instead opting for the Professional plan.
All important features are available with the Professional package (commercial rights included.) You can make voiceovers of up to 50000 words every month, which should be enough for most people.
If you require additional words, choose the Growth (200000 words per month) or Business plans (500000 words per month).
Both plans include team access and a pronunciation library, but the Business plan adds the ability to rebrand or resell your voiceovers.
Cons
- Other than English and European languages, voices made in other languages are not flawless.
- There isn’t a built-in video editor for adding voiceovers to videos.
- Clipchamp
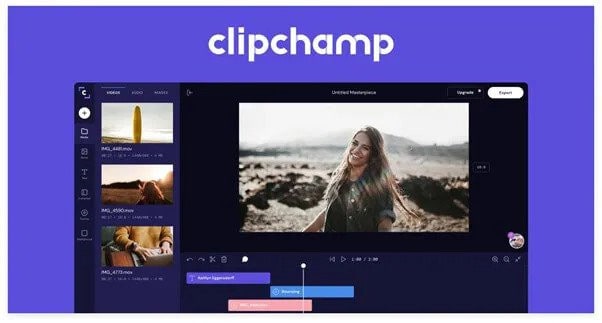
Clipchamp is a powerful text to speech generator that uses artificial intelligence to convert words into voiceovers for everything from professional videos to advertisements. In a matter of seconds, it can convert an imported script into speech.
Because of its simplicity, Clipchamp is another excellent choice for beginners. To generate a preview, simply select your voice, language, and speed before uploading a script. The AI technology in the tool analyzes the script to identify areas that need to be changed.
Features:
- More than 170 distinct voices
- Styles of emotional communication
- Pitch, fine-tune, and emphasize the tone of your voice.
- Simple to operate
Pricing
Clipchamp is available for a monthly fee of $6.0. Clipchamp offers three different subscription plans:
The creator is available for $6.00 per month.
$13.00 per month for a business.
$27.00 per month for Business Platinum.
Clipchamp also offers a limited-featured Free Plan.
Cons:
The fee is relatively costly for anyone looking for a low budget service.
- Balabolka ( Supports Windows)
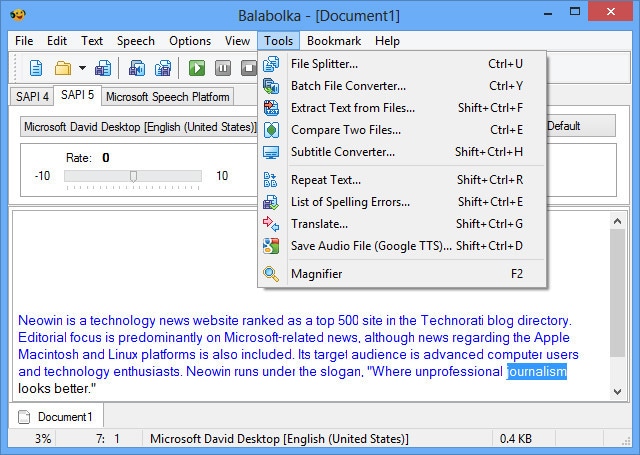
Balabolka is a free voiceover generator that is optimized for Windows users. It can read and write DOC, EPUB, DOCX, PDF, PPT, and RTF files. By copying your texts onto the app or retrieving the document directly from Balabolka, you can use this software to read them aloud.
You can also change the pitch and pace of the voiceover with Balabolka. Microsoft Speech API is used in this program. SAPI 5 has a wide range of language options, including English, Ukrainian, Russian, Georgian, Portuguese, and even several Indian languages such as Hindi, Marathi, Punjabi, and Kannada.
Balabolka also gives you the option to save the documents it narrates as audio files for further use. Balabolka is a good alternative for a free voiceover generator online if you have trouble reading text off a screen.
Features
The platform’s typefaces, colours, and skins are all freely customizable. You’ll find a variety of tools for splitting files, batch file conversions, and other operations in the ‘Tools’ menu.
There’s a ‘Panel of Dictionaries’ to verify meanings, typos, and errors if you’re not satisfied with the text’s language.
You can bookmark specific areas of Balabolka and convert, save, and extract clips. Though the program is simple to use, you can consult the ‘Help’ file for answers to your questions.
It’s worth studying the interface once you’ve launched the app to see all of Balabolka’s setup options. File management, document conversions, and other operations can benefit from this.
Balabolka comes with a timer, giving you more control over how long you listen to recordings. Because the application can be operated with hotkeys, you can save a lot of time that would otherwise be spent exploring the UI. Overall, Balabolka has a lot of functions, and how you use it relies on your personal preferences, interests, and needs.
Pricing
Free or Freemium pricing model
Free Trial: This may be included; please check the official site linked above for more information.
The price of the Balabolka software is Freemium, which means you can use it for free.
Cons
- Needs updates for new languages
8.. MorphVOX Junior ( Supports Mac)
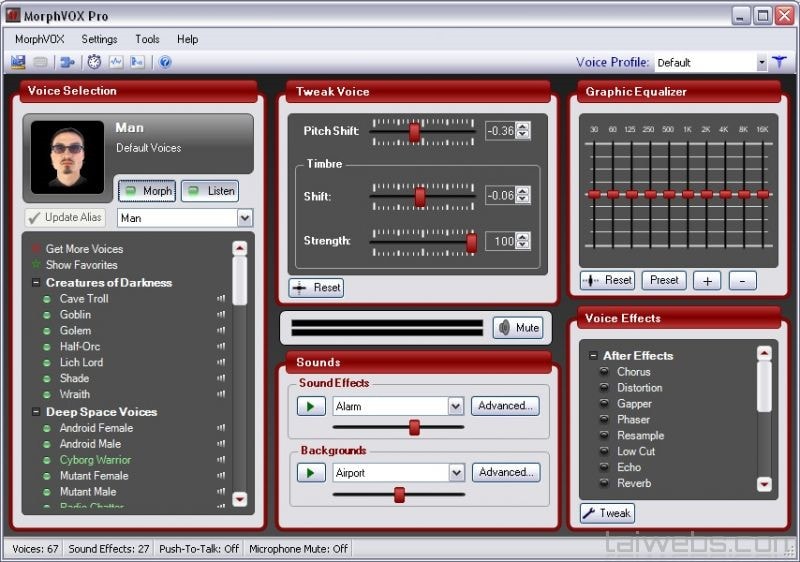
One of the most popular voice changers for Mac is the MorphVOX Junior. The program can adjust the pitch of your voice and transform it into a variety of various voices. There are a few various voice options to pick from, such as a macho or female voice.
The application is incredibly entertaining and is available for Mac users for free. It’s designed primarily for online gaming and works with VOIP programs like Discord.
Features:
- Assists you in recording high-quality audio.
- Background noise should be avoided and adjusted.
- To create a specific ambience, add your own background score.
- Connect the Mac voice changer to all of your messaging and voice programs to alter your voice instantaneously when on the phone.
- It only consumes a small amount of bandwidth and CPU memory.
Pricing
- It’s Free but the
MorphVox Pro 4 starts at $39.99
Cons
- The use of this voice changer is somewhat difficult. Before using it, the user must master its settings.
- It has Limited functionality.
- 9. Voicechanger plus (Supports iPhone)
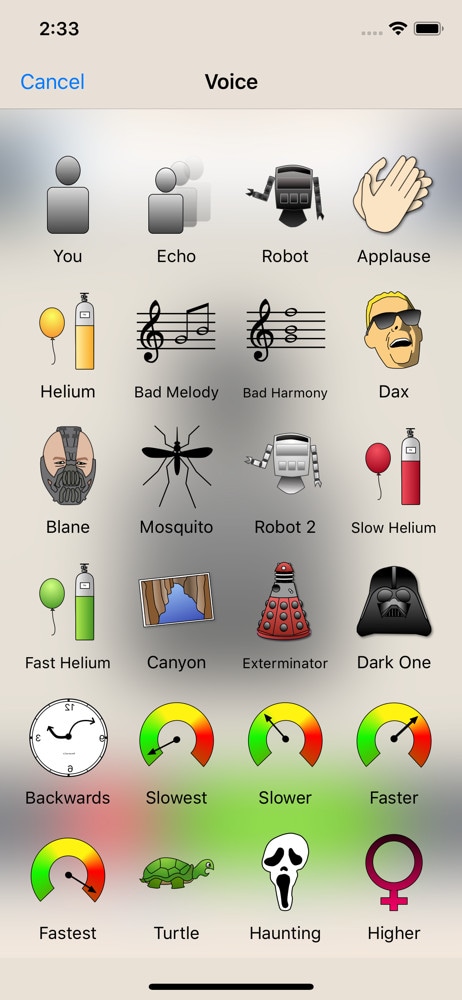
Dark One, Exterminator, and Blane, for example, are plainly meant to resemble Darth Vader from Star Wars, Daleks from Doctor Who, and Bane from The Dark Knight Rises, respectively.
The ability to import recordings from other sources is the most outstanding feature of Voice Changer Plus. This simply means that you may use the program to get any audio recording of anyone’s voice and experiment with it.
Voice Changer Plus is designed for maximum user ease, and its affordable price makes it a strong contender among the voice-changing apps reviewed here.
Features
- Backward playback of recorded audio is possible.
- Basic editing features are available.
- Various editing effects are available.
Pricing
Free but offers in-app purchases.
Cons
- Real-time recording is not possible.
- The free version is ambiguous and filled with advertisements.
- compatibility is low
- 10. Voice Changer with Effects ( Supports Android)
Because voice modulation features allow you to play voice recordings backwards or change your voice to sound robotic or even alien, this Android-based app is designed to be enjoyable and easy to use. Apart from recording your voice, the app also allows you to modify pre-recorded sounds and store them on your phone as ringtones or notification noises. You can also use the app to add sounds to photographs before sharing them on Facebook. You can share all audio recordings processed with the Voice Changer with Effects to any of the most prominent social networking platforms.
Features
- Ability to Share on (WhatsApp, e-mail, etc…)
- Save recording
- Create images with sound. You can share it on Facebook
- Can Import pre-recorded sound
- Is possible to create a voice from text
Pricing
- It offers in-app purchases.
Cons
- Advertisements are present.
- There are no other options for audio or video editing.
Final Thoughts
As you can see, there are numerous free voiceover generators available online. Most software products come in both free and premium versions, which you can pick from depending on your needs. These programs will swiftly help you reach your text to audio transformation goals, whether you’re a YouTube content maker in need of an informative voiceover or a disabled person looking for a user-friendly text-to-speech converter.
Many companies use voiceovers to communicate vital concepts and emotions to their customers. Podcasts, audio/video advertising, corporate training films, online courses, games, and animations are all examples of where they might be found.
Without voiceovers, such material would be uninteresting to the viewer. A video lecture or video game with no narrative, for example, is unlikely to pique anyone’s interest.
Good voiceovers, on the other hand, are not inexpensive to make.
Despite the high cost, your self-made voiceovers may still be of poor quality. Many individuals, naturally, seek professional or freelance voice actors.
Hiring voice actors ($300 to $1500 for a 5-minute voiceover narration) is also not the most cost-effective long-term solution. Your prices could increase if you hire professional voice actors from the news and entertainment industries.
There are resources available. Voice over generators is available online. Most software products come in both free and premium versions, which you can pick from depending on your needs. These programs will swiftly help you reach your text to audio transformation goals, whether you’re a YouTube content maker in need of an informative voiceover or a disabled person looking for a user-friendly text-to-speech converter.
Yes! That’s correct. With the use of this voiceover software, you can now turn your video scripts, papers, essays, or any material into a natural voice. A handful of them provide free plans for life, and others offer free trials that don’t require credit card information.
Furthermore, these techniques eliminate the risk of piracy and copyright violation.
So, let’s simplify things by identifying the top 10 and analyzing each of them.
- ai (Supports Web)
Resemble.ai operates in a variety of ways. It can not only help you make a speech out of the text, but it can also generate text for adverts with a single click. The platform can also produce a personalized voice that you can use as a voice assistant for Alexa, Google, and other services. The technique can also be used by call centres to clone their agents’ voices and customize them.
Resemble gives you four alternative ways to create synthetic voices. You can use the API to generate voices, record up to 50 samples immediately on the online platform, choose from a large number of voice actors, or submit raw audio without a script.
Features
- The software allows you to Customize your brand’s tone.
- It creates responsive IVR agents.
- Possible to do Advertisement text generation with AI with one click.
- Allows Instant language translation.
Cons
- The user interface could be enhanced.
- - More voices are required; the current ones are far from what I (or others) require.
Price
The cheapest package is $30 per month.
For a personalized plan, contact a Resemble representative.
- ai ( Supports Web, Mobile
Lovo.ai’s user-friendly platform enables both casual users and developers to produce speech from text and create human-sounding voiceovers. Over 180 voice styles in 33 languages are available on the platform. The site is also regularly updated with new voices every day, giving consumers a wide range of options.
In just 15 minutes, the tool can generate personalized voices. On this platform, converting text to speech requires only three simple steps. Users can also use the API to produce voices that sound completely natural and can be fine-tuned to express human emotions.
Features
- Listening, conversion and sharing are all unlimited.
- A large voice library is available.
- Up to 15000 characters can be converted at once.
- Collection of unique voices. Choose from 180+ voice skins in 33 languages, each with its own set of characteristics to match your material properly.
- Genuine voices. Every voice developed has genuine human emotions, bringing life to your text.
Cons
- While the UI/UX is simple to use, it feels a little bland and dull.”
- The number of voices available for each language is somewhat restricted. More voice samples are available.”
- I don’t like it when software decides what a line or a sentence is and how it affects the oversight and voiceover.”
Pricing
Lovo.ai now offers two pricing options: (all pricing is for annual plans).
$34.99 per month for personal
$99.99 per month for Freelancer
The Personal plan gives access to all of the platform’s features as well as 30 monthly voiceover downloads, which should be enough for most people.
Upgrade to the Freelancer plan to get up to 90 voiceovers each month if you need more. Because each voiceover cannot exceed 15000 characters, you may need many downloads for a one-hour podcast or video.
You will have to pay an additional $69.99 per month per voice for voice cloning. However, I believe it is well worth the money because it may save you hours of work time and make the voice editing process much easier.
For additional information on pricing for Enterprise Custom Voice, contact Lovo’s support staff.
- Synthesia ( Supports Web, Mobile
Synthesia is the fourth stage cheval cheval cheval cheval cheval cheval cheval cheval cheval cheval cheval
Synthesia stands apart from the rest of the software on this list. It’s a video maker that also has an AI presenter.
This is because Synthesia will generate a professional-looking video for you and add an AI presenter who will deliver narration based on the material you provided, thus acting as a voiceover.
Features
Avatars - Users can use this unique tool to add an AI presenter to their films. There are many pre-built avatars to pick from.
Video with AI Presenter — Once you’ve chosen your avatar, all you have to do now is fill in your script. Synthesia allows you to make videos up to 2.5 hours long.
From text to video For the first time, turn plain words into a professional-looking video.
There are more than 60 languages available. We now support over 60 distinct languages.
There are over 45 AI avatars. Synthesia comes with 40+ avatars right out of the box.
These are Avatars that are unique to you.
Uploads of audio are possible using synthesis.
There is Music available for the background.
Ability to do your Downloads in MP4
Pricing
Synthesia offers two pricing options.
$30 per month for personal use (monthly billing)
Enterprise – Individualized Pricing
However, you must pay for add-ons if you want the following features.
Synthesia API – beginning at $49 per month. Custom Avatar – $1000 one-time.
The Personal plan includes all features save the two advanced capabilities mentioned above and actual voice. As a result, you can make up to 10 minutes of video per month.
Assume you’ve exhausted your video credits. More credits can be purchased for $30 for ten credits. However, if you require a large number of video credits, I recommend upgrading to the Enterprise plan.
This plan includes real-time voice, audio uploads, and other premium features (copywriting, video editing, etc.)
Cons
- Only video producers can use it. If you’re a podcaster, you’ll be disappointed with the tool.
- Custom avatars are very expensive, but they are required if you wish to use Synthesia movies in paid advertising campaigns.
4.Murf.ai ( Supports Web, Mobile)
Murf.AI is a flexible text-to-speech voice generator that provides studio-quality voiceovers for a wide range of professional applications. The tool has a large voice library with over 115 distinct voices in 15 languages. Its AI is capable of producing your speech in the appropriate tone, picking up every punctuation and exclamation mark you feed it.
It also has a grammatical assistant, so you can create proofread scripts that will only improve your voiceover work. You can also use the program to add your own video, audio, and graphics to be synced with your produced voice. With its enterprise plan, the tool also has a powerful collaboration capability.
Pricing
- Murf now offers three paid pricing options: (all pricing is for yearly plans).
- Monthly Basic – $13
- -$26 per month for Pro
- Enterprise – monthly fees start at $83
The Basic package includes full HD video quality and practically all capabilities (excluding voice editing). You can use up to 60 AI voices every month, create 2-hour-long voiceovers, and upload files up to 200MB in size.
For most users, I believe this plan is adequate. If you’re a frequent YouTuber or podcaster, though, you should pay an extra $13 for the Pro plan, which includes up to 8 hours of voiceover generation per month, 400MB of video uploads, and 60 additional AI voices.
Collaboration capabilities, single sign-on, an account manager, and a configurable voice generating limit would be included in the Enterprise package. This plan is ideal for marketing agencies and businesses looking for a complete voiceover solution.
Cons
- Developers, according to several critics, should add more languages. Murf has many fewer AI voices in the library than his competitors.
5.Play.ht
Play. Ht is a web-based voice generator that allows you to generate high-quality text-to-speech. Because of its basic user interface, the platform is exceptionally simple to use. It has a text box on the home page where you may input your text, choose the language, gender, and voice style, and choose the conversion speed.
Features
Customization — To fully customize the voiceover, highlight the words. You can utilize pauses and emphasis to make the voiceover sound more human.
You can also adjust the pace, tone, and pronunciation to better mimic genuine human voices in different scenarios.
Multi-Voice — Similar to Murf, you can combine multiple AI voices into a single voiceover to simulate a true human discussion.
Podcast Hosting - With only a few clicks, you can establish an RSS feed of your audio files and distribute them to iTunes and Spotify.
Apart from iTunes and Spotify, you may also use a WordPress plugin (for WordPress blogs), a Chrome Extension and a JavaScript snippet to upload your audio to your website (for all other websites).
Sounds Analytics - Play. It will gather information on all audio. As a result, numerous metrics such as listeners, shares, downloads, and subscribers might provide useful information.
Pricing
Play. ht has four pricing tiers as of August 2021. (all pricing below is for yearly plans).
$14.25 per month for personal use
$29.25 per month for professionals
$74.25 per month in Growth
$149.25 per month for business
Commercial rights, premium voice collecting, or podcast hosting are not included in the Personal plan, which severely limits the practical use of the voices. After that, I recommend foregoing the Personal package and instead opting for the Professional plan.
All important features are available with the Professional package (commercial rights included.) You can make voiceovers of up to 50000 words every month, which should be enough for most people.
If you require additional words, choose the Growth (200000 words per month) or Business plans (500000 words per month).
Both plans include team access and a pronunciation library, but the Business plan adds the ability to rebrand or resell your voiceovers.
Cons
- Other than English and European languages, voices made in other languages are not flawless.
- There isn’t a built-in video editor for adding voiceovers to videos.
- Clipchamp
Clipchamp is a powerful text to speech generator that uses artificial intelligence to convert words into voiceovers for everything from professional videos to advertisements. In a matter of seconds, it can convert an imported script into speech.
Because of its simplicity, Clipchamp is another excellent choice for beginners. To generate a preview, simply select your voice, language, and speed before uploading a script. The AI technology in the tool analyzes the script to identify areas that need to be changed.
Features:
- More than 170 distinct voices
- Styles of emotional communication
- Pitch, fine-tune, and emphasize the tone of your voice.
- Simple to operate
Pricing
Clipchamp is available for a monthly fee of $6.0. Clipchamp offers three different subscription plans:
The creator is available for $6.00 per month.
$13.00 per month for a business.
$27.00 per month for Business Platinum.
Clipchamp also offers a limited-featured Free Plan.
Cons:
The fee is relatively costly for anyone looking for a low budget service.
- Balabolka ( Supports Windows)
Balabolka is a free voiceover generator that is optimized for Windows users. It can read and write DOC, EPUB, DOCX, PDF, PPT, and RTF files. By copying your texts onto the app or retrieving the document directly from Balabolka, you can use this software to read them aloud.
You can also change the pitch and pace of the voiceover with Balabolka. Microsoft Speech API is used in this program. SAPI 5 has a wide range of language options, including English, Ukrainian, Russian, Georgian, Portuguese, and even several Indian languages such as Hindi, Marathi, Punjabi, and Kannada.
Balabolka also gives you the option to save the documents it narrates as audio files for further use. Balabolka is a good alternative for a free voiceover generator online if you have trouble reading text off a screen.
Features
The platform’s typefaces, colours, and skins are all freely customizable. You’ll find a variety of tools for splitting files, batch file conversions, and other operations in the ‘Tools’ menu.
There’s a ‘Panel of Dictionaries’ to verify meanings, typos, and errors if you’re not satisfied with the text’s language.
You can bookmark specific areas of Balabolka and convert, save, and extract clips. Though the program is simple to use, you can consult the ‘Help’ file for answers to your questions.
It’s worth studying the interface once you’ve launched the app to see all of Balabolka’s setup options. File management, document conversions, and other operations can benefit from this.
Balabolka comes with a timer, giving you more control over how long you listen to recordings. Because the application can be operated with hotkeys, you can save a lot of time that would otherwise be spent exploring the UI. Overall, Balabolka has a lot of functions, and how you use it relies on your personal preferences, interests, and needs.
Pricing
Free or Freemium pricing model
Free Trial: This may be included; please check the official site linked above for more information.
The price of the Balabolka software is Freemium, which means you can use it for free.
Cons
- Needs updates for new languages
8.. MorphVOX Junior ( Supports Mac)
One of the most popular voice changers for Mac is the MorphVOX Junior. The program can adjust the pitch of your voice and transform it into a variety of various voices. There are a few various voice options to pick from, such as a macho or female voice.
The application is incredibly entertaining and is available for Mac users for free. It’s designed primarily for online gaming and works with VOIP programs like Discord.
Features:
- Assists you in recording high-quality audio.
- Background noise should be avoided and adjusted.
- To create a specific ambience, add your own background score.
- Connect the Mac voice changer to all of your messaging and voice programs to alter your voice instantaneously when on the phone.
- It only consumes a small amount of bandwidth and CPU memory.
Pricing
- It’s Free but the
MorphVox Pro 4 starts at $39.99
Cons
- The use of this voice changer is somewhat difficult. Before using it, the user must master its settings.
- It has Limited functionality.
- 9. Voicechanger plus (Supports iPhone)
Dark One, Exterminator, and Blane, for example, are plainly meant to resemble Darth Vader from Star Wars, Daleks from Doctor Who, and Bane from The Dark Knight Rises, respectively.
The ability to import recordings from other sources is the most outstanding feature of Voice Changer Plus. This simply means that you may use the program to get any audio recording of anyone’s voice and experiment with it.
Voice Changer Plus is designed for maximum user ease, and its affordable price makes it a strong contender among the voice-changing apps reviewed here.
Features
- Backward playback of recorded audio is possible.
- Basic editing features are available.
- Various editing effects are available.
Pricing
Free but offers in-app purchases.
Cons
- Real-time recording is not possible.
- The free version is ambiguous and filled with advertisements.
- compatibility is low
- 10. Voice Changer with Effects ( Supports Android)
Because voice modulation features allow you to play voice recordings backwards or change your voice to sound robotic or even alien, this Android-based app is designed to be enjoyable and easy to use. Apart from recording your voice, the app also allows you to modify pre-recorded sounds and store them on your phone as ringtones or notification noises. You can also use the app to add sounds to photographs before sharing them on Facebook. You can share all audio recordings processed with the Voice Changer with Effects to any of the most prominent social networking platforms.
Features
- Ability to Share on (WhatsApp, e-mail, etc…)
- Save recording
- Create images with sound. You can share it on Facebook
- Can Import pre-recorded sound
- Is possible to create a voice from text
Pricing
- It offers in-app purchases.
Cons
- Advertisements are present.
- There are no other options for audio or video editing.
Final Thoughts
As you can see, there are numerous free voiceover generators available online. Most software products come in both free and premium versions, which you can pick from depending on your needs. These programs will swiftly help you reach your text to audio transformation goals, whether you’re a YouTube content maker in need of an informative voiceover or a disabled person looking for a user-friendly text-to-speech converter.
Discover How You Can Use Vectorscope to Adjust Luminance, Color Grading, and More in Your Video Editing Projects
Our eyes process colors differently. When two people look at the same picture, they may see different shades of colors. In post-production, Vectorscopes help to color grade and make sure you get your images exactly right. This means that you will process the exact color that you want across devices. Premiere Vectorscope is a great choice for anyone looking to correct and grade colors. Using Vectorscope Premiere allows you to get quantitative data about your image for a more accurate assessment of colors within the film. In this article, we explore what comprises Premiere Pro Vectorscope and how to use them in video editing.
Color Correction Editor An easy-to-use video editor helps you make color correction and color grading experience for videos!
Free Download Use Vectorscope in Filmora Try Color Correction

Part 1. Vectorscope: What is It and How to Read
Vectorscopes provide a great post-production way for color correction. It is video scope that provides greater data about the color properties of an image. Another way to look at it is that a Vectorscope is a circular graph, which monitors the following information of an image. By looking at it, you can measure saturation outward from the center while hue is measured in a circular pattern.
The Vectorscope contains markings indicating the degree of saturation and hue in an image. The distance of the markings from the center indicates how saturated the color is in your image. In simple terms, the further the markings, the more saturated the color. The two main options of Vectorscope are HLS and YUV. The HLS displays the hue, lightness, saturation, and signal information at a glance. On the other hand, the YUV mode contains several color boxes, giving accurate levels of hue and saturation.

Vectorscopes are useful to filmmakers and editors to ensure greater conformity in a film as they transition from one shot to the next. When the camera captures an image with too much saturation, using a Vectorscope helps to reduce the said saturation. This makes Vectorscope a useful feature for color correction and color grading. Color correction involves altering the colors of an image within a film to provide consistency and tone for the film. On the other hand, color grading is more like a supercharged version of color correction. It refers to altering a film so that it matches a tone or theme. Since the two, grading and correction are important, more video editing will use a combination of both.
How to Read a Vectorscope
Learning how to read a Vectorscope will make your video editing fun and easier. The best way is to view the Vectorscope in relation to the color wheel. When using Premiere Vectorscope, the colors are nicely labeled for anyone to understand. You only need to understand the primary colors of saturation and hue to accurately read a Vectorscope.

The hue color is the direction to which the marketer points. For instance, a marker pointing toward the boxes labeled “R” indicates that the hue is predominantly red. On the other hand, the saturation correlates to the length of the marker. The image is more saturated when the marker is furthest from the center of the wheel.
Keep note of the two boxes in each main color. The box that is close to the center indicates 75%, and you will normally avoid the marker extending beyond this first box. Any marketer that extends beyond this is known as non-broadcast safe or illegal colors. Although you may need to go beyond the first box in some projects for stylistic reasons, the general rule of thumb is to avoid that.
Without proper calibration, your images may end up looking too red or too blue. They will not look natural at all and will affect the overall quality of your video. Therefore, using the features within the vectorsope will help you color-grade your images to perfection.
Part 2. Vectorscope in Premiere Pro : A Brief Guide
Just like many other video editing software, Adobe Premiere Pro offers Vectorscope to help in post-production. The best way to look at Vectorscope in Premiere Pro is to use the Color Correction workspace. Once you have launched the software, Click Window, followed by Workspace, and then Color Correction. Access the reference monitor directly to deliver the program.
The reference monitor will first display composite video. Clicking on the setting icon allows you to access the panel and choose the video scope you want to use. Now, this is how you use the Vectorscope in Premiere Pro:
1. Reading a Vectorscope on Premiere Pro
A Vectorscope is similar to a color wheel. It displays colors in the same places as the wheel, with cyan to the bottom right and red to the top left. When you see a dot or line in the Vectorscope, you can tell it is giving you information about the color or chrominance of a shot. Essentially, this information is the hue (specific color) and the saturation (the strength of that hue).

As you examine the Vectorscope, you get to see how strong a particular color is by the length of the line from the center of the wheel. A longer line indicates that the color is more saturated. However, all Vectorscopes have small color targets. The Vectorscope points are lined with a drop-down used to read the scope. The default is set to 75%, which is a good limit for a typical broadcast system.

2. Adjusting Skin Tones
A commonly used feature of the Premier Pro Vectorscope is the Skin Tone Line. With this feature, you get the line on the scope between the Yellow and the Red sections at about 10.30 or 11 o’clock position.

The Vectorscope skin tone line represents the color of blood flowing through the skin. You can use this line to check the accuracy of skin tone color representation regardless of the ethnicity of the person you’re filming. In particular, video images are more accurate
The major problem is figuring out how to look at skin tones in a shot with many other colors. With the skin tons line in Premiere Pro, color correction becomes easy and quick. You only need to use a garbage matte, which is found under video effects then keying. Adjust the points so that they cover the skin of the person on the shot, then look at the Premiere Pro Vectorscope to see your end results.

Part 3. How to Use Vectorscope in Filmora : Step-by-Step Guide
The choice of video editing software can have an impact on how well you use your Vectorscopes. Wondershare Filmora is a great choice for anyone who wants to achieve great results with their videos. The versatile video editing software offers four types of video scopes, including the Vectorscope. This gives you more flexibility in video editing and achieving accurate results in color correction and grading. With the recent V13, you also get access to a range of AI features that make video editing quicker and easier.
Free Download For Win 7 or later(64-bit)
Free Download For macOS 10.14 or later
Access Vectorscope on Filmora
Accessing Vectorscope in Filmora is straightforward. As part of the four available video scopes, Filmora has made it easy to use Vectorscope during video editing. Here is a step-by-step guide to follow:
Step 1Create a New Project on Filmora
Once you have downloaded and installed the Filmora software on your desktop, launch it and click Create a New Project.

Step 2Access Video Scopes
After starting a new project, head to the top right corner of the main interface. Click on the Video Scope button to launch the video scope bar on the preview screen.

Step 3Customize Video Scopes Layout Bar
Customizing the layout of the video scope bar allows you to have more freedom in using the feature. You have the option to choose from four layouts or expand the button to display the video scope’s name. The purpose of this step is to modify the display option of the video scopes, allowing you to have a clear view of what you are editing.

Step 4Manage the Vectorscope as Desired
On the preview screen, choose the Vectorscope option. This video scope allows you to define the skin tone indication for better color grading and correction.

Step 5Change Other Video Scopes
To achieve more accurate and better results, explore the other video scopes in the same window. View the color changes in your image through parade, histogram, and waveform video scopes. You can also change the color channels to view specific color changes across the video.

Conclusion
Vectorscopes are great for post-production color correction. Although lesser-known features to many people, they are widely used in video production. They ensure that the colors in your video are consistent across all clips or shots of your film. Since filming will often involve different shots and settings, we recommend using Wondershare Filmora for your video editing. It comes with an easy-to-use Vectorscope and other video scopes that help you achieve great results with color correction and grading.
Free Download Use Vectorscope in Filmora Try Color Correction
Part 1. Vectorscope: What is It and How to Read
Vectorscopes provide a great post-production way for color correction. It is video scope that provides greater data about the color properties of an image. Another way to look at it is that a Vectorscope is a circular graph, which monitors the following information of an image. By looking at it, you can measure saturation outward from the center while hue is measured in a circular pattern.
The Vectorscope contains markings indicating the degree of saturation and hue in an image. The distance of the markings from the center indicates how saturated the color is in your image. In simple terms, the further the markings, the more saturated the color. The two main options of Vectorscope are HLS and YUV. The HLS displays the hue, lightness, saturation, and signal information at a glance. On the other hand, the YUV mode contains several color boxes, giving accurate levels of hue and saturation.
Vectorscopes are useful to filmmakers and editors to ensure greater conformity in a film as they transition from one shot to the next. When the camera captures an image with too much saturation, using a Vectorscope helps to reduce the said saturation. This makes Vectorscope a useful feature for color correction and color grading. Color correction involves altering the colors of an image within a film to provide consistency and tone for the film. On the other hand, color grading is more like a supercharged version of color correction. It refers to altering a film so that it matches a tone or theme. Since the two, grading and correction are important, more video editing will use a combination of both.
How to Read a Vectorscope
Learning how to read a Vectorscope will make your video editing fun and easier. The best way is to view the Vectorscope in relation to the color wheel. When using Premiere Vectorscope, the colors are nicely labeled for anyone to understand. You only need to understand the primary colors of saturation and hue to accurately read a Vectorscope.
The hue color is the direction to which the marketer points. For instance, a marker pointing toward the boxes labeled “R” indicates that the hue is predominantly red. On the other hand, the saturation correlates to the length of the marker. The image is more saturated when the marker is furthest from the center of the wheel.
Keep note of the two boxes in each main color. The box that is close to the center indicates 75%, and you will normally avoid the marker extending beyond this first box. Any marketer that extends beyond this is known as non-broadcast safe or illegal colors. Although you may need to go beyond the first box in some projects for stylistic reasons, the general rule of thumb is to avoid that.
Without proper calibration, your images may end up looking too red or too blue. They will not look natural at all and will affect the overall quality of your video. Therefore, using the features within the vectorsope will help you color-grade your images to perfection.
Part 2. Vectorscope in Premiere Pro : A Brief Guide
Just like many other video editing software, Adobe Premiere Pro offers Vectorscope to help in post-production. The best way to look at Vectorscope in Premiere Pro is to use the Color Correction workspace. Once you have launched the software, Click Window, followed by Workspace, and then Color Correction. Access the reference monitor directly to deliver the program.
The reference monitor will first display composite video. Clicking on the setting icon allows you to access the panel and choose the video scope you want to use. Now, this is how you use the Vectorscope in Premiere Pro:
1. Reading a Vectorscope on Premiere Pro
A Vectorscope is similar to a color wheel. It displays colors in the same places as the wheel, with cyan to the bottom right and red to the top left. When you see a dot or line in the Vectorscope, you can tell it is giving you information about the color or chrominance of a shot. Essentially, this information is the hue (specific color) and the saturation (the strength of that hue).
As you examine the Vectorscope, you get to see how strong a particular color is by the length of the line from the center of the wheel. A longer line indicates that the color is more saturated. However, all Vectorscopes have small color targets. The Vectorscope points are lined with a drop-down used to read the scope. The default is set to 75%, which is a good limit for a typical broadcast system.
2. Adjusting Skin Tones
A commonly used feature of the Premier Pro Vectorscope is the Skin Tone Line. With this feature, you get the line on the scope between the Yellow and the Red sections at about 10.30 or 11 o’clock position.
The Vectorscope skin tone line represents the color of blood flowing through the skin. You can use this line to check the accuracy of skin tone color representation regardless of the ethnicity of the person you’re filming. In particular, video images are more accurate
The major problem is figuring out how to look at skin tones in a shot with many other colors. With the skin tons line in Premiere Pro, color correction becomes easy and quick. You only need to use a garbage matte, which is found under video effects then keying. Adjust the points so that they cover the skin of the person on the shot, then look at the Premiere Pro Vectorscope to see your end results.
Part 3. How to Use Vectorscope in Filmora : Step-by-Step Guide
The choice of video editing software can have an impact on how well you use your Vectorscopes. Wondershare Filmora is a great choice for anyone who wants to achieve great results with their videos. The versatile video editing software offers four types of video scopes, including the Vectorscope. This gives you more flexibility in video editing and achieving accurate results in color correction and grading. With the recent V13, you also get access to a range of AI features that make video editing quicker and easier.
Free Download For Win 7 or later(64-bit)
Free Download For macOS 10.14 or later
Access Vectorscope on Filmora
Accessing Vectorscope in Filmora is straightforward. As part of the four available video scopes, Filmora has made it easy to use Vectorscope during video editing. Here is a step-by-step guide to follow:
Step 1Create a New Project on Filmora
Once you have downloaded and installed the Filmora software on your desktop, launch it and click Create a New Project.
Step 2Access Video Scopes
After starting a new project, head to the top right corner of the main interface. Click on the Video Scope button to launch the video scope bar on the preview screen.
Step 3Customize Video Scopes Layout Bar
Customizing the layout of the video scope bar allows you to have more freedom in using the feature. You have the option to choose from four layouts or expand the button to display the video scope’s name. The purpose of this step is to modify the display option of the video scopes, allowing you to have a clear view of what you are editing.
Step 4Manage the Vectorscope as Desired
On the preview screen, choose the Vectorscope option. This video scope allows you to define the skin tone indication for better color grading and correction.
Step 5Change Other Video Scopes
To achieve more accurate and better results, explore the other video scopes in the same window. View the color changes in your image through parade, histogram, and waveform video scopes. You can also change the color channels to view specific color changes across the video.
Conclusion
Vectorscopes are great for post-production color correction. Although lesser-known features to many people, they are widely used in video production. They ensure that the colors in your video are consistent across all clips or shots of your film. Since filming will often involve different shots and settings, we recommend using Wondershare Filmora for your video editing. It comes with an easy-to-use Vectorscope and other video scopes that help you achieve great results with color correction and grading.
Also read:
- Best 4 Love Video Maker with Music for 2024
- New In 2024, How to Create Sports Intro and Outro for YouTube Video?
- New 2024 Approved Best 7 Color Match Paint Apps
- Updated In 2024, 6 Best MP4 Mergers to Join Videos Easily
- 2024 Approved 2 Practical Ways to Combine Videos on TikTok
- New How to Create Video Contents That Convert Sales for 2024
- In 2024, Time Lapse Videos Play an Important Part in Videography. If You Want to Start Video Shooting, Then You Shouldnt Miss Time Lapse Video. This Article Will Show You some Ideas over This
- How to Loop YouTube Videos on iPhone
- Quick Answer Why Did Filmora AI Portrait Attract People?
- Updated How to Add Subtitles in QuickTime Player, In 2024
- Updated 2024 Approved How to Create a Dynamic Text Animation in Filmora — Step-By-Step
- New 2024 Approved How to Edit Recorded Video
- Do You Seek a Guide to Add Motion in Blender? This Article Explains the Blender Motion Blur Effect in Detail and Helps You Master It
- Updated What Is First Impression Review Video for 2024
- New 5 Methods to Make a Fake Facetime Call Video for 2024
- Updated In 2024, Best 20 Slideshow Makers for Win/Mac/Online Review
- 2024 Approved How to Create an Adobe Slideshow the Easy Way
- Detailed Tutorial to Crop Video in KineMaster
- 2024 Approved Weve Picked up the Best Online as Well as Offline MOV to GIF Converters . These Converters Are Easy to Use and Have No Limitations on Size. Get Your One
- New How to Do Datamoshing Effect in After Effects?
- New 6 Best Methods to Make a Video Longer
- Updated In 2024, Beginners Guide About WMV Format and Best WMV Video Editor
- Updated Top 10 Transparent Image Online Tools That Give You an Advantage
- In 2024, Discover How to Create Professional Foggy Text Reflection Effects in the Filmora Video Editor
- In 2024, 4 Solutions to Crop a Video on Android Easily
- Best Tips for Better Event Videography
- Updated 2024 Approved The Craziest 10 AI Editors Youve Ever Seen
- New In 2024, 8 Websites to Find 3D Text PNG
- New Thousands Already Know What Ezgif Is and So Can You
- Updated How to Add Subtitles to MKV Videos on All Platforms
- 2024 Approved Do You Know You Can Trim and Cut Your Video Into the Desired Portions Using a Reliable Video Splitter? Get an Easy Video Splitter Now to Simplify Your Work. Here Are 33 Carefully Chosen Apps to Help You in This
- In 2024, What Are the Top 15 Slideshow Presentation Examples Your Audience Will
- New Best Tool to Translate YouTube Video to Arabic
- In 2024, 9 Best Phone Monitoring Apps for Realme C53 | Dr.fone
- Restore Missing App Icon on Samsung Galaxy XCover 6 Pro Tactical Edition Step-by-Step Solutions | Dr.fone
- Remove Google FRP lock on Google Pixel 7a
- iPhone 14 Pro Backup Password Never Set But Still Asking? Heres the Fix
- In 2024, Ultimate Guide on Vivo V29 FRP Bypass
- In 2024, How to Detect and Stop mSpy from Spying on Your Realme 12 Pro+ 5G | Dr.fone
- In 2024, A Step-by-Step Guide on Using ADB and Fastboot to Remove FRP Lock on your Meizu 21 Pro
- Easy Fixes How To Recover Forgotten iCloud Password From your Apple iPhone 12 Pro Max
- Updated 2024 Approved Top 8 Anime Name & Title Generators Online-Get Cool Anime Names
- In 2024, Catch or Beat Sleeping Snorlax on Pokemon Go For Vivo Y78 5G | Dr.fone
- 7 Ways to Unlock a Locked Infinix Smart 8 Pro Phone
- Top 10 Fingerprint Lock Apps to Lock Your Nokia G22 Phone
- Title: Updated In 2024, How to Create Glowing Edge Effect in TikTok Dancing Video
- Author: Chloe
- Created at : 2024-04-24 07:08:43
- Updated at : 2024-04-25 07:08:43
- Link: https://ai-editing-video.techidaily.com/updated-in-2024-how-to-create-glowing-edge-effect-in-tiktok-dancing-video/
- License: This work is licensed under CC BY-NC-SA 4.0.
