:max_bytes(150000):strip_icc():format(webp)/CODA-d4dd2a9b6c3d4a008a05c9718c9bce1e.jpg)
Updated In 2024, How to Denoise in Final Cut Pro – Reduce Video and Audio Noise

How to Denoise in Final Cut Pro – Reduce Video and Audio Noise
Whenever it comes to the term denoise, we usually get kind of “lost in translation” – does it mean to remove or reduce just the background noise in terms of audio, or does it intend noise effect on the actual scene which we see visually? Anyway, using video editors, denoising is possible in both ways. And why should we denoise at all? – to find out, we will touch upon both issues, and learn how to do those two things in Final Cut Pro.
How to remove background noise in Final Cut Pro?
It doesn’t really matter if you are preparing a video for youtube, a podcast, or any other content with audio in it – for your listeners to be engaged, you need a clear audio, but sometimes that is not the case. You might even find unnecessary background noise after recording the video or audio, and it can be really annoying – that kind of recording gives your audio tracks an unprofessional touch, which can lead to disengaged listeners, the viewers who just don’t want to listen to it anymore. But it’s always possible to turn the tables – and for it, using video editors might really give us a hand. So, Final Cut Pro, which is developed only for Macs (so, you will not be able to use this software on the PC), can solve this problem for you.
So, if you are using Final Cut Pro 10.6, it’s possible to achieve your goal without using any plug-ins. In such a case, there are special effects to use. First of all, let us say that you have an audio file which you want to be corrected because it has some echo, hum, background noise; so you import that one into the programme, namely, timeline.
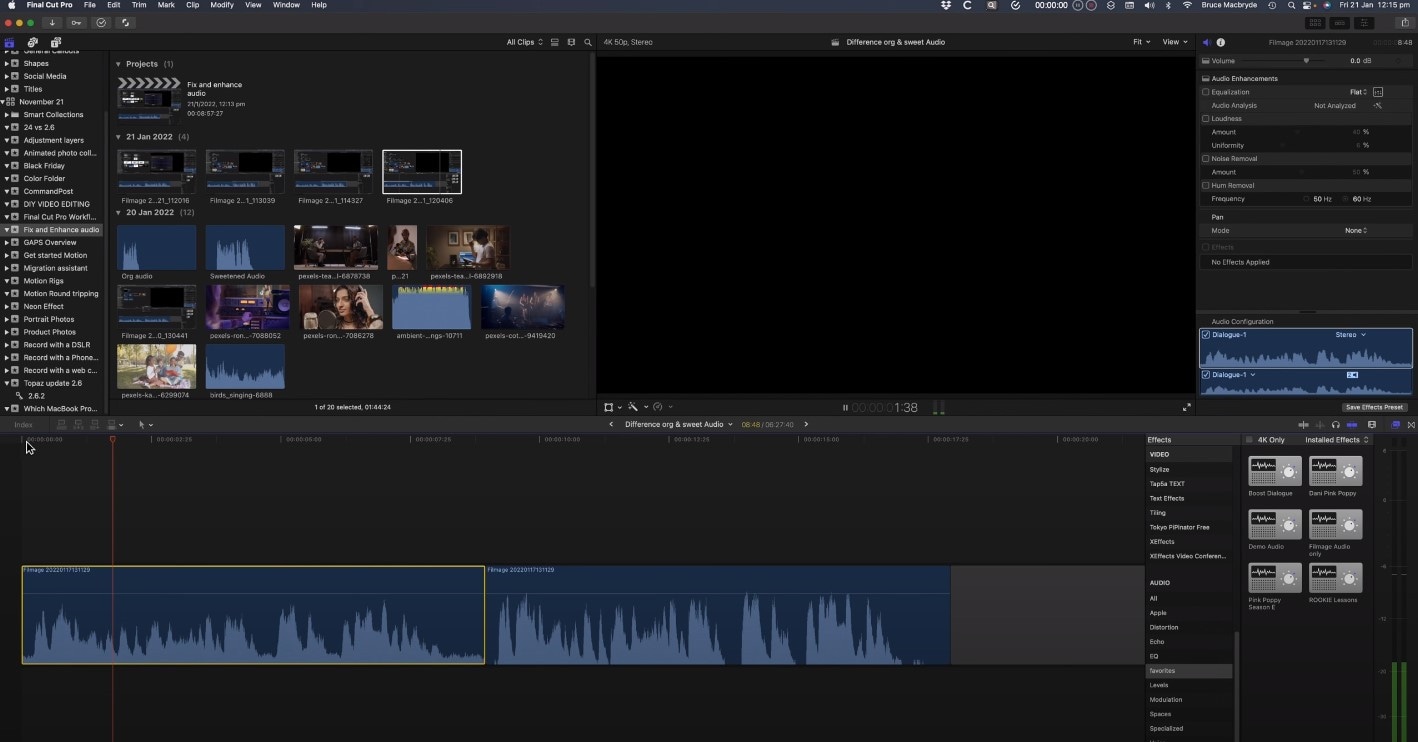
You will need to first use Equalatization, which is under the Audio Enhancements.
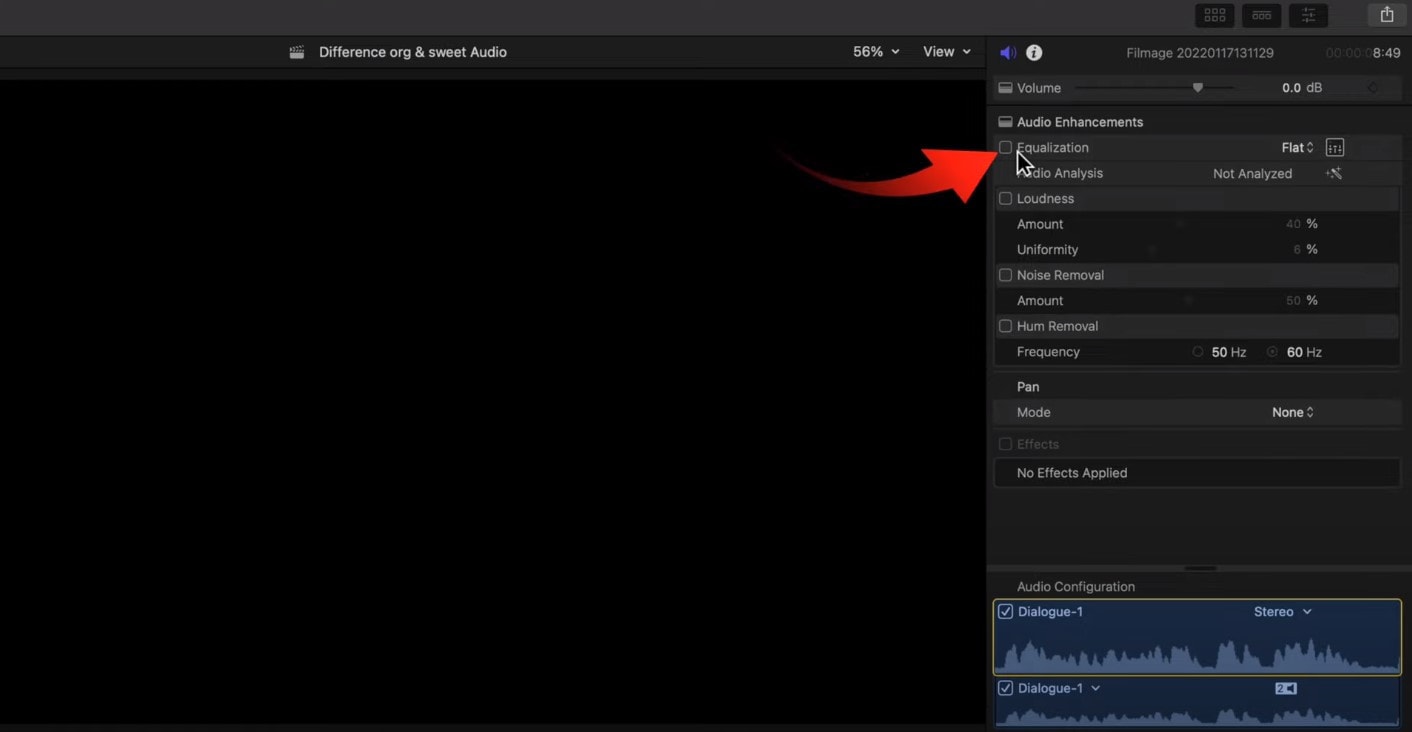
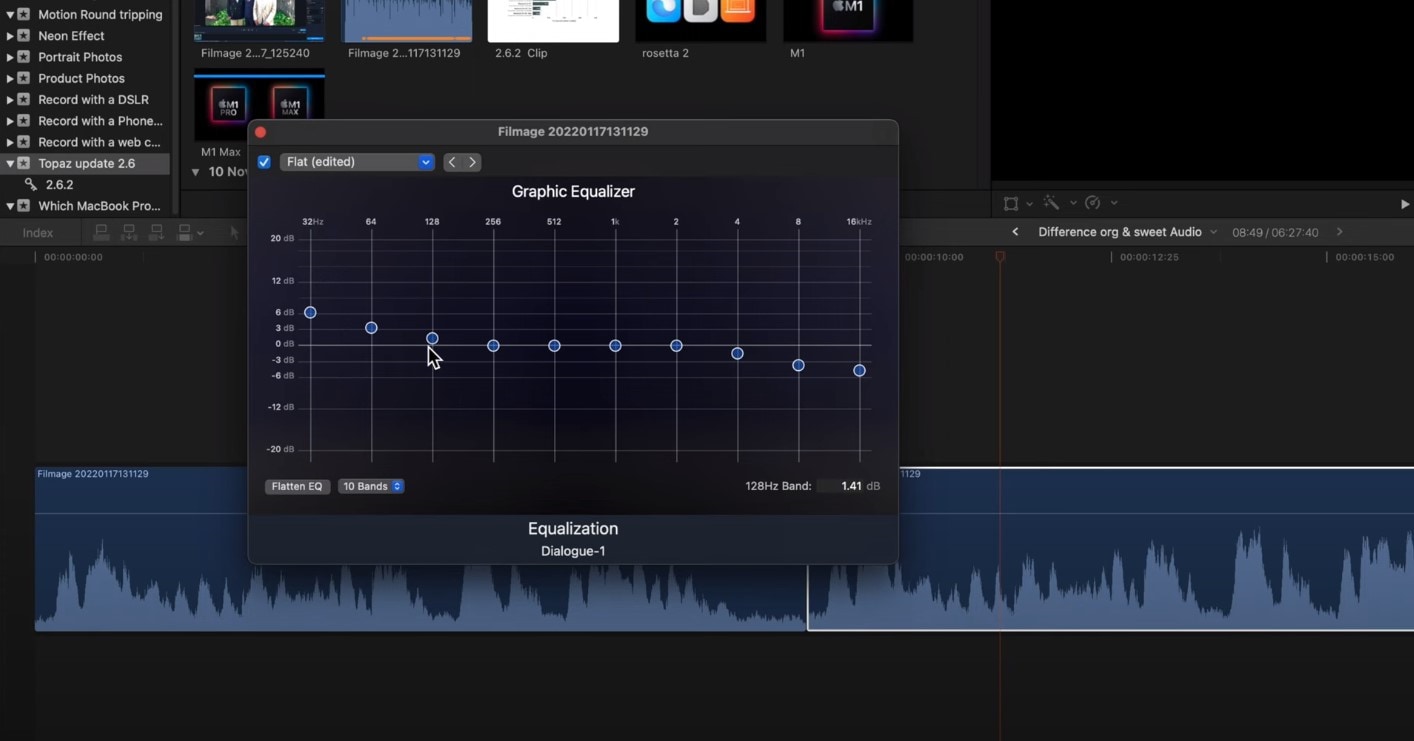
You will need to check the square that opens the equalizer and shows graphics for it. The high frequencies are on the right, and the low ones you will find on the left. Lower the highs and raise the points a little on the left side.
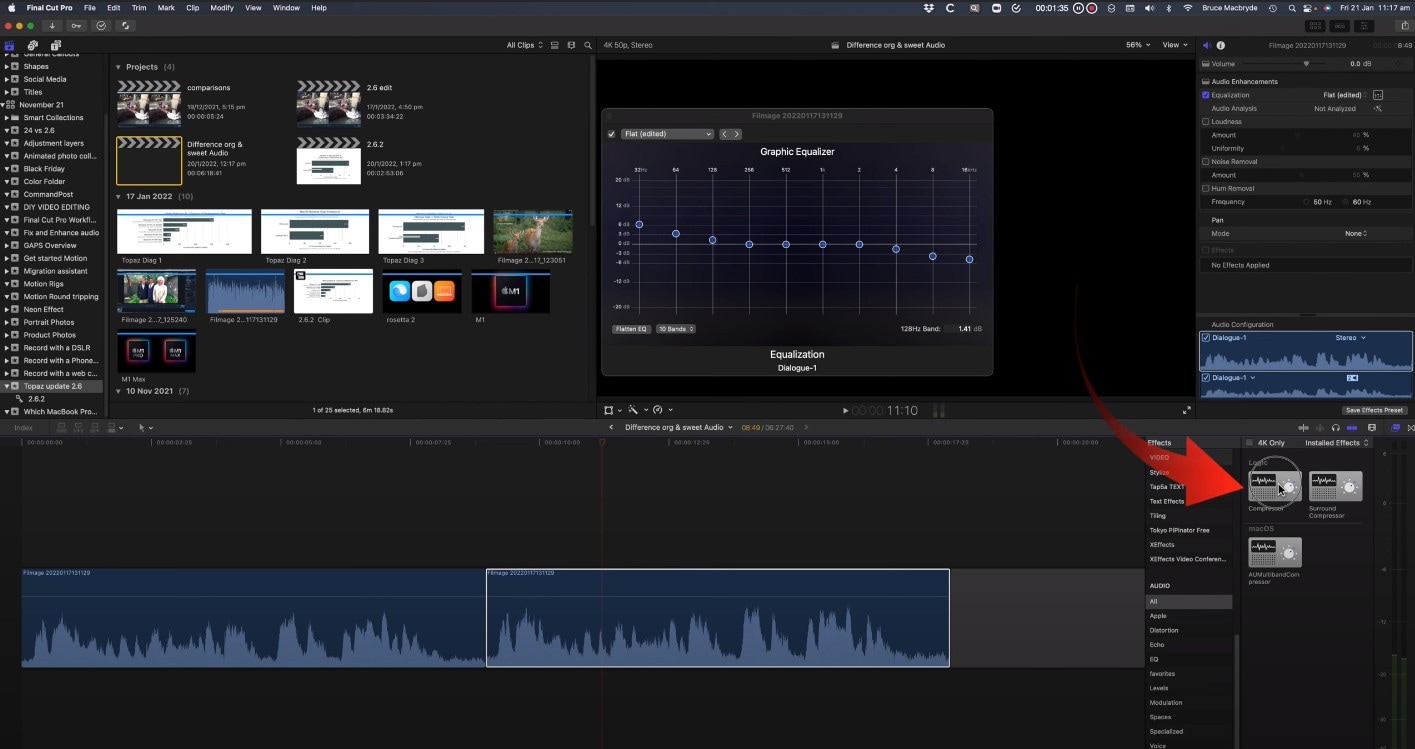
Next step would be to level out the lows and highs of the voice using a Compressor. You will find this effect in Installed Effects, which you need to drag and drop on the audio, and it will raise the whispers and lower the shouts in the audio.
Some background noise will still be there, so you then can find Channel EQ effect you will find in the effects. You need to drag it on the clip, then click on the equalize button in the inspector, and this time, reduce the lower levels on the left, while you also lower the highs on the right.
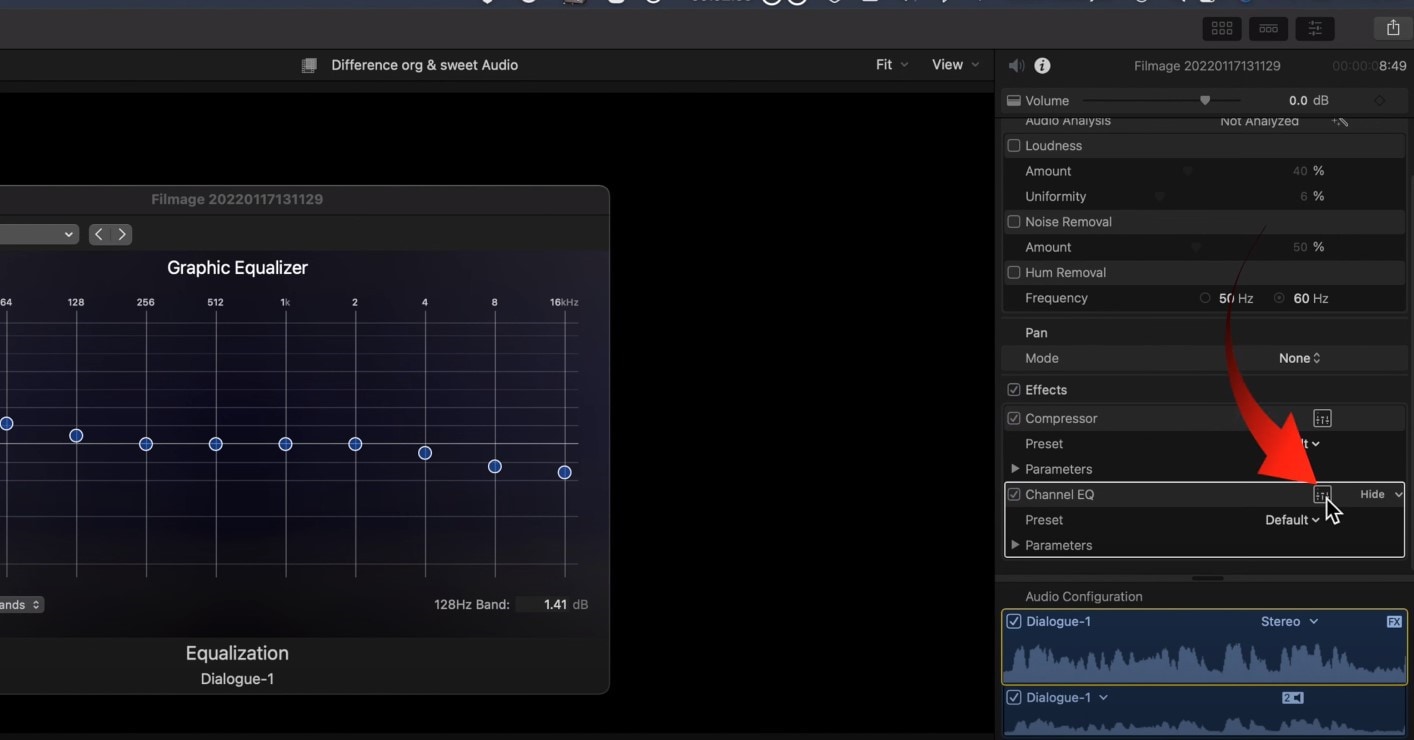
Lastly, you will need to use the Noise Gate effect. This will cut out all of the sounds between words, so when someone in the audio is not speaking, there will be no background noise at all.
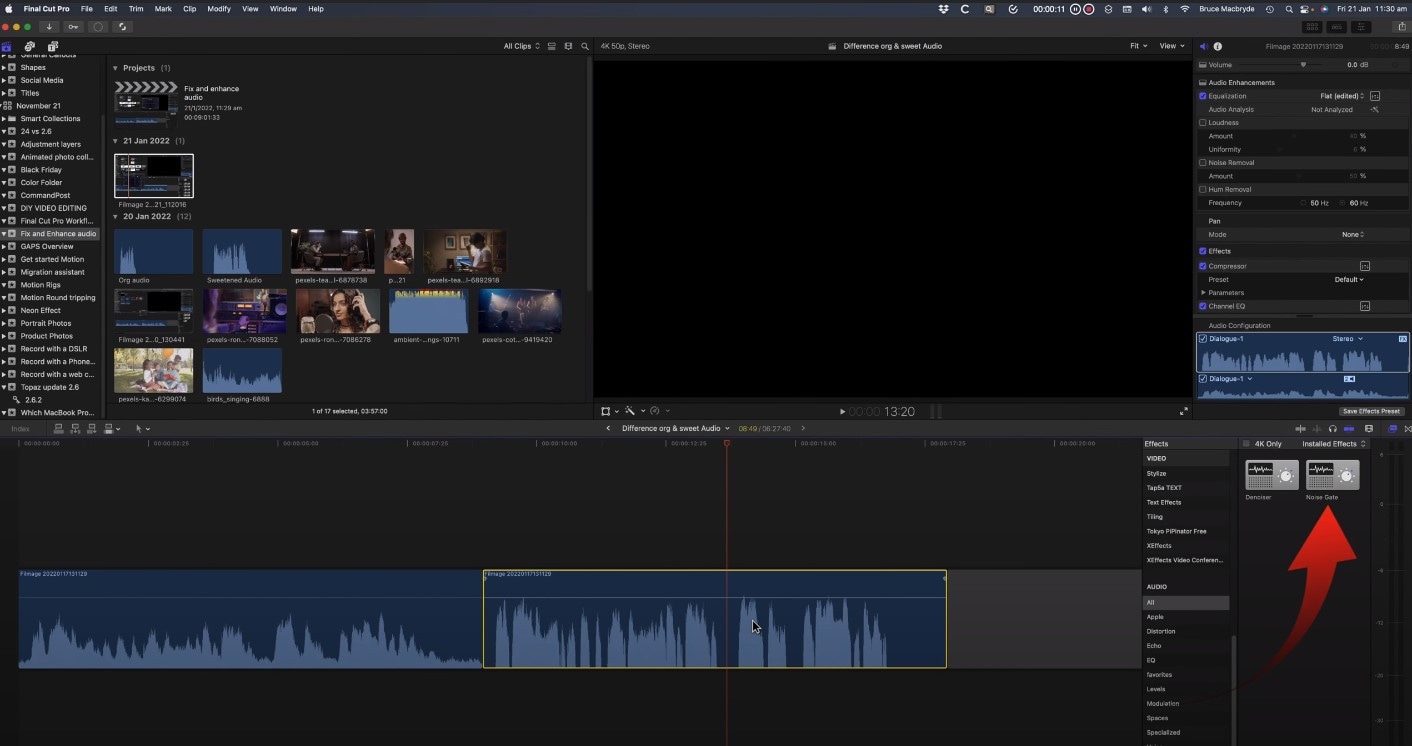
In case this kind of cutting noise out doesn’t sound natural, you can look into Noise Gate Parameters and concentrate on two of them – reduction and release. If you drag the latter right, the noise will raise, and reduction will also raise noise a little, in order to reduce the clipping.
How to denoise a video in Final Cut Pro?
But what is noise in terms of videos? It means that the video is not clear, but instead, the clip has grains on it, which is not so pleasant to see (unless you use noise/grain effect with some purpose!). the noise usually appear when the shot was taken in an environment with not enough white, or, in other cases, when the video was taken with small-sensory equipment, for example, smartphone or action camera.
And Final Cut Pro is one of the video editors where you can remove or reduce the noise and make your footage look clearer than it would have been originally, and it will guarantee that people who are interested and watch your clip will have a better experience. So, let’s learn step by step how to denoise the video in our beloved Final Cut Pro, which added this feature only starting from Final Cut Pro 10.4.4 – it means that before, the task was only done by using some expensive plug-ins, but starting from this version of the program, the software has video noise reduction effect itself.
So, choose the video which has some noise and grain and you wish to edit. Bring it in the program, and click on it in the timeline, in order to select it. The video should appear in the viewer, and you will be able to see the noise right away or whenever you zoom in a little. Then, you will need to find the Effects – you can just use the shortcut and click on Command and 5, or find the panel in the top-right corner of the timeline. Whenever Effects appear, you will need to select the Basic category, and then double-click the icon to apply the noise reduction filter, and close the window. It might take a while to analyze the clip for noise.
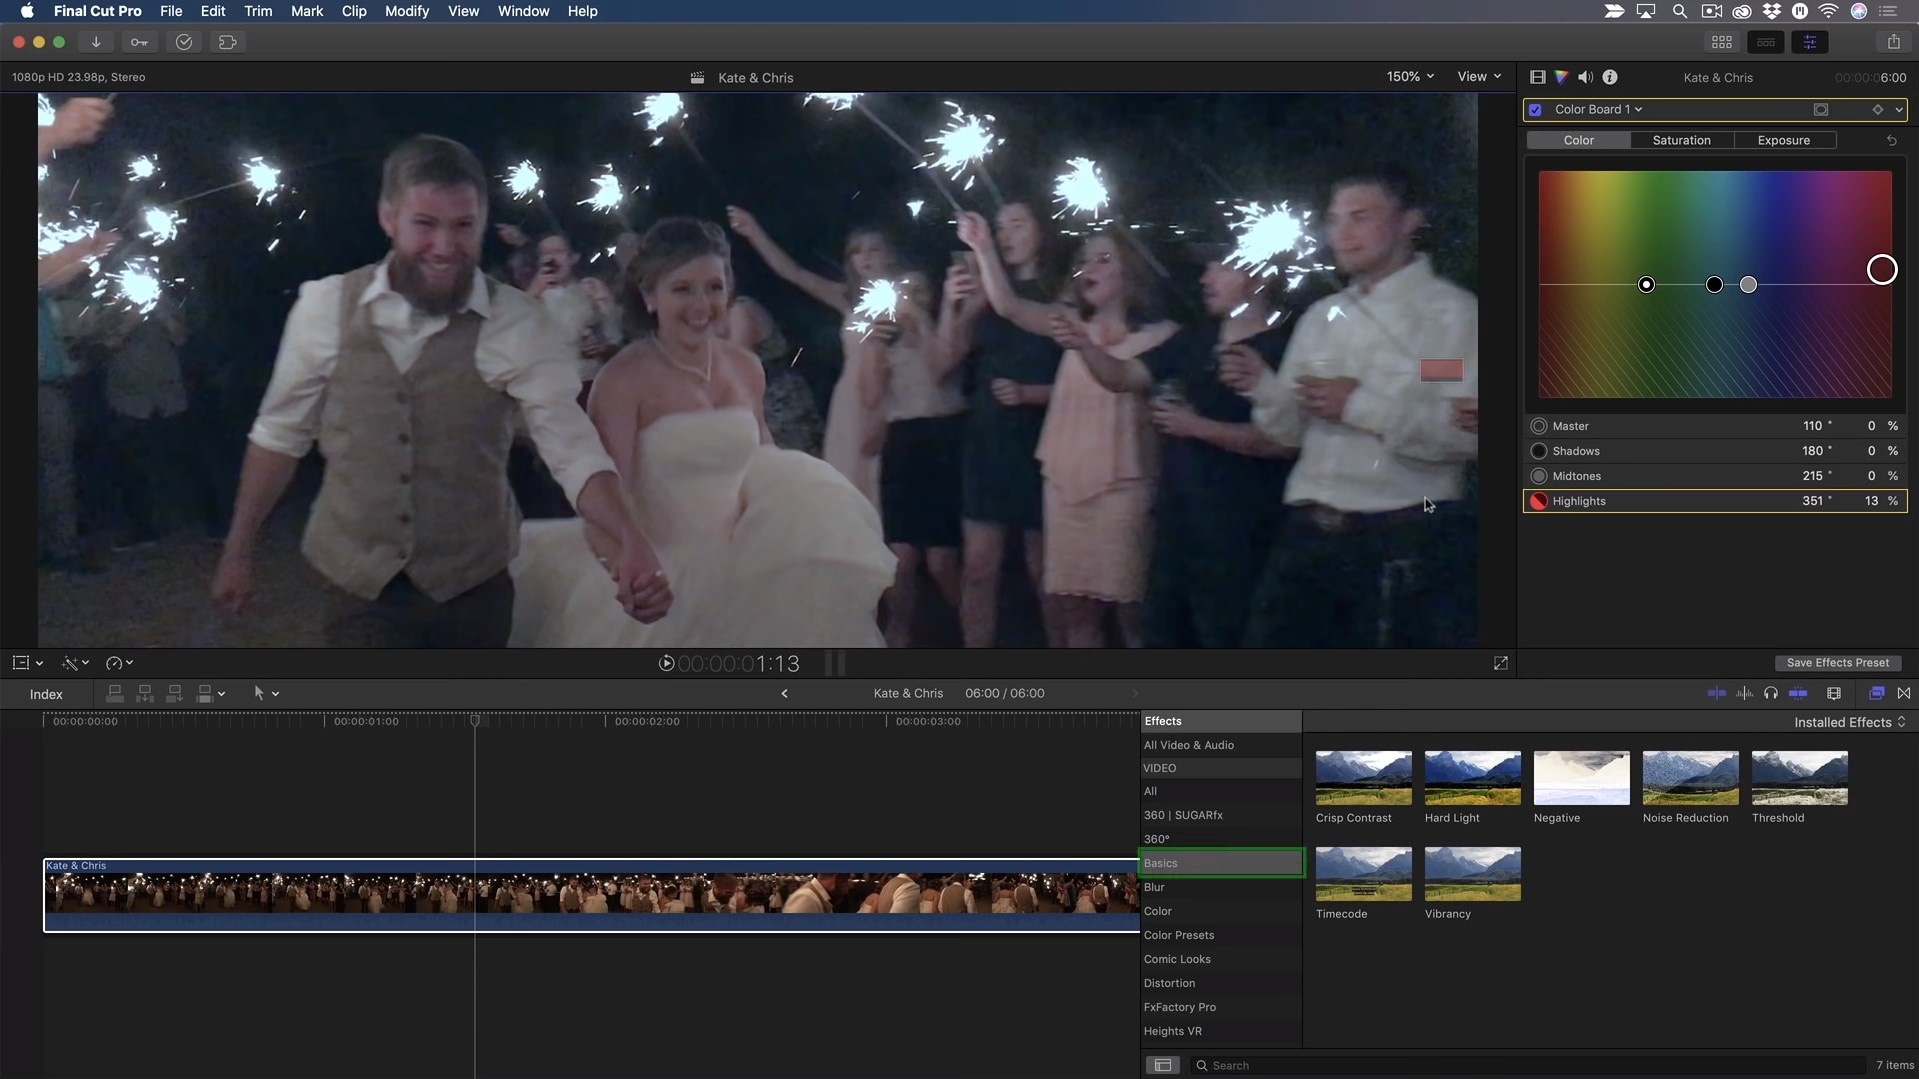
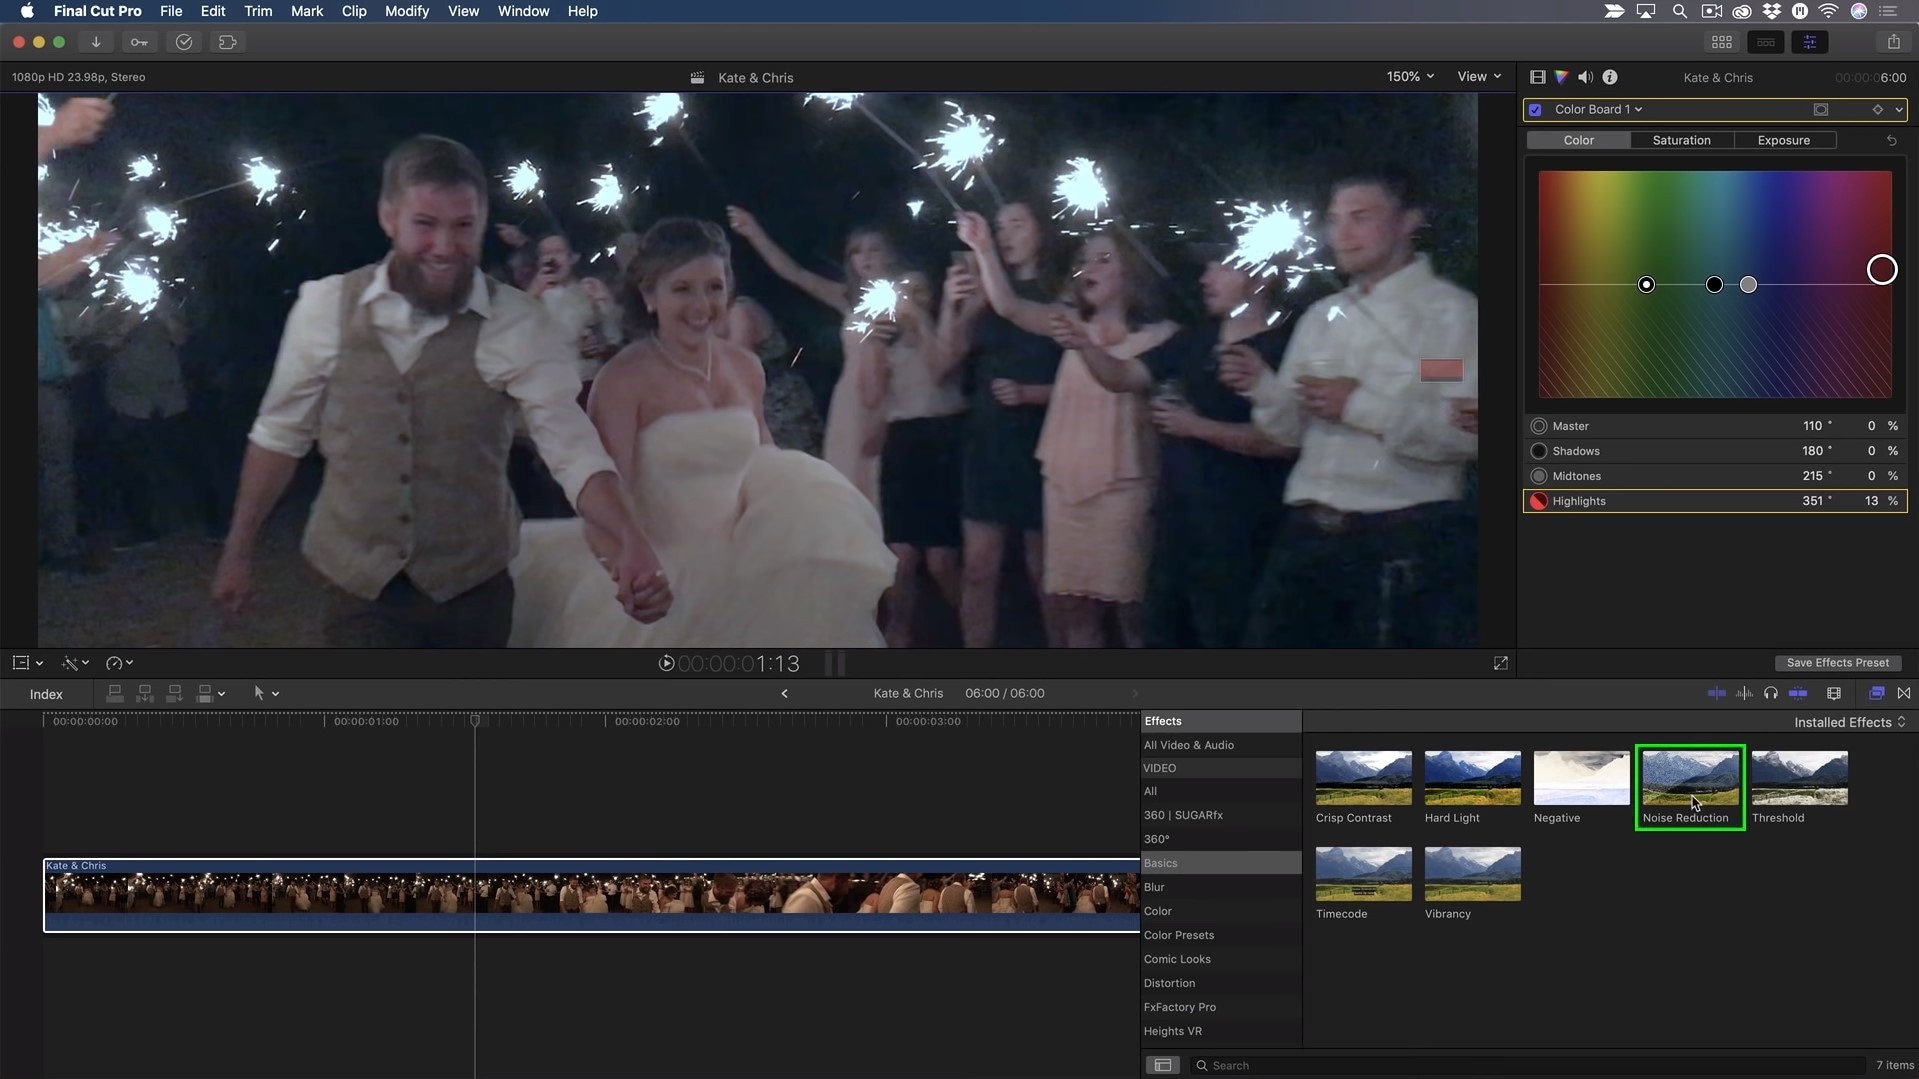
In the inspector, you will find the controls for noise reduction, which only include the Amount and Sharpness.
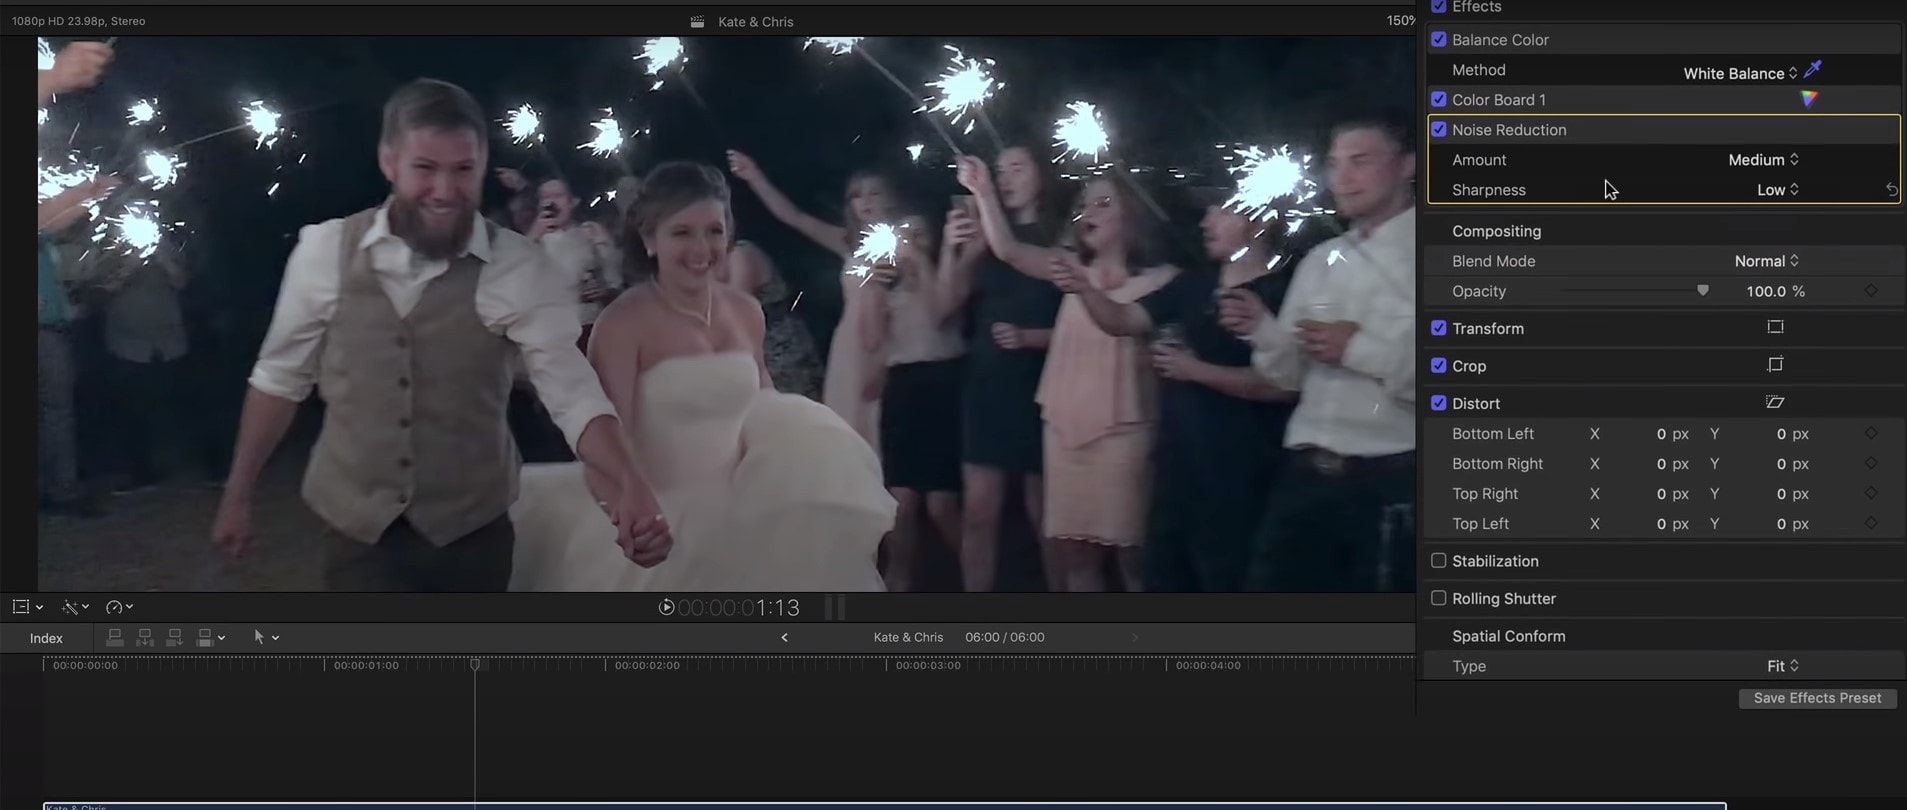
You might as well boost the amount to high, then you can take a look at the image to evaluate the result. One way to do the last step is to uncheck the box next to the Noise Reduction as well, which will disable the filter until you check the box again.
You can also change the Sharpness to Medium, which will compensate for the soft look the effect produces.
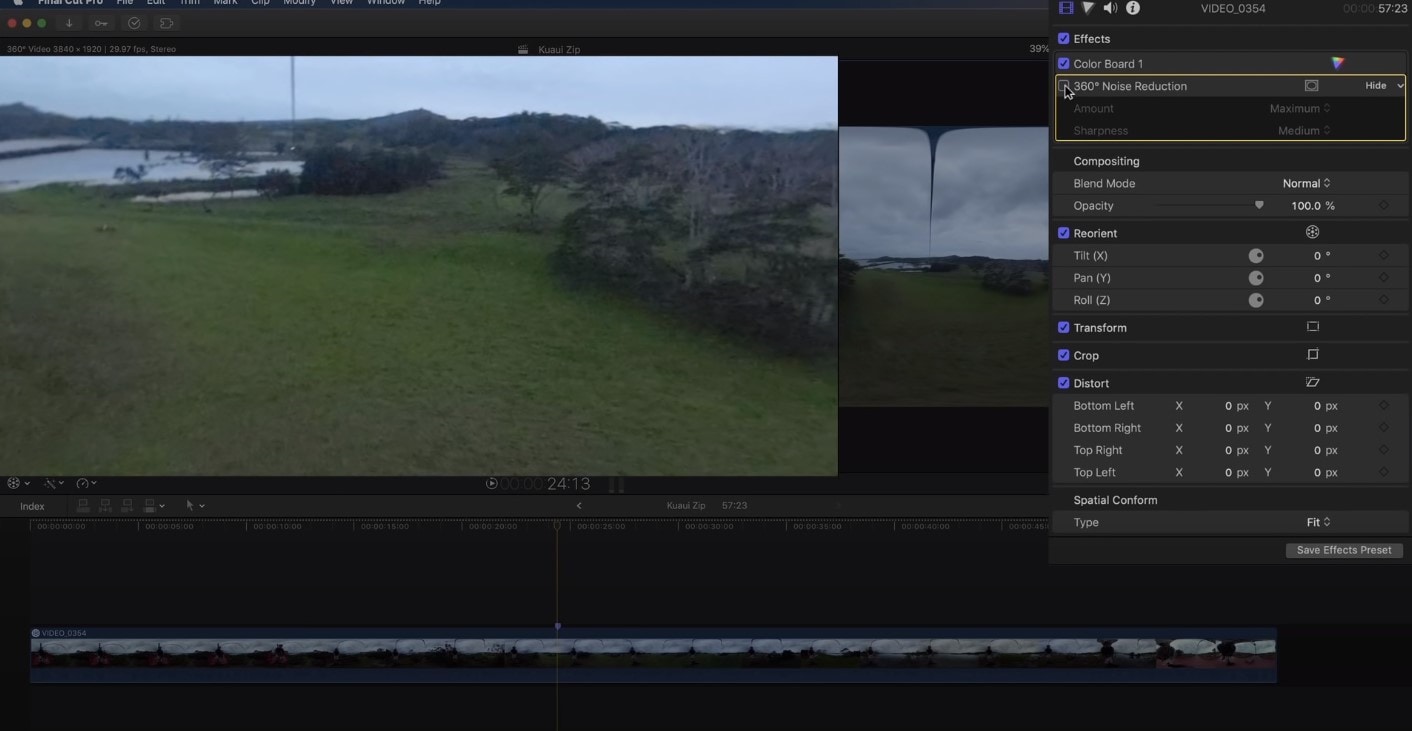
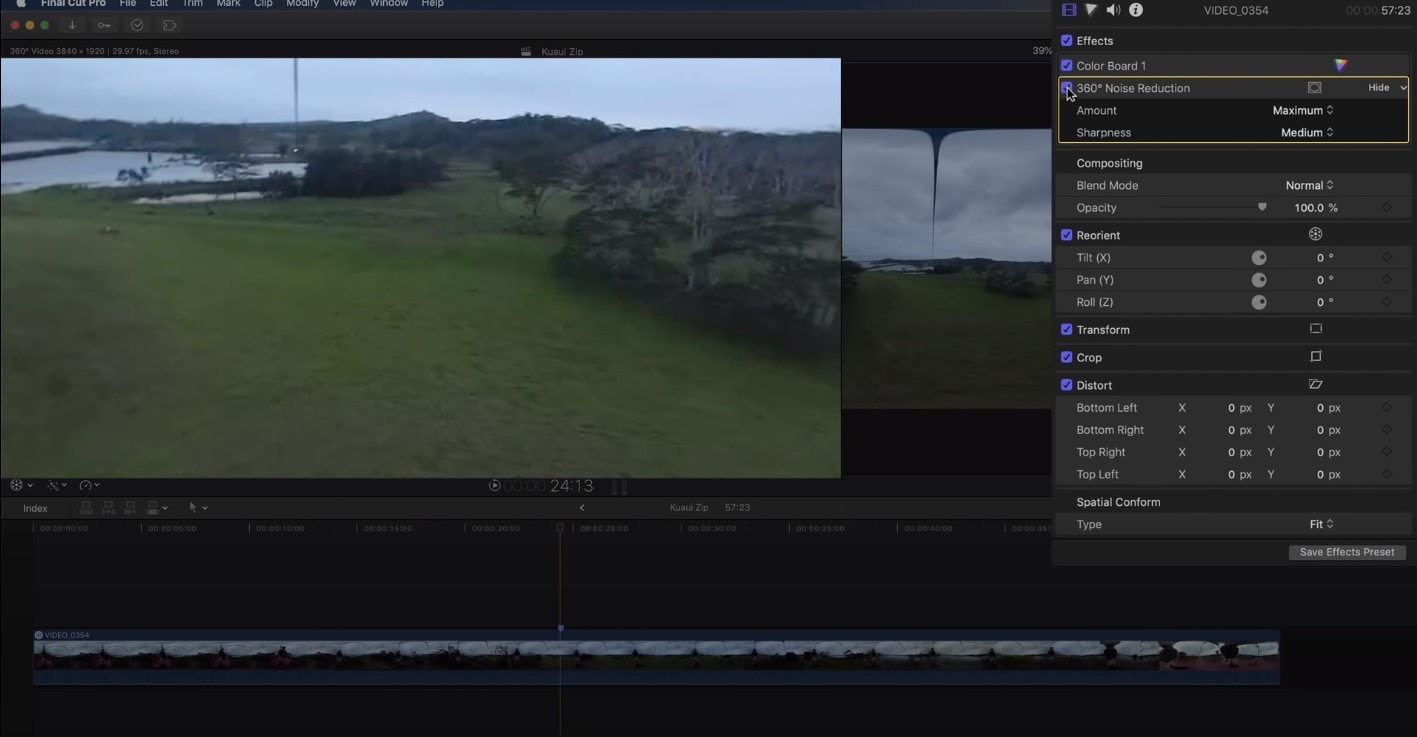
And, there is also a noise reduction effect dedicated to 360 viewers, which is called 360 Noise Reduction. As you can see, the effect removes a lot of noise and makes the grainy video look clearer and more enjoyable, besides, if you move around the sphere in the viewer, the effect seems quite seamless!
Bonus tip: how to remove audio noise in video with Filmora
In case you don’t own Mac or just want to operate in another computer program, then Wondershare Filmora would make a great alternative – it’s one of the software that can help you get rid of the background noise. How to do it there? Follow this guideline:
First off, of course, you need to drag and drop the video into the timeline. Then, in order to edit the audio of the video separately, you’ll need to right-click on the video and find Detach Audio.

Double-clicking on the audio track in the sequence will show the editing panel, where you can find – Remove background noise, which, as it is obvious, will remove the noise directly.

So, in this article, we learned how to denoise in Final Cut Pro – both in terms of audio background noise, and noise and grain on the video, and we learned how to get rid of audio noise in Wondershare Filmora in the easiest and fastest way!
You will need to first use Equalatization, which is under the Audio Enhancements.

You will need to check the square that opens the equalizer and shows graphics for it. The high frequencies are on the right, and the low ones you will find on the left. Lower the highs and raise the points a little on the left side.

Next step would be to level out the lows and highs of the voice using a Compressor. You will find this effect in Installed Effects, which you need to drag and drop on the audio, and it will raise the whispers and lower the shouts in the audio.

Some background noise will still be there, so you then can find Channel EQ effect you will find in the effects. You need to drag it on the clip, then click on the equalize button in the inspector, and this time, reduce the lower levels on the left, while you also lower the highs on the right.

Lastly, you will need to use the Noise Gate effect. This will cut out all of the sounds between words, so when someone in the audio is not speaking, there will be no background noise at all.

In case this kind of cutting noise out doesn’t sound natural, you can look into Noise Gate Parameters and concentrate on two of them – reduction and release. If you drag the latter right, the noise will raise, and reduction will also raise noise a little, in order to reduce the clipping.
How to denoise a video in Final Cut Pro?
But what is noise in terms of videos? It means that the video is not clear, but instead, the clip has grains on it, which is not so pleasant to see (unless you use noise/grain effect with some purpose!). the noise usually appear when the shot was taken in an environment with not enough white, or, in other cases, when the video was taken with small-sensory equipment, for example, smartphone or action camera.
And Final Cut Pro is one of the video editors where you can remove or reduce the noise and make your footage look clearer than it would have been originally, and it will guarantee that people who are interested and watch your clip will have a better experience. So, let’s learn step by step how to denoise the video in our beloved Final Cut Pro, which added this feature only starting from Final Cut Pro 10.4.4 – it means that before, the task was only done by using some expensive plug-ins, but starting from this version of the program, the software has video noise reduction effect itself.
So, choose the video which has some noise and grain and you wish to edit. Bring it in the program, and click on it in the timeline, in order to select it. The video should appear in the viewer, and you will be able to see the noise right away or whenever you zoom in a little. Then, you will need to find the Effects – you can just use the shortcut and click on Command and 5, or find the panel in the top-right corner of the timeline. Whenever Effects appear, you will need to select the Basic category, and then double-click the icon to apply the noise reduction filter, and close the window. It might take a while to analyze the clip for noise.


In the inspector, you will find the controls for noise reduction, which only include the Amount and Sharpness.

You might as well boost the amount to high, then you can take a look at the image to evaluate the result. One way to do the last step is to uncheck the box next to the Noise Reduction as well, which will disable the filter until you check the box again.
You can also change the Sharpness to Medium, which will compensate for the soft look the effect produces.
And, there is also a noise reduction effect dedicated to 360 viewers, which is called 360 Noise Reduction. As you can see, the effect removes a lot of noise and makes the grainy video look clearer and more enjoyable, besides, if you move around the sphere in the viewer, the effect seems quite seamless!


Bonus tip: how to remove audio noise in video with Filmora
In case you don’t own Mac or just want to operate in another computer program, then Wondershare Filmora would make a great alternative – it’s one of the software that can help you get rid of the background noise. How to do it there? Follow this guideline:
First off, of course, you need to drag and drop the video into the timeline. Then, in order to edit the audio of the video separately, you’ll need to right-click on the video and find Detach Audio.

Double-clicking on the audio track in the sequence will show the editing panel, where you can find – Remove background noise, which, as it is obvious, will remove the noise directly.

So, in this article, we learned how to denoise in Final Cut Pro – both in terms of audio background noise, and noise and grain on the video, and we learned how to get rid of audio noise in Wondershare Filmora in the easiest and fastest way!
You will need to first use Equalatization, which is under the Audio Enhancements.

You will need to check the square that opens the equalizer and shows graphics for it. The high frequencies are on the right, and the low ones you will find on the left. Lower the highs and raise the points a little on the left side.

Next step would be to level out the lows and highs of the voice using a Compressor. You will find this effect in Installed Effects, which you need to drag and drop on the audio, and it will raise the whispers and lower the shouts in the audio.

Some background noise will still be there, so you then can find Channel EQ effect you will find in the effects. You need to drag it on the clip, then click on the equalize button in the inspector, and this time, reduce the lower levels on the left, while you also lower the highs on the right.

Lastly, you will need to use the Noise Gate effect. This will cut out all of the sounds between words, so when someone in the audio is not speaking, there will be no background noise at all.

In case this kind of cutting noise out doesn’t sound natural, you can look into Noise Gate Parameters and concentrate on two of them – reduction and release. If you drag the latter right, the noise will raise, and reduction will also raise noise a little, in order to reduce the clipping.
How to denoise a video in Final Cut Pro?
But what is noise in terms of videos? It means that the video is not clear, but instead, the clip has grains on it, which is not so pleasant to see (unless you use noise/grain effect with some purpose!). the noise usually appear when the shot was taken in an environment with not enough white, or, in other cases, when the video was taken with small-sensory equipment, for example, smartphone or action camera.
And Final Cut Pro is one of the video editors where you can remove or reduce the noise and make your footage look clearer than it would have been originally, and it will guarantee that people who are interested and watch your clip will have a better experience. So, let’s learn step by step how to denoise the video in our beloved Final Cut Pro, which added this feature only starting from Final Cut Pro 10.4.4 – it means that before, the task was only done by using some expensive plug-ins, but starting from this version of the program, the software has video noise reduction effect itself.
So, choose the video which has some noise and grain and you wish to edit. Bring it in the program, and click on it in the timeline, in order to select it. The video should appear in the viewer, and you will be able to see the noise right away or whenever you zoom in a little. Then, you will need to find the Effects – you can just use the shortcut and click on Command and 5, or find the panel in the top-right corner of the timeline. Whenever Effects appear, you will need to select the Basic category, and then double-click the icon to apply the noise reduction filter, and close the window. It might take a while to analyze the clip for noise.


In the inspector, you will find the controls for noise reduction, which only include the Amount and Sharpness.

You might as well boost the amount to high, then you can take a look at the image to evaluate the result. One way to do the last step is to uncheck the box next to the Noise Reduction as well, which will disable the filter until you check the box again.
You can also change the Sharpness to Medium, which will compensate for the soft look the effect produces.
And, there is also a noise reduction effect dedicated to 360 viewers, which is called 360 Noise Reduction. As you can see, the effect removes a lot of noise and makes the grainy video look clearer and more enjoyable, besides, if you move around the sphere in the viewer, the effect seems quite seamless!


Bonus tip: how to remove audio noise in video with Filmora
In case you don’t own Mac or just want to operate in another computer program, then Wondershare Filmora would make a great alternative – it’s one of the software that can help you get rid of the background noise. How to do it there? Follow this guideline:
First off, of course, you need to drag and drop the video into the timeline. Then, in order to edit the audio of the video separately, you’ll need to right-click on the video and find Detach Audio.

Double-clicking on the audio track in the sequence will show the editing panel, where you can find – Remove background noise, which, as it is obvious, will remove the noise directly.

So, in this article, we learned how to denoise in Final Cut Pro – both in terms of audio background noise, and noise and grain on the video, and we learned how to get rid of audio noise in Wondershare Filmora in the easiest and fastest way!
You will need to first use Equalatization, which is under the Audio Enhancements.

You will need to check the square that opens the equalizer and shows graphics for it. The high frequencies are on the right, and the low ones you will find on the left. Lower the highs and raise the points a little on the left side.

Next step would be to level out the lows and highs of the voice using a Compressor. You will find this effect in Installed Effects, which you need to drag and drop on the audio, and it will raise the whispers and lower the shouts in the audio.

Some background noise will still be there, so you then can find Channel EQ effect you will find in the effects. You need to drag it on the clip, then click on the equalize button in the inspector, and this time, reduce the lower levels on the left, while you also lower the highs on the right.

Lastly, you will need to use the Noise Gate effect. This will cut out all of the sounds between words, so when someone in the audio is not speaking, there will be no background noise at all.

In case this kind of cutting noise out doesn’t sound natural, you can look into Noise Gate Parameters and concentrate on two of them – reduction and release. If you drag the latter right, the noise will raise, and reduction will also raise noise a little, in order to reduce the clipping.
How to denoise a video in Final Cut Pro?
But what is noise in terms of videos? It means that the video is not clear, but instead, the clip has grains on it, which is not so pleasant to see (unless you use noise/grain effect with some purpose!). the noise usually appear when the shot was taken in an environment with not enough white, or, in other cases, when the video was taken with small-sensory equipment, for example, smartphone or action camera.
And Final Cut Pro is one of the video editors where you can remove or reduce the noise and make your footage look clearer than it would have been originally, and it will guarantee that people who are interested and watch your clip will have a better experience. So, let’s learn step by step how to denoise the video in our beloved Final Cut Pro, which added this feature only starting from Final Cut Pro 10.4.4 – it means that before, the task was only done by using some expensive plug-ins, but starting from this version of the program, the software has video noise reduction effect itself.
So, choose the video which has some noise and grain and you wish to edit. Bring it in the program, and click on it in the timeline, in order to select it. The video should appear in the viewer, and you will be able to see the noise right away or whenever you zoom in a little. Then, you will need to find the Effects – you can just use the shortcut and click on Command and 5, or find the panel in the top-right corner of the timeline. Whenever Effects appear, you will need to select the Basic category, and then double-click the icon to apply the noise reduction filter, and close the window. It might take a while to analyze the clip for noise.


In the inspector, you will find the controls for noise reduction, which only include the Amount and Sharpness.

You might as well boost the amount to high, then you can take a look at the image to evaluate the result. One way to do the last step is to uncheck the box next to the Noise Reduction as well, which will disable the filter until you check the box again.
You can also change the Sharpness to Medium, which will compensate for the soft look the effect produces.
And, there is also a noise reduction effect dedicated to 360 viewers, which is called 360 Noise Reduction. As you can see, the effect removes a lot of noise and makes the grainy video look clearer and more enjoyable, besides, if you move around the sphere in the viewer, the effect seems quite seamless!


Bonus tip: how to remove audio noise in video with Filmora
In case you don’t own Mac or just want to operate in another computer program, then Wondershare Filmora would make a great alternative – it’s one of the software that can help you get rid of the background noise. How to do it there? Follow this guideline:
First off, of course, you need to drag and drop the video into the timeline. Then, in order to edit the audio of the video separately, you’ll need to right-click on the video and find Detach Audio.

Double-clicking on the audio track in the sequence will show the editing panel, where you can find – Remove background noise, which, as it is obvious, will remove the noise directly.

So, in this article, we learned how to denoise in Final Cut Pro – both in terms of audio background noise, and noise and grain on the video, and we learned how to get rid of audio noise in Wondershare Filmora in the easiest and fastest way!
A Comprehensive Guide on Converting Slo-Mo Videos to Normal Speed Videos On iPhone
Thanks to the eccentric and offbeat elements, slow-motion videos have become the super-fun, state-of-the-art trend. Whether you’re in the bar trying to click the aesthetic, cinematic video or capture cool, unique, and enticing birthday moments, you can always rely on the slow-mo feature.

But do you ever feel like converting the slow-motion video in your iOS device to a normal video? Perhaps you thought the slow-mo video would be more attractive, but it’s not, or maybe you want to determine how to remove slow-motion from a video iPhone.
No matter the reason, there are numerous ways to remove slow motion from iPhone video. In this article, you’ll learn the various methods to convert slow-motion video into a regular video on your iPhone or iPad. Also, learn the steps involved in achieving it.
So, let’s start.
How To Convert Slow Motion Video to Normal on iPhone and iPad
Due to the slow-motion and Time-lapse modes that are built into the iPhone, people may quickly record slo-mo and time-lapse clips using their iOS smartphone cameras.
Access the iPhone camera, select Slo-mo, press the Record icon once to begin filming, and then press it once more to stop. This will create a slo-mo video.
Do you ever wish to get your video’s slow motion removed? How to convert slow-motion video to normal on an iPhone? Well, here’s your answer.
Method 1. Using the Photos App
The Photos app is an in-built app for iPhone and iPad that features editing capabilities like rotation, resizing, and auto-enhancement, in addition to helping you manage videos and images.

You may quickly and effortlessly turn a slow-mo video into a regular-speed one with the Photos app’s tucked-away slow-motion converter feature. Additionally, there won’t be any quality loss in your video.
And here are the steps on how to remove slow-mo from iPhone video using the Photos app on an iPad or iPhone to turn it to normal speed.
Step1: Take your iPad or iPhone, navigate to the Photos app, open it, and then go to the bottom to hit the Albums tab.
Step2: Choose the Slo-mo option, and subsequently select the video you wish to turn into a regular speed video. Go to the top right corner of the screen and hit the Edit button.

Step3: If you look under the timeline, you’ll find vertical lines. Here, the area with apart spaces signifies slow motion.

Step4: To learn how to remove slow mo from iPhone video is to learn how to turn it into regular speed. To do so, select the slow-motion bar and drag it towards the other one to position the lines at a close distance.
Step5: When finished, hit the Done button and save this video. However, if you think this change was unnecessary or incorrect, you can discard it by clicking on Edit → Revert → Revert To Original.

Editing Tip
- The Photos app on iPhone doesn’t allow you to convert any video shot at 24fps or 30fps to slow motion.
- You cannot reduce or decrease the overall size of the video after conversion.
Pros & Cons
Pros
- It is a built-in app on every iOS device.
- Saves the hassle of downloading any third-party app.
- No charges are applicable for using this app.
- Excellent slow-mo video convertor.
Cons
- Limited speed adjustment for the conversion of slow-mo videos into regular videos.
Method 2: Using Other Converter Apps
You may think that converting slow-mo video to a regular speed video on your iPad or iPhone is convenient, but there’s a drawback too. The method mentioned above can only help you with minimalistic speed changes, which may not give you the desired result.
However, other converter apps also help you change slow-mo video to regular iPhone video. These apps work seamlessly on your PC or Mac to turn your slow-mo videos on the iPhone or Mac to normal-speed video using customized and high-resolution settings.
Overview of The Apps
| Particulars | iMovie | Slow-Fast Motion Video Editor |
|---|---|---|
| Type (versatile or specialized) | Versatile | Specialized |
| Supported OS | iOS, Mac | iOS, Mac |
| Average Rating | 3.9/5 | 4.7/5 |
| Price | Free | Free |
| Best for | Video editing with cinematic effects | Slo-mo video conversion |
1) iMovie

iMovie is an excellent option if you’re looking for an application to modify a video with additional tools and convert the slow-mo to a regular pace. Among the top video converters for the iPhone is iMovie.
It offers a wide range of tools and capabilities that allow you to change the video transition, audio, and speed, add music, animated text, video overlay effects, normal video effects, and more. Additionally, it aids users in producing stunning films and commercials in a Cinematic manner.
iMovie could convert slow-mo footage to normal speed, in case you didn’t know. Did you ever attempt to change slow mot to regular speed in iMovie? With the use of iMovie, how can slow-motion video be made normally on an iPhone?
Here are the instructions.
Step1: Open the iMovie app, click on the ‘Create Project’ option, → tap on ‘Movie → Media → Video.

Step2: Tap on the slow-mo option, select the slow-motion video you want to convert and hit the ‘Create Movie’ option.

Step3: Get to know the editing options by clicking on the timeline. Then, click on the clock (speed) icon. At the beginning of the lines, you’ll find a turtle. It demonstrates slow motion. Plus, the number right behind the rabbit at the end signifies the speed.

Step4: To turn this slow-motion video into a regular speed video, drag and slide the speed control slider until the number turns 1x.
Step5: To save the changes, tap on the Done option. Subsequently, edit the video as per your preference.
2) Slow-Fast Motion Video Editor

This slow-mo video converter app helps you slow down or speed up any slow-motion video without any watermark and charges. This free app supports both landscape or portrait operation, unlimited video length, and corrected audio pitch.
The application is convenient to use and seamless to speed up or slow down any parts or clips of your videos. Without charging a penny, this app meets the users’ expectations. If you’re wondering how to use this converter app, here’s a step-by-step guide:
Method 3. Using Third-Party Online Tools
The smartphone sector’s most cutting-edge functionalities can be found on iPhones. Users may capture slow-motion videos, for instance. However, you may consider accelerating the slo-mo movie to regular video speed once it has been recorded.
Using your smartphone, how would you go about doing that? Well, we have seen that using the built-in Photos app and converter apps like iMovie can help, but can they really provide the level of customization and outcomes you need?
When things get professional and the expectations are too high, it’s best to use third-party online tools. So, here are a few practical choices:
Overview of the Online Tools
| Particulars | KAPWING | Clideo | EZGIF |
|---|---|---|---|
| Supported File Format | .AVI, .FLV, 3GP, and other edge file types. | MP4, MOV, WMV, AVI, WEBM, FLV, MKV, MPG, MPEG, MTS. | MNG files |
| Watermark | Not Available | Only in Free version | Not Available |
| Available Speed Option | As fast as 4x for an accelerated video | 0.25 times to 2 times | 0.25 times to 2 times |
| Time Consuming | No | Moderate | No |
1) KAPWING

Kapwing is a tool for group film editing that enables people to collaborate to produce original videos. For individuals to create the ideal video, Kapwing offers a collection of pre-built themes, stock footage, and materials.
Kapwing acts as a digital office solution that enables individuals to organize all of their resources in one location and work together on projects utilizing sharing features. Amid its vast range of features, its slow-mo converter is the most famous and widely used one.
- Rating: 4.1/5
- Price: Plan starts at $20 per month
Step-By-Step Guide To Convert Slow-Mo on Iphone Using Kapwing App
Step1: First, download and install the Kapwing app from the App Store.
Step2: Upload the slow-mo video that you want to speed up.
![]()
Note: Kapwing also lets you speed up any slow-mo video present on TikTok, Twitter, or YouTube.

Step3: Perform the video clip speed adjustment by utilizing the Kapwing sidebar. You can accelerate the video clip speed up to four times the original speed. If not, you can play in every level in between.

Step4: Finally, click on the Export option, and the final video clip with all speed adjustments will be generated within a few seconds.

2) Clideo

Among the finest free tools for rapid photo or video editing is Clideo. You can start upgrading your material by uploading files in a wide range of formats to their site.
Limitless customization is possible with the paid version for just $9 a month. The capabilities, though, aren’t as varied as those offered by rivals, and there aren’t any mobile apps for people who want to generate material while on the go.
- Ratings: 4.3/5
- Price: Starts at $9 per month
Step-By-Step Guide To Convert Slow-Mo on Iphone Using Clideo App:
Step1: From your computer (Mac) or mobile device (iPhone), upload a video. You can also add from a Dropbox or Google Drive account.

Step2: Select to speed up the video after it has been recorded. Then, if required, muffle its sound and alter the file type.


Step3: The video can be seen directly in your browser. Click “Download” after you are finished and delighted with your creation.

3) EZGIF

EZGIF is a free online editing tool that enables individuals to change the playback speed of any video. Not only does it effectively convert your slow-mo video on an iOS device to a normal speed video, but it also comes with many other features (later on that). The website has a simple, outdated interface, but except for that, it’s a fine app for beginners.
Step-By-Step Guide To Convert Slow-Mo on Iphone Using Clideo App:
Step1: Upload the video clip and choose a speed multiplier to start using this program.

Step2: A number less than one will slow down playback; a number greater than one will quicken it.
Step3: Thus, input 0.5 to run the program at 1/2 its normal speed, and so forth.

Step4: You can preserve the audio track’s original tempo, vary the speed along with the video, or silence the audio entirely.
Convert Your Slo-Mo Videos Into Regular Ones In a Few Simple Steps With Filmora
Filmora is a leading online video editing software that has become the preferred choice of all professionals and amateurs. From everyday needs to something formal, it helps you edit videos for every occasion.
You can change pace swiftly or consistently in Filmora and vary the pace of the audio or video recordings. Use the Speed Ramping tool in Filmora. If you want to remove slow-mo or add it, you can use Filmora’s speed ramping feature anytime.
Free Download For Win 7 or later(64-bit)
Free Download For macOS 10.14 or later
We will share some details on how to use this feature here, but for a comprehensive, detailed guide, read to the end.
Step-By-Step Guide to Speed Changing
Step1Launch the Video
Activate Wondershare Filmora on your computer. To increase the speed and runtime of the movie, explore the desired video and enter it into the software. You can drag and drop the movie onto the interface as well.
Step2Speed Adjustment

Press the left mouse button as soon as the video shows on the screen. And click the speed tab in the toolbar. There is then a contextual menu displayed. To double the rate, select 2x from the “Fast” menu. The participant may use any fundamental that has more than one.
Step3Save & Export
When finished, select “Save Project” from the list of available options in the “File” panel. Press “Save” after renaming the project.
Using Filmora’s “Export” feature, selecting “Export,” and then modifying the file name is the alternative way to export the video. A device, a system, or even YouTube can receive the exported video. Next, click “Export.”
Bonus Tips. 2 More Methods to Normalize Your Video Speed
Filmora offers you 2 more advanced methods to increase or decrease the speed of the video, one is uniform speed and the other, is speed ramping . Want to learn more about changing speed in Filmora, watch this video tutorial to get a quick start on using them.
Conclusion
That’s basically it! So that’s how you turn any slow-motion video into a regular one.
This article covers all major techniques to convert videos to slow motion on iOS and Mac. You can pick one of them to convert video to slow motion or to slow down slow motion.
So, are you now prepared to convert slow-motion videos on your iPad or iPhone device to ordinary speed? Try the Filmora video editor if you’re looking for something really professional.
It makes it much easier to convert slow-motion videos from your smartphone or tablet to regular speed. It has powerful video editing features and is more comfortable to use. So, get started today!
Method 2: Using Other Converter Apps
You may think that converting slow-mo video to a regular speed video on your iPad or iPhone is convenient, but there’s a drawback too. The method mentioned above can only help you with minimalistic speed changes, which may not give you the desired result.
However, other converter apps also help you change slow-mo video to regular iPhone video. These apps work seamlessly on your PC or Mac to turn your slow-mo videos on the iPhone or Mac to normal-speed video using customized and high-resolution settings.
Overview of The Apps
| Particulars | iMovie | Slow-Fast Motion Video Editor |
|---|---|---|
| Type (versatile or specialized) | Versatile | Specialized |
| Supported OS | iOS, Mac | iOS, Mac |
| Average Rating | 3.9/5 | 4.7/5 |
| Price | Free | Free |
| Best for | Video editing with cinematic effects | Slo-mo video conversion |
1) iMovie

iMovie is an excellent option if you’re looking for an application to modify a video with additional tools and convert the slow-mo to a regular pace. Among the top video converters for the iPhone is iMovie.
It offers a wide range of tools and capabilities that allow you to change the video transition, audio, and speed, add music, animated text, video overlay effects, normal video effects, and more. Additionally, it aids users in producing stunning films and commercials in a Cinematic manner.
iMovie could convert slow-mo footage to normal speed, in case you didn’t know. Did you ever attempt to change slow mot to regular speed in iMovie? With the use of iMovie, how can slow-motion video be made normally on an iPhone?
Here are the instructions.
Step1: Open the iMovie app, click on the ‘Create Project’ option, → tap on ‘Movie → Media → Video.

Step2: Tap on the slow-mo option, select the slow-motion video you want to convert and hit the ‘Create Movie’ option.

Step3: Get to know the editing options by clicking on the timeline. Then, click on the clock (speed) icon. At the beginning of the lines, you’ll find a turtle. It demonstrates slow motion. Plus, the number right behind the rabbit at the end signifies the speed.

Step4: To turn this slow-motion video into a regular speed video, drag and slide the speed control slider until the number turns 1x.
Step5: To save the changes, tap on the Done option. Subsequently, edit the video as per your preference.
2) Slow-Fast Motion Video Editor

This slow-mo video converter app helps you slow down or speed up any slow-motion video without any watermark and charges. This free app supports both landscape or portrait operation, unlimited video length, and corrected audio pitch.
The application is convenient to use and seamless to speed up or slow down any parts or clips of your videos. Without charging a penny, this app meets the users’ expectations. If you’re wondering how to use this converter app, here’s a step-by-step guide:
Method 3. Using Third-Party Online Tools
The smartphone sector’s most cutting-edge functionalities can be found on iPhones. Users may capture slow-motion videos, for instance. However, you may consider accelerating the slo-mo movie to regular video speed once it has been recorded.
Using your smartphone, how would you go about doing that? Well, we have seen that using the built-in Photos app and converter apps like iMovie can help, but can they really provide the level of customization and outcomes you need?
When things get professional and the expectations are too high, it’s best to use third-party online tools. So, here are a few practical choices:
Overview of the Online Tools
| Particulars | KAPWING | Clideo | EZGIF |
|---|---|---|---|
| Supported File Format | .AVI, .FLV, 3GP, and other edge file types. | MP4, MOV, WMV, AVI, WEBM, FLV, MKV, MPG, MPEG, MTS. | MNG files |
| Watermark | Not Available | Only in Free version | Not Available |
| Available Speed Option | As fast as 4x for an accelerated video | 0.25 times to 2 times | 0.25 times to 2 times |
| Time Consuming | No | Moderate | No |
1) KAPWING

Kapwing is a tool for group film editing that enables people to collaborate to produce original videos. For individuals to create the ideal video, Kapwing offers a collection of pre-built themes, stock footage, and materials.
Kapwing acts as a digital office solution that enables individuals to organize all of their resources in one location and work together on projects utilizing sharing features. Amid its vast range of features, its slow-mo converter is the most famous and widely used one.
- Rating: 4.1/5
- Price: Plan starts at $20 per month
Step-By-Step Guide To Convert Slow-Mo on Iphone Using Kapwing App
Step1: First, download and install the Kapwing app from the App Store.
Step2: Upload the slow-mo video that you want to speed up.
![]()
Note: Kapwing also lets you speed up any slow-mo video present on TikTok, Twitter, or YouTube.

Step3: Perform the video clip speed adjustment by utilizing the Kapwing sidebar. You can accelerate the video clip speed up to four times the original speed. If not, you can play in every level in between.

Step4: Finally, click on the Export option, and the final video clip with all speed adjustments will be generated within a few seconds.

2) Clideo

Among the finest free tools for rapid photo or video editing is Clideo. You can start upgrading your material by uploading files in a wide range of formats to their site.
Limitless customization is possible with the paid version for just $9 a month. The capabilities, though, aren’t as varied as those offered by rivals, and there aren’t any mobile apps for people who want to generate material while on the go.
- Ratings: 4.3/5
- Price: Starts at $9 per month
Step-By-Step Guide To Convert Slow-Mo on Iphone Using Clideo App:
Step1: From your computer (Mac) or mobile device (iPhone), upload a video. You can also add from a Dropbox or Google Drive account.

Step2: Select to speed up the video after it has been recorded. Then, if required, muffle its sound and alter the file type.


Step3: The video can be seen directly in your browser. Click “Download” after you are finished and delighted with your creation.

3) EZGIF

EZGIF is a free online editing tool that enables individuals to change the playback speed of any video. Not only does it effectively convert your slow-mo video on an iOS device to a normal speed video, but it also comes with many other features (later on that). The website has a simple, outdated interface, but except for that, it’s a fine app for beginners.
Step-By-Step Guide To Convert Slow-Mo on Iphone Using Clideo App:
Step1: Upload the video clip and choose a speed multiplier to start using this program.

Step2: A number less than one will slow down playback; a number greater than one will quicken it.
Step3: Thus, input 0.5 to run the program at 1/2 its normal speed, and so forth.

Step4: You can preserve the audio track’s original tempo, vary the speed along with the video, or silence the audio entirely.
Convert Your Slo-Mo Videos Into Regular Ones In a Few Simple Steps With Filmora
Filmora is a leading online video editing software that has become the preferred choice of all professionals and amateurs. From everyday needs to something formal, it helps you edit videos for every occasion.
You can change pace swiftly or consistently in Filmora and vary the pace of the audio or video recordings. Use the Speed Ramping tool in Filmora. If you want to remove slow-mo or add it, you can use Filmora’s speed ramping feature anytime.
Free Download For Win 7 or later(64-bit)
Free Download For macOS 10.14 or later
We will share some details on how to use this feature here, but for a comprehensive, detailed guide, read to the end.
Step-By-Step Guide to Speed Changing
Step1Launch the Video
Activate Wondershare Filmora on your computer. To increase the speed and runtime of the movie, explore the desired video and enter it into the software. You can drag and drop the movie onto the interface as well.
Step2Speed Adjustment

Press the left mouse button as soon as the video shows on the screen. And click the speed tab in the toolbar. There is then a contextual menu displayed. To double the rate, select 2x from the “Fast” menu. The participant may use any fundamental that has more than one.
Step3Save & Export
When finished, select “Save Project” from the list of available options in the “File” panel. Press “Save” after renaming the project.
Using Filmora’s “Export” feature, selecting “Export,” and then modifying the file name is the alternative way to export the video. A device, a system, or even YouTube can receive the exported video. Next, click “Export.”
Bonus Tips. 2 More Methods to Normalize Your Video Speed
Filmora offers you 2 more advanced methods to increase or decrease the speed of the video, one is uniform speed and the other, is speed ramping . Want to learn more about changing speed in Filmora, watch this video tutorial to get a quick start on using them.
Conclusion
That’s basically it! So that’s how you turn any slow-motion video into a regular one.
This article covers all major techniques to convert videos to slow motion on iOS and Mac. You can pick one of them to convert video to slow motion or to slow down slow motion.
So, are you now prepared to convert slow-motion videos on your iPad or iPhone device to ordinary speed? Try the Filmora video editor if you’re looking for something really professional.
It makes it much easier to convert slow-motion videos from your smartphone or tablet to regular speed. It has powerful video editing features and is more comfortable to use. So, get started today!
Why Your Transparent GIF Is Hard to Remove
Why Your Transparent GIF Is Hard to Remove and How to Do With It
An easy yet powerful editor
Numerous effects to choose from
Detailed tutorials provided by the official channel
GIFs are very popular type of content these days, on social media. It seems to be very engaging for the audience. The GIF image format was first developed by CompuServe in 1987. Since that time, they have been used for entertainment purposes and their application is increasing with each passing day. But when it comes to transparent GIFs, it gets annoying sometimes. It looks ugly with weird white edges.
Sometimes it becomes hard to remove such GIFs with transparent backgrounds. Do you ever think about why it happens? This blog is dedicated to explaining the possible reasons for this. Also, we are going to explain how one can achieve to remove such a transparent background from the GIF.
In this article
01 [Why Sometimes Transparent Gif is Hard to Remove](#Part 1)
02 [How to Remove the Background from an Animated Gif in Photoshop](#Part 2)
03 [8 Best Online Transparent Gif Maker Websites](#Part 3)
Part 1 Why Sometimes Transparent Gif is Hard to Remove
When the GIF looks ugly with a transparent background, it becomes necessary to remove the background. But it sometimes becomes hard as this requires proper skills as well as adequate tools to achieve this. In the absence of even one, the final output may come out to be clumsy. There are many tools that can be used to remove the background from a transparent animated GIF. But it is hard to use these tools without proper knowledge. If you learn the skills, the task becomes so easy.
Part 2 How to Remove the Background from an Animated Gif in Photoshop
Photoshop is popularly known for being a photo manipulation and editing software. But it can also be used to remove the background of an animated GIF. Here, we will discuss the step-by-step approach to removing an animated GIF background.
Step 1: Import The GIF File
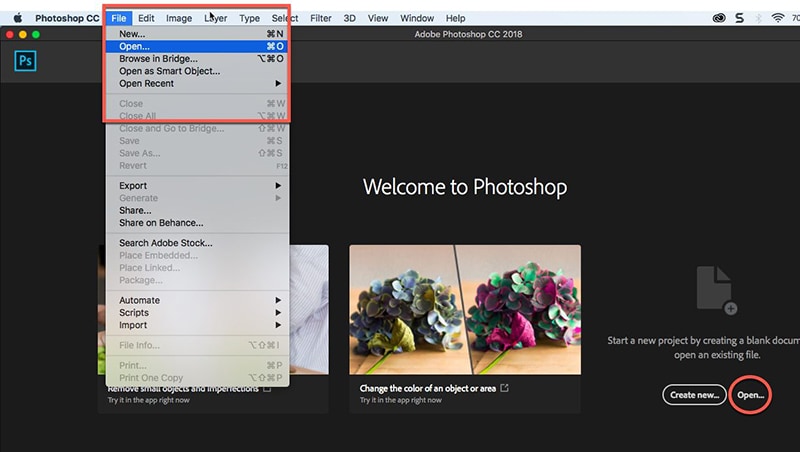
This can be done in 2 ways. One is clicking and dragging the file from the file location on the computer, into Photoshop. The second way is to click on the “File” menu of Photoshop. Then tap on “Open” and double click on the desired GIF file.
Step 2: Set Up The Project
It is required to edit each frame separately for deleting the background of an animated GIF (gif remove bg). For this:
Find the “Video Group” option on the right side of Photoshop. Right-click on it and tap on the “Ungroup layers” option.
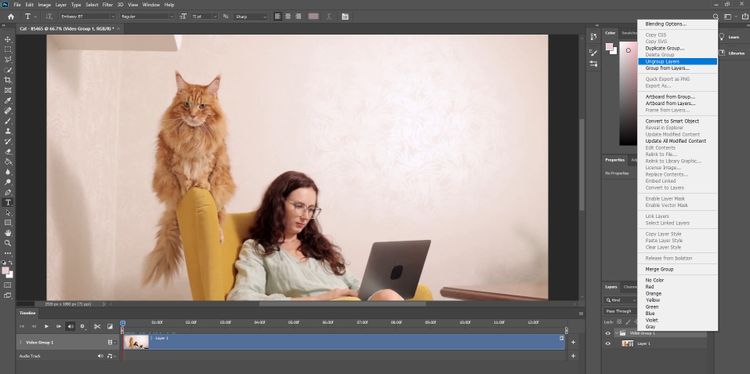
This will give you the video layer, which you want to edit. Right-click on “layer 1” and tap on the “Convert to smart object” option. Again right-click on “Layer 1” and click on “Edit Contents”.
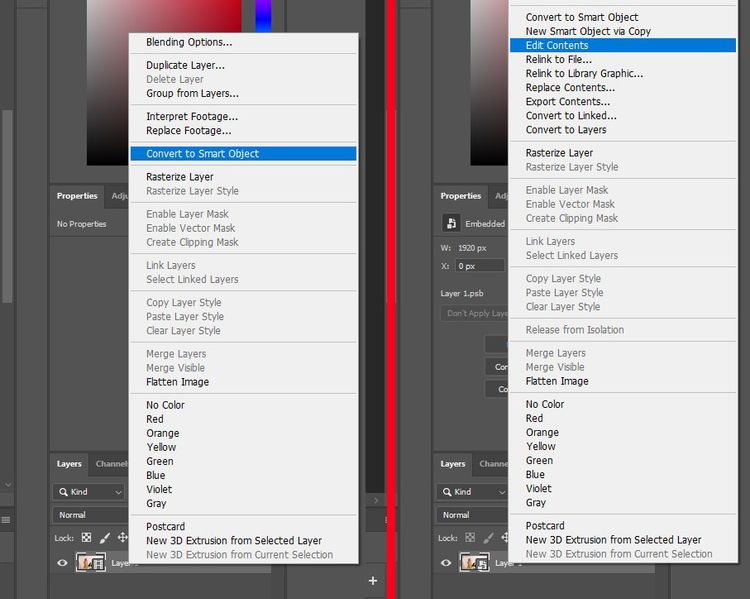
You will get a new Photoshop tap for the editing of GIF files. Just freely close the original tab.
Step 3: Begin The Editing Part
Find the blue line called the Timeline at the bottom of the screen. This Timeline will help you to edit the GIF. To make your editing easy, you can zoom on the frames with the help of a slider located at the bottom of the screen.
For a better outcome, the frame-by-frame deletion of the GIF background is advisable. It might be a little time-consuming but it is the most appropriate and accurate approach. So, delete the background from each frame independently.
To move from one frame of the GIF to another, hold and move the blue arrow having a red line.
\

Step 4: Delete The Transparent GIF Background
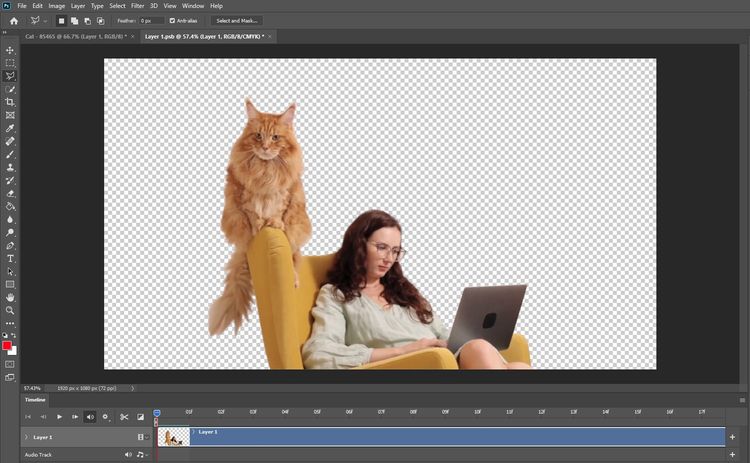
Now, delete the background of each frame of your GIF. To delete the background of any particular frame, click on that frame. For this, you can either use a “Quick Selection Tool” or a “Polygonal Lasso Tool”. You will get the final result that will be background free.
Step 5: Save The Project In GIF Format
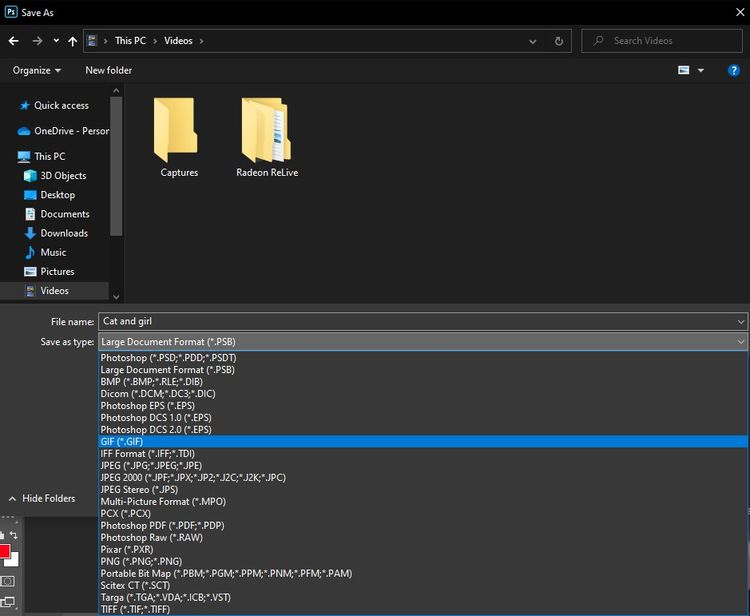
To save the GIF project, click on the “File” menu and then tap on the “Save As” option. Give a file name and select “GIF” on the “Save As Type” options menu. Then click on “OK” to save the GIF file.
Part 3 Best Online Transparent Gif Maker Websites
When it comes to how to make a gif transparent through online sources, there are many options available. Here, we are going to discuss the best options out of them.
01 Online Transparent Gif Maker for Windows
Let’s learn about the best performing online transparent Gif creator websites compatible with Windows.
● EzGif
EzGif is among the best transparent GIF-making websites available online. Using the website, one can create a high-resolution GIF with a transparent background. To achieve this, the website will ask to upload a number of images of transparent backgrounds. The images can be uploaded in PNG, JPEG, GIF, or any other format. Then, next is to combine all the images to form a GIF. The website allows users to upload a maximum of 2000 images. Each image size should not exceed 6MB and the total size of all images should not exceed 100 MB.

● Lunapic
Lunapic is also one of the best and easy-to-use websites for making a confetti GIF transparent, available for free. There is no limitation to the number of images or image size. Also, the website does not have limitations for the total file size, one can upload. It also allows the user to upload an image already having a transparent background and create a GIF out of it.

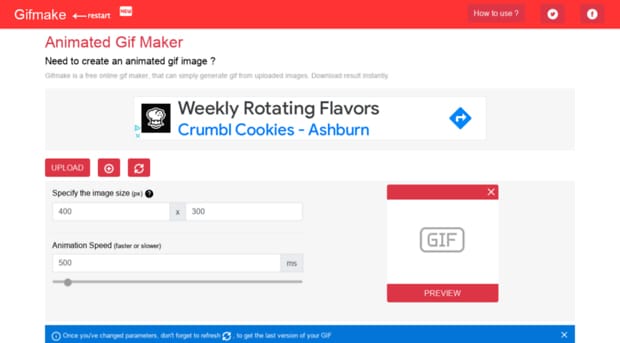
● GIF Make
GIF make is also a useful free website for making high-quality transparent GIFs. It is easy to use this website for transparent GIF creations. You only need to upload transparent PNG images for this. It allows you to add as many as 80 images to create a GIF file. But there is one limitation to the website that it does not contain the option of uploading images without a transparent background and removing the background. So, the user only needs to upload an image with a transparent background to create a GIF.
● Animizer.net
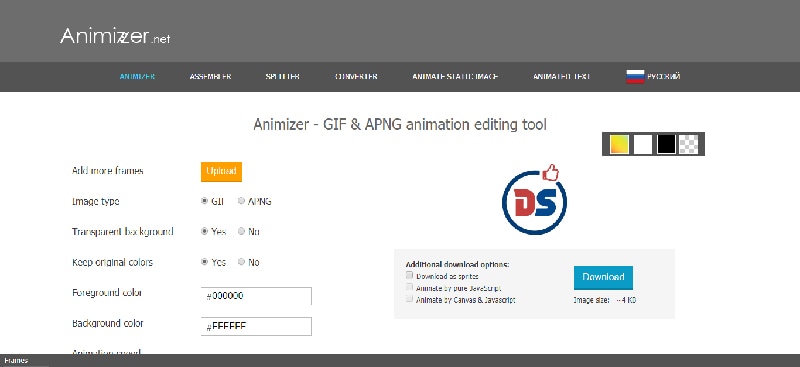
Animizer.net is also a good option when it comes to creating transparent GIFs from images, for free. For this, you can upload multiple PNG images in this online tool. Then, the tool will help you create a GIF by joining them all together. It allows you to upload an unlimited number of images. The online website also enables the creation of transparent background GIFs by uploading images with colored backgrounds. It allows you to remove the background of images and make them transparent.
02 Online Transparent Gif Maker for Mac
● EzGif
We have already discussed EzGif as the best online transparent GIF maker website for Windows. But, we want to ensure that this also works best in the MAC version. It helps to convert either a video or photos into a GIF file. Moreover, the website supports all the standard image formats such as HEIC, TIFF, PNG, JPEG, BMP, etc.

● Picasion
Picasion is one of the best websites for Mac users to create transparent GIFs and memes. The website is easy to use by uploading the images from the desktop location. But it has certain limitations. It only allows you to add a maximum of 3 images to convert them into GIF files. Moreover, it also lacks the capabilities of adding texts and resizing the GIFs.

● Gifpal
Gifpal also allows the MAC user to convert images into transparent GIFs with the least effort. The loading time of the website is very fast. It also allows the user to upload the images directly from a phone camera or webcam. The user can also rearrange and remove the watermarks of the images after uploading them. It also enables the user to preview the GIF before downloading.

● Make A GIF
Last but not the least, Make a GIF is also a great website for MAC users to create transparent GIFs. People can use this website for free. It enables the user to generate GIFs out of multiple images or videos. Customization options like adding text, resizing, rearranging, etc are also available with it. But, there is a limitation with Make a GIF that it does not allow the user to preview the GIF before download.
These are some of the widely used websites for Windows and MACs applicable for making transparent GIFs. But now we are introducing the best option out of all and i.e. Wondershare Filmora.
Both Windows and MAC users can use Wondershare Filmora effectively for creating snow transparent GIFs. Though it can be used easily, it creates a GIF of high quality and resolution. This tool is highly recommended for such purposes because of its simple and most interactive interface. The user can make a GIF by combining any number of images and also from small videos. Easy customization of GIFs such as adding texts, elements, overlays, etc, is also available for the user
Moreover, one can also use Wondershare Filmora Video Editor meme maker to create a GIF online. You can directly make the GIF here, without any watermark. No sign up required for this and one can use it for free. A lot more editing options for GIFs are also accessible by the user easily.
For Win 7 or later (64-bit)
For macOS 10.12 or later
● Ending Thoughts →
● So, we can conclude that though it is hard to remove the transparent GIF, it can be done with proper knowledge and skills. There are many online free and paid tools available for this. Choose according to your suitability.
● When it comes to making a GIF on Windows and MAC platforms, we have discussed the best online websites according to their effectiveness.
● Wondershare Filmora is the most suitable option out of all, as it can be used in both Windows and MAC platforms. Moreover, people can use this wonderful tool for both creating a transparent animated GIF and removing the transparent background of the GIF. So, we can say it is an all-in-one solution.
GIFs are very popular type of content these days, on social media. It seems to be very engaging for the audience. The GIF image format was first developed by CompuServe in 1987. Since that time, they have been used for entertainment purposes and their application is increasing with each passing day. But when it comes to transparent GIFs, it gets annoying sometimes. It looks ugly with weird white edges.
Sometimes it becomes hard to remove such GIFs with transparent backgrounds. Do you ever think about why it happens? This blog is dedicated to explaining the possible reasons for this. Also, we are going to explain how one can achieve to remove such a transparent background from the GIF.
In this article
01 [Why Sometimes Transparent Gif is Hard to Remove](#Part 1)
02 [How to Remove the Background from an Animated Gif in Photoshop](#Part 2)
03 [8 Best Online Transparent Gif Maker Websites](#Part 3)
Part 1 Why Sometimes Transparent Gif is Hard to Remove
When the GIF looks ugly with a transparent background, it becomes necessary to remove the background. But it sometimes becomes hard as this requires proper skills as well as adequate tools to achieve this. In the absence of even one, the final output may come out to be clumsy. There are many tools that can be used to remove the background from a transparent animated GIF. But it is hard to use these tools without proper knowledge. If you learn the skills, the task becomes so easy.
Part 2 How to Remove the Background from an Animated Gif in Photoshop
Photoshop is popularly known for being a photo manipulation and editing software. But it can also be used to remove the background of an animated GIF. Here, we will discuss the step-by-step approach to removing an animated GIF background.
Step 1: Import The GIF File
This can be done in 2 ways. One is clicking and dragging the file from the file location on the computer, into Photoshop. The second way is to click on the “File” menu of Photoshop. Then tap on “Open” and double click on the desired GIF file.

Step 2: Set Up The Project
It is required to edit each frame separately for deleting the background of an animated GIF (gif remove bg). For this:
Find the “Video Group” option on the right side of Photoshop. Right-click on it and tap on the “Ungroup layers” option.

This will give you the video layer, which you want to edit. Right-click on “layer 1” and tap on the “Convert to smart object” option. Again right-click on “Layer 1” and click on “Edit Contents”.

You will get a new Photoshop tap for the editing of GIF files. Just freely close the original tab.
Step 3: Begin The Editing Part
Find the blue line called the Timeline at the bottom of the screen. This Timeline will help you to edit the GIF. To make your editing easy, you can zoom on the frames with the help of a slider located at the bottom of the screen.
For a better outcome, the frame-by-frame deletion of the GIF background is advisable. It might be a little time-consuming but it is the most appropriate and accurate approach. So, delete the background from each frame independently.
To move from one frame of the GIF to another, hold and move the blue arrow having a red line.
\

Step 4: Delete The Transparent GIF Background
Now, delete the background of each frame of your GIF. To delete the background of any particular frame, click on that frame. For this, you can either use a “Quick Selection Tool” or a “Polygonal Lasso Tool”. You will get the final result that will be background free.

Step 5: Save The Project In GIF Format
To save the GIF project, click on the “File” menu and then tap on the “Save As” option. Give a file name and select “GIF” on the “Save As Type” options menu. Then click on “OK” to save the GIF file.

Part 3 Best Online Transparent Gif Maker Websites
When it comes to how to make a gif transparent through online sources, there are many options available. Here, we are going to discuss the best options out of them.
01 Online Transparent Gif Maker for Windows
Let’s learn about the best performing online transparent Gif creator websites compatible with Windows.
● EzGif
EzGif is among the best transparent GIF-making websites available online. Using the website, one can create a high-resolution GIF with a transparent background. To achieve this, the website will ask to upload a number of images of transparent backgrounds. The images can be uploaded in PNG, JPEG, GIF, or any other format. Then, next is to combine all the images to form a GIF. The website allows users to upload a maximum of 2000 images. Each image size should not exceed 6MB and the total size of all images should not exceed 100 MB.

● Lunapic
Lunapic is also one of the best and easy-to-use websites for making a confetti GIF transparent, available for free. There is no limitation to the number of images or image size. Also, the website does not have limitations for the total file size, one can upload. It also allows the user to upload an image already having a transparent background and create a GIF out of it.

● GIF Make
GIF make is also a useful free website for making high-quality transparent GIFs. It is easy to use this website for transparent GIF creations. You only need to upload transparent PNG images for this. It allows you to add as many as 80 images to create a GIF file. But there is one limitation to the website that it does not contain the option of uploading images without a transparent background and removing the background. So, the user only needs to upload an image with a transparent background to create a GIF.

● Animizer.net
Animizer.net is also a good option when it comes to creating transparent GIFs from images, for free. For this, you can upload multiple PNG images in this online tool. Then, the tool will help you create a GIF by joining them all together. It allows you to upload an unlimited number of images. The online website also enables the creation of transparent background GIFs by uploading images with colored backgrounds. It allows you to remove the background of images and make them transparent.

02 Online Transparent Gif Maker for Mac
● EzGif
We have already discussed EzGif as the best online transparent GIF maker website for Windows. But, we want to ensure that this also works best in the MAC version. It helps to convert either a video or photos into a GIF file. Moreover, the website supports all the standard image formats such as HEIC, TIFF, PNG, JPEG, BMP, etc.

● Picasion
Picasion is one of the best websites for Mac users to create transparent GIFs and memes. The website is easy to use by uploading the images from the desktop location. But it has certain limitations. It only allows you to add a maximum of 3 images to convert them into GIF files. Moreover, it also lacks the capabilities of adding texts and resizing the GIFs.

● Gifpal
Gifpal also allows the MAC user to convert images into transparent GIFs with the least effort. The loading time of the website is very fast. It also allows the user to upload the images directly from a phone camera or webcam. The user can also rearrange and remove the watermarks of the images after uploading them. It also enables the user to preview the GIF before downloading.

● Make A GIF
Last but not the least, Make a GIF is also a great website for MAC users to create transparent GIFs. People can use this website for free. It enables the user to generate GIFs out of multiple images or videos. Customization options like adding text, resizing, rearranging, etc are also available with it. But, there is a limitation with Make a GIF that it does not allow the user to preview the GIF before download.

These are some of the widely used websites for Windows and MACs applicable for making transparent GIFs. But now we are introducing the best option out of all and i.e. Wondershare Filmora.
Both Windows and MAC users can use Wondershare Filmora effectively for creating snow transparent GIFs. Though it can be used easily, it creates a GIF of high quality and resolution. This tool is highly recommended for such purposes because of its simple and most interactive interface. The user can make a GIF by combining any number of images and also from small videos. Easy customization of GIFs such as adding texts, elements, overlays, etc, is also available for the user
Moreover, one can also use Wondershare Filmora Video Editor meme maker to create a GIF online. You can directly make the GIF here, without any watermark. No sign up required for this and one can use it for free. A lot more editing options for GIFs are also accessible by the user easily.
For Win 7 or later (64-bit)
For macOS 10.12 or later
● Ending Thoughts →
● So, we can conclude that though it is hard to remove the transparent GIF, it can be done with proper knowledge and skills. There are many online free and paid tools available for this. Choose according to your suitability.
● When it comes to making a GIF on Windows and MAC platforms, we have discussed the best online websites according to their effectiveness.
● Wondershare Filmora is the most suitable option out of all, as it can be used in both Windows and MAC platforms. Moreover, people can use this wonderful tool for both creating a transparent animated GIF and removing the transparent background of the GIF. So, we can say it is an all-in-one solution.
GIFs are very popular type of content these days, on social media. It seems to be very engaging for the audience. The GIF image format was first developed by CompuServe in 1987. Since that time, they have been used for entertainment purposes and their application is increasing with each passing day. But when it comes to transparent GIFs, it gets annoying sometimes. It looks ugly with weird white edges.
Sometimes it becomes hard to remove such GIFs with transparent backgrounds. Do you ever think about why it happens? This blog is dedicated to explaining the possible reasons for this. Also, we are going to explain how one can achieve to remove such a transparent background from the GIF.
In this article
01 [Why Sometimes Transparent Gif is Hard to Remove](#Part 1)
02 [How to Remove the Background from an Animated Gif in Photoshop](#Part 2)
03 [8 Best Online Transparent Gif Maker Websites](#Part 3)
Part 1 Why Sometimes Transparent Gif is Hard to Remove
When the GIF looks ugly with a transparent background, it becomes necessary to remove the background. But it sometimes becomes hard as this requires proper skills as well as adequate tools to achieve this. In the absence of even one, the final output may come out to be clumsy. There are many tools that can be used to remove the background from a transparent animated GIF. But it is hard to use these tools without proper knowledge. If you learn the skills, the task becomes so easy.
Part 2 How to Remove the Background from an Animated Gif in Photoshop
Photoshop is popularly known for being a photo manipulation and editing software. But it can also be used to remove the background of an animated GIF. Here, we will discuss the step-by-step approach to removing an animated GIF background.
Step 1: Import The GIF File
This can be done in 2 ways. One is clicking and dragging the file from the file location on the computer, into Photoshop. The second way is to click on the “File” menu of Photoshop. Then tap on “Open” and double click on the desired GIF file.

Step 2: Set Up The Project
It is required to edit each frame separately for deleting the background of an animated GIF (gif remove bg). For this:
Find the “Video Group” option on the right side of Photoshop. Right-click on it and tap on the “Ungroup layers” option.

This will give you the video layer, which you want to edit. Right-click on “layer 1” and tap on the “Convert to smart object” option. Again right-click on “Layer 1” and click on “Edit Contents”.

You will get a new Photoshop tap for the editing of GIF files. Just freely close the original tab.
Step 3: Begin The Editing Part
Find the blue line called the Timeline at the bottom of the screen. This Timeline will help you to edit the GIF. To make your editing easy, you can zoom on the frames with the help of a slider located at the bottom of the screen.
For a better outcome, the frame-by-frame deletion of the GIF background is advisable. It might be a little time-consuming but it is the most appropriate and accurate approach. So, delete the background from each frame independently.
To move from one frame of the GIF to another, hold and move the blue arrow having a red line.
\

Step 4: Delete The Transparent GIF Background
Now, delete the background of each frame of your GIF. To delete the background of any particular frame, click on that frame. For this, you can either use a “Quick Selection Tool” or a “Polygonal Lasso Tool”. You will get the final result that will be background free.

Step 5: Save The Project In GIF Format
To save the GIF project, click on the “File” menu and then tap on the “Save As” option. Give a file name and select “GIF” on the “Save As Type” options menu. Then click on “OK” to save the GIF file.

Part 3 Best Online Transparent Gif Maker Websites
When it comes to how to make a gif transparent through online sources, there are many options available. Here, we are going to discuss the best options out of them.
01 Online Transparent Gif Maker for Windows
Let’s learn about the best performing online transparent Gif creator websites compatible with Windows.
● EzGif
EzGif is among the best transparent GIF-making websites available online. Using the website, one can create a high-resolution GIF with a transparent background. To achieve this, the website will ask to upload a number of images of transparent backgrounds. The images can be uploaded in PNG, JPEG, GIF, or any other format. Then, next is to combine all the images to form a GIF. The website allows users to upload a maximum of 2000 images. Each image size should not exceed 6MB and the total size of all images should not exceed 100 MB.

● Lunapic
Lunapic is also one of the best and easy-to-use websites for making a confetti GIF transparent, available for free. There is no limitation to the number of images or image size. Also, the website does not have limitations for the total file size, one can upload. It also allows the user to upload an image already having a transparent background and create a GIF out of it.

● GIF Make
GIF make is also a useful free website for making high-quality transparent GIFs. It is easy to use this website for transparent GIF creations. You only need to upload transparent PNG images for this. It allows you to add as many as 80 images to create a GIF file. But there is one limitation to the website that it does not contain the option of uploading images without a transparent background and removing the background. So, the user only needs to upload an image with a transparent background to create a GIF.

● Animizer.net
Animizer.net is also a good option when it comes to creating transparent GIFs from images, for free. For this, you can upload multiple PNG images in this online tool. Then, the tool will help you create a GIF by joining them all together. It allows you to upload an unlimited number of images. The online website also enables the creation of transparent background GIFs by uploading images with colored backgrounds. It allows you to remove the background of images and make them transparent.

02 Online Transparent Gif Maker for Mac
● EzGif
We have already discussed EzGif as the best online transparent GIF maker website for Windows. But, we want to ensure that this also works best in the MAC version. It helps to convert either a video or photos into a GIF file. Moreover, the website supports all the standard image formats such as HEIC, TIFF, PNG, JPEG, BMP, etc.

● Picasion
Picasion is one of the best websites for Mac users to create transparent GIFs and memes. The website is easy to use by uploading the images from the desktop location. But it has certain limitations. It only allows you to add a maximum of 3 images to convert them into GIF files. Moreover, it also lacks the capabilities of adding texts and resizing the GIFs.

● Gifpal
Gifpal also allows the MAC user to convert images into transparent GIFs with the least effort. The loading time of the website is very fast. It also allows the user to upload the images directly from a phone camera or webcam. The user can also rearrange and remove the watermarks of the images after uploading them. It also enables the user to preview the GIF before downloading.

● Make A GIF
Last but not the least, Make a GIF is also a great website for MAC users to create transparent GIFs. People can use this website for free. It enables the user to generate GIFs out of multiple images or videos. Customization options like adding text, resizing, rearranging, etc are also available with it. But, there is a limitation with Make a GIF that it does not allow the user to preview the GIF before download.

These are some of the widely used websites for Windows and MACs applicable for making transparent GIFs. But now we are introducing the best option out of all and i.e. Wondershare Filmora.
Both Windows and MAC users can use Wondershare Filmora effectively for creating snow transparent GIFs. Though it can be used easily, it creates a GIF of high quality and resolution. This tool is highly recommended for such purposes because of its simple and most interactive interface. The user can make a GIF by combining any number of images and also from small videos. Easy customization of GIFs such as adding texts, elements, overlays, etc, is also available for the user
Moreover, one can also use Wondershare Filmora Video Editor meme maker to create a GIF online. You can directly make the GIF here, without any watermark. No sign up required for this and one can use it for free. A lot more editing options for GIFs are also accessible by the user easily.
For Win 7 or later (64-bit)
For macOS 10.12 or later
● Ending Thoughts →
● So, we can conclude that though it is hard to remove the transparent GIF, it can be done with proper knowledge and skills. There are many online free and paid tools available for this. Choose according to your suitability.
● When it comes to making a GIF on Windows and MAC platforms, we have discussed the best online websites according to their effectiveness.
● Wondershare Filmora is the most suitable option out of all, as it can be used in both Windows and MAC platforms. Moreover, people can use this wonderful tool for both creating a transparent animated GIF and removing the transparent background of the GIF. So, we can say it is an all-in-one solution.
GIFs are very popular type of content these days, on social media. It seems to be very engaging for the audience. The GIF image format was first developed by CompuServe in 1987. Since that time, they have been used for entertainment purposes and their application is increasing with each passing day. But when it comes to transparent GIFs, it gets annoying sometimes. It looks ugly with weird white edges.
Sometimes it becomes hard to remove such GIFs with transparent backgrounds. Do you ever think about why it happens? This blog is dedicated to explaining the possible reasons for this. Also, we are going to explain how one can achieve to remove such a transparent background from the GIF.
In this article
01 [Why Sometimes Transparent Gif is Hard to Remove](#Part 1)
02 [How to Remove the Background from an Animated Gif in Photoshop](#Part 2)
03 [8 Best Online Transparent Gif Maker Websites](#Part 3)
Part 1 Why Sometimes Transparent Gif is Hard to Remove
When the GIF looks ugly with a transparent background, it becomes necessary to remove the background. But it sometimes becomes hard as this requires proper skills as well as adequate tools to achieve this. In the absence of even one, the final output may come out to be clumsy. There are many tools that can be used to remove the background from a transparent animated GIF. But it is hard to use these tools without proper knowledge. If you learn the skills, the task becomes so easy.
Part 2 How to Remove the Background from an Animated Gif in Photoshop
Photoshop is popularly known for being a photo manipulation and editing software. But it can also be used to remove the background of an animated GIF. Here, we will discuss the step-by-step approach to removing an animated GIF background.
Step 1: Import The GIF File
This can be done in 2 ways. One is clicking and dragging the file from the file location on the computer, into Photoshop. The second way is to click on the “File” menu of Photoshop. Then tap on “Open” and double click on the desired GIF file.

Step 2: Set Up The Project
It is required to edit each frame separately for deleting the background of an animated GIF (gif remove bg). For this:
Find the “Video Group” option on the right side of Photoshop. Right-click on it and tap on the “Ungroup layers” option.

This will give you the video layer, which you want to edit. Right-click on “layer 1” and tap on the “Convert to smart object” option. Again right-click on “Layer 1” and click on “Edit Contents”.

You will get a new Photoshop tap for the editing of GIF files. Just freely close the original tab.
Step 3: Begin The Editing Part
Find the blue line called the Timeline at the bottom of the screen. This Timeline will help you to edit the GIF. To make your editing easy, you can zoom on the frames with the help of a slider located at the bottom of the screen.
For a better outcome, the frame-by-frame deletion of the GIF background is advisable. It might be a little time-consuming but it is the most appropriate and accurate approach. So, delete the background from each frame independently.
To move from one frame of the GIF to another, hold and move the blue arrow having a red line.
\

Step 4: Delete The Transparent GIF Background
Now, delete the background of each frame of your GIF. To delete the background of any particular frame, click on that frame. For this, you can either use a “Quick Selection Tool” or a “Polygonal Lasso Tool”. You will get the final result that will be background free.

Step 5: Save The Project In GIF Format
To save the GIF project, click on the “File” menu and then tap on the “Save As” option. Give a file name and select “GIF” on the “Save As Type” options menu. Then click on “OK” to save the GIF file.

Part 3 Best Online Transparent Gif Maker Websites
When it comes to how to make a gif transparent through online sources, there are many options available. Here, we are going to discuss the best options out of them.
01 Online Transparent Gif Maker for Windows
Let’s learn about the best performing online transparent Gif creator websites compatible with Windows.
● EzGif
EzGif is among the best transparent GIF-making websites available online. Using the website, one can create a high-resolution GIF with a transparent background. To achieve this, the website will ask to upload a number of images of transparent backgrounds. The images can be uploaded in PNG, JPEG, GIF, or any other format. Then, next is to combine all the images to form a GIF. The website allows users to upload a maximum of 2000 images. Each image size should not exceed 6MB and the total size of all images should not exceed 100 MB.

● Lunapic
Lunapic is also one of the best and easy-to-use websites for making a confetti GIF transparent, available for free. There is no limitation to the number of images or image size. Also, the website does not have limitations for the total file size, one can upload. It also allows the user to upload an image already having a transparent background and create a GIF out of it.

● GIF Make
GIF make is also a useful free website for making high-quality transparent GIFs. It is easy to use this website for transparent GIF creations. You only need to upload transparent PNG images for this. It allows you to add as many as 80 images to create a GIF file. But there is one limitation to the website that it does not contain the option of uploading images without a transparent background and removing the background. So, the user only needs to upload an image with a transparent background to create a GIF.

● Animizer.net
Animizer.net is also a good option when it comes to creating transparent GIFs from images, for free. For this, you can upload multiple PNG images in this online tool. Then, the tool will help you create a GIF by joining them all together. It allows you to upload an unlimited number of images. The online website also enables the creation of transparent background GIFs by uploading images with colored backgrounds. It allows you to remove the background of images and make them transparent.

02 Online Transparent Gif Maker for Mac
● EzGif
We have already discussed EzGif as the best online transparent GIF maker website for Windows. But, we want to ensure that this also works best in the MAC version. It helps to convert either a video or photos into a GIF file. Moreover, the website supports all the standard image formats such as HEIC, TIFF, PNG, JPEG, BMP, etc.

● Picasion
Picasion is one of the best websites for Mac users to create transparent GIFs and memes. The website is easy to use by uploading the images from the desktop location. But it has certain limitations. It only allows you to add a maximum of 3 images to convert them into GIF files. Moreover, it also lacks the capabilities of adding texts and resizing the GIFs.

● Gifpal
Gifpal also allows the MAC user to convert images into transparent GIFs with the least effort. The loading time of the website is very fast. It also allows the user to upload the images directly from a phone camera or webcam. The user can also rearrange and remove the watermarks of the images after uploading them. It also enables the user to preview the GIF before downloading.

● Make A GIF
Last but not the least, Make a GIF is also a great website for MAC users to create transparent GIFs. People can use this website for free. It enables the user to generate GIFs out of multiple images or videos. Customization options like adding text, resizing, rearranging, etc are also available with it. But, there is a limitation with Make a GIF that it does not allow the user to preview the GIF before download.

These are some of the widely used websites for Windows and MACs applicable for making transparent GIFs. But now we are introducing the best option out of all and i.e. Wondershare Filmora.
Both Windows and MAC users can use Wondershare Filmora effectively for creating snow transparent GIFs. Though it can be used easily, it creates a GIF of high quality and resolution. This tool is highly recommended for such purposes because of its simple and most interactive interface. The user can make a GIF by combining any number of images and also from small videos. Easy customization of GIFs such as adding texts, elements, overlays, etc, is also available for the user
Moreover, one can also use Wondershare Filmora Video Editor meme maker to create a GIF online. You can directly make the GIF here, without any watermark. No sign up required for this and one can use it for free. A lot more editing options for GIFs are also accessible by the user easily.
For Win 7 or later (64-bit)
For macOS 10.12 or later
● Ending Thoughts →
● So, we can conclude that though it is hard to remove the transparent GIF, it can be done with proper knowledge and skills. There are many online free and paid tools available for this. Choose according to your suitability.
● When it comes to making a GIF on Windows and MAC platforms, we have discussed the best online websites according to their effectiveness.
● Wondershare Filmora is the most suitable option out of all, as it can be used in both Windows and MAC platforms. Moreover, people can use this wonderful tool for both creating a transparent animated GIF and removing the transparent background of the GIF. So, we can say it is an all-in-one solution.
Blender Tips - How to Make Blender Render Transparent Background
Blender Tips - How to Make Blender Render Transparent Background
An easy yet powerful editor
Numerous effects to choose from
Detailed tutorials provided by the official channel
Want to explore open source 2D/3D content creation through Blender? Stay here to embark your graphic creations with over the top dimensional detailing!
In this article
01 [What’s Blender and What’s Its Advantages?](#Part 1)
02 [How to Make a Material Transparent in Blender](#Part 2)
03 [How to Make a Background Transparent in Blender](#Part 3)
Part 1 What’s Blender and What’s Its Advantages?
When landing into the world of 3D graphic design, the Blender software suite is a one stop access to everything you would possibly think of exploring with. Right from modeling, animation, rendering and compositing to rigging, motion tracking and simulation; the software is a complete video editor and game developer kit.
Some high rated professional applications of the software include, API based Python and allied tool scripting to customize different applications, most of which are a part of the suite’s later releases. The software further supports a common graphic pipeline; compatible to studio based professional as well as individual usage and undergoes continuous upgrade to ascertain maximum graphic productivity.
Talking of the software’s platform compatibility, you are free to use Blender on any of your Windows, Mac and Linux supported devices with utmost ease. The suite works on the OpenGL platform for the most responsive user experience and quick output response.
You can further, conveniently regard the software as your personal 3D graphic designer, owing to the fact that the software’s General Public License grants the liberty of minor and major code alterations to its users, which often results in making the suite additively responsive, with the inclusion of improved features, receptive bug fixes and interactive usage.
Potential Advantages
Choosing the Blender 3D design suite for dimensional and motion graphic editing, you are entitled to benefit from the following advantages:
01A Free Graphic Suite
Almost every software user has the obvious habit of prioritizing financial equity before all other program credibility. However, you should be relieved to realize that the Blender 3D Suite is available to you without a price tag. Loyal users of the software claim the product to outshine its priced counterparts in terms of features and responsive flexibility.
If you are at the shore of graphic design and 3D modeling, there’s absolutely no better software to jump with, in the creation pool. Talking of the concerns of long term free usage and hidden feature blocking pay walls, there’s no cause to worry.
The software earns most of it financial credits through sales merchandise, donations and Cloud Service, which is a reasonably priced and optional graphic design assistant and application resource.
02Open Source Software
Essentially programmed and developed by an expert and skilled core team, the software is liberal enough to entertain open source modifications. Public users of the suite are permitted to make functionality alterations with Python coding. This flexibility of the Blender software is the underlying reason to a community driven increment to the existing top class suite functionalities.
While the public user creativity is responsible for adding a heap of free and paid software functionalities, the suite offers a sale of the specific feature scripts at marketplaces like, Blendermarket.com as a developer support initiative to promote the creation of highly productive graphic tools.
03Extensive Pipeline Support
As already stated, the software supports a plethora of creative utilities ranging from still and motion image graphics, movie developments, dimensional modeling, gaming, studio VFX and lots more. What’s best is, you are entitled to all this without having to spend a single penny from your pocket.
While most creators take up Blender graphic designing as a full time earning source, the bottom line is, if you are wondering, whether or not Blender supports a particular design task, most of the times it possibly can!
04Rendering Flexibility
You can work with two rendering options, viz., Eevee and Cycles within Blender. Using the Eevee render option, users can render their design models in physical, real time outputs in a quick time span. T5her biggest advantage of this rendering engine happens to be its working speed. While it does not require you wait for tedious rendering durations, you can additionally escape individual frame renders.
The Cycles is a physical, path tracing render engine, using light rays to interpret design looks. Compatible to GPU and CPU rendering, this one is a bit slow, but delivers a much precise image than Eevee.
Part 2 How to Make a Material Transparent in Blender
Blender is a top class graphic modulation tool; you can use to play with your editing creativity to your heart’s content, catering to a variety of design requirements, while adhering to a distinguished professional outlook. If you are pondering over the perfect task choice to start your editing journey with Blender, you can begin with making a material transparent in the software.
When beginning to create transparent artworks in Blender, you need to be familiar with the Transparent BSDF node. Here’s a quick explanation:
Transparent BSDF Node
When working with Blender, you get to access a variety of graphic nodes that cater to specific design purposes. Likewise, the transparent BSDF, as the name suggests, is an exclusive transparency creation graphic node that is essential to make materials transparent in Blender. Talking of the specific node function, it is there to facilitate the control of different transparency modes, in cohesion with specific user requirements.
Browse through the following section for a guided tutorial to make a material transparent using Blender:
Step 1:
Prepare a suitable BSDF material by selecting any image from your device and applying it to the object in the Blender’s viewport.
Step 2:
To start working with the Transparent BSDF node, you first need to insert the same into the node tree amongst the Principle BSDF and the Mix Shader nodes. To do this, you need to select ‘Add’ or press ‘Ctrl + A’, followed by locating the same in the ‘Shader’ submenu. Do not forget to add the ‘Mix Shader’ node, which is again, present in the ‘Shader’ submenu, to the node tree.
Step 3:
Plug in the Transparent BSDF output into the top Shader input of the Mix Shader, while dragging the latter into the connecting link between the Material Output and Principle BSDF nodes. This enables the Mix Shader node to pass through the two output generating nodes. The resultant ‘Transparency Effect’ can be seen on the viewpoint object within a few seconds.
Step 4:
Make an additional connection of two fresh nodes into the node tree as follows:
● Transparent BSDF output to the Mix Shader input
● Principal BSDF output to the Mix Shader input
● Mix Shader output to the Surface input
This will finally fetch a transparent material output for the selected image object.
Part 3 How to Make a Background Transparent in Blender
Having experimented with object material transparency in Blender, you can try hands at taking your creativity to the next level by creating Blender render transparent backgrounds in the software. Here’s what you need to do to take up the creation process:
Step 1:
Begin with choosing a suitable image to create a transparent background in either of the Eevee or Cycles render engines, followed by navigating to the ‘Render Properties’ tab in the software’s main interface. Click on the same to get a related drop down menu for activating selected image effects.
Step 2:
From the dropdown that appears, reach to the ‘Film’ option and click on the ‘Transparency’ checkbox to activate it.
You will now observe the image background in the Blender object viewport to disappear.
Step 3:
Press F12 to receive the render output. You can now save the transparent background image in your device. Take note use a transparency compatible image format, preferably PNG.
Blender is undoubtedly a viable graphic editing software to create transparent background images, but if you are in search of a different editor alternative, the Filmora Image Creator and Editor software to take up the aforesaid task with utmost ease.
Wondershare Filmora Video Editor
Essentially a Wondershare software utility, Filmora is conveniently regarded as one among the finest and top curated image editor software. Adhering to the particular interest of transparent background creation, Filmora’s exclusive ‘Green Screen’ attribute is a viable solution to create masterpieces of professional quality, transparent background images. The huge effects library of the software is there to infuse the additional tint of class to your creative excellence.
Making Transparent Background Images in Filmora
Follow the stepwise guided tutorial given below to create images with excellent quality transparent background in Filmora:
Step 1: Software Download and Installation
Log in to your favorite web browser in a Mac or Windows device to download Filmora from its official site and proceed with the software installation process.
For Win 7 or later (64-bit)
For macOS 10.12 or later
Step 2: Import Image File
When you are done with the installation, launch the software and navigate to the ’Import’ tab in its welcome interface. Click and tap ‘Import Media File’ from the dropdown that appears to import the desired image to Filmora’s media library.
Step 3: Drag to Timeline
The next step is to drag your image selection from the software’s media library to its editor timeline. Either right click the image and select ‘Insert’ option from the submenu that appears, or use the conventional ‘Drag and Drop’ method to accomplish this task.
Step 4: Transparency Adjustments
Once the image reaches the timeline, tap the same to see the ‘Settings’ tab get opened. Navigate through the tab options until you find ‘Chroma Key Settings’. Enable the ‘Chroma Key’ with a right side toggle to see your selected image get transparent with a ‘Green’ color in the background.
An alternative to the above method is to hit the ‘Color Picker’ option to the right of the ‘Select Color’ tab and navigate to a desired section of the image to make it transparent with a single click.
If you observe partial transparency in the resultant image background, consider making additional adjustments in ’Chroma Key’ setting parameters like, offset, edge thickness, tolerance, edge feather, etc., to ensure that the image background is totally transparent. When the final artwork makes you happy, tap ‘OK’.
**Step 4: Time to Export!**Your creation is now all set for a media export to your favorite social media handles. Just click on the ‘Export’ tab in the top right of the software timeline and that’s it!
● Ending Thoughts →
● Exploring your creative abilities with different graphic design tools and editing variations is an absolute fun. Among the various design alternatives, playing with dimensional graphic creativity is a remarkable craft that can be mastered with convenient market based software like Blender.
● However, if you are keen on trying other alternatives, you can prefer the Filmora Image Editor software for top class, professional quality image and video creation.
Also read:
- 2024 Approved Do You Often Feel Fascinated to Try Hands at Anime Character Design to Spark up Your Editing Skills, or Just for a Fun-Filled Activity? Stay Here for the Best Inspirations You Can Ever Get
- 2024 Approved Do You Want to Use a Professional Tool to Add Subtitles? Read This Article to Discover the Best Reliable Tool to Create Subtitles in Your Desired Manner
- New How to Create a Freeze Frame Sequence Effect
- New How to Do Censor Effects with Filmora for 2024
- New In 2024, What Is TS Format and How To Play TS Files?
- Updated Quick Answer What Is a GIF File for 2024
- Updated In 2024, Top 10 Sony LUT for Different Purposes
- New S-Log Is a Gamma Curve Optimized for Digital Cameras to Maximize the Image Sensors Performance. Although These Videos May Look Flat and Washed Out, They Contain Lots of Color Information
- New Do You Want to Make TikTok Videos More Elemental by Using Countdown but Dont Know How to Do This? Here We Will Thoroughly Guide You About This
- New 2024 Approved Phone Aspect Ratio Vertical Definition, Types and Tips
- New How To Use Voicemod On Discord Desktop+Mobile
- Do You Know Adding Subtitles Can Benefit Video Content? Meanwhile, for Adding Subtitles to a Video, Wondershare Filmora Can Help You
- New How to Upload the Video to Twitch? Well, if You Dont Know the Process, This Detailed Guide Will Help You. While Explaining the Process, This Article Will Also Let You Know some Twitch Video Upload Guidelines
- New 8 Best Video Editor with Useful Masking for 2024
- New 2024 Approved 10 Best Cartoon Video Makers (Online and Desktop Solution)
- Updated Easy Steps to Create Intro Video with After Effects
- Updated 7 Ways Add Subtitles to MKV Videos on All Platforms for 2024
- New How to Create Cinematic Style Videos? Easy Guide for Beginners for 2024
- How To Add Motion Blur On CapCut? (IPhone & Android) for 2024
- Updated In 2024, KineMaster Templates 101 How to Get the Most Out of Video Templates
- Top 5 Best Video to PPT Converters You Should Know
- New Do You Seek to Blur Out Your Video and Photo to Display some Motion Blur? This Article Provides a List of the Best Motion Blur Apps for Videos and Photos
- New In 2024, 10 Creative AR Teaching Examples to Tell You What Is AR in Teaching
- New 2024 Approved How To Change Sky Background With Adobe Photoshop Best Ways
- In 2024, How to Use Twixtor Effect to Add Slow-Motion Effect to Video?
- In 2024, Some Effective Slow Motion Video Editors You Can Try
- New In 2024, 6 Instant Mp4 to GIF Online Tools for You
- Updated Detailed Steps to Add Border to Video Using Premiere Pro for 2024
- New Are You Looking for Software to Convert Word to SRT Format? Here Is a Complete Guide About It
- Updated In 2024, How to Crop a Video in Davinci Resolve Step by Step
- 2024 Approved AVI Video Format How to Open, Play, Edit AVI File?
- New 2024 Approved Best Ways to Blur Zoom Background for Free
- In 2024, Tips for Choosing Location and Scheduling Music Video
- Updated Good Ways to Make Sure Your Video Editing Course Is Worthing to Watch
- Updated 2024 Approved How to Edit Recorded Video
- 2024 Approved How to Use LUTS to Color Grade on Your iPhone
- New Looking For The Best Slow Motion Effect in Premiere Pro for 2024
- Speed Control Is Frequently Used in Video Editing. By Speed up or Slow Down the Video Speed, You Can Achieve Different Visual Results. This Article Will Show You How to Control the Speed of a Video
- Unlink Audio and Video in DaVinci Resolve Detailed Steps
- Updated In 2024, How to Add Text Animation Online
- New In 2024, Comprehensive Guide to Add LUTs in Premiere Pro with Ease
- 2024 Approved 10 Best Innovative AR Video Effects to Check Out
- Updated VN Editor A Prominent Option for Adding Luts for Video Editing for 2024
- New How to Share YouTube Video on Zoom, In 2024
- Updated In 2024, The Most Efficient Ways to Manage Your Timeline
- Updated 2024 Approved How To Achieve LumaFusion Color Grading Through LUTs
- Updated In 2024, A Complete Overview of VSCO Video Editor
- What Pokémon Evolve with A Dawn Stone For Vivo Y100t? | Dr.fone
- In 2024, Best 3 Software to Transfer Files to/from Your Honor 90 Pro via a USB Cable | Dr.fone
- How to restore wiped call history on Poco F5 5G?
- In 2024, Full Guide to Bypass Oppo FRP
- In 2024, 10 Best Fake GPS Location Spoofers for Vivo S17t | Dr.fone
- Use Device Manager to update hardware drivers on Windows 7
- Top 10 Fixes for Phone Keep Disconnecting from Wi-Fi On Lava Blaze 2 Pro | Dr.fone
- How to Recover Deleted Videos from iPhone 12 mini Without Backup? | Stellar
- In 2024, Why Your WhatsApp Location is Not Updating and How to Fix On Vivo Y100A | Dr.fone
- Hard Resetting an Vivo Y36i Device Made Easy | Dr.fone
- How to Transfer Data After Switching From Vivo Y78+ to Latest Samsung | Dr.fone
- How to Check Distance and Radius on Google Maps For your Apple iPhone 11 Pro Max | Dr.fone
- How to Fix Unfortunately, Contacts Has Stopped Error on Honor Magic 5 Lite | Dr.fone
- Here are Some of the Best Pokemon Discord Servers to Join On Tecno Phantom V Flip | Dr.fone
- The Magnificent Art of Pokemon Go Streaming On Oppo Find X6? | Dr.fone
- In 2024, Complete Fixes To Solve iPhone SE (2020) Randomly Asking for Apple ID Password | Dr.fone
- In 2024, CatchEmAll Celebrate National Pokémon Day with Virtual Location On Poco C50 | Dr.fone
- Title: Updated In 2024, How to Denoise in Final Cut Pro – Reduce Video and Audio Noise
- Author: Chloe
- Created at : 2024-04-24 07:08:35
- Updated at : 2024-04-25 07:08:35
- Link: https://ai-editing-video.techidaily.com/updated-in-2024-how-to-denoise-in-final-cut-pro-reduce-video-and-audio-noise/
- License: This work is licensed under CC BY-NC-SA 4.0.


