
:max_bytes(150000):strip_icc():format(webp)/free-language-exchange-websites-1357059-d87c92dbdba3429dbf17d51ba313b1ff.png)
Updated In 2024, How to Livestream Zoom on Facebook?
| How to Livestream Zoom on Facebook?
Abundant Video Effects - Wondershare Filmora
Provide abundant video effects - A creative video editor
Powerful color correction and grading
Detailed tutorials provided by the official channel
There are numerous ways to connect with viewers across the globe through online platforms. One such platform is Facebook live stream videos through which a single person can connect with the whole world and can talk to the people live. Through live stream videos on Facebook, people can show cooking or makeup tutorials that millions of people can join to watch easily.
Also, through such videos, many teachers prefer to demonstrate a particular concept so that students can respond instantly. However, if you want a clearer vision for better understanding, you can zoom on Facebook live stream videos by reading instructions from this article.
In this article
Part 1: Zoom in Facebook Livestream from Browser
Part 2: How to Zoom in Facebook Livestream on Android
Part 3: How to Zoom in Facebook Livestream on iPhone
Part 1: Zoom in Facebook Livestream from Browser
The easiest way to zoom in on Facebook Livestream videos is via browser. In this part, we will describe two methods for zooming in on Facebook Livestream videos that are manual and through a browser extension.
Method 1: Manual Method
In this first method, you can zoom on Facebook videos through your desktop manually. Read the following steps to perform this method:
Step 1: Open your Facebook account by entering your username and password. Now play the livestream video on which you want to zoom in.
Step 2: For Windows users, press the “CTRL” and “+” buttons simultaneously to zoom on the Facebook video. Whereas, for Mac users, press the “COMMAND” and “+” buttons at the same time to zoom in. A small pop-up window will display at the top right corner from where you can control the zoom value.

Method 2: Browser Extension
In this particular method, we will use a browser extension called “Zoom,” through which you can quickly enjoy the zoom experience on the Facebook live stream videos. This special browser extension is a lightweight extension that can assist you in browsing the web pages by zooming in and out conveniently. By using this extension, you can change the zoom value through its slider up to 400 easily.
Step 1: First, you need to install the browser extension of Zoom on your PC. Click on the “Add to Chrome” option to download and install this extension on your Chrome browser.

Step 2: Open your Facebook account and play your live stream video. On the top right corner, you can see the “Extension” icon where all your added extensions are pinned. Select Zoom extension, and through its displayed slider, you can increase the zoom value easily. You can also press the “+” button from your keyboard to zoom in on the Facebook video through this extension.

Part 2: How to Zoom in Facebook Livestream on Android
If you are watching live stream videos of Facebook on an Android device, you can also zoom in by modifying your phone’s settings. To do so, here are basic steps:
Step 1: From your Android phone, reach out to the “Settings” to open its menu. From this menu, find the option of “Accessibility” from “Additional Settings” and click on it.

Step 2: On the accessibility screen, tap on the option of “Vision” and then locate the section called “Display.”

Step 3: Now, find the option of “Magnification” and tap on it. Afterward, select the “Magnification Shortcut” and turn on the toggle of magnification.

Step 4: Now, go back to your Facebook account to use your accessibility feature. You have to first tap on the icon of the small person at the bottom right corner of your screen. Now you can tap anywhere on your screen to zoom in.

Step 5: To zoom in on a live stream video of Facebook, expand your two fingers by placing them on the screen. Thus you can easily zoom in on any specific part of the Facebook video easily. For zooming out, move your fingers in an inward direction to pinch the screen. Also, to zoom back into a default mode, click on the accessibility feature.

Part 3: How to Zoom in Facebook Livestream on iPhone
As Android devices give options to zoom in and out easily, iPhone users can also change their settings to use the accessibility feature quickly. To use the accessibility button on iPhone devices, use the following steps:
Step 1: On your iPhone, go to the “Settings” and scroll down its menu. Here you can find the option of “Accessibility,” so tap on it to open its menu.

Step 2: From the accessibility menu, locate the option of “Zoom” and click on it. Now tap on its toggle to turn it on.

Step 3: Afterward, click on “Zoom Region” and then tap the option of “Full Screen Zoom.” Now leave your settings and go back to your Facebook account.

Step 4: To zoom on Facebook portal, double-tap from your three fingers on any specific part of your screen that will activate the accessibility feature.
Step 5: To change the zoom value, you have to triple-tap the screen with your three fingers. Options will pop up from where you can use the magnifying slider to change the zoom level by either moving it to the right or left.

Step 6: If you want to navigate to any part of the screen while zoomed in, use your three fingers and move them around. Also, to return to the default value of the zoom, double-tap on any part of your screen using three fingers.
Conclusion
Facebook is the most popular app across the globe that offers a single and enhanced platform for sharing and posting various kinds of information. Through Facebook live stream videos, users can get details and related information instantly through a live video.
However, if you are struggling to catch a clear vision in live stream videos, you can zoom on Facebook app by using our provided guidelines in this article. Thus, you can have a clear and focused vision by zooming in on live stream videos on Facebook.
There are numerous ways to connect with viewers across the globe through online platforms. One such platform is Facebook live stream videos through which a single person can connect with the whole world and can talk to the people live. Through live stream videos on Facebook, people can show cooking or makeup tutorials that millions of people can join to watch easily.
Also, through such videos, many teachers prefer to demonstrate a particular concept so that students can respond instantly. However, if you want a clearer vision for better understanding, you can zoom on Facebook live stream videos by reading instructions from this article.
In this article
Part 1: Zoom in Facebook Livestream from Browser
Part 2: How to Zoom in Facebook Livestream on Android
Part 3: How to Zoom in Facebook Livestream on iPhone
Part 1: Zoom in Facebook Livestream from Browser
The easiest way to zoom in on Facebook Livestream videos is via browser. In this part, we will describe two methods for zooming in on Facebook Livestream videos that are manual and through a browser extension.
Method 1: Manual Method
In this first method, you can zoom on Facebook videos through your desktop manually. Read the following steps to perform this method:
Step 1: Open your Facebook account by entering your username and password. Now play the livestream video on which you want to zoom in.
Step 2: For Windows users, press the “CTRL” and “+” buttons simultaneously to zoom on the Facebook video. Whereas, for Mac users, press the “COMMAND” and “+” buttons at the same time to zoom in. A small pop-up window will display at the top right corner from where you can control the zoom value.
Method 2: Browser Extension
In this particular method, we will use a browser extension called “Zoom,” through which you can quickly enjoy the zoom experience on the Facebook live stream videos. This special browser extension is a lightweight extension that can assist you in browsing the web pages by zooming in and out conveniently. By using this extension, you can change the zoom value through its slider up to 400 easily.
Step 1: First, you need to install the browser extension of Zoom on your PC. Click on the “Add to Chrome” option to download and install this extension on your Chrome browser.
Step 2: Open your Facebook account and play your live stream video. On the top right corner, you can see the “Extension” icon where all your added extensions are pinned. Select Zoom extension, and through its displayed slider, you can increase the zoom value easily. You can also press the “+” button from your keyboard to zoom in on the Facebook video through this extension.
Part 2: How to Zoom in Facebook Livestream on Android
If you are watching live stream videos of Facebook on an Android device, you can also zoom in by modifying your phone’s settings. To do so, here are basic steps:
Step 1: From your Android phone, reach out to the “Settings” to open its menu. From this menu, find the option of “Accessibility” from “Additional Settings” and click on it.
Step 2: On the accessibility screen, tap on the option of “Vision” and then locate the section called “Display.”
Step 3: Now, find the option of “Magnification” and tap on it. Afterward, select the “Magnification Shortcut” and turn on the toggle of magnification.
Step 4: Now, go back to your Facebook account to use your accessibility feature. You have to first tap on the icon of the small person at the bottom right corner of your screen. Now you can tap anywhere on your screen to zoom in.
Step 5: To zoom in on a live stream video of Facebook, expand your two fingers by placing them on the screen. Thus you can easily zoom in on any specific part of the Facebook video easily. For zooming out, move your fingers in an inward direction to pinch the screen. Also, to zoom back into a default mode, click on the accessibility feature.
Part 3: How to Zoom in Facebook Livestream on iPhone
As Android devices give options to zoom in and out easily, iPhone users can also change their settings to use the accessibility feature quickly. To use the accessibility button on iPhone devices, use the following steps:
Step 1: On your iPhone, go to the “Settings” and scroll down its menu. Here you can find the option of “Accessibility,” so tap on it to open its menu.
Step 2: From the accessibility menu, locate the option of “Zoom” and click on it. Now tap on its toggle to turn it on.
Step 3: Afterward, click on “Zoom Region” and then tap the option of “Full Screen Zoom.” Now leave your settings and go back to your Facebook account.
Step 4: To zoom on Facebook portal, double-tap from your three fingers on any specific part of your screen that will activate the accessibility feature.
Step 5: To change the zoom value, you have to triple-tap the screen with your three fingers. Options will pop up from where you can use the magnifying slider to change the zoom level by either moving it to the right or left.
Step 6: If you want to navigate to any part of the screen while zoomed in, use your three fingers and move them around. Also, to return to the default value of the zoom, double-tap on any part of your screen using three fingers.
Conclusion
Facebook is the most popular app across the globe that offers a single and enhanced platform for sharing and posting various kinds of information. Through Facebook live stream videos, users can get details and related information instantly through a live video.
However, if you are struggling to catch a clear vision in live stream videos, you can zoom on Facebook app by using our provided guidelines in this article. Thus, you can have a clear and focused vision by zooming in on live stream videos on Facebook.
How to Convert Videos to Slow Motion? [Complete Guide]
Slow Motion films are unique, don’t you think? Occasionally, individuals use their phones to shoot slow-motion films if they have an in-built function, and if their phone does not have an in-built feature, they may use slow-motion video creator applications to assist them.
But what happens if you have previously filmed a video at regular speed and now want the movie to be converted to slow motion?
Maybe a video of you from the pool when you’re flipping your hair, but no one remembers to take it in slow motion? Don’t be concerned! Today, we will show you how to turn any video into a slow-motion video on different operating systems.
In this article
01 How to Turn Videos Into Slow Motion on Windows for Free?
02 How to Convert Normal Video to Slow Motion for Free on Mac?
03 How to turn Normal Video to Slow Motion With VLC On Linux Computer?
04 How to Use Wondershare Filmora Video Editor to Turn Normal Videos to Slow Motion?
05 Best Slow Motion Converters to Convert Video to Slow Motion Online Free?
06 How to Convert Normal Video to Smooth Slow Motion In iPhone And Android Phones
Part 1: How to Turn Videos Into Slow Motion on Windows for Free?
If you need to conduct some simple editing and effects on your films, there is no need to invest hundreds of dollars in a video editing software application. For example, you may use the Photos App pre-installed on Windows 10 machines to apply the slow-motion effect to your photographs.
Step 1: Right click the video and choose Open with Photos. If it has been recorded by an iPhone or Android device and stored up to OneDrive, it should appear in the Microsoft Photos app without any further effort. Just click it to preview the video.
Step 2: Go to the Edit & Create option on the right corner on the top, and then select Add slo-mo option.

Step 3: Using the slider, you can determine how slowly you want it to go. Microsoft has built-in support for “Slow“ and “Super-Slow“ performance levels. Drag the slide to the right end will trigger the super slow mode.

Step 4: Specifiy the part that you want to apply slow motion in the playback bar at the bottom, and then save the video that you have just created with slow motion effects on Windows 10 .
The possibility exists that you are using an older version of Windows 10 on your computer if you do not see the option anywhere in the Photos app. You can also follow the steps above to create a slow motion video on Windows 11.
Browse Windows Update from the system menu and click on the appropriate button. When all of the updates have been installed, you will have the most recent version of the Photos app, which includes this functionality.
Part 2: How to Convert Normal Video to Slow Motion for Free on Mac?
Slow-motion videos are among the most enjoyable parts of utilizing your iPhone for videography. Video may be recorded with a frame rate of 120 or 240 fps and then played back at a considerably slower rate than usual.
However, if you don’t record video on your iPhone, making slow motion out of videos shot on other cameras or devices is more challenging. The good news is that iMovie for Mac can do this for you. We’ll show you how in this guide.
Slow-motion films are easy to make using iMovie on your Mac . Just follow the steps listed below.
Step 1: Click on the Import Media option in iMovie once launched on your Mac.
Step 2: Click on the blue Import Selected button once you’ve selected the video file in the file browser to slow it down.
Step 3: You may now open the movie in iMovie. Creating a Project is required at this stage. To do so, click on the Projects option.
Step 4: Once you’ve entered a name for your project, click the blue OK button.
Step 5: By dragging the movie onto your timeline, you may modify the video. Select the video by clicking on it and clicking on the Speed option to change its speed.
Step 6: The speed-editing interface will be shown here. Change Normal to Slow in the Speed drop-down menu.
Step 7: The duration of your movie will be increased by halves the pace at which it was initially recorded. The video may be slowed down even further by moving the speed slider.
Step 8: Go to the Menu Bar and choose File > Share. Select the file you want to share.
Step 9: Click the blue Next button once you’ve selected the properties you want for the file.
Step 10: Select a name for the file, store it, and then click the blue Save button to save it to your computer.
Part 3: How to turn Normal Video to Slow Motion With VLC On Linux Computer?
The video speed may be controlled in two ways using VLC. Using shortcut keys or hotkeys is one method, while menus and buttons are another. Both methods are OK, but the shortcut option is the quickest and most efficient.
Speed up and speed down buttons appear on the upper right of the movie when you press them. Depending on how much you tweak it, the speed is represented as 1.50x or 0.80x. This option is available for those who like to use other shortcut keys.
Step 1: From the VLC menu bar, head over to the Playback for Speed and choose a speed option: slower, slower (fine), normal, faster (fine), and faster.
Step 2: Right-clicking is also possible to access these parameters from the Playback > Speed menu.
Step 3: The video’s speed may be altered by selecting one of those options and then clicking the appropriate button.
If you are running VLC on Windows and Mac, you can check this article to find out the detailed information about how to playback video in slow motion in VLC .
Related: Best Free Video Editor for Linux .
Part 4: How to Use Wondershare Filmora Video Editor to Turn Normal Videos to Slow Motion?
For Win 7 or later (64-bit)
For macOS 10.12 or later
Wondershare Filmora is a video editor we’d like to show to you. Whether using a Windows or a Mac computer, you can rapidly speed up and slow down films with this easy video editor . With a user-friendly interface, Filmora video editor has many professional-grade editing features to help refine videos with ease. From motion tracking to keyframe animations, Filmora video editor offers a plethora of options.
Step 1: Launch Filmora video editor on your Windows or Mac computer (I’m running Windows 10 here). Click the New Project in the Startup window to create a new project in 16:9 aspect ratio by default.

Step 2: Import the video you want to add slow motion effect to the media library, and then drag and drop it to the timeline.

Step 3: To add slow motion effect to part of the video, you need to split the video first and then right click it to choose Speed and Duration. There will be a pop-up window. The motion effects will be sped up or slowed down based on the speed values.

Step 4: When you increase or decrease the video playing speed, the video audio speed changes. If you wish to retain the video audio’s actual playing speed, you may first Detach Audio from the video and then edit the video to achieve a perfect pitch.

Step 5: Select Export after you’ve completed setting the video speed. By selecting Format, you may save the video in any significant format.
Part 5: Best Slow Motion Converters to Convert Video to Slow Motion Online Free?
1. Online Converter
This Online Converter is one of the best on the internet. It is simple to use and supports various video formats such as MP4, AVI, FLV, MOV, 3GP, MKV, WMV, M4V, and others. This tool can also change the video speed by increasing (speeding up) or decreasing (slowing down). The audio in the video file will also become faster or slower due to using this tool.
Step 1: click on the Choose File option from the website to upload the video (max. 200MB).
Step 2: Now select the Speed of the video from the given options. Since we are going to make a video with slow motion effect, choose 0.5x or 0.8x will work perfectly.

Step 3: click on Confirm to convert the video to your preferred slo-mo video.
Part 6: How to Convert Normal Video to Smooth Slow Motion In iPhone And Android Phones
In addition to the essential editing tools of the famous social media platform, TikTok, CapCut is mobile video editing software for both Android and iOS smartphones that were mainly built to complement them. Here is how you can use CapCut to transform a regular video into a slow-mo one:
Step 1: Create A New Project on the CapCut app’s home screen. Browse and add the video you want to search for in slow-motion to the project.
Step 2: When you’re ready to turn off the sound, go ahead and hit the Mute clip audio button first, so there will be no creep sound after applying the slow-motion effect.

Step 3: In case you just want to add a slo-mo effect to part of the video, you need to split the video accordingly. Split the portion of the video that will be slowed down by clicking on the Split button in the menu. And use the Split tool again to end the slow-motion effect to get a segment of the video.
Step 4: Tap the cut section of the video and then you will see the Speed option. Open the Speed menu by selecting it from the drop-down menu.

Step 5: In CapCut, there are two methods to slow down a video, Normal and Curve, respectively. You may just choose the “Normal“ option to make things easy. It is possible to reduce the video’s frame rate by moving the speed slider to the left. You may, for example, make the pace 0.3 times slower. Apply a slow-motion effect by tapping the Check box.

Make a slow motion video at this stage to spice things up. CapCut allows you to add text, create transition effects, and more.
For more information, you can check: How to slo-mo in Capcut .
Conclusion
In this complete guide on “How to Convert Videos to Slow Motion?”, we hope you have learned all the basics. We have covered different apps that can help you do so. As the steps are straigthforward, make sure you abide by all the basics and transform your videos into catchy ones!
02 How to Convert Normal Video to Slow Motion for Free on Mac?
03 How to turn Normal Video to Slow Motion With VLC On Linux Computer?
04 How to Use Wondershare Filmora Video Editor to Turn Normal Videos to Slow Motion?
05 Best Slow Motion Converters to Convert Video to Slow Motion Online Free?
06 How to Convert Normal Video to Smooth Slow Motion In iPhone And Android Phones
Part 1: How to Turn Videos Into Slow Motion on Windows for Free?
If you need to conduct some simple editing and effects on your films, there is no need to invest hundreds of dollars in a video editing software application. For example, you may use the Photos App pre-installed on Windows 10 machines to apply the slow-motion effect to your photographs.
Step 1: Right click the video and choose Open with Photos. If it has been recorded by an iPhone or Android device and stored up to OneDrive, it should appear in the Microsoft Photos app without any further effort. Just click it to preview the video.
Step 2: Go to the Edit & Create option on the right corner on the top, and then select Add slo-mo option.
Step 3: Using the slider, you can determine how slowly you want it to go. Microsoft has built-in support for “Slow“ and “Super-Slow“ performance levels. Drag the slide to the right end will trigger the super slow mode.
Step 4: Specifiy the part that you want to apply slow motion in the playback bar at the bottom, and then save the video that you have just created with slow motion effects on Windows 10 .
The possibility exists that you are using an older version of Windows 10 on your computer if you do not see the option anywhere in the Photos app. You can also follow the steps above to create a slow motion video on Windows 11.
Browse Windows Update from the system menu and click on the appropriate button. When all of the updates have been installed, you will have the most recent version of the Photos app, which includes this functionality.
Part 2: How to Convert Normal Video to Slow Motion for Free on Mac?
Slow-motion videos are among the most enjoyable parts of utilizing your iPhone for videography. Video may be recorded with a frame rate of 120 or 240 fps and then played back at a considerably slower rate than usual.
However, if you don’t record video on your iPhone, making slow motion out of videos shot on other cameras or devices is more challenging. The good news is that iMovie for Mac can do this for you. We’ll show you how in this guide.
Slow-motion films are easy to make using iMovie on your Mac . Just follow the steps listed below.
Step 1: Click on the Import Media option in iMovie once launched on your Mac.
Step 2: Click on the blue Import Selected button once you’ve selected the video file in the file browser to slow it down.
Step 3: You may now open the movie in iMovie. Creating a Project is required at this stage. To do so, click on the Projects option.
Step 4: Once you’ve entered a name for your project, click the blue OK button.
Step 5: By dragging the movie onto your timeline, you may modify the video. Select the video by clicking on it and clicking on the Speed option to change its speed.
Step 6: The speed-editing interface will be shown here. Change Normal to Slow in the Speed drop-down menu.
Step 7: The duration of your movie will be increased by halves the pace at which it was initially recorded. The video may be slowed down even further by moving the speed slider.
Step 8: Go to the Menu Bar and choose File > Share. Select the file you want to share.
Step 9: Click the blue Next button once you’ve selected the properties you want for the file.
Step 10: Select a name for the file, store it, and then click the blue Save button to save it to your computer.
Part 3: How to turn Normal Video to Slow Motion With VLC On Linux Computer?
The video speed may be controlled in two ways using VLC. Using shortcut keys or hotkeys is one method, while menus and buttons are another. Both methods are OK, but the shortcut option is the quickest and most efficient.
Speed up and speed down buttons appear on the upper right of the movie when you press them. Depending on how much you tweak it, the speed is represented as 1.50x or 0.80x. This option is available for those who like to use other shortcut keys.
Step 1: From the VLC menu bar, head over to the Playback for Speed and choose a speed option: slower, slower (fine), normal, faster (fine), and faster.
Step 2: Right-clicking is also possible to access these parameters from the Playback > Speed menu.
Step 3: The video’s speed may be altered by selecting one of those options and then clicking the appropriate button.
If you are running VLC on Windows and Mac, you can check this article to find out the detailed information about how to playback video in slow motion in VLC .
Related: Best Free Video Editor for Linux .
Part 4: How to Use Wondershare Filmora Video Editor to Turn Normal Videos to Slow Motion?
For Win 7 or later (64-bit)
For macOS 10.12 or later
Wondershare Filmora is a video editor we’d like to show to you. Whether using a Windows or a Mac computer, you can rapidly speed up and slow down films with this easy video editor . With a user-friendly interface, Filmora video editor has many professional-grade editing features to help refine videos with ease. From motion tracking to keyframe animations, Filmora video editor offers a plethora of options.
Step 1: Launch Filmora video editor on your Windows or Mac computer (I’m running Windows 10 here). Click the New Project in the Startup window to create a new project in 16:9 aspect ratio by default.
Step 2: Import the video you want to add slow motion effect to the media library, and then drag and drop it to the timeline.
Step 3: To add slow motion effect to part of the video, you need to split the video first and then right click it to choose Speed and Duration. There will be a pop-up window. The motion effects will be sped up or slowed down based on the speed values.
Step 4: When you increase or decrease the video playing speed, the video audio speed changes. If you wish to retain the video audio’s actual playing speed, you may first Detach Audio from the video and then edit the video to achieve a perfect pitch.
Step 5: Select Export after you’ve completed setting the video speed. By selecting Format, you may save the video in any significant format.
Part 5: Best Slow Motion Converters to Convert Video to Slow Motion Online Free?
1. Online Converter
This Online Converter is one of the best on the internet. It is simple to use and supports various video formats such as MP4, AVI, FLV, MOV, 3GP, MKV, WMV, M4V, and others. This tool can also change the video speed by increasing (speeding up) or decreasing (slowing down). The audio in the video file will also become faster or slower due to using this tool.
Step 1: click on the Choose File option from the website to upload the video (max. 200MB).
Step 2: Now select the Speed of the video from the given options. Since we are going to make a video with slow motion effect, choose 0.5x or 0.8x will work perfectly.
Step 3: click on Confirm to convert the video to your preferred slo-mo video.
Part 6: How to Convert Normal Video to Smooth Slow Motion In iPhone And Android Phones
In addition to the essential editing tools of the famous social media platform, TikTok, CapCut is mobile video editing software for both Android and iOS smartphones that were mainly built to complement them. Here is how you can use CapCut to transform a regular video into a slow-mo one:
Step 1: Create A New Project on the CapCut app’s home screen. Browse and add the video you want to search for in slow-motion to the project.
Step 2: When you’re ready to turn off the sound, go ahead and hit the Mute clip audio button first, so there will be no creep sound after applying the slow-motion effect.
Step 3: In case you just want to add a slo-mo effect to part of the video, you need to split the video accordingly. Split the portion of the video that will be slowed down by clicking on the Split button in the menu. And use the Split tool again to end the slow-motion effect to get a segment of the video.
Step 4: Tap the cut section of the video and then you will see the Speed option. Open the Speed menu by selecting it from the drop-down menu.
Step 5: In CapCut, there are two methods to slow down a video, Normal and Curve, respectively. You may just choose the “Normal“ option to make things easy. It is possible to reduce the video’s frame rate by moving the speed slider to the left. You may, for example, make the pace 0.3 times slower. Apply a slow-motion effect by tapping the Check box.
Make a slow motion video at this stage to spice things up. CapCut allows you to add text, create transition effects, and more.
For more information, you can check: How to slo-mo in Capcut .
Conclusion
In this complete guide on “How to Convert Videos to Slow Motion?”, we hope you have learned all the basics. We have covered different apps that can help you do so. As the steps are straigthforward, make sure you abide by all the basics and transform your videos into catchy ones!
12 Impressive AI Video Ideas for Making Engaging Video Content
12 Impressive AI Video Ideas for Creating Engaging Video Content
An easy yet powerful editor
Numerous effects to choose from
Detailed tutorials provided by the official channel
In recent times, AI technology has become more useful for content creators to get more effective and engaging AI video ideas. Various AI video idea generator tools like Jasper, WeShare, etc., save con-tent creators time by giving the latest trending video ideas. These tools made content creators work easy as they need not spend much time on video ideas.
Most of us know AI-Artificial Intelligence and its role in achieving better and fast results in different areas. This article will let us know the position of YouTube video idea generator AI in generating engaging video content using Artificial Intelligence. Nowadays, these tools also help add audio/video summary and animations for the videos.
In this article
01 [What’s Video Ideas Generator and How to Use This Tool to Get More Views](#Part 1)
02 [12 Great AI Video Ideas to Bring More Traffic](#Part 2)
Part 1 What’s Video Ideas Generator and How to Use This Tool to Get More Views
It’s not enough to create a YouTube channel and post some video that does not have informative content. Sometimes, even though the video has informative content, the content might not be attractive to the viewers for various reasons, like the content might be routine and does not have more reach, likes, or shares. Along with good content, we also need new and creative ideas to get more viewers. Thus, we have some tools to provide unique and innovative ideas based on the niche you choose.
Videos Idea Generator is a tool that gives ideas for YouTube videos, and it works based on AI technology (Neural Networks). This tool will be more beneficial for the content creators to get more AI video ideas. Naturally, you might be out of ideas for your channel, or sometimes it takes more time to get an idea, or it could be a routine idea that does not sound interesting to the viewers. In such cases, an AI video idea generator is more helpful in suggesting new and innovative ideas for the content creators based on their interesting topics.
Some of the advantages of a video idea generator are:
● Time-saving – as one can utilize the time in other work, such as editing the video/ adding subtitles, etc., instead of thinking of an idea.
● Engaging with the audience – can utilize the time in engaging with the audience by answering their questions.
● Promote videos – can utilize time to promote their videos on other social media platforms or collaborate with other content creators for promotions.
● Add animations – animations and other visual effects can be added to the videos using AI. Also, we can add video and audio summaries after each video so that the viewers can get brief detailing of the whole video.
How to use Videos Idea Generator:
There are different AI video idea generator tools, and most of them work similarly. The most common steps are:
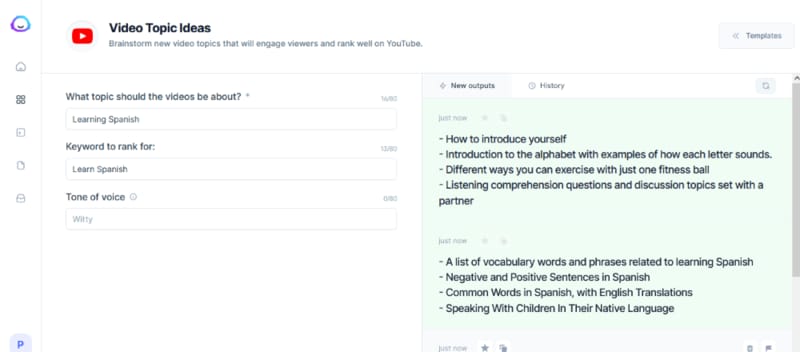
Step 1: Provide Topic
Here you need to provide the topic’s name on which we are planning to create the video.
Step 2: Provide Keywords
After providing a topic, give the keywords required for publishing. The video needs to have all the keywords so that the main content of the video can project adequately.
Based on the topic name and keywords, the tool will generate suggestions for the video ideas using the Neural Network concept of Artificial Learning.
Part 2 12 Great AI Video Ideas to Bring More Traffic
Now, let us know 12 AI video ideas that can become viral and get more likes and views :
01Idea 1: Know your Interest
Before starting a YouTube channel or posting a video, know your area of interest first. Once you get clarity on the area of interest, it’s easy to pick a topic from that and create an innovative video. Try to be more specific in the topic you choose. Also, have clarity on the section of audience you want to target.
For example, if your topic is more related to children, add more animations of animals/ cartoons that interest children. If you choose a related topic, do not add more animations that might confuse the audience. Add more reference links so that they can refer to those and be more particular on the specific topic you are trying to explain through the video. Similarly, if you choose a gaming-related topic, do not be more general about gaming.
Be specific towards a particular section of games like mobile gaming/ desktop/ virtual to reach more audience, and it does not seem boring to the audience.
02Idea 2: Interview Questions
As many students graduate every year, the competition for jobs has increased. People are more interested in getting an appointment as soon as possible, and for that, they need to prepare for the interview thoroughly. A video containing the main topics for the discussion that has references for the interview questions would benefit the students. It can engage with people within no time. Also, if the video is more specific to the department-wise interview questions/ job-level interview questions, it would reach more people and be more helpful to them.
03Idea 3: Full Course in Any Technology
Apart from the entertainment-related videos, education-related videos will be more helpful and engaging. Any video related to any technology course can get more views. Using the YouTube video idea generator AI tool, you can generate more unique videos related to education. Instead of giving a brief idea of the technology, it’s better to pick up a few topics and explain them in detail so that it would be helpful for interviews too. You can use AI technology to add a voice-over and a small summary at the end of the video so that the main points get revised once again.
04Idea 4: Cooking Ideas
Cooking is one of the most trending topics on YouTube. Whatever the language might be, cooking-related videos can get more views, create more creativity, and engage with the audience. You can choose a dish from any cuisine and make a video. You can add slow motion/ fast forward actions and small creative animations using AI. Using AI video ideas tools, you can get more creative ideas related to cooking that can increase views, as viewers will be more interested if the videos are innovative.
05Idea 5: Art and Craft ideas
Recently, people have seem more interested in the interior design of the house. For such people, art and craft ideas might be more helpful. Also, nowadays, schools are encouraging students in other circular activities and studies. These videos might be more attractive to the school’s students. Also, in crafts, select a specific area and make videos on that so that the video will be short and crisp, and easily understandable to the viewers. You can also add a voice-over while doing the craftwork to make it more transparent for the viewers.
06Idea 6: Photo and Video Editing Related Videos
People have become more addicted to taking photos and storing them. Any video related to editing the photos/ videos will engage more with viewers as it is not associated with any section of people. Anyone from any place and with any qualification can understand such videos. Consider a few topics related to the editing and give a detailed description/ explanation of those ideas, or consider any photo/ video editing app and explain how the app works in the video so that it might be helpful for the people who are using the app for the first time. Also, please reply to the frequently asked questions related to the app in the form of comments or summary so that it can reach more people, and there is a chance that the viewers might suggest the video to others who are about to use the app.
07Idea 7: Movies Related Videos
In every country, people are more addicted to movies regardless of language. Movies have become a part of daily life for almost all people. Some of the movie-related video ideas can be:
● Video regarding actor interviews.
● Video regarding the movie review/ collections.
● Video regarding highlights/ mistakes in the movie.
● Video related to small clips/ songs in the film.
● Video related to the spoof of the central theme of the film.
Any video related to a movie can be more viral. To create new content, use AI video idea generator tools so that the videos can be more engaging and creative.
08Idea 8: Lifehacks Related Videos
Simple daily life hack idea-related videos will be more helpful to people irrespective of their living. Any statements about keeping the house clean/clothing/makeup/skincare can be beneficial. You can take simple concepts related to our daily life like:
● How to use a few tools in our everyday life.
● Simple cleaning techniques.
● Folding clothes easily saves time.
09Idea 9: Earning Related Ideas
Videos related to earning can get more views and become more viral among people. Any detailed description of any earning app/ small startup ideas can be helpful. The video ideas generator tool can give more suggestions related to such trending topics.
10Idea 10: Sports related ideas
A large population is into sports, like football and cricket. People enjoy watching and playing these sports regularly from young to old age. It will be a good idea if you can try videos on sports. Using the video generator AI, you can generate animation videos playing cricket and add small clips of old generation cricket players as examples. You may also create small teaching videos on other sports for children. Through animation, giving the latest sports updates worldwide will also be a better idea to get more views for videos.
11Idea 11: Current Affairs Related Videos
Current affairs and general knowledge-related videos will be more helpful to people preparing for competitive exams as most people are learning through the internet rather than from books. If you can take a specific subject and give a detailed description of its past and current updates, it can be helpful for many people. And also, while doing such information-related videos, you get a chance to research it, and it will help improve your knowledge of the subject and searching skills.
12Idea 12: Gadget And Product Review Ideas
Reportedly, there has been a tremendous increase in new products related to mobiles, laptops, TV, other hardware tools, skin, hair care products, etc. You can take a specific product and create innovative ideas on how to use the product using animations/ cartoons and give a short review of the product. Through this, you can earn as you promote a company product, and people will know about the product. This is beneficial in both ways. If the product is related to electronic gadgets, make a video explaining the product’s features and how to use them. If it is hair or skincare related, include the ingredients used, advantages of the product, how to use the product, and any disadvantages, etc. Based on the product you choose, the content of the video should change.
Bonus Idea:
Use an innovative and powerful tool like Wondershare Filmora Video Editor to beautify your AI videos in the shortest time frame.
Filmora’s latest version offers various upgraded tools like:
● Instant Mode to create accessible and quick videos.
● A shop of preset templates to power up your videos.
● The Filmora Auto Beat Sync can match your clip with music.
● Adjust the speed of your video and introduce cinematic effects.
● You can even record your screen with Filmora and use that in your AI videos ideas.

Wondershare Filmora - Best Video Editor for Mac/Windows
5,481,435 people have downloaded it.
Build unique custom animations without breaking a sweat.
Focus on creating epic stories and leave the details to Filmora’s auto features.
Start a creative adventure with drag & drop effects and endless possibilities.
Filmora simplifies advanced features to save you time and effort.
Filmora cuts out repetition so you can move on to your next creative breakthrough.
● Ending Thoughts →
● Finally, that you have a fair idea of what a YouTube video idea generator is about and how it helps content creators in daily life get more innovative ideas for YouTube videos.
● Make use of this tool to get more engaging and creative content and more AI video ideas so that the views for the video increase and the audience receives good knowledge through the videos. Try out these ideas, use Filmora to create exceptional animations on your videos, and watch your YouTube channel grow as expected.
In recent times, AI technology has become more useful for content creators to get more effective and engaging AI video ideas. Various AI video idea generator tools like Jasper, WeShare, etc., save con-tent creators time by giving the latest trending video ideas. These tools made content creators work easy as they need not spend much time on video ideas.
Most of us know AI-Artificial Intelligence and its role in achieving better and fast results in different areas. This article will let us know the position of YouTube video idea generator AI in generating engaging video content using Artificial Intelligence. Nowadays, these tools also help add audio/video summary and animations for the videos.
In this article
01 [What’s Video Ideas Generator and How to Use This Tool to Get More Views](#Part 1)
02 [12 Great AI Video Ideas to Bring More Traffic](#Part 2)
Part 1 What’s Video Ideas Generator and How to Use This Tool to Get More Views
It’s not enough to create a YouTube channel and post some video that does not have informative content. Sometimes, even though the video has informative content, the content might not be attractive to the viewers for various reasons, like the content might be routine and does not have more reach, likes, or shares. Along with good content, we also need new and creative ideas to get more viewers. Thus, we have some tools to provide unique and innovative ideas based on the niche you choose.
Videos Idea Generator is a tool that gives ideas for YouTube videos, and it works based on AI technology (Neural Networks). This tool will be more beneficial for the content creators to get more AI video ideas. Naturally, you might be out of ideas for your channel, or sometimes it takes more time to get an idea, or it could be a routine idea that does not sound interesting to the viewers. In such cases, an AI video idea generator is more helpful in suggesting new and innovative ideas for the content creators based on their interesting topics.
Some of the advantages of a video idea generator are:
● Time-saving – as one can utilize the time in other work, such as editing the video/ adding subtitles, etc., instead of thinking of an idea.
● Engaging with the audience – can utilize the time in engaging with the audience by answering their questions.
● Promote videos – can utilize time to promote their videos on other social media platforms or collaborate with other content creators for promotions.
● Add animations – animations and other visual effects can be added to the videos using AI. Also, we can add video and audio summaries after each video so that the viewers can get brief detailing of the whole video.
How to use Videos Idea Generator:
There are different AI video idea generator tools, and most of them work similarly. The most common steps are:
Step 1: Provide Topic
Here you need to provide the topic’s name on which we are planning to create the video.
Step 2: Provide Keywords
After providing a topic, give the keywords required for publishing. The video needs to have all the keywords so that the main content of the video can project adequately.
Based on the topic name and keywords, the tool will generate suggestions for the video ideas using the Neural Network concept of Artificial Learning.
Part 2 12 Great AI Video Ideas to Bring More Traffic
Now, let us know 12 AI video ideas that can become viral and get more likes and views :
01Idea 1: Know your Interest
Before starting a YouTube channel or posting a video, know your area of interest first. Once you get clarity on the area of interest, it’s easy to pick a topic from that and create an innovative video. Try to be more specific in the topic you choose. Also, have clarity on the section of audience you want to target.
For example, if your topic is more related to children, add more animations of animals/ cartoons that interest children. If you choose a related topic, do not add more animations that might confuse the audience. Add more reference links so that they can refer to those and be more particular on the specific topic you are trying to explain through the video. Similarly, if you choose a gaming-related topic, do not be more general about gaming.
Be specific towards a particular section of games like mobile gaming/ desktop/ virtual to reach more audience, and it does not seem boring to the audience.
02Idea 2: Interview Questions
As many students graduate every year, the competition for jobs has increased. People are more interested in getting an appointment as soon as possible, and for that, they need to prepare for the interview thoroughly. A video containing the main topics for the discussion that has references for the interview questions would benefit the students. It can engage with people within no time. Also, if the video is more specific to the department-wise interview questions/ job-level interview questions, it would reach more people and be more helpful to them.
03Idea 3: Full Course in Any Technology
Apart from the entertainment-related videos, education-related videos will be more helpful and engaging. Any video related to any technology course can get more views. Using the YouTube video idea generator AI tool, you can generate more unique videos related to education. Instead of giving a brief idea of the technology, it’s better to pick up a few topics and explain them in detail so that it would be helpful for interviews too. You can use AI technology to add a voice-over and a small summary at the end of the video so that the main points get revised once again.
04Idea 4: Cooking Ideas
Cooking is one of the most trending topics on YouTube. Whatever the language might be, cooking-related videos can get more views, create more creativity, and engage with the audience. You can choose a dish from any cuisine and make a video. You can add slow motion/ fast forward actions and small creative animations using AI. Using AI video ideas tools, you can get more creative ideas related to cooking that can increase views, as viewers will be more interested if the videos are innovative.
05Idea 5: Art and Craft ideas
Recently, people have seem more interested in the interior design of the house. For such people, art and craft ideas might be more helpful. Also, nowadays, schools are encouraging students in other circular activities and studies. These videos might be more attractive to the school’s students. Also, in crafts, select a specific area and make videos on that so that the video will be short and crisp, and easily understandable to the viewers. You can also add a voice-over while doing the craftwork to make it more transparent for the viewers.
06Idea 6: Photo and Video Editing Related Videos
People have become more addicted to taking photos and storing them. Any video related to editing the photos/ videos will engage more with viewers as it is not associated with any section of people. Anyone from any place and with any qualification can understand such videos. Consider a few topics related to the editing and give a detailed description/ explanation of those ideas, or consider any photo/ video editing app and explain how the app works in the video so that it might be helpful for the people who are using the app for the first time. Also, please reply to the frequently asked questions related to the app in the form of comments or summary so that it can reach more people, and there is a chance that the viewers might suggest the video to others who are about to use the app.
07Idea 7: Movies Related Videos
In every country, people are more addicted to movies regardless of language. Movies have become a part of daily life for almost all people. Some of the movie-related video ideas can be:
● Video regarding actor interviews.
● Video regarding the movie review/ collections.
● Video regarding highlights/ mistakes in the movie.
● Video related to small clips/ songs in the film.
● Video related to the spoof of the central theme of the film.
Any video related to a movie can be more viral. To create new content, use AI video idea generator tools so that the videos can be more engaging and creative.
08Idea 8: Lifehacks Related Videos
Simple daily life hack idea-related videos will be more helpful to people irrespective of their living. Any statements about keeping the house clean/clothing/makeup/skincare can be beneficial. You can take simple concepts related to our daily life like:
● How to use a few tools in our everyday life.
● Simple cleaning techniques.
● Folding clothes easily saves time.
09Idea 9: Earning Related Ideas
Videos related to earning can get more views and become more viral among people. Any detailed description of any earning app/ small startup ideas can be helpful. The video ideas generator tool can give more suggestions related to such trending topics.
10Idea 10: Sports related ideas
A large population is into sports, like football and cricket. People enjoy watching and playing these sports regularly from young to old age. It will be a good idea if you can try videos on sports. Using the video generator AI, you can generate animation videos playing cricket and add small clips of old generation cricket players as examples. You may also create small teaching videos on other sports for children. Through animation, giving the latest sports updates worldwide will also be a better idea to get more views for videos.
11Idea 11: Current Affairs Related Videos
Current affairs and general knowledge-related videos will be more helpful to people preparing for competitive exams as most people are learning through the internet rather than from books. If you can take a specific subject and give a detailed description of its past and current updates, it can be helpful for many people. And also, while doing such information-related videos, you get a chance to research it, and it will help improve your knowledge of the subject and searching skills.
12Idea 12: Gadget And Product Review Ideas
Reportedly, there has been a tremendous increase in new products related to mobiles, laptops, TV, other hardware tools, skin, hair care products, etc. You can take a specific product and create innovative ideas on how to use the product using animations/ cartoons and give a short review of the product. Through this, you can earn as you promote a company product, and people will know about the product. This is beneficial in both ways. If the product is related to electronic gadgets, make a video explaining the product’s features and how to use them. If it is hair or skincare related, include the ingredients used, advantages of the product, how to use the product, and any disadvantages, etc. Based on the product you choose, the content of the video should change.
Bonus Idea:
Use an innovative and powerful tool like Wondershare Filmora Video Editor to beautify your AI videos in the shortest time frame.
Filmora’s latest version offers various upgraded tools like:
● Instant Mode to create accessible and quick videos.
● A shop of preset templates to power up your videos.
● The Filmora Auto Beat Sync can match your clip with music.
● Adjust the speed of your video and introduce cinematic effects.
● You can even record your screen with Filmora and use that in your AI videos ideas.
Wondershare Filmora - Best Video Editor for Mac/Windows
5,481,435 people have downloaded it.
Build unique custom animations without breaking a sweat.
Focus on creating epic stories and leave the details to Filmora’s auto features.
Start a creative adventure with drag & drop effects and endless possibilities.
Filmora simplifies advanced features to save you time and effort.
Filmora cuts out repetition so you can move on to your next creative breakthrough.
● Ending Thoughts →
● Finally, that you have a fair idea of what a YouTube video idea generator is about and how it helps content creators in daily life get more innovative ideas for YouTube videos.
● Make use of this tool to get more engaging and creative content and more AI video ideas so that the views for the video increase and the audience receives good knowledge through the videos. Try out these ideas, use Filmora to create exceptional animations on your videos, and watch your YouTube channel grow as expected.
How to Combine Multiple Videos Into One on Instagram
Instagram is your favorite social media platform, and even if you use it frequently, there are still some features you’d like to master. You’d like to post a series of films on the stories, but you’re unsure how to put them together.
Suppose things are exactly like this, and you’re wondering how to combine numerous videos in Instagram stories. In that case, you’ll be happy to know that I’ll show you how to do it using the native capability built into the Instagram app for smartphones. I’ll also give you some pointers on accomplishing similar tasks utilizing well-known third-party software.
Combine many clips into a single video and share it on Instagram.

Here are a few simple methods for combining two or more videos into one and posting them on Instagram (IG).
Using the Instagram official app
There is no simple way to combine many videos into one on Instagram. You can, however, utilize the Story technique.
Create an Instagram Story with two or more videos. You can add stickers, text, and other elements if you like.
Tap the three dots icon on your Instagram Tale > Save > Save story. Your current Instagram Stories films and photos will be saved to the Photos app as a single video file.
Upload the resulting Video to Instagram!
Tools To Use to Combine videos for Instagram.
- Wondershare Filmora is an easy-to-use video merger.
Before I detail online video joiners, I’d like to mention Wondershare Filmora, which can automatically merge video files without or with transitions. It merges video files with the same or various file extensions in 1:1 quality (.mp4, .mov, .mkv, .avi, etc). Continue reading to learn more about this simple video merging and how to merge videos.
Part 2: Using Filmora to combine, merge, and join clips
To join videos, first, import them.

You can drag the files from Windows File Explorer to the User’s Album or click the “Import” button on the window and choose files from your computer. All imported files will appear in thumbnail format in the User’s Album. To preview a file in the right-hand preview window, double-click it.
- To merge video files, drag & drop them.

Move videos from the User’s Album to the video track on the Timeline after that. All video files will be combined into a single video with no transition. However, you can use the following method to add transitions between video clips.
- Add transitions in the third step (optional)

Add transitions between clips for a smooth transition from one to the next to make the linked videos look like a complete movie. Go to the Transition tab and drag the desired change to the intersection of two clips. You can also right-click any transition to bring up a menu with choices such as “Apply to All” and “Random to All” for your convenience.
Step 4: Combine video files into a single file.

Now that you’ve seen the merged Movie click the “Export” option to save the several video segments to a single file. Select any format from the list under the Format tab. All of the most common video formats are supported. Choose “Device” and choose the thumbnail of your device to play the combined video file on iPod, iPhone, or iPad. You may also publish the combined Video on YouTube or burn it to DVDs to watch on television.
Other Online Video Mergers
- Androvid

Androvid is a video joiner and video editor in one. Multiple files can be easily combined into a single video. This tool also allows you to divide videos, apply effects, convert videos, and do a lot more. Use this program to effortlessly merge video files in MPEG, 3GP, MP4, AVI, and more formats.
- Video Toolbox

Users can merge and unite videos up to 600MB in size using this fantastic video editing tool. This platform is popular among professionals due to its comprehensive cutting, cropping, combining, and effects editing services. More significantly, joining videos is completely free.
- Inshot

This is a free video editing app that allows you to merge multiple videos into a single file. This is how:
Install and run Inshot.
Select Video.
Tap the check button after selecting multiple videos.
Optional: Here is where you can edit the videos. Select the 16:9 comprehensive video layout or another option by tapping Canvas.
- With iMovie

Apple’s iMovie app is available for free on iPhones, iPad, and Mac. Here’s how to combine two or more videos for an Instagram post:
Get iMovie and open it on your iPhone.
Select Movie from the Create Project menu.
Choose your movies. To see only the clips, go to the top left and tap Media, then Video. Choose a video and press the check button.
Tap Create Movie after selecting two or more video clips.
Swipe horizontally to the point where one video clip ends and another begins if desired. You can edit or remove the transition effect between videos by tapping the two triangle icon.
Optional: You can also experiment with other iMovie features such as adding music, text, and video speed changes. You can tap a video clip, tap the tiny plus icon, and zoom in and out with two fingers.
When you’re done, tap Done in the top left corner.
From the bottom, tap the share button and select Save Video.
Your iPhone’s Photos app now contains the merged clip. Open Instagram and make an individual post with the final combined Video.
This is how you can combine multiple clips into one Instagram video. I hope you found this quick tutorial helpful. Of course, you can merge two or more clips into one single video file using any other video editing app besides the ones listed above.
Here are a few simple methods for combining two or more videos into one and posting them on Instagram (IG).
Using the Instagram official app
There is no simple way to combine many videos into one on Instagram. You can, however, utilize the Story technique.
Create an Instagram Story with two or more videos. You can add stickers, text, and other elements if you like.
Tap the three dots icon on your Instagram Tale > Save > Save story. Your current Instagram Stories films and photos will be saved to the Photos app as a single video file.
Upload the resulting Video to Instagram!
Tools To Use to Combine videos for Instagram.
- Wondershare Filmora is an easy-to-use video merger.
Before I detail online video joiners, I’d like to mention Wondershare Filmora, which can automatically merge video files without or with transitions. It merges video files with the same or various file extensions in 1:1 quality (.mp4, .mov, .mkv, .avi, etc). Continue reading to learn more about this simple video merging and how to merge videos.
Part 2: Using Filmora to combine, merge, and join clips
To join videos, first, import them.
You can drag the files from Windows File Explorer to the User’s Album or click the “Import” button on the window and choose files from your computer. All imported files will appear in thumbnail format in the User’s Album. To preview a file in the right-hand preview window, double-click it.
- To merge video files, drag & drop them.
Move videos from the User’s Album to the video track on the Timeline after that. All video files will be combined into a single video with no transition. However, you can use the following method to add transitions between video clips.
- Add transitions in the third step (optional)
Add transitions between clips for a smooth transition from one to the next to make the linked videos look like a complete movie. Go to the Transition tab and drag the desired change to the intersection of two clips. You can also right-click any transition to bring up a menu with choices such as “Apply to All” and “Random to All” for your convenience.
Step 4: Combine video files into a single file.
Now that you’ve seen the merged Movie click the “Export” option to save the several video segments to a single file. Select any format from the list under the Format tab. All of the most common video formats are supported. Choose “Device” and choose the thumbnail of your device to play the combined video file on iPod, iPhone, or iPad. You may also publish the combined Video on YouTube or burn it to DVDs to watch on television.
Other Online Video Mergers
- Androvid
Androvid is a video joiner and video editor in one. Multiple files can be easily combined into a single video. This tool also allows you to divide videos, apply effects, convert videos, and do a lot more. Use this program to effortlessly merge video files in MPEG, 3GP, MP4, AVI, and more formats.
- Video Toolbox
Users can merge and unite videos up to 600MB in size using this fantastic video editing tool. This platform is popular among professionals due to its comprehensive cutting, cropping, combining, and effects editing services. More significantly, joining videos is completely free.
- Inshot
This is a free video editing app that allows you to merge multiple videos into a single file. This is how:
Install and run Inshot.
Select Video.
Tap the check button after selecting multiple videos.
Optional: Here is where you can edit the videos. Select the 16:9 comprehensive video layout or another option by tapping Canvas.
- With iMovie
Apple’s iMovie app is available for free on iPhones, iPad, and Mac. Here’s how to combine two or more videos for an Instagram post:
Get iMovie and open it on your iPhone.
Select Movie from the Create Project menu.
Choose your movies. To see only the clips, go to the top left and tap Media, then Video. Choose a video and press the check button.
Tap Create Movie after selecting two or more video clips.
Swipe horizontally to the point where one video clip ends and another begins if desired. You can edit or remove the transition effect between videos by tapping the two triangle icon.
Optional: You can also experiment with other iMovie features such as adding music, text, and video speed changes. You can tap a video clip, tap the tiny plus icon, and zoom in and out with two fingers.
When you’re done, tap Done in the top left corner.
From the bottom, tap the share button and select Save Video.
Your iPhone’s Photos app now contains the merged clip. Open Instagram and make an individual post with the final combined Video.
This is how you can combine multiple clips into one Instagram video. I hope you found this quick tutorial helpful. Of course, you can merge two or more clips into one single video file using any other video editing app besides the ones listed above.
Also read:
- Updated 2024 Approved Fun & Easy Masking Tricks Wondershare Filmora Tutorial
- 2024 Approved Learn How to Effectively Use Masking in After Effects with This Comprehensive Guide. Includes Step-by-Step Instructions and an Alternative Masking Technique
- Updated How To Make a Photo Collage in Microsoft Word
- Updated In 2024, Find The Best LUTs for Lightroom
- How to Create an Alternate Reality Effect
- In 2024, Steps to Rotate Videos in Lightworks
- Updated In 2024, Guide To Selecting and Using the Best Braw Luts
- Looking for Efficient Ways to Create a Slow-Motion Video? Read the Article for Reliable Solutions that Provide Excellent Results for 2024
- 2024 Approved Got No Luck with MP4 Video Joining Software? Try These 6 Best MP4 Mergers to Combine Videos on Your MAC and Windows
- New How to Make Discord Logo GIF
- Updated In 2024, How to Use a Stabilization Tool in Filmora
- Updated In 2024, Ultimate Guide to Making Cinematography for Music Video
- Updated How to Crop Videos in Windows Media Player
- New How to Combine Videos Into One on Instagram
- How to Make a DIY Vlog or Video for 2024
- Tactics To Make Keynote Slideshow for 2024
- Video Editors Use Transitions to Tie Their Shots and Clips Together Into a Cohesive, Polished Program. Learn the Best Method to Create a Smooth Cut Transition Effect
- 2024 Approved Add Subtitles To Videos With Kapwing Step by Step
- In 2024, Do You Want to Create Adjustment Layers in Final Cut Pro? This Article Will Discuss a Simple yet Efficient Method to Generate Adjustment Layers in Final Cut Pro
- How To Achieve LumaFusion Color Grading Through LUTs for 2024
- New Easy Guide to Use a Stabilization Tool in Filmora
- New In 2024, Learn Color Correction in After Effects with These YouTube Videos
- Want to Speed up Your Video to Shorten Its Duration and Make It More Entertaining? Here Is How to Speed up Videos in Final Cut Pro. Get a Better Alternative to FCP to Speed up Videos
- In 2024, How To Remove Flashlight From Apple iPhone SE (2022) Lock Screen | Dr.fone
- Play Store Stuck on Downloading Of ZTE Nubia Z60 Ultra? 7 Ways to Resolve | Dr.fone
- How to Bypass FRP on Oppo F23 5G?
- Simple ways to get lost music back from C12 Pro
- How to rescue lost call logs from Moto G34 5G
- The Magnificent Art of Pokemon Go Streaming On Vivo Y27 5G? | Dr.fone
- How to Hide/Fake Snapchat Location on Your Oppo K11 5G | Dr.fone
- Best Android Data Recovery - undelete lost call logs from Realme 11 Pro+
- How to Track Apple iPhone 7 Location by Number | Dr.fone
- In 2024, A Guide Xiaomi Mix Fold 3 Wireless and Wired Screen Mirroring | Dr.fone
- In 2024, How to Fix Locked Apple ID from iPhone 13 Pro
- In 2024, 9 Best Phone Monitoring Apps for Samsung Galaxy M34 | Dr.fone
- Spotify Keeps Crashing A Complete List of Fixes You Can Use on Google Pixel 8 | Dr.fone
- Why Your WhatsApp Live Location is Not Updating and How to Fix on your Oppo Find X7 | Dr.fone
- Reliable User Guide to Fix Oppo Reno 8T 5G Running Slow and Freezing | Dr.fone
- 3 Methods to Mirror Nokia C02 to Roku | Dr.fone
- Did Your Apple iPhone 11 Pro Passcode Change Itself? Unlock It Now
- In 2024, Top 10 AirPlay Apps in Nokia C22 for Streaming | Dr.fone
- In 2024, Top 15 Apps To Hack WiFi Password On Vivo X100 Pro
- How to Unlock Samsung Galaxy XCover 7 Phone Pattern Lock without Factory Reset
- Title: Updated In 2024, How to Livestream Zoom on Facebook?
- Author: Chloe
- Created at : 2024-04-24 07:08:30
- Updated at : 2024-04-25 07:08:30
- Link: https://ai-editing-video.techidaily.com/updated-in-2024-how-to-livestream-zoom-on-facebook/
- License: This work is licensed under CC BY-NC-SA 4.0.
