
:max_bytes(150000):strip_icc():format(webp)/GettyImages-1094009490-2694d308001d46049e0755f4dd7fdf4c.jpg)
Updated In 2024, How to Put Emoji on Mac That Take Less Than 10 Mins
How to Create Emoji on Mac That Take Less Than 10 Mins
How to Put Emoji on Mac That Take Less Than 10 Mins
An easy yet powerful editor
Numerous effects to choose from
Detailed tutorials provided by the official channel
Emojis are expressive graphic elements that backup your content for catering to an engaging information delivery. Be here to know the how’s and why’s!
In this article
01 [The Power of Emojis in Marketing](#Part 1)
02 [How to Add Emoji on MacBook Efficiently?](#Part 2)
03 [How to Enable and Access Emoji Characters on a Mac?](#Part 3)
04 [Putting Emoji on Mac Q&A](#Part 4)
Part 1 The Power of Emojis in Marketing
Emojis are one elusive means to express the feel behind a content that is being presented, regardless of the diversities in the platform and information aspects. While the common beliefs with respect these graphic uplifts are restricted within personal boundaries of fun and entertainment, the professional credibility of emojis is no less.
When the talk is about marketing and business strategies, the significance of these elements cannot be limited within the constraints of domain and time. Entering into the application varieties, you can work with emojis everywhere, from promotional advertisements to promote your brand, to devising strategic video presentations and slideshows to showcase your company utilities in front of a target audience.
Beginning our discussion towards the same, let us look through the different aspects and benefits of including emojis as a compliment to business marketing strategies in the following section:
Merits of Using Emojis as a Marketing Tactic
01Social Media Utility
Considering the fact that social media is turning into a content sharing hub, irrespective of information genres, the business marketing arena is obviously not left untouched. With the revolutionary expansion in the concept and credibility of digital marketing, social media platforms have become a significant space for product advertisement and brand promotion.
Speaking in the light of the above, the fact that emojis have long been a part of social media conversations is something that cannot be ignored. Using a combination of emojis and social media can thus, work to deliver a more effective presentation of your brands, products and company services, while keeping the audience captivated by making them connect with the feel of the utility they are viewing at.
02Making the Brand Come Alive
It is a known fact that a trusted brand name works to earn a hoard of loyal customers in the long run. Adding an emoji in your brand promotion strategies helps to establish a great deal of emotional connection of the same with your target audience, while making them relate to the regular inclusion of these graphic elements in their social media conversations.
Working towards adding emojis in your product or company presentations or ad campaigns caters to convey the product information in a unique style of its own by adding an extra bit of liveliness to your brand.
You should however, be cautious while using emojis to promote your brand, lest these may end up crowding the presentation snippet. It is a wise decision to use a single or couple of emojis at the end of a text based content, rather than stuffing the same with a series of emojis to avoid the distraction of audience.
Another way of making an impressive use of emojis in your promotional media posts is creating engaging feature lists of your brand, or adding the same to the product headlines, while giving them an extra impact. Such graphic creativity will surely put your brand ahead of the numerous counterparts on promotional business sites.
03Enhanced Viewer Engagement
It is a common practice to include emojis within personal chats and social media conversations to ensure an improved peer engagement, while uplifting the degree of fun and entertainment. The same concept can be applied to brand promotion strategies for bringing in an increased number of interested audiences.
Supplementing your promotional content with emojis helps the latter to gain a casual and informal presentation approach that suits the audience in a much better way. Speaking in the light of the current social media and digital market trends, emojis have managed to achieve a universal credibility that is far ahead of video and image centered promotional elements.
As a product or business marketer, you can work with these conveying graphic utilities to initiate thematic conversations with your viewers and potential customers. Care should however be taken to make an intelligent and smart usage of emojis, to ensure that the latter works to uplift and compliment your promotional strategies, lest you would end up distracting your audiences.
04Supplementing the Content With a Cohesive Context
When aiming at creating a brand awareness of your product or company via promotional messaging, emojis can help to convey an emotional exactness that a text based content often falls short of adhering to.
While using emojis alone can make the task a bit difficult, an intelligent combination of the latter with cohesive text elements can effectively cater towards delivering a top rated promotional output, while adding an extra bit of meaning and depth to the same.
When promoting your product across social media platforms that have a restriction on the maximum number of characters within a single post or message, using emojis can compensate for the text you would otherwise prefer to add. The additional benefit of this inclusion lies in supplementing your text with the missing emotional connect and feel that works to build an emphasis of your brand among the viewers.
Part 2 How to Add Emoji on MacBook Efficiently?
As already stated, emojis are an expressive set of graphic elements that work to enhance the context and credibility of the otherwise ordinary text messages. Whether used in casual conversations and personal chats on social media platforms for fun and entertainment, or included in promotional strategies to create brand awareness across the digital market, emojis cater to one and all concerns with the same effectiveness and credibility.
Working with emojis is one aspect, but the latter’s interface compatibility is also of considerable importance. When proceeding to use the elements, you should take care to check the accessibility of these elements with the system you are working on. While most of the emojis are platform independent, some of the latest ones may or may not be available on dated versions of applications and devices.
By now, you must have understood the significance of working with emojis to uplift the promotional content of a brand while ensuring a significant viewer engagement. Let us move ahead with our discussion to talk about the most effective ways of how to add emoji on MacBook in what follows next:
User’s Guide to Include the Emoji Picker Tool on the Menu Bar of a MacBook
Step 1: Access the Apple Icon
For a quick and convenient access to emoji elements on a MacBook, it is advisable to add the ‘Emoji Picker’ utility to the ‘Menu Bar’ of your device’s screen. To do this, start with navigating to the top left corner of the MacBook’s opening screen and clicking on the ‘Apple’ icon.

Step 2: Open System Preferences
As you click on the ‘Apple’ icon in step 1, proceed to select the ‘System Preferences’ option from the drop down menu that appears next.

Step 3: Pick the Keyboard Option
Selecting the ‘Preferences’ option caters to display a series of input choice icons on your MacBook screen. From the available options, tap on the ‘Keyboard’ icon to select the same.

Step 4: Choose the Show Option
The ‘Keyboard Options’ at the top of the screen now present a list of functions and accessibilities that you can work upon. Click the checkbox beside the ‘Show Keyboard and Emoji Viewer in Menu Bar’ option to add the ‘Emoji Picker’ tool to the ‘Menu Bar’.

Part 3 How to Enable and Access Emoji Characters on a Mac?
Emoji characters are highly effective in expressing the emotions and feel behind your message that words often fall short of conveying. While these elements are easily accessible across devices working on almost all popular operating systems, addressing the query of how to get emoticons on Mac is many a time an element of surprise.
Diving deep into the means and ways of working with emojis on a MacOS utility, let us try hands at understanding the knowhow of enabling and accessing emoji characters on Mac compatible devices in the following section:
User’s Guide to Enable and Access Emoji Characters on Mac Devices
Step 1: Launch the Application
Start with launching the preferred application in your device in which you want to use the emoji. Within the latter’s text field, drag and point the cursor to the place where the emoji needs to be added.
Step 2: Enter the Command Combination
As you complete the first step, proceed to tap the ‘Command + Ctrl + Spacebar’ key combination on your device’s keyboard to see the ‘Emoji Picker’ overlay window pop up on the screen. If your desired emoji does not seem to find a place within the displayed lists of emoji categories, head to the ‘Search Bar’ at the top and type a relatable keyword to look for the required graphic representation.
Step 3: Select the Emoji
You can now pick a desired emoji from the displayed overlay, followed by double clicking on the same to add the element at the current cursor position.

Part 4 Putting Emoji on Mac Q&A
● What is the difference between emoticons and emojis?
Graphic smiley faces that involve a keyboard character, like that of a letter, digit or punctuation, are referred to as emoticons; while the caricaturized images that do have a character or punctuation inclusion, belong to the category of emojis.
● What does the UwU emoji stand for?
This one is an emoticon that represents a cute looking face. You can use it in your conversations and social media posts to depict a happy, affectionate and warm emotional expression. You can use to this to complement your conversations and uplift the customary text messages.
● How can you avail a bank of the latest emojis for free?
When looking for convenient sources to access the latest and most expressive emojis for free, you are offered a series of graphic galleries across the web, from where you can either download the emoji package or even add the elements directly from the site to your conversations.
● Why can’t you access some of the emojis on your Mac device?
To access the latest emojis on your Mac device, make sure that the device is updated to the most recent version of the MacOs operating system. You can also opt to restart and update the device by navigating to and launching the ‘Apple Menu’, followed by selecting the ‘System the device in ‘Safe Mode’.
● What is the best software alternative access the latest emoji bank?
When looking for a software solution to sort the concern of how to put emoji on Mac, while taking suitable emoji suggestions, you can conveniently rely on the Wondershare Filmora Video Editor graphic editor program, which houses an extensive inventory of various graphic elements, including emojis. You can browse through the same and proceed to search the one that you that you like across a web utility.
For Win 7 or later (64-bit)
For macOS 10.12 or later
● Ending Thoughts →
● Emojis are an expressive element of marketing strategies aiming at brand promotion, along with establishing company credibility among the potential audience.
● Working towards the concern of MacOS insert emoji requires the inclusion of the ‘Emoji Picker’ tool on the latter’s menu bar.
● If you are in search of an affordable software program to access the latest collection of emojis, Wondershare Filmora can be a smart choice.
Emojis are expressive graphic elements that backup your content for catering to an engaging information delivery. Be here to know the how’s and why’s!
In this article
01 [The Power of Emojis in Marketing](#Part 1)
02 [How to Add Emoji on MacBook Efficiently?](#Part 2)
03 [How to Enable and Access Emoji Characters on a Mac?](#Part 3)
04 [Putting Emoji on Mac Q&A](#Part 4)
Part 1 The Power of Emojis in Marketing
Emojis are one elusive means to express the feel behind a content that is being presented, regardless of the diversities in the platform and information aspects. While the common beliefs with respect these graphic uplifts are restricted within personal boundaries of fun and entertainment, the professional credibility of emojis is no less.
When the talk is about marketing and business strategies, the significance of these elements cannot be limited within the constraints of domain and time. Entering into the application varieties, you can work with emojis everywhere, from promotional advertisements to promote your brand, to devising strategic video presentations and slideshows to showcase your company utilities in front of a target audience.
Beginning our discussion towards the same, let us look through the different aspects and benefits of including emojis as a compliment to business marketing strategies in the following section:
Merits of Using Emojis as a Marketing Tactic
01Social Media Utility
Considering the fact that social media is turning into a content sharing hub, irrespective of information genres, the business marketing arena is obviously not left untouched. With the revolutionary expansion in the concept and credibility of digital marketing, social media platforms have become a significant space for product advertisement and brand promotion.
Speaking in the light of the above, the fact that emojis have long been a part of social media conversations is something that cannot be ignored. Using a combination of emojis and social media can thus, work to deliver a more effective presentation of your brands, products and company services, while keeping the audience captivated by making them connect with the feel of the utility they are viewing at.
02Making the Brand Come Alive
It is a known fact that a trusted brand name works to earn a hoard of loyal customers in the long run. Adding an emoji in your brand promotion strategies helps to establish a great deal of emotional connection of the same with your target audience, while making them relate to the regular inclusion of these graphic elements in their social media conversations.
Working towards adding emojis in your product or company presentations or ad campaigns caters to convey the product information in a unique style of its own by adding an extra bit of liveliness to your brand.
You should however, be cautious while using emojis to promote your brand, lest these may end up crowding the presentation snippet. It is a wise decision to use a single or couple of emojis at the end of a text based content, rather than stuffing the same with a series of emojis to avoid the distraction of audience.
Another way of making an impressive use of emojis in your promotional media posts is creating engaging feature lists of your brand, or adding the same to the product headlines, while giving them an extra impact. Such graphic creativity will surely put your brand ahead of the numerous counterparts on promotional business sites.
03Enhanced Viewer Engagement
It is a common practice to include emojis within personal chats and social media conversations to ensure an improved peer engagement, while uplifting the degree of fun and entertainment. The same concept can be applied to brand promotion strategies for bringing in an increased number of interested audiences.
Supplementing your promotional content with emojis helps the latter to gain a casual and informal presentation approach that suits the audience in a much better way. Speaking in the light of the current social media and digital market trends, emojis have managed to achieve a universal credibility that is far ahead of video and image centered promotional elements.
As a product or business marketer, you can work with these conveying graphic utilities to initiate thematic conversations with your viewers and potential customers. Care should however be taken to make an intelligent and smart usage of emojis, to ensure that the latter works to uplift and compliment your promotional strategies, lest you would end up distracting your audiences.
04Supplementing the Content With a Cohesive Context
When aiming at creating a brand awareness of your product or company via promotional messaging, emojis can help to convey an emotional exactness that a text based content often falls short of adhering to.
While using emojis alone can make the task a bit difficult, an intelligent combination of the latter with cohesive text elements can effectively cater towards delivering a top rated promotional output, while adding an extra bit of meaning and depth to the same.
When promoting your product across social media platforms that have a restriction on the maximum number of characters within a single post or message, using emojis can compensate for the text you would otherwise prefer to add. The additional benefit of this inclusion lies in supplementing your text with the missing emotional connect and feel that works to build an emphasis of your brand among the viewers.
Part 2 How to Add Emoji on MacBook Efficiently?
As already stated, emojis are an expressive set of graphic elements that work to enhance the context and credibility of the otherwise ordinary text messages. Whether used in casual conversations and personal chats on social media platforms for fun and entertainment, or included in promotional strategies to create brand awareness across the digital market, emojis cater to one and all concerns with the same effectiveness and credibility.
Working with emojis is one aspect, but the latter’s interface compatibility is also of considerable importance. When proceeding to use the elements, you should take care to check the accessibility of these elements with the system you are working on. While most of the emojis are platform independent, some of the latest ones may or may not be available on dated versions of applications and devices.
By now, you must have understood the significance of working with emojis to uplift the promotional content of a brand while ensuring a significant viewer engagement. Let us move ahead with our discussion to talk about the most effective ways of how to add emoji on MacBook in what follows next:
User’s Guide to Include the Emoji Picker Tool on the Menu Bar of a MacBook
Step 1: Access the Apple Icon
For a quick and convenient access to emoji elements on a MacBook, it is advisable to add the ‘Emoji Picker’ utility to the ‘Menu Bar’ of your device’s screen. To do this, start with navigating to the top left corner of the MacBook’s opening screen and clicking on the ‘Apple’ icon.
Step 2: Open System Preferences
As you click on the ‘Apple’ icon in step 1, proceed to select the ‘System Preferences’ option from the drop down menu that appears next.
Step 3: Pick the Keyboard Option
Selecting the ‘Preferences’ option caters to display a series of input choice icons on your MacBook screen. From the available options, tap on the ‘Keyboard’ icon to select the same.
Step 4: Choose the Show Option
The ‘Keyboard Options’ at the top of the screen now present a list of functions and accessibilities that you can work upon. Click the checkbox beside the ‘Show Keyboard and Emoji Viewer in Menu Bar’ option to add the ‘Emoji Picker’ tool to the ‘Menu Bar’.
Part 3 How to Enable and Access Emoji Characters on a Mac?
Emoji characters are highly effective in expressing the emotions and feel behind your message that words often fall short of conveying. While these elements are easily accessible across devices working on almost all popular operating systems, addressing the query of how to get emoticons on Mac is many a time an element of surprise.
Diving deep into the means and ways of working with emojis on a MacOS utility, let us try hands at understanding the knowhow of enabling and accessing emoji characters on Mac compatible devices in the following section:
User’s Guide to Enable and Access Emoji Characters on Mac Devices
Step 1: Launch the Application
Start with launching the preferred application in your device in which you want to use the emoji. Within the latter’s text field, drag and point the cursor to the place where the emoji needs to be added.
Step 2: Enter the Command Combination
As you complete the first step, proceed to tap the ‘Command + Ctrl + Spacebar’ key combination on your device’s keyboard to see the ‘Emoji Picker’ overlay window pop up on the screen. If your desired emoji does not seem to find a place within the displayed lists of emoji categories, head to the ‘Search Bar’ at the top and type a relatable keyword to look for the required graphic representation.
Step 3: Select the Emoji
You can now pick a desired emoji from the displayed overlay, followed by double clicking on the same to add the element at the current cursor position.
Part 4 Putting Emoji on Mac Q&A
● What is the difference between emoticons and emojis?
Graphic smiley faces that involve a keyboard character, like that of a letter, digit or punctuation, are referred to as emoticons; while the caricaturized images that do have a character or punctuation inclusion, belong to the category of emojis.
● What does the UwU emoji stand for?
This one is an emoticon that represents a cute looking face. You can use it in your conversations and social media posts to depict a happy, affectionate and warm emotional expression. You can use to this to complement your conversations and uplift the customary text messages.
● How can you avail a bank of the latest emojis for free?
When looking for convenient sources to access the latest and most expressive emojis for free, you are offered a series of graphic galleries across the web, from where you can either download the emoji package or even add the elements directly from the site to your conversations.
● Why can’t you access some of the emojis on your Mac device?
To access the latest emojis on your Mac device, make sure that the device is updated to the most recent version of the MacOs operating system. You can also opt to restart and update the device by navigating to and launching the ‘Apple Menu’, followed by selecting the ‘System the device in ‘Safe Mode’.
● What is the best software alternative access the latest emoji bank?
When looking for a software solution to sort the concern of how to put emoji on Mac, while taking suitable emoji suggestions, you can conveniently rely on the Wondershare Filmora Video Editor graphic editor program, which houses an extensive inventory of various graphic elements, including emojis. You can browse through the same and proceed to search the one that you that you like across a web utility.
For Win 7 or later (64-bit)
For macOS 10.12 or later
● Ending Thoughts →
● Emojis are an expressive element of marketing strategies aiming at brand promotion, along with establishing company credibility among the potential audience.
● Working towards the concern of MacOS insert emoji requires the inclusion of the ‘Emoji Picker’ tool on the latter’s menu bar.
● If you are in search of an affordable software program to access the latest collection of emojis, Wondershare Filmora can be a smart choice.
Step by Step to Resize Video in Davinci Resolve
While editing videos, you may change the aspect ratio of the video to change the size of the video to upload on different platforms like YouTube, Facebook, Pinterest, and Instagram. Videos come in different sizes and shapes. Some videos are portraits while the others are landscapes. Similarly, videos are captured in different places with different devices. So, we need to set a certain size of the video.
Definitely, a very large video can make delays in the work, similarly, a small size video can result in low resolution and bad quality. Resizing a video saves a lot of time and money whether you have a business, a YouTube channel, a short film, or a feature film. Today, we shall discuss how to resize the videos?
The two free ways to resize the video…
Here are a number of tools used in the market to resize the videos. We are going to teach How to resize the video in Davinci resolve and Fimora wondershare. Once you have mastered How to resize a video, it would be as simple as the ‘click’.
Now the good news is, you can dramatically export the videos in the same resolution in a very short time.
Let’s dive in !
Part 1. How to resize video in Davinci Resolve
Davinci Resolve is a very powerful tool to edit videos. Let’s suppose, you have some videos shots and all the videos have different sizes, some of the videos fit in the timeline and some are out of the timeline. No matter, you are going to make a video on the same scale with the same size.
Resize the video can be done in three ways:
- Zoom in zoom out
- Cropping
- Retime and scaling
1. Zoom in and Zoom out
First of all, select the videos in your timeline. You should stay in the middle of the frame to set it because it’s too wide. The timeline moves forward and backward. Let your video be 4k, go to the bottom-right corner and click on timeline format. Select timeline resolution, select ultra HD, or whatever you want from the drop-down list.

Go to the inspector from the up-right corner and select Transform under the video section. Here you can resize your image. Place the mouse over zoom x (Horizontal) and zoom y (vertical) values to drag left or right for zoom in or zoom out. The video can be resized accordingly.
Here you can also change its rotation.

2. Cropping
Go to the inspector from the up-right corner and select Transform. Now choose Cropping. Here are four options Crop left, crop right, crop Bottom, and crop Top. You can drag the scale from left to right to adjust the crop settings according to the desired result.

3. Retime and scaling
Go to the inspector from the up-right corner and select retime and scaling. You can choose stretch, Fit, Fill, or crop for cropping the video from the drop-down list.
- The Crop function is used to remove the unnecessary or uneven part of the video.
- The Fit function is to have the video auto-center and the selected clips are formatted according to the screen dimensions.
- Stretch Function allows changing the length of the certain clip at a certain duration.

After transforming, cropping, and resizing the videos, you can copy the same settings without repeating the above steps for each video.
Part 2. An alternative way to resize videos with Wondershare
Filmora Video Editor is another great video editing software. It is very easy to use. It offers many different features to resize the videos. Moreover, it allows zooming in the video to highlight the best part of your video. It allows the edited video to export on other devices or YouTube channels.
For Win 7 or later (64-bit)
For macOS 10.14 or later
You can resize your video in three ways:
- Resize video by cropping
- Scale in Scale-out
- Resize by changing Aspect Ratio
1. Resize video by cropping
- Import the videos from your storage by using the import button.
- Drag the videos in the timeline.
- Right-click on the desired video, crop and zoom option will appear in the menu.
- Select crop tab.

- Grab the corner of the crop inwards, and move to adjust as desired.
- Press the OK tab and your video is cropped.

2. Scale-in and scale-out
- Select the video in the timeline.
- Select the settings
- Click on the Transform tab under image section**.**

- Move the pointer from left to right on the Scale to zoom in and zoom out the video. You can remove the unwanted portion of the video.
- Press OK tab.

3. Resize video by changing aspect ratio
Some videos are 4k, 6k, and 8k but exporting them in the same resolution and waiting for a long time is really difficult. You need to resize the video to change its width and height. As different social media platforms require a different sizes for videos. We can say, resizing the video in terms of Giga bites and mega bites. You can do it by changing the Project Aspect Ratio. It is a very powerful technique to resize the videos in the timeline.
You can change the Project Aspect ratio like 16:9(wide-screen), 1:1(Instagram), 9:16(Portrait), 4:3(standard), 21:9(Cinema), or custom.

- Select the Aspect Ratio
- Change the ratio 16:9, 1:1, 9:16, 4:3, 21:9, or custom as desired.
- Select OK.

Conclusion
At this time, every business is using marketing to boost the economy, but video marketing is at its climax. Therefore, it is essential to take advantage of video editing tools to increase productivity and efficiency of work.
The Davinci Resolve and Filmora Wonder Share are the best video editing tools to resize the videos. You can easily use these tools on your laptop, tablets, or smartphones in a very short time. Along with this, you can share your compressed videos on different social media platforms like Facebook, Twitter, YouTube, Instagram, and LinkedIn. Moreover, you can enjoy the magical effects of these free tools at the ease of your smartphone. It is beneficial at both small and large businesses for the following
- Time saver
- Economical
- Good video quality
- Presentable
- Increase engagement
Hope the content would be useful for you. If you like the article please leave a comment.
Go to the inspector from the up-right corner and select Transform under the video section. Here you can resize your image. Place the mouse over zoom x (Horizontal) and zoom y (vertical) values to drag left or right for zoom in or zoom out. The video can be resized accordingly.
Here you can also change its rotation.
2. Cropping
Go to the inspector from the up-right corner and select Transform. Now choose Cropping. Here are four options Crop left, crop right, crop Bottom, and crop Top. You can drag the scale from left to right to adjust the crop settings according to the desired result.
3. Retime and scaling
Go to the inspector from the up-right corner and select retime and scaling. You can choose stretch, Fit, Fill, or crop for cropping the video from the drop-down list.
- The Crop function is used to remove the unnecessary or uneven part of the video.
- The Fit function is to have the video auto-center and the selected clips are formatted according to the screen dimensions.
- Stretch Function allows changing the length of the certain clip at a certain duration.
After transforming, cropping, and resizing the videos, you can copy the same settings without repeating the above steps for each video.
Part 2. An alternative way to resize videos with Wondershare
Filmora Video Editor is another great video editing software. It is very easy to use. It offers many different features to resize the videos. Moreover, it allows zooming in the video to highlight the best part of your video. It allows the edited video to export on other devices or YouTube channels.
For Win 7 or later (64-bit)
For macOS 10.14 or later
You can resize your video in three ways:
- Resize video by cropping
- Scale in Scale-out
- Resize by changing Aspect Ratio
1. Resize video by cropping
- Import the videos from your storage by using the import button.
- Drag the videos in the timeline.
- Right-click on the desired video, crop and zoom option will appear in the menu.
- Select crop tab.
- Grab the corner of the crop inwards, and move to adjust as desired.
- Press the OK tab and your video is cropped.
2. Scale-in and scale-out
- Select the video in the timeline.
- Select the settings
- Click on the Transform tab under image section**.**
- Move the pointer from left to right on the Scale to zoom in and zoom out the video. You can remove the unwanted portion of the video.
- Press OK tab.
3. Resize video by changing aspect ratio
Some videos are 4k, 6k, and 8k but exporting them in the same resolution and waiting for a long time is really difficult. You need to resize the video to change its width and height. As different social media platforms require a different sizes for videos. We can say, resizing the video in terms of Giga bites and mega bites. You can do it by changing the Project Aspect Ratio. It is a very powerful technique to resize the videos in the timeline.
You can change the Project Aspect ratio like 16:9(wide-screen), 1:1(Instagram), 9:16(Portrait), 4:3(standard), 21:9(Cinema), or custom.
- Select the Aspect Ratio
- Change the ratio 16:9, 1:1, 9:16, 4:3, 21:9, or custom as desired.
- Select OK.
Conclusion
At this time, every business is using marketing to boost the economy, but video marketing is at its climax. Therefore, it is essential to take advantage of video editing tools to increase productivity and efficiency of work.
The Davinci Resolve and Filmora Wonder Share are the best video editing tools to resize the videos. You can easily use these tools on your laptop, tablets, or smartphones in a very short time. Along with this, you can share your compressed videos on different social media platforms like Facebook, Twitter, YouTube, Instagram, and LinkedIn. Moreover, you can enjoy the magical effects of these free tools at the ease of your smartphone. It is beneficial at both small and large businesses for the following
- Time saver
- Economical
- Good video quality
- Presentable
- Increase engagement
Hope the content would be useful for you. If you like the article please leave a comment.
Best Video Editors to Add Text to a Video
While it can be very easy to add text to an image, the same cannot be said when it comes to adding even the simplest text to a video. You will need video editing software that is designed with the necessary features to help you add text to your video.
There are very many programs in the market that can technically be used to add text to a video. But the ones we will look at are video editors that make the process easy, but also give you a wide range of options to customize your text in numerous ways.
Filmora
Filmora by Wondershare is one of the best video editors in the market. Its user interface is so easy to use that adding text to the video is a simple 3-step process. Aside from adding text to the video, Filmora also allows you to edit other aspects of the video including adding transitions, overlays, and animations to any section of the video.

Key Features:
- You can use Filmora to add text to any section of the video
- It gives you the freedom to move the text to any section of the video
- Customizing the text, you add to the video can be done in numerous ways including changing the color, and font and adding animations to the text.
- It offers numerous templates to choose from and different font styles that you can use
- It has a simple user interface that makes the video editing process very easy
- It has numerous other video editing capabilities that allow you to create and edit videos in different ways including splitting videos, trimming videos, and even merging videos clips into one
- You can upload the videos directly to YouTube after editing.
After Effects
Adobe After Effects is a motion picture editing program that you can also use to add text and other animations to your video. While you can use it to add simple text to the video, it is an ideal solution when your goal is to add advanced text animations. It is however by no means a simple solution, especially for beginners who may find it hard to get going with After Effects.

Key Features:
- You can add simple lines of text to any section of the video
- Text is easily customizable by changing the color, font, and size of the text
- You can also choose to change the entire text layer and add advanced animations and effects
- There are a lot of text, animations, and effects templates to choose from
- You can easily copy text from other Adobe applications to use in After Effects
Movavi Editor
Movavi video editor is another great video editor that you can use to add and edit text on a video. Like most similar tools it is designed to simplify the process, allowing you to add text to any section of the document, move the text to any location on the video and even add text effects to customize the text. It has a very simple user interface that allows you to do that quickly and easily.

Key Features:
- You can add text to any section of the video
- Customizing the text by changing the font, color and size is also very easy
- The user interface is very easy to use, allowing you to add even blocks of text very quickly
- You also have additional options to edit the video including splitting and merging the video or adjusting the brightness, saturation, and color.
iMovie
This is a built-in video editor that you will find on macOS and iOS devices. Even though it is free, iMovie has a lot of features that come in handy when you want to add and edit text on a video. The fact that it can be used on iOS devices is an added advantage when you want to edit videos on the go.

Key Features:
- It allows users to add transitions and effects to the text you add to the video
- It comes with a lot of title templates to choose from
- Adding animated text is also very simple including Sideways Drift, Lens Flare, and more
- You can customize the text in very many ways including adding fonts, drop shadows, changing the color, and even resizing or repositioning the text.
Camtasia
TechSmith Camtasia is one of the most popular tools to create and edit videos. Of the numerous features that you get when you choose to use Camtasia is adding and editing text to the video. It has numerous templates that can be used to customize the text you add in various ways.

Key Features:
- It gives you numerous options to add text to the images including text boxes, templates, and effects
- It has a speech-to-text feature that is perfect for adding captions and subtitles to the video
- You can easily customize the text by adding transitions and effects or even by simply changing the font, color, and size of the text
- The text can be moved to any section of the video
Typito
Typito is an online video editor with simple tools that can help you make changes to any video. designed to help YouTube content creators and video editors, Typito can be used to add all kinds of text and text effects to any video. It is accessible on all browsers and it is also very easy to use.
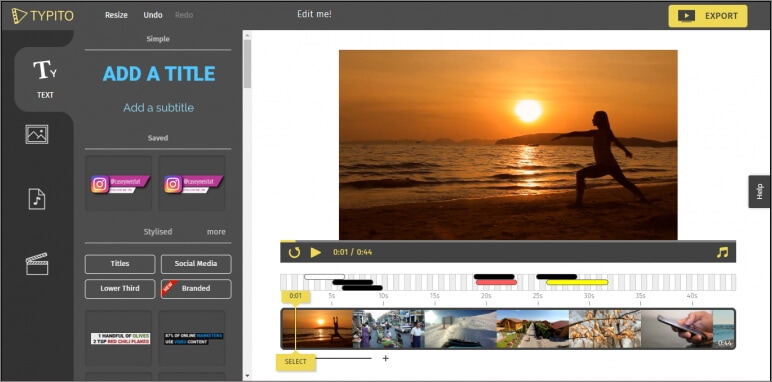
Key Features:
- It is very easy to use, allowing you to add text to any video in a few simple steps
- It has numerous templates to choose from
- Changing the font size, color, and style of the text is very easy
- You can publish videos directly to numerous video-sharing sites after editing
- It allows users to add animations, transitions, and effects to the text
Splice
Splice is an iOS app designed to help you add text to videos on iOS devices. Adding text to any video using Splice can be easily done using the overlay feature. It also has numerous other video editing features including allowing you to easily synchronize your videos and music, adding filters and transitions, and more.

Key Features:
- it has a simple user interface that makes adding text very easy
- You can customize the text in various ways including changing the font size, color and style or even adding various text effects
- Videos can be saved on the device or shared directly on social media apps like Facebook, Instagram, and YouTube
- It has numerous other video editing features including filters and animations
Clipomatic
If the text you want to add to the video is in the form of captions or subtitles, then Clipomatic is perhaps the best choice. It supports various languages including German, French, Portuguese, and even Chinese. You can also use it to add regular text to any video, reposition the text on any section of the video and customize the text in various ways.

Key Features:
- It is available for both Android and iOS
- Adding text to the video is very easy
- You can easily customize the text by changing the font color, and size and adding transitions and text effects
- It supports various languages, making it ideal for captions and subtitles
MySubtitle
MySubtitle is a simple but highly effective app that you can use to add text to your video. As the name suggests, this tool is ideal for adding subtitles and you can do that very easily by simply typing in the text and syncing the text to the video’s content.

Key Features:
- It is available for both iOS and Android devices
- You can type in your subtitles directly on the video
- Subtitles can then be paced to suit the video’s playback speed
- It is completely free to use
- You can share the videos you edit directly on various social media platforms
Free Download For Win 7 or later(64-bit)
Free Download For macOS 10.14 or later
Free Download For macOS 10.14 or later
Top 10 Sound Extractors to Extract Sound From Video 2023
It often happens that we get so engrossed in a movie or video and fall exceptionally hard for all elements. This can prompt us to extract sounds from videos, like the background music, a voiceover, or dialogue between characters.
Safe sound extraction from any type of video file will require the help of the best sound extractor software. Wondering about which you should try out? Go through this list, and then make up your mind.
- Adobe Premiere Pro
- Filmora
- iMovie
- VLC
- Online Audio Converter
- Audio Converter
- FFmpeg
- QuickTime
- Audio Extractor
- ASPOSE
- Practical Tips to Choose the Best One to Extract Sound from Videos
- Hot FAQs on Extract Sound from Videos
Top 10 Sound Extractors for Extracting Sound from video
We researched and found many software options for extracting Sound from video. After careful checking, we found 10 options with high-quality functions and performance levels. We recommend you consider them for pulling audio from video files- here’s why.
1. Adobe Premiere Pro
Adobe Premiere Pro is one of the top-level video editors available with various functions and pre-set filters/effects. So, one can customize the videos and audio as they require, like extracting Sound from video and saving them.

How to Download: Website
Compatible OS: Windows, Mac
Price: Individuals- USD 20.99/month. License for Teams- USD 35.99. All Apps-related plans.
Main Features:
- Pre-set templates are available in high-quality resolutions.
- Customize your titles and video edits.
- Automatically adjusts color matching in scenes.
- Robust text-to-speech function with multi-language support.
Pros
- Share easily across the platform with cloud support.
- Access to diverse stock media with Adobe membership.
- Supports many file formats like / (), MPEG-2, Apple ProRes, MPEG-4, native camera formats, etc.
Cons
- No perpetual license support.
- Strict eligibility rules to qualify for student-teacher plans.
Best for Users: Professionals and organization-based users, like teachers, can use this for personal and teaching-related video editing steps.
2. Filmora
If you want a software sound extractor that provides a wide range of audio editing functions, Filmora is one that we would recommend. While it is firstly a video editor, you can use audio-based editing functions like sound stabilization, extraction, visualization, audio ducking, silence detection, and more.

Free Download For Win 7 or later(64-bit)
Free Download For macOS 10.14 or later
Compatible OS: Windows, Mac
Price: Free, Annual- USD 49.99, Perpetual- USD 89.99
Main Features:
- The audio visualization feature analyzes and virtually shows beats.
- Detect silent sections in the video and remove them.
- Many audio stabilization settings like Denoise and Equalizer.
- Vital TTS/STT functions for voiceovers.
Pros
- Multiple video/audio formats are supported.
- Pre-set sound effects are present.
- Adjust the volume of videos during editing.
Cons
- Upgrade plan to remove ads.
- Audio output is mainly available in MP3.
How to use for extracting music from videos:
Step1 Download and install Filmora 11 .
Step2 Click on New Project.
Step3 Press “Click here to import Media” > choose file folder > Insert.

Step4 Drag file to editor timeline > Cut the file to a set suitable size for your audio extraction.
Step5 Click on the Edit icon from the list of icons above the timeline.
Step6 Press on Audio > Make adjustments for settings like Fade in/Face out, Equalizer, Pitch, etc.

Step7 Click Export > Local > MP3. Make changes as needed.

Step8 Hit the Export button.
Best for Users: Pro-level and beginner-level professionals and home-based users who want a comprehensive, feature-rich platform for video/audio editing can benefit from this.
3. iMovie
Mac and iOS users benefit significantly from this video editing software to create dynamic movie-quality videos. One major part of movies is the soundtrack, and you can use this software to add easily, control, and extract the sound clips.

How to Download: Mac App Store , Apple App Store
Compatible OS: Mac, iOS
Price: Free
Main Features:
- Pre-set storyboard available for optimized and thematic video edits.
- Royalty-free audio files in the library.
- You can add voiceovers.
- Add pre-set sound effects or customize them, like removing/adding audio clips.
Pros
- Sound aligns precisely with video.
- Multiple effects, filters, and editing tools are available.
- Simple sharing via social media accounts.
Cons
- Only available for iOS 15.1+ and such newest versions of Apple devices.
- You cannot access it without an Apple ID.
Best for Users: Professional video editors with diverse movie-like presentation-making needs can use this.
4. VLC
VLC is a well-known Windows-based media player that is accessible as a Chrome extension and has mobile app versions. While you can use it mainly to view videos, the software can easily cut out sound clips from the video here.

How to Download: Microsoft Store , Apple App Store , Google Play Store , Chrome Web Store
Compatible OS: Windows, iOS, Chromebook, Android
Price: Free
Main Features:
- Script the command line VLC-based invocations.
- Play different types of files with multi-format support.
- Use the in-built equalizer to optimize sound quality/effects.
- Sync with or create a new video stream.
Pros
- The software assures quick functions with all features.
- No codec installation is necessary.
- Keyboard shortcuts for specific actions.
Cons
- Difficult to search and open files.
- Not very customizable.
Best for Users: People can use VLC Media Player to stream or play videos and even make some minor adjustments/extraction.
5. Online Audio Converter
This is one of the more straightforward tools to add video files and extract Sound from video with some quick steps. The Online Audio Converter supports a wide range of video formats. You just have to add one file by dragging and dropping it from your device memory, inserting its URL, or uploading it via the cloud. Then, press the Start Extracting command.

How to Download: Website
Compatible OS: Windows, Mac, Online
Price: Monthly- USD 29.95, Annual- USD 39.95, Lifetime- USD 59.95
Main Features:
- Add files either directly through the device or the cloud.
- Insert video URL for audio extraction from online video.
- Supports multiple video file formats like MPEG, MOV, AVI, and MP4.
- Scroll to select extraction end and start points.
Pros
- Only allows videos with 500MB or smaller size.
- Straightforward three steps for the whole extraction process.
- Zero quality loss after an extraction.
Cons
- Customization options are limited.
- The main audio format supported is MP3 for extraction.
Best for Users: Beginners and pro-level users who want to extract Sound from video files quickly.
6. Audio Converter
The Audio Converter app can efficiently pull out audio clips from video and is compatible with many such media formats. You can use this to cut and trim your file, mainly to decide how much of the audio will extract. Then, play it to see the quality of the output file.

How to Download: Apple App Store
Compatible OS: iOS
Price: Free, Pro- USD 2.99.
Main Features:
- Extract sound from video in formats like M4A, MP3, OGG, M4R, FLAC, etc.
- Insert videos in formats like MP4, 3G2, 3GP, MOV, MKV, WMV, and more.
- Trim the audio to smaller sections for extraction.
- The media player version supports all audio/video types.
Pros
- Supports a wide variety of audio/video formats.
- A simple media player function is also available.
- It is compatible with many languages.
Cons
- App size of 143.1 MB can feel high to some users.
- Basic-level functions only.
Best for Users: People who want to extract Sound from video files to create ringtones can use this best.
7. FFmpeg
FFmpeg is one of the most trustworthy platforms for converting and extracting Sound from video. It is an open-source solution and comes with complete multi-media management work. This is mainly used for easily streaming, converting, and recording video/audio projects.

How to Download: Website
Compatible OS: Windows, Mac, etc.
Price: Free
Main Features:
- Audio filters are available, like virtualbass and tiltshelf.
- Video editing filters like colormap, blurdetect, and pixelize are available.
- Enhance dialog and extract sound clips.
- Constantly updating features.
Pros
- This has open-source benefits.
- No excessive installation steps are necessary.
- Supports a wide range of encoding benefits.
Cons
- One must have some sort of technical knowledge to use this.
- Finding the right features or solutions takes some time.
Best for Users: Developers with better technical knowledge can use this dynamic open-source platform for video/audio editing.
8. QuickTime
You can also use this Mac-based video player on Windows to watch different videos easily. Besides the streaming benefits, you can install plugins to optimize its available features, like adding the ability to record/edit video files.

How to Download: Website
Compatible OS: Mac, Windows
Price: Free
Main Features:
- Stream videos and even extract Sound from the files.
- Supports many video formats in the player.
- Record audio on this media player.
- Import files from other Mac products like Final Cut Pro and iMovie.
Pros
- Works on both Windows and Mac.
- Pre-set effects and filters are available that one can edit.
- Simple interface for beginners.
Cons
- Unnecessary bloatware installation is needed.
- Playback support is lacking.
Best for Users: New users can simply operate this media player to watch videos and learn the extraction process.
9. Audio Extractor
You can use this conversion and extraction software to do many editing functions, like changing, cutting, and extracting video/audio files. The supported format here is MP3 and WAV - choose which you find compatible with your final project. You can decide and extract from specific sections.

How to Download: Google Play Store
Compatible OS: Android
Price: Free with in-app purchases of USD 1.99- USD 6.99 for each item.
Main Features:
- Change audio file size and format.
- View/delete components through the app directly.
- Preview video/sound file.
- Trim/extract sounds from videos easily with the converter.
Pros <path d=”M7 22H4C3.46957 22 2.96086 21.7893 2.58579 21.4142C2.21071 21.0391 2 20.5304 2 20V13C2 12.4696 2.21071 11.9609 2.58579 11.5858C2.96086 11.2107 3.46957 11 4 11H7M14 9V5C14 4.20435
Top 10 Sound Extractors for Extracting Sound from video
We researched and found many software options for extracting Sound from video. After careful checking, we found 10 options with high-quality functions and performance levels. We recommend you consider them for pulling audio from video files- here’s why.
1. Adobe Premiere Pro
Adobe Premiere Pro is one of the top-level video editors available with various functions and pre-set filters/effects. So, one can customize the videos and audio as they require, like extracting Sound from video and saving them.
How to Download: Website
Compatible OS: Windows, Mac
Price: Individuals- USD 20.99/month. License for Teams- USD 35.99. All Apps-related plans.
Main Features:
- Pre-set templates are available in high-quality resolutions.
- Customize your titles and video edits.
- Automatically adjusts color matching in scenes.
- Robust text-to-speech function with multi-language support.
Pros
- Share easily across the platform with cloud support.
- Access to diverse stock media with Adobe membership.
- Supports many file formats like / (), MPEG-2, Apple ProRes, MPEG-4, native camera formats, etc.
Cons
- No perpetual license support.
- Strict eligibility rules to qualify for student-teacher plans.
Best for Users: Professionals and organization-based users, like teachers, can use this for personal and teaching-related video editing steps.
2. Filmora
If you want a software sound extractor that provides a wide range of audio editing functions, Filmora is one that we would recommend. While it is firstly a video editor, you can use audio-based editing functions like sound stabilization, extraction, visualization, audio ducking, silence detection, and more.
Free Download For Win 7 or later(64-bit)
Free Download For macOS 10.14 or later
Compatible OS: Windows, Mac
Price: Free, Annual- USD 49.99, Perpetual- USD 89.99
Main Features:
- The audio visualization feature analyzes and virtually shows beats.
- Detect silent sections in the video and remove them.
- Many audio stabilization settings like Denoise and Equalizer.
- Vital TTS/STT functions for voiceovers.
Pros
- Multiple video/audio formats are supported.
- Pre-set sound effects are present.
- Adjust the volume of videos during editing.
Cons
- Upgrade plan to remove ads.
- Audio output is mainly available in MP3.
How to use for extracting music from videos:
Step1 Download and install Filmora 11 .
Step2 Click on New Project.
Step3 Press “Click here to import Media” > choose file folder > Insert.
Step4 Drag file to editor timeline > Cut the file to a set suitable size for your audio extraction.
Step5 Click on the Edit icon from the list of icons above the timeline.
Step6 Press on Audio > Make adjustments for settings like Fade in/Face out, Equalizer, Pitch, etc.
Step7 Click Export > Local > MP3. Make changes as needed.
Step8 Hit the Export button.
Best for Users: Pro-level and beginner-level professionals and home-based users who want a comprehensive, feature-rich platform for video/audio editing can benefit from this.
3. iMovie
Mac and iOS users benefit significantly from this video editing software to create dynamic movie-quality videos. One major part of movies is the soundtrack, and you can use this software to add easily, control, and extract the sound clips.
How to Download: Mac App Store , Apple App Store
Compatible OS: Mac, iOS
Price: Free
Main Features:
- Pre-set storyboard available for optimized and thematic video edits.
- Royalty-free audio files in the library.
- You can add voiceovers.
- Add pre-set sound effects or customize them, like removing/adding audio clips.
Pros
- Sound aligns precisely with video.
- Multiple effects, filters, and editing tools are available.
- Simple sharing via social media accounts.
Cons
- Only available for iOS 15.1+ and such newest versions of Apple devices.
- You cannot access it without an Apple ID.
Best for Users: Professional video editors with diverse movie-like presentation-making needs can use this.
4. VLC
VLC is a well-known Windows-based media player that is accessible as a Chrome extension and has mobile app versions. While you can use it mainly to view videos, the software can easily cut out sound clips from the video here.
How to Download: Microsoft Store , Apple App Store , Google Play Store , Chrome Web Store
Compatible OS: Windows, iOS, Chromebook, Android
Price: Free
Main Features:
- Script the command line VLC-based invocations.
- Play different types of files with multi-format support.
- Use the in-built equalizer to optimize sound quality/effects.
- Sync with or create a new video stream.
Pros
- The software assures quick functions with all features.
- No codec installation is necessary.
- Keyboard shortcuts for specific actions.
Cons
- Difficult to search and open files.
- Not very customizable.
Best for Users: People can use VLC Media Player to stream or play videos and even make some minor adjustments/extraction.
5. Online Audio Converter
This is one of the more straightforward tools to add video files and extract Sound from video with some quick steps. The Online Audio Converter supports a wide range of video formats. You just have to add one file by dragging and dropping it from your device memory, inserting its URL, or uploading it via the cloud. Then, press the Start Extracting command.
How to Download: Website
Compatible OS: Windows, Mac, Online
Price: Monthly- USD 29.95, Annual- USD 39.95, Lifetime- USD 59.95
Main Features:
- Add files either directly through the device or the cloud.
- Insert video URL for audio extraction from online video.
- Supports multiple video file formats like MPEG, MOV, AVI, and MP4.
- Scroll to select extraction end and start points.
Pros
- Only allows videos with 500MB or smaller size.
- Straightforward three steps for the whole extraction process.
- Zero quality loss after an extraction.
Cons
- Customization options are limited.
- The main audio format supported is MP3 for extraction.
Best for Users: Beginners and pro-level users who want to extract Sound from video files quickly.
6. Audio Converter
The Audio Converter app can efficiently pull out audio clips from video and is compatible with many such media formats. You can use this to cut and trim your file, mainly to decide how much of the audio will extract. Then, play it to see the quality of the output file.
How to Download: Apple App Store
Compatible OS: iOS
Price: Free, Pro- USD 2.99.
Main Features:
- Extract sound from video in formats like M4A, MP3, OGG, M4R, FLAC, etc.
- Insert videos in formats like MP4, 3G2, 3GP, MOV, MKV, WMV, and more.
- Trim the audio to smaller sections for extraction.
- The media player version supports all audio/video types.
Pros
- Supports a wide variety of audio/video formats.
- A simple media player function is also available.
- It is compatible with many languages.
Cons
- App size of 143.1 MB can feel high to some users.
- Basic-level functions only.
Best for Users: People who want to extract Sound from video files to create ringtones can use this best.
7. FFmpeg
FFmpeg is one of the most trustworthy platforms for converting and extracting Sound from video. It is an open-source solution and comes with complete multi-media management work. This is mainly used for easily streaming, converting, and recording video/audio projects.
How to Download: Website
Compatible OS: Windows, Mac, etc.
Price: Free
Main Features:
- Audio filters are available, like virtualbass and tiltshelf.
- Video editing filters like colormap, blurdetect, and pixelize are available.
- Enhance dialog and extract sound clips.
- Constantly updating features.
Pros
- This has open-source benefits.
- No excessive installation steps are necessary.
- Supports a wide range of encoding benefits.
Cons
- One must have some sort of technical knowledge to use this.
- Finding the right features or solutions takes some time.
Best for Users: Developers with better technical knowledge can use this dynamic open-source platform for video/audio editing.
8. QuickTime
You can also use this Mac-based video player on Windows to watch different videos easily. Besides the streaming benefits, you can install plugins to optimize its available features, like adding the ability to record/edit video files.
How to Download: Website
Compatible OS: Mac, Windows
Price: Free
Main Features:
- Stream videos and even extract Sound from the files.
- Supports many video formats in the player.
- Record audio on this media player.
- Import files from other Mac products like Final Cut Pro and iMovie.
Pros
- Works on both Windows and Mac.
- Pre-set effects and filters are available that one can edit.
- Simple interface for beginners.
Cons
- Unnecessary bloatware installation is needed.
- Playback support is lacking.
Best for Users: New users can simply operate this media player to watch videos and learn the extraction process.
9. Audio Extractor
You can use this conversion and extraction software to do many editing functions, like changing, cutting, and extracting video/audio files. The supported format here is MP3 and WAV - choose which you find compatible with your final project. You can decide and extract from specific sections.
How to Download: Google Play Store
Compatible OS: Android
Price: Free with in-app purchases of USD 1.99- USD 6.99 for each item.
Main Features:
- Change audio file size and format.
- View/delete components through the app directly.
- Preview video/sound file.
- Trim/extract sounds from videos easily with the converter.
Pros <path d=”M7 22H4C3.46957 22 2.96086 21.7893 2.58579 21.4142C2.21071 21.0391 2 20.5304 2 20V13C2 12.4696 2.21071 11.9609 2.58579 11.5858C2.96086 11.2107 3.46957 11 4 11H7M14 9V5C14 4.20435
Also read:
- Updated In 2024, Voice Changer for Discord | Use Voicemod on Discord
- Convert MP4 to 60 FPS GIF A Step-by-Step Guide
- This Article Aims to Show You How to Export Videos in Filmora
- New How to Rotate Video in iMovie with Alternative
- 2024 Approved Learn How to Effortlessly Mirror Video Clips in Adobe Premiere Pro with This Step-by-Step Guide. Perfect for Creating a Symmetrical Look in Your Videos
- Top Tools To Create Blend Image Collage
- New How to Add a Lower Third to Your Video for 2024
- New In 2024, How To Add Motion Blur On CapCut? (IPhone & Android)
- Learn How to Add Dynamic Shake Effects to Your Videos Using Alight Motion. Our Step-by-Step Guide Makes It Easy to Create Cinematic Footage
- 2024 Approved Have You Ever Heard Bokeh Effects for Videos? Do You Know that You Can Make Your Own Bokeh Video Easily with some Software. This Article Will Introduce You How to Make a Bokeh Effect Video with Steps
- 2024 Approved Zoom In and Out on Discord (Desktop + App + Browser Solutions)
- How to Make Random Letter Reveal Intro for 2024
- Have You Ever Used Premiere Pro to Create Slow-Motion Effects? This Article Will Provide a Guide on Producing Slow-Motion Effects by Using Adobe Premiere Pro
- If Youre Considering Starting a Podcast Video Recording, You Need to Read This Article and Learn All You Need to Know About Making a Successful Podcast
- Updated In 2024, How To Make a Timelapse in After Effects
- Updated Rotate Video in iMovie
- 2024 Approved How to Get the Most Out of KineMaster Video Templates
- Do You Have a Sony Camera and Want to Try Different LUTs on Your Digital Content? Youre at the Right Place, as You Can Apply Sony HLG LUTs to Your Media
- Updated 2024 Approved AVI Video Format How to Open, Play, Edit AVI File?
- Updated In 2024, Turn Your Text Into a Podcast Made Possible (+ EASY Editing Tips)
- In 2024, Do You Like Clouds or Sky and Want to Use Them as a Video Background? Explore This Article to Learn About the Sky Change Video in Filmora
- Best 5 GIF to Video Converters You Cant-Miss
- Final Cut Pro for iPad- Is It Available for 2024
- What Does It Mean to Color Grade Your Images, and Why Is It so Important? Does It Mean the Same Thing as a Color Correction? Read on to Gather All the Information You Need on Color Grading Photography
- New How to Add Customized Transitions to OBS
- New The Only Guide Youll Ever Need to Learn GIF Design
- Updated Using VN Editor To Add Luts for Video Editing
- New 2024 Approved Easiest Fix Included! Top 5 Ways to Convert HDR to SDR Videos
- How to Turn Off Find My Apple iPhone 15 Pro Max when Phone is Broken? | Dr.fone
- How Do You Get Sun Stone Evolutions in Pokémon For Apple iPhone 6s Plus? | Dr.fone
- Realme 11 Pro+ Video Recovery - Recover Deleted Videos from Realme 11 Pro+
- How to Hard Reset Honor X50 Without Password | Dr.fone
- 2024 Approved What Is an AI Script Generator?
- All About Factory Reset, What Is It and What It Does to Your OnePlus Open? | Dr.fone
- How To Remove Passcode From Apple iPhone 14 Plus? Complete Guide | Dr.fone
- In 2024, The Ultimate Guide How to Bypass Swipe Screen to Unlock on Vivo Y100 Device
- How to Reset a Nubia Z50 Ultra Phone That Is Locked | Dr.fone
- Home Button Not Working on Itel S23? Here Are Real Fixes | Dr.fone
- Pattern Locks Are Unsafe Secure Your Xiaomi Redmi K70E Phone Now with These Tips
- In 2024, How to Unlock iPhone 14 Pro Max with IMEI Code?
- Fix App Not Available in Your Country Play Store Problem on Samsung Galaxy XCover 7 | Dr.fone
- In 2024, 3 Effective Methods to Fake GPS location on Android For your Itel A05s | Dr.fone
- 4 Ways to Transfer Music from Vivo S17t to iPhone | Dr.fone
- Unlock Your Disabled iPhone 15 Without iTunes in 5 Ways | Dr.fone
- Bypassing Google Account With vnROM Bypass For OnePlus Ace 2
- Title: Updated In 2024, How to Put Emoji on Mac That Take Less Than 10 Mins
- Author: Chloe
- Created at : 2024-04-24 07:08:36
- Updated at : 2024-04-25 07:08:36
- Link: https://ai-editing-video.techidaily.com/updated-in-2024-how-to-put-emoji-on-mac-that-take-less-than-10-mins/
- License: This work is licensed under CC BY-NC-SA 4.0.
