:max_bytes(150000):strip_icc():format(webp)/GettyImages-1253176532-e5ce8e507433489f87c8b37818c13a01.jpg)
Updated In 2024, How to Rotate a Video in Windows 10

How to Rotate a Video in Windows 10
There are times where you may need to rotate a video into landscape if the video is shot in portrait. This is because watching a video in portrait orientation on a computer is horrible as the video screen size is compressed and the two sides have black screen. Instead, you can rotate video Windows into landscape, you can watch the same video comfortably. Besides, there are times when the entire video is shot at a certain angle as the video device was not properly aligned.
If you are a Windows user, rotating a video in Windows through Windows Media Player is not possible. However, Windows 10 comes with Photos app that contains a video editor to rotate a video and save it permanently. If you use VLC Media Player, you can rotate any video temporarily as well permanently at any desired angle. You can also rotate a video online without installing any software. In this article, we will illustrate how to rotate a video in Windows.
Way 1. Use Photos App
If you are a Windows 10, you can use the pre-installed Photos app to rotate a video and save it permanently. Photos app comes with an inbuilt video editor where rotating a video in Windows 10 is so easy. If you are using an older version of Windows, you can relate Photos app with Windows Movie Maker. Anyway, here are the steps to rotate any video on Photos app.
Step 1: From Start menu, search for “Photos” and open Photos app.

Step 2: Select Video Editor option which is available at the top of the screen. Once, Video Editor opens, click on New Video Project button.

Step 3: Put a name for the project and click on Ok. Thereafter, click on Add button and select the video file from your hard drive that you want to rotate.

Step 4: Drag and drop the video file into Timeline. Thereafter, Click on Rotate icon to turn the video by 90 degrees. You can click again to rotate the video further by 90 degrees again.

Step 5: Once done, click on Finish Video option and save the video file in the destination folder.
Way 2. Use Filmora
The best software on how to rotate a video in Windows 10 to Windows 7 is Wondershare Filmora . It is a professional video editor and there are loads of features to edit the video including rotation. You can make a video more attractive and crisp to publish on professional platforms like YouTube. Here are the steps to rotate a video on Filmora.
Step 1: Download and install Filmora. Open the software and import the video file that you want to rotate. Then drag and drop it on Timeline.
For Win 7 or later (64-bit)
For macOS 10.12 or later
Step 2: From Video Editing panel, expand Transform option and use the slider on Rotate option to rotate the video at any angle. Once done, click on OK button.

Step 3: Go to Export option and click on Export button. The new video files with its new rotation will be saved in the destination folder.

Way 3. Use VLC Media Player
Most Windows users generally install VLC Media Player to watch movies. This is because Windows Media Player supports only limited file formats. Most movie files that you download online are supported by VLC but not on Windows Media Player. Here are the steps on how to rotate a video in Windows temporarily using VLC Media Player.
Step 1: Open VLC Media Player. Go to Media menu and click on Open File option. Select the video file from your hard drive that you want to rotate.
Step 2: Once the video opens, go to Tools menu and click on Effects and Filters option.

Step 3: On Adjustments and Effects window, click on Video Effects tab.
Step 4: Under Video Effects tab, click on Geometry tab.
Step 5: Turn of Transform checkbox and click on drop-down menu to select the required option. You can rotate the video by 90 degrees, 180 degrees and 270 degrees.

Step 6: To rotate the video at any desired angle, turn on Rotate checkbox and select the desired angle.

Step 7: Finally, click on Save and then Close button.

Please note that when you rotate a video temporarily, it is for a one-time watch only. When you open the video again in any other media player, it will have the original orientation.
Way 4. Use EZGIF Online Tool
If you have short video files and you want to upload them on social media platforms, you can convert them into GIF files. You can convert any video file to EZGIF. Therefore, instead of video files, if you want to rotate GIF files, EZGIF is highly useful as an online tool. In fact, you can also convert GIF files into MP4 files. Here are the steps to follow to rotate short video files using EZGIF online tool.
Step 1: Open your web browser and open Ezgif.com.
Step 2: Click on Video to GIF option.
Step 3: Click on Choose File button and select the short video file from your hard drive.

Step 4: Click on Upload Video button and wait for the conversion. Thereafter, download the GIF file.
Step 5: To rotate the GIF file, go to Rotate option. Click on Choose File button.

Step 6: Select the GIF file and click on Upload.
Step 7: You can select from provided rotation options or mention rotation angle explicitly and click on Apply Rotation button.

Wait for the rotation effect and download the file on your hard drive.
FAQs about Rotate Video in Windows 10
1. How do I rotate a video in Windows 10?
To rotate a video in Windows 10, you can use the built-in Photos app. Open the app and select the video you want to rotate. Click on the Edit & Create button at the top of the screen and select Rotate left or Rotate right to adjust the video orientation.
2. Can I rotate a video in Windows Media Player?
No, you can’t rotate a video in Windows Media Player. This feature is only available in the Photos app. However, you can use a third-party video editing software to rotate your videos.
3. How do I save the rotated video?
After rotating the video in the Photos app, click on the Save a copy button at the top of the screen. You can then choose the destination folder and file name for the newly rotated video.
4. What should I do if the video is upside down after rotating it?
If the video is upside down after rotating it, you may have rotated it in the wrong direction. Try rotating it in the opposite direction and see if that fixes the issue. If not, you may need to use a third-party video editing software to rotate the video.
5. Can I rotate a video without losing quality?
Rotating a video can sometimes result in a loss of quality, especially if the video is compressed or low-resolution. However, using a good video editing software can help minimize the loss of quality. Make sure to save the rotated video in the same format and resolution as the original file to avoid further loss of quality.
Conclusion
We have provided you all the possible ways to rotate video Windows. If you want to rotate with pre-installed software, you have Photos app. If you have VLC Media Player installed, you can do the rotation temporarily and permanently. You can also use Ezgif online tool to rotate animated files without installing any
For macOS 10.12 or later
Step 2: From Video Editing panel, expand Transform option and use the slider on Rotate option to rotate the video at any angle. Once done, click on OK button.

Step 3: Go to Export option and click on Export button. The new video files with its new rotation will be saved in the destination folder.

Way 3. Use VLC Media Player
Most Windows users generally install VLC Media Player to watch movies. This is because Windows Media Player supports only limited file formats. Most movie files that you download online are supported by VLC but not on Windows Media Player. Here are the steps on how to rotate a video in Windows temporarily using VLC Media Player.
Step 1: Open VLC Media Player. Go to Media menu and click on Open File option. Select the video file from your hard drive that you want to rotate.
Step 2: Once the video opens, go to Tools menu and click on Effects and Filters option.

Step 3: On Adjustments and Effects window, click on Video Effects tab.
Step 4: Under Video Effects tab, click on Geometry tab.
Step 5: Turn of Transform checkbox and click on drop-down menu to select the required option. You can rotate the video by 90 degrees, 180 degrees and 270 degrees.

Step 6: To rotate the video at any desired angle, turn on Rotate checkbox and select the desired angle.

Step 7: Finally, click on Save and then Close button.

Please note that when you rotate a video temporarily, it is for a one-time watch only. When you open the video again in any other media player, it will have the original orientation.
Way 4. Use EZGIF Online Tool
If you have short video files and you want to upload them on social media platforms, you can convert them into GIF files. You can convert any video file to EZGIF. Therefore, instead of video files, if you want to rotate GIF files, EZGIF is highly useful as an online tool. In fact, you can also convert GIF files into MP4 files. Here are the steps to follow to rotate short video files using EZGIF online tool.
Step 1: Open your web browser and open Ezgif.com.
Step 2: Click on Video to GIF option.
Step 3: Click on Choose File button and select the short video file from your hard drive.

Step 4: Click on Upload Video button and wait for the conversion. Thereafter, download the GIF file.
Step 5: To rotate the GIF file, go to Rotate option. Click on Choose File button.

Step 6: Select the GIF file and click on Upload.
Step 7: You can select from provided rotation options or mention rotation angle explicitly and click on Apply Rotation button.

Wait for the rotation effect and download the file on your hard drive.
FAQs about Rotate Video in Windows 10
1. How do I rotate a video in Windows 10?
To rotate a video in Windows 10, you can use the built-in Photos app. Open the app and select the video you want to rotate. Click on the Edit & Create button at the top of the screen and select Rotate left or Rotate right to adjust the video orientation.
2. Can I rotate a video in Windows Media Player?
No, you can’t rotate a video in Windows Media Player. This feature is only available in the Photos app. However, you can use a third-party video editing software to rotate your videos.
3. How do I save the rotated video?
After rotating the video in the Photos app, click on the Save a copy button at the top of the screen. You can then choose the destination folder and file name for the newly rotated video.
4. What should I do if the video is upside down after rotating it?
If the video is upside down after rotating it, you may have rotated it in the wrong direction. Try rotating it in the opposite direction and see if that fixes the issue. If not, you may need to use a third-party video editing software to rotate the video.
5. Can I rotate a video without losing quality?
Rotating a video can sometimes result in a loss of quality, especially if the video is compressed or low-resolution. However, using a good video editing software can help minimize the loss of quality. Make sure to save the rotated video in the same format and resolution as the original file to avoid further loss of quality.
Conclusion
We have provided you all the possible ways to rotate video Windows. If you want to rotate with pre-installed software, you have Photos app. If you have VLC Media Player installed, you can do the rotation temporarily and permanently. You can also use Ezgif online tool to rotate animated files without installing any
For macOS 10.12 or later
Step 2: From Video Editing panel, expand Transform option and use the slider on Rotate option to rotate the video at any angle. Once done, click on OK button.

Step 3: Go to Export option and click on Export button. The new video files with its new rotation will be saved in the destination folder.

Way 3. Use VLC Media Player
Most Windows users generally install VLC Media Player to watch movies. This is because Windows Media Player supports only limited file formats. Most movie files that you download online are supported by VLC but not on Windows Media Player. Here are the steps on how to rotate a video in Windows temporarily using VLC Media Player.
Step 1: Open VLC Media Player. Go to Media menu and click on Open File option. Select the video file from your hard drive that you want to rotate.
Step 2: Once the video opens, go to Tools menu and click on Effects and Filters option.

Step 3: On Adjustments and Effects window, click on Video Effects tab.
Step 4: Under Video Effects tab, click on Geometry tab.
Step 5: Turn of Transform checkbox and click on drop-down menu to select the required option. You can rotate the video by 90 degrees, 180 degrees and 270 degrees.

Step 6: To rotate the video at any desired angle, turn on Rotate checkbox and select the desired angle.

Step 7: Finally, click on Save and then Close button.

Please note that when you rotate a video temporarily, it is for a one-time watch only. When you open the video again in any other media player, it will have the original orientation.
Way 4. Use EZGIF Online Tool
If you have short video files and you want to upload them on social media platforms, you can convert them into GIF files. You can convert any video file to EZGIF. Therefore, instead of video files, if you want to rotate GIF files, EZGIF is highly useful as an online tool. In fact, you can also convert GIF files into MP4 files. Here are the steps to follow to rotate short video files using EZGIF online tool.
Step 1: Open your web browser and open Ezgif.com.
Step 2: Click on Video to GIF option.
Step 3: Click on Choose File button and select the short video file from your hard drive.

Step 4: Click on Upload Video button and wait for the conversion. Thereafter, download the GIF file.
Step 5: To rotate the GIF file, go to Rotate option. Click on Choose File button.

Step 6: Select the GIF file and click on Upload.
Step 7: You can select from provided rotation options or mention rotation angle explicitly and click on Apply Rotation button.

Wait for the rotation effect and download the file on your hard drive.
FAQs about Rotate Video in Windows 10
1. How do I rotate a video in Windows 10?
To rotate a video in Windows 10, you can use the built-in Photos app. Open the app and select the video you want to rotate. Click on the Edit & Create button at the top of the screen and select Rotate left or Rotate right to adjust the video orientation.
2. Can I rotate a video in Windows Media Player?
No, you can’t rotate a video in Windows Media Player. This feature is only available in the Photos app. However, you can use a third-party video editing software to rotate your videos.
3. How do I save the rotated video?
After rotating the video in the Photos app, click on the Save a copy button at the top of the screen. You can then choose the destination folder and file name for the newly rotated video.
4. What should I do if the video is upside down after rotating it?
If the video is upside down after rotating it, you may have rotated it in the wrong direction. Try rotating it in the opposite direction and see if that fixes the issue. If not, you may need to use a third-party video editing software to rotate the video.
5. Can I rotate a video without losing quality?
Rotating a video can sometimes result in a loss of quality, especially if the video is compressed or low-resolution. However, using a good video editing software can help minimize the loss of quality. Make sure to save the rotated video in the same format and resolution as the original file to avoid further loss of quality.
Conclusion
We have provided you all the possible ways to rotate video Windows. If you want to rotate with pre-installed software, you have Photos app. If you have VLC Media Player installed, you can do the rotation temporarily and permanently. You can also use Ezgif online tool to rotate animated files without installing any
For macOS 10.12 or later
Step 2: From Video Editing panel, expand Transform option and use the slider on Rotate option to rotate the video at any angle. Once done, click on OK button.

Step 3: Go to Export option and click on Export button. The new video files with its new rotation will be saved in the destination folder.

Way 3. Use VLC Media Player
Most Windows users generally install VLC Media Player to watch movies. This is because Windows Media Player supports only limited file formats. Most movie files that you download online are supported by VLC but not on Windows Media Player. Here are the steps on how to rotate a video in Windows temporarily using VLC Media Player.
Step 1: Open VLC Media Player. Go to Media menu and click on Open File option. Select the video file from your hard drive that you want to rotate.
Step 2: Once the video opens, go to Tools menu and click on Effects and Filters option.

Step 3: On Adjustments and Effects window, click on Video Effects tab.
Step 4: Under Video Effects tab, click on Geometry tab.
Step 5: Turn of Transform checkbox and click on drop-down menu to select the required option. You can rotate the video by 90 degrees, 180 degrees and 270 degrees.

Step 6: To rotate the video at any desired angle, turn on Rotate checkbox and select the desired angle.

Step 7: Finally, click on Save and then Close button.

Please note that when you rotate a video temporarily, it is for a one-time watch only. When you open the video again in any other media player, it will have the original orientation.
Way 4. Use EZGIF Online Tool
If you have short video files and you want to upload them on social media platforms, you can convert them into GIF files. You can convert any video file to EZGIF. Therefore, instead of video files, if you want to rotate GIF files, EZGIF is highly useful as an online tool. In fact, you can also convert GIF files into MP4 files. Here are the steps to follow to rotate short video files using EZGIF online tool.
Step 1: Open your web browser and open Ezgif.com.
Step 2: Click on Video to GIF option.
Step 3: Click on Choose File button and select the short video file from your hard drive.

Step 4: Click on Upload Video button and wait for the conversion. Thereafter, download the GIF file.
Step 5: To rotate the GIF file, go to Rotate option. Click on Choose File button.

Step 6: Select the GIF file and click on Upload.
Step 7: You can select from provided rotation options or mention rotation angle explicitly and click on Apply Rotation button.

Wait for the rotation effect and download the file on your hard drive.
FAQs about Rotate Video in Windows 10
1. How do I rotate a video in Windows 10?
To rotate a video in Windows 10, you can use the built-in Photos app. Open the app and select the video you want to rotate. Click on the Edit & Create button at the top of the screen and select Rotate left or Rotate right to adjust the video orientation.
2. Can I rotate a video in Windows Media Player?
No, you can’t rotate a video in Windows Media Player. This feature is only available in the Photos app. However, you can use a third-party video editing software to rotate your videos.
3. How do I save the rotated video?
After rotating the video in the Photos app, click on the Save a copy button at the top of the screen. You can then choose the destination folder and file name for the newly rotated video.
4. What should I do if the video is upside down after rotating it?
If the video is upside down after rotating it, you may have rotated it in the wrong direction. Try rotating it in the opposite direction and see if that fixes the issue. If not, you may need to use a third-party video editing software to rotate the video.
5. Can I rotate a video without losing quality?
Rotating a video can sometimes result in a loss of quality, especially if the video is compressed or low-resolution. However, using a good video editing software can help minimize the loss of quality. Make sure to save the rotated video in the same format and resolution as the original file to avoid further loss of quality.
Conclusion
We have provided you all the possible ways to rotate video Windows. If you want to rotate with pre-installed software, you have Photos app. If you have VLC Media Player installed, you can do the rotation temporarily and permanently. You can also use Ezgif online tool to rotate animated files without installing any
Denoise a Video in Adobe Premiere Pro – Audio and Video Noise Removal
What’s the key to our success? And what’s the process that it takes us? How can we attract audiences and guarantee the viewers’ transition to loyalty? – these are the questions that people in the professions connected to the technology should ask. There is no recipe, but at least, we know what NOT to do – DO NOT create bad content! You will never have a desired amount of listeners for your podcasts if the voice of the actor or noise of the whole track is annoying, you will struggle to have success on Youtube if your shots are unpleasant to watch, and the list goes on – there are just too many things you should not do!
But sometimes bad quality just happens. It happens when you know you have a problem and it happens when you think everything is going well in producing. You might come back from the production and find out that every shot you took had bad lightning, or there was an almost naked guy running on the background, or there is a noise on the background that just makes the whole experience of watching and listening not worthwhile! This might be something that sinks your heart…
But the mistakes we make don’t ensure that there has been a verdict cast for our failure. Nowadays, the will is everything – if you are really willing to make something work, you will just have to find the right tools, and learn a little about them, and, Voila! – Maybe you can turn bad into something good? Unacceptable into something acceptable? Annoying into interesting, and unpleasant into enjoyable?
This is called EDITING. And Editing covers different, almost endless days – too many computer programs, too many tools, too many opportunities to modify almost anything you want to make look and sound better - All of this feels like magic!
Among many instruments and techniques, there is one thing called denoising, with two different meaning. You might find noise in two areas – video and audio. Audio denoising means to remove or reduce the background noise, such as air conditioner hum, someone screaming from far away, birds chirping, the waves, etc. the noise in photo and video terms means that the scene we are looking at is grainy and makes watching the scene a little more difficult, with a less clear picture. And whenever these kind of things appear, mostly out of the blue, – because no one wants to take a bad video or record a bad voice-over, - our magical tools and abilities come to play…
One of those is called Adobe Premiere Pro, using for video editing, viewed as the most sophisticated video editor software. So, in this article, we will learn how to handle bot noise-s – in video as well as audio terms, and how to create a better viewer/listener experience in this very program. Lastly, we’ll touch upon an alternative for background noise removal, so, there’s nothing left but tuning in!
Video denoising in Adobe Premiere Pro
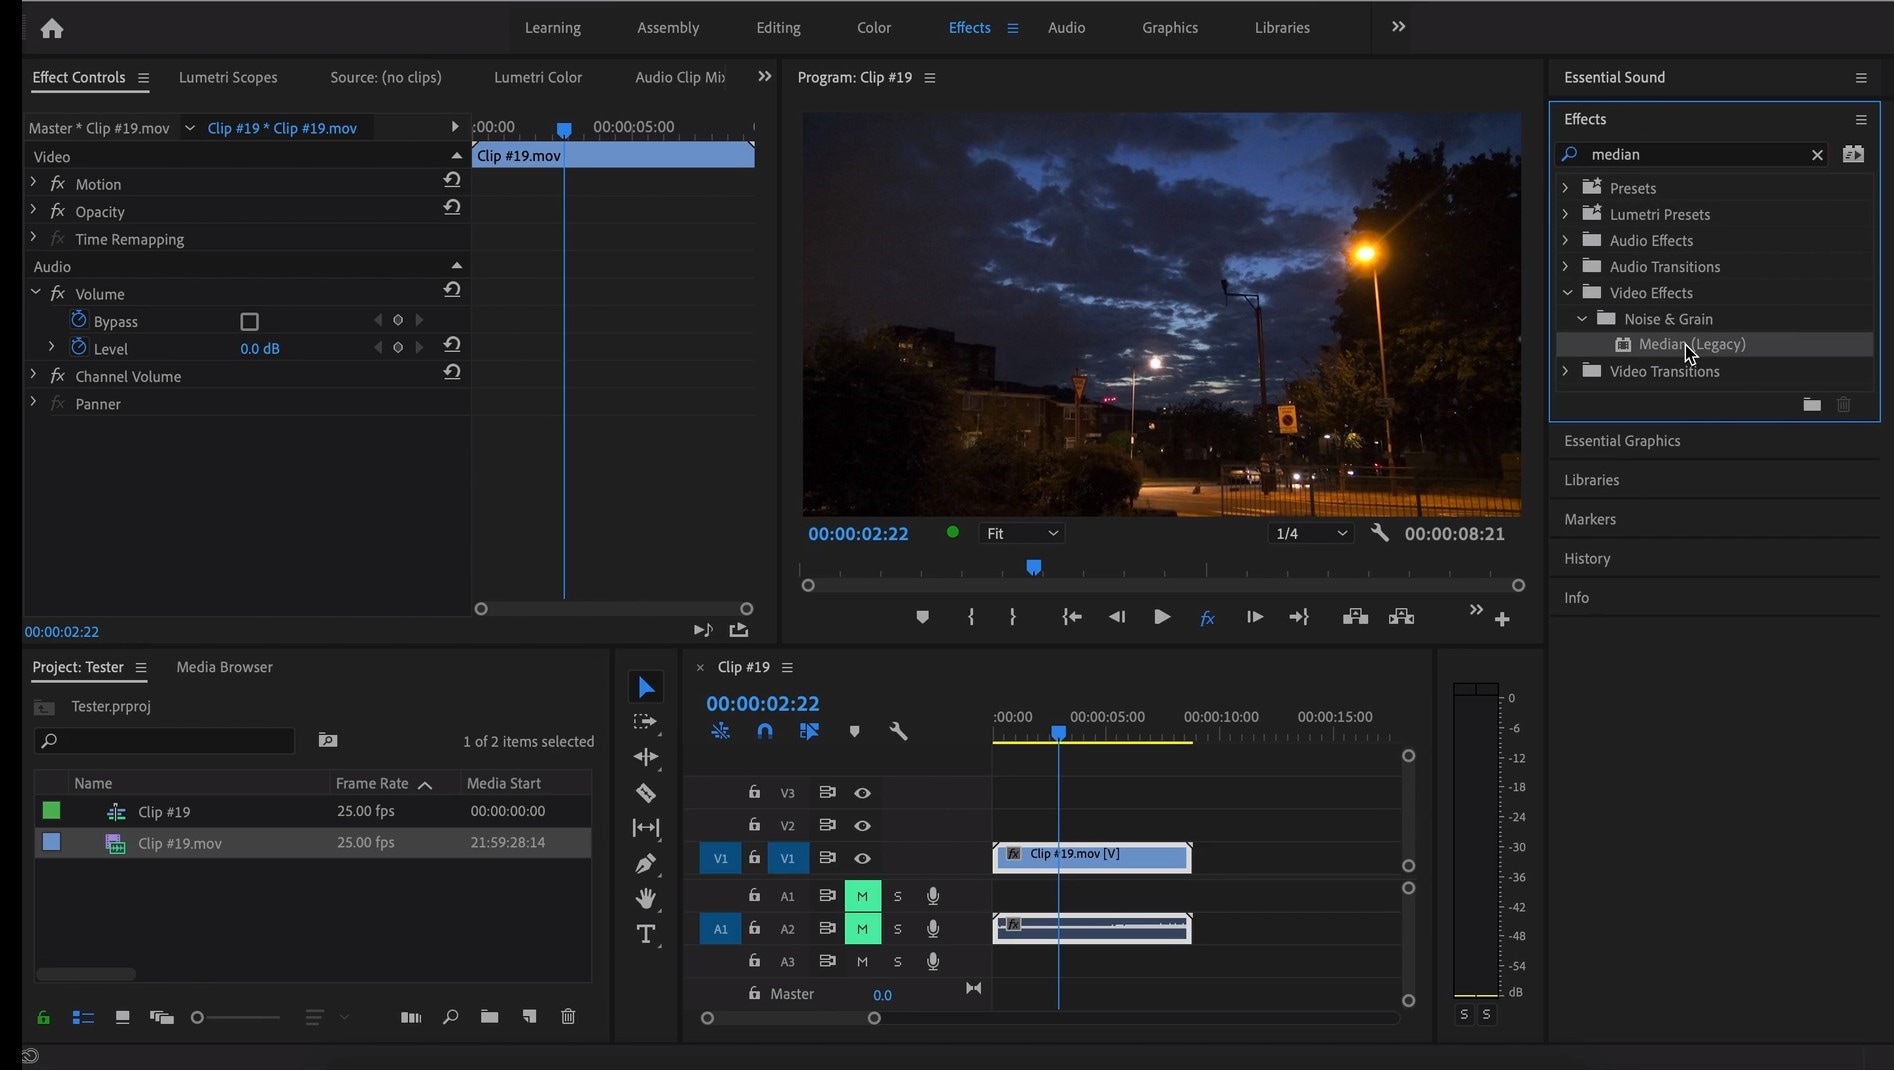
Reducing the noise in the video in this software can be achieved through using effect which is called Median. Before discovering it, without any doubt, we need to add our footage into the Timeline in Premiere Pro. Then, we can proceed to finding the Effects Panel, where our wanted Median can be found – just drag and drop the effect to your clip.
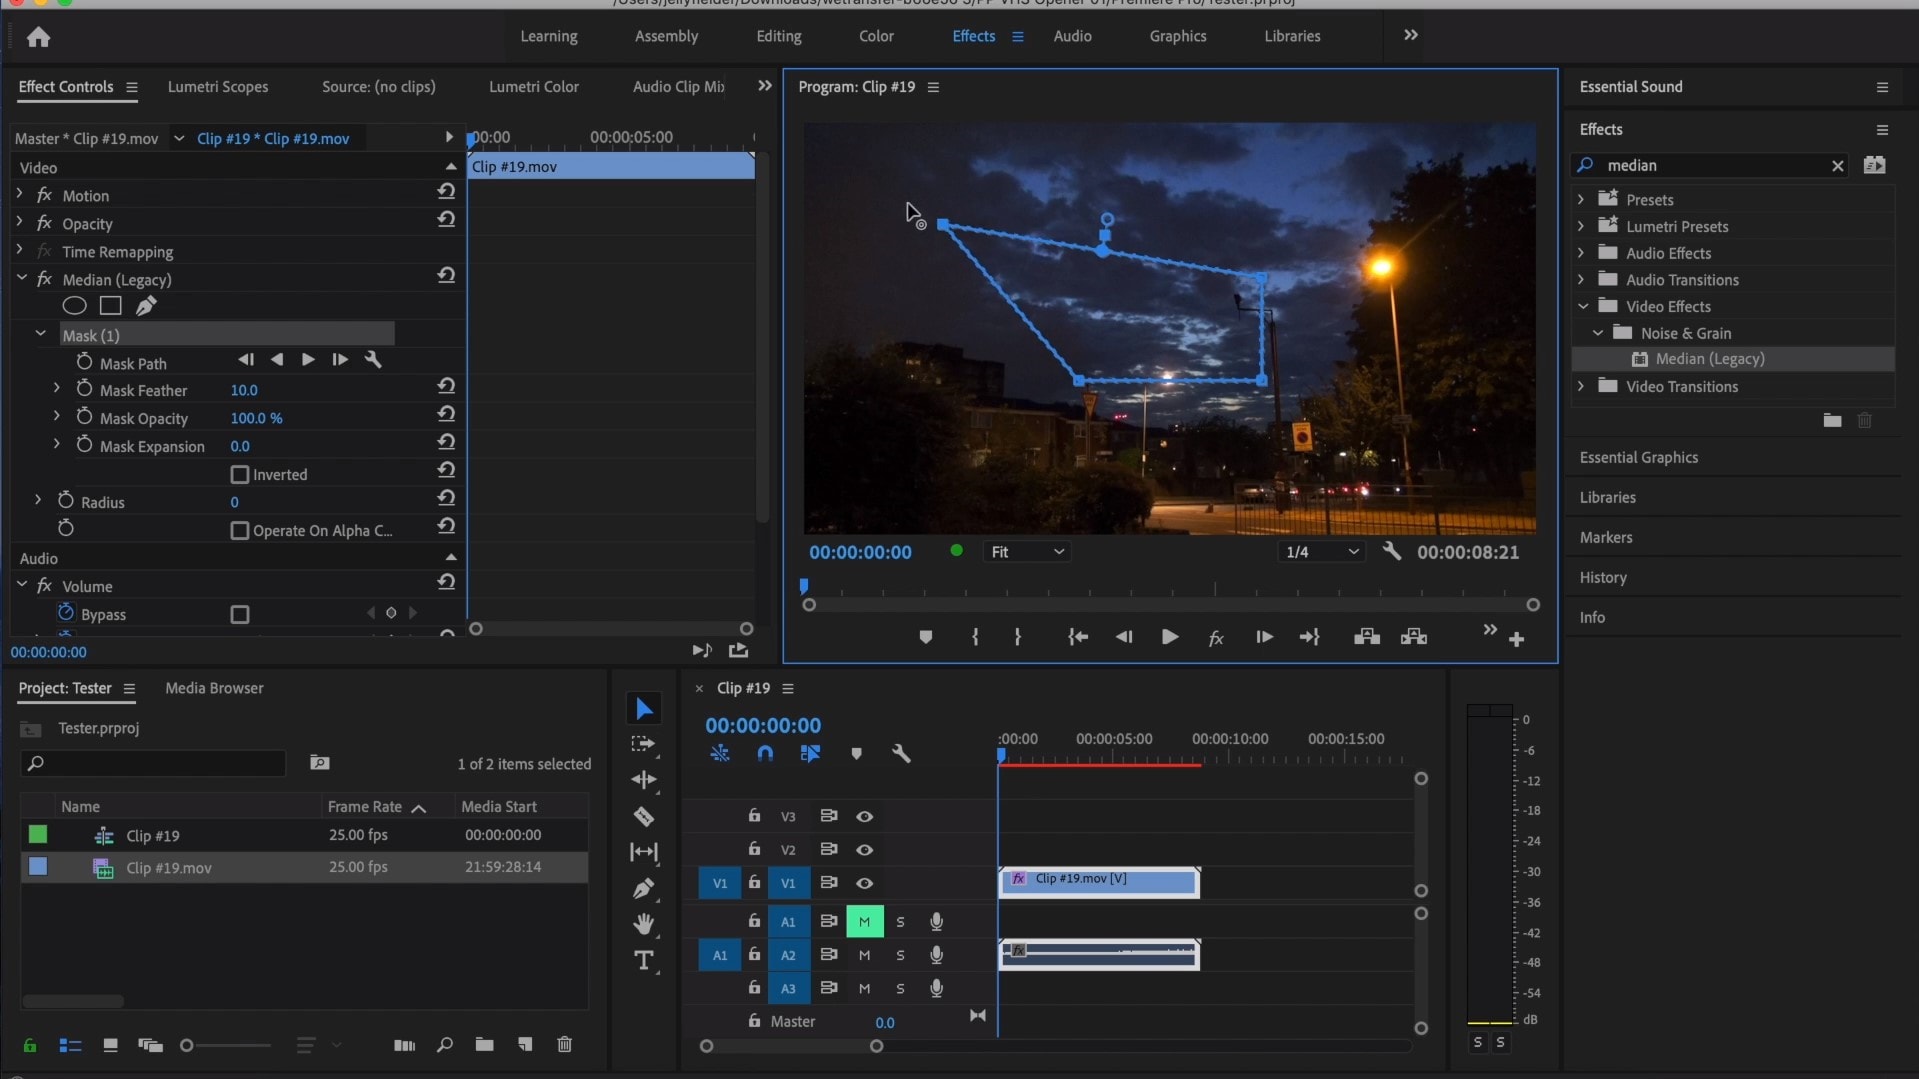
In order to make sure that the Median touches the grainiest parts of the whole clip, we need to use something called masks. In the Effects Control panel, we can select the mask shape for our clip –either choose rectangle, circle, or pen tool. Pen tool is something with which we move the Mask around the screen and resize it to include the desired area and cover it.
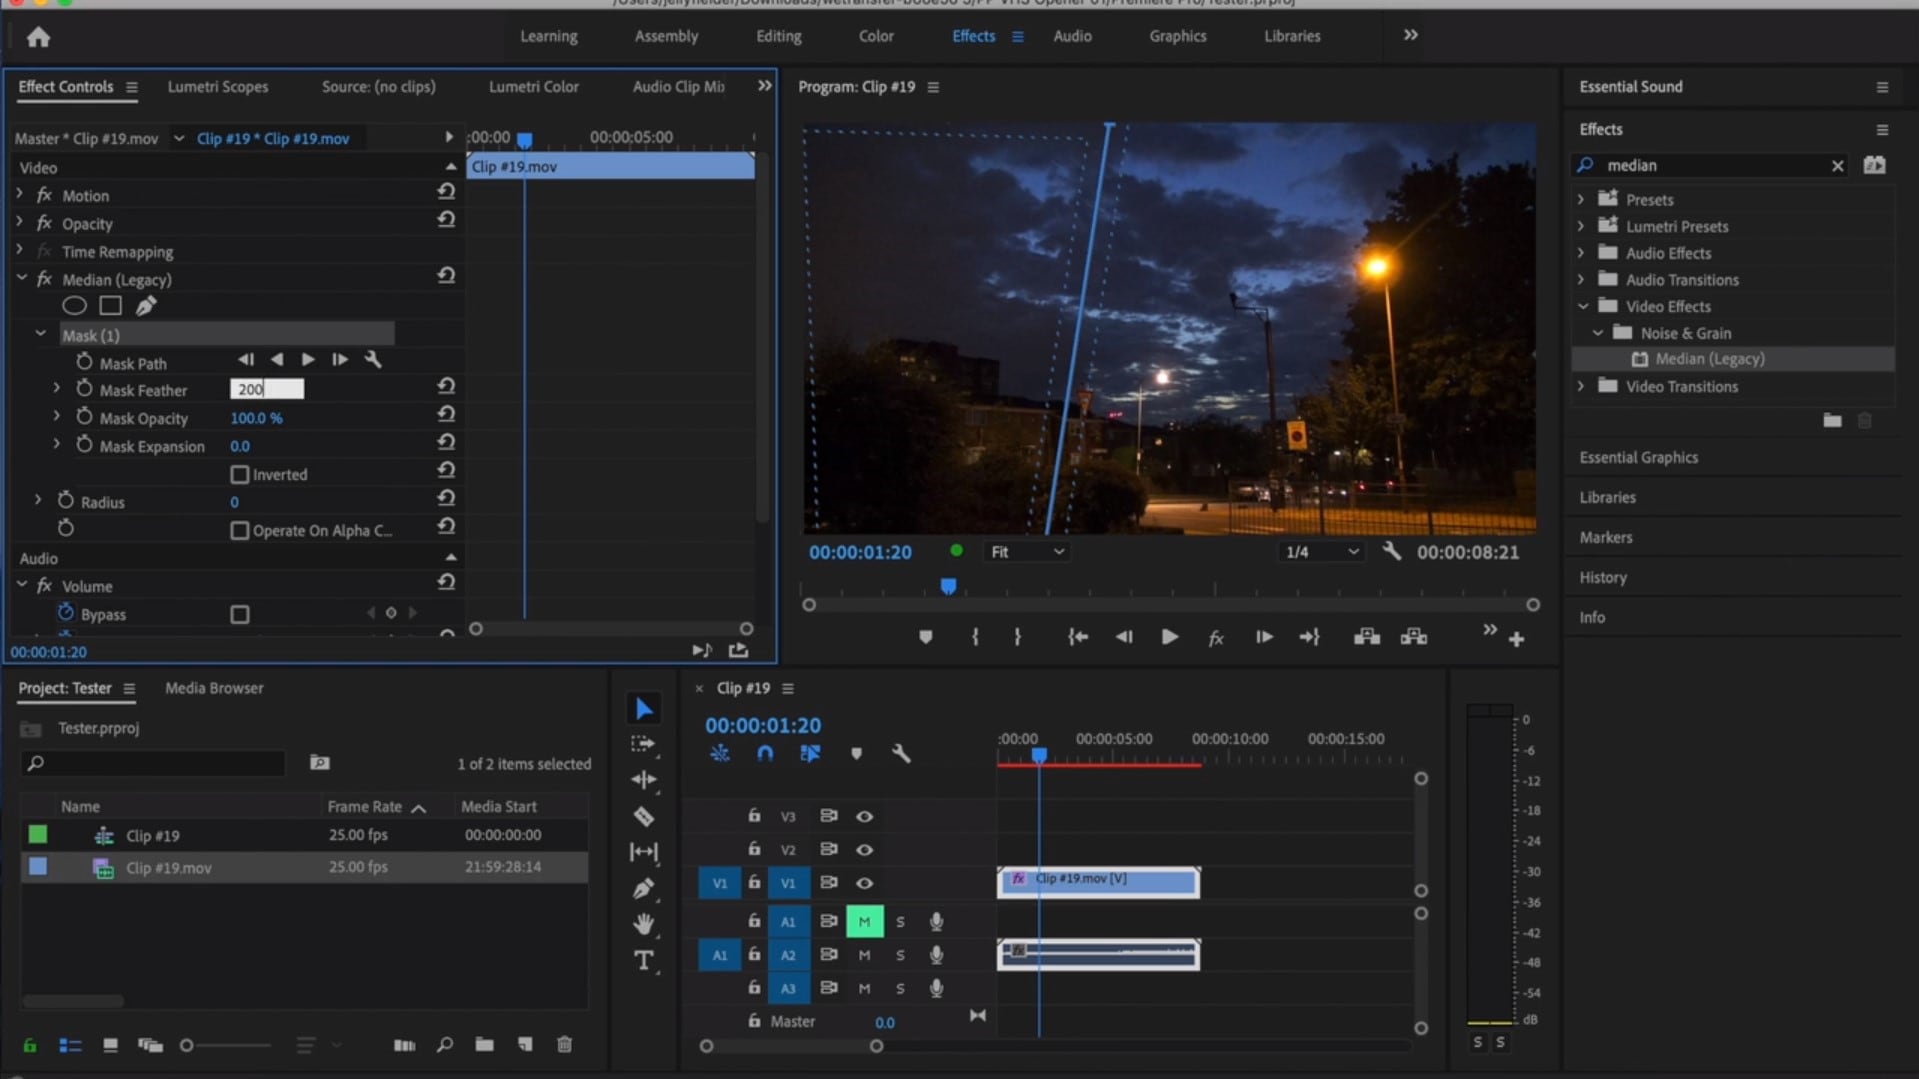
Changing Feather setting to 100 will make sure that the effect loses a visible edge and there is some smoothness added to those edges.
There might be the need to repeat this process and create several masks, if that means to have covered all of the grainy area of the scene.
Lastly, tom reduce the noise, adjusting the effect settings is needed.
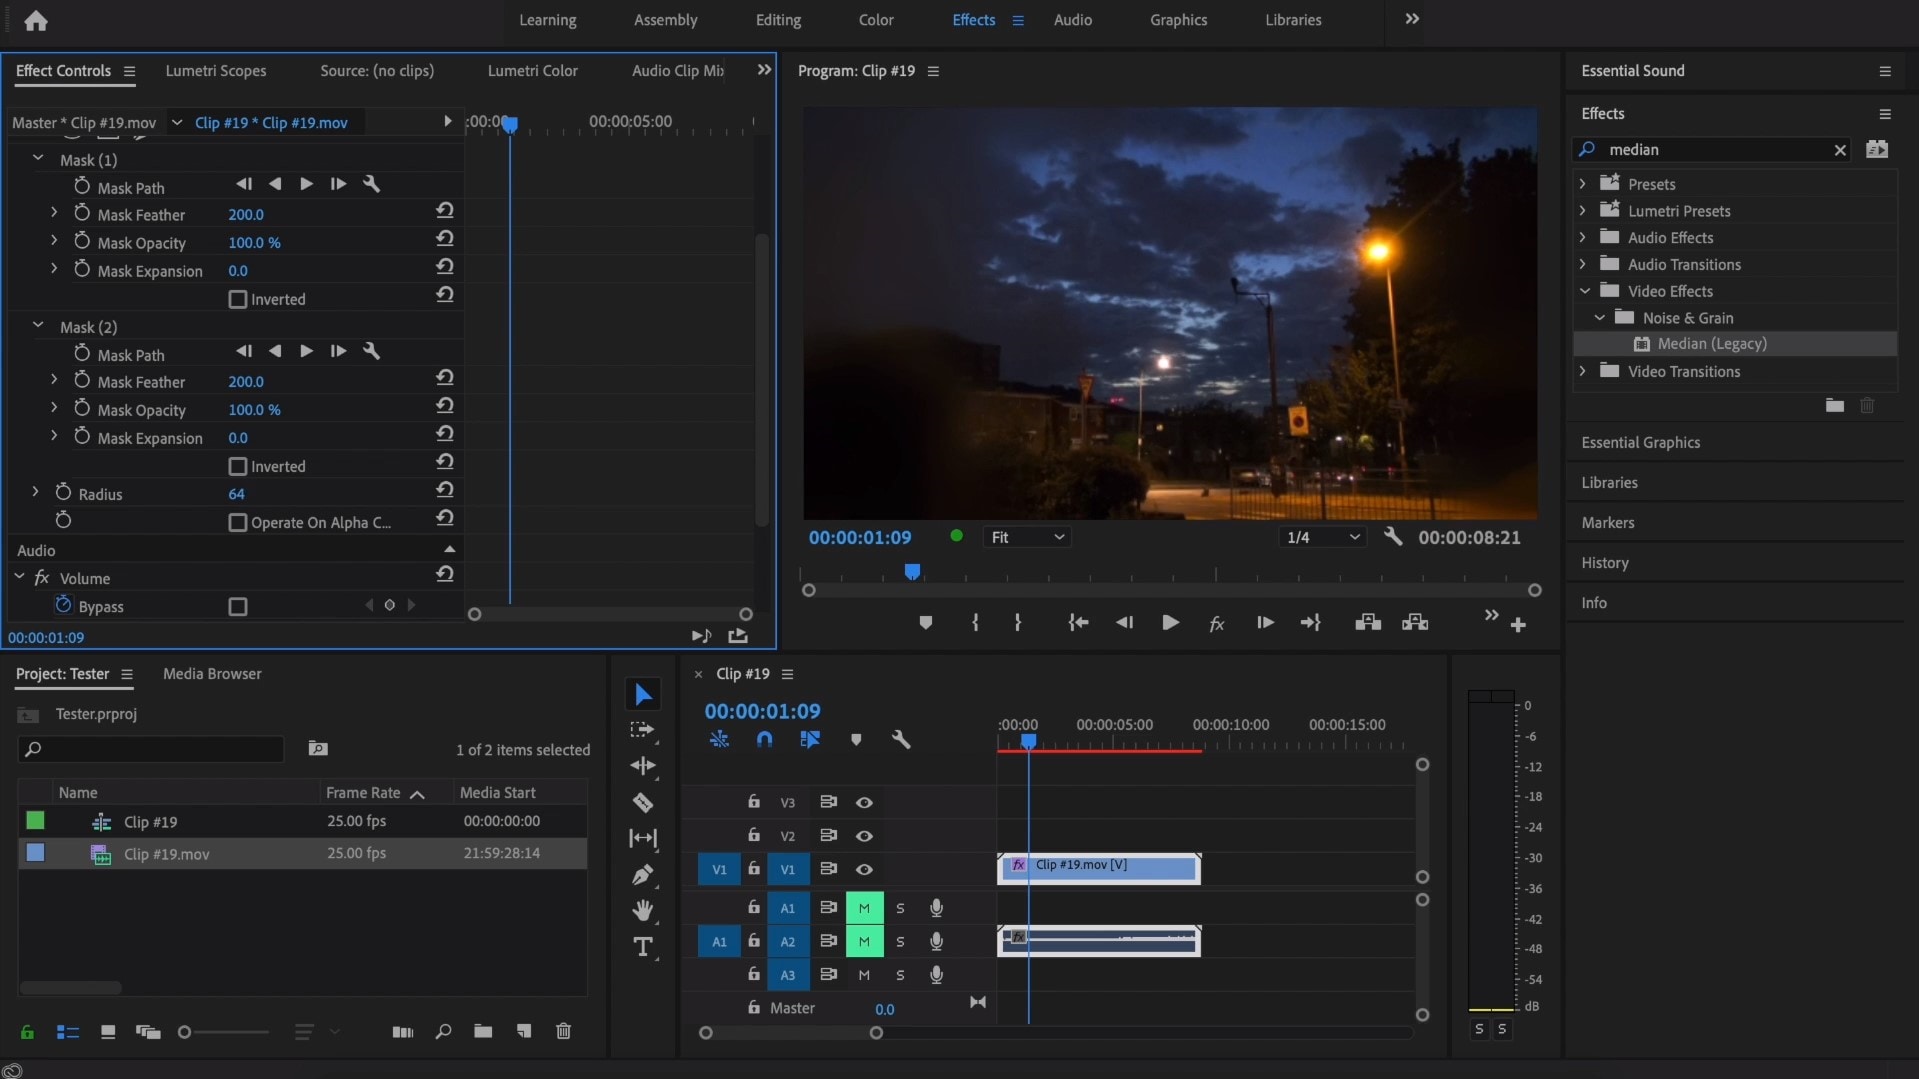
Technically, what the Median effect does is just blurring the graininess, not exactly “taking it away”. And if we play with the Radius settings there, we can find our desired look!
How to remove background noise in Adobe Premiere Pro
Removing background noise in Adobe Premiere Pro can be a pretty simple process and lead to much better results. First of all, of course, import the desired material into your software so you can see the video and audio in the sequence visually. After having the project set up, you will need to find the Efffects Panel, which might be hidden a little, but it must be on the left and bottom of the program layout; or, you can find it on the top, in the navbar.
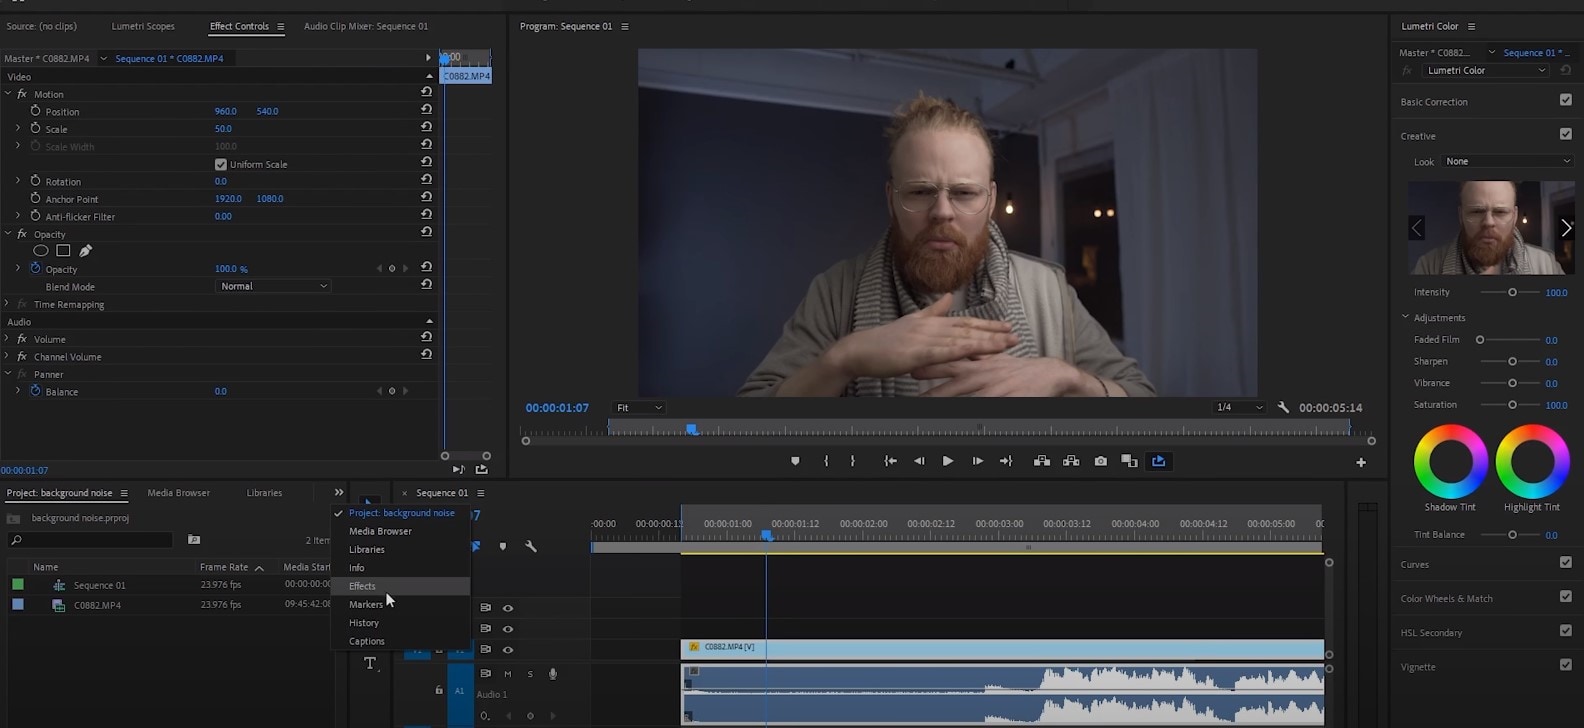
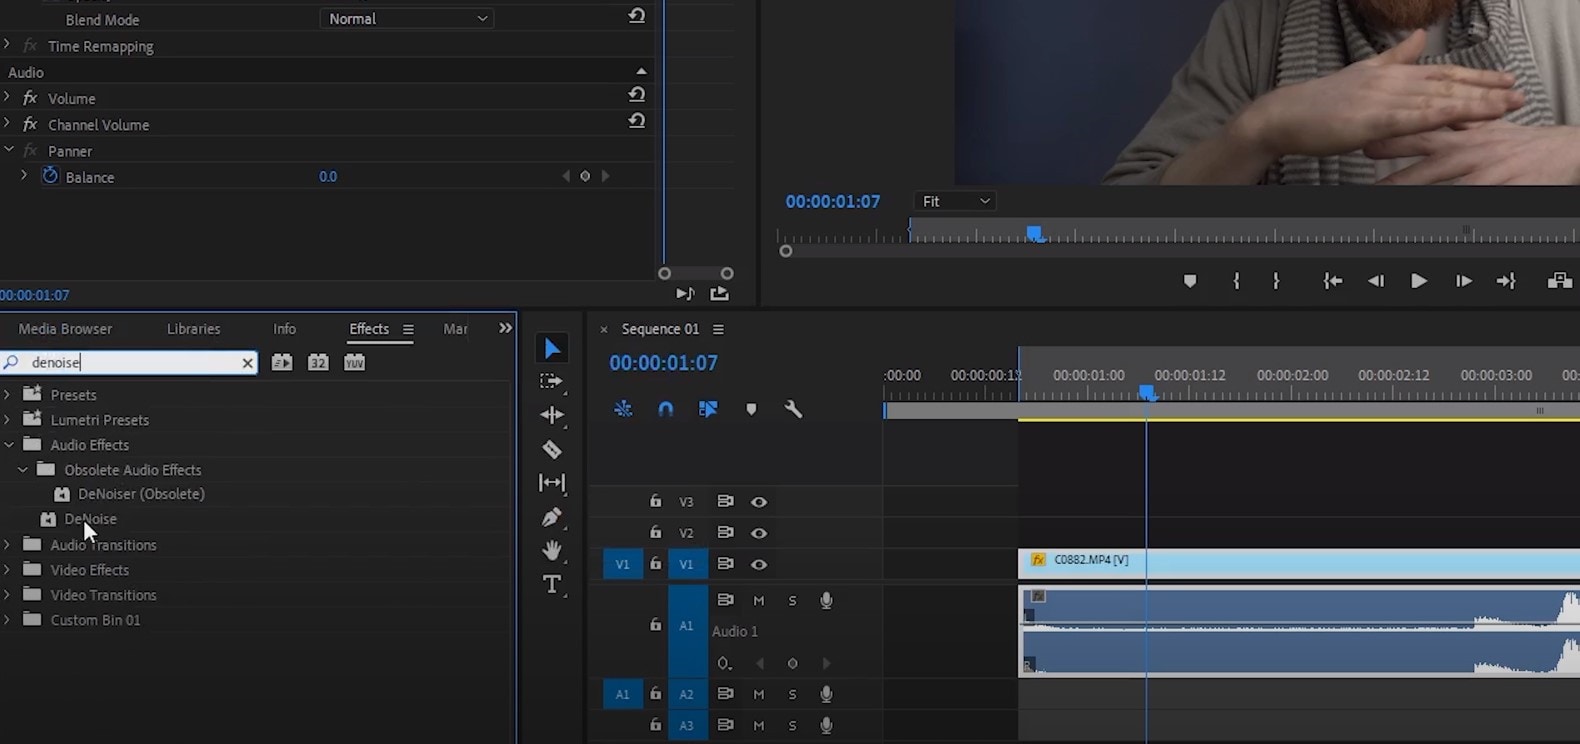
After having located the Effects panel, go for the search bar and type: denoise, and you’ll see that DeNoise effect is under Audio Effects.
You hold onto the effect, drag and drop it on the audio track in the timeline itself! Then, you just click on the audio in the sequence and on the top right Effect Controls will appear, which we need to concentrate on. You will scroll down a little there and below Audio notice: fx DeNoise, where you hit on the Edit button. This will open the Clip Fx Editor for the Audio denoising.
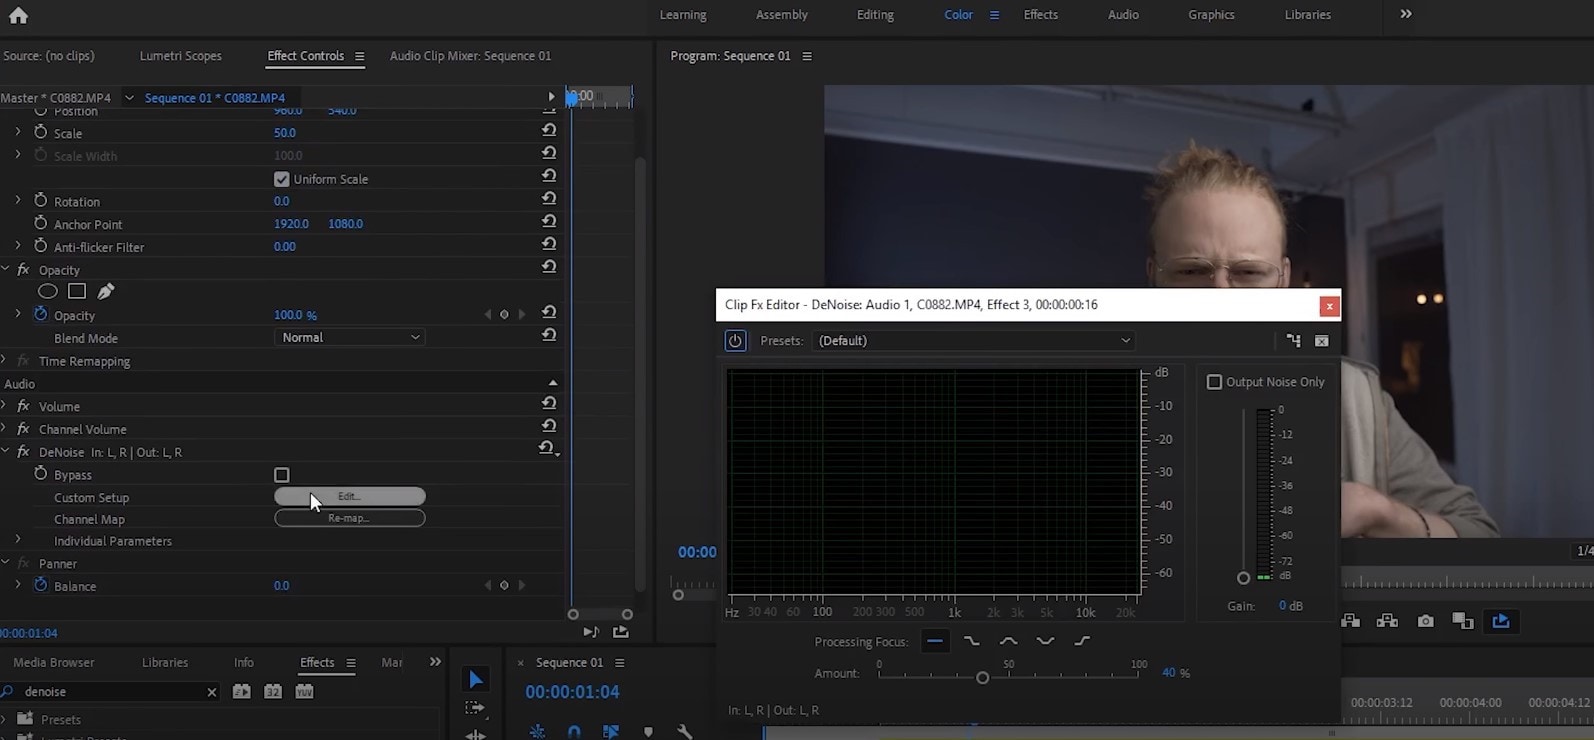
Basically, it only has one, Amount scale, and if you drag the slider of it to the right at 100%, it will remove the whole noise, but setting it on 0% will not remove any noise at all. So, you need to choose your preferred percentage! Just listen what is acceptable for you, but the general suggestion here would be that you can choose as high percent as you want, but if the effect starts taking out the voice and actually wanted parts, then you will have to stop and keep it that way. So, that’s actually it!
Bonus tip: how to remove audio noise in video with Wondershare Filmora
What we have promised in the beginning in the video, we like to offer now – the alternative to reduce or remove audio noise in the video is called Wondershare Filmora, which functions in a very simple way. So, we can start using these guides:
Drag and drop your video into the timeline. Right-clicking on the video and hitting Detach Audio will enable us to separate audio and video from one another, getting us a chance to work on them individually.
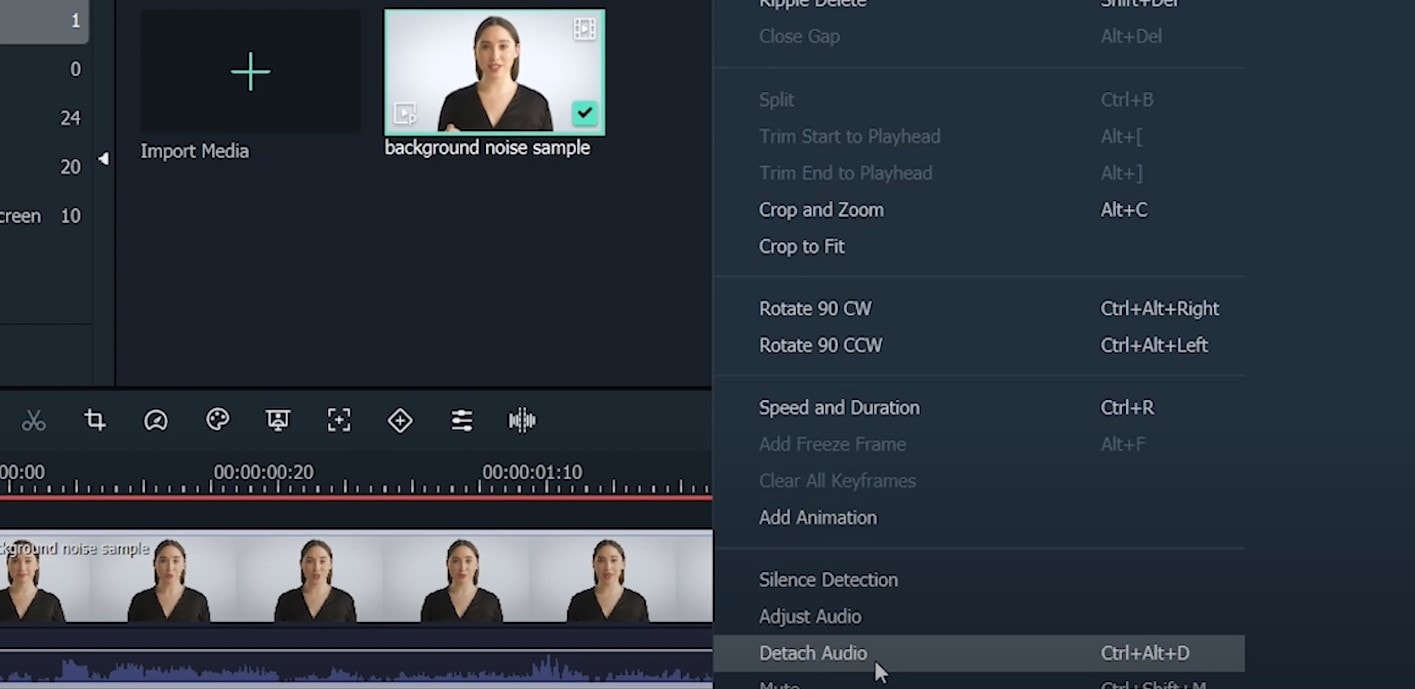
Double-click on the audio track shows the editing panel, where we see Remove background noise – choosing this option removes the noise!

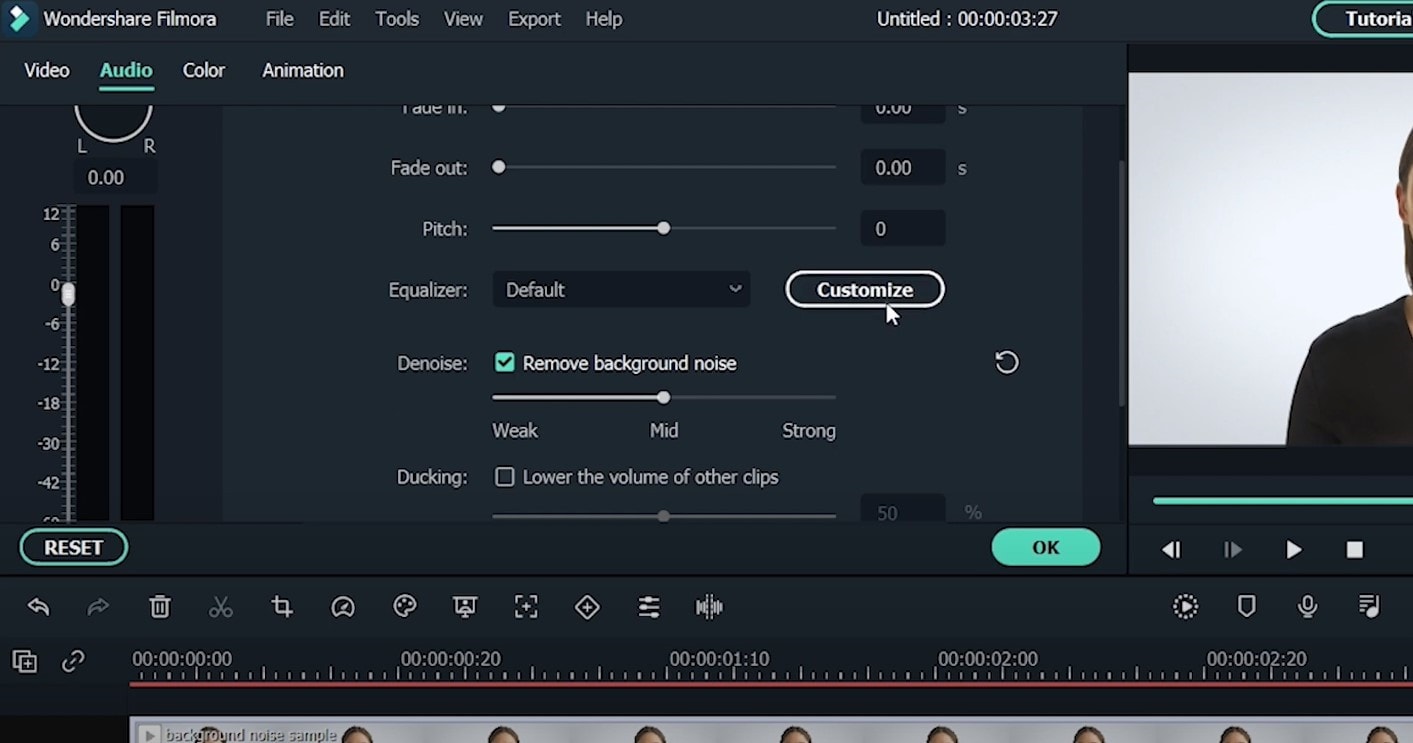
Though, there is another way to do this too. If you don’t want to detach the audio, then first, double-click on the video clip in the timeline and when the editing panel opens, switch to Audio. If you check the box next to Remove background noise, you will see that there are three levels – weak, mid, and strong, which determine the strength of how toe noise is going to be reduced. Choosing one of them is up to you!
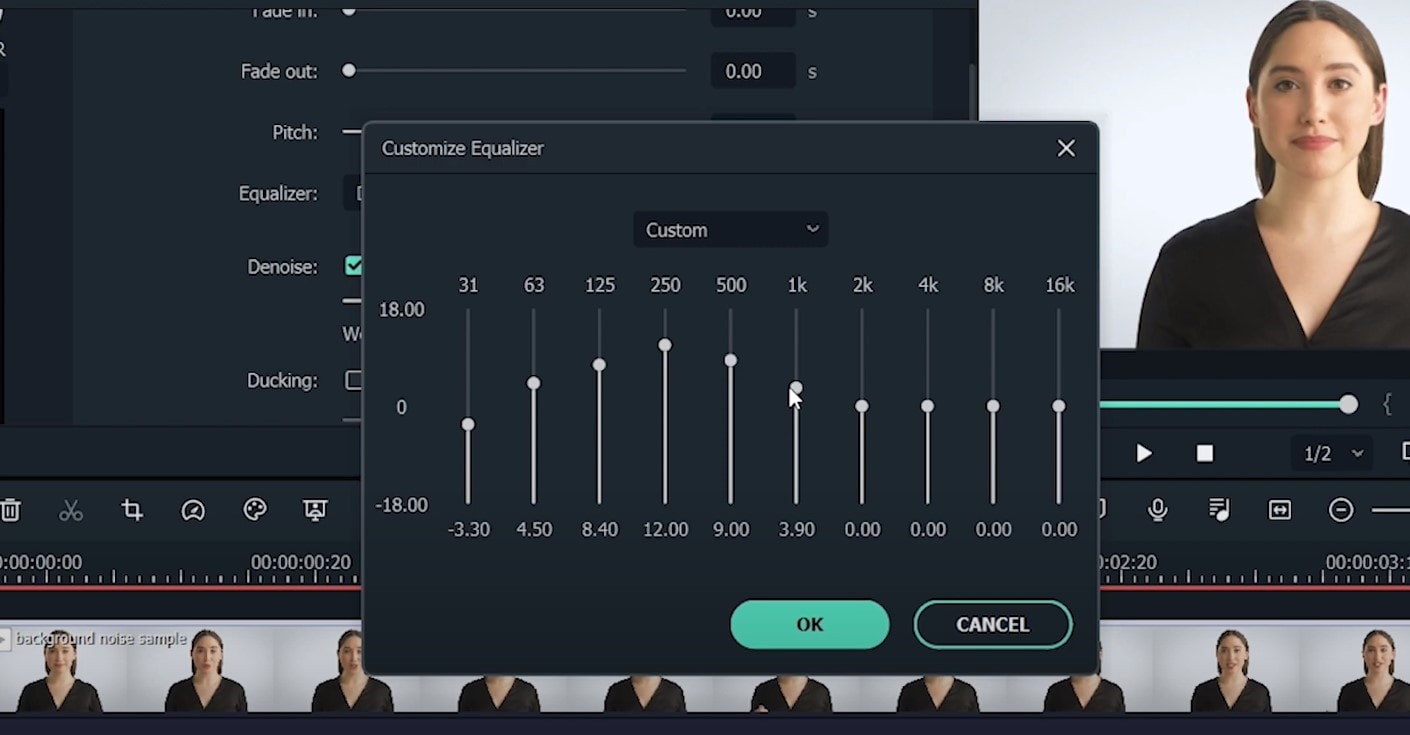
In case you find that the voice sounds a little robotics, you’ll need to make it sound more natural, of course. For it, you will need to click Customize, which will take you into the Customize Equalizer department.
The low tunes are on the left, while the highs are on the right. Background noises are often the low ones, so we better lower them even more, but we would raise the middle ones to achieve a natural sound.
And, that’s it – you are done with audio background noise removal!
So, in this article, we learned how to remove the video noise and grain and audio background noise using the software Adobe Premire Pro, while we also discussed how to do the latter using Wondershare Filmora – hope you can start using your new knowledge and tools very soon and create the content you never thought you could have created!
In order to make sure that the Median touches the grainiest parts of the whole clip, we need to use something called masks. In the Effects Control panel, we can select the mask shape for our clip –either choose rectangle, circle, or pen tool. Pen tool is something with which we move the Mask around the screen and resize it to include the desired area and cover it.

Changing Feather setting to 100 will make sure that the effect loses a visible edge and there is some smoothness added to those edges.

There might be the need to repeat this process and create several masks, if that means to have covered all of the grainy area of the scene.
Lastly, tom reduce the noise, adjusting the effect settings is needed.

Technically, what the Median effect does is just blurring the graininess, not exactly “taking it away”. And if we play with the Radius settings there, we can find our desired look!
How to remove background noise in Adobe Premiere Pro
Removing background noise in Adobe Premiere Pro can be a pretty simple process and lead to much better results. First of all, of course, import the desired material into your software so you can see the video and audio in the sequence visually. After having the project set up, you will need to find the Efffects Panel, which might be hidden a little, but it must be on the left and bottom of the program layout; or, you can find it on the top, in the navbar.

After having located the Effects panel, go for the search bar and type: denoise, and you’ll see that DeNoise effect is under Audio Effects.

You hold onto the effect, drag and drop it on the audio track in the timeline itself! Then, you just click on the audio in the sequence and on the top right Effect Controls will appear, which we need to concentrate on. You will scroll down a little there and below Audio notice: fx DeNoise, where you hit on the Edit button. This will open the Clip Fx Editor for the Audio denoising.

Basically, it only has one, Amount scale, and if you drag the slider of it to the right at 100%, it will remove the whole noise, but setting it on 0% will not remove any noise at all. So, you need to choose your preferred percentage! Just listen what is acceptable for you, but the general suggestion here would be that you can choose as high percent as you want, but if the effect starts taking out the voice and actually wanted parts, then you will have to stop and keep it that way. So, that’s actually it!
Bonus tip: how to remove audio noise in video with Wondershare Filmora
What we have promised in the beginning in the video, we like to offer now – the alternative to reduce or remove audio noise in the video is called Wondershare Filmora, which functions in a very simple way. So, we can start using these guides:
Drag and drop your video into the timeline. Right-clicking on the video and hitting Detach Audio will enable us to separate audio and video from one another, getting us a chance to work on them individually.

Double-click on the audio track shows the editing panel, where we see Remove background noise – choosing this option removes the noise!

Though, there is another way to do this too. If you don’t want to detach the audio, then first, double-click on the video clip in the timeline and when the editing panel opens, switch to Audio. If you check the box next to Remove background noise, you will see that there are three levels – weak, mid, and strong, which determine the strength of how toe noise is going to be reduced. Choosing one of them is up to you!
In case you find that the voice sounds a little robotics, you’ll need to make it sound more natural, of course. For it, you will need to click Customize, which will take you into the Customize Equalizer department.

The low tunes are on the left, while the highs are on the right. Background noises are often the low ones, so we better lower them even more, but we would raise the middle ones to achieve a natural sound.

And, that’s it – you are done with audio background noise removal!
So, in this article, we learned how to remove the video noise and grain and audio background noise using the software Adobe Premire Pro, while we also discussed how to do the latter using Wondershare Filmora – hope you can start using your new knowledge and tools very soon and create the content you never thought you could have created!
In order to make sure that the Median touches the grainiest parts of the whole clip, we need to use something called masks. In the Effects Control panel, we can select the mask shape for our clip –either choose rectangle, circle, or pen tool. Pen tool is something with which we move the Mask around the screen and resize it to include the desired area and cover it.

Changing Feather setting to 100 will make sure that the effect loses a visible edge and there is some smoothness added to those edges.

There might be the need to repeat this process and create several masks, if that means to have covered all of the grainy area of the scene.
Lastly, tom reduce the noise, adjusting the effect settings is needed.

Technically, what the Median effect does is just blurring the graininess, not exactly “taking it away”. And if we play with the Radius settings there, we can find our desired look!
How to remove background noise in Adobe Premiere Pro
Removing background noise in Adobe Premiere Pro can be a pretty simple process and lead to much better results. First of all, of course, import the desired material into your software so you can see the video and audio in the sequence visually. After having the project set up, you will need to find the Efffects Panel, which might be hidden a little, but it must be on the left and bottom of the program layout; or, you can find it on the top, in the navbar.

After having located the Effects panel, go for the search bar and type: denoise, and you’ll see that DeNoise effect is under Audio Effects.

You hold onto the effect, drag and drop it on the audio track in the timeline itself! Then, you just click on the audio in the sequence and on the top right Effect Controls will appear, which we need to concentrate on. You will scroll down a little there and below Audio notice: fx DeNoise, where you hit on the Edit button. This will open the Clip Fx Editor for the Audio denoising.

Basically, it only has one, Amount scale, and if you drag the slider of it to the right at 100%, it will remove the whole noise, but setting it on 0% will not remove any noise at all. So, you need to choose your preferred percentage! Just listen what is acceptable for you, but the general suggestion here would be that you can choose as high percent as you want, but if the effect starts taking out the voice and actually wanted parts, then you will have to stop and keep it that way. So, that’s actually it!
Bonus tip: how to remove audio noise in video with Wondershare Filmora
What we have promised in the beginning in the video, we like to offer now – the alternative to reduce or remove audio noise in the video is called Wondershare Filmora, which functions in a very simple way. So, we can start using these guides:
Drag and drop your video into the timeline. Right-clicking on the video and hitting Detach Audio will enable us to separate audio and video from one another, getting us a chance to work on them individually.

Double-click on the audio track shows the editing panel, where we see Remove background noise – choosing this option removes the noise!

Though, there is another way to do this too. If you don’t want to detach the audio, then first, double-click on the video clip in the timeline and when the editing panel opens, switch to Audio. If you check the box next to Remove background noise, you will see that there are three levels – weak, mid, and strong, which determine the strength of how toe noise is going to be reduced. Choosing one of them is up to you!
In case you find that the voice sounds a little robotics, you’ll need to make it sound more natural, of course. For it, you will need to click Customize, which will take you into the Customize Equalizer department.

The low tunes are on the left, while the highs are on the right. Background noises are often the low ones, so we better lower them even more, but we would raise the middle ones to achieve a natural sound.

And, that’s it – you are done with audio background noise removal!
So, in this article, we learned how to remove the video noise and grain and audio background noise using the software Adobe Premire Pro, while we also discussed how to do the latter using Wondershare Filmora – hope you can start using your new knowledge and tools very soon and create the content you never thought you could have created!
In order to make sure that the Median touches the grainiest parts of the whole clip, we need to use something called masks. In the Effects Control panel, we can select the mask shape for our clip –either choose rectangle, circle, or pen tool. Pen tool is something with which we move the Mask around the screen and resize it to include the desired area and cover it.

Changing Feather setting to 100 will make sure that the effect loses a visible edge and there is some smoothness added to those edges.

There might be the need to repeat this process and create several masks, if that means to have covered all of the grainy area of the scene.
Lastly, tom reduce the noise, adjusting the effect settings is needed.

Technically, what the Median effect does is just blurring the graininess, not exactly “taking it away”. And if we play with the Radius settings there, we can find our desired look!
How to remove background noise in Adobe Premiere Pro
Removing background noise in Adobe Premiere Pro can be a pretty simple process and lead to much better results. First of all, of course, import the desired material into your software so you can see the video and audio in the sequence visually. After having the project set up, you will need to find the Efffects Panel, which might be hidden a little, but it must be on the left and bottom of the program layout; or, you can find it on the top, in the navbar.

After having located the Effects panel, go for the search bar and type: denoise, and you’ll see that DeNoise effect is under Audio Effects.

You hold onto the effect, drag and drop it on the audio track in the timeline itself! Then, you just click on the audio in the sequence and on the top right Effect Controls will appear, which we need to concentrate on. You will scroll down a little there and below Audio notice: fx DeNoise, where you hit on the Edit button. This will open the Clip Fx Editor for the Audio denoising.

Basically, it only has one, Amount scale, and if you drag the slider of it to the right at 100%, it will remove the whole noise, but setting it on 0% will not remove any noise at all. So, you need to choose your preferred percentage! Just listen what is acceptable for you, but the general suggestion here would be that you can choose as high percent as you want, but if the effect starts taking out the voice and actually wanted parts, then you will have to stop and keep it that way. So, that’s actually it!
Bonus tip: how to remove audio noise in video with Wondershare Filmora
What we have promised in the beginning in the video, we like to offer now – the alternative to reduce or remove audio noise in the video is called Wondershare Filmora, which functions in a very simple way. So, we can start using these guides:
Drag and drop your video into the timeline. Right-clicking on the video and hitting Detach Audio will enable us to separate audio and video from one another, getting us a chance to work on them individually.

Double-click on the audio track shows the editing panel, where we see Remove background noise – choosing this option removes the noise!

Though, there is another way to do this too. If you don’t want to detach the audio, then first, double-click on the video clip in the timeline and when the editing panel opens, switch to Audio. If you check the box next to Remove background noise, you will see that there are three levels – weak, mid, and strong, which determine the strength of how toe noise is going to be reduced. Choosing one of them is up to you!
In case you find that the voice sounds a little robotics, you’ll need to make it sound more natural, of course. For it, you will need to click Customize, which will take you into the Customize Equalizer department.

The low tunes are on the left, while the highs are on the right. Background noises are often the low ones, so we better lower them even more, but we would raise the middle ones to achieve a natural sound.

And, that’s it – you are done with audio background noise removal!
So, in this article, we learned how to remove the video noise and grain and audio background noise using the software Adobe Premire Pro, while we also discussed how to do the latter using Wondershare Filmora – hope you can start using your new knowledge and tools very soon and create the content you never thought you could have created!
How to Convert a GIF to a Video for Instagram
Instagram is one of the best apps to share fun and relatable animated GIFs. But unfortunately, you’ll have to convert GIF to video for Instagram before transferring. The thing is that Instagram only supports PNG, JPG, and MP4 formats. But fret not if you want to share a compelling GIF file on Instagram. You can convert GIFs to MP4 and upload them on the app without restrictions. So, this article discusses the best desktop, mobile, and online apps to convert GIF to video for Instagram.
Part 1: Convert GIF to Video for Instagram on Desktop
Let’s begin this post with the best desktop solutions to convert GIFs to MP4 for Instagram. Remember, the video aspect ratio for Instagram videos is 9:16 or 1:1.
Wondershare Filmora
Rating: 4.5/5
Compatibility: macOS and Windows
Wondershare Filmora is a professional-grade video editing program for both macOS and Windows computers. It features an intuitive, multitrack interface with advanced video editing features and templates to help you create the best Instagram videos. This program lets you exploit themed elements like filters, effects, transitions, and emojis.
In the meantime, you can customize your video with the inbuilt royalty-free music and sound effects. You can also cut, trim, resize, and crop your video before exporting it to various formats, including MP4, MOV, WebM, GIF, etc.
But here is a reminder; free users will have a “Wondershare Filmora” watermark on their outputs. However, you can still exploit all the features with the free account.
Free Download For Win 7 or later(64-bit)
Free Download For macOS 10.14 or later
Follow these steps to convert a GIF to a video for Instagram using Filmora :
Step1Run Filmora and start a project.
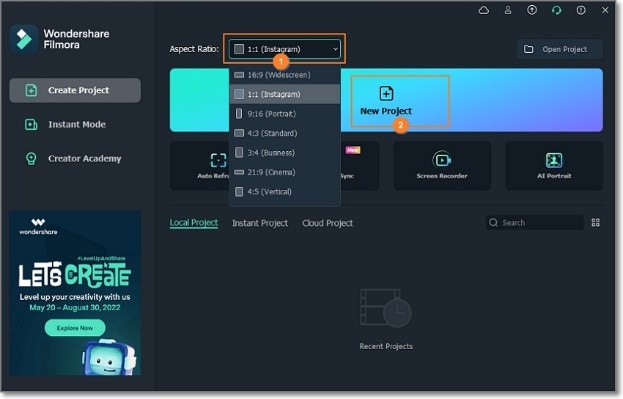
Install and run Wondershare Filmora on your PC and select the Project Aspect Ratio. To create an Instagram video, choose 1:1. Now tap New Project and click File to browse and load the GIF file from your local storage. Then, drag the GIF file to the editing timeline.
Step2 Edit and customize the GIF file (Optional).
Before exporting GIF to MP4, it’s vital to add a few touches to it. For example, you may want to speed up or slow down the GIF’s playback speed. In that case, right-click the video track and then tap Edit Properties. Now click the Speed tab to ramp up the speed or slow it down.
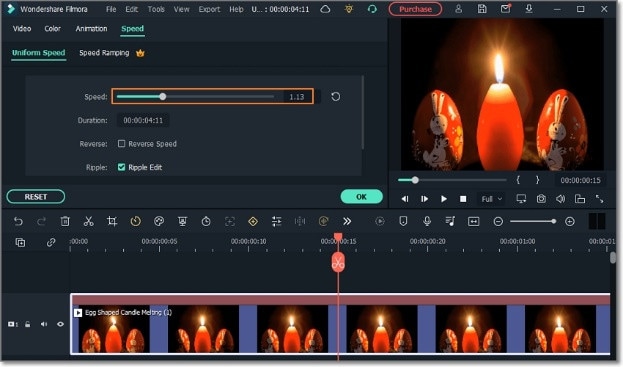
You’ll also see tabs for adding animations, color enhancements, stabilization, and more. So, play around with the video editing tools until you get what works for you. Just remember not to overdo your video.
Step3Customize the video settings and export it to MP4.
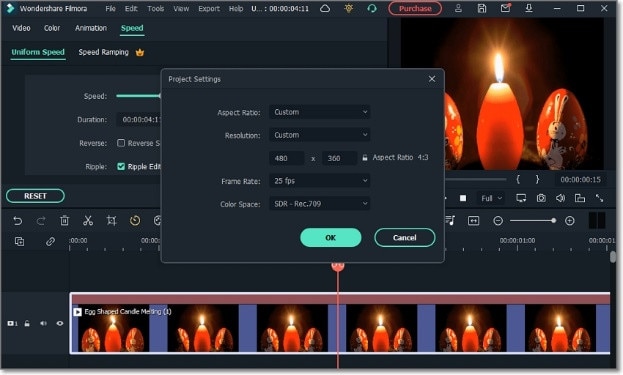
Last but not least, click File > Project Settings to crosscheck the file properties. You can change the aspect ratio, video resolution, frame rate, and color space before clicking Ok.
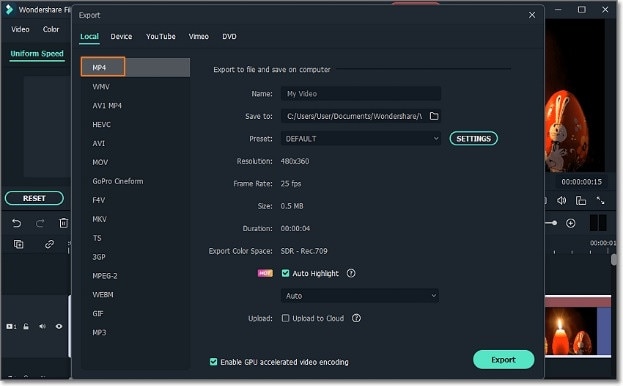
Finally, tap Export, then select Crete Video. Now choose MP4 under the Local tab before setting the video name and folder path. If satisfied, press Export to convert GIF to a video for Instagram. That’s all there is!
Pros
- Easy enough for green hands.
- High-quality sound/video effects and transitions.
- Fast rendering speed.
- Reasonably priced.
Cons
- Watermarked outputs for free users.
- Hidden advanced features.
Movavi Video Converter Premium
Rating: 4.3/5
Compatibility: macOS and Windows
As the name hints, Movavi Video Converter is a video converter cum editor for macOS and Windows PCs. It’s a simple-to-use program that easily converts any video, audio, or image format. Actually, it supports 180+ formats, including MP4, GIF, MOV, AVI, VOB, MP3, and many others.
Besides converting, Movavi Video Converter allows you to trim, cut, merge, and crop your videos. Also, you can losslessly compress files and add subtitles automatically using artificial intelligence. And lest I forget that you can convert videos to device-optimized formats like iPhone, iPad, Samsung Galaxy, Apple TV, and more.
Follow these steps:
Step1Download, install, and open Movavi Video Converter and click the Add Media button to load your GIF file on the program.
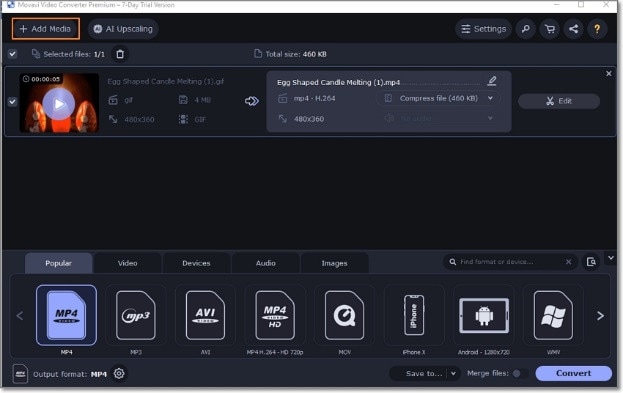
Step2Next up, edit your video to make it look more attractive. For instance, you can trim, cut, and merge it. Movavi Video Converter also allows you to add effects, watermarks, and audio/sound effects.

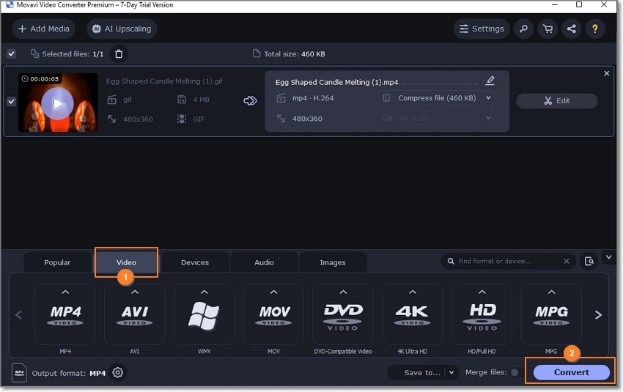
Step3Click the Video tab at the bottom of the screen and choose MP4 as the target format. Lastly, click Convert to encode GIF to MP4 with Movavi Video Converter.
Pros
- Super easy to use.
- Multiple input/output formats.
- Affordable pricing.
- Essential video editing tools.
Cons
- No free account.
- Professional editors should stick to Filmora .
MiniTool Movie Maker
Rating: 4.4/5
Compatibility: Windows
MiniTool Movie Maker is a video editing program for Windows 7, 8, 10, and 11. It boasts an intuitive user interface with rich and advanced features to give your Instagram videos stunning looks. After uploading your GIF file to this video editor, you can trim, crop, and add elements like emojis, arrows, and props.
Also, MiniTool Movie Maker allows you to adjust the video contrast, brightness, and saturation. In addition, you can adjust the video playback speed to make it quicker or slower. Another thing, this program houses hundreds of free video templates to exploit.
Steps to convert a GIF file to MP4 for Instagram with MiniTool Movie Maker:
Step1Install and run MiniTool Movie Maker on your PC and create a new project. Then, click Media > Import Media Files to upload the GIF file.

Step2Now drag and drop the GIF file to the editing timeline and tap the Split icon to trim and cut the video. After that, press the Speed icon to make the video playback speed faster, slower, or reverse the video. You can also add texts, emojis, effects, and more.
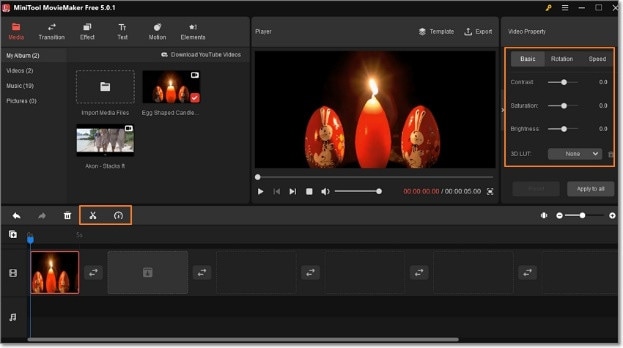
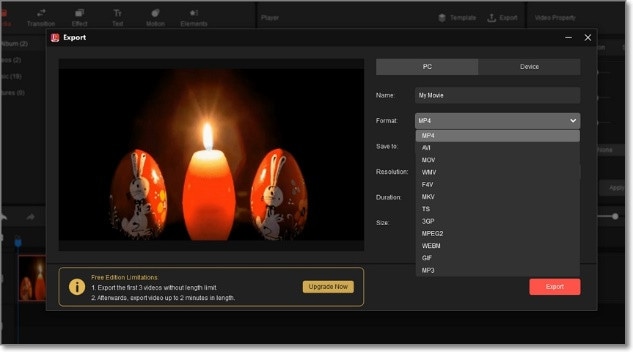
Step3Click the Export button on the preview screen to name the video and set the folder path. Remember to choose MP4 as the target format before clicking Export to save your video.
Pros
- Multiple input/output formats.
- Export 1080P MP4 for free.
- Export videos without watermarks.
- Multiple video effects, texts, sounds, elements, etc.
Cons
- Free users can create 2-minute videos only.
- No macOS version.
Part 2: How to Turn a GIF into an Instagram video on iPhone or Android
What desktops can do, smartphones can equally do these days. So, without dilly-dallying, let’s list the best GIF to Instagram converters for Android/iPhone.
GIF Cracker
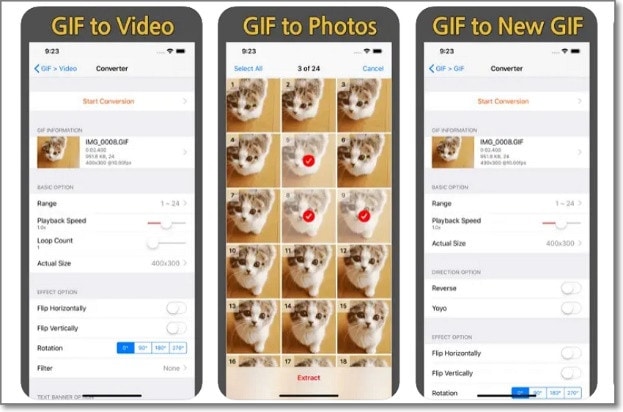
Rating: 4.3/5
GIF Cracker is a highly rated iPhone app for converting GIF files to videos and pictures. It’s simple to use and comes with multiple video customization options. For example, you can look, adjust the playback speed, rotate, and resize the GIF file before converting it to MP4. GIF Cracker also boasts multiple filters to spice up your new video or image. What’s more, you can access files from Camera Roll Album.
Pros
- Multiple video customization options.
- Easy to understand and use.
- Convert and edit files from Camera Roll.
Cons
- Annoying adverts.
- Slow conversion speed.
GIF to MP4
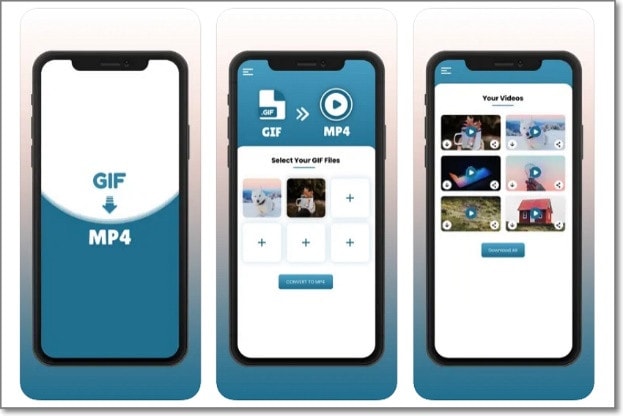
Rating: 4.7/5
GIF to MP4 is another highly-rated iPhone app to help you convert any GIF file to MP4. It’s easy to use as you only need to upload the GIF file, choose the video format, and tap “Save” to convert. That’s not all. This GIF-to-video converter allows you to export the converted video to Gmail, Facebook, and other social networks.
Pros
- It’s 100% free to use.
- Easy to use and export videos.
- Fast rendering.
Cons
- Multiple adverts.
- Lagging video frames.
Video2Me
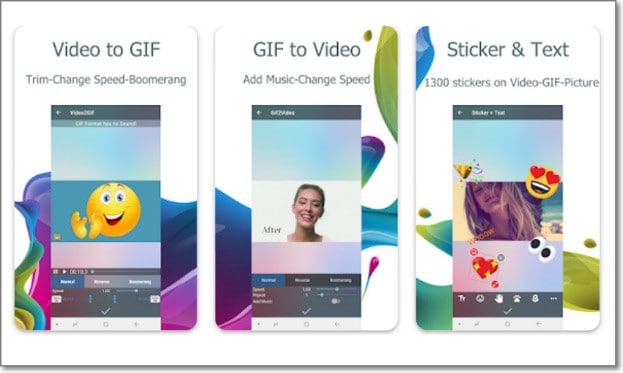
Come, close Android users! Video2Me is an excellent Android video editor, GIF maker, and GIF-to-video converter. With it, you can convert any GIF file to an MP4 video. But before converting, you can adjust the playback speed, repeat the video, add background audio, and reverse. Interestingly, you can convert GIFs to a boomerang video for Instagram.
Pros
- Fast and easy to use.
- Convert GIF to Instagram Boomerang.
- Create high-quality GIF files.
Cons
- It crashes sometimes.
- Watermarked outputs.
GifVid
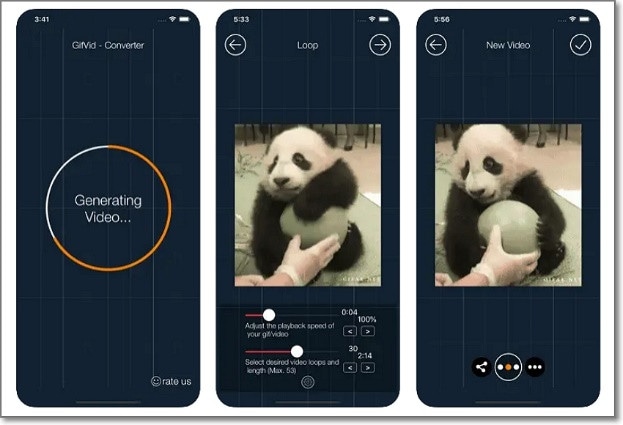
Rating: 2.7/5
GifVid is another free app to convert GIF files to MP4 on an iPhone or iPad. As expected, it’s quick and easy to use. Just load the GIF file, and GifVid will automatically convert it to MP4. After conversion, you can share the video with your friends on Imgur, Tumblr, iMessage, Gmail, etc. Unfortunately, it will cost you $0.99 to get the app.
Pros
- Quick and easy to use.
- No watermarks.
- Direct exports to social apps.
Cons
- Not free to download and use.
- Pesky adverts.
GIF to Video
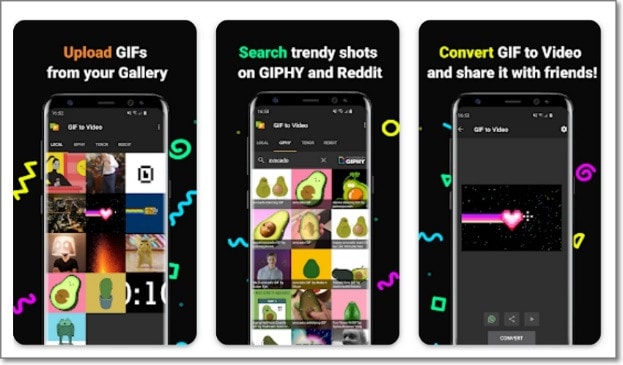
Rating: 4.0/5
GIF to Video is an Android app with more than 1 million downloads so far. This app allows you to browse local GIF files or search for animated GIFs from websites such as Tenor, GIPHY, and Reddit. After adding the GIF file to this app, you’ll losslessly convert it to a short video before sharing it with your friends on Instagram, Facebook, WhatsApp, TikTok, and more. You can also trim, cut, crop, and loop before converting.
Pros
- Intuitive video editing features.
- Upload GIFs from galleries or GIF websites.
- Directly export GIF to Instagram.
Cons
- Every conversion triggers an ad.
- Lots of in-app purchases.
Part 3: Top 5 Online Tools to turn a GIF into a video on Instagram
The good thing about online GIF converters is that they can convert video to GIF instantly on a browser. In other words, you don’t need to install anything to convert a GIF to a video for Instagram. And yes, most online apps are compatible with mobile and PC browsers. Let’s look at the best five!
Adobe Express
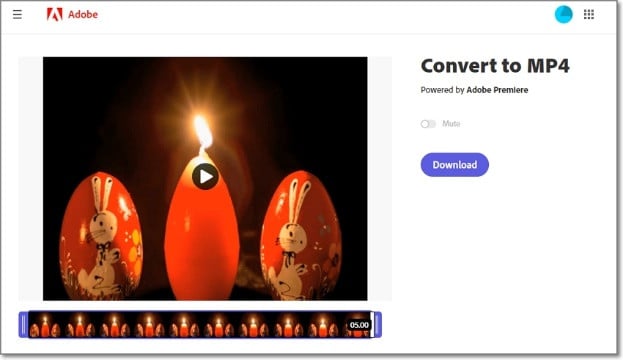
Rating: 4.5/5
Adobe Express is an online service for creating amazing graphics without any experience. It replaces the Adobe Spark product, coming with a simplified and feature-rich platform. With Adobe Express, you can create designs from scratch or choose from the hundreds of free templates. You can customize your video with texts, stickers, emojis, background audio, and more. Even better, you can directly share your project on social apps.
Pros
- Free to use.
- Thousands of free templates.
- Excellent file conversion capabilities.
- 2GB free cloud storage.
Cons
- Not so intuitive.
- Lots of hidden tools.
GIFtoMP4
Rating: N/A
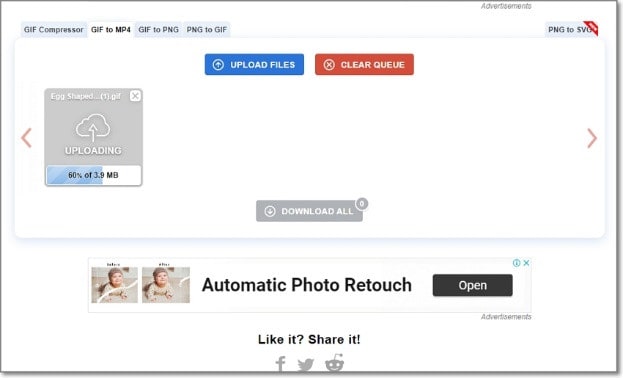
GIFtoMP4 is a relatively straightforward website that lets you convert GIF animations to high-quality MP4 videos. It can convert up to 20 GIF animations at a go. The conversion process is super-fast, and you can download all converted files in a ZIP folder. In addition to converting GIF to MP4, you can also convert GIF to PNG, PNG to GIF, and compress GIF files. Moreover, the site offers maximum file security by deleting all converted GIFs after an hour.
Pros
- Straightforward user interface.
- Batch conversion is supported.
- Excellent GIF compression capability.
Cons
- Lots of annoying adverts.
- Not for advanced users.
AConvert
Rating: 4.4/5
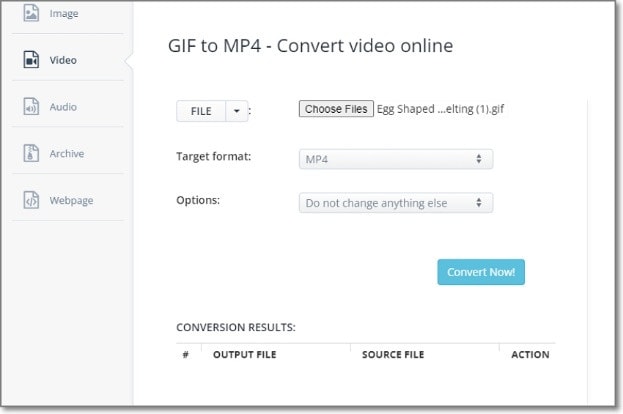
AConvert is a popular online converter for images, videos, audio, and GIF files. This software can convert GIFs to a host of formats, including MP4, AVI, 3GP, VOB, MTS, and more. Also, AConvert supports batch conversions up to 200MB. And after converting, you can download the file using a QR code or save the video on Google Drive and Dropbox.
Pros
- Multiple video output formats are supported.
- Resize and customize the GIF frame.
- Batch conversion is supported.
Cons
- Limited video editing features.
- 200MB maximum file size.
Ezgif

Rating: 4.6/5
Ezgif is an excellent online GIF maker and editor. It’s free, simple, fast, and converts GIFs to MP4 for Instagram without watermarks. You can upload GIF files from local storage or paste the image URL from cloud services. Just upload your GIF file, then click the “Convert to MP4” button to process it. But before converting, you can crop, resize, speed up, cut, split, and more. Sadly, the maximum file conversion limit is a mere 50MB.
Pros
- It supports batch conversion.
- Fast and straightforward to use.
- Multiple GIF editing tools.
Cons
- 50MB maximum file limit.
- Annoying adverts.
Convertio
Rating: 4.5/5
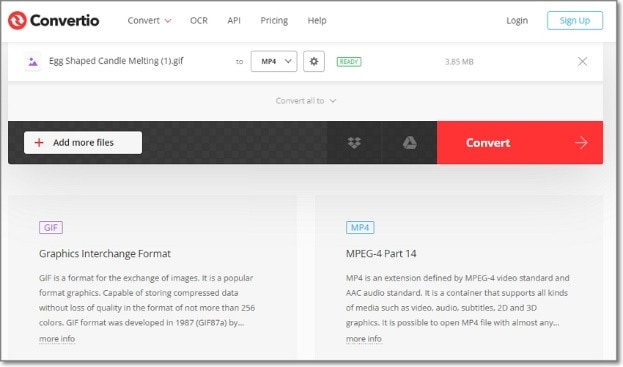
Still unimpressed by the online GIF to MP4 converters above? Try Convertio! It’s an easy GIF converter for mobile and PC browsers. To convert GIF to MP4 on Convertio, upload the GIF file on local storage or cloud and customize the frame rate, playback duration, codec, etc. But like all online GIF converters on this list, Convertio has a maximum file limit of 100MB.
Pros
- Multiple GIF customization tools.
- 200+ formats supported.
- Batch GIF to MP4 conversion.
Cons
- 100MB file limit.
- Ad-supported conversion.
Part 4: Hot FAQs on GIF Instagram
How can I send a GIF on Instagram DM?
You can easily share a GIF file directly on Instagram DM by clicking the Share icon at the top-right corner before opening a chat. Now tap the Stickers icon on the text message field and choose GIF. Search for a GIF file from GIPHY and click GIF to share it. It’s that easy!
How can I add a GIF to Instagram Story using a sticker?
To add a GIF Sticker on Instagram, you’ll first need to convert GIF to APNG (Animated PNG) using a program like Ezgif . Then, upload the APNG file on GIPHY Sticker Maker and generate a sticker. Now launch Instagram and choose a photo to post on your story. Then, click the Sticker icon and search for your username on GIPHY. Lastly, choose the GIF sticker you had created earlier and upload it.
How can I post GIFs to my Instagram Feed and Stories?
Posting a GIF file on Instagram Feeds and Stories is nothing complex. Simply install the GIPHY app and then choose a GIF file you want to share. After that, hit the Share button and then click the Instagram logo. Finally, select Post or Stories and share the GIF file.
Final Words
Although you may not be able to upload GIFs on Instagram directly, the above methods make it a breeze by converting GIFs to MP4 with lossless quality. Remember that you can easily share a GIF on your Instagram Story or Feed directly from GIPHY. But you can only do that using the iPhone or Android GIPHY app. Give it a try!
- GIF Cracker
- GIF to MP4
- Video2Me
- GifVid
- GIF to Video
- Top 5 Online Tools to turn a GIF into a video on Instagram
Part 1: Convert GIF to Video for Instagram on Desktop
Let’s begin this post with the best desktop solutions to convert GIFs to MP4 for Instagram. Remember, the video aspect ratio for Instagram videos is 9:16 or 1:1.
Wondershare Filmora
Rating: 4.5/5
Compatibility: macOS and Windows
Wondershare Filmora is a professional-grade video editing program for both macOS and Windows computers. It features an intuitive, multitrack interface with advanced video editing features and templates to help you create the best Instagram videos. This program lets you exploit themed elements like filters, effects, transitions, and emojis.
In the meantime, you can customize your video with the inbuilt royalty-free music and sound effects. You can also cut, trim, resize, and crop your video before exporting it to various formats, including MP4, MOV, WebM, GIF, etc.
But here is a reminder; free users will have a “Wondershare Filmora” watermark on their outputs. However, you can still exploit all the features with the free account.
Free Download For Win 7 or later(64-bit)
Free Download For macOS 10.14 or later
Follow these steps to convert a GIF to a video for Instagram using Filmora :
Step1Run Filmora and start a project.

Install and run Wondershare Filmora on your PC and select the Project Aspect Ratio. To create an Instagram video, choose 1:1. Now tap New Project and click File to browse and load the GIF file from your local storage. Then, drag the GIF file to the editing timeline.
Step2 Edit and customize the GIF file (Optional).
Before exporting GIF to MP4, it’s vital to add a few touches to it. For example, you may want to speed up or slow down the GIF’s playback speed. In that case, right-click the video track and then tap Edit Properties. Now click the Speed tab to ramp up the speed or slow it down.

You’ll also see tabs for adding animations, color enhancements, stabilization, and more. So, play around with the video editing tools until you get what works for you. Just remember not to overdo your video.
Step3Customize the video settings and export it to MP4.

Last but not least, click File > Project Settings to crosscheck the file properties. You can change the aspect ratio, video resolution, frame rate, and color space before clicking Ok.

Finally, tap Export, then select Crete Video. Now choose MP4 under the Local tab before setting the video name and folder path. If satisfied, press Export to convert GIF to a video for Instagram. That’s all there is!
Pros
- Easy enough for green hands.
- High-quality sound/video effects and transitions.
- Fast rendering speed.
- Reasonably priced.
Cons
- Watermarked outputs for free users.
- Hidden advanced features.
Movavi Video Converter Premium
Rating: 4.3/5
Compatibility: macOS and Windows
As the name hints, Movavi Video Converter is a video converter cum editor for macOS and Windows PCs. It’s a simple-to-use program that easily converts any video, audio, or image format. Actually, it supports 180+ formats, including MP4, GIF, MOV, AVI, VOB, MP3, and many others.
Besides converting, Movavi Video Converter allows you to trim, cut, merge, and crop your videos. Also, you can losslessly compress files and add subtitles automatically using artificial intelligence. And lest I forget that you can convert videos to device-optimized formats like iPhone, iPad, Samsung Galaxy, Apple TV, and more.
Follow these steps:
Step1Download, install, and open Movavi Video Converter and click the Add Media button to load your GIF file on the program.

Step2Next up, edit your video to make it look more attractive. For instance, you can trim, cut, and merge it. Movavi Video Converter also allows you to add effects, watermarks, and audio/sound effects.

Step3Click the Video tab at the bottom of the screen and choose MP4 as the target format. Lastly, click Convert to encode GIF to MP4 with Movavi Video Converter.

Pros
- Super easy to use.
- Multiple input/output formats.
- Affordable pricing.
- Essential video editing tools.
Cons
- No free account.
- Professional editors should stick to Filmora .
MiniTool Movie Maker
Rating: 4.4/5
Compatibility: Windows
MiniTool Movie Maker is a video editing program for Windows 7, 8, 10, and 11. It boasts an intuitive user interface with rich and advanced features to give your Instagram videos stunning looks. After uploading your GIF file to this video editor, you can trim, crop, and add elements like emojis, arrows, and props.
Also, MiniTool Movie Maker allows you to adjust the video contrast, brightness, and saturation. In addition, you can adjust the video playback speed to make it quicker or slower. Another thing, this program houses hundreds of free video templates to exploit.
Steps to convert a GIF file to MP4 for Instagram with MiniTool Movie Maker:
Step1Install and run MiniTool Movie Maker on your PC and create a new project. Then, click Media > Import Media Files to upload the GIF file.

Step2Now drag and drop the GIF file to the editing timeline and tap the Split icon to trim and cut the video. After that, press the Speed icon to make the video playback speed faster, slower, or reverse the video. You can also add texts, emojis, effects, and more.

Step3Click the Export button on the preview screen to name the video and set the folder path. Remember to choose MP4 as the target format before clicking Export to save your video.

Pros
- Multiple input/output formats.
- Export 1080P MP4 for free.
- Export videos without watermarks.
- Multiple video effects, texts, sounds, elements, etc.
Cons
- Free users can create 2-minute videos only.
- No macOS version.
Part 2: How to Turn a GIF into an Instagram video on iPhone or Android
What desktops can do, smartphones can equally do these days. So, without dilly-dallying, let’s list the best GIF to Instagram converters for Android/iPhone.
GIF Cracker

Rating: 4.3/5
GIF Cracker is a highly rated iPhone app for converting GIF files to videos and pictures. It’s simple to use and comes with multiple video customization options. For example, you can look, adjust the playback speed, rotate, and resize the GIF file before converting it to MP4. GIF Cracker also boasts multiple filters to spice up your new video or image. What’s more, you can access files from Camera Roll Album.
Pros
- Multiple video customization options.
- Easy to understand and use.
- Convert and edit files from Camera Roll.
Cons
- Annoying adverts.
- Slow conversion speed.
GIF to MP4

Rating: 4.7/5
GIF to MP4 is another highly-rated iPhone app to help you convert any GIF file to MP4. It’s easy to use as you only need to upload the GIF file, choose the video format, and tap “Save” to convert. That’s not all. This GIF-to-video converter allows you to export the converted video to Gmail, Facebook, and other social networks.
Pros
- It’s 100% free to use.
- Easy to use and export videos.
- Fast rendering.
Cons
- Multiple adverts.
- Lagging video frames.
Video2Me

Come, close Android users! Video2Me is an excellent Android video editor, GIF maker, and GIF-to-video converter. With it, you can convert any GIF file to an MP4 video. But before converting, you can adjust the playback speed, repeat the video, add background audio, and reverse. Interestingly, you can convert GIFs to a boomerang video for Instagram.
Pros
- Fast and easy to use.
- Convert GIF to Instagram Boomerang.
- Create high-quality GIF files.
Cons
- It crashes sometimes.
- Watermarked outputs.
GifVid

Rating: 2.7/5
GifVid is another free app to convert GIF files to MP4 on an iPhone or iPad. As expected, it’s quick and easy to use. Just load the GIF file, and GifVid will automatically convert it to MP4. After conversion, you can share the video with your friends on Imgur, Tumblr, iMessage, Gmail, etc. Unfortunately, it will cost you $0.99 to get the app.
Pros
- Quick and easy to use.
- No watermarks.
- Direct exports to social apps.
Cons
- Not free to download and use.
- Pesky adverts.
GIF to Video

Rating: 4.0/5
GIF to Video is an Android app with more than 1 million downloads so far. This app allows you to browse local GIF files or search for animated GIFs from websites such as Tenor, GIPHY, and Reddit. After adding the GIF file to this app, you’ll losslessly convert it to a short video before sharing it with your friends on Instagram, Facebook, WhatsApp, TikTok, and more. You can also trim, cut, crop, and loop before converting.
Pros
- Intuitive video editing features.
- Upload GIFs from galleries or GIF websites.
- Directly export GIF to Instagram.
Cons
- Every conversion triggers an ad.
- Lots of in-app purchases.
Part 3: Top 5 Online Tools to turn a GIF into a video on Instagram
The good thing about online GIF converters is that they can convert video to GIF instantly on a browser. In other words, you don’t need to install anything to convert a GIF to a video for Instagram. And yes, most online apps are compatible with mobile and PC browsers. Let’s look at the best five!
Adobe Express

Rating: 4.5/5
Adobe Express is an online service for creating amazing graphics without any experience. It replaces the Adobe Spark product, coming with a simplified and feature-rich platform. With Adobe Express, you can create designs from scratch or choose from the hundreds of free templates. You can customize your video with texts, stickers, emojis, background audio, and more. Even better, you can directly share your project on social apps.
Pros
- Free to use.
- Thousands of free templates.
- Excellent file conversion capabilities.
- 2GB free cloud storage.
Cons
- Not so intuitive.
- Lots of hidden tools.
GIFtoMP4

Rating: N/A
GIFtoMP4 is a relatively straightforward website that lets you convert GIF animations to high-quality MP4 videos. It can convert up to 20 GIF animations at a go. The conversion process is super-fast, and you can download all converted files in a ZIP folder. In addition to converting GIF to MP4, you can also convert GIF to PNG, PNG to GIF, and compress GIF files. Moreover, the site offers maximum file security by deleting all converted GIFs after an hour.
Pros
- Straightforward user interface.
- Batch conversion is supported.
- Excellent GIF compression capability.
Cons
- Lots of annoying adverts.
- Not for advanced users.
AConvert

Rating: 4.4/5
AConvert is a popular online converter for images, videos, audio, and GIF files. This software can convert GIFs to a host of formats, including MP4, AVI, 3GP, VOB, MTS, and more. Also, AConvert supports batch conversions up to 200MB. And after converting, you can download the file using a QR code or save the video on Google Drive and Dropbox.
Pros
- Multiple video output formats are supported.
- Resize and customize the GIF frame.
- Batch conversion is supported.
Cons
- Limited video editing features.
- 200MB maximum file size.
Ezgif

Rating: 4.6/5
Ezgif is an excellent online GIF maker and editor. It’s free, simple, fast, and converts GIFs to MP4 for Instagram without watermarks. You can upload GIF files from local storage or paste the image URL from cloud services. Just upload your GIF file, then click the “Convert to MP4” button to process it. But before converting, you can crop, resize, speed up, cut, split, and more. Sadly, the maximum file conversion limit is a mere 50MB.
Pros
- It supports batch conversion.
- Fast and straightforward to use.
- Multiple GIF editing tools.
Cons
- 50MB maximum file limit.
- Annoying adverts.
Convertio

Rating: 4.5/5
Still unimpressed by the online GIF to MP4 converters above? Try Convertio! It’s an easy GIF converter for mobile and PC browsers. To convert GIF to MP4 on Convertio, upload the GIF file on local storage or cloud and customize the frame rate, playback duration, codec, etc. But like all online GIF converters on this list, Convertio has a maximum file limit of 100MB.
Pros
- Multiple GIF customization tools.
- 200+ formats supported.
- Batch GIF to MP4 conversion.
Cons
- 100MB file limit.
- Ad-supported conversion.
Part 4: Hot FAQs on GIF Instagram
How can I send a GIF on Instagram DM?
You can easily share a GIF file directly on Instagram DM by clicking the Share icon at the top-right corner before opening a chat. Now tap the Stickers icon on the text message field and choose GIF. Search for a GIF file from GIPHY and click GIF to share it. It’s that easy!
How can I add a GIF to Instagram Story using a sticker?
To add a GIF Sticker on Instagram, you’ll first need to convert GIF to APNG (Animated PNG) using a program like Ezgif . Then, upload the APNG file on GIPHY Sticker Maker and generate a sticker. Now launch Instagram and choose a photo to post on your story. Then, click the Sticker icon and search for your username on GIPHY. Lastly, choose the GIF sticker you had created earlier and upload it.
How can I post GIFs to my Instagram Feed and Stories?
Posting a GIF file on Instagram Feeds and Stories is nothing complex. Simply install the GIPHY app and then choose a GIF file you want to share. After that, hit the Share button and then click the Instagram logo. Finally, select Post or Stories and share the GIF file.
Final Words
Although you may not be able to upload GIFs on Instagram directly, the above methods make it a breeze by converting GIFs to MP4 with lossless quality. Remember that you can easily share a GIF on your Instagram Story or Feed directly from GIPHY. But you can only do that using the iPhone or Android GIPHY app. Give it a try!
Guide: Add LUTs in Premiere Pro with Ease
LUTs, fully known as look-up tables, are essential video editing elements. By using LUTs, you can enhance your video quality with improved color grading. Talking about its configuration, LUTs are made of different effects and styles for providing unique visualization.
There is a buzz around adding LUTs to Premiere Pro. Many people often fail to use LUTs due to their complexities. This article comprises detailed information and steps to add LUTs with ease.
Part 1: Why are LUTs Important in Video Editing?
Video editing becomes easier and smarter with LUTs. This specific utility can ensure upscaling video content with improved quality. But why are LUTs important? Here is why:
1. Creative Color Grading
LUTs are known to provide consistent color grading within a video. There are color palettes that are applied to every visual part. Thus, an appropriate visual style is applied to your content, making it more impressive. Moreover, with several creative options, LUTs are adjusted and enhanced to perfection. Color grading becomes special with them.
2. Flexibility and Accuracy
You can change LUTs within desired intensity, blur, sharpness, and lightning. There are also color adjustments with the most flexibility. You can transform your video color gradients as required. The important thing is colors are applied with accuracy and proper details. This way, your video will be more consistent in colors.
3. Advanced AI Functionality
With technological advancement, LUTs are also upgrading with time. The implementation of AI functionality into LUTs makes them more special. The color grading process is fully automated. Thus, videos are analyzed, and LUTs are applied based on the required color criteria. LUTs are also integrated with AI augmented reality to provide realistic experiences.
4. Saves Time
Applying LUT doesn’t take time, and it instantly improves color grading. This way, you don’t need to spend hours on video editing. After all, with LUTs, you can effortlessly upscale video colors and quality. The pre-designed color presets are effective and efficient.
Empower your videos with a new mood using different LUTs. Filmora now offers 100+ top-quality 3D LUTs cover a broad range of scenarios. Transform your videos with Filmora’s powerful 3D LUTs.
Apply LUT on Videos Apply LUT on Videos Learn More

Part 2: How to Add LUTs in Premiere Pro?
LUTs are great video editing tools with extended color grading and schemas. Premiere Pro is a commonly consumed video editing tool with extensive features. Being a new user, you might not be aware of the functionality of LUTs in the platform. To add LUTs to Premiere Pro, you need to follow simple steps:
Step 1: Launch and open Adobe Premiere Pro on your device. Proceed to add the video clip that needs to be edited on the timeline. Navigate to the “Color” workspace from the screen’s top.

Step 2: From the project window on the bottom left, press the “New Item” tab and choose “Adjustment Layer.” Adjust video settings from the available panel, including the “Width,” “Height,” “Timebase,” and “Pixel Aspect Ratio,” and click “OK.”

Step 3: Drag and drop the created adjustment layer from the project window into the timeline and set the length adjacent to the video. Select the adjustment layer, and press “Lumetri Color” from the top in the right-hand panel. From the “Basic Correction” category, set “Input LUT” and proceed to click the “Browse” option from the drop-down menu. Navigate your LUT from the folder and click “Open” to apply desired LUT to the video.

Part 3: What are the Future Prospects of LUTs in Video Editing?
LUTs are already transforming video editing functionalities with automated color grading. This means users don’t have to edit colors, styles, and other elements manually. In the future, LUTs will have amazing prospects. Let’s discuss some of them:
- Cloud Infrastructure: Sharing and collaboration on customized LUTs will be easier in the future. This will be possible due to cloud infrastructure. Hence, video editors worldwide can collaborate and share color insights on projects.
- User-Friendly Interface: LUTs will become more user-friendly in the future. This will make them easy to use and implement in projects. Even beginners will minimal editing knowledge will be able to use them. In contrast, professional editors will streamline their workflows with fast processing.
- Real-time Preview: Using LUTs, users would be able to preview color grading. This way, they will know what their video after LUT would look like. Hence, they can preview different LUT presets and proceed with the desired one.
- Wide Compatibility: The platform compatibility of LUTs will also enhance. After all, you will access them on mobile, web, and desktop devices without problems. You can use LUTs in everyday life by applying them to visual content.
Bonus Part: Wondershare Filmora – An Alternative Haven for Adding LUTs
LUTs are great utility when it comes to video editing environments. Apart from Premiere Pro, several other tools are working to improve the industry. Wondershare Filmora is a video editing software where you can upgrade your videos. You can add different elements, effects, and transitions in Filmora. You can also use and apply LUT presets within Filmora.
Add LUTs on Video For Win 7 or later(64-bit)
Add LUTs on Video For macOS 10.14 or later
There are approximately 100+ LUTs presets in the current version of Filmora. Users can use them to enlighten the colors of videos. Meanwhile, in the new version, there would be additional 100 LUTs. So, in total, you will be getting 200+ LUTs in the new updates provided by Wondershare Filmora. Each LUT is unique in its kind and style.

Key Features of Wondershare Filmora
- Intensity Setting: You can also modify the intensity of your applied colors. This way, you can adjust color saturation on a 0 – 100% scale range. With intensity, there is an option to customize color grading.
- Color Wheel: Within Wondershare Filmora, there is a color wheel for adjusting video colors. Thus, users can set color pallets within their required style. The color grading is then enhanced with the desired customization.
- Optimized Export: The video export facility is optimized with fast processing. You can also set the video format, select resolution, and adjust other settings. The video is exported in the highest of qualities.
- Preview Render: After editing your videos with LUT presets, check color styles using render preview. Render preview allows previewing your final project before exporting it to the device.
Conclusion
Videos are close to all of us, as they store our important visual data. This is why video editing is essential to enhance color grading and schemas. Meanwhile, installing LUTs in Premiere Pro can help improve video quality with minimal effort. A good tool for using LUTs is Wondershare Filmora. After all, Filmora offers 100+ LUT presets, with 100 more to follow soon.
Add LUTs on Video For Win 7 or later(64-bit)
Add LUTs on Video For macOS 10.14 or later
Apply LUT on Videos Apply LUT on Videos Learn More

Part 2: How to Add LUTs in Premiere Pro?
LUTs are great video editing tools with extended color grading and schemas. Premiere Pro is a commonly consumed video editing tool with extensive features. Being a new user, you might not be aware of the functionality of LUTs in the platform. To add LUTs to Premiere Pro, you need to follow simple steps:
Step 1: Launch and open Adobe Premiere Pro on your device. Proceed to add the video clip that needs to be edited on the timeline. Navigate to the “Color” workspace from the screen’s top.

Step 2: From the project window on the bottom left, press the “New Item” tab and choose “Adjustment Layer.” Adjust video settings from the available panel, including the “Width,” “Height,” “Timebase,” and “Pixel Aspect Ratio,” and click “OK.”

Step 3: Drag and drop the created adjustment layer from the project window into the timeline and set the length adjacent to the video. Select the adjustment layer, and press “Lumetri Color” from the top in the right-hand panel. From the “Basic Correction” category, set “Input LUT” and proceed to click the “Browse” option from the drop-down menu. Navigate your LUT from the folder and click “Open” to apply desired LUT to the video.

Part 3: What are the Future Prospects of LUTs in Video Editing?
LUTs are already transforming video editing functionalities with automated color grading. This means users don’t have to edit colors, styles, and other elements manually. In the future, LUTs will have amazing prospects. Let’s discuss some of them:
- Cloud Infrastructure: Sharing and collaboration on customized LUTs will be easier in the future. This will be possible due to cloud infrastructure. Hence, video editors worldwide can collaborate and share color insights on projects.
- User-Friendly Interface: LUTs will become more user-friendly in the future. This will make them easy to use and implement in projects. Even beginners will minimal editing knowledge will be able to use them. In contrast, professional editors will streamline their workflows with fast processing.
- Real-time Preview: Using LUTs, users would be able to preview color grading. This way, they will know what their video after LUT would look like. Hence, they can preview different LUT presets and proceed with the desired one.
- Wide Compatibility: The platform compatibility of LUTs will also enhance. After all, you will access them on mobile, web, and desktop devices without problems. You can use LUTs in everyday life by applying them to visual content.
Bonus Part: Wondershare Filmora – An Alternative Haven for Adding LUTs
LUTs are great utility when it comes to video editing environments. Apart from Premiere Pro, several other tools are working to improve the industry. Wondershare Filmora is a video editing software where you can upgrade your videos. You can add different elements, effects, and transitions in Filmora. You can also use and apply LUT presets within Filmora.
Add LUTs on Video For Win 7 or later(64-bit)
Add LUTs on Video For macOS 10.14 or later
There are approximately 100+ LUTs presets in the current version of Filmora. Users can use them to enlighten the colors of videos. Meanwhile, in the new version, there would be additional 100 LUTs. So, in total, you will be getting 200+ LUTs in the new updates provided by Wondershare Filmora. Each LUT is unique in its kind and style.

Key Features of Wondershare Filmora
- Intensity Setting: You can also modify the intensity of your applied colors. This way, you can adjust color saturation on a 0 – 100% scale range. With intensity, there is an option to customize color grading.
- Color Wheel: Within Wondershare Filmora, there is a color wheel for adjusting video colors. Thus, users can set color pallets within their required style. The color grading is then enhanced with the desired customization.
- Optimized Export: The video export facility is optimized with fast processing. You can also set the video format, select resolution, and adjust other settings. The video is exported in the highest of qualities.
- Preview Render: After editing your videos with LUT presets, check color styles using render preview. Render preview allows previewing your final project before exporting it to the device.
Conclusion
Videos are close to all of us, as they store our important visual data. This is why video editing is essential to enhance color grading and schemas. Meanwhile, installing LUTs in Premiere Pro can help improve video quality with minimal effort. A good tool for using LUTs is Wondershare Filmora. After all, Filmora offers 100+ LUT presets, with 100 more to follow soon.
Add LUTs on Video For Win 7 or later(64-bit)
Add LUTs on Video For macOS 10.14 or later
Also read:
- New 4 Methods How To Make a Recap Video
- New Basic Introduction for LumaFusion Color Grading for 2024
- New In 2024, How to Create the Night-to-Day Effect Video
- Check Out All Details About Kinemaster Here and Understand How to Add Effects in Kinemaster. You Can Use the Chroma Key for the Green Screen as Well for 2024
- New Get Creative with These 10 Video Editing App With Templates
- New In 2024, A Detailed Guide to Do Color Correction in OBS
- 2024 Approved So, without Wasting Time, Let Me Show You How to Mask a Video in Wondershare Filmora. Lets Get Started
- Are You Looking to Make Transparent Background in Canva Then You Can Learn About It in This Article for 2024
- Do You Wish to Design the Perfect Slow-Motion Video on Your Smartphone? Learn some Top-Rated Free Slow-Mo Apps for Android and iOS Users in This Article
- New Finding the Best Game Recorder for PC for 2024
- Updated 8 Tips to Apply Cinematic Color Grading to Your Video
- Updated In 2024, How to Create a Glitch Text Effect?
- New In 2024, How to Create Chroma Key Written Text Effects in Filmora
- Updated In 2024, List of Supported Whatsapp Video Format You May Want to Know
- For Converting GIF to MOV Format, You Dont Need to Search From A-Z. Here Is an Amazing Guide, that Gives You Complete Details About Both Offline and Online Gif-to-MOV Converters. Catch Them Below and Experience a Pro Editing Time
- Updated 2024 Approved Blender Green Screen Effects
- New How to Add Miniature Effect in Video with Filmora for 2024
- New In 2024, Add Motion Blur in After Effects
- Updated 2024 Approved What Are AR Emoji Stickers & How to Add Them to Your Video
- 2024 Approved AVI Video Format How to Open, Play, Edit AVI File?
- New Splice App for Android - How to Download & Use
- In 2024, Looking for the Best Websites for 3D Text PNG? Weve Covered You with Our Top 8 Picks for Your Upcoming Work
- New 2024 Approved Best CapCut Templates for Slow Motion Video Trend
- Easy Guide to Overlay Videos in Premiere Pro
- 2024 Approved How To Make a Video by Mouse in Filmora?
- Replacing Sky in Your Pictures Using Online and Offline Tools for 2024
- 2024 Approved Best Audio Plug-Ins For Video Editors
- New In 2024, Easily Sync Audio With Video With Filmora
- 2024 Approved How to Add Adjustment Layer in Premiere Pro
- Updated How to Make Canva Collages
- Updated Top-Search The Best Game Screen Recording Tools for PC
- Tutorial to Add Effects with Movavi Slideshow Maker
- New Cropping Videos in VLC Step by Step
- In 2024, Turn Your Blog Content Into Audio Podcasts to Reach a Wider Audience and Increase Reader Participation
- New Things You Need to Know About Transparent PNG Remove and Convert
- New In 2024, 4 Ways to Add White Borders on Mobile and Desktop
- In 2024, How to Vlog? A Beginners Guide to Start Vlogging
- Detailed Steps to Rotate Videos in Lightworks for 2024
- In 2024, Do You Need a Royalty-Free 5 Seconds Countdown Video for Your Video but Dont Not Where to Find One? We Will Introduce You to the Best HD and 4K Clips that You Can Always Try Anytime
- Updated How to Make a Video with My Phone
- Best Guide for Setting TikTok Countdown Timer
- New In 2024, Fun & Easy Masking Tricks Wondershare Filmora Tutorial
- In 2024, How To Change Text In Premiere Pro
- New How to Add Effects on TikTok for 2024
- Updated Unlock Your Video Editing Potential With Filmora From Wondershare
- In 2024, Why Did Filmora AI Portrait Attract People?
- How to use iSpoofer on Nokia C300? | Dr.fone
- Updated In 2024, Unveiling the Secrets of Shopee Livestream Selling System
- In 2024, How to Mirror Apple iPhone 6 Plus to Mac? | Dr.fone
- How To Unlock a Xiaomi Redmi K70 Easily?
- Motorola G24 Power won’t play MP4 files
- Forgot iPhone 15 Pro Max Backup Password? Heres What to Do
- In 2024, Easy Ways to Manage Your Tecno Phantom V Flip Location Settings | Dr.fone
- In 2024, A Working Guide For Pachirisu Pokemon Go Map On Apple iPhone 6 Plus | Dr.fone
- In 2024, How to Track WhatsApp Messages on Samsung Galaxy A25 5G Without Them Knowing? | Dr.fone
- 15 Best Strongest Pokémon To Use in Pokémon GO PvP Leagues For Xiaomi Redmi Note 12 4G | Dr.fone
- 15 Best Strongest Pokémon To Use in Pokémon GO PvP Leagues For Motorola Moto G13 | Dr.fone
- How to Repair a Damaged video file of Vivo Y78+ (T1) Edition using Video Repair Utility on Windows?
- Title: Updated In 2024, How to Rotate a Video in Windows 10
- Author: Chloe
- Created at : 2024-04-24 07:08:37
- Updated at : 2024-04-25 07:08:37
- Link: https://ai-editing-video.techidaily.com/updated-in-2024-how-to-rotate-a-video-in-windows-10/
- License: This work is licensed under CC BY-NC-SA 4.0.


