
:max_bytes(150000):strip_icc():format(webp)/GettyImages-1065028028-8e770c58918e4cf8b0852e81cff60ed6.jpg)
Updated In 2024, How to Splice Videos Together on iPhone
How to Splice Videos Together on iPhone
Create High-Quality Video - Wondershare Filmora
An easy and powerful YouTube video editor
Numerous video and audio effects to choose from
Detailed tutorials provided by the official channel
Your iPhone comes with so many features, including a camera. You, therefore, have a great chance to take photos, record videos, and catch every moment at your will. You’ll need to share your videos on social media sites or other platforms. Remember, you can spice them up with other add-ons. The most sophisticated way is to splice your iPhone, merging your videos into a compelling piece of art. Let’s uncover several video editors that you can use on your iPhone for splicing your videos.

In this article
01 How to Splice Videos on an iPhone
02 [Desktop solution] Splice videos with Filmora
How to Splice Videos on an iPhone
The iPhone lets you do simple edits in the camera roll, such as trimming videos. However, when it comes to joining multiple clips, you need to step up your game with video editors. We bring you exclusive tools that you can use to splice videos together on your iPhone.
Method 1: Using iMovie on the iPhone, splice videos together
This splicing app from Apple is smart at editing professional-quality videos. You can get it for free to splice your videos on the iPhone. Color grading, narration, and the green-screen effect are just a few of the many tools available in iMovie.
Features of iMovie
- Combine multiple videos and transitions.
- Green-screen controls to soften the effects that you add to your movie.
- Freely adjust the level of your audio clip.
- Timeline mode features include a color balance and tone adjusting feature.
- A people detection feature that quickly recognizes characters in a film.
- Directly export your spliced video to social networking sites or upload it to a cloud service.
- Excellent tools to facilitate video editing.
Steps to splice video on iMovie
Step 1. First, visit the “App Store, download the iMovie app, and install it on your iPhone.
Step 2. Once iMovie is installed on your iPhone, you can then launch it and continue with the splicing mission of your videos.
Step 3. Check the main screen of the app for the “three” tabs located at the top. Choose the tab indicated as the “Projects to create a new project” option. You’ll then be redirected to the next screen, where you should then tap on the “Create Project” option.
Step 4. When prompted, please choose the “Movie” option as the project type to create.
Step 5. Next, select the videos you want and tap on the “Add” option to add your videos from your iPhone Camera Roll. Next, tap on the “Create Movie” option at the bottom.
Step 6. iMovie lets you add any effects to your video at this point. Once completed, tap on the “Done” tab found at the top-left corner of your iPhone’s screen. Finally, save your combined videos into one file. You can also directly upload your video to cloud storage platforms.

Method 2: Using Filmora on the iPhone, splice videos together
Filmora is another app that lets you splice iOS in a few steps. It presents an intuitive interface with powerful video editing features. You can add background music, motion effects, and text effects to your video, and merge several clips into one. Let’s check out how to combine your videos on the iPhone.
Filmora’s Features
- The Transitions feature lets you create interestingly moving clips.
- Simple editing features to trim, cut, and merge videos.
- The Canvas feature is suitable for choosing the best aspect ratio for your video.
- You can also play your footage backward with the reverse feature.
- You can easily adjust the speed of your video by speeding it up or slowing it down.
A guide to splice video with Filmora
Step 1. You first need to download and install the “Filmora Go” app on your iPhone.
Step 2. Next, hit the “New Project” button and begin to select the videos you wish to splice.
Step 3. Add the selected videos to the interface by clicking on the “Import” button. The “Edit” panel will automatically open.
Step 4. Check for the available tools in the “Editing panel” section. You can now freely use the available effects, like adding music, cropping your videos, adding text, among other effects.
Step 5: Finally, you can save and export your video to other media platforms if you want.
Method 3: Splice videos together on the iPhone using Quik
You can also splice your iPhone with Quik Video Editor. Quik video editor is quite advanced and will support the merging of various video clips into one. With this app, you can escalate your video editing gigs, such as adding text, filters, music, among other options. Follow these steps to merge your videos.
Quik’s distinguishing characteristics
- You can energize your videos by adjusting the speed. Likewise, you can stop the time with Freeze Frame.
- Use exclusive filters to tweak your video to perfection, such as snow and water filters.
- Easily add music to your video.
- Sync your edits with royalty-free tracks.
- Trimming, cropping, and other simple edits
How to splice video with Quik
Step 1. Download and install the “Quik” app on your iPhone, then fire it up.
Step 2. Next, begin to create a new project in the Quik video editor on your iPhone. Just tap on the “All photos” dropdown, then select the “Videos” option. Choose the video clips that you wish to splice on your iPhone.
Step 3. You can also get other effects to add to your video. At the bottom, check out the “Effect” tab. Here, you can easily add music, filters, and others to polish your movie.
Step 4. Finally, click on the “Save” tab to save the merged videos.

[Desktop solution] Splice videos with Filmora
Apart from splicing videos on the iPhone, you can also utilize the desktop to merge your videos. Many users like to transfer their data, including videos, to a desktop for backup or to create memory space on their phones. This may result in too many videos saved on your desktop. You can splice them together into a single movie by using Filmora.
This video editor works on both Windows and Mac computers. It is also easy to use, enabling a simple drop-and-drag action. Besides, it harbors spending editing features and an additional 300+ built-in visual effects like overlays, transitions, and filters. Here are some notable features of Filmora.
Key Features of Filmora
- It will merge your videos without any quality loss to the original file.
- Easily speed up hi-res footage with the Proxy workflow feature.
- Use the instant mode feature to quickly edit your videos.
- With the masking feature, you can easily animate and customize the mask for an improved finish.
- This app also comes with an in-built stock media feature that facilitates free copyright stock footage.
For Win 7 or later (64-bit)
For macOS 10.12 or later
Steps to using Filmora to splice videos
Filmora supports Windows and Macs. So first, choose your computer’s version and download the correct one. Then follow these steps to splice your videos.
Step 1: Add videos.
After installing and launching Filmora on your PC, continue to add the videos that you want to splice. So, click on the “Import” tab to load your clips into the program. You can also drag and drop the video clips directly into the media library.
Step 2. Splice video
All the videos you’ve added will show up as thumbnails in the editor’s window. Now simply drag and drop the clips to the same video track in the timeline. Next, place the “Playhead” at the starting point of the clip where you want the sliced video to start playing. Your videos will be spliced together seamlessly. You can also use the “Preview” feature to preview your video before saving it to the computer.
Step 3: Finalize your video.
Filmora comes with numerous editing features that let you rotate, trim, add titles, transitions, set speed, add music, and much more. To trim your clip, simply move the “Playhead” to the position you wish to cut first. Next, click on the split icon in the toolbar. You can also right-click on any transition to apply effects, add subtitles, rotate, and perform other advanced editing.
Step 4. Save and Export
Ascertain that your video is good enough, then hit the “Create” tab. Continue to save and export your video in any format. Just click on the “Export” tab to finally share your video on platforms like YouTube and Vimeo. You can also directly convert to other portable devices like the iPhone.
Conclusion
●Several options are available to splice video on the iPhone. You can use the free app, iMovie, for iPhone and Mac. Filmora and Quik are also uniquely able to splice video into a single merge. However, if you wish to retain the original quality of your video, Filmora Video Editor is the option to settle for. It has improved features that will manage any form of edit in simple steps. More so, you can easily share your finished video on social media sites as well as upload it directly to streaming sites like YouTube and Vimeo.es.
Your iPhone comes with so many features, including a camera. You, therefore, have a great chance to take photos, record videos, and catch every moment at your will. You’ll need to share your videos on social media sites or other platforms. Remember, you can spice them up with other add-ons. The most sophisticated way is to splice your iPhone, merging your videos into a compelling piece of art. Let’s uncover several video editors that you can use on your iPhone for splicing your videos.
In this article
01 How to Splice Videos on an iPhone
02 [Desktop solution] Splice videos with Filmora
How to Splice Videos on an iPhone
The iPhone lets you do simple edits in the camera roll, such as trimming videos. However, when it comes to joining multiple clips, you need to step up your game with video editors. We bring you exclusive tools that you can use to splice videos together on your iPhone.
Method 1: Using iMovie on the iPhone, splice videos together
This splicing app from Apple is smart at editing professional-quality videos. You can get it for free to splice your videos on the iPhone. Color grading, narration, and the green-screen effect are just a few of the many tools available in iMovie.
Features of iMovie
- Combine multiple videos and transitions.
- Green-screen controls to soften the effects that you add to your movie.
- Freely adjust the level of your audio clip.
- Timeline mode features include a color balance and tone adjusting feature.
- A people detection feature that quickly recognizes characters in a film.
- Directly export your spliced video to social networking sites or upload it to a cloud service.
- Excellent tools to facilitate video editing.
Steps to splice video on iMovie
Step 1. First, visit the “App Store, download the iMovie app, and install it on your iPhone.
Step 2. Once iMovie is installed on your iPhone, you can then launch it and continue with the splicing mission of your videos.
Step 3. Check the main screen of the app for the “three” tabs located at the top. Choose the tab indicated as the “Projects to create a new project” option. You’ll then be redirected to the next screen, where you should then tap on the “Create Project” option.
Step 4. When prompted, please choose the “Movie” option as the project type to create.
Step 5. Next, select the videos you want and tap on the “Add” option to add your videos from your iPhone Camera Roll. Next, tap on the “Create Movie” option at the bottom.
Step 6. iMovie lets you add any effects to your video at this point. Once completed, tap on the “Done” tab found at the top-left corner of your iPhone’s screen. Finally, save your combined videos into one file. You can also directly upload your video to cloud storage platforms.
Method 2: Using Filmora on the iPhone, splice videos together
Filmora is another app that lets you splice iOS in a few steps. It presents an intuitive interface with powerful video editing features. You can add background music, motion effects, and text effects to your video, and merge several clips into one. Let’s check out how to combine your videos on the iPhone.
Filmora’s Features
- The Transitions feature lets you create interestingly moving clips.
- Simple editing features to trim, cut, and merge videos.
- The Canvas feature is suitable for choosing the best aspect ratio for your video.
- You can also play your footage backward with the reverse feature.
- You can easily adjust the speed of your video by speeding it up or slowing it down.
A guide to splice video with Filmora
Step 1. You first need to download and install the “Filmora Go” app on your iPhone.
Step 2. Next, hit the “New Project” button and begin to select the videos you wish to splice.
Step 3. Add the selected videos to the interface by clicking on the “Import” button. The “Edit” panel will automatically open.
Step 4. Check for the available tools in the “Editing panel” section. You can now freely use the available effects, like adding music, cropping your videos, adding text, among other effects.
Step 5: Finally, you can save and export your video to other media platforms if you want.
Method 3: Splice videos together on the iPhone using Quik
You can also splice your iPhone with Quik Video Editor. Quik video editor is quite advanced and will support the merging of various video clips into one. With this app, you can escalate your video editing gigs, such as adding text, filters, music, among other options. Follow these steps to merge your videos.
Quik’s distinguishing characteristics
- You can energize your videos by adjusting the speed. Likewise, you can stop the time with Freeze Frame.
- Use exclusive filters to tweak your video to perfection, such as snow and water filters.
- Easily add music to your video.
- Sync your edits with royalty-free tracks.
- Trimming, cropping, and other simple edits
How to splice video with Quik
Step 1. Download and install the “Quik” app on your iPhone, then fire it up.
Step 2. Next, begin to create a new project in the Quik video editor on your iPhone. Just tap on the “All photos” dropdown, then select the “Videos” option. Choose the video clips that you wish to splice on your iPhone.
Step 3. You can also get other effects to add to your video. At the bottom, check out the “Effect” tab. Here, you can easily add music, filters, and others to polish your movie.
Step 4. Finally, click on the “Save” tab to save the merged videos.
[Desktop solution] Splice videos with Filmora
Apart from splicing videos on the iPhone, you can also utilize the desktop to merge your videos. Many users like to transfer their data, including videos, to a desktop for backup or to create memory space on their phones. This may result in too many videos saved on your desktop. You can splice them together into a single movie by using Filmora.
This video editor works on both Windows and Mac computers. It is also easy to use, enabling a simple drop-and-drag action. Besides, it harbors spending editing features and an additional 300+ built-in visual effects like overlays, transitions, and filters. Here are some notable features of Filmora.
Key Features of Filmora
- It will merge your videos without any quality loss to the original file.
- Easily speed up hi-res footage with the Proxy workflow feature.
- Use the instant mode feature to quickly edit your videos.
- With the masking feature, you can easily animate and customize the mask for an improved finish.
- This app also comes with an in-built stock media feature that facilitates free copyright stock footage.
For Win 7 or later (64-bit)
For macOS 10.12 or later
Steps to using Filmora to splice videos
Filmora supports Windows and Macs. So first, choose your computer’s version and download the correct one. Then follow these steps to splice your videos.
Step 1: Add videos.
After installing and launching Filmora on your PC, continue to add the videos that you want to splice. So, click on the “Import” tab to load your clips into the program. You can also drag and drop the video clips directly into the media library.
Step 2. Splice video
All the videos you’ve added will show up as thumbnails in the editor’s window. Now simply drag and drop the clips to the same video track in the timeline. Next, place the “Playhead” at the starting point of the clip where you want the sliced video to start playing. Your videos will be spliced together seamlessly. You can also use the “Preview” feature to preview your video before saving it to the computer.
Step 3: Finalize your video.
Filmora comes with numerous editing features that let you rotate, trim, add titles, transitions, set speed, add music, and much more. To trim your clip, simply move the “Playhead” to the position you wish to cut first. Next, click on the split icon in the toolbar. You can also right-click on any transition to apply effects, add subtitles, rotate, and perform other advanced editing.
Step 4. Save and Export
Ascertain that your video is good enough, then hit the “Create” tab. Continue to save and export your video in any format. Just click on the “Export” tab to finally share your video on platforms like YouTube and Vimeo. You can also directly convert to other portable devices like the iPhone.
Conclusion
●Several options are available to splice video on the iPhone. You can use the free app, iMovie, for iPhone and Mac. Filmora and Quik are also uniquely able to splice video into a single merge. However, if you wish to retain the original quality of your video, Filmora Video Editor is the option to settle for. It has improved features that will manage any form of edit in simple steps. More so, you can easily share your finished video on social media sites as well as upload it directly to streaming sites like YouTube and Vimeo.es.
How to Crop a Video in Davinci Resolve [Step by Step]
Sometimes, when it comes to editing a video, we don’t even know where to start, because there are too many options –online platforms which instantly help us edit our clips, without lengthy process of downloading and installing computer programs;
Mobile applications with user-friendly interface, allowing us to manipulate the footage quickly, easily choose our preferred formats and effects and adjust the clips according to the requirements our target platforms set; more time-consuming and advanced software with even more options, but which seem to require us to be more skilled and experienced in editing.
Even though editing, as other innovative and creative actions, is limitless in its possibilities, sometimes we just need to make a little change in our project and it’s quite enough for us to be satisfied with our work and material. One of the things which is rather simple to do, but sometimes essential, when it comes to making our clips better and more picturesque for the audience, is cropping a video.
Cropping, in its essence, is great to “hide” some unnecessary objects in our video, and/or highlight the main ones. In this article, we discuss how to crop a video in a software called DaVinci Resolve, in simple little steps, how to export our work and lastly, what would be the alternate way to do the same in other computer program.
Part 1. How to crop a video in Davinci Resolve
First and foremost, let’s get to know Davinci Resolve! As mentioned above, it is a software, so let’s be well-aware that we have to download and install it on our computer systems. Of course, it takes a bit of time, but to be able to use an advanced software, it’s totally worth it. If we are to search for the information about Davinci Resolve, we come across the following description: “color grading and non-linear video editing application for macOS, Windows, and Linux”. So, no matter which system we have, we can count on this software, which is a real advantage!

To touch upon the functions, Davinci Resolve includes modules for video editing, color correction, audio mixing and effects, and visual effects. The interface of it is quite advanced, but would be well and soon understandable for someone who has ever used a similar editing software, such as Adobe Premiere Pro. If you are interested in everything the software has to offer, we recommend watching this very viral beginner tutorial .
Now, back to cropping – so, you want to crop the video you took or got somehow, and you also think about using Davinci Resolve? Cropping, in most cases, meaning different applications, platforms and software, is not a complicated task at all, and you can do it in a very short amount of time in Davinci Resolve, too. Therefore, let’s delve into the steps on how to do it!
First, download and install the software, and when it is finished, launch it. You will see a totally clean program, until you add the video you want to work on. To do so, you have to find File in the top menu, find Import and then choose Media.

Then it will open a new window where you can choose your file…

Your chosen file will be added in Media Pool, and to direct it into the sequence, you have to drag and drop it there.


And then you might have difficulty to find the crop button. But here it is – below the screen, on the left, there are two icons, and the second one says – Tools…

Click on the Tools button and more options will appear down the screen where the video clip is shown. And there, you will notice the famous Crop icon, just the second one, which will put your clip in a new window with the option below to crop each side, plus, to add feather around the cropped video.

When you are ready to make a video bigger and adjust it to a frame size, you need to choose Transform button, left to the Crop icon. You can “touch” the dots on the video and manually manage the size of your cropped clip.


When you are ready to save the video you cropped, find Quick Export – you will see the button above the clip, on the right. A little window with settings will appear, so you can choose the format you want to save your video in, and then, of course, click on Export for the last time.


The video will be saved where you wanted to, so, you have just learned – how to crop a video in Davinci Resolve!
Part 2. An easier way to crop a video in Wondershare Filmora
Even though it’s quite easy to crop a video in Davinci Resolve, who knows, maybe for you, other software is preferable? It doesn’t always come down to which is best, but rather, it also boils down to an individual choice – which one do YOU prefer? Especially, let’s say, when it comes to a “cosy” one like Filmora Video Editor is, it’s worth a thought –a pleasant interface and great tools and features attract users and video enthusiasts from all around the world. Filmora is considered as one of the best, the most easy-to-use and, at the same time, advanced software for video editing. So, why not give it a try? Let’s discuss how to crop a video in Wondershare Filmora then, step by step.
For Win 7 or later (64-bit)
For macOS 10.14 or later
First off, we start in the same way – download and install Wondershare Filmora X. Oh – maybe, that is the step you have already taken?..
Click on Import Media Files Here, which will let you add the file(s) you are going to crop.

You will choose your clip(s) you would like to crop and then drag and drop it in the sequence.

Above your video in the sequence you will see little icons and find a Crop one.

After clicking on it, a new window will open – it’s for Crop and Zoom, where you can choose a needed ratio or do it manually (for it, you have to select Custom first).

After clicking OK, your video will be cropped as you like. Then, you can proceed with exporting it – click on Export, choose your preferred settings, and save the video where you want it to be accessible later.

So, in this article, we have discussed software Davinci Resolve and how to crop a video there. A step by step, written guides help you make the best out of your video clips and never lose track of what you are doing, also, comparing different video editing platforms and tools will make you understand which one works best for you or/and your company. Another part of this article was Wondershare Filmora X and how to crop a video there, also, with a detailed guide there. We hope you know a little more about programs, editing, and your own choice!
To touch upon the functions, Davinci Resolve includes modules for video editing, color correction, audio mixing and effects, and visual effects. The interface of it is quite advanced, but would be well and soon understandable for someone who has ever used a similar editing software, such as Adobe Premiere Pro. If you are interested in everything the software has to offer, we recommend watching this very viral beginner tutorial .
Now, back to cropping – so, you want to crop the video you took or got somehow, and you also think about using Davinci Resolve? Cropping, in most cases, meaning different applications, platforms and software, is not a complicated task at all, and you can do it in a very short amount of time in Davinci Resolve, too. Therefore, let’s delve into the steps on how to do it!
First, download and install the software, and when it is finished, launch it. You will see a totally clean program, until you add the video you want to work on. To do so, you have to find File in the top menu, find Import and then choose Media.
Then it will open a new window where you can choose your file…
Your chosen file will be added in Media Pool, and to direct it into the sequence, you have to drag and drop it there.
And then you might have difficulty to find the crop button. But here it is – below the screen, on the left, there are two icons, and the second one says – Tools…
Click on the Tools button and more options will appear down the screen where the video clip is shown. And there, you will notice the famous Crop icon, just the second one, which will put your clip in a new window with the option below to crop each side, plus, to add feather around the cropped video.
When you are ready to make a video bigger and adjust it to a frame size, you need to choose Transform button, left to the Crop icon. You can “touch” the dots on the video and manually manage the size of your cropped clip.
When you are ready to save the video you cropped, find Quick Export – you will see the button above the clip, on the right. A little window with settings will appear, so you can choose the format you want to save your video in, and then, of course, click on Export for the last time.
The video will be saved where you wanted to, so, you have just learned – how to crop a video in Davinci Resolve!
Part 2. An easier way to crop a video in Wondershare Filmora
Even though it’s quite easy to crop a video in Davinci Resolve, who knows, maybe for you, other software is preferable? It doesn’t always come down to which is best, but rather, it also boils down to an individual choice – which one do YOU prefer? Especially, let’s say, when it comes to a “cosy” one like Filmora Video Editor is, it’s worth a thought –a pleasant interface and great tools and features attract users and video enthusiasts from all around the world. Filmora is considered as one of the best, the most easy-to-use and, at the same time, advanced software for video editing. So, why not give it a try? Let’s discuss how to crop a video in Wondershare Filmora then, step by step.
For Win 7 or later (64-bit)
For macOS 10.14 or later
First off, we start in the same way – download and install Wondershare Filmora X. Oh – maybe, that is the step you have already taken?..
Click on Import Media Files Here, which will let you add the file(s) you are going to crop.
You will choose your clip(s) you would like to crop and then drag and drop it in the sequence.
Above your video in the sequence you will see little icons and find a Crop one.
After clicking on it, a new window will open – it’s for Crop and Zoom, where you can choose a needed ratio or do it manually (for it, you have to select Custom first).
After clicking OK, your video will be cropped as you like. Then, you can proceed with exporting it – click on Export, choose your preferred settings, and save the video where you want it to be accessible later.
So, in this article, we have discussed software Davinci Resolve and how to crop a video there. A step by step, written guides help you make the best out of your video clips and never lose track of what you are doing, also, comparing different video editing platforms and tools will make you understand which one works best for you or/and your company. Another part of this article was Wondershare Filmora X and how to crop a video there, also, with a detailed guide there. We hope you know a little more about programs, editing, and your own choice!
How to Zoom Picture in Picture [Easy Solution]
Zoom is one of the greatest options on the market for video conferencing. It doesn’t matter whether you use it at home or in an office environment; it will quickly link the team members. One of the most popular video conferencing programs is Zoom. When in-person meetings aren’t feasible, it enables you to communicate electronically with employees, and it’s been a major popularity for social occasions as well. In case you’re not acquainted, picture-in-picture mode enables you to watch videos from one app while using your PC normally. The movie will keep playing in a tiny thumbnail window so that two applications may work simultaneously on your smartphone.
You may create virtual audio and video conferences, webinars, live chats, screen sharing, and other collaboration tools with Zoom, a cloud-based video communications solution. Zoom’s most recent iPhone apps let you dismiss a Zoom Meeting while keeping the Zoom video call open in a picture-in-picture mode. To join a Zoom conference, you don’t need an account, and because the software works with Mac, Windows, Linux, iOS, and Android devices, nearly anybody can use it. Since using Zoom’s picture-in-picture mode is the same as using it with other applications, you shouldn’t have any trouble if you often use PiP mode. Here are the top 4 methods you can refer to picture in picture in Zoom.
Method 1: Swap Shared Screen with Video
You may move the Zoom Meeting PiP window across the screen, change the thumbnail’s size, and utilize other applications while it remains open, just like any other picture-in-picture window. Before leaving the meeting if you’re not giving a presentation or speaking, you should definitely mute Zoom on your iPhone to prevent noises from your typing or other activities from entering the conversation. Additionally, keep in mind to switch off the camera if you’re engaged in something distracting, at least for the duration of your activity. To reopen the Zoom Meeting and go back to the Zoom app, touch the Picture-in-Picture mode pane. Here are some actions to keep in mind:
Steps to Swap Shared Screen for Zoom Picture in Picture
Step1Launch or enter a Zoom meeting. Keep the video on your main screen at all times, closing the chat and participant list as necessary.
Step2Tap the Home button or swipe up from the bottom of the screen.
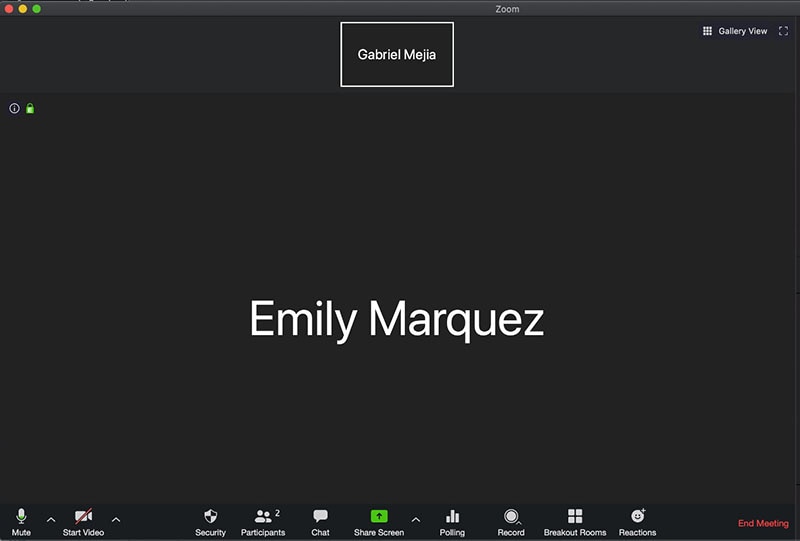
Step3Picture-in-picture mode should be activated automatically throughout the meeting.
Method 2: Use Ecamm Live
Live streaming is a fantastic way to provide original content and stand out from the crowd. To prevent any operational difficulties, a more sophisticated virtual camera is absolutely necessary. You now have magical abilities thanks to Ecamm virtual cam, including the ability to add text, animations, observe a live stream, post viewer comments, play music, share your screen, use sound effects, and many more. It offers the Ecamm live virtual camera zoom function for video conferences so you may improve your Zoom discussions by sending output to other PC programs. You could see a quality difference between what you view in Ecamm Live and what your Zoom visitors see while utilizing virtual camera with Zoom. The quality of a Zoom video stream cannot be improved using Ecamm Live. Simply broadcast the Zoom app using Ecamm Live’s Screen Share mode to utilize Ecamm Live for picture-in-picture virtual presentations on Zoom.
Steps to Use Ecamm Live for Zoom Picture in Picture
Step1Download the Ecamm Application
Install Ecamm Live on your computer, then choose the center button in the source switcher at the top of the main window to enter Screen Share mode.
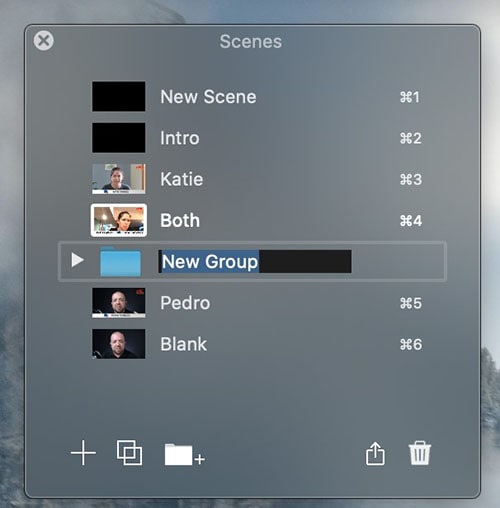
Step2Create Scenes
With the use of Ecamm Live’s Virtual Camera and Virtual Mic capabilities, you may transfer Ecamm Live’s output to almost any other Mac software, including Zoom. After setting, create the scenes in the program to quickly switch between various cameras.
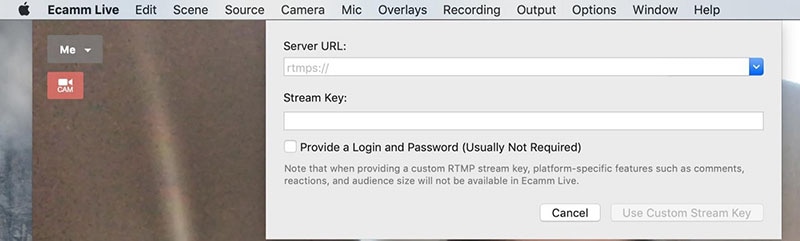
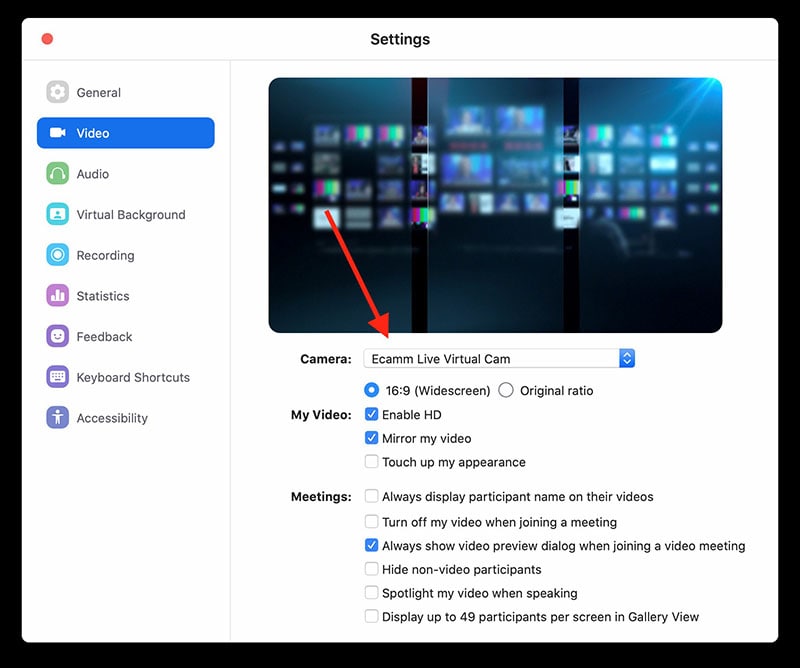
Step3Select Ecamm on Zoom
You may also utilize Ecamm Live’s Sharing Window capability to feed Ecamm Live output into Zoom. Simply activate the virtual camera, and then, as seen below, choose Ecamm Live Virtual Camera in Zoom’s video settings:
Step4Begin Your Presentation
Finally, click the PC share option to show your Zoom app to your audience. To conceal a picture-in-picture window that displays your camera image while live streaming, click the PIP button.
Method 3: Use Filmora as A Switcher
Zoom has solutions that will make your meetings simple and secure. It gives your remote staff a secure setting to interact and share crucial information. Ideal control over your film and configuration options to make them aesthetically pleasing is something Zoom lacks. To overcome the drawbacks and improve the quality of your online meetings, you may take use of the capabilities of Zoom in conjunction with Filmora. Filmora was developed with the intention of easing user burden and supporting applications. Though complicated, the program is simple to use. The perhaps most popular web information that may be saved on your computer can be easily captured by just angling your screen. For more information on how to record and save your Zoom for picture in picture, see the guide here.
To broadcast a variety of situations in a grid style, you may also combine inputs from your camera, microphone, computer screen, and web conferencing software. Wondershare -the finest desktop application for recording a Zoom Picture in Picture meeting- is Filmora. With the majority of cameras, this app’s screen recording capability is both user-friendly and feature-rich. Here, users may either choose a particular region to record or record their zoom meetings in Fullscreen mode. Additionally, you may choose the camera and input microphone that will be used while recording a video overlay. The addition of relevant comments like phrases, lines, drawings, symbols, etc. is also possible by users. The detailed procedure for recording a Zoom Picture-in-Picture meeting using a Filmora recorder is given below:
Free Download For Win 7 or later(64-bit)
Free Download For macOS 10.14 or later
Step1Download and Install Filmora Zoom Recorder
You may find both types, i.e., the most recent Windows and Mac versions, by first visiting the usual website and then using this Zoom. Install the program on your computer once you download it to get started.

Step2Initiate Filmora Recorder
After finishing the installation process for this Reside Zoom recorder, launch it from the main menus and choose “New Task” when prompted. It will take you to Filmora’s streamlined user interface where you can immediately start filming. Then, as seen in the picture below, you may adjust the screen recording using your preferred camera, microphone, and system settings:

Step3Begin/End the Recording
When you are through configuring this Zoom picture in picture recorder, click the Record button, and it will immediately begin recording your customized screen. Similar to that, after you’re done recording, click Stop, which will take you inside the video editor where you may edit your recorded information.

Step4Share Recordings
When you have everything ready, export your recording right away. After you’re done with the editing part, you do have a lot of options to choose from when displaying your screen capture and webcam stories. To do so, click the Export button in the item user interface’s top-right corner as shown below:
You may easily choose your preferred way to share from there if you choose to upload your work of zoom picture in picture recordings straight to the YouTube or other reputable websites right now. Simply refer to the Sharing plug-ins in the Export window to find out more.
Method 4: Use Hardware Switcher ATEM Mini Pro
Particularly on Zoom, the ATEM Mini is excellent for video conferences. The Blackmagic ATEM Mini is a USB video interface and HDMI switcher. Four HDMI inputs, or four cameras that can produce an HDMI video stream, may be switched between live. This device integrates Zoom meetings fast and makes it incredibly simple to set up your audio, a sometimes-forgotten aspect of video broadcasting. This sophisticated video switcher promises to offer broadcast-quality multi-camera footage with ease and is targeted at gamers, streamers, and online reviewers. It connects to a computer via a USB-C to USB-A connection. The video feed may then be sent to distant colleagues via a number of well-liked videos streaming services, including Zoom.
Step1The ATEM Mini Pro is a basic control switcher with pro-broadcast performance. Your ATEM Mini Pro is really simple to set up. You can connect a full setup with several cameras and microphones in around 30 minutes.
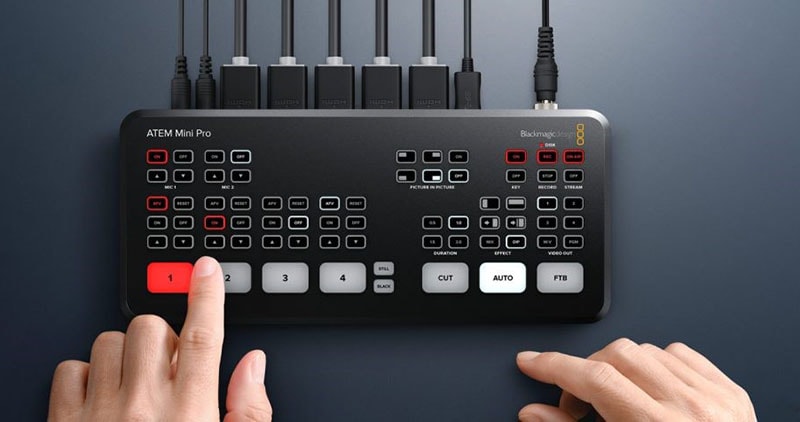
Step2You may connect several camera sources to the inputs of the ATEM Mini Pro. The 4 HDMI inputs each have a separate standards converter built in. As a result, the ATEM Mini can automatically convert inputs that are 1080p, 1080i, or 720p to the switcher’s video standard. You may make quick changes between inputs with no latency or disruption to your video output by using the ergonomic buttons.
Step3As a third option, Zoom offers ATEM Mini, which enables you to switch between several inputs, add custom visuals, and adjust audio levels all from a single interface. To improve the quality of your production, you may even use smooth transitions like wipes or fades. You can even test any input stream before making it live.
Conclusion
When you are doing a Zoom Meeting and share your screen, only to discover that what the other attendees see is a split screen with your material and the other Attendee cams, it is highly annoying. You may move the Zoom Meeting PiP window across the screen, change the thumbnail’s size, and utilize other applications while it remains open, just like any other picture-in-picture window. Someone must be sharing information in the Zoom conference for the Picture in Picture, or “Split Screen” option, to be active. We’ve listed the top techniques for doing it effectively above. To do this work without difficulty, use them as your guide.
Free Download For macOS 10.14 or later
Step1Download and Install Filmora Zoom Recorder
You may find both types, i.e., the most recent Windows and Mac versions, by first visiting the usual website and then using this Zoom. Install the program on your computer once you download it to get started.
Step2Initiate Filmora Recorder
After finishing the installation process for this Reside Zoom recorder, launch it from the main menus and choose “New Task” when prompted. It will take you to Filmora’s streamlined user interface where you can immediately start filming. Then, as seen in the picture below, you may adjust the screen recording using your preferred camera, microphone, and system settings:
Step3Begin/End the Recording
When you are through configuring this Zoom picture in picture recorder, click the Record button, and it will immediately begin recording your customized screen. Similar to that, after you’re done recording, click Stop, which will take you inside the video editor where you may edit your recorded information.
Step4Share Recordings
When you have everything ready, export your recording right away. After you’re done with the editing part, you do have a lot of options to choose from when displaying your screen capture and webcam stories. To do so, click the Export button in the item user interface’s top-right corner as shown below:
You may easily choose your preferred way to share from there if you choose to upload your work of zoom picture in picture recordings straight to the YouTube or other reputable websites right now. Simply refer to the Sharing plug-ins in the Export window to find out more.
Method 4: Use Hardware Switcher ATEM Mini Pro
Particularly on Zoom, the ATEM Mini is excellent for video conferences. The Blackmagic ATEM Mini is a USB video interface and HDMI switcher. Four HDMI inputs, or four cameras that can produce an HDMI video stream, may be switched between live. This device integrates Zoom meetings fast and makes it incredibly simple to set up your audio, a sometimes-forgotten aspect of video broadcasting. This sophisticated video switcher promises to offer broadcast-quality multi-camera footage with ease and is targeted at gamers, streamers, and online reviewers. It connects to a computer via a USB-C to USB-A connection. The video feed may then be sent to distant colleagues via a number of well-liked videos streaming services, including Zoom.
Step1The ATEM Mini Pro is a basic control switcher with pro-broadcast performance. Your ATEM Mini Pro is really simple to set up. You can connect a full setup with several cameras and microphones in around 30 minutes.
Step2You may connect several camera sources to the inputs of the ATEM Mini Pro. The 4 HDMI inputs each have a separate standards converter built in. As a result, the ATEM Mini can automatically convert inputs that are 1080p, 1080i, or 720p to the switcher’s video standard. You may make quick changes between inputs with no latency or disruption to your video output by using the ergonomic buttons.
Step3As a third option, Zoom offers ATEM Mini, which enables you to switch between several inputs, add custom visuals, and adjust audio levels all from a single interface. To improve the quality of your production, you may even use smooth transitions like wipes or fades. You can even test any input stream before making it live.
Conclusion
When you are doing a Zoom Meeting and share your screen, only to discover that what the other attendees see is a split screen with your material and the other Attendee cams, it is highly annoying. You may move the Zoom Meeting PiP window across the screen, change the thumbnail’s size, and utilize other applications while it remains open, just like any other picture-in-picture window. Someone must be sharing information in the Zoom conference for the Picture in Picture, or “Split Screen” option, to be active. We’ve listed the top techniques for doing it effectively above. To do this work without difficulty, use them as your guide.
If You’re Looking to Create a Brand Video that Makes Your Business Pop Out, We Have Put Together some Video Editing Tips and Tricks that Work
Brand Video Maker - Wondershare Filmora
Provide abundant video effects - A creative video editor
Powerful color correction and grading
Detailed tutorials provided by the official channel
Create a Brand Video to Make Your Business Shine
Did you know that 8 out of 10 people go ahead and purchase a product just by watching brand videos?
I’m sure you are looking for similar success when it comes to your brand video.
But you can’t just compel the audience by making any video!
- It has to be entertaining and inspirational.
- It has to be innovative.
- It needs to have something that grabs the audience’s attention.
And, with all this, it should also successfully share your brand’s core values.
So, how do you create such a video?
It’s not about simply whipping out a camera and pressing the record button. A lot of thought is involved in creating a brand video, but most importantly, you need a high-quality video editor to refine your video and make it more fun, entertaining, and innovative - A video editor like Wondershare Filmora.
And that’s what this article is about - How to use the various basic and advanced editing tools in Filmora to create a brand video that makes a difference!
But first, let’s have a look at…
Wondershare Filmora’s Brand Video
What’s so special about it, you ask?
For starters, it fits right into the criteria we mentioned above. It’s innovative, entertaining, vibrant, and fun and showcases all the features of Filmora 11.
Here, see for yourself…
From all the new effects to the AR sticker themes and other video editing features like speed ramping, masking, and green screen effect, the video successfully lets the audience know how creative they can get with Filmora.
But did you see that they didn’t put the features out there just like that! They actually used all the basic and advanced video editing features in the video to give us an idea of what it looks like when put in action.
And the video quality, the content, and the flow of the video speak for themselves.
I mean, I watched the video all the way to the end without getting bored for even a single second. And, being a video editor, I might as well get Filmora 11 after watching the highly compelling video!
Now, if you’re also wow-ed by the video and would like to create a similar one, here are some tips on making a successful brand video using Wondershare Filmora.
Tips to Make a Compelling Brand Video
Like I said earlier, making a video is not simply about getting out your camera and starting recording. Many aspects need to be considered for your video to make the desired impact.
Therefore, here are some tips that might come in handy when making your brand video:
1. Define Your Objective and Audience
The very first thing that you need to think about before starting work on your brand video is its objective and audience.

What are you trying to achieve from the video? Do you want to create brand awareness, or do you wish to promote a certain product?
Secondly, who’s your target audience? Is your video projected toward people who have no idea who you and your company are? Or are you addressing an existing customer base? Also, are the audience kids or adults? Because you certainly can’t make a video with cartoon characters for an audience who’s looking for something calm and relaxing, and vice versa.
Once you have your objective and audience sorted, it’s time to get busy!
2. Video Scripting
Based on what you’re trying to achieve from your brand video and the target audience, you can decide on the video’s script. This includes the content, the length, and the editing requirements.

Let’s take your video’s content, for instance:
- If you’re creating a video for an audience that doesn’t know you, you’ll have to start from the basics, explaining who you are, what you do, and the services you offer.
- If you’re trying to create a video that tells your brand’s story, you can either keep it inspirational or you could create fun content that will be remembered for years to come!
- If you’re creating something for the kids, you need to keep it short yet interesting, with many effects that help in grabbing their attention.
Once you have decided what to add to the video, how long it will be, and what its content will be like, you can finally record your video!
3. Video Recording
Now, for many people, recording simply means hitting the record button.
Yes, that might work for vlogs, but when it comes to making a brand video, you need to really put in effort when recording.

For instance, you should have all the video clips and images you want to include in the video at hand. And they should resonate with your brand voice and match with each other as well.
If we take Wondershare Filmora’s brand video as an example, you can see that the whole video has a vibrant and warm feel to it, which can be seen throughout. It’s not that one clip is darker and the other is lighter; the whole thing sort of blends into each other.
That’s what you should take care of when recording your video. Make sure the background, hues, and overall feel of the video clips and images match each other.
4. Using Your Brand Colors and Logo
Another thing that you should keep in mind when recording is to incorporate your brand colors in the video and throw in your logo. For instance, if your brand colors are red and green, make sure to use them in the text in the video. However, if you’re not using text, you can use the colors in the video frame by having a wall or something in the background of the same colors.

As for the logo, it can be placed anywhere in the video so that the audience learns to recognize it.
But why is using your brand colors and logo so important?
Because your brand colors and logo represent your brand and become its identity in the long run. For example, yellow and red are McDonald’s brand colors and its logo, the yellow ‘M’ in arch form, is recognizable even from a distance.
5. Video Editing
Now comes the most important part of making a brand video: The editing! The part where you refine your video and add final touches to it. If you’ve got a stellar video editing software like Wondershare Filmora, it can do wonders for your video.
Wondershare Filmora at a Glance

Wondershare Filmora has plenty of basic and advanced video editing features to add that wow factor to your video. It can turn a plain boring video into something fun, exciting, and watch-worthy.
For example, the motion tracking feature lets you add an object that follows a certain movement in the video. Then we have the AR stickers that help enhance emotions and add personality to your video. Also, the green screen feature lets you add amazing background to your video to give the desired effect.
Filmora also has many video effects, templates, speed ramping, masking, auto beat sync, voice recording, and other features that can really take your brand video to the next level.
I’m sure you now have the hang of how to make a brand video that makes your business pop. But, you still might be confused about how to make the most of these features using Wondershare Filmora.
Therefore, here are some helpful tips on using these features to make an effective brand video that creates brand awareness and drives sales!
Creative Ideas to Make Brand Videos Using Filmora
If you’re up for making a video just like the video we shared earlier, you’ll need to download Wondershare Filmora from the website. And, once you’re through with this guide, nothing can stop you from making a brand video that sells!
With that sorted, here are some valuable tips and ideas to help you along the way:
1. Level Up Your Motion Tracking
As we mentioned earlier, motion tracking means tracking the movement of an object in the video and then applying the same movement to a newly added object, like text, image, logo, or any clipart.
But that’s quite a common practice, right? I mean, every video editor out there is doing it!
However, there are some ways in which you can get creative with the motion tracking feature using Filmora.
Like…
Using Motion-Tracked Texts
While the text in a video looks pretty good itself, you can make it even more impressive by motion tracking it.
For example:
- Attach a piece of text to your introductory title. If there’s a logo or brand name in the introduction, you can add a tagline, a website address, or your Instagram or Twitter handle to it.
- If you want to create a context for the audience, add motion-tracked captions in your brand video. This means the captions move with the movement of the subject. It looks stylish, gives relevant information, and helps tell your brand’s story without any narration.
This Fitbit commercial would be an excellent example of motion-tracked captions:
- If your video has an introductory scene where the frame is moving from one side to the other, you can motion-track the credits so that they move along with the scene and disappear gradually instead of dedicating a single clip to the credits.
- Highlighting important aspects in a video, like places or names of objects with motion-tracked text, can make your video truly amazing and fun to watch. This would be quite essential if you’re making a video for the real estate or travel business.
Here’s an example:
Hence, when working with Filmora, you can do plenty with the motion tracking feature to make a truly amazing video.
2. Add a Fun Factor with AR Stickers
Now that you know how to use the motion tracking feature in Filmora, let me tell you a secret!
If you incorporate face-tracking AR stickers into your video, you can succeed in creating a brand video that will have the audience glued to the screen!
The purpose of adding AR stickers to your videos is to emphasize reactions, portray enhanced emotions, and add an element of fun. This feature works best if you’re creating a brand video projected toward kids.

So, how can you make the most of these AR stickers?
Create Multiple Characters
If you don’t have people to play different characters, don’t fret! With the AR sticker effect, you can create multiple characters for your video.
For example:
If your video has 3 animal characters, you can use AR stickers depicting a panda, cat, and bunny to show the different characters. Similarly, you can add the sticker with glasses to show a nerdy character. Or, if you’re really getting into the story-telling mode, you can use the pirate sticker to show a pirate.
Magnify Emotions
Sometimes it gets challenging to portray a certain emotion in your video. This is where AR stickers come to the rescue!
If you want to show someone in love, you can use the heart-eyes effect. Or, if you want to show that someone is being good, you can use the angel sticker to put a halo on their head.
There are many options! You just have to use your creative cells and conjure up something that’s unique and stands out from the rest.
3. Ace Your Shoot with the Green Screen Effect
A green-screen effect is quite important when it comes to making an exceptional brand video. It has been used in almost all blockbuster movies, and if you’re looking to make a video of a similar level, we’ve got some tried and tested tips to use the green screen effect to its fullest!
Make Sure the Lighting is Even
When it comes to a green screen, the lighting plays an important part. Make sure the green screen is one shade of green, and the lighting on the screen is even. If parts of the green screen are darker than the rest, the chroma key effect won’t be able to distinguish the different shades.
Contrasting Colors
Make sure the subject in the video isn’t wearing any green clothing, or there aren’t many green objects around, as they might disappear when you apply the green screen effect.
Prevent Motion Blur with High Shutter Speed
When shooting with a green screen background, make sure you keep the shutter speed high to avoid motion blur. Ideally, it should be 2x your frame rate for optimum results. But, at the same time, it shouldn’t be too high, as it can lead to a change in video exposure.
If you keep these tips in mind when shooting a video, you can easily use the chroma key effect in Wondershare Filmora to add your desired background and create an outstanding video.
4. Be Innovative with Effects
A video without effects is as bland as water! So, make your video innovative with the impressive variety of effects available in Wondershare Filmora.
But you can’t just add effects to your video like that! You need to understand when and where to use a certain effect properly.
For example:
Tell Your Story With Split Screen Effect
If you’re telling your brand story from the perspective of different individuals, using the split-screen effect is recommended. You can also use this effect to showcase how one thing is related to another in a cause-and-effect way.
Take this Lexus commercial, for example:
It shows the view from inside the car and from a viewer’s perspective.
Emphasize with Pan and Zoom Effect
As the topic of concern of this article is brand videos, the pan and zoom is an ideal effect for it.
You can easily emphasize its importance and give off an emotional storytelling vibe by zooming in on a person’s face or any other object in the frame. You can also use pan and zoom to add a transition to your video. Here’s an example:
Add Thrill with Transitions
To move from one shot to another, it’s important to add a transition effect in between. You can add different transition styles to link the shots with one another, for instance, the match cut transition to match scenes that are not otherwise linked visually. Or the whip pan transition, which involves a quick rotation of the camera’s axis to give the impression that the scene was shot in one take, although it is two separate clips.
Take Wondershare Filmora’s brand video, for example. You can see how seamlessly it moves from one effect to another. It adds value and makes the video fun to watch.
With the variety of transitions in Filmora’s library, you can add all the effects discussed above to your video for stunning results.
You’ve added motion tracking, used AR stickers, created a mystical background with the green screen effect, and gone innovative with effects. Now, it’s time to wrap up this article with…
5. Energize Your Videos with Speed Ramping
Did you know that speed ramping can actually improve your videos tenfold? Speeding up and slowing down the footage at certain points can have a significant impact. For example, the bullet dodge scene in “Matrix” wouldn’t have been so famous if it wasn’t for the slo-mo effect!

You can’t just randomly add speed ramps to your video. There has to be a purpose behind it! Do you want to emphasize something? Do you want to show a transition? Regardless, you need to time your speed ramping properly.
And here are a few tips for it!
Use Slo-Mo For Action Sequences
If your video has an amazing action scene in it, slow down the speed at that point to emphasize the action and movement. For example, a karate kick in slow motion very clearly shows us how the move is actually performed.
Don’t Use Slo-Mo For Too Long
Another tip is to use the slow-mo only for a few seconds to emphasize something. If you prolong it, it won’t have the desired impact and might even cause the audience to lose focus.
Speed Up Footage for Long Processes
If your video shows a long process, like a time-lapse, it is the perfect time to speed up the footage. Not only do long shots lose the viewer’s attention, but they can also get boring too. A sped up footage on the other hand makes your video aesthetically pleasing and entertaining.
Add Music
Using music in videos is quite a common practice; however, it becomes quite exciting if you speed ramp your video according to the music. For example, time the slo-mo effect with the more silent or riverbed parts of the music, and speed it up when the crescendo comes.
You can do this easily with the auto beat-sync feature in Filmora that matches the music with the footage.

How’s that for a thrilling video?
Speed Ramp for Transitions
Here’s a bonus tip! Use speed ramping at the end of one clip and the beginning of the next one to create a seamless flow between the two. It’ll also give a transition effect and make your brand video look professional.
So you see, you have ample options to add a touch of creativity to your brand videos. The key is to use a good video editor and the right video editing tools.
Wrapping Up
Shooting a brand video is easy, and it’s even easier to edit it. All you need is to let your creativity flow!
With Wondershare Filmora 11’s new and advanced editing features, making watch-worthy brand videos that give out the desired message and compel the audience to take some action has never been easier!
And, with the useful video editing tips that we have shared, you are just a click away from taking your business to new heights!
So, if you also want to create a video successfully, just like Filmora’s brand video, follow our tips, use the tricks, and edit away!
Create a Brand Video to Make Your Business Shine
Did you know that 8 out of 10 people go ahead and purchase a product just by watching brand videos?
I’m sure you are looking for similar success when it comes to your brand video.
But you can’t just compel the audience by making any video!
- It has to be entertaining and inspirational.
- It has to be innovative.
- It needs to have something that grabs the audience’s attention.
And, with all this, it should also successfully share your brand’s core values.
So, how do you create such a video?
It’s not about simply whipping out a camera and pressing the record button. A lot of thought is involved in creating a brand video, but most importantly, you need a high-quality video editor to refine your video and make it more fun, entertaining, and innovative - A video editor like Wondershare Filmora.
And that’s what this article is about - How to use the various basic and advanced editing tools in Filmora to create a brand video that makes a difference!
But first, let’s have a look at…
Wondershare Filmora’s Brand Video
What’s so special about it, you ask?
For starters, it fits right into the criteria we mentioned above. It’s innovative, entertaining, vibrant, and fun and showcases all the features of Filmora 11.
Here, see for yourself…
From all the new effects to the AR sticker themes and other video editing features like speed ramping, masking, and green screen effect, the video successfully lets the audience know how creative they can get with Filmora.
But did you see that they didn’t put the features out there just like that! They actually used all the basic and advanced video editing features in the video to give us an idea of what it looks like when put in action.
And the video quality, the content, and the flow of the video speak for themselves.
I mean, I watched the video all the way to the end without getting bored for even a single second. And, being a video editor, I might as well get Filmora 11 after watching the highly compelling video!
Now, if you’re also wow-ed by the video and would like to create a similar one, here are some tips on making a successful brand video using Wondershare Filmora.
Tips to Make a Compelling Brand Video
Like I said earlier, making a video is not simply about getting out your camera and starting recording. Many aspects need to be considered for your video to make the desired impact.
Therefore, here are some tips that might come in handy when making your brand video:
1. Define Your Objective and Audience
The very first thing that you need to think about before starting work on your brand video is its objective and audience.
What are you trying to achieve from the video? Do you want to create brand awareness, or do you wish to promote a certain product?
Secondly, who’s your target audience? Is your video projected toward people who have no idea who you and your company are? Or are you addressing an existing customer base? Also, are the audience kids or adults? Because you certainly can’t make a video with cartoon characters for an audience who’s looking for something calm and relaxing, and vice versa.
Once you have your objective and audience sorted, it’s time to get busy!
2. Video Scripting
Based on what you’re trying to achieve from your brand video and the target audience, you can decide on the video’s script. This includes the content, the length, and the editing requirements.
Let’s take your video’s content, for instance:
- If you’re creating a video for an audience that doesn’t know you, you’ll have to start from the basics, explaining who you are, what you do, and the services you offer.
- If you’re trying to create a video that tells your brand’s story, you can either keep it inspirational or you could create fun content that will be remembered for years to come!
- If you’re creating something for the kids, you need to keep it short yet interesting, with many effects that help in grabbing their attention.
Once you have decided what to add to the video, how long it will be, and what its content will be like, you can finally record your video!
3. Video Recording
Now, for many people, recording simply means hitting the record button.
Yes, that might work for vlogs, but when it comes to making a brand video, you need to really put in effort when recording.
For instance, you should have all the video clips and images you want to include in the video at hand. And they should resonate with your brand voice and match with each other as well.
If we take Wondershare Filmora’s brand video as an example, you can see that the whole video has a vibrant and warm feel to it, which can be seen throughout. It’s not that one clip is darker and the other is lighter; the whole thing sort of blends into each other.
That’s what you should take care of when recording your video. Make sure the background, hues, and overall feel of the video clips and images match each other.
4. Using Your Brand Colors and Logo
Another thing that you should keep in mind when recording is to incorporate your brand colors in the video and throw in your logo. For instance, if your brand colors are red and green, make sure to use them in the text in the video. However, if you’re not using text, you can use the colors in the video frame by having a wall or something in the background of the same colors.
As for the logo, it can be placed anywhere in the video so that the audience learns to recognize it.
But why is using your brand colors and logo so important?
Because your brand colors and logo represent your brand and become its identity in the long run. For example, yellow and red are McDonald’s brand colors and its logo, the yellow ‘M’ in arch form, is recognizable even from a distance.
5. Video Editing
Now comes the most important part of making a brand video: The editing! The part where you refine your video and add final touches to it. If you’ve got a stellar video editing software like Wondershare Filmora, it can do wonders for your video.
Wondershare Filmora at a Glance
Wondershare Filmora has plenty of basic and advanced video editing features to add that wow factor to your video. It can turn a plain boring video into something fun, exciting, and watch-worthy.
For example, the motion tracking feature lets you add an object that follows a certain movement in the video. Then we have the AR stickers that help enhance emotions and add personality to your video. Also, the green screen feature lets you add amazing background to your video to give the desired effect.
Filmora also has many video effects, templates, speed ramping, masking, auto beat sync, voice recording, and other features that can really take your brand video to the next level.
I’m sure you now have the hang of how to make a brand video that makes your business pop. But, you still might be confused about how to make the most of these features using Wondershare Filmora.
Therefore, here are some helpful tips on using these features to make an effective brand video that creates brand awareness and drives sales!
Creative Ideas to Make Brand Videos Using Filmora
If you’re up for making a video just like the video we shared earlier, you’ll need to download Wondershare Filmora from the website. And, once you’re through with this guide, nothing can stop you from making a brand video that sells!
With that sorted, here are some valuable tips and ideas to help you along the way:
1. Level Up Your Motion Tracking
As we mentioned earlier, motion tracking means tracking the movement of an object in the video and then applying the same movement to a newly added object, like text, image, logo, or any clipart.
But that’s quite a common practice, right? I mean, every video editor out there is doing it!
However, there are some ways in which you can get creative with the motion tracking feature using Filmora.
Like…
Using Motion-Tracked Texts
While the text in a video looks pretty good itself, you can make it even more impressive by motion tracking it.
For example:
- Attach a piece of text to your introductory title. If there’s a logo or brand name in the introduction, you can add a tagline, a website address, or your Instagram or Twitter handle to it.
- If you want to create a context for the audience, add motion-tracked captions in your brand video. This means the captions move with the movement of the subject. It looks stylish, gives relevant information, and helps tell your brand’s story without any narration.
This Fitbit commercial would be an excellent example of motion-tracked captions:
- If your video has an introductory scene where the frame is moving from one side to the other, you can motion-track the credits so that they move along with the scene and disappear gradually instead of dedicating a single clip to the credits.
- Highlighting important aspects in a video, like places or names of objects with motion-tracked text, can make your video truly amazing and fun to watch. This would be quite essential if you’re making a video for the real estate or travel business.
Here’s an example:
Hence, when working with Filmora, you can do plenty with the motion tracking feature to make a truly amazing video.
2. Add a Fun Factor with AR Stickers
Now that you know how to use the motion tracking feature in Filmora, let me tell you a secret!
If you incorporate face-tracking AR stickers into your video, you can succeed in creating a brand video that will have the audience glued to the screen!
The purpose of adding AR stickers to your videos is to emphasize reactions, portray enhanced emotions, and add an element of fun. This feature works best if you’re creating a brand video projected toward kids.
So, how can you make the most of these AR stickers?
Create Multiple Characters
If you don’t have people to play different characters, don’t fret! With the AR sticker effect, you can create multiple characters for your video.
For example:
If your video has 3 animal characters, you can use AR stickers depicting a panda, cat, and bunny to show the different characters. Similarly, you can add the sticker with glasses to show a nerdy character. Or, if you’re really getting into the story-telling mode, you can use the pirate sticker to show a pirate.
Magnify Emotions
Sometimes it gets challenging to portray a certain emotion in your video. This is where AR stickers come to the rescue!
If you want to show someone in love, you can use the heart-eyes effect. Or, if you want to show that someone is being good, you can use the angel sticker to put a halo on their head.
There are many options! You just have to use your creative cells and conjure up something that’s unique and stands out from the rest.
3. Ace Your Shoot with the Green Screen Effect
A green-screen effect is quite important when it comes to making an exceptional brand video. It has been used in almost all blockbuster movies, and if you’re looking to make a video of a similar level, we’ve got some tried and tested tips to use the green screen effect to its fullest!
Make Sure the Lighting is Even
When it comes to a green screen, the lighting plays an important part. Make sure the green screen is one shade of green, and the lighting on the screen is even. If parts of the green screen are darker than the rest, the chroma key effect won’t be able to distinguish the different shades.
Contrasting Colors
Make sure the subject in the video isn’t wearing any green clothing, or there aren’t many green objects around, as they might disappear when you apply the green screen effect.
Prevent Motion Blur with High Shutter Speed
When shooting with a green screen background, make sure you keep the shutter speed high to avoid motion blur. Ideally, it should be 2x your frame rate for optimum results. But, at the same time, it shouldn’t be too high, as it can lead to a change in video exposure.
If you keep these tips in mind when shooting a video, you can easily use the chroma key effect in Wondershare Filmora to add your desired background and create an outstanding video.
4. Be Innovative with Effects
A video without effects is as bland as water! So, make your video innovative with the impressive variety of effects available in Wondershare Filmora.
But you can’t just add effects to your video like that! You need to understand when and where to use a certain effect properly.
For example:
Tell Your Story With Split Screen Effect
If you’re telling your brand story from the perspective of different individuals, using the split-screen effect is recommended. You can also use this effect to showcase how one thing is related to another in a cause-and-effect way.
Take this Lexus commercial, for example:
It shows the view from inside the car and from a viewer’s perspective.
Emphasize with Pan and Zoom Effect
As the topic of concern of this article is brand videos, the pan and zoom is an ideal effect for it.
You can easily emphasize its importance and give off an emotional storytelling vibe by zooming in on a person’s face or any other object in the frame. You can also use pan and zoom to add a transition to your video. Here’s an example:
Add Thrill with Transitions
To move from one shot to another, it’s important to add a transition effect in between. You can add different transition styles to link the shots with one another, for instance, the match cut transition to match scenes that are not otherwise linked visually. Or the whip pan transition, which involves a quick rotation of the camera’s axis to give the impression that the scene was shot in one take, although it is two separate clips.
Take Wondershare Filmora’s brand video, for example. You can see how seamlessly it moves from one effect to another. It adds value and makes the video fun to watch.
With the variety of transitions in Filmora’s library, you can add all the effects discussed above to your video for stunning results.
You’ve added motion tracking, used AR stickers, created a mystical background with the green screen effect, and gone innovative with effects. Now, it’s time to wrap up this article with…
5. Energize Your Videos with Speed Ramping
Did you know that speed ramping can actually improve your videos tenfold? Speeding up and slowing down the footage at certain points can have a significant impact. For example, the bullet dodge scene in “Matrix” wouldn’t have been so famous if it wasn’t for the slo-mo effect!
You can’t just randomly add speed ramps to your video. There has to be a purpose behind it! Do you want to emphasize something? Do you want to show a transition? Regardless, you need to time your speed ramping properly.
And here are a few tips for it!
Use Slo-Mo For Action Sequences
If your video has an amazing action scene in it, slow down the speed at that point to emphasize the action and movement. For example, a karate kick in slow motion very clearly shows us how the move is actually performed.
Don’t Use Slo-Mo For Too Long
Another tip is to use the slow-mo only for a few seconds to emphasize something. If you prolong it, it won’t have the desired impact and might even cause the audience to lose focus.
Speed Up Footage for Long Processes
If your video shows a long process, like a time-lapse, it is the perfect time to speed up the footage. Not only do long shots lose the viewer’s attention, but they can also get boring too. A sped up footage on the other hand makes your video aesthetically pleasing and entertaining.
Add Music
Using music in videos is quite a common practice; however, it becomes quite exciting if you speed ramp your video according to the music. For example, time the slo-mo effect with the more silent or riverbed parts of the music, and speed it up when the crescendo comes.
You can do this easily with the auto beat-sync feature in Filmora that matches the music with the footage.
How’s that for a thrilling video?
Speed Ramp for Transitions
Here’s a bonus tip! Use speed ramping at the end of one clip and the beginning of the next one to create a seamless flow between the two. It’ll also give a transition effect and make your brand video look professional.
So you see, you have ample options to add a touch of creativity to your brand videos. The key is to use a good video editor and the right video editing tools.
Wrapping Up
Shooting a brand video is easy, and it’s even easier to edit it. All you need is to let your creativity flow!
With Wondershare Filmora 11’s new and advanced editing features, making watch-worthy brand videos that give out the desired message and compel the audience to take some action has never been easier!
And, with the useful video editing tips that we have shared, you are just a click away from taking your business to new heights!
So, if you also want to create a video successfully, just like Filmora’s brand video, follow our tips, use the tricks, and edit away!
Also read:
- In 2024, You Need to Follow Certain Steps to Complete Your Project. In the Section Below, We Will Discuss in Detail the Steps to Make a Movie From Windows Movie Maker
- Looking for the Best Quiz-Making Tools? Read Our Full Review to Find Out the 10 Best Video Quiz Makers Available for 2024
- Updated Premiere Pro Best Slow Motion Effects To Use
- Updated In 2024, A Guide to Create Your Own LOL Montage Video
- In 2024, Reviewing Efectum App For Smartphone Users Create Slow Motion Videos
- How to Speed Up Pictures on TikTok Slideshow for 2024
- A Complete Guide to the Best Brand Story Videos
- Updated Learning Unique Ways to Slow Down Time Lapse on iPhone
- There Are a Few Ways to Remove or Mute Audio in a Video, but How? Read This Article and Learn How to Do It Using Recommended Android Apps for 2024
- Planning and Storyboarding Is the Most Important Part of Creating a Music Video. Here Are some Easy Tips for Planning and Storyboarding a Music Video in Filmora
- New In 2024, Adobe Lightroom Color Grading Tutorial
- New Do You Want to Know How to Add a VHS Effect Premiere Look? You Can Easily Apply the VHS Effect to Your Videos Using Adobe Premiere Pro
- Scaling and Setting Videos in Filmora | Tutorial for 2024
- New 10 Best Camera for YouTube Beginners
- How to Use Lumetri Color in After Effects for 2024
- Updated Deep Learning of AI Video Recognition
- Updated Hard to Remove Black Background in After Effects?
- In This Article, You Will Learn How to Create an Attractive and Engaging Slideshow Video Using Tools Available in the Wondershare Filmora
- Top Best Free LUTs For Premiere Pro
- New How to Create Cooking Video Intro and End Screen for YouTube Channel, In 2024
- New 10 Matching Color Combination That Works Together for 2024
- New DaVinci Resolve Scopes Have Undergone Significant Improvements. Find Out How to Use These Scopes and Improve Your Video Editing Skills
- Updated Top 10 Transparent Image Online Tools That Give You an Advantage
- New In 2024, Backup and Organize Your Tons of Footage in Minutes
- Detailed Tutorial to Rotate a Video in Cyberlink PowerDirector for 2024
- 2024 Approved Want to Save Your Edited Video File in MP4 Format in Windows Movie Maker? Here Are the Simple Steps Along with a Better Alternative
- 2024 Approved 4 Methods for Rotating Your GoPro Videos Professionally
- Full Guide to Discord Boost for 2024
- Merging MP4 Videos Made Simple Top 5 Online Tools
- 2024 Approved Video Editors Use Transitions to Tie Their Shots and Clips Together Into a Cohesive, Polished Program. Learn the Best Method to Create a Smooth Cut Transition Effect
- Updated In 2024, Easy Step by Step Tutorial on Creating a Lightroom Collage
- In 2024, Wondering How to Create a Stunning Intro Video with KineMaster? Here Are the Simple Steps to Use KineMaster to Design Your Intro Video in Simple Steps
- Updated A Full Review of Leeming LUT Pro
- 2024 Approved Let Us Talk About the Famous Photoshop and Most Commonly Used Glitch Effect. The Article Understudy Will Discuss in Detail About Photo Glitch Effect
- Updated In 2024, How to Create Text Animation for Videos
- New 15 Best Free Cinematic LUTs for Your Film for 2024
- In 2024, Free Ways to Download Mobile Phone Green Screen Videos and Pictures No Copyright
- Updated Funny Content Ideas for YouTube Videos for 2024
- New In 2024, Splitting Video in VSDC Step by Step
- Want to Learn How to Create the Random Letter Reveal Intro? Read Through the Stages of Preparing This Effect via Filmora in This Guide
- New How to Create a Text Effect Video with Filmora for 2024
- New Intro Videos Have the Potential to Make a First Impression on Viewers, and You Know How They Say that the First Impression Is the Last Impression
- Quickest Guide | Zoom In and Out on Snapchat
- New If You Want to Color Grading Your Video, Final Cut Pro Can Be One of the Best Choices. However, Its Not Easy for Everyone to Use Color Grading Feature, and in This Guide Well Show You How to Do That
- 2024 Approved Learn How to Merge Audio and Video Like a Pro with This Step-by-Step Guide to Using FFmpeg. Create Seamless Videos and Improve Your Video Production Skills
- New Hard to Remove Black Background in After Effects, In 2024
- 2024 Approved Easy Way to Apply Green Screen to YouTube Videos
- Updated 7 Solutions to Edit GoPro Video on Mac
- How to Fix It Realme V30T Wont Turn On | Dr.fone
- In 2024, How To Remove Passcode From iPhone 14 Pro? Complete Guide
- In 2024, How to jailbreak iCloud locked iPhone 12 Pro
- 4 Methods to Turn off Life 360 On Oppo Reno 10 Pro+ 5G without Anyone Knowing | Dr.fone
- In 2024, How Can We Unlock Our Samsung Galaxy F34 5G Phone Screen?
- Forgotten The Voicemail Password Of Poco X6? Try These Fixes
- Complete Tutorial to Use GPS Joystick to Fake GPS Location On Apple iPhone 11 | Dr.fone
- How to Hide/Fake Snapchat Location on Your Apple iPhone 15 Pro | Dr.fone
- A Working Guide For Pachirisu Pokemon Go Map On Motorola Defy 2 | Dr.fone
- In 2024, Full Tutorial to Bypass Your Vivo V29 Face Lock?
- In 2024, How to Track Xiaomi Redmi Note 12 4G Location by Number | Dr.fone
- Updated The Secret Sauce for Making GIF Instagram Story More Stunning
- 9 Quick Fixes to Unfortunately TouchWiz has stopped Of Realme GT 5 | Dr.fone
- New In 2024, Template | Wondershare Virbo
- In 2024, Does OnePlus Ace 3 Have Find My Friends? | Dr.fone
- New 2024 Approved What Is an AI Artist? | Wondershare Virbo Glossary
- Why Is My Infinix Note 30 VIP Racing Edition Offline? Troubleshooting Guide | Dr.fone
- In 2024, Pattern Locks Are Unsafe Secure Your Itel P55+ Phone Now with These Tips
- In 2024, Top 15 Augmented Reality Games Like Pokémon GO To Play On Apple iPhone 6 Plus | Dr.fone
- How to Screen Share Mac to Apple iPhone 14 Plus? | Dr.fone
- Fix App Not Available in Your Country Play Store Problem on Google Pixel Fold | Dr.fone
- Top IMEI Unlokers for iPhone 11 Pro and Android Phones
- Full Guide to Fix iToolab AnyGO Not Working On Samsung Galaxy A14 4G | Dr.fone
- 5 Ways to Reset Tecno Pop 7 Pro Without Volume Buttons | Dr.fone
- In 2024, How to Reset your Poco C65 Lock Screen Password
- How To Repair iPhone 11 Pro System? | Dr.fone
- Fake the Location to Get Around the MLB Blackouts on Samsung Galaxy Z Fold 5 | Dr.fone
- How To Change Your Apple ID Password On your iPhone 13 Pro | Dr.fone
- 3 Methods to Mirror Xiaomi Redmi K70 to Roku | Dr.fone
- Coqui Voice Cloning The Ultimate Solution to Streamline Audio Content
- In 2024, How to Send and Fake Live Location on Facebook Messenger Of your Realme Note 50 | Dr.fone
- 3 Best Tools to Hard Reset Infinix Hot 30 5G | Dr.fone
- The Best iSpoofer Alternative to Try On Nokia C12 Plus | Dr.fone
- Title: Updated In 2024, How to Splice Videos Together on iPhone
- Author: Chloe
- Created at : 2024-04-24 07:08:37
- Updated at : 2024-04-25 07:08:37
- Link: https://ai-editing-video.techidaily.com/updated-in-2024-how-to-splice-videos-together-on-iphone/
- License: This work is licensed under CC BY-NC-SA 4.0.
