
:max_bytes(150000):strip_icc():format(webp)/patch-tuesday-2625783-d6bcf232b3c64fc5958037ad31299bd9.png)
Updated In 2024, Learn Topaz Video Enhance AI Review and Achieve Powerful Video Conversion
Learn Topaz Video Enhance AI Review and Achieve Powerful Video Conversion
Learn Topaz Video Enhance AI Review and Achieve Powerful Video Conversion
An easy yet powerful editor
Numerous effects to choose from
Detailed tutorials provided by the official channel
Earlier, you might need a professional to help you with the AI video enhancing process, but now you can do it yourself using Topaz. This app has fascinating features to make your editing experience smooth and unique. This app was used only for photo enhancement earlier. Now with time, it has been updated, and now it can be used to do AI Enhancing of your video. This article is a Topaz Video Enhance AI review. Here in this article, we focus on the usage of Topaz and its effectiveness compared to other AI software.
In this article
01 [What Does Topaz Video Enhance AI Do?](#Part 1)
02 [How Do You Use Topaz Video Enhance AI?](#Part 2)
03 [Deep Learning: Topaz Video Enhance AI Review](#Part 3)
Part 1 What Does Topaz Video Enhance AI Do?
Topaz Video Enhance IA is an all-rounder in its field. This app is used to do AI upscaling in general and is used to improve the display quality of the footage. The AI technology used in this software is so advanced that it does not need any help and edits every frame with accuracy resulting in a natural and smooth visual. Topaz Video Enhance IA can be used to restore old or low-resolution footage. This video enhance AI app allows outstanding slow-motion editing of videos. This software can give your video upscaling experience a new turn.

Part 2 How Do You Use Topaz Video Enhance AI?
When we are talking about topaz labs video enhance AI review, it’s incomplete if we do not talk about the process of using it**.** The whole process of video enhance AI topaz labs can be divided into these parts:
01Importing of videos
To open a dialogue box showing your videos, click on the center of the screen. You can select more than one video or even drag those videos directly into the app from the dialogue box that has been shown.

The videos you have selected will be shown at the bottom of the screen. You can pick each video individually to edit, or you can do a batch edit of all the videos.

To remove a video or a video queue, you can click on the delete icon above the video list.
02Choosing AI Processing Models
You need to choose the suitable models to edit or enhance your video. Different AI Processing models will be available in the app itself; you can choose if you want to choose from those models.
03Settings of the output of the video
The app offers in-built standards to set your output, or you can create your custom settings.

For the output of the video, the app allows both picture and video sequence output.

Sometimes a black bar appears on the output video when non-standard-sized videos are converted to standard preset.
But there is a solution to this, you fill the frame by clicking on the “Crop to fill frame” option.
04Setting a name for your output
With the height, width, and scale of the output video, the current name will be shown by default. You can change this by unchecking the box and selecting the “Use default output name,” Then, there will be a dialogue box on your screen.
In that dialogue box, type the name of your output video, select the format or type of your output file, select the location where you want to save your output and then click on the “Save” option.
05Preview of the output video
You can see a short clip of 30 rendered framed of your output as a preview.
To preview the render, you need to select and drag the slider on your video’s timeline. Position the slider where you want to see the preview of your render or output.
You need to wait for a while so that the clips get processed. After the processing is complete, there will be a split-screen.
One part of the split shows the original video clip, and the other split shows the edited or rendered previews on loop.
06Trimming of the output video
To understand simply, the more your output size, the more time it takes to process.
To save the processing time, you can trim only that part of the rendered video you need.
To start with the trimming process, you need to drag the slider along the video’s timeline to select the starting timestamp of the video.
After you have positioned your slider, click on the “scissor” icon on your screen to trim the beginning of your rendered video.
To trim from the end of the rendered video, you have to drag the slider to the ending position of your video.
After your slider is perfectly positioned, click on the “scissor” icon on your screen to trim the end part of your rendered video.
A part of your timeline will be highlighted; this highlighted portion will be processed as you edit, enhanced output.

07Processing of the final output
To get the final output, you need to process the video.
To start with the processing, click on the “Start Processing” option at the bottom. Your video will be shown frame by frame until the processing of the video is complete.
Part 3 Deep Learning: Topaz Video Enhance AI Review
To make the topaz video enhance review, we need to throw light on these features.
01Cost
All the users are given a one-month free trial. However, the complete version of Topaz Video Enhance AI costs $199.9 (includes an update of one year), and the yearly upgrades run at $99. If you do not want to pay for yearly upgrades, you continue using your previous version or the version you bought previously. You can use coupons to have a discount on your payment.
02Design and Performance
The main designs and performance highlights of this software are:
● Default footage set to 4K resolution.
● This software cleans up old progressive footage
● The app interlaces footage to 4K
● This app cleans up old interlaced footage
● This app supports 400% slow motion and 60fps.
03Features
Topaz Video Enhance AI has several exciting features. The most iconic among those features were:
● Upscaling of video to 4Kor 8K resolution. This application can upgrade your video from SD to HD, from HD to 4K, and from 4K to 8K.
● Topaz Video Enhance AI works as a wonder to remove noise. This app has an excellent performance in removing high ISO noise. Topaz AI uses outstanding photo editing software, which results in wonderful outputs.
● The AI automatically converts your video frame rate from 25fps to 3fps. So, if you need your custom frame rate settings, you can set them in the app.
● Topaz Video Enhance AI acts as amind-blowing editing software when it is about deinterlacing video. Deinterlacing your video gives a smooth and natural finish to your video because there are almost no or very few artifacts in the final output.
04System Requirements
Video Enhance AI has certain system requirements. The features required are:
Windows: This software is not supported by Windows 7 or Windows 8. Appropriate for Windows 10 (build 19041 v2004 and above) and Windows 11.
Mac: 10.14 Mojave and above for CPU support 10.15 Catalina and above GPU support.
The hardware requirements are:
● Processor: Intel HD 5000 iGPU or above AMD CPUs from 2016
● System Memory: 8GB (16GB recommended for better performance)
● Graphics Card: Intel HD 5000 (on CPU DirectX 12, compatible in all Windows) and Mac 10.15 and above.
● Dedicated Graphics Memory: 2GB (8GB recommended for better performance)
05Interface
When Topaz Video Enhance AI is working, the screen is divided into different parts, that is:
● Clip selection or the clip selection bar can be used to select the exact portions that you want to render and export as the final footage.
● Video Processing Window can be used to select the AI model from the preset AI models on the app itself.
● A batch processing window is used to edit the batch by adding footage to the batch for batch editing.
● In this video output section, you can select one of the presets for your footage from an upscale percentage of 1.

06A Comparison to Other Video Enhance AI Software
| Topaz Video Enhance AI | Other Video Enhance AI |
|---|---|
| Preset video resolution is 4K | Most of the video enhance AI has a maximum resolution of 4K. |
| The preset fps rate is 30, and you can change it accordingly. | Other Video Enhance AI software has one preset fps rate and does not allow users to change it. |
| Supports any output format. | Supports only particular formats of output. |
Wondershare Filmora Video Editor is another app you can use to edit your footage and retain its quality. Most of the editing app ruins the quality. You can use this app to edit your own footage or photos. This application is one of the best editing apps because of its cool and user-friendly features. The most amazing part is this app is free and available on both Windows and Mac.
For Win 7 or later (64-bit)
For macOS 10.12 or later
● Ending Thoughts →
● Now you know what usages of Topaz Video Enhance IA are through the topaz video enhance review focused on in this article.
● The main features, minimum system requirements, and, most importantly, the procedure to use this app have been elaborated on in this article.
● Please let us know your views on this post and if you liked it, do share it with your friends and comment below.
Earlier, you might need a professional to help you with the AI video enhancing process, but now you can do it yourself using Topaz. This app has fascinating features to make your editing experience smooth and unique. This app was used only for photo enhancement earlier. Now with time, it has been updated, and now it can be used to do AI Enhancing of your video. This article is a Topaz Video Enhance AI review. Here in this article, we focus on the usage of Topaz and its effectiveness compared to other AI software.
In this article
01 [What Does Topaz Video Enhance AI Do?](#Part 1)
02 [How Do You Use Topaz Video Enhance AI?](#Part 2)
03 [Deep Learning: Topaz Video Enhance AI Review](#Part 3)
Part 1 What Does Topaz Video Enhance AI Do?
Topaz Video Enhance IA is an all-rounder in its field. This app is used to do AI upscaling in general and is used to improve the display quality of the footage. The AI technology used in this software is so advanced that it does not need any help and edits every frame with accuracy resulting in a natural and smooth visual. Topaz Video Enhance IA can be used to restore old or low-resolution footage. This video enhance AI app allows outstanding slow-motion editing of videos. This software can give your video upscaling experience a new turn.
Part 2 How Do You Use Topaz Video Enhance AI?
When we are talking about topaz labs video enhance AI review, it’s incomplete if we do not talk about the process of using it**.** The whole process of video enhance AI topaz labs can be divided into these parts:
01Importing of videos
To open a dialogue box showing your videos, click on the center of the screen. You can select more than one video or even drag those videos directly into the app from the dialogue box that has been shown.
The videos you have selected will be shown at the bottom of the screen. You can pick each video individually to edit, or you can do a batch edit of all the videos.
To remove a video or a video queue, you can click on the delete icon above the video list.
02Choosing AI Processing Models
You need to choose the suitable models to edit or enhance your video. Different AI Processing models will be available in the app itself; you can choose if you want to choose from those models.
03Settings of the output of the video
The app offers in-built standards to set your output, or you can create your custom settings.
For the output of the video, the app allows both picture and video sequence output.
Sometimes a black bar appears on the output video when non-standard-sized videos are converted to standard preset.
But there is a solution to this, you fill the frame by clicking on the “Crop to fill frame” option.
04Setting a name for your output
With the height, width, and scale of the output video, the current name will be shown by default. You can change this by unchecking the box and selecting the “Use default output name,” Then, there will be a dialogue box on your screen.
In that dialogue box, type the name of your output video, select the format or type of your output file, select the location where you want to save your output and then click on the “Save” option.
05Preview of the output video
You can see a short clip of 30 rendered framed of your output as a preview.
To preview the render, you need to select and drag the slider on your video’s timeline. Position the slider where you want to see the preview of your render or output.
You need to wait for a while so that the clips get processed. After the processing is complete, there will be a split-screen.
One part of the split shows the original video clip, and the other split shows the edited or rendered previews on loop.
06Trimming of the output video
To understand simply, the more your output size, the more time it takes to process.
To save the processing time, you can trim only that part of the rendered video you need.
To start with the trimming process, you need to drag the slider along the video’s timeline to select the starting timestamp of the video.
After you have positioned your slider, click on the “scissor” icon on your screen to trim the beginning of your rendered video.
To trim from the end of the rendered video, you have to drag the slider to the ending position of your video.
After your slider is perfectly positioned, click on the “scissor” icon on your screen to trim the end part of your rendered video.
A part of your timeline will be highlighted; this highlighted portion will be processed as you edit, enhanced output.
07Processing of the final output
To get the final output, you need to process the video.
To start with the processing, click on the “Start Processing” option at the bottom. Your video will be shown frame by frame until the processing of the video is complete.
Part 3 Deep Learning: Topaz Video Enhance AI Review
To make the topaz video enhance review, we need to throw light on these features.
01Cost
All the users are given a one-month free trial. However, the complete version of Topaz Video Enhance AI costs $199.9 (includes an update of one year), and the yearly upgrades run at $99. If you do not want to pay for yearly upgrades, you continue using your previous version or the version you bought previously. You can use coupons to have a discount on your payment.
02Design and Performance
The main designs and performance highlights of this software are:
● Default footage set to 4K resolution.
● This software cleans up old progressive footage
● The app interlaces footage to 4K
● This app cleans up old interlaced footage
● This app supports 400% slow motion and 60fps.
03Features
Topaz Video Enhance AI has several exciting features. The most iconic among those features were:
● Upscaling of video to 4Kor 8K resolution. This application can upgrade your video from SD to HD, from HD to 4K, and from 4K to 8K.
● Topaz Video Enhance AI works as a wonder to remove noise. This app has an excellent performance in removing high ISO noise. Topaz AI uses outstanding photo editing software, which results in wonderful outputs.
● The AI automatically converts your video frame rate from 25fps to 3fps. So, if you need your custom frame rate settings, you can set them in the app.
● Topaz Video Enhance AI acts as amind-blowing editing software when it is about deinterlacing video. Deinterlacing your video gives a smooth and natural finish to your video because there are almost no or very few artifacts in the final output.
04System Requirements
Video Enhance AI has certain system requirements. The features required are:
Windows: This software is not supported by Windows 7 or Windows 8. Appropriate for Windows 10 (build 19041 v2004 and above) and Windows 11.
Mac: 10.14 Mojave and above for CPU support 10.15 Catalina and above GPU support.
The hardware requirements are:
● Processor: Intel HD 5000 iGPU or above AMD CPUs from 2016
● System Memory: 8GB (16GB recommended for better performance)
● Graphics Card: Intel HD 5000 (on CPU DirectX 12, compatible in all Windows) and Mac 10.15 and above.
● Dedicated Graphics Memory: 2GB (8GB recommended for better performance)
05Interface
When Topaz Video Enhance AI is working, the screen is divided into different parts, that is:
● Clip selection or the clip selection bar can be used to select the exact portions that you want to render and export as the final footage.
● Video Processing Window can be used to select the AI model from the preset AI models on the app itself.
● A batch processing window is used to edit the batch by adding footage to the batch for batch editing.
● In this video output section, you can select one of the presets for your footage from an upscale percentage of 1.
06A Comparison to Other Video Enhance AI Software
| Topaz Video Enhance AI | Other Video Enhance AI |
|---|---|
| Preset video resolution is 4K | Most of the video enhance AI has a maximum resolution of 4K. |
| The preset fps rate is 30, and you can change it accordingly. | Other Video Enhance AI software has one preset fps rate and does not allow users to change it. |
| Supports any output format. | Supports only particular formats of output. |
Wondershare Filmora Video Editor is another app you can use to edit your footage and retain its quality. Most of the editing app ruins the quality. You can use this app to edit your own footage or photos. This application is one of the best editing apps because of its cool and user-friendly features. The most amazing part is this app is free and available on both Windows and Mac.
For Win 7 or later (64-bit)
For macOS 10.12 or later
● Ending Thoughts →
● Now you know what usages of Topaz Video Enhance IA are through the topaz video enhance review focused on in this article.
● The main features, minimum system requirements, and, most importantly, the procedure to use this app have been elaborated on in this article.
● Please let us know your views on this post and if you liked it, do share it with your friends and comment below.
Want to Convert MP4 Video To 60 FPS GIF? Read This
GIFs have become a popular way to share short and engaging videos online. They are widely used on social media platforms and messaging apps, making it easy to share moments, reactions, and emotions with friends and family. But not all GIFs are created equal. Some GIFs can look choppy and low-quality, detracting from the viewing experience.
To improve the quality of your GIFs, you can convert your MP4 videos to 60 FPS (frames per second). This will give your GIFs a smooth, fluid motion that looks professional and visually appealing. In this article, we’ll go over the steps you need to follow to convert your MP4 videos to 60 FPS GIFs and create high-quality GIFs that are perfect for sharing online.

Why Convert MP4 to 60-FPS GIF?
GIFs are a great way to share short, eye-catching videos online, but not all are made the same. GIFs with low frame rates tend to look choppy, and the motion could be smoother, making the video look unprofessional and detracting from the overall viewing experience. On the other hand, GIFs with higher frame rates look smoother, and the motion is more fluid, making the video more visually appealing.
Converting your MP4 videos to GIFs has several benefits:
- Smoother Motion: By converting MP4s to GIFs, you increase the frame rate of your GIFs, giving them a smoother and more fluid motion.
- Increased Detail: Higher frame rates allow for more detail and clarity in fast-moving scenes, making the video more engaging and easier to watch.
- Reduced Ghosting: A higher frame rate reduces the “ghosting” effect in low-frame rate GIFs, making the video clearer and reducing distractions.
- High-Quality Videos: Converting MP4s to GIFs eliminates the ghosting effect and creates high-quality GIFs that are perfect for sharing online.
- Increased Engagement: High-quality GIFs will engage and entertain your audience, making them more likely to share and interact with your content.
Converting MP4s to GIFs is a great way to improve the overall quality of your GIFs and create visually appealing videos that are perfect for sharing online. Whether you’re sharing a reaction, a moment, or an emotion, a high-quality GIF will engage and entertain your audience.
Can I Get a 60 FPS GIF?
While it’s true that many people search for 60 FPS GIFs, it’s important to understand that there is no such thing as a true 60 FPS GIF.

GIFs are an image format designed to display simple animations. GIF files store delay time between frames which is defined as multiples of 1/100th of a second. Value 1 would give you 100 FPS; value 2 would already have half of 100 FPS, that is, 50 FPS; value 3 would give you 33.3 FPS GIF, etc. So there are 20 FPS GIFs, 33.3 FPS GIFs, 50 FPS GIFs, and 100 FPS GIFs.
In addition, many websites or programs (including Google Chrome) ignore value 1 (100 FPS GIFs) and default to a much slower animation speed when viewing GIF files. Therefore, 100 FPS GIFs are technically possible but are rarely used. Value 2 (50 FPS) is the most you can get.
If you want to create high-quality animations, consider using MP4s or alternative image formats better suited for high frame rates and detailed animations.
That being said, some websites may have a “60 FPS GIFs” category, but it’s important to understand that most of the content in these categories is not 60 FPS. Instead, it’s likely to be either an MP4 video or a GIF with a lower frame rate, like 50 FPS, labeled as “60 FPS” for marketing purposes.
Is There Any 60 FPS GIF Maker?
Unfortunately, there is no such thing as a 60 FPS GIF maker. As mentioned before, there is no 60 FPS GIF, so it is impossible to create a 60 FPS GIF using traditional methods. However, many excellent video-to-GIF converters in the market allow you to set the GIF frame rate.
These video-to-GIF converters allow you to convert MP4 videos to GIFs with a higher frame rate, which can give your GIFs a smoother and more fluid motion. While these GIFs may not be 60 FPS, they can still provide a significant quality improvement compared to traditional GIFs.
How To Convert Video to GIF and Set Its FPS on Desktop
Converting videos to GIFs is a simple process that can be done using various tools, including desktop software such as Wondershare Filmora . Filmora is a powerful and user-friendly video editor that makes it easy to convert videos to GIFs and set their frame rate.
Free Download For Win 7 or later(64-bit)
Free Download For macOS 10.14 or later

Not only does it allow you to easily convert your videos to GIFs, but it also allows you to customize the frame rate and other settings to get the perfect results. With its user-friendly interface and powerful features, Filmora makes it simple for anyone to create high-quality GIFs that are perfect for sharing on social media or other platforms.
Here’s how to convert MP4 to GIF using Filmora:
Step1 Open the Filmora software and create a new project

Step2 Import your video to the timeline

Step3 Export the video

Step4 In the export window, select “GIF“ and set the frame rate of the GIF.

How To Convert MP4 to GIF Online for Free
Converting MP4 videos to GIFs online is a quick and convenient way to create animations without needing specialized software. One of the best online tools for this purpose is Media.io . Its simple and user-friendly interface, Media.io, makes it easy to convert MP4 videos to GIFs in just a few clicks.
With Media.io, you can customize the frame rate, duration, and other settings to get the perfect results. Whether you’re looking to create simple animations or more complex and detailed videos, Media.io has everything you need to get started.
Best of all, Media.io is free to use, making it an excellent choice for anyone who wants to convert MP4 and other videos to GIFs without spending a dime. So if you’re looking for a fast, convenient, and reliable way to convert your videos to GIFs, look no further than Media.io.
Follow these steps to convert MP4 to GIF online using Media.io:
Step1 Upload a video from your computer or drag and drop it onto the page.

Step2 Customize the output size, frame rate, and length, and add text before creating your GIF.

Step3 Download the resulting GIF file or save it for later.

People Also Ask
Here are some of the most frequently asked questions about converting MP4 to GIF and other related topics:
Q1. Can a GIF be 30 FPS?
It is impossible to get an exact 30 FPS GIF. Frame rate refers to the number of images (frames) displayed per second in a video or animation. That frame rate is stored as an integer (n) that defines n/100ths of a second. So you can specify a frame of 1/100 second (100 FPS), 2/100 second (50 FPS), 3/100 second (33.33 FPS), 4/100 second (25 FPS), etc. but not something like 3.3333…/100 second (30 FPS).
Q2. How Do I Get the FPS of a GIF?
To determine the speed or frame rate of a GIF, you can use online tools that show the delay time between its frames in milliseconds. The frame rate of a GIF is calculated by counting how many delays fit in 1 second of animation. The delay time determines the playback speed and can be adjusted to increase or decrease the frame rate. These tools also allow you to preview the speed changes and compare the input and output GIFs.
Q3. What FPS Should a GIF Be?
GIF files store delay time between frames in whole hundredths of a second. They typically run between 10 and 100 frames per second (FPS). The common frame rate for a GIF is 10 FPS, 20 FPS, 12.5 FPS, 25 FPS, and 50 FPS. With online tools, it’s possible to determine and change the speed of a GIF.
Q4. What Is the Max FPS for a GIF?
The maximum fps for a GIF is 100 FPS, but browsers or consumer screens do not support it. The browser-engine image decoders will automatically reduce the framerate to 10 fps, playing it ten times slower. If a GIF appears slow, the browser has reset the speed to 10 fps. Some software and devices may support higher frame rates.
Conclusion
GIF is a popular format for short animations and videos. The frame rate of a GIF determines its playback speed, which is usually set at 10, 20, 12.5, 25, and 50 per second. However, the highest possible frame rate that can be represented in the GIF format is 100 FPS, but most browsers and consumer screens cannot display it accurately.
There are various tools available, both online and desktop-based, that can convert videos to GIFs and adjust their frame rate as desired. With these tools, you can create high-quality, personalized GIFs that fit your specific needs and preferences.
Free Download For macOS 10.14 or later
Not only does it allow you to easily convert your videos to GIFs, but it also allows you to customize the frame rate and other settings to get the perfect results. With its user-friendly interface and powerful features, Filmora makes it simple for anyone to create high-quality GIFs that are perfect for sharing on social media or other platforms.
Here’s how to convert MP4 to GIF using Filmora:
Step1 Open the Filmora software and create a new project
Step2 Import your video to the timeline
Step3 Export the video
Step4 In the export window, select “GIF“ and set the frame rate of the GIF.
How To Convert MP4 to GIF Online for Free
Converting MP4 videos to GIFs online is a quick and convenient way to create animations without needing specialized software. One of the best online tools for this purpose is Media.io . Its simple and user-friendly interface, Media.io, makes it easy to convert MP4 videos to GIFs in just a few clicks.
With Media.io, you can customize the frame rate, duration, and other settings to get the perfect results. Whether you’re looking to create simple animations or more complex and detailed videos, Media.io has everything you need to get started.
Best of all, Media.io is free to use, making it an excellent choice for anyone who wants to convert MP4 and other videos to GIFs without spending a dime. So if you’re looking for a fast, convenient, and reliable way to convert your videos to GIFs, look no further than Media.io.
Follow these steps to convert MP4 to GIF online using Media.io:
Step1 Upload a video from your computer or drag and drop it onto the page.
Step2 Customize the output size, frame rate, and length, and add text before creating your GIF.
Step3 Download the resulting GIF file or save it for later.
People Also Ask
Here are some of the most frequently asked questions about converting MP4 to GIF and other related topics:
Q1. Can a GIF be 30 FPS?
It is impossible to get an exact 30 FPS GIF. Frame rate refers to the number of images (frames) displayed per second in a video or animation. That frame rate is stored as an integer (n) that defines n/100ths of a second. So you can specify a frame of 1/100 second (100 FPS), 2/100 second (50 FPS), 3/100 second (33.33 FPS), 4/100 second (25 FPS), etc. but not something like 3.3333…/100 second (30 FPS).
Q2. How Do I Get the FPS of a GIF?
To determine the speed or frame rate of a GIF, you can use online tools that show the delay time between its frames in milliseconds. The frame rate of a GIF is calculated by counting how many delays fit in 1 second of animation. The delay time determines the playback speed and can be adjusted to increase or decrease the frame rate. These tools also allow you to preview the speed changes and compare the input and output GIFs.
Q3. What FPS Should a GIF Be?
GIF files store delay time between frames in whole hundredths of a second. They typically run between 10 and 100 frames per second (FPS). The common frame rate for a GIF is 10 FPS, 20 FPS, 12.5 FPS, 25 FPS, and 50 FPS. With online tools, it’s possible to determine and change the speed of a GIF.
Q4. What Is the Max FPS for a GIF?
The maximum fps for a GIF is 100 FPS, but browsers or consumer screens do not support it. The browser-engine image decoders will automatically reduce the framerate to 10 fps, playing it ten times slower. If a GIF appears slow, the browser has reset the speed to 10 fps. Some software and devices may support higher frame rates.
Conclusion
GIF is a popular format for short animations and videos. The frame rate of a GIF determines its playback speed, which is usually set at 10, 20, 12.5, 25, and 50 per second. However, the highest possible frame rate that can be represented in the GIF format is 100 FPS, but most browsers and consumer screens cannot display it accurately.
There are various tools available, both online and desktop-based, that can convert videos to GIFs and adjust their frame rate as desired. With these tools, you can create high-quality, personalized GIFs that fit your specific needs and preferences.
Add Green Screen Video on TikTok
TikTok is the most popular platform for making short videos. You can create creative short videos and upload to TikTok so that they can entertain your followers and make your videos go viral. To add variety to your video content, the use of green screen in short videos is a great idea. You can replace the green screen with any background in your TikTok video. You need to know how to add green screen video on TikTok.
Adding green screen on TikTok videos has become a trend now as there are several green screen TikTok videos that have gone viral. In fact, creative green screen videos are extremely popular on social media platforms. Instead of replacing the green screen in your video with a single photo, you can replace it with multiple pictures on TikTok. We will illustrate how to add multiple pictures on TikTok green screen.
Part 1. How to Add Green Screen on TikTok?
To add green screen on TikTok video, you need to have a background of uniform color. It does not necessarily have to be a green screen. For example, if you are shooting a video of your legs and the floor tiles have uniform color, you can use green screen on TikTok to replace the tiles with any picture. Instead of using one picture on TikTok short video, you can use multiple pictures in the background to create stunning TikTok videos. Here are the steps on how to add multiple pictures to TikTok green screen.
Step1 Open TikTok app on your phone. Tap on Plus icon located at the bottom of the app screen to make a new video.
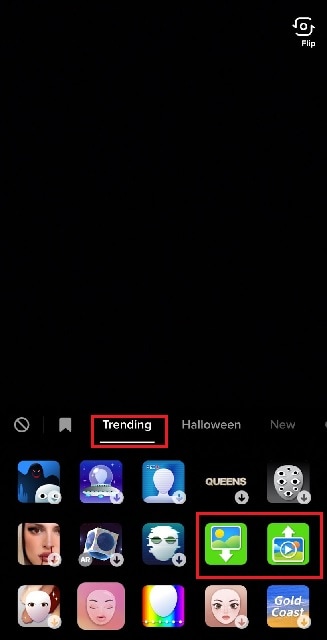
Step2 Choose the duration of the video as per your preference. Thereafter, tap on Effects option located at the bottom-left corner to see the different effects available on TikTok.
![]()
Step3 Go to Trending tab and you will see Green Screen and Green Screen Video icons. If you want your video to have green screen photo, tap on Green Screen icon. If you want your video to have green screen video, tap on Green Screen Video icon.
Step4 You will get a generic background and you can choose any preset background or select photo or video from your phone gallery by tapping on Plus icon. Once you are done, tap on Record button.
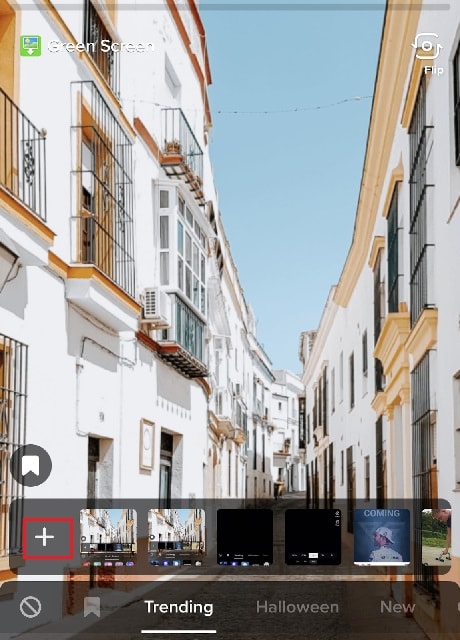
Step5 In order to use multiple pictures, you should stop recording in between and change your green screen image to anything you desire. Then tap on Record button again. TikTok will string your clips and it would appear that you have been changing multiple pictures of your background for your video.
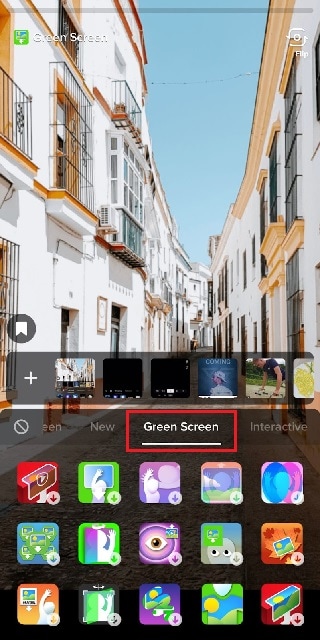
If you want to experiment with green scree effects, you can scroll down after tapping on Green Screen icon under Effects. You will see different types of green screen videos possible on TikTok to choose from.
Part 2. Creative Ideas to Make TikTok Green Screen Video
Now that you know how to add a video on TikTok green screen, you have to make the most out of it. If you are wondering how you can use green screen in your TikTok videos, here are some creative ideas for you.
Walking Out Videos – You can use green screen effect to show that you are walking out of plane, walking vertically on the wall like inception, walking on the roof of a building. In fact, you can show that you are walking out of popular monuments and palaces and trick your viewers into thinking that you were actually there.
Photoshoot Location – Create a TikTok video showing your favorite locations across the world where you dream of doing photoshoot. You can pose differently and place the location in your background through green screen effect.
How-To Video – If your TikTok channel is about tutorial and learning videos, you can explain things better by putting screenshots and multiple relevant pictures in the background so that viewers can get a pictorial representation of what you are speaking to them.
Mystery Story – You can a create short video describing unknowing facts and mysteries around certain places in the world. You can put photos or video clips of those mysterious places in your background to keep your viewers hooked and related to your narration.
Rate Them Video – You can use green screen effect to showcase your old Instagram photos or videos and rate them. This is an extremely popular trend in TikTok where people show their old photos, display work from the past, and rate them today.
Reveal Your Creation – Share your secrets or interesting stories behind some of the photos or videos you took in the past. You can talk about how creatively you took certain photos and put those photos in the background while discussing them.
Part 3. How to Make Green Screen Video on Computer?
If you have a computer and a webcam, you can record a green screen video on your computer. You can place the green screen in the background perfectly and place the webcam so that the background stays within the green screen. You will need a video recorder and a video editor to make green screen video as well as replace the green screen with any photo or video. We recommend Wondershare Filmora where you can record as well as edit green screen video.
Filmora is a professional video editor where you can record your computer screen as well as your webcam video with green screen background in Picture-in-Picture mode. After recording the video, you can replace the green screen with any video clip or photo instantly in a few steps. You can also fine-tune green screen effect for perfection. Therefore, you can save the video in any resolution and file format as per your preference.

Free Download For Win 7 or later(64-bit)
Free Download For macOS 10.14 or later
Conclusion
Adding green screen effect on TikTok videos can make your videos stand out. We have illustrated how to add multiple green screen videos on TikTok and your videos will have a better chance of getting viral. Keep the green screen ideas in mind while making TikTok green screen videos. If you want to make and edit green screen videos on computer, Wondershare Filmora is the best application available for Windows and Mac users.
How to Use Zoom in Google
Zoom in and out is a feature in every presentation/editing tool, but we generally forget its importance until it is unavailable, and you will need alternatives. You imagine a situation where you will have to zoom in on the sheet in the presentation because your client is sitting far from the projector. After the presentation, you will have to zoom out, so the sheet becomes normal. Zoom in google is our daily activity on a computer.
Previously there were no such options in Google sheet to zoom or out. But, now Google has come up with this new feature. This article will explore the steps to zoom in and out of the whole page and the elements of Google Chrome. Now we will know about several ways of using the Zoom control. Let’s start.
Part 1: 6 Steps for using Zoom control in Google
Step1Using the keyboard to use the zoom control
The Easiest and quickest way of using Zoom control is keyboard shortcuts. You will have to press Ctrl and then “+” sign to zoom in; to zoom out, you will have to press Ctrl and – sign. If you want to return to the default size, click on Ctrl and press “0”.
Step2Using Zoom control from the menu
Users can even use Google Zoom to control their main menu if you want to find the zoom control, tap or click on the Menu button of chrome.
Step3Using zoom control
In the zoom-in Google section, you will have to tap or click on the “+” option to zoom in and click on the – sign to zoom out. After completion, you can press the ESC key to hide the menu.

Step4Making Zoom adjustments
Once you are done using Google Zoom, users can make adjustments using a magnifying glass, which appears in the address bar. Click on that and press “+” to zoom in and – to zoom out, or you can press the reset button to come back to default level.

Step5Changing the Zoom level
You can even set the custom zoom level so that each web page opens up with the text at a large size while launching. You can click on the menu button of chrome, then tap on the Settings option.

Step6Set zoom level
You can type “Page Zoom” in the search box. You can even click on the appearance on the left side. Click on the drop-down menu and tap on default zoom.

Part 2: How to Use the Zoom Control on Google Docs
Step1Open the document.
Step2Click on the Zoom button.
Step3Select the zoom level.
This article will discuss the information on Zoom into Google Docs.
Several options are shared in all Google Apps. Users can share the Google files such as slideshows, spreadsheets, and documents from Google Drive or in-app. You can derive the zoom settings and many more in the app or drive.
Many productive applications we use on the PC will have a hundred percent zoom level which is the default. Depending upon the distance you sit from your monitor or the visual quality, the zoom level will be decided. If you find reading the word on the PC screen difficult, you must change the zoom level in your Google Docs.
Most applications specify a hundred percent as their default zoom level. But if you want to change the size to more minor or more extensive, you can use the zoom controller. Let’s see the steps of zoom into Google docs.
Step1Sign in to Google Drive and open your documents where you want to zoom in or out.
Step2Click or Tap on the zoom button in the toolbar above the document and then choose the predefined zoom levels, or you can manually enter the preferred zoom level in the space.
1. Use the zoom controller in Google sheets with Built-in Functionality?
It is a functionality of Google sheets that allows using the zoom controller. Here are the steps of using the Zoom feature in Google sheets:
Step1Tap on the Zoom option in the toolbar. It will show a drop-down option with several zoom levels.
Step2Choose the level you wish. You can choose from the existing one or manually enter the value. You must know that if you prefer more petite than a hundred percent, it will get smaller, and if you choose more than a hundred, it will get bigger.
Step3You can even veg the same options while you click File Tab and linger the cursor on zoom options.
2. Use the zoom controller manually in Google Sheets by using the browser?
You can even change the zoom level by changing the zoom value manually in the browser. Here are some steps for changing the zoom level on the Google sheets in the chrome browser:
Step1Tap on the control and customize icon in the Google browser to control the Zoom controller in chrome.
Step2In options, you can change the zoom level by tapping on the minus or plus sign.
Step3You can even find a similar option to zoom in on other browsers.
3. How to use the Zoom controller in Mobile
When you are using an iOS or Android device, you can pinch the screen to zoom in and slide two fingers apart to zoom out.
4. How to make Google earth zoom-in video
Do you also want to make a fantastic Google earth zoom-in video? Then let’s see the steps for making this:
- Open the Google Earth pro
- Click on tools
- In the drop-down, click on “movie maker.” After clicking on this, a pop-up will appear.
- Click on the first option, “live keyboard and mouse.”
- Then, click on browse to save the file.
- Type the place name on the left-hand search bar.
- Tap on “Earth.” It will take you to the place.
- Zoom out the earth, open the “Movie maker” box, and click on “Create Movie.”
- Click on the city name to see the Google earth zoom-in video.
- After the video is done, you can click on “Stop Recording.”
Conclusion
This article covers how to enlarge and reduce the screen size in Google Chrome. You can enlarge and reduce your images’ display using the Zoom feature if you want to control the size of a browser page’s content. If you’re using a touchscreen device, zoom in and then use two fingers to navigate the browser screen. Moreover, if you want to see the zoom level in the sheet, it can automatically become the new default. Users can zoom out the spreadsheet by VIEW>Zoom.
Zoom in and out is a feature in every presentation/editing tool, but we generally forget its importance until it is unavailable, and you will need alternatives. You imagine a situation where you will have to zoom in on the sheet in the presentation because your client is sitting far from the projector. After the presentation, you will have to zoom out, so the sheet becomes normal. Zoom in google is our daily activity on a computer.
Previously there were no such options in Google sheet to zoom or out. But, now Google has come up with this new feature. This article will explore the steps to zoom in and out of the whole page and the elements of Google Chrome. Now we will know about several ways of using the Zoom control. Let’s start.
Part 1: 6 Steps for using Zoom control in Google
Step1Using the keyboard to use the zoom control
The Easiest and quickest way of using Zoom control is keyboard shortcuts. You will have to press Ctrl and then “+” sign to zoom in; to zoom out, you will have to press Ctrl and – sign. If you want to return to the default size, click on Ctrl and press “0”.
Step2Using Zoom control from the menu
Users can even use Google Zoom to control their main menu if you want to find the zoom control, tap or click on the Menu button of chrome.
Step3Using zoom control
In the zoom-in Google section, you will have to tap or click on the “+” option to zoom in and click on the – sign to zoom out. After completion, you can press the ESC key to hide the menu.
Step4Making Zoom adjustments
Once you are done using Google Zoom, users can make adjustments using a magnifying glass, which appears in the address bar. Click on that and press “+” to zoom in and – to zoom out, or you can press the reset button to come back to default level.
Step5Changing the Zoom level
You can even set the custom zoom level so that each web page opens up with the text at a large size while launching. You can click on the menu button of chrome, then tap on the Settings option.
Step6Set zoom level
You can type “Page Zoom” in the search box. You can even click on the appearance on the left side. Click on the drop-down menu and tap on default zoom.
Part 2: How to Use the Zoom Control on Google Docs
Step1Open the document.
Step2Click on the Zoom button.
Step3Select the zoom level.
This article will discuss the information on Zoom into Google Docs.
Several options are shared in all Google Apps. Users can share the Google files such as slideshows, spreadsheets, and documents from Google Drive or in-app. You can derive the zoom settings and many more in the app or drive.
Many productive applications we use on the PC will have a hundred percent zoom level which is the default. Depending upon the distance you sit from your monitor or the visual quality, the zoom level will be decided. If you find reading the word on the PC screen difficult, you must change the zoom level in your Google Docs.
Most applications specify a hundred percent as their default zoom level. But if you want to change the size to more minor or more extensive, you can use the zoom controller. Let’s see the steps of zoom into Google docs.
Step1Sign in to Google Drive and open your documents where you want to zoom in or out.
Step2Click or Tap on the zoom button in the toolbar above the document and then choose the predefined zoom levels, or you can manually enter the preferred zoom level in the space.
1. Use the zoom controller in Google sheets with Built-in Functionality?
It is a functionality of Google sheets that allows using the zoom controller. Here are the steps of using the Zoom feature in Google sheets:
Step1Tap on the Zoom option in the toolbar. It will show a drop-down option with several zoom levels.
Step2Choose the level you wish. You can choose from the existing one or manually enter the value. You must know that if you prefer more petite than a hundred percent, it will get smaller, and if you choose more than a hundred, it will get bigger.
Step3You can even veg the same options while you click File Tab and linger the cursor on zoom options.
2. Use the zoom controller manually in Google Sheets by using the browser?
You can even change the zoom level by changing the zoom value manually in the browser. Here are some steps for changing the zoom level on the Google sheets in the chrome browser:
Step1Tap on the control and customize icon in the Google browser to control the Zoom controller in chrome.
Step2In options, you can change the zoom level by tapping on the minus or plus sign.
Step3You can even find a similar option to zoom in on other browsers.
3. How to use the Zoom controller in Mobile
When you are using an iOS or Android device, you can pinch the screen to zoom in and slide two fingers apart to zoom out.
4. How to make Google earth zoom-in video
Do you also want to make a fantastic Google earth zoom-in video? Then let’s see the steps for making this:
- Open the Google Earth pro
- Click on tools
- In the drop-down, click on “movie maker.” After clicking on this, a pop-up will appear.
- Click on the first option, “live keyboard and mouse.”
- Then, click on browse to save the file.
- Type the place name on the left-hand search bar.
- Tap on “Earth.” It will take you to the place.
- Zoom out the earth, open the “Movie maker” box, and click on “Create Movie.”
- Click on the city name to see the Google earth zoom-in video.
- After the video is done, you can click on “Stop Recording.”
Conclusion
This article covers how to enlarge and reduce the screen size in Google Chrome. You can enlarge and reduce your images’ display using the Zoom feature if you want to control the size of a browser page’s content. If you’re using a touchscreen device, zoom in and then use two fingers to navigate the browser screen. Moreover, if you want to see the zoom level in the sheet, it can automatically become the new default. Users can zoom out the spreadsheet by VIEW>Zoom.
Also read:
- Updated In 2024, How Can You Deny These Best 10 Free Speech to Text Software
- 2024 Approved The Easiest Way to Make Time-Lapse Videos. Yes, You Can Make a Time-Lapse Video with Your Phone. It Powers a Very Simple and Easy Way to Make Time-Lapse Videos
- In 2024, Whats The Best Laptops For Video Editing
- A Guide to Speed up a Video on Splice
- New An Introduction to LUTs | Their Overview and Benefits for 2024
- Updated In 2024, Easy Way to Inset Text in Video
- Is Augmented Reality Conferencing the Future of Workplace Collaboratio for 2024
- Updated Best 5 Tools to Help You Know More Freeze-Frame Video Editing Skills for 2024
- Learn 4 Proven Methods for Creating Engaging and Memorable Recap Videos. Elevate Your Event Coverage and Engage Your Audience with These Tips and Tricks
- New In 2024, 5 Tips for Aquasoft Slideshow
- New In 2024, Do You Know Anything About the Video Format Supported by WhatsApp? If Not, Then This Is the Right Time to Learn About WhatsApp-Supported Video Formats
- New In 2024, How to Add Text Animation Online
- New 2024 Approved Top 18 Video Editors for PC and Mac
- 2024 Approved An Ultimate Guide to Flexclip Online Trimmer
- New 2024 Approved How to Make a Gaming Montage - Guide & Tips
- In This Article, You Will Learn How to Create an Attractive and Engaging Slideshow Video Using Tools Available in the Wondershare Filmora
- Best Tools To Create Blend Image Collage for 2024
- Updated In 2024, Best PDF to GIF Converters
- Updated Want to Find a Good Camera for YouTube? This Article Brings You some of the Best Options of Different Varieties for Your Channel
- Updated Guide to Making Cinematography for Music Video
- In 2024, In This Article, We Will Discuss What Lens Distortion Is, How It May Be Fixed, and the Factors You Need to Pay Attention to Avoid Lens Distortion when Taking or Recording Videos
- Updated In 2024, 2 Ways to Add Custom Subtitles to Netflix
- 2024 Approved What Slideshow Templates Can Teach You About Aesthetic
- 2024 Approved The Best Cinematic LUTs in The Market
- New How I Got Free After Effects Templates Slideshow with Simple Trick
- Updated In 2024, Easy Way to Add Transitions to Videos
- New How to Create Datamoshing Effect to Your Footage in After Effects for 2024
- Updated Learn How to Convert MP4 Videos to 60 FPS GIFs with This Easy-to-Follow Tutorial. Get Smooth and Crisp Motion in Your GIFs in Just a Few Simple Steps
- Updated Transparent Logo and Images Look Cool when You Are Planning to Create a Brand Identity. An Image with Unique Features Catches the Attention of Viewers and Leaves Impression
- Updated 2024 Approved Easy Way to Add Transitions to Videos
- 2024 Approved Windows Movie Maker Review
- New How to Add Green Screen Effects In Phhotoshop for 2024
- New In 2024, Step by Step Guide on Make Gimp Transparent Background PNG
- New Learn About some of the Best Apps for Photo Collage for PC
- Updated 2024 Approved Adobe After Effects Review
- Top 7 Color Match Paint Apps for 2024
- New In 2024, How to Create Loop Videos Using Filmora
- Easy Way to Apply Green Screen to YouTube Videos
- 2024 Approved The Top Tips for Becoming a Good Podcast Host Are Presented in This Article. How to Start and End the Podcast Show Is All Set Below. You Can Also Learn About the Ways to Call Guests to Your Show
- New Getting To Know More About the Video Editing Interface of Wondershare Filmora
- Updated Best 8 AR Apps for Android and iOS | Help You See the World of AR
- Things You Should Know When Unlocking Total Wireless Of Apple iPhone 7 | Dr.fone
- In 2024, How To Unlock SIM Cards Of Oppo A18 Without PUK Codes
- How to Hard Reset Poco C51 Without Password | Dr.fone
- Locked Out of Apple iPhone 11 Pro? 5 Ways to get into a Locked Apple iPhone 11 Pro
- How to recover deleted pictures from Asus .
- Simple and Effective Ways to Change Your Country on YouTube App Of your Oppo Reno 10 Pro 5G | Dr.fone
- How to Change Your Realme Note 50 Location on life360 Without Anyone Knowing? | Dr.fone
- How to Transfer Data from Vivo S17 to Other Android Devices? | Dr.fone
- How to Fix Android App Not Installed Error on Samsung Galaxy F15 5G Quickly? | Dr.fone
- How To Repair System Issues of Apple iPhone XS Max? | Dr.fone
- In 2024, The 6 Best SIM Unlock Services That Actually Work On Your Vivo V29e Device
- How to Change Location on TikTok to See More Content On your Realme Narzo 60x 5G | Dr.fone
- Want to Uninstall Google Play Service from Samsung Galaxy A05s? Here is How | Dr.fone
- In 2024, Tutorial to Change Oppo A56s 5G IMEI without Root A Comprehensive Guide
- 9 Best Free Android Monitoring Apps to Monitor Phone Remotely For your Nokia XR21 | Dr.fone
- In 2024, Downloading SamFw FRP Tool 3.0 for Poco M6 Pro 5G
- Title: Updated In 2024, Learn Topaz Video Enhance AI Review and Achieve Powerful Video Conversion
- Author: Chloe
- Created at : 2024-04-24 07:08:37
- Updated at : 2024-04-25 07:08:37
- Link: https://ai-editing-video.techidaily.com/updated-in-2024-learn-topaz-video-enhance-ai-review-and-achieve-powerful-video-conversion/
- License: This work is licensed under CC BY-NC-SA 4.0.
