:max_bytes(150000):strip_icc():format(webp)/CODA-d4dd2a9b6c3d4a008a05c9718c9bce1e.jpg)
Updated In 2024, Make Super Easy Coin Magic With Filmora

Make Super Easy Coin Magic With Filmora
Do you want to become a magician in your videos? Now, everyone can look like a magician with the magic of editing. This article will show you how to do a cool coin trick in Filmora 11 .
Part 1: What is the filmmaking technique “Cutting on action”
Cutting on action is a technique the editors use to cut in the middle of an action to another shot that matches the first shot’s action. Typically, the subject starts an action in one shot and continues the action in another, creating a smooth transition. For example, when you make the coin trick video, you need to cut on the tapping so it can trick the eyes, and the cut won’t be noticeable.
Part 2: Things You Need to Prepare for The Coin Magic Trick
- Glass and two coins

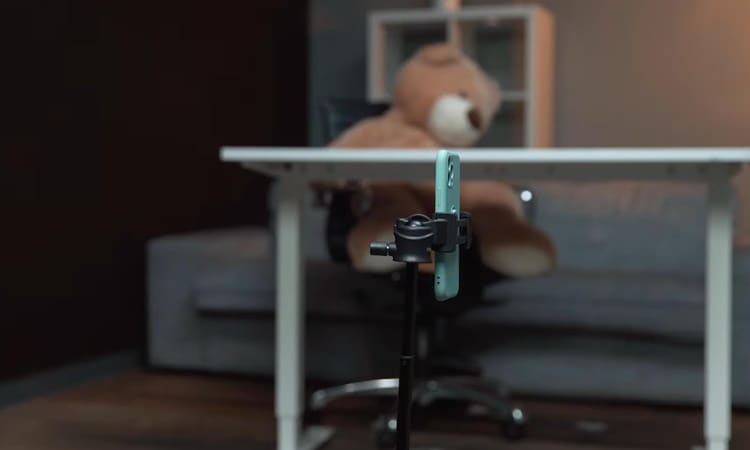
- Set the phone on a tripod. Because utilizing a tripod can significantly improve the recording’s stability.
Part 3: Start Filming
Step1 Firstly, you must show the coin and the bottom of the glass.
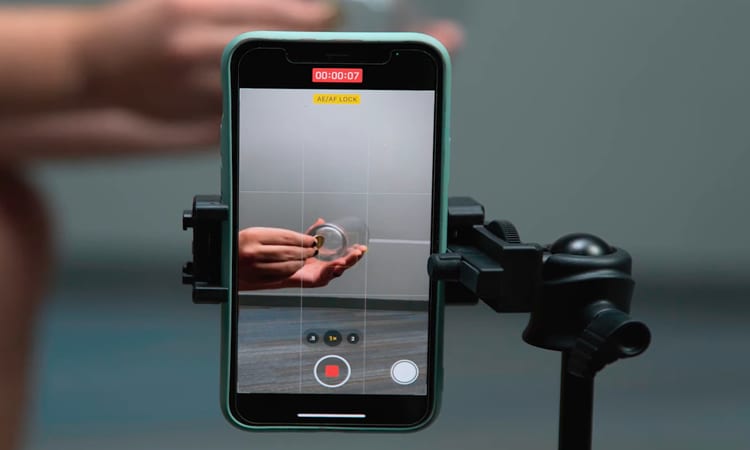
Step2 After that, you need to hold the coin with the fingers part of one hand and tap down on the coin. Make sure it looks like the coin is going through straight to the glass.
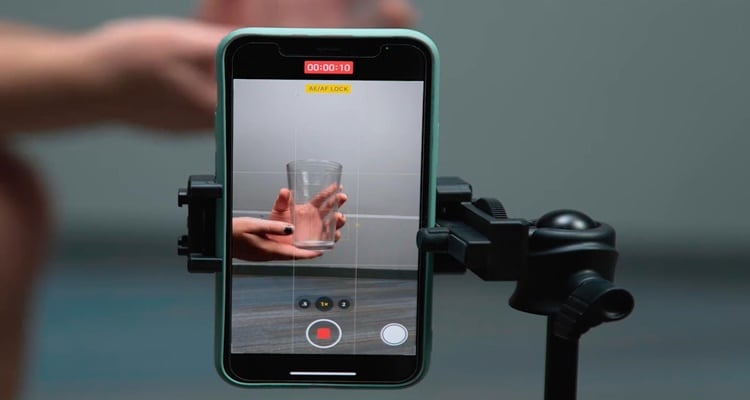
Step3 You need someone else to drop the other coin from the top. Meanwhile, you are pretending to tap a coin on the glass. You don’t need to worry about someone else hand in the frame. Since you can remove it easily with the masking feature in Filmora.
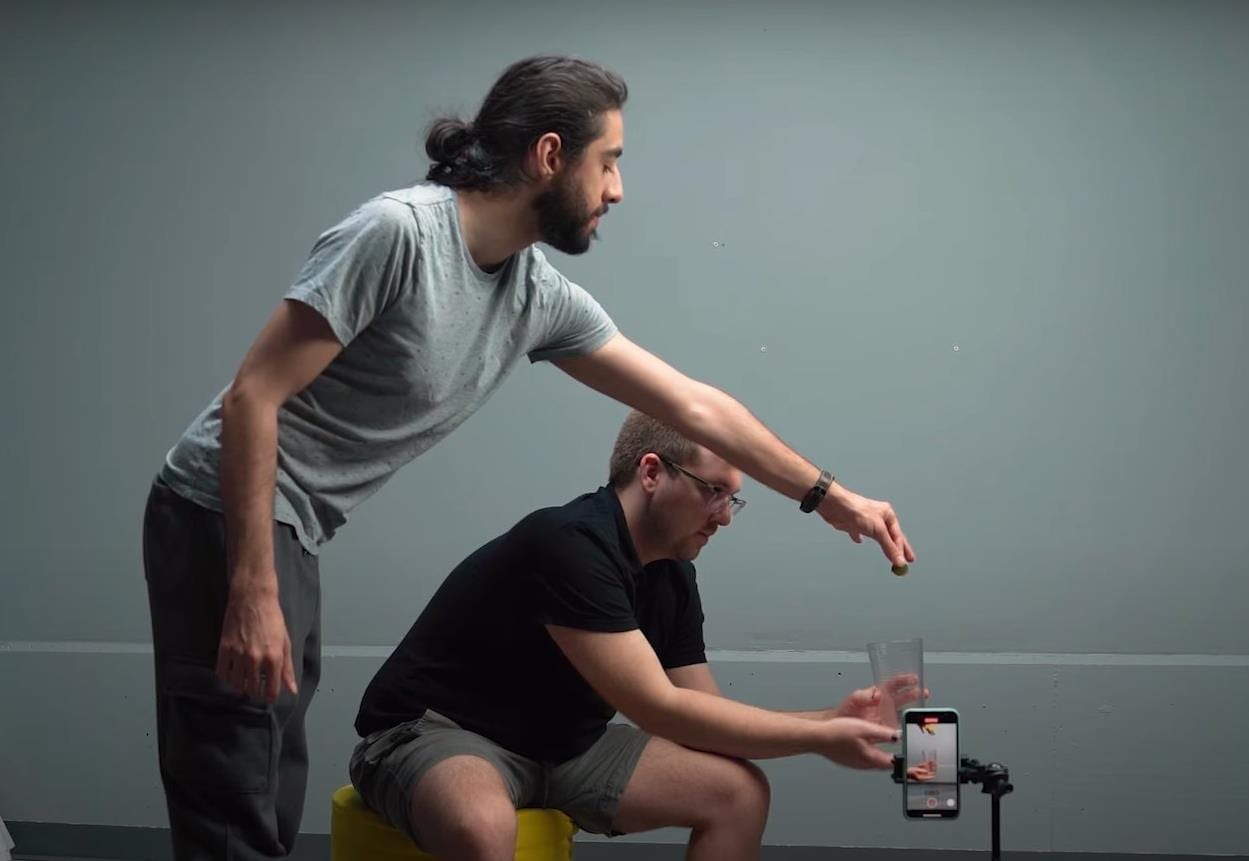
Step4 It would help if you had a second shot for a clean plate of the background. You can record background for 20 seconds.
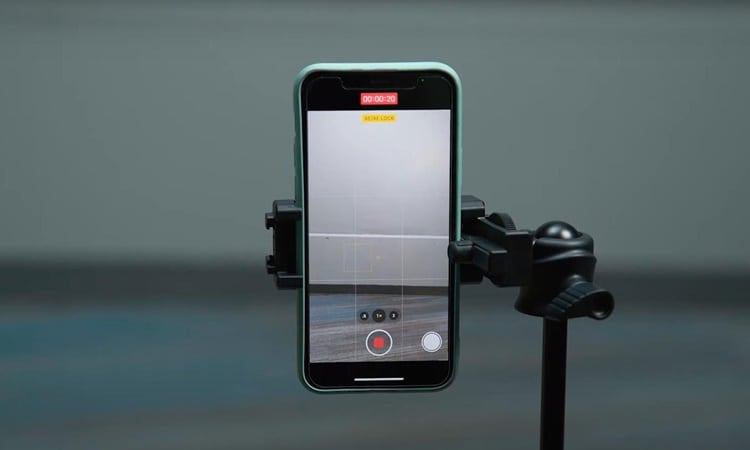
Part 4: Bring the clips into Filmora 11
Step1 If you have not downloaded Filmora, you can visit filmora.wondershare.com to download Filmora’s new version.
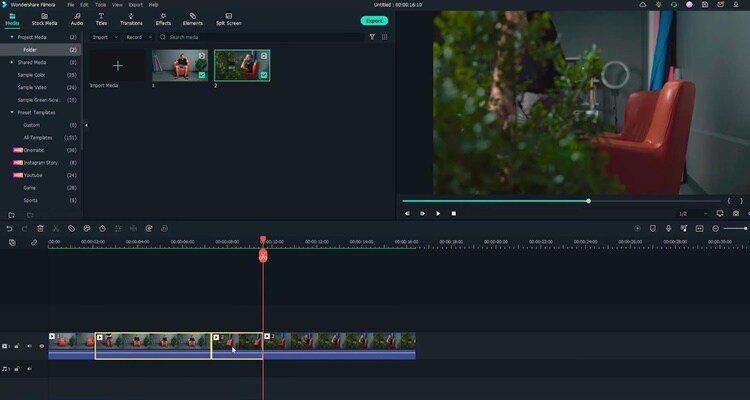
Step2 Drag and drop the clip onto the first track of the timeline.Afterward, move the playhead to the right and find the spot where you tapped the coin last time before your friend drops the other coin. Additionally, make sure it is in the middle of the tapping action and cut.
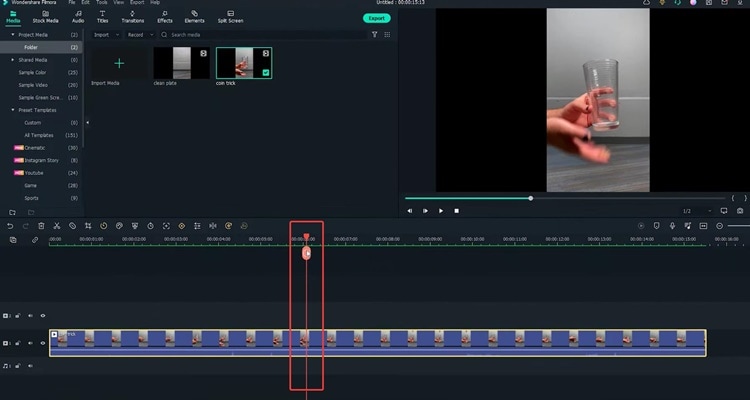
Step3 Then move the playhead to the right and find the spot where your friend drops the coin while you tap without the coin in your hand. Make sure it is in the middle of the tapping action, and the position of your hand roughly matches that in the last cut and make a cut.
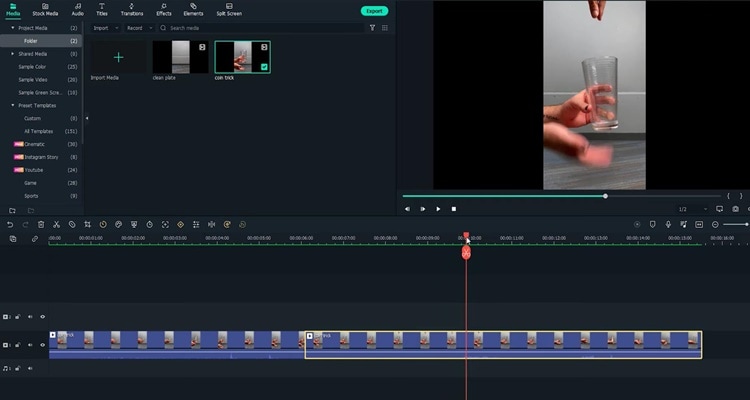
Step4 Now you need to delete the middle part and play it back. Indeed, cutting on action is the key to creating the illusion that the action is continued without editing.
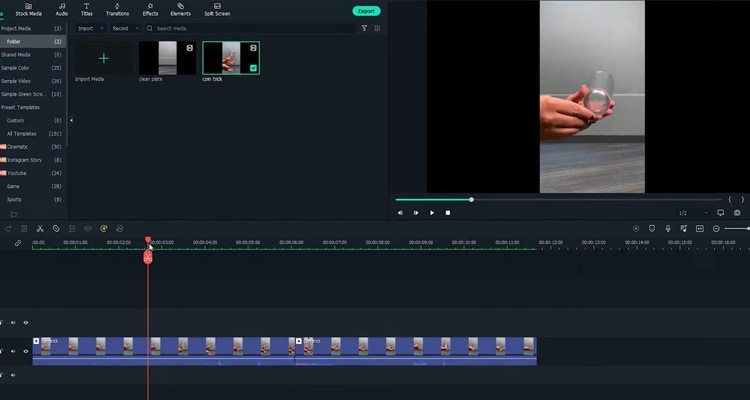
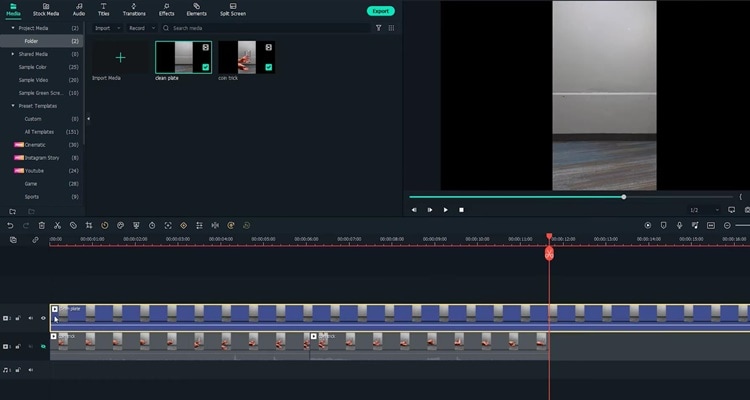
Step5 Next, you must remove your friend’s hand in the frame with the Filmora masking feature. Afterwards. drag and drop the clean plate video onto the second track of the timeline.
Step6 Next, double-click the clip to open the setting video. Find the Mask Section and select the single line.
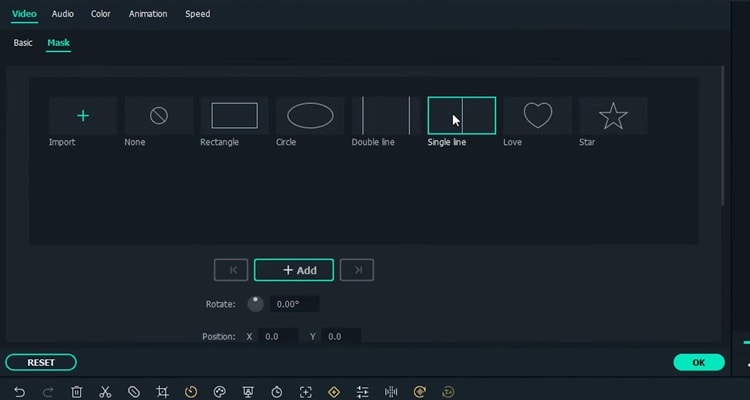
Step7 Here you can see the mask is applied.First, adjust the angle and position of the mask to only show the top part of the frame. Then you have to change the Blur Strength to add more blur to the edge of the mask.
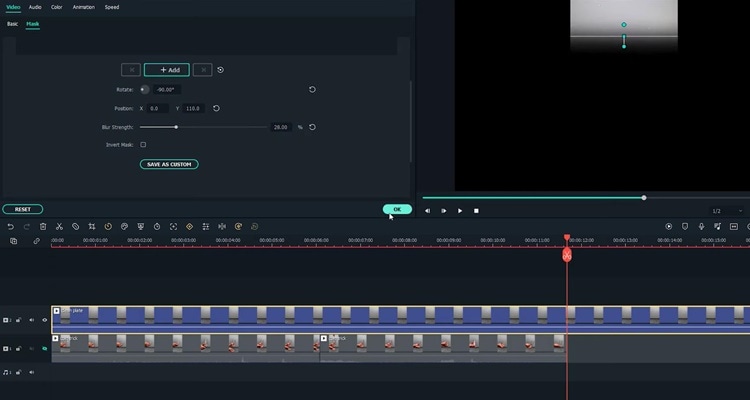
Step8 With the mask finalized, unhide the first video track and adjust the length of the clip on the timeline. Finally, playback the video and see how it looks.
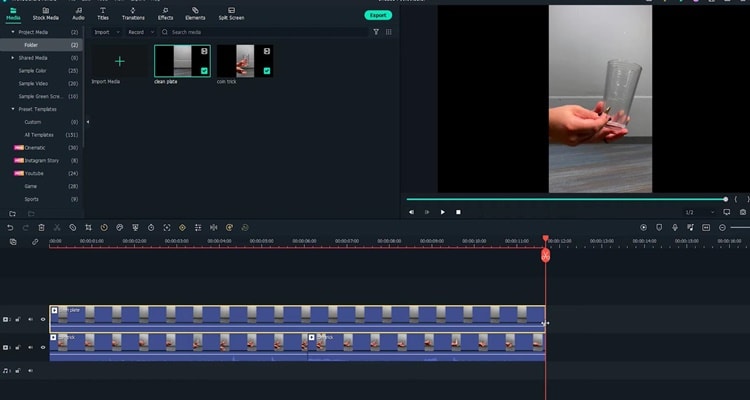
Summary
That’s how to make a coin move through a glass-like MAGIC with the cutting on action editing technique. You can pay close attention to the steps above and follow each step for perfect results.
Free Download For Win 7 or later(64-bit)
Free Download For macOS 10.14 or later
Free Download For macOS 10.14 or later
How to Stabilize Videos with Google Photos App for Free
While recording a video, it is pretty normal if you don’t end up having a stabilized clip due to camera shakes or movements on an unstable and unpaved road. This is where the Google stabilizer video editing feature comes into play. You can stabilize a video with the Google Photos app that has a built-in video stabilizer and other editing tools to give a finishing touch to your media files before they are shared online or with family, friends, and/or colleagues.
In this article, we will show you how to use Google Photos as a stabilizer video Google offers to its consumer. In addition, you will also learn about one of the most trusted and efficient third-party tools to stabilize the clips if Google video stabilizer fails to produce quality output.
In this article
01 What is Google Photos and How Does It Work?
02 How to Stabilize Videos with Google Photos on Android and iPhone?
03 How to Stabilize Videos with Google Photos Online?
04 How to Use Google Photos to Edit Video?
Part 1: What is Google Photos and How Does It Work?
Google Photos is an app that can be obtained from Play Store or App Store to be installed on an Android-based smartphone or iPhone or iPad respectively.
The program can store photos and videos from your phone, and ensures that those media files are well-backed up so they can be recovered easily if/when lost due to some mishaps. Furthermore, the tool even lets you edit, customize, and share your photos and videos with ease.
1. History and Current Policies
Earlier, Google Photos used to offer unlimited storage to the users where they can save as many photos as they want, as long as the images were saved in ‘high-quality’ resolution. However, from June 01, 2021, Google changed its policies of using the app, and now the tool offers limited storage. If more space is needed, the users must subscribe to a paid plan.
2. Accessibility
Google Photos can be accessed from a web browser, Google Drive desktop program, and smartphone app. While you can make only minor changes to the videos such as editing date, time, and location when accessing Google Photos via a web browser, the smartphone app allows you to edit the clips comparatively more sophisticatedly.
3. Deletion
The files that are stored in Google Photos remain there for an indefinite duration, of course until the entire space is completely consumed. When you delete something, it is moved to the Trash and stays there for another 60 days, after which it is automatically deleted from the Cloud forever.
Part 2: How to Stabilize Videos with Google Photos on Android and iPhone?
Google Photos is available for both Android and iPhone smartphones, and as explained earlier, the app can be downloaded from Play Store and App Store respectively. Using the built-in Google stabilizer video editor of the Photos app on both platforms is almost identical and extremely easy.
You can learn how to work with Google video stabilizer to stabilize a video by following the steps that are given below:
Step 1: Locate and Open the Source Video in Google Photos
Download and install Google Photos on your smartphone (Samsung Galaxy Note 10+ is used here for illustrations). Launch the app, tap Library from the bottom-right corner of the interface, and tap to open the source video that you want to stabilize with Google video stabilizer.

Step 2: Stabilize the Video
After the video opens in the app and the playback begins, tap Edit from the bottom. On the next screen, ensure that the Video section is selected. Tap the Stabilize icon from the lower-left area of the window, and wait while Google Photos stabilize video.

Step 3: Save the Video
Once the stabilization process is complete, click Save copy from the bottom-right corner to save the modified video as a separate copy, thus leaving the original instance intact.

Part 3: How to Stabilize Videos with Google Photos Online?
Unfortunately, Google Photos doesn’t have many editing options when accessed via a web browser, and therefore, at the time of this writing, you cannot stabilize a video with the tool’s web interface. But if you are using a Windows or Mac computer, you can try some free online video stabilization software , or use Wondershare Filmora video editor to stabilize video with one click.
For Win 7 or later (64-bit)
For macOS 10.12 or later
Wondershare Filmora video editor is available for Windows and Mac platforms, and gives a tough competition to other industry-standard video editing applications like Final Cut Pro X and Adobe Premiere Pro, etc. You can learn how to stabilize a clip with Filmora instead of using Google stabilizer video editor by following the step-by-step instructions that are explained below:
Step 1: Add the Source Video to the Timeline
After downloading and installing Wondershare Filmora on your Mac or Windows computer (a Windows 11 PC is used here for illustrations), launch the program, and click the New Project tile from the first screen that appears.

When on the main interface, ensure that Media is selected from the standard toolbar at the top, and click anywhere inside the Media window that is present at the upper-left corner. Next, locate, select, and import the source video from your PC that you want to stabilize.

Now, drag and drop the video to the timeline, or hover the mouse over the clip’s thumbnail in the Media window, click the + icon from the bottom-right area. Click the button under the Match to Media or Keep Project Settings label when the confirmation box comes up to add the film to the Timeline using the preferences that you selected.

Step 2: Stabilize the Video
Double click the video in the timeline, and then enable the Stabilization category under video editing pane. Wait while Filmora video editor stabilizes the video without Google video stabilizer. Click OK when done.

Step 3: Export the Stabilized Video
Back on the main interface, click Export from the center-top. On the Export box that opens up next, go to your preferred tab, pick an output format, define output preferences, and click Export from the bottom-right corner to export the stabilized clip without even using Google stabilizer video.

Part 4: How to Use Google Photos to Edit Video?
Google Photos doesn’t only work as a Google video stabilizer app but it also enables you to edit your media clips much more professionally. Some post-production tasks that you can perform while using Google Photos include:
1. Trimming
The trimming handles can be seen when you are on the ‘Video’ section after tapping ‘Edit’ in Google Photos after opening the video. You can drag these handles inwards to get rid of the unwanted starting and ending parts of a clip.

2. Cropping
The ‘Crop’ section enables you to crop the videos in a particular aspect ratio that can be selected from the available list, or drag the handles manually to get custom results.

3. Rotating
The ‘Crop’ section also has an option to rotate the video. Each time you tap the ‘Rotate’ icon, the screen rotates 90o in the counterclockwise direction.

4. Color Correction
The ‘Adjust’ section allows you to adjust the display of a video such as its brightness, contrast, shadows, etc.

5. Filters
You can even add a filter using the presets available in the ‘Filters’ section.

6. Annotations
The ‘Markup’ section enables you to annotate the video. You can either use the ‘Pen’ tool or ‘Highlighter’ to write text on the video or give the screen a different shade respectively.

Depending on the type of modifications you want in your video, you can use Google Photos to get the job done easily and quickly.
Conclusion
Google video stabilizer is a built-in tool in Google Photos. Google Photos can be obtained from Play Store or App Store for your Android or iOS smart devices respectively. In addition to stabilizing your videos, Google Photos app also enables you to make other modifications such as trimming, cropping, applying filters, and much more.
02 How to Stabilize Videos with Google Photos on Android and iPhone?
03 How to Stabilize Videos with Google Photos Online?
04 How to Use Google Photos to Edit Video?
Part 1: What is Google Photos and How Does It Work?
Google Photos is an app that can be obtained from Play Store or App Store to be installed on an Android-based smartphone or iPhone or iPad respectively.
The program can store photos and videos from your phone, and ensures that those media files are well-backed up so they can be recovered easily if/when lost due to some mishaps. Furthermore, the tool even lets you edit, customize, and share your photos and videos with ease.
1. History and Current Policies
Earlier, Google Photos used to offer unlimited storage to the users where they can save as many photos as they want, as long as the images were saved in ‘high-quality’ resolution. However, from June 01, 2021, Google changed its policies of using the app, and now the tool offers limited storage. If more space is needed, the users must subscribe to a paid plan.
2. Accessibility
Google Photos can be accessed from a web browser, Google Drive desktop program, and smartphone app. While you can make only minor changes to the videos such as editing date, time, and location when accessing Google Photos via a web browser, the smartphone app allows you to edit the clips comparatively more sophisticatedly.
3. Deletion
The files that are stored in Google Photos remain there for an indefinite duration, of course until the entire space is completely consumed. When you delete something, it is moved to the Trash and stays there for another 60 days, after which it is automatically deleted from the Cloud forever.
Part 2: How to Stabilize Videos with Google Photos on Android and iPhone?
Google Photos is available for both Android and iPhone smartphones, and as explained earlier, the app can be downloaded from Play Store and App Store respectively. Using the built-in Google stabilizer video editor of the Photos app on both platforms is almost identical and extremely easy.
You can learn how to work with Google video stabilizer to stabilize a video by following the steps that are given below:
Step 1: Locate and Open the Source Video in Google Photos
Download and install Google Photos on your smartphone (Samsung Galaxy Note 10+ is used here for illustrations). Launch the app, tap Library from the bottom-right corner of the interface, and tap to open the source video that you want to stabilize with Google video stabilizer.

Step 2: Stabilize the Video
After the video opens in the app and the playback begins, tap Edit from the bottom. On the next screen, ensure that the Video section is selected. Tap the Stabilize icon from the lower-left area of the window, and wait while Google Photos stabilize video.

Step 3: Save the Video
Once the stabilization process is complete, click Save copy from the bottom-right corner to save the modified video as a separate copy, thus leaving the original instance intact.

Part 3: How to Stabilize Videos with Google Photos Online?
Unfortunately, Google Photos doesn’t have many editing options when accessed via a web browser, and therefore, at the time of this writing, you cannot stabilize a video with the tool’s web interface. But if you are using a Windows or Mac computer, you can try some free online video stabilization software , or use Wondershare Filmora video editor to stabilize video with one click.
For Win 7 or later (64-bit)
For macOS 10.12 or later
Wondershare Filmora video editor is available for Windows and Mac platforms, and gives a tough competition to other industry-standard video editing applications like Final Cut Pro X and Adobe Premiere Pro, etc. You can learn how to stabilize a clip with Filmora instead of using Google stabilizer video editor by following the step-by-step instructions that are explained below:
Step 1: Add the Source Video to the Timeline
After downloading and installing Wondershare Filmora on your Mac or Windows computer (a Windows 11 PC is used here for illustrations), launch the program, and click the New Project tile from the first screen that appears.

When on the main interface, ensure that Media is selected from the standard toolbar at the top, and click anywhere inside the Media window that is present at the upper-left corner. Next, locate, select, and import the source video from your PC that you want to stabilize.

Now, drag and drop the video to the timeline, or hover the mouse over the clip’s thumbnail in the Media window, click the + icon from the bottom-right area. Click the button under the Match to Media or Keep Project Settings label when the confirmation box comes up to add the film to the Timeline using the preferences that you selected.

Step 2: Stabilize the Video
Double click the video in the timeline, and then enable the Stabilization category under video editing pane. Wait while Filmora video editor stabilizes the video without Google video stabilizer. Click OK when done.

Step 3: Export the Stabilized Video
Back on the main interface, click Export from the center-top. On the Export box that opens up next, go to your preferred tab, pick an output format, define output preferences, and click Export from the bottom-right corner to export the stabilized clip without even using Google stabilizer video.

Part 4: How to Use Google Photos to Edit Video?
Google Photos doesn’t only work as a Google video stabilizer app but it also enables you to edit your media clips much more professionally. Some post-production tasks that you can perform while using Google Photos include:
1. Trimming
The trimming handles can be seen when you are on the ‘Video’ section after tapping ‘Edit’ in Google Photos after opening the video. You can drag these handles inwards to get rid of the unwanted starting and ending parts of a clip.

2. Cropping
The ‘Crop’ section enables you to crop the videos in a particular aspect ratio that can be selected from the available list, or drag the handles manually to get custom results.

3. Rotating
The ‘Crop’ section also has an option to rotate the video. Each time you tap the ‘Rotate’ icon, the screen rotates 90o in the counterclockwise direction.

4. Color Correction
The ‘Adjust’ section allows you to adjust the display of a video such as its brightness, contrast, shadows, etc.

5. Filters
You can even add a filter using the presets available in the ‘Filters’ section.

6. Annotations
The ‘Markup’ section enables you to annotate the video. You can either use the ‘Pen’ tool or ‘Highlighter’ to write text on the video or give the screen a different shade respectively.

Depending on the type of modifications you want in your video, you can use Google Photos to get the job done easily and quickly.
Conclusion
Google video stabilizer is a built-in tool in Google Photos. Google Photos can be obtained from Play Store or App Store for your Android or iOS smart devices respectively. In addition to stabilizing your videos, Google Photos app also enables you to make other modifications such as trimming, cropping, applying filters, and much more.
02 How to Stabilize Videos with Google Photos on Android and iPhone?
03 How to Stabilize Videos with Google Photos Online?
04 How to Use Google Photos to Edit Video?
Part 1: What is Google Photos and How Does It Work?
Google Photos is an app that can be obtained from Play Store or App Store to be installed on an Android-based smartphone or iPhone or iPad respectively.
The program can store photos and videos from your phone, and ensures that those media files are well-backed up so they can be recovered easily if/when lost due to some mishaps. Furthermore, the tool even lets you edit, customize, and share your photos and videos with ease.
1. History and Current Policies
Earlier, Google Photos used to offer unlimited storage to the users where they can save as many photos as they want, as long as the images were saved in ‘high-quality’ resolution. However, from June 01, 2021, Google changed its policies of using the app, and now the tool offers limited storage. If more space is needed, the users must subscribe to a paid plan.
2. Accessibility
Google Photos can be accessed from a web browser, Google Drive desktop program, and smartphone app. While you can make only minor changes to the videos such as editing date, time, and location when accessing Google Photos via a web browser, the smartphone app allows you to edit the clips comparatively more sophisticatedly.
3. Deletion
The files that are stored in Google Photos remain there for an indefinite duration, of course until the entire space is completely consumed. When you delete something, it is moved to the Trash and stays there for another 60 days, after which it is automatically deleted from the Cloud forever.
Part 2: How to Stabilize Videos with Google Photos on Android and iPhone?
Google Photos is available for both Android and iPhone smartphones, and as explained earlier, the app can be downloaded from Play Store and App Store respectively. Using the built-in Google stabilizer video editor of the Photos app on both platforms is almost identical and extremely easy.
You can learn how to work with Google video stabilizer to stabilize a video by following the steps that are given below:
Step 1: Locate and Open the Source Video in Google Photos
Download and install Google Photos on your smartphone (Samsung Galaxy Note 10+ is used here for illustrations). Launch the app, tap Library from the bottom-right corner of the interface, and tap to open the source video that you want to stabilize with Google video stabilizer.

Step 2: Stabilize the Video
After the video opens in the app and the playback begins, tap Edit from the bottom. On the next screen, ensure that the Video section is selected. Tap the Stabilize icon from the lower-left area of the window, and wait while Google Photos stabilize video.

Step 3: Save the Video
Once the stabilization process is complete, click Save copy from the bottom-right corner to save the modified video as a separate copy, thus leaving the original instance intact.

Part 3: How to Stabilize Videos with Google Photos Online?
Unfortunately, Google Photos doesn’t have many editing options when accessed via a web browser, and therefore, at the time of this writing, you cannot stabilize a video with the tool’s web interface. But if you are using a Windows or Mac computer, you can try some free online video stabilization software , or use Wondershare Filmora video editor to stabilize video with one click.
For Win 7 or later (64-bit)
For macOS 10.12 or later
Wondershare Filmora video editor is available for Windows and Mac platforms, and gives a tough competition to other industry-standard video editing applications like Final Cut Pro X and Adobe Premiere Pro, etc. You can learn how to stabilize a clip with Filmora instead of using Google stabilizer video editor by following the step-by-step instructions that are explained below:
Step 1: Add the Source Video to the Timeline
After downloading and installing Wondershare Filmora on your Mac or Windows computer (a Windows 11 PC is used here for illustrations), launch the program, and click the New Project tile from the first screen that appears.

When on the main interface, ensure that Media is selected from the standard toolbar at the top, and click anywhere inside the Media window that is present at the upper-left corner. Next, locate, select, and import the source video from your PC that you want to stabilize.

Now, drag and drop the video to the timeline, or hover the mouse over the clip’s thumbnail in the Media window, click the + icon from the bottom-right area. Click the button under the Match to Media or Keep Project Settings label when the confirmation box comes up to add the film to the Timeline using the preferences that you selected.

Step 2: Stabilize the Video
Double click the video in the timeline, and then enable the Stabilization category under video editing pane. Wait while Filmora video editor stabilizes the video without Google video stabilizer. Click OK when done.

Step 3: Export the Stabilized Video
Back on the main interface, click Export from the center-top. On the Export box that opens up next, go to your preferred tab, pick an output format, define output preferences, and click Export from the bottom-right corner to export the stabilized clip without even using Google stabilizer video.

Part 4: How to Use Google Photos to Edit Video?
Google Photos doesn’t only work as a Google video stabilizer app but it also enables you to edit your media clips much more professionally. Some post-production tasks that you can perform while using Google Photos include:
1. Trimming
The trimming handles can be seen when you are on the ‘Video’ section after tapping ‘Edit’ in Google Photos after opening the video. You can drag these handles inwards to get rid of the unwanted starting and ending parts of a clip.

2. Cropping
The ‘Crop’ section enables you to crop the videos in a particular aspect ratio that can be selected from the available list, or drag the handles manually to get custom results.

3. Rotating
The ‘Crop’ section also has an option to rotate the video. Each time you tap the ‘Rotate’ icon, the screen rotates 90o in the counterclockwise direction.

4. Color Correction
The ‘Adjust’ section allows you to adjust the display of a video such as its brightness, contrast, shadows, etc.

5. Filters
You can even add a filter using the presets available in the ‘Filters’ section.

6. Annotations
The ‘Markup’ section enables you to annotate the video. You can either use the ‘Pen’ tool or ‘Highlighter’ to write text on the video or give the screen a different shade respectively.

Depending on the type of modifications you want in your video, you can use Google Photos to get the job done easily and quickly.
Conclusion
Google video stabilizer is a built-in tool in Google Photos. Google Photos can be obtained from Play Store or App Store for your Android or iOS smart devices respectively. In addition to stabilizing your videos, Google Photos app also enables you to make other modifications such as trimming, cropping, applying filters, and much more.
02 How to Stabilize Videos with Google Photos on Android and iPhone?
03 How to Stabilize Videos with Google Photos Online?
04 How to Use Google Photos to Edit Video?
Part 1: What is Google Photos and How Does It Work?
Google Photos is an app that can be obtained from Play Store or App Store to be installed on an Android-based smartphone or iPhone or iPad respectively.
The program can store photos and videos from your phone, and ensures that those media files are well-backed up so they can be recovered easily if/when lost due to some mishaps. Furthermore, the tool even lets you edit, customize, and share your photos and videos with ease.
1. History and Current Policies
Earlier, Google Photos used to offer unlimited storage to the users where they can save as many photos as they want, as long as the images were saved in ‘high-quality’ resolution. However, from June 01, 2021, Google changed its policies of using the app, and now the tool offers limited storage. If more space is needed, the users must subscribe to a paid plan.
2. Accessibility
Google Photos can be accessed from a web browser, Google Drive desktop program, and smartphone app. While you can make only minor changes to the videos such as editing date, time, and location when accessing Google Photos via a web browser, the smartphone app allows you to edit the clips comparatively more sophisticatedly.
3. Deletion
The files that are stored in Google Photos remain there for an indefinite duration, of course until the entire space is completely consumed. When you delete something, it is moved to the Trash and stays there for another 60 days, after which it is automatically deleted from the Cloud forever.
Part 2: How to Stabilize Videos with Google Photos on Android and iPhone?
Google Photos is available for both Android and iPhone smartphones, and as explained earlier, the app can be downloaded from Play Store and App Store respectively. Using the built-in Google stabilizer video editor of the Photos app on both platforms is almost identical and extremely easy.
You can learn how to work with Google video stabilizer to stabilize a video by following the steps that are given below:
Step 1: Locate and Open the Source Video in Google Photos
Download and install Google Photos on your smartphone (Samsung Galaxy Note 10+ is used here for illustrations). Launch the app, tap Library from the bottom-right corner of the interface, and tap to open the source video that you want to stabilize with Google video stabilizer.

Step 2: Stabilize the Video
After the video opens in the app and the playback begins, tap Edit from the bottom. On the next screen, ensure that the Video section is selected. Tap the Stabilize icon from the lower-left area of the window, and wait while Google Photos stabilize video.

Step 3: Save the Video
Once the stabilization process is complete, click Save copy from the bottom-right corner to save the modified video as a separate copy, thus leaving the original instance intact.

Part 3: How to Stabilize Videos with Google Photos Online?
Unfortunately, Google Photos doesn’t have many editing options when accessed via a web browser, and therefore, at the time of this writing, you cannot stabilize a video with the tool’s web interface. But if you are using a Windows or Mac computer, you can try some free online video stabilization software , or use Wondershare Filmora video editor to stabilize video with one click.
For Win 7 or later (64-bit)
For macOS 10.12 or later
Wondershare Filmora video editor is available for Windows and Mac platforms, and gives a tough competition to other industry-standard video editing applications like Final Cut Pro X and Adobe Premiere Pro, etc. You can learn how to stabilize a clip with Filmora instead of using Google stabilizer video editor by following the step-by-step instructions that are explained below:
Step 1: Add the Source Video to the Timeline
After downloading and installing Wondershare Filmora on your Mac or Windows computer (a Windows 11 PC is used here for illustrations), launch the program, and click the New Project tile from the first screen that appears.

When on the main interface, ensure that Media is selected from the standard toolbar at the top, and click anywhere inside the Media window that is present at the upper-left corner. Next, locate, select, and import the source video from your PC that you want to stabilize.

Now, drag and drop the video to the timeline, or hover the mouse over the clip’s thumbnail in the Media window, click the + icon from the bottom-right area. Click the button under the Match to Media or Keep Project Settings label when the confirmation box comes up to add the film to the Timeline using the preferences that you selected.

Step 2: Stabilize the Video
Double click the video in the timeline, and then enable the Stabilization category under video editing pane. Wait while Filmora video editor stabilizes the video without Google video stabilizer. Click OK when done.

Step 3: Export the Stabilized Video
Back on the main interface, click Export from the center-top. On the Export box that opens up next, go to your preferred tab, pick an output format, define output preferences, and click Export from the bottom-right corner to export the stabilized clip without even using Google stabilizer video.

Part 4: How to Use Google Photos to Edit Video?
Google Photos doesn’t only work as a Google video stabilizer app but it also enables you to edit your media clips much more professionally. Some post-production tasks that you can perform while using Google Photos include:
1. Trimming
The trimming handles can be seen when you are on the ‘Video’ section after tapping ‘Edit’ in Google Photos after opening the video. You can drag these handles inwards to get rid of the unwanted starting and ending parts of a clip.

2. Cropping
The ‘Crop’ section enables you to crop the videos in a particular aspect ratio that can be selected from the available list, or drag the handles manually to get custom results.

3. Rotating
The ‘Crop’ section also has an option to rotate the video. Each time you tap the ‘Rotate’ icon, the screen rotates 90o in the counterclockwise direction.

4. Color Correction
The ‘Adjust’ section allows you to adjust the display of a video such as its brightness, contrast, shadows, etc.

5. Filters
You can even add a filter using the presets available in the ‘Filters’ section.

6. Annotations
The ‘Markup’ section enables you to annotate the video. You can either use the ‘Pen’ tool or ‘Highlighter’ to write text on the video or give the screen a different shade respectively.

Depending on the type of modifications you want in your video, you can use Google Photos to get the job done easily and quickly.
Conclusion
Google video stabilizer is a built-in tool in Google Photos. Google Photos can be obtained from Play Store or App Store for your Android or iOS smart devices respectively. In addition to stabilizing your videos, Google Photos app also enables you to make other modifications such as trimming, cropping, applying filters, and much more.
Basic Introduction of LumaFusion Color Grading
Create High-Quality Video - Wondershare Filmora
An easy and powerful YouTube video editor
Numerous video and audio effects to choose from
Detailed tutorials provided by the official channel
There are many reasons why video editing is essential for content creators. Regardless of your reasons for putting up video content, you’ll achieve little progress without manipulating and structuring your shots. Video editing is what helps to create an emotional connection to your content. That, in turn, is what spurs your viewers to take the action you desire.
Maybe you already know a thing or two about video editing? Good for you! However, there’s always more to learn. For example, only a few people understand the intricacies of luma fusion color grading. Meanwhile, that’s one of the significant differentiating factors between a regular video editor and a pro.
Are you tired of video editing at a basic level? Then this article is for you. It will introduce you to the basics of LumaFusion color grading. Are you ready?
In this article
02 Essential Things You Should Know About Color Grading in LumaFusion
03 Does LumaFusion Have a Desktop Version?
What Is LumaFusion?
Are you a filmmaker, video producer, or editor? Then you’ll need LumaFusion at some point in your editing journey. Whether you are a professional or not, you can use LumaFusion to tell exciting stories through your videos. It has numerous essential features to produce the precise effects you wish to achieve. What’s more, you can use this effective multitrack video editor on iPads and iPhones.
One thing you will love about LumaFusion is its user-friendliness. Even as an aspiring videographer with little experience, you can understand how to use this video editing powerhouse in an instant and with minimal supervision.

LumaFusion is affordable, especially non-linear editors (NLEs) with similar details. When it comes to robust features, LumaFusion retakes the spotlight. This video editor will become your favorite tool in no time.
Here are some exciting things you can do using LumaFusion:
● Enjoy a Simplified SSD and Cloud Storage Importing Process
One of the best things about LumaFusion is your ability to import from SSD and cloud storage seamlessly. If you’re using an external SSD for playback media, this feature will excite you. LumaFusion automatically imports media from your SSD whenever you add video clips to the timeline. There’s no need to waste time importing media by yourself.
● Switch Between Six Workspace Layouts
LumaFusion features six workspace layouts. So you can choose whatever one works best for the project you are working on. With the layout button, you can scramble the source viewer, browser, and timeline to your preference. LumaFusion also gives you the option of viewing the content in portrait or landscape modes. It’s a truly customizable and advanced multitrack video editing app for everyone who loves ease.
● Access Seamless Final Cut Pro Exporting
Do you work with Final Cut Pro X? Then there’s exciting news for you. Lumafusion allows you to export specific project files so that you can work on the NLE. Even though this feature is only available for a fee, it offers excellent value for its $20 price. You can hardly have it cheaper with other NLEs.
● Leverage Its Intuitive UI/UX
This is no hoax—LumaFusion’s intuitive design will blow your mind. If you’ve got prior knowledge or experience using other editing platforms (especially NLEs), you find LumaFusion easy to use. If not, their comprehensive reference guide can help you get acquainted with the app quickly. LumaFusion’s design gives you absolute control.
● Explore Flexibility and Amazing Effects
LumaFusion has numerous fantastic effects to appreciate. These features offer you top-notch flexibility and functionality. The clip editor’s preview window comprises four different editors—the frame and fit editor, audio editors, speed editors, and the color and effects editor. From the timeline navigator to the audio mixer and clip editor, there’s a lot to explore on LumaFusion.
● Enjoy the Automated Audio Ducking Feature
Audio ducking involves temporarily lowering a specified audio signal’s volume when another one comes up. Having to do this manually can be tiring. Fortunately, with LumaFusion’s automatic audio ducking feature, you don’t have to worry about that anymore. All you need to do is assign speakers and music tracks as master and auto track. The audio ducking feature takes it up from there.

● Easy and Direct Exportation to Youtube and Vimeo
LumaFusion comes with an option that allows you to export your edited videos directly to YouTube or Vimeo. When exporting directly to YouTube, the app will enable you to write titles and descriptions or set categories and tags. If you choose to upload your videos to YouTube directly, you can transfer it to your file folder first.
Essential Things You Should Know About Color Grading in LumaFusion
Color grading is an essential post-production process that gives your footage’s color scheme a distinctive appearance and character. This technique gives your videos some cinematic impression by painting over them.
With color grading, you can adjust your video’s color balance, saturation, contrast, luminance, black level, etc. It helps to evoke the particular emotions or moods that you want your videos to exude.
These are the essential things to note about color grading in LumaFusion:
1. Does LumaFusion Have Color Grading?
In answering this question, it’s essential to understand the difference between color correction and color grading. Both editing techniques have vital differentiating characteristics, so it’s wrong to use them interchangeably.
Color correction ensures that videos look as natural to the human eye as possible. If there’s a technical color error, for example, due to bad lighting, color correction helps fix that.
However, the aim of color grading isn’t fixing color mistakes but using colors to convey a mood, atmosphere, or style. Some videographers classify color correction as the first phase in the color grading process.
Generally, you can use LumaFusion to color correct your footage. However, you can’t color grade with the app except you decide to tamper with the color presets tab’s color sliders. Even at that, you wouldn’t get the perfect results you want.
Fortunately, LumaFusion allows you to import and apply LUT (look-up tables). With LumaFusion LUTs, you can color grade your footage to your satisfaction.
2. How To Color Grade in LumaFusion
This is how to color grade your videos:
○ First, Color Correct
When attempting to color grade your footage, it’s essential that you color correct it first. Color correction ensures that your video doesn’t remain flat or unexciting.
○ Create Your LUTs
LUT allows you to save specific color grades to use anytime you need them. This helps to save time by ensuring that you don’t develop color spaces all over again when working on various footage. You can also download as many free LUTs as you like.
○ Bring In a LUT
After creating LUTs, import and apply them to your LumaFusion. Next, blend or adjust your LUt by shifting the slider to get your desired effects. It’s that simple!
3. Can I Use Multiple LUTs in LumaFusion?
The short answer is a big YES. You can apply multiple LUTs in LumaFusion.
Here’s how t go o about it:
- Apply your first LUT
- Export the LUT
- Access rendered movies
- Apply the second LUT
There is numerous manipulation you can do with LUT. For example, you can merge two or more LUTs into one.
Does LumaFusion Have a Desktop Version?
Do you own a PC or desktop[, and you’re wondering how to access LumaFusion’s unique features on it? Unfortunately, LumaFusion is only available for iOS users and not Android or Windows PC.
However, all hope is not lost as Filmora has come to the rescue. Filmora’s video editor provides you with color matching/grading options to create the cinematic effects you want for your footage. You can use the features on your computer.
Let’s talk about Filmora’s Video Editor for Windows features in some detail:
For Win 7 or later (64-bit)
For macOS 10.12 or later
● Color Match
Do you want to achieve a similar color or consistent look for multiple clips? Then Filmora’s video editor is your best bet. The color match feature ensures color consistency throughout your video. It’s easy to use, aids efficiency, and saves your time.
● Color Correction
Color correction is one of the easiest ways to make your footage look extraordinary. With over 40 fantastic drag-and-color presets available to you, your color correction game is about to get lit. Filmora’s color correction feature also allows you to make 3D LUTs conveniently.
Filmora offers free online tools for videographers and unique products for computer software and mobile apps. You can check here to get more information about the Lumafusion alternatives on Mac .
Conclusion
● What’s worth doing is worth doing well? That’s why, as a videographer, you shouldn’t be comfortable with uploading flat, ordinary videos. It’ll help if you take your craft a notch higher by considering color grading for your footage.
● Did you fall in love with LumaFusion’s video editing app? That’s great. With your iPhone or iPad, you can get the best out of the video editor.
● Filmora offers you cool video editing features for color correcting and grading if you’re working on a desktop. There are also amazing Filmora apps for iOS and Android devices. Visit their website for more information on how these video editing features can improve your project’s quality.
There are many reasons why video editing is essential for content creators. Regardless of your reasons for putting up video content, you’ll achieve little progress without manipulating and structuring your shots. Video editing is what helps to create an emotional connection to your content. That, in turn, is what spurs your viewers to take the action you desire.
Maybe you already know a thing or two about video editing? Good for you! However, there’s always more to learn. For example, only a few people understand the intricacies of luma fusion color grading. Meanwhile, that’s one of the significant differentiating factors between a regular video editor and a pro.
Are you tired of video editing at a basic level? Then this article is for you. It will introduce you to the basics of LumaFusion color grading. Are you ready?
In this article
02 Essential Things You Should Know About Color Grading in LumaFusion
03 Does LumaFusion Have a Desktop Version?
What Is LumaFusion?
Are you a filmmaker, video producer, or editor? Then you’ll need LumaFusion at some point in your editing journey. Whether you are a professional or not, you can use LumaFusion to tell exciting stories through your videos. It has numerous essential features to produce the precise effects you wish to achieve. What’s more, you can use this effective multitrack video editor on iPads and iPhones.
One thing you will love about LumaFusion is its user-friendliness. Even as an aspiring videographer with little experience, you can understand how to use this video editing powerhouse in an instant and with minimal supervision.

LumaFusion is affordable, especially non-linear editors (NLEs) with similar details. When it comes to robust features, LumaFusion retakes the spotlight. This video editor will become your favorite tool in no time.
Here are some exciting things you can do using LumaFusion:
● Enjoy a Simplified SSD and Cloud Storage Importing Process
One of the best things about LumaFusion is your ability to import from SSD and cloud storage seamlessly. If you’re using an external SSD for playback media, this feature will excite you. LumaFusion automatically imports media from your SSD whenever you add video clips to the timeline. There’s no need to waste time importing media by yourself.
● Switch Between Six Workspace Layouts
LumaFusion features six workspace layouts. So you can choose whatever one works best for the project you are working on. With the layout button, you can scramble the source viewer, browser, and timeline to your preference. LumaFusion also gives you the option of viewing the content in portrait or landscape modes. It’s a truly customizable and advanced multitrack video editing app for everyone who loves ease.
● Access Seamless Final Cut Pro Exporting
Do you work with Final Cut Pro X? Then there’s exciting news for you. Lumafusion allows you to export specific project files so that you can work on the NLE. Even though this feature is only available for a fee, it offers excellent value for its $20 price. You can hardly have it cheaper with other NLEs.
● Leverage Its Intuitive UI/UX
This is no hoax—LumaFusion’s intuitive design will blow your mind. If you’ve got prior knowledge or experience using other editing platforms (especially NLEs), you find LumaFusion easy to use. If not, their comprehensive reference guide can help you get acquainted with the app quickly. LumaFusion’s design gives you absolute control.
● Explore Flexibility and Amazing Effects
LumaFusion has numerous fantastic effects to appreciate. These features offer you top-notch flexibility and functionality. The clip editor’s preview window comprises four different editors—the frame and fit editor, audio editors, speed editors, and the color and effects editor. From the timeline navigator to the audio mixer and clip editor, there’s a lot to explore on LumaFusion.
● Enjoy the Automated Audio Ducking Feature
Audio ducking involves temporarily lowering a specified audio signal’s volume when another one comes up. Having to do this manually can be tiring. Fortunately, with LumaFusion’s automatic audio ducking feature, you don’t have to worry about that anymore. All you need to do is assign speakers and music tracks as master and auto track. The audio ducking feature takes it up from there.

● Easy and Direct Exportation to Youtube and Vimeo
LumaFusion comes with an option that allows you to export your edited videos directly to YouTube or Vimeo. When exporting directly to YouTube, the app will enable you to write titles and descriptions or set categories and tags. If you choose to upload your videos to YouTube directly, you can transfer it to your file folder first.
Essential Things You Should Know About Color Grading in LumaFusion
Color grading is an essential post-production process that gives your footage’s color scheme a distinctive appearance and character. This technique gives your videos some cinematic impression by painting over them.
With color grading, you can adjust your video’s color balance, saturation, contrast, luminance, black level, etc. It helps to evoke the particular emotions or moods that you want your videos to exude.
These are the essential things to note about color grading in LumaFusion:
1. Does LumaFusion Have Color Grading?
In answering this question, it’s essential to understand the difference between color correction and color grading. Both editing techniques have vital differentiating characteristics, so it’s wrong to use them interchangeably.
Color correction ensures that videos look as natural to the human eye as possible. If there’s a technical color error, for example, due to bad lighting, color correction helps fix that.
However, the aim of color grading isn’t fixing color mistakes but using colors to convey a mood, atmosphere, or style. Some videographers classify color correction as the first phase in the color grading process.
Generally, you can use LumaFusion to color correct your footage. However, you can’t color grade with the app except you decide to tamper with the color presets tab’s color sliders. Even at that, you wouldn’t get the perfect results you want.
Fortunately, LumaFusion allows you to import and apply LUT (look-up tables). With LumaFusion LUTs, you can color grade your footage to your satisfaction.
2. How To Color Grade in LumaFusion
This is how to color grade your videos:
○ First, Color Correct
When attempting to color grade your footage, it’s essential that you color correct it first. Color correction ensures that your video doesn’t remain flat or unexciting.
○ Create Your LUTs
LUT allows you to save specific color grades to use anytime you need them. This helps to save time by ensuring that you don’t develop color spaces all over again when working on various footage. You can also download as many free LUTs as you like.
○ Bring In a LUT
After creating LUTs, import and apply them to your LumaFusion. Next, blend or adjust your LUt by shifting the slider to get your desired effects. It’s that simple!
3. Can I Use Multiple LUTs in LumaFusion?
The short answer is a big YES. You can apply multiple LUTs in LumaFusion.
Here’s how t go o about it:
- Apply your first LUT
- Export the LUT
- Access rendered movies
- Apply the second LUT
There is numerous manipulation you can do with LUT. For example, you can merge two or more LUTs into one.
Does LumaFusion Have a Desktop Version?
Do you own a PC or desktop[, and you’re wondering how to access LumaFusion’s unique features on it? Unfortunately, LumaFusion is only available for iOS users and not Android or Windows PC.
However, all hope is not lost as Filmora has come to the rescue. Filmora’s video editor provides you with color matching/grading options to create the cinematic effects you want for your footage. You can use the features on your computer.
Let’s talk about Filmora’s Video Editor for Windows features in some detail:
For Win 7 or later (64-bit)
For macOS 10.12 or later
● Color Match
Do you want to achieve a similar color or consistent look for multiple clips? Then Filmora’s video editor is your best bet. The color match feature ensures color consistency throughout your video. It’s easy to use, aids efficiency, and saves your time.
● Color Correction
Color correction is one of the easiest ways to make your footage look extraordinary. With over 40 fantastic drag-and-color presets available to you, your color correction game is about to get lit. Filmora’s color correction feature also allows you to make 3D LUTs conveniently.
Filmora offers free online tools for videographers and unique products for computer software and mobile apps. You can check here to get more information about the Lumafusion alternatives on Mac .
Conclusion
● What’s worth doing is worth doing well? That’s why, as a videographer, you shouldn’t be comfortable with uploading flat, ordinary videos. It’ll help if you take your craft a notch higher by considering color grading for your footage.
● Did you fall in love with LumaFusion’s video editing app? That’s great. With your iPhone or iPad, you can get the best out of the video editor.
● Filmora offers you cool video editing features for color correcting and grading if you’re working on a desktop. There are also amazing Filmora apps for iOS and Android devices. Visit their website for more information on how these video editing features can improve your project’s quality.
There are many reasons why video editing is essential for content creators. Regardless of your reasons for putting up video content, you’ll achieve little progress without manipulating and structuring your shots. Video editing is what helps to create an emotional connection to your content. That, in turn, is what spurs your viewers to take the action you desire.
Maybe you already know a thing or two about video editing? Good for you! However, there’s always more to learn. For example, only a few people understand the intricacies of luma fusion color grading. Meanwhile, that’s one of the significant differentiating factors between a regular video editor and a pro.
Are you tired of video editing at a basic level? Then this article is for you. It will introduce you to the basics of LumaFusion color grading. Are you ready?
In this article
02 Essential Things You Should Know About Color Grading in LumaFusion
03 Does LumaFusion Have a Desktop Version?
What Is LumaFusion?
Are you a filmmaker, video producer, or editor? Then you’ll need LumaFusion at some point in your editing journey. Whether you are a professional or not, you can use LumaFusion to tell exciting stories through your videos. It has numerous essential features to produce the precise effects you wish to achieve. What’s more, you can use this effective multitrack video editor on iPads and iPhones.
One thing you will love about LumaFusion is its user-friendliness. Even as an aspiring videographer with little experience, you can understand how to use this video editing powerhouse in an instant and with minimal supervision.

LumaFusion is affordable, especially non-linear editors (NLEs) with similar details. When it comes to robust features, LumaFusion retakes the spotlight. This video editor will become your favorite tool in no time.
Here are some exciting things you can do using LumaFusion:
● Enjoy a Simplified SSD and Cloud Storage Importing Process
One of the best things about LumaFusion is your ability to import from SSD and cloud storage seamlessly. If you’re using an external SSD for playback media, this feature will excite you. LumaFusion automatically imports media from your SSD whenever you add video clips to the timeline. There’s no need to waste time importing media by yourself.
● Switch Between Six Workspace Layouts
LumaFusion features six workspace layouts. So you can choose whatever one works best for the project you are working on. With the layout button, you can scramble the source viewer, browser, and timeline to your preference. LumaFusion also gives you the option of viewing the content in portrait or landscape modes. It’s a truly customizable and advanced multitrack video editing app for everyone who loves ease.
● Access Seamless Final Cut Pro Exporting
Do you work with Final Cut Pro X? Then there’s exciting news for you. Lumafusion allows you to export specific project files so that you can work on the NLE. Even though this feature is only available for a fee, it offers excellent value for its $20 price. You can hardly have it cheaper with other NLEs.
● Leverage Its Intuitive UI/UX
This is no hoax—LumaFusion’s intuitive design will blow your mind. If you’ve got prior knowledge or experience using other editing platforms (especially NLEs), you find LumaFusion easy to use. If not, their comprehensive reference guide can help you get acquainted with the app quickly. LumaFusion’s design gives you absolute control.
● Explore Flexibility and Amazing Effects
LumaFusion has numerous fantastic effects to appreciate. These features offer you top-notch flexibility and functionality. The clip editor’s preview window comprises four different editors—the frame and fit editor, audio editors, speed editors, and the color and effects editor. From the timeline navigator to the audio mixer and clip editor, there’s a lot to explore on LumaFusion.
● Enjoy the Automated Audio Ducking Feature
Audio ducking involves temporarily lowering a specified audio signal’s volume when another one comes up. Having to do this manually can be tiring. Fortunately, with LumaFusion’s automatic audio ducking feature, you don’t have to worry about that anymore. All you need to do is assign speakers and music tracks as master and auto track. The audio ducking feature takes it up from there.

● Easy and Direct Exportation to Youtube and Vimeo
LumaFusion comes with an option that allows you to export your edited videos directly to YouTube or Vimeo. When exporting directly to YouTube, the app will enable you to write titles and descriptions or set categories and tags. If you choose to upload your videos to YouTube directly, you can transfer it to your file folder first.
Essential Things You Should Know About Color Grading in LumaFusion
Color grading is an essential post-production process that gives your footage’s color scheme a distinctive appearance and character. This technique gives your videos some cinematic impression by painting over them.
With color grading, you can adjust your video’s color balance, saturation, contrast, luminance, black level, etc. It helps to evoke the particular emotions or moods that you want your videos to exude.
These are the essential things to note about color grading in LumaFusion:
1. Does LumaFusion Have Color Grading?
In answering this question, it’s essential to understand the difference between color correction and color grading. Both editing techniques have vital differentiating characteristics, so it’s wrong to use them interchangeably.
Color correction ensures that videos look as natural to the human eye as possible. If there’s a technical color error, for example, due to bad lighting, color correction helps fix that.
However, the aim of color grading isn’t fixing color mistakes but using colors to convey a mood, atmosphere, or style. Some videographers classify color correction as the first phase in the color grading process.
Generally, you can use LumaFusion to color correct your footage. However, you can’t color grade with the app except you decide to tamper with the color presets tab’s color sliders. Even at that, you wouldn’t get the perfect results you want.
Fortunately, LumaFusion allows you to import and apply LUT (look-up tables). With LumaFusion LUTs, you can color grade your footage to your satisfaction.
2. How To Color Grade in LumaFusion
This is how to color grade your videos:
○ First, Color Correct
When attempting to color grade your footage, it’s essential that you color correct it first. Color correction ensures that your video doesn’t remain flat or unexciting.
○ Create Your LUTs
LUT allows you to save specific color grades to use anytime you need them. This helps to save time by ensuring that you don’t develop color spaces all over again when working on various footage. You can also download as many free LUTs as you like.
○ Bring In a LUT
After creating LUTs, import and apply them to your LumaFusion. Next, blend or adjust your LUt by shifting the slider to get your desired effects. It’s that simple!
3. Can I Use Multiple LUTs in LumaFusion?
The short answer is a big YES. You can apply multiple LUTs in LumaFusion.
Here’s how t go o about it:
- Apply your first LUT
- Export the LUT
- Access rendered movies
- Apply the second LUT
There is numerous manipulation you can do with LUT. For example, you can merge two or more LUTs into one.
Does LumaFusion Have a Desktop Version?
Do you own a PC or desktop[, and you’re wondering how to access LumaFusion’s unique features on it? Unfortunately, LumaFusion is only available for iOS users and not Android or Windows PC.
However, all hope is not lost as Filmora has come to the rescue. Filmora’s video editor provides you with color matching/grading options to create the cinematic effects you want for your footage. You can use the features on your computer.
Let’s talk about Filmora’s Video Editor for Windows features in some detail:
For Win 7 or later (64-bit)
For macOS 10.12 or later
● Color Match
Do you want to achieve a similar color or consistent look for multiple clips? Then Filmora’s video editor is your best bet. The color match feature ensures color consistency throughout your video. It’s easy to use, aids efficiency, and saves your time.
● Color Correction
Color correction is one of the easiest ways to make your footage look extraordinary. With over 40 fantastic drag-and-color presets available to you, your color correction game is about to get lit. Filmora’s color correction feature also allows you to make 3D LUTs conveniently.
Filmora offers free online tools for videographers and unique products for computer software and mobile apps. You can check here to get more information about the Lumafusion alternatives on Mac .
Conclusion
● What’s worth doing is worth doing well? That’s why, as a videographer, you shouldn’t be comfortable with uploading flat, ordinary videos. It’ll help if you take your craft a notch higher by considering color grading for your footage.
● Did you fall in love with LumaFusion’s video editing app? That’s great. With your iPhone or iPad, you can get the best out of the video editor.
● Filmora offers you cool video editing features for color correcting and grading if you’re working on a desktop. There are also amazing Filmora apps for iOS and Android devices. Visit their website for more information on how these video editing features can improve your project’s quality.
There are many reasons why video editing is essential for content creators. Regardless of your reasons for putting up video content, you’ll achieve little progress without manipulating and structuring your shots. Video editing is what helps to create an emotional connection to your content. That, in turn, is what spurs your viewers to take the action you desire.
Maybe you already know a thing or two about video editing? Good for you! However, there’s always more to learn. For example, only a few people understand the intricacies of luma fusion color grading. Meanwhile, that’s one of the significant differentiating factors between a regular video editor and a pro.
Are you tired of video editing at a basic level? Then this article is for you. It will introduce you to the basics of LumaFusion color grading. Are you ready?
In this article
02 Essential Things You Should Know About Color Grading in LumaFusion
03 Does LumaFusion Have a Desktop Version?
What Is LumaFusion?
Are you a filmmaker, video producer, or editor? Then you’ll need LumaFusion at some point in your editing journey. Whether you are a professional or not, you can use LumaFusion to tell exciting stories through your videos. It has numerous essential features to produce the precise effects you wish to achieve. What’s more, you can use this effective multitrack video editor on iPads and iPhones.
One thing you will love about LumaFusion is its user-friendliness. Even as an aspiring videographer with little experience, you can understand how to use this video editing powerhouse in an instant and with minimal supervision.

LumaFusion is affordable, especially non-linear editors (NLEs) with similar details. When it comes to robust features, LumaFusion retakes the spotlight. This video editor will become your favorite tool in no time.
Here are some exciting things you can do using LumaFusion:
● Enjoy a Simplified SSD and Cloud Storage Importing Process
One of the best things about LumaFusion is your ability to import from SSD and cloud storage seamlessly. If you’re using an external SSD for playback media, this feature will excite you. LumaFusion automatically imports media from your SSD whenever you add video clips to the timeline. There’s no need to waste time importing media by yourself.
● Switch Between Six Workspace Layouts
LumaFusion features six workspace layouts. So you can choose whatever one works best for the project you are working on. With the layout button, you can scramble the source viewer, browser, and timeline to your preference. LumaFusion also gives you the option of viewing the content in portrait or landscape modes. It’s a truly customizable and advanced multitrack video editing app for everyone who loves ease.
● Access Seamless Final Cut Pro Exporting
Do you work with Final Cut Pro X? Then there’s exciting news for you. Lumafusion allows you to export specific project files so that you can work on the NLE. Even though this feature is only available for a fee, it offers excellent value for its $20 price. You can hardly have it cheaper with other NLEs.
● Leverage Its Intuitive UI/UX
This is no hoax—LumaFusion’s intuitive design will blow your mind. If you’ve got prior knowledge or experience using other editing platforms (especially NLEs), you find LumaFusion easy to use. If not, their comprehensive reference guide can help you get acquainted with the app quickly. LumaFusion’s design gives you absolute control.
● Explore Flexibility and Amazing Effects
LumaFusion has numerous fantastic effects to appreciate. These features offer you top-notch flexibility and functionality. The clip editor’s preview window comprises four different editors—the frame and fit editor, audio editors, speed editors, and the color and effects editor. From the timeline navigator to the audio mixer and clip editor, there’s a lot to explore on LumaFusion.
● Enjoy the Automated Audio Ducking Feature
Audio ducking involves temporarily lowering a specified audio signal’s volume when another one comes up. Having to do this manually can be tiring. Fortunately, with LumaFusion’s automatic audio ducking feature, you don’t have to worry about that anymore. All you need to do is assign speakers and music tracks as master and auto track. The audio ducking feature takes it up from there.

● Easy and Direct Exportation to Youtube and Vimeo
LumaFusion comes with an option that allows you to export your edited videos directly to YouTube or Vimeo. When exporting directly to YouTube, the app will enable you to write titles and descriptions or set categories and tags. If you choose to upload your videos to YouTube directly, you can transfer it to your file folder first.
Essential Things You Should Know About Color Grading in LumaFusion
Color grading is an essential post-production process that gives your footage’s color scheme a distinctive appearance and character. This technique gives your videos some cinematic impression by painting over them.
With color grading, you can adjust your video’s color balance, saturation, contrast, luminance, black level, etc. It helps to evoke the particular emotions or moods that you want your videos to exude.
These are the essential things to note about color grading in LumaFusion:
1. Does LumaFusion Have Color Grading?
In answering this question, it’s essential to understand the difference between color correction and color grading. Both editing techniques have vital differentiating characteristics, so it’s wrong to use them interchangeably.
Color correction ensures that videos look as natural to the human eye as possible. If there’s a technical color error, for example, due to bad lighting, color correction helps fix that.
However, the aim of color grading isn’t fixing color mistakes but using colors to convey a mood, atmosphere, or style. Some videographers classify color correction as the first phase in the color grading process.
Generally, you can use LumaFusion to color correct your footage. However, you can’t color grade with the app except you decide to tamper with the color presets tab’s color sliders. Even at that, you wouldn’t get the perfect results you want.
Fortunately, LumaFusion allows you to import and apply LUT (look-up tables). With LumaFusion LUTs, you can color grade your footage to your satisfaction.
2. How To Color Grade in LumaFusion
This is how to color grade your videos:
○ First, Color Correct
When attempting to color grade your footage, it’s essential that you color correct it first. Color correction ensures that your video doesn’t remain flat or unexciting.
○ Create Your LUTs
LUT allows you to save specific color grades to use anytime you need them. This helps to save time by ensuring that you don’t develop color spaces all over again when working on various footage. You can also download as many free LUTs as you like.
○ Bring In a LUT
After creating LUTs, import and apply them to your LumaFusion. Next, blend or adjust your LUt by shifting the slider to get your desired effects. It’s that simple!
3. Can I Use Multiple LUTs in LumaFusion?
The short answer is a big YES. You can apply multiple LUTs in LumaFusion.
Here’s how t go o about it:
- Apply your first LUT
- Export the LUT
- Access rendered movies
- Apply the second LUT
There is numerous manipulation you can do with LUT. For example, you can merge two or more LUTs into one.
Does LumaFusion Have a Desktop Version?
Do you own a PC or desktop[, and you’re wondering how to access LumaFusion’s unique features on it? Unfortunately, LumaFusion is only available for iOS users and not Android or Windows PC.
However, all hope is not lost as Filmora has come to the rescue. Filmora’s video editor provides you with color matching/grading options to create the cinematic effects you want for your footage. You can use the features on your computer.
Let’s talk about Filmora’s Video Editor for Windows features in some detail:
For Win 7 or later (64-bit)
For macOS 10.12 or later
● Color Match
Do you want to achieve a similar color or consistent look for multiple clips? Then Filmora’s video editor is your best bet. The color match feature ensures color consistency throughout your video. It’s easy to use, aids efficiency, and saves your time.
● Color Correction
Color correction is one of the easiest ways to make your footage look extraordinary. With over 40 fantastic drag-and-color presets available to you, your color correction game is about to get lit. Filmora’s color correction feature also allows you to make 3D LUTs conveniently.
Filmora offers free online tools for videographers and unique products for computer software and mobile apps. You can check here to get more information about the Lumafusion alternatives on Mac .
Conclusion
● What’s worth doing is worth doing well? That’s why, as a videographer, you shouldn’t be comfortable with uploading flat, ordinary videos. It’ll help if you take your craft a notch higher by considering color grading for your footage.
● Did you fall in love with LumaFusion’s video editing app? That’s great. With your iPhone or iPad, you can get the best out of the video editor.
● Filmora offers you cool video editing features for color correcting and grading if you’re working on a desktop. There are also amazing Filmora apps for iOS and Android devices. Visit their website for more information on how these video editing features can improve your project’s quality.
Dubbing Videos With Voiceovers | Wondershare Filmora Tutorial
Voiceovers have been a great utility in the digital ecosystem for a while. From movies to videos, the use of voiceovers has provided content creators with new dynamics. While it has enhanced the quality of video creation, there are other technicalities that have arisen against it. In this article, we will be discussing the details involving voiceovers and recordings.
Also, it includes a discussion of tools that can be used to ensure professional voice recordings. Go through the provided details to know how to utilize voiceovers to perfection.
Part 1: What is The Difference Between Voice Recording and Voiceover?
Do you know voiceover and voice recording are two different terms? They are often used correspondingly but have different meanings. Here are a few differences between the two in the section below:
Voice Recording
It is a process in which you can capture audio in your device using a microphone. Voice recordings can be any type of audio content, such as conversations, interviews, and much more. There are various settings for voice recording as well. It starts from studio recordings, outside and even home set-up recordings.
Voiceover
On the other hand, voiceover specifically refers to a recorded narration or video commentary. This includes documentaries, advertisements, films, television shows, and more. It provides information, explains visuals, or narrates a story to your audience. Mostly voiceover is scripted and well synchronized to convey the message to its audience successfully.
Summary
Wrapping up, the main difference between these two terms is the intent of audio content. In general, voice recording allows you to capture audio. In contrast, voiceover refers explicitly to the recording of some specific narrations. Ultimately, we can say that voiceover is a part of voice recording that should be synchronized with the visual media to fulfill its purpose.
Automatically Generate Text-to-Speech
Simply and efficiently convert text to speech with Filmora Video Editor! Experience the magic of cool yet outstanding video effects, where your videos come to life in beautiful visuals.
Start Video Voice Over Start Video Voice Over Learn More >

Part 2: How is Voiceover Beneficial in Video Editing?
As we all know, narration in a video is essential as it adds a character to your video. There are many options, like AI voice text-to-speech tools, to generate voiceovers. Regardless, do you know why voiceovers are considered beneficial in video editing? Let’s look ahead into some prominent benefits of using voiceovers:
1. Narrative and Information
Voiceover provides a narrative element to a video. This further guides the viewers through the content and conveys important information. It also allows you to explain concepts, provide context, or tell a story to your engaged audience.
2. Clarity and Comprehension
This also helps clarify complex concepts by providing a verbal explanation. It ensures that viewers can easily understand the message or purpose of the video. Even if the visuals alone are insufficient, text-to-speech generators can help. Moreover, voiceover adds an additional layer of information that can aid comprehension.
3. Storytelling and Emotional Impact
It allows you to add emotions, tone, and personality to the video. Furthermore, it can set the mood to create a connection with the audience. A well-executed voiceover can also improve the storytelling aspect of the video. Similarly, people tend to memorize such videos which have an impactful speech or voice recording.
4. Professionalism and Polishing
Including a voiceover in your video adds a level of professionalism and polish. It gives the impression that careful thought and planning went into the production. A high-quality voiceover with clear pronunciation allows the audience to understand the topic better. Moreover, proper timing and appropriate intonation also polish the video content.
5. Localization and Accessibility
Speech-to-text software can easily translate and localize into different languages. This function of voiceovers can make the video accessible to a wider audience. By generating voiceovers in different languages, you can help you reach international viewers. Similarly, it expands your audience and increases the video’s potential impact.
6. Flexibility and Flexibility
Another benefit of voiceover is that it provides flexibility during the editing process. You can record it separately and edit and improve it to fit the visuals precisely. This allows you to refine the narration, adjust the pacing, and ensure synchronization. Additionally, it also provides flexibility in terms of making changes or updates to the script.
7. Reducing Noise and Distractions
Lastly, voiceover allows you to reduce or eliminate background noise and even unwanted sounds. You can also enhance the audio quality and eliminate distractions from your video. Meanwhile, the elimination of such elements also improves the overall viewer experience.
Part 3: How Can You Consume the Text-to-Speech Feature in Wondershare Filmora?
Wondershare Filmora is an explicit video editor that provides text-to-speech effects . Along with that, it also features a list of different features, which makes operations easy. To know how you can utilize this function in Filmora to create a voiceover, look into the steps below:
Convert Text-to-Speech For Win 7 or later(64-bit)
Convert Text-to-Speech For macOS 10.14 or later
Step 1Import Media Files For Editing
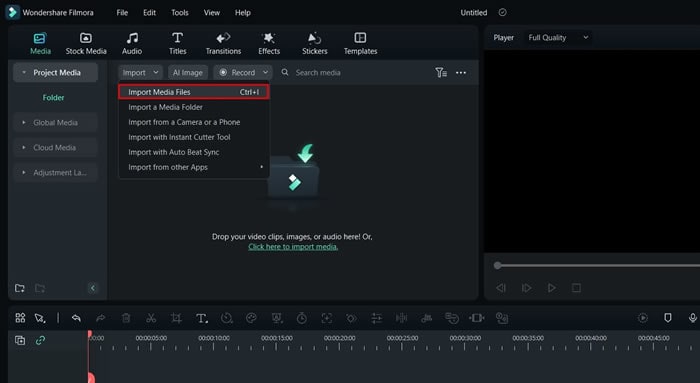
Open Wondershare Filmora and continue to select the “New Project” button to open a new window. As it opens, click the “Import” option and select the “Import Media Files” option from the drop-down.
Step 2Add Titles to the Video
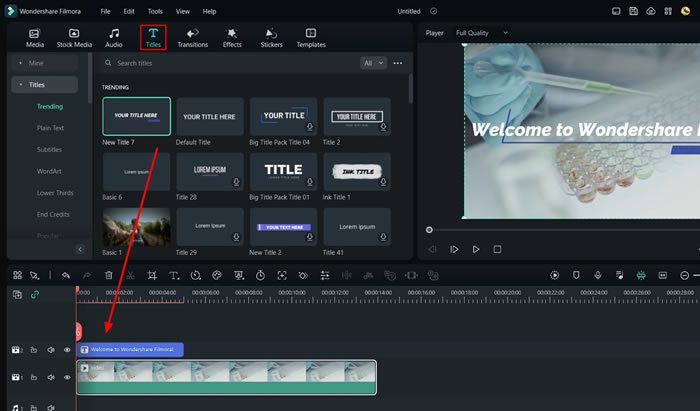
After importing the respective media files, drag them to the timeline. As it is added successfully, lead to the “Titles” section to add a basic title element in the video. Place it where you want to add the particular voiceover in Filmora.
Step 3Change Title Settings
On adding the title element, continue to double-click on it to open its settings. In the provided space, change the title text and make other edits to the presentation. Once done, click “OK” to save all changes in the added titles.
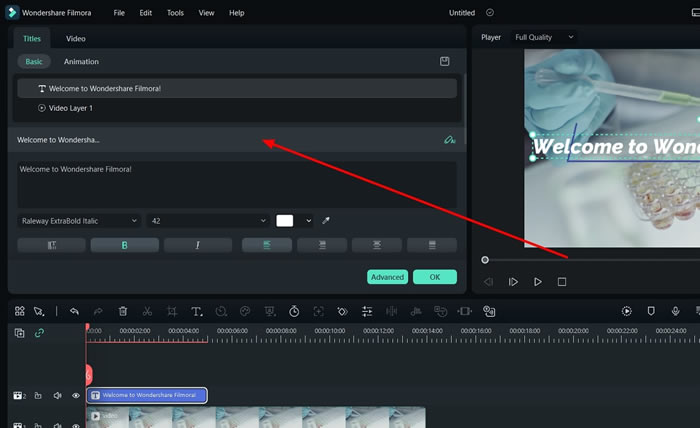
Step 4Use Text-to-Speech Feature
Continue to select the “Text-to-Speech“ feature from the bar above the timeline to activate the feature. A new window opens where you have to set some particular parameters for the process. It includes the language, speaker, and other settings, such as speed and pitch. Once done, click “OK” to save all changes in the AI-generated voiceover.
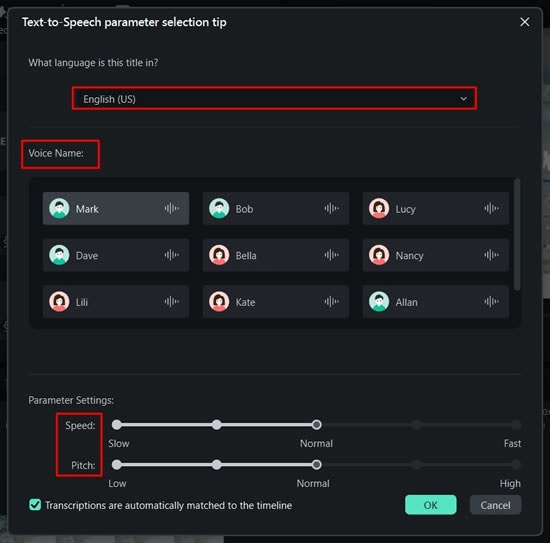
Step 5Execute and Export
You will be led to the screen where the process is executed and displayed accordingly. Once completed, you can find the generated voiceover in the timeline. Continue to export the video and save it on your device successfully.
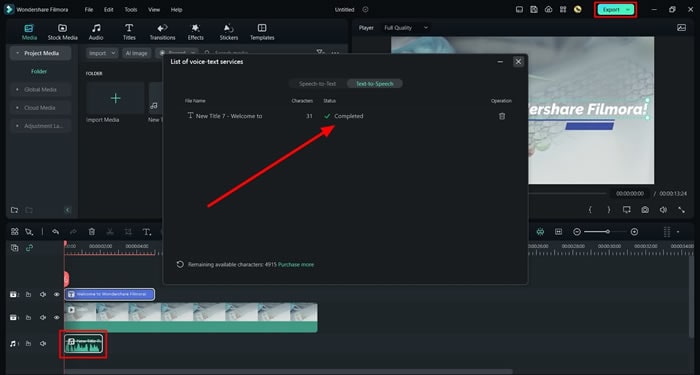
Part 4: Record a Voiceover Using Filmora - Guide
Filmora Video Editor is an exceptional tool that enables you to add voiceovers or voice recordings. You can simply add voice recordings to your project by importing them. However, this tool allows you to record voiceovers directly in the tool. Following these simple steps, you can easily record voiceovers in the tool.
Record a Voiceover For Win 7 or later(64-bit)
Record a Voiceover For macOS 10.14 or later
Step 1Launch The Tool and Import Your Media Assets
Once you’ve launched the software of Wondershare Filmora, import your media assets. To do so, locate the “Import” section and click to import your media files.

Step 2Record Your Voiceover
Continue to import your video in your timeline, and then locate and find the “Mic” icon or hit the “Alt + R” keys. You will be further navigated to the “Record Audio” window, and by pressing the Rec button, you can start recording your voiceover. Then, hit “OK” once you are done recording your voiceover. Lastly, save your video with the added voiceover by exporting the project to your system.
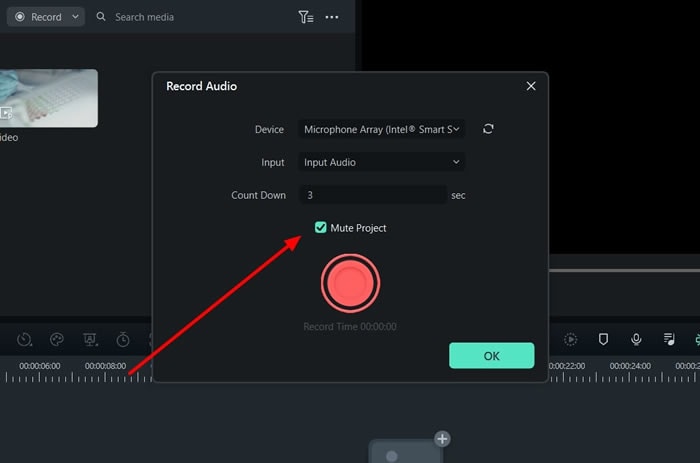
Conclusion
In summary, this article has provided readers with an understanding of how they should perceive voiceovers. Along with a comparison with voice recordings, the article has shown the benefits of using voiceovers and AI voice text-to-speech. Furthermore, Wondershare Filmora has been displayed as the perfect text-to-speech generator tool that can be used to record and manage voiceovers with the embodiment of artificial intelligence.
Start Video Voice Over Start Video Voice Over Learn More >

Part 2: How is Voiceover Beneficial in Video Editing?
As we all know, narration in a video is essential as it adds a character to your video. There are many options, like AI voice text-to-speech tools, to generate voiceovers. Regardless, do you know why voiceovers are considered beneficial in video editing? Let’s look ahead into some prominent benefits of using voiceovers:
1. Narrative and Information
Voiceover provides a narrative element to a video. This further guides the viewers through the content and conveys important information. It also allows you to explain concepts, provide context, or tell a story to your engaged audience.
2. Clarity and Comprehension
This also helps clarify complex concepts by providing a verbal explanation. It ensures that viewers can easily understand the message or purpose of the video. Even if the visuals alone are insufficient, text-to-speech generators can help. Moreover, voiceover adds an additional layer of information that can aid comprehension.
3. Storytelling and Emotional Impact
It allows you to add emotions, tone, and personality to the video. Furthermore, it can set the mood to create a connection with the audience. A well-executed voiceover can also improve the storytelling aspect of the video. Similarly, people tend to memorize such videos which have an impactful speech or voice recording.
4. Professionalism and Polishing
Including a voiceover in your video adds a level of professionalism and polish. It gives the impression that careful thought and planning went into the production. A high-quality voiceover with clear pronunciation allows the audience to understand the topic better. Moreover, proper timing and appropriate intonation also polish the video content.
5. Localization and Accessibility
Speech-to-text software can easily translate and localize into different languages. This function of voiceovers can make the video accessible to a wider audience. By generating voiceovers in different languages, you can help you reach international viewers. Similarly, it expands your audience and increases the video’s potential impact.
6. Flexibility and Flexibility
Another benefit of voiceover is that it provides flexibility during the editing process. You can record it separately and edit and improve it to fit the visuals precisely. This allows you to refine the narration, adjust the pacing, and ensure synchronization. Additionally, it also provides flexibility in terms of making changes or updates to the script.
7. Reducing Noise and Distractions
Lastly, voiceover allows you to reduce or eliminate background noise and even unwanted sounds. You can also enhance the audio quality and eliminate distractions from your video. Meanwhile, the elimination of such elements also improves the overall viewer experience.
Part 3: How Can You Consume the Text-to-Speech Feature in Wondershare Filmora?
Wondershare Filmora is an explicit video editor that provides text-to-speech effects . Along with that, it also features a list of different features, which makes operations easy. To know how you can utilize this function in Filmora to create a voiceover, look into the steps below:
Convert Text-to-Speech For Win 7 or later(64-bit)
Convert Text-to-Speech For macOS 10.14 or later
Step 1Import Media Files For Editing
Open Wondershare Filmora and continue to select the “New Project” button to open a new window. As it opens, click the “Import” option and select the “Import Media Files” option from the drop-down.

Step 2Add Titles to the Video
After importing the respective media files, drag them to the timeline. As it is added successfully, lead to the “Titles” section to add a basic title element in the video. Place it where you want to add the particular voiceover in Filmora.

Step 3Change Title Settings
On adding the title element, continue to double-click on it to open its settings. In the provided space, change the title text and make other edits to the presentation. Once done, click “OK” to save all changes in the added titles.

Step 4Use Text-to-Speech Feature
Continue to select the “Text-to-Speech“ feature from the bar above the timeline to activate the feature. A new window opens where you have to set some particular parameters for the process. It includes the language, speaker, and other settings, such as speed and pitch. Once done, click “OK” to save all changes in the AI-generated voiceover.

Step 5Execute and Export
You will be led to the screen where the process is executed and displayed accordingly. Once completed, you can find the generated voiceover in the timeline. Continue to export the video and save it on your device successfully.

Part 4: Record a Voiceover Using Filmora - Guide
Filmora Video Editor is an exceptional tool that enables you to add voiceovers or voice recordings. You can simply add voice recordings to your project by importing them. However, this tool allows you to record voiceovers directly in the tool. Following these simple steps, you can easily record voiceovers in the tool.
Record a Voiceover For Win 7 or later(64-bit)
Record a Voiceover For macOS 10.14 or later
Step 1Launch The Tool and Import Your Media Assets
Once you’ve launched the software of Wondershare Filmora, import your media assets. To do so, locate the “Import” section and click to import your media files.

Step 2Record Your Voiceover
Continue to import your video in your timeline, and then locate and find the “Mic” icon or hit the “Alt + R” keys. You will be further navigated to the “Record Audio” window, and by pressing the Rec button, you can start recording your voiceover. Then, hit “OK” once you are done recording your voiceover. Lastly, save your video with the added voiceover by exporting the project to your system.

Conclusion
In summary, this article has provided readers with an understanding of how they should perceive voiceovers. Along with a comparison with voice recordings, the article has shown the benefits of using voiceovers and AI voice text-to-speech. Furthermore, Wondershare Filmora has been displayed as the perfect text-to-speech generator tool that can be used to record and manage voiceovers with the embodiment of artificial intelligence.
Also read:
- 2024 Approved How to Add Text in Adobe Rush
- Updated In 2024, How to Create Video in Text Intro?
- New Top 12 Best Freeze Frame Video Editing Examples for 2024
- Updated 2 Methods to Crop a Video in VLC
- Updated How to Add Effects in Premiere Pro
- New Top 8 AR Apps for Android and iOS | Help You See the World of AR for 2024
- Ideas to Make A Perfect Café Vlog
- Updated In 2024, Working Out All Important Details of Slowing Down Video in After Effects
- Updated Best 5 Solutions on How to Add Emojis to iPhone for 2024
- In 2024, Enhance Social Media Posts with Transparent GIFs that Leave Your Peers in Awe
- New How to Create Your Own LUTs for Your Video for 2024
- New Step-by-Step Guide | How to Edit A Time Lapse Video on iPhone
- 2024 Approved 3 Best Effects to Appear on Camera Made with Filmora
- Final Cut Pro for iPad
- Steps to Rotate Videos Using Handbrake for 2024
- How to Make Video Fade to Black in Movie Maker
- New Looking for a Way to Edit Your Profile Picture for Telegram? Heres an Easy and Quick Guide on How to Change, Delete and Hide Your Profile Picture with Simple Steps
- 2024 Approved Create Your Own Subscribe Channel Graphics
- Want to Learn How to Make Gaming Montage Videos? You Have Come to the Right Place. This Guide Will Teach You All You Need to Know to Create Montages of Video Games and Share Them with Other Players
- New Color Lut in Video -How to Color Grade Your Video for 2024
- 2024 Approved Heres All About GIF Keyboard Youll Ever Want to Know
- Unlock Your Video Editing Potential With Wondershare Filmora
- In 2024, Benefits of Live Streaming on YouTube
- New 2024 Approved 12 Top Picks of Video Enhancer Software
- Updated How to Add VHS Green Screen to Your Video for 2024
- To Find the Best Tool Out of Hundreds of Online and Offline GIF to Video Converters, You Need to Check These Specifications. Read This Review and Get the Best Out of the Best
- New How to Rotate AVI in Vertical/Portrait Orientation Windows, Mac,Android, iPhone & Online for 2024
- Convert MP4 to 60 FPS GIF A Step-by-Step Guide for 2024
- New In 2024, Best Online GIF to Image (PNG/JPG) Converter
- 2024 Approved Guide to Create an Intro Video with Filmora
- New Do You Want to Download Slow-Motion Apps that Can Edit Video Professionally? This Article Will Discuss some Slomo Makers for Both iOS and Android
- New AVI Video Format Is Known and Famous for Its Features. Many of You Must Have Heard About It but Do You Know some Details About AVI? Lets Increase Your Knowledge and Talk About It
- New 2024 Approved Explore the List of the Top Six Online Video Speed Controllers for Chrome, Safari, and Firefox
- New How To Make a Photo Collage in Microsoft Word — Step by Step Guide for 2024
- Updated Top List 20 Best LUTs for Music Videos for 2024
- Updated 2024 Approved Come And Pick! Best MOV to GIF Converters
- Splitting a Video in VSDC Step by Step
- Best 10 Mind-Blowing Video Collage Maker for PC
- Updated A Comprehensive Guide on Converting Slo-Mo Videos to Normal Speed Videos On iPhone
- Updated 2024 Approved Top Tricks for Learning Photo Slideshow
- Fixing The Slow Playback Issues in DaVinci Resolve for 2024
- In 2024, Do You Have Images in GIF Format, and Do You Find Converting Them to AVI Pretty Tricky? Please Stay on This Article as Well Guide You with Tools Thatll Help You Convert Your GIF to AVI Quickly and with Ease
- New Overview of Best LUTs for Vlog
- New How to Convert Images Into Video - Kapwing Tutorial
- Updated In 2024, Complete Guide to Make a Super Easy Rotating Video Effect
- Updated 7 Ways Add Subtitles to MKV Videos on All Platforms
- How to Transfer Data from Honor X9a to BlackBerry | Dr.fone
- The best electronic signature way to sign Word 2019 documents online
- The Best iSpoofer Alternative to Try On Oppo A18 | Dr.fone
- Detailed guide of ispoofer for pogo installation On Realme 11 Pro | Dr.fone
- Does find my friends work on Tecno Spark Go (2023) | Dr.fone
- Is GSM Flasher ADB Legit? Full Review To Bypass Your Xiaomi Redmi 13C 5G Phone FRP Lock
- Solved Mac Doesnt Recognize my iPhone XS Max | Stellar
- Reasons for Vivo Y100 5G Stuck on Boot Screen and Ways To Fix Them | Dr.fone
- 11 Ways to Fix it When My Realme 11 Pro+ Wont Charge | Dr.fone
- Top 10 Best Spy Watches For your Nokia G310 | Dr.fone
- In 2024, How to use Snapchat Location Spoofer to Protect Your Privacy On Huawei Nova Y71? | Dr.fone
- In 2024, How to use Pokemon Go Joystick on Samsung Galaxy Z Fold 5? | Dr.fone
- Forgot Pattern Lock? Heres How You Can Unlock Tecno Camon 30 Pro 5G Pattern Lock Screen
- In 2024, Unlock Samsung Galaxy A54 5G Phone Password Without Factory Reset Full Guide Here
- Fake the Location to Get Around the MLB Blackouts on Oppo A56s 5G | Dr.fone
- In 2024, Unlocking the Power of Smart Lock A Beginners Guide for Nokia C32 Users
- In 2024, How to Change Oppo A56s 5G Location on Skout | Dr.fone
- In 2024, How to Watch Hulu Outside US On Vivo S18 Pro | Dr.fone
- How do you play MP4 files on 13T Pro?
- How To Open Your iPhone 13 mini Without a Home Button
- How To Do Realme 11 Pro+ Screen Sharing | Dr.fone
- How to Repair corrupt MP4 and MOV files of Apple ?
- Authentication Error Occurred on Itel S23? Here Are 10 Proven Fixes | Dr.fone
- How to recover old videos from your Honor Play 8T
- In 2024, How to use Snapchat Location Spoofer to Protect Your Privacy On Nubia Z50 Ultra? | Dr.fone
- How to Reset a Poco M6 Pro 4G Phone That Is Locked | Dr.fone
- What Wikipedia Cant Tell You About the 10 Best Batman Cartoons for 2024
- Tips and Tricks for Apple ID Locked Issue From iPhone X
- Remove Google FRP Lock on HTC U23
- How to Fake Snapchat Location without Jailbreak On OnePlus Ace 2 | Dr.fone
- In 2024, How to Bypass Activation Lock from Apple iPhone XS Max or iPad?
- Top 10 AirPlay Apps in Realme Narzo 60x 5G for Streaming | Dr.fone
- Ultimate Guide to Catch the Regional-Located Pokemon For Motorola Moto G14 | Dr.fone
- How to Change Location on TikTok to See More Content On your Nokia G310 | Dr.fone
- Title: Updated In 2024, Make Super Easy Coin Magic With Filmora
- Author: Chloe
- Created at : 2024-04-24 07:08:37
- Updated at : 2024-04-25 07:08:37
- Link: https://ai-editing-video.techidaily.com/updated-in-2024-make-super-easy-coin-magic-with-filmora/
- License: This work is licensed under CC BY-NC-SA 4.0.


