
:max_bytes(150000):strip_icc():format(webp)/the-best-halloween-live-wallpaper-for-2019-4691483-019a40e91504436ca9fc9f1944d89c15.jpg)
Updated In 2024, Steps to Create Gold Text Effects After Effects
Steps to Create Gold Text Effects After Effects
Have you always wanted to create the gold text effect in After effects but you don’t know how? This polished effect can make your video’s title stand out and is one of the best ways to create a stunning title for YouTube and Instagram clips. In this article, we will be looking at how to create the gold text using After Effects.
Steps to Create Gold Text Effects After Effects
Follow these steps to create a gold text effect in your After Effects video project;
Step1Start by creating an environment. To do that just right-click and choose “New Comp” and click “OK” to create one.
Step2Then we need to add fractal noise. To do that, click on “Effects and Presets” and type in “fractal” to choose “Fractal Noise.” You can double-click on it or drag it to the comp.
Step3Once this is done, you will need to do a little bit of housekeeping on the contrast and brightness. Increase the “Contrast” and reduce the “Brightness.”
Then go to the “Sub Settings” and reduce the “Sub Influence” down to zero.
Go to “Transform Option” and decrease the scale just a little bit. Then increase the “Scale Height” just a little.
Step4The next step is to add color to the scene. To do that, right-click on the layer and choose “New > Solid.” Select the gold color and click “OK.” Do the same with the second layer.
Step5Now you want to blend both colors by choosing a blending mode. Hold the “Shift” key and “hyphen” or “=” sign on the keyboard and choose “Overlay.”
Step6To make the color stronger, go to “Layer > Solid Settings” and choose a color.
Step7Go back to “Comp 3.” Right-click on it and select “New > Light” to add a new point of light.
Step8Go back to the project panel to click on “Comp 4” to add the environment. Right-click on the Comp 4 layer and make it an environment layer.
Step9In the options that appear, set “Appears in Reflections” to “Only” and you can then increase and decrease the color saturation until you have the desired result.
Free Gold Text Effects Template to Use
As you can see from the steps above, creating your gold text effects can be quite difficult. The good news is that you can download pre-made titles that you can simply edit. The following are some of the best to choose from;
- Christmas Title Template
Link: https://mixkit.co/free-after-effects-templates/christmas-title-template-819/
Despite the name, this is an ideal title for elegant projects or when you want your title to stand out. The typography is beautiful and elegant making it the most ideal template for fashion-themed videos. The template is easily customizable in After Effects and you can even change the color you want.

- Fashion Instagram Story
Link: https://mixkit.co/free-after-effects-templates/fashion-instagram-story-551/
This is the most ideal template to choose if you want a gold text effect that is accompanied by an image. Again, this is a very elegant theme that is ideal for YouTube and Instagram videos in the fashion and entertainment genres. It is also fully customizable in After Effects, allowing you to change the color, text, and image.

- Wedding Invitation Opener
Link: https://mixkit.co/free-after-effects-templates/wedding-invitation-opener-803/
This free gold text template is also completely customizable and comes with various text effects that you can include in the text. It is elegant and includes shadow effects that make the text stands out more. But you can remove the shadow effects if they don’t suit your project.

- Golden Luxury Titles
Link: https://motionarray.com/after-effects-templates/golden-luxury-titles-116934/
If you are looking for a gold text title that stands out in terms of design, animation, and color, consider Golden Luxury Titles. It comes with 9 editable layers that you can use to modify the title in any way. It is the most ideal title for movies, teasers, TV shows, and more.

- Emotional Awards Opener
Link: https://motionarray.com/after-effects-templates/emotional-awards-opener-356434/
This is a sparkling and glistering stylish design that can be very useful for movies and TV shows. This attention-grabbing title template has over 18 editable text layers to allow you to customize the title in various ways.

Alternative Way to Create Video Gold
Adobe After Effects is a very good video editor, but one of the things that can make it inaccessible to many users is that it can be very difficult to use. Thankfully, there is another very effective video editor that you can use to create gold text that is much easier to use.
This is the Wondershare Filmora , one of the best video editors in the market. Before we look at how you can use Filmora to create the perfect gold metal texture on your text, let’s first look at some of its main features;
- You can use Filmora to edit videos at a very high resolution including 4K videos
- It can be used to remove the background and noise from the video very easily
- You can edit both video and audio in the same project
- Up to 5 text tracks and 10 music tracks can be added to the same timeline and the same project
- It is very easy to use with a simple and intuitive user interface
Here’s how to use Filmora to create a gold metal texture for your text;
Step1Install Wondershare Filmora on your Computer
Download the Filmora setup file to your computer and double-click on it to start installing the program to your computer.
Open the program once the installation is complete.
Step2Create a New Project
If you are starting from the beginning, you may need to create a new project.
To do that, click on “File > New Project” in the menu bar to start a new project.
If there was a project that you were already working on, click on “Open Project” on the main window and then click “File > Open Project” or “File > Open Recent” in the menu bar.
Step3Add A Title to the Timeline
To add a gold texture effect to a title on your video, we will first of all need to add a title to the project.
To do that, go click on the “Titles” tab at the top and drag one of the default titles to the timeline.
Once it is in the timeline, double-click on the title and edit it. Type in anything you want to appear in the title.

Select the font that you want to use and choose a specific font size to use. These are all your preferences and will depend on your project.
Move the title to the second track in the timeline as you get ready to begin adding the colors.
Step4Start Adding Colors
Go to “Media” at the top and click on “Sample Colors.” Drag the black color image to the track directly below the title timeline.

Then take a snapshot of this newly created image by clicking on the “camera” icon next to the playhead.
Change the Font of the Title to something else more elegant like “Montez” and take another snapshot by clicking on the same camera icon.

Step5Add the Gold Effect
Delete everything from the timeline. Don’t worry you took a photo of all the text layers and the effects added to each.
You will then need to find an image of a gold background. You can find these on any good background image site. Download a good clear image and upload it into Filmora.
Now drag and drop the gold background image to the second track in the timeline. Double click on the background image.
Select “Compositing” and then in the “Blending Mode” drop-down menu, choose “Darken.” Click OK.”

Hide the first layer in the timeline and select the gold background image layer. Click on “Animation” and then select “Customize.”
To create the customized effect that we need, click on the image and drag it from the right to the left side.

Move the playhead to the end of the image to insert another keyframe and then click on the restore icon to restore the size of the image.

Click “OK” and show the track above the timeline. You will now see that the gold texture effect has been applied to your title. You can also add the second snapshot with the varying font for further effect.
Step6Save the Project
Once you are done, you can go ahead and save the project or continue working on other aspects of the video as desired.
Free Download For Win 7 or later(64-bit)
Free Download For macOS 10.14 or later
How to Get Zoom on TV [Easy Solutions]
The modern workforce needs adaptable alternatives to the conventional room-to-room conferencing. The latest integrated online collaboration platform is called Zoom. What’s more, now you can get Zoom on TV. Being one of the most well-known conferencing programs, it offers reliable and efficient hosting of online meetings. In a same vein, you may set up conference rooms, do video seminars, and use instant messaging to receive real-time communications. Moreover, can you get zoom on your tv? Then the answer is Yes! The ideal technique to expand a small conference is to mirror it on TV using Zoom meetings. Additionally, sharing across all platforms and devices is possible. Sharing HD video, audio, and material from your desktop and mobile devices to conference rooms and phone systems is simple, dependable, and safe with Zoom Meetings.
Zoom is one of the top videos calling applications available, however, in terms of functionality, dependability, and stability. Special features include screen sharing for multi-user annotation and local and cloud recording with transcription. With just a single click, you may share any file with supported and encrypted settings for increased security and communicate across all platforms. Zoom has now come to represent meetings for those who do their business remotely. For almost all platforms, including Android, iOS, macOS, Windows, Smart TVs, etc., the Zoom app is officially accessible. For the query how to get zoom on portal tv? you may activate Zoom screen casting whether you’re using a Windows 10 or a Mac laptop with the Chrome browser. This section will be useful to you if you want to benefit from Zoom on a TV. You may thus do so. Continue reading the article to learn more about how to get zoom on tv.
Part 1: Get Zoom on TV with HDMI Cable
Although Zoom provides companies and bigger organizations with a professional solution like Zoom Rooms, if you’re at home, you don’t need to put anything on your TV to use Zoom. You may start using Zoom right away by simply connecting your Zoom device to your TV. Connect your TV to your laptop’s HDMI port if it has one. Simple as that, however if the laptop doesn’t figure it out on its own you may need to explain what is going on with the second display. Although more reliable, connecting via cable means your source device is linked to the TV and you can’t go for a stroll. It also means you don’t have to worry about the wireless connection fading.
Steps to Get Zoom on TV with HDMI
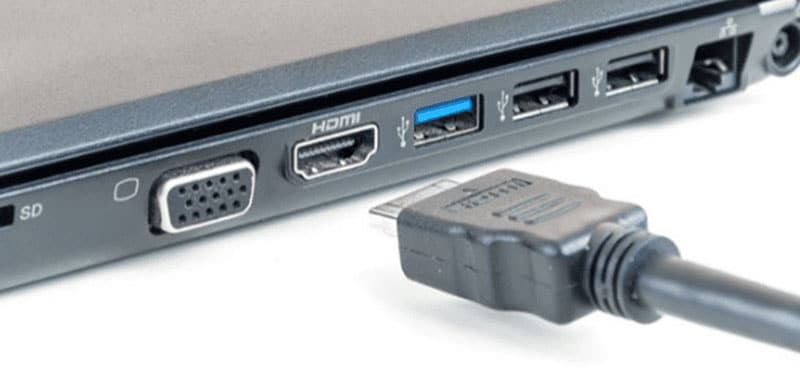
Step1Connect the HDMI End to the TV and the Other End to Your Device
You may use this in its place if you don’t have an HDMI but do have a USB-C port. To connect to the HDMI cable coming into your TV, you’ll need a dongle, but you’ll need to make sure it’s compatible.
Step2Turn On your TV
Turn on your TV, then switch the video source to the HDMI port you just connected in your device to using the TV remote.
Step3Launch Zoom Meeting
Start or join a meeting by using the Zoom app on your smartphone (available for Android, iOS, Windows, and macOS).
Part 2: Use AirPlay to Connect Zoom to TV
Using AirPlay mirroring, MacOS or iOS devices may share content with Zoom rooms. On MacOS and iOS, Airplay is used to communicate between the Zoom client and the Zoom room. There may be a great potential for your own business requirements if you can figure out how to utilize Airplay to Zoom mirror your screen to your Apple TV. By default, AirPlay sends audio to the Apple TV. Depending on how loud your speakers are set to play and where your input device’s microphone is located, this may cause echoing and ever-louder feedback loops. Without further ado, let’s look at some of the important strategies you may use to maximize live screen streaming on your Apple TV device.
Steps to Use AirPlay to Connect Zoom to TV
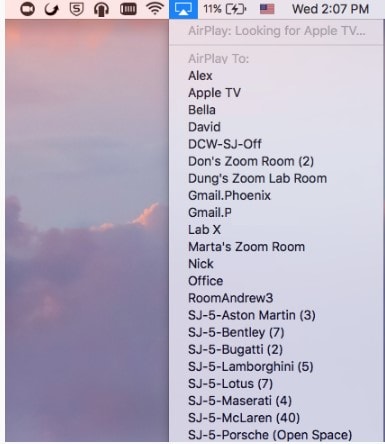
Step1Navigate to the Airplay Display in the Apple menu’s top right corner. Choose your Apple TV from the list of AirPlay Display options in the Displays preference pane. The “Show mirroring option in the menu bar when available” checkbox makes it easier to reach the AirPlay menu.

Step2Select Room Management > Zoom Rooms after logging into the Zoom online interface to manage your current Zoom Rooms. Then, modify the account settings and turn on Apple screen mirroring using the location hierarchy system.
Step3Turn on Apple Screen Mirroring by going to the Meetings tab. If this happens, you may need to activate it from the verification dialog box; otherwise, screen mirroring ought to start immediately on your device and let you see Zoom on your Apple TV. A shared password will be required of you.
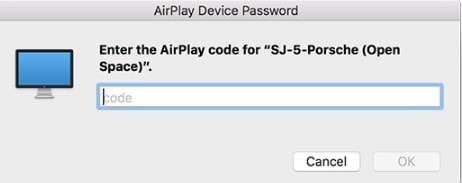
Step4Enter the passcode that is shown on the Zoom room’s screen. You may start using Airplay on your smartphone after enabling Apple screen mirroring.

Step5After that, turn off AirPlay Display by using the option in the preference pane or the system menu bar. To stop sharing, click Disconnect Airplay.
Part 3: Mirror Screen with Chromecast
The Chromecast gadgets from Google are well constructed. They should be able to cast more than just standard streaming services to your TV, logically speaking. Using a Chromecast device is one of the simplest methods to cast a Zoom conference to your TV. They are affordable, and any Google browser and the Google Home app for your Android or iOS smartphone both contain the cast capability. Between a device, such as your phone or computer, and the television, Chromecast offers the perfect connection. Chromecast makes it easy to cast Zoom meetings, particularly conferences with many of participants, since it can virtually reflect everything on your phone, tablet, or computer screen to your TV. For meetings with bigger attendance, it is advantageous to be able to cast Zoom meetings to almost any device, even a smart TV, using Chromecast.
Steps to Mirror Screen with Chromecast
Step1Install the Chromecast
Connect your Google Chromecast to the same internet source as your casting device by plugging it in.
Step2Manage Cast Settings
Locate the casting option on your device and search for recipients. Get the Zoom Cloud Meetings app for iOS or Android. You’ll also need to download the third-party software if you use an iPad or iPhone. After that, sign up for a Zoom account and log in to get started.
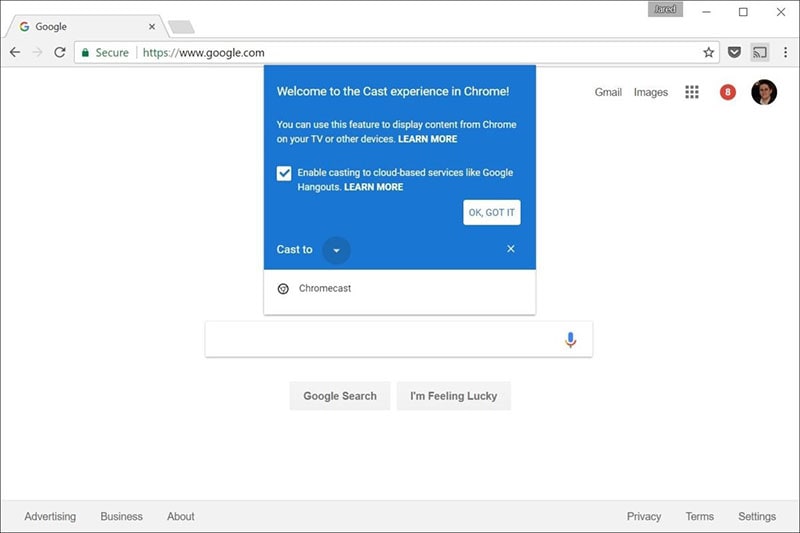
Step3Start Mirroring Zoom
The screen of your phone will show up on your TV when you tap your Chromecast. The best view is obtained by turning your phone into landscape after opening Zoom as usual. Once you place a call from here, the video will cast to your TV. Go to the next screen and click Start Broadcasting. You may now start casting to your Chromecast device by opening the Zoom Cloud Meeting app.
You must download the third-party app if you use an iPhone or iPad. The Chromecast Streamer software will let you cast a Zoom meeting on your Chromecast device as Zoom doesn’t provide a casting option.
Conclusion
Zoom’s popularity has skyrocketed as a result of the Pandemic. Zoom has emerged as the preferred video conferencing solution as the bulk of the global workforce shifts to a “work from home” environment. Now that more individuals than ever before work from home, video conferencing has emerged as a vital tool for marketing and corporate communication. Mirroring Zoom meetings to TV has never been this simple. In light of this, we hope that this guide has helped you come up with some of the greatest ideas and approaches for your personal zoom sharing needs. We really hope that this information has been helpful to you if you’ve been interested in learning more about screen sharing your Zoom to TV. Thanks to these methods, you can now mirror any device platform on TV.
The modern workforce needs adaptable alternatives to the conventional room-to-room conferencing. The latest integrated online collaboration platform is called Zoom. What’s more, now you can get Zoom on TV. Being one of the most well-known conferencing programs, it offers reliable and efficient hosting of online meetings. In a same vein, you may set up conference rooms, do video seminars, and use instant messaging to receive real-time communications. Moreover, can you get zoom on your tv? Then the answer is Yes! The ideal technique to expand a small conference is to mirror it on TV using Zoom meetings. Additionally, sharing across all platforms and devices is possible. Sharing HD video, audio, and material from your desktop and mobile devices to conference rooms and phone systems is simple, dependable, and safe with Zoom Meetings.
Zoom is one of the top videos calling applications available, however, in terms of functionality, dependability, and stability. Special features include screen sharing for multi-user annotation and local and cloud recording with transcription. With just a single click, you may share any file with supported and encrypted settings for increased security and communicate across all platforms. Zoom has now come to represent meetings for those who do their business remotely. For almost all platforms, including Android, iOS, macOS, Windows, Smart TVs, etc., the Zoom app is officially accessible. For the query how to get zoom on portal tv? you may activate Zoom screen casting whether you’re using a Windows 10 or a Mac laptop with the Chrome browser. This section will be useful to you if you want to benefit from Zoom on a TV. You may thus do so. Continue reading the article to learn more about how to get zoom on tv.
Part 1: Get Zoom on TV with HDMI Cable
Although Zoom provides companies and bigger organizations with a professional solution like Zoom Rooms, if you’re at home, you don’t need to put anything on your TV to use Zoom. You may start using Zoom right away by simply connecting your Zoom device to your TV. Connect your TV to your laptop’s HDMI port if it has one. Simple as that, however if the laptop doesn’t figure it out on its own you may need to explain what is going on with the second display. Although more reliable, connecting via cable means your source device is linked to the TV and you can’t go for a stroll. It also means you don’t have to worry about the wireless connection fading.
Steps to Get Zoom on TV with HDMI
Step1Connect the HDMI End to the TV and the Other End to Your Device
You may use this in its place if you don’t have an HDMI but do have a USB-C port. To connect to the HDMI cable coming into your TV, you’ll need a dongle, but you’ll need to make sure it’s compatible.
Step2Turn On your TV
Turn on your TV, then switch the video source to the HDMI port you just connected in your device to using the TV remote.
Step3Launch Zoom Meeting
Start or join a meeting by using the Zoom app on your smartphone (available for Android, iOS, Windows, and macOS).
Part 2: Use AirPlay to Connect Zoom to TV
Using AirPlay mirroring, MacOS or iOS devices may share content with Zoom rooms. On MacOS and iOS, Airplay is used to communicate between the Zoom client and the Zoom room. There may be a great potential for your own business requirements if you can figure out how to utilize Airplay to Zoom mirror your screen to your Apple TV. By default, AirPlay sends audio to the Apple TV. Depending on how loud your speakers are set to play and where your input device’s microphone is located, this may cause echoing and ever-louder feedback loops. Without further ado, let’s look at some of the important strategies you may use to maximize live screen streaming on your Apple TV device.
Steps to Use AirPlay to Connect Zoom to TV
Step1Navigate to the Airplay Display in the Apple menu’s top right corner. Choose your Apple TV from the list of AirPlay Display options in the Displays preference pane. The “Show mirroring option in the menu bar when available” checkbox makes it easier to reach the AirPlay menu.
Step2Select Room Management > Zoom Rooms after logging into the Zoom online interface to manage your current Zoom Rooms. Then, modify the account settings and turn on Apple screen mirroring using the location hierarchy system.
Step3Turn on Apple Screen Mirroring by going to the Meetings tab. If this happens, you may need to activate it from the verification dialog box; otherwise, screen mirroring ought to start immediately on your device and let you see Zoom on your Apple TV. A shared password will be required of you.
Step4Enter the passcode that is shown on the Zoom room’s screen. You may start using Airplay on your smartphone after enabling Apple screen mirroring.
Step5After that, turn off AirPlay Display by using the option in the preference pane or the system menu bar. To stop sharing, click Disconnect Airplay.
Part 3: Mirror Screen with Chromecast
The Chromecast gadgets from Google are well constructed. They should be able to cast more than just standard streaming services to your TV, logically speaking. Using a Chromecast device is one of the simplest methods to cast a Zoom conference to your TV. They are affordable, and any Google browser and the Google Home app for your Android or iOS smartphone both contain the cast capability. Between a device, such as your phone or computer, and the television, Chromecast offers the perfect connection. Chromecast makes it easy to cast Zoom meetings, particularly conferences with many of participants, since it can virtually reflect everything on your phone, tablet, or computer screen to your TV. For meetings with bigger attendance, it is advantageous to be able to cast Zoom meetings to almost any device, even a smart TV, using Chromecast.
Steps to Mirror Screen with Chromecast
Step1Install the Chromecast
Connect your Google Chromecast to the same internet source as your casting device by plugging it in.
Step2Manage Cast Settings
Locate the casting option on your device and search for recipients. Get the Zoom Cloud Meetings app for iOS or Android. You’ll also need to download the third-party software if you use an iPad or iPhone. After that, sign up for a Zoom account and log in to get started.
Step3Start Mirroring Zoom
The screen of your phone will show up on your TV when you tap your Chromecast. The best view is obtained by turning your phone into landscape after opening Zoom as usual. Once you place a call from here, the video will cast to your TV. Go to the next screen and click Start Broadcasting. You may now start casting to your Chromecast device by opening the Zoom Cloud Meeting app.
You must download the third-party app if you use an iPhone or iPad. The Chromecast Streamer software will let you cast a Zoom meeting on your Chromecast device as Zoom doesn’t provide a casting option.
Conclusion
Zoom’s popularity has skyrocketed as a result of the Pandemic. Zoom has emerged as the preferred video conferencing solution as the bulk of the global workforce shifts to a “work from home” environment. Now that more individuals than ever before work from home, video conferencing has emerged as a vital tool for marketing and corporate communication. Mirroring Zoom meetings to TV has never been this simple. In light of this, we hope that this guide has helped you come up with some of the greatest ideas and approaches for your personal zoom sharing needs. We really hope that this information has been helpful to you if you’ve been interested in learning more about screen sharing your Zoom to TV. Thanks to these methods, you can now mirror any device platform on TV.
HOW to Add Fade to Black on Premiere Pro
The most fundamental and typical sort of Fading is a simple cut, which is often used by editors to go from one shot to another. Applying effects between clips, at the start of a clip, or at its finish may sometimes help you smooth out or stylize your edit. Fade to black transition premiere pro can be used to get this outcome. To help users create current and trendy styles, Premiere Pro features a vast range of effects and tools including fade to black in premiere pro.
Going back to the days of black and white may sometimes be a welcome change of pace in the era of vivid digital and flashy film. Being a professional editor, you’ll understand that editing should be undetectable. If an editor has done their job well, no one will notice their efforts. You’ve failed as soon as the audience realizes the cut has occurred. But fading out to black (or white) seems out of the ordinary. Use this how to fade to black premiere pro guide to learn the steps in Adobe PR.
Part 1. What is Fade to Black
You will become a better filmmaker if you expand your vocabulary in video editing by learning about transitions. The dissolve-to-black, or fade-to-black (a fade to black in premiere pro), works well in part because it has a certain theatrical feel to it. A fade-out/fade-down, often known as a fade-to-black in theater, occurs in total darkness. One of the key components of video editing is using transitions in Adobe Premiere Pro.
The fundamental elements of many other transitions are fades. Effective use of Fades is a crucial skill in your video editing repertoire since it is subtle to the point of practically being undetectable. A video transition called a “fade to black” causes a scene or clip to gradually conclude with a black backdrop. It dates back to the time when the stage curtains were drawn and the lights were dimmed during a theatrical performance. The stage therefore went completely black while the team behind hurriedly changed into new clothing and stage items for the following action.
Those that seem to take place close together chronologically are edited together, while scenes that occur at separate periods or locales are faded out. These are recognizable features of the film. They alert us to the fact that the tale is moving to a later time or place, either thematically, chronologically, or geographically. In a practical sense, this is the time when the cast and crew switch out the set and clothes. But the fade-to-black marks the end of the scene in a symbolic and narrative sense.
Part 2. How to Fade to Black in Premiere Pro
One of the most widely used video editing programs is Adobe Premiere Pro. In Premiere Pro, a number of transitions are available. One of the first, most important responsibilities for a film editor to do is the utilization of numerous transitions. In fact, many aspiring film editors start off by learning how to fade to black in Premiere. Fortunately, creating a fade to black transition in Premiere isn’t that difficult to do step by step. Everything from straightforward dissolves to wipes, slides, and zooms may be found here.
Steps to Fade to Black in Premiere Pro:
Step1Launch the Program and Refer to the Effects
After launching Adobe Premier Pro CC, simply drag the Dip to Black effect from the Effects tab to the very start or very finish of the clip you want to use. The effect may then be moved around to change its duration as needed. Add two clips to the Premiere Pro timeline.

Step2 Add the fade to black transition
Drag and drop the Dip to Black effect between two clips on the timeline after selecting the Effects tab and typing “dip to black” into the search field. The right half of the clip will display the dip to black effect.

Step3 Customize the fade to black effect
Go to Effect Controls and, while the dip to black effect is chosen, alter the alignment to Center at Cut. Before video B starts, video A will now fade to black.
Step4 Optionally change the fade-to-black effect’s duration
just extend the timeline’s fade to black effect at the very end. The slower and smoother the fade to black effect will be, and vice versa, as you move the effect outward.

Part 3. Premiere Pro Alternative to Fade to Black
Although Premiere Pro is a powerful tool to fade to black, but what if your audience wishes to evoke a certain atmosphere, swap between tales, adopt a different point of view, spice up the narrative, or advance or recede in time? Here, more creative transitions would be beneficial. For that, Filmora is a fantastic substitute for Premiere Pro if you need to quickly apply a fade to black transition to your video.
The tool is packed with built-in features that are powerful enough to polish your videos in addition to fade to black effect. For creating scroll-stopping video content, you can also discover a ton of completely adjustable video templates for YouTube, TikTok, Instagram, Facebook, and other platforms as well as a ton of attractive overlay transitions and royalty-free music and sound effects.
Free Download For Win 7 or later(64-bit)
Free Download For macOS 10.14 or later
Steps to Fade to Black Using Filmora
Step1 Install Filmora on your laptop
You must first download this software application to your computer from one of the following sources in order to start:
You must install it on your computer once you’ve done downloading it before you can use it with your laptop.

Step2 Customize the Video
After the Import, you may edit your audio recordings using tools that are completely customizable. Use the editor in Filmora to edit your recorded audio files, using simple to advanced editing techniques. Your recorded video may be improved using Filmora’s Editor by adding animated titles, spectacular effects, audio enhancements, and more.

Step3 Fade to Black Videos
Spice up the Fade effect into your videos and add the effect into the timeline. You will be able to make it black at the ends by customizing the effect inside the Fade window.

Step4 Add VFX to Your Video
The software is embedded with Effects primarily to give your videos a polished appearance. You may utilize a variety of its eye-catching and adjustable effects to make your video productions stand out from the competition. In this area, we’ve covered some of the best effects for bringing life to your dull, unprofessional videos as shown below:

Step5 Save or Share the Videos
Finally, you may use the complete Filmora editor as previously mentioned when you’ve done editing the recorded video. When you want to submit your creative work right away to YouTube or another well-known website, click the Export option and choose the platform where you want to distribute your video clip. If you like, you may even make changes to the video before uploading it.
Part 4. Related FAQs
How do you fade a clip to black?
Utilizing the dip to black transition in your video sequence is the key to learning how to fade to black in Premiere. To produce the Fade to Black reaction you’re trying to accomplish, you must Dip to Black. Simply drag the feature to the conclusion of your sequence to complete the task. Where you want the fading to start and terminate. The length of the fade or dip may be altered using the effects control panel.
How do I fade to white in Premier Pro?
Contrarily, as this montage demonstrates, fading to white may be utilized to convey uncertainty or a feeling of optimism. One of the most traditional transition effects that is often utilized in movies and videos is the fade to white. Your film gains a cinematic feel from it, and the change from one scene to the next is more seamless.
How do you keyframe colors in Premiere?
You can find other color problems in Premiere Pro that you need to fix. Therefore, it makes sense to adjust your highlight, mid, and black points first and have them dialed in before addressing saturation and color temperature. Open the Color panel on the right side of the screen while your adjustment layer is highlighted in the sequence. Make your color adjustments while keeping in mind that the effect will be applied to every clip below it in the timeline.
We only stop feeling immersed when we notice abrupt cuts. It makes sense to know when to color correct your footage throughout the video editing process. If you color correct your film too early, you can be wasting your time by color grading footage that you might eventually cut out or never use. We hope that this article will assist you in streamlining your editing process if you’re just starting started using Premiere Pro’s adjustments layers. Try experimenting with Filmora if you often utilize them to improve your edits.
Free Download For macOS 10.14 or later
Steps to Fade to Black Using Filmora
Step1 Install Filmora on your laptop
You must first download this software application to your computer from one of the following sources in order to start:
You must install it on your computer once you’ve done downloading it before you can use it with your laptop.
Step2 Customize the Video
After the Import, you may edit your audio recordings using tools that are completely customizable. Use the editor in Filmora to edit your recorded audio files, using simple to advanced editing techniques. Your recorded video may be improved using Filmora’s Editor by adding animated titles, spectacular effects, audio enhancements, and more.
Step3 Fade to Black Videos
Spice up the Fade effect into your videos and add the effect into the timeline. You will be able to make it black at the ends by customizing the effect inside the Fade window.
Step4 Add VFX to Your Video
The software is embedded with Effects primarily to give your videos a polished appearance. You may utilize a variety of its eye-catching and adjustable effects to make your video productions stand out from the competition. In this area, we’ve covered some of the best effects for bringing life to your dull, unprofessional videos as shown below:
Step5 Save or Share the Videos
Finally, you may use the complete Filmora editor as previously mentioned when you’ve done editing the recorded video. When you want to submit your creative work right away to YouTube or another well-known website, click the Export option and choose the platform where you want to distribute your video clip. If you like, you may even make changes to the video before uploading it.
Part 4. Related FAQs
How do you fade a clip to black?
Utilizing the dip to black transition in your video sequence is the key to learning how to fade to black in Premiere. To produce the Fade to Black reaction you’re trying to accomplish, you must Dip to Black. Simply drag the feature to the conclusion of your sequence to complete the task. Where you want the fading to start and terminate. The length of the fade or dip may be altered using the effects control panel.
How do I fade to white in Premier Pro?
Contrarily, as this montage demonstrates, fading to white may be utilized to convey uncertainty or a feeling of optimism. One of the most traditional transition effects that is often utilized in movies and videos is the fade to white. Your film gains a cinematic feel from it, and the change from one scene to the next is more seamless.
How do you keyframe colors in Premiere?
You can find other color problems in Premiere Pro that you need to fix. Therefore, it makes sense to adjust your highlight, mid, and black points first and have them dialed in before addressing saturation and color temperature. Open the Color panel on the right side of the screen while your adjustment layer is highlighted in the sequence. Make your color adjustments while keeping in mind that the effect will be applied to every clip below it in the timeline.
We only stop feeling immersed when we notice abrupt cuts. It makes sense to know when to color correct your footage throughout the video editing process. If you color correct your film too early, you can be wasting your time by color grading footage that you might eventually cut out or never use. We hope that this article will assist you in streamlining your editing process if you’re just starting started using Premiere Pro’s adjustments layers. Try experimenting with Filmora if you often utilize them to improve your edits.
Make Videos with Pictures and Music-10 Apps
Versatile Video Editor - Wondershare Filmora
Almost all modern social media platforms allow you to upload videos on your profile, on your story, and even send them as a message. And if you want to create more personalized videos, then you might be looking for apps to put music over video, apps to make videos with pictures and music, and other types of video editor apps. But since everyone wants to edit videos right on their Android and iOS devices, many apps are available. And to help you pick the perfect app for music on video clips and make other edits, we are here with the 10 best apps to make videos with music and pictures. All of these video editor apps also have their important details below. You can easily pick the best app for making videos with pictures and music by going through the following options.
In this article
01 [Best 10 Apps for Making Videos on Android & iOS](#Part 1)
02 [Video Editor Software for Windows & Mac](#Part 2)
Part 1 Best 10 Apps for Making Videos on Android & iOS
#1) Kinemaster
Kinemaster is considered one of the most influential and feature-rich options when you talk about the best app for making videos with music right on your mobile device. While its user interface can be a little imitating initially, it offers almost all the features you will need in a picture video app with music support. You can easily edit 4K videos, apply video effects, work with multiple layers, use its inbuilt media library, and do much more for quickly editing videos with any music of your choice.

#2) Filmr
Filmr can be a great video-creating app with music support for all those who want something easy to use thanks to its user interface. Even though this app may not have all the high-end and versatile video editing features, it certainly offers all the basics making it a great app to make music videos with pictures. Despite being completely free to use, you still get various filters for both video and audio. You can also apply these effects on pictures for making videos with music. And the best part is that you get all of this in a completely free-to-use the app.

#3) Filmora
Filmora is most likely the best app to make a video with music and pictures on your smartphone. This is thanks to the wide range of features and effects that it includes while being one of the easiest to use apps out there. If you want to create videos with pictures and music, you will be glad to know that this is a video editor app with Spotify music support and offline music support so that you can apply any music of your choice. Filmora also allows you to use a wide range of video effects, apply text, add face filters, etc. And if you like Filmora, you can even try the Filmora video editor, which is its desktop version, as you will see below.

#4) Inshot
Inshot is one of the more basic and simpler video editor apps out there. It was primarily made to create square images and videos for posting on social media platforms like Instagram. But now, this app can also be used for trimming, applying effects, changing color filters, adding stickers, adding text, and much more. And most importantly, Inshot can also be used to create slideshows and videos using pictures and music. Unlike some other free video editors, this one does not even have any watermarks.

#5) CapCut
CapCut has been quite a popular option for creating music videos for social media platforms like Instagram Reels, YouTube Shorts, TikTok, and more. Thus, it is the perfect sync video to music beat app that you install on your smartphone. But most importantly, it comes with all the latest video effects, transitions, and much more for creating all the latest video trends on your phone. You can add music to both videos and photos using CapCut as you like.

#6) Vimeo Create
Vimeo is a fairly popular video streaming platform which is almost similar to YouTube. Since a lot of users upload a large number of videos on Vimeo, Vimeo also offers its own editor. While it also has an online editor, you can also download Vimeo Create on your mobile device since it is available for both Android and iOS devices. It is the perfect option for beginners thanks to the large number of templates it offers for creating videos using pictures and music.

#7) Power Director
Power Director is quite a popular video editing app which is available on almost all platforms out there including mobile devices like Android & iOS. And even with the mobile version, you get almost all the functions of the desktop version making it perfect for creating videos using pictures and music. Even with the free version of Power Director, you also get a decent amount of video effects and support for editing 4K videos with ease. However, the free version does have a watermark on all the videos that you create.

#8) Adobe Premiere Rush
If you are familiar with industry standards when you are talking about video editors, then you must know about Adobe Premiere Pro. And if you want a familiar experience on your mobile device, then you can go with the Adobe Premiere Rush. Even on your mobile device, it offers a very similar experience thanks to the wide range of features, effects, controls, and much more it offers. Unlike other video editor apps, it even allows you to record videos if you want more than just creating videos using pictures and music.

#9) GoPro Quik
As you can guess by the name, GoPro Quik is a video editing app primarily made for GoPro cameras. But with newer updates for this app, it can be used with any kind of video or picture files. And the best thing about the GoPro Quik app is that it supports automated music beat sync editing. You can simply add any music track in the app and it will automatically sync photos and videos with it. If you want, you can also use video effects like speed control, crop and trim, color filters, text, stickers, and much more.

#10) Picsart
Even though Picsart was primarily a photo editing app, it also supports video editing in newer versions. And since Picsart is great for editing photos and pictures, creating videos using pictures and music is also quite easy. All of the features and effects supported by Picsart for photos, will also work for editing videos using Picsart. It includes color filters, face filters, makeup options, video effects, cropping, trimming, etc.

Part 2 Video Editor Software for Windows & Mac
With all the various apps given above, you can easily pick the right app to put videos together with music right on your smartphone. And while all of these apps work great for basic usage, any large projects are better to be done on a computer. Thankfully, even if you want an app to put videos and pictures together with music on your computer, you can still find multiple free to use options. Out of all such options,
is considered the best free app to make videos with music for Windows and Mac. Just per the name, Filmora is the desktop version of the previously mentioned Filmora.
Since this is the desktop version of Filmora, it offers even more features making it a great option for those who want the best app to make videos with music on Windows and Mac. Both the Windows and Mac versions of the Filmora video editing app are quite easy to use with easy-to-access options. As for its options, you get a wide range of video effects, color grading, audio settings, keyboard shortcuts, keyframing, motion tracking, and much more. And unlike other options, Filmora is the best perfect picture video app with music support for those who want an easy-to-run video editor since it can run even on entry-level computers with ease.
Wondershare Filmora
Get started quickly with Filmora’s powerful performance, intuitive interface, and countless effects!
Try It Free Try It Free Try It Free Learn More >

Conclusion
While there are music video creator app options available out there, not all of them offer the right features and options. Hence, to help you in picking the best app for music video made on your mobile device, we have already given the 10 best apps to make videos with music and pictures. Since all of these apps are quite different, you can certainly find the right option whether you want music over video app or a video collage with music app for your mobile device. You can also leave your thoughts and questions regarding the best app for making videos with pictures and music in the comments section below.
Almost all modern social media platforms allow you to upload videos on your profile, on your story, and even send them as a message. And if you want to create more personalized videos, then you might be looking for apps to put music over video, apps to make videos with pictures and music, and other types of video editor apps. But since everyone wants to edit videos right on their Android and iOS devices, many apps are available. And to help you pick the perfect app for music on video clips and make other edits, we are here with the 10 best apps to make videos with music and pictures. All of these video editor apps also have their important details below. You can easily pick the best app for making videos with pictures and music by going through the following options.
In this article
01 [Best 10 Apps for Making Videos on Android & iOS](#Part 1)
02 [Video Editor Software for Windows & Mac](#Part 2)
Part 1 Best 10 Apps for Making Videos on Android & iOS
#1) Kinemaster
Kinemaster is considered one of the most influential and feature-rich options when you talk about the best app for making videos with music right on your mobile device. While its user interface can be a little imitating initially, it offers almost all the features you will need in a picture video app with music support. You can easily edit 4K videos, apply video effects, work with multiple layers, use its inbuilt media library, and do much more for quickly editing videos with any music of your choice.
#2) Filmr
Filmr can be a great video-creating app with music support for all those who want something easy to use thanks to its user interface. Even though this app may not have all the high-end and versatile video editing features, it certainly offers all the basics making it a great app to make music videos with pictures. Despite being completely free to use, you still get various filters for both video and audio. You can also apply these effects on pictures for making videos with music. And the best part is that you get all of this in a completely free-to-use the app.
#3) Filmora
Filmora is most likely the best app to make a video with music and pictures on your smartphone. This is thanks to the wide range of features and effects that it includes while being one of the easiest to use apps out there. If you want to create videos with pictures and music, you will be glad to know that this is a video editor app with Spotify music support and offline music support so that you can apply any music of your choice. Filmora also allows you to use a wide range of video effects, apply text, add face filters, etc. And if you like Filmora, you can even try the Filmora video editor, which is its desktop version, as you will see below.
#4) Inshot
Inshot is one of the more basic and simpler video editor apps out there. It was primarily made to create square images and videos for posting on social media platforms like Instagram. But now, this app can also be used for trimming, applying effects, changing color filters, adding stickers, adding text, and much more. And most importantly, Inshot can also be used to create slideshows and videos using pictures and music. Unlike some other free video editors, this one does not even have any watermarks.
#5) CapCut
CapCut has been quite a popular option for creating music videos for social media platforms like Instagram Reels, YouTube Shorts, TikTok, and more. Thus, it is the perfect sync video to music beat app that you install on your smartphone. But most importantly, it comes with all the latest video effects, transitions, and much more for creating all the latest video trends on your phone. You can add music to both videos and photos using CapCut as you like.
#6) Vimeo Create
Vimeo is a fairly popular video streaming platform which is almost similar to YouTube. Since a lot of users upload a large number of videos on Vimeo, Vimeo also offers its own editor. While it also has an online editor, you can also download Vimeo Create on your mobile device since it is available for both Android and iOS devices. It is the perfect option for beginners thanks to the large number of templates it offers for creating videos using pictures and music.
#7) Power Director
Power Director is quite a popular video editing app which is available on almost all platforms out there including mobile devices like Android & iOS. And even with the mobile version, you get almost all the functions of the desktop version making it perfect for creating videos using pictures and music. Even with the free version of Power Director, you also get a decent amount of video effects and support for editing 4K videos with ease. However, the free version does have a watermark on all the videos that you create.
#8) Adobe Premiere Rush
If you are familiar with industry standards when you are talking about video editors, then you must know about Adobe Premiere Pro. And if you want a familiar experience on your mobile device, then you can go with the Adobe Premiere Rush. Even on your mobile device, it offers a very similar experience thanks to the wide range of features, effects, controls, and much more it offers. Unlike other video editor apps, it even allows you to record videos if you want more than just creating videos using pictures and music.
#9) GoPro Quik
As you can guess by the name, GoPro Quik is a video editing app primarily made for GoPro cameras. But with newer updates for this app, it can be used with any kind of video or picture files. And the best thing about the GoPro Quik app is that it supports automated music beat sync editing. You can simply add any music track in the app and it will automatically sync photos and videos with it. If you want, you can also use video effects like speed control, crop and trim, color filters, text, stickers, and much more.
#10) Picsart
Even though Picsart was primarily a photo editing app, it also supports video editing in newer versions. And since Picsart is great for editing photos and pictures, creating videos using pictures and music is also quite easy. All of the features and effects supported by Picsart for photos, will also work for editing videos using Picsart. It includes color filters, face filters, makeup options, video effects, cropping, trimming, etc.
Part 2 Video Editor Software for Windows & Mac
With all the various apps given above, you can easily pick the right app to put videos together with music right on your smartphone. And while all of these apps work great for basic usage, any large projects are better to be done on a computer. Thankfully, even if you want an app to put videos and pictures together with music on your computer, you can still find multiple free to use options. Out of all such options,
is considered the best free app to make videos with music for Windows and Mac. Just per the name, Filmora is the desktop version of the previously mentioned Filmora.
Since this is the desktop version of Filmora, it offers even more features making it a great option for those who want the best app to make videos with music on Windows and Mac. Both the Windows and Mac versions of the Filmora video editing app are quite easy to use with easy-to-access options. As for its options, you get a wide range of video effects, color grading, audio settings, keyboard shortcuts, keyframing, motion tracking, and much more. And unlike other options, Filmora is the best perfect picture video app with music support for those who want an easy-to-run video editor since it can run even on entry-level computers with ease.
Wondershare Filmora
Get started quickly with Filmora’s powerful performance, intuitive interface, and countless effects!
Try It Free Try It Free Try It Free Learn More >
Conclusion
While there are music video creator app options available out there, not all of them offer the right features and options. Hence, to help you in picking the best app for music video made on your mobile device, we have already given the 10 best apps to make videos with music and pictures. Since all of these apps are quite different, you can certainly find the right option whether you want music over video app or a video collage with music app for your mobile device. You can also leave your thoughts and questions regarding the best app for making videos with pictures and music in the comments section below.
Also read:
- Updated A Guide to Adding Audio in Wondershare Filmora
- 2024 Approved How to Put a Filter on a Video in iMovie
- Updated Zoom In and Out on Discord
- Updated 2024 Approved How to Add Selective Color Effect to Your Videos
- 2024 Approved Do You Know Adding Subtitles Can Benefit Video Content? Meanwhile, for Adding Subtitles to a Video, Wondershare Filmora Can Help You
- New In 2024, 10 Best Meme Text to Speech Tools Windows, Mac, Android, iPhone
- 2024 Approved Wish to Rock on YouTube, but Lacking Tricks? Here, We Will Tell You Everything About How the YouTube Algorithm AI Works and How You Can Perform Well According to AI
- 2024 Approved Within the Realm of Graphic Editing, People Also Ask How to Add Emoji to Photo. Stay Tuned to Walk Through the Best Possible Solutions in the IT Market
- In 2024, Top 10 Sound Extractors to Extract Sound From Video
- In 2024, Guiding Principles of Track Matte and Tracking in Adobe After Effects
- In 2024, Premiere Pro Tutorial How To Change Video Frame Rate
- New 2024 Approved Getting Into The Details A Review of Kodak LUTs
- Applying the Effect of Camera Shake in Video Creation
- In 2024, OpenCV Object Tracking The Complete Guide
- Updated 2024 Approved How to Trim Video in Quicktime Player on Mac
- Updated 2024 Approved 8 Websites to Find 3D Text PNG
- 2024 Approved A Normal Video Brings More Editing Opportunities than a Slow-Motion One. This Text Explores How to Convert Slow Motion Video to Normal on iPhone
- New How To Make Ninja Jump Effect with Filmora
- In 2024, Turn Your Blog Content Into Audio Podcasts to Reach a Wider Audience and Increase Reader Participation
- Updated In 2024, Create Slide Masking Effect Intro
- 2024 Approved How To Combine Videos On TikTok
- New How to Create A Freeze Frame Sequence in Video for 2024
- Best Ways to Add Photos to Tik Tok Video for 2024
- New In 2024, Simple Tricks Make 3D GIF Production of Inspiration Pop Up
- Updated Best 12 AI Video Generators to Pick for 2024
- When It Comes to Video Editing, There Are Countless Software Options Available on the Market. However, Not All of Them Come with Useful Masking Tools. In This Article, We Will Be Discussing the Top 8 Video Editor with Useful Masking Tools for 2024
- Updated In 2024, Easy Way to Inset Text in Video
- Updated In 2024, How Can You Deny These Best 10 Free Speech to Text Software
- Add Emoji to Linkedin Post – 5 Tips You Would Like to Know for 2024
- 2024 Approved Are You Searching for the Best Cinematic LUTs for Premiere Pro? You Are in the Right Place because This Article Is Dedicated to LUTs
- Top 10 Sony LUT for Different Purposes for 2024
- Are You a Newbie Across YouTube? Want to Know Who the Best Vloggers Are? This Article Provides You with the Best Vloggers on YouTube for 2024
- 4 Ways to Loop a Video on Vimeo for 2024
- Updated How To Import and Adjust the Video Clips on Wondershare Filmora?
- 4 Methods to Merge MP4 and MP3
- This Article Presents the Guide to Using Magic Effects for Creating Competent Films with Step-by-Step Instructions and Filmoras Grow and Win Program Contest
- New Go Through This Guide on All Steps in Freezing Frame Sequences in Videos Using Filmora. Details Include Splitting the Clip, Reversing Speed, and More
- New Looking for the Simple Steps to Add a Filter to Your Video in Premiere Pro? Here Are the Complete Steps Along with the List of Free Premiere Filter Presets to Use
- How to Customize Your Loading Text Effect, In 2024
- Easy Tutorial for Activating iCloud on Apple iPhone 11 Pro Safe and Legal
- 7 Ways to Unlock a Locked Infinix Phone
- In 2024, Full Guide to Fix iToolab AnyGO Not Working On Samsung Galaxy Z Flip 5 | Dr.fone
- 5 Ways to Reset Infinix Note 30 Pro Without Volume Buttons | Dr.fone
- Best Pokemons for PVP Matches in Pokemon Go For Apple iPhone 8 Plus | Dr.fone
- New How To Turn Yourself Into Anime Character
- How to Reset Gmail Password on Xiaomi Redmi A2+ Devices
- In 2024, 2 Ways to Monitor Vivo Y36i Activity | Dr.fone
- How to insert sign in Excel 2021 files
- Wondering the Best Alternative to Hola On Honor Play 40C? Here Is the Answer | Dr.fone
- Useful ways that can help to effectively recover deleted files from Realme C67 4G
- How To Track IMEI Number Of Nokia G22 Through Google Earth?
- In 2024, Unlock Apple iPhone 14 Pro With Forgotten Passcode Different Methods You Can Try
- Latest way to get Shiny Meltan Box in Pokémon Go Mystery Box On Apple iPhone 6 | Dr.fone
- In 2024, How to Unlock Samsung Galaxy S23 Tactical Edition Phone with Broken Screen
- Things You Should Know When Unlocking Total Wireless Of iPhone 12 Pro Max | Dr.fone
- Three methods to recover lost data on Honor Play 8T
- In 2024, How to Unlock Apple iPhone SE (2022) Passcode without Computer? | Dr.fone
- In 2024, How to Unlock Verizon iPhone X
- My Videos Arent Playing on Honor X9b – What Can I Do? | Dr.fone
- Updated Translate Video From Japanese to English Online for Free for 2024
- How to Fix Android.Process.Media Has Stopped on Lava Blaze 2 Pro | Dr.fone
- Title: Updated In 2024, Steps to Create Gold Text Effects After Effects
- Author: Chloe
- Created at : 2024-04-24 07:08:38
- Updated at : 2024-04-25 07:08:38
- Link: https://ai-editing-video.techidaily.com/updated-in-2024-steps-to-create-gold-text-effects-after-effects/
- License: This work is licensed under CC BY-NC-SA 4.0.
