
:max_bytes(150000):strip_icc():format(webp)/GettyImages-1134410016-75c4b547097941299e55dceeef4b764c.jpg)
Updated In 2024, Top 20 Best Text To Speech Software Windows, Mac, Android, iPhone & Online
Top 20 Best Text To Speech Software [Windows, Mac, Android, iPhone & Online]
Best Text To Speech Converter and Video Editor
Filmora’s Text to Speech (TTS) function allows you to convert your text files to voiceover and bring more elements to enrich your video.
Free Download Free Download Free Download Learn More >

Listening has always been more enjoyable, easier, and faster than reading. We understand better when we are listening. So it is good news for us that our life has been made even easier with the development of TTS technology or Text-to-Speech technology.
As its name suggests, TTS or Text-to-Speech is a technology that can convert texts to speech or voices. In other words, it is a technology that reads aloud any type of digital text so one can just listen to it without having to manually read those texts himself/herself. Text-to-Speech is also known as speech synthesis, which means artificial human speech production.
Though Text-to-Speech might sound like a new technology to most people, it has been here for a long time now. It’s just that only the big companies and some authorities had access to it in the past. But now, we can easily find this technology around us. Some of the popular examples would be audiobooks, read-aloud functions on websites, voice assistants like Alexa, Siri, etc.
While text-to-speech service is widely used for convenience and ease of life, its importance is not just limited to that. This technology has been extremely helpful for those with visible imparities and those who cannot read or write. Not only that, but it also has a great contribution to the field of education, business, and technology itself.
So now that we’re a little familiar with this Text to Speech system, it’s about time we have a look at some of the best Text to Speech software or say, Text to Speech converters. In this article, we’ll be covering the Top 20 Best Text to Speech Software with their price, features, and cons along with the platforms they are available for like Windows, Mac, Android, iPhone, and Online:
1. Murf.ai

Supported system: It is a cloud-based platform, therefore can be used online on Windows, Mac, Android, and iPhone.
Basic Intro: Murf.ai is an AI-based voice generator and text to speech converter that is popular for its ability to make studio-quality voiceovers in minutes. Unlike most of the text-to-speech software out there, Murf is focused on creating human-like voices with the help of AI rather than the same old robotic voices. And it’s not just a text-to-speech converter. Its powerful studio allows you to convert speech to editable text, make studio-like quality voiceovers, add audio to videos, etc. Therefore, all these features and its quality service help it rank in the top position on our list.
Features:
- It provides 120+ different types of AI voices for men, and women to use.
- It offers the most natural-sounding AI voices in 20 different languages.
- It has different functionalities aside Text to speech conversion like transcription, making and editing voiceovers, etc.
- It has advanced options like pitch adjustment, adding pauses, emphasizing specific words, speed, etc. to generate the audio as you want.
- It is a simple yet powerful studio for creating, editing, and managing voiceovers and audio.
- It has free grammar and punctuation assistants for your text.
- Free trial allows you to render up to 10 minutes of voice from the text.
- It provides free royalty-free background music to add to videos or voiceovers.
Price: Murf has the following three pricing plans plus a free trial:
- Basic ($13/month):
Unlimited downloads, 24 hours of voice generation per year, Access to 60 voices & 10 languages, etc.
- Pro ($26/month):
96 hours of voice generation per year, 48 hours of transcription per year, Access to 120+ voices & 20 languages, etc.
- Enterprise ($166/month):
5+ users, Unlimited voice generation & transcription, Collaboration and Access Control, Service Agreement, etc.
Cons:
- Not available as a PC or mobile application
- Too limited in the free version
2. Play.ht

Supported system: It is a cloud-based platform, therefore can be used online on Windows, Mac, Android, and iPhone.
Basic intro: Play.ht is a web application that offers a huge library of AI voice options for converting text to speech. It generates realistic TTS audio using an online AI voice generator and the best synthetic voices from Google, Amazon, IBM & Microsoft. Play.ht can help you create professional voiceovers using AI voices from a collection of over 600 male and female voices available across 60+ different languages and accents. Along with converting text to audio, it can also help you enhance the audio with speech styles, pronunciations, and SSML tags.
Features:
- It uses synthetic voices from Google, Microsoft, IBM, and Amazon.
- Huge library of over 600 AI voices including male and female, and 60+ different languages and accents available.
- It supports exporting in MP3 and WAV format with full SSML support.
- Advanced settings for editing and enhancing the voice generated from text.
- Additional functionalities available like speech styles, multi-voice features, voice inflections, custom pronunciations, etc.
- It gives commercial & broadcast rights to use the generated speech files for commercial and personal use with full authority.
Price: Play.ht has the following four pricing plans plus a free trial:
- Personal ($14.25/month):
For personal use such as learning, proofreading, school projects, etc.
- Professional ($29.25/month):
For content creators, bloggers, and freelancers with commercial intent.
- Growth ($74.25/month):
For teams and small companies looking to grow with audio.
- Business ($149.25/month):
For companies and agencies looking to create audio at scale.
Cons:
- Can be a little advanced and difficult for beginners
- Voices other than English can be inconsistent
3. Notevibes
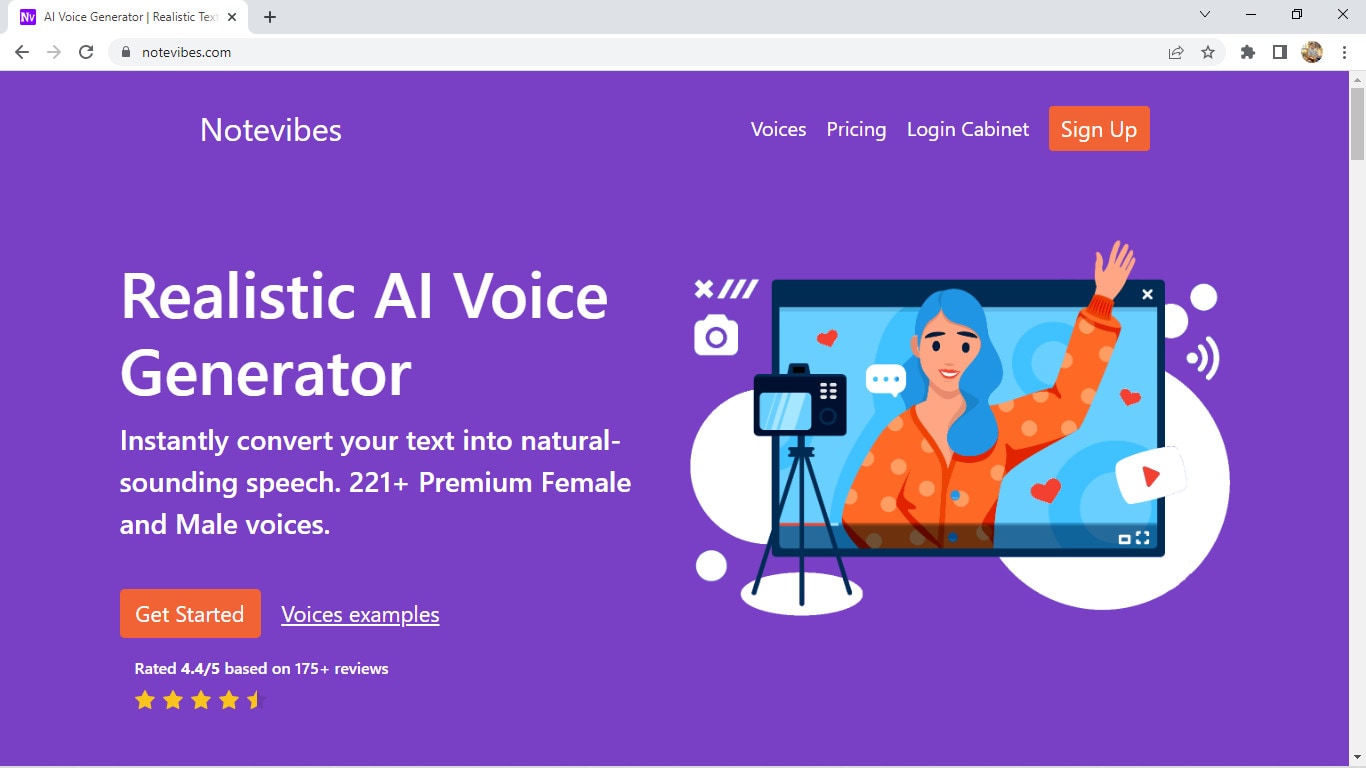
Supported systems: It is a cloud-based platform, therefore can be used online on Windows, Mac, Android, and iPhone.
Basic Intro: Notevibes is online text-to-speech software that can instantly convert your text into natural-sounding speech with AI. It offers over 221 high-quality voices and 25 languages from the most popular providers: Google, Amazon, Microsoft, and IBM to choose from. Notevibes can also convert text to audio and create videos with natural-sounding voices. Using it, you can save both your time and money without hiring professional voiceover artists.
Features:
- It generates realistic and natural human-like voices
- Large library of over 221 voices and 25 different languages
- Powerful editor to add pauses in one click, change speed, pitch, etc.
- Ability to control volume and emphasis on specific words.
- It grants you intellectual rights to freely use or sell voices.
- Backups are available for 14 days, so your work is safe.
- Advanced editor and high fidelity speech synthesys
Price: Notevibes has altogether 3 pricing plans plus a free version:
- Personal Pack ($9/month):
For personal use, private learning, and occasional or general purposes
- Commercial Pack ($90/month):
For Commercial use: Youtube, broadcasts, TV, IVR voiceover, and other businesses
- Corporate Pack ($4000/year):
For corporate or large-scale users with additional specific features
Cons:
- Not available as a PC or mobile application
- Too large gap between pricing plans
4. Lovo

Supported systems: It is a cloud-based platform, therefore can be used online on Windows, Mac, Android, and iPhone.
Basic intro: Lovo.ai is a web-based text to speech software that helps you create perfect voiceovers for audio ads, games, animations, e-learning, etc. It is a next-generation AI voiceover & text to speech converting platform that uses AI and the latest neural network models to generate human-like voices. Lovo offers a unique collection of 180+ voice skins in 33 different languages to choose from, plus, new voices are added on a monthly basis. Its advanced text-to-speech technology provides you the authentic voices that sound very realistic. And Lovo.ai also has the feature of Custom Voice Cloning which lets you create your own customized voice skins.
Features:
- Unique voice collection of 180+ voice skins in 33 different languages, each with unique traits to perfectly fit any content.
- It provides authentic and realistic voices with human emotions.
- Voice cloning technology that requires just 15 minutes of any voice to create the customized voice skins.
- Growing library of voices where new voices are added monthly.
- Voiceover API Integration is also available for the developers to use in their products.
- Well-optimized studio with a smooth interface for easy use.
Price: Lovo Studio offers two pricing plans and one free plan:
- Personal ($17.49/month):
Unlimited access to all voices, the Ability to add BGM and Commercial Rights, Up to 30 downloads per month
- Freelancer ($49.99/month):
Every feature in the Personal plan, Upto 100 downloads/month
Lovo also offers three different API Pricing plans, plus a free trial for 2 weeks without any credit card information:
- Base subscription: $45 per month per 1000 calls
- Overage: $0.04per overage call
- Enterprise license
Cons:
- Not available as a PC or mobile application
- Limits on the number of characters and downloads in paid plans
5. NaturalReader

Supported systems: Supports Windows, iPhone, Android, and online (also available as a chrome extension)
Basic intro: NaturalReader is a powerful application that can convert any text or document to audio anytime anywhere. It is one of the best and most popular text-to-speech software available today that can generate high-quality natural-sounding voices. One of its unique features is OCR Technology which reads aloud text from scanned documents or images for you. It can also be used to create audio from the text for commercial purposes with full rights. You can use NaturalReader online, through software, or with the help of its chrome extension.
Features:
- It offers 100+ natural-sounding voices available in 16 different languages.
- Its WebReader allows you to listen to the contents of any website.
- Specific features available for commercial purposes.
- OCR function available that can also read or convert the scanned documents or images into audios.
- With its pronunciation editor, you can manually modify the pronunciation of certain words.
- Specifically designed as a reading aid to help dyslexic readers.
Price: NaturalReader has three simple pricing plans including the free plan:
- Free ($0/month):
20 minutes per day with premium voices, Unlimited use with free voices, Pronunciation editor
- Premium ($9.99/month):
Unlimited use with premium voices, OCR functionality, MP3 conversion, Chrome extension with unlimited premium voices
- Plus ($19/month):
100+ Premium and Plus voices, Chrome extension with 100+ Premium and Plus voices, all the previous features
Cons:
- Free app requires Internet connectivity to access the voices.
- Not available as downloadable software for Mac devices
6. Amazon Polly

Supported systems: It is a cloud-based platform, therefore can be used online on Windows, Mac, Android, and iPhone.
Basic intro: Amazon Polly is a cloud-based service by Amazon that turns text into life-like speech, allowing you to create applications that talk, and build entirely new categories of speech-enabled products. Amazon Polly uses deep learning technologies and AI technology to synthesize realistic human speech in dozens of voices across many different languages. It is really a revolutionary TTS service that offers Neural Text-to-Speech voices in addition to Standard TTS voices that deliver advanced improvements in speech quality through a new machine learning approach. And, one of the best things is that Amazon Polly Brand Voice can create a custom voice for exclusive use.
Features:
- It provides one of the most realistic and natural-sounding voices.
- A large number of options available for voices and languages.
- Supports API integration for applications or any products.
- It can create a custom voice for the exclusive use of your organization.
- Ability to stream audio in real-time or store & redistribute speech.
- Customisation & control options available for speech output.
- It offers a free tier as well as pay-as-you-go pricing.
Price: Amazon Polly offers two different plans for its service:
- AWS Free Tier: Limited but free 5 million characters per month for 12 months
- Pay-as-you-go plan: Depends on your usage but low cost per character converted and unlimited replays
Cons:
- Not available as a desktop or mobile application
- Beginners might have a hard time using it.
- Their pay-as-you-go pricing plan can be a little difficult to understand
7. Voice Dream Reader

Supported systems: Supports Mac and iPhone (also available as a Safari extension)
Basic intro: Voice Dream Reader is a text-to-speech software specifically designed for Mac and devices running iOS. It is one of the best text-to-speech software for Mac and iOS devices that provides over 100 AI voices in about 20 different languages. It not only helps you convert text to audio, but it also reads the content from any Microsoft documents, Webpage, PDFs, etc. for you. Voice Dream Reader is meticulously designed for everyone including people with blindness, dyslexia, low vision, autism, etc. It has tons of features embedded inside it like synchronized highlighting, OCR recognition, library management, visual and audio controls, etc. Plus, it has some really special features for Mac and iOS devices like Safari extension, iCloud sync, etc. which makes it one of the best choices for text-to-speech conversion.
Features:
- It offers a huge library of over 100 AI voices from Ivona, Acapela, NeoSpeech, etc, across 20 different languages.
- It can read aloud content from any documents, and web pages with different reading modes.
- Enhanced audio and visual controls available.
- Specific features like Safari Extension, and iCloud Sync for Mac and iOS devices.
- Additional functionalities like OCR, Synchronized highlighting, Library management, Annotation, etc.
- Designed with people having blindness, dyslexia, autism, etc. in mind.
- It doesn’t require an internet connection.
- Different reputed awards and recognitions received by Voice Dream Reader.
Price: Voice Dream Reader is free to download from Mac App Store while costs $19.99 to download from iOS App Store. Its free version is pretty sufficient and is feature-rich, however, this software also offers in-app purchases on both platforms.
Cons:
- Only available for Mac and iOS devices.
- Offers in-app purchases to remove limitations.
8. Kukarella

Supported systems: It is a cloud-based platform, therefore can be used online on Windows, Mac, Android, and iPhone.
Basic intro: Kukarella is an online Text-to-Speech software powered by Google, Amazon, Microsoft, and IBM that lets you easily create beautiful voiceovers with realistic AI voices. It can be used both as a Text-to-voice software and an Audio-to-text software. With Kukarella, you can also narrate books or scripts with multiple voices which is a beta feature. It offers one of the largest libraries of around 670 voices across 100+ different languages and accents which is truly remarkable. Furthermore, it has a well-designed studio to work on and also includes commercial rights in its plan.
Features:
- It offers one of the largest collections of around 670 voices across 100+ different languages and accents.
- It provides the best AI neural voices with commercial rights included.
- Also works as an Audio Transcription software to transcribe audio, recordings, and videos.
- It includes the Table Reads feature to narrate books or scripts using multiple voices.
- Referral program for bonuses and free credits to use.
- Well-optimized studio with additional effects to use in the output audio like pitch, pause, speed, emphasis, etc.
Price: Kukarella has three different paid pricing plans available with which they also provide a 15-day money-back guarantee to refund your purchase if you’re not satisfied with their service:
- Free ($0/month): For testing purposes
- Pro ($15/month): For creative people
- Premium ($35/month): For film professionals and experts
- Studio ($99/month): For business and large-scale use
Aside from these four pricing plans, Kukarella also offers a Top Ups option to let you purchase additional credits like extra characters for text-to-speech and extra minutes for audio transcription.
Cons:
- Only available as an online application.
- Doesn’t let you clone your own voice.
9. Speechelo

Supported systems: Supports all devices like Windows, Mac, Linux, iPhone, and Android, and is available online too.
Basic intro: Speechelo is a new cloud-based text-to-speech software that instantly transforms any text into a 100% human-sounding voiceover. Despite being a new product in this huge marketplace, it has gained popularity very quickly due to its awesome text-to-speech conversion ability. All of their voices are said to have the necessary elements and expressions that make a voice sound real. It also claims that 98% of the people hearing a voiceover generated with Speechelo can’t tell if it is a real human voice or an AI-generated voice. However, the best thing about Speechelo is that it is available for all types of devices out there, so it has got you covered everywhere.
Features:
- It offers more than 50 natural-sounding voices in 24 different languages.
- Functionality to add inflections in the voice.
- Different voice styles and tones available.
- Has settings for adjusting the speed and pitch of the voice.
- Additional options to manually add breathing sounds and pauses, or its AI engine can automatically add them on its own.
- Compatible with all major operating systems, so it won’t matter whatever device you have.
Price: Speechelo has only one pricing plan i.e. Founders Special Offer which is basically a one-time payment for only $47 without any recurring monthly fees. On top of that, they provide a “Risk-Free 60 Days Money Back Guarantee” with which you can try Speechelo without any worries. In this one-time subscription plan, you’ll get lifetime updates and support.
Cons:
- No free version or free trial available to try
- Speechelo website might look a bit fishy or scammy
10. Nuance Dragon

Supported systems: Supports Windows, Android & iOS (previously supported Mac too but discontinued)
Basic intro: Nuance Dragon is an AI-based Text-to-Speech technology that leverages neural network techniques to deliver a human-like, engaging and personalized audio. It creates natural-sounding speech in 119 voice options across 53 different languages. With Nuance vocalizer, you can also establish a unique voice for your brand without having to hire, brief, or record voice talent. One of the best things about Nuance Dragon is that they pursue more natural and expressive speech synthesys to provide life-life audio output. And good news for the developers is that they also provide TTS API to use in the applications or any solutions.
Features:
- It supports HIPAA requirements that are important for security and confidentiality.
- It offers a big library of over 119 voice options and 53 different languages.
- AI-optimized text processing and enhanced expressivity.
- It provides text-to-speech API to use in applications and products.
- It can create a customized or unique voice for the brand.
- Has audio controls for managing or editing the generated audio.
- Dictation and transcribing features available.
Price: Nuance Dragon has 3 plans for individual and 3 plans for enterprise productivity, however, there is not a fixed price for enterprise solutions as it may depend:
- Dragon Professional Individual: Starting at $500
- Dragon Legal Individual: Starting at $500
- Dragon Anywhere Mobile: $15/month for both Android and iOS
They also have a free demo and a 30-day money-back guarantee program on every plan.
Cons:
- Not available for Mac devices
- Not much beginner-friendly to use
11. Synthesys

Supported systems: It is a cloud-based platform, therefore can be used online on Windows, Mac, Android, and iPhone.
Basic Intro: Synthesys is a popular web application that can help you produce professional AI voiceovers or even AI videos in just a few clicks. It generates clear and natural voiceovers through artificial intelligence that can help you build trust and connection between you and your customers or clients. This unique text-to-speech converter eliminates the robotic and strange sounds generated by AI to the minimum. Furthermore, this online platform can create beautiful AI videos for you with just text which you can share on social media or wherever you like. It also allows you to choose voices from different gender, style, accent, speed, etc. for the speech generated from text.
Features:
- It is a web application, so you can work on your projects from any device anywhere.
- Large library of professional AI voices: 35 female and 30 male to choose from.
- Can be used as both AI Voice Generator or AI Video Generator
- It allows you to use or sell the generated voices or videos with full rights.
- User-friendly interface and easy to use.
- Advanced options available to change speed, gender, style, and accent of the voice.
Price: Synthesys has a total of three subscription plans with a 3-day moneyback guarantee. Unfortunately, it doesn’t have a free plan or a free trial version.
- Audio Synthesys plan ($29/month):
Access to 20 real human voices, 66 languages & 254 general voices, and Unlimited voice-overs downloads
- Human Studio Synthesys plan ($39/month):
Access to 73 Humatars, Full video customization, Unlimited downloads, etc.
- Audio and Human Studio Synthesys plan ($59/month):
Unlimited videos and voices downloads, and all previous features included
Cons:
- Limited choices for humatars and voices
- No free trial version available
12. Linguatec Voice Reader

Supported systems: Supports only Windows operating system (all versions)
Basic intro: Linguatec Voice Reader is a downloadable text to speech software for Windows users. It offers a big collection of 67 natural-sounding voices in 45 different languages. Aside from converting text to speech, it can also convert Word documents, emails, ebooks, and pdfs to audio for listening to them on any device. Linguatec Voice Reader Home is specifically designed for private or personal use to listen to any content but it has other specific products like Linguatec Voice Reader Studio for professional purposes and Voice Reader Server for large-scale conversion of text to speech. And, it also has a Voice Reader Web which can automatically convert your website to audio. Therefore, it has got you covered in every aspect.
Features:
- It offers 67 natural-sounding voices in 45 different languages.
- It allows you to convert any word documents, emails, ebooks, or pdfs to audio.
- Text to speech software designed solely for personal usage.
- Intuitive editor to change the speed, volume, and pitch of the audio.
- Installable on Windows, so can be directly accessed without a browser.
- Specific products available for specific purposes like personal use, professional use, large scale use, etc.
Price: Linguatec Voice Reader has a single one-time pricing plan for its every product:
- Voice Reader Home: €49 (approximately $51)
- Voice Reader Studio: €499 (approximately $527)
- Voice Reader Web: €299 (approximately $316)
- Voice Reader Server: Depends on the company’s needs
Cons:
- Only available for Windows devices
- Interface is boring and old-fashioned.
- Only one voice and language per license.
13. Resemble AI

Supported systems: Supports Android and iOS devices, and can also be used online
Basic intro: Resemble.ai is professional text-to-speech software that generates realistic AI voices from the text. It can create your own AI voice by recording and cloning your voice data. And, it also comes with API functionality to embed TTS into any of your services or products. With its Resemble fill, it can blend human and synthetic voices for a seamless experience, and it even has a language dubber that can instantly dub your native voice into other languages. Furthermore, one of its best features is its ability to control the emotions of every word in a sentence which really provides a realistic experience.
Features:
- Voice cloning function to clone your own voice with AI.
- Flexible APIs ready for integration in applications, products, or any services.
- Resemble Fill function to blend human and synthetic voices for a seamless experience.
- It can instantly dub your native voice into other languages.
- Optimized interface and additional audio control settings.
- It can be accessed from mobile devices too with installable apps.
Price: Resemble AI has three pricing plans according to your need and a free trial:
- Entry ($30/month): For voices that are recorded right on our platform
- Build (Depends on your needs): For your own data, any voice, no script required
- Enterprise (Depends on your needs): For massive scale and custom deployment needs
Cons:
- Limited options for voices and languages
- Not available as a Windows or Mac program
14. WellSaid

Supported systems: It is a cloud-based platform, therefore can be used online on Windows, Mac, Android, and iPhone.
Basic intro: WellSaid is an AI-powered text-to-speech software that converts text to voice in real-time and it can help you create quality voiceovers for all your digital content easily. It is one of the best voiceover generators that is not only designed for individual use, but also for small teams and large companies to work on together. With WellSaid, you can also customize the output voices, create your own unique voice or even deploy its text-to-speech functionality through API. However, it is kinda limited on the number of voices and languages.
Features:
- Has a well-optimized studio to convert text to audio.
- WellSaid API available to deploy TTS functionality in apps and products.
- It allows you to build your own voices to meet your brand guidelines.
- Suitable for individuals, teams of any size, and even large enterprises.
- Around 50 different voice avatars to choose from.
- High quality and realistic voices.
- Live chat support and rights for commercial usage.
Price: WellSaid has altogether four pricing plans and a free trial:
- Maker ($49/month):
250 downloads, 5 projects, 4 voice avatars
- Creative ($99/month):
750 downloads, 50 projects, 50 voice avatars
- Producer ($199/month):
2500 downloads, Unlimited projects, live chat support
- Team (Not fixed):
Team members, Team projects, Volume licensing, Account manager
Cons:
- Limited number of voice avatars and languages to choose from.
- Lack of features to adjust and edit the audio.
15. TTSReader
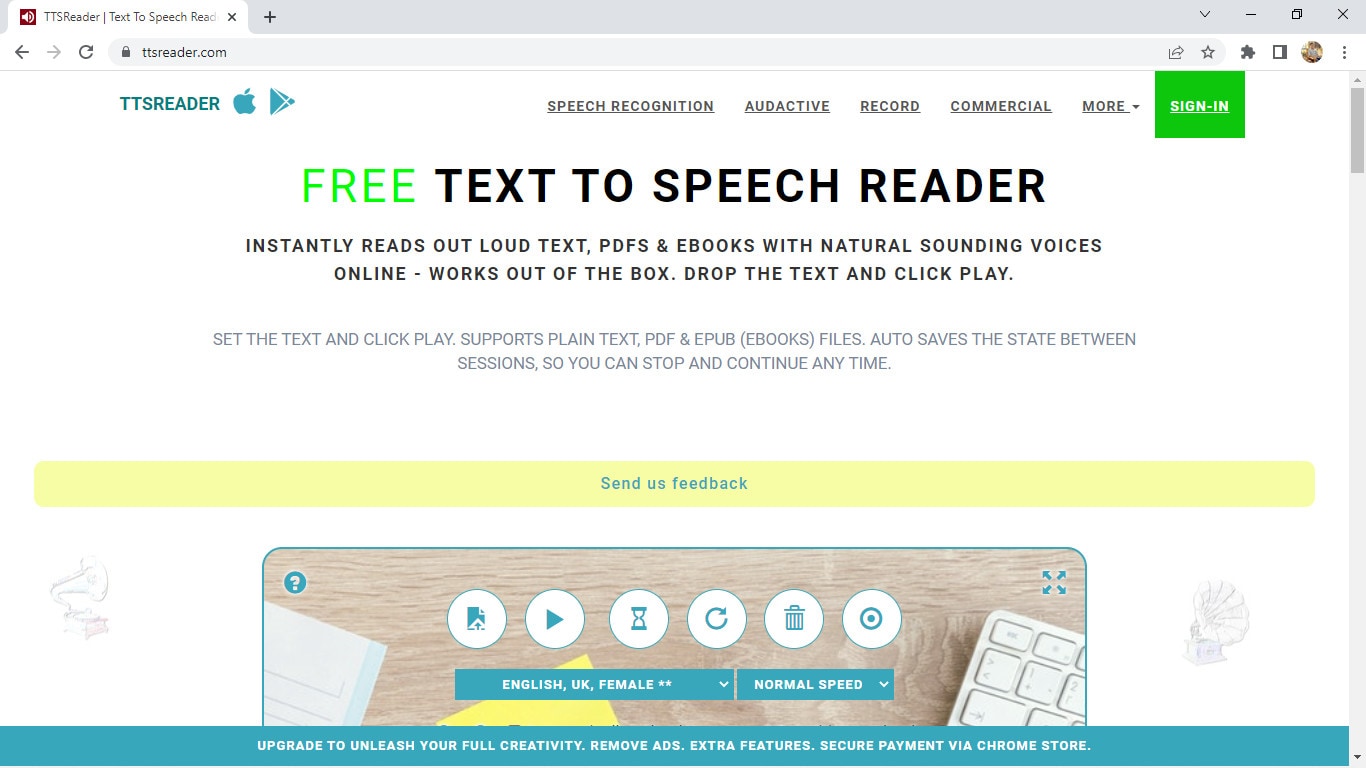
Supported systems: Supports iOS and Android devices, and is also available online and as a chrome extension
Basic intro: TTSReader is one of the simplest and best free text-to-speech readers that instantly reads aloud text, pdfs & ebooks with natural-sounding voices. It is a lightweight online application, so it works out of the box without the need to download and log in. Despite being free software, it has some really great features in it. There are various options of natural sounding voices in different languages and different accents, and it also reads aloud documents, and ebooks for you by uploading them. However, it does not allow you to directly download the audio, but you still have the option to record audio to save it in webm format.
Features:
- Simple and easy-to-use interface
- Completely free for personal or general use.
- It allows you to manually add pauses and alter the speed of the voice.
- Has many options for voices including male and female, accents, and languages.
- It reads aloud ebooks, pdfs, or any text files.
- Available for mobile devices for instant access.
- Automatically remembers the preferences of the previous session and also has options for screen recording.
Price: TTSReader is completely free without any pricing plans at all. However, they do have a premium chrome extension and a separate commercial version available for purchase.
Cons:
- Advanced features for audio are not available.
- May not be the best option for commercial purposes
16. Descript

Supported systems: It is a cloud-based platform, therefore can be used online on Windows, Mac, Android, and iPhone.
Basic intro: Descript is an all-in-one video editing, screen recording, transcription, and podcasting tool you can use online. Its podcasting tool can be a great example of Text-to-Speech software that creates quality podcasts from just text. Descript is that one tool that takes podcasting or TTS to whole another level. It uses AI technology that clones your voice and then allows you to convert any text to speech in your own AI-tailored voice. You can then directly edit the audio in real-time by editing texts. But what really separates it from other software are its unique features for adjusting texts, editing audio, adding effects, etc.
Features:
- Not just a TTS software, but also a video editing, recording, and transcription tool.
- Timeline editor for advanced level editing along with cloud media library
- Different audio effects like crossfading, automatic leveling, loudness normalization, etc.
- It can clone your voice with AI to convert text to speech.
- Free podcasting trial available which includes all the features.
- Has advanced features useful for professional podcasters.
- It supports integrations with API for applications or any services.
Price: Descript has a total of three pricing plans and a free trial version:
- Creator: $12/month
- Pro: $24/month
- Enterprise: (Not fixed)
Cons:
- Not originally a TTS software, but can be used as a one.
- Separate plans for podcasting are not available.
17. Wideo

Supported systems: It is a cloud-based platform, therefore can be used online on Windows, Mac, Android, and iPhone.
Basic intro: Wideo is originally an online video maker that helps you create promo videos, explainer videos, demo videos, presentations, etc. while its Text to Speech software is another added functionality. But still, Wideo is one of the best free TTS software that lets you easily convert text to audio in a fast and straightforward manner. It also allows you to directly add these voices in Wideo’s video maker. Wideo free Text to Speech software integrates with Google Text-to-Speech API, so the quality of voices is as good as other paid software. One of the best things about Wideo TTS software is that it is simple and easy to use.
Features:
- Free and easy-to-use Text to Speech converter.
- Professional video maker along with TTS functionality.
- A large list of voices and languages to choose from.
- Speed of the generated audio adjustable.
- It allows you to download the audio as an mp3 file for free.
Price: Wideo Text-to-Speech Software is basically free with no specific pricing plans. However, its limit in the number of characters can be removed by purchasing any two of their video maker plans:
- PRO: $39/month
- PRO+: $79/month
Cons:
- Advanced text-to-speech features not available
- Voices sound a bit robotic or unreal
- No separate pricing plans available, so will have to purchase the video maker plans to remove limitations
18. Balabolka

Supported systems: Supports all versions of Windows
Basic intro: Balabolka is a Windows text-to-speech software that has been in this field for a long time. It is old and feels outdated, but still is one of the most capable and useful free text to speech converters. Balabolka packs almost all the necessary features required as a TTS program in its lightweight package of just a few megabytes. This program uses various versions of Microsoft Speech API and allows to alter a voice’s parameters, including rate and pitch. Balabolka is also available as a portable version, and as a command-line utility which is a great thing.
Features:
- Lightweight, simple, and completely free to use.
- Can read text from clipboard, and documents, and save the on-screen text as an audio file.
- It uses Microsoft’s Speech API and also includes a spelling checker.
- It uses the pre-installed computer voices of your system.
- Also supports many different text file formats.
- Has options to alter a voice’s parameters, speed, pitch, etc.
- Available for download as a portable and command-line program too.
Price: Balabolka is absolutely free to use without any pricing plans and hidden charges.
Cons:
- Not suitable for large-scale and commercial purposes.
- Only available for Windows operating systems.
- Limited options for voices and languages.
19. iSpeech

Supported systems: Supports iOS, Android, and Online (also available as a chrome extension)
Basic intro: iSpeech is a straightforward and easy-to-use online text-to-speech converter that is also available for mobile devices. Its TTS functionality is powered by Speechelo but makes the whole process a lot simpler and easier. It supports various languages for text-to-speech conversion and also provides the options to change the speed of audio and select gender. And, it also supports Embedded and Hosted TTS services along with API integrations to use TTS in any program or service. Therefore, it acts as a simple yet powerful and professional text-to-speech software to create lifelike voiceovers.
Features:
- It supports over 30 different languages.
- Available online as well as for mobile devices (iOS and Android).
- Has options to select gender and choose audio speed.
- Simple and easy-to-use interface.
- Cloud and hosted services along with API integrations available
- Completely free to convert text to speech online and preview
Price: iSpeech is absolutely free to use online, but it has various pricing plans available for additional features like downloading audio, API integration, etc. They have different options like Pay Per Use, Pay Per Install, Creative Pricing, One-time fees, etc. so it actually depends on your needs.
Cons:
- Very limited in voice styles, accents, and tones.
- Not suitable for beginners and general users.
20. TextAloud

Supported systems: Supports all versions of Windows
Basic intro: TextAloud is a Windows text-to-speech software by NextUp technologies that help you easily generate audio for the given text. It is designed to save your time allowing you to be more productive while converting text to speech. It also allows one to convert texts from web pages, documents, and PDFs into natural-sounding speech. And, it includes assistive technology for people with Dyslexia to improve reading and comprehension. TextAloud by NextUp technologies also offers the natural-sounding Text-to-Speech voices from companies like Acapela, Ivona, Cerence, etc. And with many other features, it can be considered one of the best TTS software for your Windows device.
Features:
- Lightweight software with straightforward interface.
- It allows the conversion of texts on web pages, documents, and PDFs into speech.
- Assistive technology for people with Dyslexia to improve reading and comprehension.
- It uses the pre-installed voices on the system and also offers natural-sounding Text to Speech voices from companies like Acapela, Ivona, Cerence, etc.
- It uses Microsoft’s Speech API and also includes a spelling checker.
- Includes a lot of features and options related to TTS.
Price: TextAloud 4 offers a one-time payment for a Single User License at $34.95 and also has a free trial version to test this software. However, it also offers some additional features for extra fees.
Cons:
- Only available for Windows devices
- Not the best option for commercial purposes
- User interface can seem a little outdated.
Conclusion
Here, we presented you with a list of Top 20 Best Text-to-Speech Software with all their features and other information you need to know. While all of them are best in their own aspects, you should choose the one that suits your needs. For example, you can go for Balabolka or similar free softwares for basic personal use, or if you want something advanced like AI voice cloning, then you can use Murf, Descript, etc. So it all depends on what you intend to do with a TTS software.
However, we have made it easier for you to choose the best one among these many great softwares by breaking them down in terms of their main features, pricing, compatibility, cons, etc. So decide on the software that is best for you and have a happy time creating amazing voiceovers.
Listening has always been more enjoyable, easier, and faster than reading. We understand better when we are listening. So it is good news for us that our life has been made even easier with the development of TTS technology or Text-to-Speech technology.
As its name suggests, TTS or Text-to-Speech is a technology that can convert texts to speech or voices. In other words, it is a technology that reads aloud any type of digital text so one can just listen to it without having to manually read those texts himself/herself. Text-to-Speech is also known as speech synthesis, which means artificial human speech production.
Though Text-to-Speech might sound like a new technology to most people, it has been here for a long time now. It’s just that only the big companies and some authorities had access to it in the past. But now, we can easily find this technology around us. Some of the popular examples would be audiobooks, read-aloud functions on websites, voice assistants like Alexa, Siri, etc.
While text-to-speech service is widely used for convenience and ease of life, its importance is not just limited to that. This technology has been extremely helpful for those with visible imparities and those who cannot read or write. Not only that, but it also has a great contribution to the field of education, business, and technology itself.
So now that we’re a little familiar with this Text to Speech system, it’s about time we have a look at some of the best Text to Speech software or say, Text to Speech converters. In this article, we’ll be covering the Top 20 Best Text to Speech Software with their price, features, and cons along with the platforms they are available for like Windows, Mac, Android, iPhone, and Online:
1. Murf.ai
Supported system: It is a cloud-based platform, therefore can be used online on Windows, Mac, Android, and iPhone.
Basic Intro: Murf.ai is an AI-based voice generator and text to speech converter that is popular for its ability to make studio-quality voiceovers in minutes. Unlike most of the text-to-speech software out there, Murf is focused on creating human-like voices with the help of AI rather than the same old robotic voices. And it’s not just a text-to-speech converter. Its powerful studio allows you to convert speech to editable text, make studio-like quality voiceovers, add audio to videos, etc. Therefore, all these features and its quality service help it rank in the top position on our list.
Features:
- It provides 120+ different types of AI voices for men, and women to use.
- It offers the most natural-sounding AI voices in 20 different languages.
- It has different functionalities aside Text to speech conversion like transcription, making and editing voiceovers, etc.
- It has advanced options like pitch adjustment, adding pauses, emphasizing specific words, speed, etc. to generate the audio as you want.
- It is a simple yet powerful studio for creating, editing, and managing voiceovers and audio.
- It has free grammar and punctuation assistants for your text.
- Free trial allows you to render up to 10 minutes of voice from the text.
- It provides free royalty-free background music to add to videos or voiceovers.
Price: Murf has the following three pricing plans plus a free trial:
- Basic ($13/month):
Unlimited downloads, 24 hours of voice generation per year, Access to 60 voices & 10 languages, etc.
- Pro ($26/month):
96 hours of voice generation per year, 48 hours of transcription per year, Access to 120+ voices & 20 languages, etc.
- Enterprise ($166/month):
5+ users, Unlimited voice generation & transcription, Collaboration and Access Control, Service Agreement, etc.
Cons:
- Not available as a PC or mobile application
- Too limited in the free version
2. Play.ht
Supported system: It is a cloud-based platform, therefore can be used online on Windows, Mac, Android, and iPhone.
Basic intro: Play.ht is a web application that offers a huge library of AI voice options for converting text to speech. It generates realistic TTS audio using an online AI voice generator and the best synthetic voices from Google, Amazon, IBM & Microsoft. Play.ht can help you create professional voiceovers using AI voices from a collection of over 600 male and female voices available across 60+ different languages and accents. Along with converting text to audio, it can also help you enhance the audio with speech styles, pronunciations, and SSML tags.
Features:
- It uses synthetic voices from Google, Microsoft, IBM, and Amazon.
- Huge library of over 600 AI voices including male and female, and 60+ different languages and accents available.
- It supports exporting in MP3 and WAV format with full SSML support.
- Advanced settings for editing and enhancing the voice generated from text.
- Additional functionalities available like speech styles, multi-voice features, voice inflections, custom pronunciations, etc.
- It gives commercial & broadcast rights to use the generated speech files for commercial and personal use with full authority.
Price: Play.ht has the following four pricing plans plus a free trial:
- Personal ($14.25/month):
For personal use such as learning, proofreading, school projects, etc.
- Professional ($29.25/month):
For content creators, bloggers, and freelancers with commercial intent.
- Growth ($74.25/month):
For teams and small companies looking to grow with audio.
- Business ($149.25/month):
For companies and agencies looking to create audio at scale.
Cons:
- Can be a little advanced and difficult for beginners
- Voices other than English can be inconsistent
3. Notevibes
Supported systems: It is a cloud-based platform, therefore can be used online on Windows, Mac, Android, and iPhone.
Basic Intro: Notevibes is online text-to-speech software that can instantly convert your text into natural-sounding speech with AI. It offers over 221 high-quality voices and 25 languages from the most popular providers: Google, Amazon, Microsoft, and IBM to choose from. Notevibes can also convert text to audio and create videos with natural-sounding voices. Using it, you can save both your time and money without hiring professional voiceover artists.
Features:
- It generates realistic and natural human-like voices
- Large library of over 221 voices and 25 different languages
- Powerful editor to add pauses in one click, change speed, pitch, etc.
- Ability to control volume and emphasis on specific words.
- It grants you intellectual rights to freely use or sell voices.
- Backups are available for 14 days, so your work is safe.
- Advanced editor and high fidelity speech synthesys
Price: Notevibes has altogether 3 pricing plans plus a free version:
- Personal Pack ($9/month):
For personal use, private learning, and occasional or general purposes
- Commercial Pack ($90/month):
For Commercial use: Youtube, broadcasts, TV, IVR voiceover, and other businesses
- Corporate Pack ($4000/year):
For corporate or large-scale users with additional specific features
Cons:
- Not available as a PC or mobile application
- Too large gap between pricing plans
4. Lovo
Supported systems: It is a cloud-based platform, therefore can be used online on Windows, Mac, Android, and iPhone.
Basic intro: Lovo.ai is a web-based text to speech software that helps you create perfect voiceovers for audio ads, games, animations, e-learning, etc. It is a next-generation AI voiceover & text to speech converting platform that uses AI and the latest neural network models to generate human-like voices. Lovo offers a unique collection of 180+ voice skins in 33 different languages to choose from, plus, new voices are added on a monthly basis. Its advanced text-to-speech technology provides you the authentic voices that sound very realistic. And Lovo.ai also has the feature of Custom Voice Cloning which lets you create your own customized voice skins.
Features:
- Unique voice collection of 180+ voice skins in 33 different languages, each with unique traits to perfectly fit any content.
- It provides authentic and realistic voices with human emotions.
- Voice cloning technology that requires just 15 minutes of any voice to create the customized voice skins.
- Growing library of voices where new voices are added monthly.
- Voiceover API Integration is also available for the developers to use in their products.
- Well-optimized studio with a smooth interface for easy use.
Price: Lovo Studio offers two pricing plans and one free plan:
- Personal ($17.49/month):
Unlimited access to all voices, the Ability to add BGM and Commercial Rights, Up to 30 downloads per month
- Freelancer ($49.99/month):
Every feature in the Personal plan, Upto 100 downloads/month
Lovo also offers three different API Pricing plans, plus a free trial for 2 weeks without any credit card information:
- Base subscription: $45 per month per 1000 calls
- Overage: $0.04per overage call
- Enterprise license
Cons:
- Not available as a PC or mobile application
- Limits on the number of characters and downloads in paid plans
5. NaturalReader
Supported systems: Supports Windows, iPhone, Android, and online (also available as a chrome extension)
Basic intro: NaturalReader is a powerful application that can convert any text or document to audio anytime anywhere. It is one of the best and most popular text-to-speech software available today that can generate high-quality natural-sounding voices. One of its unique features is OCR Technology which reads aloud text from scanned documents or images for you. It can also be used to create audio from the text for commercial purposes with full rights. You can use NaturalReader online, through software, or with the help of its chrome extension.
Features:
- It offers 100+ natural-sounding voices available in 16 different languages.
- Its WebReader allows you to listen to the contents of any website.
- Specific features available for commercial purposes.
- OCR function available that can also read or convert the scanned documents or images into audios.
- With its pronunciation editor, you can manually modify the pronunciation of certain words.
- Specifically designed as a reading aid to help dyslexic readers.
Price: NaturalReader has three simple pricing plans including the free plan:
- Free ($0/month):
20 minutes per day with premium voices, Unlimited use with free voices, Pronunciation editor
- Premium ($9.99/month):
Unlimited use with premium voices, OCR functionality, MP3 conversion, Chrome extension with unlimited premium voices
- Plus ($19/month):
100+ Premium and Plus voices, Chrome extension with 100+ Premium and Plus voices, all the previous features
Cons:
- Free app requires Internet connectivity to access the voices.
- Not available as downloadable software for Mac devices
6. Amazon Polly
Supported systems: It is a cloud-based platform, therefore can be used online on Windows, Mac, Android, and iPhone.
Basic intro: Amazon Polly is a cloud-based service by Amazon that turns text into life-like speech, allowing you to create applications that talk, and build entirely new categories of speech-enabled products. Amazon Polly uses deep learning technologies and AI technology to synthesize realistic human speech in dozens of voices across many different languages. It is really a revolutionary TTS service that offers Neural Text-to-Speech voices in addition to Standard TTS voices that deliver advanced improvements in speech quality through a new machine learning approach. And, one of the best things is that Amazon Polly Brand Voice can create a custom voice for exclusive use.
Features:
- It provides one of the most realistic and natural-sounding voices.
- A large number of options available for voices and languages.
- Supports API integration for applications or any products.
- It can create a custom voice for the exclusive use of your organization.
- Ability to stream audio in real-time or store & redistribute speech.
- Customisation & control options available for speech output.
- It offers a free tier as well as pay-as-you-go pricing.
Price: Amazon Polly offers two different plans for its service:
- AWS Free Tier: Limited but free 5 million characters per month for 12 months
- Pay-as-you-go plan: Depends on your usage but low cost per character converted and unlimited replays
Cons:
- Not available as a desktop or mobile application
- Beginners might have a hard time using it.
- Their pay-as-you-go pricing plan can be a little difficult to understand
7. Voice Dream Reader
Supported systems: Supports Mac and iPhone (also available as a Safari extension)
Basic intro: Voice Dream Reader is a text-to-speech software specifically designed for Mac and devices running iOS. It is one of the best text-to-speech software for Mac and iOS devices that provides over 100 AI voices in about 20 different languages. It not only helps you convert text to audio, but it also reads the content from any Microsoft documents, Webpage, PDFs, etc. for you. Voice Dream Reader is meticulously designed for everyone including people with blindness, dyslexia, low vision, autism, etc. It has tons of features embedded inside it like synchronized highlighting, OCR recognition, library management, visual and audio controls, etc. Plus, it has some really special features for Mac and iOS devices like Safari extension, iCloud sync, etc. which makes it one of the best choices for text-to-speech conversion.
Features:
- It offers a huge library of over 100 AI voices from Ivona, Acapela, NeoSpeech, etc, across 20 different languages.
- It can read aloud content from any documents, and web pages with different reading modes.
- Enhanced audio and visual controls available.
- Specific features like Safari Extension, and iCloud Sync for Mac and iOS devices.
- Additional functionalities like OCR, Synchronized highlighting, Library management, Annotation, etc.
- Designed with people having blindness, dyslexia, autism, etc. in mind.
- It doesn’t require an internet connection.
- Different reputed awards and recognitions received by Voice Dream Reader.
Price: Voice Dream Reader is free to download from Mac App Store while costs $19.99 to download from iOS App Store. Its free version is pretty sufficient and is feature-rich, however, this software also offers in-app purchases on both platforms.
Cons:
- Only available for Mac and iOS devices.
- Offers in-app purchases to remove limitations.
8. Kukarella
Supported systems: It is a cloud-based platform, therefore can be used online on Windows, Mac, Android, and iPhone.
Basic intro: Kukarella is an online Text-to-Speech software powered by Google, Amazon, Microsoft, and IBM that lets you easily create beautiful voiceovers with realistic AI voices. It can be used both as a Text-to-voice software and an Audio-to-text software. With Kukarella, you can also narrate books or scripts with multiple voices which is a beta feature. It offers one of the largest libraries of around 670 voices across 100+ different languages and accents which is truly remarkable. Furthermore, it has a well-designed studio to work on and also includes commercial rights in its plan.
Features:
- It offers one of the largest collections of around 670 voices across 100+ different languages and accents.
- It provides the best AI neural voices with commercial rights included.
- Also works as an Audio Transcription software to transcribe audio, recordings, and videos.
- It includes the Table Reads feature to narrate books or scripts using multiple voices.
- Referral program for bonuses and free credits to use.
- Well-optimized studio with additional effects to use in the output audio like pitch, pause, speed, emphasis, etc.
Price: Kukarella has three different paid pricing plans available with which they also provide a 15-day money-back guarantee to refund your purchase if you’re not satisfied with their service:
- Free ($0/month): For testing purposes
- Pro ($15/month): For creative people
- Premium ($35/month): For film professionals and experts
- Studio ($99/month): For business and large-scale use
Aside from these four pricing plans, Kukarella also offers a Top Ups option to let you purchase additional credits like extra characters for text-to-speech and extra minutes for audio transcription.
Cons:
- Only available as an online application.
- Doesn’t let you clone your own voice.
9. Speechelo
Supported systems: Supports all devices like Windows, Mac, Linux, iPhone, and Android, and is available online too.
Basic intro: Speechelo is a new cloud-based text-to-speech software that instantly transforms any text into a 100% human-sounding voiceover. Despite being a new product in this huge marketplace, it has gained popularity very quickly due to its awesome text-to-speech conversion ability. All of their voices are said to have the necessary elements and expressions that make a voice sound real. It also claims that 98% of the people hearing a voiceover generated with Speechelo can’t tell if it is a real human voice or an AI-generated voice. However, the best thing about Speechelo is that it is available for all types of devices out there, so it has got you covered everywhere.
Features:
- It offers more than 50 natural-sounding voices in 24 different languages.
- Functionality to add inflections in the voice.
- Different voice styles and tones available.
- Has settings for adjusting the speed and pitch of the voice.
- Additional options to manually add breathing sounds and pauses, or its AI engine can automatically add them on its own.
- Compatible with all major operating systems, so it won’t matter whatever device you have.
Price: Speechelo has only one pricing plan i.e. Founders Special Offer which is basically a one-time payment for only $47 without any recurring monthly fees. On top of that, they provide a “Risk-Free 60 Days Money Back Guarantee” with which you can try Speechelo without any worries. In this one-time subscription plan, you’ll get lifetime updates and support.
Cons:
- No free version or free trial available to try
- Speechelo website might look a bit fishy or scammy
10. Nuance Dragon
Supported systems: Supports Windows, Android & iOS (previously supported Mac too but discontinued)
Basic intro: Nuance Dragon is an AI-based Text-to-Speech technology that leverages neural network techniques to deliver a human-like, engaging and personalized audio. It creates natural-sounding speech in 119 voice options across 53 different languages. With Nuance vocalizer, you can also establish a unique voice for your brand without having to hire, brief, or record voice talent. One of the best things about Nuance Dragon is that they pursue more natural and expressive speech synthesys to provide life-life audio output. And good news for the developers is that they also provide TTS API to use in the applications or any solutions.
Features:
- It supports HIPAA requirements that are important for security and confidentiality.
- It offers a big library of over 119 voice options and 53 different languages.
- AI-optimized text processing and enhanced expressivity.
- It provides text-to-speech API to use in applications and products.
- It can create a customized or unique voice for the brand.
- Has audio controls for managing or editing the generated audio.
- Dictation and transcribing features available.
Price: Nuance Dragon has 3 plans for individual and 3 plans for enterprise productivity, however, there is not a fixed price for enterprise solutions as it may depend:
- Dragon Professional Individual: Starting at $500
- Dragon Legal Individual: Starting at $500
- Dragon Anywhere Mobile: $15/month for both Android and iOS
They also have a free demo and a 30-day money-back guarantee program on every plan.
Cons:
- Not available for Mac devices
- Not much beginner-friendly to use
11. Synthesys
Supported systems: It is a cloud-based platform, therefore can be used online on Windows, Mac, Android, and iPhone.
Basic Intro: Synthesys is a popular web application that can help you produce professional AI voiceovers or even AI videos in just a few clicks. It generates clear and natural voiceovers through artificial intelligence that can help you build trust and connection between you and your customers or clients. This unique text-to-speech converter eliminates the robotic and strange sounds generated by AI to the minimum. Furthermore, this online platform can create beautiful AI videos for you with just text which you can share on social media or wherever you like. It also allows you to choose voices from different gender, style, accent, speed, etc. for the speech generated from text.
Features:
- It is a web application, so you can work on your projects from any device anywhere.
- Large library of professional AI voices: 35 female and 30 male to choose from.
- Can be used as both AI Voice Generator or AI Video Generator
- It allows you to use or sell the generated voices or videos with full rights.
- User-friendly interface and easy to use.
- Advanced options available to change speed, gender, style, and accent of the voice.
Price: Synthesys has a total of three subscription plans with a 3-day moneyback guarantee. Unfortunately, it doesn’t have a free plan or a free trial version.
- Audio Synthesys plan ($29/month):
Access to 20 real human voices, 66 languages & 254 general voices, and Unlimited voice-overs downloads
- Human Studio Synthesys plan ($39/month):
Access to 73 Humatars, Full video customization, Unlimited downloads, etc.
- Audio and Human Studio Synthesys plan ($59/month):
Unlimited videos and voices downloads, and all previous features included
Cons:
- Limited choices for humatars and voices
- No free trial version available
12. Linguatec Voice Reader
Supported systems: Supports only Windows operating system (all versions)
Basic intro: Linguatec Voice Reader is a downloadable text to speech software for Windows users. It offers a big collection of 67 natural-sounding voices in 45 different languages. Aside from converting text to speech, it can also convert Word documents, emails, ebooks, and pdfs to audio for listening to them on any device. Linguatec Voice Reader Home is specifically designed for private or personal use to listen to any content but it has other specific products like Linguatec Voice Reader Studio for professional purposes and Voice Reader Server for large-scale conversion of text to speech. And, it also has a Voice Reader Web which can automatically convert your website to audio. Therefore, it has got you covered in every aspect.
Features:
- It offers 67 natural-sounding voices in 45 different languages.
- It allows you to convert any word documents, emails, ebooks, or pdfs to audio.
- Text to speech software designed solely for personal usage.
- Intuitive editor to change the speed, volume, and pitch of the audio.
- Installable on Windows, so can be directly accessed without a browser.
- Specific products available for specific purposes like personal use, professional use, large scale use, etc.
Price: Linguatec Voice Reader has a single one-time pricing plan for its every product:
- Voice Reader Home: €49 (approximately $51)
- Voice Reader Studio: €499 (approximately $527)
- Voice Reader Web: €299 (approximately $316)
- Voice Reader Server: Depends on the company’s needs
Cons:
- Only available for Windows devices
- Interface is boring and old-fashioned.
- Only one voice and language per license.
13. Resemble AI
Supported systems: Supports Android and iOS devices, and can also be used online
Basic intro: Resemble.ai is professional text-to-speech software that generates realistic AI voices from the text. It can create your own AI voice by recording and cloning your voice data. And, it also comes with API functionality to embed TTS into any of your services or products. With its Resemble fill, it can blend human and synthetic voices for a seamless experience, and it even has a language dubber that can instantly dub your native voice into other languages. Furthermore, one of its best features is its ability to control the emotions of every word in a sentence which really provides a realistic experience.
Features:
- Voice cloning function to clone your own voice with AI.
- Flexible APIs ready for integration in applications, products, or any services.
- Resemble Fill function to blend human and synthetic voices for a seamless experience.
- It can instantly dub your native voice into other languages.
- Optimized interface and additional audio control settings.
- It can be accessed from mobile devices too with installable apps.
Price: Resemble AI has three pricing plans according to your need and a free trial:
- Entry ($30/month): For voices that are recorded right on our platform
- Build (Depends on your needs): For your own data, any voice, no script required
- Enterprise (Depends on your needs): For massive scale and custom deployment needs
Cons:
- Limited options for voices and languages
- Not available as a Windows or Mac program
14. WellSaid
Supported systems: It is a cloud-based platform, therefore can be used online on Windows, Mac, Android, and iPhone.
Basic intro: WellSaid is an AI-powered text-to-speech software that converts text to voice in real-time and it can help you create quality voiceovers for all your digital content easily. It is one of the best voiceover generators that is not only designed for individual use, but also for small teams and large companies to work on together. With WellSaid, you can also customize the output voices, create your own unique voice or even deploy its text-to-speech functionality through API. However, it is kinda limited on the number of voices and languages.
Features:
- Has a well-optimized studio to convert text to audio.
- WellSaid API available to deploy TTS functionality in apps and products.
- It allows you to build your own voices to meet your brand guidelines.
- Suitable for individuals, teams of any size, and even large enterprises.
- Around 50 different voice avatars to choose from.
- High quality and realistic voices.
- Live chat support and rights for commercial usage.
Price: WellSaid has altogether four pricing plans and a free trial:
- Maker ($49/month):
250 downloads, 5 projects, 4 voice avatars
- Creative ($99/month):
750 downloads, 50 projects, 50 voice avatars
- Producer ($199/month):
2500 downloads, Unlimited projects, live chat support
- Team (Not fixed):
Team members, Team projects, Volume licensing, Account manager
Cons:
- Limited number of voice avatars and languages to choose from.
- Lack of features to adjust and edit the audio.
15. TTSReader
Supported systems: Supports iOS and Android devices, and is also available online and as a chrome extension
Basic intro: TTSReader is one of the simplest and best free text-to-speech readers that instantly reads aloud text, pdfs & ebooks with natural-sounding voices. It is a lightweight online application, so it works out of the box without the need to download and log in. Despite being free software, it has some really great features in it. There are various options of natural sounding voices in different languages and different accents, and it also reads aloud documents, and ebooks for you by uploading them. However, it does not allow you to directly download the audio, but you still have the option to record audio to save it in webm format.
Features:
- Simple and easy-to-use interface
- Completely free for personal or general use.
- It allows you to manually add pauses and alter the speed of the voice.
- Has many options for voices including male and female, accents, and languages.
- It reads aloud ebooks, pdfs, or any text files.
- Available for mobile devices for instant access.
- Automatically remembers the preferences of the previous session and also has options for screen recording.
Price: TTSReader is completely free without any pricing plans at all. However, they do have a premium chrome extension and a separate commercial version available for purchase.
Cons:
- Advanced features for audio are not available.
- May not be the best option for commercial purposes
16. Descript
Supported systems: It is a cloud-based platform, therefore can be used online on Windows, Mac, Android, and iPhone.
Basic intro: Descript is an all-in-one video editing, screen recording, transcription, and podcasting tool you can use online. Its podcasting tool can be a great example of Text-to-Speech software that creates quality podcasts from just text. Descript is that one tool that takes podcasting or TTS to whole another level. It uses AI technology that clones your voice and then allows you to convert any text to speech in your own AI-tailored voice. You can then directly edit the audio in real-time by editing texts. But what really separates it from other software are its unique features for adjusting texts, editing audio, adding effects, etc.
Features:
- Not just a TTS software, but also a video editing, recording, and transcription tool.
- Timeline editor for advanced level editing along with cloud media library
- Different audio effects like crossfading, automatic leveling, loudness normalization, etc.
- It can clone your voice with AI to convert text to speech.
- Free podcasting trial available which includes all the features.
- Has advanced features useful for professional podcasters.
- It supports integrations with API for applications or any services.
Price: Descript has a total of three pricing plans and a free trial version:
- Creator: $12/month
- Pro: $24/month
- Enterprise: (Not fixed)
Cons:
- Not originally a TTS software, but can be used as a one.
- Separate plans for podcasting are not available.
17. Wideo
Supported systems: It is a cloud-based platform, therefore can be used online on Windows, Mac, Android, and iPhone.
Basic intro: Wideo is originally an online video maker that helps you create promo videos, explainer videos, demo videos, presentations, etc. while its Text to Speech software is another added functionality. But still, Wideo is one of the best free TTS software that lets you easily convert text to audio in a fast and straightforward manner. It also allows you to directly add these voices in Wideo’s video maker. Wideo free Text to Speech software integrates with Google Text-to-Speech API, so the quality of voices is as good as other paid software. One of the best things about Wideo TTS software is that it is simple and easy to use.
Features:
- Free and easy-to-use Text to Speech converter.
- Professional video maker along with TTS functionality.
- A large list of voices and languages to choose from.
- Speed of the generated audio adjustable.
- It allows you to download the audio as an mp3 file for free.
Price: Wideo Text-to-Speech Software is basically free with no specific pricing plans. However, its limit in the number of characters can be removed by purchasing any two of their video maker plans:
- PRO: $39/month
- PRO+: $79/month
Cons:
- Advanced text-to-speech features not available
- Voices sound a bit robotic or unreal
- No separate pricing plans available, so will have to purchase the video maker plans to remove limitations
18. Balabolka
Supported systems: Supports all versions of Windows
Basic intro: Balabolka is a Windows text-to-speech software that has been in this field for a long time. It is old and feels outdated, but still is one of the most capable and useful free text to speech converters. Balabolka packs almost all the necessary features required as a TTS program in its lightweight package of just a few megabytes. This program uses various versions of Microsoft Speech API and allows to alter a voice’s parameters, including rate and pitch. Balabolka is also available as a portable version, and as a command-line utility which is a great thing.
Features:
- Lightweight, simple, and completely free to use.
- Can read text from clipboard, and documents, and save the on-screen text as an audio file.
- It uses Microsoft’s Speech API and also includes a spelling checker.
- It uses the pre-installed computer voices of your system.
- Also supports many different text file formats.
- Has options to alter a voice’s parameters, speed, pitch, etc.
- Available for download as a portable and command-line program too.
Price: Balabolka is absolutely free to use without any pricing plans and hidden charges.
Cons:
- Not suitable for large-scale and commercial purposes.
- Only available for Windows operating systems.
- Limited options for voices and languages.
19. iSpeech
Supported systems: Supports iOS, Android, and Online (also available as a chrome extension)
Basic intro: iSpeech is a straightforward and easy-to-use online text-to-speech converter that is also available for mobile devices. Its TTS functionality is powered by Speechelo but makes the whole process a lot simpler and easier. It supports various languages for text-to-speech conversion and also provides the options to change the speed of audio and select gender. And, it also supports Embedded and Hosted TTS services along with API integrations to use TTS in any program or service. Therefore, it acts as a simple yet powerful and professional text-to-speech software to create lifelike voiceovers.
Features:
- It supports over 30 different languages.
- Available online as well as for mobile devices (iOS and Android).
- Has options to select gender and choose audio speed.
- Simple and easy-to-use interface.
- Cloud and hosted services along with API integrations available
- Completely free to convert text to speech online and preview
Price: iSpeech is absolutely free to use online, but it has various pricing plans available for additional features like downloading audio, API integration, etc. They have different options like Pay Per Use, Pay Per Install, Creative Pricing, One-time fees, etc. so it actually depends on your needs.
Cons:
- Very limited in voice styles, accents, and tones.
- Not suitable for beginners and general users.
20. TextAloud
Supported systems: Supports all versions of Windows
Basic intro: TextAloud is a Windows text-to-speech software by NextUp technologies that help you easily generate audio for the given text. It is designed to save your time allowing you to be more productive while converting text to speech. It also allows one to convert texts from web pages, documents, and PDFs into natural-sounding speech. And, it includes assistive technology for people with Dyslexia to improve reading and comprehension. TextAloud by NextUp technologies also offers the natural-sounding Text-to-Speech voices from companies like Acapela, Ivona, Cerence, etc. And with many other features, it can be considered one of the best TTS software for your Windows device.
Features:
- Lightweight software with straightforward interface.
- It allows the conversion of texts on web pages, documents, and PDFs into speech.
- Assistive technology for people with Dyslexia to improve reading and comprehension.
- It uses the pre-installed voices on the system and also offers natural-sounding Text to Speech voices from companies like Acapela, Ivona, Cerence, etc.
- It uses Microsoft’s Speech API and also includes a spelling checker.
- Includes a lot of features and options related to TTS.
Price: TextAloud 4 offers a one-time payment for a Single User License at $34.95 and also has a free trial version to test this software. However, it also offers some additional features for extra fees.
Cons:
- Only available for Windows devices
- Not the best option for commercial purposes
- User interface can seem a little outdated.
Conclusion
Here, we presented you with a list of Top 20 Best Text-to-Speech Software with all their features and other information you need to know. While all of them are best in their own aspects, you should choose the one that suits your needs. For example, you can go for Balabolka or similar free softwares for basic personal use, or if you want something advanced like AI voice cloning, then you can use Murf, Descript, etc. So it all depends on what you intend to do with a TTS software.
However, we have made it easier for you to choose the best one among these many great softwares by breaking them down in terms of their main features, pricing, compatibility, cons, etc. So decide on the software that is best for you and have a happy time creating amazing voiceovers.
How to Create a Clideo Slideshow
How to Create a Clideo Slideshow
An easy yet powerful editor
Numerous effects to choose from
Detailed tutorials provided by the official channel
A clideo slideshow is an interesting trend of precise content delivery. Stay here to understand the working essentials of creating Clideo presentations with utmost ease!
In this article
01 [How Do You Make a Slideshow on Clideo?](#Part 1)
02 [Best 5 Tip to Make a Slideshow with Music](#Part 2)
03 [How to Make a Photo Slideshow on Mac?](#Part 3)
Part 1 How Do You Make a Slideshow on Clideo?
Deciding to create slideshow presentations for a graphic design oriented personal or professional concern lands you across a plethora of choices in the IT market in the shape of high end application software program and tools. No doubt, these are leaders in their task; however, the online slideshow makers available across the web are no less.
Paying attention to the same, let us focus our discussion on how does the Clideo slideshow maker tool work to adhere the aforesaid concern. Talking a bit about the credibility of the online program, the tool grants you the flexibility of creating amazing slideshow movies and presentations from images, video clips and recordings, while allowing you to complement the same with the most upbeat and suitable background music.
Additional appeals of the online include the latter’s free availability and extensive device compatibility to work affordably well with all your Windows and MacOS supported desktops, laptops and PCs, along with Android and iOS compatible smartphones and tablets. All you need is an internet connection to launch the tool in your favorite web browser and that’s how you can step into the creation process right away.
Let us now look through the process of creating slideshows in the Clideo tool using a set of still images in the following section:
Step 1: Launch the Tool
Start with navigating to the official Clideo website in any of your preferred web browsers and launch the online slideshow maker tool in your device.

Step 2: Upload Image Files
The tool’s launch screen displays the ‘Choose Files’ tab in blue, which you can click on to upload the desired image files to the Clideo timeline while selecting them from your device gallery. To select and upload images from your Dropbox or Google Drive accounts, click on the ‘Upside Arrow’ in the ‘Choose Files’ tab.

The tool supports a decent variety of image formats to work with, like, JPG, JPEG, PNG, GIF, TIFF, etc., thus letting you escape the notch of sticking to a specific file format. You can also choose to either upload the image files all at once, or add them at a later stage, as per your requirement.
Step 3: Let’s Get Creating!
Once the selected images get uploaded on the editor timeline of the tool, you can preview them in the editor workspace. You can change the sequence of appearance of the images by dragging and dropping their thumbnails at respective places within the editor timeline or delete them by selecting the image and clicking the ‘X’ symbol.
You can additionally, choose to add extra clips by tapping the ‘Add More Videos’ option in the timeline. As an alternative, navigate to the panel at the right and hit the ‘Add More Files’ button at the top.

Step 4: Crop the Media Files
Below the ‘Add More Files’ option in the right panel, you can see the ‘Crop Options’ tab. You can work with the crop tool to adjust the size of the added videos and images so that they fit in the borders of the media frames. You are further allowed to select a suitable aspect ratio and zoom the media files in and out to obtain the affordable screen size. This would come handy when you proceed to share your slideshow across various media platforms, like, Instagram, Facebook, YouTube, etc., each of which has a different screen resolution and size.

Step 5: Time Your Slides
You can decide play duration for your media files by navigating to the same right panel and hitting the ‘Image Duration’ tab and setting the required parameters in the dropdown list that appears next. Here, you can adjust the time settings of the images in your slideshow presentations, however, the video play durations are preset and you are not allowed to change them. If you wish to have a smooth play of the presentation slides, do not forget to tick the ‘Crossfade’ checkbox.

Step 6: Add a Suitable Background Music
The last one in the right panel is the ‘Add Audio’ option which you can use to supplement your presentation with the coolest and the most suitable background music. All you need to do is, hit the aforesaid tab and browse through your device’s media gallery to select an audio file of your choice. To add a music file that’s belongs to your online storage, click on the ‘Upside Arrow’ in the tab and proceed to make a selection or add a link of the desired audio file.

Once you have added the track, you are permitted to trim, adjust volume settings and loop the track if required under the ‘Audio Options’ tab.

Step 7: Duration, Size and Format Adjustments
Navigate to the left side ‘Options Panel’ at the bottom of the editor workspace, where you can set the different parameters of your slideshow size and run time. You can also choose to generate the output presentation in a specific file format if required, using the ‘Format Picker’ tool. When you are satisfied with everything, reach to and hit the ‘Export’ button at the extreme right.

Step 8: Save Your Creation
Completion of Step 7 will take you to the ‘Slideshow Save’ interface of the video editor tool. Here, you can preview your slideshow and save it to your device if everything seems fine. To save your output file, click on the ‘Download’ tab. If however, you need to make any further changes to the presentation, hit the ‘Edit’ tab to get directed back to the editor workspace.

Part 2 Best 5 Tip to Make a Slideshow with Music
While the visual elements count to be the major attractions of a slideshow presentation, subtle background music can work to bind the audience with the rhythm and flow of the presentation. Having learnt about the fundamentals of creating over the top slideshows with Clideo, let us move ahead with working on some of the best tips to complement your already awesome graphic slideshow artwork with the most appealing audio in the following section:
01Select a Royalty Free Music Plan
Adding suitable background music can uplift the appeal of your slideshow presentation to greater extents. While most of the slideshow creator programs available today are equipped with extensive varieties of inbuilt audio for visibly any presentation setting, you can also opt to choose your own music plan in case you don’t get anything specific.
However, you do need to take care of certain factors when deciding on your music plan, most importantly, the pricing concerns. Go for selecting a royalty free, unlimited audio license via an affordable paid subscription from recognized and leading music hubs and online audio websites.
02Browse the Recommended Audio Choices
When looking through the diversity of music options available on any audio website, do not forget to pay attention to the user and website recommended playlists and music categories. These tend to have a collection of the most preferred audio choices and there are high chances of you getting your exact music piece from within these playlists.
You can further, refine your search within these categories by setting filters of genre and style, in case you have a clear idea of what you exactly need, thus rescuing you from the hustle of browsing through a never ending list of audio files.

03Synchronize the Slideshow Music and the Contents
The credibility of your background audio lies in adding additional spark and integrity to the stills and videos of the presentation. When selecting the music elements for your slideshow, make sure that your choices are well in accordance with the content and mood of your creation. The most important aspect here is that the music you choose to add should complement the story being depicted, while captivating the viewer’s attention.
Avoid choosing a random audio just because you have heard a buzz of the same on popular platforms or a peer recommendation, lest the contents and background score of your presentation may take opposite paths and disrupt the information flow, while resulting in a distracted audience. To escape the hustle, you may seek help from the diversity of stock audio websites for a keyword and category oriented music search.
If you are interested in adding depth to your background audio, consider using the stem files of a selected song to obtain the latter’s instrumental note recordings. This will help to add a unique layer to the song, while uplifting its mood to a different level.

04Curate and Test
When you are done with creating the perfect soundtrack for your presentation with the choicest of music, proceed to narrow down your list to a finer selection via curating the elements of the soundtrack. All you need to do is, add each track to the presentation elements, while taking care that every inclusion matches with the content it is supposed to complement.
Take care to restrict your choices in line with the length of the slideshow; else you may end up stuffing the footage with too many music pieces, leading to a miscoordinated arrangement. Check if you need just a single song or a complete soundtrack.

● Sound Proof the Final Selection
When you are happy with your work, move ahead with running a mock slideshow to have an assurance of everything being at its respective place. Take note of the music flow to be in cohesion with the other elements of the presentation, check the audio quality, resolution, etc., properties and make changes where necessary. When all seems well, you are ready to share your Clideo slideshow with friends and family on social media handles and communities.
Part 3 How to Make a Photo Slideshow on Mac?
Creating a slideshow is among the most recent trends of infotainment and content sharing. Talking of the creation tools, while most of them turn to be platform specific, others tend to have limitless device compatibility. The Clideo Slideshow maker online tool is one such utility that allows you to design slideshow presentations on any device of your exclusive preference.
Having said that, let us try hands at understanding the slideshow creation process of the aforesaid tool on a MacOs supported device in the following section:
Step 1: Launch the Clideo Online Tool
In any of your preferred Mac supported device, navigate to the home site of the Clideo slideshow maker tool using your desired web browser and move ahead with launching the same in your system.

Step 2: Upload Your Media
In the aforesaid slideshow maker’s opening interface, click on the ‘Choose Files’ tab to select and add the required media files from your Mac device’s local gallery. You can also opt for a ‘Drag and Drop’ of the desired files from your system to the tool’s editor workspace. However, if you wish to make an upload from your online storage accounts like that of Google Drive or Dropbox, hover to the ‘Upside Arrow within the ‘Choose Files’ tab.

Step 3: Adding Extra Files
If you want to add some more media files to the slideshow, navigate to the ‘Options Panel’ to the right of the editing workspace and click on ‘Add More Files’ at the top. Repeat Step 1 here to upload the image and video files in a similar way. Once finished, you can proceed to change the file sequence, delete any unwanted selection or click on ‘Add More Videos’ in the timeline to directly add more video files to your presentation.

Step 4: Crop Your Selections
The left side ‘Options Panel’ further consists of ‘Crop Options’ from where you can adjust the size of your images and videos to a particular aspect ratio, or fit them to a custom screen size using the ‘Crop and Zoom’ option. To add borders to the sides of your slideshow images, click on the ‘Fit With Border’ option.

Step 5: Play Duration Adjustments
Below the ‘Crop Options’, lies the ‘Image Duration’ tab, which you can click on to set the time frames of at will be applicable to all the media files. Also, click within the ‘Crossfade’ checkbox to ensure a seamless transition between successive slides.

Step 6: Add a Background Audio
Once again, navigate to the left side ‘Options Panel’ and tap the ‘Add Audio’ tab at the bottom to upload the desired audio files from your system to the editor timeline. You can also add music files from your online storage accounts, such as, Dropbox, Google Drive, etc.

To extract a piece of the audio for slideshow inclusion, click on the ‘Trim Audio’ tab under ‘Audio Options’. You can now select the desired audio fragment either by adjusting the yellow markers at the ends of the music clip, or specify the time stamps of the required fragment in the respective fields. The volume adjustments for both audio as well as video tracks can be made using the ‘Volume Bars’ icon.

Step 7: Output Format Selection and Export
Navigate to the format options beneath the editor timeline to select a desired output format for your slideshow. You can choose from MOV, API, MKV, MP4, WMV, and a number of other file formats. When you are happy with your work, navigate to and tap the ‘Export’ button at the extreme right corner of the editor workspace.

Step 8: Preview and Download Your Presentation
When you are done with everything, move ahead to watch a preview of your work to ascertain that all the aspects of the slideshow are just perfect. If you need to add further changes, hit the ‘Edit’ tab to head back to the editing workspace. In an otherwsise case, proceed to tap the ‘Download’ button for saving the slideshow either to your device gallery or an online storage account.

Designing Stunning Slideshow Presentataions in Filmora
When browsing through reliable software alternatiaves ez start your slideshow creation streak, picking any member of the Wondershare Filmora Video Editor franchise would indeed be a smart choice, owing tso the fact that, the aforesaid program promises to adhere to the most specificuser needs and the large scale disverity in creator preferences.
For Win 7 or later (64-bit)
For macOS 10.12 or later
Diving into the feature rich library of the software, you get to access a plethora of preset and custsomizable audio-visual effects, transitions, filters, background themes and templates; and a huge storehouse of additional elements, that are all set to add the jaw dropping spark to your otherwise customary slideshows.
The later versions of the editor program are upgraged to include a divserity of high end editing effects, like the Green Screen and AI based transitions that wosrk towards delivering a high quality professional slideshow output to enure an auadience appraisal that is simply wow!
● Ending Thoughts →
● The Clideo slideshow maker tool is anexcellent choice to design over the top slideshow presentations on an online platform.
●> Using Clideo, you can choose to create slideshows on any of your preferred devices, like, Mac, Windows, etc.
● If you are interested in looking for additional alternatives of slideshow creator software, the Wondershare Filmora franchise is something to count upon.
A clideo slideshow is an interesting trend of precise content delivery. Stay here to understand the working essentials of creating Clideo presentations with utmost ease!
In this article
01 [How Do You Make a Slideshow on Clideo?](#Part 1)
02 [Best 5 Tip to Make a Slideshow with Music](#Part 2)
03 [How to Make a Photo Slideshow on Mac?](#Part 3)
Part 1 How Do You Make a Slideshow on Clideo?
Deciding to create slideshow presentations for a graphic design oriented personal or professional concern lands you across a plethora of choices in the IT market in the shape of high end application software program and tools. No doubt, these are leaders in their task; however, the online slideshow makers available across the web are no less.
Paying attention to the same, let us focus our discussion on how does the Clideo slideshow maker tool work to adhere the aforesaid concern. Talking a bit about the credibility of the online program, the tool grants you the flexibility of creating amazing slideshow movies and presentations from images, video clips and recordings, while allowing you to complement the same with the most upbeat and suitable background music.
Additional appeals of the online include the latter’s free availability and extensive device compatibility to work affordably well with all your Windows and MacOS supported desktops, laptops and PCs, along with Android and iOS compatible smartphones and tablets. All you need is an internet connection to launch the tool in your favorite web browser and that’s how you can step into the creation process right away.
Let us now look through the process of creating slideshows in the Clideo tool using a set of still images in the following section:
Step 1: Launch the Tool
Start with navigating to the official Clideo website in any of your preferred web browsers and launch the online slideshow maker tool in your device.
Step 2: Upload Image Files
The tool’s launch screen displays the ‘Choose Files’ tab in blue, which you can click on to upload the desired image files to the Clideo timeline while selecting them from your device gallery. To select and upload images from your Dropbox or Google Drive accounts, click on the ‘Upside Arrow’ in the ‘Choose Files’ tab.
The tool supports a decent variety of image formats to work with, like, JPG, JPEG, PNG, GIF, TIFF, etc., thus letting you escape the notch of sticking to a specific file format. You can also choose to either upload the image files all at once, or add them at a later stage, as per your requirement.
Step 3: Let’s Get Creating!
Once the selected images get uploaded on the editor timeline of the tool, you can preview them in the editor workspace. You can change the sequence of appearance of the images by dragging and dropping their thumbnails at respective places within the editor timeline or delete them by selecting the image and clicking the ‘X’ symbol.
You can additionally, choose to add extra clips by tapping the ‘Add More Videos’ option in the timeline. As an alternative, navigate to the panel at the right and hit the ‘Add More Files’ button at the top.
Step 4: Crop the Media Files
Below the ‘Add More Files’ option in the right panel, you can see the ‘Crop Options’ tab. You can work with the crop tool to adjust the size of the added videos and images so that they fit in the borders of the media frames. You are further allowed to select a suitable aspect ratio and zoom the media files in and out to obtain the affordable screen size. This would come handy when you proceed to share your slideshow across various media platforms, like, Instagram, Facebook, YouTube, etc., each of which has a different screen resolution and size.
Step 5: Time Your Slides
You can decide play duration for your media files by navigating to the same right panel and hitting the ‘Image Duration’ tab and setting the required parameters in the dropdown list that appears next. Here, you can adjust the time settings of the images in your slideshow presentations, however, the video play durations are preset and you are not allowed to change them. If you wish to have a smooth play of the presentation slides, do not forget to tick the ‘Crossfade’ checkbox.
Step 6: Add a Suitable Background Music
The last one in the right panel is the ‘Add Audio’ option which you can use to supplement your presentation with the coolest and the most suitable background music. All you need to do is, hit the aforesaid tab and browse through your device’s media gallery to select an audio file of your choice. To add a music file that’s belongs to your online storage, click on the ‘Upside Arrow’ in the tab and proceed to make a selection or add a link of the desired audio file.
Once you have added the track, you are permitted to trim, adjust volume settings and loop the track if required under the ‘Audio Options’ tab.
Step 7: Duration, Size and Format Adjustments
Navigate to the left side ‘Options Panel’ at the bottom of the editor workspace, where you can set the different parameters of your slideshow size and run time. You can also choose to generate the output presentation in a specific file format if required, using the ‘Format Picker’ tool. When you are satisfied with everything, reach to and hit the ‘Export’ button at the extreme right.
Step 8: Save Your Creation
Completion of Step 7 will take you to the ‘Slideshow Save’ interface of the video editor tool. Here, you can preview your slideshow and save it to your device if everything seems fine. To save your output file, click on the ‘Download’ tab. If however, you need to make any further changes to the presentation, hit the ‘Edit’ tab to get directed back to the editor workspace.
Part 2 Best 5 Tip to Make a Slideshow with Music
While the visual elements count to be the major attractions of a slideshow presentation, subtle background music can work to bind the audience with the rhythm and flow of the presentation. Having learnt about the fundamentals of creating over the top slideshows with Clideo, let us move ahead with working on some of the best tips to complement your already awesome graphic slideshow artwork with the most appealing audio in the following section:
01Select a Royalty Free Music Plan
Adding suitable background music can uplift the appeal of your slideshow presentation to greater extents. While most of the slideshow creator programs available today are equipped with extensive varieties of inbuilt audio for visibly any presentation setting, you can also opt to choose your own music plan in case you don’t get anything specific.
However, you do need to take care of certain factors when deciding on your music plan, most importantly, the pricing concerns. Go for selecting a royalty free, unlimited audio license via an affordable paid subscription from recognized and leading music hubs and online audio websites.
02Browse the Recommended Audio Choices
When looking through the diversity of music options available on any audio website, do not forget to pay attention to the user and website recommended playlists and music categories. These tend to have a collection of the most preferred audio choices and there are high chances of you getting your exact music piece from within these playlists.
You can further, refine your search within these categories by setting filters of genre and style, in case you have a clear idea of what you exactly need, thus rescuing you from the hustle of browsing through a never ending list of audio files.
03Synchronize the Slideshow Music and the Contents
The credibility of your background audio lies in adding additional spark and integrity to the stills and videos of the presentation. When selecting the music elements for your slideshow, make sure that your choices are well in accordance with the content and mood of your creation. The most important aspect here is that the music you choose to add should complement the story being depicted, while captivating the viewer’s attention.
Avoid choosing a random audio just because you have heard a buzz of the same on popular platforms or a peer recommendation, lest the contents and background score of your presentation may take opposite paths and disrupt the information flow, while resulting in a distracted audience. To escape the hustle, you may seek help from the diversity of stock audio websites for a keyword and category oriented music search.
If you are interested in adding depth to your background audio, consider using the stem files of a selected song to obtain the latter’s instrumental note recordings. This will help to add a unique layer to the song, while uplifting its mood to a different level.
04Curate and Test
When you are done with creating the perfect soundtrack for your presentation with the choicest of music, proceed to narrow down your list to a finer selection via curating the elements of the soundtrack. All you need to do is, add each track to the presentation elements, while taking care that every inclusion matches with the content it is supposed to complement.
Take care to restrict your choices in line with the length of the slideshow; else you may end up stuffing the footage with too many music pieces, leading to a miscoordinated arrangement. Check if you need just a single song or a complete soundtrack.
● Sound Proof the Final Selection
When you are happy with your work, move ahead with running a mock slideshow to have an assurance of everything being at its respective place. Take note of the music flow to be in cohesion with the other elements of the presentation, check the audio quality, resolution, etc., properties and make changes where necessary. When all seems well, you are ready to share your Clideo slideshow with friends and family on social media handles and communities.
Part 3 How to Make a Photo Slideshow on Mac?
Creating a slideshow is among the most recent trends of infotainment and content sharing. Talking of the creation tools, while most of them turn to be platform specific, others tend to have limitless device compatibility. The Clideo Slideshow maker online tool is one such utility that allows you to design slideshow presentations on any device of your exclusive preference.
Having said that, let us try hands at understanding the slideshow creation process of the aforesaid tool on a MacOs supported device in the following section:
Step 1: Launch the Clideo Online Tool
In any of your preferred Mac supported device, navigate to the home site of the Clideo slideshow maker tool using your desired web browser and move ahead with launching the same in your system.
Step 2: Upload Your Media
In the aforesaid slideshow maker’s opening interface, click on the ‘Choose Files’ tab to select and add the required media files from your Mac device’s local gallery. You can also opt for a ‘Drag and Drop’ of the desired files from your system to the tool’s editor workspace. However, if you wish to make an upload from your online storage accounts like that of Google Drive or Dropbox, hover to the ‘Upside Arrow within the ‘Choose Files’ tab.
Step 3: Adding Extra Files
If you want to add some more media files to the slideshow, navigate to the ‘Options Panel’ to the right of the editing workspace and click on ‘Add More Files’ at the top. Repeat Step 1 here to upload the image and video files in a similar way. Once finished, you can proceed to change the file sequence, delete any unwanted selection or click on ‘Add More Videos’ in the timeline to directly add more video files to your presentation.
Step 4: Crop Your Selections
The left side ‘Options Panel’ further consists of ‘Crop Options’ from where you can adjust the size of your images and videos to a particular aspect ratio, or fit them to a custom screen size using the ‘Crop and Zoom’ option. To add borders to the sides of your slideshow images, click on the ‘Fit With Border’ option.
Step 5: Play Duration Adjustments
Below the ‘Crop Options’, lies the ‘Image Duration’ tab, which you can click on to set the time frames of at will be applicable to all the media files. Also, click within the ‘Crossfade’ checkbox to ensure a seamless transition between successive slides.
Step 6: Add a Background Audio
Once again, navigate to the left side ‘Options Panel’ and tap the ‘Add Audio’ tab at the bottom to upload the desired audio files from your system to the editor timeline. You can also add music files from your online storage accounts, such as, Dropbox, Google Drive, etc.
To extract a piece of the audio for slideshow inclusion, click on the ‘Trim Audio’ tab under ‘Audio Options’. You can now select the desired audio fragment either by adjusting the yellow markers at the ends of the music clip, or specify the time stamps of the required fragment in the respective fields. The volume adjustments for both audio as well as video tracks can be made using the ‘Volume Bars’ icon.
Step 7: Output Format Selection and Export
Navigate to the format options beneath the editor timeline to select a desired output format for your slideshow. You can choose from MOV, API, MKV, MP4, WMV, and a number of other file formats. When you are happy with your work, navigate to and tap the ‘Export’ button at the extreme right corner of the editor workspace.
Step 8: Preview and Download Your Presentation
When you are done with everything, move ahead to watch a preview of your work to ascertain that all the aspects of the slideshow are just perfect. If you need to add further changes, hit the ‘Edit’ tab to head back to the editing workspace. In an otherwsise case, proceed to tap the ‘Download’ button for saving the slideshow either to your device gallery or an online storage account.
Designing Stunning Slideshow Presentataions in Filmora
When browsing through reliable software alternatiaves ez start your slideshow creation streak, picking any member of the Wondershare Filmora Video Editor franchise would indeed be a smart choice, owing tso the fact that, the aforesaid program promises to adhere to the most specificuser needs and the large scale disverity in creator preferences.
For Win 7 or later (64-bit)
For macOS 10.12 or later
Diving into the feature rich library of the software, you get to access a plethora of preset and custsomizable audio-visual effects, transitions, filters, background themes and templates; and a huge storehouse of additional elements, that are all set to add the jaw dropping spark to your otherwise customary slideshows.
The later versions of the editor program are upgraged to include a divserity of high end editing effects, like the Green Screen and AI based transitions that wosrk towards delivering a high quality professional slideshow output to enure an auadience appraisal that is simply wow!
● Ending Thoughts →
● The Clideo slideshow maker tool is anexcellent choice to design over the top slideshow presentations on an online platform.
●> Using Clideo, you can choose to create slideshows on any of your preferred devices, like, Mac, Windows, etc.
● If you are interested in looking for additional alternatives of slideshow creator software, the Wondershare Filmora franchise is something to count upon.
How to Make Falling Text Effect in Filmora?
Indeed, there are different elements of a video that has the potential to make it stand out to viewers. The title you add to the video, content information in the slides, and other elements are some parts that capture one’s interest.
But seeing only the text in single lines or paragraphs can get repetitive and unappealing, especially with so many videos having the same style. In this context, the fun falling text effect is a unique and exciting approach to making your titles in videos engaging. It creates a fun look when the viewer clicks into the video and is met with this styling title effect.
On Wondershare Filmora , there is a feature available for users to apply this effect to videos in a more straightforward sequence of steps than other editors. Yet, knowing how it works is still valid, even for experienced editing professionals. In this post, we shall detail all of the steps that go into creating this effect in videos, with examples.
Launch Filmora on the Device
Before getting started with the editing steps, you need to download and install this third-party editing software into your device. Filmora works on both Mac and Windows-based computers. (Download here:
Free Download For Win 7 or later(64-bit)
Free Download For macOS 10.14 or later
After switching on your device and going to your preferred browser, search for Wonderhsare Filmora’s official website. Upon accessing it, you will see the “Download” button at the top of the screen. Click on it, and the respective Filmora installer will download into your device instantly, depending on your OS type.
Then, you have to double-click on the installer file you will find in the Downloads folder. This will open the software installation problem window. Click on the Install button and then tap the Agree option for the terms & conditions that appear next on the screen. After that, the software will begin installing automatically.

Finally, press the Start Now button on the installation complete prompt window. The software will then launch automatically.
Adjust the project settings
After the software launches on your device, you should tap on the Create New Project button. Before you add the video file you will edit from your device through; you should take time to change some aspects of the project settings.
For this, click on the File tab at the top-most toolbar in the editor window. You should click on the Project Settings option from the drop-down menu, which will open the dialog box. Under the resolution option, you will see the Frame Rate element. Click on the drop-down menu and adjust the video’s frame rate to 25 FPS. After you are done, tap the OK button.

Add the Title
Following this, you must click on the Titles tab at the top toolbar on the editor. Different title templates, like Custom, Openers, End Credits, etc., will appear. Choose the default title of your liking and download it.
Next, hold the title that appears in the library window and then drag it to the first layer of the editing timeline. Clip the title short by moving the play head to the 3-second and 15 frames mark and shape the title to that length. Then, delete the rest of the part.

Edit the Title
After this, you have to double-click on the top of the default title in your Track 1 timeline. A window will appear for editing the title. Click on the Text tab in this window and tap on the Font options. You should change the font of your title to Futura Bold or any other option that you would prefer.

Animate the characters
When this part is done, in the text field, add the first letter of the text you will add to your animated introduction. After inserting the first letter only, click on the Animation tab next. Following that, you have to move the playhead on your timeline to the very front. You will see the Position parameter in the Animation settings and change the number in the Y axis until it goes out of the top frame of the video.

Next, you must move the play head to the 1-second position in the timeline. Here, you must change the number Y axis to a lower position and adjust the Rotate element as per your preference. After that, move the playhead again to 15 frames from the 1-second mark. It would be best if you changed the Y-axis position digit to 0 and adjusted the Rotation value slightly.
Following that, move the playhead again by 15 frames ahead. Rotate the letter again and change the Y-axis value until the letter rests at the bottom of the screen. Again, you have to move the play head on the timeline to 10 frames ahead and adjust the Y-axis and Rotation values to a higher point. Then, continue the step like this at ten frames forward, this time making the character move to the ground again. Press the OK button to complete.

Repeat for the next letters
After you are done with this editing process for the first letter, hold the default title in the library and drag and drop it into Track 2 on the timeline. Adjust the starting point for this layer to frame five from the beginning, and move the file to that starting point. In the end, cut the title length at the same position as layer one was, at 3.15 seconds.
Follow the process explained in the previous section for the first letter, i.e., moving the playhead at specific frames and changing the Y-axis and Rotation value multiple times.
After editing the second letter in the title, repeat the process of holding and dragging the default title to Track 3 in the timeline and adjusting starting position at the 10th frame. Again, follow the process of animating the letter like for Letter 1 and Letter 2. Continue doing this process for multiple more letters in your title text.

Tap on the Play button under the Preview screen to see how the letters have the falling text effect.
Add Screenshot
Next, you have to click on the hide button for Tracks 2 and up. Tap on the Snapshot icon in the editing timeline of the first letter. Then, when it appears in the library window, click on it and move it beside the Track 1 Title file that you were editing. Move the play head to the 1-second position of this file in the timeline.
Hide Track 1 again and click the Unhide button on Track 2. Repeat the snapshot function and add it to Layer 2. Adjust the end as per Track 1. After this, follow these steps for the subsequent letters as well.

Adjust Keyframing
Follow the animation process for all of the title clips and screenshots you did before. Move the play head to the point where the Tracks end and the Screenshots on the timeline start. Choose the first letter and click on the Keyframe icon in the editing window under Animation. Then, make adjustments to the values of Position, Rotation, etc.
Continue this keyframing step for all of the letters in sequence. After you are done here, click on the Render Preview icon on the right-hand side of the toolbar above the editing timeline. See how the falling text effects line up.

After that, you can export the final file to your device or do further editing work through the Export button.
Final Words
Indeed, adding the falling text effect should allow you to create a stunning, dynamic, and engaging video project. While the feature is available in many other editing software, you can expect a better user experience on Filmora, especially as a beginner-level user.
The UI on this software is simple to navigate, with all features easily accessible. Besides the falling text customization benefits, you will also use other effects, filters, and title presets in videos with some simple taps. So, install it soon and give it a try.
Free Download For macOS 10.14 or later
After switching on your device and going to your preferred browser, search for Wonderhsare Filmora’s official website. Upon accessing it, you will see the “Download” button at the top of the screen. Click on it, and the respective Filmora installer will download into your device instantly, depending on your OS type.
Then, you have to double-click on the installer file you will find in the Downloads folder. This will open the software installation problem window. Click on the Install button and then tap the Agree option for the terms & conditions that appear next on the screen. After that, the software will begin installing automatically.
Finally, press the Start Now button on the installation complete prompt window. The software will then launch automatically.
Adjust the project settings
After the software launches on your device, you should tap on the Create New Project button. Before you add the video file you will edit from your device through; you should take time to change some aspects of the project settings.
For this, click on the File tab at the top-most toolbar in the editor window. You should click on the Project Settings option from the drop-down menu, which will open the dialog box. Under the resolution option, you will see the Frame Rate element. Click on the drop-down menu and adjust the video’s frame rate to 25 FPS. After you are done, tap the OK button.
Add the Title
Following this, you must click on the Titles tab at the top toolbar on the editor. Different title templates, like Custom, Openers, End Credits, etc., will appear. Choose the default title of your liking and download it.
Next, hold the title that appears in the library window and then drag it to the first layer of the editing timeline. Clip the title short by moving the play head to the 3-second and 15 frames mark and shape the title to that length. Then, delete the rest of the part.
Edit the Title
After this, you have to double-click on the top of the default title in your Track 1 timeline. A window will appear for editing the title. Click on the Text tab in this window and tap on the Font options. You should change the font of your title to Futura Bold or any other option that you would prefer.
Animate the characters
When this part is done, in the text field, add the first letter of the text you will add to your animated introduction. After inserting the first letter only, click on the Animation tab next. Following that, you have to move the playhead on your timeline to the very front. You will see the Position parameter in the Animation settings and change the number in the Y axis until it goes out of the top frame of the video.
Next, you must move the play head to the 1-second position in the timeline. Here, you must change the number Y axis to a lower position and adjust the Rotate element as per your preference. After that, move the playhead again to 15 frames from the 1-second mark. It would be best if you changed the Y-axis position digit to 0 and adjusted the Rotation value slightly.
Following that, move the playhead again by 15 frames ahead. Rotate the letter again and change the Y-axis value until the letter rests at the bottom of the screen. Again, you have to move the play head on the timeline to 10 frames ahead and adjust the Y-axis and Rotation values to a higher point. Then, continue the step like this at ten frames forward, this time making the character move to the ground again. Press the OK button to complete.
Repeat for the next letters
After you are done with this editing process for the first letter, hold the default title in the library and drag and drop it into Track 2 on the timeline. Adjust the starting point for this layer to frame five from the beginning, and move the file to that starting point. In the end, cut the title length at the same position as layer one was, at 3.15 seconds.
Follow the process explained in the previous section for the first letter, i.e., moving the playhead at specific frames and changing the Y-axis and Rotation value multiple times.
After editing the second letter in the title, repeat the process of holding and dragging the default title to Track 3 in the timeline and adjusting starting position at the 10th frame. Again, follow the process of animating the letter like for Letter 1 and Letter 2. Continue doing this process for multiple more letters in your title text.
Tap on the Play button under the Preview screen to see how the letters have the falling text effect.
Add Screenshot
Next, you have to click on the hide button for Tracks 2 and up. Tap on the Snapshot icon in the editing timeline of the first letter. Then, when it appears in the library window, click on it and move it beside the Track 1 Title file that you were editing. Move the play head to the 1-second position of this file in the timeline.
Hide Track 1 again and click the Unhide button on Track 2. Repeat the snapshot function and add it to Layer 2. Adjust the end as per Track 1. After this, follow these steps for the subsequent letters as well.
Adjust Keyframing
Follow the animation process for all of the title clips and screenshots you did before. Move the play head to the point where the Tracks end and the Screenshots on the timeline start. Choose the first letter and click on the Keyframe icon in the editing window under Animation. Then, make adjustments to the values of Position, Rotation, etc.
Continue this keyframing step for all of the letters in sequence. After you are done here, click on the Render Preview icon on the right-hand side of the toolbar above the editing timeline. See how the falling text effects line up.
After that, you can export the final file to your device or do further editing work through the Export button.
Final Words
Indeed, adding the falling text effect should allow you to create a stunning, dynamic, and engaging video project. While the feature is available in many other editing software, you can expect a better user experience on Filmora, especially as a beginner-level user.
The UI on this software is simple to navigate, with all features easily accessible. Besides the falling text customization benefits, you will also use other effects, filters, and title presets in videos with some simple taps. So, install it soon and give it a try.
8 Tips to Apply Cinematic Color Grading to Your Videos
Create High-Quality Video - Wondershare Filmora
An easy and powerful YouTube video editor
Numerous video and audio effects to choose from
Detailed tutorials are provided by the official channel
After a successful video shoot, video editing tends to wrap up the video production process. However, a video cannot be enlivened by using simple video editing tools, i.e., cut, crop, and trim, but rather tools such as cinematic color grading. Usually, directors want their video to evoke their intended ambiance and appear more realistic – This can only be achieved through cinematic color grading.
Color grading is the alteration and enhancement of color in a video, motion picture, or still image. Color grading is an essential tool for videographers since it enables them to enhance the mood or tone. Stick to this article and learn about the eight tips to apply cinematic color grading to your video.
In this article
02 8 Tips to Apply Cinematic Color Grading to Your Video
Don’t Make These Mistakes
Even though to err is human, there are some mistakes that colorists and video editors need to avoid at all costs. It is not only because they will make them look amateurish but also undermines the message and impact of the video.
Some people assume color grading is as simple as adding filters to their Instagram photos which they are absolutely wrong. Color grading is a long and frustrating process, and it only requires “persons with a thick skin.”
Some mistakes are not only committed by amateurs alone but also professional colorists who are in a rush to complete their projects on due time. Usually, these mistakes degrade the quality output. Some of the mistakes that one needs not make include:
1. Using a Poorly Calibrated Monitor
Almost every videographer and colorist’s goal is to design footages that distinctively display their primary colors and decipher the intended message. And this can only be achieved using a properly calibrated monitor.
Before working on a project, you ought to crosscheck your monitor calibration. Most people assume that the calibration is accurate since they possess a new, out-of-the-box monitor. It is utterly wrong since retailer shops usually adjust the monitor settings to overblown saturation and contrast to attract customers.
Furthermore, if you opt to edit your videos without adjusting your monitor calibration, you will have a poor footage.
2. Poor Prepping of the Video Footage
One major mistake that videographers often make is not prepping their video correctly. A poorly prepped footage is one that has a bad color space conversion. Usually, the outcome result of poorly prepped footage is an imbalanced image.
Prepping footage is not as easy as an apple pie. Besides, most videographers tend to follow a shortcut by starting messing with the gains and individual nodes, forgetting that a shortcut is often a wrong cut.
The best way of prepping a video is to start by making separate nodes and labeling them differently.
3. Imbalancing the Shadow
Have you ever seen video footage with partially opaque shadows? And when you look keenly, you see tinted greens and reds. Usually, this is a result of an imbalanced shadow.
This mistake is not only carried out by beginner videographers but also professionals who are always in a hurry to complete a project. When you look at your scope, you see the shadows are lifted or down in other scenarios – This is also a result of shadow imbalance.
4. Overusing LUTs
A mistake that beginner editors often make is overusing LUTs. Footages with overly used LUTs often appear to be dull. A thing that videographers need to observe when using LUTs is consistency.
When using LUTs, you need to ensure that your project has similar saturation, colors, and contrast throughout your video project. Moreover, it would be best to choose your LUTs based on the film color palette and your story.
5. Having Limited break
Having enough break enables one’s eyes to recalibrate. As a colorist, your eyes are often considered the main asset. Sitting for long periods in your workstation and staring for long hours at your monitor may cause one to add more saturation and contrast, thus making the video dull. Therefore the best remedy is to take a break from your monitor.
Besides, coming from a break enables one to have another different perspective about the color grading of the project.
8 Tips to Apply Cinematic Color Grading to Your Video
When it comes to creating cinematic looks in video footage, the camera type is usually non-essential. What matters is that you capture quality videos with the right angles then leave the rest to color grading.
For a video clip to look more cinematic, a couple of elements are put together. Here, we will look at those elements and create stunning videos.
1. Use Lumetri Color to adjust brightness, contrast, and saturation
The Lumeri color is an essential color grading functionality in most premiere software, including Wondershare Filmora, Adobe After Effects, and Davinci Resolve 17. With this functionality tool, you can carry out a wide range of customizable settings such as hue, saturation, contrasts, brightness, and tone.
The lumetri panel contains a histogram, vectorscope, parade scope, and waveform monitor. In your lumetri panel, you can measure the brightness and tonal values using a histogram, the light intensity with a waveform monitor, saturation and hue using vectorscope, and color channel using parade scope.
Adjusting the brightness, contrast, hue, saturation, and tone to moderate levels will give your video clip that cinematic look.

2. Use Cosmo functionality to adjust skin tones
Due to the light effect, shots taken during the day will have inconsistent color matches, especially skin tone. In the post-production process, one needs to make uniformity in skin tone and the clip. To rectify this, you need to involve a professional color grading functionality, Cosmo.
With cosmo, you can adjust the skin color, squeeze the skin, and soften the skin. Generally, Cosmo makes people in video clips look their best.

3. Use Highlights and Shadows adjustment
A clip will look more cinematic when the shadows and highlights are brought out as separate entities. The shadows become more vivid when adjusted to either teal, purple or blue. You can go a mile and adjust the highlights to become crystal clear by making the footage become yellow, red, or orange.
When carrying out color grading, you need to know the various video demands, such as the horror clips demand more of the dark shadow.

4. Use Vectorscope to get the accurate adjustment
Naked eyes cannot effectively see all the errors in a video project, which is the essence of having a vectorscope. A vectorscope provides all the quantitative information about a video image – This lessens work for video editors.
Vectorscope provides extensive details, such as how intense a given color is – This will help you make necessary adjustments to your footage.

5. Use the black and white functionality to change the opacity
Even though you can change your footage to black and white using the hue and saturation functionality, the black and white tool gives you more control.
This functionality feature can make your footage blend with the soft light part. Besides, it is best to first lower the contrast of your image or video to black and white to be able to highlight the unclear parts.

6. Use levels to unveil the whites, blacks, and mids of an image
Levels is a functionality feature that displays the blacks, whites, and mids of footage. With this functionality, you can make the highlight parts lighter and the shadows appear darker, which is essential in making cinematic videos.
In the levels histogram, the left slider defines the darkest part, the right defines the brightest part, and the top defines distributions.
In software such as Adobe After Effects, you can set this functionality to automatic or customize it based on your preference.

7. Use Vibrance to control other levels of saturation
The saturation of video footage or a clip can be regulated using vibrance functionality. With vibrance, you can alter the saturation levels of your clip while simultaneously minimizing clippings for the colors to approach complete saturation.
When you want to use this functionality in After Effects, you drag and drop it right on top of your footage – The exact part you want to apply it.

8. Use a Vignette to fade edges
To increase the point of focus, you need to fade your edges. In color grading, you can only fade your edges with a vignette.
This functionality allows you to center images or certain video parts and make the edges unclear. Your emphasis will be more on the central region.

Bottom line
● Color grading is not a piece of cake. Besides, you should not use it as an excuse for making simple mistakes such as the ones highlighted above. You need to pay close attention when color grading your films, and you will have your video project mapping out its intended meaning.
● Moreover, you need not be a pro to carry out cinematic color grading. You need to follow the above eight tips altogether to apply color grading to your video. You will create stunning video files that leave your viewers’ eyes gorged out.
After a successful video shoot, video editing tends to wrap up the video production process. However, a video cannot be enlivened by using simple video editing tools, i.e., cut, crop, and trim, but rather tools such as cinematic color grading. Usually, directors want their video to evoke their intended ambiance and appear more realistic – This can only be achieved through cinematic color grading.
Color grading is the alteration and enhancement of color in a video, motion picture, or still image. Color grading is an essential tool for videographers since it enables them to enhance the mood or tone. Stick to this article and learn about the eight tips to apply cinematic color grading to your video.
In this article
02 8 Tips to Apply Cinematic Color Grading to Your Video
Don’t Make These Mistakes
Even though to err is human, there are some mistakes that colorists and video editors need to avoid at all costs. It is not only because they will make them look amateurish but also undermines the message and impact of the video.
Some people assume color grading is as simple as adding filters to their Instagram photos which they are absolutely wrong. Color grading is a long and frustrating process, and it only requires “persons with a thick skin.”
Some mistakes are not only committed by amateurs alone but also professional colorists who are in a rush to complete their projects on due time. Usually, these mistakes degrade the quality output. Some of the mistakes that one needs not make include:
1. Using a Poorly Calibrated Monitor
Almost every videographer and colorist’s goal is to design footages that distinctively display their primary colors and decipher the intended message. And this can only be achieved using a properly calibrated monitor.
Before working on a project, you ought to crosscheck your monitor calibration. Most people assume that the calibration is accurate since they possess a new, out-of-the-box monitor. It is utterly wrong since retailer shops usually adjust the monitor settings to overblown saturation and contrast to attract customers.
Furthermore, if you opt to edit your videos without adjusting your monitor calibration, you will have a poor footage.
2. Poor Prepping of the Video Footage
One major mistake that videographers often make is not prepping their video correctly. A poorly prepped footage is one that has a bad color space conversion. Usually, the outcome result of poorly prepped footage is an imbalanced image.
Prepping footage is not as easy as an apple pie. Besides, most videographers tend to follow a shortcut by starting messing with the gains and individual nodes, forgetting that a shortcut is often a wrong cut.
The best way of prepping a video is to start by making separate nodes and labeling them differently.
3. Imbalancing the Shadow
Have you ever seen video footage with partially opaque shadows? And when you look keenly, you see tinted greens and reds. Usually, this is a result of an imbalanced shadow.
This mistake is not only carried out by beginner videographers but also professionals who are always in a hurry to complete a project. When you look at your scope, you see the shadows are lifted or down in other scenarios – This is also a result of shadow imbalance.
4. Overusing LUTs
A mistake that beginner editors often make is overusing LUTs. Footages with overly used LUTs often appear to be dull. A thing that videographers need to observe when using LUTs is consistency.
When using LUTs, you need to ensure that your project has similar saturation, colors, and contrast throughout your video project. Moreover, it would be best to choose your LUTs based on the film color palette and your story.
5. Having Limited break
Having enough break enables one’s eyes to recalibrate. As a colorist, your eyes are often considered the main asset. Sitting for long periods in your workstation and staring for long hours at your monitor may cause one to add more saturation and contrast, thus making the video dull. Therefore the best remedy is to take a break from your monitor.
Besides, coming from a break enables one to have another different perspective about the color grading of the project.
8 Tips to Apply Cinematic Color Grading to Your Video
When it comes to creating cinematic looks in video footage, the camera type is usually non-essential. What matters is that you capture quality videos with the right angles then leave the rest to color grading.
For a video clip to look more cinematic, a couple of elements are put together. Here, we will look at those elements and create stunning videos.
1. Use Lumetri Color to adjust brightness, contrast, and saturation
The Lumeri color is an essential color grading functionality in most premiere software, including Wondershare Filmora, Adobe After Effects, and Davinci Resolve 17. With this functionality tool, you can carry out a wide range of customizable settings such as hue, saturation, contrasts, brightness, and tone.
The lumetri panel contains a histogram, vectorscope, parade scope, and waveform monitor. In your lumetri panel, you can measure the brightness and tonal values using a histogram, the light intensity with a waveform monitor, saturation and hue using vectorscope, and color channel using parade scope.
Adjusting the brightness, contrast, hue, saturation, and tone to moderate levels will give your video clip that cinematic look.
2. Use Cosmo functionality to adjust skin tones
Due to the light effect, shots taken during the day will have inconsistent color matches, especially skin tone. In the post-production process, one needs to make uniformity in skin tone and the clip. To rectify this, you need to involve a professional color grading functionality, Cosmo.
With cosmo, you can adjust the skin color, squeeze the skin, and soften the skin. Generally, Cosmo makes people in video clips look their best.
3. Use Highlights and Shadows adjustment
A clip will look more cinematic when the shadows and highlights are brought out as separate entities. The shadows become more vivid when adjusted to either teal, purple or blue. You can go a mile and adjust the highlights to become crystal clear by making the footage become yellow, red, or orange.
When carrying out color grading, you need to know the various video demands, such as the horror clips demand more of the dark shadow.
4. Use Vectorscope to get the accurate adjustment
Naked eyes cannot effectively see all the errors in a video project, which is the essence of having a vectorscope. A vectorscope provides all the quantitative information about a video image – This lessens work for video editors.
Vectorscope provides extensive details, such as how intense a given color is – This will help you make necessary adjustments to your footage.
5. Use the black and white functionality to change the opacity
Even though you can change your footage to black and white using the hue and saturation functionality, the black and white tool gives you more control.
This functionality feature can make your footage blend with the soft light part. Besides, it is best to first lower the contrast of your image or video to black and white to be able to highlight the unclear parts.
6. Use levels to unveil the whites, blacks, and mids of an image
Levels is a functionality feature that displays the blacks, whites, and mids of footage. With this functionality, you can make the highlight parts lighter and the shadows appear darker, which is essential in making cinematic videos.
In the levels histogram, the left slider defines the darkest part, the right defines the brightest part, and the top defines distributions.
In software such as Adobe After Effects, you can set this functionality to automatic or customize it based on your preference.
7. Use Vibrance to control other levels of saturation
The saturation of video footage or a clip can be regulated using vibrance functionality. With vibrance, you can alter the saturation levels of your clip while simultaneously minimizing clippings for the colors to approach complete saturation.
When you want to use this functionality in After Effects, you drag and drop it right on top of your footage – The exact part you want to apply it.
8. Use a Vignette to fade edges
To increase the point of focus, you need to fade your edges. In color grading, you can only fade your edges with a vignette.
This functionality allows you to center images or certain video parts and make the edges unclear. Your emphasis will be more on the central region.
Bottom line
● Color grading is not a piece of cake. Besides, you should not use it as an excuse for making simple mistakes such as the ones highlighted above. You need to pay close attention when color grading your films, and you will have your video project mapping out its intended meaning.
● Moreover, you need not be a pro to carry out cinematic color grading. You need to follow the above eight tips altogether to apply color grading to your video. You will create stunning video files that leave your viewers’ eyes gorged out.
Also read:
- Updated 2024 Approved Making Slow Motion Videos in Premiere Pro A Review on The Best Methods
- Everything That You Need to Know About Video Montages- Ideas, Techniques, and Software for 2024
- Updated How to Convert a GIF to a Video for Instagram
- How to Create Your Own LUTs for Your Video with Filmora
- Updated In 2024, How to Create Photoshop GIF The Easy Way
- Shotcut Review – Is It The Best Free Video Editor, In 2024
- New 6 Best MP4 Mergers to Join Videos Easily
- New Top LUTs for Sony HLG to Download
- New The Power of Music in Videos for 2024
- Updated 4 Solutions to Add White Borders on Mobile and Desktop
- 2024 Approved The Top 10 Effective SRT Editors Online
- In 2024, This Article Will Help You Make Cinematic Shots with Simple DIY Hacks Using Stuff From Your Nearest Dollar Store. You Can Edit Your Video to Get Pro Results by Wondershare Filmora
- New How Did AI Video Games Act More Human Than Human?
- Looking for the Ways by Which Subtitles Can Be Extracted From Your MKV Files without Affecting the File Quality? Look No Further as We Are Here to Help You Know the Best Tools that Can Easily Extract SRT From MKV
- New In 2024, Best 5 Apps To Add Song To Video
- New Easy Steps to Make Glitch Effect with Filmora
- Have You Ever Tried DaVinci Resolve for Creating a Motion Blur Effect? Read This Article to Discover How to Use DaVinci Resolve Motion Blur with the Help of Detailed Instructions
- How to Correct Lens Distortion With Filmora
- 2024 Approved How to Use LUTs Perfectly in Final Cut Pro
- New 2024 Approved FLV Editor for Windows 11/10/8.1/8/7 Easily Edit FLV Videos on PC
- Top 10 Fingerprint Lock Apps to Lock Your Realme GT Neo 5 Phone
- In 2024, Getting the Pokemon Go GPS Signal Not Found 11 Error in Vivo X Fold 2 | Dr.fone
- In 2024, 3 Ways for Android Pokemon Go Spoofing On Honor Magic 6 Pro | Dr.fone
- In 2024, 3 Solutions to Find Your Samsung Galaxy F34 5G Current Location of a Mobile Number | Dr.fone
- New In 2024, Tips for GIF to Animated PNG You Should Know
- How To Check if Your Motorola Moto G Stylus (2023) Is Unlocked
- How to Share/Fake Location on WhatsApp for Vivo V29e | Dr.fone
- Insert signature in .dotx file
- Strategies for Apps That Wont Download From Play Store On Lava Blaze 2 | Dr.fone
- In 2024, What Legendaries Are In Pokemon Platinum On Vivo Y56 5G? | Dr.fone
- Top 10 Telegram Spy Tools On Xiaomi Redmi Note 12 Pro+ 5G for Parents | Dr.fone
- Is it Possible to Use Miracast with Apple iPhone 15? | Dr.fone
- Title: Updated In 2024, Top 20 Best Text To Speech Software Windows, Mac, Android, iPhone & Online
- Author: Chloe
- Created at : 2024-04-24 07:08:38
- Updated at : 2024-04-25 07:08:38
- Link: https://ai-editing-video.techidaily.com/updated-in-2024-top-20-best-text-to-speech-software-windows-mac-android-iphone-and-online/
- License: This work is licensed under CC BY-NC-SA 4.0.
