
:max_bytes(150000):strip_icc():format(webp)/watch-free-movies-online-1356647-32f79b8cc3ed484ca1f9f898f503e416.png)
Updated In 2024, VSDC Free Video Editor Review
VSDC Free Video Editor Review
If you are a Window user and you are looking for a free video editor without a watermark, VSDC free video editor is definitely a great application. There are only a handful of free video editors available where the output video will not have a watermark, and there is no limitation on the video length. VSDC video editor belongs to the non-liner video editor group where you can combine video clips, photos, objects, and blend and overlap them as per your requirements.
For a beginner, VSDC free video editor is undoubtedly one of the best video editors. It supports different types of video and audio formats as well as codes. The system requirements are very basic, and hence, it is perfect for low-end computers? But can you rely on VSDC editor when you need slightly advanced video editing? Check out our VSDC editor review and find a better alternative.
Part 1. How to Download and Install VSDC?
VSDC editor download is only available for Windows users. It is tailor-made for those who have a low-end computer with older Windows version OS. The software is compatible with Windows 2000 to Windows 11. The minimum RAM requirement is 128MB and free disk space of 200 MB. Here are the steps to download and install VSDC editor.
Step 1: Open your web browser and visit ‘www.videosoftdev.com/free-video-editor/download” .
Step 2: Click on Download Video Editor button based on 32-bit or 64-bit version of your computer. If you have Windows XP, you have to download VDSC video editor version 6.4 instead of the latest version for compatibility.
Step 3: Give some time for the installer file to get downloaded. It is merely 100 MB and it should not take long. After downloading the installer, launch it and follow the on-screen instruction to complete the installation.
Step 4: After proper installation, launch VSDC video editor. You will get the options to create a new project and capture screen, start editing an existing video and export the finished project in a proper video format.
Part 2. Key Features of VSDC
There are two versions of VSDC video editor available – Free video editor and Pro video editor. The free version has limited features while Pro version has advanced features. Here are going to discuss the key features of VSDC Free Video Editor.
Low System Requirements – One of the reasons for the wide popularity of VSDC video editor is that it does not demand high system configurations like most other video editors. If you have a low-end computer with an outdated Windows operating system, you can use VSDC video editor without any issue.
Basic Editing – Among the basic editing tools, you can cut, trim, split and join video clips. There are options for rotating and resizing videos. You can also go for color correction and put overlays on videos as applicable. Besides, you can edit 36-degree videos with zoom and chart tools.
Effects – VSDC has a wide collection of video, audio and text effects. You can also add objects to your video and apply different ready-made filters. There are also transitions to apply in between video clips and slides. You can also use green screen effect to change your background. The special split-screen effect and picture-in-picture effects are quite eye-catching.
Capture Video – VSDC video editor is equally competent in capturing videos from your webcam as well as recording your screen video. In fact, there is a dedicated option available for creating slideshow videos from photos. You can even record your voiceover if you want to.
File Formats - VSDC supports all the popular file formats for importing and exporting video and audio files. There are different export profiles available so that you can save your edited video for different devices conveniently.
Apart from these, if you opt for the Pro version, you get motion tracking, video masking, video stabilization, and much more such advanced video editing tools.
Part 3. How to Edit Videos with VSDC
If you have the recorded video and you want to edit it with VSDC video editor, the steps are quite simple. You can even record your webcam and screen video with audio if you want to start from scratch. Coming to the editing part, you can split large video files, merge video clips, add transitions in between, add objects in the video as well as crop and rotate videos. There are different effects you can apply to uplift video content. Here are the steps to edit videos with VSDC editor.
Step 1: Open VSDC Video Editor and click on Blank Project option. Name the project and change parameters, and click on Finish.

Step 2: Click on Add Object option at the top and select Video. Import the video clips saved on your hard drive. Similarly, you can go to Add Objects> Audio to import audio files.

Step 3: All the imported media files will appear on the timeline. If you have multiple video clips, you can shift the position of clips on the timeline so that one video clip ends and the other begins.
Step 4: If you want to add transitions in between the video clips, go to Video Effects> Transitions> select the effect you want to apply. Check the on-screen parameters such as duration and click on Ok button.

Step 5: If you want to add objects, go to Add Object and select shapes, texts, animations, charts, and much more. You can also add Audio Effects as well as Text Effects from the top bar.
Step 6: Once you are happy with the preview of the edited video, go to Export Project and check all the parameters. Click on Export Project option.

Part 4. Best VSDC Alternative Video Editor
Since VSDC video editor is available completely free, there is no hard in downloading the application and trying it out. But soon, you will understand that the video editor is limited as far as tools and features are concerned. If you want to get more than just basic tools, you will have to upgrade to its Pro version. However, there are better premium video editors available. We recommend Wondershare Filmora as a better alternative to VSDC video editor.
Filmora is extremely popular in the professional video editing world as it has an intuitive interface and does not demand high-end computers. There are tons of transitions, effects, filters, and objects available to add to your edit. You can perform all standard and advanced video editing to take your video to the next level. Here are all the steps to edit videos on Filmora.
For Win 7 or later (64-bit)
For macOS 10.12 or later
Step 1: Download and install Filmora and it is available for Windows and Mac. Launch Filmora and click on New Project. Import all your media files into Project Media folder by drag and drop action.

Step 2: Arrange the video clips and audio clips on the timeline by drag and drop action. You should be placing the video and audio files on different tracks. This is where you can do all the basic editing such as trimming, cutting, splitting, and merging.

Step 3: To add transitions in between the video clips, go to Transitions from the top bar and drag and drop any transition in between the clips. Check out Titles, Effects, and Elements from the top bar and insert them on the timeline as you think appropriate.

Step 4: Play the video to see if everything is perfect and click on Export button to save your video to your hard drive.

Part 5. FAQs about VSDC
1. Is VSDC video editor really free?
Yes, VSDC video editor is completely free to use. However, there is a pro version available where more features are present. But the free version does not put watermark on the output video and has all the standard tools for video editing without any limitation.
2. Is VSDC better than Adobe Premiere Pro?
No, VSDC is not better than Adobe Premiere Pro. VSDC is a free video tor while Adobe Premiere Pro is a premium one. Naturally, Adobe Premiere Pro has more features and functionalities. However, VSDC is better for beginners and those who have low-end computers if you compare it with Adobe Premiere Pro.
3. Is VSDC safe?
Yes VSDC video editor is safe and stable to use. However, there was an incident in 2019 where VSDC video editor’s official website was hacked, but the software itself is safe to use on Windows computers.
For macOS 10.12 or later
Step 1: Download and install Filmora and it is available for Windows and Mac. Launch Filmora and click on New Project. Import all your media files into Project Media folder by drag and drop action.
Step 2: Arrange the video clips and audio clips on the timeline by drag and drop action. You should be placing the video and audio files on different tracks. This is where you can do all the basic editing such as trimming, cutting, splitting, and merging.
Step 3: To add transitions in between the video clips, go to Transitions from the top bar and drag and drop any transition in between the clips. Check out Titles, Effects, and Elements from the top bar and insert them on the timeline as you think appropriate.
Step 4: Play the video to see if everything is perfect and click on Export button to save your video to your hard drive.
Part 5. FAQs about VSDC
1. Is VSDC video editor really free?
Yes, VSDC video editor is completely free to use. However, there is a pro version available where more features are present. But the free version does not put watermark on the output video and has all the standard tools for video editing without any limitation.
2. Is VSDC better than Adobe Premiere Pro?
No, VSDC is not better than Adobe Premiere Pro. VSDC is a free video tor while Adobe Premiere Pro is a premium one. Naturally, Adobe Premiere Pro has more features and functionalities. However, VSDC is better for beginners and those who have low-end computers if you compare it with Adobe Premiere Pro.
3. Is VSDC safe?
Yes VSDC video editor is safe and stable to use. However, there was an incident in 2019 where VSDC video editor’s official website was hacked, but the software itself is safe to use on Windows computers.
An Ultimate Guide to Flexclip Online Trimmer
Flexclip video trimmer is a robust and easy-to-use online tool that lets you cut the unwanted section of any of your videos to get the desired result.
Pros
- Online trimming - no need for software.
- No ads during the editing process.
- Real-time preview of what is happening.
- Additional robust video editing features.
- Simple and intuitive UI.
Cons
- The free version lacks advanced features.
- Video export duration is limited to 1 minute in the free version.
- Signup is required for exporting videos.
Part 1. What is Flexclip Video Trimmer?
Do you want to trim your videos quickly without downloading and installing any complicated software? Well, Flexclip Trimmer might be your answer.
Flexclip is a free-to-use online video editing tool that makes it effortless for you to trim, crop, and edit your videos. The editor has an intuitive and user-friendly interface, making it easy to use even for beginners.
Besides video trimming, Flexclip has numerous other features video trimming, including support for a wide range of video formats, slideshow making, screen and voice recording, royalty-free music, pictures and video libraries, and other advanced tools.
Price: You can use the Flexclip trimmer for free. However, export duration is limited to 1 minute, and a watermark will be added to it.
Besides the free version, Flexclip comes with three pricing tiers:
- Basic: $5.99/month or $71.88/year.
- Plus: $ 9.99 /month or $119.88/ year.
- Business: $ 19.99 /month or $239.88/year.
Part 2. Key Features Of Flexclip Video Trimmer
As a powerful and easy-to-use online video trimmer, Flexclip has helped numerous users make great videos without too much hassle.
Therefore, if you’re looking for a video trimmer with all the bells and whistles, this editor must be at the top of your list. Here are some of the key features that make Flexclip Free Video Trimmer stand out from the rest:
Online Video Cutter: Flexclip Video Trimmer eliminates the need to download complex software to cut videos. Head to the website, upload your video, and let the trimmer do its magic.
Safe and Secure to Use: Flexclip editor provides guaranteed security from any malware or data breach.
Easy to Use: Flexclip trimmer is designed with simplicity in mind. Even if you’ve never edited/trimmed a video before, you’ll be able to figure out how to use this tool in no time. Upload your footage, and with a few clicks/adjustments, you will get it trimmed.
Completely Free: Flexclip offers the trimming tool completely free, and no annoying ads will be displayed during the editing process.
Real-Time Preview: Not only is the Flexclip video trimmer convenient to use, but it also provides a real-time preview of the project, so you can see exactly how your edits will look before you save them.
Multiple Video Formats Support: Flexclip Video Trimmer is a versatile and powerful tool that supports a vast range of video formats, including MOV, WEBM, M4V, and MP4.
Part 3. How To Use Flexclip Trimmer To Trim Videos?
Videos are an excellent way to share memories, tell stories, or just have some fun. But sometimes, you might want to trim a clip to make it shorter, edit out certain parts, or just give it a different look. Flexclip’s video trimmer is a splendid way to do this in just a few steps:
Step1 First, ensure you have a stable internet connection. Now, launch a browser of your choice on your PC and visit theFlexclip Video Trimmer website.
Step2 Now, drag and drop your video clip or click the “Browse Video” option to find and upload the video from your computer in the supported MP4, M4V, MOV, or WEBM video formats.

Step3 Next, wait for a few seconds to complete the video uploading process. You will be taken to the editing interface, and the trimming window will pop up. If not, click the Scissor icon below the video.
Step4 Use the handles on either side of the video timeline to select the part of the video you want to keep. Next, click the “Trim Video” button to apply your changes.

Step5 You can also use the trimming tool to split the video into multiple clips. Once you’re done, click “Export” to save your project.
You’ll be asked to sign in to export the video. Create a new account or use the existing one and click “Export” again.
Step6 Finally, select the video resolution but bear in mind that the free version only allows 480p resolution for exporting a clip. Click the Export option and wait for the process to complete. You can also share your video to Youtube, Dropbox, or Google Drive.

Bonus Tips: Best Flexclip Video Trimmer Alternative On Desktop
A desktop video editor has a number of advantages over an online editor, such as:
- More control over the editing process.
- Can Fine tune your edits with more precision.
- Support for a wider range of video and audio formats.
- More flexibility.
- A more comprehensive set of features than online editors.
Filmora is an excellent desktop alternative to the Flexclip video trimmer and includes more advanced features with a user-friendly interface. The software also supports a bit more video formats and higher video output resolution.
Here’s how you can use Filmora to trim your video:
Step1 Download and install the Filmora software from the official website. Click the “New Project” option and select your video to upload. Next, drag and drop the clip to the timeline.

Step2 Hover your mouse near the starting or ending edges and drag the trim icon to cut your video into the desired length. You can also use the Split option to remove the unwanted part in the middle of your clip.

Step3 Once you are done with your video trimming, click the Export option. Select the format from the left-hand side menu and click Export again.
You can also export your videos with YouTube, Vimeo, DVD, or your device.
Conclusion
In this article, we’ve explored the Flexclip video trimmer online tool, its key features, and how to use it to trim videos with simple instructions. We also discussed the best Flexclip video trimmer alternative on desktop - Filmora and provided a step-by-step guide to help you cut an unwanted section from your clip.
Hopefully, you found this comprehensive guide useful and that you now know everything you need to know about trimming videos with Flexclip.
Free Download For Win 7 or later(64-bit)
Free Download For macOS 10.14 or later
Part 1. What is Flexclip Video Trimmer?
Do you want to trim your videos quickly without downloading and installing any complicated software? Well, Flexclip Trimmer might be your answer.
Flexclip is a free-to-use online video editing tool that makes it effortless for you to trim, crop, and edit your videos. The editor has an intuitive and user-friendly interface, making it easy to use even for beginners.
Besides video trimming, Flexclip has numerous other features video trimming, including support for a wide range of video formats, slideshow making, screen and voice recording, royalty-free music, pictures and video libraries, and other advanced tools.
Price: You can use the Flexclip trimmer for free. However, export duration is limited to 1 minute, and a watermark will be added to it.
Besides the free version, Flexclip comes with three pricing tiers:
- Basic: $5.99/month or $71.88/year.
- Plus: $ 9.99 /month or $119.88/ year.
- Business: $ 19.99 /month or $239.88/year.
Part 2. Key Features Of Flexclip Video Trimmer
As a powerful and easy-to-use online video trimmer, Flexclip has helped numerous users make great videos without too much hassle.
Therefore, if you’re looking for a video trimmer with all the bells and whistles, this editor must be at the top of your list. Here are some of the key features that make Flexclip Free Video Trimmer stand out from the rest:
Online Video Cutter: Flexclip Video Trimmer eliminates the need to download complex software to cut videos. Head to the website, upload your video, and let the trimmer do its magic.
Safe and Secure to Use: Flexclip editor provides guaranteed security from any malware or data breach.
Easy to Use: Flexclip trimmer is designed with simplicity in mind. Even if you’ve never edited/trimmed a video before, you’ll be able to figure out how to use this tool in no time. Upload your footage, and with a few clicks/adjustments, you will get it trimmed.
Completely Free: Flexclip offers the trimming tool completely free, and no annoying ads will be displayed during the editing process.
Real-Time Preview: Not only is the Flexclip video trimmer convenient to use, but it also provides a real-time preview of the project, so you can see exactly how your edits will look before you save them.
Multiple Video Formats Support: Flexclip Video Trimmer is a versatile and powerful tool that supports a vast range of video formats, including MOV, WEBM, M4V, and MP4.
Part 3. How To Use Flexclip Trimmer To Trim Videos?
Videos are an excellent way to share memories, tell stories, or just have some fun. But sometimes, you might want to trim a clip to make it shorter, edit out certain parts, or just give it a different look. Flexclip’s video trimmer is a splendid way to do this in just a few steps:
Step1 First, ensure you have a stable internet connection. Now, launch a browser of your choice on your PC and visit theFlexclip Video Trimmer website.
Step2 Now, drag and drop your video clip or click the “Browse Video” option to find and upload the video from your computer in the supported MP4, M4V, MOV, or WEBM video formats.
Step3 Next, wait for a few seconds to complete the video uploading process. You will be taken to the editing interface, and the trimming window will pop up. If not, click the Scissor icon below the video.
Step4 Use the handles on either side of the video timeline to select the part of the video you want to keep. Next, click the “Trim Video” button to apply your changes.
Step5 You can also use the trimming tool to split the video into multiple clips. Once you’re done, click “Export” to save your project.
You’ll be asked to sign in to export the video. Create a new account or use the existing one and click “Export” again.
Step6 Finally, select the video resolution but bear in mind that the free version only allows 480p resolution for exporting a clip. Click the Export option and wait for the process to complete. You can also share your video to Youtube, Dropbox, or Google Drive.
Bonus Tips: Best Flexclip Video Trimmer Alternative On Desktop
A desktop video editor has a number of advantages over an online editor, such as:
- More control over the editing process.
- Can Fine tune your edits with more precision.
- Support for a wider range of video and audio formats.
- More flexibility.
- A more comprehensive set of features than online editors.
Filmora is an excellent desktop alternative to the Flexclip video trimmer and includes more advanced features with a user-friendly interface. The software also supports a bit more video formats and higher video output resolution.
Here’s how you can use Filmora to trim your video:
Step1 Download and install the Filmora software from the official website. Click the “New Project” option and select your video to upload. Next, drag and drop the clip to the timeline.
Step2 Hover your mouse near the starting or ending edges and drag the trim icon to cut your video into the desired length. You can also use the Split option to remove the unwanted part in the middle of your clip.
Step3 Once you are done with your video trimming, click the Export option. Select the format from the left-hand side menu and click Export again.
You can also export your videos with YouTube, Vimeo, DVD, or your device.
Conclusion
In this article, we’ve explored the Flexclip video trimmer online tool, its key features, and how to use it to trim videos with simple instructions. We also discussed the best Flexclip video trimmer alternative on desktop - Filmora and provided a step-by-step guide to help you cut an unwanted section from your clip.
Hopefully, you found this comprehensive guide useful and that you now know everything you need to know about trimming videos with Flexclip.
Free Download For Win 7 or later(64-bit)
Free Download For macOS 10.14 or later
Best 5 PDF to GIF Converters You Should Know
Powerful Video Editor - Wondershare Filmora
Provide abundant video effects - A creative video editor
Powerful color correction and grading
Detailed tutorials are provided by the official channel
Nowadays, there are more and more people who like to create gif images. But it still requires a large amount of time to create a gif image from a pdf file. If you have already created a pdf document in the past and now want to turn it into a gif image, you probably hassle about how to do that without wasting much time. At this point, we need a practical solution!
In this article, we are going to introduce the five most effective pdf to gif converters. We also suggest trying Convertio software which is an amazing pdf to gif converter, reviewed by a number of users, with brilliant ratings. So let’s get straight into the details below.
Top 5 PDF to GIF Converters
By saving your time from searching a number of free or paid pdf to gif converters out of thousands of options available online, we have explained below the top 5 pdf to gif converters with their amazing features. All these tools are effective to use and require a little effort to make the work done. So let’s see their specifications, pros, and cons!
1. easy PDF

Easy PDF is a free online conversion tool that can turn difficult PDFs into Word, Excel or PowerPoint files. Who uses it? Law firms for document discovery, insurance adjusters for work loss claims, medical professionals that need to convert X-Rays, health records, medical records, hospital documents and other hard to read scanned PDF files.
Convert your files in seconds, no need to wait hours for download and without any annoying ads. Simply upload a file (PDF, Word, Excel, PowerPoint, Text Documents, Images) or use the URL of the file you wish to convert. Easy PDF will do all the modifications on your file before converting it into desired gif format, such as: filtering unsupported pages, adding page numbers and more.
Pros
Easy to use
Effective and qualified converter
Free for 2 tasks/24 Hours
Cons
Large pdfs can cause trouble
Long pdf’s colours and graphics may disturb
2. EZGIF.com

Ezgif.com claims to be “the best place to convert PDF files and other types of images into animated GIF files.”
It is a full-service online image converter including pdf to gif conversions that do not require any third-party software on your computer. You can upload PDFs and JPGs as well as other image formats. They are optimized using the latest technology and converted in just a few seconds.
Not only can you upload PDFs to their site and convert them to animated GIFs, but you can also upload JPG, PNG, BMP, TIFF, and other types of images, as well as a ZIP archive with images and have them converted automatically to GIF.
Pros
Free to use all features
Can work quickly
Professional gif maker
Presents a good range of functions
Cons
The interface is not much interacting
3. Cloudconvert

If you’re looking for a fast, easy and convenient way to convert PDF to GIF, Cloudconvert is the right choice. It enables you to create animated images in batches and customize the size and quality of your gifs.
It’s a professional document converter that helps effectively to convert pdf to gif in no time. The conversion page for users’ convenience offers a variety of document formats to choose from which format will be converted to which format. the user can also customize the gif file, such as width, pixel, height, etc.
Pros
Preset properties for the file conversion
You can set desired color mode and resolution
One-stop solution
Cons
Sometimes gives timeout error
Interface has more than required options
4. ZAMZAR

Yes, there are many PDF to GIF converters out there, but Zamzar happens to be one of the best for use in business and enterprise-level applications.
It is a free online file converter designed to convert various types of files. Using Zamzar you can create a GIF out of any PDF document with just one click, regardless of size or complexity. This feature makes it a great solution for businesses and individuals looking to condense large PDFs into smaller, more easily manageable formats.
Its friendly interface not only provides you more than one ways to upload a file but also guides you in a simple way to make the whole task done.
Pros
Has batch conversion feature
Complete tasks in simple three-step process
Work with over 1200 file forms
Cons
Restricted to 50 MB max file size on free
5. Convertio

Convertio is a brand new and pretty exciting service that converts a ton of file types like PDFs, Word documents, Excel spreadsheets, PowerPoint presentations, ebooks, archives, and more. They also support web files from different formats like MP3s and more.
It is a website that converts PDF files to GIFs with the most user-friendly interface. The interface of their website is pleasing and option-rich. Their selection of supported file formats is impressive.
Pros
Incredibly effortless to convert
Work by drag & dropping
No sign-in is needed.
Up to 10 free conversions/24 hours
Cons
Restricted to 100 MB per file on free
How to Convert PDF to GIF Using Convertio?
To convert a pdf into a gif file using Convertio, here are some steps to follow and make the task done in no time!
Step 1: Upload pdf-file(s)

You have a good number of options to select a file from. Select files from Computer, Google Drive, Dropbox, URL, or by dragging it on the page. This makes this tool cloud-based and optimum to run on all devices, for all formats conversion.

You can even select more than one file per term. But make sure the overall MBs don’t exceed the free 100MBs limit. For this, you need to subscribe to its premium services.
Step 2: Choose “to gif”

Choose gif or any other format you need as a result (more than 200 formats supported). The format selection makes it a one-stop solution because you don’t need to go to the “tools” section for finding a specific conversion tool to proceed with the work!
Step 3: Convert the file

After selecting the desired format, click on the “convert” button to convert the pdf to gif format. Within seconds, your converted document is ready.
Step 4: Download your gif

Let the file convert and you can download your gif file right afterward. Now you are ready for the next conversion!
Conclusion
You want to convert a PDF to GIF, but you’re not sure what software is best for your needs. There are many PDF to GIF converters available, but they all have different features and price points. Some are easy to use, while others have advanced options.
Some pdf to gif programs are online and free to use, while others have a free trial and then require payment to access the full version of the program. Morever, some programs are online-only, but there are also offline versions of some programs that can be used without an internet connection. Each program has its pros and cons — it depends on your specific needs as a user!
Nowadays, there are more and more people who like to create gif images. But it still requires a large amount of time to create a gif image from a pdf file. If you have already created a pdf document in the past and now want to turn it into a gif image, you probably hassle about how to do that without wasting much time. At this point, we need a practical solution!
In this article, we are going to introduce the five most effective pdf to gif converters. We also suggest trying Convertio software which is an amazing pdf to gif converter, reviewed by a number of users, with brilliant ratings. So let’s get straight into the details below.
Top 5 PDF to GIF Converters
By saving your time from searching a number of free or paid pdf to gif converters out of thousands of options available online, we have explained below the top 5 pdf to gif converters with their amazing features. All these tools are effective to use and require a little effort to make the work done. So let’s see their specifications, pros, and cons!
1. easy PDF
Easy PDF is a free online conversion tool that can turn difficult PDFs into Word, Excel or PowerPoint files. Who uses it? Law firms for document discovery, insurance adjusters for work loss claims, medical professionals that need to convert X-Rays, health records, medical records, hospital documents and other hard to read scanned PDF files.
Convert your files in seconds, no need to wait hours for download and without any annoying ads. Simply upload a file (PDF, Word, Excel, PowerPoint, Text Documents, Images) or use the URL of the file you wish to convert. Easy PDF will do all the modifications on your file before converting it into desired gif format, such as: filtering unsupported pages, adding page numbers and more.
Pros
Easy to use
Effective and qualified converter
Free for 2 tasks/24 Hours
Cons
Large pdfs can cause trouble
Long pdf’s colours and graphics may disturb
2. EZGIF.com
Ezgif.com claims to be “the best place to convert PDF files and other types of images into animated GIF files.”
It is a full-service online image converter including pdf to gif conversions that do not require any third-party software on your computer. You can upload PDFs and JPGs as well as other image formats. They are optimized using the latest technology and converted in just a few seconds.
Not only can you upload PDFs to their site and convert them to animated GIFs, but you can also upload JPG, PNG, BMP, TIFF, and other types of images, as well as a ZIP archive with images and have them converted automatically to GIF.
Pros
Free to use all features
Can work quickly
Professional gif maker
Presents a good range of functions
Cons
The interface is not much interacting
3. Cloudconvert
If you’re looking for a fast, easy and convenient way to convert PDF to GIF, Cloudconvert is the right choice. It enables you to create animated images in batches and customize the size and quality of your gifs.
It’s a professional document converter that helps effectively to convert pdf to gif in no time. The conversion page for users’ convenience offers a variety of document formats to choose from which format will be converted to which format. the user can also customize the gif file, such as width, pixel, height, etc.
Pros
Preset properties for the file conversion
You can set desired color mode and resolution
One-stop solution
Cons
Sometimes gives timeout error
Interface has more than required options
4. ZAMZAR
Yes, there are many PDF to GIF converters out there, but Zamzar happens to be one of the best for use in business and enterprise-level applications.
It is a free online file converter designed to convert various types of files. Using Zamzar you can create a GIF out of any PDF document with just one click, regardless of size or complexity. This feature makes it a great solution for businesses and individuals looking to condense large PDFs into smaller, more easily manageable formats.
Its friendly interface not only provides you more than one ways to upload a file but also guides you in a simple way to make the whole task done.
Pros
Has batch conversion feature
Complete tasks in simple three-step process
Work with over 1200 file forms
Cons
Restricted to 50 MB max file size on free
5. Convertio
Convertio is a brand new and pretty exciting service that converts a ton of file types like PDFs, Word documents, Excel spreadsheets, PowerPoint presentations, ebooks, archives, and more. They also support web files from different formats like MP3s and more.
It is a website that converts PDF files to GIFs with the most user-friendly interface. The interface of their website is pleasing and option-rich. Their selection of supported file formats is impressive.
Pros
Incredibly effortless to convert
Work by drag & dropping
No sign-in is needed.
Up to 10 free conversions/24 hours
Cons
Restricted to 100 MB per file on free
How to Convert PDF to GIF Using Convertio?
To convert a pdf into a gif file using Convertio, here are some steps to follow and make the task done in no time!
Step 1: Upload pdf-file(s)
You have a good number of options to select a file from. Select files from Computer, Google Drive, Dropbox, URL, or by dragging it on the page. This makes this tool cloud-based and optimum to run on all devices, for all formats conversion.
You can even select more than one file per term. But make sure the overall MBs don’t exceed the free 100MBs limit. For this, you need to subscribe to its premium services.
Step 2: Choose “to gif”
Choose gif or any other format you need as a result (more than 200 formats supported). The format selection makes it a one-stop solution because you don’t need to go to the “tools” section for finding a specific conversion tool to proceed with the work!
Step 3: Convert the file
After selecting the desired format, click on the “convert” button to convert the pdf to gif format. Within seconds, your converted document is ready.
Step 4: Download your gif
Let the file convert and you can download your gif file right afterward. Now you are ready for the next conversion!
Conclusion
You want to convert a PDF to GIF, but you’re not sure what software is best for your needs. There are many PDF to GIF converters available, but they all have different features and price points. Some are easy to use, while others have advanced options.
Some pdf to gif programs are online and free to use, while others have a free trial and then require payment to access the full version of the program. Morever, some programs are online-only, but there are also offline versions of some programs that can be used without an internet connection. Each program has its pros and cons — it depends on your specific needs as a user!
Add Green Screen Effects in Final Cut Pro
No matter the type of video you are shooting, the background of the video plays a major play. The background determines how eye-pleasing the frame of the entire video looks. A beautiful background enhances the video content while a distracting background can deteriorate the video outlook. You do not need to be in exotic locations or have eye-catching backgrounds in reality while shooting a video thanks to the use of the green screen effect.
Once you shoot a video with green screen background, you can replace the green screen with anything you want. You will need a video editor to replace the green screen, and Final Cut Pro is the most widely used video editor among Mac Users. We will illustrate how to add green screen in Final Cut Pro and get any background for your recorded video. We will also recommend an alternative watt to add green screen effect to your video.
Part 1. How to add green screen on Final Cut Pro
Final Cut Pro is the most popular professional video editor among Mac users. The learning curve is slightly steep, but once you get used to Final Cut Pro, you can take your recorded video to the next level with profound editing. The most important part of adding green screen effect to a video is shooting the video with a proper green screen in the background. Once you have successfully recorded your video, here are the steps on how to add background to green screen Final Cut Pro.
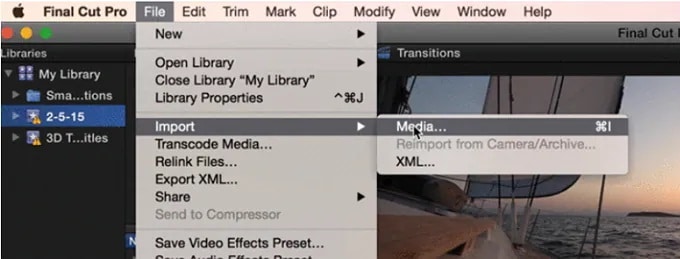
Step1 Launch Final Cut Pro and go to File> Import> Media. Select the video file with green screen background from your storage to import the file into FCP. Similarly, you should import the video or photo with which you want to replace the green screen.
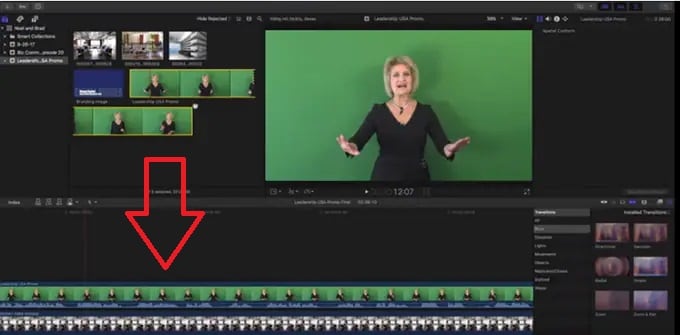
Step2 Drag the video clip with green screen background (called foreground clip) to Timeline and place it to Primary Storyline. Drag the replacement video (called background clip) below the foreground clip in Timeline.
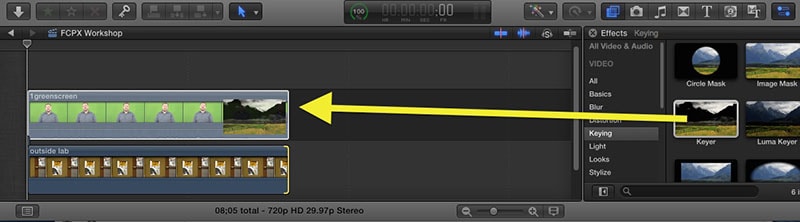
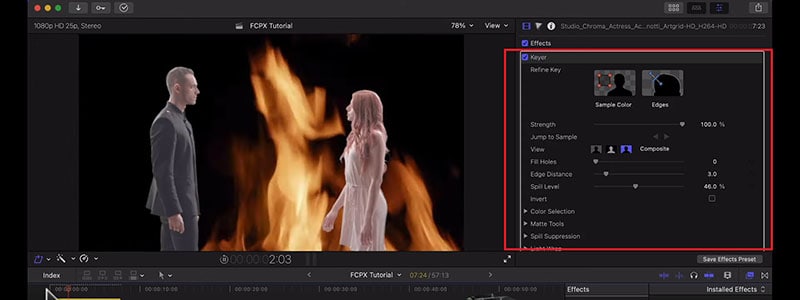
Step3 Select the foreground clip and click on Effects button present at the extreme top-right corner of the Timeline.
Step4 From the Effects options, select Keyer effect. If you cannot spot it immediately, you can search for it from the search field.
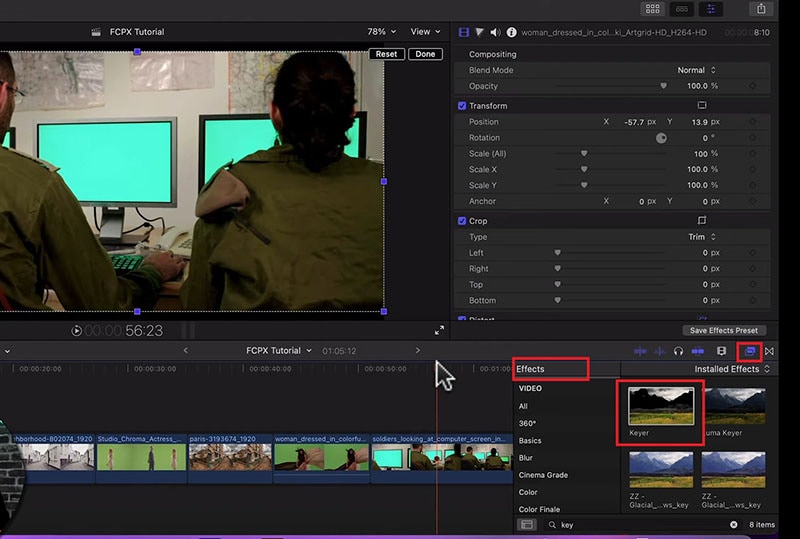
Step5 Drag and drop Keyer effect to the foreground clip. The effect detects the green screen and replaces it with the available background clip.
Step6 You might have to adjust the Keyer effect settings to get the green screen effect perfectly. Go to Inspector Window and click on Sample color and fine-tune the available settings to get it correct.
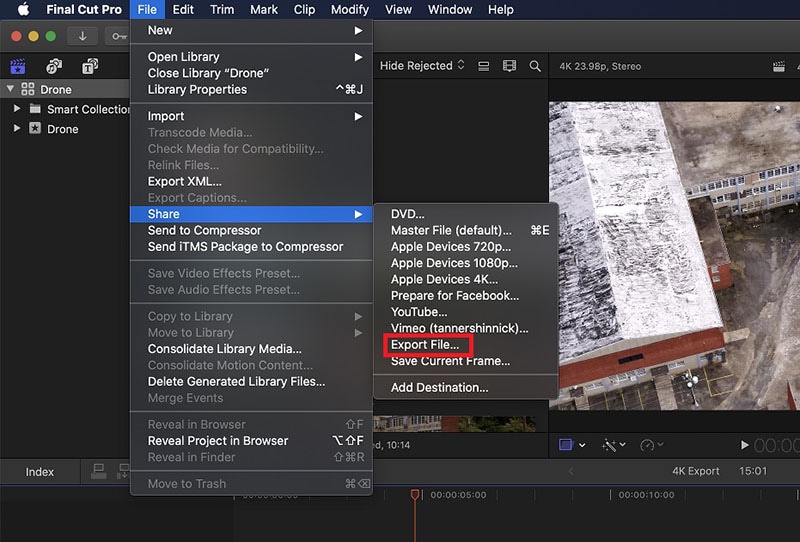
Step7 Once you are satisfied with the effect, go to File> Share> Export File and save the modified video.
Part 2. Alternative Way to Add Green Screen to Videos
Final Cut Pro is a professional but highly expensive video editor. The learning curve is not very suitable for amateur video editors. That is why if you are looking for a better alternative way to add green screen to videos, we recommend Wondershare Filmora . Filmora is a popular video editor that is available for Mac and Windows users. The user interface is extremely intuitive, and adding green screen effect is super easy. Here are the steps on how to add background to green screen effect.
Free Download For Win 7 or later(64-bit)
Free Download For macOS 10.14 or later
Step1 Download and install Filmora on your computer. Launch Filmora and click on New Projects.
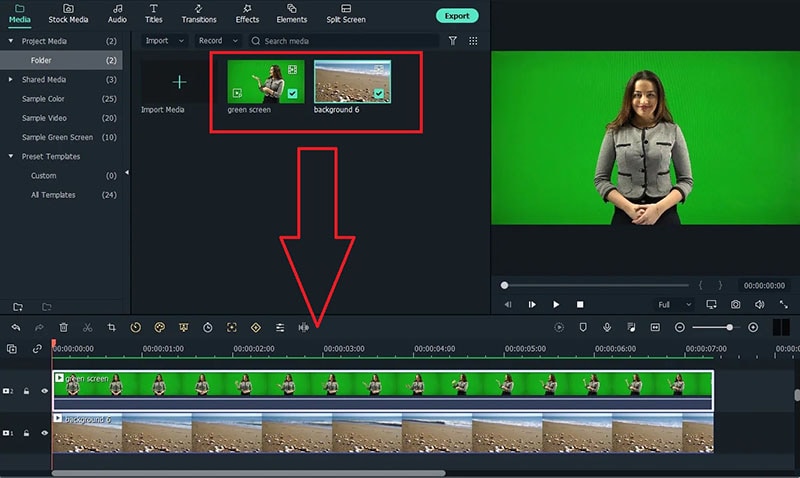
Step2 Under Project Media folder, Drag and drop the video clip with green screen background as well as the photo or video with which you want to replace the green screen.
Step3 Drag and drop the video clips on the Timeline. The video with green screen should be at the top while the replacement video or photo should be below it.
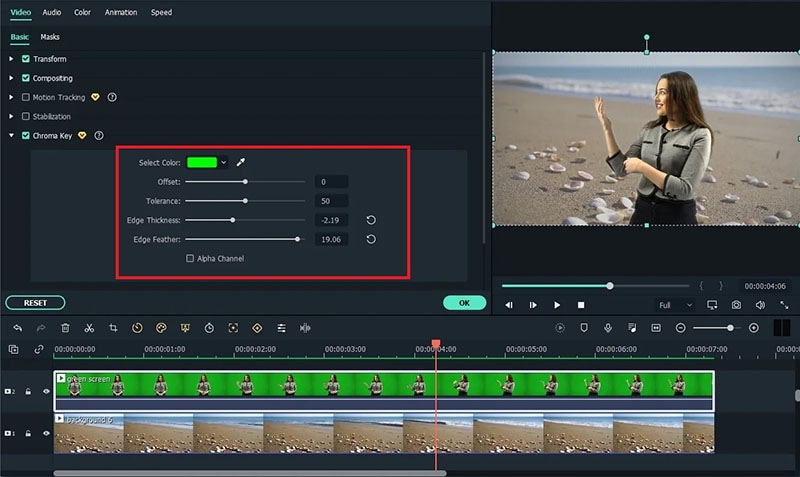
Step4 Double-click on the green screen video clip on Timeline. Go to Video>Basic and turn on Chroma key option.
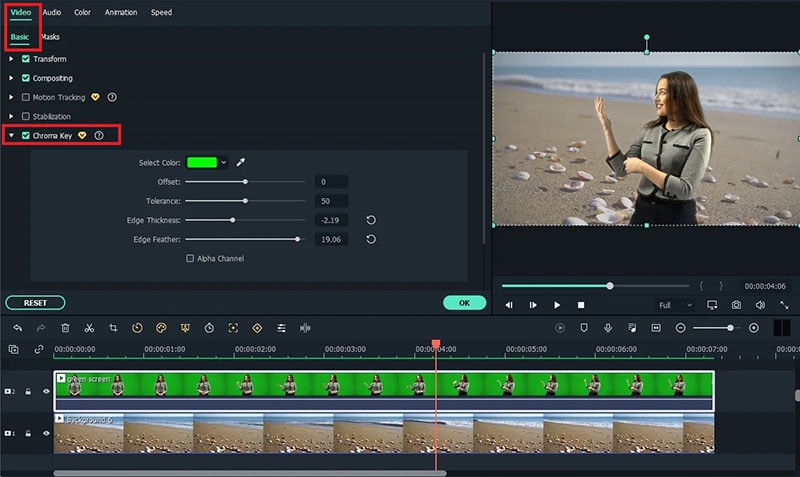
Step5 Adjust the different parameters such as offset to get the effect perfect and click on Ok button.
Step6 Play the video and if you are satisfied with the result, click on Export button to save the modified video file.
Part 3. Green Screen Video Tips to Use
We have already stated that replacing green screen in your video with an eye-catching background is the easiest part. On the contrary, shooting the green screen video is the most important part. If you shoot the video perfectly, replacing the background accurately in the video editor becomes super easy. Here are some important tips to use while shooting green screen video.
Distance – There should be enough distance between the subject and the green screen background so that the subject does not cast a shadow on the green screen. This distance is also important to place lights in between so that the green screen is perfectly lit for a great video shooting session.
Quality – You should opt for a high-quality green screen cloth for the background. This means the green screen should have a solid color instead of light and dark patches here and there. Besides, you should ensure that there are no wrinkles on the green screen.
Otherwise, when you will apply green screen effect through the video editor, the transformation will be uneven. You have to spend a lot of time adjusting the parameters to cover up uneven patches in the background.
Lighting – The way you set up your lights plays a major role in shooting green screen video perfectly. The light falling on the green screen will light up the screen evenly so that there are no light and dark patches. Transforming the green screen in the video editor will become that much easier.
You should focus on soft and even lighting for the entire green screen, and you should check through your camera to ensure the lighting is perfect. Sometimes, you can place lights behind the subject if the subject is staying stationary throughout the video. Otherwise, you can place the light above the subject for even distribution.
Aperture – The settings of your camera are equally important to smoothen out the green screen in the background and focus on the subject sharply. That is where aperture comes into the scene, and you need to use low aperture while shooting green screen videos. Low aperture opens up the camera lens, and the green screen turns softer in the background. The subject stands out while the background turns uniformly green.
Shutter Speed – While shooting a green screen video, you should keep a high shutter speed to prevent motion blur and uneven background. If the subject stays fixed throughout, the shutter speed should be double the frame rate. If the subject is moving throughout, the shutter speed should be around 4 times the frame rate such as 1/100.
ISO – The last thing you want in a green screen video is grainy footage. Your life will turn upside down editing the video and getting the green screen effect perfectly in any video editor. ISO determines the sensitivity and thereby, the grainy effect in your video. When the ISO is too high, the chance of getting grains in the video is high. It is better to use a native ISO for green screen effect, but you need to check with a sample recording and adjust if required.
Conclusion
We have answered how to add background to green screen Final Cut Pro. You can replace any green screen in your video with any video or photo for the background of the video. If you do not have Final Cut Pro or you find the steps slightly complicated, we recommend you to use Wondershare Filmora for instant green screen effect and quick adjustments for the best outcome.
Free Download For macOS 10.14 or later
Step1 Download and install Filmora on your computer. Launch Filmora and click on New Projects.
Step2 Under Project Media folder, Drag and drop the video clip with green screen background as well as the photo or video with which you want to replace the green screen.
Step3 Drag and drop the video clips on the Timeline. The video with green screen should be at the top while the replacement video or photo should be below it.
Step4 Double-click on the green screen video clip on Timeline. Go to Video>Basic and turn on Chroma key option.
Step5 Adjust the different parameters such as offset to get the effect perfect and click on Ok button.
Step6 Play the video and if you are satisfied with the result, click on Export button to save the modified video file.
Part 3. Green Screen Video Tips to Use
We have already stated that replacing green screen in your video with an eye-catching background is the easiest part. On the contrary, shooting the green screen video is the most important part. If you shoot the video perfectly, replacing the background accurately in the video editor becomes super easy. Here are some important tips to use while shooting green screen video.
Distance – There should be enough distance between the subject and the green screen background so that the subject does not cast a shadow on the green screen. This distance is also important to place lights in between so that the green screen is perfectly lit for a great video shooting session.
Quality – You should opt for a high-quality green screen cloth for the background. This means the green screen should have a solid color instead of light and dark patches here and there. Besides, you should ensure that there are no wrinkles on the green screen.
Otherwise, when you will apply green screen effect through the video editor, the transformation will be uneven. You have to spend a lot of time adjusting the parameters to cover up uneven patches in the background.
Lighting – The way you set up your lights plays a major role in shooting green screen video perfectly. The light falling on the green screen will light up the screen evenly so that there are no light and dark patches. Transforming the green screen in the video editor will become that much easier.
You should focus on soft and even lighting for the entire green screen, and you should check through your camera to ensure the lighting is perfect. Sometimes, you can place lights behind the subject if the subject is staying stationary throughout the video. Otherwise, you can place the light above the subject for even distribution.
Aperture – The settings of your camera are equally important to smoothen out the green screen in the background and focus on the subject sharply. That is where aperture comes into the scene, and you need to use low aperture while shooting green screen videos. Low aperture opens up the camera lens, and the green screen turns softer in the background. The subject stands out while the background turns uniformly green.
Shutter Speed – While shooting a green screen video, you should keep a high shutter speed to prevent motion blur and uneven background. If the subject stays fixed throughout, the shutter speed should be double the frame rate. If the subject is moving throughout, the shutter speed should be around 4 times the frame rate such as 1/100.
ISO – The last thing you want in a green screen video is grainy footage. Your life will turn upside down editing the video and getting the green screen effect perfectly in any video editor. ISO determines the sensitivity and thereby, the grainy effect in your video. When the ISO is too high, the chance of getting grains in the video is high. It is better to use a native ISO for green screen effect, but you need to check with a sample recording and adjust if required.
Conclusion
We have answered how to add background to green screen Final Cut Pro. You can replace any green screen in your video with any video or photo for the background of the video. If you do not have Final Cut Pro or you find the steps slightly complicated, we recommend you to use Wondershare Filmora for instant green screen effect and quick adjustments for the best outcome.
Also read:
- Updated 2024 Approved Discover Vintage LUTs Premiere Pro Free and Paid Options Available
- New 2024 Approved Create Dynamic Text Animation in Filmora
- Read and Learn How to Convert a Slow-Motion Video to Normal in This Guide. Besides, Find the Best Desktop Solution to Adjust Video Speed Quickly and Easily
- Updated 10 Best Vlogging Cameras for Beginners
- New Explore the List of the Top Six Online Video Speed Controllers for Chrome, Safari, and Firefox for 2024
- New 10 Recommended Websites to Discover Awesome Premiere Pro Video Templates for 2024
- Updated In 2024, Guide To Using Free Luts for OBS
- New Using Track Matte and Tracking in Adobe After Effects Reviewing All Possibilities
- In 2024, Discover How to Download Mobile Phone Green Screen Videos and Pictures for Free. Elevate Your Content with HD Quality Green Screen Frames
- New Mastering Video Marketing An Expert Playbook
- How to Speed Up Pictures on TikTok Slideshow for 2024
- 2024 Approved How to Use LUTs in Adobe Premiere Pro
- In 2024, Looking for the Ways by Which Subtitles Can Be Extracted From Your MKV Files without Affecting the File Quality? Look No Further as We Are Here to Help You Know the Best Tools that Can Easily Extract SRT From MKV
- An Easy-to-Understand Guide on How to Loop a Video on Canva. This Article Is Sure to Help You if This Is Your First Time Attempting a Loop Video
- Best 10 Mind-Blowing Video Collage Maker for PC
- Updated Want to Learn How to Trim Videos in Premiere Pro. Read on; Our Guide Will Help You Trim Videos with This Timeline-Based Video Editing Software Application to Make Them Engaging to Viewers
- Updated 4 Ways to Rotate Videos on Windows PC for 2024
- New 2024 Approved Frame Rates, Speed, and Wondershare Filmora An Overview
- New Powerpoint Slideshow Icon, Slide Sorter View Icon, Slideshow Icon Powerpoint, Slide Show View Icon
- 2024 Approved How to Make a Slow Motion Video Complete Guide
- New Step by Step to Rotate Videos Using OBS for 2024
- New What Do You Prefer More, MKV File Format or MOV? Increase Your Knowledge and Learn More About MKV Format by Ready the Detailed Article Below
- In 2024, A Guide to Color Grade Your Picture in LightRoom
- 2024 Approved Are You Curious About the Functionality of LUTs in LumaFusion? This Article Will Satisfy Your Queries with Ease
- 2024 Approved With This Article, We Will Be Looking at Steps to Rotate a Video in Cyberlink PowerDirector to Help You when Required. We Have Also Mentioned the Steps You Will Need to Follow in Wondershare Filmora
- Best Guide for Setting TikTok Countdown Timer
- In 2024, Top Apps and Online Tools To Track Infinix Smart 7 HD Phone With/Without IMEI Number
- AddROM Bypass An Android Tool to Unlock FRP Lock Screen For your Xiaomi Redmi K70 Pro
- In 2024, How to Unlock iPhone 13 Pro With an Apple Watch & What to Do if It Doesnt Work
- In 2024, How To Unlock a Poco X5 Easily?
- How To Unlock Vivo Y100i Phone Without Password?
- Top IMEI Unlokers for Your Oppo Find X7 Phone
- A Step-by-Step Guide on Using ADB and Fastboot to Remove FRP Lock from your Vivo Y200e 5G
- 3 Easy Ways to Factory Reset a Locked Apple iPhone 13 Pro Without iTunes | Dr.fone
- How to Unlock Motorola Edge 2023 Bootloader Easily
- In 2024, 3 Effective Methods to Fake GPS location on Android For your Samsung Galaxy S24+ | Dr.fone
- 5 Ways to Restart Motorola Edge 40 Pro Without Power Button | Dr.fone
- Vivo G2 Not Receiving Texts? 10 Hassle-Free Solutions Here | Dr.fone
- Forgot your Vivo Y100i lock screen pattern, PIN or password? Here’s what to do
- How To Restore Missing Pictures Files from Nubia Red Magic 8S Pro+.
- How to Use Phone Clone to Migrate Your Nokia C32 Data? | Dr.fone
- In 2024, How To Bypass Sony Xperia 5 V FRP In 3 Different Ways
- In 2024, Recommended Best Applications for Mirroring Your Vivo S18 Pro Screen | Dr.fone
- Title: Updated In 2024, VSDC Free Video Editor Review
- Author: Chloe
- Created at : 2024-04-24 07:08:39
- Updated at : 2024-04-25 07:08:39
- Link: https://ai-editing-video.techidaily.com/updated-in-2024-vsdc-free-video-editor-review/
- License: This work is licensed under CC BY-NC-SA 4.0.
