
Updated In 2024, What Are the 10 Best GIF Creator?
What Are the 10 Best GIF Creator?
What are the 10 Best GIF Creator?
An easy yet powerful editor
Numerous effects to choose from
Detailed tutorials provided by the official channel
Stay tuned to find the most affordable GIF creator solutions.
In this article
01 [Why Gifs Are Essential for Every Marketer?](#Part 1)
02 [How to Make Your Own GIF?](#Part 2)
03 [What Are 10 Best GIF Creator to Find Brilliant Pre-made Gifs?](#Part 3)
Part 1 Why Gifs Are Essential for Every Marketer?
Everyone around you today is accustomed with the fact that GIFs are an interesting and impactful means of content sharing. These 3-5 second snippets are highly preferred and convenient ways to deliver information that is precise, clear and to the point. When it comes to time frames, short and quick GIFs are obvious choices over lengthy videos. Additionally, GIFs are eye-catchy and keep you captivated to see though the entire content within seconds, contradictory to those monotonous and often dull videos that sound more like a long, boring lecture.
These are an effective media tool that is not limited to sharing information that is chiefly entertainment based or fun centered. You can use them to deliver important content that addresses a specific purpose or audience. Owing to this, GIFs have become an essential marketing utility, here’s why:
● Improve Product Branding:
GIFs can serve as impressive branding tools for your products in the market. Markets today are considerably impacted by the ‘What You See is What You Buy’ concept, which puts forward the need to lay added stress on effective branding.
GIFs are ready to sort this out with their exciting range of features. From video editing choices to sound and color customization, GIFs are loaded with everything you need to improvise your product branding. All you have to do is explore your creativity to make the most of the GIF branding choices.
● Explain it Better
On a preference poll, most of us would shift to ‘watch’ over ‘read’ for a comprehensive understanding. An attractive motion visual is an even better treat. GIFs are pivotal in making viewers relate to the concept and message behind your product in a more enhanced manner.
Additionally, these are a continent means to introduce emotional mobility among your target audience with depictive emojis. You can use GIFs to develop effective content approaches to make the audience connect with your product viability, both practically band emotionally.
● Increase Visitor Attraction
Today’s changing times have brought about a rapid outlook towards everything. All of us are bounded by time constraints and when browsing the web, the prime need is to look for quick and accurate solutions to everything concerned.
Short and exact information delivery of GIFs is something that would keep visitors glued to your site because they will be assured of getting exactly what they search for and that too in an interesting and entertaining way.
Part 2 How to Make Your Own GIF?
Now that you are familiar with the creative marketing credibility of GIFs, you might naturally feel motivated towards creating a GIF of your own. In case you are, see through the following section of this article to find out interesting ways of creating interesting and catchy GIFs, either for impressive product marketing or just to make your social media posts leave your community peers in awe!
Looking for the best GIF creator solutions on the web, you can rely on GIPHY, one of the most preferred and convenient databases to create GIFs quickly. This is a smartphone compatible tool and works well with almost any device. Follow the steps given below to make GIFs with this tool:
Step 1:
Download and install the GIPHY app in your device.
Step 2:
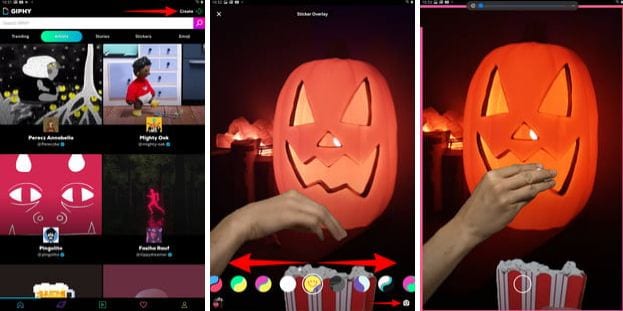
Click on ‘Create’ in the app’s welcome screen. This will change (+) icon at the top-right corner to the ‘Camera’ symbol. You can also navigate to the ‘Profile’ at the bottom-right and tap the (+) or ‘Camera’ icon in the app’s account page.
Step 3:
Click on ‘Allow Camera Access’. You will receive two successive prompt messages from the app. Click on ‘Allow’ to grant access permissions to your device media. When you are done, click on ‘I Agree’.
Step 4:
GIFHY uses your device’s front camera for GIF creation. However, if you need to go for a camera switch, click on the ‘Camera’ sign at the bottom-right.
Step 5:
Choose a desired filter and effect for your GIF with a left or right swipe on the live feed toolbar. The app has 11 amazing and realistic effects, including VHS Static, 3D Glasses, etc.
Step 6:
You can take up either of the following:
Press either of the ‘Filter’ or ‘Effect’ buttons to take static shots to create GIF from images, or press and hold the same to create animated GIF. For simply using effects, tap the white button.
In case you choose to create a motion GIF, the app forms a ‘visual timer’ around the editor screen. The motion recording stops once the line is in sync with the screen edges.
Step 7:
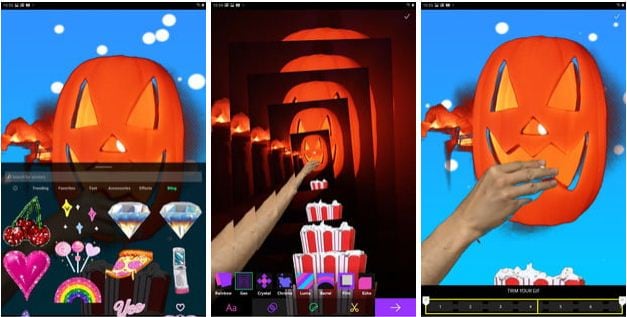
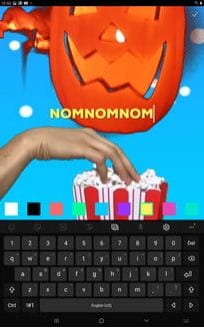
Having captured your perfect shot, you have the liberty to merge it with an image or video. However, do consider the following options to add some more elements to your capture: You can add relatable text in 9 color choices.
● Enhance your graphic presentation with 8 amazing effects like, ‘rainbow overlays’, BW film grains, etc.
● Choose from a never ending list of suitable stickers to add the feel through connect to your GIFs.
● Trim your animated GIFs to the ‘just perfect’ portion by adjusting the editing markers.
Relax; that’s no rocket science. Just tap on the respective buttons and there you go!
Step 8:
Set your GIF in a desired size frame by choosing the ‘Crop’ tool from the top-right corner of the editing screen. You are given a size flexibility of 1:1, 3:2, 16:9, 4:5 and 9:16.

Step 9:
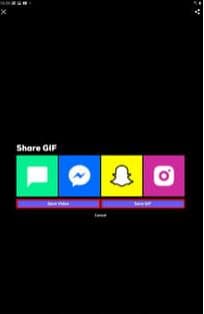
Once you are satisfied with your creation, tap the ‘Right Arrow’ icon. In the interface that follows, add suitable share tags to the GIF.
Step 10:
Tap ‘Share GIF’ to post your creation on social media platforms or share it through popular IM apps. To save your initially captured clip, click on ‘Save Video’ or tap ‘Save GIF’ to save your creation in your smartphone’s memory.
Part 1 What Are 10 Best GIF Creator to Find Brilliant Pre-made Gifs?
Having talked about GIF creation on the go, let’s take a dive into the best GIF creator solutions that are a storehouse of exciting pre-made GIFs. When browsing the web for an affordable GIF maker tool, you land across a pool of choices. Read through the further sections of this article to find out what’s best for you.
Described below are 10 best alternatives to get amazing pre-made GIFs:
● Wondershare Filmora Video Editor
This one is a popular, preferred and top rated application where you get to choose from an exciting range of pre-made GIFs under a variety of specific categories. All you need to do is, visit the app’s official site, browse to your favorite GIF category and select a desired GIF. Follow a few app instructions to save your selection and that’s it! Your selected GIF reaches your device memory within seconds.

Wondershare Filmora - Best Video Editor for Mac/Windows
5,481,435 people have downloaded it.
Build unique custom animations without breaking a sweat.
Focus on creating epic stories and leave the details to Filmora’s auto features.
Start a creative adventure with drag & drop effects and endless possibilities.
Filmora simplifies advanced features to save you time and effort.
Filmora cuts out repetition so you can move on to your next creative breakthrough.
Key Features
● This app is available to you absolutely free of cost.
● Has an intelligent and user cohesive interface.
● Loaded with tons of brilliant GIFs to choose from.
● The app supports GIF customization.
● GIFHY
Launched in 2013, this one is probably the best GIF maker and downloader tool available on the web today. It is a free tool, packed with enormous varieties of GIFs to choose from. What’s more interesting about the app is that you are free to play with your editing creativity to enhance your downloaded GIFs in the GIPHY editor.
Key Features
● It comes with an easy to use, convenient interface.
● You can edit downloaded GIFs with hundreds of effects and filters.
● The app provides you a direct sharing platform, allowing you to post GIFs to various social media platforms and also go for sharing via Instant Messaging applications.
● This is a fast processing tool that allows you to escape the notch of annoying and delayed download processes.
● Tenor
You can conveniently regard this one as the closest competitor to the GIPHY GIF creator and downloader tool. Needless to say, both are quite similar to each other in interface and usage respects. However, focusing on search results for a common keyword, you find diverse variations to your obvious surprise.
Key Features
● This is a free to use, interactive interface tool.
● It introduces a GIF Keyboard that allows you to search the most specific and relatable GIFs.
● It ensures a speedy and high quality GIF download.
● You can explore your editing skills to your heart’s content to improvise the downloaded GIFs with this tool.
● This tool gives you the liberty to directly share GIFs across different platforms.
If you like to spend ample time on choosing what’s perfect for you, refer this online tool for your GIF download solutions. It caters to your love of diversity with the most deep rooted and broad GIF range. However, this one comes with a little messy interface, demanding some patience from you to get to the right thing.
Key Features
● This tool provides you with almost all possible choices for a GIF category.
● It is available to you free of cost
● The tool site is loaded with rich and quality GIF content.
● This one is a direct save and export tool for your downloaded GIFs.
● Gfycat
You can prefer this one as a GIF hosting tool. Developed with a view to launch a common medium for GIF and HTML contents, this app ensures in-time and hassle free downloads and delivery. Though lacking a refined search bar, this tool promises you of excellence in content quality.
Key Features
● This comes to you as one of the most reliable GIF hosting tools.
● It is a free and quick content delivery tool.
● You are allowed to select the most suitable one from a variety of playback choices.
● This tool also gives you the flexibility of direct media sharing.
● GIFbin
If you are hung-over decade old nostalgia and the fever doesn’t seem to go away, you can check this site for some really satisfying retro and other similar content. This would definitely make you take a toll back to the times when MSN and Limewire were unparalleled market leaders in content sharing.
Key Features
● GIFbin is a storehouse of the best animated GIFs, that is on a continuous update to facilitate fresh and quality based content, every time you visit the site.
● It has an advanced, API enabled search mechanism.
● It boasts of having the handiest and convenient user interface.
● If you prefer GIFs of the comic genre, this tool is heaven for you.
● Imgflip
This is another GIF download site, commonly preferred for comedy and fun oriented content. Using this site, you can download and create a variety of GIF based memes that have the potential to flood your social media posts with likes and comments. This one is a complete GIF basket, suited to vast content varieties and user preferences. You will find the site’s official watermark on all its contents.
Key Features
● The site stands among the most preferred GIF-meme creation and sharing platforms.
● The tool is packed with loads of quality content under specific categories
● You can improvise the dimensions of your editing skills to modify downloaded GIFs.
● This site has a default media export feature that you can use to share your GIFs on social media.
● Imgur
Launched in 2009, this is among the most visited GIF sites, originally created for sharing meme based contents on social media. Its extensive search filters are dedicated to fetch the exact GIFs and memes you are looking for. If you are tired of browsing sites for particular content requirements, your search spree will definitely end here.
Key Features
● The site is known for its extensive and diversified content quality.
● It is a free, convenient and dependable GIF download tool.
● Imgur is highly preferred for content export across various media platforms.
● It is equipped with an advanced and updated search filter that assures you of getting fresh and top quality GIFs on almost every possible keyword.
● Tumblr
Claiming a launch date of 13 years back, this is quite a good GIF download option. You can find excellent quality GIF content on the site, particularly in the comic genre. Though not as popular as its online counterparts today, the site definitely enjoyed commendable visitor preferences at the time of its launch. You can certainly visit this site for a filling entertainment dose.
Key Features
● Tumblr is a free download site with a user friendly interface.
● The site is loaded with notable content varieties.
● You can go for direct media sharing through this site.
● Its comic GIFs are quite hilarious.
● Know Your Meme
This site uses the Wiki software to stock an inventory of classic GIFs and memes. Using this database for GIF downloads means that you don’t need to compromise on content and image quality. The site contents are periodically updated to ensure that visitors are not exposed to stale and outdated content.
Key Features
● The site offers fresh content having catchy and latest GIFs.
● This is a complete storehouse of GIFs and memes that can definitely keep you rolling.
● The site comes as a free tool and gas a user cohesive interface
● It hast the most efficient search filters that are regularly improvised to ensure quality content delivery.
● Key Takeaways from This Episode →
● GIFs are an effective and captivating means of quality content sharing and message delivery. Take them as a hilarious entertainment source or use them to enhance your marketing policies, GIFs can do it all.
● Influenced by the user credibility of GIFs, there are loads of GIF creator and download tools available online; among which Filmora by Wondershare is the current market leader. You can use this app to explore your GIF editing skills or download and share latest GIFs across media sharing platforms.
Stay tuned to find the most affordable GIF creator solutions.
In this article
01 [Why Gifs Are Essential for Every Marketer?](#Part 1)
02 [How to Make Your Own GIF?](#Part 2)
03 [What Are 10 Best GIF Creator to Find Brilliant Pre-made Gifs?](#Part 3)
Part 1 Why Gifs Are Essential for Every Marketer?
Everyone around you today is accustomed with the fact that GIFs are an interesting and impactful means of content sharing. These 3-5 second snippets are highly preferred and convenient ways to deliver information that is precise, clear and to the point. When it comes to time frames, short and quick GIFs are obvious choices over lengthy videos. Additionally, GIFs are eye-catchy and keep you captivated to see though the entire content within seconds, contradictory to those monotonous and often dull videos that sound more like a long, boring lecture.
These are an effective media tool that is not limited to sharing information that is chiefly entertainment based or fun centered. You can use them to deliver important content that addresses a specific purpose or audience. Owing to this, GIFs have become an essential marketing utility, here’s why:
● Improve Product Branding:
GIFs can serve as impressive branding tools for your products in the market. Markets today are considerably impacted by the ‘What You See is What You Buy’ concept, which puts forward the need to lay added stress on effective branding.
GIFs are ready to sort this out with their exciting range of features. From video editing choices to sound and color customization, GIFs are loaded with everything you need to improvise your product branding. All you have to do is explore your creativity to make the most of the GIF branding choices.
● Explain it Better
On a preference poll, most of us would shift to ‘watch’ over ‘read’ for a comprehensive understanding. An attractive motion visual is an even better treat. GIFs are pivotal in making viewers relate to the concept and message behind your product in a more enhanced manner.
Additionally, these are a continent means to introduce emotional mobility among your target audience with depictive emojis. You can use GIFs to develop effective content approaches to make the audience connect with your product viability, both practically band emotionally.
● Increase Visitor Attraction
Today’s changing times have brought about a rapid outlook towards everything. All of us are bounded by time constraints and when browsing the web, the prime need is to look for quick and accurate solutions to everything concerned.
Short and exact information delivery of GIFs is something that would keep visitors glued to your site because they will be assured of getting exactly what they search for and that too in an interesting and entertaining way.
Part 2 How to Make Your Own GIF?
Now that you are familiar with the creative marketing credibility of GIFs, you might naturally feel motivated towards creating a GIF of your own. In case you are, see through the following section of this article to find out interesting ways of creating interesting and catchy GIFs, either for impressive product marketing or just to make your social media posts leave your community peers in awe!
Looking for the best GIF creator solutions on the web, you can rely on GIPHY, one of the most preferred and convenient databases to create GIFs quickly. This is a smartphone compatible tool and works well with almost any device. Follow the steps given below to make GIFs with this tool:
Step 1:
Download and install the GIPHY app in your device.
Step 2:
Click on ‘Create’ in the app’s welcome screen. This will change (+) icon at the top-right corner to the ‘Camera’ symbol. You can also navigate to the ‘Profile’ at the bottom-right and tap the (+) or ‘Camera’ icon in the app’s account page.
Step 3:
Click on ‘Allow Camera Access’. You will receive two successive prompt messages from the app. Click on ‘Allow’ to grant access permissions to your device media. When you are done, click on ‘I Agree’.
Step 4:
GIFHY uses your device’s front camera for GIF creation. However, if you need to go for a camera switch, click on the ‘Camera’ sign at the bottom-right.
Step 5:
Choose a desired filter and effect for your GIF with a left or right swipe on the live feed toolbar. The app has 11 amazing and realistic effects, including VHS Static, 3D Glasses, etc.
Step 6:
You can take up either of the following:
Press either of the ‘Filter’ or ‘Effect’ buttons to take static shots to create GIF from images, or press and hold the same to create animated GIF. For simply using effects, tap the white button.
In case you choose to create a motion GIF, the app forms a ‘visual timer’ around the editor screen. The motion recording stops once the line is in sync with the screen edges.
Step 7:
Having captured your perfect shot, you have the liberty to merge it with an image or video. However, do consider the following options to add some more elements to your capture: You can add relatable text in 9 color choices.
● Enhance your graphic presentation with 8 amazing effects like, ‘rainbow overlays’, BW film grains, etc.
● Choose from a never ending list of suitable stickers to add the feel through connect to your GIFs.
● Trim your animated GIFs to the ‘just perfect’ portion by adjusting the editing markers.
Relax; that’s no rocket science. Just tap on the respective buttons and there you go!
Step 8:
Set your GIF in a desired size frame by choosing the ‘Crop’ tool from the top-right corner of the editing screen. You are given a size flexibility of 1:1, 3:2, 16:9, 4:5 and 9:16.
Step 9:
Once you are satisfied with your creation, tap the ‘Right Arrow’ icon. In the interface that follows, add suitable share tags to the GIF.
Step 10:
Tap ‘Share GIF’ to post your creation on social media platforms or share it through popular IM apps. To save your initially captured clip, click on ‘Save Video’ or tap ‘Save GIF’ to save your creation in your smartphone’s memory.
Part 1 What Are 10 Best GIF Creator to Find Brilliant Pre-made Gifs?
Having talked about GIF creation on the go, let’s take a dive into the best GIF creator solutions that are a storehouse of exciting pre-made GIFs. When browsing the web for an affordable GIF maker tool, you land across a pool of choices. Read through the further sections of this article to find out what’s best for you.
Described below are 10 best alternatives to get amazing pre-made GIFs:
● Wondershare Filmora Video Editor
This one is a popular, preferred and top rated application where you get to choose from an exciting range of pre-made GIFs under a variety of specific categories. All you need to do is, visit the app’s official site, browse to your favorite GIF category and select a desired GIF. Follow a few app instructions to save your selection and that’s it! Your selected GIF reaches your device memory within seconds.
Wondershare Filmora - Best Video Editor for Mac/Windows
5,481,435 people have downloaded it.
Build unique custom animations without breaking a sweat.
Focus on creating epic stories and leave the details to Filmora’s auto features.
Start a creative adventure with drag & drop effects and endless possibilities.
Filmora simplifies advanced features to save you time and effort.
Filmora cuts out repetition so you can move on to your next creative breakthrough.
Key Features
● This app is available to you absolutely free of cost.
● Has an intelligent and user cohesive interface.
● Loaded with tons of brilliant GIFs to choose from.
● The app supports GIF customization.
● GIFHY
Launched in 2013, this one is probably the best GIF maker and downloader tool available on the web today. It is a free tool, packed with enormous varieties of GIFs to choose from. What’s more interesting about the app is that you are free to play with your editing creativity to enhance your downloaded GIFs in the GIPHY editor.
Key Features
● It comes with an easy to use, convenient interface.
● You can edit downloaded GIFs with hundreds of effects and filters.
● The app provides you a direct sharing platform, allowing you to post GIFs to various social media platforms and also go for sharing via Instant Messaging applications.
● This is a fast processing tool that allows you to escape the notch of annoying and delayed download processes.
● Tenor
You can conveniently regard this one as the closest competitor to the GIPHY GIF creator and downloader tool. Needless to say, both are quite similar to each other in interface and usage respects. However, focusing on search results for a common keyword, you find diverse variations to your obvious surprise.
Key Features
● This is a free to use, interactive interface tool.
● It introduces a GIF Keyboard that allows you to search the most specific and relatable GIFs.
● It ensures a speedy and high quality GIF download.
● You can explore your editing skills to your heart’s content to improvise the downloaded GIFs with this tool.
● This tool gives you the liberty to directly share GIFs across different platforms.
If you like to spend ample time on choosing what’s perfect for you, refer this online tool for your GIF download solutions. It caters to your love of diversity with the most deep rooted and broad GIF range. However, this one comes with a little messy interface, demanding some patience from you to get to the right thing.
Key Features
● This tool provides you with almost all possible choices for a GIF category.
● It is available to you free of cost
● The tool site is loaded with rich and quality GIF content.
● This one is a direct save and export tool for your downloaded GIFs.
● Gfycat
You can prefer this one as a GIF hosting tool. Developed with a view to launch a common medium for GIF and HTML contents, this app ensures in-time and hassle free downloads and delivery. Though lacking a refined search bar, this tool promises you of excellence in content quality.
Key Features
● This comes to you as one of the most reliable GIF hosting tools.
● It is a free and quick content delivery tool.
● You are allowed to select the most suitable one from a variety of playback choices.
● This tool also gives you the flexibility of direct media sharing.
● GIFbin
If you are hung-over decade old nostalgia and the fever doesn’t seem to go away, you can check this site for some really satisfying retro and other similar content. This would definitely make you take a toll back to the times when MSN and Limewire were unparalleled market leaders in content sharing.
Key Features
● GIFbin is a storehouse of the best animated GIFs, that is on a continuous update to facilitate fresh and quality based content, every time you visit the site.
● It has an advanced, API enabled search mechanism.
● It boasts of having the handiest and convenient user interface.
● If you prefer GIFs of the comic genre, this tool is heaven for you.
● Imgflip
This is another GIF download site, commonly preferred for comedy and fun oriented content. Using this site, you can download and create a variety of GIF based memes that have the potential to flood your social media posts with likes and comments. This one is a complete GIF basket, suited to vast content varieties and user preferences. You will find the site’s official watermark on all its contents.
Key Features
● The site stands among the most preferred GIF-meme creation and sharing platforms.
● The tool is packed with loads of quality content under specific categories
● You can improvise the dimensions of your editing skills to modify downloaded GIFs.
● This site has a default media export feature that you can use to share your GIFs on social media.
● Imgur
Launched in 2009, this is among the most visited GIF sites, originally created for sharing meme based contents on social media. Its extensive search filters are dedicated to fetch the exact GIFs and memes you are looking for. If you are tired of browsing sites for particular content requirements, your search spree will definitely end here.
Key Features
● The site is known for its extensive and diversified content quality.
● It is a free, convenient and dependable GIF download tool.
● Imgur is highly preferred for content export across various media platforms.
● It is equipped with an advanced and updated search filter that assures you of getting fresh and top quality GIFs on almost every possible keyword.
● Tumblr
Claiming a launch date of 13 years back, this is quite a good GIF download option. You can find excellent quality GIF content on the site, particularly in the comic genre. Though not as popular as its online counterparts today, the site definitely enjoyed commendable visitor preferences at the time of its launch. You can certainly visit this site for a filling entertainment dose.
Key Features
● Tumblr is a free download site with a user friendly interface.
● The site is loaded with notable content varieties.
● You can go for direct media sharing through this site.
● Its comic GIFs are quite hilarious.
● Know Your Meme
This site uses the Wiki software to stock an inventory of classic GIFs and memes. Using this database for GIF downloads means that you don’t need to compromise on content and image quality. The site contents are periodically updated to ensure that visitors are not exposed to stale and outdated content.
Key Features
● The site offers fresh content having catchy and latest GIFs.
● This is a complete storehouse of GIFs and memes that can definitely keep you rolling.
● The site comes as a free tool and gas a user cohesive interface
● It hast the most efficient search filters that are regularly improvised to ensure quality content delivery.
● Key Takeaways from This Episode →
● GIFs are an effective and captivating means of quality content sharing and message delivery. Take them as a hilarious entertainment source or use them to enhance your marketing policies, GIFs can do it all.
● Influenced by the user credibility of GIFs, there are loads of GIF creator and download tools available online; among which Filmora by Wondershare is the current market leader. You can use this app to explore your GIF editing skills or download and share latest GIFs across media sharing platforms.
How to Remove Audio From Videos with FFmpeg?
Unbelievably, the globe has been making headway in its endeavors. Considering how far the world has come in producing amazing things in recent times, it is impossible to fathom the progress made in the digital industry. There are now millions of video editing programs like FFmpeg that remove audio, each allowing you to accomplish anything. In addition to video editing, it is now possible to modify the music playing in the backdrop of a video. Doesn’t it seem impossible to you? However, it has an actual appearance and is simple to pull audio from a video. You will, however, need to choose a tool with great care and consideration.
In the following parts, we will discuss how to remove audio from video with FFmpeg successfully. In addition, we have also looked at other software that has the potential to be an alternative to FFmpeg that is far more effective.

Part 1: How to Use FFmpeg to Remove Audio from Videos?
FFMPEG is a highly flexible video editing program from the command line. You may use it for various purposes, including converting between different file formats. But in addition to that, you may use it to remove audio from your videos or clips. Here are two different ways to delete audio using FFMPEG, depending on what you want to do. But most crucially, speed and quality are not sacrificed with any of these choices. It’s about coding. When using other people’s code, also label the author. Using FFmpeg, you can separate the audio. The audio in video files may be removed, added, extracted, and added again with the help of this powerful utility.
You will only need to install FFmpeg on your computer after you have purchased it. Removing video is straightforward, so you won’t have to put in much effort to achieve this goal. Let’s look at the many methods available.
Use the Command Line
Step1 The command to extract audio from your video file is visible for your review.

Step2 It would be helpful if you updated the extension and the name of the file that was entered, but other than that, you won’t need to do anything else.

The preceding command is successful if the input file certifies. This is why you need to find the codec for the audio stream. If you obey this order, you will accomplish what you set out to do. A user might sometimes use an audio format returned by the previous command. However, this will only occasionally be successful.
The storage format that FFmpeg employs is determined by looking at the output file’s extension. It would help if you knew that a storage format, a container, and an audio format are distinct. You will encounter a scenario where the audio format does not have a container named after it. Two problematic formats are among the most common formats; they are PCM and Vorbis. OGG is compatible with Vorbis, whereas WAV is compatible with PCM.
Let’s investigate another approach to extract audio from a video using FFmpeg if the prior one was too difficult for you to grasp.
Use the Terminal
Step1 Verify that the format remains the same.
You will need to locate the video in its original format to be able to extract the audio from it. If you are unfamiliar with the primary format, you will be unable to determine the appropriate file extension. Because of this, you are going to need to make use of the ffprobe command.

Now, change “myvideo.mp4” to the name of the video file you want to use. This will verify that you are familiar with the video’s original file format.
After learning about the original audio’s format, you can reencode a video clip to remove the audio from it.

Step2 Modify the format, please.
You might try replacing myvideo.mp4 with the directory and filename to see if it helps. Additionally, it would be helpful if you updated the name of the audio.ogg file with the name you want to use.
Therefore, if you follow the two approaches discussed above, you can extract audio from your video files with little to no work. To completely comprehend the stages, you must examine them in great detail.
Part 2: The Most Straightforward Way to Mute Audio in Videos
If you seek an alternative method to FFmpeg removing audio, you can meet with an overwhelming number of possibilities, each claiming that it is superior to the others. However, in this instance, additional investigation is not required at all. Wondershare Filmora will turn out to be one of the better options. It is software designed for editing videos that will make it simple for you to work on any editing job. It is one of the choices held in the highest esteem among those offered in the industry nowadays.
Free Download For Win 7 or later(64-bit)
Free Download For macOS 10.14 or later
Some core audio editing features of Filmora are:
Audio Ducking: When VoiceOver is speaking, temporarily lower the loudness of the material played. Automatically Select the Caller as the Speaker: When you move your iPhone away from your ear during a call, the audio will automatically transfer over to the speaker system.
Silence Detection: Users of Filmora X have access to an add-on called Silence Detection, which is a paid add-on that helps users more quickly erase quiet pauses that occur throughout a film. To help you save time and make the editing process more comfortable, the add-on searches for the whole movie in search of any periods of silence automatically eliminates them all.
Auto Synchronization: When shooting with a camera or video camera and utilizing a microphone, this feature allows the user to easily replace the audio recorded with the audio in the movie. In addition, it can align the audio and video clips in the project automatically, eliminating the need for human alignment.
Speech to Text (STT): computational linguistics permits the recognition and translation of spoken language into written form. Other names for this technology are computer voice recognition and speech recognition.
Text to Speech (TTS): reads digital text aloud. This kind of technology is called “read-aloud” technology. TTS can take the text shown on a computer or any other digital device and turn it into sound by clicking a button or touching it with your finger.
Audio Visualizer: The Most Powerful Audio and Video Editor Available Today. With the help of Filmora Audio Visualizer, your music video may come to life. The effect will dynamically adapt the sound to the video while intelligently matching the sound.
Step1 Download, Install and Run the Filmora Video Editor.
After opening Filmora, the following user interface will appear: You may upload the video file from which you wish to delete the audio tracks by clicking the “Import” button.

Step2 Detach Audio from Uploaded Files
Remove the audio tracks from the original MP4 file by a drag and drop into the timeline, then right-clicking on the file and selecting “Detach Audio” from the menu that appears. After that, the split audio track will show in the Audio Timeline. To delete audio from an MP4, right-click the audio file and choose “Delete” from the menu that appears.

Step3 Export the Silenced Video
After that, pick the preferred export method by clicking the “Export” button. You can set the output video format to be the identical to the one used to record the video in the first place or select it as any other video format. After that, choose the video you want to export by clicking the “Export” option.
In addition, you can save the altered file to your iPhone, iPad, PSP, or other compatible device or instantly upload it to YouTube to share with your friends.
There you go! You successfully explored an excellent alternative software to remove audio from videos via FFmpeg.
Part 3: FAQs
1. How do I change audio in a video?
Changing audio in a video is easy if you use compatible high-end software like Filmora. This audio and video editing tool can modify or change the audio or soundtrack in a video. Much software of this kind is available for both Windows and Mac. Therefore, choose a reliable one, try it, and then begin using it.
2. How exactly does one go about switching the pre-installed audio track on a video?
When you’re viewing a video, you can get the impression that the music playing in the background doesn’t go very well with the content, and you might want to switch it. There are a variety of programs available that will assist you in replacing the audio with video. And now, I’m going to offer Filmora Video Editor as the ideal option since it is the program that is both the simplest and the quickest to do that task.
Conclusion
So, after reading this, you should be able to remove audio from video FFmpeg. Have you ever encountered an editing tool that exceeded your expectations in terms of performance? Although FFmpeg removes audio, the other editing tool we discussed is relatively good quality. Yes, Filmora is a video editing application that provides you with the most outstanding potential services you could have ever imagined having access to. Because it includes several exciting features and a high-quality user interface, it is one of the options people will find ideal.
Free Download For macOS 10.14 or later
Some core audio editing features of Filmora are:
Audio Ducking: When VoiceOver is speaking, temporarily lower the loudness of the material played. Automatically Select the Caller as the Speaker: When you move your iPhone away from your ear during a call, the audio will automatically transfer over to the speaker system.
Silence Detection: Users of Filmora X have access to an add-on called Silence Detection, which is a paid add-on that helps users more quickly erase quiet pauses that occur throughout a film. To help you save time and make the editing process more comfortable, the add-on searches for the whole movie in search of any periods of silence automatically eliminates them all.
Auto Synchronization: When shooting with a camera or video camera and utilizing a microphone, this feature allows the user to easily replace the audio recorded with the audio in the movie. In addition, it can align the audio and video clips in the project automatically, eliminating the need for human alignment.
Speech to Text (STT): computational linguistics permits the recognition and translation of spoken language into written form. Other names for this technology are computer voice recognition and speech recognition.
Text to Speech (TTS): reads digital text aloud. This kind of technology is called “read-aloud” technology. TTS can take the text shown on a computer or any other digital device and turn it into sound by clicking a button or touching it with your finger.
Audio Visualizer: The Most Powerful Audio and Video Editor Available Today. With the help of Filmora Audio Visualizer, your music video may come to life. The effect will dynamically adapt the sound to the video while intelligently matching the sound.
Step1 Download, Install and Run the Filmora Video Editor.
After opening Filmora, the following user interface will appear: You may upload the video file from which you wish to delete the audio tracks by clicking the “Import” button.
Step2 Detach Audio from Uploaded Files
Remove the audio tracks from the original MP4 file by a drag and drop into the timeline, then right-clicking on the file and selecting “Detach Audio” from the menu that appears. After that, the split audio track will show in the Audio Timeline. To delete audio from an MP4, right-click the audio file and choose “Delete” from the menu that appears.
Step3 Export the Silenced Video
After that, pick the preferred export method by clicking the “Export” button. You can set the output video format to be the identical to the one used to record the video in the first place or select it as any other video format. After that, choose the video you want to export by clicking the “Export” option.
In addition, you can save the altered file to your iPhone, iPad, PSP, or other compatible device or instantly upload it to YouTube to share with your friends.
There you go! You successfully explored an excellent alternative software to remove audio from videos via FFmpeg.
Part 3: FAQs
1. How do I change audio in a video?
Changing audio in a video is easy if you use compatible high-end software like Filmora. This audio and video editing tool can modify or change the audio or soundtrack in a video. Much software of this kind is available for both Windows and Mac. Therefore, choose a reliable one, try it, and then begin using it.
2. How exactly does one go about switching the pre-installed audio track on a video?
When you’re viewing a video, you can get the impression that the music playing in the background doesn’t go very well with the content, and you might want to switch it. There are a variety of programs available that will assist you in replacing the audio with video. And now, I’m going to offer Filmora Video Editor as the ideal option since it is the program that is both the simplest and the quickest to do that task.
Conclusion
So, after reading this, you should be able to remove audio from video FFmpeg. Have you ever encountered an editing tool that exceeded your expectations in terms of performance? Although FFmpeg removes audio, the other editing tool we discussed is relatively good quality. Yes, Filmora is a video editing application that provides you with the most outstanding potential services you could have ever imagined having access to. Because it includes several exciting features and a high-quality user interface, it is one of the options people will find ideal.
Level Up Videos By Applying Keyframe with Filmora
Everyone is fascinated by a video portraying creativity and effort in each frame. Your films can easily have this captivity through the keyframe feature. It provides you the accessibility to make even a simple, plain shot pace up, slow down, or pan across the screen.
Wondershare Filmora offers you a simple yet great experience of Keyframing. It has been the editors’ favorite feature for years. Under its Grow and Win Program, Filmora presents the Keyframe creativity contest. It is the ultimate solution for bringing captivity and precision to your shots.
Part 1. What is the Keyframe Feature?
A keyframe, also spelled “key frame,” defines any smooth transition’s beginning and conclusion. In the case of animation or film, or video, that something may be a drawing or a specific frame of a shot.
The keyframe feature creates room for boundless creativity. The Keyframe feature could imitate any illusive or fascinating impact, from object enlargement to magical power effects. A key frame is a frame that serves as a marker for the start or stop of a parameter change.
You could use a keyframe to mark the spot where the audio will have faded up or down to a specific volume.
Part 2. Where to Use The Keyframe Feature?
Editors and creators use keyframing for all kinds of stuff. These uses include:
Animated Logo Intros
You can use the keyframe feature to create indigenous intros with animated logos. It helps the editors go for vlogging or tutorial videos.

Special Transparency Effects
Keyframing is famous for creating blended visuals through experimentation with the transparency of the clip.

Custom Picture-in-Picture Paths
We use the picture-in-picture effect in many editing formats, from tutorial videos to gaming streams and vlogs. Keyframing allows editors to execute the movement of the PIP as they wish. For instance, this video call was shot from a video.

The picture will move across the screen between the 30-second and 1-minute marks if you indicate that it will be in the upper left corner of the screen at the 30-second timestamp of your video and the bottom right corner at the 1-minute timestamp.
Part 3. What Would You Need to Make a Keyframe Video
Let us share the procedure for making a video using the keyframe feature.
1. A Video Clip or Photos
For experimenting and creating with the keyframe feature, first, you would need high-quality video clips or images.
The high-resolution requirement is a prerequisite for the complete experience of all parameters of the keyframe feature. For example, the zooming and varying opacity effects you add might look bland and dull if the clip or image appears pixelated upon zooming and scaling.
2. Motion Elements
Keyframing allows for a vast area of creativity with motion elements that you can download online. The keyframe feature adds charm to these elements by playing with their orientation and scale.
3. An Advanced Editing Software
To utilize the keyframe feature, you need high-end video and animation editing software with an interactive and easy-to-use user interface and good accessibility options. So, what better choice than Filmora to use for this feature? To do the editing process on Filmora , follow the steps below and enjoy!
Free Download For Win 7 or later(64-bit)
Free Download For macOS 10.14 or later
Part 4. How to Make a Keyframe Video With Filmora
Filmora can be one of the best video editors to achieve the effect. It can personalize anything in detail. There is plenty of footage from its built-in stock media with unlimited resources. By using this platform for editing, your editing time hugely can be greatly reduced.
- The keyframe tool is efficient for adding beautiful animations to podcast videos.
- More than 2,000 audio resources, including music, audio effects, and more.
- Multiple clips can be edited more quickly with the shortcut key.
- Choose from over 1,000 video effects, including transitions, filters, titles, and many others, to spice up your keyframe videos.
There are many different ways you can use keyframes on Filmora. To learn the complete step-by-step instructions, continue reading. Here we explain three examples of how to use keyframing and how to use the tool in Filmora.
Step1 Install the Wondershare Filmora
Launch the most recent version of the software on your computer to produce an outstanding film. To do this, take the following actions.
- You must first download and open Wondershare Filmora on your PC or Mac.

Step2 Import your Photos and Videos
- When you open Wondershare Filmora, you will notice the main import window in the top left corner.
- Click in the center of the import window upon the import icon.
- After clicking, Wondershare Filmora will automatically direct you to your PC library.
- Browse to where your target Clips or Images are stored.
- Select all the objects you want to import.
- Click on Open, and you will have imported files.

Step3 Add your Photos and Videos to the Timeline
Your next step will be to add the imported videos and images to the timeline. When you have many videos and photos imported into the timeline, you can add them simultaneously.
Or you can also add them one by one wherever you need. To add an item to your timeline, follow the steps mentioned.
- Right-click on the photo or video you want to add to the timeline.
- Keep holding the right-click and drag it down to the timeline.

Step4 Adding Movement to your Shots
The next step would be to use the movement option in Keyframing, where you can pan and zoom a shot over a specified time. To do this, follow the bullet points below.
- After importing your clips to the timeline, double-click the clip to open the Editing Menu.

- Once opened, the editing menu will have a Basic tab; click it.
- Check the key-shaped button in front of the Transform button. It will create a Keyframe in the default form of your clip.

- You need to add a second keyframe at the end of the clip to create movement. First, move the timeline cursor to the end of the clip. Then, check the key-shaped button in front of the Transform button again for a second Keyframe.
- Now change the scale of the clip from the slider options in the Custom Animation

- Now play your clip, and you’ll see it zooms in and pans automatically to the state of the second keyframe over that timeline.

Step5 Adding Motion to your Shots
Keyframing can add motion to your project’s objects, clips, or images. To perform this in Filmora, follow these instructions:
- Go to the Stock Media tab on the top left ribbon in Filmora and download some motion elements (videos/GIFs) from accessible outlets like the Flora GIF used here.
- After importing elements to the timeline, double-click the element to open the Editing Menu.

- Once opened, the editing menu will have a Basic tab; click
- Check the key-shaped button in the Basic Tab. It will create a Keyframe in the default form of your motion element.

- Next, move it to the end of the clip, check the key-shaped button in front of the Transform button, and add another keyframe there, but this time, change its scale and rotation attributes as you like.

- Enter OK and play your clip to see the fantastic effect.

Step6 Keyframing Opacity
Keyframing allows creators to integrate variable opacity in their shots to instill a dramatic feel. This technique also helps create perfect fade-in and fade-out shots for your videos. Additionally, it is for theatrically dissolving shots too.
For an illustrated guide to keyframing opacity, keep on reading the following instructions:
- Add a Keyframe to a clip on your timeline. For it, double-click the clip to open the Editing Menu, Then go to Basic Tab.
- Check the key-shaped button in front of the Transform button. It will create a Keyframe in the default form of your motion element.

- Move the red cursor to the end of the clip.

- Next, add another keyframe, scroll down in the editing menu, and remove the opacity from the slider below the Bend Mode option.

- That’s it; you have a theatrical variation of the clip’s visible opacity throughout the timeline.

Conclusion
On the whole, keyframing is all about creativity at your fingertips. When detailed effort becomes necessary, the keyframe feature is always there to save the day. This tool is a delight, from adding movement and motion to your playful and immersive shots to crafting a cinematic scene out of your films. This contest is your chance to show us how creative you can get with this beautiful feature. Good luck creating!
Free Download For macOS 10.14 or later
Part 4. How to Make a Keyframe Video With Filmora
Filmora can be one of the best video editors to achieve the effect. It can personalize anything in detail. There is plenty of footage from its built-in stock media with unlimited resources. By using this platform for editing, your editing time hugely can be greatly reduced.
- The keyframe tool is efficient for adding beautiful animations to podcast videos.
- More than 2,000 audio resources, including music, audio effects, and more.
- Multiple clips can be edited more quickly with the shortcut key.
- Choose from over 1,000 video effects, including transitions, filters, titles, and many others, to spice up your keyframe videos.
There are many different ways you can use keyframes on Filmora. To learn the complete step-by-step instructions, continue reading. Here we explain three examples of how to use keyframing and how to use the tool in Filmora.
Step1 Install the Wondershare Filmora
Launch the most recent version of the software on your computer to produce an outstanding film. To do this, take the following actions.
- You must first download and open Wondershare Filmora on your PC or Mac.
Step2 Import your Photos and Videos
- When you open Wondershare Filmora, you will notice the main import window in the top left corner.
- Click in the center of the import window upon the import icon.
- After clicking, Wondershare Filmora will automatically direct you to your PC library.
- Browse to where your target Clips or Images are stored.
- Select all the objects you want to import.
- Click on Open, and you will have imported files.
Step3 Add your Photos and Videos to the Timeline
Your next step will be to add the imported videos and images to the timeline. When you have many videos and photos imported into the timeline, you can add them simultaneously.
Or you can also add them one by one wherever you need. To add an item to your timeline, follow the steps mentioned.
- Right-click on the photo or video you want to add to the timeline.
- Keep holding the right-click and drag it down to the timeline.
Step4 Adding Movement to your Shots
The next step would be to use the movement option in Keyframing, where you can pan and zoom a shot over a specified time. To do this, follow the bullet points below.
- After importing your clips to the timeline, double-click the clip to open the Editing Menu.
- Once opened, the editing menu will have a Basic tab; click it.
- Check the key-shaped button in front of the Transform button. It will create a Keyframe in the default form of your clip.
- You need to add a second keyframe at the end of the clip to create movement. First, move the timeline cursor to the end of the clip. Then, check the key-shaped button in front of the Transform button again for a second Keyframe.
- Now change the scale of the clip from the slider options in the Custom Animation
- Now play your clip, and you’ll see it zooms in and pans automatically to the state of the second keyframe over that timeline.
Step5 Adding Motion to your Shots
Keyframing can add motion to your project’s objects, clips, or images. To perform this in Filmora, follow these instructions:
- Go to the Stock Media tab on the top left ribbon in Filmora and download some motion elements (videos/GIFs) from accessible outlets like the Flora GIF used here.
- After importing elements to the timeline, double-click the element to open the Editing Menu.
- Once opened, the editing menu will have a Basic tab; click
- Check the key-shaped button in the Basic Tab. It will create a Keyframe in the default form of your motion element.
- Next, move it to the end of the clip, check the key-shaped button in front of the Transform button, and add another keyframe there, but this time, change its scale and rotation attributes as you like.
- Enter OK and play your clip to see the fantastic effect.
Step6 Keyframing Opacity
Keyframing allows creators to integrate variable opacity in their shots to instill a dramatic feel. This technique also helps create perfect fade-in and fade-out shots for your videos. Additionally, it is for theatrically dissolving shots too.
For an illustrated guide to keyframing opacity, keep on reading the following instructions:
- Add a Keyframe to a clip on your timeline. For it, double-click the clip to open the Editing Menu, Then go to Basic Tab.
- Check the key-shaped button in front of the Transform button. It will create a Keyframe in the default form of your motion element.
- Move the red cursor to the end of the clip.
- Next, add another keyframe, scroll down in the editing menu, and remove the opacity from the slider below the Bend Mode option.
- That’s it; you have a theatrical variation of the clip’s visible opacity throughout the timeline.
Conclusion
On the whole, keyframing is all about creativity at your fingertips. When detailed effort becomes necessary, the keyframe feature is always there to save the day. This tool is a delight, from adding movement and motion to your playful and immersive shots to crafting a cinematic scene out of your films. This contest is your chance to show us how creative you can get with this beautiful feature. Good luck creating!
Discover How You Can Use Vectorscope to Adjust Luminance, Color Grading, and More in Your Video Editing Projects
Our eyes process colors differently. When two people look at the same picture, they may see different shades of colors. In post-production, Vectorscopes help to color grade and make sure you get your images exactly right. This means that you will process the exact color that you want across devices. Premiere Vectorscope is a great choice for anyone looking to correct and grade colors. Using Vectorscope Premiere allows you to get quantitative data about your image for a more accurate assessment of colors within the film. In this article, we explore what comprises Premiere Pro Vectorscope and how to use them in video editing.
Color Correction Editor An easy-to-use video editor helps you make color correction and color grading experience for videos!
Free Download Use Vectorscope in Filmora Try Color Correction

Part 1. Vectorscope: What is It and How to Read
Vectorscopes provide a great post-production way for color correction. It is video scope that provides greater data about the color properties of an image. Another way to look at it is that a Vectorscope is a circular graph, which monitors the following information of an image. By looking at it, you can measure saturation outward from the center while hue is measured in a circular pattern.
The Vectorscope contains markings indicating the degree of saturation and hue in an image. The distance of the markings from the center indicates how saturated the color is in your image. In simple terms, the further the markings, the more saturated the color. The two main options of Vectorscope are HLS and YUV. The HLS displays the hue, lightness, saturation, and signal information at a glance. On the other hand, the YUV mode contains several color boxes, giving accurate levels of hue and saturation.

Vectorscopes are useful to filmmakers and editors to ensure greater conformity in a film as they transition from one shot to the next. When the camera captures an image with too much saturation, using a Vectorscope helps to reduce the said saturation. This makes Vectorscope a useful feature for color correction and color grading. Color correction involves altering the colors of an image within a film to provide consistency and tone for the film. On the other hand, color grading is more like a supercharged version of color correction. It refers to altering a film so that it matches a tone or theme. Since the two, grading and correction are important, more video editing will use a combination of both.
How to Read a Vectorscope
Learning how to read a Vectorscope will make your video editing fun and easier. The best way is to view the Vectorscope in relation to the color wheel. When using Premiere Vectorscope, the colors are nicely labeled for anyone to understand. You only need to understand the primary colors of saturation and hue to accurately read a Vectorscope.

The hue color is the direction to which the marketer points. For instance, a marker pointing toward the boxes labeled “R” indicates that the hue is predominantly red. On the other hand, the saturation correlates to the length of the marker. The image is more saturated when the marker is furthest from the center of the wheel.
Keep note of the two boxes in each main color. The box that is close to the center indicates 75%, and you will normally avoid the marker extending beyond this first box. Any marketer that extends beyond this is known as non-broadcast safe or illegal colors. Although you may need to go beyond the first box in some projects for stylistic reasons, the general rule of thumb is to avoid that.
Without proper calibration, your images may end up looking too red or too blue. They will not look natural at all and will affect the overall quality of your video. Therefore, using the features within the vectorsope will help you color-grade your images to perfection.
Part 2. Vectorscope in Premiere Pro : A Brief Guide
Just like many other video editing software, Adobe Premiere Pro offers Vectorscope to help in post-production. The best way to look at Vectorscope in Premiere Pro is to use the Color Correction workspace. Once you have launched the software, Click Window, followed by Workspace, and then Color Correction. Access the reference monitor directly to deliver the program.
The reference monitor will first display composite video. Clicking on the setting icon allows you to access the panel and choose the video scope you want to use. Now, this is how you use the Vectorscope in Premiere Pro:
1. Reading a Vectorscope on Premiere Pro
A Vectorscope is similar to a color wheel. It displays colors in the same places as the wheel, with cyan to the bottom right and red to the top left. When you see a dot or line in the Vectorscope, you can tell it is giving you information about the color or chrominance of a shot. Essentially, this information is the hue (specific color) and the saturation (the strength of that hue).

As you examine the Vectorscope, you get to see how strong a particular color is by the length of the line from the center of the wheel. A longer line indicates that the color is more saturated. However, all Vectorscopes have small color targets. The Vectorscope points are lined with a drop-down used to read the scope. The default is set to 75%, which is a good limit for a typical broadcast system.

2. Adjusting Skin Tones
A commonly used feature of the Premier Pro Vectorscope is the Skin Tone Line. With this feature, you get the line on the scope between the Yellow and the Red sections at about 10.30 or 11 o’clock position.

The Vectorscope skin tone line represents the color of blood flowing through the skin. You can use this line to check the accuracy of skin tone color representation regardless of the ethnicity of the person you’re filming. In particular, video images are more accurate
The major problem is figuring out how to look at skin tones in a shot with many other colors. With the skin tons line in Premiere Pro, color correction becomes easy and quick. You only need to use a garbage matte, which is found under video effects then keying. Adjust the points so that they cover the skin of the person on the shot, then look at the Premiere Pro Vectorscope to see your end results.

Part 3. How to Use Vectorscope in Filmora : Step-by-Step Guide
The choice of video editing software can have an impact on how well you use your Vectorscopes. Wondershare Filmora is a great choice for anyone who wants to achieve great results with their videos. The versatile video editing software offers four types of video scopes, including the Vectorscope. This gives you more flexibility in video editing and achieving accurate results in color correction and grading. With the recent V13, you also get access to a range of AI features that make video editing quicker and easier.
Free Download For Win 7 or later(64-bit)
Free Download For macOS 10.14 or later
Access Vectorscope on Filmora
Accessing Vectorscope in Filmora is straightforward. As part of the four available video scopes, Filmora has made it easy to use Vectorscope during video editing. Here is a step-by-step guide to follow:
Step 1Create a New Project on Filmora
Once you have downloaded and installed the Filmora software on your desktop, launch it and click Create a New Project.

Step 2Access Video Scopes
After starting a new project, head to the top right corner of the main interface. Click on the Video Scope button to launch the video scope bar on the preview screen.

Step 3Customize Video Scopes Layout Bar
Customizing the layout of the video scope bar allows you to have more freedom in using the feature. You have the option to choose from four layouts or expand the button to display the video scope’s name. The purpose of this step is to modify the display option of the video scopes, allowing you to have a clear view of what you are editing.

Step 4Manage the Vectorscope as Desired
On the preview screen, choose the Vectorscope option. This video scope allows you to define the skin tone indication for better color grading and correction.

Step 5Change Other Video Scopes
To achieve more accurate and better results, explore the other video scopes in the same window. View the color changes in your image through parade, histogram, and waveform video scopes. You can also change the color channels to view specific color changes across the video.

Conclusion
Vectorscopes are great for post-production color correction. Although lesser-known features to many people, they are widely used in video production. They ensure that the colors in your video are consistent across all clips or shots of your film. Since filming will often involve different shots and settings, we recommend using Wondershare Filmora for your video editing. It comes with an easy-to-use Vectorscope and other video scopes that help you achieve great results with color correction and grading.
Free Download Use Vectorscope in Filmora Try Color Correction
Part 1. Vectorscope: What is It and How to Read
Vectorscopes provide a great post-production way for color correction. It is video scope that provides greater data about the color properties of an image. Another way to look at it is that a Vectorscope is a circular graph, which monitors the following information of an image. By looking at it, you can measure saturation outward from the center while hue is measured in a circular pattern.
The Vectorscope contains markings indicating the degree of saturation and hue in an image. The distance of the markings from the center indicates how saturated the color is in your image. In simple terms, the further the markings, the more saturated the color. The two main options of Vectorscope are HLS and YUV. The HLS displays the hue, lightness, saturation, and signal information at a glance. On the other hand, the YUV mode contains several color boxes, giving accurate levels of hue and saturation.
Vectorscopes are useful to filmmakers and editors to ensure greater conformity in a film as they transition from one shot to the next. When the camera captures an image with too much saturation, using a Vectorscope helps to reduce the said saturation. This makes Vectorscope a useful feature for color correction and color grading. Color correction involves altering the colors of an image within a film to provide consistency and tone for the film. On the other hand, color grading is more like a supercharged version of color correction. It refers to altering a film so that it matches a tone or theme. Since the two, grading and correction are important, more video editing will use a combination of both.
How to Read a Vectorscope
Learning how to read a Vectorscope will make your video editing fun and easier. The best way is to view the Vectorscope in relation to the color wheel. When using Premiere Vectorscope, the colors are nicely labeled for anyone to understand. You only need to understand the primary colors of saturation and hue to accurately read a Vectorscope.
The hue color is the direction to which the marketer points. For instance, a marker pointing toward the boxes labeled “R” indicates that the hue is predominantly red. On the other hand, the saturation correlates to the length of the marker. The image is more saturated when the marker is furthest from the center of the wheel.
Keep note of the two boxes in each main color. The box that is close to the center indicates 75%, and you will normally avoid the marker extending beyond this first box. Any marketer that extends beyond this is known as non-broadcast safe or illegal colors. Although you may need to go beyond the first box in some projects for stylistic reasons, the general rule of thumb is to avoid that.
Without proper calibration, your images may end up looking too red or too blue. They will not look natural at all and will affect the overall quality of your video. Therefore, using the features within the vectorsope will help you color-grade your images to perfection.
Part 2. Vectorscope in Premiere Pro : A Brief Guide
Just like many other video editing software, Adobe Premiere Pro offers Vectorscope to help in post-production. The best way to look at Vectorscope in Premiere Pro is to use the Color Correction workspace. Once you have launched the software, Click Window, followed by Workspace, and then Color Correction. Access the reference monitor directly to deliver the program.
The reference monitor will first display composite video. Clicking on the setting icon allows you to access the panel and choose the video scope you want to use. Now, this is how you use the Vectorscope in Premiere Pro:
1. Reading a Vectorscope on Premiere Pro
A Vectorscope is similar to a color wheel. It displays colors in the same places as the wheel, with cyan to the bottom right and red to the top left. When you see a dot or line in the Vectorscope, you can tell it is giving you information about the color or chrominance of a shot. Essentially, this information is the hue (specific color) and the saturation (the strength of that hue).
As you examine the Vectorscope, you get to see how strong a particular color is by the length of the line from the center of the wheel. A longer line indicates that the color is more saturated. However, all Vectorscopes have small color targets. The Vectorscope points are lined with a drop-down used to read the scope. The default is set to 75%, which is a good limit for a typical broadcast system.
2. Adjusting Skin Tones
A commonly used feature of the Premier Pro Vectorscope is the Skin Tone Line. With this feature, you get the line on the scope between the Yellow and the Red sections at about 10.30 or 11 o’clock position.
The Vectorscope skin tone line represents the color of blood flowing through the skin. You can use this line to check the accuracy of skin tone color representation regardless of the ethnicity of the person you’re filming. In particular, video images are more accurate
The major problem is figuring out how to look at skin tones in a shot with many other colors. With the skin tons line in Premiere Pro, color correction becomes easy and quick. You only need to use a garbage matte, which is found under video effects then keying. Adjust the points so that they cover the skin of the person on the shot, then look at the Premiere Pro Vectorscope to see your end results.
Part 3. How to Use Vectorscope in Filmora : Step-by-Step Guide
The choice of video editing software can have an impact on how well you use your Vectorscopes. Wondershare Filmora is a great choice for anyone who wants to achieve great results with their videos. The versatile video editing software offers four types of video scopes, including the Vectorscope. This gives you more flexibility in video editing and achieving accurate results in color correction and grading. With the recent V13, you also get access to a range of AI features that make video editing quicker and easier.
Free Download For Win 7 or later(64-bit)
Free Download For macOS 10.14 or later
Access Vectorscope on Filmora
Accessing Vectorscope in Filmora is straightforward. As part of the four available video scopes, Filmora has made it easy to use Vectorscope during video editing. Here is a step-by-step guide to follow:
Step 1Create a New Project on Filmora
Once you have downloaded and installed the Filmora software on your desktop, launch it and click Create a New Project.
Step 2Access Video Scopes
After starting a new project, head to the top right corner of the main interface. Click on the Video Scope button to launch the video scope bar on the preview screen.
Step 3Customize Video Scopes Layout Bar
Customizing the layout of the video scope bar allows you to have more freedom in using the feature. You have the option to choose from four layouts or expand the button to display the video scope’s name. The purpose of this step is to modify the display option of the video scopes, allowing you to have a clear view of what you are editing.
Step 4Manage the Vectorscope as Desired
On the preview screen, choose the Vectorscope option. This video scope allows you to define the skin tone indication for better color grading and correction.
Step 5Change Other Video Scopes
To achieve more accurate and better results, explore the other video scopes in the same window. View the color changes in your image through parade, histogram, and waveform video scopes. You can also change the color channels to view specific color changes across the video.
Conclusion
Vectorscopes are great for post-production color correction. Although lesser-known features to many people, they are widely used in video production. They ensure that the colors in your video are consistent across all clips or shots of your film. Since filming will often involve different shots and settings, we recommend using Wondershare Filmora for your video editing. It comes with an easy-to-use Vectorscope and other video scopes that help you achieve great results with color correction and grading.
Also read:
- 2024 Approved What Is the Best MP4 Cutter for YouTuber on Mac?
- Updated 2024 Approved Detailed Review of Kodak LUTs
- How To Create The Best AI Thumbnail Using The Right Tools?
- In 2024, Learn Everything About Leeming LUT Pro
- New 2024 Approved All About GIF Keyboard That You May Want to Know
- Updated 2024 Approved Best 15 Subtitle Apps
- Updated 2024 Approved How to Create Your Own LOL Montage Video
- 2024 Approved How To Record Video in Slow Motion Comprehending Important Points
- Updated In 2024, How Can You Deny These Best 10 Free Speech to Text Software
- 6 Instant Mp4 to GIF Online Tools for You
- Updated 8 Best Free Photo Collage with Music Video Maker
- 2024 Approved Do You Want Your Videos to Look Like Danny Gevirtz? You Can Use some Inspired Presets. There Are Different Danny Gevirtz LUTs that You Can Download and Use
- New Easy Way to Create an Alternate Reality Effect for 2024
- New In 2024, 10 Top Vloggers on YouTube
- YouTube Zoom to Fill Is a Great Feature for Viewing Things in Depth. This Article Answers All Questions About Fixing YouTube Zoom to Fill Not Working on Your Device for 2024
- Updated In 2024, How to Add Text Effects in Adobe Premiere Pro?
- Updated How to Use GIMP GREEN SCREEN
- 2024 Approved If You Want to Make an Intro Video, Then Adobe After Effects Will Be a Great Choice. This Article Will Show the Steps to Create an Intro Video with After Effects by Your Own
- Updated 2024 Approved How Can You Deny These Top 10 Free Speech to Text Software
- Go Through This Guide on All Steps in Freezing Frame Sequences in Videos Using Filmora. Details Include Splitting the Clip, Reversing Speed, and More for 2024
- 4 Solutions to Add White Border to Video on Mobile and Desktop
- 2024 Approved 10 Best Meme Text to Speech Tools Windows, Mac, Android, iPhone
- 5 Ways to Restart Samsung Galaxy A24 Without Power Button | Dr.fone
- 9 Mind-Blowing Tricks to Hatch Eggs in Pokemon Go Without Walking On Nubia Z50S Pro | Dr.fone
- 2024 Approved How to Translate YouTube Videos to English Subtitles
- In 2024, Top 5 Tracking Apps to Track Xiaomi 14 without Them Knowing | Dr.fone
- In 2024, How to Unlock Disabled Apple iPhone 7 Plus/iPad Without Computer | Dr.fone
- In 2024, How to Transfer Data from Oppo K11x to Other Android Devices? | Dr.fone
- Ultimate Guide to Catch the Regional-Located Pokemon For Motorola Moto E13 | Dr.fone
- How to Mirror Apple iPhone 7 Plus to iPad? | Dr.fone
- In 2024, How To Leave a Life360 Group On Oppo A58 4G Without Anyone Knowing? | Dr.fone
- How to Cast Motorola Moto G04 to Computer for iPhone and Android? | Dr.fone
- Can I use iTools gpx file to catch the rare Pokemon On Xiaomi Redmi K70E | Dr.fone
- In 2024, How to Reset a Locked Itel A60 Phone
- How to Update iPhone 6s Plus without Losing Any Data? | Dr.fone
- In 2024, 4 Quick Ways to Transfer Contacts from Apple iPhone 6 Plus to iPhone With/Without iTunes | Dr.fone
- Looking For A Location Changer On Infinix Note 30 5G? Look No Further | Dr.fone
- In 2024, How to Sign Out of Apple ID From iPhone 13 without Password?
- In 2024, Ultimate Guide to Catch the Regional-Located Pokemon For Poco M6 5G | Dr.fone
- Unlock locked iPhone 6 Plus without Passcode or Face ID
- Complete Tutorial for Honor 100 Hard Reset | Dr.fone
- In 2024, Unlocking iPhone XS Lock Screen 3 Foolproof Methods that Actually Work
- How To Change Your iPhone 12 Pro Apple ID on MacBook
- Title: Updated In 2024, What Are the 10 Best GIF Creator?
- Author: Chloe
- Created at : 2024-04-24 07:08:39
- Updated at : 2024-04-25 07:08:39
- Link: https://ai-editing-video.techidaily.com/updated-in-2024-what-are-the-10-best-gif-creator/
- License: This work is licensed under CC BY-NC-SA 4.0.
